


PortaDVD
User’s Manual
8X DVD
24X CD-ROM
®


FCC Radio Frequency Interference Regulations
Warning:
and if not installed and used in accordance with the instructions contained in this
manual, may cause harmful interference to radio and television communications.
This equipment has been tested and found to comply with the limits for a Class B
digital device pursuant to Subpart J of Part 15 of the FCC Rules. These limits are
designed to provide reasonable protection against harmful interference in a
residential installation. However, there is no guarantee that interference will not
occur in a particular installation. To ensure compliance with FCC rules, the cable
that connects the unit to the computer must be a shielded interface cable.
Note: Connecting this device to peripheral devices that do not comply with Class
B requirements or using an unshielded peripheral cable could result in
interference to radio or television reception. To ensure that the use of this product
does not contribute to interference, use a shielded interface cable.
If this equipment does cause harmful interference to radio or television reception
(which can be determined by turning the equipment off and on), the user may try
to correct the interference by one or more of the following measures:
• Reorient or relocate the receiving antenna
• Move the device and the receiver further apart
• Connect the equipment to an electrical outlet on a circuit different from that of
• Consult the dealer or an experienced audio television technician
Also, the following booklet may prove helpful:
Interference Problems
Washington, D.C. 20402, stock number 004-000-00345-4.
The user is cautioned that any changes or modifications to this equipment not
expressly approved by TEAC America, Inc. could void the user’s warranty.
This equipment generates, uses, and can radiate radio frequency energy
the receiver
How to Identify and Resolve Radio-TV
. It is available from the U.S. Government Printing Office,
Copyright and Trademark Information
© Copyright 2001 TEAC America, Inc. All rights reserved.
TEAC America, Inc. reserves the right to modify product offerings or
specifications without advance notice. No part of this publication may be
reproduced in any format without the express written permission of TEAC
America, Inc.
TEAC is a registered trademark of TEAC Corporation.
IBM and PC are registered trademarks of International Business Machines
Corporation.
Windows, Windows 95, Windows 98, Windows Me, Windows 2000, and MS-DOS
are trademarks or registered trademarks of Microsoft Corporation.
DVDExpress is a trademark of Mediamatics, Inc.
All other trademarks and registered trademarks are the property of their
respective owners.
TEAC PortaDVD User’s Manual
i
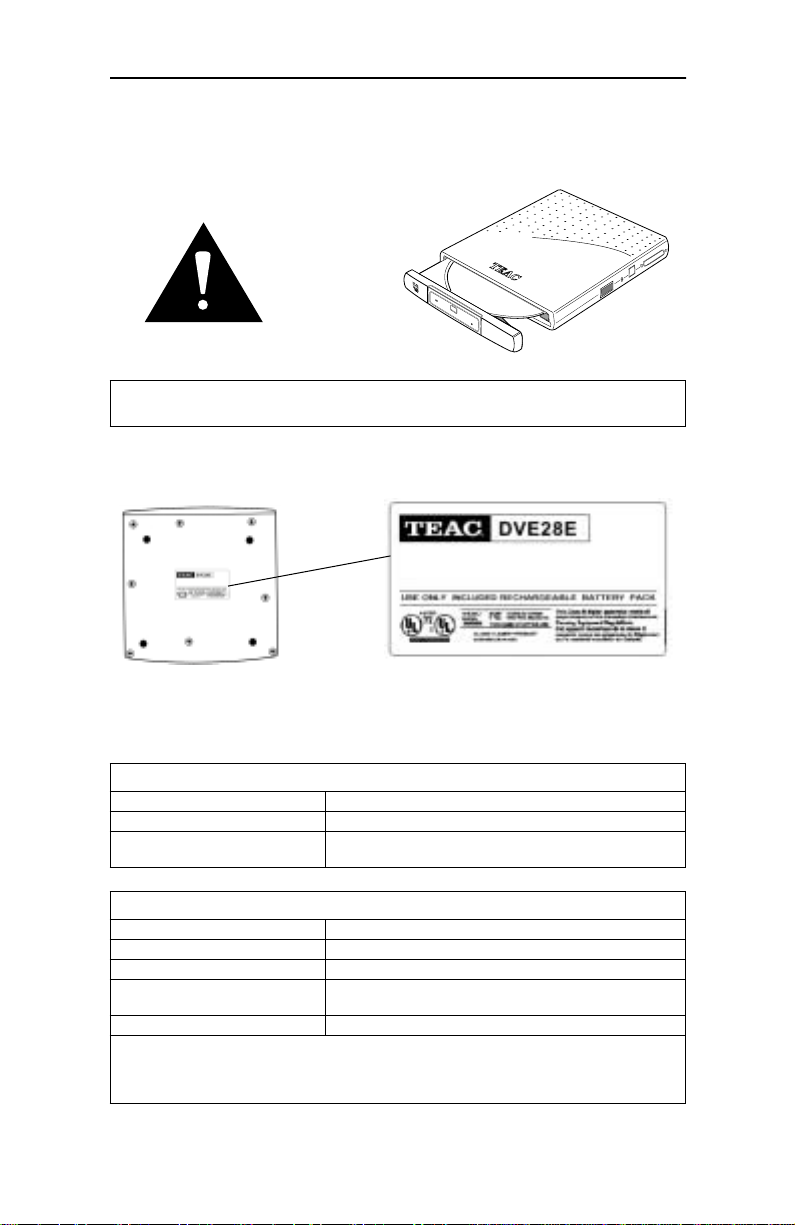
Safety Information
The TEAC PortaDVD uses an invisible laser beam that can damage your
vision if you stare directly into it or view it with optical instruments when
the disc tray is extended. Avoid direct visual contact with the laser beam.
disc tray extended
Caution: Use of controls or adjustments or performance of procedures other
than those specified herein may result in hazardous radiation exposure.
Optical Pickup
Type HPD-28
Laser output Less than 0.69mW on the objective lens
Wavelength 770-795nm (CD)
Model Number: DVE28E
Trade Name: TEAC
Responsible Party: TEAC AMERICA, Inc.
Address: 7733 Telegraph Road
Telephone Number: 1-323-726-0303
This device complies with part 15 of the FCC Rules. Operation is subject to the following two
conditions: (1) This device may not cause harmful interference, and (2) This device must
accept any interference received, including interference that may cause undesirable operation.
ii
640-660nm (DVD)
Declaration of Conformity
Montebello, California 90640, U.S.A.
TEAC PortaDVD User’s Manual

Table of Contents
FCC Radio Frequency Interference Regulations. . . . . . . . . . . . . . . . . . . . . i
Copyright and Trademark Information . . . . . . . . . . . . . . . . . . . . . . . . . . . . i
Safety Information . . . . . . . . . . . . . . . . . . . . . . . . . . . . . . . . . . . . . . . . . . . . . ii
List of Figures. . . . . . . . . . . . . . . . . . . . . . . . . . . . . . . . . . . . . . . . . . . . . . . . . iv
Introduction . . . . . . . . . . . . . . . . . . . . . . . . . . . . . . . . . . . . . . . . . . . . . . . . . . . 1
Recommended System Requirements . . . . . . . . . . . . . . . . . . . . . . . . . . . . . 1
Unpacking Your PortaDVD . . . . . . . . . . . . . . . . . . . . . . . . . . . . . . . . . . . . . . 2
Power Sources/Battery. . . . . . . . . . . . . . . . . . . . . . . . . . . . . . . . . . . . . . . . . . 3
Power Sources. . . . . . . . . . . . . . . . . . . . . . . . . . . . . . . . . . . . . . . . . . . . . . . . 3
Power Settings. . . . . . . . . . . . . . . . . . . . . . . . . . . . . . . . . . . . . . . . . . . . . . . . 3
Charging the Battery Pack. . . . . . . . . . . . . . . . . . . . . . . . . . . . . . . . . . . . . . 3
Removing the Battery Pack . . . . . . . . . . . . . . . . . . . . . . . . . . . . . . . . . . . . . 3
Operating Orientation. . . . . . . . . . . . . . . . . . . . . . . . . . . . . . . . . . . . . . . . . . . 3
Front and Right Panels . . . . . . . . . . . . . . . . . . . . . . . . . . . . . . . . . . . . . . . . . . 4
Connecting the PortaDVD . . . . . . . . . . . . . . . . . . . . . . . . . . . . . . . . . . . . . . . 6
Connecting to Audio Equipment . . . . . . . . . . . . . . . . . . . . . . . . . . . . . . . . 6
Detecting the PCMCIA Card . . . . . . . . . . . . . . . . . . . . . . . . . . . . . . . . . . . . . 7
Installing the PCMCIA Card Using the Windows PC Card Wizard . . 9
Installing the PortaDVD Driver Using the Windows Wizard . . . . . . . 11
For Windows 98/Me/2000 . . . . . . . . . . . . . . . . . . . . . . . . . . . . . . . . . . . . 11
Installing and Using DVDExpress. . . . . . . . . . . . . . . . . . . . . . . . . . . . . . . . 14
Installing DVDExpress. . . . . . . . . . . . . . . . . . . . . . . . . . . . . . . . . . . . . . . . 14
Starting DVDExpress . . . . . . . . . . . . . . . . . . . . . . . . . . . . . . . . . . . . . . . . . 17
Handling Discs. . . . . . . . . . . . . . . . . . . . . . . . . . . . . . . . . . . . . . . . . . . . . . . . 18
Loading and Ejecting Discs . . . . . . . . . . . . . . . . . . . . . . . . . . . . . . . . . . . . . 18
Loading a Disc. . . . . . . . . . . . . . . . . . . . . . . . . . . . . . . . . . . . . . . . . . . . . . . 18
Ejecting a Disc . . . . . . . . . . . . . . . . . . . . . . . . . . . . . . . . . . . . . . . . . . . . . . . 19
Specifications . . . . . . . . . . . . . . . . . . . . . . . . . . . . . . . . . . . . . . . . . . . . . . . 20
Technical Support . . . . . . . . . . . . . . . . . . . . . . . . . . . . . . . . . . . . . . . . . . . . . 21
TEAC PortaDVD User’s Manual
iii

List of Figures
Figure 1. Package Contents . . . . . . . . . . . . . . . . . . . . . . . . . . . . . . . . . . . . . . . . . . . . . . 2
Figure 2. Front and Right Panels . . . . . . . . . . . . . . . . . . . . . . . . . . . . . . . . . . . . . . . . . 4
Figure 3. Connecting Cables . . . . . . . . . . . . . . . . . . . . . . . . . . . . . . . . . . . . . . . . . . . . . 6
Figure 4. Control Panel . . . . . . . . . . . . . . . . . . . . . . . . . . . . . . . . . . . . . . . . . . . . . . . . . . 7
Figure 5. System Properties Panel . . . . . . . . . . . . . . . . . . . . . . . . . . . . . . . . . . . . . . . . 7
Figure 6. Welcome to PC Card Wizard . . . . . . . . . . . . . . . . . . . . . . . . . . . . . . . . . . . . 9
Figure 7. PC Card Wizard . . . . . . . . . . . . . . . . . . . . . . . . . . . . . . . . . . . . . . . . . . . . . . . 9
Figure 8. PC Card Wizard . . . . . . . . . . . . . . . . . . . . . . . . . . . . . . . . . . . . . . . . . . . . . . 10
Figure 9. System Settings Change . . . . . . . . . . . . . . . . . . . . . . . . . . . . . . . . . . . . . . . . 10
Figure 10. Add New Hardware Wizard . . . . . . . . . . . . . . . . . . . . . . . . . . . . . . . . . . 11
Figure 11. Add New Hardware Wizard . . . . . . . . . . . . . . . . . . . . . . . . . . . . . . . . . . 12
Figure 12. Add New Hardware Wizard . . . . . . . . . . . . . . . . . . . . . . . . . . . . . . . . . . 12
Figure 13. Add New Hardware Wizard . . . . . . . . . . . . . . . . . . . . . . . . . . . . . . . . . . 13
Figure 14. Add New Hardware Wizard . . . . . . . . . . . . . . . . . . . . . . . . . . . . . . . . . . 13
Figure 15. System Settings Change . . . . . . . . . . . . . . . . . . . . . . . . . . . . . . . . . . . . . . . 13
Figure 16. DVDExpress Control Panel . . . . . . . . . . . . . . . . . . . . . . . . . . . . . . . . . . . . 14
Figure 17. Installing DVD Express (1) . . . . . . . . . . . . . . . . . . . . . . . . . . . . . . . . . . . . 15
Figure 18. Installing DVD Express (2) . . . . . . . . . . . . . . . . . . . . . . . . . . . . . . . . . . . . 15
Figure 19. Installing DVD Express (3) . . . . . . . . . . . . . . . . . . . . . . . . . . . . . . . . . . . . 16
Figure 20. Installing DVD Express (4) . . . . . . . . . . . . . . . . . . . . . . . . . . . . . . . . . . . . 16
Figure 21. Installing DVD Express (5) . . . . . . . . . . . . . . . . . . . . . . . . . . . . . . . . . . . . 17
Figure 22. Handling Discs . . . . . . . . . . . . . . . . . . . . . . . . . . . . . . . . . . . . . . . . . . . . . . 18
Figure 23. Extending the Disc Tray . . . . . . . . . . . . . . . . . . . . . . . . . . . . . . . . . . . . . . 18
Figure 24. Inserting a Disc . . . . . . . . . . . . . . . . . . . . . . . . . . . . . . . . . . . . . . . . . . . . . . 19
iv
TEAC PortaDVD User’s Manual

Introduction
Thank you for choosing the TEAC PortaDVD (model DVE28E).
This durable, portable, external DVD drive can read DVD discs at up to
8X DVD speed and CD-ROM discs at a maximum of 24X speed. It is
designed for use with IBM PC/AT compatible portable computers that
utilize PCMCIA card technology.
The slim design of the TEAC PortaDVD makes it ideal for portable use.
The integrated rechargeable battery provides drive power when the AC
adapter is disconnected from the drive.
The PortaDVD features a disc tray that extends forward to facilitate the
loading and unloading of discs.
Please read this manual in its entirety before you begin the installation
procedure.
Recommended System Requirements
The following items represent the minimum system requirements for
successful operation of the PortaDVD.
❏
Portable IBM PC-compatible computer, Pentium II 400MHz or
higher with integrated sound card and speakers
❏
4MB of Video RAM (minimum)
❏
64MB RAM (minimum)
❏
Microsoft Windows 98/Me/2000
❏
PCMCIA Card Type II slot (for DVD video playback, an activated
zoomed video PCMCIA slot)
❏
3.5" floppy disk drive for software installation
TEAC PortaDVD User’s Manual
1
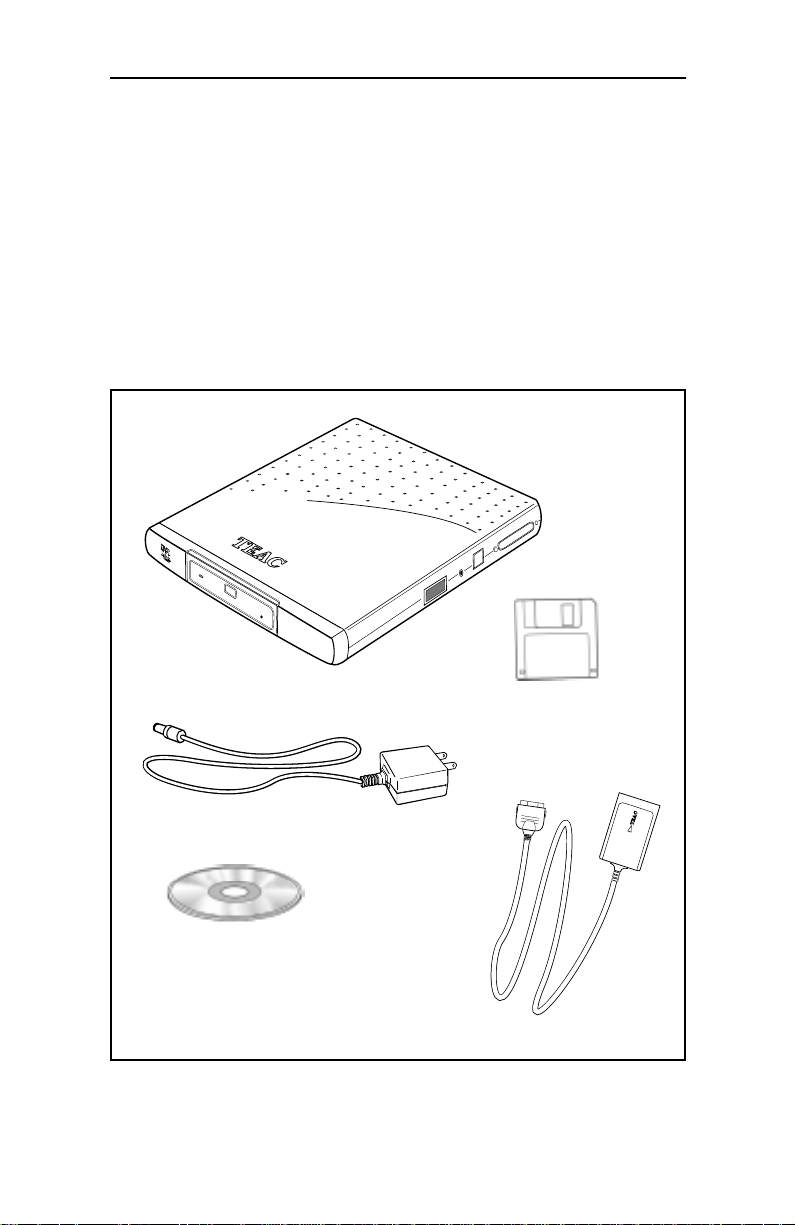
Unpacking Your PortaDVD
Your TEAC PortaDVD and accessories are packaged in a sturdy shipping
container. Please verify that the following items are included in the
package (see Figure 1).
If an item is missing, contact the dealer from whom you purchased the
drive.
❏
PortaDVD portable DVD drive
❏
AC adapter
❏
PCMCIA card/cable
❏
DVD player software CD-ROM
❏
Installation software floppy disk
❏
TEAC PortaDVD User’s Manual
PortaDVD
(this document)
Compact disc containing
DVDExpress software
2
Installation software floppy disk
AC adapter
PCMCIA card/cable
Figure 1. Package Contents
TEAC PortaDVD User’s Manual

Power Sources/Battery
This section provides information on the power sources available to the
PortaDVD, including the battery and the AC adapter.
Power Sources
The PortaDVD drive does not have an On/Off switch. It is ready for
operation when connected to the computer under one of these power
sources:
❏
AC adapter
❏
Charged integrated battery pack
❏
Portable computer using PCMCIA card
Power Settings
The power supply selection switch has two settings:
1. Set the power supply selection switch (see page 4) to “Batt./DC” to
power the drive via the integrated battery pack or the AC adapter. If
the AC adapter is connected, it will supply power to the drive. If the
AC adapter is not connected and the battery pack is charged, the
drive will be powered by the battery pack.
2. Set the power supply selection switch to “PC” to power the drive
via the PCMCIA cable.
Charging the Battery Pack
The integrated battery pack can be charged automatically when the AC
adapter is connected to the drive and plugged into an electrical outlet.
The drive does not have to be connected to the computer to charge the
battery pack. Allow up to five hours for the initial charge time to fully
charge an empty battery pack. A fully charged battery will last up to two
hours.
Removing the Battery Pack
When removing the battery pack, do not use a metal object. Doing so
could short circuit the battery pack or damage the drive.
Only use TEAC integrated rechargeable battery packs. Standard
commercial batteries could damage the drive.
Operating Orientation
Place the TEAC PortaDVD drive on a stable, level surface for operation.
The surface should be within 10° of horizontal.
Caution: Do not operate the drive upside-down (i.e., with the TEAC logo facing down).
TEAC PortaDVD User’s Manual
3

Front and Right Panels
Figure 2. Front and Right Panels
Busy indicator:
On/
This LED indicator lights up during seek/data
transfer and flashes to indicate that the drive is in seek, play, or read
mode.
Eject button:
Press the Eject button to release the disc tray from the
drive. Gently pull the disc tray to open it, or push to close. Certain
software can control disc eject.
Caution: Do not forcefully pull open or close the disc tray by hand or you
may damage the unit.
Emergency eject mechanism:
To eject a disc when the standard
means fail, insert a slender, straight tool (such as a straightened
paper clip) into the emergency eject hole. Press firmly to partially
extend the disc tray.
Power supply selection switch:
Use this switch to set the power
source for the PortaDVD drive. Refer to “Power Sources/Battery” on
page 3.
Line out audio/ headphone jack:
You can connect headphones or
external speakers to this 3.5 mm stereo mini-jack. See “Connecting to
Audio Equipment” on page 6 for more information.
AC Power input:
4
Connect the AC adapter to this plug.
TEAC PortaDVD User’s Manual

Interface connector:
Connect the plug end of the provided PCMCIA
interface cable to this connector. (See “Connecting the PortaDVD” on
page 6 for more information.)
Power LED:
LED AC Adapter Drive Battery
Off
Green Not plugged in Connected Powered by battery
Red Plugged in Disconnected Battery is being charged
Blinking red Plugged in Disconnected Battery is fully charged
Orange Plugged in Connected Battery is being charged and drive
Green with
blinking
orange
This LED indicates the power state of the PortaDVD.
—
Plugged in Connected Battery is fully charged and drive pow-
Disconnected Off
powered by AC adapter
ered by AC adapter
TEAC PortaDVD User’s Manual
5

Connecting the PortaDVD
This section explains how to connect the PortaDVD to an IBM PC or
compatible portable computer that utilizes
The procedure begins by connecting the appropriate cables to the PortaDVD. Please read the following instructions thoroughly; the installation procedure varies depending on the operating system you are using.
3. Connect the
PCMCIA
cable plug to the interface connector on the
side panel of the PortaDVD (Figure 3).
4. Do not
insert the
PCMCIA
card into the computer at this time.
With Windows 98/Me/2000, the PortaDVD enables you to perform
a “hot swap” installation while the computer is powered on. You
will insert the card for the first time later as part of the software
installation procedure.
5. Connect the AC adapter cable to the AC power input on the drive
(Figure 3).
PCMCIA
card technology.
PCMCIA cable
AC adapter cable
headphones cable
(not included)
Figure 3. Connecting Cables
Connecting to Audio Equipment
The PortaDVD outputs a line-level audio signal from the headphone jack.
You can connect a 3.5 mm stereo mini-plug to the headphone jack (see
Figure 3 on page 6) to enjoy digital audio.
6
TEAC PortaDVD User’s Manual

Detecting the PCMCIA Card
Before you can operate the PortaDVD, you must:
❏
make sure Windows recognizes the
❏
install device driver software on your computer’s hard disk.
PCMCIA
socket, and
To determine whether Windows recognizes the
PCMCIA
socket in your
computer, follow these steps, which may vary slightly with your version
of Windows.
1. Click the left mouse button on the Windows Start icon, and select
Settings-->Control Panel
The system displays the
from the pop-up menu.
Control Panel
(Figure 4).
PCMCIA Card icon
System icon
Figure 4. Control Panel
2. Double-click the
The system displays the
3. Click the
Device Manager
The system displays the
icon on the
System
System Properties
tab on the
Device Manager
Control Panel
.
panel (Figure 5).
System Properties
(Figure 5).
panel.
Figure 5. System Properties Panel
TEAC PortaDVD User’s Manual
socket items recognized
by the system
7

4. Double-click the item
ing.
PCMCIA Socket
on the Device Manager list-
The Device Manager displays the
PCMCIA
Socket items currently
recognized by the system (see Figure 5 on page 7).
If an “x” or “!” mark appears on an item, it is not currently
recognized by the system. In this case, you must install the PCMCIA
driver using the PCMCIA Card Wizard. (See “Installing the
PCMCIA Card Using the Windows PC Card Wizard” on page 9.)
If the TEAC PCMCIA/IDE card is recognized by the system, proceed
to “Installing the PortaDVD Driver Using the Windows Wizard” on
page 11.
Note: If the PCMCIA Card icon does not appear in the Control Panel, try
double-clicking the Add New Hardware icon and instruct the Wizard to
search for new hardware.
8
TEAC PortaDVD User’s Manual

Installing the PCMCIA Card Using the Windows PC Card Wizard
Follow the steps below to install the PCMCIA driver using the PC Card Wizard.
1. Open the Windows
To do so, click the
the pop-up menu.
2. On the Control Panel, double-click the
The system displays the
panel.
Follow the instructions on the PC Card Wizard panels to complete
the installation.
Control Panel
Start
button, and select
Welcome to the PC Card (PCMCIA) Wizard
Figure 6. Welcome to PC Card Wizard
.
Settings-->Control Panel
PC Card (PCMCIA)
from
icon.
Note: The system configuration and your dialog responses determine
which panels the Wizard displays. Do not be concerned if your installation process varies slightly from the one described below. Simply follow
the dialog presented.
3. Click the
Next
button.
The system displays the following panel.
Figure 7. PC Card Wizard
TEAC PortaDVD User’s Manual
9

4. Click the
Next
button.
The system displays the following panel:
Figure 8. PC Card Wizard
5. Click the
Finish
button.
The system displays the following panel:
Figure 9. System Settings Change
6. Click the
button to shut down the computer.
Yes
The system shuts down the computer.
7. Power on the computer.
10
TEAC PortaDVD User’s Manual

Installing the PortaDVD Driver Using the Windows Wizard
The following sections explain how to install the PCMCIA driver using
the Windows
Add New Hardware
Wizard.
For Windows 98/Me/2000
The installation procedure for the
PCMCIA Card Driver varies depending
on the version of Windows 98/Me/2000 installed in your computer.
To install the driver on a Windows 98/Me/2000 system, follow these
steps:
1. Insert the PCMCIA card into the PCMCIA card slot in your laptop
computer.
The other end of the card/cable should already be connected to the
interface connector on the PortaDVD. (For more information, see
“Connecting the PortaDVD” on page 6.)
The system displays the initial
Figure 10. Add New Hardware Wizard
Add New Hardware Wizard panel.
Note: The panels the Wizard displays are determined by your system configuration and your responses to the dialog. Do not be concerned if your
installation process varies slightly from the one described. Please simply
follow the dialog presented.
TEAC PortaDVD User’s Manual
11

2. Click the Next button to search for the driver.
The system displays the following
Add New Hardware Wizard panel,
asking what you would like to do:
Figure 11. Add New Hardware Wizard
3. Select the Search for best driver option, then click the Next button.
The system displays the following
Add New Hardware Wizard panel,
asking you to specify the location of the driver:
Figure 12. Add New Hardware Wizard
4. Insert the TEAC Installation Software for PCMCIA Card diskette in
your computer’s floppy disk drive.
5. Select the
Floppy disk drives Wizard option, then click the Next but-
ton.
The system displays the following Add New Hardware Wizard panel,
indicating that Windows has located the driver:
12 TEAC PortaDVD User’s Manual

Figure 13. Add New Hardware Wizard
6. Click the Next button.
The system displays the following
indicating that installation is complete:
Figure 14. Add New Hardware Wizard
7. Click the Finish button.
The system displays the following panel:
Add New Hardware Wizard panel,
Figure 15. System Settings Change
8. Click the Yes button to shut down the computer.
The system shuts down the computer.
9. Remove the floppy diskette and restart the computer.
After you restart the computer, the system will assign a new drive
letter and icon to the PortaDVD drive.
10. To fully utilize the drive, you should now install DVDExpress
software (see page 14).
TEAC PortaDVD User’s Manual 13

Installing and Using DVDExpress
DVDExpress is full-featured multimedia control software that enables
you to play DVD movies on your TEAC PortaDVD.
You can play, pause, rewind, and fast forward DVD movies. DVDExpress
also features several advanced controls, such as Volume, Camera Angle
and Subtitles.
For more information on using DVDExpress, click the question mark icon
on the DVDExpress control panel (see Figure 16) to access DVDExpress
Help information.
You can listen to DVD audio via your computer’s built-in speakers,
connected powered speakers, or headphones.
Click to display Help information
Figure 16. DVDExpress Control Panel
Installing DVDExpress
To install DVD Express, follow these steps:
1. Insert the DVDExpress CD-ROM into your laptop’s CD-ROM
drive or the PortaDVD drive.
2. Double-click the Windows
The system displays the
3. Double-click the CD-ROM icon for the drive that contains the
DVDExpress CD-ROM.
(This is typically the D: drive.)
The system displays the
4. Double-click the file icon for
The system begins the installation and displays the DVDExpress
Welcome panel (Figure 17 on page 15).
14 TEAC PortaDVD User’s Manual
My Computer icon.
My Computer folder.
DVDExpress window.
Setup.exe.
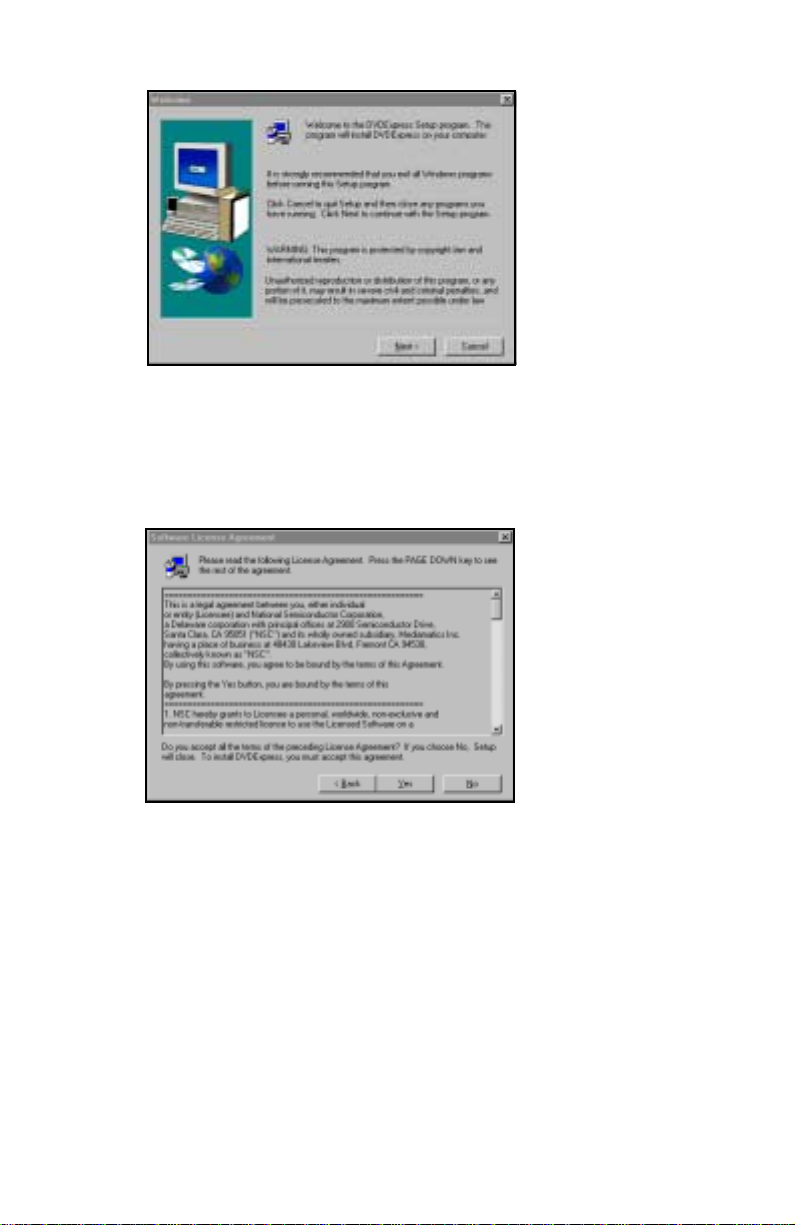
Figure 17. Installing DVD Express (1)
5. Exit all other programs currently running on your computer.
Then, click the
The system displays the
Next button.
Software Licensing Agreement (Figure 18 on
page 15).
Figure 18. Installing DVD Express (2)
6. Please read the Software Licensing Agreement. If you agree to its
terms, click the
Yes button. (If you do not agree, click the No but-
ton.)
The system displays the Choose Destination Location panel (Figure 19
on page 16).
TEAC PortaDVD User’s Manual 15

Figure 19. Installing DVD Express (3)
7. Click the Next button to accept the default location, or click Browse
and specify a location you prefer.
The system displays installation progress panels (Figure 20),
followed by a “setup complete” panel (Figure 21 on page 17).
Figure 20. Installing DVD Express (4)
16 TEAC PortaDVD User’s Manual

Figure 21. Installing DVD Express (5)
8. Click the Finish button.
The installation is complete.
Starting DVDExpress
1. To launch DVDExpress, select:
Start-->Programs-->Mediamatics DVDExpress-->Mediamatics DVDPlayer.
The system displays the DVDExpress Control Panel (Figure 16 on
page 14).
2. Click the question mark icon to access
tional information.
DVDExpress Help for opera-
TEAC PortaDVD User’s Manual 17

Handling Discs
❏ Handle compact discs only by their edges to avoid getting finger-
prints on the surface. Do not touch the disc’s data surface (non-label
side).
❏ Do not place discs in direct sunlight, or in locations subject to high
humidity, high temperatures, or dusty conditions.
❏ If cleaning the disc becomes necessary (erratic operation or visible
dust or smudges), gently wipe the surface of the disc from the center
to the outside edge. Do not use benzene, alcohol, thinner, or other
solvents.
wipe disc surface from
center to outside edge
Figure 22. Handling Discs
handle discs
by their edges
Loading and Ejecting Discs
This section explains how to load and eject discs from the PortaDVD.
Loading a Disc
1. Press the Open/Eject button on the front panel.
The PortaDVD partially extends the disc tray. Grasp the front bezel
and slide the tray fully open.
Figure 23. Extending the Disc Tray
18 TEAC PortaDVD User’s Manual

2. Insert a DVD, CD-ROM or audio CD into the drive. Make sure
the disc label faces up.
Press the disc gently down onto the spindle, if necessary, until it
snaps securely into position.
3. Press the Open/Eject button to retract the disc tray into the drive.
Figure 24. Inserting a Disc
Ejecting a Disc
1. T o eject a disc, first make sure the disc has stopped spinning. Then
press the
The PortaDVD partially extends the disc tray. Grasp the front bezel
and slide the tray fully open.
2. Carefully remove the disc.
Open/Eject button on the front panel.
You may need to press a finger on the spindle or chassis to stabilize
the drive.
3. Press the Open/Eject button again to retract the disc tray into the
drive.
TEAC PortaDVD User’s Manual 19

Specifications
Model DVE28E
Disc Type DVD-ROM; DVD-Video; Data CD; Audio CD; CD-DA;
CD-ROM (Mode-1, Mode-2);
CD-ROM XA Mode-2 (Form-1, Form-2);
Multi-Session PhotoCD
Disc Diameter 12 cm, 8 cm
Max. Read Speed DVD Mode: 10,816KBps (8X DVD speed)
CD Mode: 3,600KBps (24X CD speed)
Interface ATAPI (drive side)
PCMCIA Card Type II
Random Access Time DVD Mode: 110msec
CD Mode: 90 msec
Data Buffer Capacity 512KB
Ambient Temperature Operating: 5° to 55°C
Relative Humidity Operating: 8% to 80% (non-condensing), wet bulb
temperature 29.4°C
Vibration Operating: 0.2G or less (5-500Hz, Sweep)
Transportation: (packed): 2G or less (5-500Hz,
Sweep)
Shock Operating: 5G or less (half-sine wave, 11 msec)
excepting CD-DA play mode
Non-operating/Transportation: 60G or less (half-sine
wave, 11 msec)
MTBF 60,000 POH (10% duty)
Safety Standard Approved by UL, FCC
TM
; Mixed Mode CD
Specifications and features subject to change without notice or obligation.
20 TEAC PortaDVD User’s Manual

Technical Support
For technical support, please contact the dealer from whom you
purchased the drive or the TEAC Service and Support Center nearest
you:
North America:
TEAC America, Inc. (USA)
Technical Support
Telephone: (323) 727-4860
Fax: (323) 869-8751
Monday - Friday 8:00 a.m. - 5:00 pm
http://www.teac.com/dspd
E-mail: dspdtsg@teac.com
Europe:
TEAC Deutschland GmbH ICP Division (Germany)
Telephone: (611) 71-580
Fax: (611) 71-5892
BBS: (611) 71-5851
http://www.teac.de
TEAC UK Ltd.
Telephone: 923-225235 • Fax 923-236290
TEAC France S.A.
Telephone: (1) 42-37-01-02
Fax: (1) 42-37-65-45
Japan, Asia, Middle East:
TEAC Corporation, 3-7-3 Nakacho,
Musashino-shi, Tokyo 180 Japan
Field Service and Technical Support Section
Data Storage Products Sales and Marketing Division
Telephone: (0422) 52-5048
Fax-on-Demand (24 hours): (0422) 55-2554
BBS: (0429) 62-7498
(8 bit; 1 stop bit; no parity. Downloaded files compressed by LHA.)
http://www.teac.co.jp
TEAC Australia PTY LTD
A.C.N 005 408 462
106 Bay Street, Port Melbourne
Victoria 3207, Australia
Telephone: (03) 9644-2442
Fax: (03) 9646-9187
http://www.teac.com.au
TEAC PortaDVD User’s Manual 21
 Loading...