

Page 1

Page 2

Page 3

NSW
Queensland
Western A ustr alia
South Australia
Victoria
T hank you for selecting a TEAC product
TEAC Customer Support Hotline
1300 553 315
before returning the product to the store where you purchased it.
Please read the own er ’s m anu al careful l y and ensure that you have followed the correct installation and operating
procedures.
1. Please read this warranty card.
2. Keep your purchase rec eip t to en abl e you t o pr oc eed quickly in th e event of a Warr ant y S ervice.
3. If you require Warranty Service, please contact the TEAC Customer Support Hotline at 1300 553 315 for
assistance. Please ens u re that you have th e m odel number , s er i al nu mb er an d purc hase rec eipt ready when
you call.
Please complete the section below and keep this information for your own records.
Owner’s Name
Owner’s Address
Postcode
Model Name/No. Serial No.
Dealer’s Name
Dealer’s Address
Postcode
WARRANTY PROCEDURE
Authorised Service Centres in Major Australian Citi es
151 Arthur Street
Homebush West, NSW 2140
11 McInnes Street
Ridleyt on, SA 50 08
Unit 1, 320 Curtin Ave West
Eagle Farm, QLD 4009
282 Normanby Road
South Melbourne, VIC 32 05
Unit 2, 50 Pilbara Street
Welshpool, WA 6106
If you should require assistance with your product regarding its setup
or operation, or if you believe it is faulty, please first call us at the
teacservicesupport@awa.com.au
In many cases, our Hotline has been able to solve
suspected f a ul ts over the phone.
www.teac.com.au
.
Page 4

WARRANTY INFORMATION
TEAC PRODUCT
WARRANTY PERIOD
LED/LCD TV 42” (106 cm) and above
1 Year (In-Home Service/ Pick up Available)*
LED/LCD TV 32” (80 cm) and above
1 Year (Carry-in Servic e)
All other TEAC products
1 Year (Carry-in Servic e)
Our goods com e with guarantees that cannot be excluded under the Australian Consumer Law. You are
entit led to a r eplacement or ref und for a major failure and for compensatio n for any other reasonably
for eseeab le l o ss or d am age. Yo u are al s o entit l ed t o hav e th e go o ds r ep air ed o r r ep lac ed if t he go o d s f ai l
to be of acceptable quality and the failure does not amount to a major failure.
Warranty Terms & Conditions
1. TEAC warr ants th at thi s produc t is fr ee f r om def ects in m ater ial and wor kmans hi p und er norm al d omes tic us e with
reasonabl e care and s kill. Maintenanc e and cl eaning (i. e. laser h ead) is n ot covered by this w arranty. T he TEAC
warranty only applies to TEAC products purchased, used and serviced in Australia.
2. The benefits to t he cons umer gi ven by t his W arrant y are in additi on t o other ri ghts an d rem edies of the cons umer
under a law in rel at i on t o goods or s ervices to which t h e war ranty relates, being the Australian Consumer Law.
3. Refund or repl acem ent via your retai l er is avai labl e for a per iod of 1 4 da ys aft er purc has e for goods that have b een
inspected and determined to have a major failure. Refund and exchange is not applicable for chan g e of mi nd.
4. Subject t o the terms herein, th is warran ty effectivel y covers t he equip ment as sp ecified in t he Warrant y Periods
Table below from the date of purchase.
5.
In Home Service/Pick up* Service
This s ervice will only b e provi d ed as part of this war ranty if all the f ollow i ng c onditions ar e met;
a) The product is in dicated in the W arr ant y Period Tabl e.
b) The product is within the warranty period.
c) The product is located within the normal service area of the local TEAC Authorised Service Centre.
If TEAC determines that the product is not repairable on site, TEAC can complete the repair by taking the product to
a TEAC Authorised Service Centre.
Carry-in Service
Where In-Home service/Pick up* is not available, the purchaser is required to send the product to the nearest TEAC
Authoris ed S er vic e Centr e f or rep air. In t his e vent, pr oof of p urc has e is requ ir ed t o su ppor t a w arr anty c lai m. Af t er
the repair, th e produc t will be avail abl e for collecti on by or r eturn t o the p urch aser at a fee u p on req uest . T EAC i nhome service can be made available at a fee upon request.
6. A 12-month replacement warranty is applicable to all Accessories such as Remote, Power Adaptors and Cables.
7. TEAC will ensure to the best of its abilities that all required parts are made available for any required service/repair.
8. TEAC Aust ralia Pty Ltd and its Au thorised S ervice Centr es will use th eir best en deavours t o complete p roduct
repairs with in a reasonable peri od based on availabl e res ources and workload du ring the time when servic e is
requested an d performed .
9. Refurbis hed part s may b e used t o rep air th e produc t. In t he cas e of a r eplacem ent, th e prod uct m ay be r eplac ed,
with a refurb ished unit of the sam e type or , if one is un availab le, a simil ar refurbis hed mod el with equ al or bett er
features & specifications.
10. Please b e advised th at if th e produc t pr esented for repair is capab l e of retain in g user-g en er at ed data, th e d ata may
be lost during servicing. Cust omers are strong ly encouraged to back up all important inf ormation/data before
sending the product in for service/repair.
11. Service wi ll be provi ded on ly durin g normal busin ess hours and und er safet y condi tions an d circums tanc es. TEAC
and its aut h or ised service agents can refus e an y repair if safety, in relation t o OH & S , becomes a c oncern to its s taff
or authorised service agents’ personnel.
12. The warranty is void and warranty claims may be refused, subject to the Australian Consumer Law, if:
a) The product was not transported, ins t al led, operat ed or maintained according t o m an uf acturer instruc tion, or
b) The product w as abused, damag ed , t am p ered, altered or r ep ai red by any unaut h orised persons , or
c) Product failure is due to accidents during use, installation or transit, power surges, use of defective or
incompat ibl e exter nal de vic es, expos ur e to abnor mal c onditi ons suc h as excessi ve t emp eratur es or hu midit y, or
entry of liqui ds , ob j ects or cr eatures int o the product.
13. No one is authorised t o ass u m e an y li ab i l it y on behalf of TEA C or impos e any obligation on it, in c on n ect ion with the
sale of any equi p m ent other than as st at ed i n th is w arr an t y and ou t l in ed ab ove.
14. TEAC reser ves the ri ght to inspect and verif y whether the produ ct is exhibiting a major failure as claimed by
customers/retailers.
15. LCD dead pixel policy, please contact TEAC Customer Support Hotline on 1300 553 315 for assistance.
Page 5

User’s Manual
Thank you for purchasing HDR3500T High Definition Digital Video Recorder.
This manual will help you to install, use and maintain the unit. Please read this manual carefully
before operating your unit and keep it for future reference.
Warning & Note
In this manual, pay special attention to the following marks that indicate hazardous situations.
Warning: Alert user to the operation which could result in device damage or data loss, and
the presence of a hazardous situation which could result in serious injury.
Note: Remind user of presence of possible problems and information of any importance to
help understand, use and maintain the installation.
Note: The information in this user ’s manual is subject to change without notice. The
photos and function explanations in the man ual are for reference. If any discrepancy
exists, please refer to the entity.
I
Page 6

User’s Manual
Safety Instruction
Read following items carefully before operating this unit.
Installation
Place the unit on a firm and level surface.
The mains socket should be near the equipment. Do not run an extension lead to the unit.
Install the unit in a place with:
good ventilation (leave no less than 10cm around this unit)
no heat source (burning candle, radiator, heater, fireplace, amplifier, etc)
suitable temperature
against humidity (especially bathroom, kitchen, etc)
no direct sunlight
low vibration
Maintenance
Unplug this unit from wall outlet before changing connections between this unit and other
related equipment.
Do not unplug or insert signal, audio and video cables when this unit is turned on.
To avoid the risk of lightning strike, unplug power adapter of the unit from wall outlet in
lightning storm.
Unplug power adapter from wall outlet when the unit is not used for a long time or damaged
accidentally.
If the unit is moved from a cold environment to a hot environment (and vice versa), leave
the power off from 1 to 2hours.
To avoid the risk of fire or electric shock, do not expose this unit to rain, splashing and do
not place objects filled with liquid on this unit.
Do not cover vents of this unit with newspaper, table cloth, curtain, etc.
Do not put heavy objects on this unit.
Unplug power adapter of this unit from wall outlet before cleaning. To reduce d amage,
clean this unit with dry cloth. Do not let liquid and spray flow into this device to avoid serious damage.
There is dangerous voltage in product enclosure. Do not remove the cover (or back) to
avoid the risk of fire or electric shock.
Power Socket and Power Adapter
Power socket should be available near the unit and well grounded.
Do not insert or pull out power adapter with wet hands to avoid electric shock or fire.
Do not use damaged power adapter. If power adapter is damaged, contact your local op-
erator for replacement to avoid risk of fire or electric shock.
Do not excessively bend power adapter, and do not place heavy objects on it, which could
cause damage, electric shock or fire.
RCU Battery
Batteries should be installed in accordance with the (+/-) markings on battery compartment.
Remove batteries if RCU is not be used for a long time.
Replace batteries if there is not enough po wer and dispose of battery waste properly for
II
Page 7

User’s Manual
environmental protection.
Others
The all-pole power switch of this receiver is on rear panel. Switch it to “I”, related equipment
will connect with power supply. Switch it to “o”, related equipment will disconnect with
power supply completely.
Only use accessories specified by the manufacturer, as other unsupported accessories
may cause damage to the unit.
Never open the digital unit casing under any circumstances, otherwise the warranty will be
void.
Refer all servicing to a qualified service technician.
Warning Mark
This mark appears on rear panel of this receiver, painted prominently in contrasting color to
background. It consists of two graphical symbols and warning messages. The detailed specifications are as follows:
Warning: To reduce the risk of electric shock, don’t remove the cover (or
back). Equipment service and maintenance should be undertaken by
qualified personnel.
This symbol alerts user to the presence of uninsulated “dangerous voltage”
in product enclosure that sufficient magnitude will constitute risk to person.
This symbol reminds user of presence of important operation and maintenance instructions in literature accompanying this receiver.
III
Page 8

User’s Manual
Contents
1. Before Using the unit...........................................................................................................3
1.1 Main Feature.................................................................................................................3
1.2 Accessories...................................................................................................................3
1.3 Front Panel ...................................................................................................................4
1.4 Remote Control Unit (RCU) ..........................................................................................5
1.5 Rear Panel.................................................................................................................... 7
2. Setup .....................................................................................................................................8
2.1 Setting up the unit......................................................................................................... 8
2.2 Inserting batteries into the Remote Control Unit (RCU)..............................................10
2.3 Power on.....................................................................................................................10
2.4 Power on and check picture........................................................................................ 11
2.5 Active Standby & Passive Standby ............................................................................. 11
3. Basic Operation.................................................................................................................. 11
3.1 Channel Switch........................................................................................................... 11
3.2 Volume Control ...........................................................................................................12
3.3 Program Information ...................................................................................................12
3.4 Channel List................................................................................................................ 12
3.5 Audio Selection ........................................................................................................... 13
3.6 Teletext........................................................................................................................ 13
3.7 Subtitle........................................................................................................................ 13
3.8 Picture in Picture (PIP)................................................................................................ 13
4. Electronic Program Guide (EPG)...................................................................................... 14
4.1 View EPG Information................................................................................................. 14
4.2 Schedule Program using EPG.................................................................................... 15
4.3 View Detailed Program Information ............................................................................15
5. Personal Video Recording (PVR)...................................................................................... 15
5.1 Set Storage Device..................................................................................................... 16
5.2 Set Recording Parameter ...........................................................................................16
5.3 Quick Recording ......................................................................................................... 17
5.4 Schedule Recording....................................................................................................18
5.5 Playback File...............................................................................................................20
5.6 Edit Recorded File ...................................................................................................... 22
5.7 Time Shift....................................................................................................................24
5.8 Storage Device Management......................................................................................24
5.9 Shortcut Key of PVR................................................................................................... 26
6. Multimedia...........................................................................................................................26
6.1 MP3.............................................................................................................................26
6.2 Digital Photo................................................................................................................26
7. Channel Search..................................................................................................................27
7.1 Advance Frequency Edit.............................................................................................27
7.2 Auto Search ................................................................................................................27
7.3 Manual Search............................................................................................................28
8. Channel Edit ....................................................................................................................... 28
8.1 Set Favourite Channel ................................................................................................28
8.2 Lock Channel.............................................................................................................. 28
8.3 Move Channel.............................................................................................................29
8.4 Delete Channel ...........................................................................................................29
1
Page 9

User’s Manual
9. System Setting ...................................................................................................................29
9.1 General Settings .........................................................................................................29
9.2 Change Password.......................................................................................................30
9.3 PG (parental guide) Lock............................................................................................ 30
9.4 Network.......................................................................................................................31
9.5 Factory Reset.............................................................................................................. 31
10. Software Upgrade.............................................................................................................31
11. Information........................................................................................................................32
11.1 Channel Information.................................................................................................. 32
11.2 System Information................................................................................................... 32
12. Appendix...........................................................................................................................33
12.1 Trouble Shooting.......................................................................................................33
12.2 Specification..............................................................................................................34
12.3 Acronym.................................................................................................................... 35
2
Page 10

User’s Manual
1. Before Using the unit
1.1 Main Feature
PVR and twin tuner function
Time shift supported
Upgradeable up to 1TB HDD
Recording time up to 100 hours (depend on HDD)
Variable forward playing speed: 2, 4, 8, 16, 32,1/2, 1/4, 1/8
Variable reverse playing speed: 2, 4, 8, 16, 32, 1/2, 1/4, 1/8
Dolby 5.1 supported
MP3 playing and photo browsing
Teletext and Subtitle supported
EPG supported
Memory space up to 5000 channels
Support automatic and manual search
Powerful channel edit function
Favourite channel group
PAL supported
Software upgrade supported
Timer function supported
Standby with low power consumption
HDMI output: support 1080p/1080i/720p/576p
YPbPr output: support 1080p/1080i/720p/576p
S/P DIF audio supported
USB 2.0 interface supported
Built in 500GB internal memory capacity
1.2 Accessories
Check and make sure all the following items are included in the package.
3
Page 11
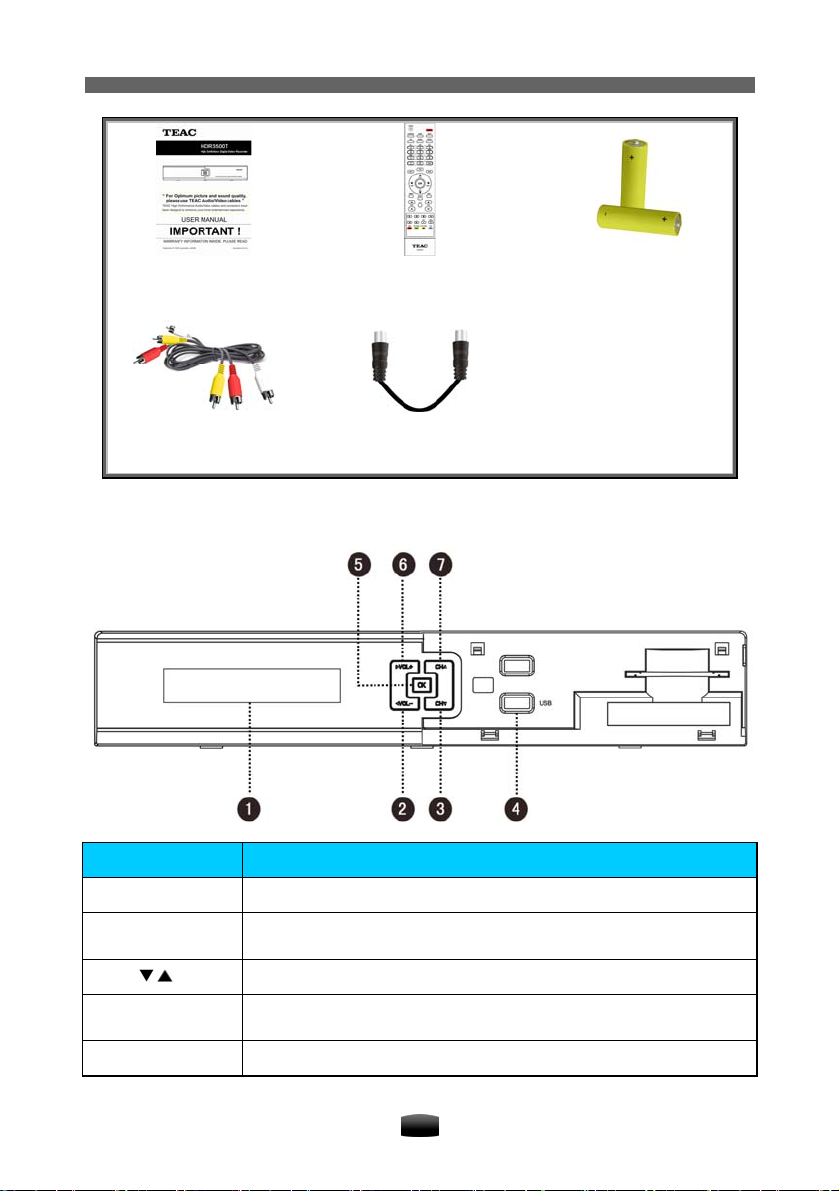
User’s Manual
User’s manual (1)
RCA cable (1)
Remote control unit (1)
RF male to RF female loop
1.3 Front Panel
Name Function
Battery (2)
1. DISPLAY Display status
2/6. VOL-/+
3/7. CH /
4. USB
5. OK Display channel list or confirm operation
Decrease or increase the volume, change values for menu options or
move cursor left/right
Switch to previous/next channel, or move cursor down/up
Connect to USB devices like a memory stick or an external hard disk
drive.
4
Page 12
1.4 Remote Control Unit (RCU)
User’s Manual
1. POWER: Commands unit to be on standby or
operational mode. In standby mode, the unit will still
be able to record a scheduled recording. Refer to
2.5 Active Standby & Passive Standby for more
details.
2. SUBT: Switch on/off Subtitle.
3. FORMAT: Display AV setting window.
4. PIP: Display/hide PIP window.
5. 0-9: Number keys are used to enter a channel
number for changing channels or to specify values
for menu options.
6. : Switches between the current channel and
the previously viewed channel.
7. EPG: Display Electronic Program Guide (EPG).
8. OK: Display channel list (See 3.4 Channel List),
or confirm operation.
9/28. VOL-/+: Decrease or increase the volume,
change values for menu options or move cursor
left/right.
10/27. CH-/+: Switch to previous or next channel,
or move cursor down/up.
11. MENU: Display main menu.
13. VOL+/-: Increase or decrease the volume.
20. MUTE: Mute/restore sound.
The keys of the STB
21. TEXT: Display Teletext information.
22. MOVE: Change position of PIP window.
23. SWAP: Swap focus between main screen and
PIP window.
24. INFO: Press once to display current and fol-
lowing program. Press twice for detailed information on current program.
25. FAV: Display favourite channel list.
29. EXIT: Back to previous menu or exit from op-
eration.
30. AUDIO: Display audio selection window.
5
Page 13
User’s Manual
y
R
)
(
(
r
)
)
g
g
)
play
The keys of PVR
12. PVR: Display shortcut key window (see 5.9
Shortcut Ke
14. : Pause live television or playback of a recorded file.
15. : Return to play at normal speed.
16. : Start forward playback in fast motion.
Subsequent presses increase the playback speed
x2, x4, x8, x16, x32).
17. : Start reverse playback in fast motion.
Subsequent presses increase the rewind speed
x2, x4, x8, x16, x32).
18. FIRST: Skip backwards while playing back.
19. SET MARK: Set bookmark on playback proc-
ess ba
26. HDD: Display recorded file list (see 5.5 Play-
back File
32. : Stop playback or recording and return to
live television.
33. : Start slow motion forward playback. Subsequent presses change the playback speed (x1/2,
x1/4, x1/8
34. REC: Record current program or display recordin
35. TIMER: Display schedule window (see 5.4
Schedule Recordin
36. END: Skip forward while playing back.
37. PLAY MARK: Jump to next bookmark on
backprocess bar.
The color coded keys are used for some menu
functions with on the screen description.
of PV
.
.
.
information.
.
.
Notes:
The keys mentioned in the manual refer to that on RCU exce pt for special explana-
tions.
Please operate according to key instructions on screen.
6
Page 14

1.5 Rear Panel
User’s Manual
Name Function
1. LOOP OUT1 Terrestrial broadcasting signal output socket through the first tuner.
2. LOOP OUT2
3. ETHERNET Connect to Ethernet
4. L/R-AUDIO Output left, right or stereo audio signal to TV or amplifier.
5. USB To attach external memory storage with USB connections.
6. HDMI Output high definition video and audio signal to TV.
7. S/P DIF
8. DC power supply.
9. ANT IN1 Terrestrial broadcasting signal input socket for the first tuner.
10. ANT IN2 Terrestrial broadcasting signal input socket for the second tuner.
11. YPbPr
11. CVBS Composite video signal output socket for TV.
12. RS-232
13/15. CVBS 1/2 Input CVBS video signal from another receiver
14/16. L/R-AUDIO Input left/right audio signal from another receiver
18. ON/OFF Power switch.
Terrestrial broadcasting signal output socket through the second
tuner.
Optical output socket for Dolby digital, output digital audio signal to
amplifier.
Component video output socket, output YPbPr video signal to TV
(supporting high definition output).
Serial port used for software upgrade (authorized for qualified personnel).
7
Page 15

User’s Manual
2. Setup
2.1 Setting up the unit
There are several ways to connect the unit, as follows. If you have any trouble or problems with
your setup or need assistance or advice, please don’t hesitate to contact the dealer.
2.1.1 Connecting an antenna
Connect the antenna cable to the ANT IN 1 (antenna input 1) connector on the rear panel.
Please ensure that there is a connection to both LOOP OUT 1 and ANT I N 2 connector
with the loop cable provided. Not doing so will prevent the unit from working at full capacity.
If another set top box, or television unit is available, a connection can be made from the
LOOP OUT 2 connector. The second set top box would act independently, allowing the
user to browse through different channels.
Analogue channels may still be received on your television set by connecting the antenna
cable from the LOOP OUT 2 connector to the antenna input on the television back panel.
2.1.2 Connecting to your TV set
It is advised to use a HDMI cable connection from your set top box to your television unit to
obtain the best picture quality. If your Television unit does not support a HDMI connection, then
use the component video cables as indicated below.
1. Using a HDMI connector
Plug one end of the HDMI cable into HDMI socket on the unit, and plug the other end into the
matching socket on your TV.
Note: You do not have to make audio connection be cause HDMI connector can out put
stereo audio or Dolby digital audio.
8
Page 16

User’s Manual
2. Using YPbPr (component video) and audio connectors
1. Plug one end of the component video cable into the Y (green), Pb (blue) and Pr (red) sockets on the unit, and plug the other ends into the matching sockets on your Television back
panel.
2. Plug one end of the audio cable into the AUDIO L (white) and AUDIO R (red) sockets on the
unit, and plug the other end into the matching sockets on your television or audio system.
3. Using CVBS (composite video) and audio connectors
Note: You cannot view high definition video with the composite video connector.
1. Plug one end of the composite video cable into CVBS (yellow) socket on the unit, and plug
the other end into the matching socket on your TV.
2. Plug one end of the audio cable into the AUDIO L (white) and AUDIO R (red) sockets on the
unit, and plug the other end into the matching sockets on your TV or audio system.
9
Page 17

User’s Manual
4. Using a S/P DIF connector
If you want to enjoy Dolby digital audio, your TV or audio system must be able to decode Dolby
digital audio. Plug one end of the optical S/P DIF cable into the S/P DIF socket on the unit, and
plug the other end into the matching socket on your audio system.
2.2 Inserting batteries into the Remote Control Unit (RCU)
Remove the battery cover from the remote control. Insert 2 x AAA size batteries inside the
battery compartment. Please take note of the battery’s polarity which is indicated inside the
battery compartment.
Note: Batteries, including those which contain no heavy metals, should not be disposed
off together with household waste. Please dispose off used batteries in an environmentally sound manner. Find out about the legal regulations which apply in your area.
2.3 Power on
1. Connect one end of power adaptor to the unit.
2. Connect the other end of the adaptor to the power supply outlet.
3. Switch on the unit, and the s ystem would initialize in a few seconds, displaying the On
Screen Display (OSD).
Note: Please turn on your TV and switch it to AV mode.
10
Page 18

User’s Manual
2.4 Power on and check picture
1. If channels have already been stored in the unit beforehand, the programs broadcasted will
be played automatically after the set top box unit and television is switched on. The televised station number will be shown on the front panel display of the set top box.
2. If the set top box does not contain channels stored in the unit, the system will automatically
search channels after initialization. Please refer to 7.2 Search Type for more details.
2.5 Active Standby & Passive Standby
The unit supports two standby modes:
ACTIVE Standby
PASSIVE Standby
To turn the unit off, press POWER key on the remote control or on the front panel of the set top box,
there will be a pop up window with 2 selections.
Options will be available to select Active Standby or
Passive Standby, then press OK key to confirm a
selection. If no selection has been made, then the
highlighted option will take effect, and the unit will
turn off after 10 seconds.
In Active Standby Mode:
1. Antenna LOOP OUT connector on the rear panel will still output antenna signal.
2. The current time will be showed on the front panel display, as show below.
In Passive Standby Mode:
1. The unit will cut all power and reduce consumption to minimum.
2. Antenna LOOP OUT connector will not output antenna signal.
3. The current time will not be showed on the front panel display.
3. Basic Operation
This section describes operations such as, channel switch, volume control and other basic
features when playing programs.
3.1 Channel Switch
You can switch channels using the following methods:
Press
keys to switch channel.
11
Page 19

User’s Manual
Input channel number with number keys.
Press
Select channel in channel list. Refer to 3.4 Channel List for detailed operation.
key to switch to the previously viewed channel.
3.2 Volume Control
Press keys to adjust volume level of your unit.
Press MUTE key to mute/restore sound.
3.3 Program Information
Press INFO key to display program information bar. Before it disappears, press INFO key again
to view detailed information of program. Press EXIT key to hide program information bar.
1. Detailed information of current program
2. Channel number and name
3. Current and next program information
4. Current audio mode
5. Audio decoding standard
6. Current time
7. Standard/high definition mode icon
3.4 Channel List
Channel list is available for you to browse channels easily and quickly. The channel list contains details of the channel number and name of the channel.
1. Press OK key to display the channel list. A list of
current services will be shown.
2. Press
channel groups.
3. Press
4. Press OK key to play it in full screen.
Notes:
In non-menu mode, you can press FAV key
to display favourite channel list.
The signal of “AV IN 1” is from INPUT 1 ports on rear panel, and “AV IN 2” from IN-
PUT 2 ports.
keys to switch among different
keys to select a channel.
12
Page 20

User’s Manual
3.5 Audio Selection
Some programs provide more than one audio track
with one or more languages. In addition, you can
enjoy audio tracks in three sound modes: Stereo,
Left or Right.
1. Press AUDIO key to display audio selection
window.
2. Press
press
3. Press EXIT key to save and exit.
Note: Subject to availability from the broadcaster.
keys to select audio language, and
keys to select audio mode.
3.6 Teletext
On some channels, information such as weather reports, news or stock quotations are provided
by means of Teletext.
1. Press TEXT key to display Teletext window, and
the first page shows the index.
2. Input a page number (3 digits) to display specified page.
3. Press EXIT key to close Teletext window.
Notes:
Subject to availability from the broadcaster.
Please operate according to on-screen in-
structions.
3.7 Subtitle
If “Closed Caption” is set to “On” in 10.1 General Settings, press SUBT key to switch on/off
Closed Caption information.
Note: Subject to availability from the broadcaster.
3.8 Picture in Picture (PIP)
You can watch two channels simultaneously, having a sub screen display window to view
programs on other channels. The audio output on the main screen will be available.
1. Activate PIP Function
Select Main Menu → Settings → General Settings and press OK key to enter.
1. Highlight “PIP” and press OK key to pop up a
drop-down list.
2. Select “On” and press OK key to confirm.
3. Press EXIT key to return to main menu.
4. A reboot prompt will pop up on the display
screen. Select “OK” and press OK key to restart
the set top box or select “EXIT” and press OK
key to cancel the operation.
Notes:
You can also press FORMAT key to activate PIP function in AV setting window.
13
Page 21

User’s Manual
This function is unavailable when some i nform ation is display ed on screen, such as
channel list, detailed information, etc.
The modified setting only takes effect after restarting the receiver.
There will be no video output through R CA if PIP function is activated. In this case,
connect the unit to HDTV with YPbPr or HDMI cable and modify the setting to “OFF”.
With PIP, browsing can only be done on the main screen.
The audio in main screen will be available.
2. Display/hide PIP Window
After restarting the receiver and activating this function, press PIP key on the remote to display/hide the
PIP window.
3. Swap PIP Window
You can swap main screen for PIP window by
pressing SWAP key.
4. Change Position of PIP Window
Press MOVE key on the remote to move the PIP window to different positions, as illustrated
below.
5. Switch Channel in Main Screen
1. Press OK key to display channel list.
2. Press
3. Press OK key to play it in main screen.
keys to select a channel.
4. Electronic Program Guide (EPG)
This function allows the user to view program information for each digital channel based on
date and time. In addition, there is an option to set a timer for recording or setting an automated
timer to switch to a certain channel when a selected program starts.
Select Main Menu → EPG and press OK key to enter, or press EPG key to enter directly, in
non-menu mode.
4.1 View EPG Information
EPG information is displayed as follows:
14
Page 22

User’s Manual
EPG key: Switch between channel list and program list
In channel list:
keys: Select channel
OK key: Play current program of the selected channel in full screen
In program list:
keys: Select date within a week
keys: Select program
OK key: Play current program in full screen (in red), or display EPG schedule window (in
white).
1. Channel list
2. Preview window
3. Current time
4. Date table
5. Program list
6. Operation help information
4.2 Schedule Program using EPG
1. Press keys to select a future program.
2. Press OK key to pop up EPG schedule window.
3. Set schedule type and mode. For detailed operations, please refer to 5.4.1 Add Schedule.
4. Select “OK” and press OK key to confirm the
setting. The scheduled program is marked with
” (Record) or “ ” (Play). If you want to cancel
“
this setting, press OK key again.
Notes:
System will record scheduled program in both operational and standby modes.
Refer to 5.4 Schedule Recording for more detailed operations.
4.3 View Detailed Program Information
1. Press arrow keys to select a program.
2. Press INFO key to pop up extended info window.
3. Press EXIT key to exit.
5. Personal Video Recording (PVR)
PVR is similar to VCR in recording. You can record programs into the internal hard disk or an
external USB device.
The unit has two tuners so that you can enjoy the following:
You can record one channel while watching another.
You can record two different channels while watching another-only if two of the channels
are provided through the same transponder.
15
Page 23

User’s Manual
You can record two different services while playing a previously recorded file and even
start playing a recording while it is being recorded. Refer to 5.5 Playback File for more
detailed operation.
Notes:
Radio programs can not be recorded.
If space on your disk is insufficient, recording will stop automatically.
Unmount USB device before unplugging it fr om the unit. Refer to 5.8.2 Unmount
USB for detailed operations.
This unit supports recording programs of two channels simultaneously.
Warnings:
We cannot guarantee compatibility (opera tion and/or bus powe r) with all USB mass
storage devices and assume no responsibility for any loss of data that may occur
when connected to this unit.
With large amounts of data, it may take longer for the system to read the contents of
a USB device.
Some USB devices may not be properly recognised.
Even when they are in a supported format, some file s may not play or display de-
pending on the content.
If the unit does not detect storage device, please wait two to three minutes.
5.1 Set Storage Device
You can select the designated memory location of the program being recorded. Recordings
can either be saved to the internal hard disk or to an external memory disk drive connected to
the USB port.
Select Main Menu → Settings → Storage Device
and press OK key to enter. A password will be required to make changes to the selection of storage
device, refer to 9.2 Change Password to modify the
password.
1. Press keys to select a device.
2. Press OK key to pop up a drop-down list.
3. Press
Notes:
You can also select Main Menu → PVR → Storage Device and press OK key to enter.
If you set “USB device” as storage device, time shift is unavailable.
keys to select “Default storage” and
press OK key to confirm. Recorded files will be
saved into the selected device.
Select a device and press OK key to confirm.
5.2 Set Recording Parameter
Note: If you do not set recording parameters, system will record program according to
default settings.
Select Main Menu → PVR → PVR Setting and press OK key to enter.
16
Page 24

User’s Manual
Schedule Start/Stop Time Offset
You can set schedule start/stop time offset value.
Press
minutes. The symbol “+” before time means
start/stop recording later and “-“means start/stop
earlier. For example, if schedule start time is “13:00”
and offset value is “+2”, the real recoding time is
“13:02”.
Remind before Schedule Start
Set reminding time before starting the schedule recording.
Press
PVR Icon Time out
keys to select a time from -10 to +30
keys to select 30s, 60s, 90s, 120s or OFF.
Once recording has started, a symbol
and duration is shown on the screen. You can change the display time of the symbol. Press
keys to select Always, 5s, 10s, 30s, or 60s.
If “Always” is selected, PVR icon is displayed on the screen throughout the recording.
Manual Recording Duration
Set default recording duration of quick recording. Press
hours.
Timeshift Start Mode
Press
Always: System always records programs in the background temporarily. When changing
channels or switching the unit to operation mode, system will delete recorded information and
start recording program of current channel.
Pause Key: Start time shift recording with
Never: Unit will not start time shift recording.
Note: Refer to 5.7 Time Shift for corresponding operations.
keys to select Always, Pause Key or Never.
key.
with recording time, recording channel
keys to select one from 1 to 24
5.3 Quick Recording
Quick Recording is a function to record current ongoing programs spontaneously.
1. Start Recording
When watching a program, press REC key to start recording and a symbol is
displayed in top left corner of screen.
Once a recording starts, the recording file is displayed on the recorded list even though the
current recording is in progress. To view the recorded file, press HDD key (See 5.5 Playback
File) or alternatively, select the File List menu (See 5.6 Edit Recorded File). To record another
channel, switch to the channel you want to record and press REC key again.
Pressing
play record Info window, in which you can select “Pause” and press OK key to pause the recording.
key directly will not pause the current recording. You must press REC key to dis-
17
Page 25

User’s Manual
Warnings:
Do not move the unit nor unpl ug the main AC/DC power while it is running. It may
cause damage to recorded file and internal HDD.
When a program is being reco rded onto an external USB device, you m ust not dis-
connect it. Arbitrary disconnecting may cause damage to the recording file and USB
storage device.
Do not record more than TWO programs at once.
2. Current Recording Information
Switch to a channel you are currently recording, and press REC key to enter recording information window, or select Main Menu → PVR → Recording Info and press OK key to enter.
Index: Press
Mode: Display recording mode (Quick or Schedule).
Channel Name: Display channel name.
File Name: You can rename the file. Press OK
key to display a keyboard. Refer to 5.6.3 Rename Recorded File for detailed operations.
Valid Record Time: Display valid record time.
Time Passed: Display time elapsed.
Duration: Press
duration. The recording will end at the specified
time.
Select “Pause” and press OK key to pause valid recording.
Select “Resume” and press OK key to resume valid recording.
Select “OK” and press OK key to save the setting.
Select “Cancel” and press OK key to cancel the setting.
keys to select recording index (R1 or R2).
keys to select a recording
3. Stop Recording
1. Press key when recording, a prompt pops
up on screen.
2. Select a recording and press OK key to stop.
Note: If you playback a program while recording,
press
key again to stop recording.
key to stop playback, and press
5.4 Schedule Recording
You can set future programs to be recorded at a specific time and date, where the unit will start
recording automatically as programmed. In addition, you can modify recording schedules and
delete unwanted schedules.
Note: The unit has 2 standby modes called “Passive” and “Active” - see 2.5 Active
Standby & Passive Standby for further details. In either mode, the unit will start recording, and will return to standby mode upon completion. If the unit is alrea dy on, an d
a recording has commenced, the recording has to be stopped before placing the televi sion unit on standby mode.
To access Schedule Recording, select Main Menu → PVR → Schedule List and press OK key
to enter, or press TIMER key to enter directly in non-menu mode.
18
Page 26

User’s Manual
1. Add Schedule
1. Once in the “Schedule List” page, if no schedule is stored, press the OK button directly to
display the “Add Schedule” window. If some schedules are stored, press OK key to pop up
a drop-down list, select “Add” and press OK key to display add schedule window.
2. Set schedule parameters as follows:
Schedule Type: Set schedule type to Rec with
the specified time automatically.
Start Time: Press OK key to display the calendar window. You can select a specific date
using the arrow keys, then press the FAV key to
enter a starting time using the number keys. The
recording will be started at the specific time.
Press OK key to save and re-enter the schedule
window.
End Time: Press number keys to input end
time.
Schedule Mode: Press
Once (one time only), Daily (every day) or
Weekly (one day every week). If “Weekly” is
selected, press OK key to display weekly window. You can select desired days from Monday
to Sunday with
confirm, then select “OK” and press OK key to
save.
Channel Name: Press OK key to display channel list, from which you can press
to select your desired channel.
3. Move cursor to “OK” and press OK key to add schedule.
Note: You can schedule recording in EPG window directly. Refer to 4.2 Schedule Program using EPG for detailed operations.
keys and press OK key to
keys to select
keys. The unit will record channel at
keys
2. Modify Schedule
1. Press keys to select a schedule.
2. Press OK key to display a drop-down list.
3. Select “Modify” and press OK key to display modify schedule window. You can modify
schedule start time, end time and mode. Refer to 5.4.1 Add Schedule for detailed operations.
3. Delete Schedule
1. Press keys to select a schedule.
2. Press OK key to display a drop-down list.
3. Select “Delete” and press OK key to mark the
schedule with “
setting, press OK key again to pop up the
drop-down list and select “Cancel del”.
4. Press EXIT key to pop up a message box for
confirmation.
5. Select “OK” and press OK key, the marked
”. If you want to cancel this
19
Page 27

User’s Manual
schedules will be deleted.
Note: You can also select “Delete All” and press OK key to delete all schedules, or select “Cancel del all” and press OK key to cancel.
5.5 Playback File
After a program has been recorded, would be stored as a file on the internal hard disk drive or
designated USB external memory device. You can select a file to playback from the recorded
file list.
Once playback has started, a
for few seconds. When a program is recorded, its additional contents such as audio tracks or
Teletext are also recorded together. So you can enjoy the use of these functions while playing a
recorded file.
Note: When a file from the external hard disk drive is being played back, you must not
disconnect it from the unit. Arbitrary disconnecting may cause dama ge to the recorded
file.
Select Main Menu → REC Files and press OK key to enter, or press HDD key to enter directly
in non-menu mode. The instructions on how to play a recorded file are as follows:
If there are several storage devices connected to
your receiver at the same time, or if a favourite
group has been created, you can select a storage
device or a group from a list displayed on the right,
then press
1. Press
2. Press OK key to pop up a drop-down list.
3. Select “Play” and press OK key to start playback.
4. Press
key to enter the file list.
keys to select a file.
key to stop playback and play live program.
symbol will be displayed at the top left corner of the screen
During a playback, you can execute the following operations:
1. Pause
Press key to pause playback, press key to resume playback.
2. Fast Backward/Forward
You can fast forward or rewind while watching a recorded file.
To rewind, press
×4, ×8, ×16 and ×32 times. You can press
To fast forward, press
steps: ×2, ×4, ×8, ×16 and ×32 times. You can press
key. If you press it repeatedly , the playback speed changes in 5 steps: ×2,
key to resume normal speed.
key. If you press it repeat edly, the playback speed changes in 5
key to resume normal speed.
3. Slow Motion Playback
To watch in slow motion during a playback, press key. If you press it repeatedly, the playback speed changes in 3 steps: ×1/2, ×1/4, ×1/8 times. Yo u can press
speed.
20
key to resume normal
Page 28

User’s Manual
4. Playback Process Bar
If you press INFO key, playback process bar is displayed. It displays current file information,
playback process and operation help information.
1. File name 4. Playback process
2. Time elapsed in playback (hh:mm:ss) 5. Total time (hh:mm:ss)
3. Operation help information
5. Jump backward/forward
1. Press INFO key to display playback process bar.
2. Press Red/Blue keys to make a big jump backward/forward respectively.
3. Press
key to play from the specified time point.
6. Bookmark
You can mark favourite parts of a recorded file by creating bookmarks, and then jump to them.
You can have up to 20 bookmarks. Bookmarks are stored with the recorded file so that you can
use them again.
To make bookmarks, perform the following steps during playback:
Add Bookmark
1. Press INFO key to display the process bar.
2. Press Green key to add a bookmark at a desired scene; then you will see a small triangle
appear on the progress bar as per the picture on the right.
Go to Bookmark
1. Press INFO key to display the process bar.
2. Press Yellow key to jump to the next bookmark
on progress bar. The file will be played from the
bookmark.
Delete Bookmark
1. Press INFO key to display the process bar.
2. Press Yellow key to jump to a bookmark.
3. Press Green key to delete it.
6. File Cut
You can cut sections such as commercial breaks from a recorded file. The cut section will be
skipped during playback. To cut the file, perform the following steps during playback:
1. Press INFO key to display playback progress bar.
2. Press OK key to enable the “File cut” keys (Green and Yellow).
3. Move to the starting point of the scene you want to cut by using VOL
21
or VOL key.
Page 29

User’s Manual
4. Press Green key, then a small triangle appears on the progress bar.
5. Move to the end of the scene.
6. Press Yellow key, the cut section is marked in bright green.
7. Press OK key,and then you get asked for confirmation. If you select “OK”, the marked part
is cut.
Note: If you want to restore all cut contents, press FAV key.
5.6 Edit Recorded File
You can delete, rename, lock and manage group of recorded files and also copy files between
internal and external hard disk drives.
Select Main Menu → REC Files and press OK key to enter, or press HDD key to enter directly
in non-menu mode.
1. Delete Recorded File
1. Press keys to select a file you want to delete.
2. Press OK key to pop up a drop-down list.
3. Select “Delete” and press OK key to confirm.
The file is marked with “
the setting, press OK key again to pop up the
drop-down list. Select “Cancel Delete” and
press OK key to confirm.
4. After pressing EXIT key, a confirmation mes-
sage is displayed on the screen for confirmation.
5. Select “OK” to delete the selected file.
Note: You can also select “Delete All” and press OK key to delete all schedules, or select “Cancel del all” and press OK key to cancel.
”. If you want to cancel
2. Add Recorded File to Group and Manage Group
Add recorded file to group
1. Press
2. Press OK key to pop up a drop-down list.
3. Select “Group Mgr” and press OK key to pop up group edit window.
4. Select a group and press OK key to add the selected file to this group.
5. Press the EXIT key to exit the menu.
In addition, you can manage groups by creating, deleting and renaming group files in the
'Group Edit' window.
Create group
Press Green key to pop up an on-screen keyboard. Refer to 5.6.3 Rename Recorded File
keys to select a file in file list.
22
Page 30

User’s Manual
for detailed operations.
Delete group
1. Press
edit window.
2. Press Red key to delete it, and then a warning
box appears asking you for confirmation. If you
select “OK”, the selected group will be removed.
Note: Deleting a file from sub-group folder will
also delete the original file from the main group
folder.
Rename group
1. Press
edit window.
2. Press Yellow key to pop up an on-screen keyboard. Refer to 5.6.3 Rename Recorded File
for detailed operations.
keys to select a group in the group
keys to select a group in the group
3. Rename Recorded File
1. Press keys to select a file.
2. Press OK key to pop up a drop-down list.
3. Select “Rename” and press OK key to display an on-screen keyboard.
You can move the cursor horizontally with
OK key on a button to enter its character on the input line.
To delete all characters on the input line, select
“Clear” and press OK key.
To switch between upper and lowercase, select
“Caps On” and press OK key.
To delete last character on the input line, select
“Back” and press OK key.
You must select “OK” and press OK key to
complete naming, otherwise if you select
“Cancel” or press EXIT key directly, it will not be
named.
4. After renaming, new file name appears in file list.
keys and vertically with keys. Press
4. Lock Recorded File
1. Press keys to select a file you want to
lock.
2. Press OK key to pop up a drop-down list.
3. Select “Lock” and press OK key to lock this file,
and mark it with “
setting, press OK key again to pop up the
drop-down list, select “Lock” and press OK key
to confirm.
Note: Password is required to view locked file,
refer to 9.2 Change Password.
”. If you want to cancel this
23
Page 31

User’s Manual
5. Copy File
You can copy files between connected storage
devices.
1. Select a file.
2. Press OK key to pop up a drop-down list.
3. Select “Copy File” and press OK key to pop up a
message box for confirmation.
4. Select a storage device and press OK key to
conform.
5.7 Time Shift
Note: If you set USB device as storage device, “time shift” will not be available.
Time shift means that the live channel you are watching gets saved temporarily in the buffer of
the internal hard disk. When enabled, you can pause the program you are watching and resume it again at a later time. You can then access any part of the current program by using the
fast forward or rewind functions as if playing back a recording. To enable this feature, refer to
5.2 Set Recording Parameter.
1. Using Time Shift
After starting time shift, the unit records current program on embedded HDD in the background
temporarily. You can playback it as if playback a recorded file.
You can perform pause/play, fast backward/forward, slow forward, etc. Refer to 5.5 Playback
File for detailed operations.
You can also press INFO key to display playback progress bar. It displays current channel
information, playback progress.
1. Channel name
2. Total time (hh:mm:ss)
3. Operation help information
4. Watching point time (hh:mm:ss)
5. Playback process
2. Stop Time Shift
Press key or switch to another channel to stop time shift and return to play live program.
5.8 Storage Device Management
1. HDD Format
Warning: This function will format y our internal hard disk or USB device, and all
stored contents will be deleted.
24
Page 32

User’s Manual
Select Main Menu → PVR → Format and press OK
key to enter.
1. Select “Storage Device” and press OK key to
pop up a drop-down list.
2. Select a storage device.
3. Select “OK” and press OK key to confirm.
4. After inputting local password, the unit will format.
You can also select Main Menu → Settings → Storage Device and press OK key to enter.
The icon in the bottom left corner of window displays used and free space of the selected
device.
1. Select a device you want to format.
2. Press OK key to pop up a drop-down list.
3. Select “Format” and press OK key, a warning
box pops up for confirmation.
4. Select “OK” and press OK key to confirm or
select “EXIT” and press OK key to cancel the
operation.
Notes:
If you have replaced the internal HDD with a new on e, you must format it be fore use
because the unit has its own file system which is different from any personal computers. You can neither record nor use time shift with an unformatted HDD.
This unit only supports Consumer Electronics (CE) HDD specially made for PVR
video recording.
2. Unmount USB Device
Warning: Unmount USB device before unplugging it from the unit. Otherwise, devic e
may be damaged.
Select Main Menu → PVR →Unmount USB Device and press OK key to enter.
1. Press OK key to pop up a drop-down list.
2. Select a desired storage device.
3. Select “OK” and press OK key to pop up a
warning box for confirmation.
4. Select “OK” and press OK key to unmount or
select “EXIT” and press OK key to cancel the
operation.
After unmount USB device successfully, you can
remove it from the unit.
You can also select Main Menu → Settings → Storage Device and press OK key to enter.
The icon in the bottom left corner of window displays
used and free space of the selected device.
1. Select a device you want to unmount.
2. Press OK key to pop up a drop-down list.
3. Select “Unmount USB” and press OK key, a
warning box pops up for confirmation.
4. Select “OK” and press OK key to confirm or
select “EXIT” and press OK key to cancel the
25
Page 33

User’s Manual
operation.
After unmount USB device successfully, you can remove it from the unit.
5.9 Shortcut Key of PVR
When watching a program, press PVR key to display shortcut key list.
This feature is a convenient pop up menu that will
display all the PVR functions according to the current situation.
6. Multimedia
You can view photos and listen to music in MP3 format from a USB device (such as memory
stick).
Notes:
Make sure that your USB device contains MP3 and JPEG files before inserting it into
the unit.
USB device should be inserted into the USB port on the front panel before operating.
Unmount USB device before unplugging it fr om the unit. Refer to 5.8.2 Unmount
USB Device for detailed operations.
6.1 MP3
Select Main Menu → Multimedia → MP3 and press
OK key to display MP3 list.
1. Press
2. Press OK key to play it, a playing process bar is
display on the screen. You can operate as follows:
OK key: Pause/resume playing
FAV key: Switch among Single Play, Sequence
Play and Random Play
Single Play: Play the selected file repeatedly.
Sequence Play: Play all files circularly.
Random Play: Play files at random.
3. Press EXIT key to exit.
keys to select an MP3 file.
6.2 Digital Photo
Select Main Menu → Multimedia → Digital photo
and press OK key to display photo list.
1. Press
2. Press OK key to display it in full screen, and you
can operate as follows:
keys: Display previous/next photo
key: Pop up photo setting window to select
slide show
3. Press EXIT key to exit.
keys to select a photo.
26
Page 34

User’s Manual
7. Channel Search
This will guide you through parameter settings to search for channels.
7.1 Advance Frequency Edit
In general, multiple television or radio broadcasts are transmitted though a single frequency.
This is a frequency with multiple channels. In Mux Edit window, the unit presets dozens of
frequencies, so you can modify or delete them. You can also add some new frequencies.
Select Main Menu → Channel → Mux Edit and press OK key to enter.
Note: Make sure you are familiar with the technical aspects of th e channel frequency
before you proceed to edit it.
1. Add Frequency
Press OK key to pop up a drop-down list. Select
“Add” and press OK key to pop up add Mux window,
in which you can add a frequency by performing the
following steps:
1. Press numeric keys to input new frequency
values.
2. Press
3. Press EXIT key to save and go back to the
previous menu.
4. The new frequency is shown on the end of list.
2. Modify Frequency
keys to select proper bandwidth.
1. Press keys to select a Mux.
2. Press OK key to pop up a drop-down list.
3. Select “Modify” and press OK key to pop up modify Mux window.
4. Press
5. Press EXIT key to save the setting.
or number keys to set proper values.
3. Delete Frequency
1. Press keys to select a frequency.
2. Press OK key to pop up a drop-down list.
3. Select “Delete” and press OK key to delete it.
7.2 Auto Search
For beginners, auto search is the best choice.
Select Main Menu → Channel → Auto Search and
press OK key to enter. The system will search
channels according to default parameters. Updated
TV and Radio channels will be sorted automatically.
Note: Do not interrupt the searching to avoid
data loss.
27
Page 35

User’s Manual
7.3 Manual Search
Y ou may choose to search for channels on a specific frequency since more than one channel is
available via each frequency. You can set the parameters manually and scan for channels at
the set frequency.
Select Main Menu → Channel → Manual Search and press OK key to enter.
1. Set parameters as follows:
Frequency (MHz): Press number keys to input correct frequency.
Bandwidth (M): The default is 8M.
Search Type: Press
drop-down list. Select a desired item and press
OK key to confirm.
If “Single” is selected, system searches channels only according to the set frequency.
If “Network” is selected, system searches
channels according to NIT (Network Information
Table).
2. Highlight “Begin Search” and press OK key to search channels.
After finishing, the found TV and radio channels will be listed.
key to pop up a
8. Channel Edit
Y ou can delete, lock and move channels. In addition, you can make your own favourite channel
list.
Select Main Menu → Channel → Channel Edit and press OK key to enter. You will need to
enter your password to access the Channel Edit window, refer to 9.2 Change Password for
more details.
8.1 Set Favourite Channel
1. Press keys to select a channel.
2. Press
3. Highlight “Favourite” and press OK key to mark
this channel with “
setting, press OK key again to pop up the
drop-down list, and select “Cancel Favor” and
press OK key to confirm.
key to pop up a drop-down list.
”. If you want to cancel this
8.2 Lock Channel
1. Press keys to select a channel.
2. Press
3. Highlight “Lock” and press OK key to mark this
channel with “
ting, press OK key again.
Note: The local password is required to view
locked channel, refer to 9.2 Change Password
for further details.
key to pop up a drop-down list.
”. If you want to cancel this set-
28
Page 36

User’s Manual
8.3 Move Channel
1. Press keys to select a channel you want to
move.
2. Press
3. Highlight “Lock” and press OK key to mark this
channel with a symbol “
4. Press
position and press OK key to confirm.
key to pop up a drop-down list.
”.
ke ys to move this channel to a new
8.4 Delete Channel
Notes:
A deleted channel cannot be accessed
unless you search for it again.
You can also delete all channels if “Delete
All” is selected.
1. Press
2. Press
3. Highlight “Delete” and press OK key to mark this
channel with “
ting, press OK key again.
After setting, press EXIT key and a message box pops up for confirmation. Select “OK“ and
press OK key to confirm or select “EXIT” and press OK key to cancel the operation.
keys to select a channel.
key to pop up a drop-down list.
”. If you want to cancel this set-
9. System Setting
9.1 General Settings
You can to configure the video and audio settings appropriately to your TV set and other appliances.
Select Main Menu → Settings →General Settings and press OK key to enter.
Menu Language: The default is “English”.
Aspect Rat io: To view wide screen programs on a non-wide screen TV, set the option to
Letter Box or pan-scan. Wide-screen pictures then will be reduced to fit to the width of the
normal screen.
Resolution: The unit supports various video
resolutions: 1080p, 1080i, 720p or 576p. The
resolution of 720p, 1080p and 1080i are considered high definition. The higher resolution the
better quality you can enjoy. However, if your TV
set does not support high definition, you cannot
enjoy high definition quality picture. You can set
the option to the highest resolution your TV can
display. If you know your TV’s native screen
resolution, you may achieve a better picture by
setting it to that resolution. The unit will then
convert all video output to the selected setting.
Note: You can only view standard definition video with the composite vid eo con-
29
Page 37

User’s Manual
nector (VIDEO).
Time Zone Set: Make sure that your local time is displayed correctly on this option, otherwise, press
zone in which you live.
Closed Caption: Set SUBT key function. Press
keys to select “On” or “Off”.
Daylight Saving Time: If daylight saving time is observed in your state at the moment, set
the option to “On”.
Note: Daylight saving time adds one hour to the time when the option is set to “On”.
When setting the time offset from Greenwich Mean Time, make sure that the time
offset does not include daylight saving time.
Audio Decode: The unit can output two types of digital audio signals via the S/P DIF
connector. One is an encoded signal, and the other is a decoded signal. If your digital audio
system does not have a Dolby Digital decoder, you have to set the option to “PCM”. Otherwise, set it to “Dolby Digital”.
Note: If the channel you are currently watchin g does not provide Dolby digit al, you
cannot watch the program with Dolby sound even though you set the option to AC3.
PIP: Refer to 3.8 Picture in Picture (PIP).
key to pop up a drop-down list, then press keys to select the time
key to pop up a drop-down list. Press
9.2 Change Password
The local password is required to view locked channels (See 8.2 Lock Channel), or access
some menus, such as Channel Edit, Software Update, Factory Reset, etc. The password is set
to 0000 by default. You can change this password if necessary.
Select Main Menu → Settings →Change Password
and press OK key to enter. The password is needed
to activate the setting.
1. Press number keys to input new password.
2. Press number keys to input new password
again for confirmation.
3. Press EXIT key to save and exit.
In the event that the user has forgotten or
Note:
misplaced the password, please use the Mas ter
Unlock Code “8101”.
9.3 PG (parental guide) Lock
You can set parental control for program.
Select Main Menu → Settings → PG Lock and press
OK key to enter. The password is needed to activate
the setting.
1. Press
different parental control levels.
2. Select a proper level and press OK key to confirm.
3. Press EXIT key to save and exit.
Note: The password is required to view programs beyond set level.
key to pop up a sub-menu consists of
30
Page 38

User’s Manual
9.4 Network
Select Main Menu → Settings → Network and press
OK key to enter.
1. Press OK key to pop up a drop-down list.
2. Press
“Static” is selected, press number keys to set IP
Address, Subnet Mask, Gate Way and DNS. If
“DHCP” is selected, system will get IP parameters automatically.
3. Press EXIT key to save and exit.
keys to select Static or DHCP. If
9.5 Factory Reset
Warning: This function will restore system
settings to factory default.
Select Main Menu → Settings → Factory Reset and
press OK key, a warning box pops up for confirmation. Select “OK” and press OK key to confirm or
select “EXIT” and press OK key to cancel the operation. System will reboot after restoring.
10. Software Upgrade
Warning: Do not turn off the unit or unplug the USB device during software upgrade.
The unit has stable and convenient software to use. However, once in a while new software
may be released to improve the unit’s performance. You can upgrade software via the USB
port.
You have to check the software information of your unit before downloading new software, and
download the latest software with the same system identification. It is only possible to upgrade
software with a system identification that is identical to your unit, otherwise, the software upgrade would not be successful.
If you have a USB memory stick, you can update the software by performing the following
steps:
1. Download new software from the web site.
2. Copy the software file to your USB memory
stick.
3. Turn on the unit.
4. Insert the USB storage device into the USB port
on the unit.
5. Select Main Menu → Settings → Software Up-
date.
6. Enter the password (default: 0000) → Software Upgrade menu.
7. Press
an upgrade progress bar is displayed on screen.
8. After upgrade, a message will be displayed on the screen and the unit will restart after
which the software update process is complete.
keys to select the software and press OK key to upgrade. During this process
31
Page 39

User’s Manual
11. Information
You can view channel information and system information, etc.
11.1 Channel Information
This window displays information about current channel, such as PID values, frequency,
bandwidth, signal level and signal quality, etc.
Select Main Menu → Channel → Channel Info and press OK key to enter.
11.2 System Information
This window displays information about the unit, such as hardware version, software version,
etc.
Select Main Menu → Settings → System Info and press OK key to enter.
32
Page 40

User’s Manual
12. Appendix
12.1 Trouble Shooting
DISPLAY on front panel is off
1. Power cord is disconnected. Make sure power cord is plugged into a proper power
socket.
2. The unit is turned off. Turn it on.
DISPLAY on front panel is on, but there is no sound or picture on the TV screen
The unit is in standby mode. It will switch into operation mode and start recording or playing
a program at a specified time. You can also press POWER key to switch it to operation
mode.
No signal
1. Signal cable is disconnected. Connect signal cable correctly.
2. Program parameters have been set incorrectly. Set correct parameters.
3. No signal from terrestrial antenna. Try again when signal is available.
No sound
1. Audio cable is disconnected or incorrectly connected. Connect audio cable correctly.
2. The unit is in mute mode. Press MUTE key to restore sound.
3. Volume is set to minimum. Increase volume to a proper level.
4. Audio parameter has been set incorrectly. Set a proper audio parameter.
No picture
1. Video cable is disconnected or incorrectly connected. Connect video cable correctly.
2. The unit is in radio mode. Switch it to TV mode if you need.
Video and audio mismatch, or abnormal sound
Audio parameter has been set incorrectly. Select a proper audio parameter.
Poor quality picture
Weak signal. Connect signal cable securely.
RCU doesn’t work
1. Not enough power in batteries. Replace the batteries.
2. RCU is not aimed at the unit. Aim RCU at the unit.
Cannot record program
1. The hard disk is full. Delete some old recorded files for new recording.
2. Check if recording is overlapped with another channel. Stop current recording or wait
until the recording is finished.
Cannot operate “time shift”
1. “Timeshift Start Mode” is set to “Never” in 5.2 Set Recording Parameter. Change the
mode to “Pause Key” or “Always”.
2. If you set USB device as your storage device, “time shift” is not available. Select internal
hard disk as storage device as per 5.1 Set Storage Device.
Note: If you cannot solve the problems after referring to this trouble shooting, pleas e
contact the TEAC Customer Care Centre, see back page for details.
33
Page 41

User’s Manual
12.2 Specification
Tuner
Input Frequency 47 ~ 858MHz
Loop out Frequency 47 ~ 858MHz
Input Level -25 ~ +20dBmV
Bandwidth 6M, 7M, 8M
Input Impedance 75ohm
Channel Decoding
Standard DVB-T EN300 744
FEC Code Rate 1/2, 2/3, 3/4, 5/6, 7/8
Demodulation (QPSK,16 and 64 QAM)
Video Decoding
Standard ISO/IEC 13818-2, MPEG-2 MP@ML,
MPEG-4 AVC/ H.264 HP@L4
Aspect Ratio 4:3, 16:9
Video Resolution 1920*1080 max.
Audio Decoding
Standard ISO/IEC 13818-3 and TR101154
Decoding MPEG-1 layer I and II, AC3
Audio Mode Left, Right, Stereo
Audio Sampling Frequency 32, 44.1, 48KHz
High Definition Output
Output Format 1080i, 1080p, 720p
Output Connector HDMI, YPbPr
Front Panel
IR Receiver 38KHz
5 Keys VOL-/+, CH / , OK
Rear Panel
ANT IN (2), LOOP OUT (2)
HDMI
Connector
Remote Control
Type Infra-red (Carrier Freq: 38 KHZ)
YPbPr/CVBS, AUDIO L/R
S/P DIF
RS-232
USB
34
Page 42

User’s Manual
Battery 2×1.5V AAA Type
Power/Ambient
DC Power Supply
Operation Temperature 0℃ ~ 40℃
HDD
Supported HDD Size Up to 1TB
Size for SD Recording 0.8 GB / hour
Size for HD Recording 2 GB / hour
Recording Format (External USB
storage device)
Music File Type MP3
Picture File Type JPEG
TRP
12.3 Acronym
DVB Digital Video Broadcasting
EPG Electronic Program Guide
FTA Free to Air
HDD Hard Disk Drive
HDMI High Definition Multimedia Interface
MUX Multiplexer
OSD On Screen Display
PVR Personal Video Recording
RCA Radio Corporation of America
RCU Remote Control Unit
S/P DIF Sony/Philips Digital Interface Format
USB Universal Serial Bus
35
Page 43

 Loading...