

Page 1

9A10504800
Z
GR
-
7i
Hi-Fi Table Radio
OWNER’S MANUAL
MANUEL DU PROPRIÉTAIRE
MANUAL DEL USUARIO
ENGLISH FRANÇAIS ESPAÑOL
Includes adapters for:
iPod nano
iPod with video
iPod mini
iPod with Click Wheel
iPod with color display
Adapters sold separately:
iPod with dock connector
Comprend des adaptateurs pour:
iPod nano
iPod avec vidéo
iPod mini
iPod avec molette sensitive Click Wheel
iPod avec écran couleur
Adaptateurs vendus séparément:
iPod avec connecteur pour dock
Incluye adaptadores para:
iPod nano
iPod con vídeo
iPod mini
iPod con rueda de clic
iPod con pantalla en color
Adaptadores no incluidos:
iPod con conector para base
Page 2

2
CAUTION: TO REDUCE THE RISK OF
ELECTRIC SHOCK, DO NOT REMOVE
COVER (OR BACK). NO USER-SERVICEABLE
PARTS INSIDE. REFER SERVICING TO
QUALIFIED SERVICE PERSONNEL.
The lightning flash with arrowhead
symbol, within an equilateral
triangle, is intended to alert the user
to the presence of uninsulated “dangerous
voltage” within the product‘s enclosure that
may be of sufficient magnitude to constitute a
risk of electric shock to persons.
The exclamation point within an
equilateral triangle is intended to
alert the user to the presence of
important operating and maintenance
(servicing) instructions in the literature
accompanying the appliance.
CAUTION
• Read all of these Instructions.
• Save these Instructions for later use.
• Follow all Warnings and Instructions
marked on the audio equipment.
1) Read Instructions — All the safety and
operating instructions should be read before
the product is operated.
2) Retain Instructions — The safety and
operating instructions should be retained for
future reference.
3) Heed Warnings — All warnings on the
product and in the operating instructions
should be adhered to.
4) Follow Instructions — All operating and
use instructions should be followed.
5) Cleaning — Unplug this product from the
wall outlet before cleaning. Do not use liquid
cleaners or aerosol cleaners. Use a damp cloth
for cleaning.
6) Attachments — Do not use attachments
not recommended by the product
manufacturer as they may cause hazards.
7) Water and Moisture — Do not use this
product near water — for example, near a
bath tub, wash bowl, kitchen sink, or laundry
tub; in a wet basement; or near a swimming
pool; and the like.
8) Accessories — Do not place this product
on an unstable cart, stand, tripod, bracket, or
table. The product may fall, causing serious
injury to a child or adult, and serious damage
to the product. Use only with a cart, stand,
tripod, bracket, or table recommended by the
manufacturer, or sold with the product. Any
mounting of the product should follow the
manufacturer’s instructions, and should use a
mounting accessory recommended by the
manufacturer.
9) A product and cart combination
should be moved with care. Quick
stops, excessive force, and uneven
surfaces may cause the product
and cart combination to overturn.
IMPORTANT SAFETY
INSTRUCTIONS
Page 3

ENGLISH
10) Ventilation — Slots and openings in the
cabinet are provided for ventilation and to
ensure reliable operation of the product and to
protect it from overheating, and these
openings must not be blocked or covered. The
openings should never be blocked by placing
the product on a bed, sofa, rug, or other
similar surface. This product should not be
placed in a built-in installation such as a
bookcase or rack unless proper ventilation is
provided or the manufacturer‘s instructions
have been adhered to.
11) Power Sources — This product should be
operated only from the type of power source
indicated on the marking label. If you are not
sure of the type of power supply to your
home, consult your product dealer or local
power company. For products intended to
operate from battery power, or other sources,
refer to the operating instructions.
12) Grounding or Polarization — This
product may be equipped with a polarized
alternating-current line plug (a plug having
one blade wider than the other). This plug will
fit into the power outlet only one way. This is
a safety feature. If you are unable to insert the
plug fully into the outlet, try reversing the
plug. If the plug should still fail to fit, contact
your electrician to replace your obsolete outlet.
Do not defeat the safety purpose of the
polarized plug.
13) Power-Cord Protection — Power-supply
cords should be routed so that they are not
likely to be walked on or pinched by items
placed upon or against them, paying particular
attention to cords at plugs, convenience
receptacles, and the point where they exit
from the product.
14) Outdoor Antenna Grounding — If an
outside antenna or cable system is connected
to the product, be sure the antenna or cable
system is grounded so as to provide some
protection against voltage surges and built-up
static charges. Article 810 of the National
Electrical Code, ANSI/NFPA 70, provides
information with regard to proper grounding
of the mast and supporting structure,
grounding of the lead-in wire to an antenna
3
discharge unit, size of grounding conductors,
location of antenna-discharge unit, connection
to grounding electrodes, and requirements for
the grounding electrode.
Note to CATV system installer:
This reminder is provided to call the CATV
system installer‘s attention to Section 820-40
of the NEC which provides guidelines for
proper grounding and, in particular, specifies
that the cable ground shall be connected to
the grounding system of the building, as close
to the point of cable entry as practical.
15) Lightning — For added protection for this
product during a lightning storm, or when it is
left unattended and unused for long periods
of time, unplug it from the wall outlet and
disconnect the antenna or cable system. This
will prevent damage to the product due to
lightning and power-line surges.
16) Power Lines — An outside antenna
system should not be located in the vicinity of
overhead power lines or other electric light or
power circuits, or where it can fall into such
power lines or circuits. When installing an
outside antenna system, extreme care should
be taken to keep from touching such power
lines or circuits as contact with them might be
fatal.
17) Overloading — Do not overload wall
outlets, extension cords, or integral
convenience receptacles as this can result in
risk of fire or electric shock.
18) Object and Liquid Entry — Never push
objects of any kind into this product through
openings as they may touch dangerous
voltage points or short-out parts that could
result in a fire or electric shock. Never spill
liquid of any kind on the product.
ANTENNA
LEAD IN
WIRE
ANTENNA
DISCHARGE UNIT
(NEC SECTION 810-20)
GROUNDING CONDUCTORS
(NEC SECTION 810-21)
GROUND CLAMPS
POWER SERVICE GROUNDING
ELECTRODE SYSTEM
(NEC ART 250. PART H)
NEC - NATIONAL ELECTRICAL CODE
ELECTRIC
SERVICE
EQUIPMENT
Example of Antenna Grounding
as per National Electrical
Code, ANSI/NFPA 70
GROUND
CLAMP
Page 4

4
WARNING: TO PREVENT FIRE OR SHOCK
HAZARD, DO NOT EXPOSE THIS
APPLIANCE TO RAIN OR MOISTURE.
CAUTION
<
DO NOT REMOVE THE EXTERNAL CASES
OR CABINETS TO EXPOSE THE
ELECTRONICS. NO USER SERVICEABLE
PARTS ARE WITHIN!
<
IF YOU ARE EXPERIENCING PROBLEMS
WITH THIS PRODUCT, CONTACT TEAC FOR
A SERVICE REFERRAL. DO NOT USE THE
PRODUCT UNTIL IT HAS BEEN REPAIRED.
<
USE OF CONTROLS OR ADJUSTMENTS OR
PERFORMANCE OF PROCEDURES OTHER
THAN THOSE SPECIFIED HEREIN MAY
RESULT IN HAZARDOUS RADIATION
EXPOSURE.
<
Do not expose this apparatus to dripps or
splashes.
<
Do not place any objects filled with liquids,
such as vases, on the apparatus.
<
Do not install this apparatus in a confined
space such as a book case or similar unit.
<
The apparatus draws nominal nonoperating power from the AC outlet with
its STANDBY/ON switch in the off position.
<
The apparatus should be located close
enough to the AC outlet so that you can
easily grasp the power cord plug at any
time.
<
An apparatus with Class ! construction shall
be connected to an AC outlet with a
protective grounding connection.
19) Servicing — Do not attempt to service
this product yourself as opening or removing
covers may expose you to dangerous voltage
or other hazards. Refer all servicing to qualified
service personnel.
20) Damage Requiring Service — Unplug
this product from the wall outlet and refer
servicing to qualified service personnel under
the following conditions:
a ) when the power-supply cord or plug is
damaged.
b ) if liquid has been spilled, or objects have
fallen into the product.
c ) if the product has been exposed to rain or
water.
d ) if the product does not operate normally
by following the operating instructions. Adjust
only those controls that are covered by the
operating instructions as an improper
adjustment of other controls may result in
damage and will often require extensive work
by a qualified technician to restore the product
to its normal operation.
e ) if the product has been dropped or
damaged in any way.
f ) when the product exhibits a distinct change
in performance _ this indicates a need for
service.
21) Replacement Parts — When replacement
parts are required, be sure the service
technician has used replacement parts
specified by the manufacturer or have the
same characteristics as the original part.
Unauthorized substitutions may result in fire,
electric shock, or other hazards.
22) Safety Check — Upon completion of any
service or repairs to this product, ask the
service technician to perform safety checks to
determine that the product is in proper
operating condition.
23) Wall or Ceiling Mounting — The
product should be mounted to a wall or ceiling
only as recommended by the manufacturer.
24) Heat — The product should be situated
away from heat sources such as radiators, heat
registers, stoves, or other products (including
amplifiers) that produce heat.
Page 5

5
ENGLISH
For CANADA
Pour le CANADA
AC POWER CORD CONNECTION
CAUTION:
TO PREVENT ELECTRIC SHOCK, MATCH
WIDE BLADE OF PLUG TO WIDE SLOT,
FULLY INSERT.
CORDE DE CONNEXION CA
ATTENTION:
POUR ÉVITER LES CHOCS ÉLECTRIQUES,
INTRODUIRE LA LAME LA PLUS LARGE
DE LA FICHE DANS LA BORNE
CORRESPONDANTE DE LA PRISE ET
POUSSER JUSQU‘AU FOND
.
This equipment has been tested and found
to comply with the limits for a Class B digital
device, pursuant to Part 15 of the FCC
Rules. These limits are designed to provide
reasonable protection against harmful
interference in a residential installation. This
equipment generates, uses, and can radiate
radio frequency energy and, if not installed
and used in accordance with the
instructions, may cause harmful interference
to radio communications. However, there is
no guarantee that interference will not
occur in a particular installation. If this
equipment does cause harmful interference
to radio or television reception, which can
be determined by turning the equipment off
and on, the user is encouraged to try to
correct the interference by one or more of
the following measures:
• Reorient or relocate the equipment
and/or the receiving antenna.
•Increase the separation between the
equipment and receiver.
• Connect the equipment into an outlet on
a circuit different from that to which the
receiver is connected.
• Consult the dealer or an experienced
radio/TV technician for help.
CAUTION
Changes or modifications to this
equipments not expressly approved by TEAC
CORPORATION for compliance will void the
user’s warranty.
For U.S.A.
Page 6

6
Contents
Read this before attempting any
operations.
< As the unit may become warm during
operation, always leave sufficient space
around the unit for ventilation.
<
The voltage supplied to the unit should
match the voltage as printed on the rear
panel. If you are in any doubt regarding
this matter, consult an electrician.
<
Choose the installation location of your
unit carefully. Avoid placing it in direct
sunlight or close to a source of heat. Also
avoid locations subject to vibrations and
excessive dust, heat, cold or moisture.
<
Do not place the unit on an
amplifier/receiver.
< Do not open the cabinet as this might
result in damage to the circuitry or
electrical shock. If a foreign object should
get into the unit, contact your dealer or
service company.
<
When removing the power plug from the
wall outlet, always pull directly on the
plug, never yank the cord.
<
Do not attempt to clean the unit with
chemical solvents as this might damage
the finish. Use a clean, dry cloth.
<
Keep this manual in a safe place for
future reference.
Before Using the Unit
Thank you for choosing TEAC. Read this
manual carefully to get the best
performance from this unit.
Before Using the Unit . . . . . . . . . . . . . . . . 6
Batteries . . . . . . . . . . . . . . . . . . . . . . . . . . 7
Connections . . . . . . . . . . . . . . . . . . . . . . . 8
Unit Functions. . . . . . . . . . . . . . . . . . . . . 10
Display . . . . . . . . . . . . . . . . . . . . . . . . . . 12
Getting Started. . . . . . . . . . . . . . . . . . . . 13
Setting the Clock . . . . . . . . . . . . . . . . . . 14
Basic Operation. . . . . . . . . . . . . . . . . . . . 15
Listening to iPod . . . . . . . . . . . . . . . . . . . 16
Listening to an External Source . . . . . . . . 19
Listening to the Radio . . . . . . . . . . . . . . . 20
Preset Tuning . . . . . . . . . . . . . . . . . . . . . 21
Timer . . . . . . . . . . . . . . . . . . . . . . . . . . . 22
Sleep Timer. . . . . . . . . . . . . . . . . . . . . . . 24
Specifications . . . . . . . . . . . . . . . . . . . . . 24
Troubleshooting . . . . . . . . . . . . . . . . . . . 25
Page 7

ENGLISH
7
Remote Control Unit
The provided Remote Control Unit allows
the unit to be operated from a distance.
When operating the remote control unit,
point it towards the remote sensor on the
front panel of the unit.
<
Even if the remote control unit is
operated within the effective range,
remote control operation may be
impossible if there are any obstacles
between the unit and the remote control.
<
If the remote control unit is operated near
other products which generate infrared
rays, or if other remote control devices
using infrared rays are used near the unit,
it may operate incorrectly. Conversely, the
other products may also operate
incorrectly.
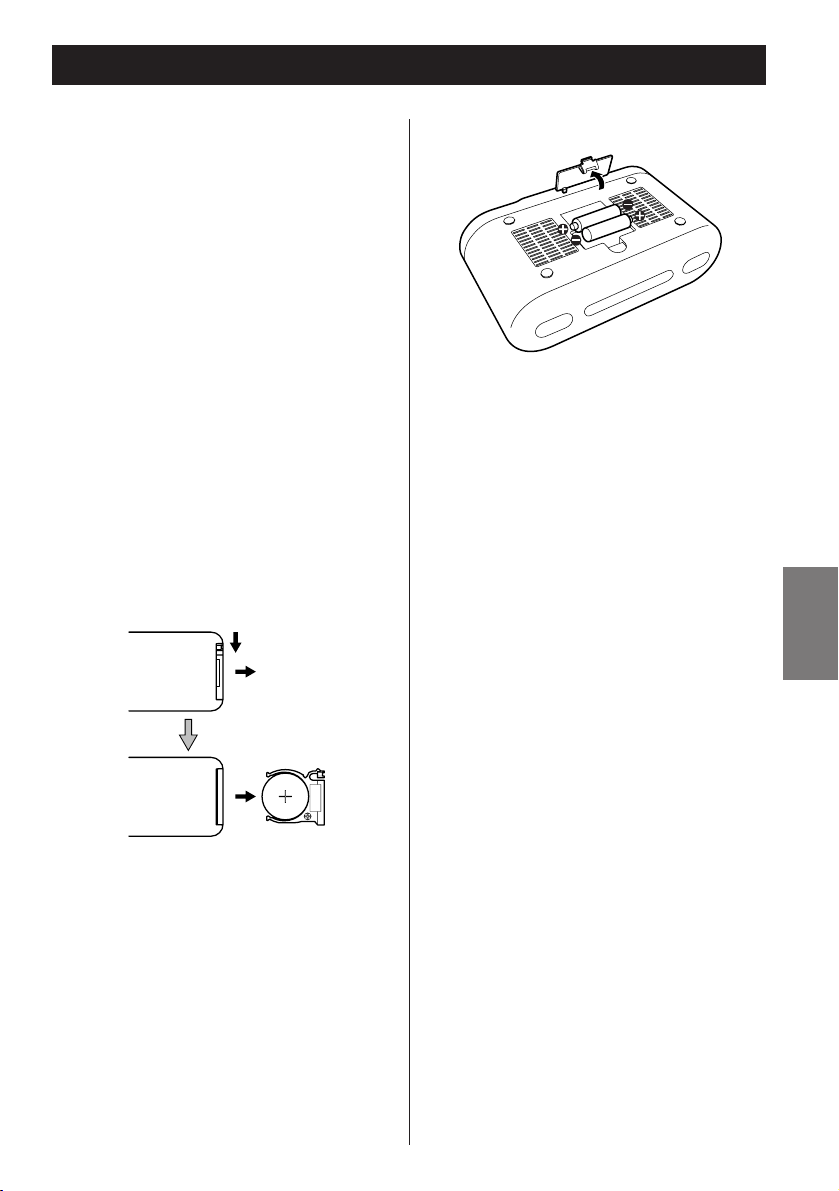
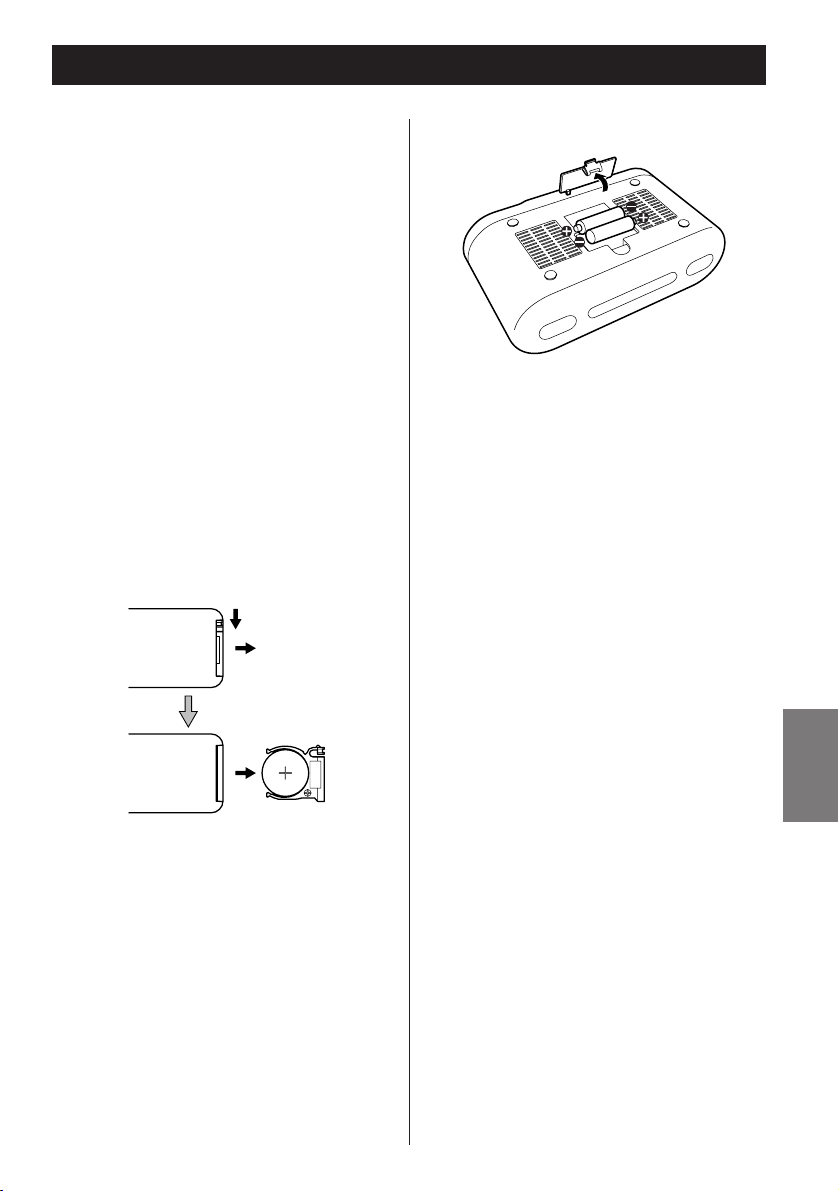
1. Pull out the battery compartment tray.
2. Place the lithium battery (CR2032, 3V) in
the tray.
3. Slide the tray back into the remote
control unit until it clicks.
Battery Replacement
If the distance required between the
remote control unit and main unit
decreases, the battery is exhausted. In this
case, replace the battery with a new one.
Batteries
Battery Installation
Main Unit
(Underside of the unit)
These batteries supply backup power to the
built-in clock when the unit is momentarily
disconnected from the AC power line.
<
If the unit is disconnected from the power
supply and the batteries have been
completely exhausted for about an hour,
clock and timer settings will be lost.
Precautions concerning
batteries
< Be sure to insert the batteries with
correct positive “+
” and negative “_”
polarities.
<
Use batteries of the same type. Never use
different types of batteries together.
<
Rechargeable and non-rechargeable
batteries can be used. Refer to the
precautions on their labels.
<
When the remote control unit is not to
be used for a long time (more than a
month), remove the batteries from the
remote control unit to prevent them
from leaking. If they leak, wipe away the
liquid inside the battery compartment
and replace the batteries with new ones.
<
Do not heat or disassemble batteries and
never dispose of old batteries by
throwing them in a fire.
Page 8

8
Connections
AUX IN
CAUTION:
< Switch off the power before making connections.
<
Read the instructions of each component you intend to use with this unit.
<
Be sure to insert each plug securely. To prevent hum and noise, do not bundle the
connection cords.
AC wall socket
A
BF C
D
E
Recorder, etc.
Page 9

9
ENGLISH
FM ANTENNA
While in FM mode, tune in an FM
station and extend the lead to find the
best position for the reception. This
antenna may need to be repositioned if
you move your unit to a new location.
AUX IN
You can connect a portable audio
player to this jack.
See page 19 for details.
CLOCK ADJ button
Hold down this button for more than 3
seconds to enter clock setting mode.
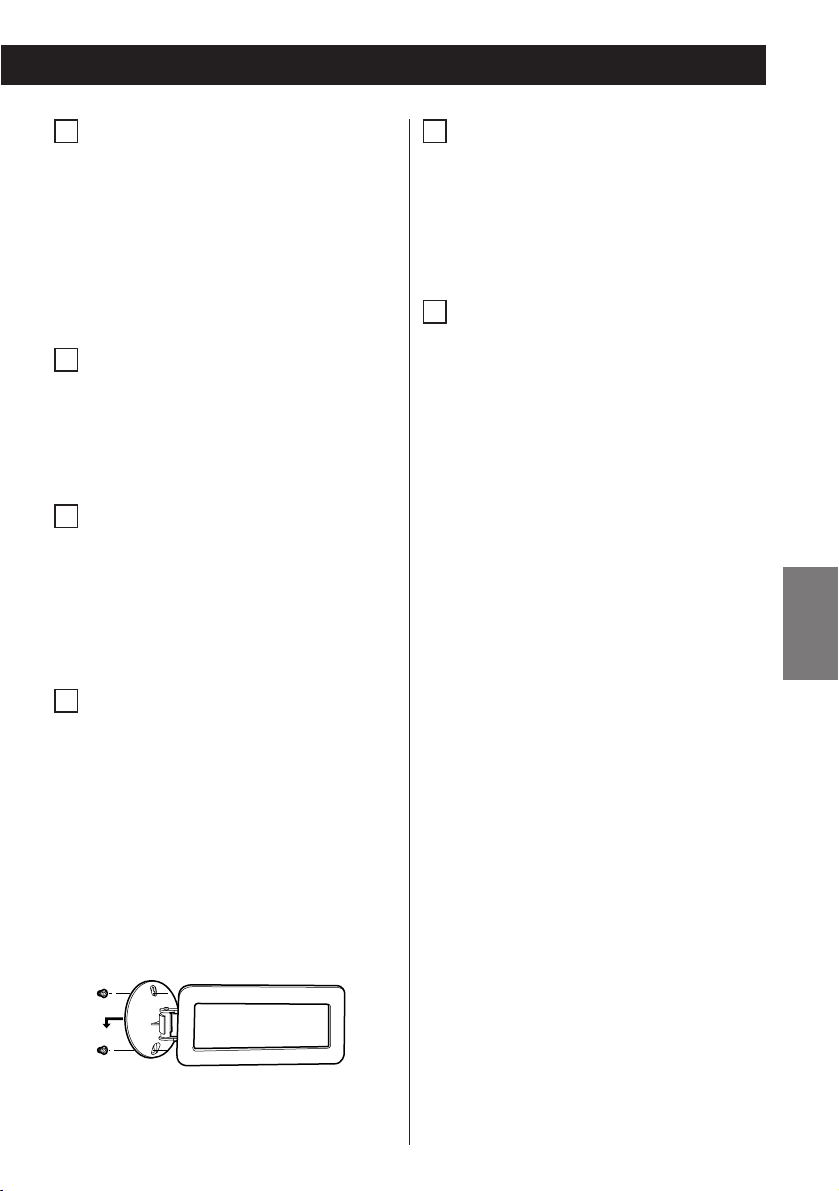
AM ANTENNA
Connect the supplied AM loop antenna
to the AM ANTENNA terminal.
Place the antenna on a shelf or hang it
on a window frame, etc., in the
direction which gives the best
reception.
If you want, you can hook the AM
antenna on a wall as shown below:
AUX OUT
You can connect an amplifier or
recording device through the AUX OUT
jack located at the back of the unit.
E
D
C
B
A
DC IN jack
Connect the provided AC adapter to
this jack. Then connect the AC
adapter’s plug to the AC wall socket.
<
Do not use any AC adapters other than
the one included with this unit to avoid
fire, electric shock, etc. Be sure to
connect the adapter to an AC outlet
that supplies the correct voltage.
F
Page 10

10
Unit Functions
A AC
B J
IE
F
L
M
HD
G
F
Q
P
C
N
J
O
B
K
A
VOLUME
Press these buttons to adjust the volume
level.
Play/Pause (y/J)
Use this button to start or pause
playback of iPod.
iPod/shuffle
Use this button to select iPod or iPod
Shuffle function. When an iPod or iPod
Shuffle is docked, press this button to
start playback.
AUX
Use this button to listen to an external
source connected to the AUX IN jack.
D
C
B
A
Page 11

ENGLISH
11
Dock connector
Before use, insert an appropriate Dock
adapter in the Dock (see page 16).
Insert an iPod mobile digital device into
this dock.
USB Port for iPod Shuffle
Insert your iPod Shuffle into this port.
Press the iPod/shuffle button to select the
iPod Shuffle mode.
MUTING
Use this button to mute the sound.
FM MODE
Pressing this button alternates between
STEREO mode and MONO mode.
PROGRAM
In TUNER mode, use this button to preset
stations.
PRESET
In TUNER mode, use this button to select
a preset station.
Note:
To simplify explanations, instructions in
this manual refer to the names of the
buttons and controls on the front panel
only. Associated controls on the remote
control will also operate similarly.
Q
P
O
N
M
L
WAKE
Press this button to select iPod, radio or
alarm buzzer hi or low to wake to.
STANDBY/ON
Use this button to turn the unit on or
standby.
TUNER (FM/AM)
Use this button to select tuner mode.
In TUNER mode, press this button to
select FM or AM.
ALARM 1/ALARM 2
Use these buttons to turn on or off the
timer or set alarm time.
SNOOZE/DIMMER
When the unit is turned on by the timer,
press this button to turn the unit standby
for 10 minutes. You may repeat this cycle
several times during the 1-hour alarm
cycle. During normal operation, use this
button to dim the display.
SLEEP
Use this button to set sleep timer.
TUNING/SKIP (.//)
In TUNER mode, use these buttons to
tune in stations.
In iPod mode, use these buttons to skip
tracks. Hold down this button to search
for a part of a track.
K
J
I
H
G
The equipment draws a nominal
amount of power from the AC outlet
even in STANDBY.
F
E
Page 12

12
Shows the digital clock, sleep time or preset
channels.
Lights in iPod Shuffle mode.
Lights in iPod mode.
Lights when the sleep function is active.
Lights in preset tuning mode.
Lights when the source is selected for the
timer.
Lights when the alarm time is set.
Shows frequency, volume, date, external
source (AUX), etc.
Lights in FM Stereo mode.
I
H
G
F
E
D
C
B
A
G H I
BA C D E F GF
F
Display
Page 13

ENGLISH
13
Getting Started
The GR-7i comes mounted with an adapter
“60GB (color) + Photo 40/60GB”. To play
your iPod through the GR-7i, you have first
to check if the factory mounted adapter fits
your model of iPod. If it does not, you have
to replace it with a correct one, as explained
below.
1. Remove the adapter from the Dock
of the GR-7i.
Hold the left and right sides of the
adapter and gently pull it up.
2. Choose the Dock adapter that fits
your iPod mobile digital device.
“Video 30GB” for iPod with video (30
GB).
“Video 60GB” for iPod with video (60
GB).
“nano” for iPod nano.
“mini” for iPod mini.
“20GB (color) + Photo 30GB” for iPod
with color display (20GB, 30GB, U2
Special Edition).
“60GB (color) + Photo 40GB/60GB” for
iPod with color display (40GB, 60GB).
“20GB + U2” for iPod with Click Wheel
(20 GB, U2 Special Edition).
“40GB” for iPod with Click Wheel (40
GB).
<
Use a commercially available adapter to
play iPod with dock connector.
Compatible iPod Software
In case your iPod will not work with the GR7i or with the remote control unit, software
update may solve the problem.
Visit the Apple website and download the
latest iPod Software.
http://www.apple.com/ipod/download/
iPod is a trademark of Apple Computer,
Inc., registered in the U.S. and other
countries.
1
2
< When you need to remove the adapter,
hold the left and right sides of the
adapter and gently pull it up.
<
When you don’t use the Dock, use the
supplied cover for the Dock to prevent
dust from settling on the Dock.
3. Insert the adapter into the Dock of
the GR-7i.
Fit the front edge of the adapter into the
Dock, and then press the back edge of
the adapter onto the Dock until a slight
“click” is heard indicating the adapter is
inserted correctly.
Page 14

14
Setting the Clock
Press the TUNING/SKIP buttons
(.
//) to select 12H or 24H, and
then press the CLOCK ADJ button.
2
Press and hold the CLOCK ADJ button
for more than 3 seconds and release
it when the time display starts
blinking.
1
< If you leave the unit idle for about 1
minute, the clock setting mode will be
canceled.
.//
Press the TUNING/SKIP buttons
(.
//) to select Year, and then
press the CLOCK ADJ button.
4
Press the TUNING/SKIP buttons
(.
//) to select Date, and then
press the CLOCK ADJ button.
The clock starts from 00 second.
5
Press the TUNING/SKIP button (.) to
select Hour, and press the TUNING/SKIP
button (/
) to select Minute, then
press the CLOCK ADJ button.
3
< Hold down the TUNING/SKIP button
(.
or / ) to adjust the clock
continuously.
CLOCK ADJ
Page 15

ENGLISH
15
Basic Operation 1
< To listen to an external source connected
to the AUX IN jack, press the AUX
button.
<
If you select “iPod” when no iPod is
docked, the iPod indicator on the display
blinks.
Press the STANDBY/ON button to
turn the unit on.
1
< The unit turns on with the source that
was last selected. If the iPod that is in
playback mode is inserted into the Dock,
the GR-7i will automatically turn on and
start playback of the iPod.
<
You can also use the iPod/shuffle, AUX
or TUNER (FM/AM) button or Play/Pause
button (y
/J) to turn the unit on.
Press the iPod/shuffle, AUX or TUNER
(FM/AM) button to select a source.
2
The volume is adjustable from MIN (00)
to MAX (40). Hold down the VOLUME –
or + button to turn down or up the
volume continuously.
Play the source, and adjust the
volume using the VOLUME buttons
(–/+).
3
132
Page 16

16
<
If you change the volume or source
during the muting, the muting will be
canceled.
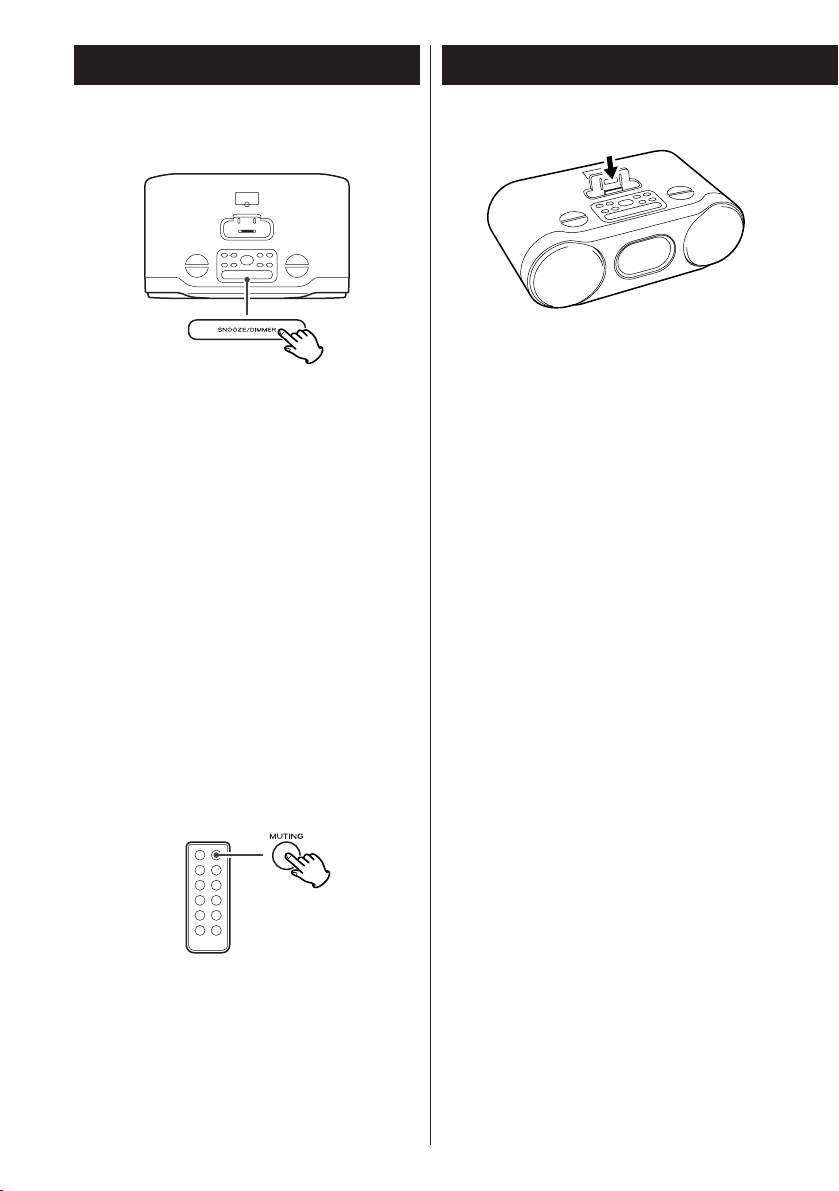
Muting
To mute the sound temporarily, press the
MUTING button. Press the MUTING
button again to restore the sound.
Basic Operation 2
Insert the iPod into the Dock of the GR7i.
Then push the Play/Pause button (y
/J)
on the iPod or the GR-7i. The GR-7i will
automatically turn on and start
playback from the iPod’s music list.
<
Make sure to use an appropriate Dock
adapter (see “Getting Started” on page
13).
<
If you remove the iPod during playback,
the GR-7i automatically turns standby.
< The battery of the iPod is recharged to
the full whenever the iPod is docked and
the GR-7i is connected to the AC power
supply.
<
When headphones are plugged into the
iPod, sound comes from both the
speakers of the GR-7i and the
headphones.
Dimmer
You can dim the front panel’s display by
pressing the SNOOZE/DIMMER button.
<
This function will be canceled when the
STANDBY/ON button is pressed.
< When you set the sleep timer, the display
is dimmed automatically.
Listening to iPod 1
Page 17

ENGLISH
17
Using an iPod Shuffle
Insert your iPod Shuffle into the USB port
and select “iPod Shuffle” using the
iPod/shuffle button.
Then press the Play/Pause button
(y /J ) on the GR-7i. The GR-7i will
automatically turn on and start
playback from the iPod Shuffle’s music
list.
<
If you remove the iPod Shuffle during
playback, the GR-7i automatically turns
standby.
<
The battery of the iPod Shuffle is
recharged to the full whenever the iPod
Shuffle is inserted and the GR-7i is
connected to the AC power supply.
<
When headphones are plugged into the
iPod Shuffle, sound comes from both the
speakers of the GR-7i and the
headphones.
Select “iPod” using the iPod/shuffle
button. If an iPod is already docked,
playback will start.
When no iPod is docked, the iPod
indicator on the display blinks.
< You can also use the Play/Pause button
(y
/J) to select “iPod”.
To select iPod mode
Page 18

18
To skip to the next or a previous
track
C
During playback, repeatedly press the
TUNING/SKIP button (.
or/) until
the desired track is found. The selected
track will be played from the beginning.
<
When the . button is pressed during
playback, the track being played will be
played from the beginning. To return to
the beginning of the previous track, press
the .
button twice.
Search for a part of a track
B
During playback, hold down the
TUNING/SKIP button (.
or /) for
more than 2 seconds and release it when
the part you want to listen to is found.
To suspend playback temporarily
(pause mode)
A
Press the Play/Pause button (G /J )
during playback. Playback stops at the
current position. To resume playback,
press the Play/Pause button (G
/J) again.
A CB
Listening to iPod 2
Page 19

ENGLISH
19
23
Listening to an External Source
Connect the PHONES jack (audio
output jack) of a portable audio
player to the AUX IN jack of the GR-7i
using the supplied stereo mini plug
cable.
1
Play the source, and adjust the
volume of both the GR-7i and the
audio player.
3
Select “AUX” using the AUX button.
2
When using the PHONES jack of your
mini player, you must adjust the volume
of the mini-player or you may hear no
sound from your GR-7i.
<
Turning the volume of the mini player up
too high may cause the sound from your
GR-7i to be distorted. If this is the case,
reduce the volume of the mini player
until the distortion stops and then adjust
the volume level of the GR-7i to a
comfortable listening level.
You can use this way of connection to
listen to an iPod that has no Dock
connector or that has, but an appropriate
Dock adapter is not available.
Page 20

20
Listening to the Radio
Press the TUNER (FM/AM) button.
1
To select FM or AM, press the TUNER
(FM/AM) button again.
2
Select the station you want to listen
to (auto selection).
3
Hold down the TUNING/SKIP button
(.
or/) for more than 2 seconds
and release it when the frequency display
begins to change.
When a station is tuned in, the tuning
process will stop automatically.
<
To stop the auto selection, press the
TUNING/SKIP button.
Selecting stations which cannot be
tuned automatically (manual selection)
When the TUNING/SKIP button
(.
or/) is pressed momentarily the
frequency changes by a fixed step.
Press the TUNING/SKIP button repeatedly
until the station you want to listen to is
found.
If the reception is poor
For the best reception, rotate the FM or
the AM antenna until you get stations
clearly.
321
FM mode
Pressing this button alternates between
STEREO mode and MONO mode.
STEREO
FM stereo broadcasts are received in
stereo and the “ST” indicator will light.
MONO
In weak FM stereo reception areas, select
this mode. Reception will now be forced
to monaural, reducing unwanted noise.
Page 21

ENGLISH
21
Preset Tuning
You can program 10 FM & 10 AM channel
presets.
Tune in a station you want to listen
to (see page 20).
Press the PROGRAM button.
2
1
Within 5 seconds, press the PROGRAM
button.
4
Within 5 seconds, select a preset
channel to store the station using the
PRESET button.
3
How to select a preset station
To select FM or AM, press the TUNER
(FM/AM) button.
1
To store more stations, repeat steps to
.
4
1
Press the PRESET button repeatedly
until the desired preset station is
found.
2
Page 22

22
<
The unit can be programmed to turn on
at a specified time. The unit will turn off
60 minutes after reaching the specified
time.
<
Adjust the clock before setting the timer
(see page 14).
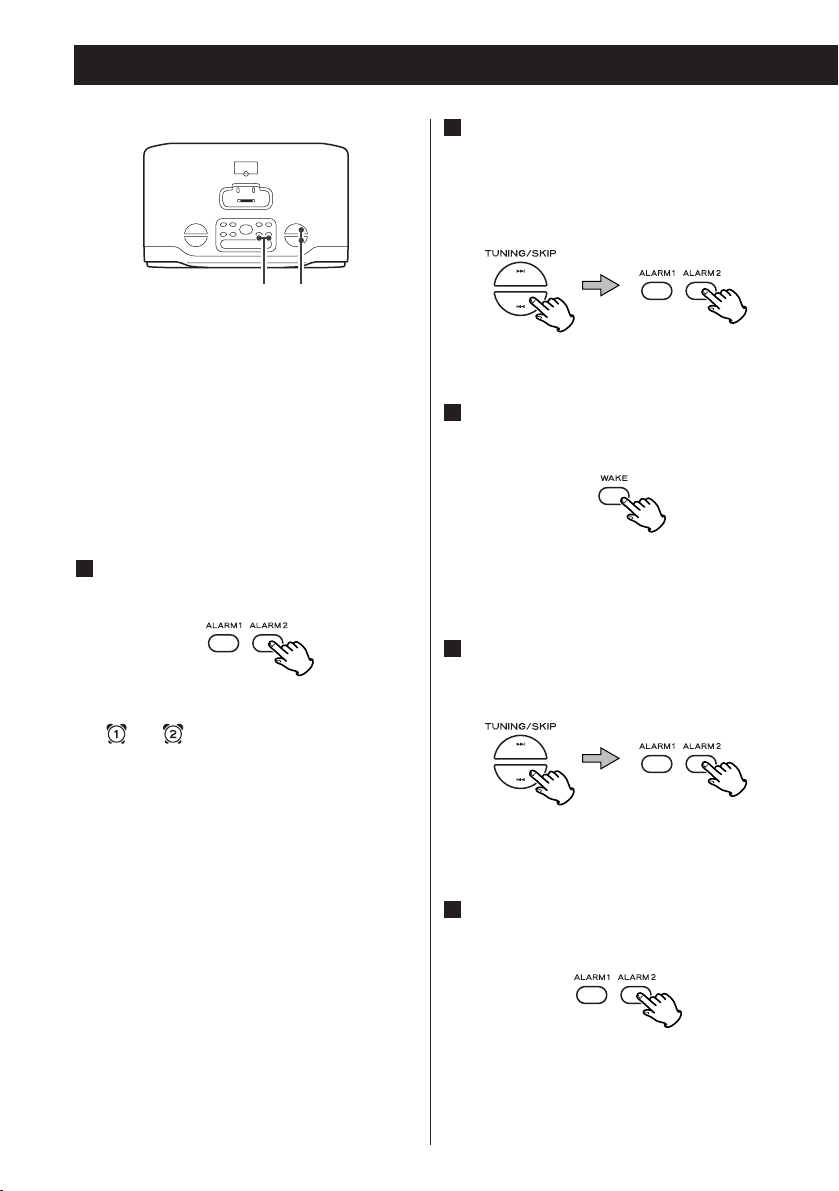
Setting the timer
Press and hold the ALARM button (1
or 2) for more than 3 seconds.
The clock blinks and the ALARM
indicator ( or ) appears on the
display.
<
If no button is pressed for about 1
minute, the timer setting mode will be
canceled.
1
Press the TUNING/SKIP button (.)
to set the start hour, and press the
TUNING/SKIP button (/
) to set the
start minute.
Select a source (iPod or RADIO) using
the WAKE button.
<
You cannot select “AUX”.
Set the volume or select alarm high
or low using the TUNING/SKIP
buttons (.
//).
The volume for timer operation is
adjustable from 10 to 40.
Press the ALARM button (1 or 2) to
enter the timer setting.
Setting the timer is now completed.
5
4
3
2
Timer
.//
ALARM1/ALARM2
Page 23

ENGLISH
23
To turn on the timer
After setting the timer, press the
ALARM button (1 or 2) to turn the
timer on.
The ALARM indicator ( or )
appears on the display.
Prepare the source.
When the source is set to “iPod” in step
on the previous page, insert an iPod.
When the source is set to “RADIO” in
step on the previous page, tune in a
station.
Press the STANDBY/ON button to
turn the unit off (standby).
Don’t forget to turn the unit off
(standby), or the timer won’t work.
<
Playback volume will gradually increase
up to your set volume when the unit is
turned on by timer.
3
3
3
2
1
< If the source is set to “iPod” but no iPod
is set, the unit will turn on into TUNER
mode.
<
When the source is set to “RADIO” and
the unit turns on, it will tune in to the
station you selected last time.
To turn off the timer
When you don’t use the timer, press the
ALARM button (1 or 2) to turn it off.
The ALARM indicator ( or )
disappears from the display.
Press the ALARM button (1 or 2) again to
turn it on.
SNOOZE function
After the unit has been turned on by the
timer, press the SNOOZE/DIMMER
button, and the unit enters STANDBY
mode. After 10 minutes, the unit will
turn on again.
You can use this function repeatedly for
up to 60 minutes.
<
Press the STANDBY/ON button or the
active ALARM button (1 or 2) once to
stop this function.
Note that if you press the ALARM button
twice, the timer is also turned off.
ALARM1/ALARM2STANDBY/ON
Page 24

24
Specifications
TUNER Section
Frequency Range . . . . . . . . . . . . . . . . . .
FM: 87.5 MHz to 108.0 MHz
AM: 520 kHz to 1,710 kHz
SPEAKER SYSTEM Section
Type . . . . . . . . . . . . . . . . . . . 50 mm x 2
Impedance . . . . . . . . . . . . . . . . . 6 ohms
GENERAL
Total Output Power. . . . . . . . 3 W + 3 W
Power Requirement . . . AC 120 V, 60 Hz
Power Consumption . . . . . . . . . . . 25 W
Dimension (W x H x D) . . . . . . . . . . . . . .
265 x 85 x 160 mm
(10 7/16” x 3 3/8” x 6 5/16”)
Weight (Net) . . . . . . . . . . . 1.35 kg (3 lb)
Standard Accessories
Remote Control Unit x 1
AM loop antenna x 1
Dock adapter x 8
(adapter “60GB (color) + Photo
40/60GB” premounted)
Cover for the Dock x 1
Stereo mini plug cable x 1
AC Adapter x 1
Owner’s Manual x 1
Warranty Card x 1
<
Design and specifications are subject to
change without notice.
<
Weight and dimensions are approximate.
<
Illustrations may differ slightly from
production models.
SLEEP 90, 60, 30 or 15:
The power will be switched off 90, 60,
30 or 15 minutes later.
<
When you set the sleep timer, the display
is dimmed automatically.
< If you want to check the remaining time,
press the SLEEP button once. The
remaining time will be displayed for a
few seconds.
You can set a sleep timer so the unit
turns itself off after a specified time.
Press the SLEEP button repeatedly until
the desired time appears on the display.
Sleep Timer
Page 25

ENGLISH
25
Troubleshooting
If you have problems with your system, look
through this chart and see if you can solve
the problem yourself before calling your
dealer or TEAC service center.
General
No power
e
Check the connection to the AC power
supply. Check and make sure the AC
source is not a switched outlet and
that, if it is, the switch is turned on.
Make sure there is power to the AC
outlet by plugging another item such as
a lamp or fan into the outlet.
No sound from speakers.
e
Select the source by pressing the
iPod/shuffle, AUX or TUNER (FM/AM)
button.
e
Adjust the volume.
e
Pull out the headphone’s plug from the
PHONES jack.
e
Check if the sound is muted. If that is the
case, press the MUTING button again.
The sound is noisy.
e
The unit is too close to a TV or similar
appliances. Install the unit apart from
them, or turn them off.
Remote control doesn’t work.
e
Press the STANDBY/ON button to turn
the unit on.
e
If the battery is exhausted, replace it
with a new one.
e
Use remote control unit within the
range (5 m) and point at the remote
sensor on the front panel.
e
Clear obstacles between the remote
control unit and the main unit.
e
If a strong light is near the unit, turn it
off.
iPod Player
Cannot insert the iPod.
e
Check the dock adapter.
e
Remove dust or obstacles from the
Dock connector of the GR-7i and the
iPod, and insert the iPod again.
Will not play.
e
Remove the iPod from the dock, wait a
few seconds, and insert it again.
e
Software update may solve the
problem. Visit the Apple website and
download the latest iPod Software.
Cannot operate the iPod.
e
Set the HOLD switch of the iPod to off.
Tuner
Cannot listen to any station, or signal is
too weak.
e
Tune in the station properly.
e
Rotate the FM or the AM antenna until
you get stations clearly.
If normal operation cannot be resumed,
unplug the power cord from the outlet
and plug it again.
Maintenance
If the surface of the unit gets dirty, wipe
with a soft cloth or use a diluted mild
liquid soap. Be sure to remove any excess
liquid completely. Do not use thinner,
benzine or alcohol as they may damage
the surface of the unit. Allow the surface
of the unit to dry completely before
using.
Page 26

26
Sommaire
Lisez ce qui suit avant toute utilisation.
< Comme l’appareil peut chauffer durant son
fonctionnement, laissez toujours assez
d’espace autour pour la ventilation.
<
La tension fournie à l’appareil doit
correspondre à celle imprimée sur sa face
arrière. En cas de doute dans ce domaine,
consultez un électricien.
<
Choisissez soigneusement le lieu
d’installation de votre appareil. Evitez de
l’exposer directement au soleil ou de le
placer près d’une source de chaleur. Evitez
aussi les emplacements sujets aux vibrations
et à une poussière excessive, à la chaleur,
au froid ou à l’humidité.
<
Ne placez pas l’appareil sur un
amplificateur/récepteur.
<
N’ouvrez pas le boîtier au risque
d’endommager les circuits ou de subir un
choc électrique. Si un objet étranger est
entré dans l’appareil, contactez votre
revendeur ou un service technique.
<
Quand vous débranchez le cordon
d’alimentation de la prise murale, saisissez
toujours la fiche, ne tirez jamais sur le
cordon.
<
N’essayez pas de nettoyer l’appareil avec
des solvants chimiques car cela pourrait
endommager la finition. Utilisez un chiffon
propre et doux.
<
Conservez ce manuel en lieu sûr pour
référence ultérieure
.
Avant d’employer l’appareil
Nous vous remercions pour l’achat d’un
appareil TEAC. Lire ce manuel avec
attention pour obtenir les meilleures
performances possibles de cet appareil.
Avant d’employer l’appareil . . . . . . . . . . 26
Piles . . . . . . . . . . . . . . . . . . . . . . . . . . . . 27
Connexions. . . . . . . . . . . . . . . . . . . . . . . 28
Fonctions de l’appareil . . . . . . . . . . . . . . 30
Affichage . . . . . . . . . . . . . . . . . . . . . . . . 32
Pour commencer. . . . . . . . . . . . . . . . . . . 33
Réglage de l’horloge. . . . . . . . . . . . . . . . 34
Fonctionnement de base. . . . . . . . . . . . . 35
Ecoute de l’iPod . . . . . . . . . . . . . . . . . . . 36
Ecoute d’une source externe. . . . . . . . . . 39
Ecoute de la radio. . . . . . . . . . . . . . . . . . 40
Préréglage de stations. . . . . . . . . . . . . . . 41
Réveil . . . . . . . . . . . . . . . . . . . . . . . . . . . 42
Minuterie d’extinction. . . . . . . . . . . . . . . 44
Caractéristiques . . . . . . . . . . . . . . . . . . . 44
Guide de dépannage . . . . . . . . . . . . . . . 45
ATTENTION
<
N’exposez pas l’appareil à des
éclaboussures ou à des gouttes d’eau.
<
Ne posez pas d’objet contenant du
liquide, tel qu’un vase, sur l’appareil.
<
N’installez pas cet appareil dans un
espace confiné, dépourvu de ventilation,
comme par exemple une bibliothèque
ou similaire.
<
L’appareil tire un courant nominal de
veille de la prise secteur, avec son
interrupteur STANDBY/ON en position
STANDBY.
<
L’appareil doit être placé suffisamment
près de la prise secteur pour que vous
puissiez à tout moment saisir la fiche du
cordon d’alimentation.
<
Un appareil de classe ! doit être
connecté à une prise secteur via une
fiche avec mise à la terre.
Page 27
27
FRANÇAIS
Télécommande
La télécommande fournie permet de
contrôler l’appareil à distance.
Quand vous utilisez la télécommande,
pointez-la vers le capteur situé en face avant
de l’appareil.
<
Même si la télécommande est employée
dans la zone de portée efficace, son
utilisation peut être impossible s’il y a des
obstacles entre elle et l’appareil.
<
Si la télécommande est employée près
d’autres produits émetteurs de rayons
infrarouges, ou si d’autres
télécommandes à infrarouges sont
employées près de l’appareil, le
fonctionnement peut être incorrect. De
même, les autres produits peuvent du
coup aussi mal fonctionner.
1. Tirez le plateau du compartiment de la
pile vers l’extérieur.
2. Mettez en place la pile au lithium
(CR2032, 3V) dans le plateau.
3. Remettez le plateau dans la
télécommande en le faisant coulisser
jusqu’au déclic.
Remplacement de la pile
Si la portée de la télécommande vis-à-vis de
l’appareil diminue, la pile est déchargée.
Dans ce cas, remplacez-la par une neuve.
Piles
Installation de la pile
Unité principale
(Dessous de l’appareil)
Ces piles alimentent l’horloge intégrée
quand l’appareil est momentanément
débranché d’une source CA.
<
Si l’appareil est débranché de l’alimention
secteur, et si ses piles sont complètement
usées, pendant environ une heure, tous
les réglages mémorisés (stations
préréglées, réglages de l’horloge et du
réveil et autres) seront perdus.
Précautions concernant les
piles
< Bien placer les piles en respectant les
polarités plus “+
” et moins “_”.
<
Utiliser des piles du même type. Ne jamais
essayer d’utiliser des types de pile
différents ensemble.
<
Des piles ou des batteries peuvent être
utilisées. Se référer à leurs étiquettes pour
les précautions à respecter.
<
Si le boîtier de télécommande n’est pas
utilisé pendant une longue période (pluss
d’un mois), retirer les piles du boîtier de
télécommande pour éviter des fuites de
pile. Si elles coulent, essuyer le liquide
dans le compartiment des piles et
remplacer les piles par des neuves.
<
Ne pas chauffer, démonter les piles ni les
mettre au feu.
Page 28

28
Connexions
ATTENTION:
<
Eteignez l’appareil avant de faire des connexions.
<
Lisez les instructions concernant chaque élément que vous voulez employer avec
cet appareil.
<
Veillez à bien insérer chaque fiche de connexion. Pour prévenir les ronflements et
bruits, ne regroupez pas les cordons de connexion.
AUX IN
Prise secteur
A
BF C
D
E
Appareil
enregistreur
ou autre
Page 29
29
FRANÇAIS
ANTENNE FM
En mode FM, réglez-vous sur la station
FM et étendez le fil d’antenne pour
trouver la meilleure position de
réception. Cette antenne peut devoir
être repositionnée si vous déplacez
votre appareil.
AUX IN (entrée auxiliaire)
Vous pouvez brancher à cette prise un
lecteur audio portable.
Voir page 39 pour des détails.
CLOCK ADJ (réglage de
l’horloge)
Maintenez cette touche enfoncé plus
de 3 secondes pour passer en mode de
réglage d’horloge.
ANTENNE AM
Branchez l’antenne cadre AM fournie à
la prise AM ANTENNA.
Placez l’antenne sur une étagère ou
accrochez-la au cadre d’une fenêtre
etc., dans la direction donnant la
meilleure réception.
Si vous le désirez, vous pouvez fixer
l’antenne AM au mur comme
représenté ci-dessous:
D
C
B
A
AUX OUT
Vous pouvez connecter un
amplificateur ou un appareil
enregistreur à la prise AUX OUT se
trouvant au dos de l’appareil.
Prise DC IN
Branchez l’adaptateur secteur fourni à
cette prise. Puis branchez la fiche de
l’adaptateur secteur dans une prise
secteur.
<
N’utilisez pas d’autre adaptateur
secteur que celui fourni avec cet
appareil pour éviter le risque d’incendie,
de choc électrique, etc. Veillez à
brancher l’adaptateur secteur à une
prise secteur fournissant la tension
correcte.
F
E
Page 30
30
VOLUME
Utilisez ces touches tpour régler le niveau
de volume.
Lecture/Pause (y/J)
Utilisez cette touche pour lancer ou
mettre en pause la lecture de l’iPod.
iPod/shuffle
Utilisez cette touche pour sélectionner la
fonction iPod ou iPod Shuffle. Quand un
iPod ou iPod Shuffle est dans le dock,
appuyez sur cette touche pour démarrer
la lecture.
AUX
Utilisez cette touche pour écouter une
source externe connectée à la prise AUX
IN.
D
C
B
A
Fonctions de l’appareil
A AC
B J
IE
F
L
M
HD
G
F
Q
P
C
N
J
O
B
K
A
Page 31

31
FRANÇAIS
WAKE
Appuyez sur cette touche pour
sélectionner l’iPod, le tuner ou le vibreur
d’alarme fort ou faible à utiliser pour le
réveil.
STANDBY/ON
Utilisez cette touche pour allumer
l’appareil ou le mettre en veille (standby).
TUNER (FM/AM)
Utilisez cette touche pour sélectionner le
mode tuner.
ALARM 1/ALARM 2
Utilisez ces touches pour activer ou
désactiver le réveil ou pour régler l’heure
d’alarme.
SNOOZE/DIMMER
Quand l’appareil est mis sous tension par
le réveil, appuyez sur cette touche pour
mettre l’appareil en veille pendant 10
minutes. Vous pouvez répéter cette mise
en veille plusieurs fois pendant le cycle
d’alarme; qui dure 1 heure. Pendant le
fonctionnement normal, utilisez cette
touche pour atténuer l’affichage.
SLEEP
Utilisez cette touche pour régler la
minuterie d’extinction.
TUNING/SKIP (.//)
En mode TUNER, utilisez ces touches
pour changer les stations.
En mode iPod, utilisez ces touches pour
changer de plage (piste). Maintenez cette
touche enfoncé pour rechercher une
partie dans une plage.
K
J
I
H
G
Le matériel tire un courant minimal de la
prise secteur même quand il est en
mode STANDBY.
F
E
Connecteur du dock
Avant utilisation, insérez un adaptateur
de dock approprié dans le dock (voir
page 36).
Insérez un dispositif numérique mobile
iPod dans ce dock.
Port USB pour iPod Shuffle
Insérez votre iPod Shuffle dans ce port.
Appuyez sur la touche iPod/shuffle pour
sélectionner le mode iPod Shuffle.
MUTING (Neutralisation)
Utilisez cette touche pour couper le son.
FM MODE
La pression sur cette touche fait
commuter l’appareil entre le mode
STEREO et le mode MONO.
PROGRAM (Programme)
En mode TUNER, utilisez cette touche
pour prérégler (mémoriser) des stations.
PRESET
En mode TUNER, utilisez cette touche
pour sélectionner une station préréglée.
Note:
Pour simplifier les explications, les
instructions de ce manuel ne se réfèrent
qu’aux noms des touches et commandes
de la face avant. Les commandes
associées sur la télécommande
fonctionneront de façon similaire.
Q
P
O
N
M
L
Page 32

32
G H I
BA C D E F GF
F
Affichage
Présente l’horloge numérique, le temps
avant extinction ou les canaux préréglés.
S’allume en mode iPod Shuffle.
S’allume en mode iPod.
S’allume en mode de syntonisation
préréglée.
S’allume quand le réveil est activé.
S’allume quand la source est sélectionnée
pour le réveil.
S’allume quand l’heure d’alarme est réglée.
Présente la fréquence, le volume, la date, la
source externe (AUX), etc.
S’allume en mode FM Stéréo.
I
H
G
F
E
D
C
B
A
Page 33

33
FRANÇAIS
Pour commencer
Le GR-7i est fourni avec un adaptateur
“60GB (color) + Photo 40/60GB” monté en
usine. Pour écouter des morceaux de votre
iPod sur le GR-7i, il vous faut tout d’abord
vérifier si l’adaptateur prémonté est
approprié pour votre modèle d’iPod. S’il ne
l’est pas, il faut le remplacer avec un
adaptateur approprié, comme expliqué cidessous.
1. Retirez le cache de dock du GR-7i.
Maintenez les bords gauche et droit de
l’adaptateur et tirez-le délicatement vers
le haut.
2. Choisissez l’adaptateur de dock qui
convient à votre dispositif numérique
mobile iPod.
“Video 30GB” pour un iPod avec vidéo
(30 Go).
“Video 60GB” pour un iPod avec vidéo
(60 Go).
“nano” pour un iPod nano.
“mini” pour un iPod mini.
“20GB (color) + Photo 30GB” pour iPod
avec écran couleur (20 Go, 30 Go,
édition spéciale U2).
“60GB (color) + Photo 40GB/60GB” pour
un iPod avec écran couleur (40 Go, 60
Go).
“20GB + U2” pour un iPod à molette
sensitive Click Wheel (20 Go, édition
spéciale U2).
“40GB” pour un iPod à molette sensitive
Click Whee (40 Go).
<
Utiliser un adaptateur disponible dans le
commerce pour écouter des morceaux de
votre iPod muni d’un dock sur le GR-7i.
Logiciel iPod compatible
Au cas où votre iPod ne fonctionnerait pas
avec le GR-7i ou sa télécommande, une
mise à jour du logiciel peut résoudre le
problème.
Visitez le site web Apple et téléchargez le
dernier logiciel pour iPod.
http://www.apple.com/fr/ipod/download/
ou
http://www.apple.com/ipod/download/
iPod est une marque commerciale d’Apple
Computer, Inc., enregistrée aux U.S.A. et
dans d’autres pays.
1
2
< Si vous devez retirer l’adaptateur,
maintenez ses bords gauche et droit et
tirez-le délicatement vers le haut.
<
Quand vous n’utilisez pas le dock, placez
le cache de dock fourni afin d’éviter que
la poussière n’y pénètre.
3. Insérez l’adaptateur dans le dock du
GR-7i.
Faites entrer le bord avant de
l’adaptateur dans le dock puis appuyez
sur le bord arrière de l’adaptateur pour
l’enfoncer dans le dock jusqu’à ce qu’un
léger “clic” se fasse entendre, indiquant
que l’adaptateur est correctement inséré.
Page 34

34
Réglage de l’horloge
Appuyez sur les touches
TUNING/SKIP (.
//) pour
sélectionner 12H ou 24H, puis
appuyez sur la touche CLOCK ADJ.
2
Maintenez enfoncé la touche CLOCK
ADJ durant plus de 3 secondes et
relâchez-le quand l’affichage de
l’heure commence à clignoter.
1
< Si vous ne touchez plus à l’appareil
durant environ 1 minute, le mode de
réglage d’horloge est abandonné.
.//
Appuyez sur la touche TUNING/SKIP
(.
) pour sélectionner l’heure, puis
appuyez sur la touche TUNING/SKIP
(/
) pour sélectionner les minutes,
et ensuite appuyez sur la touche
CLOCK ADJ.
3
Appuyez sur les touches
TUNING/SKIP (.
//) pour
sélectionner la date, puis appuyez sur
la touche CLOCK ADJ.
L’horloge démarre à 00 secondes.
5
< Maintenir la touche TUNING/SKIP (.
ou /) pour régler l’heure de façon
continue.
Appuyez sur les touches TUNING/
SKIP (.
// ) pour sélectionner
l’année, puis appuyez sur la touche
CLOCK ADJ.
4
CLOCK ADJ
Page 35

35
FRANÇAIS
< Pour écouter une source externe
connectée à la prise AUX IN, appuyez sur
la touche AUX.
<
Si vous sélectionnez “iPod” alors
qu’aucun iPod n’est sur le dock, la
touche iPod et l’indicateur iPod de
l’afficheur clignotent.
Appuyez sur la touche STANDBY/ ON
pour allumer l’appareil.
1
< L’appareil s’allume avec la dernière
source sélectionnée. Si l’iPod qui est en la
mode lecture est inséré dans le Dock, le
GR-7i se mettra automatiquement sous
tension et entamera la lecture de l’Pod.
<
Vous pouvez aussi utiliser la touche
iPod/shuffle, AUX ou TUNER (FM/AM) ou
la touche Lecture/Pause (y
/J ) pour
allumer l’appareil.
Appuyez sur la touche iPod/shuffle,
AUX ou TUNER (FM/AM) pour
sélectionner une source.
2
Le volume se règle de MIN (00) à MAX
(40). Maintenir la touche VOLUME – ou +
pour réduire ou augmenter le volume de
façon continue.
Faites jouer la source et réglez le
volume avec les touches VOLUME
(–/+).
3
Fonctionnement de base 1
132
Page 36
36
Fonctionnement de base 2
< Si vous changez le volume ou la source
alors que le son est coupé, la coupure est
annulée.
Neutralisation (MUTING)
Pour couper temporairement le son,
appuyez sur la touche MUTING. Appuyer
à nouveau sur la touche MUTING
restaure le son.
Insérez l’iPod dans le dock du GR-7i.
Ensuite appuyez sur la touche
Lecture/Pause (y
/J) de l’iPod ou du
GR-7i. Le GR-7i se mettra
automatiquement sous tension et
entamera la lecture des morceaux dans
la liste de l’iPod.
<
Veillez à employer l’adaptateur de dock
approprié (voir “Pour commencer” en
page 33).
<
Si vous retirez l’iPod durant la lecture, le
GR-7i passe automatiquement en veille
(standby).
<
La batterie de l’iPod est rechargée au
maximum quand l’iPod est mis sur le
dock et que le GR-7i est connecté au
secteur.
<
Quand des écouteurs sont branchés à
l’iPod, le son vient à la fois des hautparleurs du GR-7i et des écouteurs.
Ecoute de l’iPod 1
Dimmer (atténuateur)
Vous pouvez atténuer l’affichage de la
face avant en appuyant sur la touche
SNOOZE/DIMMER.
<
Cette fonction sera annulée si l’on
appuie sur la touche STANDBY/ON.
< Quand vous réglez la minuterie
d’extinction, l’affichage est
automatiquement atténué.
Page 37

37
FRANÇAIS
Utilisation d’un iPod Shuffle
Insérez votre iPod Shuffle dans le port USB
puis sélectionnez "iPod Shuffle" avec la
touche iPod/shuffle.
Ensuite appuyez sur la touche
Lecture/Pause (y
/J) du GR-7i. Le GR-7i
se mettra automatiquement sous
tension et commencera la lecture des
morceaux se trouvant dans la liste de
l’iPod Shuffle.
<
Si vous enlevez l’iPod Shuffle pendant la
lecture, le GR-7i passe automatiquement
en veille.
<
La batterie de l’iPod Shuffle est rechargée
au maximum quand l’iPod Shuffle est
inséré et que le GR-7i est branché au
secteur.
<
Quand des écouteurs sont branchés à
l’iPod Shuffle, le son est audible à la fois
par les haut-parleurs du GR-7i et par les
écouteurs.
Sélectionner le mode iPod
Sélectionnez “iPod” avec la touche
iPod/shuffle. Si un iPod se trouve déjà sur
le dock, la lecture commencera.
S’il n’y a pas d’iPod sur le dock,
l’indicateur iPod de l’afficheur clignotent.
<
Vous pouvez aussi employer la touche
Lecture/Pause (y
/J) pour sélectionner
“iPod”.
Page 38

38
Appuyez sur la touche Lecture/Pause
(G
/J ) durant la lecture. La lecture
s’arrête sur la position actuelle. Pour la
reprendre, appuyez à nouveau sur la
touche Lecture/Pause (G
/J).
Ecoute de l’iPod 2
Suspendre temporairement la lecture
(mode pause)
A
A CB
Sauter à la plage suivante ou
précédente
C
Durant la lecture, appuyez répétitivement
sur la touche TUNING/SKIP (.
ou
/
) jusqu’à obtention de la plage
désirée. La plage sélectionnée sera lue
depuis son début.
<
Quand on appuie sur la touche .
durant la lecture, la plage lue reprend à
son début. Pour revenir au début de la
plage précédente, appuyez deux fois sur
la touche .
.
Rechercher une partie dans une plage
B
Durant la lecture, maintenez enfoncé la
touche TUNING/SKIP (.
ou / )
durant plus de 2 secondes et relâchez-le
quand la partie que vous voulez écouter
est atteinte.
Page 39

39
FRANÇAIS
Reliez la prise PHONES (prise de
sortie audio) d’un lecteur audio
portable à la prise d’entrée auxiliaire
AUX IN du GR-7i à l’aide du câble à
mini-fiche stéréo fourni.
1
Mettez la source en lecture et réglez
le volume sonore de l’GR-7i et du
lecteur audio.
3
Sélectionnez “AUX” avec la touche
AUX.
2
Si vous utilisez la prise pour écouteurs
(PHONES) de votre mini-lecteur, vous
devez régler son volume ou vous
n’entendrez pas de son sur le GR-7i.
<
Trop monter le volume du mini-lecteur
peut entraîner de la distorsion dans votre
GR-7i. Si c’est le cas, réduisez le volume
du mini-lecteur jusqu’à disparition de la
distorsion puis réglez le niveau de volume
du GR-7i pour une écoute confortable.
Vous pouvez employer cette méthode de
connexion pour écouter un iPod sans
connecteur pour dock ou dont
l’adaptateur pour dock n’est pas
disponible.
Ecoute d’une source externe
23
Page 40

40
Maintenez enfoncé la touche
TUNING/SKIP (.
ou/) durant plus
de 2 secondes et relâchez-le quand
l’affichage de fréquence commence à
changer.
Quand une station est trouvée, le
processus de syntonisation s’arrête
automatiquement.
<
Pour stopper la recherche automatique,
appuyez sur la touche TUNING/SKIP.
Ecoute de la radio
Syntonisation de stations qui ne
peuvent pas être trouvées
automatiquement (recherche manuelle)
Quand on appuie momentanément sur la
touche TUNING/SKIP (.
or/), la
fréquence change par paliers fixes.
Appuyez répétitivement sur la touche
TUNING/SKIP jusqu’à ce que la station
que vous voulez écouter soit trouvée.
Si la réception est faible
Pour la meilleure réception, tournez
l’antenne FM ou l’antenne AM jusqu’à ce
que vous receviez clairement les stations.
Appuyez sur la touche TUNER
(FM/AM).
1
Pour sélectionner FM ou AM, appuyez
de nouveau sur la touche TUNER
(FM/AM).
2
Sélectionnez la station que vous
voulez écouter (recherche
automatique).
3
321
Touche FM MODE
La pression sur cette touche fait
commuter l’appareil entre le mode
STEREO et le mode MONO.
STEREO
Les émissions FM diffusées en stéréo sont
captées en stéréo et l’indicateur “ST”
s’allume.
MONO
Dans les zones où la réception stéréo est
faible, sélectionnez ce mode.
La réception s’effectue alors en mode
monaural, réduisant le bruit indésirable.
Page 41

41
FRANÇAIS
Préréglage de stations
Vous pouvez prérégler (“programmer”) 10
stations FM et 10 stations AM.
Réglez l’appareil sur une station que
vous voulez écouter (voir les étapes
pour cela en page 40).
Appuyez sur la touche PROGRAM.
2
1
Dans les 5 secondes, appuyez sur la
touche PROGRAM.
4
Dans les 5 secondes, sélectionnez
avec la touche PRESET une mémoire
(“preset”) où conserver la station.
3
Comment rappeler des
stations préréglées
Pour sélectionner FM ou AM,
appuyez sur la touche TUNER
(FM/AM).
1
Pour mémoriser d’autres stations, répétez
les étapes à .
41
Appuyez répétitivement sur la
touche PRESET jusqu’à obtention de
la station préréglée (preset) voulue.
2
Page 42
42
<
L’appareil peut être programmé pour
s’allumer à une heure donnée. Il
s’éteindra 60 minutes après cette heure.
<
Réglez l’horloge avant de régler le réveil
(voir page 34).
Réglage du réveil
Maitenez enfoncé la touche ALARM
(1 ou 2) durant plus de 3 secondes.
L’horloge clignote et le témoin ALARM
( ou ) apparaît sur l’affichage.
< Si aucun touche n’est employé durant
environ 1 minute, le mode de réglage de
réveil est abandonné.
1
Appuyez sur la touche TUNING/SKIP
(.
) pour spécifier l’heure, puis
appuyez sur la touche TUNING/SKIP
(/
) pour spécifier les minutes du
réveil.
Sélectionnez une source (iPod ou
RADIO) avec la touche WAKE.
<
Vous ne pouvez pas sélectionner “AUX”.
Réglez le volume ou sélectionnez
l’alarme forte ou faible avec les
touches TUNING/SKIP (.
//).
Le volume du réveil se règle de 10 à 40.
Appuyez sur la touche ALARM (1 ou
2) pour entrer le réglage du réveil.
Le réglage du réveil est maintenant
terminé.
5
4
3
2
Réveil
.//
ALARM1/ALARM2
Page 43

43
FRANÇAIS
Pour activer le réveil
Après avoir réglé le réveil, appuyer
sur la touche ALARM (1 ou 2) pour
l’activer.
Le témoin ALARM ( ou ) apparaît
dans l’afficheur.
Préparez la source.
Quand la source est réglée sur "iPod" à
l’étape de la page précédente, mettez
un iPod en place.
Quand la source est réglée sur "RADIO"
à l’étape de la page précédente,
accordez sur une station.
Appuyez sur la touche STANDBY/ON
pour éteindre l’appareil (veille ou
standby).
N’oubliez pas d’éteindre l’appareil
(veille ou standby), sinon le réveil ne
fonctionnera pas.
<
Lors de l’allumage par le réveil, le volume
de lecture monte progressivement
jusqu’au niveau de volume que vous avez
réglé.
3
3
3
2
1
< Si la source est réglée sur “iPod” alors
qu’il n’y a pas d’iPod, l’appareil passe en
mode TUNER.
<
Si la source est réglée sur “RADIO”, à
l’allumage de l’appareil, ce dernier se
place sur la dernière station sélectionnée.
Pour couper le réveil
Si vous n’utilisez pas le réveil, appuyez
sur la touche ALARM (1 ou 2) ON pour le
couper.
Le témoin ALARM ( ou ) disparaît
de l’afficheur.
Appuyez à nouveau sur la touche ALARM
(1 ou 2) pour réactiver le réveil.
SNOOZE (Sommeil)
Une fois que l’appareil a été mis sous
tension par le réveil, vous pouvez
appuyer sur la touche SNOOZE/DIMMER;
l’appareil passe alors au mode STANDBY.
Au bout de 10 minutes, l’appareil est
remis sous tension.
Vous pouvez employer plusieurs fois
cette fonction durant 60 minutes.
<
Appuyez sur la touche STANDBY/ON ou
sur la touche ALARM active (1 ou 2) pour
arrêter cette fonction.
Notez que si vous appuyez deux fois sur
la touche ALARM pour arrêter ce report,
le réveil est désactivé.
ALARM1/ALARM2STANDBY/ON
Page 44

44
Caractéristiques
Section SYNTONISEUR
Plage de fréquences
FM: 87,50 MHz à 108,00 MHz
AM: 520 kHz à 1.710 kHz
Section SYSTEME DE HAUT-PARLEURS
Type . . . . . . . . . . . . . . . . . . . 50 mm x 2
Impédance . . . . . . . . . . . . . . . . . 6 ohms
GENERALES
Puissance totale de sortie . . . 3 W + 3 W
Puissance requise . . . . . . 120 Vca, 60 Hz
Consommation électrique . . . . . . . 25 W
Dimensions (L x H x P)
265 x 85 x 160 mm
Poids (net) . . . . . . . . . . . . . . . . . . 1,8 kg
Accessoires fournis
Télécommand
x 1
Antenne cadre AM x 1
Adaptateur pour dock x 8
(adaptateur “60GB (color) + Photo
40/60GB” prémonté)
Cache pour dock x 1
Câble stéréo à mini-connecteur x 1
Adaptateur CA x 1
Manuel du propriétaire x 1
Carte de garantie x 1
< La conception et les spécifications sont
sujettes à modification sans préavis.
<
Le poids et les dimensions sont
approximatifs.
<
Les illustrations peuvent être légèrement
différentes des modèles fabriqués.
Minuterie d’extinction
SLEEP 90, 60, 30 ou 15:
L’alimentation sera coupée 90, 60, 30 ou
15 minutes plus tard.
< Quand vous réglez la minuterie
d’extinction, l’affichage est
automatiquement atténué.
<
Pour contrôler le temps restant, appuyez
une fois sur la touche SLEEP. Le temps
restant sera affiché durant quelques
secondes.
Vous pouvez régler une minuterie
d’extinction pour que l’appareil s’éteigne
tout seul après un temps donné.
Appuyez répétitivement sur la touche
SLEEP jusqu’à ce que la durée voulue
s’affiche.
Page 45

FRANÇAIS
Si vous avez des problèmes avec votre
système, lisez ce qui suit et voyez si vous
pouvez résoudre le problème vous-même
avant d’appeler votre revendeur ou le centre
technique TEAC.
Généralités
Pas d’alimentation.
e
Vérifiez la connexion au secteur.
Contrôlez et assurez-vous que la prise
secteur n’a pas d’interrupteur ou, si elle
en a un, qu’elle est en service. Vérifiez
qu’il y a du courant dans la prise en y
branchant un autre appareil comme
une lampe ou un ventilateur.
Pas de son dans les haut-parleurs.
e
Sélectionnez la source en appuyant sur
la touche iPod/shuffle, AUX ou TUNER
(FM/AM).
e
Réglez le volume.
e
Retirez la fiche du casque de la prise
CASQUE.
e
Contrôlez si le son est coupé. Le cas
échéant, appuyez de nouveau sur la
touche MUTING.
Le son est parasité.
e
L’appareil est trop près d’un téléviseur
ou d’un dispositif similaire. Installez-le
plus loin, ou éteignez ces autres
appareils.
La télécommande ne fonctionne pas.
e
Appuyez sur la touche STANDBY/ON
pour mettre l’appareil sous tension.
e
Si la pile est épuisée, remplacez-la par
une neuve.
e
Utilisez la télécommande dans le rayon
prévu (5 m) et pointez-la vers le capteur
de la face avant.
e
Eliminez les obstacles entre la
télécommande et l’unité principale.
e
Si une lumière forte se trouve près de
l’appareil, éteignez-la.
Guide de dépannage
Lecteur iPod
Impossible d’insérer l’iPod.
e
Vérifiez l’adaptateur de dock.
e
Retirez la poussière ou les obstacles du
connecteur de dock du GR-7i et de
l’iPod, et réinsérez l’iPod.
Pas de lecture.
e
Retirez l’iPod du dock, attendez
quelques secondes, et réinsérez-le.
e
Une mise à jour du logiciel peut
résoudre le problème. Visitez le site
web Apple et téléchargez le dernier
logiciel pour iPod.
L’iPod ne répond à aucune commande.
e
Relâchez le commutateur HOLD sur
l’iPod.
Syntoniseur
Aucune station ne peut être entendue,
ou le signal est trop faible.
e
Réglez correctement l’appareil sur la
station.
e
Pour la meilleure réception, tournez
l’antenne FM ou l’antenne AM jusqu’à
ce que vous receviez clairement les
stations.
Si un fonctionnement normal ne peut
pas être obtenu, débranchez le cordon
d’alimentation de la prise secteur et
rebranchez-le.
Maintenance
Si la surface de l’appareil est sale,
essuyez-la avec un chiffon doux ou
utilisez un détergent liquide léger dilué.
Veillez à totalement enlever tout liquide
excédentaire. N’utilisez pas de diluant, de
benzine ou d’alcool car cela peut
endommager la surface de l’appareil.
Laissez totalement sécher la surface de
l’appareil avant utilisation.
45
Page 46

46
Índice
Léase antes de realizar ninguna operación.
<
La unidad puede calentarse durante su
funcionamiento, por lo que habrá que dejar
espacio suficiente alrededor para su
ventilación.
<
La tensión suministrada a la unidad deberá
coincidir con el valor indicado en el panel
posterior. En caso de duda, consulte a un
electricista.
<
Elija cuidadosamente el emplazamiento de
la unidad. No coloque la unidad a la luz
solar directa ni cerca de fuentes de calor.
Evite también los lugares expuestos a
vibraciones o a un exceso de suciedad, frío,
calor o humedad.
<
No coloque la unidad encima de un
amplificador/receptor.
<
No abra la carcasa de la unidad, ya que
podrían dañarse los circuitos o producirse
descargas eléctricas. Si entra algún cuerpo
extraño en la unidad, póngase en contacto
con su distribuidor o empresa de servicios.
<
Cuando desconecte el cable de la toma
mural, sostenga únicamente el conector y
nunca el propio cable.
<
No intente limpiar la unidad con disolventes
químicos, ya que podrían dañar el acabado.
Utilice un paño limpio y seco.
<
Conserve el manual en un lugar seguro
para futuras consultas.
Antes de utilizar la unidad
PRECAUCIÓN
<
No permita que ningún líquido se
derrame o salpique este aparato.
<
No coloque objetos que contengan
líquidos, como jarrones, encima de este
aparato.
<
No instale este aparato confinado en un
espacio reducido, como podría ser
encastrado en una estantería o lugar
similar.
<
Este aparato recibe corriente nominal no
operativa de la salida de corriente AC
aun cuando su interruptor STANDBY/ON
esté en la posición STANDBY.
<
El aparato debe estar colocado lo
suficientemente cerca de la salida de
corriente como para poder acceder al
enchufe en cualquier momento.
<
Conecte siempre los aparatos de clase !
como este a salidas de corriente con
toma de tierra.
Enhorabuena por la adquisición de un
TEAC. Lea detenidamente este manual a
fin de obtener el mejor rendimiento de
esta unidad.
Antes de utilizar la unidad. . . . . . . . . . . . 46
Pilas . . . . . . . . . . . . . . . . . . . . . . . . . . . . 47
Conexiones. . . . . . . . . . . . . . . . . . . . . . . 48
Funciones . . . . . . . . . . . . . . . . . . . . . . . . 50
Pantalla. . . . . . . . . . . . . . . . . . . . . . . . . . 52
Primeros pasos . . . . . . . . . . . . . . . . . . . . 53
Puesta en hora del reloj. . . . . . . . . . . . . . 54
Funcionamiento básico . . . . . . . . . . . . . . 55
Escucha de iPod . . . . . . . . . . . . . . . . . . . 56
Audición de una fuente externa . . . . . . . 59
Escucha de la radio . . . . . . . . . . . . . . . . . 60
Presintonías . . . . . . . . . . . . . . . . . . . . . . 61
Temporizador . . . . . . . . . . . . . . . . . . . . . 62
Desconexión programada . . . . . . . . . . . . 64
Especificaciones . . . . . . . . . . . . . . . . . . . 64
Solución de problemas . . . . . . . . . . . . . . 65
Page 47
ESPAÑOL
47
Mando a distancia
El mando a distancia suministrado permite el
control remoto de la unidad.
Cuando utilice el mando a distancia, apunte
al sensor remoto del panel frontal.
<
Aunque el mando a distancia se utilice
dentro del radio de acción adecuado, es
posible que no funcione si hay algún
obstáculo entre la unidad y el mando.
<
Si el mando a distancia se utiliza cerca de
otros productos que generen rayos
infrarrojos, o se utilizan otros dispositivos
de control remoto que emitan rayos
infrarrojos, es posible que no funcione
correctamente. Y a la inversa, los otros
productos también podrían funcionar de
manera anómala.
1. Retire la bandeja del compartimento de la
pila.
2. Coloque la pila de litio (CR2032, 3V) en la
bandeja.
3. Deslice de nuevo la bandeja en el mando
a distancia hasta que se cierre con un clic.
Sustitución de la pila
Si observa que cada vez tiene que acercar
más el mando a la unidad principal para
que reciba la orden, significa que la pila
se está agotando. En tal caso, sustituya la
pila por una nueva.
Pilas
Instalación de la pila
En la unidad principal
(En el lado inferior de la unidad)
Estas baterías suministran energía de
respaldo a un reloj integrado cuando la
unidad se desconecta momentáneamente
de la línea de energía CA.
<
Si se interrumpe el suministro eléctrico de
la unidad durante aproximadamente una
hora y las pilas están completamente
agotadas, se borrarán todos los ajustes
guardados en memoria (tales como las
emisoras preestablecidas, el ajuste del
reloj y del temporizador).
Precauciones con las pilas
< Asegúrese de insertar las pilas con sus
polaridades positiva “+
” y negativa
“_
”correctas.
<
Utilice el mismo tipo de pilas. Nunca
utilice diferentes tipos de pilas juntas.
<
Pueden utilizarse pilas recargables y no
recargables. Lea las precauciones
indicadas en las pilas.
<
Si no va a utilizar el mando a distancia
durante un periodo prolongado (más de
un mes), retire las pilas para evitar fugas.
Si se producen pérdidas, limpie el líquido
del interior del compartimento y cambie
las pilas por unas nuevas.
<
No caliente ni desarme las pilas, ni se
deshaga de ellas arrojándolas al fuego.
Page 48

48
Conexiones
PRECAUCIÓN:
<
Apague la unidad antes de realizar las
conexiones.
<
Lea las instrucciones de cada uno de los
componentes que tiene intención de usar
con esta unidad.
<
Inserte correctamente los conectores. Para
evitar zumbidos y ruidos, no tienda los
cables de conexión en el mismo mazo.
AUX IN
Toma de CA
A
BF C
D
E
Grabadora, etc.
Page 49

ESPAÑOL
49
Antena de FM
En el modo FM, sintonice una emisora
de frecuencia modulada y despliegue el
cable hasta lograr la mejor recepción.
La antena quizá deba reorientarse si
cambia la unidad de emplazamiento.
AUX IN
En esta entrada puede conectar un
reproductor de audio portátil.
Más detalles en la página 59.
CLOCK ADJ
Mantenga pulsado el botón CLOCK
ADJ más de tres segundos para acceder
al modo de puesta en hora.
Antena de AM
Conecte la antena de cuadro de AM
suministrada al terminal AM ANTENNA.
Coloque la antena sobre un estante o
suspendida del marco de una ventana,
etc., en la dirección que ofrezca la
mejor calidad de recepción.
Si lo desea, puede anclar la antena de
AM a una pared como se indica en la
ilustración:
D
C
B
A
AUX OUT
Es posible conectar un amplificador o
un dispositivo de grabación a través del
jack de salida AUX OUT ubicado en la
parte posterior de la unidad.
DC IN
Conecte el adaptador de CA
suministrado a esta toma. Luego,
enchufe el adaptador de CA al
tomacorriente.
<
No utilice adaptadores CA diferentes
del modelo incluido con esta unidad
para evitar el fuego, descarga eléctrica,
etc. Asegúrese de conectar el
adaptador a una toma de CA que
suministra el voltaje correcto.
F
E
Page 50

50
Funciones
A AC
B J
IE
F
L
M
HD
G
F
Q
P
C
N
J
O
B
K
A
VOLUME
Use estos botones para regular el
volumen.
Reproducción/Pausa (y/J)
Use este botón para iniciar la
reproducción o activar la pausa del iPod.
iPod/shuffle
Use este botón para seleccionar iPod o la
función iPod Shuffle. Cuando haya un
iPod o un iPod Shuffle conectado a la
base, pulse este botón para iniciar la
reproducción.
AUX
Use este botón para oír una fuente
externa conectada al jack de entrada
AUX IN.
D
C
B
A
Page 51

ESPAÑOL
51
Conector para base (Dock)
Antes de usarlo, instale un adaptador
apropiado en la base (véase página 56).
Inserte un dispositivo digital portátil iPod
en esta base.
Puerto USB para iPod Shuffle
Inserte el iPod Shuffle en este puerto.
Pulse el botón iPod/shuffle para
seleccionar el modo iPod Shuffle.
MUTING
Use este botón para silenciar el sonido.
FM MODE
Al oprimir este botón, se alterna entre
modo STEREO (Estéreo) y modo MONO.
PROGRAM
En el modo TUNER, use este botón para
presintonizar emisoras.
PRESET
En el modo TUNER, use este botón para
seleccionar una presintonía.
Observación:
Para simplificar las explicaciones, las
instrucciones del manual se refieren
únicamente a los nombres de los botones
y controles del panel frontal. Los botones
y controles correspondientes del mando
a distancia funcionan de la misma
manera.
Q
P
O
N
M
L
WAKE
Pulse este botón para seleccionar el
volumen (alto o bajo) del iPod, el
sintonizador o el zumbador de alarma
con el que desee despertarse.
STANDBY/ON
Use este botón para encender o apagar
la unidad.
TUNER (FM/AM)
Use este botón para seleccionar el modo
Tuner.
ALARM 1/ALARM 2
Use estos botones para activar o
desactivar el temporizador o para
programar la hora de la alarma.
SNOOZE/DIMMER
Cuando el temporizador enciende la
unidad, pulse este botón para poner la
unidad en modo de espera durante 10
minutos. Puede repetir este ciclo diversas
veces durante el ciclo de alarma de 1
hora. Durante el funcionamiento normal,
use este botón para atenuar la pantalla.
SLEEP
Use este botón para programar la
desconexión programada.
TUNING/SKIP (.//)
En el modo TUNER, use estos botones
para sintonizar emisoras.
En el modo iPod, use este botón para
saltar pistas. Mantenga pulsado el botón
para buscar una parte concreta de la pista.
K
J
I
H
G
El equipo consume corriente nominal de
la salida de CA incluso si éste se
encuentra en STANDBY (modo de
espera).
F
E
Page 52

52
Muestra el reloj digital, el tiempo de
desconexión automática o los canales
predefinidos.
Se ilumina en el modo de iPod Shuffle
(reproducción aleatoria).
Se ilumina en el modo iPod.
Se ilumina en el modo de reproducción de
presintonías.
Se ilumina cuando está programado el
temporizador.
Se ilumina cuando se selecciona la fuente
para el temporizador.
Se ilumina cuando se establece la hora de la
alarma.
Información de frecuencia, volumen, fecha,
fuente externa (AUX), etc.
Se ilumina en el modo FM Stereo.
I
H
G
F
E
D
C
B
A
Pantalla
G H I
BA C D E F GF
F
Page 53

ESPAÑOL
53
Primeros pasos
El GR-7i es suministrado con un adaptador
“60GB (color) + Photo 40/60GB” premontado.
Para escuchar el iPod en el GR-7i, usted
primero tiene que comprobar si el adaptador
premontado es apropiado por su modelo de
iPod. Si esto no lo es, tiene que sustituirlo
por uno correcto, como explicado debajo.
1. Retire la cubierta de la base del GR7i.
Sostenga el adaptador por los laterales
derecho e izquierdo y tire suavemente
hacia arriba.
2. Seleccione el adaptador de base
correspondiente al dispositivo digital
portátil iPod.
“Video 30GB” para iPod con vídeo (30
GB).
“Video 60GB” para iPod con vídeo (60
GB).
“nano” para iPod nano.
“mini” para iPod mini.
“20GB (color) + Photo 30GB” para iPod
con pantalla en color (20GB, 30GB, U2
Special Edition).
“60GB (color) + Photo 40GB/60GB” para
iPod con pantalla en color (40GB, 60GB).
“20GB + U2” para iPod con rueda de clic
(20 GB, U2 Special Edition).
“40GB” para iPod con rueda de clic (40
GB).
<
Utilice un adaptador (de venta en
establecimientos) para iPod con conector
para base.
3. Inserte el adaptador en la base del
GR-7i.
Ajuste el borde frontal del adaptador en
la base, y después presione el borde
posterior hasta que oiga un ligero clic,
que indicará que el adaptador está
correctamente insertado.
1
2
< Cuando tenga que quitar el adaptador,
sosténgalo por los laterales derecho e
izquierdo y tire suavemente hacia arriba.
<
Si no va a utilizar la base, use la cubierta
facilitada para evitar la acumulación de
polvo.
Software de iPod compatible
Si el iPod no funciona con el GR-7i o con el
mando a distancia, una actualización de
software puede resolver el problema.
Visite el sitio web de Apple y descárguese el
software de iPod más reciente.
http://www.apple.com/la/ipod/download/
o
http://www.apple.com/es/ipod/download/
iPod es una marca comercial de Apple
Computer, Inc., registrada en EE.UU. y otros
países.
Page 54

54
Puesta en hora del reloj
Pulse los botones TUNING/SKIP
(.
// ) para seleccionar 12H ó
24H, y después pulse el botón CLOCK
ADJ.
2
Mantenga pulsado el botón CLOCK
ADJ durante más de 3 segundos y
suéltelo cuando la pantalla de la hora
empiece a parpadear.
1
< Si no realiza ninguna operación en 60
segundos, el modo de puesta en hora
quedará cancelado.
Pulse el botón TUNING/SKIP (.)
para seleccionar la hora, y después
pulse el botón TUNING/SKIP (/
)
para seleccionar los minutos, y
seguidamente pulse el botón CLOCK
ADJ.
3
Pulse los botones TUNING/SKIP
(.
//) para seleccionar el año, y
después pulse el botón CLOCK ADJ.
4
Pulse los botones TUNING/SKIP
(.
//) para seleccionar la fecha,
y después pulse el botón CLOCK ADJ.
El reloj comenzará a funcionar desde 00
segundos.
5
.//
< Mantenga pulsado el botón TUNING/SKIP
(.
o /) para ajustar el reloj de
forma continua.
CLOCK ADJ
Page 55

ESPAÑOL
55
Funcionamiento básico 1
< Paa oír una fuente externa conectada al
jack de entrada AUX IN, pulse el botón
AUX.
<
Si selecciona “iPod” cuando no hay
ningún iPod en la base, el botón y el
indicador iPod de la pantalla aparecerán
intermitentes.
Pulse el botón STANDBY/ON para
encender la unidad.
1
< La unidad se enciende con la última
fuente de sonido seleccionada. Si el iPod
que está en la reproducción es insertado
en la bas, el GR-7i se apagará
automáticamente y comenzará a
reproducir del iPod.
<
También puede usar el botón
iPod/shuffle, AUX o TUNER (FM/AM) o el
botón Reproducción/Pausa (y
/J) para
encender la unidad.
Pulse el botón iPod/shuffle, AUX o
TUNER (FM/AM) para seleccionar una
fuente.
2
El volumen se puede ajustar entre MIN
(00) y MAX (40). Si desea reducir o elevar
el volumen de forma continuada,
mantenga pulsado VOLUME – o +.
Ponga en marcha la fuente y regule
el volumen con los botones VOLUME
(–/+).
3
132
Page 56

56
Inserte el iPod en la base del GR-7i.
Despues pulse el botón de
reproducción/pausa (y
/J) del iPod o
del GR-7i. El GR-7i se apagará
automáticamente y comenzará a
reproducir la lista de canciones del iPod.
<
Asegúrese de usar un adaptador
apropiado para la base (véase “Primeros
pasos” en la página 53).
<
Si retira el iPod durante la reproducción,
el GR-7i se apagará automáticamente
(modo de espera).
<
La batería del iPod se recarga al máximo
siempre que el iPod está conectado a la
base y el GR-7i al suministro de
alimentación.
<
Si conecta unos auriculares al iPod, el
sonido se emitirá por los altavoces del
GR-7i y por los auriculares.
Escucha de iPod 1
< Si modifica el nivel de sonido o la fuente,
el silenciamiento quedará cancelado.
Silenciamiento
Para silenciar el sonido momentáneamente,
pulse el botón MUTING. Pulse de nuevo
MUTING para restablecer el sonido.
Funcionamiento básico 2
Intensidad luminosa
Puede atenuar la luminosidad de la
pantalla del panel frontal pulsando el
botón SNOOZE/DIMMER.
<
Esta función quedará cancelada cuando
se apague la unidad con el botón
STANDBY/ON.
<
La pantalla se atenuará automáticamente
siempre que programe el temporizador
SLEEP.
Page 57

ESPAÑOL
57
Utilización de un iPod Shuffle
Inserte el iPod Shuffle en el puerto USB y
seleccione “iPod Shuffle” con el botón
iPod/shuffle.
Después pulse el botón de
Reproducción/Pausa (y
/J) del GR-7i. El
GR-7i se encenderá automáticamente y
comenzará a reproducir la lista de
canciones del iPod Shuffle.
<
Si retira el iPod Shuffle durante la
reproducción, el GR-7i se pondrá
automáticamente en modo de espera.
<
La batería del iPod Shuffle se recarga al
máximo siempre que el iPod Shuffle esté
insertado y el GR-7i conectado al
suministro de alimentación de CA.
<
Si se conectan unos auriculares al iPod
Shuffle, el sonido se emitirá por los
altavoces del GR-7i y por los auriculares.
Selección del modo iPod
Seleccione “iPod” con el botón
iPod/shuffle. Si ya hay un iPod conectado
a la base, se iniciará la reproducción.
Si no hay un iPod en la base, el botón y
el indicador iPod de la pantalla
aparecerán intermitentes.
<
También puede usar el botón de
reproducción/pausa (y
/J) para
seleccionar “iPod”.
Page 58
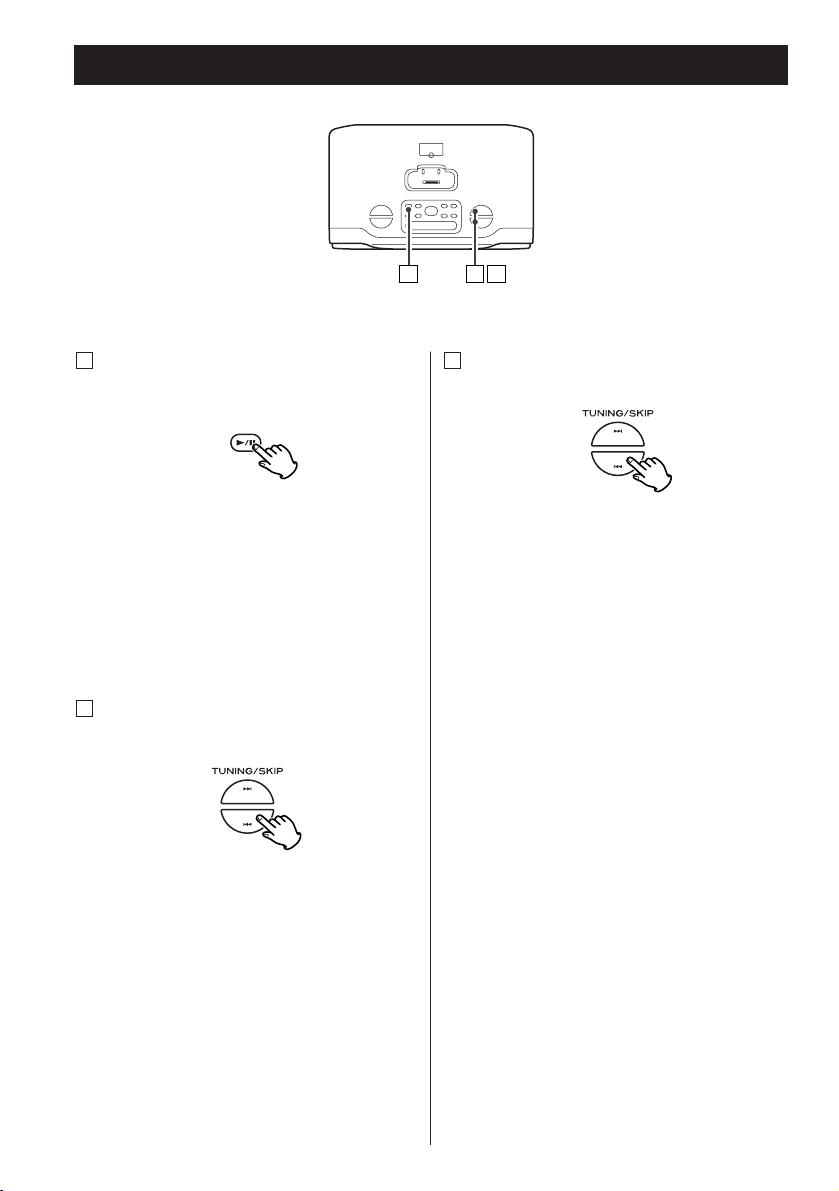
58
Para saltar a la pista siguiente o
anterior
C
Durante la reproducción, pulse
repetidamente el botón de TUNING/SKIP
(.
o /) hasta localizar la pista
deseada. La pista seleccionada se
reproducirá desde el principio.
<
Si pulsa el botón . durante la
reproducción, la pista en curso se
reproducirá desde el principio. Para
retroceder al principio de la pista
anterior, pulse dos veces el botón .
.
Búsqueda de un fragmento de la
pista
B
Durante la reproducción, mantenga
pulsado más de dos segundos el botón
de TUNING/SKIP (.
o /) y libérelo
cuando encuentre el fragmento que
desea oír.
Para interrumpir momentáneamente
la reproducción (pausa)
A
Pulse el botón de reproducción/pausa
(G
/J) durante la reproducción. La
reproducción se detiene en la posición
actual, y la lectura de tiempo parpadea.
Para reanudar la reproducción, pulse de
nuevo el botón de reproducción/pausa
(G
/J).
Escucha de iPod 2
A CB
Page 59

ESPAÑOL
59
Audición de una fuente externa
Conecte el jack PHONES (salida de
audio) de un reproductor de audio
portátil a la entrada AUX IN del GR-7i
utilizando el cable con miniconector
estéreo suministrado.
1
Reproduce la fuente sonora y ajuste
el volumen tanto del iPod como del
reproductor de audio.
3
Seleccione “AUX” con el botón AUX.
2
Cuando use el jack PHONES del
minirreproductor, deberá ajustar su
volumen o es posible que no oiga el
sonido del GR-7i.
<
Si eleva demasiado el volumen del
minirreproductor, es posible que
distorsione el sonido del GR-7i. En tal
caso, reduzca el nivel hasta que
desaparezca la distorsión, y después
seleccione un volumen confortable en el
GR-7i.
Puede usar este método de conexión si el
iPod no dispone de conector para la base
o, en caso de que lo tenga, no hay
disponible un adaptador adecuado.
23
Page 60
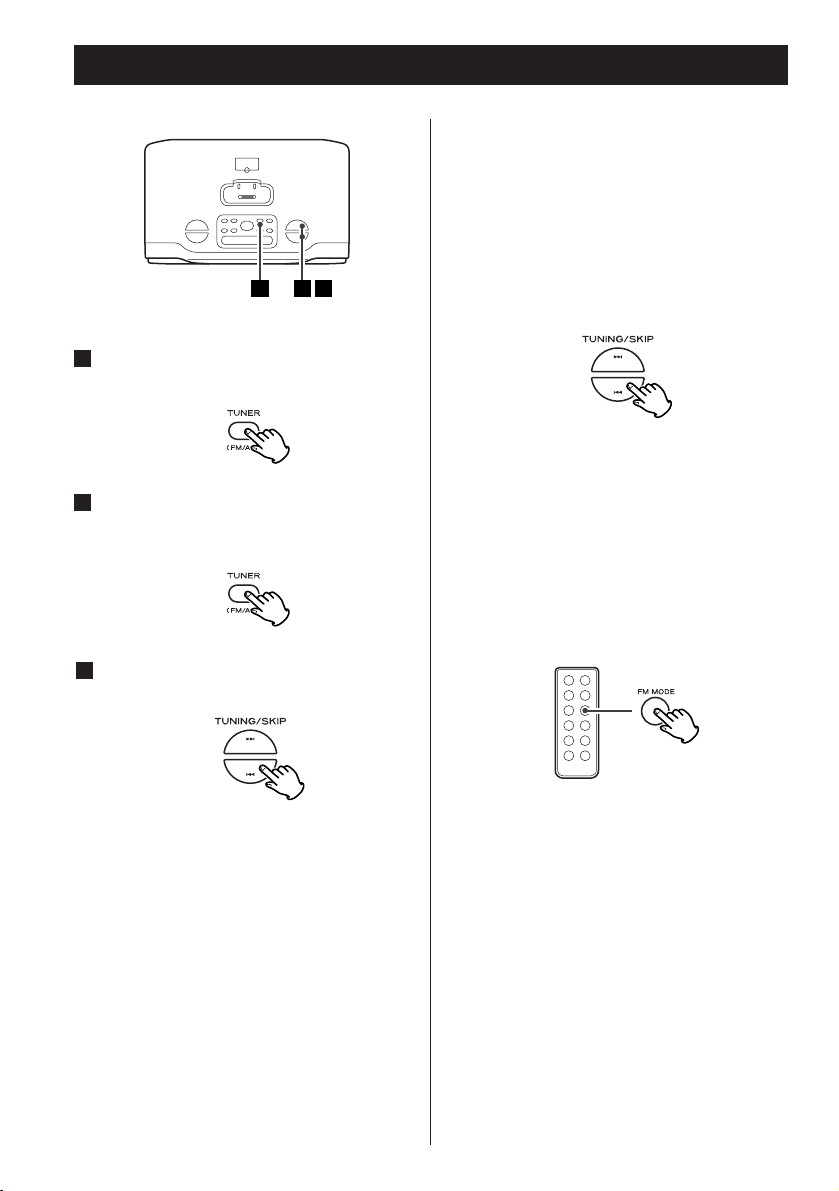
60
Pulse el botón TUNER (FM/AM).
1
Para seleccionar FM o AM, pulse de
nuevo el botón TUNER (FM/AM).
2
Selección automática de una emisora.
3
Mantenga pulsado más de dos segundos
el botón de TUNING/SKIP (.
o/), y
libérelo cuando la lectura de frecuencia
comience a cambiar.
Cuando sintoniza una emisora, la
búsqueda se detiene automáticamente.
<
Para detener la selección automática,
pulse el botón TUNING/SKIP.
Escucha de la radio
Selección manual de emisoras que no se
pueden sintonizar automáticamente
Si pulsa momentáneamente el botón de
TUNING/SKIP (.
o/), la frecuencia
cambiará en pasos fijos.
Pulse el botón de TUNING/SKIP repetidas
veces hasta localizar la emisora que
desea recibir.
Si la recepción de FM o AM es
de baja calidad
Para disfrutar de la mejor recepción, gire
la antena hasta que las emisoras se
sintonicen nítidamente.
321
Botón FM MODE
Al oprimir este botón, se alterna entre
modo STEREO (Estéreo) y modo MONO.
STEREO (Estéreo)
Las transmisiones estéreo de FM se
reciben en estéreo y se encenderá el
indicador “ST”.
MONO
Para compensar una recepción estéreo
FM débil, seleccione este modo. Ahora,
la recepción se forzará para que se
monoaural, reduciendo el ruido no
deseado.
Page 61
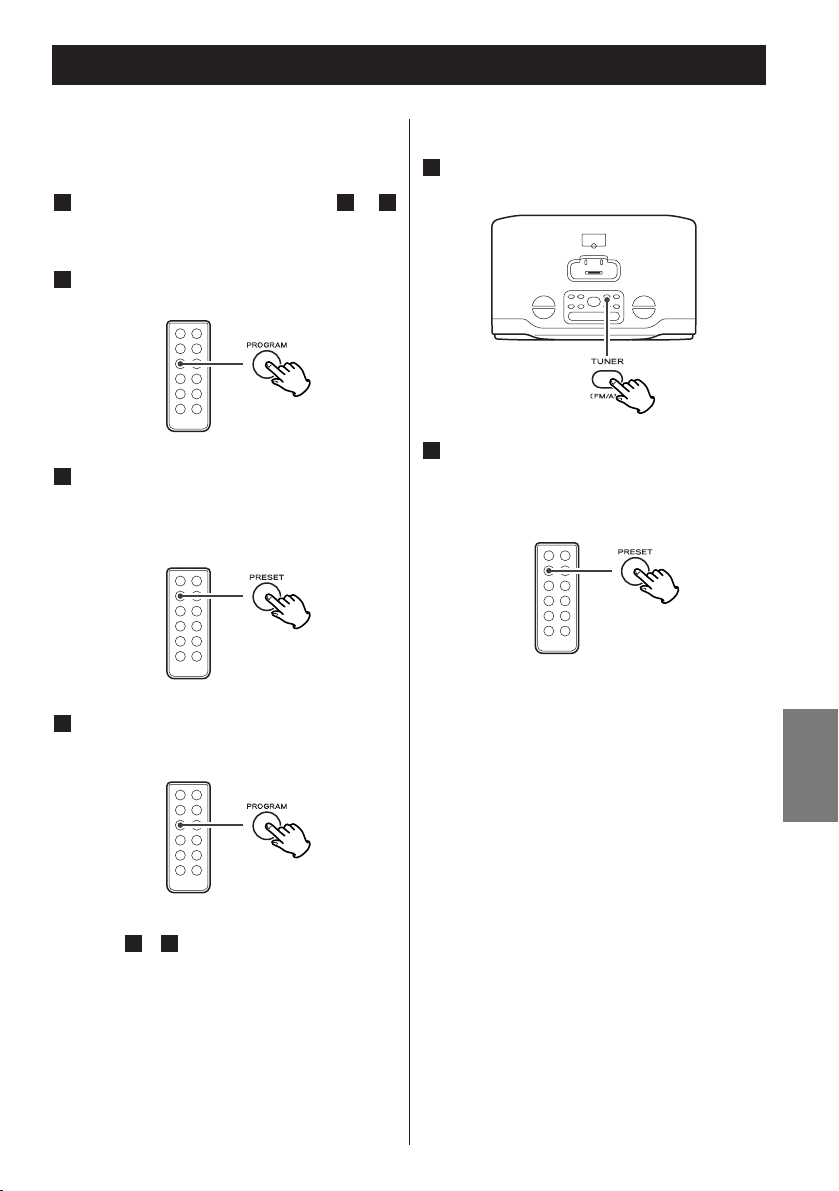
ESPAÑOL
61
Presintonías
Puede almacenar emisoras de FM y AM en
los canales del 1 al 10.
Sintonice una emisora (pasos a
en página 60).
Pulse el botón PROGRAM.
2
311
Antes de 5 segundos, pulse el botón
PROGRAM.
4
Antes de 5 segundos, seleccione con
PRESET un número de presintonía
para asignarle la emisora.
3
Cómo seleccionar presintonías
Pulse el botón TUNER (FM/AM) para
seleccionar FM o AM.
1
Para almacenar otras emisoras, repita los
pasos a .
41
Pulse el botón PRESET repetidas
veces hasta localizar la presintonía
deseada.
2
Page 62
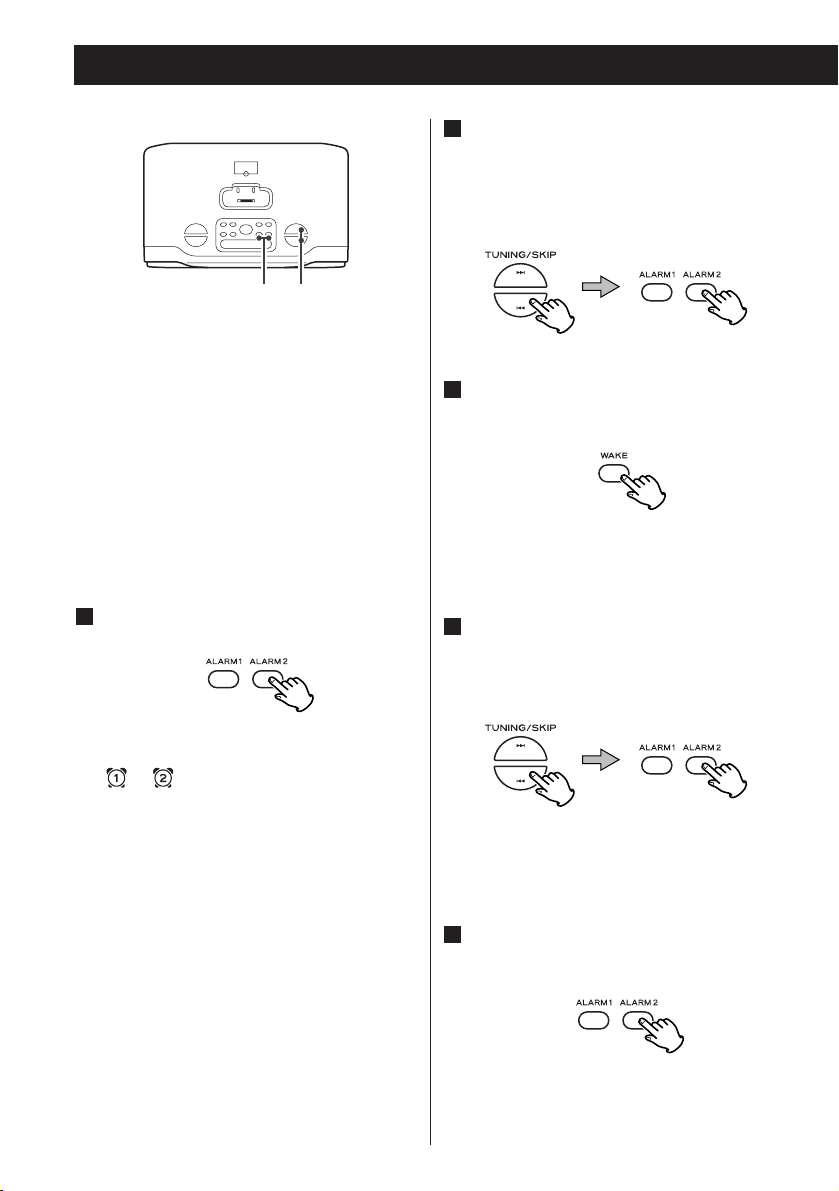
62
< La unidad puede programarse para que
se encienda a una hora determinada.
Funcionará durante 60 minutos y se
volverá a apagar.
<
Ponga el reloj en hora antes de
programar el temporizador (véase la
página 54).
Ajuste del temporizador
Pulse el botón ALARM (1 ó 2).
El reloj parpadea y el indicador ALARM
(ó ) aparece en la pantalla.
< Si no pulsa ningún botón en 1 minuto, el
modo de ajuste del temporizador
quedará cancelado.
1
Pulse el botón TUNING/SKIP (.)
para especificar la hora de comienzo,
y pulse el botón TUNING/SKIP (/
)
para especificar el minuto de
comienzo.
Seleccione una fuente de sonido
(iPod o RADIO) con el botón WAKE.
<
No se puede seleccionar “AUX”.
Especifique el volumen o seleccione
el volumen de la alarma (alto o bajo)
con los botones TUNING/SKIP
(.
//).
El volumen del modo de temporizador se
puede ajustar entre 10 y 40.
Pulse el botón ALARM (1 ó 2) para
introducir el ajuste del temporizador.
El temporizador ya está programado.
5
4
3
2
Temporizador
.//
ALARM1/ALARM2
Page 63
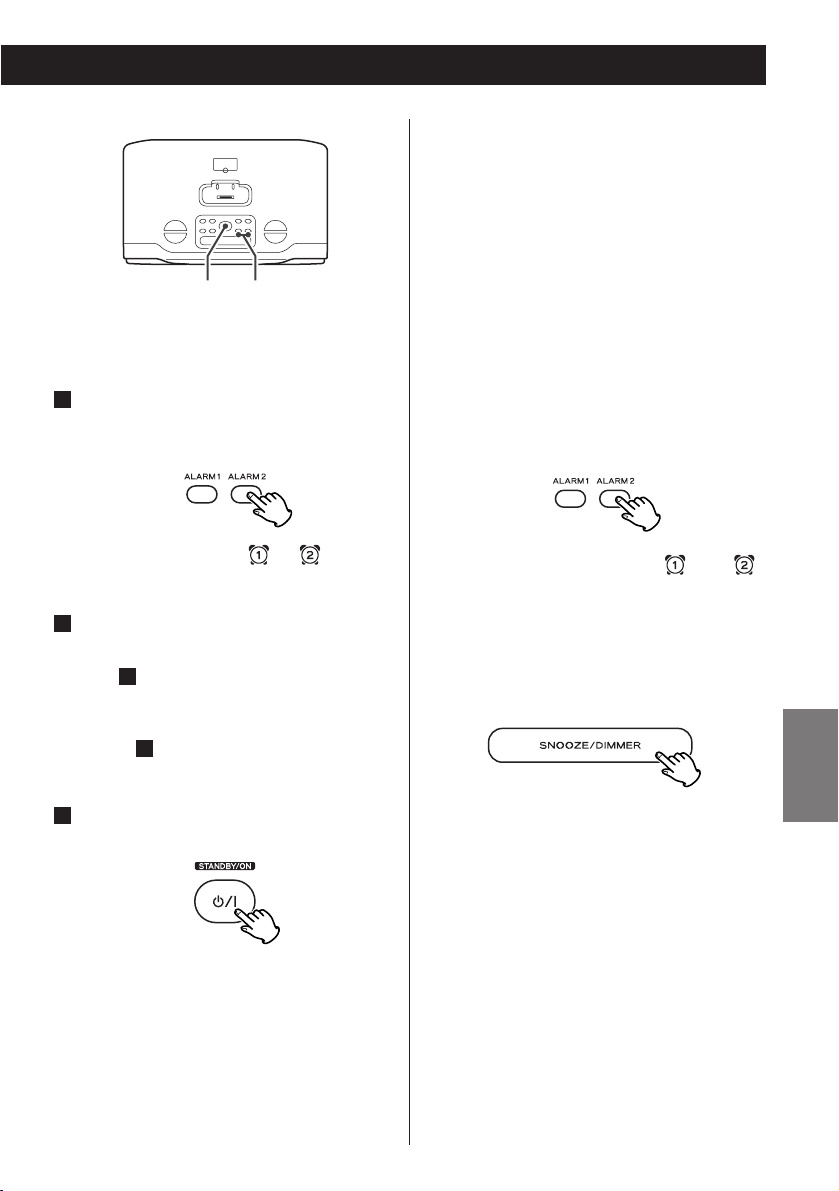
ESPAÑOL
63
Para activar el temporizador
Después de programar el
temporizador, pulse el botón ALARM
(1 ó 2) para encenderlo.
El indicador ALARM ( ó ) aparece
en la pantalla.
Prepare la fuente de sonido.
Si la fuente seleccionada es “iPod” en el
paso de la página anterior, inserte un
iPod.
Si la fuente seleccionada es “RADIO” en
el paso de la página anterior, sintonice
una emisora.
Pulse el botón STANDBY/ON para
apagar la unidad (modo de espera).
No olvide apagar la unidad (standby),
porque de lo contrario el
temporizador no funcionaría.
<
Cuando el temporizador encienda la
unidad, el volumen de reproducción se
elevará gradualmente hasta el nivel
definido por el usuario.
3
3
3
2
1
< Si se ha seleccionado “iPod” como
fuente pero no hay un iPod conectado, la
unidad cambiará al modo de
sintonizador.
<
Si se ha seleccionado RADIO como
fuente, la unidad se pondrá en
funcionamiento con la última emisora
sintonizada.
Para desactivar el temporizador
Si no va a utilizar el temporizador, pulse
el botón ALARM (1 ó 2) para
desactivarlo.
El indicador ALARM ( ó )
desaparece de la pantalla.
Pulse de nuevo el botón ALARM (1 ó 2)
para activar el temporizador.
SNOOZE (Repetición de alarma)
Si el temporizado ha activado al unidad,
pulse el botón SNOOZE/DIMMER, y la
unidad entra en el modo de espera.
Transcurridos 10 minutos, la unidad se
encenderá de nuevo.
Esta función se puede usar cuantas veces
se desee en el plazo de 60 minutos.
<
Pulse STANDBY/ON o el botón ALARM
activo (1 ó 2) una vez para cancelar esta
función.
Advierta que si pulsa dos veces el botón
ALARM, el temporizador también se
desactiva.
ALARM1/ALARM2STANDBY/ON
Page 64

64
Especificaciones
Sección de sintonizador
Margen de frecuencias
FM: 87.5 MHz-108.0 MHz
AM: 520 kHz-1,710 kHz
Sección de altavoces
Tipo. . . . . . . . . . . . . . . . . . . . 50 mm x 2
Impedancia . . . . . . . . . . . . . . . 6 ohmios
GENERAL
Salida total de potencia . . . . . 3 W + 3 W
Alimentación . . . . . . . . 120 V c.a., 60 Hz
Consumo. . . . . . . . . . . . . . . . . . . . 25 W
Dimensiones (anch. x alt. x prof.)
265 x 85 x 160 mm
Peso (neto) . . . . . . . . . . . . . . . . . 1.35 kg
Accesorios estandard
Unidad de control remoto x 1
Antena de cuadro de AM x 1
Adaptador para la base x 8
(adaptador “60GB (color) + Photo
40/60GB” premontado)
Cubierta protectora de la base x 1
Cable estéreo con tapón mini x 1
Adaptador de c.a. x 1
Manual del usuario x 1
Póliza de garantía x 1
< El diseño y las especificaciones están sujetas
a cambio sin previo aviso.
<
El peso y las dimensiones son aproximados.
<
Las ilustraciones pueden diferir ligeramente
de los modelos de producción.
Desconexión programada
SLEEP 90, 60, 30 ó 15:
La unidad se apagará cuando transcurran
90, 60, 30 ó 15 minutos respectivamente.
<
La pantalla se atenuará automáticamente
siempre que programe el temporizador
SLEEP.
<
Si quiere saber el tiempo que falta para la
desconexión, pulse una vez el botón
SLEEP. El tiempo restante se visualizará
durante 6 segundos, y después se
restablecerá la pantalla normal.
El sistema se puede programar para la
desconexión tras un periodo de tiempo
especificado.
Pulse el botón SLEEP repetidas veces
hasta que aparezca la lectura de tiempo
deseada.
Page 65

ESPAÑOL
65
Si tiene algún problema con el equipo,
repase la siguiente tabla para ver si puede
resolverlo por su cuenta antes de llamar a su
distribuidor o al centro de asistencia técnica
de TEAC.
General
No hay corriente
e
Revise la conexión a la toma de
alimentación. Compruebe que la
alimentación no procede de una toma
conmutada, y en caso de que sea así,
que el interruptor está activado.
Asegúrese de que la toma de corriente
está activa conectando otro dispositivo
(lámpara, ventilador, etc.) para ver si
funciona.
No sale ningún sonido de los altavoces.
e
Seleccione la fuente pulsando el botón
iPod/shuffle, AUX ó TUNER (FM/AM).
e
Ajuste el volumen.
e
Desconecte los auriculares de la toma
PHONES.
e
Compruebe que se emite sonido de los
altavoces. Si es así, pulse otra vez el
botón MUTING.
Sonido con ruido.
e
La unidad está demasiado cerca de un
televisor o aparato similar. Aleje la
unidad o apague el dispositivo que
interfiere.
No funciona el mando a distancia.
e
Pulse el interruptor STANDBY/ON para
encender la unidad.
e
Si la pila se ha agotado, sustitúyala por
una nueva.
e
Utilice el mando a distancia dentro del
radio de acción (5 m), y apunte al
sensor remoto del panel frontal.
e
Retire cualquier obstáculo existente
entre el mando a distancia y la unidad
principal.
Solución de problemas
e Apague cualquier fuente luminosa
intensa que haya en las proximidades
de la unidad.
Reproductor iPod
No se puede insertar el iPod.
e
Compruebe el adaptador de la base.
e
Limpie o despeje de obstáculos el
conector de la base del GR-7i y el iPod,
e insértelo de nuevo.
No se inicia la reproducción.
e
Retire el iPod de la base, espere unos
segundos y vuelva a insertarlo.
e
Una actualización de software puede
resolver el problema. Visite el sitio web
de Apple y descárguese el software de
iPod más reciente.
No puede manejar el iPod.
e
Libere el interruptor HOLD.
Sintonizador
No se recibe ninguna emisora o la señal
es muy débil.
e
Sintonice bien la emisora.
e
Oriente la antena de FM o AM en la
dirección que ofrezca la mejor
recepción.
Si no puede resolver el problema,
desconecte el cable de alimentación de
la toma de red y vuélvalo a conectar.
Mantenimiento
Si se ensucia la superficie del equipo,
pase un paño suave o utilice jabón
líquido normal diluido. Limpie cualquier
resto líquido que pueda quedar en la
unidad. No utilice aguarrás, bencina ni
alcohol, ya que podría dañar el acabado
de la unidad. Espere a que se seque por
completo la superficie de la unidad antes
de utilizarla.
Page 66

Page 67

Page 68

0706.MA-1103A
This appliance has a serial number located on the rear panel. Please record
the model number and serial number and retain them for your records.
Model number Serial number
Z
TEAC CORPORATION
3-7-3, Nakacho, Musashino-shi, Tokyo 180-8550, Japan Phone: (0422) 52-5081
TEAC AMERICA, INC. 7733 Telegraph Road, Montebello, California 90640 Phone: (323) 726-0303
TEAC CANADA LTD. 5939 Wallace Street, Mississauga, Ontario L4Z 1Z8, Canada Phone: (905) 890-8008
TEAC MEXICO, S.A. De C.V
Campesinos N°184, Colonia Granjas Esmeralda, Delegacion Iztapalapa, CP 09810, México DF
Phone: (525) 581-5500
TEAC UK LIMITED Unit 19 & 20, The Courtyards, Hatters Lane, Watford, Hertfordshire, WD18 8TE, U.K.
Phone: (0845) 130-2511
TEAC EUROPE GmbH Bahnstrasse 12, 65205 Wiesbaden-Erbenheim, Germany Phone: 0611-71580
TEAC AUSTRALIA PTY., LTD. 30 Tullamarine Park Road, Tullamarine, VIC 3043, Australia Phone: (03) 8336-6500
A.B.N. 11 113 998 048
 Loading...