

Page 1

D01163521B
D-07X
D/A Converter
OWNER’S MANUAL .................... 5
MODE D’EMPLOI ...................... 25
MANUAL DEL USUARIO ........... 45
Page 2

Page 3
3
CAUTION
DO NOT REMOVE THE EXTERNAL CASES OR CABINETS TO EXPOSE o
THE ELECTRONICS. NO USER SERVICEABLE PARTS ARE INSIDE.
IF YOU ARE EXPERIENCING PROBLEMS WITH THIS PRODUCT, o
CONTACT TEAC FOR A SERVICE REFERRAL. DO NOT USE THE
PRODUCT UNTIL IT HAS BEEN REPAIRED.
USE OF CONTROLS OR ADJUSTMENTS OR PERFORMANCE OF o
PROCEDURES OTHER THAN THOSE SPECIFIED HEREIN MAY RESULT
IN HAZARDOUS RADIATION EXPOSURE.
WARNING: TO PREVENT FIRE OR SHOCK HAZARD,
DO NOT EXPOSE THIS APPLIANCE TO RAIN OR
MOISTURE.
IN NORTH AMERICA USE ONLY ON 120 V SUPPLY.
CAUTION: TO REDUCE THE RISK OF ELECTRIC SHOCK, DO NOT
REMOVE COVER (OR BACK). NO USER-SERVICEABLE PARTS
INSIDE. REFER SERVICING TO QUALIFIED SERVICE PERSONNEL.
The lightning flash with arrowhead symbol, within an
equilateral triangle, is intended to alert the user to the
presence of uninsulated “dangerous voltage” within the
product’s enclosure that may be of sufficient magnitude to
constitute a risk of electric shock to persons.
The exclamation point within an equilateral triangle is
intended to alert the user to the presence of important
operating and maintenance (servicing) instructions in the
literature accompanying the appliance.
For Canada
Industry Canada’s Compliance Statement:
This Class B digital apparatus complies with Canadian ICES-003.
Cet appareil numérique de la classe B est conforme à la norme NMB003 du Canada.
For U.S.A.
This equipment has been tested and found to comply with the
limits for a Class B digital device, pursuant to Part 15 of the FCC
Rules. These limits are designed to provide reasonable protection
against harmful interference in a residential installation. This
equipment generates, uses, and can radiate radio frequenc y
energy and, if not installed and used in accordance with the
in structions, m ay cau se h armful in ter ference to r adio
communications. However, there is no guarantee that interference
will not occur in a particular installation. If this equipment does
cause harmful interference to radio or television reception, which
can be determined by turning the equipment off and on, the user
is encouraged to try to correct the interference by one or more of
the following measures:
• Reorient or relocate the equipment and/or the receiving
antenna.
• Increase the separation between the equipment and receiver.
• Connect the equipment into an outlet on a circuit different
from that to which the receiver is connected.
• Consult the dealer or an experienced radio/TV technician for
help.
CAUTION
Changes or modifications to this equipment not expressly
approved by TEAC CORPORATION for compliance will void the
user’s warranty.
China RoHS
The information in the following table is only applicable to products for sale in the People’s Republic of China. o
The products sold in the European area are manufactured in accordance with the European RoHS Directive. o
';
IMPORTANT SAFETY PRECAUTIONS
Page 4
4
1) Read these instructions.
2) Keep these instructions.
3) Heed all warnings.
4) Follow all instructions.
5) Do not use this apparatus near water.
6) Clean only with dry cloth.
7) Do not block any ventilation openings. Install in accordance with
the manufacturer's instructions.
8) Do not install near any heat sources such as radiators, heat
registers, stoves, or other apparatus (including amplifiers) that
produce heat.
9) Do not defeat the safety purpose of the polarized or groundingtype plug. A polarized plug has two blades with one wider than
the other. A grounding type plug has two blades and a third
grounding prong. The wide blade or the third prong are provided
for your safety. If the provided plug does not fit into your outlet,
consult an electrician for replacement of the obsolete outlet.
10) Protect the power cord from being walked on or pinched
particularly at plugs, convenience receptacles, and the point
where they exit from the apparatus.
11) Only use attachments/accessories specified by the manufacturer.
12) Use only with the cart, stand, tripod, bracket, or
table specified by the manufacturer, or sold with
the apparatus. When a cart is used, use caution
when moving the cart/apparatus combination to
avoid injury from tip-over.
13) Unplug this apparatus during lightning storms or
when unused for long periods of time.
14) Refer all servicing to qualified service personnel. Servicing is
required when the apparatus has been damaged in any way, such
as power-supply cord or plug is damaged, liquid has been spilled
or objects have fallen into the apparatus, the apparatus has been
exposed to rain or moisture, does not operate normally, or has
been dropped.
The apparatus draws nominal non-operating power from the o
AC outlet with its POWER or STANDBY/ON switch not in the ON
position.
The mains plug is used as the disconnect device, the disconnect o
device shall remain readily operable.
Caution should be taken when using earphones or headphones o
with the product because excessive sound pressure (volume) from
earphones or headphones can cause hearing loss.
Do not expose this apparatus to drips or splashes. o
Do not place any objects filled with liquids, such as vases, on o
the apparatus.
Do not install this apparatus in a confined space such as a book o
case or similar unit.
The apparatus should be located close enough to the AC outlet o
so that you can easily reach the power cord plug at any time.
If the produc t uses bat teries (including a battery pack or o
installed batteries), they should not be exposed to sunshine, fire
or excessive heat.
CAUTION for products that use replaceable lithium batteries: o
there is danger of explosion if a battery is replaced with an
incorrect type of bat tery. Replace only with the same or
equivalent type.
Products with Class construction are equipped with a power
supply cord that has a grounding plug. The cord of such a product
must be plugged into an AC outlet that has a protective grounding
connection.
CAUTION
WARNING
“DSD” is a registered trademark.
“Super Audio CD” is a registered trademark.
Microsoft, Windows XP, Windows Vista and Windows 7 are either registered trademarks or trademarks of Microsoft Corporation in the United
States and/or other countries.
Apple, Macintosh and Mac OS X are trademarks of Apple Inc., registered in the U.S. and other countries.
Other company names, product names and logos in this document are the trademarks or registered trademarks of their respective owners.
IMPORTANT SAFETY INSTRUCTIONS
Page 5
5
English
For European Customers
Disposal of electrical and electronic equipment
(a) All electrical and electronic equipment should be disposed
of separately from the municipal waste stream via collection
facilities designated by the government or local authorities.
(b) By disposing of electrical and electronic equipment correctly,
you will help save valuable resources and prevent any potential
negative effects on human health and the environment.
(c) Improper disposal of waste electrical and electronic equipment
can have serious effects on the environment and human
health because of the presence of hazardous substances in the
equipment.
(d) The Waste Electrical and Electronic Equipment (WEEE)
symbol, which shows a wheeled bin that has been
crossed out, indicates that electrical and electronic
equipment must be collected and disposed of separately from household waste.
(e) Return and collection systems are available to end users. For
more detailed information about the disposal of old electrical and electronic equipment, please contact your city office,
waste disposal service or the shop where you purchased the
equipment.
Disposal of batteries and/or accumulators
(a) Waste batteries and/or accumulators should be disposed of
separately from the municipal waste stream via collection
facilities designated by the government or local authorities.
(b) By disposing of waste batteries and/or accumulators correctly,
you will help save valuable resources and prevent any potential
negative effects on human health and the environment.
(c) Improper disposal of waste batteries and/or accumulators can
have serious effects on the environment and human health
because of the presence of hazardous substances in them.
(d) The WEEE symbol, which shows a wheeled bin that
has been crossed out, indicates that batteries and/
or accumulators must be collected and disposed of
separately from household waste.
If a battery or accumulator contains more than the
specified values of lead (Pb), mercur y (Hg), and/or cadmium
(Cd) as defined in the Battery Directive (2006/66/EC), then the
chemical symbols for those elements will be indicated beneath
the WEEE symbol.
(e) Return and collection systems are available to end users. For
more detailed information about the disposal of waste batter-
ies and/or accumulators, please contact your city office, waste
disposal service or the shop where you purchased them.
Pb, Hg, Cd
Page 6

6
Contents What’s in the box
Thank you for choosing Esoteric. Read this manual carefully
to get the best performance from this unit.
Check to be sure the box includes all the supplied accessories
shown below.
Please contact the store where you purchased this unit if any
of these accessories are missing or have been damaged during
transportation.
Power cord x 1
Owner’s manual (this document) x 1
Keep this manual in a safe place for future reference. o
Warranty card x 1
What’s in the box ................................................6
Before use .......................................................7
Using a remote control unit ......................................7
Making connections .............................................8
Names and functions of parts ...................................10
Basic Operation .................................................11
Setting mode ...................................................12
Connecting a computer and playing back audio files .............19
Messages .......................................................21
Troubleshooting ................................................22
Restoring factory default settings ................................22
Specifications ...................................................23
Rear panel ......................................................24
Page 7

7
English
Before use Using a remote control unit
Read this before attempting any operations.
CAUTION
Do not move the unit during use. o
Place the unit in a stable location near the audio system that you o
will use.
Be careful to avoid injury when moving the unit due to its weight. o
Get someone to help you if necessary.
As the unit may become warm during operation, always leave suf- o
ficient space around the unit for ventilation. Make sure there is at
least 20 cm (8") of space above and at least 5 cm (2") of space on
each side of the unit. Do NOT place anything such as a CD, CD-R,
LP, cassette tape etc. on top of the unit.
The voltage supplied to the unit should match the voltage as o
printed on the rear panel. If you are in any doubt regarding this
matter, consult an electrician.
Do not open the cabinet as this might result in damage to the o
circuitry or cause electric shock. If a foreign object should get into
the unit, contact your dealer or service company.
When removing the power plug from the wall outlet, always pull o
directly on the plug, never yank on the cord.
Maintenance
If the surface of the unit gets dirty, wipe it with a soft cloth or use
diluted mild liquid soap. Allow the surface of the unit to dry completely before using.
Q For safety, disconnect the power cord from the socket
before cleaning.
Never spray liquid directly on this unit. o
Do not use thinner or alcohol as they could damage the surface of o
the unit.
Avoid allowing rubber or plastic materials to touch this product for o
long periods of time, because they could damage the cabinet.
This unit has functions that can be accessed by remote controls from
other Esoteric units.
Functions supported by other remote controls and the corresponding
remote control buttons:
Adjust the volume level: VOLUME buttons (–/+) o
Enter setting (setup) mode: SETUP button o
Mute the output: MUTE (MUTING) button o
Switch between input sources: INPUT buttons (</>) or ( o k/j)
Adjust the brightness of the display: DIMMER button o
Other Esoteric units whose remote controls can be used by this unit:
A-100: RC-1156 o
AI-10: RC-1056 o
AZ-1: RC-1056 o
C-03: RC-1156 o
I-03: RC-1251 o
K-01: RC-1156 o
K-03: RC-1156 o
K - 0 5 : R C-1 2 5 1 o
K - 0 7 : R C-1 3 0 1 o
P - 0 2 : R C-1 15 6 o
P-05: RC-1156 o
RZ-1: R C-12 51 o
SA-50: RC-1156 o
X-05: RC-1156 o
Page 8
8
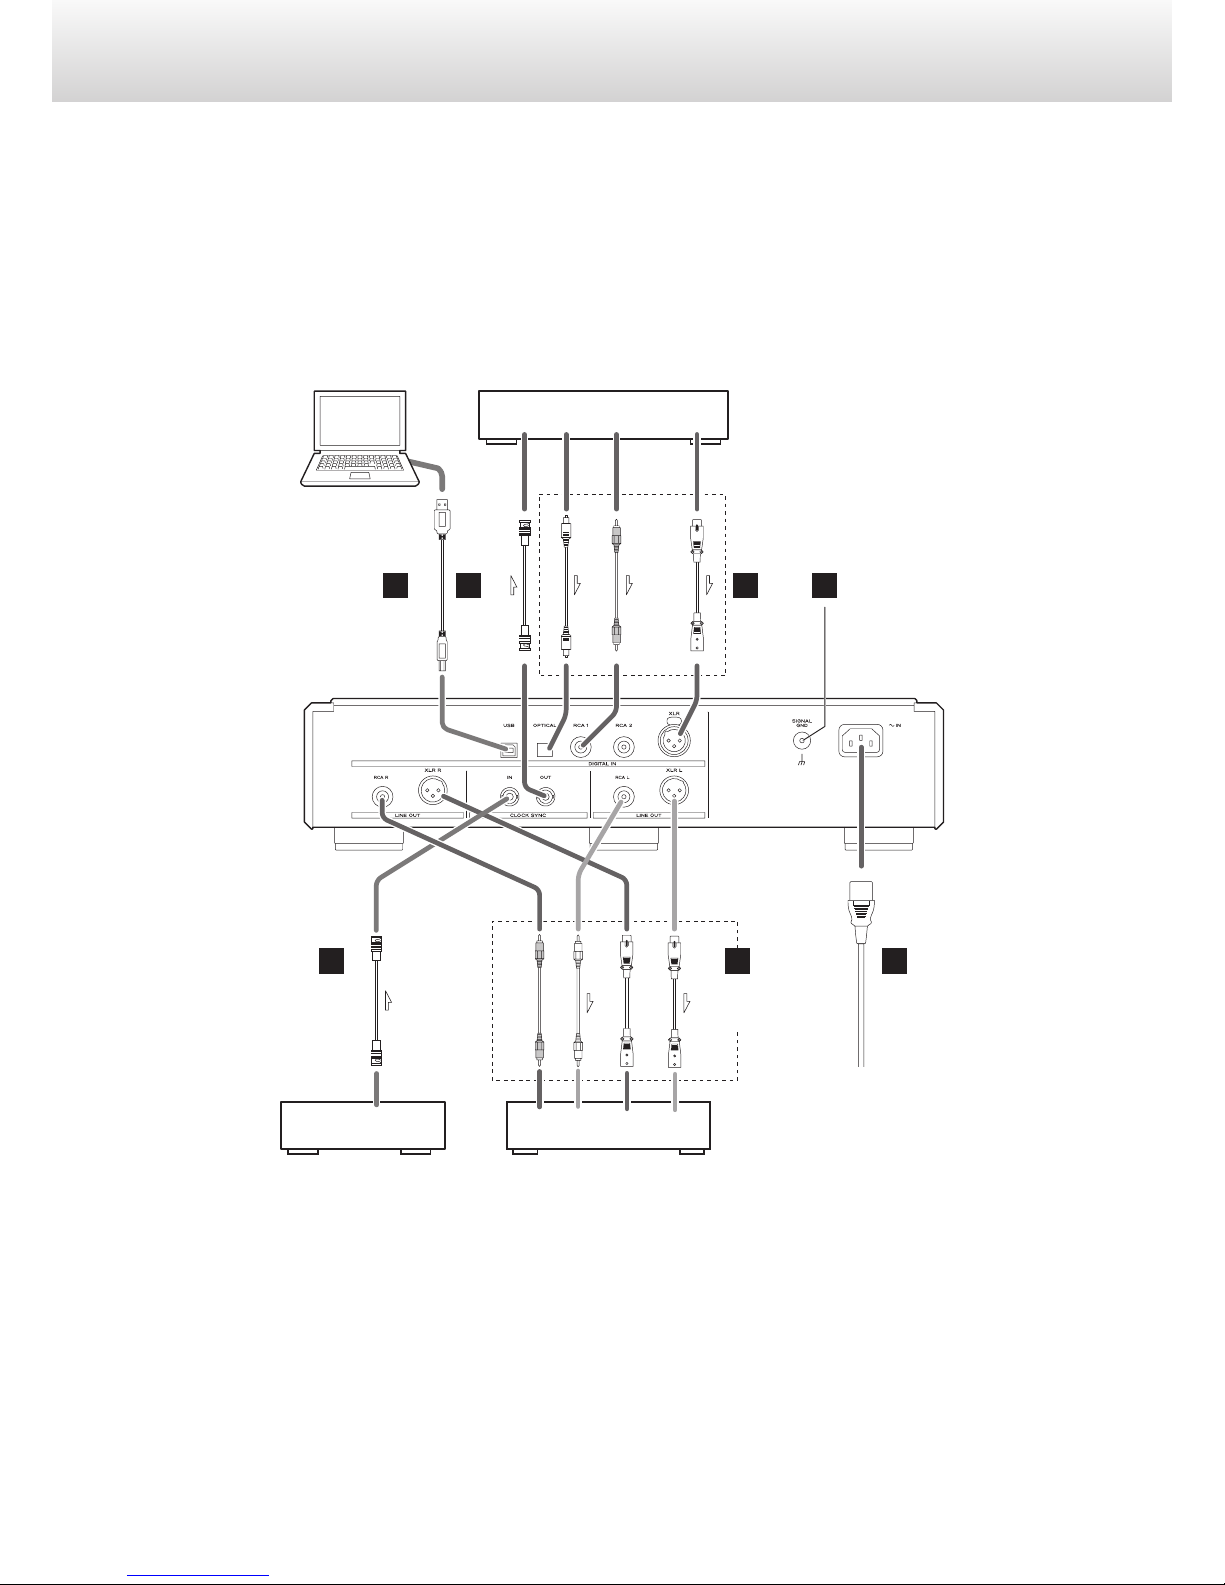
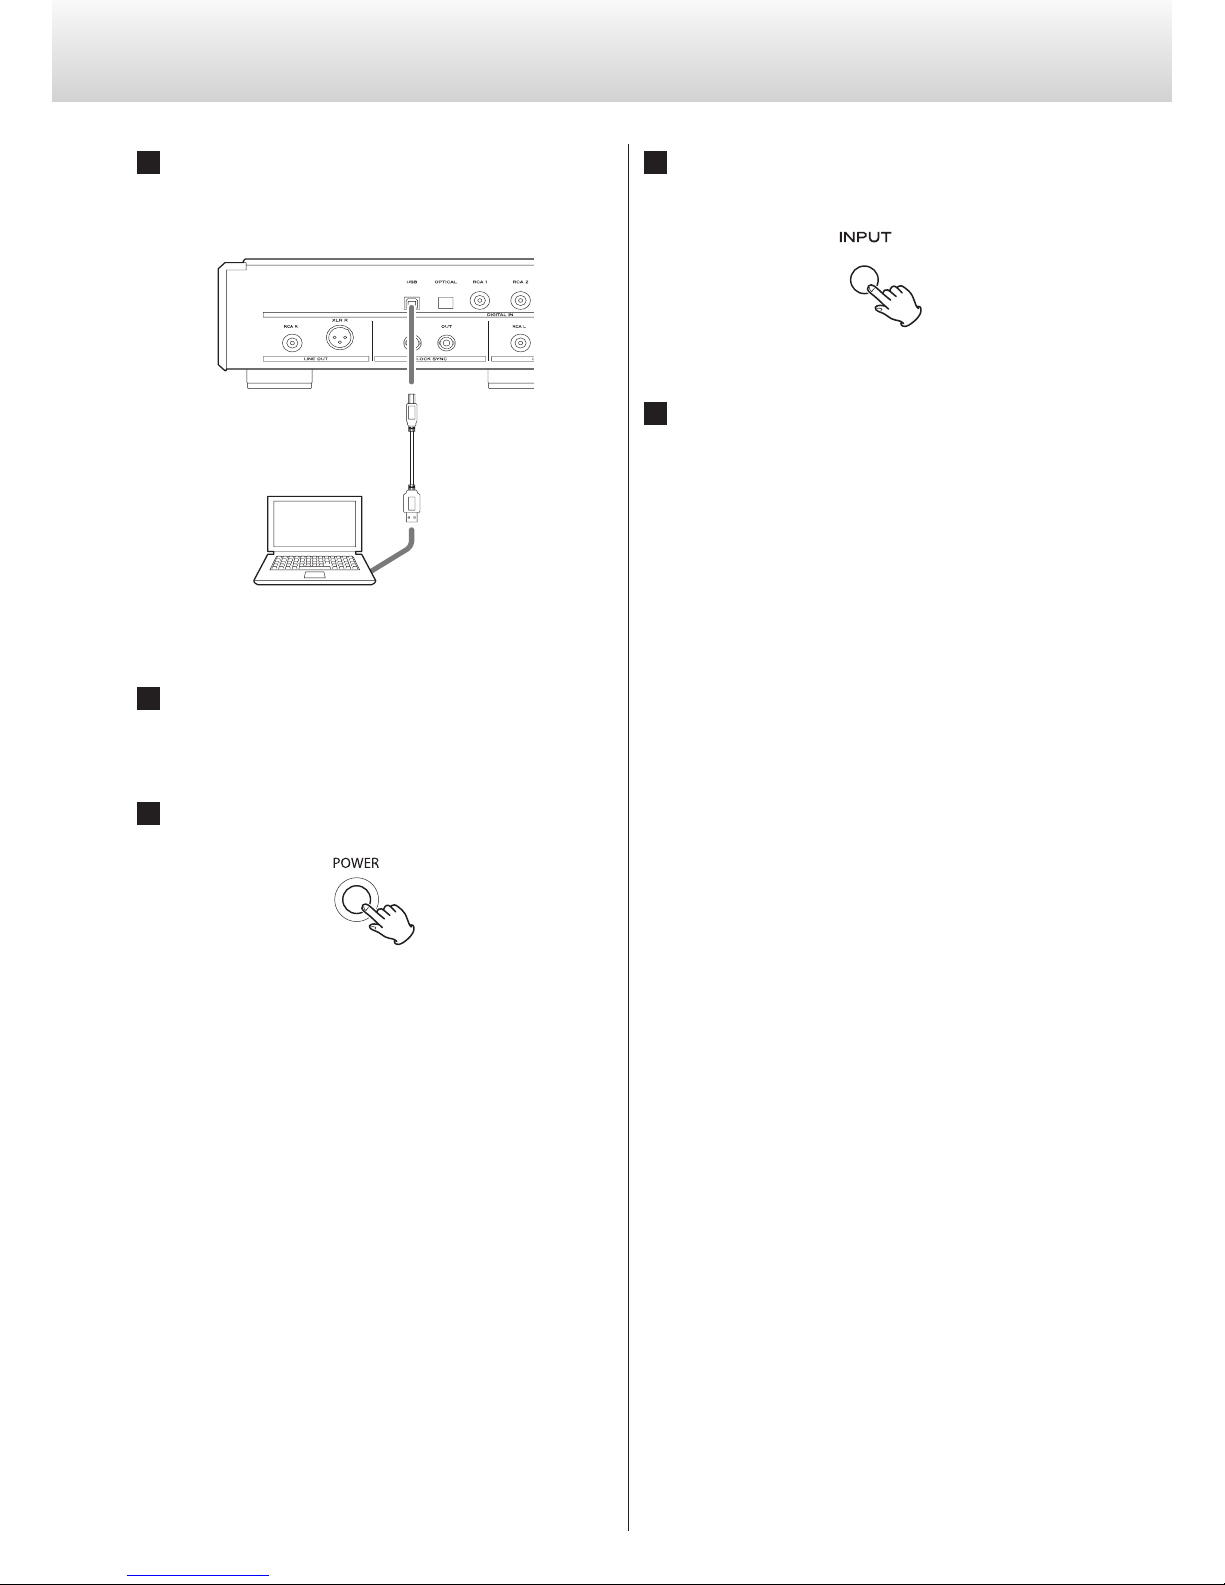
Q Precautions when making connections
Make all connection before plugging in the power cord. o
Carefully read the operation manuals of the other equipment and follow their instructions when connecting them. o
Making connections
Super Audio CD/CD transport or player
DIGITAL OUT
CLOCK SYNC
IN
BNC coaxial digital cable
XLR digital cable
RCA digital cable
Optical digital cable
USB cable
Personal computer
A
B
C D
Audio input
L
RLR
Amplier
Connect a
pair of XLR cables
or RCA cables.
XLR cable
RCA audio cable
D/A converter
(D-07X)
CLOCK SYNC
OUT
Clock generator
(G-01, G-02, etc.)
BNC coaxial digital cable
B E F
Wall socket
Page 9
9
English
A
USB input connector
Used to input digital audio from a personal computer.
Connect it to a personal computer's USB connector.
Use a commercially available USB cable for connection.
This connector is the USB-B type.
B
Clock sync input/output connector (CLOCK
SYNC)
Outputs/inputs a synchronizing (clock) signal.
Connect the CLOCK SYNC IN connector to the clock output connector of a G-01, G-02 or other clock generating device.
Connect the CLOCK SYNC OUT connector to the clock sync input
on a digital device.
Use a commercially available BNC coaxial digital cable
(impedance: 75 ohms).
C
Digital audio input connectors (DIGITAL IN)
These connectors input digital audio.
Connect these connectors to the corresponding connectors on a
digital device (for example, Esoteric P-05 or K-05 etc.).
Use commerci ally availab le cables for the foll owing
connections:
XLR: balanced XLR digital audio cable
RCA: RCA coaxial digital cable
OPTICAL: optical digital cable
D
SIGNAL GND connector
Connection of this connector with the ground connector of another
unit (digital device or amplifier) may improve sound quality.
This is not a safety ground. o
E
Analog audio output connectors (LINE OUT)
These connectors output analog audio.
Use commerciall y available XLR or RC A audio cables
according to the connector of the amplifier:
XLR: balanced XLR audio cables
RCA: RCA audio cables
XLR pin assignment:
Pin 1: Common
Pin 2: Hot (+)
Pin 3: Cold (–)
o
The polarity of the XLR connector can be set to Pin 3 HOT (page 17).
F
AC power inlet
Connect the included power cord to this inlet.
After all other connections have been completed, connect the
power plug to the AC power outlet.
Q Do not use any power cord other than an authentic Esoteric
produc t. Doi ng so could cause fire or elec tric shock.
When the unit is not used for an extended period of time,
disconnect the power plug from the outlet.
At Esoteric, we use Esoteric MEXCEL stressfree 8N/7N cables
for reference. The following types of cables in the Esoteric MEXCEL
cable series are available for purchase.
RCA audio cable
XLR audio cable
RCA digital cable
XLR digital cable
BNC digital cable
Power cord
Page 10
10
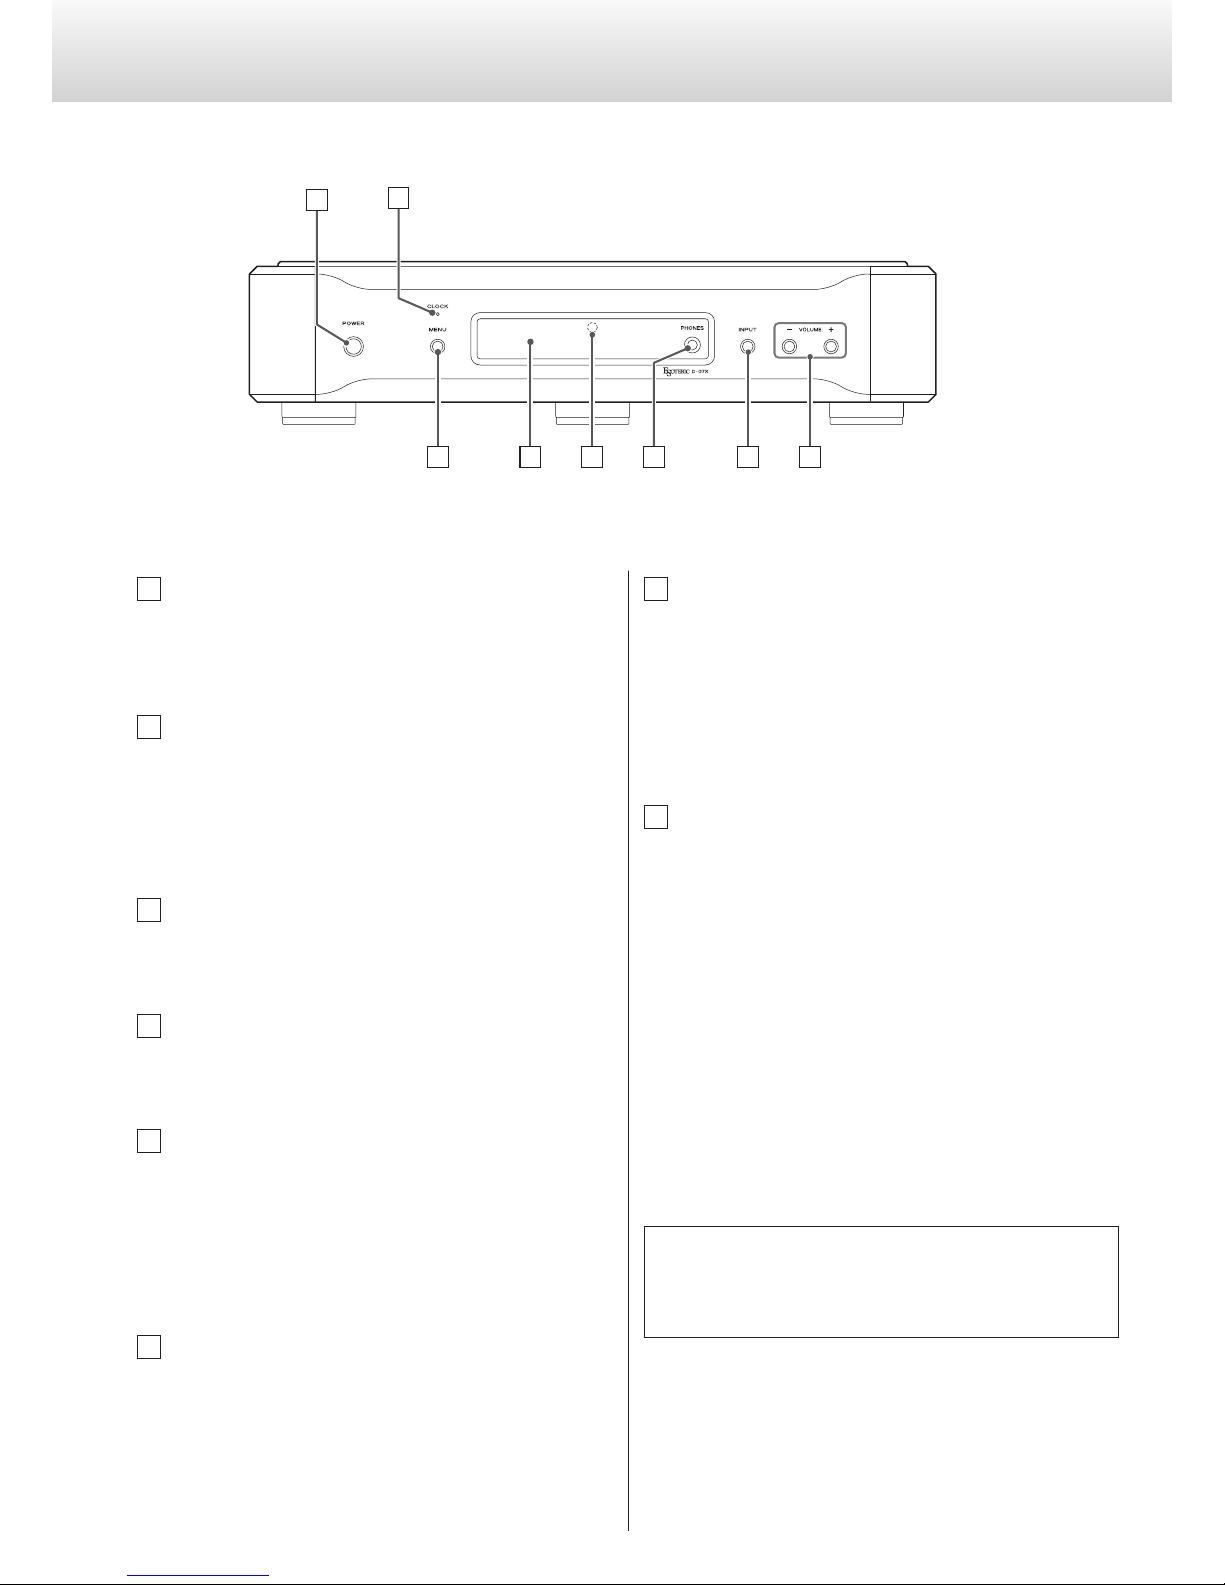
A
POWER button
Press to turn the power on and off.
When the power is on, the ring around the button lights blue.
B
CLOCK indicator
Shows the clock sync or master clock status.
This indicator blinks when a signal is being input through the
clock sync connector.
When the signal is locked, the indicator stays lit without blinking.
C
MENU button
Press to engage the setting mode (see page 12).
D
Display
Displays the current input, sampling frequency, etc.
E
Remote control sensor
Receives signals from the remote control unit.
Point the remote control unit at this sensor when using the
remote control.
You can use a remote control included with another Esoteric
product.
F
PHONES jack
Connect headphones with a stereo 6.3 mm (1/4") plug here.
Audio is output through either the analog output (LINE OUT) jack o
or the headphones (PHONES) jack.
Regardless of the input setting, audio will not be output from the o
LINE OUT jacks if headphones are connected to the PHONES jack.
C
D
E
G
H
B
A
F
G
INPUT button
Switches the digital input source.
Select the connector to which a digital device is connected.
The display flashes when no digital signal is being input.
The INPUT buttons on a remote control included with another o
Esoteric product can also be used.
H
VOLUME buttons
The volume level can be adjusted from –∞ (MUTE), –99.5 to 0.0 dB.
Use these buttons to adjust the volume when connected directly
to a power amplifier.
When a preamplifier is connected, set the volume to 0.0.
When in setting mode, these buttons are used to select options
within the menu item.
When headphones are connected to the PHONES jack, this o
adjusts the headphones volume. When headphones are not connected, this adjusts the analog audio output volume.
The VOLUME buttons (–/+) on a remote control included with o
another Esoteric product can also be used.
Names and functions of parts
You can use a remote control included with a P-05, K-05 or other
Esoteric products with this unit (see page 7).
When using a remote control included with another Esoteric product
to operate this unit, set “RC” (Remote control) to “Enable” (see page 18).
Page 11
11
English
Basic Operation
3
Start playback of the selected input device
and adjust the volume.
When connecting the unit directly to a power amp without using a preamp in between,
use the VOLUME buttons (–/+) to adjust the volume.
When connecting the unit to a preamp,
use the VOLUME buttons (–/+) to set the volume to 0.0 dB.
With this unit, you can set the analog audio output (LINE OUT) o
and headphones output levels independently.
Audio is output through either the analog output (LINE OUT) o
jacks or the headphones (PHONES) jack.
Audio will not be output from the LINE OUT jacks if headphones
are connected to the PHONES jack.
o
The remote control included with another Esoteric product can be
used to change the input, adjust the VOLUME (–/+) and for MUTING
(see page 7).
Press the POWER button to turn off the unit after use. o
When powering off your audio system, always make sure to turn o
off the power amplifier first.
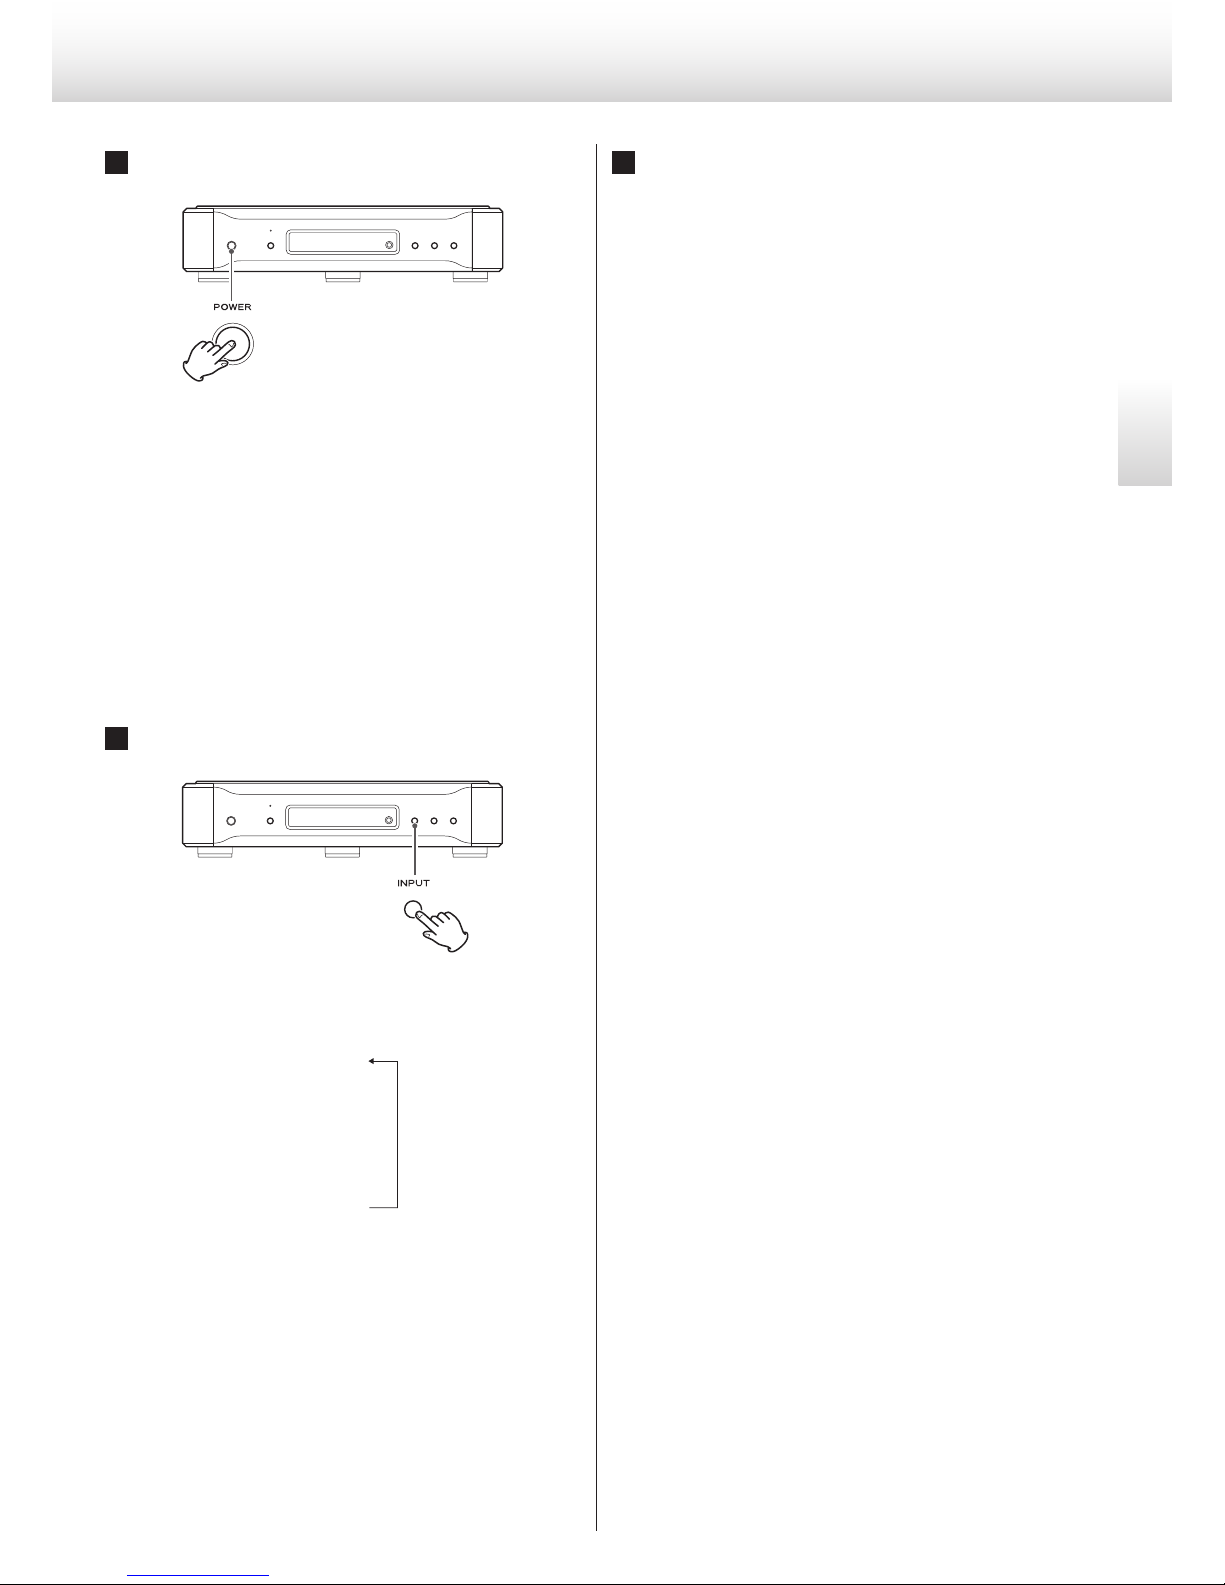
1
Press the POWER button to turn the unit on.
The ring around the POWER button lights blue.
When connecting a power amplifier to the unit, make sure to o
turn the amplifier on after turning on other devices.
Also turn on all devices connected to the unit. o
When CLK (clock) is set to IN or DMCK, if a clock signal cannot be o
detected as soon as the unit is turned on, “WRD UNLCK!” or “NO
WORD” might appear on the display, but these messages will
vanish if an input clock signal is locked after a connected device
is turned on.
2
Press the INPUT button to select an input.
Each press of the button changes input and the selected input
appears on the display as follows:
XLR
z
RCA1
z
RCA2
z
OPT
z
USB
Play back the source after selecting the source.
The text on the display flashes when a digital signal is not
detected. Turn on the connected device and check connections.
When connecting the unit directly to a power amp without using o
a preamp in between, minimize the volume (---) before changing
the input device.
Page 12
12
Setting mode (1)
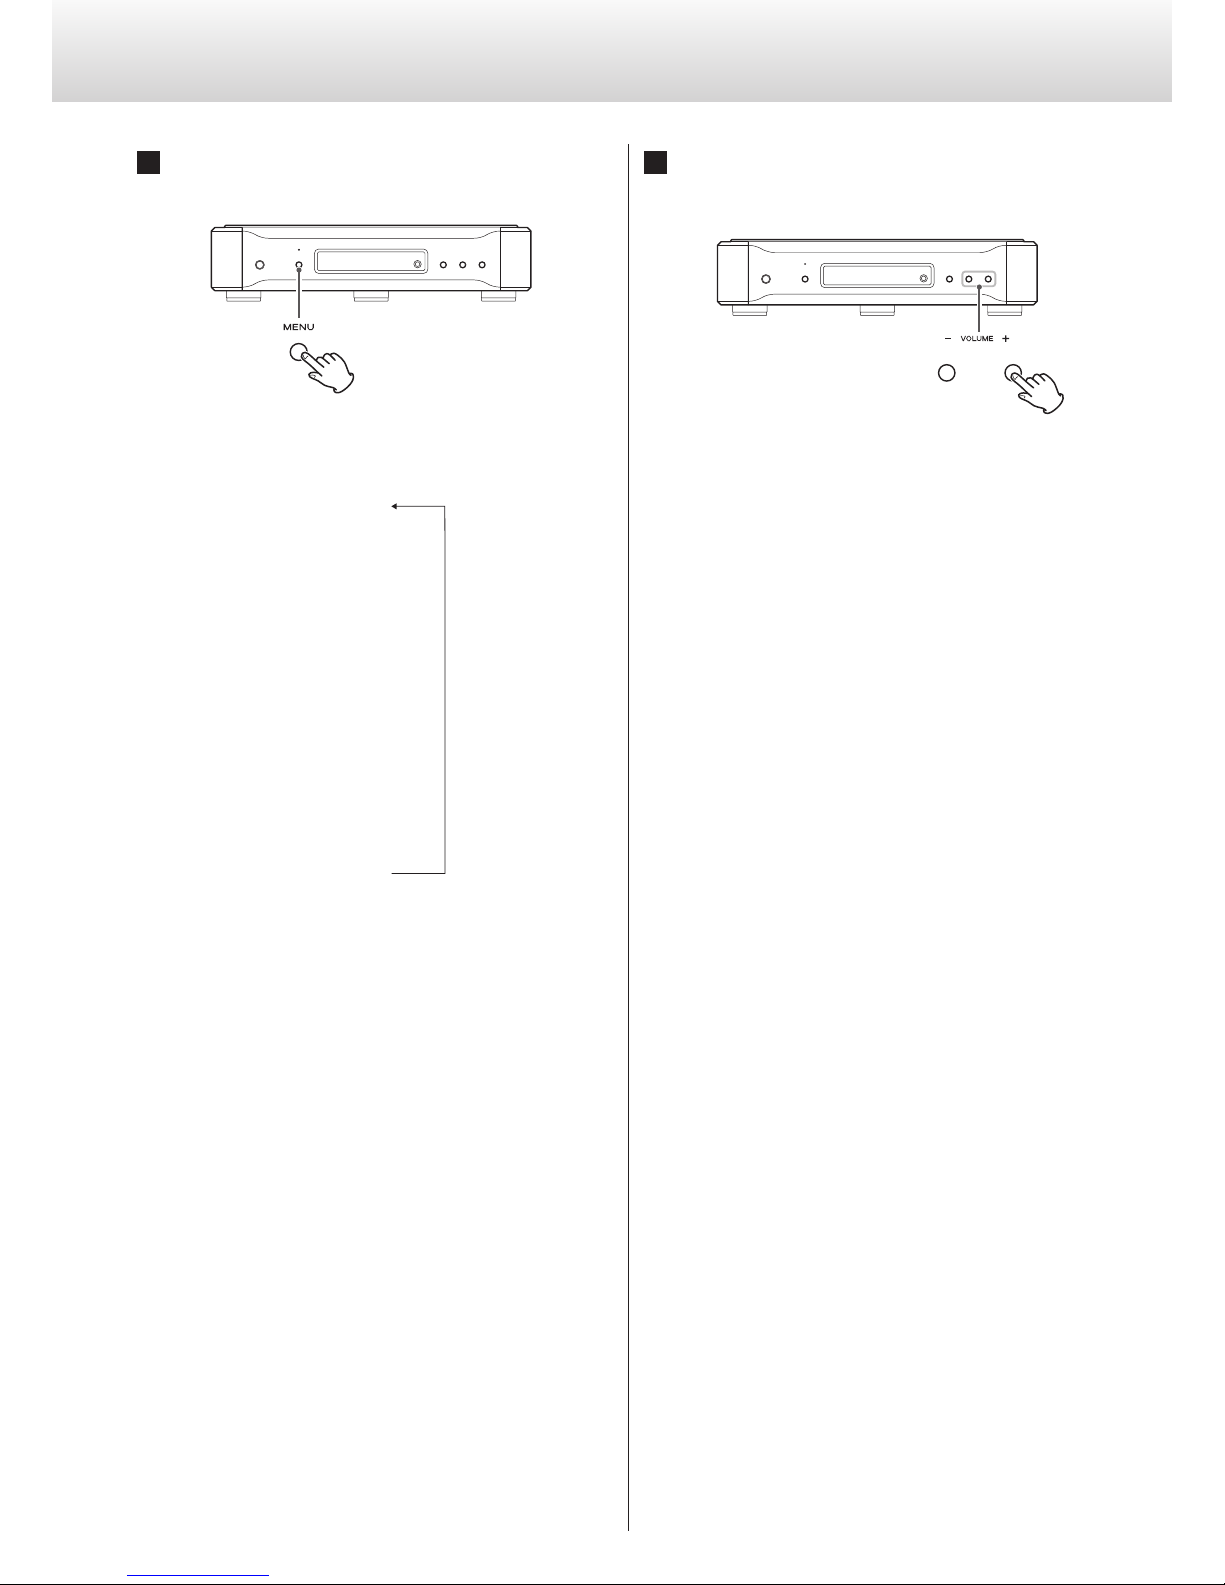
1
Press the MENU button repeatedly to select
the menu item to be changed.
Each press changes the display as follows:
CONV>***
z
DF>***
z
CLK>***
z
(WOUT>***)
z
OUT>***
z
(XLR>***)
z
(USB>***)
z
RC>***
z
DISP>***
z
FLaOFF>***
z
DIMMER>***
Items shown in ( ) might not be shown depending on other settings.
If you press the INPUT button or leave the unit idle for 10 seconds,
setting mode will be cancelled.
The SETUP button on a remote control included with another o
Esoteric product can also be used with this unit (see page 7).
2
Use the VOLUME buttons (–/+) to select the
options within the menu item.
Individual menu functions are described on pages 13–18.
o The INPUT buttons on a remote control included with another
Esoteric product can also be used (see page 7).
Settings are stored even when power is turned off and the unit is o
unplugged.
Page 13

13
English
Available menu items and settings
CONV>*** (Upconversion)
You can convert the sampling frequency of PCM signal, such as
a CD, to 2x or 4x. It is also possible to convert the PCM signal to a
DSD signal.
A different setting can be made for each input.
DF>*** (Digital filter)
Changes the digital filter characteristics when a PCM signal is being
input.
A different setting can be made for each input.
CLK>*** (Clock)
Selects the CLOCK SYNC or master clock mode.
A different setting can be made for each input.
WOUT>*** (clock sync output frequency)
When set to clock sync mode, selects the CLOCK SYNC output
frequency.
A different setting can be made for each input.
OUT>*** (Analog output)
Sets the output connector for analog audio output.
XLR>*** (XLR output gain)
Sets the XLR output gain.
USB>*** (USB input)
Sets the USB operation mode.
RC>*** (Remote control)
If used with an optional Esoteric amplifier, you can set the D-07X
not to respond to the Esoteric remote control.
DISP>*** (Display)
Selects whether the display normally displays the volume level or
the sampling frequency.
FLaOFF>*** (automatic display off)
In order to prevent the fluorescent display from wearing out, you
can set it to turn off automatically after a certain amount of time
passes without operation.
DIMMER>*** (Display dimming)
The display on the main unit can be dimmed to suit the environment in which you listen to music.
Page 14

14
Upconversion setting
Display: UPCONV>***
This setting can be made for each input. o
During Super Audio CD playback, the DSD signal is sent directly to o
the D/A converter.
OFF
The original input signal is sent directly to the D/A converter without
upconversion.
2Fs
32kHz, 44.1kHz and 48kHz sources are upconverted to double values
of 64 kHz, 88.2 kHz and 96 kHz, respectively, and then sent to the
D/A converter.
4Fs
32kHz, 44.1kHz, 48kHz, 88.2kHz and 96kHz sources are upconverted
to double or quadruple values of 128 kHz, 176.4 kHz or 192 kHz and
then sent to the D/A converter.
DSD
The signal is converted to DSD digital format, and then sent to the
D/A converter.
D/A converter digital filter setting
Display: DF>***
This setting can be made for each input. o
During Super Audio CD playback or during conversion to DSD format, o
this is automatically set to the dedicated DSD filter.
OFF
No digital filter is used by the D/A converter.
Using this setting, harmonic distortion will be output. If noise occurs o
because of the cross modulation of harmonic distortion, for example, set “DF” to “FIR” or “S_DLY” instead.
FIR1
The cutoff frequency of the FIR-type filter varies according to the
input sampling frequency.
FIR2
Regardless of the input sampling frequency, a FIR-type filter with a
cutoff frequency of about 80 kHz is used.
S _D LY 1
The cutoff frequency of the S_DLY-type filter varies according to
the input sampling frequency.
S _D LY 2
Regardless of the input sampling frequency, an S_DLY-type filter
with a cutoff frequency of about 80 kHz is used.
About the D/A converter digital filters
FIR-type digital filters
This type of filter has an established reputation for sound quality
and features tonal quality with both dense, rich sound reverberations and crisp sound transients.
S_DLY-type digital filters
This type of filter has no pre-echo in the impulse response and features natural sound attack and reverberation for a tonal quality that
is close to the original.
Setting mode (2)
Page 15
15
English
Clock setting
Display: CLK>***
This setting can be made for each input. o
The items that can be selected depend on the input setting.
When the input is XLR, RCA1, RCA2 or OPT
PLL1
z
PLL2
z
OUT
z
IN
z
DMCK
When the input is USB and the USB setting is NORM or HS_1
PLL1
z
OUT
When the input is USB and the USB setting is HS_2
INT
z
OUT
z
IN
z
DMCK
PL L1
The built-in PLL circuit follows the input digital audio signal and
generates master clock. Operation in response to a wide range of
input clock frequencies is possible.
PLL2
The PLL circuit follows the input digital audio signal and, together
with the built-in high-precision crystal oscillator, generates master
clock. By using PLL circuits with different characteristics in 2 stages,
audio signal transmission jitter is reduced.
In order to increase the performance of the built-in high-precision o
crystal oscillator, it has been designed with a narrow frequency
variation range. If the clock frequency of the incoming digital
signal exceeds the tolerance of the built-in high precision crystal
oscillator, synchronization will not be possible. In such cases, set
the unit to PLL1 mode.
INT
The unit operates with the built-in crystal oscillator as the master
clock.
OUT
The unit outputs a word clock signal from its CLOCK OUT connector
and operates with clock sync.
The frequencies that can be output are 44.1, 48, 88.2, 96, 100, 176.4,
and 192 kHz, as well as 22.5792 and 24.576 MHz.
IN
The unit receives word clock signal input through its CLOCK IN
connector from a clock generator and operates with clock sync.
The frequencies that can be input are 44.1, 48, 88.2, 96, 100, 176.4,
and 192 kHz, as well as 10 MHz.
With HS_2 USB input, the frequency that can be input depends o
on the source sampling frequency.
When the source is 44.1kHz:
44.1, 88.2, 176.4, 100 kHz and 10 MHz
When the source is 48kHz:
48, 96, 192, 100 kHz and 10 MHz
DMCK
The unit receives direct input of a word clock signal that is 512
times that of the master clock rate (22.5792 MHz for 44.1 kHz or
24.576 MHz for 48 kHz) through its CLOCK IN connector from a
clock generator and operates under direct synchronization with
that clock generator.
o
When playing back a CD or SACD with an Esoteric SACD transport,
only 22.5792 MHz can be input.
With HS_2 USB input, 22.5792 MHz for 44.1 kHz or 24.576 MHz for o
48 kHz can be input as the source sampling frequency, but it is
necessary to switch the clock according to the source.
Page 16

16
Clock output frequency setting
Display: WOUT>***
Sets the frequency of the signal output from the CLOCK OUT connector.
Use when synchronizing playback of a device that has a clock sync
input connector, such as an Esoteric P-05, with the D-07X.
This setting only appears when CLK is set to OUT, IN or DMCK. o
A different setting can be made for each input. o
The items that can be selected depend on the CLK setting.
When the CLK setting is OUT
44.1kHz
z
88.2kHz
z
176.4kHz
z
22.5792MHz
z
48kHz
z
96kHz
z
192kHz
z
24.576MHz
z
100kHz
When set to 44.1, 88.2 or 176.4 kHz or 22.5792 MHz, the audio o
signals that can be input are 44.1, 88.2 and 176.4 kHz and DSD.
When set to 48, 96 or 192 kHz or 24.576 MHz, the audio signals o
that can be input are 48, 96 and 192 kHz.
When set to 100 kHz (universal clock), the audio signals that can o
be input are 44.1, 88.2 and 176.4 kHz and DSD.
Use when connected to an Esoteric device, such as a UX-1 or
UX-3, that supports universal clock.
When the CLK setting is IN
OFF
z
THRU
z
1Fs
z
2Fs
z
4Fs
z
MCK
z
100kHz
When the CLK setting is DMCK
OFF
z
THRU
z
1Fs
z
2Fs
z
4Fs
z
MCK
The source device must receive clock input from a clock generator o
and be synchronized.
OFF
No clock signal is output.
THRU
The clock signal input through the CLOCK IN connector is output
without changing the frequency.
1Fs, 2Fs, 4Fs
A clock signal is output that is 1, 2 or 4 times the base sampling
frequency of the input clock signal, which must be either 44.1 kHz
or 48 kHz.
MCK
A master clock (MCK) signal is output that is 512 times the base
sampling frequency of the input clock signal, which must be either
44.1 kHz or 48 kHz.
100 k
Universal clock (100 kHz) is output.
Setting mode (3)
Page 17

17
English
Analog output setting
Display: OUT>***
Regardless of the input setting, audio will not be output from the o
LINE OUT jacks if headphones are connected to the PHONES jack.
RCA
Analog audio signals are output through the RCA jacks.
XLR2
Analog audio signals are output through the XLR connectors with
pin 2 HOT.
XLR3
Analog audio signals are output through the XLR connectors with
pin 3 HOT.
XLR output gain setting
Display: XLR>***
This setting only appears when the analog output is set to XLR2 or o
XLR3.
Depending on the connected amplifier, either the “+6dB” setting o
or the “0dB” setting might result in the same volume as the RCA
jack input.
+6dB
Set the XLR output level to double the RCA output level (+6 dB).
If the sound clips when set to “+6dB”, change the setting to “0dB”. o
0dB
Set the XLR output level to the same level as the RCA output level
(0 dB).
USB input setting
Display: USB>***
This item only appears when in the input source is set to USB. o
When set to use a HIGH SPEED mode, dedicated driver software o
must be installed on the computer. Download the driver software
from our website (see page 19).
NORM
Connect using USB FULL SPEED mode.
The sampling frequencies that can be input are 32 kHz, 44.1 kHz,
48 kHz, 88.2 kHz and 96 kHz.
HS _1
Connect using USB HIGH SPEED mode.
The sampling frequencies that can be input are 32 kHz, 44.1 kHz,
48 kHz, 88.2 kHz, 96 kHz, 176.4 kHz and 192 kHz.
HS_2
Connect using USB HIGH SPEED asynchronous mode.
The sampling frequencies that can be input are 32 kHz, 44.1 kHz,
48 kHz, 88.2 kHz, 96 kHz, 176.4 kHz and 192 kHz.
In asynchronous mode, the clock signal of this unit is used for playback of the audio data transmitted from the computer.
If skipping noise occurs during playback when set to HS_2, set o
the unit to HS_1 instead.
Page 18
18
Remote control setting
Display: RC>***
When using this unit together with an Esoteric amplifier, you can set
it so that the remote does not control the volume and input selection
of this unit.
Enable
Allows the unit to be controlled by the remote control from an
Esoteric product such as the P-05 or K-05 (see page 7).
Disable
Sets the unit to ignore all commands from remote controls except
DIMMER commands.
Use this setting when using the unit at the same time as an Esoteric
amplifier.
Display contents setting
Display: DISP>***
Fs
The name of the input and the sampling frequency of the audio
signal are shown.
Example 1) XLR DSD
Example 2) RCA1 48
VOL
The name of the input and the volume setting are shown.
Example 1) XLR 0.0
Example 2) OPT -7.5
Automatic display (FL) off setting
Display: FLaOFF>***
You can set the display (FL) to automatically turn off after a set amount
of time. The default value is “30m”.
15m, 30m, 60m
The display will automatically turn off if no operation is conducted
and the display does not change for 15, 30 or 60 minutes.
OFF
The display never turns off automatically.
If the input digital signal is not locked, the display will not turn off. o
If the display is left ON with the same indication for a long time, o
brightness irregularities can occur. For this reason, we recommend
that you enable the automatic display off function.
Dimmer setting
Display: DIMMER>***
The brightness of the display and indicators on the unit can be
adjusted. The default value is “3”.
3 (Ordinary brightness)
z
2
z
1
z
0 (O)
If you set it to “0” (off), the display and indicators will be unlit. o
Even when the display is set to“0” (off), pressing the INPUT button, o
for example, will turn the display back on for a few seconds.
Even when set to a value other than “3” (standard brightness), the o
brightness will be raised to the standard level while an error message or a setting menu is being shown.
Setting mode (4)
Page 19

19
English
Connecting a computer and playing back audio files (1)
By connecting this unit's USB input connector using a USB cable with
a computer, you can play back audio files stored on a computer using
this unit's D/A converter.
This unit can be connected by USB to computers that use the following operating systems.
Windows XP 32-bit
Windows Vista 32/64-bit
Windows 7 32/64-bit
Mac OS X 10.6.4 or later (32/64-bit)
Operation with other operating systems cannot be guaranteed.
Depending on the computer hardware and software integration, o
proper operation might not be possible even with the above operating systems.
To connect in HIGH SPEED 1 or HIGH SPEED 2 mode, you must o
install dedicated driver software beforehand.
If you connect this unit with a computer before installing the driver,
it will not function properly. In addition, if you are using Windows
XP, computer operation might become noticeably slower, and you
might need to restart the computer.
Website address for driver software download
http://www.esoteric.jp/products/esoteric/usb/usb_driver_e.html
Install the dedicated driver software after downloading the file from
the above address.
You can select 1 of 3 modes to use when connecting this unit to a
computer by USB. See pages 12 and 17 for information about how to
make settings.
NORMAL mode
In setting mode, select USB>NOR.
This connects to the computer in FULL SPEED mode.
The sampling frequencies that can be transmitted are 32, 44.1, 48,
88.2 and 96 kHz. There is no need to install dedicated driver software when connecting this unit with a computer in order to use
this mode. The unit and the computer will be connected using the
standard USB audio driver.
The first time that you connect this unit with a computer, the o
computer will automatically detect this unit's USB port and install
the driver. Follow the instructions from the operating system.
After completing driver installation, start the audio file playback
application.
If the proper connection has been made, you should be able to
select “ESOTERIC USB AUDIO” as the audio output.
HIGH SPEED 1 mode
In setting mode, select USB>HS_1.
This connects to the computer in HIGH SPEED mode.
The sampling frequencies that can be transmitted are 32, 44.1, 48,
88.2, 96, 176.4 and 192 kHz. You must install dedicated driver software in order to use this mode when connecting this unit with a
computer.
Download the dedicated driver software from our website.
If the proper connection has been made, you should be able to
select “ESOTERIC USB HS AUDIO” as the audio output.
HIGH SPEED 2 mode
In setting mode, select USB>HS_2.
This connects to the computer in HIGH SPEED asynchronous
mode.
The sampling frequencies that can be transmitted are 32, 44.1, 48,
88.2, 96, 176.4 and 192 kHz. You must install dedicated driver software in order to use this mode when connecting this unit with a
computer.
Download the dedicated driver software from our website.
If the proper connection has been made, you should be able to
select “ESOTERIC USB HS ASYNC AUDIO” as the audio output.
In asynchronous mode, the audio data sent from the computer will
be processed using this unit's clock, enabling the amount of jitter
that occurs during data transmission to be reduced.
When using HIGH SPEED 2 mode to connect the computer with o
this unit, if the playback sound skips or noise occurs at regular
intervals, use HIGH SPEED 1 mode instead.
If you want to use HIGH SPEED 1 or HIGH SPEED 2 mode, install o
the dedicated driver software before connecting the unit with the
computer (see the left column).
Page 20
20
1
Connect this unit to a computer using a USB
cable.
Use a cable with a connector that matches that of this unit.
Personal computer
2
Turn the computer power on.
Confirm that the operating system has started properly.
3
Press the POWER button to turn this unit on.
4
Press the INPUT button repeatedly to select
USB (see page 11).
5
Start playback of an audio file on the computer.
Better sound quality can be achieved by setting the volume on
the computer to the maximum level and using the amplifier connected to this unit to adjust the volume. Set the amplifier volume
to the minimum when you start playback and gradually increase it.
The computer cannot control this unit, nor can this unit control o
the computer.
This unit cannot send audio files to the computer by USB. o
Do not do any of the following when playing back an audio file o
via USB. Doing so could cause the computer to malfunction.
Always quit the music playback software before doing any of the
following.
Unplug the USB cable
Turn this unit's power off
Change the input
When playing back an audio file via USB, computer operation o
sounds will also be output. If you do not want these sounds to
the output, make appropriate settings on the computer to turn
them off.
If you connect this unit with the computer or change its input to o
“USB” after starting the music playback software, audio files might
not play back correctly. If this should occur, restart the audio playback software or restart the computer.
Connecting a computer and playing back audio files (2)
Page 21

21
English
Messages
“- - -” appears on the right side of the display.
An incompatible signal is input.
Do not input signals other than PCM and DSD.
Check digital device connections.
XLR, RCA1, RCA2, OPT or USB flashes.
The unit cannot detect a digital signal. Press the INPUT button to
select a connector to which a digital device is connected.
Turn on the connected device. Confirm the settings of the connected device.
PLL LCKING
The internal PLL circuit (PLL2) is locked.
PLL UNLCK!
The internal PLL circuit cannot lock the input digital signal. Check
the connection with the digital device being input. If the frequency precision of the input signal exceeds the range that this
unit can lock, the internal PLL circuit (PLL2) will not be able to lock,
so set the clock (CLK) to PLL1. (See page 15 for details.)
NO WORD!
No word clock signal is being input. Check the connection with the
external master clock generator and its power and output status.
When not using word clock, set the clock (CLK) to PLL1 or PLL2.
(See page 15 for details.)
WRD ERROR!
The clock frequency of the input source does not match word
clock frequency.
Select 44.1, 88.2, 100 or 176.4 kHz or 10 MHz during Super Audio CD
playback. You should also confirm that clock sync is occurring correctly with the source device.
Set the clock (CLK) to “PLL1” or “PLL2” when connected to a device
that does not have a clock sync function.
To synchronize with a master clock, select DMCK. (See page 15 for
details.)
WRD LCKING
Indicates that the input word clock signal is being locked.
WRD UNLCK!
Indicates that the device cannot lock to the input word clock signal.
Confirm the frequency setting of the connected clock generator.
NO MCK!
No master clock signal is being input.
MCK ERROR!
The input audio signal and the 22.5792MHz or 24.576MHz input
clock are not locked.
The frequency of the input source is not locked with the input
master clock.
Confirm that the input source supports master clock output. (See
page 16 for details.)
MCK UNLCK!
Cannot lock to the master clock input.
Check the frequency setting of the connected clock generator. (See
page 15 for details.)
Page 22

22
Troubleshooting
If you experience a problem with the unit, please take a moment to
review the following information before requesting service. Moreover,
the problem might be caused by something other than this unit.
Confirm that connected devices are also being used correctly.
The power does not turn on.
e Insert the power plug into an outlet.
e Check the connection of the power cord to the unit.
No sound
e Check the connections with the amplifier and speakers.
e Check the analog audio output setting (see page 17).
e If headphones are connected, no sound will be output from the
LINE OUT connectors.
Input indicator flashes.
e Turn on the device connected to the selected input connector.
e Check whether the connection to the selected input connector is
correct.
A beeping noise occurs at regular intervals.
e The D-07X is in clock sync mode, but the connected device is not.
Check the connection to the clock sync connector and the setup
of the connected device.
The clock indicator flashes.
e
Set the clock (CLK) to “PLL1” or “PLL2” when not using the clock sync
mode.
e An incompatible signal is input. Check the clock sync connections
and the setup of the connected devices.
Since this unit uses a microcontroller, external noise and other
interference can cause the unit to malfunction. If this occurs,
turn the power off once, and then restart it after waiting for
about one minute.
Restoring factory default settings
Memorized settings are stored even after the power cord has been
disconnected.
If you have made changes through the setup menu process, and want
to restart from a known set of options, restore the unit to the default
factory settings as follows:
1
Turn the unit off.
If the unit is on, press the POWER button to turn it off and wait for
more than 30 seconds.
2
Press the POWER button while holding down
the MENU button.
Release the MENU button when the unit turns on and the display o
lights.
Page 23

23
English
Specifications
Analog output
Jacks ........................................................XLR (2 channel) x 1
RCA (2 channel) x 1
Headphones x 1
Output impedance
XLR ...................................................................100 Ω
RCA....................................................................25 Ω
Maximum output level (1 kHz, with full-scale input)
XLR: 2.45 Vrms (when set to 0 dB with 10 kΩ load)
RCA: 2.45 Vrms (with 10 kΩ load)
PHONES: 20 mW + 20 mW (with 32 Ω load)
Frequency response ............................................ 5 Hz to 55 kHz
Signal-to-Noise Ratio (S/N) ..............................................115 dB
Total harmonic distortion ......................................0.0015% (JEITA)
Digital input
Balanced digital input ..................................XLR (5.0 Vp-p/110 Ω) x 1
Coaxial connector......................................RCA (0.5 Vp-p/75 Ω) x 2
Optical digital connector................OPTICAL (–24.0 to –14.5 dBm peak) x 1
USB port . . . . . . . . . . . . . . . . . . . . . . . . . . . . . . . . . . . . . . . . . . . . . . . . . . . . . . . B connector x 1
Input sampling frequencies ................32, 44.1, 48, 88.2, 96, 176.4, 192 (kHz)
Note: The XLR input (only) supports DSD input in ES-LINK (single) format.
Clock sync output
Jack....................................................................BNC x 1
Output frequencies ....44.1, 48, 88.2, 96, 100, 176.4, 192 (kHz/rectangular wave)
22.5792, 24.576 (MHz)
Same frequency as input (when set to THRU)
Output level ..........................Equivalent to TTL levels (with 75 Ω load)
Clock sync input
Jack....................................................................BNC x 1
Input frequencies ........................44.1, 48, 88.2, 96, 100, 176.4, 192 (kHz)
10, 22.5792, 24.576 (MHz)
Input impedance .........................................................75 Ω
Input level ................................Square wave: equivalent to TTL level
Sine wave: 0.5–1.0 Vrms (with 75 Ω load)
General
Power supply
Europe model ..............................................AC 230 V, 50 Hz
U.S.A./Canada model ....................................... AC 120 V, 60 Hz
Korea model ................................................AC 220 V, 60 Hz
Power consumption .......................................................7 W
External dimensions (W x H x D) (including protrusions)
445 x 106.5 x 356 mm (17 1/2" x 4 2/8" x 14 1/8")
Weight ........................................................10.4 kg (22.93 lb)
Operating temperature ..........................................+5°C to +35°C
Operating humidity.............................5 % to 85 % (no condensation)
Storage temperature ............................................–20°C to +55°C
Accessories
Power cord x 1
Owner’s manual (this document) x 1
Warranty card x 1
Design and specifications are subject to change without notice. o
Weight and dimensions are approximate. o
Illustrations may differ slightly from production models. o
Page 24

24
Rear panel
Page 25

25
Français
N'exposez pas cet appareil aux gouttes ni aux éclaboussures. o
Ne placez pas d'objet rempli de liquide sur l'appareil, comme o
par exemple un vase.
N’installez pas cet appareil dans un espace confiné comme une o
bibliothèque ou un meuble similaire.
L’appareil tire un courant nominal de veille de la prise secteur o
quand son interrupteur POWER ou STANDBY/ON n’est pas en
position ON.
L’appareil doit être placé suffisamment près de la prise de o
courant pour que vous puissiez à tout moment atteindre
facilement la fiche du cordon d’alimentation
La fiche secteur est utilisée comme dispositif de déconnexion o
et doit donc toujours rester disponible.
Les produits de Classe o sont équipés d'un cordon d'alimentation
ayant une fiche de terre. Le cordon de ces produits doit être
branché dans une prise de terre.
Si le produit utilise des batteries (y compris un pack d'accus ou o
des piles), elles ne doivent pas être exposées au soleil, au feu ou
à une chaleur excessive.
PRÉCAUT ION pour les produits utilisant des batteries au o
lithium remplaçables : il existe un danger d'explosion en cas de
remplacement par un type de batterie incorrect. Remplacez-les
uniquement par des modèles identiques ou équivalents.
Des précautions doivent être prises pour l'emploi d'écouteurs o
ou d'un casque avec le produit car une pression acoustique
(volume) excessive dans les écouteurs ou dans le casque peut
provoquer une perte d’audition.
Pour les consommateurs européens
Mise au rebut des équipements électriques et électroniques
(a) Tout équipement électrique et électronique doit être traité
séparément de la collecte municipale d'ordures ménagères
dans des points de collecte désignés par le gouvernement ou
les autorités locales.
(b) En vous d ébar rass ant correc tement d es équipeme nts
électriques et électroniques, vous contribuerez à la sauvegarde
de précieuses ressources et à la prévention de potentiels effets
négatifs sur la santé humaine et l'environnement.
(c) Le traitement incorrect des déchets d'équipements électriques
et é le c troniques peut avoir des ef fets graves sur
l'environnement et la santé humaine en raison de la présence
de substances dangereuses dans les équipements.
(d) Le symbole de déchets d'équipements électriques et
électroniques (DEEE), qui représente une poubelle à
roulettes barrée d'une croix, indique que l'équipement
électrique et électronique doit être collecté et traité
séparément des déchets ménagers.
(e) Des sys tèmes de retour et de collecte sont disp onibles
pour l'utilisateur final. Pour des informations plus détaillées
sur la mise au rebut des vieux équipements électriques et
électroniques, veuillez contacter votre mairie, le service
d'ordures ménagères ou le magasin dans lequel vous avez
acquis l'équipement.
Mise au rebut des batteries et/ou accumulateurs
(a) Les bat teries et /ou accumulateurs hors d'usa ge doivent
être traités séparément de la collecte municipale d'ordures
ménagères dans des points de collec te désignés par le
gouvernement ou les autorités locales.
(b) En vo us débarrass ant cor re c te ment des batter ies et /ou
accumulateurs hors d'usage, vous contribuerez à la sauvegarde
de précieuses ressources et à la prévention de potentiels effets
négatifs sur la santé humaine et l'environnement.
(c)
Le traitement incorrect des batteries et/ou accumulateurs hors
d'usage peut avoir des effets graves sur l'environnement et la
santé humaine car ils contiennent des substances dangereuses.
(d) Le symbole de déchets d'équipements électriques et
électroniques (DEEE), qui représente une poubelle à
roulettes barrée d'une croix, indique que les batteries
et/ou accumulateurs doivent être collectés et traités
séparément des déchets ménagers.
Si une batterie ou un accumulateur contient plus que les
valeurs spécifiées de plomb (Pb), mercure (Hg) et/ou cadmium
(Cd) telles que définies dans la directive sur les batteries
(2006/66/EC), alors les symboles chimiques de ces éléments
seront indiqués sous le symbole DEEE.
(e) Des systèmes de retour et de collecte sont disponibles pour
l'utilisateur final. Pour des informations plus détaillées sur la
mise au rebut des batteries et/ou accumulateurs, veuillez
contacter votre mairie, le service d'ordures ménagères ou le
magasin dans lequel vous les avez achetés.
Pb, Hg, Cd
English
Page 26

26
Sommaire Contenu de l'emballage
Nous vous remercions d’avoir choisi Esoteric. Lisez ce mode
d'emploi avec attention pour tirer les meilleures performances
de cette unité.
Vérifiez que vous disposez bien de tous les accessoires représentés
ci-dessous.
Veuillez contacter le magasin dans lequel vous avez acheté cette unité
si l'un de ces accessoires manque ou a été endommagé durant le
transport.
Cordon d’alimentation x 1
Mode d’emploi (ce document) x 1
Conservez ce mode d'emploi dans un endroit sûr pour o
référence ultérieure.
Carte de garantie x 1
Contenu de l'emballage .........................................26
Avant l’utilisation ................................................27
Emploi d'une télécommande ....................................27
Faire les branchements ..........................................28
Nomenclature et fonctions des parties ...........................30
Fonctionnement de base. . . . . . . . . . . . . . . . . . . . . . . . . . . . . . . . . . . . . . . . 31
Mode de réglage ................................................32
Branchement d'un ordinateur et lecture de fichiers audio ........39
Messages .......................................................41
Guide de dépannage ............................................42
Restauration des réglages d'usine ...............................42
Caractéristiques techniques .....................................43
Face arrière .....................................................44
Page 27

27
Français
Avant l’utilisation Emploi d'une télécommande
Lisez ce qui suit avant d’utiliser l’unité.
ATTENTION
Ne déplacez pas l'unité durant l'utilisation. o
Placez l'appareil sur une surface stable près du système audio que o
vous allez utiliser.
En raison du poids de l'unité, prenez garde à ne pas vous blesser o
quand vous la déplacez. Faites vous aider si nécessaire.
Il est possible que l’unité chauffe durant l’utilisation, laissez donc o
toujours un espace suffisant autour d'elle pour la ventilation. Veillez
à ce qu’il y ait un espace d’au moins 20 cm au dessus et d’au moins
5 cm de chaque côté. Ne placez RIEN sur l'unité du type CD, CD-R,
disque vinyle, cassette etc.
La tension d’alimentation doit correspondre à la tension imprimée o
sur le panneau arrière. Si vous avez des doutes à ce sujet, consultez
un électricien.
N’ouvrez pas le boîtier car cela peut endommager le circuit ou o
causer un choc électrique. Si un objet étranger pénètre dans
l’unité, consultez votre revendeur ou le service après-vente.
Quand vous débranchez le cordon d'alimentation de la prise o
secteur, tirez toujours sur la prise, jamais sur le cordon.
Entretien
Si la surface de l'unité est sale, essuyez-la avec un chiffon doux ou
utilisez un détergent liquide léger dilué. Laissez la surface de l'unité
sécher complètement avant utilisation.
Q Par sécurité, débranchez le cordon d'alimentation de la
prise secteur avant tout nettoyage.
Ne vaporisez jamais du liquide directement sur cette unité. o
N’utilisez pas de diluant ni d'alcool car ils peuvent endommager la o
surface de l’unité.
Évitez un contac t prolongé d e l'unité avec des matériaux o
caoutchouteux ou plastiques car ceux-ci peuvent endommager
le boîtier.
Cet te unité a des fonctions qui peuvent être pilotées par des
télécommandes d'autres unités Esoteric.
Fonctions prises en charge par les autres télécommandes et touches
correspondantes sur la télécommande :
Réglage du niveau de volume : touches VOLUME (–/+) o
Passage en mode de réglage (configuration) : touche SETUP o
Coupure du son de la sortie : touche MUTE (MUTING) o
Changement de source d'entrée : touches INPUT (</>) ou ( o k/j)
Réglage de la luminosité de l'afficheur : touche DIMMER o
Les autres unités Esoteric dont les télécommandes peuvent être
utilisées par cette unité sont :
A-100 : RC-1156 o
AI-10 : RC-1056 o
AZ-1 : RC-1056 o
C-03 : RC-1156 o
I-03 : RC-1251 o
K-01 : RC-1156 o
K-03 : RC-1156 o
K-05 : RC-1251 o
K-07 : RC-1301 o
P-02 : RC-1156 o
P-05 : RC-1156 o
RZ-1 : RC-1251 o
SA-50 : RC-1156 o
X-05 : RC-1156 o
Page 28

28
Q Précautions lors des branchements
Faites tous les branchements avant de raccorder le cordon d'alimentation. o
Lisez attentivement les modes d'emploi des autres équipements et suivez leurs instructions quand vous les branchez. o
Faire les branchements
Transport ou lecteur de Super Audio CD/CD
Sortie numérique
Entrée d’horloge
de synchro
Câble numérique coaxial BNC
Câble numérique XLR
Câble numérique RCA
Câble numérique optique
Câble USB
Ordinateur personnel
A
B
C D
Entrée audio
L
RLR
Amplicateur
Branchez une
paire de câbles XLR
ou de câbles RCA.
Câble XLR
Câble audio RCA
Convertisseur N/A
(D-07X)
Sortie d’horloge
de synchro
Générateur d’horloge
(G-01, G-02, etc.)
Câble numérique coaxial BNC
B E F
Prise secteur
Page 29

29
Français
A
Prise d'entrée USB
Sert à recevoir l'audio numérique d'un ordinateur personnel.
Reliez-la à la prise USB d'un ordinateur personnel.
Pour le branchement, utilisez un câble USB du commerce.
Cette prise est de type USB-B.
B
Prises d'entrée/sortie d'horloge de synchro
(CLOCK SYNC)
Produit/reçoit un signal (horloge) de synchronisation.
Reliez la prise d'entrée CLOCK SYNC IN à la prise de sortie
d'horloge d'un G-01, G-02 ou autre générateur d'horloge.
Reliez la prise de sortie CLOCK SYNC OUT à l'entrée d'horloge de
synchro d'un appareil numérique.
Utilisez un câble numérique coaxial BNC du commerce
(impédance : 75 ohms).
C
Prises d'entrée audio numérique (DIGITAL
IN)
Ces prises reçoivent l'audio numérique.
Reliez-les aux prises correspondantes d'un appareil numérique
(par exemple, P-05 ou K-05 Esoteric etc.).
Utilisez des câbles du commerce pour les connexions
suivantes :
XLR : câble audio numérique XLR symétrique
RCA : câble numérique coaxial RCA
OPTICAL : câble numérique optique
D
Borne SIGNAL GND
Le raccordement de cette borne à la borne de masse d'une autre
unité (appareil numérique ou amplificateur) peut améliorer la
qualité sonore.
Ce n’est pas une terre de sécurité. o
E
Prises de sortie audio analogique ligne (LINE
OUT)
Ces prises produisent l'audio analogique.
Utilisez des câbles audio XLR ou RCA du commerce en
fonction des prises de l'amplificateur :
XLR : câbles audio XLR symétriques
RCA : câbles audio RCA
Assignations des broches de la XLR :
Broche 1 : masse commune
Broche 2 : point chaud (+)
Broche 3 : point froid (–)
La polarité de la prise XLR peut être changée avec le point chaud o
en broche 3 (page 37).
F
Prise d'entrée secteur
Branchez le cordon d'alimentation fourni à cette prise.
Une fois tous les autres branchements terminés, branchez sa
fiche dans une prise secteur.
Q N'employez pas d'autre cordon d'alimentation qu'un
authentique produit Esoteric. Cela pourrait causer un
incendie ou un choc électrique. Si l'unité reste inutilisée
de façon prolongée, débranchez la fiche d'alimentation
de la prise secteur.
Chez Esoteric, nous utilisons des câbles ESOTERIC MEXCEL 8N/7N
sans contrainte comme référence. Les types de câble suivants
sont disponibles à l'achat dans la gamme Esoteric MEXCEL.
Câble audio RCA
Câble audio XLR
Câble numérique RCA
Câble numérique XLR
Câble numérique BNC
Cordon d’alimentation
Page 30

30
A
Touche POWER
Appuyez pour mettre sous ou hors tension. Quand l'unité est
sous tension, le pourtour de la touche est allumé en bleu.
B
Voyant CLOCK
Indique le statut de maître ou d'esclave de la synchronisation par
l'horloge.
Ce voyant clignote quand un signal entre par la prise d'horloge
de synchronisation.
Quand le signal est verrouillé, le voyant reste fixement allumé.
C
Touche MENU
Appuyez ici pour passer en mode de réglage (voir page 32).
D
Écran
Affiche l'entrée actuelle, la fréquence d'échantillonnage, etc.
E
Capteur de télécommande
Reçoit les signaux de la télécommande.
Quand vous utilisez la télécommande, pointez-la vers ce capteur.
Vous pouvez utiliser une télécommande fournie avec un autre
produit Esoteric.
F
Prise PHONES
Branchez ici un casque à fiche jack 6,3 mm stéréo.
L'audio est produit soit par les prises de sortie analogique (LINE o
OUT) soit par la prise casque (PHONES).
Quel que soit le réglage d'entrée, l'audio ne sera pas produit par o
les prises LINE OUT si un casque est branché à la prise PHONES.
C
D
E
G
H
B
A
F
G
Touche INPUT
Sert à changer de source d'entrée numérique.
Sélectionnez la prise à laquelle est branchée un appareil
numérique.
L'écran clignote si aucun signal numérique n'est reçu.
Les touches INPUT d'une télécommande fournie avec un autre o
produit Esoteric peuvent aussi être employées.
H
Touches VOLUME
Le niveau de volume se règle sur –∞ (coupure du son), et de
–99.5 à 0.0 dB. Utilisez ces touches pour régler le volume en cas
de branchement direct à un amplificateur de puissance.
Quand un préamplificateur est connecté, réglez le volume à 0.0.
En mode de réglage, ces touches servent à sélectionner des
options pour le paramètre de menu.
Quand un casque est branché à la prise PHONES, elles règlent le o
volume du casque. Si aucun casque n'est branché, elles règlent le
volume de la sortie audio analogique.
Les touches VOLUME (–/+) d'une télécommande fournie avec un o
autre produit Esoteric peuvent aussi être employées.
Nomenclature et fonctions des parties
Vous pouvez utiliser pour cette unité une télécommande fournie
avec un P-05, K-05 ou un autre produit Esoteric (voir page 27).
Si vous utilisez une télécommande fournie avec un autre produit
Esoteric pour piloter cette unité, réglez “RC” (Remote control ou en
français télécommande) sur “Enable” (voir page 38).
Page 31

31
Français
Fonctionnement de base
3
Lancez la lecture sur l'appareil source
sélectionné et réglez le volume.
Si vous branchez directement l'unité à un amplificateur de
puissance sans préampli intermédiaire,
utilisez les touches VOLUME (−/+) pour régler le volume.
Si vous branchez l'unité à un préampli,
utilisez les touches VOLUME (−/+) pour régler le volume à 0,0 dB.
Avec cette unité, vous pouvez régler indépendamment les o
niveaux de la sortie audio analogique ligne (LINE OUT) et de la
sortie casque.
L'audio est produit soit par les prises de sortie analogique (LINE o
OUT) soit par la prise casque (PHONES).
L'audio ne sera pas produit par les prises LINE OUT si un casque
est branché à la prise PHONES.
o
La télécommande fournie avec un autre produit Esoteric peut
servir à changer d'entrée, à régler le VOLUME (–/+) et à couper le
son (MUTING)
(voir page 27).
Appuyez sur l’interrupteur d’alimentation POWER pour éteindre o
l’unité après usage.
Pour éteindre votre système audio, commencez toujours par o
votre amplificateur de puissance.
1
Appuyez sur l’interrupteur d’alimentation
POWER pour allumer l’unité.
Le pourtour de la touche POWER s'allume en bleu.
Si vous branchez un amplificateur de puissance à l'unité, veillez o
bien à n'allumer l'amplificateur qu'après avoir allumé les autres
appareils.
Allumez aussi tous les appareils branchés à celui-ci. o
Quand CLK (clock ou “horloge”) est réglé sur IN ou DMCK, si o
aucun signal d'horloge ne peut être détecté à l'allumage de
l'unité, “WRD UNLCK!” ou “NO WORD” peut s'afficher, mais ces
messages disparaîtront en cas de verrouillage sur un signal
d'horloge entrant après allumage d'un appareil connecté.
2
Appuyez sur la touche INPUT pour sélectionner
une entrée.
Chaque pression de la touche change l'entrée et l'entrée
sélectionnée s'affiche comme suit :
XLR
z
RCA1
z
RCA2
z
OPT
z
USB
Mettez la source en lecture après l'avoir sélectionnée.
Le texte affiché clignote s'il n'y a pas de signal numérique détecté.
Allumez l'appareil connecté et vérifiez ses branchements.
Si vous branchez directement l'unité à un amplificateur de o
puissance sans préampli intermédiaire, minimisez le volume (---)
avant de changer d'entrée.
Page 32

32
Mode de réglage (1)
1
Appuyez répétitivement sur la touche MENU
pour sélectionner le paramètre de menu à
changer.
Chaque pression change l'affichage comme suit :
CONV>***
z
DF>***
z
CLK>***
z
(WOUT>***)
z
OUT>***
z
(XLR>***)
z
(USB>***)
z
RC>***
z
DISP>***
z
FLaOFF>***
z
DIMMER>***
Les paramètres représentés entre ( ) peuvent ne pas s'afficher en
fonction des autres réglages.
Si vous appuyez sur la touche INPUT ou laissez l'unité au repos 10
secondes, le mode de réglage sera abandonné.
La touche SETUP d'une télécommande fournie avec un autre o
produit Esoteric peut aussi être employée avec cette unité (voir
page 27).
2
Utilisez les touches VOLUME (–/+) pour
sélectionner les options du paramètres de
menu.
Les fonctions individuelles de menu sont décrites en pages
33-38.
o Les touches INPUT d'une télécommande fournie avec un autre
produit Esoteric peuvent aussi être employées (voir page 27).
Les réglages sont conser vés même après avoir éteint et o
débranché l'unité.
Page 33

33
Français
Paramètres de menu et réglages disponibles
CONV>*** (Conversion ascendante)
Vous pouvez convertir la fréquence d'échantillonnage d'un signal
PCM, tel que celui d'un CD, en 2x ou 4x. Il est aussi possible de
convertir le signal PCM en signal DSD.
Chaque entrée peut avoir un réglage différent.
DF>*** (Filtre numérique)
Change les caractéristiques du filtrage numérique effectué quand
un signal PCM est reçu.
Chaque entrée peut avoir un réglage différent.
CLK>*** (Horloge)
Sélectionne le statut de maître ou d'esclave de la synchronisation
par l'horloge.
Chaque entrée peut avoir un réglage différent.
W-OUT>*** (Fréquence de sortie de l'horloge de
synchro)
En mode de synchronisation sur l'horloge, sélectionne la fréquence
de sortie de l'horloge de synchro.
Chaque entrée peut avoir un réglage différent.
OUT>*** (Sortie analogique)
Règle la prise de sortie servant à la sortie audio analogique.
XLR>*** (Gain de sortie XLR)
Règle le gain de sortie XLR.
USB>*** (Entrée USB)
Règle le mode de fonctionnement USB.
RC>*** (Télécommande)
En cas d'utilisation avec un amplificateur Esoteric optionnel,
vous pouvez régler le D-07X pour qu'il ne réponde pas à la
télécommande Esoteric.
DISP>*** (Affichage)
Sélectionne comme affichage normal le niveau de volume ou la
fréquence d'échantillonnage.
FLaOFF>*** (Extinction automatique de l'affichage)
Afin d'éviter l'usure de l'affichage fluorescent, vous pouvez le régler
pour qu'il s'éteigne automatiquement après un certain temps sans
utilisation.
DIMMER>*** (Atténuation d'écran)
L'écran de l'unité principale peut être atténué pour mieux s'intégrer
à l'environnement dans lequel vous écoutez la musique.
Page 34

34
Réglage de conversion ascendante
Affichage : UPCONV>***
Ce réglage peut se faire pour chaque entrée. o
Durant la lecture de Super Audio CD, le signal DSD est directement o
envoyé au convertisseur N/A.
OFF
Le sig nal entrant d'o rigine est dire cte ment t ransmis au
convertisseur N/A sans conversion.
2Fs
Les sources à 32 kHz, 44,1 kHz et 48 kHz sont converties à une
valeur double, respectivement de 64 kHz, 88,2 kHz et 96 kHz, puis
transmises au convertisseur N/A.
4Fs
Les sources à 32 kHz, 44,1 kHz, 48 kHz, 88,2 kHz et 96 kHz sont
converties à une valeur double ou quadruple de 128 kHz, 176,4 kHz
ou 192 kHz puis transmises au convertisseur N/A.
DSD
Le signal est converti au format numérique DSD, puis transmis au
convertisseur N/A.
Réglage du filtre numérique du convertisseur
N/A
Affichage : DF>***
Ce réglage peut se faire pour chaque entrée. o
Durant la lecture de SACD ou la conversion au format DSD, ce filtre o
dédié au DSD est automatiquement réglé.
OFF
Aucun filtre numérique n'est employé par le convertisseur N/A.
Avec ce réglage, de la distorsion harmonique sera produite. Si du o
bruit survient pour cause par exemple de modulation croisée de la
distorsion harmonique, réglez plutôt “DF” sur “FIR” ou “S_DLY”.
FIR1
La fréquence de coupure du filtre de type FIR (en français RIF,
filtre à réponse impulsionnelle finie) varie avec la fréquence
d'échantillonnage en entrée.
FIR2
Quelle que soit la fréquence d'échantillonnage en entrée, un filtre
de type FIR (en français RIF, filtre à réponse impulsionnelle finie) à
fréquence de coupure d'environ 80 kHz est employé.
S _D LY 1
La fréquence de coupure du filtre de type S_DLY varie avec la
fréquence d'échantillonnage en entrée.
S _D LY 2
Quelle que soit la fréquence d'échantillonnage en entrée, un
filtre de type S_DLY à fréquence de coupure d'environ 80 kHz est
employé.
À propos des filtres numériques du convertisseur
N/A
Filtres numériques de type FIR (à réponse impulsionnelle
finie)
Ce type de filtre a une solide réputation de qualité sonore et
présente un son ayant à la fois des réverbérations riches et denses
et des transitoires vives.
Filtres numériques de type S_DLY
Ce type de filtre n'a pas de pré-écho dans la réponse impulsionnelle
et possède une attaque du son et une réverbération naturelles pour
une qualité tonale proche de celle de l'original.
Mode de réglage (2)
Page 35

35
Français
Réglage d'horloge ("Clock")
Affichage : CLK>***
Ce réglage peut se faire pour chaque entrée. o
Les réglages possibles dépendent du réglage d'entrée.
Quand l'entrée est réglée sur XLR, RCA1, RCA2 ou OPT
PLL1
z
PLL2
z
OUT
z
IN
z
DMCK
Quand l'entrée est réglée sur USB et le paramètre USB sur
NORM ou HS_1
PLL1
z
OUT
Quand l'entrée est réglée sur USB et le paramètre USB sur
HS_2
INT
z
OUT
z
IN
z
DMCK
PL L1
Le circuit PLL intégré suit le signal audio numérique entrant et
génère l'horloge maître. Le fonctionnement en réponse à une
large plage de fréquences d'horloge en entrée est possible.
PLL2
Le circuit PLL intégré suit le signal audio numérique entrant et, avec
le cristal oscillateur interne de haute précision, génère l'horloge
maître. De par l'utilisation de circuits PLL ayant des caractéristiques
différentes dans les 2 étages, la gigue de transmission du signal
audio est réduite.
Pour augmenter les performances du cristal oscillateur interne o
de haute précision, il a été conçu avec une plage de variation de
fréquence étroite. Si la fréquence d'horloge du signal numérique
entrant dépasse la tolérance du cristal oscillateur de haute
précision intégré, la synchronisation ne sera pas possible. Dans
ces cas, réglez l'unité en mode PLL1.
INT
L'unité fonctionne avec le cristal oscillateur intégré comme horloge
maître.
OUT
L'unité produit un signal word clock par sa prise de sortie d'horloge
et fonctionne avec synchronisation sur l'horloge.
Les fréquences qui peuvent être produites sont 44,1, 48, 88,2, 96,
100, 176,4, et 192 kHz, ainsi que 22,5792 et 24,576 MHz.
IN
L'unité reçoit le signal word clock d'un générateur d'horloge par
sa prise d'entrée d'horloge et fonctionne avec synchronisation sur
l'horloge.
Les fréquences qui peuvent être reçues sont 44,1, 48, 88,2, 96, 100,
176,4, et 192 kHz, ainsi que 10 MHz.
Avec l'entrée USB HS_2, la fréquence recevable dépend de la o
fréquence d'échantillonnage de la source.
Quand la source est à 44,1 kHz :
44,1, 88,2, 176,4, 100 kHz et 10 MHz.
Quand la source est à 48 kHz :
48, 96, 192, 100 kHz et 10 MHz.
DMCK
L'unité reçoit directement d'un générateur d'horloge un signal
word clock qui est à 512 fois la cadence de l'horloge maître
(22,5792 MHz pour 44,1 kHz ou 24,576 MHz pour 48 kHz) par sa
prise d'entrée CLOCK SYNC IN et fonctionne en synchronisation
directe avec ce générateur d'horloge.
o
Lors de la reproduction d'un CD ou SACD par un lecteur de SACD
Esoteric, seule une horloge à 22,5792 MHz peut être reçue.
Avec l'entrée USB HS_2, la fréquence d'échantillonnage source o
peut être de 22,5792 MHz pour 44,1 kHz ou de 24,576 MHz pour
48 kHz, mais il est nécessaire de changer l'horloge en fonction de
la source.
Page 36

36
Réglage de fréquence de sortie d'horloge
Affichage : WOUT>***
Règle la fréquence du signal produit par la prise CLOCK SYNC OUT.
Sert en cas de synchronisation de la lecture d'un appareil ayant une
entrée pour horloge de synchronisation, comme un P-05 Esoteric,
avec le D-07X.
Ce réglage ne s'affiche que si CLK est réglé sur OUT, IN ou DMCK. o
Chaque entrée peut avoir un réglage différent. o
Les options possibles dépendent du réglage du paramètre
CLK.
Quand le paramètre CLK est réglé sur OUT
44.1kHz
z
88.2kHz
z
176.4kHz
z
22.5792MHz
z
48kHz
z
96kHz
z
192kHz
z
24.576MHz
z
100kHz
Avec un réglage sur 44,1, 88,2 ou 176,4 kHz ou 22,5792 MHz, o
les signaux audio qui peuvent être reçus sont à 44,1, 88,2 et
176,4 kHz et en DSD.
Avec un réglage sur 48, 96 ou 192 kHz ou 24,576 MHz, les o
signaux audio qui peuvent être reçus sont à 48, 96 et 192 kHz.
Avec un réglage sur 100 kHz (horloge universelle), les signaux o
audio qui peuvent être reçus sont à 44,1, 88,2 et 176,4 kHz et en
DSD.
Sert en cas de connexion d'un appareil Esoteric, tels que l'UX-1
ou l'UX-3, qui prend en charge l'horloge universelle.
Quand le paramètre CLK est réglé sur IN
OFF
z
THRU
z
1Fs
z
2Fs
z
4Fs
z
MCK
z
100kHz
Quand le paramètre CLK est réglé sur DMCK
OFF
z
THRU
z
1Fs
z
2Fs
z
4Fs
z
MCK
L'appareil source doit recevoir l'horloge d'un générateur o
d'horloge et être synchronisé.
OFF
Aucun signal d'horloge n'est produit.
THRU
Le signal d'horloge reçu par la prise CLOCK SYNC IN est renvoyé
sans changement de fréquence.
1Fs, 2Fs, 4Fs
Le signal d'hor loge pro duit a 1, 2 ou 4 fois la fréquence
d'échantillonnage de base du signal d'horloge entrant, qui doit
être de 44,1 kHz ou 48 kHz.
MCK
Un signal d'horloge maître (MCK) est produit à 512 fois la fréquence
d'échantillonnage de base du signal d'horloge entrant, qui doit être
de 44,1 kHz ou 48 kHz.
100 k
Une horloge universelle (100 kHz) est produite.
Mode de réglage (3)
Page 37

37
Français
Réglage de sortie analogique
Affichage : OUT>***
Quel que soit le réglage d'entrée, l'audio ne sera pas produit par les o
prises LINE OUT si un casque est branché à la prise PHONES.
RCA
Les signaux audio analogiques sortent par les prises RCA.
XLR2
Les signaux audio analogiques sortent par les prises XLR avec point
chaud sur la broche 2.
XLR3
Les signaux audio analogiques sortent par les prises XLR avec point
chaud sur la broche 3.
Réglage de gain de la sortie XLR
Affichage : XLR>***
Ce réglage n'apparaît que si la sortie analogique est réglée sur o
XLR2 ou XLR3.
Selon l'amplificateur connec té, les réglages “+6dB ” et “0dB” o
peuvent donner le même volume que l'entrée sur prise RCA.
+6dB
Règle le niveau de la sortie XLR au double du niveau de la sortie
RCA (+6 dB).
Si le son est écrêté avec un réglage sur “+6dB”, choisissez le o
réglage “0dB”.
0dB
Règle le niveau de la sortie XLR comme celui de la sortie RCA
(0 dB).
Réglage d'entrée USB
Affichage : USB>***
Ce paramètre n'apparaît que si la source d'entrée est réglée sur o
USB.
En cas de réglage en mode à haute vitesse (HIGH SPEED), le pilote o
logiciel dédié doit être installé sur l'ordinateur. Téléchargez le pilote
logiciel depuis notre site web (voir page 39).
NORM
Connexion en mode USB FULL SPEED (pleine vitesse).
Les fréquences d'échantillonnage qui peuvent être reçues sont
32 kHz, 44,1 kHz, 48 kHz, 88,2 kHz et 96 kHz.
HS _1
Connexion en mode USB HIGH SPEED (haute vitesse).
Les fréquences d'échantillonnage qui peuvent être reçues sont
32 kHz, 44,1 kHz, 48 kHz, 88,2 kHz, 96 kHz, 176,4 kHz et 192 kHz.
HS_2
Connexion en mode USB HIGH SPEED asynchronous (haute vitesse
asynchrone).
Les fréquences d'échantillonnage qui peuvent être reçues sont
32 kHz, 44,1 kHz, 48 kHz, 88,2 kHz, 96 kHz, 176,4 kHz et 192 kHz.
En mode asynchrone, le signal d'horloge de cette unité sert pour la
lecture des données audio transmises par l'ordinateur.
Si des bruits de saut surviennent avec un réglage HS_2, réglez o
plutôt l'unité sur HS_1.
Page 38

38
Réglage de télécommande
Affichage : RC>***
Si vous utilisez cette unité avec un amplificateur Esoteric, vous pouvez
la régler pour que son volume et sa sélection d'entrée ne soient pas
contrôlés par la télécommande.
Enable
Permet à l'unité d'être contrôlée par la télécommande d'un produit
Esoteric tel que le P-05 ou le K-05 (voir page 27).
Disable
Règle l'unité pour qu'elle ignore toutes les commandes de la
téléco mmande sauf les commandes d'atténuation d'écran
(DIMMER).
Utilisez ce réglage si vous utilisez l'unité en même temps qu'un
amplificateur Esoteric.
Réglage du contenu d'affichage
Affichage : DISP>***
Fs
Le nom et la fréquence d'échantillonnage du signal audio entrant
sont affichés.
Exemple 1) XLR DSD
Exemple 2) RCA1 48
VOL
Le nom et le réglage de volume de l'entrée sont affichés.
Exemple 1) XLR 0.0
Exemple 2) OPT -7.5
Réglage d'extinction automatique de l'écran
Affichage : FLaOFF>***
Vous pouvez régler l'écran (FL) pour qu'il s'éteigne automatiquement
après un temps donné. La valeur par défaut est “30m”.
15m, 30m, 60m
L'écran s'éteindra automatiquement si aucune opération n'est
menée et si l'affichage ne change pas durant 15, 30 ou 60 minutes.
OFF
L'écran ne s'éteint jamais automatiquement.
Si le signal numérique entrant n'est pas verrouillé, l'écran ne s'éteint o
pas.
Si l'écran reste allumé longtemps sur les mêmes indications, des o
irrégularités de luminosité peuvent survenir. Pour cette raison,
nous vous recommandons d'activer sa fonction d'ex tinc tion
automatique.
Réglage de luminosité
Affichage : DIMMER>***
La luminosité de l'écran et des voyants de l'unité peut être réglée. La
valeur” par défaut est “3”.
3
(Luminosité ordinaire)
z
2
z
1
z
0 (O)
Si vous sélectionnez “0” (Off), l'écran et les voyants seront éteints. o
Même quand l'écran est réglé sur “0” (Off), appuyer par exemple o
sur la touche INPUT le fera s'allumer durant quelques secondes.
Même quand ce réglage est sur une autre valeur que "3" (luminosité o
standard), la luminosité sera ramenée au niveau standard le temps
de l'affichage d'un message d'erreur ou d'un menu de réglage.
Mode de réglage (4)
Page 39

39
Français
Branchement d'un ordinateur et lecture de fichiers audio (1)
En branchant la prise d'entrée USB de cette unité à un ordinateur à
l'aide d'un câble USB, vous pouvez lire les fichiers audio conservés sur
cet ordinateur au travers du convertisseur N/A de cette unité.
Cette unité peut être reliée par USB à des ordinateurs qui utilisent les
systèmes d'exploitation suivants.
Windows XP 32 bits
Windows Vista 32/64 bits
Windows 7 32/64 bits
Mac OS X 10.6.4 ou ultérieur (32/64 bits)
Le fonctionnement avec d'autres systèmes d'exploitation n'est pas
garanti.
Selon les composants de l'ordinateur et l'intégration du logiciel, o
un bon fonctionnement peut ne pas être possible même avec les
systèmes d'exploitation ci-dessus.
Pour une connexion en mode HIGH SPEED 1 ou HIGH SPEED 2, o
vous devez installer au préalable le pilote logiciel dédié.
Si vous connectez cette unité à l'ordinateur avant d'installer le
pilote, elle ne fonctionnera pas correctement. En outre, si vous
utilisez Windows XP, le fonctionnement de l'ordinateur peut
considérablement ralentir et vous pouvez avoir à faire redémarrer
l'ordinateur.
Adresse du site web pour télécharger le pilote logiciel
http://www.esoteric.jp/products/esoteric/usb/usb_driver_e.html
Installez le pilote logiciel dédié après avoir téléchargé le fichier
depuis l'adresse ci-dessus.
Vous pouvez sélectionner 1 des 3 modes d'utilisation quand vous
connectez cette unité à un ordinateur par USB. Voir les pages 32 et 37
pour des informations sur la façon de faire les réglages.
Mode NORMAL
En mode de réglage, sélectionnez USB>NOR.
Cela donne une connexion à l'ordinateur en mode FULL SPEED
(pleine vitesse).
Les fréquences d'échantillonnage qui peuvent être transmises sont
32, 44,1, 48, 88,2 et 96 kHz. Pour utiliser ce mode de connexion de
l'unité à un ordinateur, il n'est pas nécessaire d'installer de pilote
logiciel. L'unité et l'ordinateur se connecteront à l'aide du pilote
audio USB standard.
La première fois que vous branchez cette unité à un ordinateur, o
l'ordinateur détecte automatiquement le port USB de l'unité et
installe le pilote. Suivez les instructions du système d'exploitation.
Après avoir terminé l'installation du pilote, lancez l'application de
lecture du fichier audio.
Si la bonne connexion a été faite, vous devez pouvoir sélectionner
“ESOTERIC USB AUDIO” comme sortie audio.
Mode HIGH SPEED 1 (haute vitesse 1)
En mode de réglage, sélectionnez USB>HS_1.
Cela donne une connexion à l'ordinateur en mode HIGH SPEED
(haute vitesse).
Les fréquences d'échantillonnage qui peuvent être transmises sont
32, 44,1, 48, 88,2, 96, 176,4 et 192 kHz. Vous devez installer le pilote
logiciel dédié pour utiliser ce mode quand vous connectez cette
unité à un ordinateur.
Téléchargez le pilote logiciel dédié depuis notre site web.
Si la bonne connexion a été faite, vous devez pouvoir sélectionner
“ESOTERIC USB HS AUDIO” comme sortie audio.
Mode HIGH SPEED 2 (haute vitesse 2)
En mode de réglage, sélectionnez USB>HS_2.
Cela donne une connexion à l'ordinateur en mode HIGH SPEED
asynchronous (haute vitesse asynchrone).
Les fréquences d'échantillonnage qui peuvent être transmises sont
32, 44,1, 48, 88,2, 96, 176,4 et 192 kHz. Vous devez installer le pilote
logiciel dédié pour utiliser ce mode quand vous connectez cette
unité à un ordinateur.
Téléchargez le pilote logiciel dédié depuis notre site web.
Si la bonne connexion a été faite, vous devez pouvoir sélectionner
“ESOTERIC USB HS ASYNC AUDIO” comme sortie audio.
En mode asynchrone, les données audio envoyées par l'ordinateur
seront traitées à l'aide de l'horloge de cette unité, ce qui permet de
réduire la gigue qui survient lors de la transmission des données.
Quand vous utilisez le mode HIGH SPEED 2 pour connecter o
l'ordinateur à cette unité, si le son de la lecture saute ou si du bruit
se produit à intervalles réguliers, utilisez plutôt le mode HIGH
SPEED 1.
Pour utiliser le mode HIGH SPEED 1 ou HIGH SPEED 2, installez le o
pilote logiciel dédié avant de connecter l'unité à l'ordinateur (voir la
colonne de gauche).
Page 40

40
1
Branchez cette unité à l'ordinateur à l'aide
d'un câble USB.
Utilisez un câble ayant une fiche qui correspond à la prise de
cette unité.
Ordinateur personnel
2
Mettez l'ordinateur sous tension.
Vérifiez que son système d'exploitation a normalement démarré.
3
Appuyez sur l’interrupteur d’alimentation
POWER pour allumer cette unité.
4
Appuyez plusieurs fois sur la touche INPUT
afin de sélectionner USB (voir page 31).
5
Lancez la lecture d'un fichier audio sur
l'ordinateur.
Une meilleure qualité sonore peut être obtenue en réglant au
maximum le volume de l'ordinateur et en utilisant l'amplificateur
connecté à cette unité pour régler le volume. Réglez le volume
de l'amplificateur au minimum quand vous lancez la lecture et
montez-le progressivement.
L'ordinateur ne peut pas contrôler cette unité et cette unité ne o
peut pas contrôler l'ordinateur.
Cette unité ne peut pas tr ansmet tre de fichiers audio à o
l'ordinateur par USB.
N'essayez aucune des opérations suivantes pendant la lecture o
d'un fichier audio par USB. Cela pourrait entraîner un mauvais
fonctionnement de l'ordinateur. Quittez toujours le logiciel de
lecture de musique avant d'entamer une des actions suivantes.
Déconnexion du câble USB
Extinction de cette unité
Changement de l'entrée
Lors de la lecture d'un fichier audio par USB, les sons du système o
de l'ordinateur seront aussi produits. Si vous ne souhaitez pas
que ces sons soient produits, faites les réglages appropriés sur
l'ordinateur pour les couper.
Si vous branchez cette unité à l'ordinateur ou si vous réglez o
son entrée sur “USB” après avoir lancé le logiciel de lecture de
musique, les fichiers audio peuvent ne pas être lus correctement.
Si cela se produit, faites redémarrer le logiciel de lecture audio ou
l'ordinateur.
Branchement d'un ordinateur et lecture de fichiers audio (2)
Page 41

41
Français
Messages
“- - -” apparaît sur le côté droit de l'écran.
Un signal incompatible est reçu.
Ne faites pas entrer des signaux autres que PCM ou DSD.
Vérifiez les branchements de l'appareil numérique.
XLR, RCA1, RCA2, OPT ou USB clignote.
L'unité ne parvient pas à détecter de signal numérique. Appuyez
sur la touche INPUT pour sélectionner une prise à laquelle un
appareil numérique est connecté.
Allumez l'appareil connecté. Vérifiez les réglages de l'appareil
connecté.
PLL LCKING
Le circuit PLL interne (PLL2) est verrouillé.
PLL UNLCK!
Le circuit PLL interne ne peut pas se verrouiller sur le signal
numérique entrant. Vérifiez la connexion avec l'équipement
numérique entrant. Si la précision de fréquence du signal entrant
est en dehors de la plage dans laquelle cet te unité peut se
verrouiller, le circuit PLL interne (PLL2) ne pourra pas se verrouiller,
aussi réglez l'horloge (CLK) sur PLL1 (voir page 35 pour des détails).
NO WORD!
Aucun signal word clock n'est reçu. Vérifiez la connexion avec
le générateur d'horloge maître externe, son alimentation et son
réglage de sortie.
Si vous n'utilisez pas le signal word clock, réglez l'horloge (CLK) sur
PLL1 ou PLL2 (voir page 35 pour des détails).
WRD ERROR!
La fréquence d'horloge de la source entrante ne correspond pas à
la fréquence du signal word clock.
Sélec tionnez 44,1, 88,2, 100 ou 176,4 kHz ou 10 MHz pour la
lecture de Super Audio CD. Vous devez aussi confirmer que la
synchronisation par horloge se fait correctement avec l'appareil
source.
Réglez l'horloge (CLK) sur “PLL1” ou “PLL2” si l'appareil connecté n'a
pas de fonction de synchronisation sur l'horloge.
Pour une synchronisation avec une horloge maître, sélectionnez
DMCK (voir page 35 pour des détails).
WRD LCKING
Indique le verrouillage sur le signal word clock entrant.
WRD UNLCK!
Indique que l'appareil ne peut pas se verrouiller sur le signal word
clock entrant. Vérifiez le réglage de fréquence du générateur
d'horloge connecté.
NO MCK!
Aucun signal d'horloge maître n'est reçu.
MCK ERROR!
Le signal audio entrant et l'horloge à 22,5792 MHz ou 24,576 MHz
reçue ne sont pas verrouillés.
La fréquence de la source d'entrée n'est pas verrouillée sur
l'horloge maître reçue.
Vérifiez que la source d'entrée accepte une sortie d'horloge
maître (voir page 36 pour des détails).
MCK UNLCK!
Impossible de se verrouiller sur l'entrée d'horloge maître.
Vérifiez le réglage de fréquence du générateur d'horloge
connecté (voir page 35 pour des détails).
Page 42

42
Guide de dépannage
Si vous rencontrez un problème avec l'unité, veuillez prendre un
moment pour lire les informations suivantes avant de solliciter une
réparation. Par ailleurs, cette unité n'est peut-être pas la cause du
problème. Vérifiez que les appareils qui lui sont connectés sont aussi
employés correctement.
L'unité ne s'allume pas.
e Insérez la fiche d'alimentation dans une prise secteur.
e Vérifiez la connexion du cordon d'alimentation à l'unité.
Pas de son
e Vérifiez les branchements avec l'amplificateur et les enceintes.
e Vérifiez le réglage de sortie audio analogique (voir page 37).
e Si un casque est branché, aucun son ne sera produit par les prises
de sortie LINE OUT.
L'indicateur d'entrée clignote.
e Allumez l'appareil connecté à la prise d'entrée sélectionnée.
e Vérifiez si le branchement à la prise d'entrée sélectionnée est
correct.
Un bip se produit à intervalles réguliers.
e Le D-0 7X est en mode de syn chro d'horloge, mais pas
l'appareil connecté. Vérifiez la connexion à la prise d'horloge de
synchronisation et la configuration de l'appareil connecté.
Le voyant d'horloge clignote.
e
Réglez l'horloge (CLK) sur “PLL1” ou “PLL2” quand vous n'utilisez pas
le mode de synchro d'horloge.
e Un signal incompatible est reçu. Vérifiez les connexions d'horloge
de synchronisation et la configuration des appareils connectés.
Comme cette unité ut ilise un microcontrô leur, d u bru it
ou d'autres inter férences externes peuvent entraîne r son
mauvais fonctionnement. Si cela se produit, éteignez l'unité et
rallumez-la après une attente d'environ une minute.
Restauration des réglages d'usine
Les réglages mémorisés sont conservés même après déconnexion du
cordon d'alimentation.
Si vous avez fait des changements dans le menu de configuration et
voulez repartir d'un ensemble de réglages connus, restaurez comme
suit les réglages d'usine de l'appareil :
1
Éteignez l'unité.
Si l'unité est allumée, appuyez sur la touche POWER pour
l'éteindre et attendez plus de 30 secondes.
2
Appuyez sur la touche POWER tout en
maintenant la touche MENU pressée.
Relâchez la touche MENU une fois l'unité sous tension et son o
écran allumé.
Page 43

43
Français
Caractéristiques techniques
Sortie analogique
Prises .......................................................XLR (2 canaux) x 1
RCA (2 canaux) x 1
Casque x 1
Impédance de sortie
XLR ...................................................................100 Ω
RCA....................................................................25 Ω
Niveau de sortie maximal (1 kHz, avec entrée pleine échelle)
XLR : 2,45 Vrms (avec réglage sur 0 dB sous charge de 10 kΩ)
RCA : 2,45 Vrms (sous charge de 10 kΩ)
PHONES : 20 mW + 20 mW (sous charge de 32 Ω)
Réponse en fréquence ...........................................5 Hz à 55 kHz
Rapport signal/bruit (S/B) ...............................................115 dB
Distorsion harmonique totale ..................................0,0015 % (JEITA)
Entrée numérique
Entrée numérique symétrique .........................XLR (5,0 Vc-c/110 Ω) x 1
Prise coaxiale ...........................................RCA (0,5 Vc-c/75 Ω) x 2
Prise numérique optique ..............OPTICAL (–24,0 à –14,5 dBm en crête) x 1
Port USB ......................................................connecteur B x 1
Fréquences d'échantillonnage en entrée ...32, 44,1, 48, 88,2, 96, 176,4, 192 (kHz)
Note : l'entrée XLR (et elle seule) accepte l'entrée DSD au format ES-LINK (simple).
Sortie d'horloge de synchronisation
Prise ...................................................................BNC x 1
Fréquences de sortie...44,1, 48, 88,2, 96, 100, 176,4, 192 (kHz/onde rectangulaire)
22,5792, 24,576 (MHz)
Même fréquence que l'entrée (avec réglage sur THRU)
Niveau de sortie ............ Équivalent aux niveaux TTL (sous charge de 75 Ω)
Entrée d'horloge de synchronisation
Prise ...................................................................BNC x 1
Fréquences d'entrée ..................... 44,1, 48, 88,2, 96, 100, 176,4, 192 (kHz)
10, 22,5792, 24,576 (MHz)
Impédance d'entrée ......................................................75 Ω
Niveau d'entrée ........................Onde carrée : équivalent au niveau TTL
Onde sinusoïdale : 0,5–1,0 Vrms (sous charge de 75 Ω)
Générales
Alimentation électrique
Modèle Europe .............................................CA 230 V, 50 Hz
Modèle U.S.A./Canada . . . . . . . . . . . . . . . . . . . . . . . . . . . . . . . . . . . . . . CA 120 V, 60 Hz
Modèle Corée ..............................................CA 220 V, 60 Hz
Consommation électrique .................................................7 W
Dimensions externes (L x H x P) (hors tout) ...............445 x 106,5 x 356 mm
Poids....................................................................10,4 kg
Température de fonctionnement .................................+5°C à +35°C
Hygrométrie de fonctionnement...............5 % à 85 % (sans condensation)
Température de stockage ........................................–20°C à +55°C
Accessoires
Cordon d’alimentation x 1
Mode d’emploi (ce document) x 1
Carte de garantie x 1
Conception et caractéristiques techniques sont sujet tes à o
changements sans préavis.
Le poids et les dimensions sont des valeurs approchées. o
Les illustrations peuvent légèrement différer des modèles de o
production.
Page 44

44
Face arrière
Page 45

45
Español
No exponga este aparato a salpicaduras ni goteras. o
No coloque objetos que contengan líquidos, como por ejemplo o
jarrones, sobre el aparato.
No instale este aparato en lugares cerrados tales como o
estanterías o similares.
Este aparato liber a corr iente nominal no válida para el o
funcionamiento a través de la toma de corriente, aún cuando el
interruptor de encendido y activación (POWER o STANDBY/ON)
no esté en la posición de encendido (ON).
Este aparato debe situarse lo suficientemente cerca de una o
toma de electricidad como para poder alcanzar fácilmente el
cable de corriente en cualquier momento.
El enchufe que se conecta a la red es el dispositivo de desco- o
nexión, por lo que deberá permanecer siempre en prefecto
estado de uso.
Los productos con construcción de Clase o están equipados con
un cable de alimentación que tiene conexión de tierra. El cable
de estos productos deberá conectarse a una toma de corriente
que tenga conexión de protección de tierra.
Si el producto utiliza pilas (esto incluye las pilas instaladas y los o
"packs" de pilas), se evitará su exposición directa al sol, al fuego
o a cualquier otra fuente de calor excesivo.
PRECAUCIÓN con los productos que emplean baterías de o
litio reemplazables: existe peligro de explosión si la batería se
reemplaza por otra de tipo incorrecto. Reemplácela sólo por
otra igual o de tipo equivalente.
Deberá llevar cuidado si utiliza auriculares con este producto, o
ya que una excesiva presión sonora (volumen) procedente de
los mismos puede causar perdidas de audición.
Para consumidores europeos
Deshacerse de aparatos eléctricos y electrónicos
(a) Todos los aparatos el éctricos y electrónicos deb en ser
eliminados separados del resto de basura común y únicamente
en los "puntos limpios" o bajo los procedimientos especificados
por el gobierno o autoridades municipales locales.
(b) Con la eliminación correcta d e los e quipo s eléc tricos
y electrónicos estará ayudando a conser var recursos muy
valiosos y a evitar los posibles efectos negativos en la salud
humana y en el medio ambiente.
(c) La eliminaci ón incorrecta de los equipo s eléctricos y
electrónicos puede producir efectos muy dañinos en el medio
ambiente y en la salud humana a causa de las sustancias
peligrosas que pueden encontrarse en estos equipos.
(d) El símbolo de Eliminación de Aparatos Eléctricos y
Electrónicos (WEEE en inglés), identificado por un
cubo de basura con ruedas tachado, indica que los
equipos eléctricos y electrónicos deben ser eliminados
de forma totalmente independiente con respecto a la
basura doméstica.
(e) Existen sistemas para la eliminación y recogida de este tipo
de aparatos a disposición del usuario final. Si necesita más
información acerca de la forma de deshacerse de aparatos
eléctricos y electrónicos antiguos, póngase en contacto con su
Ayuntamiento, con la correspondiente empresa del servicio de
recogida de residuos o con el comercio en el que adquirió ese
aparato.
Deshacerse de pilas y/o acumuladores
(a) Las pilas y/o acumuladores gastados deben ser eliminados
separados del resto de basura común y únicamente en los
"puntos de recogida" o bajo los procedimientos especificados
por el gobierno o autoridades municipales locales.
(b) Con la eliminación correcta de las pilas y/o acumuladores
gastados estará ayudando a conservar recursos muy valiosos y
a evitar los posibles efectos negativos en la salud humana y en
el medio ambiente.
(c) La eliminación in correcta de las pilas y/o acumuladores
gastados puede producir efectos muy dañinos en el medio
ambiente y en la salud humana con motivo de las sustancias
peligrosas que pueden encontrarse en estos equipos.
(d) El símbolo WEEE, identi ficado por un cubo de
basura con ruedas tachado, indica que las pilas y/o
acumuladores gastados deben ser eliminados de
forma totalmente independiente con respecto a la
basura doméstica.
Si una pila o un acumulador contienen más cantidad de
los valores especificados de plomo (Pb), mercurio (Hg), y/o
cadmio (Cd) según está definido en la Directiva relativa a
las pilas (2006/66/ EC), enton ce s los símbolos químicos
correspondientes a estos elementos estarán indicados debajo
del símbolo WEEE.
(e) Existen sistemas para la eliminación y recogida a disposición
del usuario final. Si necesita más información acerca de la
forma de eliminar pilas y/o acumuladores gastados, póngase
en contacto con su Ayuntamiento, con la correspondiente
empresa del servicio de recogida de residuos o con el comercio
donde se adquirieron.
Pb, Hg, Cd
Français
Page 46

46
Índice Qué hay en la caja
Gracias por elegir Esoteric. Lea este manual atentamente para
obtener el mejor rendimiento de esta unidad.
Asegúrese de que la caja incluye todos los accesorios suministrados
que se enumeran a continuación.
Por favor, póngase en contacto con el establecimiento donde haya
comprado la unidad en caso de que falte alguno de estos accesorios
o haya sufrido daños durante el transporte.
Cable de corriente x 1
Manual del usuario (este documento) x 1
Conserve este manual en un lugar seguro para futuras o
consultas.
Tarjeta de garantía x 1
Qué hay en la caja ...............................................46
Antes de su utilización ..........................................47
Utilización de un mando a distancia .............................47
Realizar las conexiones ..........................................48
Nombres y funciones de las partes ..............................50
Funcionamiento básico .........................................51
Modo de configuración .........................................52
Conexión a un ordenador y reproducción de archivos de audio ...59
Mensajes .......................................................61
Solución de posibles fallos ......................................62
Restablecer los valores de fábrica por defecto ....................62
Especificaciones ................................................63
Panel posterior ..................................................64
Page 47

47
Español
Antes de su utilización Utilización de un mando a distancia
Lea esta información antes de proceder con ninguna operación.
PRECAUCIÓN
No mueva esta unidad durante su uso. o
Coloque la unidad en un emplazamiento estable cerca del equipo o
de audio que vaya a utilizar.
Asegúrese de no hacerse daño cuando mueva la unidad debido a o
su peso. Pida ayuda a alguien si es necesario.
Dado que la unidad puede calentarse durante el funcionamiento, o
deje siempre espacio suficiente alrededor de la unidad para su
ventilación. Asegúrese de que hay al menos 20 cm (8") de espacio
por encima y al menos 5 cm (2") de espacio a cada lado de la
unidad. NO coloque nada, como por ejemplo reproductores de
CD, CD-R, platos giradiscos o pletinas de cassette etc., encima de
la unidad.
El voltaje suministrado a la unidad debe coincidir con el voltaje o
impreso indicado en el panel posterior. Si tiene dudas al respecto,
consulte a un electricista.
No abra la carcasa ya que ello podría originar daños al circuito o o
causar una descarga eléctrica. Si se introduce algún objeto extraño
en la unidad, póngase en contacto con su distribuidor o con un
servicio técnico autorizado.
Cuando desenchufe el cable de corr iente de la to ma de o
electricidad, tire siempre del conector del enchufe, nunca estire
del cable.
Mantenimiento
Si la superficie de la unidad se ensucia, límpiela con un paño suave
o utilice un jabón líquido suave diluido. Deje que la superficie de la
unidad se seque completamente antes de usarla.
Q Por seguridad, desconecte el cable de alimentación de la
corriente antes de limpiar la unidad.
Nunca vierta ni pulverice líquido directamente sobre esta unidad. o
N o o use disolvente ni alcohol ya que pueden causar daños a la
superficie de la unidad.
Evite que materiales de goma o plástico estén en contacto con o
este producto durante largos periodos de tiempo porque podrían
dañar la carcasa.
Esta unidad tiene funciones a las que se puede acceder mediante los
mandos a distancia de otras unidades Esoteric.
Funci ones s oportadas por otro s man dos a dis tan cia y sus
correspondientes botones en los mandos a distancia:
Ajustar el nivel de volumen: botones VOLUME (-/+) o
Entrar en el modo de ajustes (configuración): botón SETUP o
Silenciar la salida: botón MUTE (MUTING) o
Cambiar de fuente de entrada: botones INPUT (</>) o ( o k/j)
Ajustar la luminosidad de la pantalla: botón DIMMER o
Otras unidades Esoteric cuyos mandos a distancia pueden ser
utilizados para esta unidad:
A-100: RC-1156 o
AI-10: RC-1056 o
AZ-1: RC-1056 o
C-03: RC-1156 o
I-03: RC-1251 o
K-01: RC-1156 o
K-03: RC-1156 o
K - 0 5 : R C-1 2 5 1 o
K - 0 7 : R C-1 3 0 1 o
P - 0 2 : R C-1 15 6 o
P-05: RC-1156 o
RZ-1: R C-12 51 o
SA-50: RC-1156 o
X-05: RC-1156 o
Page 48

48
Q Precauciones al realizar las conexiones
Haga todas las conexiones antes de enchufar el cable de corriente. o
Lea atentamente los manuales de instrucciones de los demás componentes del equipo y siga sus instrucciones al conectarlos. o
Realizar las conexiones
Transporte o reproductor de Super Audio CD/CD
SALIDA DIGITAL
ENTRADA
SINCRON.
Cable digital coaxial BNC
Cable digital XLR
Cable digital RCA
Cable digital óptico
Cable USB
Ordenador personal
A
B
C D
Entrada de audio
L
RLR
Amplicador
Conecte un
par de cables XLR
o cables RCA.
Cable XLR
Cable de audio RCA
Convertidor D/A
(D-07X)
SALIDA DE
SINCRONIZ. DE RELOJ
Generador de reloj
(G-01, G-02, etc.)
Cable digital coaxial BNC
B E F
Toma de
electricidad
DE RELOJ
Page 49

49
Español
A
Terminal de entrada USB
Se utiliz a para introducir audio digital pro cedente de un
ordenador personal.
Conéctelo al terminal USB de un ordenador.
Para la conexión, utilice un cable USB de los disponibles
en establecimientos comerciales.
Este terminal es del tipo USB-B.
B
Terminal de entrada/salida de sincronización
de reloj (CLOCK SYNC)
Emite/introduce una señal de sincronización (reloj).
Conecte el terminal de entrada CLOCK SYNC IN al terminal de
salida de un G-01, G-02 u otro dispositivo generador de reloj.
Conecte el terminal de salida CLOCK SYNC OUT al terminal de
entrada de sincronización de reloj de un dispositivo digital.
Utilice un cable digital coaxial BNC de los disponibles en
establecimientos comerciales (impedancia: 75 ohms).
C
Terminales de entrada de audio digital
(DIGITAL IN)
Por estos terminales se introduce el audio digital.
Conecte estos terminales a los terminales correspondientes en un
dispositivo digital (por ejemplo, Esoteric P-05 o K-05, etc.).
Utilice cables de los disponibles en establecimientos
comerciales para las siguientes conexiones:
XLR: cable de audio digital balanceado XLR
RCA: cable digital coaxial RCA
OPTICAL: cable digital óptico
D
Terminal SIGNAL GND
La conexión de este terminal con el terminal de tierra de otra
unidad (dispositivo digital o amplificador) puede mejorar la
calidad de sonido.
Este terminal no es una toma de protección de tierra o
eléctrica.
E
Terminales de salida de audio analógico
(LINE OUT)
Por estos terminales sale el audio analógico.
Utilice cables de audio XLR o RCA de los disponibles en
establecimientos comerciales de acuerdo a los terminales
del amplificador:
XLR: cables de audio XLR balanceados
RCA: cables de audio RCA
Asignación de las puntas XLR:
Punta 1: común
Punta 2: vivo o positivo (+)
Punta 3: neutro o negativo (–)
La polaridad del terminal XLR terminal puede configurarse con la o
Punta 3 como POSITIVO (página 57).
F
Entrada de corriente
Conecte el cable de corriente incluido con la unidad en esta
entrada.
Enchufe el cable de corriente a la toma de electricidad después
de haber completado todas las demás conexiones.
Q No utilice ningún otro cable de corriente que no sea un
producto Esoteric auténtico. Si lo hace podría originar
fuego o una descarga eléctrica. Cuando la unidad no se
vaya a utilizar durante un largo período de tiempo, desconecte el cable de corriente de la toma de electricidad.
En Esoteric utilizamos cables Esoteric MEXCEL 8N/7N libres de
estrés como referencia. Los siguientes tipos de cables de la serie
de cables Esoteric MEXCEL están disponibles para su adquisición.
Cable de audio RCA
Cable de audio XLR
Cable digital RCA
Cable digital XLR
Cable digital BNC
Cable de corriente
Page 50

50
A
Botón POWER
Pulse este botón para encender y apagar.
Cuando la unidad está encendida, el anillo alrededor del botón se
ilumina en azul.
B
Indicador de reloj CLOCK
Muestra el estado de la sincronización del reloj o del reloj
maestro.
Este indicador parpadea cuando está entrando una señal a través
del terminal de sincronización de reloj (CLOCK SYNC).
Cuando la señal está acoplada, el indicador se ilumina sin
parpadear.
C
Botón MENU
Púlselo para activar el modo de configuración (ver página 52).
D
Pantalla
Muestra la entrada activa, la frecuencia de muestreo, etc.
E
Sensor del mando a distancia
Recibe las señales procedentes del mando a distancia.
Apunte hacia este sensor con el mando a distancia cuando lo use.
Puede usar el mando a distancia incluido con otro producto
Esoteric.
F
Terminal de auriculares PHONES
Conecte aquí unos auriculares con un conector de tipo jack
estéreo de 6.3 mm (1/4").
La salida de audio se produce o bien por la salida analógica (LINE o
OUT) o bien por la salida de auriculares (PHONES).
Independientemente del ajuste de entrada, el audio no saldrá o
por los terminales LINE OUT si están conectados unos auriculares
al terminal PHONES.
C
D
E
G
H
B
A
F
G
Boton INPUT
Cambia la fuente de entrada digital.
Seleccione el terminal al que esté conectado un dispositivo
digital.
La pantalla parpadea cuando no se está introduciendo ninguna
señal digital.
También se pueden usar los botones INPUT de un mando a o
distancia incluido con otro producto Esoteric.
H
Botones VOLUME
Se puede ajustar el volumen desde –∞ (SILENCIADO), –99.5 hasta
0.0 dB. Use estos botones para ajustar el volumen cuando la
unidad esté conectada directamente a un amplificador.
Cuando se conecte a un preamplificador, ponga el volumen a 0.0.
Cuando esté dentro del modo de configuración, estos botones se
utilizan para seleccionar opciones dentro del apartado del menú.
Cuando haya unos auriculares conectados al terminal PHONES, o
estos botones ajustan el volumen de los auriculares. Cuando
no haya auriculares conectados, ajusta el volumen de salida del
audio analógico.
También se pueden usar los botones VOLUME (–/+) de un mando o
a distancia incluido con otro producto Esoteric.
Nombres y funciones de las partes
Puede utilizar un mando a distancia incluido con un P-05, K-05 u
otros productos Esoteric con esta unidad (ver página 47).
Cuando utilice el mando a distancia incluido con otro producto
Esoteric para manejar esta unidad, ponga "RC" (control remoto) en
"Enable" (activado) (ver página 58).
Page 51

51
Español
Funcionamiento básico
3
Comience la reproducción del dispositivo de
entrada seleccionado y ajuste el volumen.
Cuando conecte la unidad directamente a una etapa de
potencia sin utiliar un preamplificador entre medias,
use los botones VOLUME (–/+) para ajustar el volumen.
Cuando conecte la unidad a un preamplificador,
use los botones VOLUME (–/+) para ajustar el volumen a 0.0 dB.
Con esta unidad, usted puede ajustar los niveles de la salida o
de audio analógico (LINE OUT) y de la salida de auriculares
independientemente.
La salida de audio se produce o bien por la salida analógica (LINE o
OUT) o bien por la salida de auriculares (PHONES).
El au dio no saldrá po r los terminales LINE OUT si están
conectados unos auriculares al terminal PHONES.
o
También se puede utilizar el mando a distancia incluido con
otro producto Esoteric para cambiar la entrada (INPUT), ajustar el
volumen (VOLUME –/+) y para silenciar la unidad (MUTING)
(ver
página 47).
Pulse el botón POWER para apagar la unidad después de usarla. o
Cuando apague su equipo de audio, asegúrese siempre de o
apagar el amplificador lo primero.
1
Pulse el botón POWER para encender la
unidad.
El anillo alrededor del botón POWER se ilumina en azul.
Cuando conecte un amplificador a la unidad, asegúrese de o
encend erlo desp ués d e haber encendido los restantes
dispositivos.
Encienda también todos los demás dispositivos conectados a la o
unidad.
Cuando CLK (reloj) está configurado en "IN" o en "DMCK" , si no se o
puede detectar una señal de reloj tan pronto como se encienda
la unidad, "WRD UNLCK!" (palabras no acopladas) o "NO WORD"
(sin palabras) podría aparecer en la pantalla, pero estos mensajes
desaparecerán si se acopla una señal de reloj de entrada después
de encender un dispositivo conectado.
2
Pulse el botón INPUT para seleccionar una
entrada.
Cada pulsación del botón cambia la entrada y la entrada
seleccionada aparece en la pantalla como sigue:
XLR
z
RCA1
z
RCA2
z
OPT
z
USB
Reproduzca la fuente después de seleccionarla.
El texto de la pantalla parpadea cuando no se detecta una
señal digital. Encienda el dispositivo conectado y compruebe las
conexiones.
Cuando conecte la unidad directamente a una etapa de potencia o
sin utilizar un preamplificador entre medias, minimice el volumen
(---) antes de cambiar el dispositivo de entrada.
Page 52

52
Modo de configuración (1)
1
Pulse el botón MENU repetidamente para
seleccionar el apartado del menú que desee
cambiar.
Cada pulsación cambia la pantalla como sigue:
CONV>***
z
DF>***
z
CLK>***
z
(WOUT>***)
z
OUT>***
z
(XLR>***)
z
(USB>***)
z
RC>***
z
DISP>***
z
FLaOFF>***
z
DIMMER>***
Los apartados o parámetros mostrados entre paréntesis "( )" podrían
no aparecer dependiendo de otros ajustes.
Si pulsa el botón INPUT o si deja la unidad inactiva durante 10
segundos, el modo de configuración será cancelado.
También puede usarse el botón SETUP de un mando a distancia o
incluido con otro producto Esoteric (ver página 47).
2
Use los botones VOLUME (–/+) para seleccionar
las opciones del apartado del menú.
Las funciones individuales del menú están descritas en las
páginas 53–58.
También pueden utilizarse los botones INPUT o de un mando a
distancia incluido con otro producto Esoteric (ver página 47).
Los ajustes quedan almacenados incluso aunque se apague la o
unidad y se la desenchufe de la corriente eléctrica.
Page 53

53
Español
Apartados del menú y ajustes disponibles
CONV>*** (conversión ascendente)
Usted puede convertir la frecuencia de muestreo de una señal
PCM, como por ejemplo un CD, a 2x o 4x. También es posible
convertir la señal PCM en una señal DSD.
Se puede hacer un ajuste diferente para cada entrada.
DF>*** (filtro digital)
Cambia las características del filtro digital cuando se está
introduciendo una señal PCM.
Se puede hacer un ajuste diferente para cada entrada.
CLK>*** (reloj)
Selecciona el modo de sincronización de reloj CLOCK SYNC o de
reloj maestro.
Se puede hacer un ajuste diferente para cada entrada.
WOUT>*** (frecuencia de salida de la sincronización
de reloj)
Cuando la unidad está puesta en el modo de sincronización de
reloj, selecciona la frecuencia de salida de CLOCK SYNC.
Se puede hacer un ajuste diferente para cada entrada.
OUT>*** (salida analógica)
Establece el terminal de salida para la salida de audio analógico.
XLR>*** (ganancia de la salida XLR)
Establece la ganancia de salida de los terminales XLR.
USB>*** (entrada USB)
Establece el modo de funcionamiento USB.
RC>*** (control remoto por mando a distancia)
Si utiliza un amplificador Esoteric opcional, puede ajustar el D-07X
para que no responda al mando a distancia Esoteric.
DISP>*** (pantalla)
Selecciona si la pantalla muestra normalmente el nivel de volumen
o la frecuencia de muestreo.
FLaOFF>***
(apagado automático de la pantalla)
Para prevenir que la pantalla fluorescente sufra desgaste, puede
configurarla para que se apague automáticamente después de
transcurrido un cierto tiempo sin funcionamiento.
DIMMER>*** (atenuación de la pantalla)
La iluminación de la pantalla de la unidad principal puede ser
atenuada para adecuarse al entorno en el que esté escuchando
música
.
Page 54

54
Ajuste de conversión ascendente
Pantalla: UPCONV>***
Se puede hacer este ajuste para cada entrada. o
Durante la reproducción de un Super Audio CD, la señal DSD es o
enviada directamente al convertidor D/A.
OFF
La señal de entrada original es enviada directamente al convertidor
D/A sin incremento de conversión.
2Fs
Las fuentes de 32k Hz, 4 4.1kHz y 48kHz son convertid as
ascendentemente a valores dobles de 64 kHz, 88.2 kHz y 96 kHz
respectivamente y después enviadas al convertidor D/A.
4Fs
Las fuentes de 32kHz, 44.1kHz, 48kHz , 88.2kHz y 96kHz son
convertidas ascendentemente hasta valores dobles o cuádruples
de 128 kHz, 176.4 kHz o 192 kHz y después enviadas al convertidor
D/A .
DSD
La señal es convertida a formato digital DSD y después enviada al
convertidor D/A.
Ajuste del filtro digital del convertidor D/A
Pantalla: DF>***
Se puede hacer este ajuste para cada entrada. o
Durante la reproducción de un Super Audio CD o durante la o
co nversión a formato DSD, este par á m etro se ajusta
automáticamente al filtro específico para DSD.
OFF
El convertidor D/A no utiliza ningún filtro digital.
Usando este ajuste, se creará distorsión armónica. Si se produce o
ruido a causa de la modulación cruzada de la distorsión armónica,
por ejemplo, cambie el ajuste de "DF" a "FIR" o "S_DLY".
FIR1
La frecuencia de corte del filtro de tipo FIR varía según la frecuencia
de muestreo de entrada.
FIR2
Independientemente de la frecuencia de muestreo de entrada,
se usa un filtro de tipo FIR con una frecuencia de corte de
aproximadamente 80 kHz.
S _D LY 1
La frecuencia de corte del filtro de tipo S_DLY varía según la
frecuencia de muestreo de entrada.
S _D LY 2
Independientemente de la frecuencia de muestreo de entrada,
se usa un filtro de tipo S_DLY con una frecuencia de corte de
aproximadamente 80 kHz.
Acerca de los filtros digitales del convertidor
D/A
Filtros digitales de tipo FIR
Este tipo de filtro tiene fama bien ganada por su calidad de sonido
y sus prestaciones de calidad tonal, tanto por sus reverberaciones
de gran densidad y riqueza sonora como por sus transitorios de
gran nitidez.
Filtros digitales de tipo S_DLY
Este tipo de filtro no tiene pre-eco en la respuesta de impulsos
y se caracteriza por la naturalidad del ataque del sonido y de la
reverberación para obtener una calidad tonal cercana al original.
Modo de configuración (2)
Page 55

55
Español
Ajuste de reloj
Pantalla: CLK>***
Se puede hacer este ajuste para cada entrada. o
Los parámetros que se pueden seleccionar dependen del
ajuste de entrada.
Cuando la entrada es XLR, RCA1, RCA2 u OPT
PLL1
z
PLL2
z
OUT
z
IN
z
DMCK
Cuando la entrada es USB y la configuración USB es NORM
o HS_1
PLL1
z
OUT
Cuando la entrada es USB y la configuración USB es HS_2
INT
z
OUT
z
IN
z
DMCK
PL L1
El circuito PLL interno sigue la señal de audio digital que entra y
genera el reloj maestro. Es posible el funcionamiento en respuesta
a un amplio rango de frecuencias de reloj de entrada.
PLL2
El circuito PLL interno sigue la señal de audio digital que entra y,
junto con el oscilador de cristal de alta precisión interno, genera el
reloj maestro. Usando circuitos PLL con características diferentes
en 2 etapas, se reduce la fluctuación e inestabilidad ("jitter") en la
transmisión de la señal de audio.
Para aumentar el rendimiento del oscilador de cristal de alta o
precisión interno, éste ha sido diseñado con un rango de
variación de frecuencias estrecho. Si la frecuencia de reloj de la
señal digital entrante excede la tolerancia del oscilador de cristal
de alta precisión interno, no será posible la sincronización. En
tales casos, ponga la unidad en el modo PLL1.
INT
La unidad funciona con el oscilador de cristal interno como reloj
maestro.
OUT
La unidad emite una señal de reloj de palabras desde su terminal
CLOCK OUT y funciona con sincronización de reloj.
Las frecuencias que se pueden emitir son 44.1, 48, 88.2, 96, 100,
176.4 y 192 kHz, así como 22.5792 y 24.576 MHz.
IN
La unidad recibe la entrada de una señal de reloj de palabras a
través de su terminal CLOCK IN procedente de un generador de
reloj y funciona con sincronización de reloj.
Las frecuencias que se pueden introducir son 44.1, 48, 88.2, 96, 100,
176.4 y 192 kHz, así como 10 MHz.
Con la configuración de entrada USB en HS_2, la frecuencia que o
se puede introducir depende de la frecuencia de muestreo de la
fuente de sonido.
Cuando la fuente es 44.1kHz:
44.1, 88.2, 176.4, 100 kHz y 10 MHz
Cuando la fuente es 48kHz:
48, 96, 192, 100 kHz y 10 MHz
DMCK
La unidad recibe la entrada directa de una señal de reloj de
palabras que es 512 veces la de la velocidad del reloj maestro
(22.5792 MHz para 44.1 kHz o 24.576 MHz para 48 kHz) a través de su
terminal CLOCK IN procedente de un generador de reloj y funciona
bajo sincronización directa con ese generador de reloj.
o
Cuando reproduzca un CD o un SACD con un lector de SACD
Esoteric , solamente es posible introducir 22.5792 MHz.
Con la configuración de entrada USB en HS_2, es posible o
introducir 22.5792 MHz para 44.1 kHz o 24.576 MHz para 48 kHz
como frecuencia de muestreo de la fuente de sonido, pero es
necesario cambiar el reloj de acuerdo con la fuente de sonido.
Page 56

56
Ajuste de la frecuencia de salida de reloj
Pantalla: WOUT>***
Establece la frecuencia de la salida de señal procedente del terminal
CLOCK OUT.
Se utiliza cuando se sincroniza la reproducción de un dispositivo que
tenga un terminal de entrada de sincronización de reloj con el D-07X,
como por ejemplo un Esoteric P-05.
Este parámetro solamente aparece cuando CLK está configurado o
en OUT, IN o DMCK.
Se puede hacer una ajuste diferente para cada entrada. o
Los parámetros que se pueden seleccionar dependen de
la configuración de CLK.
Cuando la configuración de CLK es OUT
44.1kHz
z
88.2kHz
z
176.4kHz
z
22.5792MHz
z
48kHz
z
96kHz
z
192kHz
z
24.576MHz
z
100kHz
Cuando se configura en 44.1, 88.2 o 176.4 kHz o 22.5792 MHz, las o
señales de audio que se pueden introducir son 44.1, 88.2 y 176.4
kHz y DSD.
Cuando se configura en 48, 96 o 192 kHz o 24.576 MHz, las o
señales de audio que se pueden introducir son 48, 96 y 192 kHz.
Cuando se configura en 100 kHz (reloj universal), las señales de o
audio que se pueden introducir son 44.1, 88.2 y 176.4 kHz y DSD.
Se utiliza cuando la unidad está conectada a un dispositivo
Esoteric, como por ejemplo un UX-1 o un UX-3, que soporta
reloj universal.
Cuando la configuración de CLK es IN
OFF
z
THRU
z
1Fs
z
2Fs
z
4Fs
z
MCK
z
100kHz
Cuando la configuración de CLK es DMCK
OFF
z
THRU
z
1Fs
z
2Fs
z
4Fs
z
MCK
El dispositivo fuente debe recibir entrada de reloj procedente o
de un generador de reloj y estar sincronizado.
OFF
No se emite ninguna señal de reloj.
THRU
La señal de reloj introducida a través del terminal CLOCK IN es
enviada a la salida sin cambiar la frecuencia.
1Fs, 2Fs, 4Fs
Se emite una señal de reloj que es 1, 2 o 4 veces la frecuencia de
muestreo base de la señal de reloj introducida, que debe ser o bien
44.1 kHz o bien 48 kHz.
MCK
Se emite una señal de reloj maestro (MCK) que es 512 veces la
frecuencia de muestreo base de la señal de reloj introducida, que
debe ser o bien 44.1 kHz o bien 48 kHz.
100 k
Se emite reloj universal (100 kHz).
Modo de configuración (3)
Page 57

57
Español
Ajuste de la salida analógica
Pantalla: OUT>***
Independientemente de los ajustes o configuración de entrada, o
no saldrá audio por los terminales LINE OUT si hay unos auriculares
conectados al terminal PHONES.
RCA
Las señales de audio analógico salen por los terminales RCA.
XLR2
Las señales de audio analógico salen por los terminales XLR con la
punta 2 VIVO (POSITIVO).
XLR3
Las señales de audio analógico salen por los terminales XLR con la
punta 3 VIVO (POSITIVO).
Ajuste de la ganancia de la salida XLR
Pantalla: XLR>***
Es te ajuste so lo aparece cuando l a salida an alógica es tá o
configurada en XLR2 o XLR3.
Dependiendo del amplificador conectado, tanto el ajuste en o
"+6dB" como el ajuste en "0dB" podría dar como resultado el
mismo volumen que la entrada por los terminales RCA.
+6dB
Configura el nivel de salida XLR en el doble que el nivel de salida
RCA (+6dB).
Si el sonido está distorsionado cuando se ajusta en "+6dB", o
cambie el ajuste a "0dB".
0dB
Configura el nivel de salida XLR al mismo nivel que el nivel de
salida RCA (0dB).
Ajuste de la entrada USB
Pantalla: USB>***
Este parámetro solamente aparece cuando la fuente de entrada o
está configurada en USB.
Cuando se configure en un modo HIGH SPEED (alta velocidad), se o
deberá instalar en ordenador el software del "driver" controlador
específico. Descargue el software del "driver" controlador desde
nuestra página web (ver página 59).
NORM
Conecta usando el modo USB FULL SPEED (velocidad completa).
Las frecuencias de muestreo que pueden ser introducidas son 32
kHz, 44.1 kHz, 48 kHz, 88.2 kHz y 96 kHz.
HS _1
Conecta usando el modo USB HIGH SPEED (alta velocidad).
Las frecuencias de muestreo que pueden ser introducidas son 32
kHz, 44.1 kHz, 48 kHz, 88.2 kHz, 96 kHz, 176.4 kHz y 192 kHz.
HS_2
Conecta usando el modo USB HIGH SPEED (alta velocidad)
asíncrono.
Las frecuencias de muestreo que pueden ser introducidas son 32
kHz, 44.1 kHz, 48 kHz, 88.2 kHz, 96 kHz, 176.4 kHz y 192 kHz.
En el modo asíncrono, la señal de reloj de esta unidad se utiliza
para la reproducción de datos de audio transmitidos desde el
ordenador.
Si se producen saltos o ruidos durante la reproducción con este o
apartado puesto en HS_2, cambie la configuración a HS_1.
Page 58

58
Ajuste del control remoto por mando a
distancia
Pantalla: RC>***
Si utiliza esta unidad con un amplificador Esoteric, usted puede
configurarla de modo que el mando a distancia no controle el
volumen ni la selección de entrada de esta unidad.
Enable
Permite a la unidad ser controlada por el mando a distancia de un
producto Esoteric como por ejemplo el P-05 o el K-05 (ver página
47).
Disable
Configura la unidad para ignorar todas las órdenes que provengan
de mandos a distancia excepto las órdenes de atenuación de la
iluminación de la pantalla (DIMMER).
Use este parámetro cuando esté utilizando la unidad al mismo
tiempo que un amplificador Esoteric.
Ajuste del contenido de la pantalla
Pantalla: DISP>***
Fs
En la pantalla se muestran el nombre de la entrada y la frecuencia
de muestreo de la señal de audio.
Ejemplo 1) XLR DSD
Ejemplo 2) RCA1 48
VOL
En la pantalla se muestran el nombre de la entrada y el ajuste de
volumen.
Ejemplo 1) XLR 0.0
Ejemplo 2) OPT -7.5
Ajuste del apagado automático de la pantalla
Pantalla: FLaOFF>***
Us ted puede co nfigu rar la pan tall a p ar a que s e apague
automáticamente después de transcurrida una cierta cantidad de
tiempo. El valor por defecto es "30m".
15m, 30m, 60m
La pantalla se apagará automáticamente si no se lleva a cabo
ninguna operación y la pantalla no cambia durante 15, 30 o 60
minutos.
OFF
La pantalla nunca se apaga automáticamente.
Si la señal digital entrante no está acoplada, la pantalla no se apagará. o
Si la pantalla se deja ENCENDIDA con la misma indicación durante o
mucho tiempo, se pueden producir irregularidades en su iluminación.
Por esta razón, le recomendamos que active la función de apagado
automático de la pantalla.
Atenuación de la pantalla
Pantalla: DIMMER>***
La iluminación de la pantalla y de los indicadores de la unidad puede
ajustarse. El valor por defecto es "3".
3 (luminosidad normal)
z
2
z
1
z
0 (apagada)
Si se configura en "0" (apagada), no se iluminarán ni la pantalla ni los o
indicadores.
Incluso cuando la pantalla está configurada en "0" (apagada), o
al pulsar el botón INPUT, por ejemplo, la pantalla se volverá a
encender durante unos segundos.
Incluso cuando esté configurada en un valor que no sea "3" o
(intensidad de iluminación normal), cuando se muestre un mensaje
de error o un menú de configuración la intensidad de iluminación
se elevará al nivel normal.
Modo de configuración (4)
Page 59

59
Español
Conexión a un ordenador y reproducción de archivos de audio (1)
Conectando el terminal de entrada USB a un ordenador mediante un
cable USB, se pueden reproducir archivos de audio almacenados en
un ordenador utilizando el convertidor D/A de esta unidad.
Esta unidad se puede conectar por USB a ordenadores que utilicen los
siguientes sistemas operativos.
Windows XP 32 bits
Windows Vista 32/64 bits
Windows 7 32/64 bits
Mac OS X 10.6.4 o posterior (32/64 bits)
No está garantizado el funcionamiento con otros sistemas operativos.
Dependiendo del hardware del ordenador y de la integración o
del software, podría darse el caso que incluso con los sistemas
operativos mencionados anteriormente el funcionamiento no
fuese el correcto.
Para conectarse en el modo de Alta Velocidad 1 (HIGH SPEED o
1) o Alta Velocidad 2 (HIGH SPEED 2), deberá instalar primero el
software del "driver" controlador específico.
Si conecta esta unidad a un ordenador antes de instalar el "driver"
controlador, no funcionará correctamente. Además, si está usando
Windows XP, el funcionamiento del ordenador podría ralentizarse
notablemente y podría ser necesario reiniciar el ordenador.
Dirección de la página web para descargar el "driver" controlador:
http://www.esoteric.jp/products/esoteric/usb/usb_driver_e.html
Instale el software del "driver" controlador específico después de
descargar el archivo de la dirección web arriba mencionada.
Puede seleccionar 1 de los 3 modos posibles cuando conecte esta
unidad a un ordenador mediante USB. Ver páginas 52 y 57 para más
información sobre cómo hacer los ajustes.
Modo NORMAL
En el modo de configuración, seleccione USB>NOR.
De esta forma se conecta al ordenador en modo FULL SPEED
(velocidad completa).
Las frecuencias de muestreo que pueden ser transmitidas son 32,
44.1, 48, 88.2 y 96 kHz. No hace falta instalar el software del "driver"
controlador específico para usar este modo cuando se conecte la
unidad a un ordenador. La unidad y el ordenador se conectarán
usando el "driver" controlador de audio USB estándar del sistema
operativo.
La primera vez que conecte esta unidad a un ordenador, el o
ordenador detectará el puerto USB de la unidad e instalará el
"driver" controlador. Siga las instrucciones del sistema operativo.
Una vez terminada la instalación del "driver" controlador, inicie la
aplicación para reproducir archivos de audio.
Si la conexión se ha hecho correctamente, podrá seleccionar
"ESOTERIC USB AUDIO" como salida de audio.
Modo HIGH SPEED 1 (alta velocidad 1)
En el modo de configuración, seleccione USB>HS_1.
De esta forma se conecta al ordenador en modo HIGH SPEED (alta
velocidad).
Las frecuencias de muestreo que pueden ser transmitidas son 32,
44.1, 48, 88.2, 96, 176.4 y 192 kHz. Deberá instalar el software del
"driver" controlador específico para utilizar este modo cuando
conecte esta unidad a un ordenador. Descargue el software del
"driver" controlador específico desde nuestra página web.
Si la conexión se ha hecho correctamente, podrá seleccionar
"ESOTERIC USB HS AUDIO" como salida de audio.
Modo HIGH SPEED 2 (alta velocidad 2)
En el modo de configuración, seleccione USB>HS_2.
De esta forma se conecta al ordenador en modo HIGH SPEED (alta
velocidad) asíncrono.
Las frecuencias de muestreo que pueden ser transmitidas son 32,
44.1, 48, 88.2, 96, 176.4 y 192 kHz. Deberá instalar el software del
"driver" controlador específico para utilizar este modo cuando
conecte esta unidad a un ordenador.
Descargue el software del "driver" controlador específico desde
nuestra página web.
Si la conexión se ha hecho correctamente, podrá seleccionar
"ESOTERIC USB HS ASYNC AUDIO" como salida de audio.
En el modo asíncrono, los datos de audio enviados desde el
ordenador se procesan usando el reloj de esta unidad, permitiendo
así que se reduzca la cantidad de fluctuación o inestabilidad
("jitter") que tiene lugar durante la transmisión de datos.
Cuando se esté utilizando el modo HIGH SPEED 2 para conectar o
el ordenador con esta unidad, si se producen saltos o ruidos
periódicos en el sonido durante la reproducción, utilice en su lugar
el modo HIGH SPEED 1.
Si desea usar el modo HIGH SPEED 1 o HIGH SPEED 2, instale el o
software del "driver" controlador específico antes de conectar la
unidad al ordenador (ver columna de la izquierda).
Page 60

60
1
Conecte esta unidad a un ordenador usando
un cable USB
Utilice un cable con el conector adecuado para esta unidad.
Ordenador personal
2
Encienda el ordenador.
Confirme que el sistema operativo se ha iniciado correctamente.
3
Pulse el botón POWER para encender esta
unidad.
4
Pulse el botón INPUT repetidamente para
seleccionar USB (ver página 51).
5
Comience la reproducción de un archivo de
audio en el ordenador
.
La mejor calidad de sonido se consigue ajustando el volumen en
el ordenador al máximo nivel y usando el amplificador conectado
a esta unidad para ajustar el volumen. Ponga el volumen del
amplificador al mínimo cuando comience la reproducción y vaya
aumentándolo gradualmente.
El ordenador no puede controlar a esta unidad ni esta unidad o
puede controlar al ordenador.
Esta unidad no puede enviar archivos de audio al ordenador o
mediante USB.
No lleve a cabo ninguna de las siguientes operaciones cuando se o
esté reproduciendo un archivo de audio mediante USB. Si lo hace
podría causar anomalías de funcionamiento en el ordenador.
Salga siempre del software de reproducción de música antes de
llevar a cabo alguna de las siguientes acciones.
Desconectar el cable USB
Apagar esta unidad
Cambiar la entrada
Cuando reproduzca un archivo de música mediante USB, los o
sonidos propios del funcionamiento operativo del ordenador
también se escucharán por la salida. Si no quiere que estos
sonidos se escuchen, haga los ajustes pertinentes en el ordenador
para desactivarlos.
Si conecta esta unidad al ordenador o cambia la entrada a o
"USB" después de haber iniciado el software de reproducción
de música, los archivos de música podrían no reproducirse
correctam ente. S i esto ocu rre, re inici e el software de
reproducción de música o reinicie el ordenador.
Conexión a un ordenador y reproducción de archivos de audio (2)
Page 61

61
Español
Mensajes
"- - -" aparece en el lado derecho de la pantalla.
Se está introduciendo una señal incompatible.
No introduzca señales que no sean PCM y DSD.
Compruebe las conexiones digitales de la unidad.
XLR, RCA1, RCA2, OPT o USB parpadean intermitentemente.
La unidad no puede detectar una señal digital. Pulse el botón
INPUT para seleccionar un terminal al que haya conectado un
dispositivo digital.
Encienda el dispositivo conectado. Confirme los ajustes del
dispositivo conectado
.
PLL LCKING
El circuito PLL interno (PLL2) está acoplado.
PLL UNLCK!
El circuito PLL interno no puede acoplar la señal digital introducida.
Compruebe la conexión con el dispositivo digital que se esté
enviando a la entrada. Si la precisión de la frecuencia de la señal de
entrada excede el rango que esta unidad puede acoplar, el circuito
PLL interno (PLL2) no será capaz de acoplarse, de modo que
configure el reloj (CLK) en PLL1 (ver página 55 para más detalles).
NO WORD!
No está entrando ninguna señal de reloj de palabras. Compruebe
la conexión con el generador de reloj maestro externo y si está
encendido, así como su estado de salida.
Cuando no se esté utilizando el reloj de palabras, configure el
reloj (CLK) en PLL1 o PLL2 (ver página 55 para más detalles).
WRD ERROR!
La frecuencia de reloj de la fuente de entrada no coincide con la
frecuencia del reloj de palabras.
Seleccione 44.1, 88.2, 100 o 176.4 kHz o 10 MHz durante la
reproducción de un Super Audio CD. También debería confirmar
que la sincronización de reloj está teniendo lugar correctamente
con el dispositivo fuente.
Configure el reloj (CLK) en "PLL1" o "PLL2" cuando la unidad esté
conectada a un dispositivo que no tenga función de sincronización
de palabras.
Para sincronizar con un reloj maestro, seleccione DMCK (ver página
55 para más detalles).
WRD LCKING
Indica que la señal de reloj de palabras entrante está siendo acoplada.
WRD UNLCK!
Indica que el dispositivo no se puede acoplar a la señal de reloj de
palabras entrante. Confirme el ajuste de frecuencia del generador
de reloj conectado
.
NO MCK!
No se está introduciendo ninguna señal de reloj maestro.
MCK ERROR!
La señal de audio entrante y el reloj entrante de 22.5792MHz o
24.576MHz no están acoplados.
La frecuencia de la fuente de entrada no está acoplada con el reloj
maestro entrante.
Confirme que la fuente de entrada soporta salida de reloj maestro
(ver página 56 para más detalles).
MCK UNLCK!
No se puede acoplar a la entrada de reloj maestro.
Compruebe el ajuste de frecuencia del generador de reloj conectado
(ver página 55 para más detalles).
Page 62

62
Solución de posibles fallos
Si experimenta problemas con esta unidad, por favor tómese el
tiempo de consultar la información que le facilitamos a continuación
antes de solicitar atención técnica. Es más, el problema podría
estar causado por algún motivo ajeno a esta unidad. Confirme que
el resto de dispositivos conectados también estén siendo usados
correctamente.
No hay corriente o la unidad no se enciende.
e Inserte el cable de corriente en una toma de electricidad.
e Compruebe la conexión del cable de corriente a la unidad.
No hay sonido
e Compruebe las conexiones con el amplificador y los altavoces.
e
Compruebe el ajuste de salida de audio analógico (ver página 57).
e Si hay unos auriculares conectados, no saldrá sonido por los
terminales LINE OUT.
El indicador de entrada parpadea intermitentemente.
e Encienda el dispositivo conectado al terminal de entrada
seleccionado.
e Compruebe si es correcta la conexión al terminal de entrada
seleccionado.
Se escucha un pitido a intervalos regulares.
e
El D-07X está en modo de sincronización de reloj, pero el dispositivo
conectado no lo está. Compruebe la conexión al terminal de
sincronización de reloj y la configuración del dispositivo conectado.
El indicador de reloj parpadea intermitentemente.
e
Configure el reloj (CLK) en "PLL1" o "PLL2" cuando no se esté
usando el modo de sincronización de reloj.
e Se está introduciendo una señal incompatible. Compruebe las
conexiones de sincronización de reloj y la configuración de los
dispositivos conectados.
Dado que esta unidad utiliza un micro controlador, ruidos
externos y otras interferencias pueden producir anomalías de
funcionamiento en la unidad. Si esto ocurre, apague la corriente
una vez y después vuelva a encenderla tras haber esperado un
minuto aproximadamente.
Restablecer los valores de fábrica por defecto
Los ajustes memori zados se almacenan incluso d espués de
desconectar el cable de corriente.
Si usted ha hecho cambios a través del proceso del menú de
configuración y desea volver a empezar a partir de una configuración
de opciones conocida, restablezca la unidad a los valores de fábrica
por defecto como sigue:
1
Apague la unidad.
Si la unidad está encendida, pulse el botón POWER para apagarla
y espere durante más de 30 segundos.
2
Pulse el botón POWER mientras mantiene
pulsado el botón MENU.
Suelte el botón MENU cuando la unidad se encienda y se ilumine o
la pantalla.
Page 63

63
Español
Especificaciones
Salida analógica
Conectores .................................................XLR (2 canales) x 1
RCA (2 canales) x 1
Auriculares x 1
Impedancia de salida
XLR ...................................................................100 Ω
RCA....................................................................25 Ω
Nivel de salida máximo (1 kHz, con entrada de escala completa)
XLR: 2.45 Vrms (cuando configurado en 0 dB con carga de 10 kΩ)
RCA: 2.45 Vrms (con carga de 10 kΩ)
PHONES: 20 mW + 20 mW (con carga de 32 Ω)
Respuesta en frecuencias .....................................de 5 Hz a 55 kHz
Relación señal/ruido (S/N)...............................................115 dB
Distorsión armónica total ......................................0.0015% (JEITA)
Entrada digital
Entrada digital balanceada .............................XLR (5.0 Vp-p/110 Ω) x 1
Terminal coaxial........................................RCA (0.5 Vp-p/75 Ω) x 2
Terminal digital óptico ................ OPTICAL (de –24.0 a –14.5 dBm pico) x 1
Puerto USB......................................................Conector B x 1
Frecuencias de muestreo de entrada.......32, 44.1, 48, 88.2, 96, 176.4, 192 (kHz)
Nota: la entrada XLR (sólo) soporta entrada DSD en formato ES-LINK (simple).
Salida de sincronización de reloj
Conector...............................................................BNC x 1
Frecuencias de salida ...44.1, 48, 88.2, 96, 100, 176.4, 192 (kHz/onda rectangular)
22.5792, 24.576 (MHz)
Misma frecuencia que la entrada (cuando está puesta en THRU)
Nivel de salida ...................Equivalente a niveles TTL (con carga de 75 Ω)
Entrada de sincronización de reloj
Conector...............................................................BNC x 1
Frecuencias de entrada ..................44.1, 48, 88.2, 96, 100, 176.4, 192 (kHz)
10, 22.5792, 24.576 (MHz)
Impedancia de entrada ...................................................75 Ω
Nivel de entrada .......................Onda cuadrada: equivalente a nivel TTL
Onda senoidal: 0.5–1.0 Vrms (con carga de 75 Ω)
General
Alimentación
Modelo para Europa ........................................CA 230 V, 50 Hz
Modelo para U.S.A./Canada .................................CA 120 V, 60 Hz
Modelo para Corea .........................................CA 220 V, 60 Hz
Consumo de corriente .....................................................7 W
Dimensiones externas (ancho x alto x profundo) (incluyendo salientes)
445 x 106.5 x 356 mm (17 1/2" x 4 2/8" x 14 1/8")
Peso ..........................................................10.4 kg (22.93 lb)
Temperatura de funcionamiento ..............................de +5°C a +35°C
Humedad de funcionamiento................de 5 % a 85 % (sin condensación)
Temperatura de almacenamiento ............................de –20°C a +55°C
Accesorios
Cable de corriente x 1
Manual del usuario (este documento) x 1
Tarjeta de garantía x 1
El diseño y las especificaciones están sujetas a cambios sin previo o
aviso.
El peso y las dimensiones son aproximados. o
Las ilustraciones pueden diferir ligeramente de los modelos de o
producción.
Page 64

64
Panel posterior
Page 65

65
Español
Page 66

66
Page 67

Page 68

0912.MA-1 779B
TEAC CORPORATION 1-47 Ochiai, Tama-shi, Tokyo 206-8530, Japan Phone: (042) 356-9156 e-mail: eso-os@tec.teac.co.jp
TEAC AMERICA, INC. 7733 Telegraph Road, Montebello, California 90640 U.S.A. Phone: (323) 726-0303 e-mail: esoteric_info@teac.com
TEAC MEXICO, S.A. de C.V. Río Churubusco 364, Colonia Del Carmen, Delegación Coyoacàn, CP 04100, México DF, México Phone: (5255)5010-6000
TEAC EUROPE GmbH Bahnstraße 12, D-65205 Wiesbaden-Erbenheim, Deutschland Phone: 0611-71580
This appliance has a serial number located on the rear panel. Please record the
serial number and retain it for your records.
Model name: D-07X Serial number
 Loading...