


TCL
|
- TV -PE |
|
|
|
|
|
|
|
|
|
|
|
|
|
|
|
|
||
HZ2019 |
TCL L32S60A |
|
|
|
|
||||
72-RT41KS-XRUBV |
RUSSIA |
|
|
|
|
||||
|
|
|
BOM H7-32F6NNW-URNA1AA |
|
|
|
|||
|
|
32S60A |
|
|
ELQ145380O |
|
|
|
|
|
|
RT41XS-RU |
|
2019-10-6 |
|
|
|
|
|
|
|
|
1:1 |
|
|
|
|
|
|
|
|
|
A5 |
|
|
|
|
|
|
|
|
|
80g |
|
|
|
|
|
|
|
|
|
|
|
|
|
|
|
|
|
|
|
72-RT41KS-ERU1B R1 |
|
|
|
|||
|
|
|
+ |
|
|
|
|
|
|
|
|
|
|
|
|
|
|
||
|
|
|
|
|
|
|
|
||
|
|
|
70-STDD30-EEM1A |
|
|
|
|
||
|
|
|
|
|
|
DN cn= |
c=< |
|
|
|
|
|
|
|
2019.10.0 |
> |
|
|
DN cn= , o, ou, |
|
|
|
/ |
2019.10.09 |
|
email=vasya.liu@tcl.c |
|||
|
14:21:03 +08'00' |
|
om, c=< |
||||||
|
9 08:50:30 |
|
|
2019.10.08 |
|||||
PREPARED BY |
|
ENG.CHECKED BY: |
+08'00' |
CONFIRM |
BY |
14:16:30 +08'00' |
|||
|
|
|
|
|
|
|
|
|
|

OPERATION MANUAL
L32S60A
Figures and illustrations in this User Manual are provided for reference only and may di er from actual product appearance. Product design and speci cations may be changed without notice.

Table of Contents
Chapter 1: Introduction |
|
Precautions ............................................................... |
3 |
Warning ................................................................... |
3 |
Product .................................................................... |
3 |
Power and Plug ....................................................... |
3 |
Power Cord and Signal Cable ................................. |
3 |
Use Environment ..................................................... |
3 |
Cleaning .................................................................. |
3 |
Hanging the TV Set on the Wall ............................... |
3 |
Sockets ...................................................................... |
4 |
Remote Control Functions ...................................... |
5 |
How to use the remote control.................................. |
5 |
Installing Batteries .................................................... |
5 |
Exclusive Remote Control ....................................... |
6 |
Installing Batteries ................................................... |
6 |
Chapter 2: Getting Started |
|
Switching On ............................................................. |
7 |
Network Connection ................................................. |
8 |
TV Buttons ........................................................... |
9 |
Initial Setup ............................................................. |
9 |
Chapter 3: Basic TV Operations |
|
Accessing Channels .............................................. |
10 |
Watching Connected Devices ............................... |
10 |
Adjusting Volume ................................................... |
10 |
Accessing Smart TV Homepage ............................ |
10 |
Accessing T recommended .................................... |
10 |
Using System Settings Menu ................................. |
10 |
Using TV Settings Menu ........................................ |
10 |
Chapter 4: Using More of Your TV |
|
Installing Channels ................................................. |
11 |
Common Interface .................................................. |
11 |
Using the Common Interface Function ................... |
11 |
Accessing Common Interface Services ................. |
11 |
Using Subtitles ........................................................ |
11 |
Enabling Subtitle Languages on Digital TV |
|
Channels ................................................................ |
11 |
Selecting a Subtitle Type on Digital TV Channels ... |
11 |
Using Teletext ......................................................... |
12 |
Selecting Decoding Page Language ...................... |
12 |
Digital Teletext Language ....................................... |
12 |
Using Instant Power On .......................................... |
12 |
Network Wake Up ................................................ |
12 |
T-Link ....................................................................... |
12 |
Enabling or Disabling T-Link ................................... |
12 |
Using Auto Power On ............................................. |
12 |
Using Auto Standby ................................................ |
12 |
Using EPG (Electronic Program Guide) ................... |
12 |
Bluetooth Function ................................................. |
13 |
......... |
13 |
Password in Parental Control ................................ |
13 |
Chapter 5: Other Information |
|
Problems & Solutions ............................................. |
14 |
Troubleshooting ..................................................... |
15 |
Table Stand Installation ......................................... |
16 |
2

Chapter 1 |
Introduction |
|
|
Precautions
Read all of the instructions before operating the set. Keep these instructions well for future use.
Warning
Never place a television set in an unstable location. A television set may fall, causing serious personal injury or death. Many injuries, particularly to children, can be avoided by taking simple precautions such as:
-- Using cabinets or stands recommended by the manufacturer of the television set.
-- Only using furniture that can safely support the television set.
-- Ensuring the television set is not overhanging the edge of the supporting furniture.
-- Not placing the television set on tall furniture (for example, cupboards or bookcases) without
anchoring both the furniture and the television set to a suitable support.
-- Not placing the television set on cloth or other materials that may be located between the television set and supporting furniture.
-- Educating children about the dangers of climbing on furniture to reach the television set or its controls.
If your existing television set is being retained and relocated, the same considerations as above should be applied.
Product
•Do not block or cover the ventilation openings on the back cover.
•Do not push objects of any kind into this unit through the cabinet slots as they could touch the current carrying parts or short-circuit parts, resulting in fire, electric shock, or damage to the unit.
•Do not attempt to open the cabinet as this may cause damage. There are no parts inside you can service by yourself. Refer all servicing to qualified personnel.
•Do not touch the screen surface with fingers as this may scratch or mar the TV screen.
•Do not impact the TV screen with hard pressure as this may damage the TV screen severely.
Power and Plug
•Unplug the set under the following conditions:
-- If the set will not be used for a long period of time.
-- If the power cord or the power outlet/plug is damaged.
-- Follow the instructions to install and adjust the product. Adjust those controls that are covered in these operating instructions as improper adjustment of other controls may result in damage. If this happens, unplug the set and refer to the service personnel.
-- If the set is subject to impact or has been dropped and the cabinet has been damaged.
•Where the mains plug or an appliance coupler is used as disconnect device, the disconnect device shall remain readily operable.
(*Where an all-pole mains switch is used as the disconnect device, the switch shall remain readily operable.)
Power Cord and Signal Cable
•Do not allow anything to rest on or roll over the power cord and the signal cable.
•Protect the power cord and the signal cable from being trampled.
•Do not overload the power cord or the power outlet.
•Do not expose the power cord and the signal cable to moisture.
Use Environment
•Do not place the set on an unstable cart, stand, or table.
•Place the set on a place that allows good ventilation.
•Do not use the set near damp, and cold areas.
•Do not expose the set to excessive heat such as direct sunlight, fire, or the like and no naked flame sources, such as lighted candles, should be placed on the apparatus.
•Do not expose the set to dripping or splashing and no objects filled with liquids, such as vases, shall be placed on the apparatus.
•Do not use the set in dusty environments.
•Operating Temperature: 5°C to 35°C (41°F to 95°F) Operating Humidity: 20% to 80%, non-condensing Storage Temperature: -15°C to 45°C (5°F to 113°F) Storage Humidity: 10% to 90%, non-condensing
Cleaning
•Dust the set by wiping the screen and the cabinet with a soft, clean cloth or some special liquid cleaner.
•Do not apply excessive force to the screen when cleaning.
•Do not use water or other chemical cleaner to clean the screen as this may damage the surface of the TV screen.
Hanging the TV Set on the Wall
Warning: This operation requires two people.
To ensure a safe installation, observe the following safety notes:
•Check that the wall can support the weight of the TV set and wall mount assembly.
•Follow the mounting instructions provided with the wall mount.
•The TV set must be installed on a vertical wall.
•Make sure to use only screws suitable for the material of the wall.
•Make sure that the TV set cables are placed so that there is no danger of tripping over them.
All other safety instructions about our TV sets are also applicable here. (Note: Certain TV model is not
designed to be mounted to the wall.)
3

Introduction
Sockets
Note: The location and names of the sockets on the TV may vary according to TV model, and not all sockets available on all models.
LAN
Router / Modem
LAN
This socket can be used to connect to external modem or network access equipment.
SPDIF or  DIGITAL
  AUDIO OUT (OPTICAL)
HDMI
(SERVICE)
or HDMI
(ARC)
HDD
USB 2.0
SPDIF or DIGITAL AUDIO OUT(OPTICAL) socket (output)
This socket can be used to connect a compatible digital audio receiver.
HDMI(SERVICE) or HDMI(ARC) socket (input)
The HDMI (High-Definition Multimedia Interface) socket can be used to connect a Blu-ray player, PC with a compatible video card installed, certain DVD players or a high-definition compatible digital satellite decoder. This socket provides an uncompressed digital connection that carries both video and audio data by way of an integrated mini-plug cable.
USB2.0 socket (input)
These sockets can be used to connect a USB device.
Note: The number of USB sockets on the TV may vary according to TV model.
ANTENNA |
ANTENNA/CABLE IN socket (input) |
|
This socket can be used to connect the outside aerial or cable |
||
/CABLE IN |
||
|
network. |
|
R |
R |
R |
AV IN |
L |
L |
L |
adapter |
|
|
|
|
V |
V |
V |
SATELLITE IN
COMMON INTERFACE
AV IN adapter socket
The AV IN adapter socket can be used to connect the attached AV adapter cable with VIDEO and AUDIO L & R IN sockets. The AV IN sockets can be used to connect a range of equipment, including video recorders, camcorders, decoders, satellite receivers, DVD players, or games consoles.
Headphone socket (output)
This socket can be used to connect headphones or stereo earphones.
Warning: Excessive sound pressure from earphones and earphones and headphones can cause hearing loss.
SATELLITE IN socket (input)
This socket can be used to connect a coaxial cable to receive the signal from your satellite receiver.
COMMON INTERFACE socket
This slot can be used to watch encrypted digital TV channels by inserting a CAM(Conditional Access Module) along with a smart card provided by a digital TV service operator.
4
Introduction
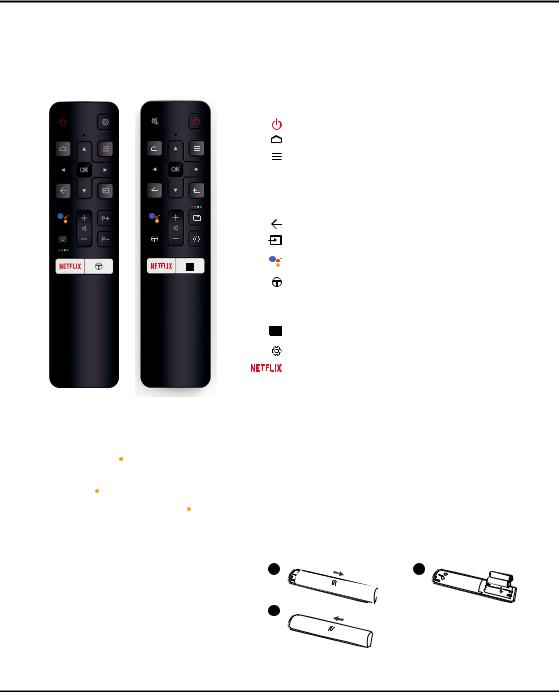
Remote Control Functions
Most of your television's functions are available via the menus that appear on the screen. The remote control(s) supplied with your set can be used to navigate through the menus and to configure all the general settings.
Note: Figures and illustrations in this operation manual are provided for reference only and may differ from actual product appearance. Certain function may be accessed from the virtual remote control keyboard only.
*
▲/▼/◄/►
OK
or

 /
/
P /P
/P
*
To switch the sound off and back on.
Standby / quit standby.
To access the Smart TV homepage. To display the Option menu.
Navigation direction buttons. The ▲/▼ buttons are also used to change channels in TV mode.
To confirm an entry or selection. This button is also used to display the channel list in TV mode.
To return to the previous menu or quit an App. To select input source.
To turn on the voice function. (Available only when the network connection works normally.)
To access T recommended Apps. To control the volume.
To change channels.
To pop up the virtual remote control keyboard when available.
To display the Settings menu.
To access Netflix. (Not available for some models.)
To access Apps view page directly.
Note: Certain function may be accessed from the virtual remote control keyboard only, please press  button on the remote to display it and operate accordingly.
-- How to Use the Remote Control
When using 
 button for the first time, you will be prompted to pair the remote with the TV.
a.Keep the remote control and TV in 1 meter, please follow the on-screen guide for paring instructions. You can use 
 button after activating successfully.
b.This voice search function 
 is only available for content search from certain apps.
c.Set languages in the TV settings to your local language or official language to enhance voice search successfully.
Installing Batteries |
1 |
2 |
|
1. |
Push to open the back cover as illustrated. |
|
|
2. |
Insert two AAA batteries according to the |
|
|
|
polarities marked on the battery case. |
3 |
|
3. |
Replace the back cover as illustrated. |
|
|
5
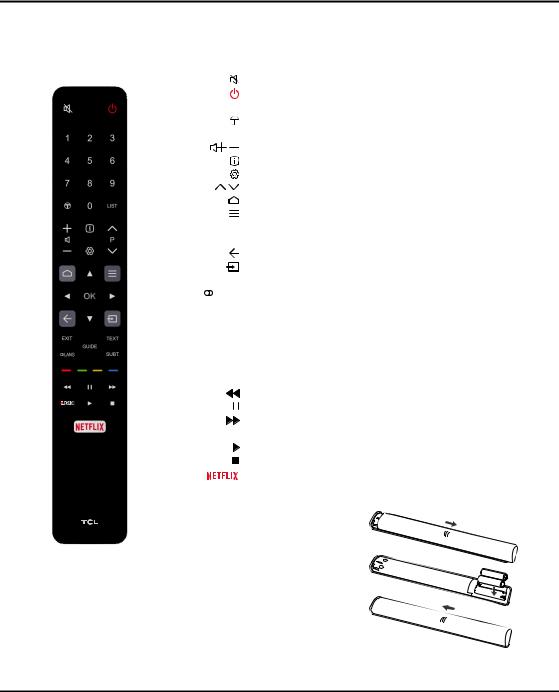
Exclusive Remote Control
Note: This remote control is only available for selected models, and the remote control type may be changed without notice.
|
|
To switch the sound off and back on. |
|
|
Standby / quit standby. |
|
Numeric buttons |
To enter channel numbers or a digit. |
|
|
To access T recommended apps. |
|
LIST |
To display the channel list. |
/ |
To control the volume. |
|
|
|
To display program information, if available. |
|
|
To display the Settings menu. |
|
P / |
To change channels. |
|
|
To access or exit the Smart TV homepage. |
|
|
To display the Option menu. |
|
▲/▼/◄/► Navigation direction buttons. |
|
|
OK |
To confirm an entry or selection. |
|
|
To return to the previous menu or quit an App. |
|
|
To select input source. |
|
EXIT |
To exit the Settings menu. |
|
LANG |
To select an audio language available for selected |
|
|
digital TV program. |
|
GUIDE |
To toggle the Electronic Program Guide on or off. (only |
|
|
available for digital channels.) |
|
TEXT |
To toggle Teletext on or off. |
|
SUBT. |
To select a subtitle language available for selected digital TV |
|
|
program. |
|
Colour buttons |
To select tasks or Teletext pages. |
|
|
To start fast reverse. |
|
|
To pause playback. |
|
|
|
|
|
To start fast forward. |
|
ZOOM |
To select the desired screen format. |
|
|
To start playback. |
To stop playback.
To access Netflix. (Not available for some models.)
Installing Batteries
1. Push to open the back cover as illustrated.
2. Insert two AAA batteries according to the polarities marked on the battery case.
3. Replace the back cover as illustrated.
6

Chapter 2 |
Getting Started |
|
|
Switching On
Follow the instructions on this page on how to switch on your TV set and the remote control before going on to following pages describing how to use the channel set-up procedure.
1.Insert two AAA batteries in the remote control. Precautions on using batteries:
-Only use the battery types specified.
-Make sure you use the correct polarity.
-Do not mix new and used batteries.
-Do not use rechargeable batteries.
-Do not expose batteries to excessive heat such as sunshine, fire or the like, throw them in a fire, recharge them or try to open them, as this could cause them to leak or explode.
-Remove the batteries from the remote control if you are not using it for a long period of time.
-Attention should be drawn to the environmental aspects of battery disposal.
2. Connect the power cable FIRST to the television, THEN to a mains socket. (Note: If the power cable is connected to the television, please only connect the power cable to the mains socket.)
Your TV set should only be connected to an AC supply. It must not be connected to a DC supply. If the plug is detached from the cable, do not, under any circumstances, connect it to a mains socket, as there is a risk of electric shock.
Note: The figures are for representation only, the location of power socket of the television may differ depending on the model.
3. Connect an outside aerial to the ANTENNA IN socket at the back of the TV set.
The aerial socket (75 OHM - VHF / UHF / cable) can be used for connecting an external aerial or other equipment fitted.
Note: If you want to receive the signal from your cable or cable box, please connect a coaxial cable to the CABLE IN socket at the back of the TV set.
4.When powered on, the TV will be turned on directly or be in standby mode.
If the power indicator lights up, the TV set is in standby mode. Press the  button on the remote control or on the TV set to turn on the TV.
Switching Off
•To put the TV set into standby mode, press the  button on the
remote control. The TV set remains powered up, but with low energy consumption.
•To switch off the TV set, unplug the mains socket from the mains outlet.
7

Getting Started
Network Connection
Your TV will require an internet connection to operate all functions. Data usage charges may apply. Please refer to your Internet Service Provider (ISP) for additional information.
To access the Internet, you must subscribe to high speed broadband Internet service with your Internet service provider (ISP).
Your TV can be connected to your home network in two ways:
•Wired, using the RJ45 (LAN) connector on the back panel.
•Wireless, using the internal wireless and your home wireless network.
Note: Instructions below are just the usual ways to connect your TV to the wired or wireless network. The connection method may be different depending on your actual network configuration. If you have any questions about your home network, please refer to your ISP.
Connecting to a Wired Network
To connect to a wired network:
1.Ensure you have:
•An Ethernet cable long enough to reach your TV
•A router or modem with an available Ethernet port
•A high-speed Internet connection
•An Ethernet (LAN) port on the back of the TV
2.Connect your Ethernet cable to the router and to the Ethernet port on the back of the TV.
3.Use the Network menu to configure the TV.
Connecting to a Wireless Network
To connect to a wireless network:
1.Ensure you have:
•A router broadcasting a high-speed wireless signal
•A high-speed Internet connection
2.Use the Network menu to configure the TV.
Router
Modem Internet
LAN port 

Modem Internet
Wireless router
Note: Please follow below steps to enter the Network menu.
1.Press  on the remote control to display the Smart TV homepage.
2.Press ▲/◄/► to move the cursor to  (Settings) on the right top of the screen and press OK to enter the system settings.
3.Press ▲/▼ to select Network, then press OK to enter the submenu and follow the on-screen guidance to set up your network.
8
Getting Started
TV Buttons
If the batteries in your remote control are run down, you can use the buttons on your TV set. They have the following functions:
For models with below buttons on the set:
 /◄
/◄

 /►
/►
Features (Short press)  (Long press)
For models with only one button on the set:  Power on/Standby
Note:
For models with below buttons on the set:
|
TV mode |
In menus |
|
P |
▲ |
|
P |
▼ |
|
|
► |
|
|
◄ |
|
Features (Long press) |
Features (Long press) |
|
||
|
OK (Short press) |
OK (Short press) |
Figures and illustrations are provided for reference only and may vary depending on the model.
Initial Setup
The first time you switch the set on, the Welcome screen appears, which guides you through the initial setup process. Follow the on-screen instructions to finish the initial setup process such as selecting the language, connecting to the network, scanning channels, and more. During each step, either make a choice or skip the step. If you skip a step, you can perform the setup later from the settings menu.
Note: If the channel search retrieved only the analogue channels it could be caused by poor broadcasting and therefore is not covered by manufacturer warranty. Manufacturers cannot be held responsible for lack of or poor broadcasting in some areas.
9

Chapter 3 |
Basic TV Operations |
|
|
Note: Certain function may be accessed from the virtual remote control keyboard only. Please use  button
to display the virtual remote control keyboard.
Accessing Channels
Press 
 on the remote control to display the virtual remote control keyboard, and operate as suggested below.
Using the numeric buttons: press the corresponding numeric buttons to access the channels.
Using the P+/- buttons: press the P+/- buttons or the corresponding buttons on the TV set to scroll through the channels.
Using the LIST button: press the LIST button to display the channel list and press ▲/▼/◄/► and OK to select channels.
Watching Connected Devices
Press on the remote control to display the source list. Press ▲/▼ to select TV or other input sources and press OK to confirm.
You can also press  on the remote control to display the homepage, press ▲/◄/► to move the cursor to the (Inputs) area on the right top of the screen, and press OK to enter. Then press ▲/▼ and OK to select the input source.
Adjusting Volume
Volume control: press the  /
/ buttons on the remote control or the corresponding buttons on the TV set to increase or decrease the volume.
Accessing Smart TV Homepage
Allows you to enjoy Internet Applications (Apps) and specially adapted Internet websites, and perform system settings for your TV. You can make controlling with the TV remote control.
WARNING:
•Configure the network settings before using Smart TV applications.
•Slow responses and/or interruptions may occur, depending on your network conditions.
•If you experience a problem using an application, please contact the content provider.
•According to circumstances of the content provider, an application’s updates or the application itself may be discontinued.
•Depending on your country’s regulations, some applications may have limited service or not be supported.
•Changes in application content may be made without prior notice by the service provider.
1.Press  on the remote control to display the Smart TV homepage.
2.Press ▲/▼/◄/► and OK to enter the desired Apps, functions or settings.
3.Press  to return to the homepage.
4.To exit the homepage, use ▲/◄/► to move the cursor to the (Inputs) area on the right top of the screen, and press OK to enter. Then press ▲/▼ and OK to select your desired input source.
Note: Since the connection with Internet takes time, it’s recommended that you wait a few minutes to use the Smart TV feature after activation of TV from standby.
Accessing T recommended
Allows you to enjoy Internet Applications (Apps).
1. Press |
on the remote control to display the |
recommended apps.
2.Press ▲/▼/◄/► and OK to enter the desired Apps.
For the first time, the apps will be downloaded automatically.
3.Press  to return to the recommend page and exit.
Using System Settings menu
Allows you to not only adjust device settings, such as Network, Inputs, Google Cast, Power and Apps, etc., but also set preferences.
1.Press  on the remote control to display the Smart TV homepage.
2.Press ▲/◄/► to move the cursor to  (Settings) on the right top of the screen and press OK to enter the system settings.
3.Press ▲/▼ to choose the items and press OK to enter.
4.Press  to return to previous interface and exit.
Using TV Settings menu
Allows you to adjust TV settings, such as picture and sound.
1.Press  on the remote control to display the Settings menu.
2.Press ▲/▼ to select the desired item, then press OK/► to enter the corresponding submenu.
3.In submenus, press ▲/▼ to select menu options, then press OK/► to enter the option list, the adjustment interface, or the corresponding submenu.
4.Press  to return to the previous menu.
5.Press  to close the menu.
Note:
-- You can also press  on the remote control, select Settings (if available) and press OK to enter the Settings menu. Some options may not be available for certain signal sources.
-- Setting LED Motion clear on will make fast moving images clearer by controlling the LED backlight, but the picture will be darker and more flickering than with LED Motion clear off.
10

Chapter 4 |
Using More of Your TV |
|
|
Installing Channels
This section describes how to search and store channels automatically. This may be done in any of the cases below:
-- you have skipped the channel installation step in the initial setup;
-- you are prompted that there are no channels in TV mode;
-- you want to update your channels.
1.In TV mode, press  on the remote control and select Channel > Channel scan. Press OK/► to enter.
2.The TV installs and arranges channels according to your country or region. Press ▲/▼ to select
Country/Region, and press OK/► to enter. Enter the default password 1234 or your own password in case you have changed the password in the System
> Lock menu. Press ▲/▼ to select your country or region and press OK to confirm.
3.Press ▲/▼ to select Automatic search and press OK/► to enter.
4.Press ▲/▼ to select Tuner mode and press ◄/► to select Cable, Antenna or Satellite.
5.Press ▲/▼ to select other options and use ◄/► to configure.
6.After configuration is completed, press ▼ to select
Search and press OK to start scanning channels.
7.The channel search may take a few minutes. After the automatic search, channels are arranged in a preset order. If you wish to hide or swap channels,
press  on the remote control, select Channel >
Channel organizer and press OK/► to enter.
Common Interface
Encrypted digital TV channels can be decoded with a Conditional Access Module (CAM) along with a smart card provided by a digital TV service operator.
The CAM may enable several digital services, depending on the operator and services you choose (for example, pay TV). Contact your digital TV service operator for more information about services and terms.
Using the Common Interface Function
WARNING: Switch off your TV before inserting a
CAM. Be sure to follow the instructions described below. Wrong insertion of a CAM may damage both the module and your TV.
1.Following the directions printed on the CAM, gently insert the module into the common interface slot on the TV.
2.Push the module in as far as it will go.
3.Turn on the TV and wait for the common interface function to be activated. This may take several minutes.
Note: Do not remove the CAM from the slot. Removing the module will deactivate the digital services.
Accessing Common Interface Services
After inserting and activating the CAM, press  on the remote control, select Channel > Common interface and press OK/► to enter.
This menu option is only available if the CAM is correctly inserted and activated. On-screen applications and content are provided by your digital TV service operator.
Note: This feature is only available under DTV source.
Using Subtitles
You can enable subtitles for each TV channel. Subtitles are broadcast via Teletext or DVB-T/DVB-C digital broadcasts. With digital broadcasts, you have the additional option of selecting a preferred subtitle language.
Note: Some options are available only when Subtitle is set to On.
Turning On/Off Subtitles
1.Press  on the remote control, select Channel > Subtitle and press OK/► to enter.
2.Select the Subtitle option, press OK/► to enter, press ▲/▼ to select On or Off and press OK to confirm.
3.Press  to close the menu.
Enabling Subtitle Languages on Digital TV Channels
1.Press  on the remote control, select Channel > Subtitle > Digital subtitle language 1st and press
OK/► to enter.
2.Press ▲/▼ to select a subtitle language as your preferred language and press OK to confirm.
3.Press ▲/▼ to select Digital subtitle language 2nd and press OK/► to enter.
4.Press ▲/▼ to select a secondary subtitle language and press OK to confirm.
5.Press  to close the menu.
Selecting a Subtitle Type on Digital TV Channels
1.Press  on the remote control, select Channel > Subtitle > Subtitle type and press OK/► to enter.
2.Press ▲/▼ to select a subtitle type and press OK to confirm. You can select Hearing impaired to display
11
 Loading...