


Table of Contents |
|
Chapter 1: Safety Information |
|
Precautions ........................................................................................................................................ |
3 |
Product ............................................................................................................................................ |
3 |
Power and Plug ............................................................................................................................... |
3 |
Power Cord and Signal Cable ......................................................................................................... |
3 |
Use Environment ............................................................................................................................. |
3 |
Cleaning .......................................................................................................................................... |
3 |
Hanging the TV Set on the Wall ...................................................................................................... |
3 |
Important Information ....................................................................................................................... |
3 |
Chapter 2: Connections and Setup |
|
TV Controller ..................................................................................................................................... |
4 |
Sockets .............................................................................................................................................. |
5 |
Remote Control Functions ............................................................................................................... |
6 |
Network Connection ......................................................................................................................... |
8 |
Switching on ...................................................................................................................................... |
9 |
Switching off ...................................................................................................................................... |
9 |
Initial Set-up ....................................................................................................................................... |
10 |
Chapter 3: Homepage |
|
Using Homepage-TV.......................................................................................................................... |
11 |
Using Homepage-APPS..................................................................................................................... |
12 |
Chapter 4: Menu Operation |
|
Using Quick Access Menu ............................................................................................................... |
13 |
Picture Preset .................................................................................................................................. |
13 |
Sound Preset .................................................................................................................................. |
13 |
Picture Freeze ................................................................................................................................. |
13 |
Football mode ................................................................................................................................. |
13 |
T-Link............................................................................................................................................... |
13 |
Timeshift .......................................................................................................................................... |
13 |
PVR ................................................................................................................................................. |
13 |
Schedule List ................................................................................................................................... |
14 |
WiFi TV link ..................................................................................................................................... |
14 |
Settings ........................................................................................................................................... |
14 |
Using System Settings ..................................................................................................................... |
14 |
Picture ............................................................................................................................................. |
15 |
Sound .............................................................................................................................................. |
15 |
Channel ........................................................................................................................................... |
15 |
Network ........................................................................................................................................... |
16 |
System ............................................................................................................................................ |
18 |
Chapter 5: Advanced Functions |
|
Using E-Manual(Help) ....................................................................................................................... |
20 |
Using MHL Function(Mobile High-definition Link) ......................................................................... |
20 |
Viewing photos, playing music and watching videos from a USB device .................................. |
20 |
Chapter 6: Other Information |
|
Problems and Solutions.................................................................................................................... |
22 |
Troubleshooting ................................................................................................................................ |
23 |
Legal Statement ................................................................................................................................ |
24 |
Licence ............................................................................................................................................... |
24 |
2

Chapter 1 |
Safety Information |
Precautions
Read all of the instructions before operating the set. Keep these instructions well for future use.
Product
•Do not block or cover the ventilation openings on the back cover.
•Do not push objects of any kind into this unit through the cabinet slots as they could touch current carrying parts or short-circuit parts, resulting in fire, electric shock, or damage to the unit.
•Do not attempt to open the cabinet as this may cause damage. There are no parts inside you can service by yourself. Refer all servicing to qualified personnel.
•Do not touch the screen surface with fingers as this may scratch or mark the TV screen.
•Do not impact the TV screen with hard pressure as this may damage the TV screen severely.
•The appliance is not intended for use by young children or infirm persons without supervision.
Young children should be supervised to ensure that they do not play with the appliance.
Power and Plug
•Unplug the set under the following conditions:
-If the set will not be used for a long period of time.
-If the power cord or the power outlet/plug is damaged.
-Follow the instructions to install and adjust the product. Adjust those controls that are covered in these operating instructions as improper
adjustment of other controls may result in damage. If this happens, unplug the set and refer to the service personnel.
-If the set is subject to impact or has been dropped and the cabinet has been damaged
•Where the mains plug or an appliance coupler is used as disconnect device, the disconnect device shall remain readily operable.
Power Cord and Signal Cable
•Do not allow anything to rest on or roll over the power cord and the signal cable.
•Protect the power cord and the signal cable from being trampled.
•Do not overload the power cord or the power outlet.
•Do not expose the power cord and the signal cable to moisture.
Use Environment
•Do not place the set on an unstable cart, stand, or table.
•Place the set on a place that allows good ventilation.
•Do not use the set near damp, and cold areas.
Protect the set from overheating.
•Keep the set away from direct sunlight.
•The apparatus shall not be exposed to dripping or splashing and no objects filled with liquids, such
as vases, shall be placed on the apparatus.
•Do not use the set in dusty environments.
•Operating Temperature: 5 to 35 (41°F to 95°F) Operating Humidity: 20% to 80%,non-condensing Storage Temperature: -15 to 45 (5°F to 113°F) Storage Humidity: 10% to 90%,non-condensing
Cleaning
•Dust the set by wiping the screen and the cabinet with a soft, clean cloth or some special liquid cleaner.
•Do not apply excessive force to the screen when cleaning.
•Do not use water or other chemical cleaners to clean the screen as this may damage the surface of the TV screen.
Hanging the TV Set on the Wall
Warning: This operation requires two people.
To ensure a safe installation, observe the following safety notes:
•Check that the wall can support the weight of the TV set and wall mount assembly.
•Follow the mounting instructions provided with the wall mount.
•The TV set must be installed on a vertical wall.
•Make sure to use only screws suitable for the material of the wall.
•Make sure that the TV set cables are placed so that there is no danger of tripping over them.
All other safety instructions about our TV sets are also applicable here. Wall Mount Bracket not included. (Note: Certain TV models are not designed to be mounted to the walls.)
Important Information
If a television is not positioned in a sufficiently stable location, it can be potentially hazardous due to falling. Many injuries, particularly to children, can be avoided by taking simple precautions such as:
•Using cabinets or stands recommended by the manufacturer of the television.
•Only using furniture that can safely support the television.
•Ensuring the television is not overhanging the edge of the supporting furniture.
•Not placing the television on tall furniture (for example, cupboards or bookcases) without anchoring both the furniture and the television to a suitable support.
•Not standing the television on cloth or other materials placed between the television and supporting furniture.
•Educating children about the dangers of climbing on furniture to reach the television or its controls.
Note: Graphics contained within this publication are for presentation only.
3
Chapter 2 |
Connections and Setup |
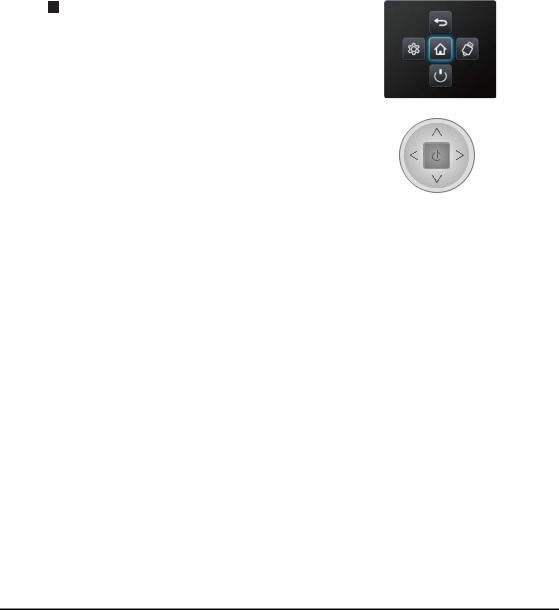
TV Controller
TV Controller is a multi directional button that helps navigate without remote control. For some models, there's only
one TV button--TV Controller.
Note: The product colour and shape may vary depending on the model.
1.
Turns the TV on by pressing the Controller when the TV is in standby mode.
In the menu system, press and release it within 2 seconds, it acts like
OK button on the remote to confirm your selection.
When the power is on, press and hold the TV Controller more than 2 seconds and then release, the NAV menu will display on the screen;
The NAV menu is a shortcut to Homepage, Settings menu, Source,
Power and Return.
The NAV menu will disappear after several seconds without operation.
2.

Scans up/down through the channel list. In the menu system, they act like the UP/DOWN direction buttons on the remote and adjust menu controls.
3.

Adjusts the volume by moving the Controller left and right. In the menu system, they act like the RIGHT/LEFT direction buttons on the remote and adjust menu controls.
NAV menu on TV Screen
TV Controller
4
Connections and Setup
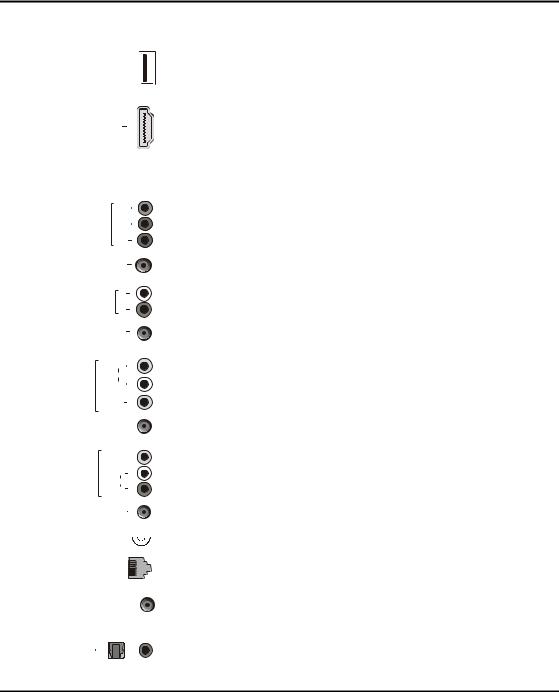
Sockets
Note: The location and names of the sockets on the TV may vary according to TV model, and not all sockets are available on all models.
USB 3.0 or
USB 2.0 or 
USB 2.0/SERVICE
HDMI 1(MHL) or
HDMI 2 or
HDMI 3 or
HDMI 4(ARC)
|
Y |
COMPONENT |
PB |
IN |
|
|
PR |
|
or |
CMP IN(YPBPR) adapter
COMPONENT L
AUDIO IN |
R |
|
or
CMP AUDIO IN adapter
|
R |
|
AUDIO |
AV IN |
L |
|
VIDEO |
or
AV IN adapter 
VIDEO 
AV OUT |
L |
|
|
|
AUDIO |
|
R |
|
or |
AV OUT adapter |
|
USB 3.0 or USB2.0 or USB 2.0/SERVICE socket (input)
These sockets can be used to connect a USB device.
Note: The number of USB sockets on the TV may vary according to TV model.
HDMI1(MHL) or HDMI2 or HDMI3 or HDMI4(ARC) socket (input)
The HDMI (High-Definition Multimedia Interface) socket can be used to connect a Bluray player, PC with a compatible video card installed, certain DVD players or a highdefinition compatible digital satellite decoder. This socket provides an uncompressed digital connection that carries both video and audio data by way of an integrated miniplug cable.
Note: Only HDMI sockets with the MHL identification will support the MHL function, MHL stands for Mobile High-definition Link, and allows you to link an MHL capable mobile device to the television.
CMP IN (YPBPR)adapter socket (input)
The CMP adapter socket can be used to connect the attached CMP adapter cable with YPbPr component sockets. These YPbPr sockets can be used to connect a device that has component video sockets, such as a DVD player. The component sockets can recognize if the device you're connecting to is Y Pb Pr compatible. The component sockets provide excellent picture quality because the video is separated into three independent parts.
CMP AUDIO IN adapter sockets (input)
The CMP AUDIO IN adapter socket can be used to connect the attached AUDIO in adapter cable with audio L & R sockets, and be used to obtain sound. These AUDIO IN L & R sockets can be used to connect a range of equipment, including video recorders, camcorders, satellite receivers, DVD players, or games consoles.
AV IN adapter socket
The AV IN adapter socket can be used to connect the attached AV adapter cable with VIDEO and AUDIO L & R IN sockets. The AV IN sockets can be used to connect a range of equipment, including video recorders, camcorders, decoders, satellite
receivers, DVD players, or games consoles. The VIDEO IN socket provides composite video connection.
AV OUT adapter (output) socket
The AV OUT adapter socket can be used to connect the attached AV adapter cable with VIDEO and AUDIO L & R OUT sockets. These AV out sockets can be used to connect a VCR to record programmes. You must leave the TV on the same channel you are recording. The VIDEO OUT socket provides composite video connection.
ANTENNA IN 

LAN 

 or HEADPHONE
ANTENNA IN socket (input)
This socket can be used to connect the outside aerial or cable network.
LAN
RJ45 plug for connecting to external modem or network access equipment.
Headphone socket (output)
This socket can be used to connect headphones or stereo earphones.
Warning: Excessive sound pressure from earphones and headphones can cause hearing loss.
SPDIF |
or |
SPDIF socket (output) |
|
The SPDIF socket can be used to connect a compatible digital audio receiver. |
|||
|
|
5
Connections and Setup
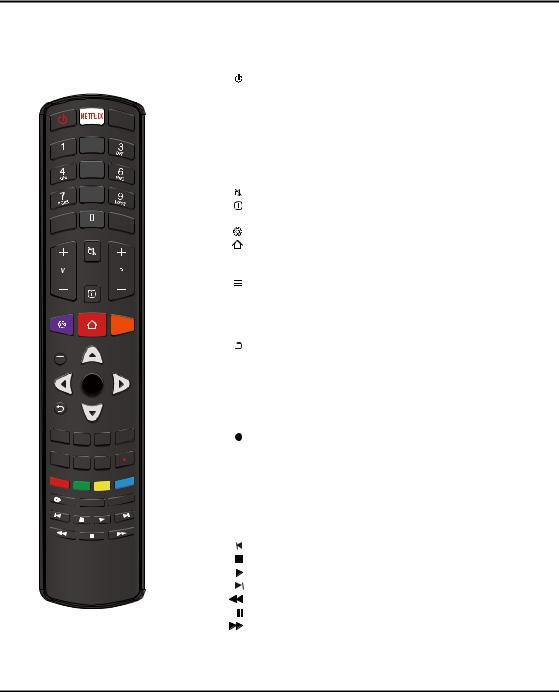
Remote Control Functions
Most of your television's functions are available via the menus that appear on the screen. The remote control supplied with your set can be used to navigate through the menus and to configure all the general settings.
Note: Figures and illustrations in this operation manual are provided for reference only and may differ from actual product appearance.
Standby / quit standby.
NETFLIX To access the NETFLIX application. (Not available for some models.)
TV To access TV mode.
0-9 To enter channel numbers; to enter a letter, a digit or a symbol in
some functions.
ECO To select a desired energy saving mode.
SOURCE To select connected devices.
V+/- To control the volume.
To switch the sound off and back on.
To display programme information, if available.
ECO
P+/- To change channels.
To display the Settings menu.
GUIDE
EXIT |
ZOOM- |
ZOOM+ |
LIST |
|
|
||
SLEEP |
PRE-CH |
FAV |
|
|
|
SUBTITLE
To access the Smart TV portal.
GUIDE To toggle the Electronic Programme Guide on or off (only available for digital channels).
To access the Option menu.
▲/▼ To navigate through the menus; to select menu options.
◄/► To navigate through the menus; to select menu options and change values.
OK To confirm an entry or selection.
To return to the previous menu.
EXIT To exit the menu, homepage or Teletext, etc.
ZOOM-/+ To select the screen mode. LIST To display the channel list.
SLEEP To select the sleep timer options.
PRE-CH To return to the previous channel in TV mode. FAV To bring up your favourite channel list.
Recording button. (only available for some models and digital channels.)
Colour buttons To select tasks or Teletext pages; to be used for HbbTV function.
 LANG To select a sound type available for selected analogue TV programme; to select an audio language available for selected digital TV programme.
SUBTITLE To select a subtitle language available for selected digital TV programme.
TEXT To toggle Teletext on or off.
To select the previous picture, music or video.
To stop playback.
To start playback.
To select the next picture, music or video.
To start fast reverse.
To pause playback. To start fast forward.
Note: The remote control type may be changed without notice.
6
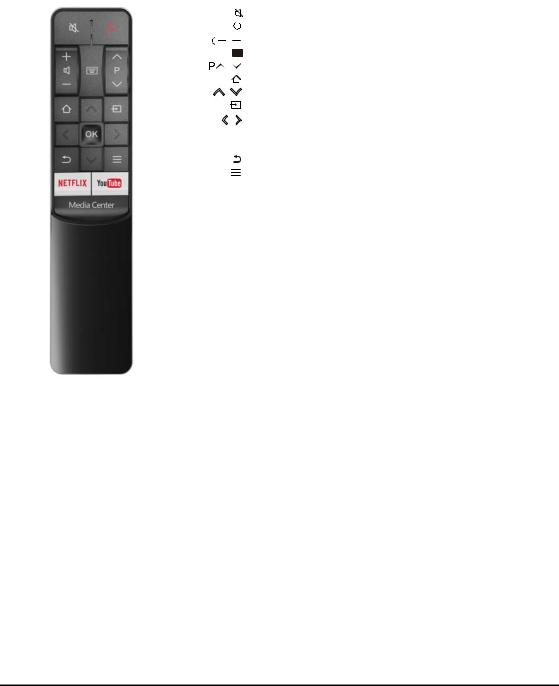
. |
Connections and Setup |
|
|
|
|
|
To switch the sound off and back on. |
|
Standby / quit standby. |
|
|
|
|
/ |
To control the volume. |
/ |
To access digit buttons. |
To change channels. |
|
|
To access the homepage. |
/ |
To navigate through the menus; to select menu options. |
|
To select connected devices. |
/ |
To navigate through the menus; to select menu options and |
|
change values. |
OK To comfirm an entry or selection.
To return to the previous menu.
To display the function menu to perform certain operations; to display the Teletext page in different modes.
NETFLIX To access the NETFLIX application. (Not available for some models.)
YouTube To access the YouTube App. Media Center To access a storage device.
Note: This remote control is available only for selected models.
The remote control type may be changed without notice.
7
Connections and Setup
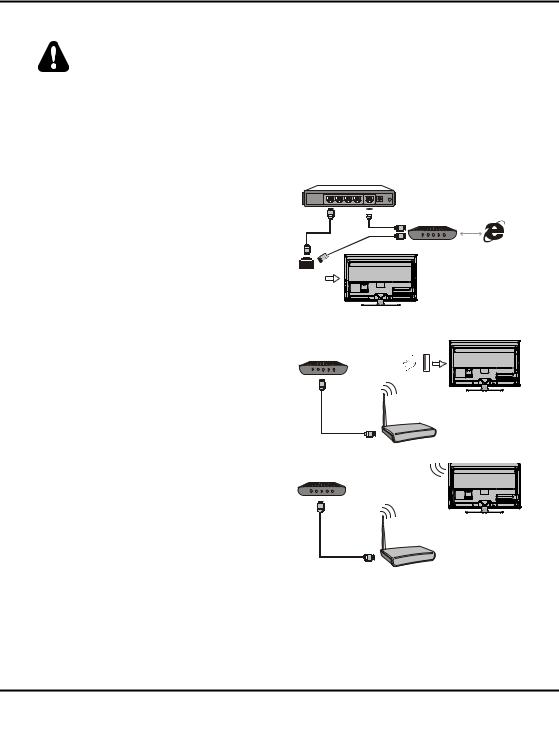
Network Connection
Your TV will require an internet connection to operate all functions. Data usage charges may apply. Please refer to your Internet Service Provider (ISP) for additional information.
To access the internet, you must subscribe to high speed broadband internet service from your internet service provider.
Your TV can be connected to your home network in two ways:
•Wired, using the RJ45 (LAN) connector on the back panel.
•Wireless, using the internal wireless or external wireless USB adapter and your home wireless network.
Note: The following instructions are just the usual ways to connect your TV to the wired or wireless network. The connection method may be different depending on your actual network configuration. If you have any questions about your home network, please refer to your ISP(Internet Service Provider).
Connecting to a wired network
To connect to a wired network:
1.Ensure you have:
•An ethernet cable long enough to reach your TV
•A router or modem with an available Ethernet port
•A high-speed internet connection
•An Ethernet (LAN) port on the back of the TV
2.Connect your ethernet cable to the router and to the Ethernet port on the back of the TV.
3.Use the Network Settings to configure the TV.
Connecting to a wireless network
To connect to a wireless network
1.Ensure you have:
•A router broadcasting a high-speed wireless signal
•A high-speed internet connection
•A wireless USB Adapter (not needed if your TV has a built-in wireless Adapter).
2.Remember to connect your wireless USB Adapter to your TV's USB port.
3.Use the Network Settings to configure the TV.
Note:
For models with a built-in wireless adaptor, the USB wireless adaptor is not required. Not all wireless adaptors are compatible with this TV.
Router 


or
Modem Internet
Ethernet Port on the back panel
|
TV Set |
Modem |
Wireless |
|
USB Adapter |
USB port on the back panel
TV Set
Wireless Router
Modem
TV Set
Wireless Router
8
 Loading...