

Page 1
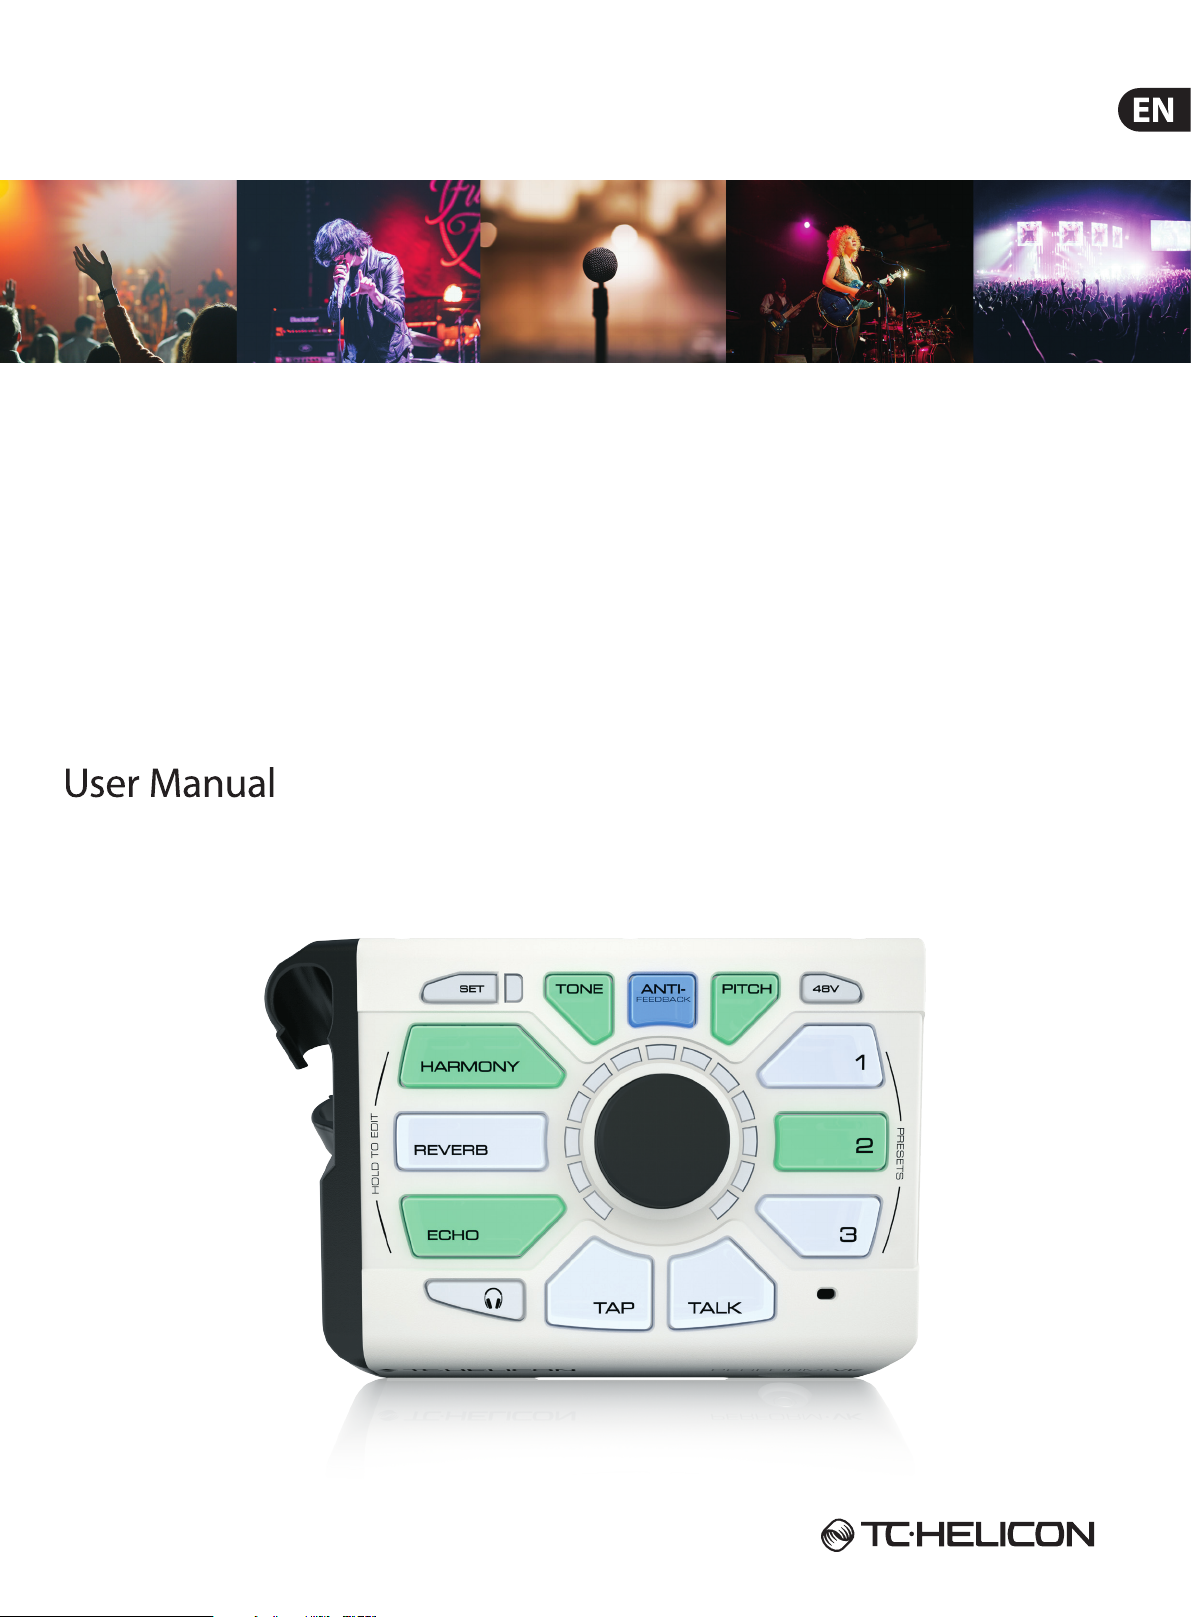
PERFORM-VK
Ultimate Mic Stand-Mount Vocal Processor for
Studio-Quality Sound with Expandable Eects and
Keyboard I/O
Page 2

2 PERFORM-VK User Manual
Table of Contents
Important Safety Instructions ................................................ 3
Legal Disclaimer ....................................................................... 3
Limited warranty ...................................................................... 3
Introduction ......................................................................................4
Read the Quick Start! .......................................................................4
Connection Diagram ........................................................................4
Eects .................................................................................................5
Turning Eects On and O .............................................................6
Editing Eects ...................................................................................6
Preset .................................................................................................6
Importing (Beaming) a preset ........................................................7
HIT ......................................................................................................7
Editing a Beamed preset .................................................................7
Editing HIT .........................................................................................7
Tone ....................................................................................................8
Anti-Feedback ...................................................................................8
Pitch Correction ................................................................................8
Pitch Guide ........................................................................................9
+48V (Phantom Power) ....................................................................9
Mic Control ........................................................................................9
Talk ...................................................................................................10
Lock/Mute ........................................................................................10
Tap (Tempo) .....................................................................................10
RoomSense .....................................................................................10
AUX Input ........................................................................................10
Aux to Main Out ..............................................................................11
Dimming the Buttons ....................................................................11
USB Audio ........................................................................................11
MIDI Implementation ....................................................................12
Factory Reset ...................................................................................14
Support ............................................................................................14
Page 3

3 PERFORM-VK User Manual
9. Do not defeat the safety purpose of the polarized
20. Please keep the environmental aspects of battery
Important Safety Instructions
Terminals marked with this symbol carry
electrical current of su cient magnitude
to constitute risk of electric shock.
Use only high-quality professional speaker cables with
¼" TS or twist-locking plugs pre-installed. Allother
installation or modi cation should be performed only
by quali edpersonnel.
This symbol, wherever it appears,
alertsyou to the presence of uninsulated
dangerous voltage inside the
enclosure-voltage that may be su cient to constitute a
risk ofshock.
This symbol, wherever it appears,
alertsyou to important operating and
maintenance instructions in the
accompanying literature. Please read the manual.
Caution
To reduce the risk of electric shock, donot
remove the top cover (or the rear section).
No user serviceable parts inside. Refer servicing to
quali ed personnel.
Caution
To reduce the risk of re or electric shock,
do not expose this appliance to rain and
moisture. The apparatus shall not be exposed to dripping
or splashing liquids and no objects lled with liquids,
suchas vases, shall be placed on the apparatus.
Caution
These service instructions are for use
by quali ed ser vice personnel only.
Toreduce the risk of electric shock do not perform any
servicing other than that contained in the operation
instructions. Repairs have to be performed by quali ed
servicepersonnel.
1. Read these instructions.
2. Keep these instructions.
3. Heed all warnings.
4. Follow all instructions.
5. Do not use this apparatus near water.
6. Clean only with dry cloth.
7. Do not block any ventilation openings. Install in
accordance with the manufacturer’s instructions.
8. Do not install near any heat sources such as
radiators, heat registers, stoves, or other apparatus
(including ampli ers) that produce heat.
or grounding-type plug. A polarized plug has two blades
with one wider than the other. A grounding-type plug
has two blades and a third grounding prong. The wide
blade or the third prong are provided for your safety. Ifthe
provided plug does not t into your outlet, consult an
electrician for replacement of the obsolete outlet.
10. Protect the power cord from being walked on or
pinched particularly at plugs, convenience receptacles,
and the point where they exit from the apparatus.
11. Use only attachments/accessories speci ed by
themanufacturer.
12. Use only with the
cart, stand, tripod, bracket,
or table speci ed by the
manufacturer, orsold with
the apparatus. When a cart
is used, use caution when
moving the cart/apparatus
combination to avoid
injury from tip-over.
13. Unplug this apparatus during lightning storms or
when unused for long periods of time.
14. Refer all servicing to quali ed service personnel.
Servicing is required when the apparatus has been
damaged in any way, such as power supply cord or plug
is damaged, liquid has been spilled or objects have fallen
into the apparatus, the apparatus has been exposed
to rain or moisture, does not operate normally, or has
beendropped.
15. The apparatus shall be connected to a MAINS socket
outlet with a protective earthing connection.
16. Where the MAINS plug or an appliance coupler is
used as the disconnect device, the disconnect device shall
remain readily operable.
17. Correct disposal of this
product: This symbol indicates
that this product must not be
disposed of with household
waste, according to the WEEE
Directive (2012/19/EU) and
your national law. This product
should be taken to a collection center licensed for the
recycling of waste electrical and electronic equipment
(EEE). The mishandling of this type of waste could have
a possible negative impact on the environment and
human health due to potentially hazardous substances
that are generally associated with EEE. At the same time,
your cooperation in the correct disposal of this product
will contribute to the e cient use of natural resources.
For more information about where you can take your
waste equipment for recycling, please contact your local
city o ce, or your household waste collection service.
18. Do not install in a con ned space, such as a book
case or similar unit.
19. Do not place naked ame sources, such as lighted
candles, on the apparatus.
disposal in mind. Batteries must be disposed-of at a
battery collection point.
21. Use this apparatus in tropical and/or
moderate climates.
LEGAL DISCLAIMER
MUSIC Group accepts no liability for any loss
which may be su ered by any person who relies
either wholly or in part upon any description,
photograph, or statement contained herein.
Technical speci cations, appearances and other
information are subject to change without notice.
All trademarks are the property of their respective
owners. MIDAS, KLARK TEKNIK, LAB GRUPPEN, LAKE,
TANNOY, TURBOSOUND, TC ELECTRONIC, TC HELICON,
BEHRINGER, BUGERA and DDA are trademarks
or registered trademarks of MUSIC Group IP Ltd.
© MUSIC Group IP Ltd. 2017 All rights reserved.
LIMITED WARRANTY
For the applicable warranty terms and conditions
and additional information regarding MUSIC Group’s
Limited Warranty, please see complete details online at
music-group.com/warranty.
Page 4

4 PERFORM-VK User Manual
Introduction
Thank you for purchasing PERFORM-VK!
Your new mic stand-mounted vocal processor opens up a world of new
performance opportunities.
Starting with our Adaptive Tone (automatic EQ, De-Essing, Gating and
Compression), your voice will punch through the mix and sound great
in any environment.
Add studio-quality Reverb, Harmony and Echo to the party and you’ll easily craft
eardrum pleasing vocal eects that are perfec tly suited to your song.
With the addition of “beamable” presets you can expand the sonic capabilities of
PERFORM-VK and include up to four more vocal eects!
Anti-Feedback tames the annoying high pitched squeals we’ve all experienced at
live shows and keeps your performance sounding its very best.
Our global Pitch Correction gently guides your voice to the nearest note, ensuring
that your pitches are spot on.
The Guide feature lets you see your vocal pitches in real time, letting you know
when you’re accurate and when you might be sharp or at. It’s a great tool for
both live and rehearsal.
Audio and MIDI inputs for your keyboard give you a choice of methods to guide
key and scale for harmony voices and HardTune.
Read the Quick Start!
We’ll assume that you read the Quick Start Guide that came in the box, hooked
everything up, and that you’re able to sing and play through the product. If you
haven’t made it that far, please read the Quick Start Guide now and come back to
this manual when you’re set up. Don’t worry, we’ll wait.
Update Your Device!
It is HIGHLY recommended that you update the rmware on your PERFORM-VK
before rst use. ”Beaming“ presets from the app will not function without
the update.
To update your rmware, you'll need both a USB driver (PC only) and our
VoiceSupport 2 program. Both can be found at tc-helicon.com/products/
perform-vk/support/
PC Users
1. Download both the USB driver and VoiceSupport 2
2. Install the USB driver (restart if prompted)
3. Install VoiceSupport 2 (restart if prompted)
4. Connect your Perform-VK to your computer with the supplied USB cable
5. Power up Perform-VK
6. Star t VoiceSupport 2
7. Follow the prompts to update your rmware
Mac Users
You will not need the USB driver. Download VoiceSupport 2 and follow
steps 3-7 above.
Connection Diagram
MP-75
Page 5
5 PERFORM-VK User Manual
Eects
There are three eects available to you in PERFORM-VK and up to four more
which are accessed via beamed presets.
Harmony (onboard)
Additional voices, created from copies of your own voice, provide harmony as
your own personal backup singers. Chord information is captured via the
instrument input(s), MIDI or Aux and used to pick the correct key and scale for
your song.
We can also use a combination of the built-in RoomSense microphone and
music coming into the AUX input to automatically pick the right key/scale for the
harmony voices. You’ll need to have a chorded instrument near the RoomSense
mic and/or music with chord information coming into the AUX input for this
to work.
Reverb (onboard)
Echo (onboard)
Otherwise known as “Delay”, echo eects repeat your voice back to you in various
ways and amounts, simulating the eect shouting into a mountain range or very
large space. Some Echoes can have eects applied to the “taps” or repeats of the
echo, like Megaphone or Radio.
Double (Beamable)
Simulates the classic “double tracked” studio sound that’s common on recordings
of all genres. Double can include Octave Up and Octave Down voices too.
Megaphone (beamable)
Anything that lters or distorts your voice falls into the Megaphone category.
You can sound like you’re on an old radio or distort your voice for an edgy attack.
Be careful with Megaphone eec ts when you’ve got a loud PA. We need to adjust
EQ a lot to create these sounds, so they’re a bit more prone to feedback than
other eects.
Reverb creates a simulated physical space for your voice. It can be a small space,
like a shower (where everyone’s best singing takes place), or something as big as
a concert hall. It’s common to use a smaller (shorter) Reverb for faster songs and
a larger (longer) Reverb for slower ones.
HardTune (beamable)
The name of this eect can be a bit misleading, because it covers both subtle and
T-Pain™ style tuning. There are several styles to help you hit the pitch perfec tly,
but some sound much more natural than others. Conveniently enough, our
natural style is called…well… natural. The Pop style covers the other end of
the spectrum. HardTune requires key information to work correctly, so just like
Harmony, you’ll need a chorded instrument, MIDI or AUX input.
µMod (beamable)
Here’s where you’ll nd eects like Flanger, Chorus and other similar eects.
These eects are typically used sparingly, but can add a great point of interest to
your performance.
Page 6

6 PERFORM-VK User Manual
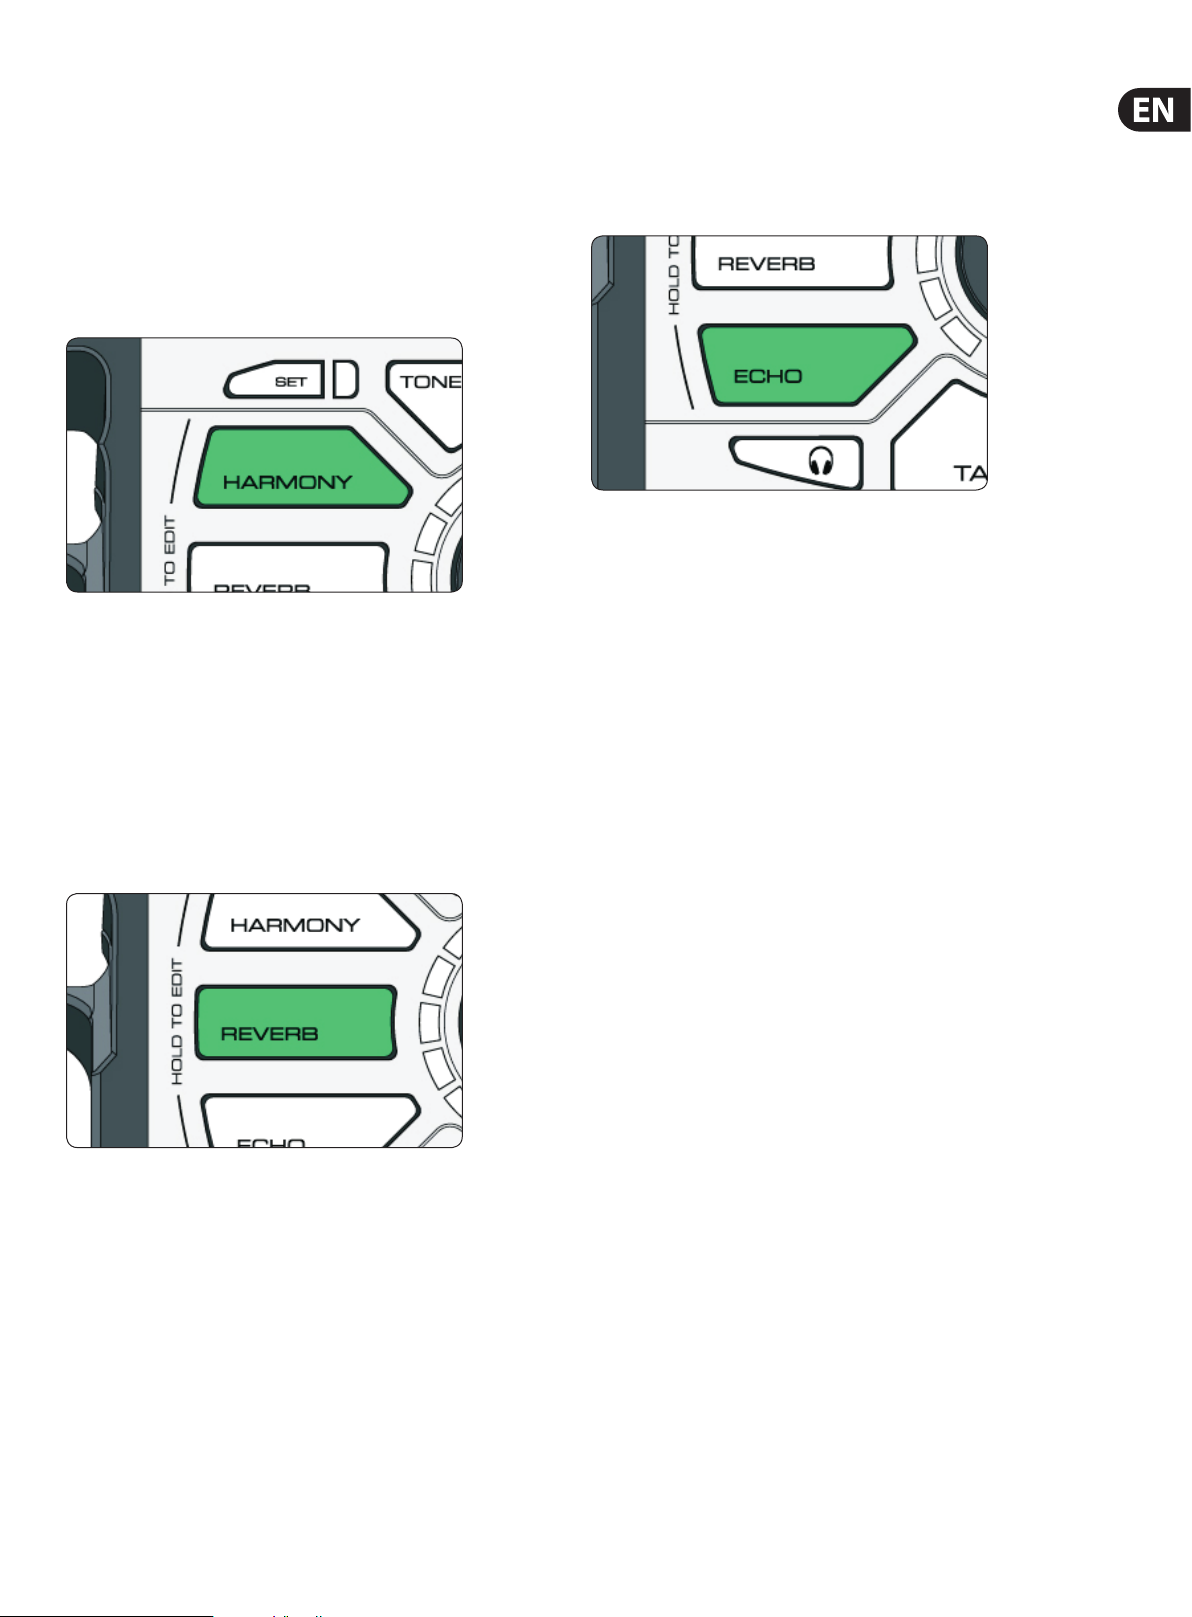
Turning Eects On and O
To activate or deactivate an eect, simply tap the Reverb, Harmony or Echo
button. The button will glow GREEN when active and WHITE when inactive.
Editing Eects
Don’t like the Reverb, Harmony or Echo that you hear? You can adjust both the
Level (volume) and Style (sound of the eect) to dial in just the right combination
for your music.
To edit an eect, simply PRESS & HOLD the eect button. You’ll know you’re in
EDIT mode because the LED ring surrounding the Control Knob will illuminate and
the eect button will pulse.
The LED ring serves as both a Level and Style control. As you turn the knob, the
LED segments will ll up, indicating that you’re turning up the Level of the
current style. When you completely ll the LED ring, the color will change, letting
you know that you’ve now changed the Style of the eect. Continuing to turn the
Control Knob will increase the Level of that Style.
Each eect has four dierent styles to choose from. Three of the styles are
available “out of the box” and one is reser ved for a Beamed preset Style
(described next).
Reverb
• Room
• Club
• Hall
• Beamed preset Style
Harmony
• 1 Voice Above
• 1 Voice Below
• 2 Voices (1 above and 1 below)
• Beamed preset Style
Echo
• ¼ Note
• ⁄ Note
• Slap
• Beamed preset Style
Saving Changes
Any changes you make to an eect are stored in real time. There are no extra
steps to take.
Preset
A preset is a “complete sound” created by a combination of eects.
You’ll notice that the active eects change between Preset 1 and Preset 2 in the
images above. Presets can be congured however you like. The state (on/o),
style and level for each eect in a preset can also be dierent from preset
to preset.
With 3 available presets, you might want to set up something like:
1. Fast songs
2. Slow songs
3. Death Metal Englebert Humperdinck Covers
Try shorter reverb for fast songs.
Choose longer reverb and add a bit of echo for slower songs and/or ballads.
Crank up the levels and choose the craziest styles for a special eect preset.
Page 7

7 PERFORM-VK User Manual
Importing (Beaming) a preset
PERFORM-VK also has the ability to “beam” or import a preset sound to each of
the 1, 2, 3 buttons.
The imported sound can contain up to 7 eects:
• Harmony
• HardTune (pitch correction)
• Megaphone
• Modulation (chorus, ange etc.)
• Reverb
• Double
• Echo
Here’s how to import a preset:
Use your smartphone and our preset app to “beam” a preset into PERFORM-VK.
Simply press once on the preset location where you’d like your preset to live
(1, 2 or 3). Then, follow the instructions in the app to send the preset data to your
PERFORM-VK.
You can download the preset app here:
tc-helicon.com/products/Perform-VK/support/
HIT
Here’s a little chart to show you what you can control, depending on which
eects are contained in the preset:
Harmony HardTune Megaphone µMod Modier
1 X Harmony Level
2 X HardTune Gender
3 X EQ Filter
4 X µMod Level
5 X X X X Harmony Level
6 X X HardTune Gender
7 X X µMod Level
8 X X µMod Level
If you nd the chart confusing as heck, here’s an example:
If the preset contains both Harmony and HardTune (number 5) the “Modier”
is Harmony Level. If the preset contains Megaphone and µMod (number 8) the
modier is for µMod level.
Make sense? Good. Moving on…
Editing HIT
HIT is controlled dynamically, which means you can make changes to each HIT
“state” whenever you choose. Taking the previous example as a starting point,
if you have Reverb on while HIT is o:
Beamed presets can turn on one or more eects with a single button press. We
call the additional eects “HIT”. A common example of HIT is a preset that starts
out with a simple Reverb, then adds Harmony via HIT.
The beamed preset ’s green light changes to blue to indicate that HIT is on. When
a preset is beamed in, HIT is turned on by default.
Editing a Beamed preset
The process to change the sound of Reverb, Harmony and Echo within a beamed
preset is exactly the same as the one you did without a beamed preset, with one
small exception…
When you press/hold to edit the Reverb, Harmony, or Echo in a beamed preset,
you’ll notice that the LED ring is now white. That ’s the new Style imported by
the preset. You can control the level of that Style, or change back to one of the
“factory” Styles you’ve used before.
If you press and hold the 1, 2 or 3 buttons (whichever preset you’re already using)
you can make an adjustment to the sound of one of the other eects within the
preset too.
Then you turn Echo on:
Now, Echo and Reverb will be active when HIT is OFF. You can make similar
changes to the HIT ON state.
Page 8

8 PERFORM-VK User Manual
Tone
Tone automatically adds EQ (equalization), Compression, De-Ess and Gate to your
overall vocal sound.
To activate Tone, press the button. White is OFF, Green is ON.
EQ helps to shape the tone of your voice to t into a musical mix. We remove
some of the low “mud” frequencies and boost the highs for “sparkle” or “air”.
Every recording you hear has some manner of EQ on the lead vocal (and pretty
much everything else too).
Compression reduces the dierence in volume between the loudest and quietest
notes. This gives you a more even sound that can blend into the music better.
It’s almost unheard of for vocals to go uncompressed in modern music, both
recorded and live.
De-Ess gets rid of harsh “S” sounds and makes them sound more pleasing to the
human ear. De-Ess goes hand in hand with Compression, since Compression can
make “S” sounds a bit more pronounced in the mix.
Gate “shuts o” an audio input when it falls below a certain volume.
This works great on things like drums where you want the drum hit to come
through, but then have the mic silent in between hits.
You’ll see the LED light blue when it’s working to get rid of oending frequencies.
If the LED is ashing constantly, it’s done all it can do and you’ll have to look at
the rest of your audio setup to reduce things fur ther.
Here’s a Craig’s Corner video about feedback: youtube.com/watch?v=VlN1RJ4gcAo
Pitch Correction
Nobody is perfect, so we give you the option to add a little bit of transparent
pitch correction to your voice. It gently guides you to the nearest semi-tone when
you sing.
To activate Pitch Correction, press the Pitch but ton. White is OFF, Green is ON.
An important note about Pitch Correction: it’s normal to hear “phasing” bet ween
your head voice (not to be confused with “the voices” in your head) and the
corrected voice coming from speakers or headphones. The collision of the
two signals creates the phased eect. Your audience (or a recording) doesn’t
experience the sound.
You can actually use the phased sound to improve your pitch over time. The less of
the phased sound you hear, the closer you are to perfect pitch.
Here’s a Craig’s Corner video about Pitch Correction Phasing:
youtube.com/watch?v=KWrEIuiDXsA
Anti-Feedback
Everyone loves that amazing squealing sound coming out of the speakers, right?
Yeah, not so much.
Anti-Feedback automatically adapts to your environment and removes
frequencies that can cause feedback. It’s not a silver bullet, you still have to set
up your gear with reasonable volume levels and avoid pointing the mic at the
speakers, but Anti-Feedback can help when you’re “on the edge” and getting
some squealing here and there.
To activate Anti-Feedback, simply press the button. White is OFF, Blue is ON.
Page 9

9 PERFORM-VK User Manual
Pitch Guide
Sometimes it’s nice to get some about your singing. With the Pitch Guide, you can
see how close to the “true” note you are when you sing. It’s great to know that
you typically sing sharp or at, or simply struggle with a particular note or two.
To activate the Pitch Guide, press and hold the Pitch button. To deactivate the
Guide, press and hold again. When the pitch meter turns on, you’ll see the LED
ring light from red (at the bottom) to green (at the top). When the pitch meter
turns o, the LED’s will change from green to red.
The pitch guide shows whether you’re “on the note” (green LED’s), “at” (yellow/
red LED’s on the left hand side of the ring) or “sharp” (yellow/red LED’s on the
right hand side of the ring).
+48V (Phantom Power)
If you have a condenser mic, it’ll need power to function. You’ll need to press and
hold the 48V button for two seconds to turn phantom power on.
If you’re not sure what kind of mic you have, but you don’t hear any sound, it’s ok
to try 48V. It won’t damage a dynamic microphone.
Mic Control
To enable Mic Control, activate +48V.
Then, you’ll need to select your Mic Control Mode. This is done by holding the
+48V button and then pressing the 1, 2 or 3 button.
Button 1 sets Mic Control OFF. Use this when you have a condenser mic. If you
have another Mic Control mode set, you may inadvertently activate buttons on
the box as you sing.
Button 2 sets MP-75 mode. The Mic Control button cycles presets by default.
You can change Mic Control behavior by holding the Mic Control button and then
pressing the button on PERFORM-VK that you’d like to control. For example, if you
hold the Mic Control then press the Reverb button, the MP-75 will now control
on/o for Reverb. If you have an MP-76 connected but choose MP-75 mode,
the “top” button on the MP-76 will function just like the MP-75 button. The other
buttons will not do anything.
Button 3 sets MP-76 Mode. In this mode, the “Top” button controls Harmony.
The “Left” button controls Preset 1. The “Right” button controls Preset 2.
The “Bottom” button controls Preset 3.
MP-75 and MP-76 modes can control the following:
• Harmony
• Reverb
• Echo
• Tap Temp o
• Talk
• Preset 1
• Preset 2
• Preset 3
• Tone
• Anti-Feedback
• Pitch
Page 10

10 PERFORM-VK User Manual
Talk
During a performance, especially between songs, you might want to speak with
the audience. It’s unlikely that you’ll want all the eects on your voice while
doing so. That’s where the TALK button comes in. When active, Talk bypasses all
of the eects in the box (except Tone) so that you can speak with the crowd and
be heard clearly.
AUX signals are still passed to the XLR out in TALK mode.
To activate Talk, press the button. White is OFF, Red is ON.
Lock/Mute
Press and HOLD the TALK button to enter Lock/Mute mode. All outputs, including
XLR and Headphone, are muted and the front panel is disabled. This stops people
from messing with your gear if you’ve stepped away.
The TALK button will ash when in Lock/Mute mode.
RoomSense
Did you notice that little hole on the front of the unit? It’s a microphone!
It’s there for two reasons:
1. If you beam in a preset that contains Harmony or HardTune eects and
you’re not using MIDI, keyboard audio or an Aux music source to guide key/
scale, the mic will listen for chords in the room (like a nearby guitar) and try
to gure out key and scale from that! Pretty cool.
a. RoomSense is the most unpredictable of the key/scale trackers, since
the room dynamics and chord information is most easily obscured using
this mode. That said, it can be quite eective in specic situations,
like placing the unit on top of an acoustic piano.
2. If you don’t plug in a microphone and have headphones connected, you
can sing into the onboard mic. It’s a great way to practice with virtually no
other equipment.
To re-activate PERFORM-VK, press and HOLD the TALK button again.
Tap (Tempo)
When pressed, this light ashes in time with your echo eects. You can re-tap the
tempo at any time to sync up with your current song. Keep in mind that you can
tap at half-time or double-time to make your echo sounds more exible.
If you have an Echo selected but the Tap button is dark, the Echo style is a “slap”
style that doesn’t use tap tempo.
a. If you’re singing into the RoomSense mic, the Main Outputs *there isn’t
a Mic Out on VK* will be muted to prevent feedback.
AUX Input
When you have a music player connected to the AUX jack, and nothing is
connected to the MIDI or INST jacks, any incoming chord information from the
AUX input will be used to determine key/scale for Harmony or HardTune.
(When both the AUX and MIDI/INST jacks are used, the MIDI and INST connections
take priority for detection of key/scale)
You will hear the AUX input mixed with your Mic input (vocals). If the AUX is
too loud or too quiet, use the volume control on the music player to create the
appropriate mix with your vocals.
Page 11

1 PERFORM-VK User Manual
1
Audio from the AUX input is slightly delayed from input to output so that we
can better detect chords. This won’t have any eect on music you’re singing
or playing along with, but it does mean this input isn’t intended to support
instruments that you’d play live. They’d feel strangely “laggy”. Use the INST IN for
live instruments.
If you do have a keyboard connected to the MIDI or INST IN jacks, they will be
used for the key detection, and the AUX jack will not be delayed. This way the
AUX input can still be used for a click track, drum machine, etc.
Aux to Main Out
Sometimes, you’d like to have a signal from the Aux input guide key/scale, but
you don’t want that Aux signal mixed into your main outputs. If you’d like to
remove audio from Aux to the main out, simply press/hold the Headphone
button while connecting your Aux (⁄") cable.
This parameter resets each time you unplug and re-plug the Aux cable or if you
power cycle the unit. We don’t save this parameter because it ’s not immediately
obvious how you’d “toggle” things and we don’t want to trap unsuspecting users
in a mode they can’t nd a way out of.
Dimming the Buttons
The buttons on your PERFORM-VK are designed to be pretty darned bright so you
can see them clearly in an outdoor environment. If you’re playing inside, you may
not want to tan yourself with their brilliance.
SWITCH-6
HIT PLAY/REC STOP/CLR LOOP INC
To dim/brighten the buttons, tap (do not hold) the SET button, then turn the
Control Knob. Turning the knob to the right increases brightness and turning to
the left decreases brightness.
Switch3/Switch6 (Pedal) In
When a Switch3 or Switch6 is connected (using the TRS cable that came in the
S3/S6 box) you can control various aspects of PERFORM-VK remotely.
The default behavior for Switch3 is to change presets according to the numbers
on Switch3.
Switch1 = Preset 1
Switch2 = Preset 2
Switch3 = Preset 3
You can reassign any of the PERFORM-VK buttons to be activated by a
footswitch, with the exception of TRIM, +48V, Headphone Level, and Lock/Mute
(TALK is assignable).
Press and hold the desired footswitch, then press the button on PERFORM-VK
that you’d like the switch to control. Release both buttons.
Switch6 acts in the same manner as Switch3 but adds buttons 4, 5, and 6.
The default controls for the extra buttons are:
Switch4 = Harmony
Switch5 = Reverb
USB Audio
There are 4 input and 8 output channels for USB audio in PERFORM-VK. A driver
is required for both USB audio AND MIDI use. It can be found at tc-helicon.com/
products/perform-vk/support/
USB IN
CH 1 Backing Track L
CH 2 Backing Track R
CH 3 Dry vocal in
CH 4 NaturalPlay IN
If no signal is transmitted to the product on USB audio channel 3, the product will
use analog in for the voice input. So, you could use channels 1&2 to input stereo
tracks from your DAW but sing into the product via your mic. Note that channel
1&2 input is NOT passed to the USB outputs, but IS passed to the Main analog
outs. If you use a computer for backing tracks, they will get sent analog to the PA.
Volume control for those tracks happens at the computer.
NaturalPlay IN is not connected to the audio output. It is used only for NaturalPlay
chord input. This is intended to allow you to use a “guide track” for NatualPlay
that you may not want heard in the mix. It could be dry guitar chords or piano
chords, with dierent voicings or placement in order to create your desired
harmony output.
Switch6 = Echo
Page 12

12 PERFORM-VK User Manual
USB OUT
CH 1 L processed vocal, Keyboard/ Aux in (same as what is on main outputs,
less the audio received on USB in
CH 2 R processed vocal, Keyboard/ Aux in (same as what is on main outputs,
less the audio received on USB in 2
CH 3 Dry Voice input
CH 4 Not used
CH 5 Dry INST IN R / Aux L
CH 6 Dry INST IN R / Aux R
CH 7 Harmony Voices L
MIDI Implementation
PERFORM-VK responds to Control Change (CC), Program Change (PC) and MIDI
Tempo (not MIDI Clock) information.
For convenience, we have mapped many PERFORM-VK CC’s to the Behringer
UMA25s controller keyboard. The “UMA25s Mapping” column shows the button
or control on the UMA25s related to each control.
MIDI PC Messages
The products 3 presets correspond to Program Change Bank 0: 125, 126, 127
MIDI CC List
Implemented CCs
CH 8 Harmony Voices R
Function Controlled CC# MIDI Sta ndard Values UMA25s Mapping N otes Bug Notes
Buttons
Harmony HitControl 21 undened 0-63 o ; 64-127 on e1 preset UI Harmony button
Delay HitControl 22 undened 0-63 o; 6 4-127 on e2 preset UI Echo but ton
Reverb HitControl 23 undened 0-63 o; 64 -127 on e3 preset UI Reverb butt on
Double HitControl 24 undened 0-63 o ; 64-127 on e4 preset —
Hardtune HitControl 25 undened 0-63 o; 6 4-127 on e5 preset —
Transducer HitControl 26 undened 0-63 o; 64 -127 on e6 preset —
uMod HitControl 27 undened 0-63 o; 64 -127 on e7 preset —
Hit On/O 28 undened 0-63 o; 64 -127 on e8 preset —
Rotary Knobs
Harmony Mix 74 brightness — e9 preset —
Delay Level 71 timbre — e10 preset —
Reverb Level 73 attack — e11 preset —
Doubling Level 75 de cay — e1 2 preset —
Reverb Decay 91 reverb send — e14 preset —
uMod Level 93 chorus send — e15 preset —
Delay Feedback 10 pan — e16 preset —
Wheels, Slider,
Pedals
Harmony PitchBen d PB pitch bend — e17 Pitch Bend Whee l volatile a ected by pitch be nd
Harmony Vibrato_Boost 1 mo d wheel — e18 Mod Wheel volatile —
Notes Sus tain 64 sustain pedal — e20 Su stain Pedal volatile —
Harmony Level 11 expression — e21 Expres sion Pedal volatile —
Not Default
Mapped to UMA25S
Harmony Notes_Smoothing 16 general purpose 1 — — volatile —
Harmony Notes_Gender 17 general purpose 2 — — volatile —
Harmony Notes _Porta 18 general purpose 3 — — volatile —
Harmony Attac k 29 undened — — volatile —
Harmony Release 31 undened — — volatile —
Harmony HumanAmount 76 v ibrato rate — — volatile —
Harmony VibratoAmount 77 vibrato depth — — volatile —
Harmony Hold_Release 78 vibr ato delay — — volatile —
Harmony Hold 80 general purpose 5 0-63 o ; 64-127 on — volatile —
Utility Talk/Bypass 81 general purpose 6 0-6 3 o; 64-127 on — volatile UI Talk But ton
Hardtune Shift 85 undened preset
range, set b y RPN 0
Page 13

13 PERFORM-VK User Manual
Function Controlled CC# MIDI Sta ndard Values UMA25s Mapping N otes Bug Notes
Transducer Filter 86 undened — — preset —
Double HumanAmount 87 undened — — volatile —
Mixer OverallOutputAnalog 102 undened — — volatile —
Special CCs
—
— bank selec t LSB 32 b ank select LSB — — — —
— data entry MSB 6 data entr y MSB — — — RPN/NRPN data entry
— dat a entry LSB 38 data en try LSB — — — —
— data increment 96 data increment — — — —
— data decrement 97 dat a decrement — — — —
— NRPN LSB 98 NRPN LSB — — — —
— NRPN MSB 99 NRPN MSB — — — —
— RPN LSB 100 RPN LSB — — — —
— RPN MSB 101 RPN MSB — — — —
— All Sound O 120 all soun d o — — — —
— All N otes O 123 all n otes o — — — —
bank sele ct MSB 0 bank se lect MSB
— — —
programs use bank
0 only
RPN/NRPN Implementation
RPN 0: Pitch Bend Sensitivity. This is a standard way to change pitch bend range.
MIDI Tempo
Perform-VK responds to incoming MIDI tempo and will adjust system Tap
Tempo accordingly.
Split Point and Transpose
When controlling harmony via MIDI, in either Notes mode or NaturalPlay, it is
sometimes desirable to have one section of the keyboard designated to sending
that control information. It could be the area that your lef t hand is, to play chords
of harmonies.
In order to designate an area of the keyboard to respond to, a Split Point is set.
Any notes, either above or below the split point, are deemed useable by the
system. Notes outside the range are rejected.
To set the Split Point, hold the SET button and press the note on your keyboard
that you want to act as the split note. Then, to choose a split ABOVE that note,
release the split note and press a note ONE SEMITONE ABOVE your split note.
To choose a split BELOW, release the split note and press a note ONE SEMITONE
BELOW your split note.
This creates a split, above or below, with no transposition. In order to set a split
point AND transpose the incoming MIDI notes, you will choose a dierent note in
place of the ABOVE/BELOW notes mentioned above.
It will seem a bit confusing, but does allow you to make both a split above/below
point AND transpose either up or down. So, here’s a chart and some explanation.
Second Note Split Transpo se X To
X+6 Above X5
— Above —
X+2 Above X1
X+1 Above X (no transpose)
X+0 — —
X-1 Below X (no transpose)
X-2 Below X6
— Below —
X-6 Below X2
In the chart above, “X” is the split note, the point at which you want to split the
keyboard, as explained previously.
To facilitate things like “split above, but transpose down” we need to have
settings both above and below your split point. That ’s where the chart comes in.
For example, if you want to split ABOVE middle C, t ypically known as C4,
but transpose DOWN so that C4 is actually C2, you’d do the following:
1. Hold SET
2. Press middle C (C4)
3. Press the note 6 SEMITONES DOWN from middle C (F#)
If you want to split BELOW middle C (C4) and transpose up so that C4 is C6, you’d:
1. Hold SET
2. Press middle C (C4)
3. Press the note 2 SEMITONES DOWN from middle C (A#)
You may need to experiment a bit to gure this out, but it does give you the
ability to set your split point, split direction and transposition very quickly.
Page 14

14 PERFORM-VK User Manual
Factory Reset
To reset the unit back to factory settings, press and hold the Echo and Harmony
buttons while powering up.
Support
If you’ve read through this manual and still need a little help, you can contact us
via our support portal and forums http://support.tc-helicon.com
Page 15

 Loading...