

Page 1
PERFORM-VG
Ultra-Simple Mic-Stand-Mount Vocal and Acoustic Guitar Processor
for Solo and Duo Performers
User Manual
Rev. 1.0
Page 2

2 PERFORM-VG User Manual
Table of Contents
Important Safety Instructions ...................................... 3
Legal Disclaimer ............................................................. 3
Limited warranty ............................................................ 3
1. Introduction ............................................................... 4
2. Let’s Get Going! ......................................................... 4
3. Set Mic Gain ................................................................ 4
4. Connection Diagram ................................................. 4
5. Control ........................................................................ 5
6. Eects ......................................................................... 5
7. Turning Eects On and O ....................................... 5
8. Editing Eects ............................................................ 6
9. Tone.............................................................................9
10. Pitch Correction ..................................................... 11
11. Anti-Feedback ........................................................ 11
12. BodyRez .................................................................. 11
13. 48V (Phantom Power) ............................................ 11
14. Mic Control ............................................................. 12
15. Talk/Tuner .............................................................. 12
16. Lock/Mute ..............................................................12
17. Tap (Tempo) ............................................................ 12
18. RoomSense .............................................................12
19. AUX Input ............................................................... 13
20. Aux to Main Out ..................................................... 13
21. Dimming the Buttons ............................................ 13
22. Switch3/Switch6 (Pedal) In ................................... 13
23. Harmony Style Footswitch Assignment .............. 13
24. Default Top-Level Control .................................... 14
25. Factory Reset ......................................................... 14
26. Support .................................................................. 14
Page 3
3 PERFORM-VG User Manual
9. Do not defeat the safety purpose of the polarized
20. Please keep the environmental aspects of battery
Important Safety Instructions
Terminals marked with this symbol carry
electrical current of sucient magnitude
to constitute risk of electric shock.
Use only high-quality professional speaker cables with
¼" TS or twist-locking plugs pre-installed. Allother
installation or modication should be performed only
by qualiedpersonnel.
This symbol, wherever it appears,
alertsyou to the presence of uninsulated
dangerous voltage inside the
enclosure-voltage that may be sucient to constitute a
risk ofshock.
This symbol, wherever it appears,
alertsyou to important operating and
maintenance instructions in the
accompanying literature. Please read the manual.
Caution
To reduce the risk of electric shock, donot
remove the top cover (or the rear section).
No user serviceable parts inside. Refer servicing to
qualied personnel.
Caution
To reduce the risk of re or electric shock,
do not expose this appliance to rain and
moisture. The apparatus shall not be exposed to dripping
or splashing liquids and no objects lled with liquids,
suchas vases, shall be placed on the apparatus.
Caution
These service instructions are for use
by qualied service personnel only.
Toreduce the risk of electric shock do not perform any
servicing other than that contained in the operation
instructions. Repairs have to be performed by qualied
servicepersonnel.
1. Read these instructions.
2. Keep these instructions.
3. Heed all warnings.
4. Follow all instructions.
5. Do not use this apparatus near water.
6. Clean only with dry cloth.
7. Do not block any ventilation openings. Install in
accordance with the manufacturer’s instructions.
8. Do not install near any heat sources such as
radiators, heat registers, stoves, or other apparatus
(including ampliers) that produce heat.
or grounding-type plug. A polarized plug has two blades
with one wider than the other. A grounding-type plug
has two blades and a third grounding prong. The wide
blade or the third prong are provided for your safety. Ifthe
provided plug does not t into your outlet, consult an
electrician for replacement of the obsolete outlet.
10. Protect the power cord from being walked on or
pinched particularly at plugs, convenience receptacles,
and the point where they exit from the apparatus.
11. Use only attachments/accessories specied by
themanufacturer.
12. Use only with the
cart, stand, tripod, bracket,
or table specied by the
manufacturer, orsold with
the apparatus. When a cart
is used, use caution when
moving the cart/apparatus
combination to avoid
injury from tip-over.
13. Unplug this apparatus during lightning storms or
when unused for long periods of time.
14. Refer all servicing to qualied service personnel.
Servicing is required when the apparatus has been
damaged in any way, such as power supply cord or plug
is damaged, liquid has been spilled or objects have fallen
into the apparatus, the apparatus has been exposed
to rain or moisture, does not operate normally, or has
beendropped.
15. The apparatus shall be connected to a MAINS socket
outlet with a protective earthing connection.
16. Where the MAINS plug or an appliance coupler is
used as the disconnect device, the disconnect device shall
remain readily operable.
17. Correct disposal of this
product: This symbol indicates that
this product must not be disposed
of with household waste,
according to the WEEE Directive
(2012/19/EU) and your national
law. This product should be taken
to a collection center licensed for the recycling of waste
electrical and electronic equipment (EEE). The
mishandling of this type of waste could have a possible
negative impact on the environment and human health
due to potentially hazardous substances that are generally
associated with EEE. At the same time, your cooperation
in the correct disposal of this product will contribute to
the ecient use of natural resources. For more
information about where you can take your waste
equipment for recycling, please contact your local city
oce, or your household waste collection service.
18. Do not install in a conned space, such as a book
case or similar unit.
19. Do not place naked ame sources, such as lighted
candles, on the apparatus.
disposal in mind. Batteries must be disposed-of at a
battery collection point.
21. Use this apparatus in tropical and/or
moderate climates.
LEGAL DISCLAIMER
MUSIC Group accepts no liability for any loss which
may be suered by any person who relies either
wholly or in part upon any description, photograph,
or statement contained herein. Technical specications,
appearances and other information are subject to
change without notice. All trademarks are the property
of their respective owners. MIDAS, KLARK TEKNIK,
LAB GRUPPEN, LAKE, TANNOY, TURBOSOUND,
TC ELECTRONIC, TC HELICON, BEHRINGER, BUGERA,
COOLAUDIO and EUROCOM are trademarks or
registered trademarks of MUSIC Group IP Ltd.
© MUSIC Group IP Ltd. 2017 All rights reserved.
LIMITED WARRANTY
For the applicable warranty terms and conditions
and additional information regarding MUSIC Group’s
Limited Warranty, please see complete details online at
music-group.com/warranty.
Page 4
4 PERFORM-VG User Manual
1. Introduction
Thank you for purchasing Perform-VG!
Your new mic stand-mounted vocal and guitar processor opens up a world of new
performance opportunities.
Starting with Adaptive Tone (automatic EQ, De-Essing, Gating and Compression),
your voice will punch through the mix and sound great in any environment.
Add studio-quality Reverb, Harmony and Echo to the party and you’ll easily craft
eardrum pleasing vocal eects that are perfectly suited to your song.
With the addition of acoustic guitar BodyRez and independent Echo and Chorus
eects it’s easier than ever to get a complete guitar sound for your per formance.
Anti-Feedback tames the annoying high pitched squeals we’ve all experienced at
live shows and keeps your performance sounding its very best.
Our global Pitch Correction gently guides your voice to the nearest note,
ensuring that your pitches are spot on.
2. Let’s Get Going!
On the box, you may have seen a connection guide and simple instructions to set
your mic gain. If you haven’t got things connected and making sound, we should
do that now.
3. Set Mic Gain
• Connect your mic, guitar, and mixer or headphones according to the
guide below
• Press and hold the SET button for about 2 seconds, while singing normally
• When the process is complete, the SET LED will turn RED
• Release the SET button to complete the process
• Your mic gain is now set optimally
After the gain is set, you’ll see the LED ring illuminate red, showing you the
current mic gain. If you would like to make a manual adjustment to the automatic
setting, simply turn the control knob. When you’re done making adjustments,
the control will time out and your manually selected level will be saved. Manually
setting mic gain also disables the “nudge" feature which protects you from
overloading the input by reducing gain when repeated overloads are detected in
a short period of time. Pressing the SET button after manually setting mic gain
will re-enable “nudge”.
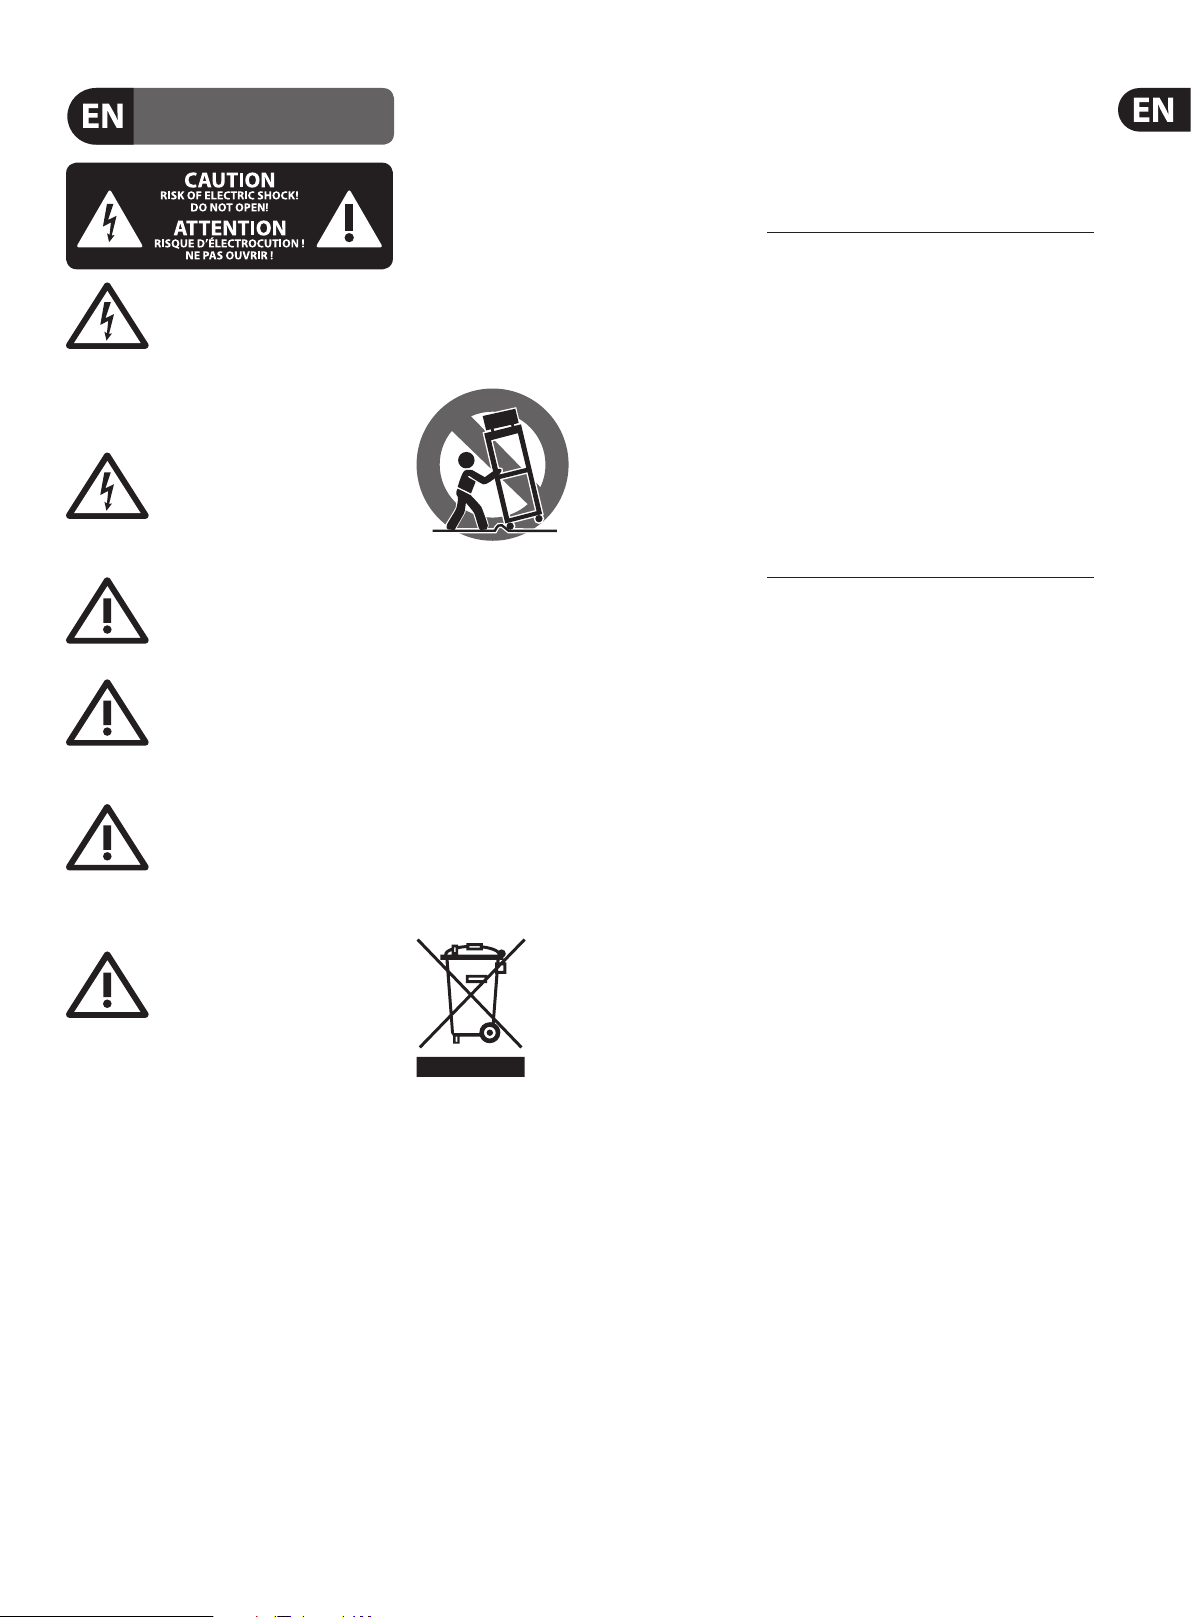
4. Connection Diagram
1 2 3 4 5 6
HIT
*Note that using guitar THRU will mute all guitar sounds in Perform-VG. Chords will still be detected for NaturalPlay harmony, but the intent is to connect to other
pedals/amps instead of hearing guitar from VG.
SWITCH- 6
PLAY/REC STOP/CLR LOOP INC
MP-75
If you change the guitar level via the MIX button while the THRU is connected, the guitar signal will become available again via both THRU and MIC OUT, should you
want a dry signal for guitar in addition to the mixed vocal/guitar output.
To re-mute the guitar in the MIC OUT, plug and re-plug the THRU or GUITAR IN.
Page 5
5 PERFORM-VG User Manual
5. Control
All editing and control on Perform-VG is achieved in three ways.
Here are some examples:
• Button press
• Eects on/o
• Tone , Anti-Feedback, BodyRez on/o
• Enter headphone level control
• Enter mix control
• Enter dimming control
• Tap tempo
• Button hold
• Enter eects edit mode
• Start automatic gain calibration
• Talk/Tuner mode
• Lockout mode
• 48V on/o
• Aux to main out toggle
• Control knob rotation
• Main output level (default top-level control)
Reverb
Reverb creates a simulated physical space for your voice and guitar. It can
be a small space, like a shower (where everyone’s best singing takes place),
or something as big as a concer t hall. It’s common to use a smaller (shorter)
Reverb for faster songs and a larger (longer) Reverb for slower ones.
Vocal and guitar share the reverb style, but control over the levels is independent.
Echo
Otherwise known as “Delay”, echo eects repeat your voice or guitar back to you
in various ways and amounts, simulating the eect of shouting into a mountain
range or very large space.
Vocal and guitar can each have independent echo styles and levels.
Chorus
Chorus adds pitch/time modulation eects to your guitar, giving you options to
further expand your sound.
• Eects level/style
• Headphone level
• Guitar level
• Dimming level
• Manual mic gain level
6. Eects
Harmony
Additional voices, created from your own voice, provide harmony as personal
backup singers. Chord information is captured via the guitar input to pick the
right key and scale for your song automatically.
We can also use music coming into the AUX input to automatically pick the right
key/scale for the harmony voices if you don’t have a guitar connec ted. If you have
no guitar or Aux input, we’ll use the built in RoomSense mic to listen for key/
scale. You’ll need to have a chorded instrument near the RoomSense mic for this
to work.
7. Turning Eects On and O
To activate or deactivate an eect, simply tap the Reverb, Harmony,
Echo or Chorus button. The button will glow WHITE when active and turn o
when inactive.
Page 6

6 PERFORM-VG User Manual
8. Editing Eects
Don’t like the Reverb, Harmony, Echo or Chorus that you hear? You can adjust
both the Level (volume) and Style (sound of the eect) to dial in just the right
combination for your music.
To edit an eect, simply PRESS & HOLD the eect button. You’ll know you’re in
EDIT mode because the eect button will pulse.
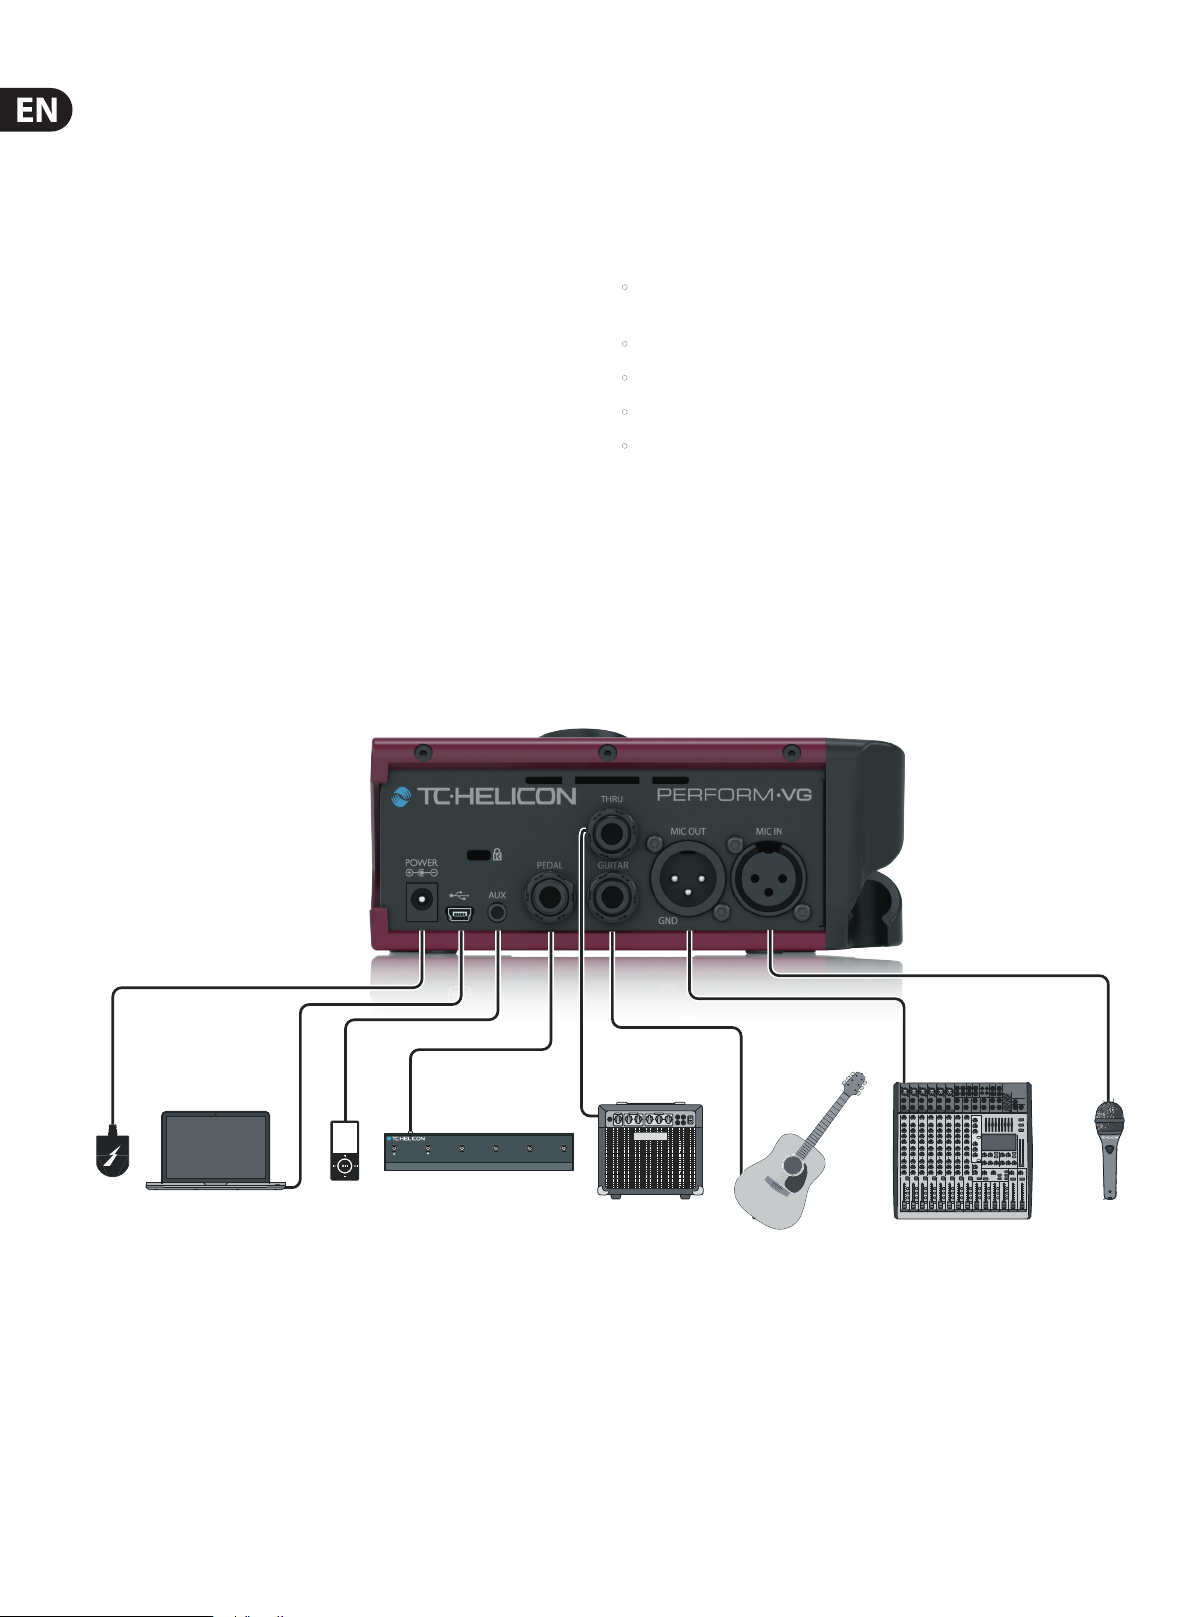
The LED ring serves as both a Level and Style control. As you turn the knob
clockwise, the LED segments will ll up, indicating that you’re turning up the
Level of the current style.
When you completely ll the LED ring, the color will change, letting you know
that you’ve now changed the Style of the eect.
Continuing to turn the Control Knob clockwise will increase the Level of that
Style. Turning the knob counter-clockwise will reduce the level until you
change style.
We’ve tried to relate the color of the LED ring to the type of style from “least ”
to “most”.
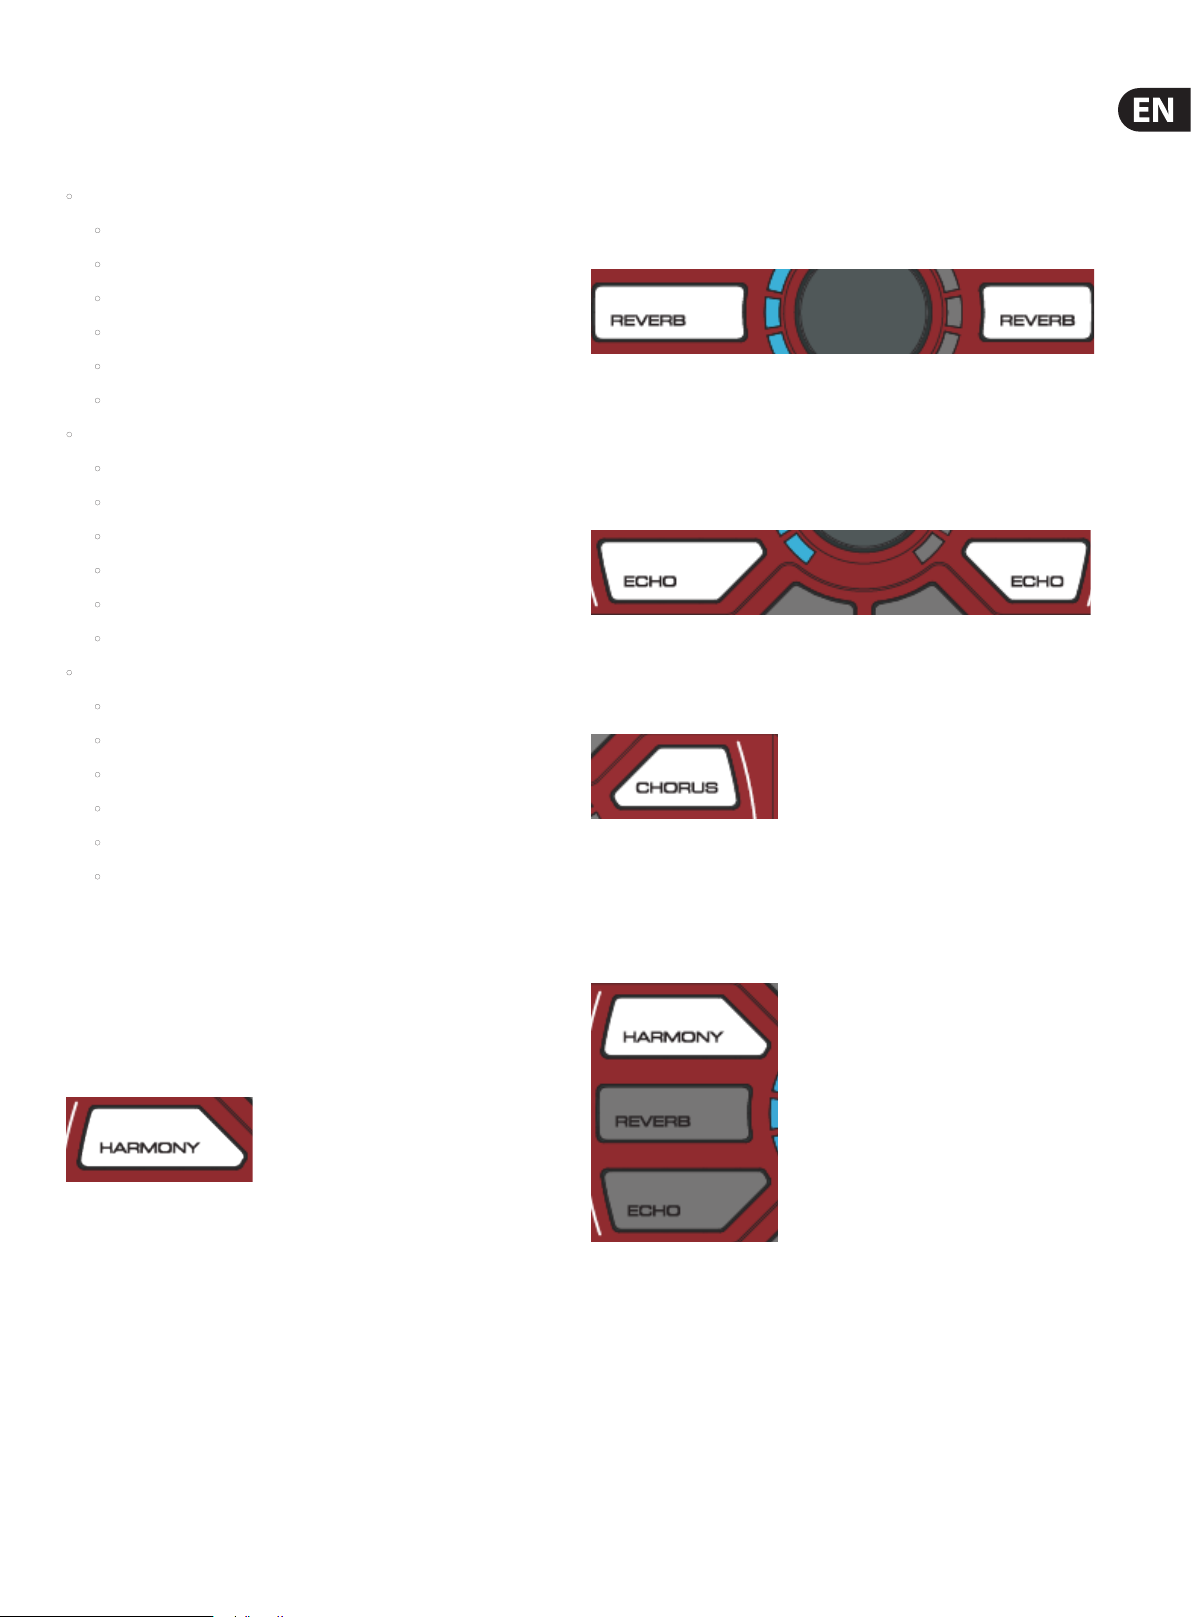
When you rst hold the harmony button to enter edit mode, you’ll be greeted
with a level control. Unlike the other eects, this is simply a minimum to
maximum control and applies regardless of which harmony style you’ve chosen.
Once in edit mode, tap the harmony button again to toggle between level control
and style control.
Each eect has three dierent styles to choose from, with the exception of
Harmony, which oers 13.
Harmony
• High
Blue = smallest/least, like slap echo (very short) or room reverb (also short) or
guitar chorus (least extreme of the guitar eects)
Purple = medium, like ⁄th note echo, club reverb or guitar anger
• High & Higher
• Higher
• Octave Up
• Bass & High
• Bass
• Octave Up & Down
• Octave Down
• Lower & Higher
• Lower
• Lower & Low
• Low
• High & Low
Reverb
• Room (blue)
• Club (purple)
• Hall (red)
Echo
Red = most, like ¼ note echo, hall reverb or guitar detune
Harmony works slightly dierently than the other eects, since there are more
styles to choose from.
• Slap (blue)
• ⁄ note (purple)
• ¼ note (red)
Chorus
• Chorus (blue)
• Flanger (purple)
• Detune (red)
Page 7

7 PERFORM-VG User Manual
Harmony styles are represented relative to the topmost (12 O’Clock) LED, which
serves as an indicator of your lead voice.
• High
• High & Higher
• Octave Up
Bass & High
• Higher
Bass
Page 8

8 PERFORM-VG User Manual
Octave Up & Down
Octave Down
Lower
Low & Lower
Higher & Lower
Low
Page 9

9 PERFORM-VG User Manual
High & Low 9. Tone
Tone automatically adds EQ (equalization), Compression, De-Ess and Gate to your
overall vocal sound.
To activate Tone, press the button.
EQ helps to shape the tone of your voice to t into a musical mix. We remove
some of the low “mud” frequencies and boost the highs for “sparkle” or “air”.
Every recording you hear has some manner of EQ on the lead vocal (and pretty
much everything else too).
Compression reduces the dierence in volume between the loudest and quietest
notes. This gives you a more even sound that can blend into the music better. It’s
almost unheard of for vocals to go uncompressed in modern music, both recorded
and live.
De-Ess gets rid of harsh “S” sounds and makes them sound more pleasing to the
human ear. De-Ess goes hand in hand with Compression, since Compression can
make “S” sounds a bit more pronounced in the mix.
Gate “shuts o” an audio input when it falls below a certain volume. This works
great on things like drums where you want the drum hit to come through, but
then have the mic silent in between hits. For vocals, we don’t want to go as far
as shutting your mic o but we do want to reduce the volume (gain) of the mic
when you’re not singing so that feedback becomes less likely.
Although you can turn Tone o, we recommend you leave it on.
Since Perform-VG replaces EQ and eects that are often added by a live sound
technician, you’ll want to make sure that the mixer channel you plug Perform-VG
into has a at EQ (not altering any frequencies) and that any eects are
turned o.
Page 10

10 PERFORM-VG User Manual
Tone Style
To change Tone styles, press and HOLD the tone but ton for 3 seconds. Turn the
Control Knob to select a style. There are 8 to choose from:
• Normal
• Less Bright
• Normal, No Gate
• Less Bright, No Gate
Normal + Warmth, No Gate
• Normal + Warmth
• More Compression
More Compression, No Gate
Page 11

11 PERFORM-VG User Manual
10. Pitch Correction
Auto chromatic pitch correction gently guides you to the nearest semi-tone
without making you sound like a robot. To access pitch correction, press and hold
the Tone button for about one second. Use the control knob to adjust the amount
of correction, from 0-100%.
Here’s a Craig’s Corner explaining why you might hear a “phased” type sound
when using pitch correc tion: https://youtu.be/KWrEIuiDXsA
11. Anti-Feedback
12. BodyRez
There’s nothing like a great sounding acoustic guitar. However, most guitar
pickups create what we refer to as a “quacky” sound that ’s just not the same as
listening to the natural guitar either in a room or via a nice microphone based
recording. BodyRez works with your acoustic guitar’s unique tone to reduce
muddiness and “quack” giving you a vastly improved sound. We recommend
leaving BodyRez on.
To turn BodyRez on and o, simply tap the button.
To adjust the amount of BodyRez:
• Press and hold the BodyRez button for about one second
• Use the Control Knob to adjust the BodyRez amount to taste
13. 48V (Phantom Power)
If you have a condenser mic, it’ll need power to function. You’ll need to press and
hold the 48V button for two seconds to turn phantom power on.
Everyone loves that amazing squealing sound coming out of the speakers,
right? Yeah, not so much.
Anti-Feedback automatically adapts to your environment and removes
frequencies that can cause feedback. It’s not a silver bullet, you still have to set
up your gear with reasonable volume levels and avoid pointing the mic at the
speakers, but Anti-Feedback can help when you’re “on the edge” and getting
some squealing here and there.
To activate Anti-Feedback, simply press the button. White is ON.
You’ll see the LED light blue when it’s working to get rid of oending frequencies.
If the LED is ashing constantly, it’s done all it can do and you’ll have to look at
the rest of your audio setup to reduce feedback further.
To reset the lters, simply turn Anti-Feedback o and on again.
Note that Anti-Feedback works for the microphone input only.
However, you can press and hold Anti-Feedback to invert the phase of your
guitar, which can help reduce acoustic instrument feedback signicantly. Use the
control knob to toggle between green “normal phase” and red “inverted phase”.
There’s no right or wrong choice here. Use whichever setting reduces guitar
feedback the best for you.
If you’re not sure what kind of mic you have, but you don’t hear any sound, it’s ok
to try 48V. It won’t damage a dynamic microphone.
Here’s a Craig’s Corner video about feedback:
www.youtube.com/watch?v=VlN1RJ4gcAo
Page 12

12 PERFORM-VG User Manual
14. Mic Control
To enable Mic Control, activate +48V.
Then, you’ll need to select your Mic Control Mode. This is done by holding
the +48V button and then pressing the guitar Chorus, Reverb or Echo
buttons respectively.
Chorus sets Mic Control OFF. Use this when you have a condenser mic. If you have
another Mic Control mode set, you may inadvertently activate buttons on the box
as you sing.
Guitar Reverb sets MP-75 mode. The Mic Control button activates harmony by
default. You can change Mic Control behavior by holding the Mic Control button
and then pressing the but ton on Perform-VG that you’d like to control. For
example, if you hold the Mic Control then press the Reverb button, the MP-75 will
now control on/o for Reverb. If you have an MP-76 connected but choose MP-75
mode, the “top” button on the MP-76 will function just like the MP-75 button.
The other buttons will not do anything.
Guitar Echo sets MP-76 Mode. In this mode, the “Top” button controls Harmony.
The “Left” button controls Echo. The “Right” button controls Reverb. The
“Bottom” button controls Talk Mode.
MP-75 and MP-76 modes can control the following:
• Harmony
• follow the Harmony Style Footswitch Assignment instructions, pressing
a mic button instead of footswitch
16. Lock/Mute
Press and HOLD the MIX button for 5 seconds to enter Lock/Mute mode. Only the
Aux input remains active and is sent to the XLR output. This stops people from
messing with your gear if you’ve stepped away for a break. The Aux is left active
in case you want to play canned music between sets.
The MIX button will ash when in Lock/Mute mode.
To re-activate Perform-VG, press and HOLD the MIX button again.
17. Tap (Tempo)
When pressed, this light ashes in time with your echo eects. You can re-tap the
tempo at any time to sync up with your current song. Keep in mind that you can
tap at half-time or double-time to make your echo sounds more exible.
If the guitar and vocal Echo styles are engaged but the Tap button is dark,
both Echo styles are “slap” style and don’t use tap tempo.
• Reverb
• Echo
• Tap Temp o
• Talk
• If you activate Talk via Mic Control, we don’t mute the guitar or activate
the tuner. We assume you’re using Mic Control because you’re not
playing guitar and wouldn’t want to mess with that signal if it doesn’t
belong to you. Entering Talk/Tuner directly on the unit will always mute
the guitar and enable the tuner.
15. Talk/Tuner
During a performance, especially between songs, you might want to speak with
the audience and/or tune your guitar. It’s unlikely that you’ll want all the eects
on your voice while doing so. That’s where the talk/tuner mode comes in. When
active, it bypasses all of the eects in the box (except Tone) so that you can speak
with the crowd and be heard clearly. It also mutes your guitar signal and gives
you an easy-to-use guitar tuner on the main LED ring.
AUX signals are still passed to the XLR out in talk/tuner mode.
Hold the MIX button for 2 seconds to engage talk/tuner.
*Guitar tuner and guitar level are disabled if no guitar is present
Tap will ash red in time with the tempo you’ve just tapped in, then will turn o
so it doesn’t annoy you, annoy you, annoy you, annoy you…
18. RoomSense
Did you notice that little hole on the front of the unit? It’s a microphone!
If you activate Harmony and you’re not using the guitar input or an Aux music
source to guide key/scale, the mic will listen for chords in the room (like a nearby
piano or speaker) and try to gure out key and scale from that. Pretty cool.
RoomSense is the most unpredictable of the key/scale trackers, since the room
dynamics and chord information is most easily obscured using this mode. That
said, it can be quite eective in specic situations, like placing the unit on top of
an acoustic piano.
Page 13

13 PERFORM-VG User Manual
19. AUX Input
When you have a music player connected to the AUX input, any incoming chord
information will be used to determine key/scale for Harmony. (guitar connections
have priority over Aux when detecting key/scale)
You will hear the AUX input mixed with your Mic input (vocals). If the AUX is
too loud or too quiet, use the volume control on the music player to create the
appropriate mix with your vocals.
20. Aux to Main Out
Sometimes, you’d like to have a signal from the Aux input guide key/scale or use
it for an incoming monitor mix, but you don’t want that Aux signal mixed into
your main outputs. If you’d like to remove audio from Aux to the main out, simply
press/hold the Headphone button while connecting your Aux (⁄") cable.
This parameter resets each time you unplug and re-plug the Aux cable or if you
power cycle the unit. We don’t save this parameter because it ’s not immediately
obvious how you’d “toggle” things and we don’t want to trap unsuspecting users
in a mode they can’t nd a way out of.
21. Dimming the Buttons
The buttons on your Perform-VG are designed to be pretty darned bright so you
can see them clearly in an outdoor environment. If you’re playing inside, you may
not want to tan yourself with their brilliance.
To dim/brighten the buttons, tap the SET button and then turn the Control
Knob. Turning the knob to the right increases brightness and turning to the left
decreases brightness.
23. Harmony Style Footswitch Assignment
Perform-VG is the rst product from TC-Helicon to oer harmony style
assignments directly to a footswitch. This means that you can, for example,
assign “High” harmony to one switch and “High & Low” harmony to another,
changing them on the y.
To assign a style to a footswitch:
• Enter harmony edit mode by pressing and holding the Harmony button for
2 seconds
• Select your desired harmony style
• if you see the level control after holding the harmony button, remember
to tap the Harmony button to toggle between level and style control
• Let the menu “time out” and exit back to normal operation
• Press and hold the desired foot switch
• Press the Harmony button to conrm the current style
• Your harmony style is now assigned to the switch
Here’s how the on/o works. Let’s imagine you have two harmony styles
assigned to switches 1 and 2 on the footswitch. Switch 1 has “High” harmony and
switch 2 has “High & Higher”.
• If harmony is OFF and you press either switch 1 or switch 2, harmony will
turn on with the assigned style
• For this example, we’ll say you turned on “High” via switch 1
• If you press switch 1 again, harmony will turn OFF
22. Switch3/Switch6 (Pedal) In
When a Switch3 or Switch6 is connected (using the TRS cable that came in the
S3/S6 box) you can control various aspects of Perform-VG remotely.
The default behavior for Switch3 is:
Switch1 = Harmony - High
Switch2 = Harmony - Low
Switch3 = Harmony - High & Low
You can reassign any of the Perform-VG buttons to be activated by a
footswitch, with the exception of SET, +48V, Headphone Level, and Lock/Mute
(TALK is assignable).
Guitar Boost is also available by mapping the MIX button to a footswitch.
This acts as a +6dB level increase for solos and the like. The MIX button is lit
white when boost is ON and unlit when boost is OFF.
Guitar Phase Invert may be assigned to a footswitch by mapping the AntiFeedback button.
To map a function, press and hold the desired footswitch, then press the button
on Perform-VG that you’d like the switch to control. Release both buttons.
Switch6 acts in the same manner as Switch3 but adds buttons 4, 5, and 6.
The default controls for the buttons are:
• If you press switch 2, harmony will remain ON and change to the “High &
Higher” style
• If you then press switch 2 again, harmony will turn OFF
• If you press switch 1 instead, harmony will remain on and change back
to the “High” style
This new functionality allows you to “stack” harmony by changing the style.
You could, for example, sing and hold a note, turn on “High” harmony, then turn
on “High & Higher” to emulate multi-part additive harmony. Nice!
A vocal/guitar mix of switch assignments could be something like:
1. High Harmony
2. Low Harmony
3. High & Low Harmony
4. Vocal Echo
5. Guitar Echo
6. Guitar Chorus
Switch1 = Harmony – High
Switch2 = Harmony – Low
Switch3 = Harmony – High & Low
Switch4 = Guitar Chorus
Switch5 = Guitar Echo
Switch6 = Guitar Boost
Page 14

14 PERFORM-VG User Manual
24. Default Top-Level Control
Out of the box, the Control Knob allows you to control the main output level.
This is particularly handy if you’re connected to a powered speaker directly and
would like to have control over your level at all times. However, there may be
times when you’d like the Control Knob to do something else, so we’ve covered
you there as well.
You may change the default behavior of the Control Knob during power-up.
Simply HOLD the indicated button during the power-up sequence.
There three options:
• Harmony Level – harmony button
• Headphone Level – headphone button
• Guitar Level – MIX button
• This control will only work if you have a guitar plugged in. If your guitar
is not plugged in, it will default back to Main Output Level until you plug
the instrument back in.
Please note:
These control options are “volatile” and will only be remembered during the
current power cycle. When you re-power, you must perform the operation again
to reset the control. This, like the Aux To Main Out control’s behavior, is to ensure
someone who gets stuck/lost with an unwanted top level control can easily reset
it back to Main Out Level (the default) by simply restarting the unit.
Additionally, if you have reassigned the top level control from Main Out Level
your last known main out level will be maintained in the background. If you
need to change your main out level, you’d need to re-power without holding
any buttons, set your level and then re-power again to reassign your top level
control to one of the other options. Generally, if you’re going to be using one of
the options regularly, just set your main out level to max (0dB) once and leave
it there permanently. This is because you’d be connected to a system with level
control somewhere else, like a mixer, which would take care of any changes you
might need.
25. Factory Reset
To reset the unit back to factory settings, press and hold the Vocal Echo and
Harmony buttons while powering up.
26. Support
If you’ve read through this manual and still need a little help, you can contact us
via our support portal and forums
http://support.tc-helicon.com
Page 15

15 PERFORM-VG User Manual
Page 16

 Loading...