

Page 1
PERFORM-VE
Revolutionary Vocal Manipulator with MIDI-Pitch-Controlled Sampling,
Vocal Synth and One-Button Drum Looper
User Manual
Rev. 1.2
A50-XXXXX-XXXXX
Page 2

2 PERFORM-VE User Manual
Table of Contents
Important Safety Instructions ...................................... 3
Legal Disclaimer ............................................................. 3
Limited warranty ............................................................ 3
1. Introduction ............................................................... 4
2. Update your Device! .................................................. 4
3. Connection Diagram ................................................. 5
4. Front Panel ................................................................. 6
4.1 The Set Button ..................................................................... 6
4.2 The Headphone Button ................................................... 8
5. Eects ......................................................................... 9
5.1 Double ................................................................................... 9
5.2 Morph ..................................................................................... 9
5.3 HardTune ............................................................................ 12
5.4 XFX ......................................................................................... 13
5.5 Echo ...................................................................................... 16
5.6 Filter ....................................................................................... 17
5.7 Tap (Tempo) ........................................................................ 18
6. Looper ...................................................................... 19
7. Sample ......................................................................22
8. Presets ...................................................................... 23
9. I/O Section ................................................................ 24
9.1 AUX Input .............................................................................24
9.2 Switch3/Switch6 (Pedal) In ............................................ 24
9.3 USB Audio ............................................................................ 24
9.4 RoomSense ......................................................................... 25
Appendix A: Eect Quick Reference Chart ................ 26
Appendix B: MIDI Implementation .............................27
Appendix C: General ....................................................28
Page 3
3 PERFORM-VE User Manual
9. Do not defeat the safety purpose of the polarized
20. Please keep the environmental aspects of battery
are trademarks or registered trademarks of MUSIC Group
Important Safety Instructions
Terminals marked with this symbol carry
electrical current of sucient magnitude
to constitute risk of electric shock.
Use only high-quality professional speaker cables with
¼" TS or twist-locking plugs pre-installed. Allother
installation or modication should be performed only
by qualiedpersonnel.
This symbol, wherever it appears,
alertsyou to the presence of uninsulated
dangerous voltage inside the
enclosure-voltage that may be sucient to constitute a
risk ofshock.
This symbol, wherever it appears,
alertsyou to important operating and
maintenance instructions in the
accompanying literature. Please read the manual.
Caution
To reduce the risk of electric shock, donot
remove the top cover (or the rear section).
No user serviceable parts inside. Refer servicing to
qualied personnel.
Caution
To reduce the risk of re or electric shock,
do not expose this appliance to rain and
moisture. The apparatus shall not be exposed to dripping
or splashing liquids and no objects lled with liquids,
suchas vases, shall be placed on the apparatus.
Caution
These service instructions are for use
by qualied service personnel only.
Toreduce the risk of electric shock do not perform any
servicing other than that contained in the operation
instructions. Repairs have to be performed by qualied
servicepersonnel.
1. Read these instructions.
2. Keep these instructions.
3. Heed all warnings.
4. Follow all instructions.
5. Do not use this apparatus near water.
6. Clean only with dry cloth.
7. Do not block any ventilation openings. Install in
accordance with the manufacturer’s instructions.
8. Do not install near any heat sources such as
radiators, heat registers, stoves, or other apparatus
(including ampliers) that produce heat.
or grounding-type plug. A polarized plug has two blades
with one wider than the other. A grounding-type plug
has two blades and a third grounding prong. The wide
blade or the third prong are provided for your safety. Ifthe
provided plug does not t into your outlet, consult an
electrician for replacement of the obsolete outlet.
10. Protect the power cord from being walked on or
pinched particularly at plugs, convenience receptacles,
and the point where they exit from the apparatus.
11. Use only attachments/accessories specied by
themanufacturer.
12. Use only with the
cart, stand, tripod, bracket,
or table specied by the
manufacturer, orsold with
the apparatus. When a cart
is used, use caution when
moving the cart/apparatus
combination to avoid
injury from tip-over.
13. Unplug this apparatus during lightning storms or
when unused for long periods of time.
14. Refer all servicing to qualied service personnel.
Servicing is required when the apparatus has been
damaged in any way, such as power supply cord or plug
is damaged, liquid has been spilled or objects have fallen
into the apparatus, the apparatus has been exposed
to rain or moisture, does not operate normally, or has
beendropped.
15. The apparatus shall be connected to a MAINS socket
outlet with a protective earthing connection.
16. Where the MAINS plug or an appliance coupler is
used as the disconnect device, the disconnect device shall
remain readily operable.
17. Correct disposal of this
product: This symbol indicates
that this product must not be
disposed of with household
waste, according to the WEEE
Directive (2012/19/EU) and
your national law. This product
should be taken to a collection center licensed for the
recycling of waste electrical and electronic equipment
(EEE). The mishandling of this type of waste could have
a possible negative impact on the environment and
human health due to potentially hazardous substances
that are generally associated with EEE. At the same time,
your cooperation in the correct disposal of this product
will contribute to the ecient use of natural resources.
For more information about where you can take your
waste equipment for recycling, please contact your local
city oce, or your household waste collection service.
18. Do not install in a conned space, such as a book
case or similar unit.
19. Do not place naked ame sources, such as lighted
candles, on the apparatus.
disposal in mind. Batteries must be disposed-of at a
battery collection point.
21. Use this apparatus in tropical and/or
moderate climates.
LEGAL DISCLAIMER
MUSIC Group accepts no liability for any loss which
may be suered by any person who relies either
wholly or in part upon any description, photograph,
or statement contained herein. Technical specications,
appearances and other information are subject to
change without notice. All trademarks are the property
of their respective owners. MIDAS, KLARK TEKNIK,
LAB GRUPPEN, LAKE, TANNOY, TURBOSOUND,
TC ELECTRONIC, TC HELICON, BEHRINGER and BUGERA
IP Ltd. © MUSIC Group IP Ltd. 2017 All rights reserved.
LIMITED WARRANTY
For the applicable warranty terms and conditions
and additional information regarding MUSIC Group’s
Limited Warranty, please see complete details online at
music-group.com/warranty.
Page 4

4 PERFORM-VE User Manual
1. Introduction
Thank you for purchasing Perform-VE!
Your new mic stand-mounted vocal processor opens up a world of sound
creation and performance opportunities.
Starting with our Adaptive Tone (automatic EQ, De-Essing, Gating and
Compression), your voice will punch through the mix and sound great in
any environment.
Next up, an impressive assortment of transformations await your voice: HardTune
Pitch Correction, Doubling, Shift and Gender Morphing all work together to
create whatever modern lead vocal sound you can dream up.
Perform-VE also generates MIDI Voices to accompany your Lead. MIDI Voices can
be pitch-perfect vocal harmonies, virtual analog vocoder voices, or VS Synthesis
samples that you record on the y. Simply play notes on a connected MIDI
controller keyboard and you can have up to eight of these MIDI voices singing
along with your Lead.
You also get XFX for stutter, rhythmic, ring modulation and anger eects,
Echo for spacious reverbs + beat-synced delays, and Filter for a selection of
transducer and sweepable lters. With all this at your command, you’ll quickly
generate striking vocal eects and exciting, fresh sounds that will take your
music to new levels.
But wait, there’s more!
Perform-VE also includes a Drum and Audio Looper. With several dierent kick,
snare and hi-hat sounds available, you can easily build a beat and then record
a synchronized audio loop from Perform-VE’s internal signal path. Just tap
and vocalize.
2. Update your Device!
It is HIGHLY recommended that you update the rmware on your Perform-VE
before rst use.
To update your rmware, you'll need both a USB driver
(PC only) and our VoiceSupport 2 program. Both can be found at
tc-helicon.com/products/ perform-ve/support/
PC Users
1. Download both the USB driver and VoiceSupport 2
2. Install the USB driver (restart if prompted)
3. Install VoiceSupport 2 (restart if prompted)
4. Connect your Perform-VE to your computer with the supplied USB cable
5. Power up Perform-VE
6. Star t VoiceSupport 2
7. Follow the prompts to update your rmware
Mac Users
You will not need the USB driver. Download VoiceSupport 2 and follow
steps 3-7 above.
Read the Quick Start!
If you’ve read the Quick Start Guide that came in the box, hooked up a
microphone, and can hear your music and vocals coming through the outputs,
you are already skimming the top features of Perform-VE. If you want to get into
Perform-VE’s deeper capabilities with this reference manual, we’ll need to do a
little more set up. Don’t worry – it won’t take long!
Page 5
5 PERFORM-VE User Manual
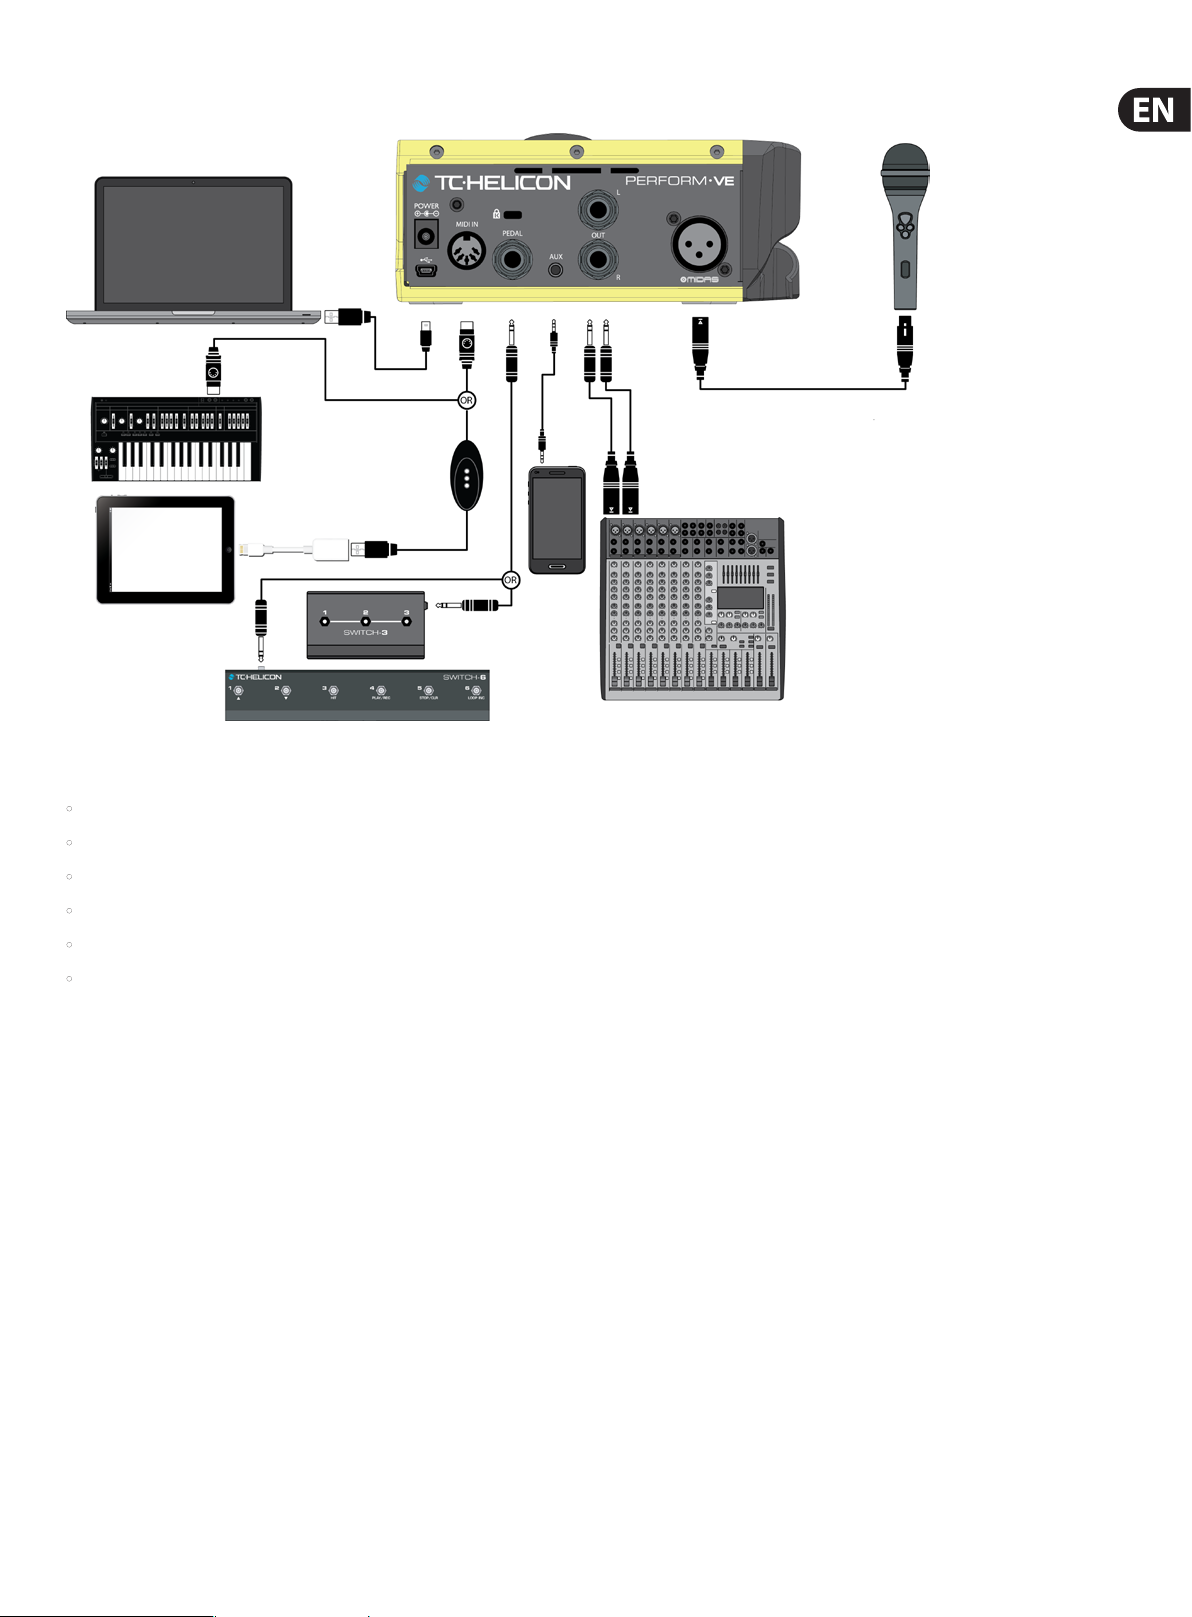
3. Connection Diagram
Perform-VE has a lot of connectivity:
• MIDI data is received via the mini-USB port or the 5-Pin MIDI socket.
• MIDI data is transmitted via the mini-USB port.
• The PEDAL input allows you to connect a Switch-3 or Switch-6 (sold separately) to change presets, toggle eects and control the LOOPER and SAMPLE features.
• The AUX input lets you mix stereo audio tracks with Perform-VE’s output.
• The balanced stereo outputs allow connection to any ¼" input equipped mixer or powered speaker system.
• The XLR input is MIDAS microphone preamplier equipped, providing the much-loved MIDAS soft-clipping characteristic sound when pushed hard.
For learning purposes, we recommend that you connect a MIDI keyboard to your Perform-VE while you track along with this reference manual. Your MIDI keyboard will
ideally be connected directly to Perform-VE’s 5-Pin MIDI port as shown above.
Alternatively, your MIDI keyboard can be connec ted via USB cable to a laptop running music software that features a MIDI soft THRU capability. You would then
connect Perform-VE to the laptop via a second USB cable and congure your DAW to take incoming MIDI from the USB MIDI keyboard and pass it on to Perform-VE’s
USB port. See your respective software manual for details on how to set up your particular system.
Page 6

6 PERFORM-VE User Manual
4. Front Panel
Now that your Perform-VE is set up and connected to the devices of your
choosing, we’re going to take a quick tour of the front panel, explaining
what each of the buttons do without getting too deep in any details just yet.
Don’t worry – we’ll go feature diving soon enough!
One Knob To Rule Them All
By default, Perform-VE’s Control Knob edits the mix between the MIDI Voices and
your Lead Voice. It applies to all three presets and is not stored when Perform-VE
is turned o.
LEAD Voice: Your voice. Enhanced
and extremely altered, just how you
want it!
MIDI Voices: Up to 8 MIDI Note
controlled voices
generated by Perform-VE to
accompany your LEAD Voice.
MIDI Voices are Harmony, Vocoder or
VS Synthesis Voices.
The graphic above shows equal levels of MIDI and LEAD as displayed on the
LED Ring. From here you can dial down the blue MIDI level by turning the knob
counter-clockwise, or dial down the green LEAD level by turning the knob
clockwise. Whichever level you turn down, the other one will stay at max volume.
Eects
Perform-VE makes some of the wildest and most complex sounds that TC-Helicon
has ever made possible. There’s a lot to discover by simply pushing buttons and
combining sounds, but we’ll give you an overview of the basics here, starting
with the six eec ts buttons, as shown below:
doubling. Alternatively, if you hold Style in the bottom right corner of the Double
button, once that button pulses, you’ll be able to change the doubling style when
you turn the Control Knob.
When a parameter edit is underway…
• The LED ring will display the currently selected parameter value,
• The Control Knob will edit this parameter, ranging (clockwise) from min to
max, and
• The pressed FX button will pulse on and o. At this point you won’t need to
keep holding it down to continue editing.
Pressing any button (including the button that is pulsing) will quit the edit mode.
Styles and Mods
In addition to parameters like Level, Shift, Gender, Mode, Key, Div, Delay and
Reverb, you’ll see that four of the eects have a Style parameter. Styles are
essentially mini-presets for the eect in question. Changing any style will
instantly update a number of deeper eect parameters that are not available
for direct Control Knob editing. Style selections appear on the LED Ring as single
color-coded LEDs.
Mods are related to the currently selected Style. They appear as levels on the LED
Ring, colored to match the Style. You can think of each mod as custom ‘Tweak’
parameter matched to the Style in question.
4.1 The Set Button
Congures: Microphone Input Level,
MIDI Channel Select,
MIDI Split Point Select,
& More…
Once a microphone and a MIDI keyboard are connected to your Perform-VE,
it’s time to ensure that the audio and MIDI settings are correct. You achieve this
with the SET button.
Toggling the Eects
Quickly pressing and releasing any one of the FX buttons will toggle the
associated eect on and o. The LED ring will switch to an alternate display mode
while the button is down. There’s a reason for this momentary ash, and we’ll
explain it now.
Real-time Control of Eect Parameters
Perform-VE was designed to allow instant access to 21 dierent eect
parameters without navigating through menus.
Each eect button is labeled with light gray text in one or more corners of the
button. For example, if you press “Level” in the top lef t corner of the Double
button, and turn the Control Knob while it’s pressed, you’ll adjust the amount of
The SET button performs many functions in your Perform-VE. By itself, the SET
button congures the mic input level and sets the MIDI channel and split-point
used to control the notes, vocoder and sample features of your unit.
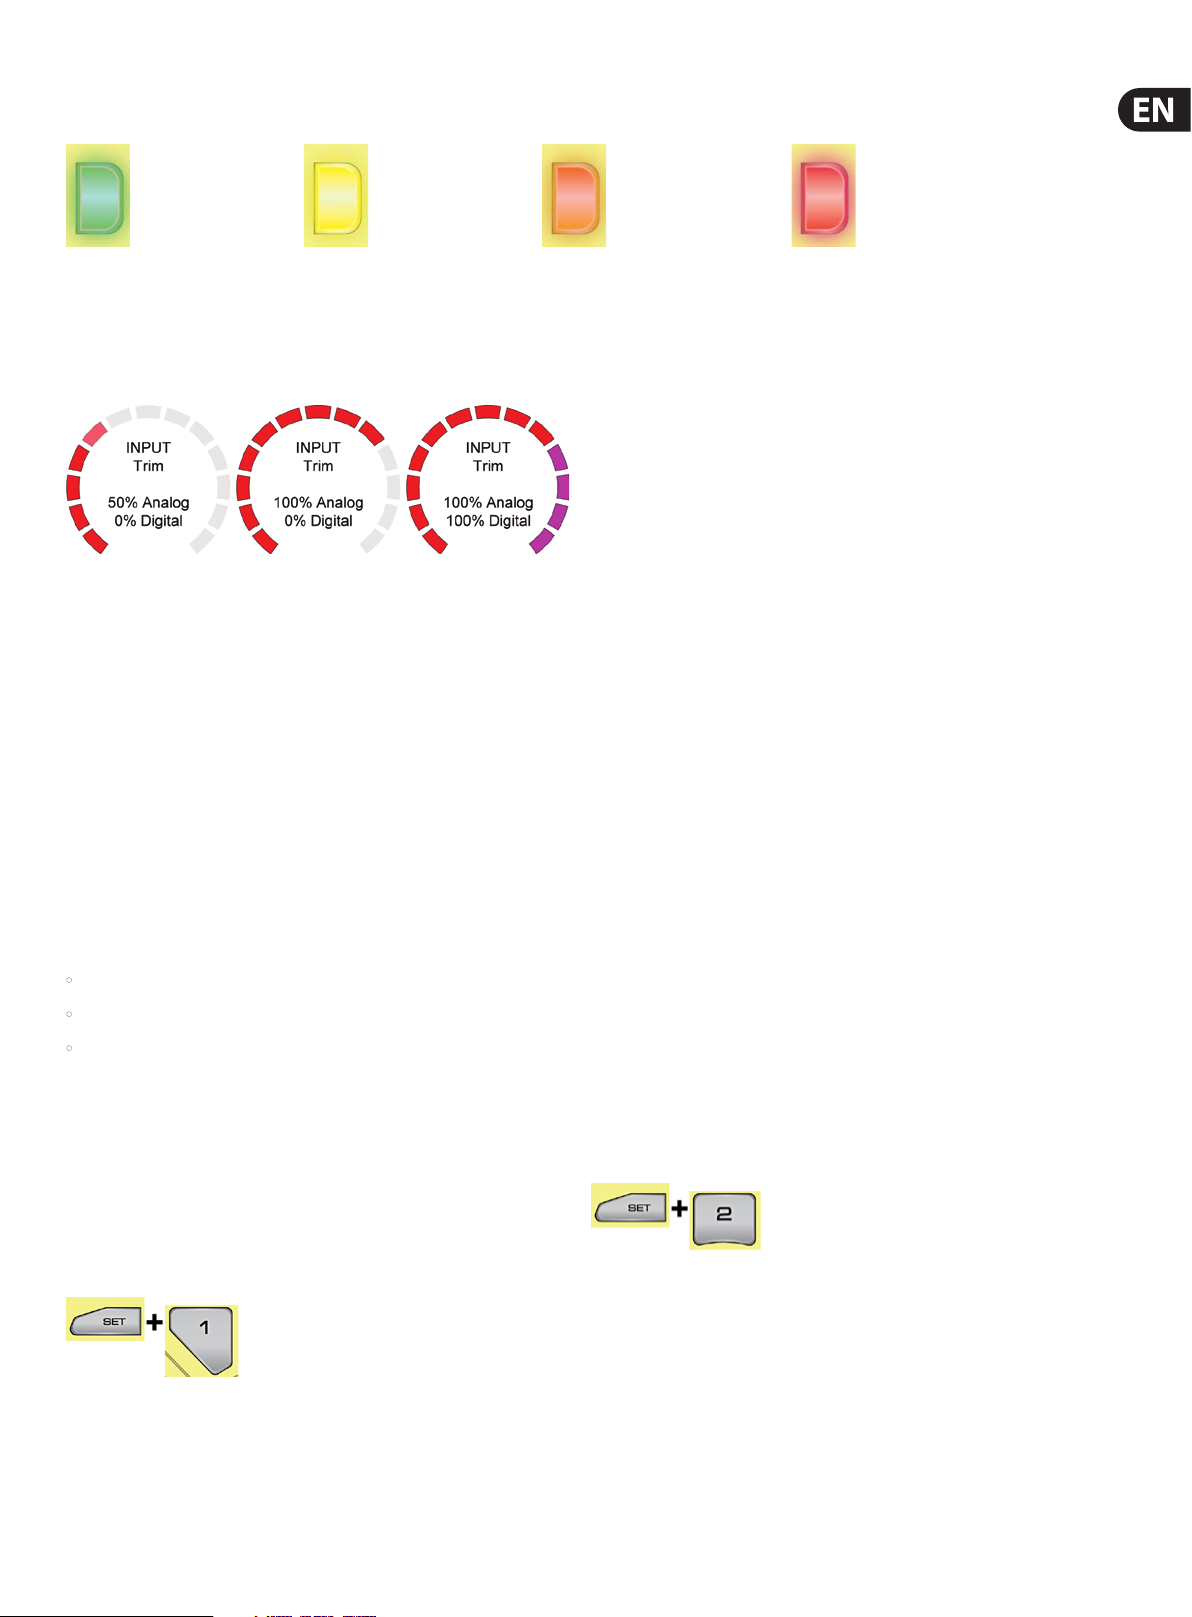
Mic Gain Setting
The actual signal level coming from your microphone can vary depending on
what type of microphone you have connected and how loudly you vocalize
(speak/sing/shout/shriek) into it. The Auto-Gain procedure is the easiest way
to ensure the microphone preamplier level set within your Per form-VE is
calibrated to match your mic and vocal technique, but you have the freedom to
set the Mic Gain level manually if you prefer.
Auto-Gain
Press and Hold the SET button to activate the Auto-Gain procedure and vocalize
into the microphone at your typical loudest volume. After several seconds the SET
button will ash red, indicating that the procedure is complete.
You will see that the LED to the right of the SET button changes color when you
vocalize into the microphone.
Page 7
7 PERFORM-VE User Manual
This LED is a VU Meter, with the following color codes:
Green
-23 dB … -13.5 dB
Good Level
Yellow
-13.5 dB…-7.5 dB
Hot level, but still okay.
Orange
-4 dB … 0 dB
Soft-clipping:
Midas Tone.
Red
0 dB
Hard-clipping!
If you nd the Auto-Gain procedure set the input trim too low or high for your liking, you can always run Auto-Gain again or you can set the gain manually.
Manual Gain
Press and Release the SET button to edit the Manual Gain with the Control Knob.
The red LED segments indicate gain provided by Perform-VE’s analog microphone
preamplier circuit. When the mic pre is at maximum gain, further gain is
possible via digital amplication (the remaining 4 magenta LED segments).
Once you stop editing with the Control Knob, the LED ring will return to the MIDI/
LEAD mix display after two seconds. You can then vocalize into your microphone
and conrm the gain settings are correct for your application.
HINT: Red in VU meter LED is not a good thing as it means hard clipping and
digital distortion! Reduce the microphone gain and try again if you see the
VU LED turning red when you are vocalizing.
EQ helps to shape the tone of your voice to t into a musical mix. We remove
some of the low “mud” frequencies and boost the highs for “sparkle” or “air”.
Every recording you hear has some manner of EQ on the lead vocal (and pretty
much everything else too).
Compression reduces the dierence in volume between the loudest and quietest
notes. This gives you a more even sound that helps your vocal sit better in the
local mix. It’s almost unheard of for vocals to go uncompressed in modern music,
both recorded and live.
De-Ess gets rid of harsh “S” sounds and makes them sound more pleasing. De-Ess
goes hand in hand with Compression, since Compression can make “S” sounds a
MIDI Channel
bit more pronounced in the mix.
The MIDI channel that Perform-VE responds to is set if a MIDI note event is received
while the SET button is held down.
To set the MIDI Channel (without a split point):
• Press and Hold the SET button,
• Play a single MIDI note on your controller,
• Release the SET button.
Don’t worry about having to repeat the Auto-Gain on the microphone – these
steps will not overwrite your previous microphone level settings while the SET
button is down, provided you a MIDI note is received while SET is held down.
When complete, you can verify Perform-VE is set to receive on the correct MIDI
channel for your keyboard by playing notes and monitoring the SET button;
the SET button will ash red whenever MIDI note events are received on the
congured MIDI channel.
SET + Preset 1: Adaptive Tone
Holding down the SET button and pressing
Preset 1 will toggle Adaptive Tone, with the VU
meter LED as an indicator.
RED: O
GREEN: On
Tone automatically adds EQ (equalization), Compression, De-Ess and Gate to your
overall vocal sound. Tone is enabled by default and we highly recommend leaving
it on.
Gate “shuts o” an audio input when it falls below a certain volume. This works
great on things like drums where you want the drum hit to come through, but
then have the mic silent in between hits.
For vocals, we don’t want to go as far as shutting your mic o but we do want to
reduce the volume (gain) of the mic when you’re not singing so that feedback
becomes less likely.
Since Perform-VE replaces EQ and eects that are often added by a live sound
technician, you’ll want to make sure that the mixer channel you plug Perform-VE
into has a at EQ (not altering any frequencies) and that any eects are
turned o.
SET + Preset 2: +48 V (Phantom Power)
Holding down the SET button and pressing
Preset 2 will toggle phantom power (+48 V),
with the VU meter LED as an indicator.
RED: O
GREEN: On
If you have a condenser mic, it’ll need power to function. Enable +48 V to use it
with your Perform-VE.
If you’re not sure what kind of mic you have, but you don’t hear any sound, it’s ok
to try +48 V - it won’t damage a dynamic microphone.
Page 8
8 PERFORM-VE User Manual
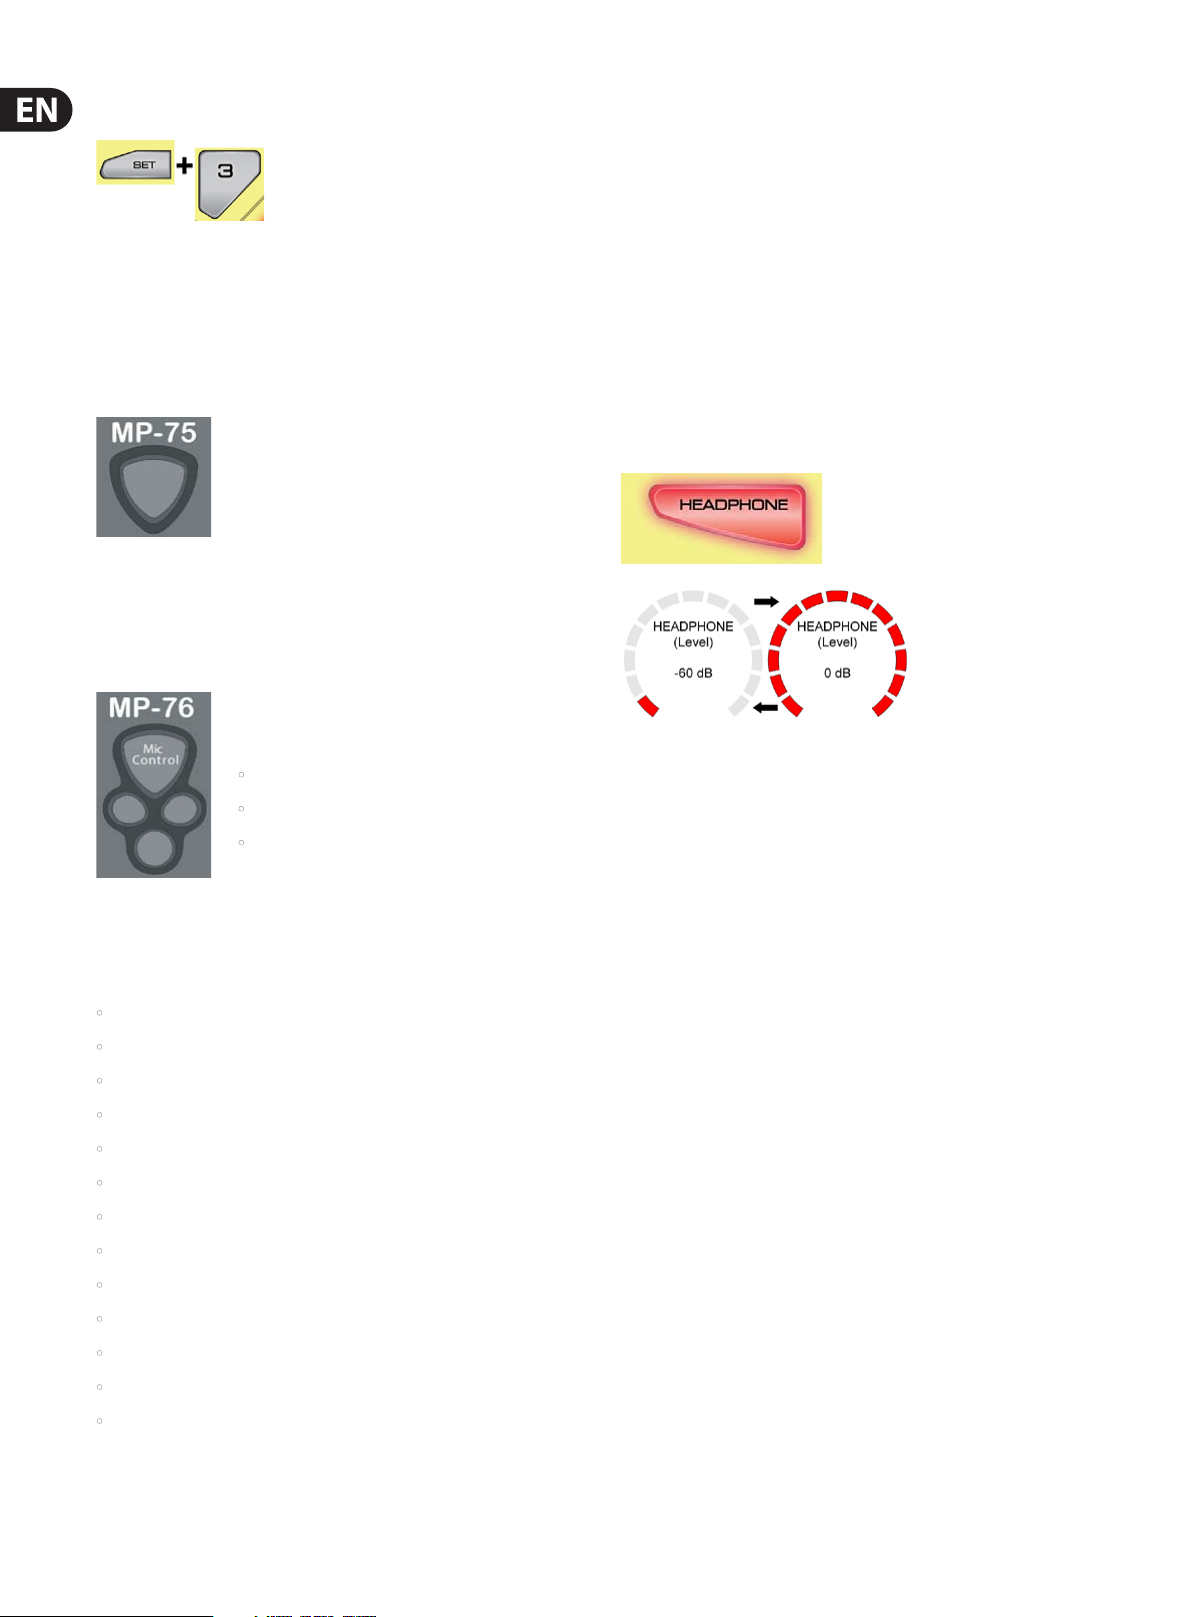
SET + Preset 3: Mic Control
Holding down the SET button and pressing
Preset 3 repeatedly will cycle through Mic
Control settings, with the VU meter LED showing
which mode you’re in.
RED: Mic Control O
Use this when you have a condenser microphone. If you have another Mic Control
mode set, you may inadvertently activate buttons on the box as you sing.
GREEN: MP-75 Mode
On your TC-Helicon MP-75 Microphone, the single
Mic Control button cycles the preset selection. You
can reassign the Mic Control button by holding the
button and then pressing the corresponding button on
Perform-VE that you’d like to control.
For example, if you hold the Mic Control then press the
Reverb button, the MP-75 will now toggle Reverb on
and o.
YELLOW: M P-76 Mode
In MP-76 mode, the Mic Control button cycles the preset
selection as it does in MP-75 mode. The remaining three
buttons default to toggle the following eects on your
Perform-VE:
• Left toggles ECHO.
• Right toggles FILTER.
• Bottom toggles XFX.
SET + Double: MIDI SYSEX Dump Current Preset
Holding down the SET button and pressing the DOUBLE button outputs the sysex
of the current active preset parameters.
SET + Tap
Holding down the SET button and pressing the Tap button toggles drum
quantizing on and o.
SET + Kick: Erase Kick loop component
SET + Snare: Erase Snare loop component
SET + Headphone: Erase Hi-hat loop component
SET + Loop: Erase Audio loop component
4.2 The Headphone Button
When held down,
HEADPHONE Level
adjusts the volume of
the headphone jack.
Range: -60 to 0 dB
When the looper button is lit or pulsing, the headphone button plays the hi-hat.
The loop needs to be erased to be able to adjust the headphone level.
Now that the basics are out of the way, let’s check out Perform-VE’s eects!
NOTE: If you have a TC-Helicon MP-76 connected but
choose MP-75 mode instead, the lower three buttons will
not operate.
The MP-75 and MP-76 buttons can be reassigned to control the following:
• DOUBLE
• MORPH
• HARDTUNE
• XFX
• ECHO
• FILTE R
• LOOPER Record/Play/Erase
• SAMPLE record
• SAMPLE play
• Preset 1
• Preset 2
• Preset 3
• Tap Temp o
Page 9
9 PERFORM-VE User Manual
5. Eects
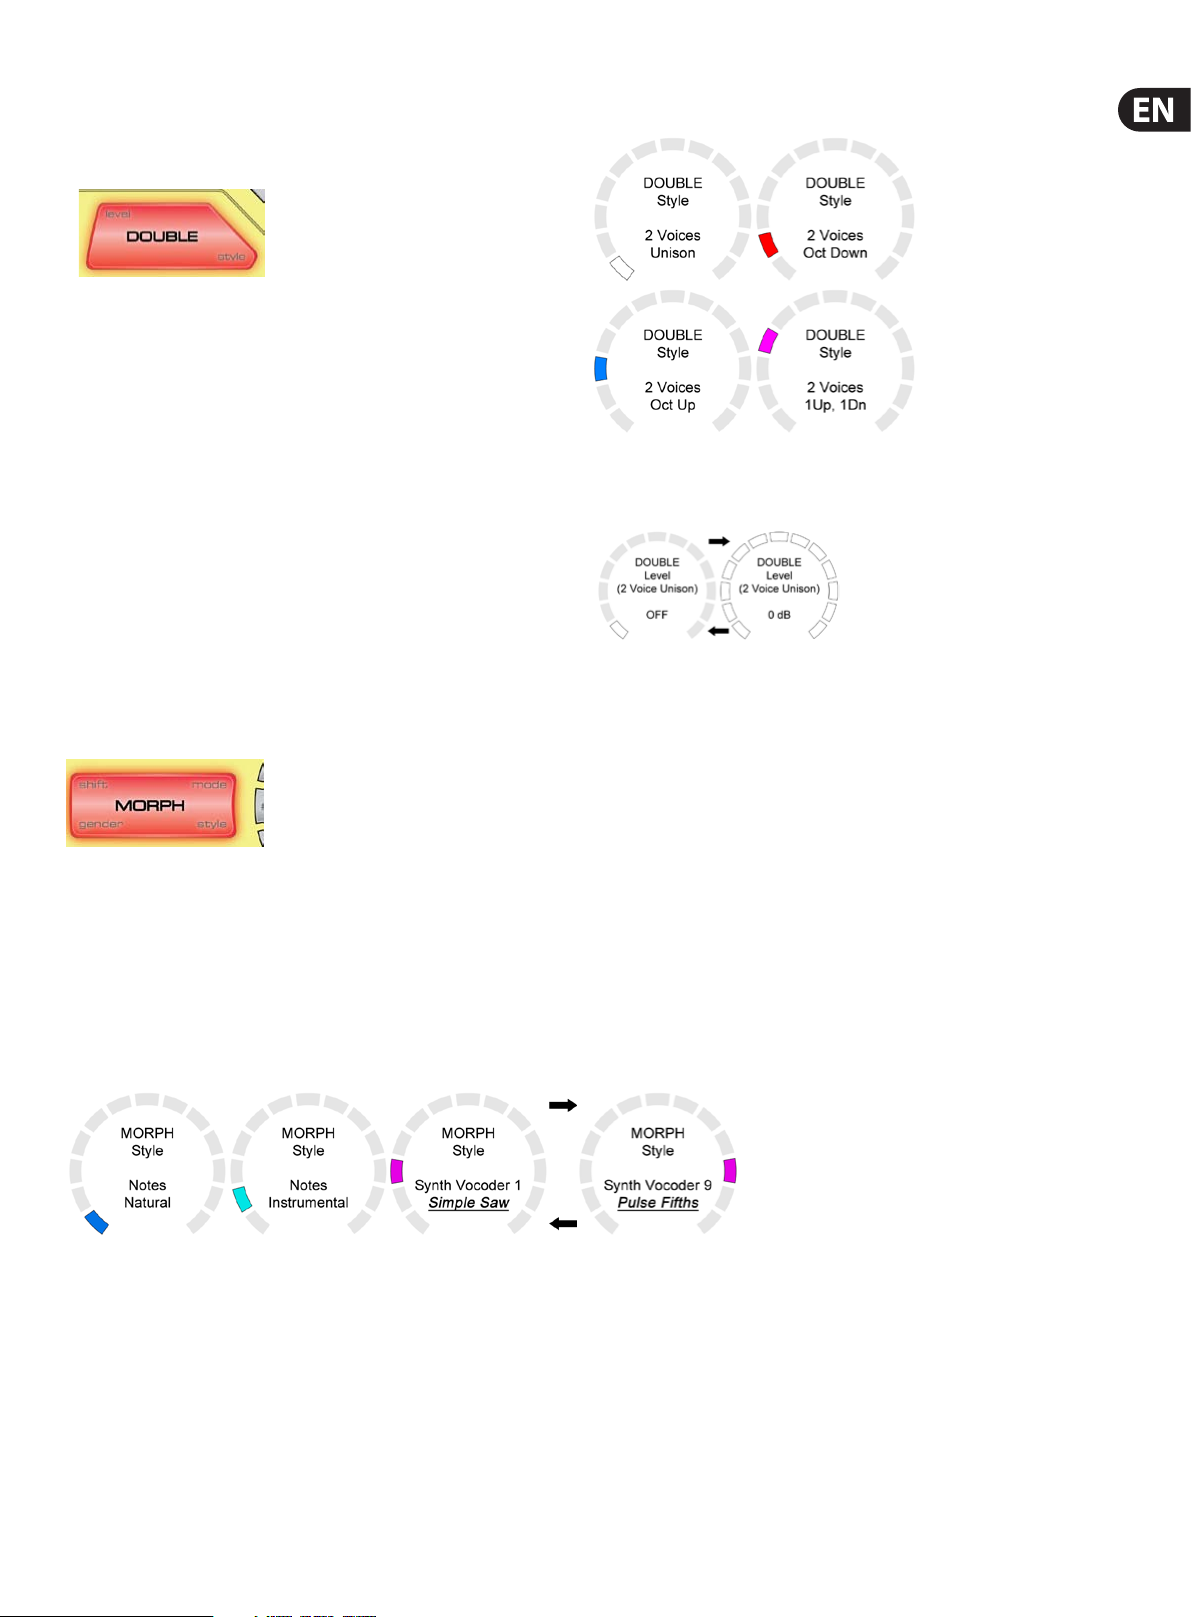
5.1 Double
Applies to: LEAD Voice
Double simulates the classic “double tracked” studio sound that’s common on
recordings of all genres. Double Style selections can include Octave Up and
Octave Down voices, for an even thicker eect. Hold style to edit.
Double Style
Double Level
Double Level changes the amount
of doubled voice, relative to your
lead vocal. Hold level to edit.
On the ring, Level is indicated by one
up to all LEDs lit, in the color of the
current style.
Range: O, -10 to 0 dB
5.2 Morph
Applies to: LEAD Voice
(Shift & Gender),
MIDI Voice (Mode & Style)
“Morphing is a special eect in motion pictures and animations that changes (or morphs) one image or shape into another through a seamless transition. Most often it
is used to depict one person turning into another through technological means or as part of a fantasy or surreal sequence.” (Wikipedia)
Perform-VE’s Morph eect does exactly this to your voice: you can morph your lead voice into a giant, a mouse, or a spaced out alien (and beyond) using the Shift and
Gender parameters, while also morphing your MIDI voices into choirs of angels, robots, zombies or whatever you dream up using the Mode and Style parameters.
Morph Style
Morph Style sets the MIDI Voices to be either Notes harmony voices or Synth Vocoder voices. There are two styles of Notes harmony (natural or warp), and eight
dierent Synth Vocoder styles to choose from.
Notes
Notes harmony voices are created from either your own voice, or a VS Synthesis sample (vocal sample synthesis) that you create with Perform-VE’s innovative new
VS Synthesis sampler technology (covered later in this manual).
Formants are the unique resonant frequencies that give your voice its charac teristic sound. When set to Natural operation, the Notes Harmony voices will retain the
formant characteristics of your lead vocal. When set to Warp, the voices will have their formant characteristics expanded or compressed depending on the actual
MIDI notes you play, making for tonal transformations that are striking, unexpected and possibly unreal sounding when compared to the original. Try it and hear for
yourself!
Notes Natural is the default mode for Perform-VE’s MIDI Voices. As long as MORPH and SAMPLE are turned o, you will hear natural shifted harmony voices whenever
you vocalize and send MIDI Notes to Perform-VE.
When MORPH is turned on, the MIDI Voice mode changes to reect the MORPH Style – you can keep the MIDI Voices Natural, make them Warped, or replace them with
Synth Vocoder voices as you see t.
Page 10
10 PERFORM-VE User Manual
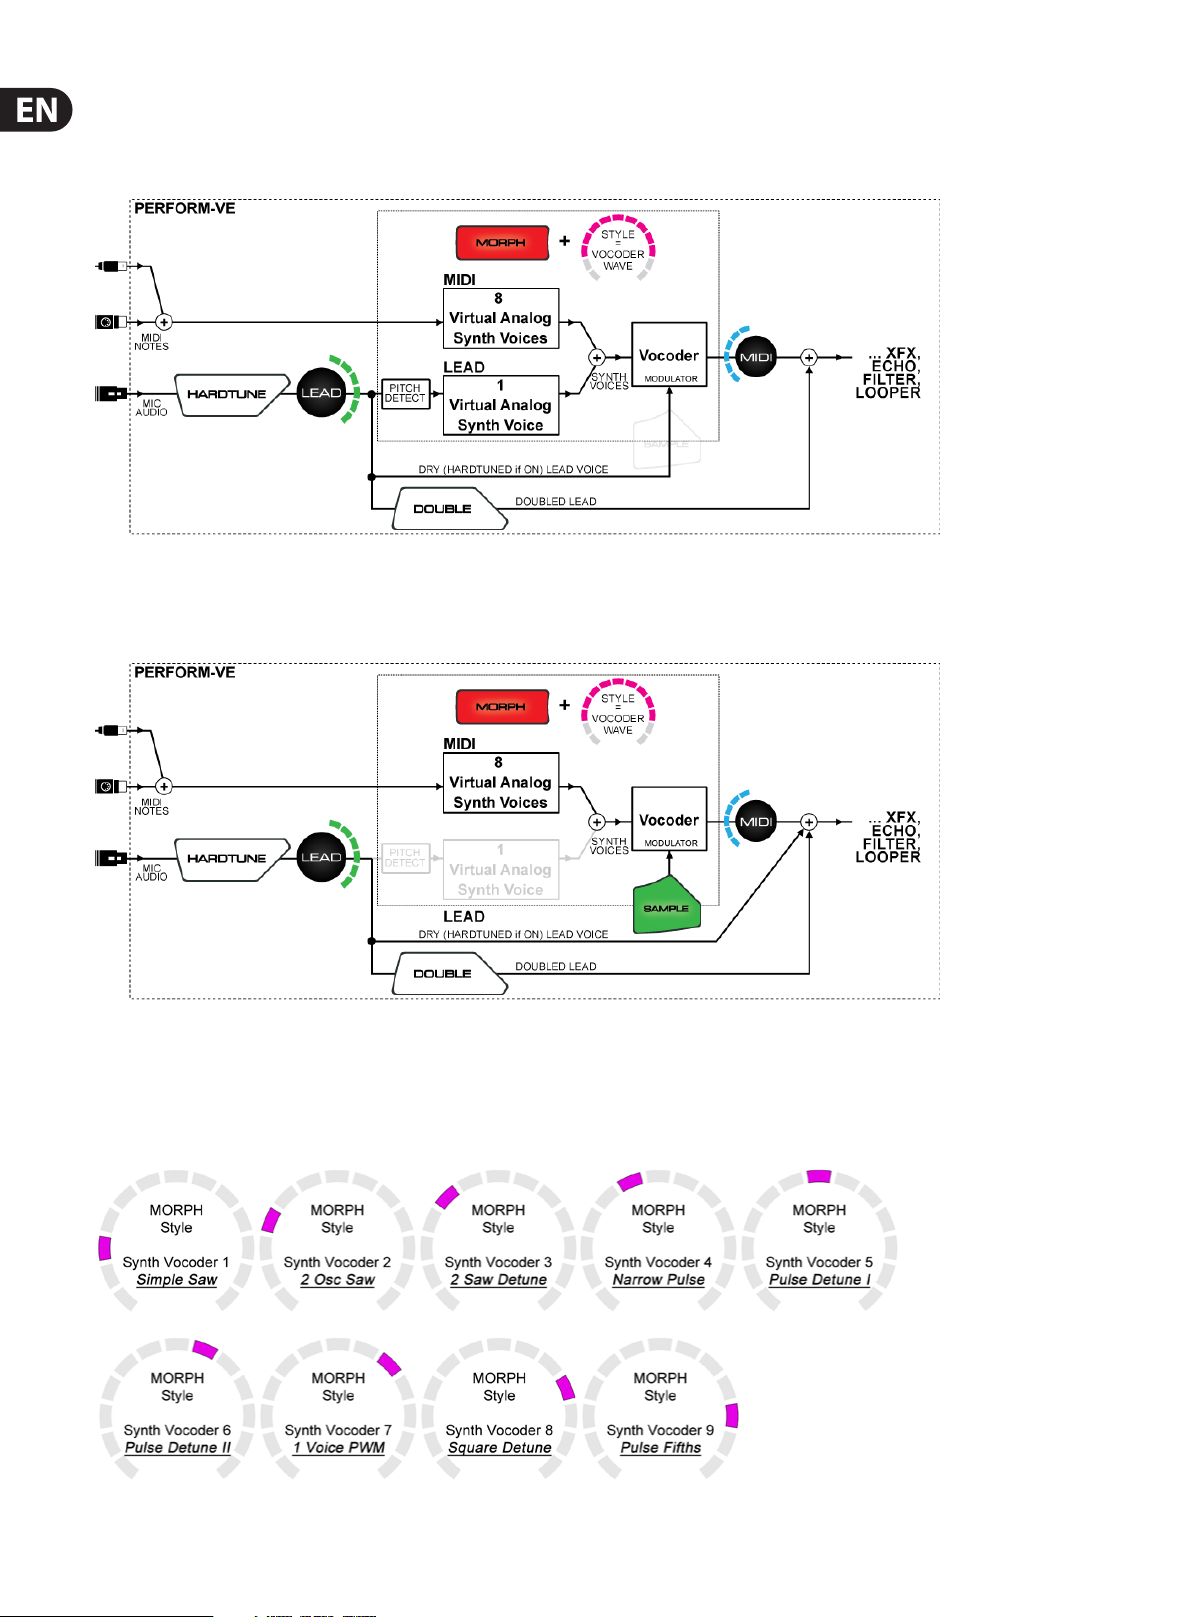
Synth Vocoder
Perform-VE has a dual oscillator synth vocoder hidden inside. When Synth Vocoder styles are chosen, the synthesizer will generate up to eight articulated synth voices
to render the MIDI notes you play, and will also generate a ninth Lead synth voice that follows the pitch of your voice.
The graphic above assumes a sample hasn’t been recorded. In this case, your Lead vocal gets a dedicated synth voice and also ac ts as the modulator (shaping signal) for
the vocoder.
Enabling the SAMPLE button changes the way the vocoder operates:
We’ll cover the SAMPLE features in detail later on. For now, it’s enough to know that when the SAMPLE button is green, the recorded sample acts as the modulator of
up to 8 synthesizer voices, and your lead Vocal passes through to the rest of the eects aboard Perform-VE.
Synth Vocoder
Each one of the Synth Vocoder styles is actually a synthesizer preset (or patch), named accordingly:
Page 11

11 PERFORM-VE User Manual
Morph Mode
Morph Mode controls the Mono/Poly setting of the Notes, Vocoder and Sample
MIDI voices. Hold mode to edit.
Green LED selections set the MIDI voices to Poly mode, and adjust their release
time (how long voices will take to fade out after you release their controlling
key). Bear in mind you will need to keep singing (play a long enough sample)
after the note release to hear the fade out.
Red LED selections set the MIDI Voices to Mono mode and adjust the portamento
time from 0 to long. Portamento time is how long it takes to glide from one
note’s pitch to the next.
Morph Shift
Morph Shift pitch shifts your lead voice up or down by a set number of semitones (+/- 12). Hold shift to edit.
NOTE: If you control Morph Shif t via MIDI Continuous Controller (CC) messages, the range is +/- 36 semitones for even more extreme eects and automated sweeps.
Morph Gender
Morph Gender expands and compresses the formant signature of your voice to make it sound more male (negative values) or female (positive values).
Hold gender to edit.
Page 12

12 PERFORM-VE User Manual
5.3 HardTune
Applies to: LEAD Voice
HardTune provides pitch correction that varies from subtle all the way up to T-Pain™ style tuning. Generally speaking, pitch correction alters your Lead vocal pitch to t
within a selected Key and Scale.
If all you care about is keeping your voice within the dened black and white
notes on the piano keyboard, select the Chromatic scale, which is the same for
all keys.
On the other hand, if your song is in the key of C, you’d likely get more
musically pleasing results by selecting the C Pop Major scale.
This scale is the C Major scale (all white keys) with an added at 7th for the
blues-inuenced variations common in pop music.
When transposed to other keys, the Pop Major scale can denitely look
unusual. Here it is in the key of C#, just one semitone up from C.
When using the Pop Major Scale, Perform-VE should be set to the correct key for your composition. You can set this manually, or you can set the key to NaturalPlay to
have Perform-VE automatically set the correction key based on the chords it detects in the incoming MIDI or audio (Aux input).
Har dTune Key
HardTune Key selects NaturalPlay Pop Major Scale, Pop Major Scale in all 12 keys, or Chromatic scale. Hold key to edit.
HardTune Amount
HardTune Amount changes the amount of pitch correction
applied to your lead vocal. Higher amounts mean more
T-Pain™ for you. Hold amt to edit.
Range: Natural to Slammed!
Page 13

13 PERFORM-VE User Manual
5.4 XFX
XFX stands for ‘EXTREME EFFECTS’… it lives up to the name, as we’ll now explain.
Applies to: Lead Vocal, MIDI Voices
Looper Audio (Flange, SideChain
Pumping & LPF/HPF only)
Looper Drums (Flange & LPF/HPF only)
XFX Style
There are seven dierent XFX styles: Stutter eect, Chopper eect, Ring Modulation, Flanging and even a SideChain Pumping Compressor. Each XFX Style has two
dedicated mod parameters that you can apply to tailor the XFX in question to suit your current inspiration. Hold style to edit.
XFX Style: Stutter
Stutter is an extreme eect that chops incoming audio into smaller time divisions and quickly repeats
those divisions, resulting in a stuttering sound. At the largest time divisions you’ll hear the audio as
rhythmic repeats, while at the smallest time divisions, the audio cycles so quickly that it produces a
dierent pitched tone (or buzz) for each division.
Stutter will be armed for sampling your Lead vocal as soon as you select the Style. Just vocalize and
stuttering will begin!
Stutter Mod 1: Division
Stutter Mod 1 controls the size of the stutter division in real time. The Quar ter Note division is indicated by a white LED, while all other divisions are light blue LEDs.
Hold mod1 to edit.
Stutter Mod 2: Level
Stutter Mod 2 changes the level of the stutter audio,
relative to your Lead vocal. Hold mod2 to edit.
On the ring, Level is indicated from one up to all LEDs lit
up in Cyan.
Pausing Stutter
You can put the Stutter eect on hold at any time by turning the XFX toggle o. Your sample won’t be lost while the eect is turned o.
Range: O, -10 to 0 dB
Page 14

14 PERFORM-VE User Manual
Recording a new Stutter Sample
For even faster re-recording of the stut ter sample, double-click the style corner button and this will instantly
clear the sample and arm the Stutter eect to record a new sample.
XFX Style: Chopper
There are two Chopper styles: Mono Chopper and
Stereo Chopper. At full depth, Mono will gate the level of the
audio, while Stereo will alternate (ping-pong) the audio between
Perform-VE’s left and right stereo outputs. Both Chopper styles
are beat-synchronized, of course!
Chopper Mod 1: Division
Chopper Mod 1 controls the size of the Chopper’s rhythmic division in real time. Hold mod1 to edit.
Chopper Mod 2: Depth
XFX Style: Ring Mod
Chopper Mod 2 changes the depth of the volume modulation (gating), relative to
your Lead vocal. Hold mod2 to edit.
On the ring, Level is indicated from one up to all LEDs lit up in Yellow.
Range: 0 to 100%
Range: 0 to 100%
The Ring Modulator multiplies your lead vocal with an internally-generated sine wave to create a classic
‘Dalek from Doctor Who’ sound.
At full Ring Mod depth, you’ll be ready to visit planet Skaro, but subtle amounts can also work wonders
on a vocoder voice to bring out an old-school Electric Cylon Orchestra sound for a retro sci- clip or t wo.
Robots and aliens aside, a bit of Ring Mod will give any signal a gritty electronic characteristic that
follows the pitch or melody of the input signal. It’s very useful!
Page 15

15 PERFORM-VE User Manual
Ring Mod, Mod 1: Frequency
Ring Mod, Mod 1 controls the frequency (pitch) of the modulating sine wave.
Sweep it across its range to apply a vintage radio tuning sound on your xed
pitch signal, or keep the frequency xed while singing a melody to hear that
1950’s UFO/Raygun sound. Hold mod1 to edit.
Range: 30 to 1000 Hz
Ring Mod, Mod 2: Level
Ring Mod, Mod 2 controls the depth of the ring-modulated signal Hold mod2
to edit.
Range: 0 to 100%
XFX Style: Flange
Flanging is an audio eect produced by mixing two identical signals together,
with one signal delayed by a small and gradually changing amount.
Part of the anged signal is fed back to the input, producing a resonance eec t
which further enhances the intensity of the sound.
Flange 1 (Mono Flange) is a negative feedback ange: the phase of the fed-back signal is inverted (made negative), producing a striking alternative to the classic sound
of Flange 2 (Stereo Flange) which uses positive feedback.
Flange, Mod 1: Speed
Flange, Mod 2: Depth
Flange Mod 1 controls the speed of the gradually changing delay time. You can
take the anging from a subtle slow ‘Jet Plane’ sweep variation all the way up to
an extreme ‘wowing’ eect. Hold mod1 to edit.
Range: 0 to 100%
Flange Mod 2 controls the depth of the eect, from subtle to very obvious.
Hold mod2 to edit.
Range: 0 to 100%
Page 16

16 PERFORM-VE User Manual
XFX Style: SideChain Pumping
The SideChain Pumping Compressor is meant to be used with the LOOPER’s built in drum sequencer.
When you are playing a beat, the SideChain Compressor will momentarily throttle back (compress)
the volume of your Lead, MIDI and audio loop mix whenever the drums hit a certain threshold volume.
This ensures your drums will always stand out in the mix. This eect is also called ‘SideChain Pumping’.
SideChain Pumping, Mod 1: Compressor Threshold
The SideChain Compressor reduces the level of the non-drums audio signal if the
kick drum mix level exceeds a certain ‘trigger’ threshold value.
SideChain Pumping Mod 1 controls this compressor threshold.
Lower threshold values mean a larger portion of the non-drums audio signal
is compressed. Hold mod1 to edit.
Range: -8 dB to -30 dB
SideChain Pumping, Mod 2: Compressor Release Time
SideChain Pumping Mod 2 controls the Compressor Release Time. It lets you
dene how quickly the compressor acts on an incoming audio signal. When the
input level falls below the compressor threshold, there is a delay between the
compressor release and the input signal’s return to full strength. This delay is the
Release Time, and its amount is indicated on the LED Ring. Hold mod2 to edit.
Range: 1 ms to 3 seconds
5.5 Echo
Applies to: LEAD Vocal
MIDI Voices
Echo is a combined Delay and Reverb processor: Echo eec ts repeat your voice back to you in various ways and amounts, simulating the eect shouting into a
mountain range (delay) or very large space (reverb). With Echo turned on, you’ll get delay and reverb combined as you like them.
Echo Style
Echo Style changes the Reverb settings. The LEDs indicators are colored by type: two natural reverbs (Hall & Arena) and two electromechanical reverbs (Spring & Plate).
Hold style to edit.
Echo Reverb
Echo Reverb is a master parameter that simultaneously edits the reverb’s
decay time and output level. Greater amounts will expand the perceived size of
your reverberation, so you can make even a small plate reverb sound gigantic if
you want. Hold reverb to edit.
Range: 0 to 100%
Page 17

17 PERFORM-VE User Manual
Echo Div
Echo Division controls both the Delay’s rhythmic division and its type. Blue LED selections are Ping-Pong delays in which echoes ‘bounce’ between left and right in the
stereo eld, while green LED selections are delays in which echoes are heard on both sides of the stereo eld. The red LED selection is a short single-repeat echo called
a Slapback delay, useful for dialing in a retro 50’s pop song vibe. Hold div to edit.
NOTE: As with other eect division parameters, a white LED indicates a straight quarter note division.
Echo Delay
Echo Delay is a master parameter that simultaneously edits the delay’s feedback
and output level, where greater amounts will expand the volume and increase
the number of delay echoes that you hear. At 100% the delay will feedback into
echoes that never stop! Hold delay to edit.
Range: 0 to 100%
5.6 Filter
Applies to: LEAD Vocal
MIDI Voices
Anything that EQ’s (equalizes), lters or distorts your voice falls into the Filter category. You can sound like you’re on an old radio or distort your voice for an edgy
attack. Be careful with Megaphone eects when you’ve got a loud PA. We need to adjust EQ a lot to create these sounds, so they’re a bit more prone to feedback than
other eects. Hold style to select dierent styles.
Filter Style: LPF/HPF
The rst lter style is dierent from the rest: LPF/HPF is a LowPass/HighPass lter combination designed for shaping and sweeping musical audio. It also sounds
great on rhythm tracks and noise.
Applies to: LEAD Vocal
MIDI Voices
LOOPER Drums & Audio
Page 18

18 PERFORM-VE User Manual
Filter Mod (LPF/HPF)
When the LPF/HPF Style is active, Filter Mod controls the cuto frequency of
either the LowPass or HighPass lter (LPF and HPF).
Range: 0 to 100%
Filter Style: Transducer Styles
The remaining four Filter Styles are lter transducer eects that alter your signal to sound like it is coming through various-sized amps and enclosures. The LOOPER
Drum sounds will not be aected.
Try them out for yourself. They are fun and can be quite useful to mark a section of your music as ‘dierent’ from the rest of your arrangement.
Filter Mod (Transducer Styles)
When a transducer style is selected, Filter Mod controls the
transducer’s cuto frequency.
5.7 Tap (Tempo)
Applies to: Tempo
The Tap button’s red LED ashes in time with the current tempo, with the down beat of each 4/4 measure ashing brighter than the remaining three beats.
When pressed, this light ashes in time with the Looper, Chopper, Stutter and Echo eects. Provided you have not previously recorded a loop, you can re-tap the
tempo at any time to sync up with your current song. Keep in mind that you can tap at half-time or double-time for more exible control.
NOTE: When the LOOPER is activated (glowing green), this means an audio loop has been recorded. You won’t be able to tap a new tempo until the loop is erased.
The LOOPER section (later in this manual) explains how you can record and erase drum and audio loops.
Page 19

19 PERFORM-VE User Manual
6. Looper
The Looper acts as both a drum machine and an
audio looper.
Press the loop corner of the button to arm the
looper. The button will now pulse to indicate that
it is armed.
You can lay down a drum pattern immediately or
press loop again to record an audio loop.
Drum Loop
Pressing the kick, snare and HEADPHONE (works as hi-hat) buttons will start
recording the drum loop. Pressing loop again will set the loop point.
Audio loop
With the initial drum loop playing or the LOOPER button pulsing red, press loop
to record the audio loop. The audio loop can be multiple lengths of the drum
loop thus you can put down a single bar of drums then say 8 bars of audio.
Pressing loop again sets the audio loop length.
Overdubbing
When the loop is playing, press loop again to overdub drums and audio.
Erasing Loop Components
Hold the SET button while pressing kick, snare, HEADPHONE or loop to erase
the kick, snare, hi-hat or audio loop respectively. You can then re-record the
component.
Stopping Loop Playback
Press the TAP button or double tap loop.
Start Loop Playback
Press loop.
Erase Loop Including Drums and Audio
Double tap and hold loop.
The LOOPER states are as follows:
Unlit Looper o / loop cleared
Pulsing red Armed for 1st loop recording
Solid red Recording in progress
Pulsing green Loop paused
Solid green Loop playing
Once a loop has been recorded Perform-VE derives its tempo from the loop
so that all eects are in sync. The derived tempo will be between 80 and
160 BPM (Beats Per Minute).
Drum Level
To adjust the drum loop level, hold the loop corner button while turning the
Control Knob.
Range: -60 dB to 0 dB
Kick Drum Selection
Press the kick corner button to trigger the kick sample - you do this whether you are recording or not.
Hold the kick corner but ton while turning the Control Knob to select one of four kick drum samples:
A green LED indicates an acoustic kick, while red LEDs indicate an electronic kick.
Page 20

20 PERFORM-VE User Manual
Snare Drum Selection
Press the snare corner button to trigger the snare sample. Just as with the kick, you can press snare at any time regardless of looper activity.
Hold the snare corner button while turning the Control Knob to select one of four snare drum samples:
A green LED indicates an acoustic snare, while red LED options indicate an electronic sound.
NOTE: When you select a new snare sample, a matching hi-hat sample is also selected.
Looper: hi-hat
As was mentioned earlier, the hi-hat sample is triggered by pressing
the HEADPHONE button when the LOOPER is active. This lets you
record and overdub hi-hat events into your loop, and lets you play
hi-hat along with the loop.
As long as the Looper button is lit or pulsing, the headphone button will trigger the hi-hat sample.
Looper Quantize
Perform-VE’s looper can either quantize your drum events as they are recorded, or can leave their timing untouched. If Quantizing is enabled, drum events will be
‘corrected’ to the closest 16th note as they are recorded, resulting in a tighter more ‘machine-like’ groove.
To enable/disable Looper Quantize, press SET and TAP to toggle
between OFF and ON
Range: OFF, ON
Quantizing applies to external and internal clock setups, even when you lay down the very rst pass of a drum loop under internal clock control. Once drum events
have been recorded as quantized, disabling quantize will not restore their original timing.
If you nd that the drum patterns you wish to record do not play back as intended, try erasing and re-recording them with the quantize set to the opposite value.
Syncopated drum beats work best with quantize disabled, while robotic beats and quantization go great together.
External MIDI Clock
The alternative looper setup is to have MIDI clock coming in from an external instrument or a computer running audio workstation software. In this situation,
Perform-VE is the slave to the ex ternal device and any loops you record will need to be made in time with the pulses shown on the TAP button.
One advantage of external clocking is that odd bar patterns (3, 5, 7 and up) can be recorded as loops, and playback will be perfectly synchronized with your external
gear such as drum machines, arpeggiators and the like.
Page 21

21 PERFORM-VE User Manual
Backing Up Your Loops
The best way to preser ve a loop is to record it with a DAW software
package where it can be added to your clip library and used to build really
complex arrangements.
The Looper Cookbook
Now you know where all the kitchen utensils are, here are some simple recipes
for cooking up loops on Perform-VE.
How to make an initial drum loop:
• Arm loop by tapping the loop corner.
• Pressing kick, snare or the Headphone button (for hi hat) will automatically
start the recording as you tap the drum pattern.
• Press loop corner again (on the beat) to set loop point and immediately
begin playback.
How to add drums or audio to an existing loop:
• Press the loop corner to begin overdub recording while the drum loop plays,
and either sing into the mic or press the drum trigger keys.
• Press loop corner again to set loop point and continue playback (audio loop
can be multiples of the drum loop).
How to start with an audio loop (with no drum loop):
• Press loop to arm the recorder (pulses red).
• Press loop again to begin recording (solid red). Vocalize the audio that you
want to loop.
• Press loop again to stop recording and set the loop point, playback begins
immediately.
Stop Loop Playback:
• Press TAP or double tap loop.
Start Loop Playback:
• Press loop
Delete loop:
Double tap and hold loop corner.
Page 22

22 PERFORM-VE User Manual
7. Sample
The SAMPLE performance eect records a sample of your input audio signal and
processes it with TC-Helicon’s VSS technology to create sample-based MIDI voices.
VSS (Vocal SampleSynthesis) allows you to record anything from bel canto
to beatboxing, then play it back on the keyboard instantly at any pitch, with
the tonal nuance of your performance well intact. SAMPLE works closely with
MORPH, in that Morph styles and modes interact directly with sample playback.
• Hold rec while singing into a connected microphone to record audio for sample playback.
• Play a connected MIDI instrument for pitch-attened sample playback.
• Press MODE to toggle from sample playback to MIDI notes operation.
• Press PLAY to play back the sample as recorded.
Sample Mode
The four sample modes control how the sample is played back in response to MIDI notes:
The four sample modes are combinations of staccato, legato, normal and looped playback characteristics.
• Re-trigger: Each new note triggers the sample from the start.
• Legato: Each new note synchronizes its playback to samples that are already playing.
• Looped: When MIDI notes are held down beyond the end of the sample, it will loop.
Sample yourself saying a short sentence and try the various modes out. Each has something exciting to oer your music making.
Once a sample has been recorded, it will stay in memory until replaced by a new recording, or until you turn o your Perform-VE.
Sample Management with the Perform-VE App
The Perform-VE App for iOS allows you to back up, manage and restore Perform-VE samples. Please check out the app for more details. Note: The Android version of
the Perform-VE App does not support samples owing to OS limitations.
Page 23

23 PERFORM-VE User Manual
8. Presets
A preset is a “complete sound” created by a combination of eects.
You’ll notice that the active eects change between Preset 1 and Preset 2 in the image above. Presets can be congured however you like. The state (on/o), style,
level and other editable parameters for each eect in a preset can also be dierent from preset to preset.
Saving Changes
To save your current settings as one of the three presets, press and hold preset button 1, 2, or 3 for one second. The preset button will ash briey when storage is
complete. You can now turn o your Perform-VE and your preset will be ready for you when you next power up and press a number button.
Preset Management with the Perform-VE App
The Perform-VE App for iOS and Android is available as a free download from each plat form’s respective app stores. This app allows you to back up, manage and
restore all three of Perform-VE’s onboard presets. Please check out the app for more details.
Page 24

24 PERFORM-VE User Manual
9. I/O Section
9.1 AUX Input
Perform-VE’s AUX input allows you to connect a separate stereo audio source as a
source of backing tracks – this could be a smartphone, pod device, music player,
secondary laptop or any device connecting via a 1/8th inch stereo jack.
When you have a music player connected to the AUX input, incoming
chord information will not be used to determine key/scale for HardTune’s
NaturalPlay detection.
You will hear the AUX input mixed with your Mic input (vocals). If the AUX is
too loud or too quiet, use the volume control on the music player to create the
appropriate mix with your vocals.
9.2 Switch3/Switch6 (Pedal) In
When a Switch3 or Switch6 is connected (using the TRS cable that came in the
S3/S6 box) you can control various aspects of Perform-VE remotely.
The default behavior for Switch3 is to change presets according to the numbers
on Switch3.
Switch1 = Preset 1
Switch2 = Preset 2
Switch3 = Preset 3
You can reassign any of the Perform-VE buttons to be activated by a footswitch,
with the exception of TRIM, +48V, Headphone Level, and Lock/Mute
(TALK is assignable).
Press and hold the desired footswitch, then press the button on Per form-VE that
you’d like the switch to control. Release both buttons.
Switch6 acts in the same manner as Switch3 but adds buttons 4, 5, and 6.
The default controls for the extra buttons are:
Switch4 = Harmony
Switch5 = Reverb
Switch6 = Echo
9.3 USB Audio
Perform-VE has 5 input and 6 output channels for USB audio. A driver is required
for both USB audio and MIDI use. It can be found and downloaded from
tc-helicon.com/products/Perform-VE/support/
USB IN
CH 1 Backing Track L
CH 2 Backing Track R
CH 3 Dry vocal in
Aux to Main Out
Sometimes, you’d like to have a signal from the Aux input guide key/scale, but
you don’t want that Aux signal mixed into your main outputs. If you’d like to
remove audio from Aux to the main out, simply press/hold the Headphone
button while connecting your Aux (⁄") cable.
This parameter resets each time you unplug and re-plug the Aux cable, and when
you power cycle the unit. Perform-VE doesn’t save this parameter because it ’s
not immediately obvious how you’d “toggle” things and we don’t want to trap
unsuspecting users like you in a mode you can’t nd a way out of.
As for Perform-VE’s headphone output jack - the Aux in is always routed to it
regardless of the Aux to Main Out setting.
CH 4 Sample IN
CH 5 NaturalPlay IN
If no signal is transmitted to the product on USB audio channel 3, the product
will use the Microphone IN for the voice input. So, you could use channels 1&2
to input stereo tracks from your DAW but sing into the product via your mic.
Note that channel 1&2 input is NOT passed to the USB outputs, but IS passed to
the Main analog outs. If you use a computer for backing tracks, they will be sent
analog to the PA. Volume control for those tracks happens at the computer. When
USB audio on channel 3 stops, the Set button will ash. Pressing the Set button at
this time will change the voice input back to the Microphone input.
NaturalPlay IN is not connected to the audio output - it is used only for NaturalPlay
chord input. This provides the option to have a “guide track” for NatualPlay that the
audience can’t hear. It could be dry guitar chords or piano chords, with dierent
voicings or placement in order to create your desired vocal output.
USB OUT
CH 1 L processed vocal, Keyboard/ Aux in (same as what is on main outputs, less
the audio received on USB in
CH 2 R processed vocal, Keyboard/ Aux in (same as what is on main outputs, less
the audio received on USB in 2
CH 3 Dry Voice input
CH 4 SAMPLE Out
CH 5 Aux L
CH 6 Aux R
Page 25

25 PERFORM-VE User Manual
9.4 RoomSense
Did you notice that little hole on the front of the unit? It’s a microphone!
It’s there for two reasons:
1. If you don’t plug in a microphone and have headphones connected, you can
sing into the onboard mic. It ’s a great way to practice with virtually no other
equipment. If you’re singing into the RoomSense mic, the Main Outputs will
be muted to prevent feedback.
2. If you activate HardTune eects with the NP (Natural Play) key set, and
you’re not using MIDI, keyboard audio or an Aux music source to guide key/
scale, the mic will listen for chords in the room (like a nearby guitar) and try
to gure out key and scale from that! Pretty cool. RoomSense is the most
unpredictable of the key/scale trackers, since the room dynamics and chord
information are most easily obscured using this mode.
Page 26

26 PERFORM-VE User Manual
Appendix A: Eect Quick Reference Chart
Double Style
Morph Style
Mode Green: Poly + release time
XFX Style 1. Stutter
Filter Style
1. Unison
2. Octave Down
3. Octave Up
4. Octave Up/Down
1. Natural Shift
2. Warp Shift
3. to 11. Analog Synth Modeled Vocoder
Red: Mono + Portamento time
2. Mono Chopper
3. Stereo Chopper
4. Ring Mod
5. Stereo Flanger
6. Mono Flanger
7. Side Chain Pumping
1. LPF/HPF
Mod1: Rate
Mod2: Level
Mod1: Rate
Mod2: Depth
Mod1: Rate
Mod2: Depth
Mod1: Rate
Mod2: Depth
Mod1: Rate
Mod2: Depth
Mod1: Rate
Mod2: Depth
Mod1: Threshold
Mod 2: Release Time
Sample Mode
2. Radio
3. Megaphone
4. Guitar Amp
5. Distortion
1. Re-Trigger
2. Legato
3. Looped Re-Trigger
4. Looped Legato
Page 27

27 PERFORM-VE User Manual
Appendix B: MIDI Implementation
Perform-VE responds to Control Change (CC), Program Change (PC) and MIDI Tempo (not MIDI Clock) information.
MIDI PC Messages
The product ’s 3 presets correspond to Program Change: 0, 1, 2
MIDI CC List
Implemented Continuous Controller (CC) messages:
CC Perform-VE Parameter Range
1 Vibrato (Mod Wheel) 0-127
16 XFX Style 0-6 (See Style List)
17 DOUBLE Style 0-3 (See Style List)
18 FILTER Style 0-4 (See Style List)
19 HardTune Key 0-13 (See HardTune Key List)
20 HardTune Amount 0-127
21 XFX Mod 1 0-127
22 XFX Mod 2 0 -127
23 MORPH Mode 0-25 (0-12: Poly Release), (13-25: Mono Portamento)
24 MORPH Style 0-10 (See Style List)
25 SAMPLE Mode 0-3 (See Style List)
26 Notes Voice Smoothing 0-127
27 ECHO (Delay) Div 0-12 (See Echo Div List)
28 ECHO (Reverb) Style 0-3 (See Style List)
41 Top Mix: LEAD Level 0-127 (Lead is set independent of MIDI via CC)
42 Top Mix: MIDI Level 0-127 (MIDI is set independent of LEAD via CC)
43 MORPH Shift 0-36-72 (maps to -36,0,+36 semitones)
44 Morph Gender 0-127
45 DOUBLE Level 0-127
46 Delay 0-127
47 Reverb 0-127
48 Filter Mod 0 -127
51 DOUBLE Enable 0-63: OFF, 64-127: ON
52 MORPH Enable 0-63: OFF, 64-127: ON
53 HARDTUNE Enable 0-63: OFF, 64-127: ON
54 XFX Enable 0-63: OFF, 64-127: ON
55 ECHO Enable 0-63: OFF, 64-127: ON
56 FILTER Enable 0-63: OFF, 64-127: ON
58 SAMPLE Record Switch 0-63: OFF, 64-127: ON
59 SAMPLE Play Switch 0-63: OFF, 64-127: ON
64 Sustain Pedal 0-63: OFF, 64-127: ON
72 Envelope Release 0-127
73 Envelope Attack 0-127
80 SAMPLE Enable 0-63: OFF, 64-127: ON
81 LOOPER Kick Trigger 0: OFF, 1-127: ON - All positive values trigger.
82 LOOPER Snare Trigger 0: OFF, 1-127: ON - All positive values trigger.
83 LOOPER Hi-Hat Trigger 0: OFF, 1-127: ON - All positive values trigger.
Page 28

28 PERFORM-VE User Manual
RPN/NRPN Implementation
RPN 0: Pitch Bend Sensitivity. This is a standard way to change pitch bend range.
MIDI Tempo
Perform-VE responds to incoming MIDI tempo and will adjust system Tap
Tempo accordingly.
Split Point and Transpose
When controlling Morph Voices via MIDI notes, it is sometimes desirable to have
one section of the keyboard designated to sending that control information.
It could be the area that your lef t hand is, to play chords of harmonies.
In order to designate an area of the keyboard to respond to, a Split Point is set.
Any notes, either above or below the split point, are deemed useable by the
system. Notes outside the range are rejected.
To set the Split Point, hold the SET button and press the note on your keyboard
that you want to act as the split note. Then, to choose a split ABOVE that note,
release the split note and press a note ONE SEMITONE ABOVE your split note.
To choose a split BELOW, release the split note and press a note ONE SEMITONE
BELOW your split note.
This creates a split, above or below, with no transposition. In order to set a split
point AND transpose the incoming MIDI notes, you will choose a dierent note in
place of the ABOVE/BELOW notes mentioned above.
This may seem a bit confusing, but does allow you to make both a split
above/below point AND transpose either up or down. Here’s a chart and
some explanation.
Appendix C: General
Factory Reset
To reset the unit back to factory settings, press and hold the
DOUBLE and HARDTUNE buttons while powering up.
Support
If you’ve read through this manual and still need a little help, you can contact us
via our support portal and forums
http://support.tc-helicon.com
Second Note Split Transpose X To
X+6 Above X5
... Above ...
X+2 Above X1
X+1 Above X (no transpose)
X+0 --- -X-1 Below X (no transpose)
X-2 Below X6
... Below ...
X-6 Below X2
In the chart above, “X” is the split note, the point at which you want to split the
keyboard, as explained previously.
To facilitate things like “split above, but transpose down” we need to have
settings both above and below your split point. That’s where the chart comes in.
For example, if you want to split ABOVE middle C, t ypically known as C4, but
transpose DOWN so that C4 is actually C2, you’d do the following:
1. Hold SET
2. Press middle C (C4)
3. Press the note 6 SEMITONES DOWN from middle C (F#)
If you want to split BELOW middle C (C4) and transpose up so that C4 is C6, you’d:
1. Hold SET
2. Press middle C (C4)
3. Press the note 2 SEMITONES DOWN from middle C (A#)
You may need to experiment a bit to gure this out, but it does give you the
ability to set your split point, split direction and transposition ver y quickly.
Page 29

29 PERFORM-VE User Manual
Page 30

30 PERFORM-VE User Manual
Page 31

31 PERFORM-VE User Manual
Page 32

 Loading...