

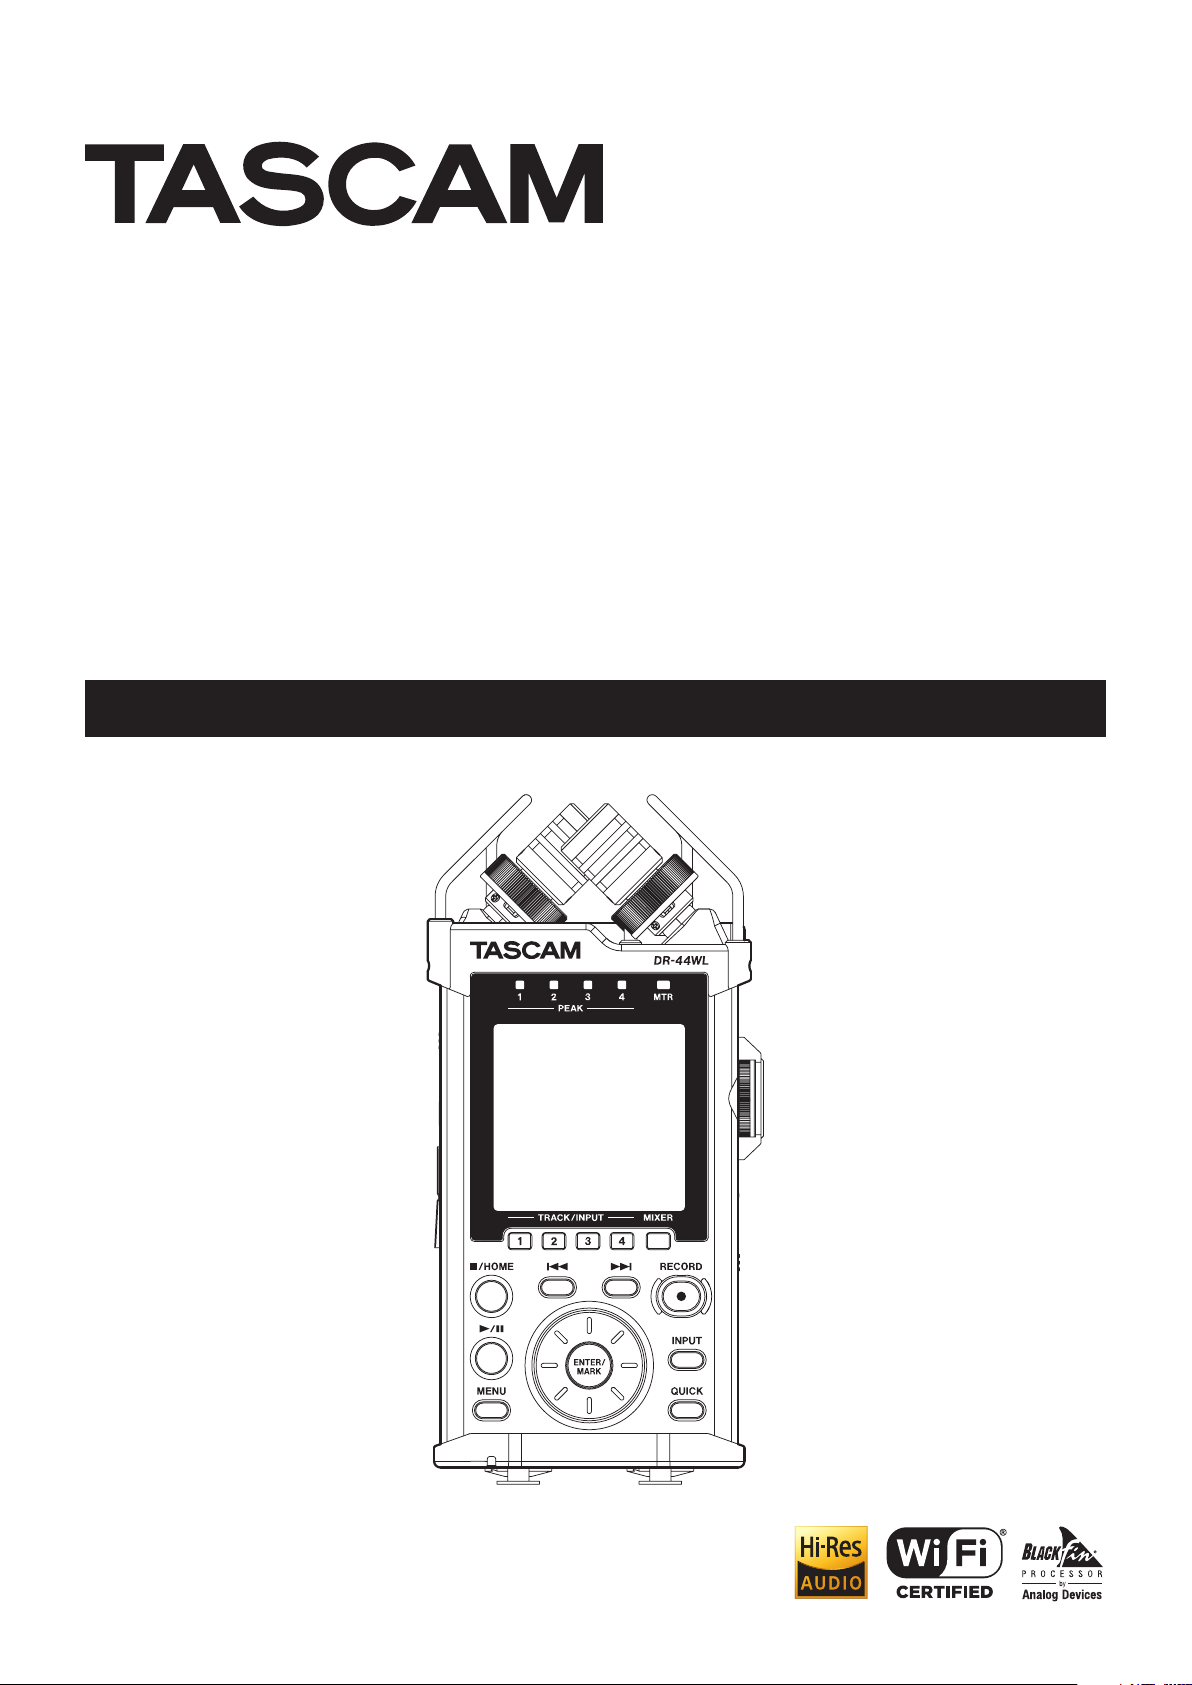
DR-44WL
Black Edition (DR-44WLB)
Linear PCM Recorder
REFERENCE MANUAL
D01388320A

Contents
1 – Introduction ....................................................................... 4
Features .....................................................................................................4
Conventions used in this manual .....................................................4
About SD cards........................................................................................5
Precautions .........................................................................................5
Trademarks and copyrights ................................................................5
2 – Names and functions of parts ........................................... 6
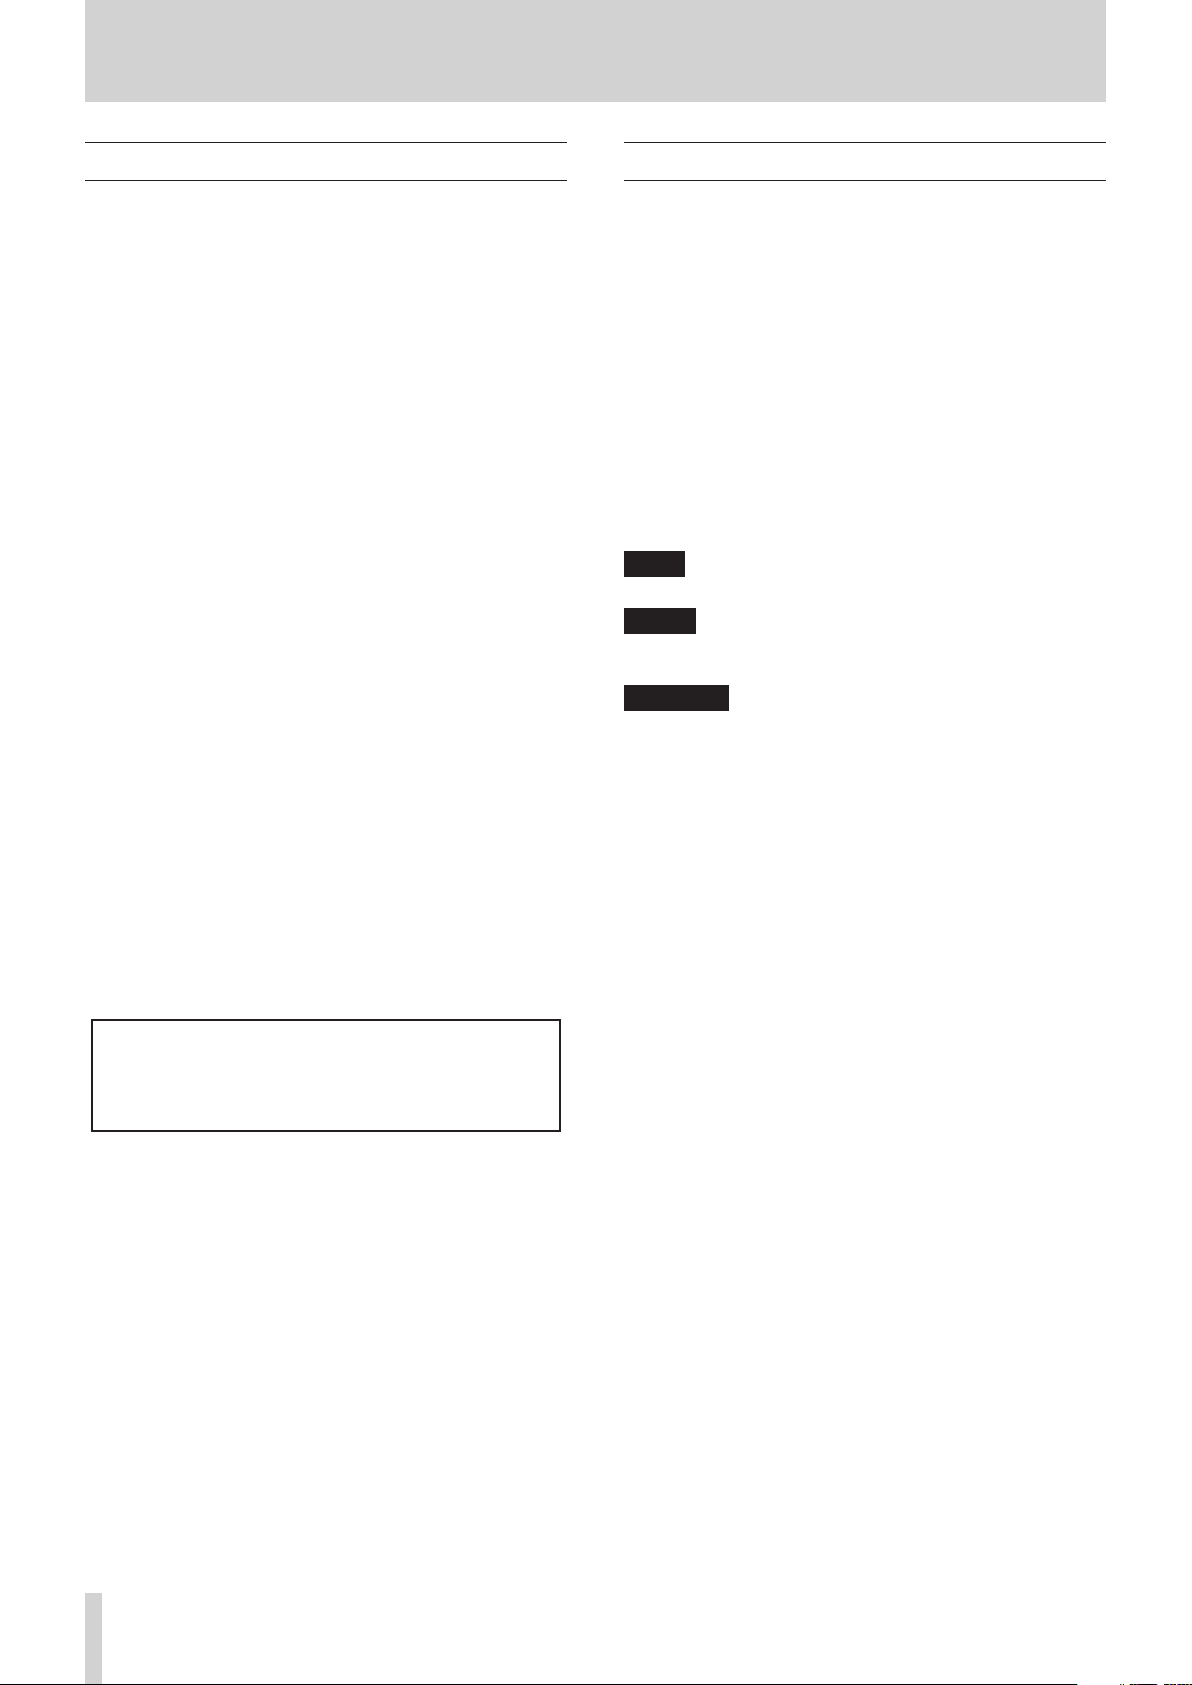
Top panel ...................................................................................................6
Front panel ...............................................................................................7
Left side panel .........................................................................................7
Right side panel ...................................................................................... 7
Bottom panel ...........................................................................................8
Home Screen ............................................................................................8
Recording Screen ...................................................................................9
Menu item list ....................................................................................... 10
Using menus ......................................................................................... 11
Basic operations ................................................................................... 11
3 – Preparation .......................................................................12
Powering the unit................................................................................ 12
Power sources.................................................................................12
Using AA size batteries ................................................................ 12
Using an AC adapter
Using an external battery pack (sold separately) .............. 12
Using USB bus power .................................................................. 13
Turning the power on and off (standby mode) ........................13
Starting up the unit ...................................................................... 13
Shutting down (standby mode) .............................................. 13
Resume function ........................................................................... 13
Selecting the language ..................................................................... 14
If you accidentally select the wrong language................... 14
Setting the date/time ........................................................................ 14
Inserting and removing SD cards .................................................. 14
Inserting the SD card ................................................................... 14
Removing the card ....................................................................... 14
SD card write protection switches .......................................... 15
Preparing an SD card for use ........................................................... 15
Turning the built-in speaker on/off .............................................. 15
Connecting a monitor device ......................................................... 15
Adjusting the playback volume ..................................................... 16
Input settings ........................................................................................ 16
Recording with the built-in microphone .............................. 16
Recording with an external microphone (EXT MIC IN) .... 16
Recording from an external device (LINE IN) ...................... 16
Selecting Operation Mode............................................................... 17
Setting a mode ............................................................................... 17
Checking mode .............................................................................. 17
4 – Recording .........................................................................18
Overview of recording modes ........................................................ 18
Set where to save the file ................................................................. 18
Select the file format and sampling frequency (4CH mode
only) ......................................................................................................... 18
Adjusting the input level .................................................................. 19
Set the input gain ................................................................................ 19
Using phantom power ................................................................ 19
Settings in the INPUT SETTING screen......................................... 20
Setting channel links (4CH mode only) ................................. 21
Set the track input (MTR mode only) ..................................... 21
DELAY setting ................................................................................. 22
Set the low-cut filter ..................................................................... 22
Using the level control function .............................................. 23
Record in 4CH mode (4CH mode only) ....................................... 23
(sold separately) ........................................12
Record 4 channels ......................................................................... 23
File names when recording in 4-channel ............................. 23
Record in MTR mode (MTR mode only) ....................................... 24
Switch files during recording (track increment, available in
4CH mode only) ................................................................................... 24
Manual track increment during recording ........................... 24
Automatic track increment at specified time...................... 24
Recording automatically (AUTO REC) (4CH mode only)........ 25
Start recording a moment before pressing RECORD (PRE REC,
4CH mode only) ................................................................................... 25
Self-timer function .............................................................................. 26
Simultaneously recording two files with different input
levels/formats (DUAL REC, 4CH only) ........................................... 26
Enabling dual recording ............................................................. 26
Starting dual recording ............................................................... 27
Dual recording file names .......................................................... 27
Create cue marks during recording .............................................. 27
Manual cue marking during recording ................................. 27
Add cue marks automatically during recording ................ 28
Moving to the cue mark position ............................................ 28
Use MS microphone ........................................................................... 29
Punching in/out (MTR mode only) ................................................ 29
Punching in/out manually ......................................................... 29
Punching in/out automatically (AUTO PUNCH) ....................... 29
Recording duration............................................................................. 31
5 – Operating Files and Folders (4CH Mode Only) ..............32
Screen navigation ............................................................................... 32
Icons on the BROWSE screen .......................................................... 32
File operations ...................................................................................... 32
Folder operations ................................................................................ 33
Creating a new folder ........................................................................ 34
6 – Managing Songs (MTR Mode only) ................................. 35
Song Operation .................................................................................... 35
Loading Songs ...................................................................................... 35
Creating a New Song ......................................................................... 36
Changing the Song Name ................................................................ 36
Deleting songs ..................................................................................... 37
7 – Playback ...........................................................................38
Playback .................................................................................................. 38
Pausing.............................................................................................. 38
Stopping ........................................................................................... 38
Fast-rewinding and fast-forwarding (search) ...................... 38
Moving the playback position .................................................. 38
Selecting a playback file (skip) ....................................................... 38
Special Playback Control Functions ..............................................38
Playback Control Screen ............................................................. 38
Repeated Playback of Selection (Loop Playback) .............. 39
Clearing IN and OUT points only ............................................. 39
Changing the playback speed (VSA) ...................................... 39
Key control playback .................................................................... 40
Adding marks manually during playback .................................. 40
Clearing specified marks .................................................................. 40
Setting the mark skip mode ............................................................ 40
8 – QUICK Button Operation ................................................. 41
QUICK button overview .................................................................... 41
Quick menu operation ...................................................................... 41
Closing the Quick menu ............................................................. 42
Deleting the selected file (Quick Delete, only when in 4CH
mode) ...................................................................................................... 43
Dividing the selected file (4CH mode only) ............................... 43
TASCAM DR-44WL
2

Contents
Dividing the selected file manually(DIVIDE) ....................... 43
Dividing the selected file automatically (AUTO DIVIDE) . 44
Deleting track input (MTR mode only) ........................................ 44
Track bounce (MTR mode only) ..................................................... 45
Bouncing tracks ............................................................................. 45
Confirming the results of bouncing ....................................... 45
Mixing down ......................................................................................... 46
Loading master tracks (MTR mode only) ................................... 46
9 – Mixer ................................................................................. 47
Setting the mixer ................................................................................. 47
10 – Useful functions ............................................................. 48
Tuner function ...................................................................................... 48
Chromatic tuner............................................................................. 48
Oscillator mode .............................................................................. 48
Metronome function ......................................................................... 49
Reverb function ................................................................................... 49
Setting the reverb function ....................................................... 49
Reverb type pre-set list ............................................................... 50
Setting the XRI information recording function (4CH mode
only) ......................................................................................................... 50
Viewing XRI information (4CH mode only) ................................ 50
Deleting XRI information (4CH mode only) ............................... 50
11 – Connecting with a computer ........................................52
Transferring files to a computer ..................................................... 52
Transferring files from a computer ............................................... 52
Disconnecting the unit from a computer ................................... 52
Set the voltage value of the phantom power supply ...... 61
Backlight setting ............................................................................ 61
Adjusting the display contrast ................................................. 61
Set the peak hold .......................................................................... 61
14 – Messages ........................................................................ 62
15 – Troubleshooting ............................................................63
16 – Specifications ................................................................. 64
Rating ...................................................................................................... 64
Input/output ratings .......................................................................... 64
Analog audio input and output ratings ................................ 64
Control input/output ratings .................................................... 64
Audio performance ............................................................................ 64
Wi-Fi ......................................................................................................... 64
General .................................................................................................... 65
Dimensional drawings ....................................................................... 65
12 – Using Wi-Fi ...................................................................... 53
Connect the unit and smart phone via Wi-Fi ............................ 53
How to download and install the exclusive application (DR
CONTROL) ........................................................................................ 53
Selecting the Wi-Fi mode ........................................................... 53
Connecting the unit directly to external devices (smartphones, tablets and computers) by Wi-Fi (TO DEVICE
mode) ................................................................................................ 53
Connecting the unit to external devices (smartphones,
tablets and computers) by Wi-Fi (VIA ROUTER mode) ..... 55
Launching DR CONTROL ............................................................ 56
Connecting this unit to a computer by Wi-Fi ............................ 57
Downloading and installing the TASCAM DR FILE
TRANSFER software ...................................................................... 57
Connecting the unit directly to a computer by Wi-Fi (TO
DEVICE mode) ................................................................................ 57
Connecting this unit to a computer by Wi-Fi after the first
time .......................................................................................................... 58
13 – Settings and Information .............................................. 59
View information (INFORMATION) ................................................ 59
Project information page 1 (PROJECT 1/2) (4CH mode
only) ................................................................................................... 59
Project information page 2 (PROJECT 2/2) (4CH mode
only) ................................................................................................... 59
Card information page (CARD) ................................................. 59
System information page (SYSTEM) ....................................... 59
Configuration (SYSTEM) .................................................................... 60
Setting the file name type ......................................................... 60
Setting the language ................................................................... 60
Restoring the DR-44WL to factory settings ......................... 60
Completely format a SD card .................................................... 61
Power and display settings (POWER/DISPLAY) ........................ 61
Auto power save function setting ........................................... 61
Battery type settings .................................................................... 61
TASCAM DR-44WL
3
1 – Introduction
Features
•
Compact audio recorder that uses SD/SDHC/SDXC cards as
recording media
•
Built-in with high performance directional stereo
microphones in XY positions
•
Mid-side decoding function can be used with MS
microphones
•
Simultaneous recording of up to four channels is possible
•
Built-in four-track MTR feature
•
Built-in Wi-Fi feature to use smartphone as remote control,
transfer files from the PCM recorder, and play back audio
•
44.1/48/96 kHz, 16/24-bit, linear PCM (WAV format)
recording possible
•
Compatible with the BWF format
•
32–320 kbps MP3 format recording possible (compatible
with ID3 tag v2.4)
•
The dual recording feature allows two files to be recorded
simultaneously at different levels
•
Supports dual format recording (WAV/MP3)
•
Built-in 0.3 W monaural output monitor speaker
•
Built-in effector (reverb) function can be used during
recording and playback
•
Auto-record function starts recording automatically when a
set sound input level is detected
•
Track incrementing function allows you to update a file at
a preset time or at desired position without interrupting
recording
•
Pre-recording (PRE REC) function allows the unit to record
the 2 seconds of sound before recording is activated
•
Peak reduction function is available to reduce the level
automatically in case of excessively large input
•
Limiter function is available to reduce the level
automatically in case of excessively large input
•
Low-cut filter conveniently reduces low-frequency noise
•
VSA function can change the playback speed in the range
from 0.5 to 2.0 times (in 0.1 increments) the normal speed
without changing pitch
•
IN-OUT loop playback functions
Conventions used in this manual
In this manual, we use the following conventions:
•
When we refer to buttons, connectors and other parts of
this unit and other equipment, we use a bold font like this:
MENU button.
•
When we show messages, for example, that appears on the
unit’s display, the typeface looks like this: REPEAT.
•
Highlighted area on the DR-44WL display is indicated as a
“cursor”.
•
SD/SDHC/SDXC memory cards are referred to as “SD cards”.
•
Words that appear on the computer display are shown in
quotation marks like this: “DR-44WL”
•
The selected folder is indicated as the “current folder”.
•
A computer or a smartphone that is connected with the
DR-44WL via Wi-Fi is referred to as the “Wi-Fi device”.
•
Additional information is provided as “tips", “notes", and
“caution” as required.
TIPS
These are tips about how to use the unit.
NOTE
These provide additional explanations and describe special
cases.
CAUTION
Failure to follow these instructions could result in injury,
damage to equipment or lost recording data, for example.
This product has a Blackfin® 16/32-bit embedded processor
made by Analog Devices, Inc. This processor controls digital
signal processing.
Inclusion of this Blackfin® processor in the product increases
its performance and reduces its power consumption.
TASCAM DR-44WL
4

1 – Introduction
About SD cards
This unit uses SD cards for recording and playback.
You can use 64 MB to 2 GB SD cards, 4 GB to 32 GB SDHC cards,
and 48 GB to 128 GB SDXC cards with this unit.
A list of SD cards that have been confirmed for use with this unit
can be found on our web site. Please access to a product page of
this product from the TEAC Global Site (https://teac-global.com)
to find the list or contact the TASCAM customer support service.
Precautions
SD cards are delicate media. Please refer to the below when
using memory cards to prevent memory and/or card damage:
•
Do not leave a memory card in extremely hot or cold places
•
Do not leave a memory card in extremely humid places
•
Do not spill any liquids on the memory card
•
Do not bend the card or subject it to any excessive force
•
Do not subject the card to any physical shock
•
Do not remove the card while the unit is accessing data, or
recording, playing, or making data transfer
•
Always store the memory card in a case
Trademarks and copyrights
•
TASCAM is a trademark of TEAC CORPORATION, registered
in the U.S. and other countries.
•
SDXC Logo is a trademark of SD-3C, LLC.
•
Supply of this product does not convey a license nor imply
any right to distribute MPEG Layer-3 compliant content
created with this product in revenue-generating broadcast
systems (terrestrial, satellite, cable and/or other distribution
channels), streaming applications (via Internet, intranets
and/or other networks), other content distribution systems
(pay-audio or audio-on-demand applications and the like)
or on physical media (compact discs, digital versatile discs,
semiconductor chips, hard drives, memory cards and the
like). An independent license for such use is required. For
details, please visit http://mp3licensing.com.
•
MPEG Layer-3 audio coding technology licensed from
Fraunhofer IIS and Thomson.
•
Wi-Fi is a trademark of Wi-Fi Alliance. The Wi-Fi CERTIFIED
Logo is a certification mark of Wi-Fi Alliance.
•
Microsoft and Windows are either registered trademarks or
trademarks of Microsoft Corporation in the United States
and/or other countries.
•
Mac is trademarks of Apple Inc. in the United States and
other countries.
•
IOS is a trademark or registered tradmark of Cisco in the U.S.
and other countries and is used under license.
•
App Store is a service mark of Apple Inc.
•
Google Play and Android are trademarks of Google inc.
•
Blackfin® and the Blackfin logo are registered trademarks of
Analog Devices, Inc.
•
Other company names, product names and logos in this
document are the trademarks or registered trademarks of
their respective owners.
TASCAM DR-44WL
5
2 – Names and functions of parts
Top panel
1 Built-in stereo microphone (INT R/INT L)
This is an XY directional stereo electret condenser microphone.
On this unit, the mic that appears behind and on the left in
the illustration is called INT R and the mic in front on the
right is called INT L.
2 PEAK indicator
Lights (red) when the input volume is too high (−2 dB).
3 Display
Displays a variety of information.
4 TRACK/INPUT button
During recording standby (4 CH mode) or when stopped
(MTR mode), press this button to select the channel (track)
to record.
When the INPUT LEVEL setting screen pops up, press this
button to select the channel (track) for adjusting the input
level.
When the INPUT SETTING screen is open, press these
buttons to show channels (tracks) to set.
5 8/HOME button
If you want to pause, press the button again.
Press this button during pause time to return to the
beginning of the file.
Press this button during recording or recording standby to
cause the recording to stop.
To return to the Home screen, press this button in any screen
display. Use this button to select “NO” to a confirmation
message.
6 . button
During playback or when stopped in the middle of a file,
press to return to the beginning of the file.
When the IN and OUT points are set between the current
position and the end of the playback file, pressing this
button skips to those points.
If you press this button when a track is stopped at its
beginning, the unit will skip to the beginning of the previous
track.
Press and hold this button to search backwards.
Press this button while pressing and holding the ENTER/
MARK button to return to the previous mark.
On the setting screens, use this button to move the cursor
left.
On the BROWSE screen, press this button to move up a level.
7 7/9 button
To start playback in the Home screen, press this button while
in stop mode.
If you want to pause, press the button again.
When a file or folder is selected on the BROWSE screen, press
this button to return to the Home screen and play the file or
the first file in the folder from the beginning.
8 MENU button
When the Home screen is displayed, press this button to
open the MENU screen.
Press this button to return to the MENU screen from the
various setting screens.
When the MENU screen is open, press this button to return to
the Home screen.
9 MTR indicator
Lights up when the operation mode is in MTR mode.
0 MIXER button
Press this button to open the MIXER screen.
When the MIXER screen is open, press this button to return
to the Home screen.
q RECORD button/RECORD indicator
4CH mode:
When stopped, press this button to put the unit into
recording standby. The RECORD indicator will start to
blink.
When in standby, press this button to start recording. The
RECORD indicator lights when recording.
Press when recording to pause recording. The RECORD
indicator will start to blink.
MTR mode:
When stopped or playing back, press this button to start
recording. The RECORD indicator lights when recording.
When recording, this button does not function.
w / Fast forward button
Press this button in playback or stop mode to skip to the
next track.
When the IN and OUT points are set between the current
position and the end of the playback file, pressing this
button skips to those points.
Press and hold this button for fast forward search.
On the setting screens, use this button to move the cursor
right.
Press this button while pressing and holding the ENTER/
MARK button to move forward to the next mark.
On the BROWSE screen, press this button to move down
a level. If a file is selected, the file is loaded and the unit
returns to the Home screen.
e INPUT button
Press this button to open the INPUT SETTING screen.
When the INPUT SETTING screen is open, press this button
to return to the Home screen.
r ENTER/MARK button
Use this button to confirm selections or select “YES” to a
confirmation message.
Press this button during recording to add a mark manually.
(See “Manual cue marking during recording” on page 27.)
While pressing and holding this button during playback,
press the . button to return to the previous mark or
TASCAM DR-44WL
6
2 – Names and functions of parts
press the / button to move forward to the next mark.
(See “Moving to the cue mark position” on page 28.)
When the PLAY FUNCTION screen is open, use this button to
set the IN (start) and OUT (end) points of the interval that
you want to set for loop playback. When the IN (start) and
OUT (end) points are already set, press this button to clear
the IN and OUT points.
t QUICK button
When the Home screen, PLAY FUNCTION screen, BROWSE
screen or SONG screen is open, press this button to pop up
the quick menu. (See “QUICK button overview” on page
41.)
y Wheel
This is used to select items or change value on setting
screens. Also used to change the playback position in a file.
Front panel
o SD card slot
Insert or remove a SD card.
p HOLD/ switch
To turn the power on/off, slide and hold the switch towards
the icon.
When you slide the switch towards the HOLD side, all the
functions of the buttons are locked.
a /LINE OUT jack
A headphone or a line input jack of an external device (via
stereo mini-jack cable) can be connected to this jack.
s OUTPUT LEVEL button
These buttons adjust the output sound level of the built-in
speaker or the /LINE OUT jack.
During adjustment, a volume indicator will be displayed in a
pull-up window.
d Wi-Fi button
Use this button to turn on/off the Wi-Fi function.
Right side panel
u Wi-Fi indicator
Indicates the status of wireless LAN.
Lights out: OFF
Blinks: Waiting to be connected
Lights up: Operable from the exclusive application (DR
CONTROL)
i EXT MIC/LINE IN 1/L / 2/R jack (XLR/TRS)
These are balanced analog XLR/TRS combo jacks for microphone and line level inputs.
XLR (1: GND, 2: HOT, 3: COLD)
TRS (Tip: HOT, Ring: COLD, Sleeve: GND)
CAUTION
•
Confirm that phantom power is OFF before connecting
a line level device to these EXT MIC/LINE IN jacks. If you
connect a line level device while phantom power is being
supplied, that device and this unit could be damaged.
•
When connecting to or disconnecting a condenser microphone from the EXT MIC/LINE IN jack, confirm that the
phantom power for that jack is OFF. If you connect or
disconnect a microphone while phantom power is being
supplied, that microphone and this unit could be damaged.
•
Do not connect an unbalanced dynamic microphone to
an XLR connector when phantom power is being supplied.
Doing so could damage that microphone and this unit.
Left side panel
f EXT IN switch
Set the gain for the EXT MIC/LINE IN jack and whether
phantom power is on or off.
CAUTION
•
Confirm that phantom power is OFF before connecting a
line-level device to the EXT MIC/LINE IN connector. If you
connect a line-level device while phantom power is being
supplied, that device and this unit could be damaged.
•
Do not connect or disconnect mics when the phantom
power switch is set to ON. Doing so could cause a loud noise
and might damage this unit and connected equipment.
•
Turn phantom power ON only when using a condenser
microphone that requires phantom power. Turning
phantom power on when a dynamic mic or other mic that
does not require it is connected could damage this unit and
connected equipment.
•
When using condenser mics that require phantom power
and dynamic mics together, be sure to use balanced
dynamic mics. Unbalanced dynamic mics cannot be used
when phantom power is enabled.
•
Supplying phantom power to some ribbon mics could break
them. If you are unsure, do not supply phantom power to a
ribbon mic.
•
When using USB bus power, the unit might not be able
to supply phantom power depending on the computer.
If this occurs, use the dedicated AC adapter (TASCAM
PS-P520U:sold separately).
•
Some condenser microphones will not operate when
phantom power is set to +24V.
•
Do not connect or disconnect the AC adapter when using
phantom power. Doing so could cause the unit to turn off
even when batteries are installed in it. This can result in
recording data being damaged or lost.
TASCAM DR-44WL
7
2 – Names and functions of parts
g INPUT LEVEL button
Press this button to show the INPUT LEVEL setting screen on
the display as a pull-down menu.
When the INPUT LEVEL setting screen is shown, press this
button to close the pull-down menu.
h INPUT LEVEL volume
When the INPUT LEVEL setting screen is shown, use this to
adjust the input level.
j USB port
Use a USB cable to connect the DR-44WL with a computer.
(See “11 – Connecting with a computer” on page 52.)
Power can be supplied through the USB cable or the
dedicated AC adapter (TASCAM PS-P520U: sold separately).
CAUTION
Connect the DR-44WL directly be connected directly with
the computer, not through a USB hub.
Bottom panel
z Strap holder
A strap can be attached to this holder.
x Battery compartment
Insert four AA batteries into the compartment to power the
unit. (See “Using AA size batteries” on page 12.)
Home Screen
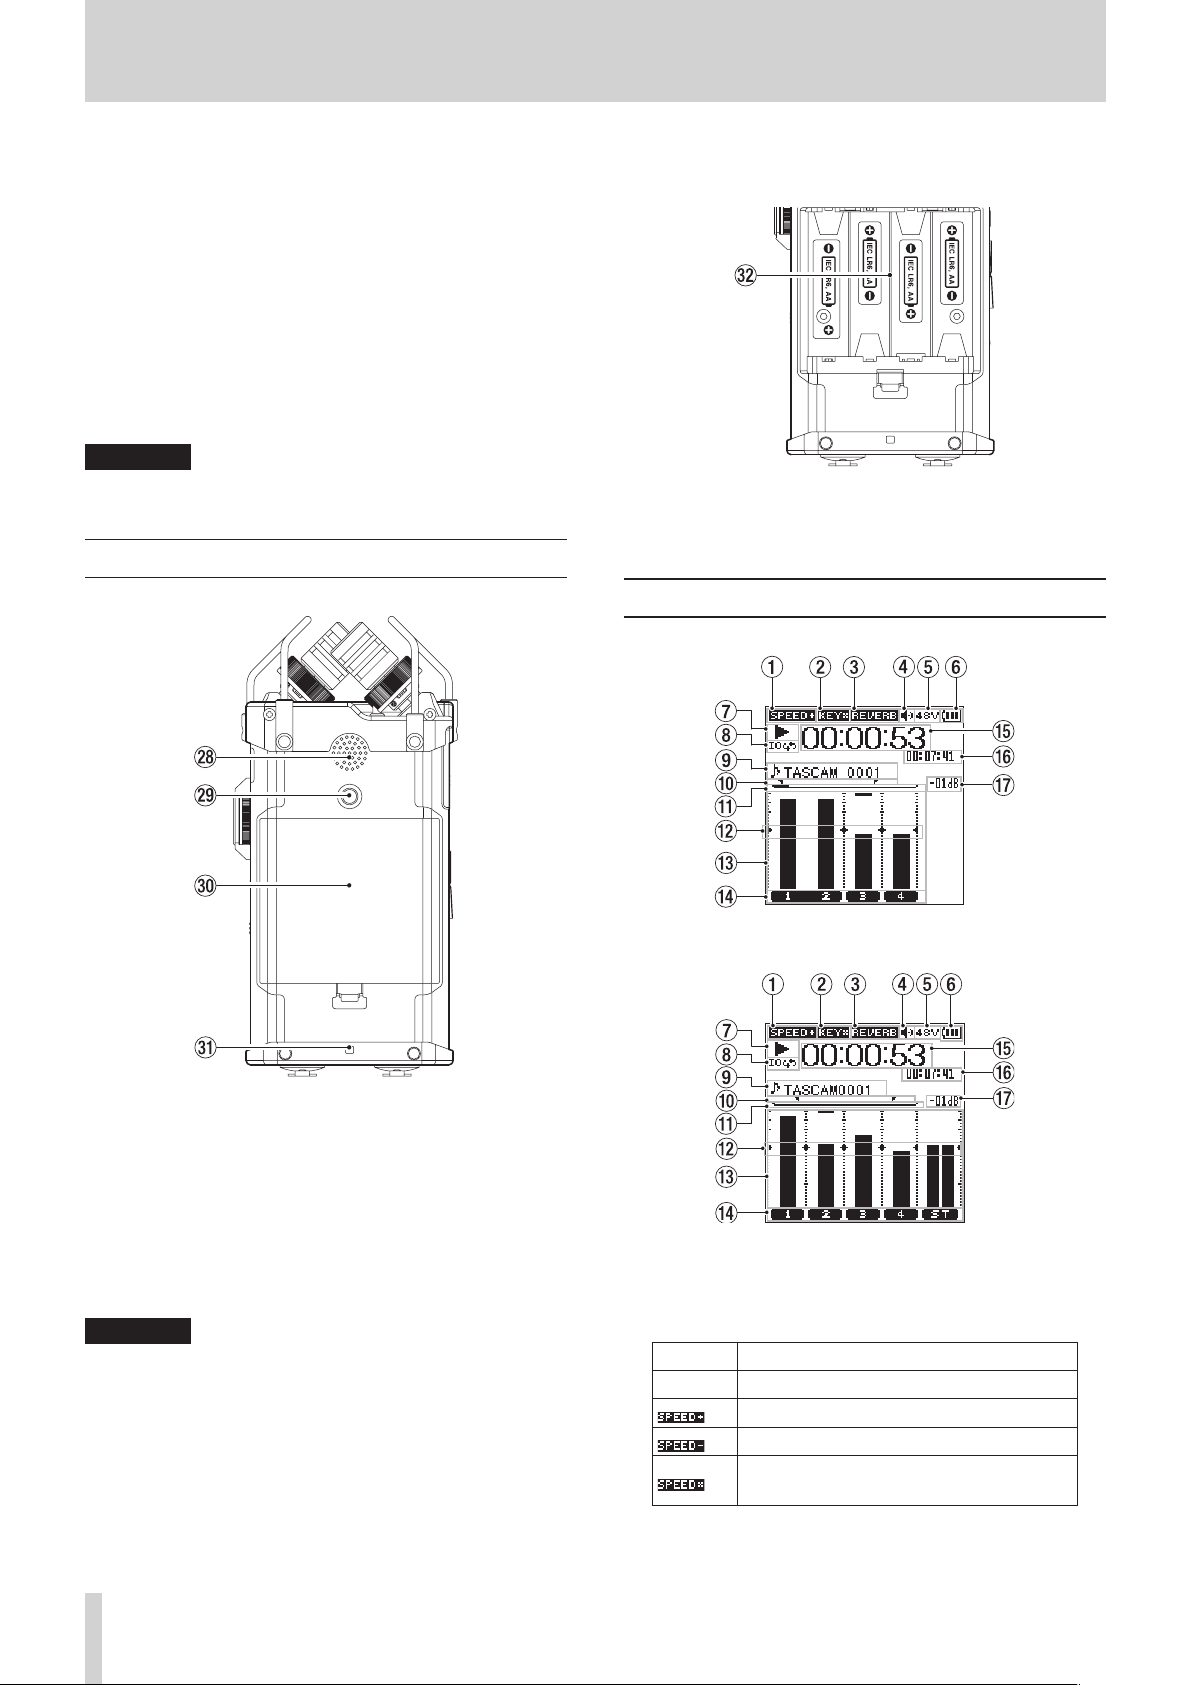
k Built-in mono speaker
Use this built-in speaker to listen to recordings.
No sound will play when:
• In recording standby
• Headphone is connected
• In recording mode
• Speaker output setting is turned off
l Tripod attachment screw-hole (1/4 inch)
A tripod can be attached to the DR-44WL.
CAUTION
•
Ensure the tripod or microphone stand screws are securely
fastened to prevent the unit from falling off.
•
When attaching this unit to a tripod or microphone stand,
ensure to place it on a level surface.
•
Some tripods have different screw specifications that make
direct connection impossible. Use a commercially-available
adapter with such tripods.
; Battery compartment cover
Home Screen in the 4 CH mode
Home Screen in the MTR mode
1 Playback speed status display
One of the following icons appears according to the
playback speed setting.
Icon Playback speed
Blank Playback speed not changed
×1.1 – ×2.0
×0.5 – ×0.9
When the playback speed cannot be
changed
TASCAM DR-44WL
8
2 – Names and functions of parts
2 Display of the key control function on/off status
This icon shows whether the key control function is on or off.
Icon On/off status
Blank Key control function off
Key control function on
Key control function on (setting disabled
state)
3 Reverb on/off status display
This icon shows the reverb on/off status.
Icon On/off status
Blank Reverb is off
Reverb is on (sound effects recording) INT
MIC, EXT IN
Reverb is on (SEND status) MIX
4 Speaker output display
displayed: Speaker output on
Blank: Speaker output off
5 Phantom power supply display
Blank: No phantom power supply
: 48V phantom power supplied
: 24V phantom power supplied
6 Power supply status message
When power is supplied from the batteries, the current
battery level is displayed in bars ( , , ).
When the battery level is low, the will flash and the power
will be switched off (standby mode).
When the dedicated AC adapter (TASCAM PS-P520U: sold
separately) or USB bus power is used, appears.
NOTE
When attempting recording or other operations that
consume large amount of power, a warning message of
Battery Low may pop-up.
7 Recorder status message
The recording status is indicated in the following icons:
Indicator Detail
8
9
7
,
m
/
.
Stop
Pause
Playback
Fast-forwarding
Fast-rewinding
Skip forward to the beginning of the next
file
Skip backward to the beginning of either the
current or preceding file
NOTE
ID3 tag information contains titles and artist names, which
can be stored in MP3 files.
0 Loop playback IN (starting) and OUT (ending) points
setting status
The IN (starting) and OUT (ending) points-setting state of
the loop playback is shown.
When the IN (starting) point is set, the icon appears at the
set position on the playback position-displaying bar.
The icon appears at the playback position on the bar
when the OUT (ending) point is set.
q Playback position display
The current playback position is shown by a bar. As playback
progresses, the bar extends to the right.
w Level meter guide display
This is a level meter guide for adjusting the input and output
levels. It is displayed at the “−12 dB” position of the scale.
e Level meter
This meter displays the level of an input sound or that of a
playback sound.
r File status display
The file state is displayed in different ways, depending on
the type of a file to be played back.
: Stereo file status
: Status of two mono files
: No file
t Elapsed time display
Displays the elapsed time (hours: minutes: seconds) of the
current file.
y Remaining time display
Displays the remaining time (hours: minutes: seconds) of the
current file.
u Peak value displayed in decibel (dB)
Displays the maximum playback level in decibel reading per
set amount of time.
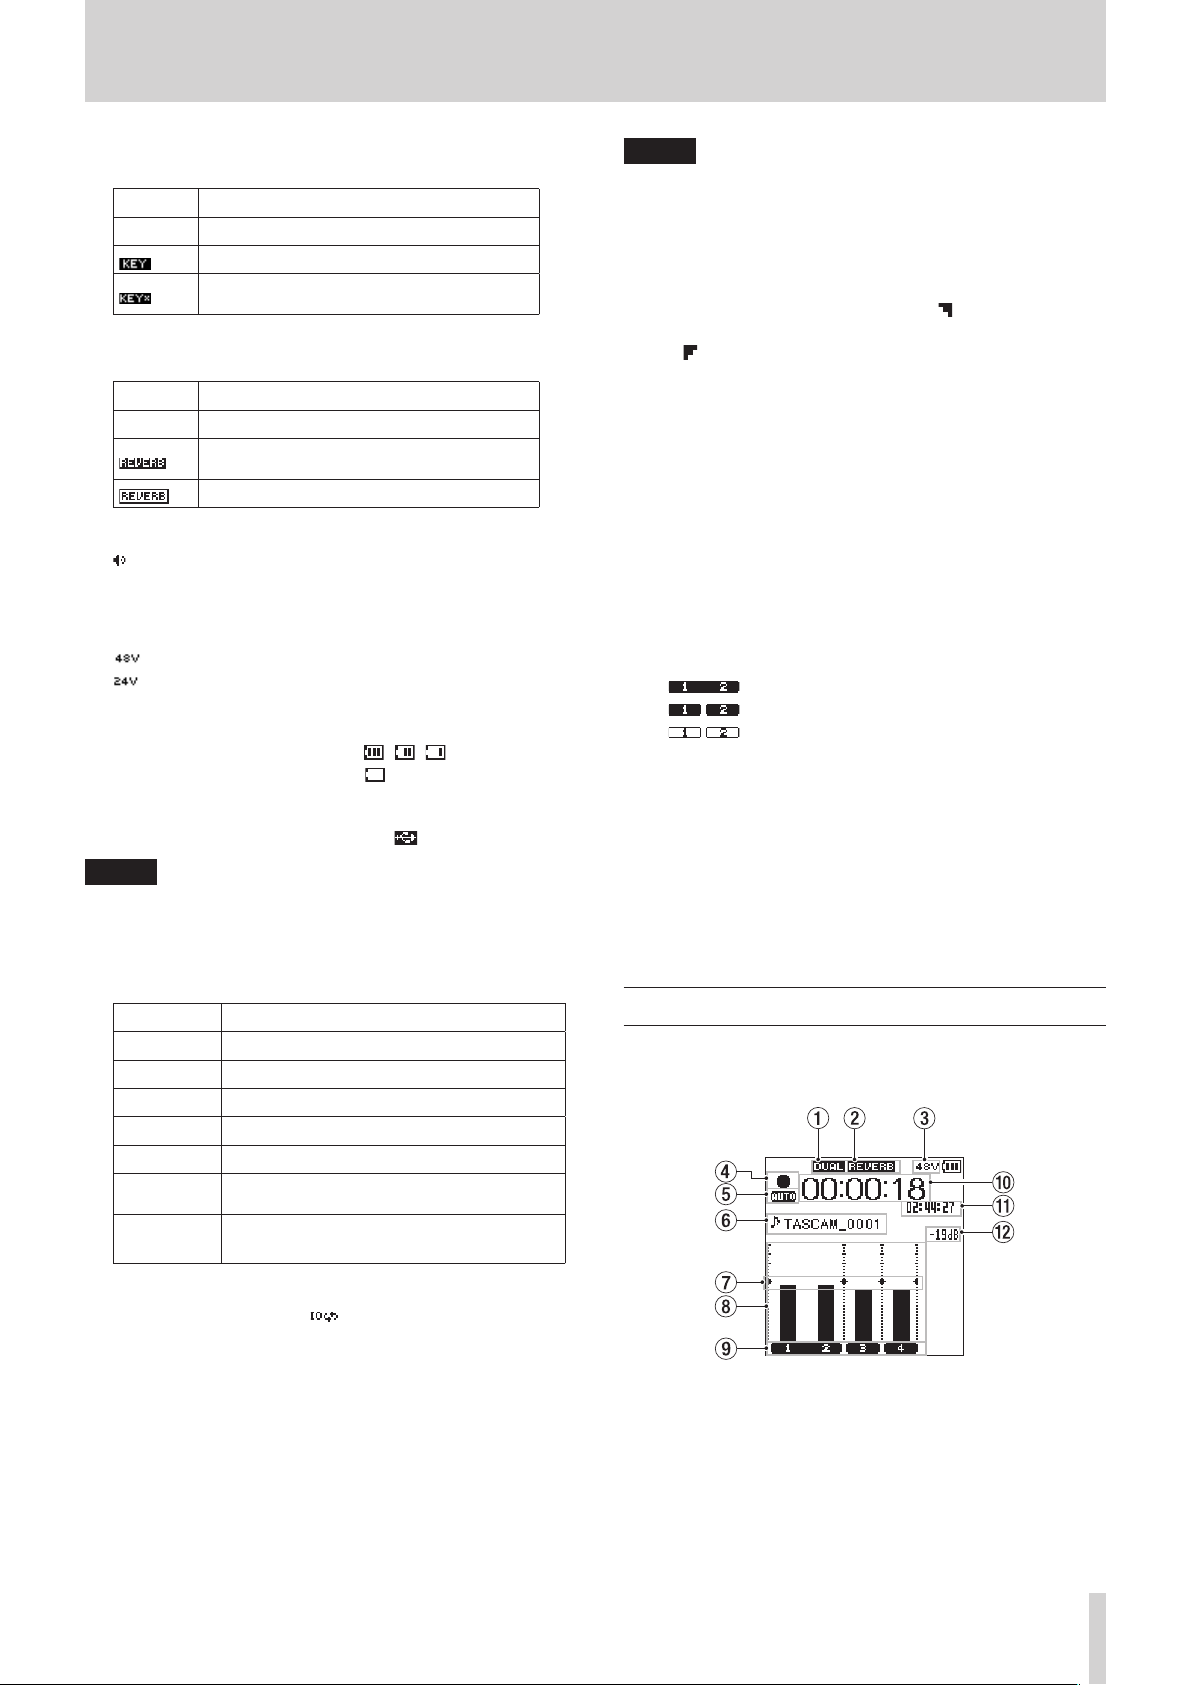
Recording Screen
The following recording screen is displayed in recording or
recording standby mode.
8 Loop playback setting status display
During loop playback, the icon is displayed.
9 Filename/song name display
When the 4CH mode is selected, the name or tag information of a file being played back is shown.
The ID3 tag information is displayed instead when included
in the MP3 file.
When there are multiple files in the 4CH mode, only the
format portion of each of the file names and the basic
number of a recording file are displayed. When a single file is
recorded, its name is shown.
When the MTR mode is selected, the name of an opened
song is shown.
Recording screen in the 4 CH mode
TASCAM DR-44WL
9
2 – Names and functions of parts
Recording screen in the MTR mode
1 Display of the dual recording function on/off status (4CH
mode only)
Blank: dual recording function off
: dual recording function on
2 Reverb on/off status display
This icon shows the reverb on/off status.
Icon Detail
Blank Reverb is off
Reverb is on (sound effects recording) INT
MIC, EXT IN
Reverb is on (SEND status) MIX
3 Phantom power supply display
Blank: No phantom power supply
: 48V phantom power supplied
: 24V phantom power supplied
4 Recording status message
The recording status is indicated in the following icons:
Indicator Detail
09
0
5 Display of the setting status of the PRE REC or AUTO REC
function (4CH mode only)
When the PRE REC function is ON, the icon appears.
When the AUTO REC function is ON, the icon appears.
6 Filename/song name display
Displays the file name automatically assigned to the
recording file.
When there are multiple files in the 4CH mode, only the
format portion of each of the file names and the basic
number of a recording file are displayed. When a single file is
recorded, its name is shown.
When the MTR mode is selected, the name of an opened
song is shown.
7 Level meter guide display
This is a level meter guide for adjusting the input and output
levels. It is displayed at the “-12 dB” position of the scale.
8 Level meter
Displays the input sound level.
9 File status display
The file state is displayed in different ways, depending on
the type of a file to be recorded.
Recording standby or recording pause
mode
In recording mode
Self-timer recording activated
: Stereo file status
: Status of two mono files
0 Elapsed recording time
Displays the elapsed recording time of a recorded file (hours:
minutes: seconds).
q Remaining recording time
The remaining time left on the SD card is shown in hours:
minutes: seconds.
w Peak decibel (dB) message
Displays the peak input level in decibel reading.
e Auto punch in/out function on/off status or master track
loading status (MTR mode only)
No icon: auto punch in/out function off
: auto punch in/out function on
: master track loaded
Menu item list
Press the MENU button to open the MENU screen. Menu items
are as follows:
Menu item Function Ref. page
MODE
REC SETTING
AUTO FUNCTION
BROWSE
(4CH mode only)
SONG
(MTR mode only)
TOOLS
REVERB
POWER/DISPLAY
SYSTEM
Switch the operation
mode of this unit.
Make recording
settings
Set different recording
functions.
SD card file and folder
operations
Operate songs on the
card.
Configure settings for
different functions
Configure reverb
settings.
Set the power and the
display
Various system settings
page 17
page 18
page 25
page 26
page 29
page 24
page 25
page 28
page 32
page 35
page 15
page 48
page 49
page 53
page 55
page 57
page 49
page 61
page 59
page 60
TASCAM DR-44WL
10

2 – Names and functions of parts
Using menus
The following explains the menus, using the display contrast
setting as an example.
1. Press the MENU button to open the MENU screen.
2. Use the wheel to select a menu item (highlighted), and
press the ENTER/MARK or / button to move to various
settings screens.
3. Use the wheel to select an item to set (highlighted).
Basic operations
Use the following buttons to operate the various screens.
8
MENU button
Opens the MENU screen.
8
8/HOME button
To return to the Home screen, press the 8/HOME button in any
screen display.
Use this to answer “NO” to a confirmation message.
8
ENTER/MARK button
Use this button to confirm selection of a setting item or to select
“YES” to a confirmation message.
8
/ button
Use this to move the cursor (the highlighted area) to the right on
the screen or to open folders on the BROWSE screen.
8
. button
Use this to move the cursor (the highlighted area) to the left on
the screen, and to close folders on the BROWSE screen.
8
Wheel
Use this to select (highlight) each item or to change value.
8
MIXER button
Open the MIXER screen.
8
INPUT button
Open the INPUT SETTING screen.
8
QUICK button
This opens the quick menu pop-up. (See “QUICK button
overview” on page 41.)
4. Press the ENTER/MARK or / button to move the cursor
to highlight the setting.
5. Use the wheel to change the setting.
6. Press the ENTER/MARK or . button to set a different
item in the same menu.
This enables you to select a new item. Use the wheel to
select an item to be set (highlighted).
7. Repeat the 3. to 6. steps to set each items, as necessary.
8. Press the MENU button to return to the MENU screen.
Press the 8/HOME button to return to the Home screen.
TASCAM DR-44WL
11
3 – Preparation
Powering the unit
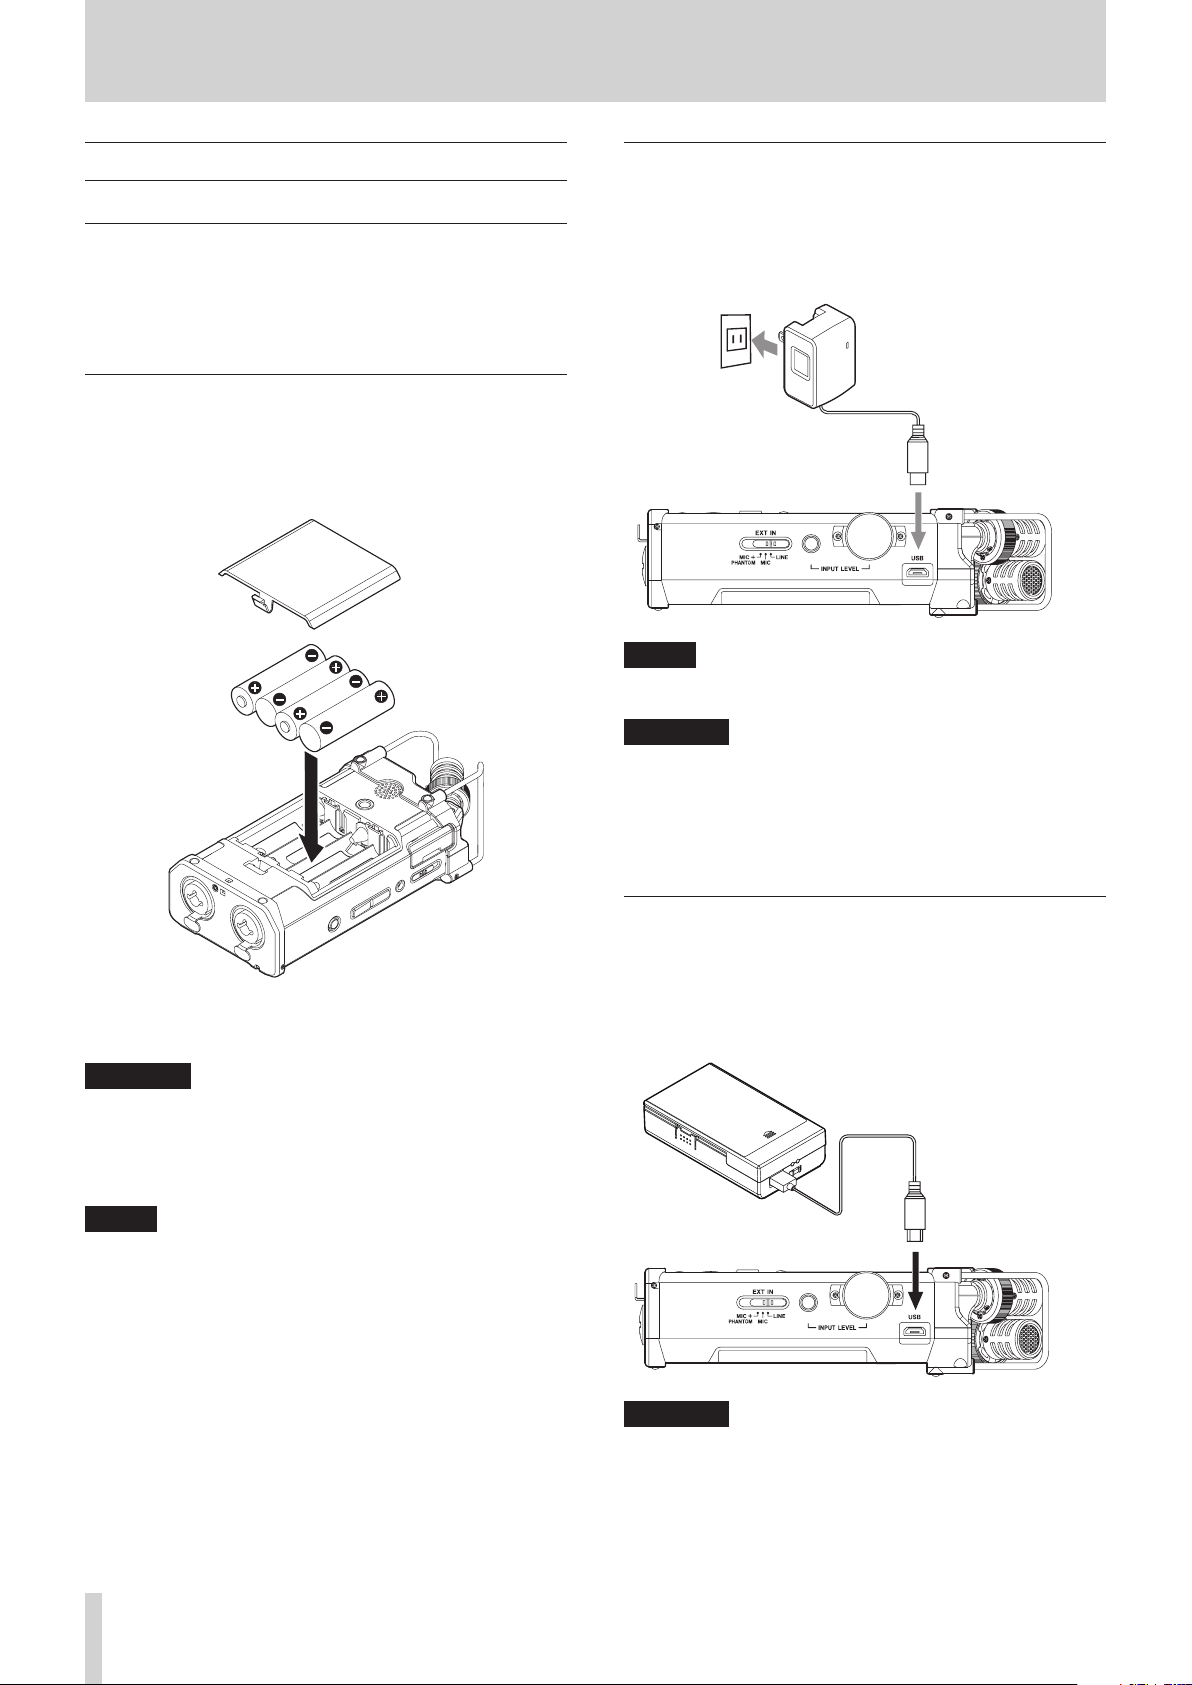
Power sources
The DR-44WL operates on four AA batteries, the dedicated AC
adapter (TASCAM PS-P520U: sold separately) or USB cable (USB
bus power).
Use either alkaline batteries or Ni-MH batteries.
Using AA size batteries
Remove the battery compartment cover on the back of the unit,
insert four AA batteries into the battery compartment, aligning
to the ¥ and ^ markings inside the battery compartment, and
close the cover.
Using an AC adapter
Connect the dedicated AC adapter (TASCAM PS-P520U: sold
separately) and the USB port of the unit with the USB cable
(Type-A to micro-B: Included with TASCAM PS-P520U) as shown
in the illustration.
AC outlet
PS-P520U
(sold separately)
micro-B USB plug
(sold separately)
Connect the USB cable
NOTE
When both batteries and the AC adapter are attached to the
unit, power will be supplied from the AC adapter.
CAUTION
•
Use only the dedicated AC adapter (TASCAM PS-P520U:
sold separately). The use of another adapter may cause
malfunction, fire or electric shock.
•
Noise may occur during microphone recording when the
unit and AC adapter are in close proximity. If noise occurs,
move the AC adapter away from the unit.
Select the same type of batteries to get an accurate reading of
the remaining battery power and required minimum power for
operation. (See “Battery type settings” on page 61.)
CAUTION
•
Do not use Manganese dry cell batteries.
•
Ni-MH batteries will not be recharged with this unit; use a
separate battery recharger instead.
•
The supplied alkaline batteries are for testing and may not
last long.
NOTE
A large amount of power is consumed to provide phantom
power to a condenser microphone. If you use a condenser
microphone while running the unit on AA batteries (NiMH
rechargeable or alkaline), the operating time will be
extremely shortened.
If you need to operate the unit for a long time, use the
dedicated AC adapter (TASCAM PS-P520U: sold separately)
or TASCAM BP-6AA external battery box (sold separately) to
power the unit.
Using an external battery pack (sold separately)
Connect a TASCAM BP-6AA external battery pack (designed
for use with this unit and sold separately) to the recorder with
the USB cable as shown in the illustration. For details, see the
BP-6AA Owner’s Manual.
TASCAM BP-6AA (sold separately)
Connect the USB cable
(sold separately)
micro-B USB plug
CAUTION
The DR-44WL cannot detect the remaining battery charge
of a BP-6AA. If you use a BP-6AA to operate the DR-44WL
without batteries in the recorder itself, the unit might stop
operating suddenly if the battery pack runs out of charge.
In order to avoid problems, put batteries with sufficient charge
into the DR-44WL before connecting and using a BP-6AA.
TASCAM DR-44WL
12
3 – Preparation
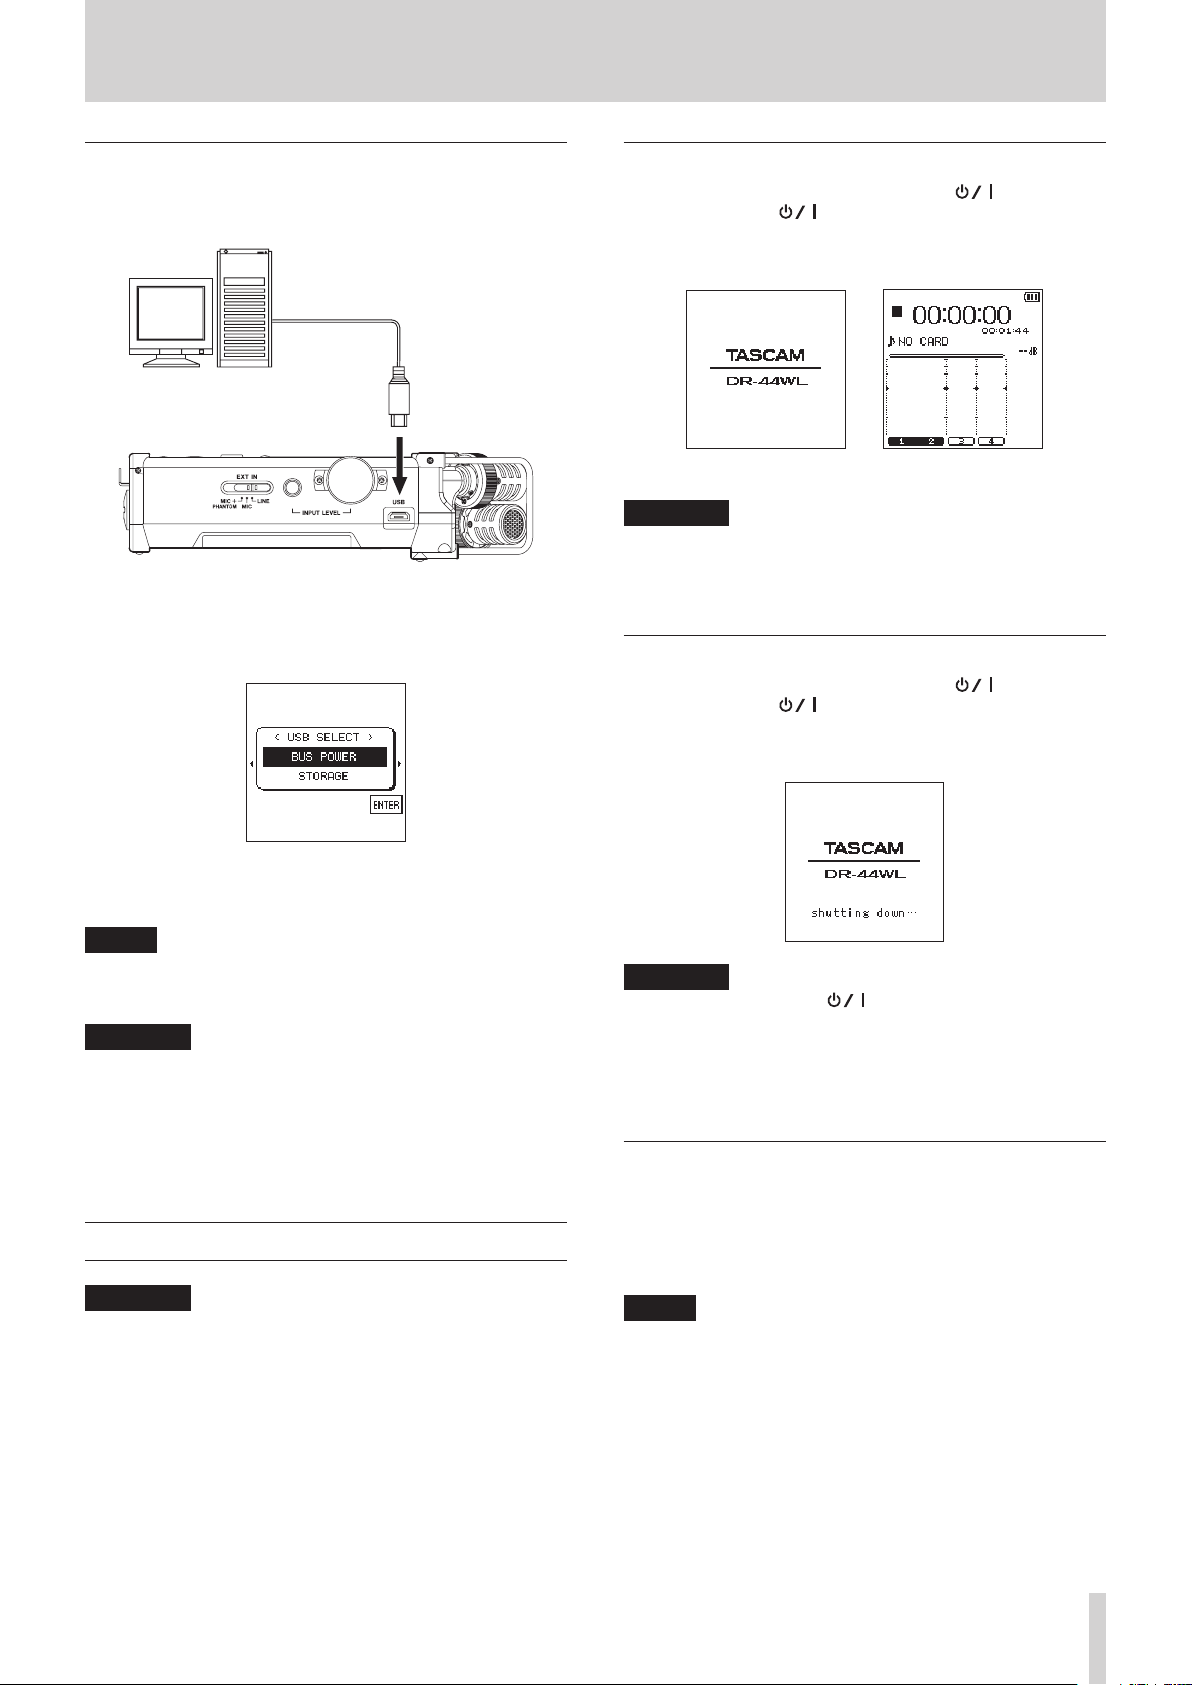
Using USB bus power
Use the USB cable to connect the unit and the computer as
illustrated below.
Computer
USB
micro-B USB plug
When you connect a USB cable while the unit power is on, or turn
on the power after making a connection, the USB SELECT screen
will pop up, prompting the user to select either to operate the unit
with USB bus power or make a USB connection with the computer.
Starting up the unit
When the unit is turned off, slide the HOLD/ switch of the
left side panel in the direction, and when the TASCAM
DR-44WL (start-up screen) appears, release the switch.
The DR-44WL starts up and the Home screen is displayed.
Start-up screen Home screen
CAUTION
When turn the power on for the first time (or when the
built-in clock is reset due to no battery power), the DATE/
TIME screen will appear before the Home screen to set date/
time. (See “Song Operation” on page 35.)
Shutting down (standby mode)
When the unit is turned on, slide the HOLD/ switch of the
left side panel in the direction, and when the TASCAM
DR-44WL shutting down… appears, release the switch.
The power turns off after the unit completes its shutdown process.
Use the wheel to select BUS POWER (highlighted) and press the
ENTER/MARK button to select power supply from the USB port.
The Home screen will appear.
NOTE
Power is supplied from the USB port when USB cable is
connected to the unit inserted with batteries (USB bus
power prioritized).
CAUTION
•
Depending on the USB bus power specifications of the
computer, the DR-44WL may not operate with a USB
connection. If this occurs, use the dedicated AC adapter
(TASCAM PS-P520U: sold separately).
•
This unit is not compatible with the computer's power-save
mode or sleep-mode. Please turn off these modes when
operating the unit from the computer's USB bus power.
Turning the power on and off (standby mode)
CAUTION
•
When you turn the power switch off while supplying power
from the dedicated AC adapter (TASCAM PS-P520U: sold
separately) or the USB bus power connected to a computer,
the unit will go into standby mode.
•
Before turning the power switch on and off, turn the volume
down for the sound system connected to the unit.
•
Do not wear headphones when turning the power switch
on and off (standby mode); the noise may cause damage to
your ears and/or headphones.
CAUTION
Always use the HOLD/ switch to turn the power off.
Do not remove the batteries or disconnect the power cable
accidentally while the unit is operating. If you do so, the unit
cannot shut down properly and all recordings, settings and
other data will be lost. Any lost data and/or settings cannot
be restored.
Resume function
The DR-44WL is equipped with a resume function to locate the
previous position (or time) when the power was turned off.
Turn the power on and press the 7/9 button to play back
from the previous file position (time) when the power was
turned off.
NOTE
The position is recorded in the SD card. The resume function
does not work if the SD card is replaced or formatted.
TASCAM DR-44WL
13
3 – Preparation
Selecting the language
You can change the language shown on the display. The first
time you turn the unit on after purchasing it, the LANGUAGE
screen will open. You can set the language used on this screen.
You can also change this setting with the SYSTEM screen
LANGUAGE item.
1. Turn the wheel to move the cursor and select the language.
Options
English: use English
日本語: use Japanese
Français: use French
Español: use Spanish
Deutsch: use German
Italiano: use Italian
Русский
: use Russian
5. Press the . button or / button to move the cursor
(highlighted area), and use the wheel to change values.
6. Press the ENTER/MARK button to confirm the change and
return to the SYSTEM screen.
NOTE
The file name will include the set date/time. (See “Setting
the file name type” on page 60.)
CAUTION
The date and time setting can only be maintained for a few
minutes if the battery power becomes low or the unit is not
powered by the dedicated AC adapter (TASCAM PS-P520U:
sold separately) or USB cable.
When using batteries, we recommend to replace them
before they are completely drained.
Inserting and removing SD cards
2. After making the selection, press the ENTER/MARK button
to confirm it.
If you accidentally select the wrong language
Slide the HOLD/ switch to turn the power off. Then, slide
the HOLD/ switch while pressing and holding the MENU
button to turn the unit on again.
The language selection menu where you can set the language
appears.
Setting the date/time
The DR-44WL uses its internal clock to record the date and time
to the recorded files.
1. Press the MENU button to open the MENU screen.
2. Using the wheel, select (highlight) SYSTEM menu item and
press the ENTER/MARK or / button.
The SYSTEM screen is displayed.
3. Use the wheel to select DATE/TIME and press the ENTER/
MARK or / button.
Exec appears selected for the DATE/TIME item.
Inserting the SD card
1. Open the SD card slot cover on the left side panel.
2. Insert the SD card into the slot as shown in the following
illustration until it clicks into place.
Removing the card
1. Open the SD card slot cover.
2. Press the SD card in gently and then release it to allow it to
come out.
4. Press the ENTER/MARK button to open the DATE/TIME
screen.
TASCAM DR-44WL
14
3 – Preparation
CAUTION
•
Do not remove the SD card from the unit during recording,
playback or at other times when it is being accessed.
•
Do not remove the SD card from the unit when it is
connected to a computer via USB.
•
SD cards that meet SD, SDHC or SDXC standards can be used
with this unit.
•
A list of SD cards that have been confirmed for use with this
unit can be found on our web site. Please access to a product
page of this product from the TEAC Global Site (https://
teac-global.com) to find the list or contact the TASCAM
customer support service.
•
When using a microSD card in an SD card adapter, do not
remove just the microSD card. Always remove the adapter
with the microSD card in it. Removing only the microSD card
could cause malfunction.
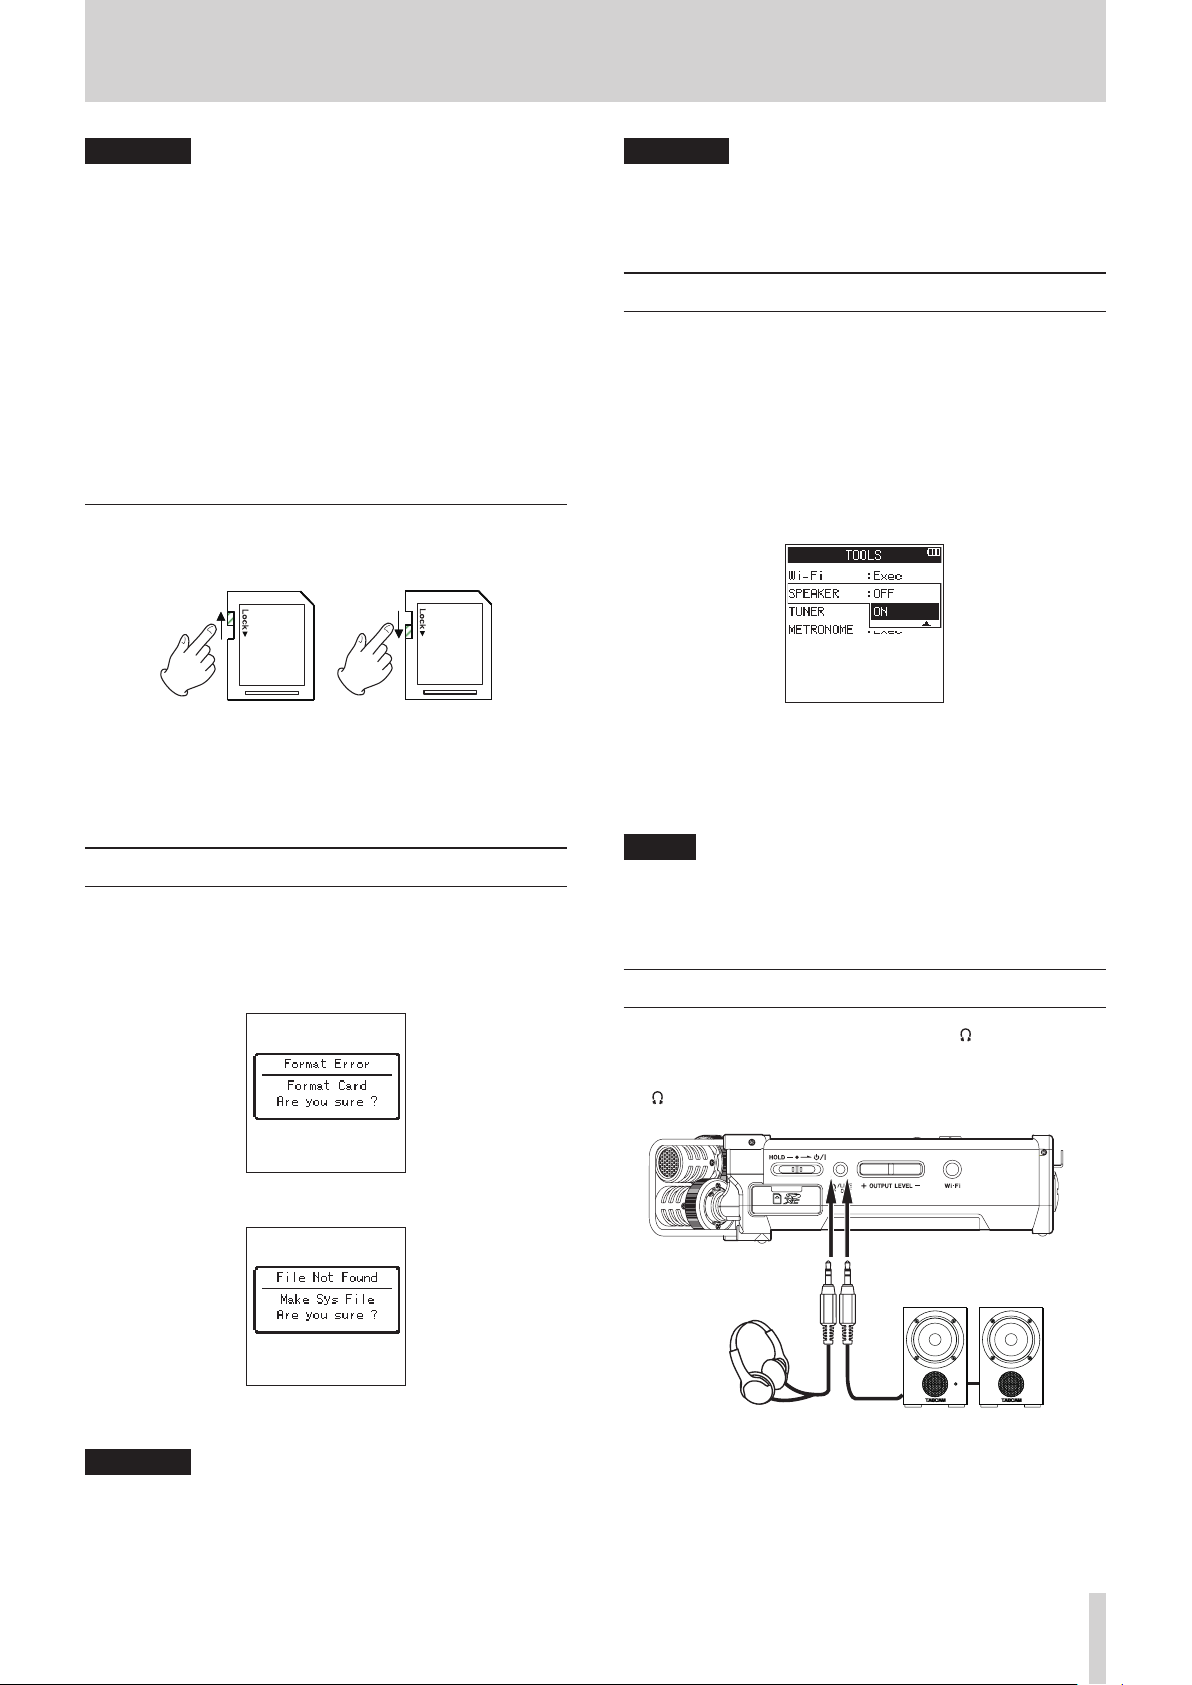
SD card write protection switches
An SD card comes equipped with a write protect switch.
Unprotected Protected
If you slide the protect switch to the LOCK position, file
recording and editing is not possible. Move the switch to the
unlocked position in order to record, erase and otherwise edit
data on the card.
CAUTION
When formatting the SD card, make sure the unit is
connected to the dedicated AC adapter (TASCAM PS-P520U:
sold separately), a computer via USB bus power, or fullycharged batteries.
Turning the built-in speaker on/off
The factory setting for the built-in speaker output is selected as
ON. To turn it off, open the TOOLS screen and select OFF for the
SPEAKER setting.
1. Press the MENU button to open the MENU screen.
2. Using the wheel, select (highlight) TOOLS menu item and
press the ENTER/MARK or / button.
TOOLS screen appears.
3. Using the wheel, select (highlight) SPEAKER and press the
ENTER/MARK or / button.
4. Using the wheel, turn on or off and press the ENTER/MARK
button.
Options: OFF, ON (default setting)
5. Once the setting has been completed, press the 8/HOME
button to return to the Home screen.
Preparing an SD card for use
In order to use an SD card in this unit, you must format it first.
1. Confirm that an SD card is installed and turn the power ON.
2. The following message appears when a new card or a card
formatted by another device is inserted into the unit.
SD/SDHC card
SDXC card
3. Press the ENTER/MARK button to start formatting.
NOTE
In a recording standby or recording mode, or when a
headphone or a speaker system is connected to the
DR-44WL, the built-in speaker will not emit sound even
when the SPEAKER setting is ON.
Connecting a monitor device
To listen with a headphone, connect it to the /LINE OUT jack.
External monitor system (powered monitor speaker or an
amplifier and speaker): connect the external monitor system to
the /LINE OUT jack.
Powered speakers
Headphone
or
Amplifier and speaker
CAUTION
Formatting an SD card erases all the data on it.
4. When formatting is complete, it will return to the Home
screen. You may format the card whenever required.
TASCAM DR-44WL
15
3 – Preparation
Adjusting the playback volume
When the Home screen is being displayed, use the OUTPUT
LEVEL (+/−) button on the left side panel to adjust the volume
of output through the built-in speaker or the /LINE OUT jack.
A volume level indicator will pull up at the bottom of the display.
When increasing the volume, this pop-up message might
appear: “INCREASE YOUR RISK OF HEARING DAMAGE.”
Input settings
Recording with the built-in microphone
Point the built-in microphone toward the sound source and
place the unit on a stable surface with minimum vibration.
NOTE
During mono recording, orient the mic set for the recording
channel toward the sound source.
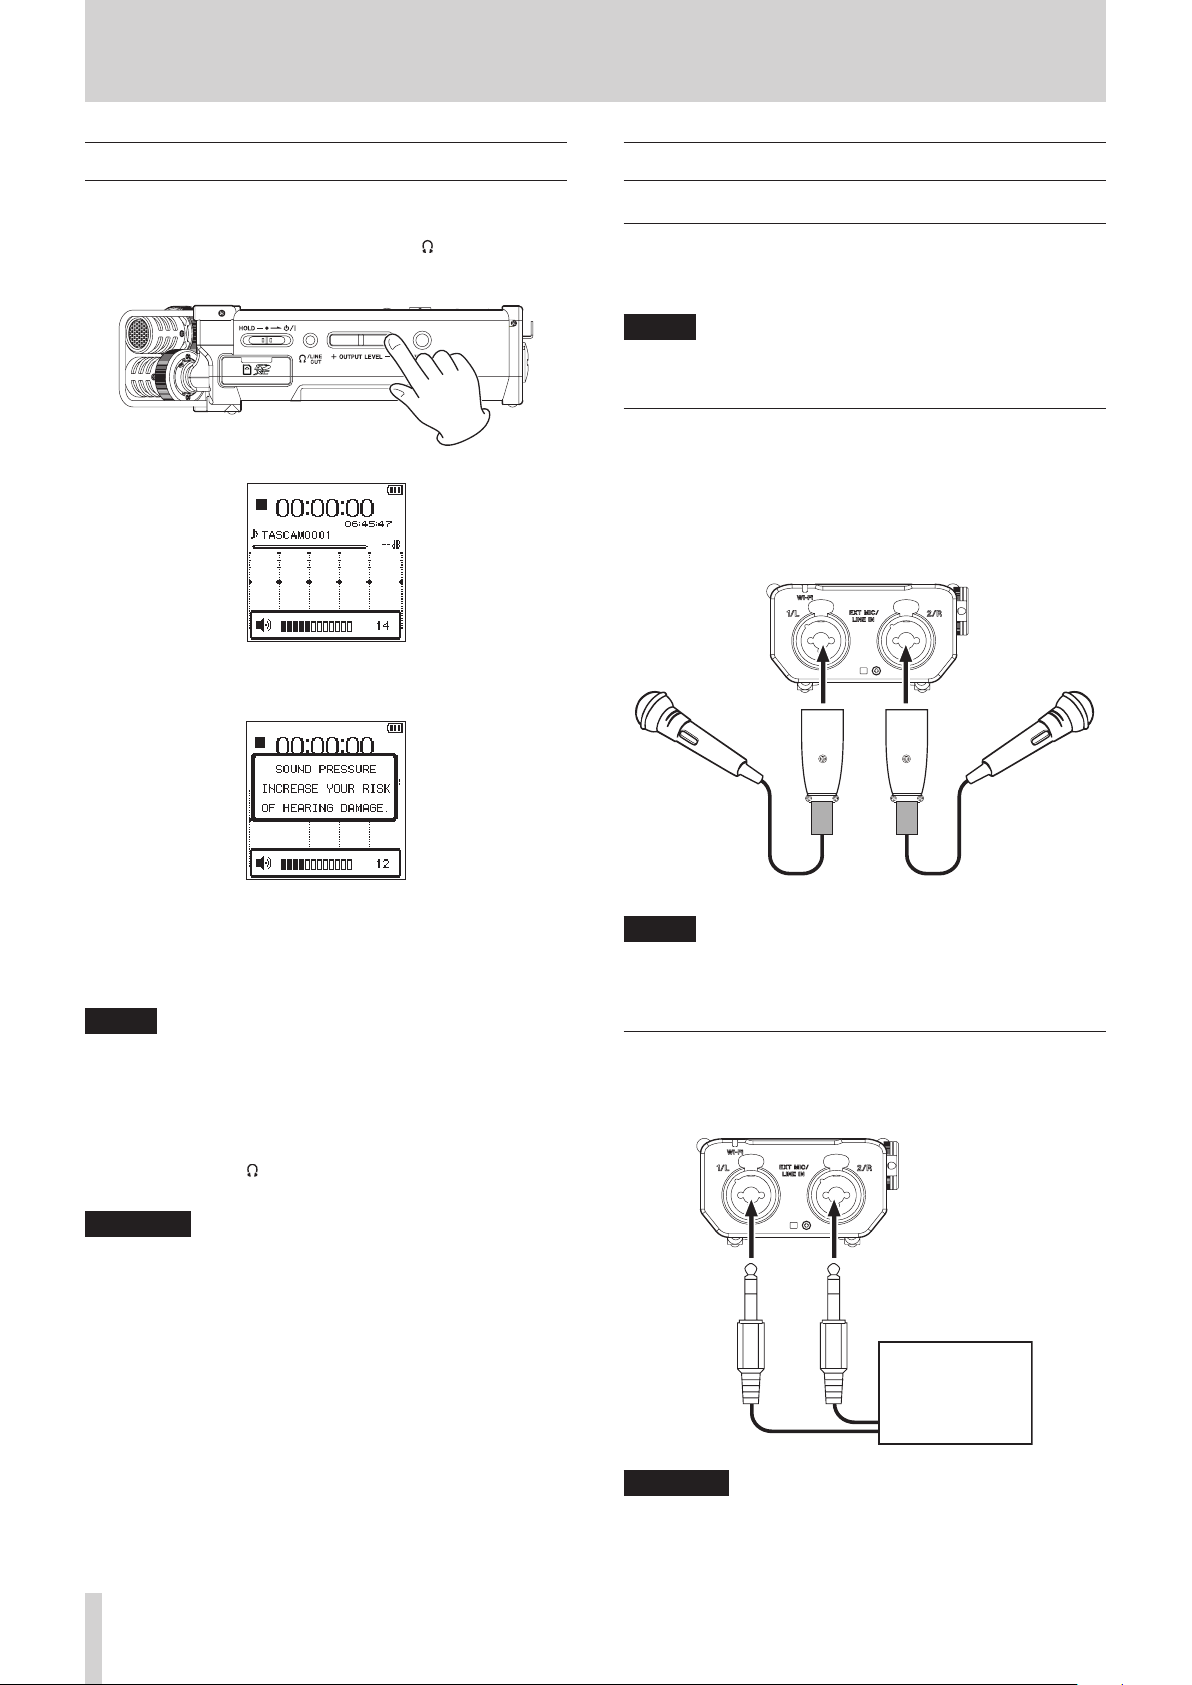
Recording with an external microphone (EXT MIC IN)
Connect an external microphone to the EXT MIC/LINE IN jack of
this unit.
Point the external microphone toward the sound source and
place the unit on a stable surface with minimum vibration.
This warning appears when the volume is set above a level
recommended by the European Union (EU) to avoid hearing
damage (EU volume limit regulation).
Reconnecting headphones will reset the volume to its default
value.
NOTE
•
You can continue to adjust the volume even after the
pop-up message appears.
When you raise or lower the volume, the pop-up message
will disappear.
•
If the output level is set to 12 or higher and the unit
is restarted when headphones or another device are
connected to the /LINE OUT jack, the upper level will be
set to 12 after the unit restarts.
CAUTION
Listening at high volumes could cause hearing damage. If
the surroundings are noisy, the sound of playback might
seem quieter than it actually is.
Start playback of the audio and check the volume before
putting on headphones, for example.
Microphones
NOTE
To provide phantom power to a condenser microphone, set
the EXT IN switch to MIC+PHANTOM. (See “Set the input
gain” on page 19.)
Recording from an external device (LINE IN)
Use stereo plug cables to connect to the output of an external
audio device.
Audio device
or
external device
TASCAM DR-44WL
16
CAUTION
•
If the input sound is still distorted after adjusting the input
level of the unit, reduce the playback sound of the external
device.
•
When an external audio device with a fixed output line level
is connected, it would be impossible to control the gain level
appropriately because of excessively large input signals. In
such cases, use the headphone jack or other level-controllable output for connection to the unit.
Selecting Operation Mode
Two operation modes are available in this unit: 4CH and MTR
modes. (See “Overview of recording modes” on page 18.)
Setting a mode
1. Press the MENU button to open the MENU screen.
2. Using the wheel, select (highlight) MODE menu item and
press the ENTER/MARK or / button.
The MODE screen is displayed.
3. Using the wheel, select (highlight) MODE and press the
ENTER/MARK or / button.
3 – Preparation
4. Use the wheel to select operation mode.
Options: 4CH (default value), MTR
5. Once the setting has been completed, press the 8/HOME
button to return to the Home screen.
NOTE
The selected mode is stored and started in the selected
mode when the power is turned on next time.
Checking mode
When the operation mode is set to MTR, the MTR indicator on
the top of the display lights up.
TASCAM DR-44WL
17
4 – Recording
In addition to the built-in microphone, an external microphone
or external audio devices (i.e. CD player) can also be used for
recordings.
Recordings can be made in MP3 (32k -320kbps, 44.1k/48kHz)
and WAV/BWF (44.1k/48k/96kHz, 16/24-bit) audio formats.
Cue marks in WAV file that supports BWF (Broadcast Wave
Format) can be used in BWF compatible softwares.
Overview of recording modes
This recorder can record sounds in two modes: 4CH and MTR
modes.
8
4CH mode
A maximum of four channels can be recorded simultaneously
from the built-in mics and external input jacks (input jack assignments are fixed).
The recorded files are as follows according to the recording
channel link settings.
•
Mono × 1–4
•
Stereo × 1–2
•
Stereo × 1 + Mono × 1–2 (WAV or BWF only)
8
MTR mode
You can use this device as a multitrack recorder (MTR) to record
individual tracks and overdub them.
A maximum of four channels can be recorded simultaneously
from the built-in mics and external input jacks (input jack assignments can be selected). These can also be recorded into already
recorded files (overdubbing) .
The recorded files are as follows.
•
Mono × 4
3. Using the wheel, select (highlight) FORMAT and press the
ENTER/MARK or / button.
Set the file format.
Using the wheel, select one of the following options.
Options: BWF 24bit, BWF 16bit, WAV 24bit, WAV 16bit
(default value), MP3 320k, MP3 256k, MP3 192k, MP3
128k, MP3 96k, MP3 64k, MP3 32k
NOTE
•
BWF is a format created for broadcasting that has the same
sound quality as the standard WAV format. It also uses the
same .wav file extension as WAV files. In this manual, we
distinguish these file types by using the terms BWF and WAV.
•
The WAV and BWF formats offer higher quality recording
than MP3 files.
•
The MP3 format can record for longer hours compared to
the WAV and BWF formats.
•
With MP3 format, recording with higher values offers better
quality.
4. Press the ENTER/MARK or . button to confirm the
setting and enable selection of other setting items.
5. Using the wheel, select (highlight) SAMPLE and press the
ENTER/MARK or / button.
Set the sampling frequency.
Set where to save the file
Set the folder where recorded files are saved.
The recorded file will be saved in the current (currently selected)
folder. For details, see the SELECT quick menu item under (See
“Folder operations” on page 33.).
In 4CH mode if no setting is made, new recording files are
created in the “MUSIC” folder.
In MTR mode, new recording files are created in the “MTR” folder.
Select the file format and sampling frequency (4CH mode only)
Select the desired audio file type before you start recording.
1. Press the MENU button to open the MENU screen.
2. Using the wheel, select (highlight) REC SETTING and press
the ENTER/MARK or / button.
The REC SETTING screen appears.
Using the wheel, select one of the following options.
Options: 44.1k (default value), 48k, 96k
NOTE
96k cannot be selected for a MP3 format file.
TIP
You can record with audio quality equivalent to a CD by
selecting WAV 16bit and 44.1k.
6. Press the ENTER/MARK or . button to confirm the
setting and enable selection of other setting items.
7. Once the setting has been completed, press the 8/HOME
button to return to the Home screen.
TASCAM DR-44WL
18
4 – Recording
Adjusting the input level
Before starting recording, the input level should be adjusted to
prevent the recorded sounds or signals from being distorted
due to excessively large input signals or from being inaudible
due to excessively low input signals compared to noise.
In addition to manual adjustment, the unit has the following
two level adjustment functions: peak reduction and limiter. Any
of these can be used as required. (See “How to download and
install the exclusive application (DR CONTROL)” on page 53.)
TIPS
In addition to adjusting the INPUT level, try changing the
distance and angle between the microphone and the sound
source. The angle and distance of the microphone can also
change the sound quality.
1. In the Home screen mode, press the INPUT LEVEL button at
the right side panel to make the INPUT LEVEL setting screen
pop up.
All the TRACK/INPUT buttons start flashing.
Press a TRACK/INPUT button to select a channel (track) for
input level adjustment.
Selected TRACK/INPUT buttons light.
NOTE
If you select multiple channels/tracks (1/2 or 3/4) for input
level adjustment, you can adjust them at the same time.
2. Use the INPUT LEVEL volume of the right side panel to
adjust the input level.
Set the input gain
When an external input is selected for the input source, select
the option for the EXT IN switch at the right side panel to suit
the connected external device.
8
MIC+PHANTOM:
Use this setting when connecting condenser microphones
that require phantom power (+24V or +48V) to the recorder.
(See “Using phantom power” on page 19.)
8
MIC:
Use this setting when connecting microphones to the
recorder.
8
LINE:
Use this setting when connecting line output jacks of
external devices to the analog inputs of this recorder.
CAUTION
Depending on this setting, the input level setting range
changes. For this reason, the input level might change
greatly when this setting is changed. Before changing it, you
should turn the power OFF or turn the output level all the
way down.
Using phantom power
In stop mode, if you change the EXT IN switch at the right
side panel to MIC+PHANTOM, a pop-up message appears
confirming that you want to turn phantom power on.
When the input sound is too loud, the PEAK indicator of the
top panel is lit in red.
A tg mark is provided at the “-12 dB” position on the
level meters.
Set the input level so that the level changes near this mark
without causing the PEAK indicator to light in red.
3. Press the INPUT LEVEL button at the right side panel or the
8/HOME button at the top panel to return to the HOME
screen.
NOTE
When in recording standby or during recording, the speaker
does not output sound even if the SPEAKER setting is
enabled.
If you need to monitor sound to adjust the input level and
make recordings, connect the headphone to the /LINE
OUT jack.
To adjust monitor sound, go to the Home screen and use the
OUTPUT LEVEL button at the left side panel. Adjusting the
monitor sound will not affect the recording quality.
When the confirmation pop-up message opens, press the
ENTER/MARK button to turn phantom power on for the EXT
MIC/LINE IN jack and supply phantom power (+24V or +48V) to
the connected microphone.
While the confirmation pop-up message is displayed, change
the EXT IN switch to either MIC or LINE to close the confirmation pop-up message and turn phantom power off.
Use the POWER/DISPLAY screen to set the voltage to +24V or
+48V. (See “Set the voltage value of the phantom power supply”
on page 61.)
NOTE
Battery power will be consumed faster when set to +48V
than when set to +24V.
CAUTION
•
Confirm that phantom power is OFF before connecting a
line level device to the EXT MIC/LINE IN jack. If you connect
a line level device while phantom power is being supplied,
that device and this unit could be damaged.
TASCAM DR-44WL
19
4 – Recording
•
When connecting to or disconnecting a condenser microphone from the EXT MIC/LINE IN jack, confirm that the
phantom power for that jack is OFF. If you connect or
disconnect a microphone while phantom power is being
supplied, that microphone and this unit could be damaged.
•
Turn phantom power ON only when using a condenser
microphone that requires phantom power.
•
Supplying phantom power to some ribbon microphones
will break them. If you are unsure, do not supply phantom
power to a ribbon microphone.
•
When using USB bus power, the unit might not be able to
supply phantom power depending on the computer. If this
occurs, use the dedicated AC adapter (TASCAM PS-P520U:
sold separately).
•
Some condenser microphones will not operate when
phantom power is set to +24V.
•
Do not connect or disconnect the AC adapter when using
phantom power. Even when the battery were inserted in
the unit, the power might be cut off, causing data being
recorded to be damaged or lost.
Settings in the INPUT SETTING screen
The contents of the INPUT SETTING screen displayed by
pressing the INPUT button vary depending on which mode to
be selected between 4CH mode and MTR mode.
INPUT SETTING screen TRACK 1 display when in 4CH mode
INPUT SETTING screen TRACK 1 display when in MTR mode
NOTE
When a channel (track) link is turned on, the link status
shown at the bottom of the INPUT SETTING screen will
change.
INPUT SETTING screen TRACK 1 display when in 4CH mode
TASCAM DR-44WL
20

4 – Recording
Setting channel links (4CH mode only)
Channels 1 and 2, as well as channels 3 and 4, can be linked.
When channels (tracks) are linked, their settings on the INPUT
SETTING screen are shared.
1. Press the INPUT button to show the INPUT SETTING screen.
2. Press a TRACK/INPUT button to open the INPUT SETTING
screen for the linked channels (tracks).
3. Using the wheel select (highlight) LINK and press the
ENTER/MARK or / button.
4. Use the wheel to set the channel (track) link.
Options: OFF (default value), ON
5. Press the ENTER/MARK button to confirm the setting and
enable selection of other setting items.
6. Once the setting has been completed, press the 8/HOME
button to return to the Home screen.
NOTE
LINK can be set or changed even during recording standby
and when recording.
Set the track input (MTR mode only)
1. Press the MENU button to open the MENU screen.
2. Using the wheel, select (highlight) MODE and press the
ENTER/MARK or / button.
The MODE screen is displayed.
3. Press the ENTER/MARK or / button.
4. Using the wheel, set the mode to MTR mode and press the
ENTER/MARK button.
Options: 4CH (4 CH mode, default value), MTR (MTR mode)
5. Press the INPUT button to show the INPUT SETTING screen.
6. Press a TRACK/INPUT button to open the INPUT SETTING
screen for that track to set its input.
7. Using the wheel, select (highlight) INPUT and press the
ENTER/MARK or / button.
INPUT SETTING screen TRACK 1 display when in MTR mode
Option Input destination
OFF
INT L
(Track 1 default)
INT R
EXT 1
EXT 2
8. Press the ENTER/MARK button to confirm the setting and
enable selection of other setting items.
9. Once the setting has been completed, press the 8/HOME
button to return to the Home screen.
No input setting
Input from right front side of built-in
stereo mic
Input from left back side of built-in
stereo mic
Input from EXT MIC/LINE IN 1/L jack
Input from EXT MIC/LINE IN 2/R jack
NOTE
•
The INPUT setting cannot be used when recording.
•
The same input option cannot be shared by multiple
tracks. If an input option that has already been assigned is
selected, the track that was originally assigned will be set to
OFF.
TASCAM DR-44WL
21

4 – Recording
DELAY setting
Correct a time delay that occurs when the built-in microphones
are far away from an external microphone.
1. Press the INPUT button to show the INPUT SETTING screen.
2. Press a TRACK/INPUT button to open the INPUT SETTING
screen for that channel (track) to set its DELAY item.
3. Using the wheel select (highlight) DELAY and press the
ENTER/MARK or / button.
INPUT SETTING screen TRACK 1 display when in 4CH mode
4. Use the wheel to set a value according to the distance of the
connected microphone.
Options: 0ms (0m) (default value) to 300ms (103m)
5. Press the ENTER/MARK button to confirm the setting and
enable selection of other setting items.
6. Once the setting has been completed, press the 8/HOME
button to return to the Home screen.
Set the low-cut filter
The low-cut filter can reduce noise such as offensive wind noise
from air-conditioners and projectors.
1. Press the INPUT button to show the INPUT SETTING screen.
2. Press a TRACK/INPUT button to open the INPUT SETTING
screen for that channel (track) to set its low-cut filter.
3. Using the wheel select (highlight) LOW CUT and press the
ENTER/MARK or / button.
INPUT SETTING screen TRACK 1 display when in 4CH mode
4. Use the wheel to set the cut-off frequency of the low-cut
filter.
Options: OFF (default value), 40Hz, 80Hz, 120Hz, 220Hz
5. Press the ENTER/MARK button to confirm the setting and
enable selection of other setting items.
6. Once the setting has been completed, press the 8/HOME
button to return to the Home screen.
NOTE
LOW CUT can be set or changed even during recording
standby.
TASCAM DR-44WL
22

4 – Recording
TASCAM0001S12.WAV
Using the level control function
You can set the input level for microphone input.
1. Press the INPUT button to show the INPUT SETTING screen.
2. Press a TRACK/INPUT button to open the INPUT SETTING
screen for that channel (track) to set its level control
function.
3. Using the wheel select (highlight) LV CTRL and press the
ENTER/MARK or / button.
INPUT SETTING screen when in 4CH mode
4. Use the wheel to set the level to be used.
Options: OFF (default value), LIMITER, PEAK
5. Press the ENTER/MARK button to confirm the setting and
enable selection of other setting items.
6. Once the setting has been completed, press the 8/HOME
button to return to the Home screen.
NOTE
LV CTRL can be set or changed even during recording
standby and when recording.
8
PEAK
This function is used to automatically lower the input level to an
appropriate one when an input sound is too loud. This allows
input level setting to be performed easily. The input level can be
raised manually if required.
TIPS
When recording live performances, for example, test for
peak reduction may be performed before actual recording.
Select the peak reduction mode in recording standby, and
maximize the input level. As a test performance is given
subsequently, the input gain is reduced to an appropriate
level to meet the input signals, and an optimum input level
for the performance is set.
Recording will be stored at this input level if this mode is
disabled before starting recording. Otherwise, the input
level will continue to be controlled automatically during
recording.
8
LIMITER
This function prevents distortion due to a sudden and excessive
input.
This mode is also suited for recording of live performances with
large volume changes.
In this mode, you can change the input level manually even
during recording.
CAUTION
Distortion of sounds may occur when excessively large input
signals come in even if the LIMITER function is activated. If
this occurs, reduce the input level manually or move the unit
farther away from the sound source.
Record in 4CH mode (4CH mode only)
You can connect built-in microphones to external microphones
or other equipment to record four independent channels.
Mono × 1–4
Channels 1, 2, 3 and 4
Stereo × 1–2
Channels 1/2 and 3/4
Stereo × 1 + Mono × 1–2 (WAV or BWF only)
Channels 1/2, channel 3 and channel 4
Channel 1, channel 2 and channels 3/4
Record 4 channels
1. Set the mode to 4CH mode. (See “Selecting Operation Mode”
on page 17.)
2. Press the RECORD button to set the recording standby
mode.
3. Select the channel (track) you want to record by using the
TRACK/INPUT button.
At this point, for the channel (track) you want to record into
a stereo file, turn the stereo link on. A channel (track) not
stereo-linked is recorded into a mono file.
4. Press the RECORD button again to start recording.
5. Press the 8/HOME button to stop recording.
8
How to Set the Stereo Link
•
Turn the stereo link for channel 1 and channel 2 on/off.
When in recording standby, press TRACK/INPUT button 1
and button 2 at the same time.
•
Turn the stereo link for channel 3 and channel 4 on/off.
When in recording standby, press TRACK/INPUT button 3
and button 4 at the same time.
You can check the status of the stereo link from the channel
(track) status display in the screen display.
The stereo link can be set for the above combinations only.
NOTE
When the FORMAT item on the REC SETTING screen is set to
MP3, recording a combination of mono and stereo files is not
possible.
File names when recording in 4-channel
In 4-channel recording, the following files are created.
If they are stereo-linked, files are created in sets for the built-in
mic (channels 1/2) and external device (channels 3/4).
1: Set with the WORD item on the FILE NAME screen.
2: Recording file base number
3: S is the source file
4: Assigned channels (1 is channel 1, 12 is channels 1/2 and
34 is channels 3/4)
TASCAM DR-44WL
23

4 – Recording
Record in MTR mode (MTR mode only)
You can use this device as a multitrack recorder (MTR) to record
individual tracks and overdub them.
A maximum of four channels can be recorded simultaneously
from the built-in mics and external input jacks (input jack assignments can be selected). These can also be recorded into already
recorded files (overdubbing).
Recorded files are saved as mono x 4.
1. Set the mode to MTR mode. (See “Selecting Operation Mode”
on page 17.)
2. Select the track you want to record by using the TRACK/
INPUT button.
The track selected here goes into recording standby mode.
3. Press the RECORD button to start recording.
4. Press the 8/HOME button to stop recording.
NOTE
In MTR mode, you can punch in and out as well as bounce
tracks. (See “Punching in/out (MTR mode only)” on page
29.) (See “Track bounce (MTR mode only)” on page 45.)
Switch files during recording (track increment, available in 4CH mode only)
During recording, you can stop recording to the current file
either manually or automatically at a set time, and continue to
record to a new file (the track increment function).
Manual track increment during recording
During recording, you can easily update a file manually and
continue to make recording.
1. Press the / button during recording.
NOTE
Numbers at the end of file name will increment each time
when a new file is created.
CAUTION
•
The maximum total number of folders and files you can
create is 5,000.
•
Files with a recording time of less than two seconds cannot
be created. Moreover, if the sampling frequency is 96 kHz,
files shorter than four seconds cannot be created.
•
When the name of a new file to be created already exists,
the number will be incremented further.
Automatic track increment at specified time
During recording, the DR-44WL will automatically switch
recording from the current file to a new file when it reaches a
certain time specified in the TRACK INC of the AUTO FUNCTION
screen.
Follow the below steps to set the maximum time for automatic
increment:
1. Press the MENU button to open the MENU screen.
2. Using the wheel, select (highlight) AUTO FUNCTION and
press the ENTER/MARK or / button.
AUTO FUNCTION screen is displayed.
3. Using the wheel, select (highlight) TRACK INC and press the
ENTER/MARK or / button.
4. Use the wheel to select the automatic track increment time.
Options: OFF (default value), 5min, 10min, 15min, 30min,
60min
5. Press the ENTER/MARK button to confirm the setting and
enable selection of other setting items.
6. Once the setting has been completed, press the 8/HOME
button to return to the Home screen.
TASCAM DR-44WL
24
CAUTION
The maximum total number of folders and files you can
create is 5,000.

4 – Recording
Recording automatically (AUTO REC) (4CH mode only)
When the auto record function is on, the unit can start and
pause recording and create new files automatically in response
to input sound levels.
1. Press the MENU button to open the MENU screen.
2. Using the wheel, select (highlight) AUTO FUNCTION and
press the ENTER/MARK or / button.
AUTO FUNCTION screen is displayed.
3. Using the wheel, select (highlight) AUTO REC and press the
ENTER/MARK or / button.
4. Use the wheel to select a start level that activates the AUTO
REC function (a level that recognizes incoming signals).
Options: OFF (default value), -6dB, -12dB, -24dB, -48dB
5. Press the ENTER/MARK button to confirm the setting and
enable selection of other setting items.
6. Once the setting has been completed, press the 8/HOME
button to return to the Home screen.
7. Press the RECORD button to set to the mode in which the
channel (track) is selected for recording.
8. Select the channel (track) you want to record by using the
TRACK/INPUT button.
At this point, for the channel (track) you want to record into
a stereo file, turn the stereo link on. A track not stereo-linked
is recorded into a mono file.
9. Press the RECORD button to set the recording standby
mode.
Recording starts automatically when the input signal
exceeds the threshold set in the AUTO REC item.
Start recording a moment before pressing RECORD (PRE REC, 4CH mode only)
By using prerecording, when the unit is in recording standby
you can record up to two seconds of the signal input before the
RECORD button is pushed to start recording. (PRE REC)
1. Press the MENU button to open the MENU screen.
2. Using the wheel, select (highlight) REC SETTING and press
the ENTER/MARK or / button.
The REC SETTING screen appears.
3. Using the wheel, select (highlight) PRE REC and press the
ENTER/MARK or / button.
4. Using the wheel, turn the PRE REC function on or off.
Options: OFF (default value), ON
Press the ENTER/MARK button to confirm the setting and
enable selection of other setting items.
5. Once the setting has been completed, press the 8/HOME
button to return to the Home screen.
TIPS
By combining PRE REC with the AUTO REC function, you will
not miss an opportunity to start recording.
NOTE
If you start recording within two seconds from when the
record standby mode is turned ON, recording will begin
from the record standby mode.
NOTE
•
When in recording standby, the RECORD indicator flashes
faster than when recording.
•
When recording, if the input signal level falls below the level
set with the AUTO REC item for more than 5 seconds, the unit
pauses recording and creates a new file. When the input
signal level becomes higher than the set level again, it starts
recording to a new file.
•
When new files are created, incremental numbers are added
to the end of each file name.
10. Press the 8/HOME button to stop recording.
CAUTION
•
When the auto record function is on the self-timer cannot
be used.
•
The maximum total number of folders and files you can
create is 5,000.
•
Files with a recording time of less than two seconds cannot
be created. Moreover, if the sampling frequency is 96 kHz,
files shorter than four seconds cannot be created.
•
When the name of a new file to be created already exists,
the number will be incremented further.
TIPS
By using this in combination with the PRE REC function, you
can record events without losing the beginnings of sounds.
TASCAM DR-44WL
25

4 – Recording
Self-timer function
Similar to a camera, the DR-44WL has a self-timer function to
begin recording after a set period of time.
1. Press the MENU button to open the MENU screen.
2. Using the wheel, select (highlight) REC SETTING and press
the ENTER/MARK or / button.
The REC SETTING screen appears.
3. Using the wheel, select (highlight) SELF TIMER and press
the ENTER/MARK or / button.
4. Use the wheel to set the waiting time to start recording.
Options: OFF (default value), 5SEC., 10SEC.
5. Press the ENTER/MARK button to confirm the setting and
enable selection of other setting items.
6. Once the setting has been completed, press the 8/HOME
button to return to the Home screen.
7. Press the RECORD button to set the recording standby
mode.
The self-timer icon appears on the recorder status screen,
and the time is displayed on the right.
8. Press the RECORD button.
Recording will start after the set time period.
Simultaneously recording two files with different input levels/formats (DUAL REC, 4CH only)
This recorder can simultaneously record a second recording
at a different input level along with the regular recording. For
example, when recording with microphones, you can make an
ordinary recording with the input level set as high as possible
and simultaneously record at a slightly lower input level for
safety.
Recorded files are saved as two files: one recorded at the input
level of ordinary recording and the other recorded at an input
level 12dB lower than that level. In addition, you can record in
two different formats (WAV and MP3) simultaneously and create
two files.
NOTE
•
Make the input level setting for the ordinary recording in
the usual manner. (See “Adjusting the input level” on page
19.), (See “Set the input gain” on page 19.)
•
You cannot apply effects to the second file, which is
recorded at a different input level or in a different format.
Enabling dual recording
1. Press the MENU button to open the MENU screen.
2. Using the wheel, select (highlight) REC SETTING and press
the ENTER/MARK or / button.
The REC SETTING screen appears.
3. Using the wheel, select (highlight) MODE and press the
ENTER/MARK or / button.
NOTE
•
The self-timer function will not work when recording is
paused during recording.
•
The self-timer function and the AUTO REC function cannot
be used together.
•
When in MTR mode, if the AUTO PUNCH item on the AUTO
FUNCTION screen is ON, the AUTO PUNCH function will be given
priority.
4. Use the wheel, to set the recording mode for dual recording.
Options Detail
OFF (default value)
LEVEL:
FORMAT
5. Press the ENTER/MARK button to confirm the setting and
enable selection of other setting items.
6. When FORMAT is selected for the recording mode, move
on to the next step. When an item other than FORMAT is
selected, press the 8/HOME button to return to the Home
screen.
7. Using the wheel, select (highlight) FORMAT and press the
ENTER/MARK or / button.
Record in ordinary stereo mode.
Record at two different levels.
Record in two different formats (WAV
and MP3).
TASCAM DR-44WL
26

4 – Recording
TASCAM0002S12.WAV
TASCAM0002S12D.WAV
8. Use the wheel to set the MP3 format for dual recording.
Options: MP3 320k, MP3 256k, MP3 192k , MP3 128k, MP3 96k,
MP3 64k, MP3 32k
9. Press the ENTER/MARK button to confirm the setting and
enable selection of other setting items.
10. Once the setting has been completed, press the 8/HOME
button to return to the Home screen.
NOTE
•
The WAV file format is the setting in ordinary recording.
•
DUAL FORMAT can be selected only when the recording
format is WAV or BFW, 44.1kHz and 16 bits or 48 kHz and 16
bits.
•
With dual recording, two tracks can be recorded for a stereo
file or one track can be recorded for a mono file. Multiple
channels (tracks) cannot be selected as dual recording
sources.
Starting dual recording
1. Press the RECORD button to enter recording standby,
and use the TRACK/INPUT buttons to select the channels
(tracks) that you want to record.
2. Press the RECORD button to start dual recording.
During dual recording, the recording screen appears as
follows.
Create cue marks during recording
In recording or recording standby mode, the DR-44WL can
create cue marks to a file to quickly locate the marked position
and start playback. (See “How to download and install the
exclusive application (DR CONTROL)” on page 53.)
You can either manually set the cue mark, or automatically set
the cue mark level or time to minimize the operation noise.
NOTE
The unit will not move to the cue mark position in recording
or recording standby mode.
Manual cue marking during recording
Press the ENTER/MARK button during recording or recording
standby to create a cue mark.
The registered pull-up cue mark no. message will appear at the
bottom of the screen display.
In the input source display area of the recording screen, the
input levels of the current input source and of the second file for
dual recording are shown.
Dual recording file names
Dual recording allows two files to be created simultaneously.
The name of the second file created by dual recording has “_D”
added to the name of the file recorded ordinarily.
1: Set with the WORD item on the FILE NAME screen.
2: Recording file base number
3: S is the source file
4: Assigned channels( 12 is channels 1/2 and 34 is channels
3/4)
5: D is the dual recording file
NOTE
•
Up to 99 cue marks can be created and stored in each file.
•
Cue marks that are created during the recording of WAV file
in BWF format by this unit are stored in the file. You can use
the cue marks in softwares compatible with BWF format.
•
MARK SET [xx]* is added to the mark name.
* [xx] is a serial number common to all marks.
TASCAM DR-44WL
27

4 – Recording
Add cue marks automatically during recording
When you turn the AUTO MARK function ON, cue marks can be
added automatically according to the operating level and time.
8
Add cue marks automatically according to set levels
1. Press the MENU button to open the MENU screen.
2. Using the wheel, select (highlight) AUTO FUNCTION and
press the ENTER/MARK or / button.
AUTO FUNCTION screen is displayed.
3. Using the wheel, select (highlight) MODE for AUTO MARK and
press the ENTER/MARK or / button.
4. Use the wheel to set the automatic cue mark mode to
LEVEL.
Options: OFF (default value), LEVEL, TIME
5. Press the ENTER/MARK button to finalize the set mode.
6. Using the wheel, select (highlight) LVL/TIME for AUTO MARK
and press the ENTER/MARK or / button.
6. Using the wheel, select (highlight) LVL/TIME for AUTO MARK
and press the ENTER/MARK or / button.
7. Use the wheel to set a time to automatically add cue marks.
Options: 5min, 10min, 15min, 30min, 60min (default value)
8. Press the ENTER/MARK button to finalize the set time.
9. Once the setting has been completed, press the 8/HOME
button to return to the Home screen.
8
Adding marks automatically when the PEAK
indicator lights
1. Press the MENU button to open the MENU screen.
2. Use the wheel to select AUTO FUNCTION, and press the
ENTER/ MARK or / button.
The AUTO FUNCTION screen opens.
3. Use the wheel to select the PEAK MARK item under AUTO
MARK, and press the ENTER/MARK or / button.
7. Use the wheel to set a level to automatically add cue marks.
Options: -6dB, -12dB (default value), -24dB, -48dB
8. Press the ENTER/MARK button to finalize the set mode.
9. Once the setting has been completed, press the 8/HOME
button to return to the Home screen.
8
Add cue marks automatically according to set time
1. Press the MENU button to open the MENU screen.
2. Using the wheel, select (highlight) AUTO FUNCTION and
press the ENTER/MARK or / button.
AUTO FUNCTION screen is displayed.
3. Using the wheel, select (highlight) MODE for AUTO MARK and
press the ENTER/MARK or / button.
4. Use the wheel to set the automatic cue mark mode to TIME.
5. Press the ENTER/MARK button to finalize the set mode.
4. Use the wheel to turn the PEAK MARK function ON.
Options: OFF (default), ON
5. Press the ENTER/MARK button to confirm the setting and
reenable setting item selection.
6. When finished making the setting, press the 8/HOME
button to return to the Home Screen.
NOTE
•
Marks are added two seconds before a PEAK indicator
lights.
•
For 10 seconds after a mark is added because a PEAK
indicator lit, no other mark will be added if the PEAK
indicator lights again or an automatic mark would normally
be added according to the LEVEL setting.
•
Marks added because of a PEAK indicator lighting will not
cause division when the automatic division function is used.
Moving to the cue mark position
During pause, you can move to a cue mark registered in the
selected file. When multiple cue marks exist, you will move to
the nearest cue mark to the present cue mark.
You can use this function to go to the beginning of a song,
similar to an index.
1. During pause or playback, while pressing the ENTER/MARK
button, press the . button or the / button.
NOTE
You cannot move to a cue mark of a different file.
TASCAM DR-44WL
28

4 – Recording
Use MS microphone
The unit is provided with the MS decoder; you can record or play
tracks using the MS microphone.
1. Press the MENU button to open the MENU screen.
2. Using the wheel, select (highlight) REC SETTING and press
the ENTER/MARK or / button.
The REC SETTING screen appears.
3. Using the wheel, select (highlight) MS DECODE and press the
ENTER/MARK or / button.
4. Use the wheel to set the decoding mode when using a
mid-side microphone.
Options Detail
OFF
(default value)
REC
PLAY
5. Press the ENTER/MARK button to confirm the setting and
enable selection of other setting items.
6. Using the wheel, select (highlight) SOURCE and press the
ENTER/MARK or / button.
Record in ordinary stereo mode.
Use to decode while recording.
Playback is conducted without decoding.
Record mid-side microphone output
without decoding for decoding later. Use
this mode to monitor when recording
with a mid-side microphone.
Use this also when playing back mid-side
files that were recorded without
decoding.
Punching in/out (MTR mode only)
Punching in and out is a technique used to replace parts of
already recorded tracks.
Punching in/out manually
You can start playback of recording, switch to recording when
it reaches the part to be replaced (punch in), and then switch
back to playback (or stop) when the end of that part is reached
(punch out).
1. Set the operation mode to MTR. (See “Selec ting Operation
Mode” on page 17.)
2. Determine the part you want to replace in advance.
Select a point where the replacement audio can be
combined well with the original track audio.
3. Press the TRACK/INPUT button for the track with the part to
be replaced to enter recording standby (RECORD indicator
flashes).
4. Press the 7/9 button again to restart playback before the
part to be replaced.
5. When the part to be replaced is reached, press the RECORD
button to switch to recording (punch in).
6. When the end of the part to be replaced is reached, press
the 8/HOME button to switch to playback (punch out).
Punching in/out automatically (AUTO PUNCH)
Use this function to start (punch in) and stop (punch out)
recording automatically when set IN (starting) and OUT (ending)
points are reached.
1. Set the operation mode to MTR. (See “Selec ting Operation
Mode” on page 17.)
2. Set the IN (starting) and OUT (ending) points of the loop
on the PLAY FUNCTION screen. (See “Repeated Playback of
Selection (Loop Playback)” on page 39.)
3. Press the 8/HOME button to return to the Home Screen.
4. Press the MENU button to open the MENU screen.
5. Use the wheel to select AUTO FUNCTION and press the
ENTER/MARK or / button to open the AUTO FUNCTION
screen.
6. Use the wheel to select AUTO PUNCH and press the ENTER/
MARK or / button.
7. Use the wheel to set the channel to use a mid-side microphone for.
Options: 1+2 CH, 3+4 CH (default value)
8. Press the ENTER/MARK button to confirm the setting and
enable selection of other setting items.
9. Once the setting has been completed, press the 8/HOME
button to return to the Home screen.
NOTE
A mid-side mic can be used in the following circumstances.
•
In 4CH mode, when a mid-side mic is input through the
EXT MIC/LINE IN jack and when this unit is playing back
an external file recorded using a mid-side mic
•
In MTR mode, when a mid-side mic is input through the
EXT MIC/LINE IN jack (channel can be changed using
INPUT)
7. Use the wheel to select ON and press the ENTER/MARK
button.
Options: OFF (default value), ON
TASCAM DR-44WL
29

4 – Recording
8. After you complete the setting, press the 8/HOME button
to return to the Home Screen.
When the AUTO PUNCH function is on, the icon
appears at the top of the Home Screen.
9. Press the TRACK/INPUT buttons for the tracks that you want
to record.
10. Press the RECORD button to start playback. Recording will
start when the IN (starting) point set in step 1 is reached.
Recording will stop when the OUT (ending) point set in step
1 is reached.
TASCAM DR-44WL
30

Recording duration
The table below shows the maximum recording time per file format for SD/SDHC/SDXC cards:
File format (recording setting)
WAV/BWF 16 bit (STEREO)
WAV/BWF 24 bit (STEREO)
32 kbps 44.1kHz/48kHz 69 hour 26 minutes 277 hour 555 hour 2222 hour
64 kbps 44.1kHz/48kHz 34 hour 43 minutes 138 hour 277 hour 1111 hour
MP3
(STEREO/MONO)
96 kbps 44.1kHz/48kHz 23 hour 08 minutes 92 hour 35 minutes 185 hour 740 hour
128 kbps 44.1kHz/48kHz 17 hour 21 minutes 69 hour 26 minutes 138 hour 555 hour
192 kbps 44.1kHz/48kHz 11 hour 34 minutes 46 hour 17 minutes 92 hour 35 minutes 370 hour
256 kbps 44.1kHz/48kHz 8 hour 40 minutes 34 hour 43 minutes 69 hour 26 minutes 277 hour
320 kbps 44.1kHz/48kHz 6 hour 56 minutes 27 hour 46 minutes 55 hour 33 minutes 222 hour
1GB 4GB 8GB 32GB
44.1kHz 1 hour 34 minutes 6 hour 17 minutes 12 hour 35 minutes 50 hour 23 minutes
48kHz 1 hour 26 minutes 5 hour 47 minutes 11 hour 34 minutes 46 hour 17 minutes
96kHz 43 minutes 2 hour 53 minutes 5 hour 47 minutes 23 hour 08 minutes
44.1kHz 1 hour 02 minutes 4 hour 11 minutes 8 hour 23 minutes 33 hour 35 minutes
48kHz 57 minutes 3 hour 51 minutes 7 hour 42 minutes 30 hour 51 minutes
96kHz 28 minutes 1 hour 55 minutes 3 hour 51 minutes 15 hour 25 minutes
SD/SDHC/SDXC cards capacity
4 – Recording
•
The recording times shown above are theoretical values. They might differ depending on the SD, SDHC, and SDXC cards in use.
•
The recording times shown above are not continuous recording times, but they are the total possible recording times for the SD,
SDHC, and SDXC cards.
•
If the recording time exceeds 24 hours, a new file will be created automatically and recording will continue without pause.
•
Mono recording in WAV format will double the maximum recording times specified above.
•
For DUAL REC recording in the WAV/BWF format and 4-channel recording, the maximum recording time will be half the figures
above.
TASCAM DR-44WL
31

5 – Operating Files and Folders (4CH Mode Only)
In the BROWSE screen, you can browse the MUSIC folder (stores
audio files), delete files and folders, or create a new folder in the
SD card.
TIPS
You can also connect the unit with a computer via USB, or
directly insert the SD card to the computer to change the
configuration of folders or delete files in the MUSIC folder
also from the computer. In addition, you can edit file names
from the computer.
To open the BROWSE screen, press the MENU button to open
the MENU screen. Use the wheel to select (highlight) BROWSE and
press the ENTER/MARK or / button.
Displayed in this screen are the contents of the folder containing
the file selected on the Home screen before the BROWSE screen
was opened.
Screen navigation
Folders and music files are displayed in a layered-tree type in the
BROWSE screen.
The DR-44WL can create up to two layers in each folder.
•
Use the wheel to select (highlight) a file or folder.
•
When a folder is selected (highlighted), press the /
button to show the contents of that folder.
•
When a file for folder is selected (highlighted), press the
. button to move one level upward.
•
When a file or folder is selected (highlighted), press the
QUICK button to open the QUICK pop-up menu.
•
When a file is selected, press the ENTER/MARK or /
button to return to the Home Screen and load the file.
The folder that contains this file becomes the current folder
(the currently selected folder), and recorded files will be
saved to this folder.
•
When a file is selected, press the 7/9 button to return to
the Home Screen and play the file.
•
When a folder is selected, press the ENTER/MARK button
to return to the Home screen and load the first file in that
folder.
This folder becomes the current folder (the currently
selected folder), and recorded files will be saved to this
folder.
Icons on the BROWSE screen
The meanings of icons that appear on the BROWSE screen are as
follows.
8
MUSIC folder ( )
In the BROWSE showing the ROOT level, the MUSIC folder is
displayed at the top.
8
Audio file ( )
This icon appears before the name of a music file.
8
Folder ( )
This folder contains a sub-folder.
8
Folder ( )
This folder contains no sub-folder.
8
Folder in display ( )
Contents of this folder is currently in display.
8
New folder ( )
A new folder will be created.
File operations
Select (highlight) the desired audio file in the BROWSE screen,
and press the QUICK button to open the following QUICK
pop-up menu.
Use the wheel to select (highlight) an item, and press the
ENTER/MARK button. Either of the following actions will start
according to the selected item.
8
INFORMATION
Information about the selected file (date/time, size) will pop up.
TASCAM DR-44WL
32
Press the 8/HOME button again to return to the BROWSE screen.

5 – Operating Files and Folders (4CH Mode Only)
8
FILE DELETE
A pop-up message appears to confirm that the deletion of the
selected file.
Press the ENTER/MARK button to delete the file, and press the
8/HOME button to cancel the delete operation.
8
Protecting files (4CH mode only)
This function protects files to change them to read-only.
1. Select a file to protect on the BROWSE screen.
2. Press the QUICK button to open the quick menu pop-up,
and use the wheel to select CHANGE PROTECT.
3. Press the ENTER/MARK button.
A SET PROTECT pop-up message appears to confirm that
you want to protect the selected file.
If the file has already been protected, REMOVE PROTECT will
appear instead.
8
Clearing all marks (4CH mode only)
1. Select the file for which to clear all marks on the BROWSE
screen.
2. Press the QUICK button to open the quick menu pop-up,
and use the wheel to select CLR ALL MARKS.
3. Press the ENTER/MARK button.
The following confirmation pop-up message appears.
4. Press the ENTER/MARK button to clear the marks and return
to the BROWSE screen.
Press the 8/HOME button to cancel clearing the marks and
return to the BROWSE screen.
Folder operations
Select the desired folder on the BROWSE screen and press the
QUICK button to open the QUICK pop-up menu that is shown
below.
4. Press the ENTER/MARK button to protect the file and return
to the BROWSE screen. If the file has already been protected,
this will remove protection from it before returning to the
BROWSE screen.
Press the 8/HOME button to cancel changing the
protection status and return to the BROWSE screen.
NOTE
•
All other files in the same project as the protected file will
also be protected.
•
Use the INFORMATION item in the BROWSE screen quick menu
to check protection status.
Use the wheel to select (highlight) an item, and press the
ENTER/MARK button. Either of the following actions will start
according to the selected item.
8
SELECT
Returns to the Home screen and selects the first file in the folder.
In addition, the recorded files are saved in the selected folder.
8
ALL DELETE
A pop-up message will appear to confirm deletion of all files in
the selected folder.
Press the ENTER/MARK button to delete the files, and press the
8/HOME button to cancel the delete operation.
TASCAM DR-44WL
33

5 – Operating Files and Folders (4CH Mode Only)
NOTE
•
Read-only files and unrecognized files by the DR-44WL will
not be deleted.
•
Files on different levels of the selected folder will not be
deleted.
•
To delete all the files in the root folder (MUSIC) at the same
time, move to the top level in the BROWSE screen, select the
MUSIC folder and selects ALL DELETE from the Quick menu.
8
Deleting empty folders (4CH mode)
1. Select the empty folder that you want to delete on the
BROWSE screen.
2. Press the QUICK button to open the quick menu pop-up,
and use the wheel to select FOLDER DELETE.
3. Press the ENTER/MARK button.
The following confirmation pop-up message appears.
Creating a new folder
A NEW FOLDER is available at the bottom of each folder.
1. Select (highlight) NEW FOLDER, and press the ENTER/MARK
or / button to confirm creation of a new folder.
2. Press the ENTER/MARK button to create a new folder.
Press the 8/HOME button to cancel creation of a new
folder.
NOTE
If the folder is not empty, a NOT EMPTY pop-up message will
appear.
4. Press the ENTER/MARK button to delete the empty folder
and return to the BROWSE screen.
Press the 8/HOME button to cancel deleting the folder and
return to the BROWSE screen.
NOTE
The DR-44WL is not designed to handle folders with three or
more layers, and therefore the NEW FOLDER does not exist in
a folder with two layers.
A newly created folder becomes the current folder (currently
selected folder), and recorded files are saved in this folder.
TASCAM DR-44WL
34

6 – Managing Songs (MTR Mode only)
In the MTR mode of this recorder, one track (recording data
group) is treated as one song and data is managed on a song
basis. For one song, four tracks and a master file after mixing
down are saved.
To record or create music, a song being created needs to be
loaded or a new song needs to be created.
This chapter describes basic operations such as a method for
loading songs and a procedure for creating new songs as well as
various functions to mange songs.
Song Operation
Select (highlight) the desired song file on the SONG screen,
and press the QUICK button to open the QUICK pop-up menu
below.
Use the wheel to select (highlight) the desired item, and press
the ENTER/MARK button. Then, the unit operates as follows:
8
LOAD
Loads the selected song.
8
CREATE
Creates a new song.
8
INFORMATION
Information about the selected song (date/time, size) will pop
up.
Loading Songs
Use the following procedure to load the song you want.
1. Set the mode to MTR mode. (See “Selecting Operation Mode”
on page 17.)
2. Press the MENU button when the recorder is stopped to
open the MENU screen.
3. Using the wheel, select (highlight) SONG and press the
ENTER/MARK or / button.
The SONG screen will be displayed.
NOTE
The * icon appears for a song currently being loaded.
4. Use the wheel to select (highlight) the desired song and
press QUICK to open the QUICK pop–up menu below.
NOTE
After selecting (highlighting) the desired song, press the
ENTER/MARK button to load the selected song and return
to the Home screen.
5. Using the wheel, select (highlight) LOAD and press the
ENTER/MARK button.
The selected song will be loaded, and the pop–up will
disappear.
The icon * will move to the selected song.
6. Press the 8/HOME button to return to the Home screen.
8
RENAME ( V1.10 supported)
Edits the name of the selected song.
8
DELETE
Deletes the selected song.
TASCAM DR-44WL
35

6 – Managing Songs (MTR Mode only)
Creating a New Song
Use the following procedure to create a new song.
1. Set the mode to MTR mode. (See “Selecting Operation Mode”
on page 17.)
2. Press the MENU button when the recorder is stopped to
open the MENU screen.
3. Using the wheel, select (highlight) SONG and press the
ENTER/MARK or / button.
The SONG screen will be displayed.
4. Press the QUICK button to open the QUICK pop–up menu
and use the wheel to select (highlight) CREATE.
5. Press the ENTER/MARK button to open the QUICK pop-up
menu for setting the format for a new song.
Changing the Song Name
Use the following procedure to change the song name.
1. Set the mode to MTR mode. (See “Selecting Operation Mode”
on page 17.)
2. Press the MENU button when the recorder is stopped to
open the MENU screen.
3. Using the wheel, select (highlight) SONG and press the
ENTER/MARK or / button.
The SONG screen will be displayed.
4. Use the wheel to select the song with the name you want to
change.
5. Press the QUICK button to open the quick pop-up menu,
and use the wheel to select RENAME.
6. When the ENTER/MARK button is pressed, the SONG RENAME
screen for changing the song name will pop up.
6. Use the wheel to set the format of the new song.
Options: 44.1kHz - 16bit (default), 44.1kHz - 24bit,
48kHz - 16bit, 48kHz - 24bit
7. Press the ENTER/MARK button to create the new song.
Press the 8/HOME button to return to the SONG screen.
NOTE
The song to be created will be named according to the
settings of the TYPE item on the FILE NAME screen.
8. Edit the name (title) of the song as necessary. (See “Song
Operation” on page 35.)
TIPS
The song name (title) can also be edited later using RENAME
in the QUICK menu. The song name can also be edited when
saving the song.
9. Press the 8/HOME button to return to the Home screen.
NOTE
The “MTR” folder must always contain at least one song.
For this reason, when you insert or format an SD card, for
example, a new song will be created.
7. Use the . button and the / button to move the cursor
and use thewheel to change the text.
8. Press the ENTER/MARK button to confirm the song name
and return to the SONG screen.
9. Press the 8/HOME button to return to the Home screen.
TASCAM DR-44WL
36

6 – Managing Songs (MTR Mode only)
Deleting songs
You can delete songs. We recommend deleting unnecessary
songs when the SD card space is low.
1. Set the mode to MTR mode. (See “Selecting Operation Mode”
on page 17.)
2. Press the MENU button when the recorder is stopped to
open the MENU screen.
3. Using the wheel, select (highlight) SONG and press the
ENTER/MARK or / button.
The SONG screen will be displayed.
4. Use the wheel to select the song that you want to delete.
5. Press the QUICK button to open the quick pop-up menu,
and use the wheel to select DELETE.
6. Press the ENTER/MARK button to delete the selected song
and return to the SONG DELETE screen.
7. Press the ENTER/MARK button to delete the selected song.
8. Press the 8/HOME button to return to the Home screen.
NOTE
The “MTR” folder must always contain at least one song.
For this reason, when you insert or format an SD card, for
example, a new song will be created.
TASCAM DR-44WL
37

7 – Playback
Playback
When playback is stopped on the Home screen, press the7/9
button to start playing.
NOTE
You can also choose files for playback by name on the
BROWSE screen.
Pausing
Press the 7/9 button to pause playback at the current
position (pause) when playing a track on the Home screen.
Press the 7/9 button again to resume playback from the
previous position
Stopping
When you press 8/HOME button while a track is being played
back on the Home screen, the playback is paused.
Press 8/HOME button again to stop playback at the beginning
of a file.
Fast-rewinding and fast-forwarding (search)
During playback when the Home screen is open, press and hold
the.// button to search backward/forward.
Special Playback Control Functions
Using the unit's playback control functions, you can play back a
selected section of a track repeatedly. You can also change the
playback speed without changing the pitch or change the pitch
without changing the playback speed.
You can use these playback control functions to practice and
learn musical passages effectively.
Playback Control Screen
Use the PLAY FUNCTION screen to set the playback control
functions. Loop playback, playback speed change, and key
change can be made in this mode.
Set the playback control functions using the following method.
1. While the Home screen is open and the unit is stopped,
paused, or playing back, press QUICK to open the QUICK
pop-up menu.
2. Using the wheel, select (highlight) PLAY FUNCTION and press
ENTER/MARK button.
The PLAY FUNCTION screen is displayed.
NOTE
Press and hold the . button or / button to increase
the search speed.
Moving the playback position
Use the wheel to move the playback position while the
playback is stopped or paused on the Home screen.
After you have moved the playback position, the playback is
paused.
Selecting a playback file (skip)
When the Home screen is open, press the . button or the
/ button to select the file you want to play.
When you press the . button while playback of the file is
in progress, it will return to the beginning of the file. When
you press the . button, it will skip to the beginning of the
previous file.
To skip to the next file, press the / button at the beginning
of in the middle of a file.
NOTE
•
The track name, file number and other file information for
the currently playing track appear on the display.
•
When playback was stopped at the beginning of a file, the
status 8 icon will appear on the screen. When playback
was stopped in the middle of a file, the status 9 icon will
appear on the screen.
•
To move a file, press the . button or / button
repeatedly as many times as needed.
3. Press the QUICK button to open the PLAY FUNCTION screen
Quick pop-up menu.
LOOP ON/OFF
Use to turn loop playback on and off. (See “Repeated
Playback of Selection (Loop Playback)” on page 39.)
IN CLEAR
This clears only the loop IN (starting) point. (See “Clearing
IN and OUT points only” on page 39.)
OUT CLEAR
This clears only the loop OUT (ending) point. (See
“Clearing IN and OUT points only” on page 39.)
SPEED
Open a pop-up where you can change the playback
speed. (See “Changing the playback speed (VSA)” on page
39.)
KEY
Open a pop-up where you can change the key. (See “Key
control playback” on page 40.)
FINE TUNE
Open a pop-up where you can change the key. (See “Key
control playback” on page 40.)
4. Use the wheel to select a Quick menu item and press the
ENTER/MARK button.
5. After you finish making settings on this screen, press the
8/HOME button to return to the Home screen.
TASCAM DR-44WL
38

7 – Playback
Repeated Playback of Selection (Loop Playback)
With this function, you can continuously repeat (loop) the
playback of a selection that you make.
1. When the PLAY FUNCTION screen is open, press the 7/9
button to start playback, and press
ENTER/MARK button at the start point of the section that
you want to start loop playback.
This position is set as IN (start) point.
The icon will light up at the playback position under the
playback indicator bar.
2. Press ENTER/MARK button at the end point of the section
that you want to start loop playback.
Clearing IN and OUT points only
1. When the PLAY FUNCTION screen is open, press QUICK
to open the QUICK pop-up menu on the PLAY FUNCTION
screen.
2. Using the wheel, select (highlight) IN CLEAR or OUT CLEAR
and press ENTER/MARK button.
The set IN and OUT points will be cleared.
Changing the playback speed (VSA)
The DR-44WL has a built-in VSA (Variable Speed Audition)
function to change the playback speed without changing its
pitch.
CAUTION
The VSA function will not work when you select a file
recorded at a sampling rate of 96 kHz or three or more
channels (tracks) exist in MP3. However, the icon is
displayed, and the setting of the playback speed can be
changed.
To enable the settings of playback speed when a file
recorded at a sampling frequency of 44.1 kHz or 48 kHz is
loaded by using the . button or / button.
1. When the PLAY FUNCTION screen is open, press QUICK
to open the QUICK pop-up menu on the PLAY FUNCTION
screen.
2. Using the wheel, select (highlight) SPEED and press ENTER/
MARK button.
The screen for changing playback speed will be popped up.
This position is set as OUT (end) point, and the unit will
playback the section between the loop playback IN and OUT
points.
The icon will light up at the playback position under the
playback indicator bar.
During loop playback, the icon lights up under the
recording status indicator.
Press the 8/HOME button return to the Home screen while
maintaining the IN (start) and OUT (end) points and loop
settings enabled. On the Home screen, the icon lights up
and the icon lights up at the position corresponding to
IN (start) and OUT (end) points under the playback indicator
bar.
NOTE
•
The I/O Too Short pop-up message will appear when the
IN-OUT points are too close. Please reset by spacing at least
one second in between.
•
Press ENTER/MARK button again to clear the IN and OUT
points.
•
To stop loop playback, set the PLAY FUNCTION screen Quick
menu LOOP ON/OFF to OFF. When off, disappears from
the Home screen. Set LOOP ON/OFF to ON again to enable
loop playback between the set IN and OUT points.
•
You cannot set the IN and OUT points in different files.
•
The previous IN and OUT point settings are lost when you
set the IN point in a different file.
•
MP3 files with VBR (variable bit rate) format may affect the
accuracy of the IN and OUT points settings.
3. Use the wheel to change the settings of playback speed.
Options: x0.5 - x2.0 (default value: per x1.0, x0.1)
4. Press ENTER/MARK button to finalize the setting and return
to open the QUICK pop-up menu on the PLAY FUNCTION
screen.
5. Press 8/HOME button to the Home screen while
maintaining the set playback speed enabled.
When the playback speed is larger than 1.0, the
icon appears or when it is smaller than 1.0, the icon
appears at the top of the Home screen.
TASCAM DR-44WL
39

7 – Playback
Key control playback
The DR-44WL can change the playback key (pitch) using its key
control function.
In the key control function, the KEY item and FINE TUNE item are
available. The KEY item can adjust in ±6 half-tone, and the FINE
TUNE item can move the key up or down in ±50 cents.
CAUTION
The key control playback cannot be used when a file
recorded with a 96kHz sampling frequency or an MP3 with
three or more channels (tracks) is selected. However, the
icon will still appear and the playback speed can still be
changed.
This function will not affect this file, but it will become
effective if you return to the Home screen and use the .
and / buttons to select a file recorded with a 44.1kHz or
48kHz sampling frequency.
1. When the PLAY FUNCTION screen is open, press QUICK
to open the QUICK pop-up menu on the PLAY FUNCTION
screen.
2. Using the wheel, select (highlight) KEY or FINE TUNE and
press ENTER/MARK button.
The screen for changing keys will be popped up.
Adding marks manually during playback
Press the ENTER/MARK button during playback to add a mark
at that position.
The number of the added mark will be shown on a pull-up at the
bottom of the display.
Clearing specified marks
Pause at the position of a mark. Then, press the ENTER/MARK
button to clear that mark.
Pop-up display of the KEY item
Pop-up display of the FINE TUNE item
3. Use the wheel to change the key settings.
Options
When KEY is selected : ¢6 - £6 (default value: £0, per
half-tone)
When FINE TUNE is selected : -50 - +50 (default value: +0 ,
per cent)
4. Press ENTER/MARK button to finalize the setting and return
to open the QUICK pop-up menu on the PLAY FUNCTION
screen.
5. Press 8/HOME button to the Home screen while
maintaining the set playback speed enabled.
When the key control function is on, appears at the top
of the Home Screen.
Setting the mark skip mode
Multiple types of marks can be added to files (MARK, LEVEL, TIME
and PEAK). With this function, you can set what type of mark to
use when moving between them.
1. Press the MENU button to open the MENU Screen.
2. Use the wheel to select SYSTEM, and press the ENTER/MARK
or / button.
The SYSTEM screen opens.
3. Use the wheel to select MARK SKIP MODE, and press the
ENTER/MARK or / button.
4. Use the wheel to set the mark skip mode.
Options
ALL (default): Move between all marks
MARK: Move between marks added manually
LEVEL: Move between marks added using the automatic
mark function LEVEL setting
TIME: Move between marks added using the automatic
mark function TIME setting
PEAK: Move between marks added when a PEAK indicator
lit
OFF: Do not move between marks
5. Press the ENTER/MARK button to confirm the setting and
reenable setting item selection.
6. When finished making the setting, press the 8/HOME
button to return to the Home Screen.
TASCAM DR-44WL
40

8 – QUICK Button Operation
QUICK button overview
The QUICK button allows you to do the following things.
•
While the playback is stopped or paused on the Home
screen, the QUICK pop-up menu for displaying current file
information, setting playback control functions or mixing
down will be displayed.
QUICK menu display while playback is stopped or paused when
During playback, the QUICK pop-up menu for displaying
current file information, setting playback control function, or
clearing peak hold of the level meters will appear.
QUICK menu display during playback on the Home screen when
In recording standby or recording mode, the QUICK pop-up
menu for displaying current file information or clearing peak
hold of the level meters will appear.
in 4CH mode
in 4CH mode
Actions of the QUICK button for different screens and statuses
are as follows.
Screen State Action
Displays file information (only in the 4CH
mode)
Playback Control Screen
Clears peak hold of a level meter
Stopped/
paused
Home
Screen
Playback
In
recording
standby
In
recording
mode
BROWSE screen/SONG
screen
MENU screen/MIXER
screen, various
settings screens
Deletes and splits a file (only in the 4CH
mode)
Mixing down
Clear track function (only in MTR mode)
Bounce function (only in MTR mode)
Master track function (only in MTR mode)
Displays file information (only in the 4CH
mode)
Playback Control Screen
Clears peak hold of a level meter
Displays file information (only in the 4CH
mode)
Clears peak hold of a level meter (only in
the 4CH mode)
Displays file information (only in the 4CH
mode)
Clears peak hold of a level meter
Opens the QUICK pop-up menu for
operating the selected file/folder (or
song)
No operation
Quick menu operation
Press QUICK when the Homes screen is open to display the
QUICK pop-up menu.
Use the wheel to select (highlight) the desired QUICK menu
item, and press ENTER/MARK button to get the unit to work as
follows:
QUICK menu display during recording standby on the Home
•
The QUICK pop-up menu for operating the selected file or
folder appears on the BROWSE screen or SONG screen. (See
“5 – Operating Files and Folders (4CH Mode Only)” on page
32.), (See “6 – Managing Songs (MTR Mode only)” on page
35.)
Quick menu display on the BROWSE screen when in 4CH mode
screen when in 4CH mode
NOTE
When the MENU screen or the REC SETTING screen is open for
various settings, the QUICK button is disabled.
NOTE
What appears on the QUICK menu is different in operation,
depending on the state of the unit when QUICK is pressed.
•
While playback is stopped or paused on the Home screen,
the following functions can be selected.
QUICK menu display while playback is stopped or paused when
in 4CH mode
TASCAM DR-44WL
41

8 – QUICK Button Operation
QUICK menu display while playback is stopped or paused when
INFORMATION (only in 4CH mode):
The current file or song information s displayed.
PLAY FUNCTION:
The PLAY FUNCTION screen is displayed. (See “Special
Playback Control Functions” on page 38.)
PEAK CLEAR:
Clears the peak level displayed on the level meter.
DELETE (only in 4CH mode):
A pop-up message appears to confirm that you want to
delete the current file. (See “Song Operation” on page
35.)
DIVIDE (only in 4CH mode):
The current file can be divided manually. (See “Dividing
the selected file manually(DIVIDE)” on page 43.)
AUTO DIVIDE (only in 4CH mode):
The current file can be divided at a mark position set in
advance. (See “Dividing the selected file automatically
(AUTO DIVIDE)” on page 44.)
MIXDOWN:
This function combines four channels (two or more files)
into two right and left channels (one file).
The effect level, volume balance, and right and left
positions can be freely set on the MIXER screen. (See
“Song Operation” on page 35.)
BOUNCE (MTR mode only):
This function can be used to bounce tracks in the current
song. (See “Song Operation” on page 35.)
TRACK CLEAR (MTR mode only):
This function can be used to delete one track at a time in
the current song. (See “Song Operation” on page 35.)
MASTER TRACK (MTR mode only):
The master track created can be loaded. (See “Loading
master tracks (MTR mode only)” on page 46.)
•
During playback on the Home screen, the following
functions can be selected.
in MTR mode
QUICK menu display during playback on the Home screen when
•
During recording standby on the Home screen when in 4CH
mode, the following functions can be selected.
QUICK menu display during recording standby when in 4CH
•
During recording on the Home screen, the following
functions can be selected.
QUICK menu display during recording when in 4CH mode
QUICK menu display during recording when in MTR mode
in MTR mode
mode
Closing the Quick menu
Press QUICK to close the Quick menu screen.
QUICK menu display during playback on the Home screen when
TASCAM DR-44WL
42
in 4CH mode

Deleting the selected file (Quick Delete, only when in 4CH mode)
The currently selected file can be deleted without using the
BROWSE screen.
1. Press the . button or the / button to select the file
you want to delete.
2. While the Home screen is open when stopped, press QUICK
to open the QUICK pop-up menu.
3. Use the wheel to select DELETE and press the ENTER/MARK
button.
The following pop-up confirmation message will appear.
4. Press ENTER/MARK button to delete a file and return to the
Home screen.
Press 8/HOME button to cancel the delete operation and
return to the Home screen.
NOTE
When you use the DELETE item from the Quick menu on the
Home screen to delete, files for all the currently selected
channels will be deleted.
When you use the FILE DELETE item from the Quick menu
on the BROWSE screen to delete a file, deletion of individual
files is possible.
Dividing the selected file (4CH mode only)
A recorded file can be divided into two manually or at a mark
position.
CAUTION
•
MP3 files cannot be divided.
•
If the SD card has insufficient open space, division might not
be possible.
•
Division is not possible if the file name would become more
than 200 characters long.
•
Division is not possible if a file that already exists has the
same name as the name that would be given to a new file
created by division.
Dividing the selected file manually(DIVIDE)
A recorded file can be divided into two at a desired position.
1. Use the . button, / button, or the BROWSE screen to
select the file you want to divide.
2. While the Home screen is open when stopped, press QUICK
to open the QUICK pop-up menu.
3. Use the wheel to select DIVIDE and press the ENTER/MARK
button.
The DIVIDE screen shown below will appear.
8 – QUICK Button Operation
4. Use the wheel to determine the position where you want to
divide the file and press RECORD.
The following confirmation message will pop-up:
5. Press ENTER/MARK button to return to the Home screen
after deleting the file.
Press 8/HOME button to return to the DIVIDE screen
without dividing the file.
NOTE
•
When the DIVIDE screen is open, you can press the 7/9
button and set the divide position while playing the track.
•
When the DIVIDE screen is open, press the7/9 button
to play, the 8/HOME button to pause, the. button to
move to the beginning of a file or the / button to move
to the end of a file. Use the wheel to make fine adjustments
of the division position.
•
After a file is divided, files with _a or _b added to the end of
file names will be created.
(Example of files recorded in 4CH mode)
File name before division
140826_0001S12.wav
140826_0001S34.wav
File name after division
140826_0001_aS12.wav (before the dividing point)
140826_0001_aS34.wav (before the dividing point)
140826_0001_bS12.wav (after the dividing point)
140826_0001_bS34.wav (after the dividing point)
•
When multiple files are currently selected, multiple files are
divided at a time.
CAUTION
•
Division may not be available when there is not enough
space on SD card.
•
File name with more than 200 characters cannot be divided.
•
File cannot be divided when there is a file name identical to
that of the post-divided file.
TIPS
You can add cue marks during recording at the position you
want to divide. (See “Create cue marks during recording” on
page 27.)
TASCAM DR-44WL
43

8 – QUICK Button Operation
Dividing the selected file automatically (AUTO DIVIDE)
Use the AUTO DIVIDE function to automatically divide an
already recorded file at positions where marks have been added.
NOTE
See “Create cue marks during recording” on page 27 for
details about how to add marks.
1. Select a file to be divided at marks using the . and /
buttons or the BROWSE screen.
2. While the Home Screen is open when stopped, press the
QUICK button to open the Quick pop-up menu.
3. Use the wheel to select AUTO DIVIDE and press the ENTER/
MARK button.
The following pop-up confirmation message will appear.
NOTE
If the file does not have any marks, a Can't Divide No
Mark pop-up message will appear.
4. Press the ENTER/MARK button to divide the file and return
to the Home screen .
Press the 8/HOME button to cancel division and return to
the Home screen.
Deleting track input (MTR mode only)
1. Set the mode to MTR mode. (See “Selecting Operation Mode”
on page 17.)
2. Lord the song in which you want to delete tracks on the
SONG screen. (See “Loading Songs” on page 35.)
3. While the Home Screen is open when stopped, press the
QUICK button to open the Quick pop-up menu.
4. Use the wheel to select TRACK CLEAR and press the ENTER/
MARK button.
This opens a pop-up where you can select the track to
delete.
5. Use the wheel to select (highlight) tracks you want to clear
and press ENTER/MARK button.
The following confirmation message will pop-up:
NOTE
•
After dividing a file, new files with _01, _02 and _03 added
to the end of the original file name are created in order.
Example: 2 marks
File name before division
140826_0001.wav
File names after division
140826_0001_01.wav
140826_0001_02.wav
•
140826_0001_03.wav
When used together with the automatic marking function,
long recordings can automatically be divided into files with
individual songs. (See “Add cue marks automatically during
recording” on page 28.)
6. Press ENTER/MARK button to return to the Home screen
after deleting the selected tracks.
Press the 8/HOME button to return to the Home screen
without clearing tracks.
TASCAM DR-44WL
44

8 – QUICK Button Operation
Guitar
Vocal
Track bounce (MTR mode only)
Use the track bounce (ping-pong recording) function to
combine recorded tracks 1 - 4 into one track.
This function allows you to record on tracks 1 - 2 after mixing
down tracks 1 - 4 (stereo bounce) or to record on track 1 by
mono mixing tracks 1 - 4 (mono bounce).
Track 1
Drum L
When recorded on the playback track itself, the original
playback track is naturally cleared (the drum part in Track 1 - 2 is
overwritten in the illustration above).
Bouncing tracks
1. Set the mode to MTR mode. (See “Selecting Operation Mode”
on page 17.)
2. On the SONG screen, load songs in which you want to bounce
tracks. (See “Loading Songs” on page 35.)
3. Press TRACK/INPUT for the track you want to use as bounce
destination and make TRACK/INPUT blink.
Among tracks selected as bounce destinations, the left
channel of the mixed-down stereo source will overwrite
the odd track and the right channel will overwrite the even
track.
4. Press MIXER to open the MIXER screen and adjust PAN knob
and the LEVEL knob for each track. (See “Setting the mixer”
on page 47.)
Track 2
Drum R
Tracks 1–4 are mixed down to stereo
and bounced to tracks 1–2
Track 1 and 2
Drums, Bass,
Guitar
Track 1 and 2
Drums, Bass,
Guitar
Track 3
Bass
Track 3
Bass
(can be
overwritten)
Track 3
Lead
Track 4
Guitar
Track 4
Guitar
(can be
overwritten)
New recordings can be
made to tracks 3–4
Track 4
Lead
7. Using the wheel, select (highlight) PLAY FUNCTION and
press ENTER/MARK button.
The PLAY FUNCTION screen is displayed.
8. Set the IN and OUT points of bounce as the loop playback
section. (See “Repeated Playback of Selection (Loop
Playback)” on page 39.)
NOTE
When the IN/OUT points are not set, bounce from 00:00:00
to the final point of recording.
9. Press 8/HOME button to return to the Home screen, and
press QUICK to open the QUICK pop-up menu.
10. Using the wheel, select (highlight) BOUNCE and press the
ENTER/MARK button.
The following confirmation message will pop-up:
11. Press ENTER/MARK button to start track bounce and return
to the Home screen after bouncing.
Press the 8/HOME button to return to the Home screen
without track bouncing.
Confirming the results of bouncing
Lift the LEVEL knob for the track at the bounce destination and
the master level knob (set the LEVEL knob for other tracks to
minimum) to play back.
After bouncing tracks, you can record again (overdub) to the
bounced tracks
For mono bounce to odd-numbered track, set the PAN knob
to L12. For mono bounce to even-numbered track, set the
PAN knob to R12.
Adjust the overall level with the master level knob.
5. When the MIXER screen is open, press MIXER to return to
the Home screen.
6. When playback is stopped or paused or when playing back,
press QUICK to open the QUICK pop-up menu.
TIPS
If it may be necessary to have the original track at a later
date, back up the song data on your computer before
bouncing (ping-pong recording). (See “11 – Connecting with
a computer” on page 52.)
TASCAM DR-44WL
45

8 – QUICK Button Operation
Mixing down
This function combines multiple files into a single stereo file.
Adjustments of the effect level (SEND), right and left positions
(PAN), volume balance (LEVEL) can be freely set on the MIXER
screen. (See “Setting the mixer” on page 47.)
1. Use the .// button to select file you want to mix
down on the BROWSE screen for 4CH operation mode or on
the SONG screen for MTR operation mode. (See “Selecting
Operation Mode” on page 17.)
2. While the Home Screen is open when stopped or paused,
press the QUICK button to open the Quick pop-up menu.
3. Using the wheel, select (highlight) MIXDOWN and press the
ENTER/MARK button.
The following confirmation message will pop-up:
Popup display in 4CH mode
4. Press ENTER/MARK button to start mixing down return to
the Home screen after mixing down.
Press the 8/HOME button to return to the Home screen
without mixing down files.
5. After mixdown completes, the Home screen reopens, and
the mixdown file that was created is loaded. In this state, you
can press the 7/9 button to play the mixdown file.
NOTE
•
When a mixdown file is created, it is named by adding an
incremental number to the end of the name of the file used
before mixdown.
•
When files created in 4CH mode are mixed down, a file is
created with "MIX" added to the end of the file name.
Loading master tracks (MTR mode only)
A file mixed down from files created in MTR mode can be
loaded.
1. Set the operation mode to MTR. (See “Selec ting Operation
Mode” on page 17.)
2. Load the mixdown file on the SONG screen. (See “Loading
Songs” on page 35.)
3. While the Home Screen is open when stopped or paused,
press the QUICK button to open the Quick pop-up menu.
4. Use the wheel to select MASTER TRACK and press the ENTER/
MARK button. This loads the master track and reopens the
Home screen.
NOTE
The icon appears at the top of the Home screen when
a master track is loaded.
If there is no master file, a NO MASTER TRACK pop-up
message will appear.
5. Press the 7/9 button to start playback of the master file.
NOTE
After loading the master track, select MULTI TRACK from the
Quick menu and press the ENTER/MARK button to return to
ordinary MTR mode.
TASCAM DR-44WL
46

9 – Mixer
The mixer functions that can be used for setting a built-in effect,
right and left positions and volume balance for each channel are
available.
Recording sound can be finely changed by setting these during
mixing down or playback. (See “Mixing down” on page 46.)
Setting the mixer
1. When the Home screen is open, press MIXER to open the
MIXER screen.
in 4CH mode
4. Use the wheel to change the setting.
Items Options Action
Adjusts the forwarding level
of the selected reverb (See
SEND 0 - 100
PAN L12 - C - R12
LEVEL:
RTN 0 - 100
5. Press the ENTER/MARK button to return to the original
position where you can select the position to change the
setting next time.
0 - 100
“Reverb function” on page
49.).
(0: Minimum to 100:
Maximum)
Adjusts the balance between
the right and left channels.
(L12: Left - C: Center - R12:
Right)
Adjusts the volume balance
between the right and left
channels. (0: Minimum to 100:
Maximum)
Adjust the total volume of the
signals with reverb applied
sent from the SEND buses of
each channel (track).
NOTE
•
Operation is available in any mode when playing back,
stopped, paused, or in recording standby or recording.
•
While the MIXER screen is open, press the 7/9 button to
play back or press 8/HOME button to pause the playback.
Stereo Link is set
MS decoder is used
2. Use the wheel to select (highlight) an item you want to
change).
3. Press ENTER/MARK button to pop up setting items and
settings on the left.
TASCAM DR-44WL
47

10 – Useful functions
Tuner function
A guitar and wind instruments can be tuned using a built-in
chromatic tuner.
The tuner incorporated into this unit has chromatic tuner mode
that allows tuning of musical instruments while looking at
the tuning meter and oscillator mode that outputs reference
sounds.
Chromatic tuner
1. Connect a guitar or bass to the EXT MIC/LINE IN 1/L or 2/R
jack.
Tune wind instruments using the built-in microphone.
2. Press the MENU button to open the MENU screen.
3. Using the wheel, select (highlight) TOOLS and press the
ENTER/MARK or / button.
TOOLS screen appears.
4. Use the wheel to select TUNER and press the ENTER/MARK
or / button.
Exec appears selected for the TUNER item.
5. Press the ENTER/MARK button to open the TUNER screen.
6. Use the wheel to select MODE and press the ENTER/MARK
button.
7. Use the wheel to set the tuner mode to CHROMATIC.
Options: CHROMATIC (default value) , OSC.
8. Press the ENTER/MARK button to confirm the setting and
enable selection of other setting items.
9. Use the wheel to select CALIB and press the ENTER/MARK
button.
10. Use the wheel to set the standard frequency of A4.
Range: 435Hz–445Hz (default: 440Hz)
11. Press the ENTER/MARK button to confirm the setting and
enable selection of other setting items.
12. Use the wheel to select SOURCE and press the ENTER/MARK
button.
13. Use the wheel to set the input for the sound to be tuned.
Options Input destination
INT L
(default)
INT R
EXT 1
EXT 2
14. Press the ENTER/MARK button to confirm the setting and
enable selection of other setting items.
Input from right front side of built-in
stereo mic
Input from left back side of built-in
stereo mic
Input from EXT MIC/LINE IN 1/L jack
Input from EXT MIC/LINE IN 2/R jack
15. Perform tuning by playing a musical instrument.
The note that is closest to the sound you played is shown at
the top of the tuning meter.
Tune the musical instrument so that the note you want to
match is shown and the center of the tuning meter lights up.
A bar appears on the left or right of the center if the sound
is lower or higher than the target pitch. The bar becomes
longer as the sound shifts away from the target pitch.
When the sound played matches the note exactly, tg on
the right and left of the note lights up.
16. Once tuning has been completed, press 8/HOME button to
return to the Home screen.
Oscillator mode
1. Press the MENU button to open the MENU screen.
2. Using the wheel, select (highlight) TOOLS and press the
ENTER/MARK or / button.
TOOLS screen appears.
3. Use the wheel to select TUNER and press the ENTER/MARK
or / button.
Exec appears selected for the TUNER item.
4. Press the ENTER/MARK button to open the TUNER screen.
5. Use the wheel to select MODE and press the ENTER/MARK
button.
6. Use the wheel to set the tuner mode to OSC.
Options: CHROMATIC (default value) , OSC.
7. Press ENTER/MARK button to change the TUNER screen to
the oscillator mode display.
The following settings can be made in the oscillator mode
display.
NOTE
Set the sound to output.
The setting range is from C3 to B5 . (default value: A4)
LEVEL
Set the output level.
The setting range is from 0 (minimum) to 100 (maximum).
(default value: 70)
8. Use the wheel and ENTER/MARK button to set NOTE and
LEVEL.
9. Use the wheel and ENTER/MARK button to set SOUND to ON
so that reference sound is output.
TASCAM DR-44WL
48

10 – Useful functions
Reverb function
A reverb is incorporated into this unit.
When recording or practicing, the input signal can be reverbed
or the playback signal can be reverbed during playback.
When reverb function is ON, the icon will appear at the
top of the home screen.
10. Once tuning has been completed, set SOUND to OFF and
press 8/HOME button to return to the Home screen.
Metronome function
Metronome operates when the METRONOME screen is open.
1. Press the MENU button to open the MENU screen.
2. Using the wheel, select (highlight) TOOLS and press the
ENTER/MARK or / button.
TOOLS screen appears.
3. Use the wheel to select METRONOME and press the ENTER/
MARK or / button. Exec appears selected for the
METRONOME item.
4. Press the ENTER/MARK button to open the METRONOME
screen.
Set the following items on the METRONOME screen.
TEMPO
Set speed between 20 - 250 (BPM).
(default value: 120)
BEAT
Set beat between 1 - 9 (default value: 4)
This will accent the first beat.
SOUND
You can set the metronome sound to CLICK, STICK or
BELL. (default value: CLICK)
LEVEL
Set the metronome volume between 0 and 100. (default
value: 50)
5. Use the wheel to select the item to set and press the ENTER/
MARK button. This shows the parameters for the item to be
set.
6. Use the wheel to select the value. Press the ENTER/MARK
button to confirm it and enable selection of other setting
items.
7. Repeat steps 5 and 6 as necessary.
8. Press the 7/9 button to start the metronome. Press the
7/9 button to stop the playing metronome.
9. Once the setting has been completed, press the 8/HOME
button to return to the Home screen.
REVERB icon
Setting the reverb function
1. Press the MENU button to open the MENU screen.
2. Using the wheel, select (highlight) REVERB and press the
ENTER/MARK or / button.
The REVERB screen is displayed.
The REVERB screen has four setting items.
REVERB:
Set the reverb on/off status (default value: OFF).
TYPE:
See the reverb type from the pre-set items. See (See
“How to download and install the exclusive application
(DR CONTROL)” on page 53.) for more details on reverb
types.
SOURCE:
You can select input/output source to be reverbed from
the following: (default value: MIX)
SOURCE (options) Detail
Enabled for SEND:
Reverb can be added to the
MIX (default value)
INT MIC
EXT IN
When MIX is sent, the forwarding level (SEND) to the
effect of each signal can be set on the MIXER screen. (See
“Setting the mixer” on page 47.)
output sound.
The recorded sound is not
affected.
Enabled for input:
Reverb can be added to the sound
input from the built-in mic.
Sound can be recorded with
reverb added.
Enabled for input:
Reverb can be added to the sound
input from external mics and
devices.
Sound can be recorded with
reverb added.
TASCAM DR-44WL
49

10 – Useful functions
LEVEL:
Use this to change the input/output level of the sound set
with SOURCE to which reverb is applied. Settings can be
selected from 0 - 100. (default value: 70)
3. Use the wheel to select (highlight) the desired item and
press the ENTER/MARK or / button to set options/
values.
4. Use the wheel to set the desired option/value.
5. Press the ENTER/MARK button to confirm the setting and
enable selection of other setting items.
6. Once the setting has been completed, press the 8/HOME
button.
CAUTION
When sampling frequency is set to 96 kHz or the WAV file
with 96 kHz sampling frequency is played back, the reverb
function does not work. In this case, reverb can be set.
Reverb type pre-set list
Pre-set name Effect
HALL 1 (default
value)
HALL 2
ROOM
STUDIO
PLATE 1
PLATE 2
A bright effect, like a spacious hall
A warm effect, like a spacious hall
Small room effect
Studio effect
Bright plate reverb
Warm plate reverb
LATITUDE: Latitude data
LONGITUDE: Longitude data
Viewing XRI information (4CH mode only)
You can check XRI and GPS information recorded in a BWF-compliant WAV file on the XRI screen.
Follow these procedures to open the XRI screen.
1. Use the . and / buttons or the BROWSE screen to
select the file with information that you want to view.
2. While the Home Screen is open when stopped, press the
QUICK button to show the quick menu pop-up.
3. Use the wheel to select XRI.
4. Press the ENTER/MARK button to open the XRI screen that
shows the following XRI information.
If no information has been recorded, No Data is shown
Setting the XRI information recording function (4CH mode only)
When recording in the BWF file format, the unit can also record
XRI information (eXtended Recording Information), which
includes the input volume and other recording settings.
1. Press the MENU button to open the MENU Screen.
2. Use the wheel to select SYSTEM, and press the ENTER/MARK
or / button.
The SYSTEM screen opens.
3. Use the wheel to select XRI MODE, and press the ENTER/
MARK or / button.
4. Use the wheel to set the XRI information recording mode.
Options:
OFF: XRI information not recorded
ON (default): Record only XRI information
ON+GPS: Record XRI and GPS information
5. Press the ENTER/MARK button to confirm the setting and
reenable setting item selection.
6. When finished making the setting, press the 8/HOME
button to return to the Home Screen.
5. Use the . and / buttons to switch between tabs to
view XRI information for each track. Select the OTHERS tab to
view the following information about the unit
6. Press the 8/HOME button to return to the Home Screen.
Deleting XRI information (4CH mode only)
You can delete XRI and GPS information.
1. When the XRI screen is open, press the QUICK button to
open the quick menu pop-up.
CAUTION
GPS information is acquired from the dedicated app (DR
CONTROL). This information cannot be acquired when using
the unit without the app. Information acquired is as follows.
TASCAM DR-44WL
50
2. Use the wheel to select which information to delete.
Options

DELETE ALL DATA: Delete XRI and GPS information.
DELETE GPS DATA: Delete only GPS information.
3. Press the ENTER/MARK button.
The following confirmation pop-up message appears.
4. Press the ENTER/MARK button to clear the selected type of
information and return to the Home Screen.
Press the 8/HOME button to cancel deleting the data and
return to the Home Screen.
10 – Useful functions
TASCAM DR-44WL
51

11 – Connecting with a computer
By connecting this unit with a computer using the USB cable,
you can transfer audio files on the SD card in the unit to a
computer, as well as transfer audio files on the computer to the
SD card in the unit.
This unit can handle audio files of the following formats.
WAV : 44.1k/48k/96kHz, 16/24 bit
BWF : 44.1k/48k/96kHz, 16/24 bit
MP3 : 44.1k/48kHz, 32k/64k/96k/128k/192k/256k/320kbps
Computer
USB
micro-B USB plug
NOTE
•
Instead of connecting the DR-44WL a computer via USB, you
can remove the SD card from the unit and insert directly (or
with a card adapter) to the computer and make the same
operation.
•
Both WAV and BWF files will have the ”.wav” extension.
CAUTION
•
The DR-44WL will not operate when STORAGE is selected
(highlighted) under USB connection.
•
Please make a direct connection with the computer without
using a hub.
NOTE
Power is supplied from the USB port if the USB cable is
connected to the unit that contains batteries (USB bus
power prioritized).
If an SD card is not properly inserted before making the USB
connection, a Can't Save Data pop-up message will appear.
When you open “computer”, DR-44WL appears on the computer
screen as an external drive with a volume label of “DR-44WL”.
Transferring files to a computer
1. Click the “DR-44WL” drive on the computer screen to show
the “MTR”, “MUSIC” and “UTILITY ” folders.
2. Open the “MTR” or “MUSIC” folder and drag and drop the
files that you want to transfer to the destinations of your
choice on the computer.
Transferring files from a computer
1. Click the “DR-44WL” drive on the computer screen to show
the “MTR”, “MUSIC” and “UTILITY ” folders.
2. Drag and drop files on the computer that you want to
transfer to the unit to the “MTR” or “MUSIC” folder.
When you connect a USB cable while the unit power is on, or
turn on the power after making a connection, the USB SELECT
screen will pop up, prompting the user to select either to
operate the unit with USB bus power or make a USB connection
with the computer.
Use the wheel to select (highlight) STORAGE , and press ENTER/
MARK button to connect the unit with the computer. The
message of USB connected appears.
Make sure that an SD card has been inserted properly into the
DR-44WL.
TIPS
•
You can manage the “MTR” or “MUSIC” folder from the
computer.
•
You can create a sub-folder in the “MUSIC” folder. The
DR-44WL can create up to two layers. The DR-44WL cannot
recognize sub-folders and files located at the third layer
level or below.
•
If you name sub-folders and music tracks, these names will
appear on the Home screen or BROWSE screen of this unit.
NOTE
•
The “UTILITY” folder is used when updating the unit system,
for example.
•
Do not change names, delete or otherwise alter individual
files inside the “MTR” folder.
Disconnecting the unit from a computer
When disconnecting the DR-44WL from the computer, make
sure to follow the correct steps and remove the USB cable.
The power turns off after the unit completes its shutdown
(standby) process.
See the computer’s operation manual for instructions on how to
unmount an external volume.
TASCAM DR-44WL
52

Connect the unit and smart phone via Wi-Fi
CAUTION
The DR-44WL designs are in conformance with the laws and
regulations of the countries and regions in which this unit is
sold, and labeled as required.
The DR-44WL is approved in the following countries and
regions:
United States, Canada, Europe (EU member states),
Australia, New Zealand, Japan
The use of wireless functions in a country other than those
listed above could result in a violation of that country’s
wireless transmission laws.
Our company will bear no responsibility for use in countries
other than those listed above.
TIPS
The battery will drain faster during Wi-Fi use.
Running out of batteries during data transfer will terminate
the process and may result in transfer failure.
We recommend using either the AC adapter or USB bus
power during Wi-Fi use.
The DR-44WL is designed for remote control with the use of an
exclusive application (DR CONTROL), free of charge.
Transport control such as playback and stop, as well as input
level adjustment and file transfer can be made via Wi-Fi.
How to download and install the exclusive application (DR CONTROL)
1. Connect your smart phone to the Internet.
2. Search the exclusive application (DR CONTROL) and
download from either Google Play (Android smart phone) or
App Store (iOS device) for installation.
12 – Using Wi-Fi
Connecting the unit directly to external devices (smartphones, tablets and computers) by Wi-Fi (TO DEVICE mode)
The DR-44WL can make a Wi-Fi/peer-to-peer connection with
a smart phone via Wi-Fi, without the use of a router or other
external devices. No Wi-Fi network environment is required. It
can make direct connection with your smart phone or tablet.
NOTE
During Wi-Fi/peer-to-peer connection, the smart phone or
tablet cannot connect to an external Wi-Fi network.
8
Setting the Wi-Fi mode to TO DEVICE
1. Press the MENU button to open the MENU screen.
2. Using the wheel, select (highlight) TOOLS and press the
ENTER/MARK or / button.
TOOLS screen appears.
3. Use the wheel to select Wi-Fi and press the ENTER/MARK
button.
Exec appears selected for the Wi-Fi item.
Selecting the Wi-Fi mode
You can choose from two connection modes according to the
use conditions.
8
TO DEVICE mode
This unit operates as an access point, and computers, smartphones and other external devices can connect to it by Wi-Fi.
8
VIA ROUTER mode
This unit can connect to computers, smartphones and other
external devices by Wi-Fi through an existing Wi-Fi router.
This allows more flexibility. This also enables simultaneous
connection to the Internet, allowing easier file sharing and
location information checking, for example.
4. Press the ENTER/MARK button to open the Wi-Fi screen.
5. Use the wheel to select MODE and press the ENTER/MARK
button.
6. Use the wheel to set the Wi-Fi mode to TO DEVICE, and
press the ENTER/MARK button to confirm it.
Options: TO DEVICE (default value), VIA ROUTER
8
Connecting the DR-44WL to a smart phone or tablet
via Wi-Fi for the first time
1. Press the Wi-Fi button of the DR-44WL; the Wi-Fi indicator
will start to flash.
A CONNECT TO THE NEW DEVICE ? pop-up message appears
on the display to determine whether or not the connection
is new.
2. You will be making a connection to a new smartphone, so
press the ENTER/MARK button.
TASCAM DR-44WL
53

12 – Using Wi-Fi
3. SSID and PASSWORD appear on the display.
NOTE
The SSID is the name of the wireless LAN access point
(wireless LAN device).
4. Selec t “setting” w “Wi-Fi” on the device.
8
Connecting the DR-44WL to a smart phone or tablet
via Wi-Fi (from second time onward)
When you establish a connection between the DR-44WL and
your smart phone for the first time and need to connect them
again, you only need to select the SSID from the second time
onward.
1. Press the Wi-Fi button of the DR-44WL; the Wi-Fi indicator
will start to flash.
A CONNECT TO THE NEW DEVICE ? pop-up message appears
on the display to determine whether or not the connection
is new.
2. Your smart phone already made a peer-to-peer connection;
simply press the 8/HOME button.
3. Pop-up message on the display disappears and the DR-44WL
switches to a standby mode to connect to your smart phone.
4. In your device, select “setting” w “Wi-Fi”.
5. When Wi-Fi is enabled on for your device, it will display the
SSID list of Wi-Fi equipment. Select the SSID displayed on
the DR-44WL.
6. Wi-Fi connection is established between the DR-44WL and
your smart phone, and the Wi-Fi indicator of the unit will
light.
iOS device example Android device example
5. When Wi-Fi is enabled on for your device, it will display the
SSID list of Wi-Fi equipment. Select the SSID displayed on
the DR-44WL.
iOS device example Android device example
6. A password input screen appears on the device. Enter the
password shown on the display of the unit.
7. Wi-Fi connection is established between the DR-44WL and
your smart phone, and the Wi-Fi indicator of the unit will
light.
NOTE
The above description on operating the device are for
reference only. Please refer to your smart phone's operation
manual for more details.
8
Checking Wi-Fi connection information
1. When the Wi-Fi screen is open, use the wheel to select the
INFO item, and press the ENTER/MARK or / button.
Exec appears selected for the INFO item.
2. Press the ENTER/MARK button to open the INFORMATION
screen.
NOTE
The above description on operating the device are for
reference only. Please refer to your smart phone's operation
manual for more details.
TASCAM DR-44WL
54
SSID and PASSWORD information appears.
The SSID is used to identify this unit on the Wi-Fi network.
The PASSWORD is necessary when connecting to this unit by
Wi-Fi.

12 – Using Wi-Fi
NOTE
Press the RECORD button to change the password.
Connecting the unit to external devices (smartphones, tablets and computers) by Wi-Fi (VIA ROUTER mode)
8
Setting the Wi-Fi mode to VIA ROUTER
1. Press the MENU button to open the MENU screen.
2. Using the wheel, select (highlight) TOOLS and press the
ENTER/MARK or / button.
TOOLS screen appears.
3. Use the wheel to select Wi-Fi and press the ENTER/MARK
button.
Exec appears selected for the Wi-Fi item.
4. Press the ENTER/MARK button to open the Wi-Fi screen.
5. Use the wheel to select MODE and press the ENTER/MARK
button.
6. Use the wheel to set the Wi-Fi mode to VIA ROUTER, and
press the ENTER/MARK button to confirm it.
Options: TO DEVICE (default value), VIA ROUTER
3. From the list shown on the SSID LIST screen, use the wheel
to select the router you want to connect, and press the
ENTER/MARK button to set it.
4. The selected SSID will be shown for the SSID item.
NOTE
The SSID can also be input directly using the Wi-Fi screen
SSID item.
To do this, at the SSID item, use the . and / buttons
to move the cursor, and use the wheel to set the characters.
Press the ENTER/MARK button to confirm the SSID.
5. When the Wi-Fi screen is open, use the wheel to select the
PASSWD item, and press the ENTER/MARK or / button.
6. At the PASSWD item, use the . and / buttons to move
the cursor, and use the wheel to set the router password
(encryption key).
Press the ENTER/MARK button to confirm the router
password (encryption key).
• The following message appears when connection with
the router has succeeded. The Wi-Fi indicator on the unit
lights.
8
Connecting the unit to an external router
1. When the Wi-Fi screen is open, use the wheel to select the
LIST item, and press the ENTER/MARK or / button.
Exec appears selected for the LIST item.
2. Press the ENTER/MARK button to open the SSID LIST
screen.
• The following message appears if connection with the
router fails. Input the correct password.
NOTE
•
In many cases, the router password (encryption key) is on
a label on the router itself or in its operation manual, for
example.
•
After connection with a router has succeeded once, reconnection will be possible by just pressing the Wi-Fi button on
this unit. Passwords for the two most recent connections are
stored in this unit.
8
Connecting a smartphone or other device to an
external router
1. Selec t “setting” w “Wi-Fi” on the device.
TASCAM DR-44WL
55

12 – Using Wi-Fi
iOS device example Android device example
2. When the device Wi-Fi is turned on, a Wi-Fi device SSID list
will appear. Select the SSID of the external router to use.
Launching DR CONTROL
1. After completing the Wi-Fi connection, launch the DR
CONTROL app (installed beforehand) on the smartphone or
other device.
NOTE
Always use the latest version of DR CONTROL.
2. A screen like the following will appear when the app
launches, and remote operation of the device will be
enabled.
iOS device example Android device example
iOS device example Android device example
3. Input the password for that external router.
A Wi-Fi connection between the smartphone and the
external router will be established.
8
Checking the Wi-Fi connection information
1. When the Wi-Fi screen is open, use the wheel to select the
INFO item, and press the ENTER/MARK or / button.
Exec appears selected for the INFO item.
2. Press the ENTER/MARK button to open the INFORMATION
screen.
8
When multiple DR-44WL/DR-22WL units are
connected to the same router in VIA ROUTER mode
1. A little while after the app launches, “DR List” will appear.
Select the DR-44WL that you want to control.
iOS device example Android device example
2. If “DR is not found” appears, touch the “OK ” button, then
touch the “CONNECT” button to reacquire the list.
NAME, MAC ADDRESS, and IP ADDRESS information is shown.
NAME shows the name to select when using DR CONTROL to
operate this unit.
MAC ADDRESS shows the MAC address assigned to the unit.
IP ADDRESS is the number on the Wi-Fi network assigned by
the router.
TASCAM DR-44WL
56
iOS device example Android device example
Please refer to your smart phone's operation manual for more
details.
Detailed descriptions, on the “DR CONTROL” application,
including the “DR CONTROL reference manual", can be
downloaded from the TEAC Global Site (https://teac-global.
com).

Connecting this unit to a computer by Wi-Fi
Transferring files from this unit to a computer is possible using
the free TASCAM DR FILE TRANSFER software designed for this
purpose. You can transfer recorded files by Wi-Fi.
12 – Using Wi-Fi
Downloading and installing the TASCAM DR FILE TRANSFER software
1. Connect the computer to the Internet.
2. Download TASCAM DR FILE TRANSFER from the TEAC Global
Site (https://teac-global.com/) and install it.
Connecting the unit directly to a computer by Wi-Fi (TO DEVICE mode)
1. Press the MENU button to open the MENU screen.
2. Using the wheel, select (highlight) TOOLS and press the
ENTER/MARK or / button.
TOOLS screen appears.
3. Use the wheel to select Wi-Fi and press the ENTER/MARK
button.
Exec appears selected for the Wi-Fi item.
4. Press the ENTER/MARK button to open the Wi-Fi screen.
5. Use the wheel to select MODE and press the ENTER/MARK
button.
6. Use the wheel to set the Wi-Fi mode to TO DEVICE, and
press the ENTER/MARK button to confirm it.
Options: TO DEVICE (default value), VIA ROUTER
NOTE
The SSID is the name of the wireless LAN access point
(wireless LAN device).
10. Click the wireless connection icon in the computer taskbar/
menu bar (Windows/Mac) to open a list of wireless networks.
Windows
Mac
11. Select the SSID shown on the unit's display.
12. When the security key input screen appears on the
computer, input the password shown on the display of the
unit.
7. Press the Wi-Fi button of the unit to make the Wi-Fi
indicator blink.
A CONNECT TO THE NEW DEVICE ? pop-up message appears
on the display to determine whether or not the connection
is new.
8. Since it is a new connection, press the ENTER/MARK button.
9. SSID and PASSWORD appear on the display.
Windows
When the password input screen appears on the computer,
input the password shown on the display of the unit.
Mac
13. The Wi-Fi indicator on the unit lights when the Wi-Fi
connection is established between the unit and the
computer.
TASCAM DR-44WL
57

12 – Using Wi-Fi
Connecting this unit to a computer by Wi-Fi after the first time
After the unit and the computer have been connected once,
they can be connected again just by selecting the SS ID.
1. Press the Wi-Fi button of the unit to make the Wi-Fi
indicator blink.
A CONNECT TO THE NEW DEVICE ? pop-up message appears
on the display to determine whether or not the connection
is new.
2. Since the unit has been connected to the computer previously, press the 8/HOME button.
3. When the pop-up message disappears from the display, the
unit is waiting to connect to the computer.
4. Click the wireless connection icon in the computer taskbar/
menu bar (Windows/Mac) to open a list of wireless networks.
5. Select the SSID shown on the unit's display.
6. The Wi-Fi indicator on the unit lights when the Wi-Fi
connection is established between the unit and a computer.
TIPS
For instructions about connecting a DR-44WL in VIA
ROUTER mode to a computer using a Wi-Fi connection
through a router and other details about the software,
download the TASCAM DR FILE TRANSFER Owners Manual
from the TEAC Global Site (https://teac-global.com).
TASCAM DR-44WL
58

13 – Settings and Information
View information (INFORMATION)
Use the INFORMATION screen to view various types of information about this unit.
Follow the below steps to display the INFORMATION screen:
1. Press the MENU button to open the MENU screen.
2. Using the wheel, select (highlight) SYSTEM and press the
ENTER/MARK or / button.
SYSTEM screen appears.
3. Use the wheel to select INFORMATION and press the ENTER/
MARK or / button.
Exec appears selected for the INFORMATION item.
4. Press the ENTER/MARK button to open the INFORMATION
screen.
The INFORMATION screen has the following pages.
5. Use the wheel to change the page.
The following information appears on each page.
PROJECT 1/2 page (4CH mode only):
Displays the names of the audio files in the currently
loaded project
PROJECT 2/2 page (4CH mode only):
Displays various types of information about the currently
loaded project
CARD page:
Displays information on the inserted SD card.
SYSTEM page:
Displays information on the system settings and firmware
version of the unit.
8
FORMAT
Shows the audio file type.
For WAV and BWF files, bit length also appear.
For MP3 files, the bit rate (kbps), CBR (constant bit rate) or VBR
(variable bit rate) type also appear.
8
SAMPLE
Sampling frequency (Hz)
8
DAT E
Date of file creation
8
TIME
Time of file creation
8
SIZE
File size
Card information page (CARD)
CARD page display information on the inserted SD card.
Project information page 1 (PROJECT 1/2) (4CH mode only)
The PROJECT 1/2 page shows the names of the audio files in the
currently loaded project.
8
TITLE/FILE1-4
Shows the file name.
If an MP3 file has ID3 tag title information that information
appears.
Project information page 2 (PROJECT 2/2) (4CH mode only)
The PROJECT 2/2 page shows various types of information
about the currently loaded project.
8
TOTAL MUSIC
Displays the number of playable files in the music folder.
8
TOTAL FOLDER
Displays the total number of folders in the music folder.
8
TOTAL SIZE
Shows the total SD card capacity.
8
USED SIZE
Displays the amount of used capacity on the SD card.
8
REMAIN SIZE
Displays available free space of the SD card.
System information page (SYSTEM)
SYSTEM page display information on the firmware version of the
unit.
TASCAM DR-44WL
59

13 – Settings and Information
8
System Ver.
Displays the system's firmware version.
8
Wi-Fi Ver.
Displays the Wi-Fi firmware version.
Configuration (SYSTEM)
The SYSTEM screen allows you to initialize the setting of the unit
and format the SD card.
Follow the below steps to display the SYSTEM screen:
1. Press the MENU button to open the MENU screen.
2. Using the wheel, select (highlight) SYSTEM and press the
ENTER/MARK or / button.
SYSTEM screen appears.
Use . button and / button, ENTER/MARK button
and wheel to make settings for different items.
The following settings for each item can be made in the
SYSTEM screen.
8
Setting characters (WORD)
In the WORD item, use either the . button or the / button
to move the cursor, and turn the wheel to set characters.
In addition to alphabets and numbers, the following characters
can be used: ! # $ % & ' ( ) + , - . ; = @ [ ] ^ _ ` { } ~
8
Initializing the numbers (COUNT INIT)
To execute, press ENTER/MARK button in the COUNT INIT item.
All newly created files will be assigned with numbers set in the
WORD item, starting from the 0001 count.
Setting the language
Use the LANGUAGE item to set the language shown on the
display.
1. Use the wheel to select the LANGUAGE item and press the
ENTER/MARK
Options
Eng.: use English
日本語: use Japanese
Fran.: use French
Españ: use Spanish
Deu.: use German
Ital.: use Italian
Рус.:
button.
use Russian
Setting the file name type
This unit can set name types of the recording files.
1. Use the wheel to select FILE NAME and press the ENTER/
MARK or / button.
Exec appears selected for the FILE NAME item.
2. Press the ENTER/MARK button to open the FILE NAME
screen.
3. Use . button and / button, ENTER/MARK button
and wheel to make settings for different items.
The following settings for each item can be made in this
screen.
8
File name type
In the TYPE item, select either the DATE or WORD options.
Options:
DATE (default value): dates will be included in file name.
Example: 140101_0001S12.wav
WORD: the six characters set in WORD will be included in file
name.
Example: TASCAM_0001S12.wav
2. Turn the wheel to move the cursor and select the language.
3. Press the
confirmation window.
4. Press the
selection. To cancel language selection, press the 8/HOME
button.
ENTER/MARK
ENTER/MARK
button to open a pop-up
button to confirm the language
Restoring the DR-44WL to factory settings
Use the INITIALIZE item to execute initialization; this will
restore the unit to factory settings.
1. Use the wheel to select INITIALIZE and press the ENTER/
MARK or / button.
Exec appears selected for the INITIALIZE item.
2. Press the ENTER/MARK button to open a pop-up confirmation window.
NOTE
The internal clock of the unit is used to set dates. (See
“Setting the date/time” on page 14.)
TASCAM DR-44WL
60

3. Press the ENTER/MARK button to initialize the unit.
Press 8/HOME button to cancel initialization.
Completely format a SD card
Use the MEDIA FORMAT item to format the SD card.
Formatting erases all music files on the card and automatically
creates new “MTR”, “MUSIC” and “UTILITY” folders as well as a
“dr-1.sys” file.
1. Use the wheel to select MEDIA FORMAT and press the ENTER/
MARK or / button.
2. Select the formatting method.
Option Details
QUICK
(default value)
ERASE
NOTE
•
Using the ERASE formatting option might restore an SD card
that has decreased writing performance due to repeated
use.
•
ERASE formatting checks for memory errors as it formats, so
it takes more time compared to QUICK formatting.
3. Press the ENTER/MARK button to open a pop-up confirmation window.
Quickly format the card.
Erase and format the card.
13 – Settings and Information
3. Use . button and / button, ENTER/MARK button
and wheel to make settings for different items.
The following settings for each item can be made in the
POWER/DISPLAY screen.
Auto power save function setting
Use the AUTO PWR SAVE item to set the time for automatic
turn-off (standby mode), counting from the last operation.
Options: OFF (no automatic turn-off ), 3min, 5min,
10min, 30min (default value)
Battery type settings
Use the BATTERY TYPE item to set the battery type.
This setting is used to display the remaining battery power and
to calculate the minimum capacity for normal operation.
Options: ALKAL (alkaline batteries, default value), Ni-MH
(nickel-metal hydride batteries)
Set the voltage value of the phantom power supply
Use the PHANTOM VOLT item to set the voltage value of the
phantom power supply to connect an external microphone that
requires phantom power.
Options: +24 V, +48 V (default value)
4. Press the ENTER/MARK button to execute the formatting.
Press the 8/HOME button to cancel the formatting.
CAUTION
When formatting the SD card, make sure that the unit is
connected to either the dedicated AC adapter (TASCAM
PS-P520U: sold separately) or the USB bus power from a
computer, or operating on fully-charged batteries.
Formatting may not complete successfully if the battery
runs out.
Power and display settings (POWER/ DISPLAY)
Use the POWER/DISPLAY screen to set the power and display of
the unit.
Follow the below steps to display the POWER/DISPLAY screen:
1. Press the MENU button to open the MENU screen.
2. Using the wheel, select (highlight) POWER/DISPLAY and
press the ENTER/MARK or / button.
The POWER/DISPLAY screen will appear.
NOTE
Battery power will be consumed faster when set to +48 V
than when set to +24 V.
Backlight setting
Use the BACKLIGHT item to set the time for automatic turn-off
of back-light in battery operation, counting from the last
operation.
Options: OFF (turned off), 5SEC. (default value),
10SEC., 15SEC., 30SEC., ALWAYS (always turned on)
Adjusting the display contrast
Use the CONTRAST item to adjust the display contrast.
Options: 1 - 20 (default value: 8)
Set the peak hold
Use the PEAK HOLD item to set the peak display of the level
meter.
Options: OFF, 1sec (default value), HOLD
TASCAM DR-44WL
61

14 – Messages
The following is a list of pop-up messages.
DR-44WL displays pop-up messages according to situations.
Refer to this list when you want to know the meaning of each
message and a method of dealing with a problem.
Message Details and solutions
Battery Empty
Can't Divide
Card Error
Card Full
Current File
MP3
Dup File Name
File Full
File Name ERR
File Not Found
File Not Found
Make Sys File
File Protected
Format Error
Format CARD
Invalid Card
Change Card
Invalid SysFile
Make Sys File
I/O Too Short
The batteries are empty.
Replace the batteries.
The selected division point is not appropriate for DIVIDE action. (Beginning of a
file, end of a file)
The SD card cannot be recognized
properly. Replace the card.
The SD card has no remaining capacity.
Erase unnecessary files or transfer them to
a computer.
MP3 files cannot be divided.
The name of the DIVIDE file to be created
is identical to the name of the file that
already exists in the same folder. The
DIVIDE function adds “_a” or “_b” to the
end of the file name. Before using the
DIVIDE function, connect the DR-44WL to a
computer and edit the file name.
The total number of folders and files
exceeded the limit (5000). Delete unnecessary folders and files or move them to a
computer.
The DIVIDE function would cause the file
name to exceed 200 characters. The DIVIDE
function adds “_a” or “_b” to the end of
the file name. Before choosing the DIVIDE
function, connect the unit to a computer
and edit the file name to less than 198
characters.
The file cannot be found or damaged.
Check the target file.
System files required to operate the
DR-44WL is missing. When this message
appears, press the ENTER/MARK button to
automatically create a system file.
The file is read only and cannot be erased.
The SD card is not formatted properly or
the card may be broken. This message
also appears when a computer under USB
connection formatted the card, or when an
unformatted card is inserted to the unit.
Always use the DR-44WL to format cards to
be used with it. Replace the SD card with
another or press the
ENTER/MARK button while this message is
being shown to format the card.
Formatting will erase all the data on the
SD card.
The SD card may be abnormal. Replace the
SD card.
The system file required to operate this
unit is invalid. When this message is being
displayed, press the ENTER/MARK button
to create a new system file.
The IN (start) and OUT (end) points are
too close. Re-set by spacing at least one
second in between.
Message Details and solutions
Low battery,
Wi-Fi OFF
Max File Size
MBR Error
Init CARD
No Card
Non-Supported
Write Timeout
Can't Save Data
Device Error
File Error
Not Continued
Player Error
Writing
Failed
Sys Rom Err
System Err XX
(XX is a number.)
The battery charge is low, so Wi-Fi cannot
be used. Replace the batteries with new
ones.
The file is larger than the designated size,
or the recording time has exceeded 24
hours when the total number of folders
and files was already at the limit (5000).
The SD card is not formatted properly or
the card may be broken. Replace the SD
card with another or press the ENTER/
MARK button while this message is being
shown to format the card.
Formatting will erase all the data on the
SD card.
A SD card is not set. Insert a recordable SD
card.
The file type is not supported. Please see
“11 - Connecting with a Computer” for file
formats that this unit can use.
Writing to the SD card was not in time.
Back up files to a computer and format the
card.
Restart the unit when this error message
appears.
If the power cannot be turned off, remove
the batteries, disconnect the dedicated
AC adapter (TASCAM PS-P520U: sold
separately), or disconnect the USB cable
when in bus power supply.
If the error message continues to appear
frequently, please contact the store where
you purchased this unit or a TASCAM
customer support service.
TASCAM DR-44WL
62

15 – Troubleshooting
If you are having trouble with the operation of this unit, please try the following before seeking repair. If these measures do not solve the
problem, please contact the store where you purchased this unit or TASCAM customer support service.
8
The power does not turn on.
•
Are batteries low?
•
Are batteries inserted correctly with the ¥, ^ terminals
aligned correctly?
•
Confirm that the power plug of the dedicated AC adapter
(TASCAM PS-P520U: sold separately) and a USB connector
are securely inserted.
•
Is the USB cable connecting the computer for USB bus
power securely connected?
•
Is the USB hub in use with computer connection for USB
bus power?
8
The DR-44WL turn the power off automatically
•
Is the automatic power saving function on? (See “Auto
power save function setting” on page 61.)
• The DR-44WL is in compliance with the European Standby
Power Regulations (ErP), and therefore, the automatic
power saving function will work whether the unit is being
powered by an AC adapter or batteries. Select OFF if you
do not want to use the auto power saving function (the
factory default setting is 30min).
8
The unit does not function.
•
Is the HOLD/ switch set at HOLD?
•
Is the unit connected to a computer via USB cable (USB
Connected)?
8
The SD card is not recognized.
•
Confirm that the SD card is inserted completely.
8
The DR-44WL don't play back
•
If the file is WAV format, check whether its sampling rate is
compatible with the unit.
•
If the file is MP3 format, check whether the bit rate is
compatible with the unit.
8
The built-in speaker does not emit sound
•
Is a headphone connected to the unit?
•
Is the SPEAKER item set as OFF?
•
Is the unit in recording or recording standby mode?
8
The input level is too low
•
Is the input level setting too low?
•
Is the output level of the connected device too low?
8
The sound I want to record is distorted
•
Is the input level setting too high?
•
Is reverb setting ON?
8
Playback sound is not natural
•
Is the playback speed changed?
•
Check the setting status of the playback equalizer.
•
Confirm that the level alignment function is not enabled.
•
Is reverb setting ON?
8
The file cannot be deleted
•
Is the file a copy of a read-only file set by a computer?
8
The computer does not display the unit’s files
•
Is the DR-44WL connect to a computer via USB port?
•
Is USB hub in use?
•
Is the unit in recording or recording standby mode?
8
The DR-44WL cannot make a Wi-Fi connection or
communication is interrupted
•
Check that the Wi-Fi device is turned ON and/or the Wi-Fi
function is ON.
•
Is the distance to the Wi-Fi device too far?
Is there any obstacles in between, for example a wall?
When a Wi-Fi device is located at the rear side of the
DR-44WL, the unit itself maybe the cause of interruption.
Try changing the positions of the Wi-Fi device and the unit.
•
Turn OFF and restart the DR-44WL.
•
Delete the registration of “DR-44WL” in the Wi-Fi device and
follow the steps in “Connecting the unit to a Wi-Fi device”.
•
Relaunch the DR CONTROL application.
•
When using VIA ROUTER mode:
• Disconnect other devices that are connected to the Wi-Fi
router.
• Move the Wi-Fi router to a different location.
8
The monitor system does not emit sound
•
Is the monitoring system securely connected?
•
Is the monitoring system volume at minimum level?
•
Is the output level setting of the unit at minimum level?
8
The DR-44WL is not recording
•
Check the connection again.
•
Check the input settings again.
•
Is the input level low?
•
Confirm that the SD card is not full.
•
Check whether the number of files has reached the
maximum level.
8
The wrong language was set accidentally.
Slide the HOLD/ switch to turn the power off. Then, slide
the HOLD/ switch while pressing and holding the MENU
button to turn the unit on again.
The language selection menu will appear, and you will be able
to select the language.
TASCAM DR-44WL
63

16 – Specifications
Rating
8
Recording media
SD card (64 MB - 2 GB)
SDHC card (4 GB - 32 GB)
SDXC card (48 GB - 128 GB)
8
Recording/playback formats
BWF: 44.1k/48k/96kHz, 16/24 bit
WAV: 44.1k/48k/96kHz, 16/24 bit
MP3: 44.1k/48kHz, 32k/64k/96k/128k/192k/256k/320kbps
8
Number of channels
4 channels
•
4CH mode
Mono: Up to 4 files
Stereo: Up to 2 files
Stereo (1 file) + mono (up to 2 files)
•
MTR mode
Mono: Up to 4 files
Input/output ratings
Analog audio input and output ratings
8
EXT MIC/LINE IN jack (supporting phantom power
supply)
Connector: Combo type
XLR-3-31
(1: GND, 2: HOT, 3: COLD)
6.3 mm (1/4") TRS standard jack
(Tip: HOT, Ring: COLD, Sleeve: GND)
When the EXT IN switch is at MIC, or at
MIC+PHANTOM
Input impedance: 2.2 kΩ or more
Reference input level: -17.3 dBu ± 2 dB
Maximum input level: -1.3 dBu ± 2 dB
When the EXT IN switch is at LINE
Input impedance: 2.2 kΩ or more
Reference input level: +4 dBu
Maximum input level: +20 dBu
8
/LINE OUT jack
Connector: 1/8” (3.5 mm) stereo mini jack
Output impedance: 12 Ω
Reference output level: -14 dBV (with 10 kΩ load)
Maximum output level: +2 dBV (with 10 kΩ load)
Maximum output: 20 mW + 20 mW (with headphones
connected, with 32 Ω load)
8
Built-in speaker
0. 3 W (mono)
Audio performance
8
Frequency response
20-20 kHz +1/−3 dB
(EXT IN to LINE OUT, 44.1 kHz sampling frequency, JEITA)
20-22 kHz +1/−3 dB
(EXT IN to LINE OUT, 48 kHz sampling frequency, JEITA)
20-40 kHz +1/−3 dB
(EXT IN to LINE OUT, 96 kHz sampling frequency, JEITA)
8
Distortion
0.05% or less
(EXT IN to LINE OUT, 44.1/48/96 kHz sampling frequency, JEITA)
8
S/N ratio
92 dB or higher
(EXT IN to LINE OUT, 44.1/48/96 kHz sampling frequency, JEITA)
Note) Based on JEITA: JEITA CP-2150
Wi-Fi
8
Wireless standard
Based on IEEE 802.11b/g/n (2.4 GHz only)
8
Wireless communication mode
TO DEVICE mode
Simple access point (Limited AP)
VIA ROUTER mode
Infrastructure (Station)
8
Security
WPA2-PSK (WPS2.0 compatible)
Control input/output ratings
8
USB port
Connector: Micro-B type
Format: USB 2.0 HIGH SPEED mass storage class
TASCAM DR-44WL
64

16 – Specifications
General
8
Power supply
4 AA batteries (alkaline or NiMH)
USB bus power from a computer
Dedicated AC adapter (TASCAM PS-P520U: sold separately)
8
Power consumption
2.5W (maximum)
8
Battery operation time (continuous operation)
•
Alkaline batteries (EVOLTA)
Format Operation time Note
Recording in 2ch WAV,
96 kHz, 24 bit
Recording in 2ch WAV,
44.1 kHz, 16 bit
Recording in 2ch MP3,
44.1 kHz, 128 kbps
Recording in 4ch WAV,
96 kHz, 24 bit
Recording in 4ch WAV,
44.1 kHz, 16 bit
Recording in 4ch MP3,
44.1 kHz, 128 kbps
Recording in 4ch WAV,
44.1 kHz, 16 bit
Recording in 4ch WAV,
44.1 kHz, 16 bit
Recording in 2ch WAV,
44.1 kHz, 16 bit
Recording in 2ch MP3,
44.1 kHz, 128 kbps
About 13 hours
About 16 hours
About 14 hours
About 13 hours
About 13.5
hours
About 13.5
hours
About 5 hours
About 5.5 hours
About 15.5
hours
About 16 hours
Input from the
built-in microphone
Input from the
built-in microphone
Input from the
built-in microphone
Input from the
built-in microphone + line input
Input from the
built-in microphone + line input
Input from the
built-in microphone + line input
Built-in stereo mic
and line inputs
with phantom
power on
Built-in stereo mic
and line inputs
with Wi-Fi on
When using a
headphone
When using a
headphone
Format Operation time Note
Recording in 4ch MP3,
44.1 kHz, 128 kbps
Recording in 4ch WAV,
44.1 kHz, 16 bit
Recording in 4ch WAV,
44.1 kHz, 16 bit
Recording in 2ch WAV,
44.1 kHz, 16 bit
Recording in 2ch MP3,
44.1 kHz, 128 kbps
Recording: JEITA recording time Playback: JEITA music playback
time
About 11 hours
About 5 hours
About 5.5 hours
About 12.5
hours
About 12 hours
Input from the
built-in microphone + line input
Built-in stereo mic
and line inputs
with phantom
power on
Built-in stereo mic
and line inputs
with Wi-Fi on
When using a
headphone
When using a
headphone
NOTE
The battery operation times (during continuous operation)
could vary depending on the media being used.
8
Dimensions
79 × 162.2 × 42.5 mm (W x H x D)
8
Weight
346 g/251 g (including batteries/not including batteries)
8
Operating temperature
0°C–40°C
Dimensional drawings
Recording: JEITA recording time Playback: JEITA music playback
time
•
Using NiMH batteries (eneloop)
Format Operation time Note
Recording in 2ch WAV,
96 kHz, 24 bit
Recording in 2ch WAV,
44.1 kHz, 16 bit
Recording in 2ch MP3,
44.1 kHz, 128 kbps
Recording in 4ch WAV,
96 kHz, 24 bit
Recording in 4ch WAV,
44.1 kHz, 16 bit
About 10.5
hours
About 12.5
hours
About 10 hours
About 10.5
hours
About 11.5
hours
Input from the
built-in microphone
Input from the
built-in microphone
Input from the
built-in microphone
Input from the
built-in microphone + line input
Input from the
built-in microphone + line input
162.2mm4mm
79mm
•
Illustrations in this manual may be different from the actual
product.
•
To improve the product, specifications and external
appearance may change without prior notice.
TASCAM DR-44WL
42.5mm
1mm
65

TEAC CORPORATION
Phone: +81-42-356-9143
1-47 Ochiai, Tama-shi, Tokyo 206-8530 Japan
https://tascam.jp/jp/
TEAC AMERICA, INC. https://tascam.com/us/
Phone: +1-323-726-0303
10410 Pioneer Blvd. Suite #1, Santa Fe Springs, California 90670, U.S.A.
TEAC UK Ltd. https://www.tascam.eu/en/
Phone: +44-1923-797205
Luminous House, 300 South Row, Milton Keynes, Buckinghamshire, MK9 2FR, United Kingdom
TEAC EUROPE GmbH https://www.tascam.eu/de/
Phone: +49-611-71580
Bahnstrasse 12, 65205 Wiesbaden-Erbenheim, Germany
TEAC SALES & TRADING(SHENZHEN) CO., LTD https://tascam.cn/cn/
Phone: +86-755-88311561~2
Room 817, Xinian Center A, Tairan Nine Road West, Shennan Road, Futian District, Shenzhen, Guangdong Province 518040, China
0221.MA-3256A
 Loading...