

Page 1

TANDBERG
VIKING FS-1600
NAS APPLIANC
E
Hardware User Manual
20 Bendemeer Road, #04-05
Cyberhub, Singapore 339914
Phone + 65 6396 0786
Telefax + 65 6396 0787
© Tandberg Data Asia
Part
No.
January 2008
TANDBERG DATA ASIA
65
82 B7 - 01
Page 2

Related publications available from Tandberg Data Asia:
Part No. Title
6582X2 Tandberg Viking Series Storage Server
Administration Manual
This publication may describe designs for which patents are granted or pending.
By publishing this information, Tandberg Data Asia conveys no license
und
er any patent or any other rights.
Every
effort has been made to avoid errors in text and diagrams. However,
Tandberg
Data Asia assumes no responsibility for any errors which may ap-
pear
in this publication.
It
is the policy of Tandberg Data Asia to improve products as new techniques
and
components become available. Tandberg Data Asia therefore reserves
the
right to change specifications at any time.
We
would appreciate any comments on this publication.
Page 3

_____________________________________________________________
i
Table of Contents
Table of Contents i
1. Overview 1-1
1.1. Package Contents 1-1
1.2. Features of Viking FS-1600 Series NAS Appliance 1-2
1.3. Front Panel 1-4
1.4. Front P anel LED Indicators 1-5
1.5. Rear Panel 1-6
1.6. Rear Panel LED Indicators (LAN) 1-7
1.7. Storage 1-7
1.7.1. DVD-ROM Drive 1-7
1.7.2. Hard Disk Drives 1-8
2. Setting Up 2-1
2.1. Requirements 2-1
2.1.1. Ambient Temperature 2-1
2.1.2. Height and Weight 2-1
2.1.3. Rack Mounting 2-2
2.1.4. Power Source 2-2
2.1.5. Circuit Overloading 2-2
2.1.6. Reliable Grounding 2-2
2.1.7. Electrical Shock 2-2
2.1.8. Battery Precaution 2-2
2.1.9. Sufficient Ventilation 2-3
2.2. Accessing the HDD Tray & Installing Hard Drives 2-3
2.3 Rack Installation: Content of Accessory Kit 2-5
2.4. Rack Mount Installation 2-6
2.4. Connecting Cables 2-9
2.5. Turning ON the Viking FS-1600 Series NAS Appliance 2-10
2.6. Troubleshooting 2-10
2.7. Turning OFF the Viking FS-1600 Series NAS Appliance 2-12
2.7.1. Using Microsoft
®
Windows
®
2-12
3. RAID Configuration 3-1
3.1. Hardware RAID Layout 3-1
3.1.1. System Volume (SV) 3-3
3.1.2. Data Volume (DV) 3-3
3.2. RAID Volume Calculation 3-3
4. Customizing the Viking FS-1600 Series NAS Appliance 4-1
4.1. Preventing Static Electricity Discharge 4-1
4.2. Expanding Connectivity 4-1
4.2.1. Built-in Networking 4-2
4.2.2. USB Connection 4-2
4.3. Upgrading Storage Capacity 4-2
4.2.2. Removing/Installing Hot-Swap Hard Drive 4-2
5. System Management 5-1
5.1. Windows Installer 5-1
5.2. RAID Management 5-3
5.2.1. Configure and Creation of RAID Volumes 5-3
5.2.2. Changing RAID Level and Capacity Size 5-4
Page 4

Tandberg Data Table of Content
_____________________________________________________________
ii
5.3.
System Recovery 5-4
6. Troubleshooting 6-1
6.1. Before Calling Tandberg Data Technical Support 6-1
6.2. Safety Guidelines 6-2
6.3. Troubleshooting Steps 6-2
7. Glossary 7-i
Page 5

_____________________________________________________________
1-1 Tandberg Viking FS-1600 Series NAS Hardware User Manual
1. Overview
1.1. Package Contents
The Tandberg Viking FS-1600 Series NAS Appliance comes with the
following items:
• Viking FS-1600 Series NAS Appliance (1)
• AC power cord (1)
• Rackmount kit (1 set)
• OS Recovery DVDROM / Documentation CDROM (2 discs)
Notes
If any of the items above are damaged of missing, contact your dealer immediately.
Save the packaging box and materials for future transportation use.
Page 6

Tandberg Data Overview
_____________________________________________________________
1-2 Tandberg Viking FS-1600 Series NAS Hardware User Manual
1.2. Features of Viking FS-1600 Series NAS
Appliance
The Viking FS-1600 Series Network Attached Storage appliance is a
powerful rack-mountable system that offers a new standard for flexible
management and monitoring networked attached storage by the network
administrators. The hardware features include the followings:
• Processor:
o Viking FS-1600 uses dual 771-pin LGA Sockets that
supports 2 x 64-bit Dual-Core Intel
®
Xeon® 1.60 GHz
processor with 1066 MHz FSB and 4MB L2 Cache (5110)
o For Viking FS-1610 uses dual 771-pin LGA Sockets that
supports 1 x 64-bit Quad-Core Intel
®
Xeon® 2.00 GHz
processor with 1333 MHz FSB and 12MB L2 Cache (E5405)
• Intel 5000V (Blackford VS) chipset
• 2 x Intel® (ESB2/Gilgal) 82563EB Gigabit Ethernet Controller which
supports 10BASE-T, 100BASE-TX, and 1000BASE-T, RJ45 output
with Intel® I/OAT for fast, scaleable, and reliable networking
• Memory:
o 6 x 240-pin DIMM socket that accept a maximum memory
capacity of 16GB 667 / 533 MHz DDR2 ECC FB SDRAM
modules (Memory modules must be populated in pairs)
o Default RAM configuration for FS-1600 is 1GB and FS-1610
is 2GB
• Expansion slots:
o 1 x (x8) PCI-e slot
o 1 x (x4) PCI-e slot (using x8 slot)
o 2 x 64-bit / 100 MHz PCI-X (3.3V) slot
o 1 x 32-bit / 33 MHz PCI (3.3V) slot
• RAID:
o FS-1600 uses Areca ARC-1160 Serial-ATA II RAID
controller with 256MB RAID cache which supports RAID
level 0, 1, 0+1, 3, 5 and 6 (consume one PCI-X slot)
o FS-1610 uses Areca ARC-1261ML Serial-ATA RAID
controller with 256MB RAID cache which supports RAID
level 0, 1, 0+1, 3, 5 and 6 (consume one x8 PCI-e slot)
• Storage support for:
o Up to 16 x hot-swap Serial-ATA II hard-drive bays
o Up to 16 x hard-drive with RAID configuration
• Front control panel
o Power button
o Reset button
o 1 x Fast UART 16550 serial port
o 2 x USB 2.0 port
Page 7

Tandberg Data Overview
_____________________________________________________________
1-3 Tandberg Viking FS-1600 Series NAS Hardware User Manual
• Rear panel connectors
o 1 x PS/2 keyboard port
o 1 x PS/2 mouse port
o 1 x Fast UART 16550 serial port
o 1 x HD-68 Ultra320 SCSI port
o 1 x VGA port
o 1 x ECP/EEP parallel port
o 2 x RJ45 LAN port
o 2 x USB 2.0 port
• 2 x Redundant Power Supply Unit (Total 800W)
The Tandberg Viking FS-1600 Series NAS appliance is fully compatible with
Microsoft Windows Storage Server 2003.
Page 8

Tandberg Data Overview
_____________________________________________________________
1-4 Tandberg Viking FS-1600 Series NAS Hardware User Manual
1.3. Front Panel
1234567
1. Power button
Button that turns the FS-1600 Series on or off.
2. Reset button
Button that reset the FS-1600 Series.
3. Power LED
Lights up green when power is on.
4. HDD Activity LED
Indicates HDD activity by flashing LED.
5. LAN Access LED indicator
Indicates LAN status and activity of LAN1 and LAN2 Ethernet
controllers.
6. Over temperature LED indicator
Indicates if FS-1600 Series is overheated (continuously on) or fan
failure (flashing).
Page 9

Tandberg Data Overview
_____________________________________________________________
1-5 Tandberg Viking FS-1600 Series NAS Hardware User Manual
7. Power Supply Unit Failure LED
Indicates if one or more power supply units have failed.
1.4. Front Panel LED Indicators
LED Colour State Meaning
Power Green On FS-1600 Series NAS is on.
Off FS-1600 Series NAS is off.
HDD Green Off No hard-drive activity or no hard-drive is
connected or.
Blink Hard-drive activity.
HDD (Fault) Amber On Hard-drive is faulty.
Off Hard-drive is in normal state.
LAN Green On Network link is established.
Blink Network link is established and LAN
activity.
Off No link is established and cable could be
faulty.
Over Temp Red On FS-1600 Series is overheated.
Off FS-1600 Series is in normal condition.
Blink One or more the system fans failure.
Power Fault Red On One or more PSU have failed.
Off All PSU is in normal conditions.
Page 10
Tandberg Data Overview
_____________________________________________________________
1-6 Tandberg Viking FS-1600 Series NAS Hardware User Manual
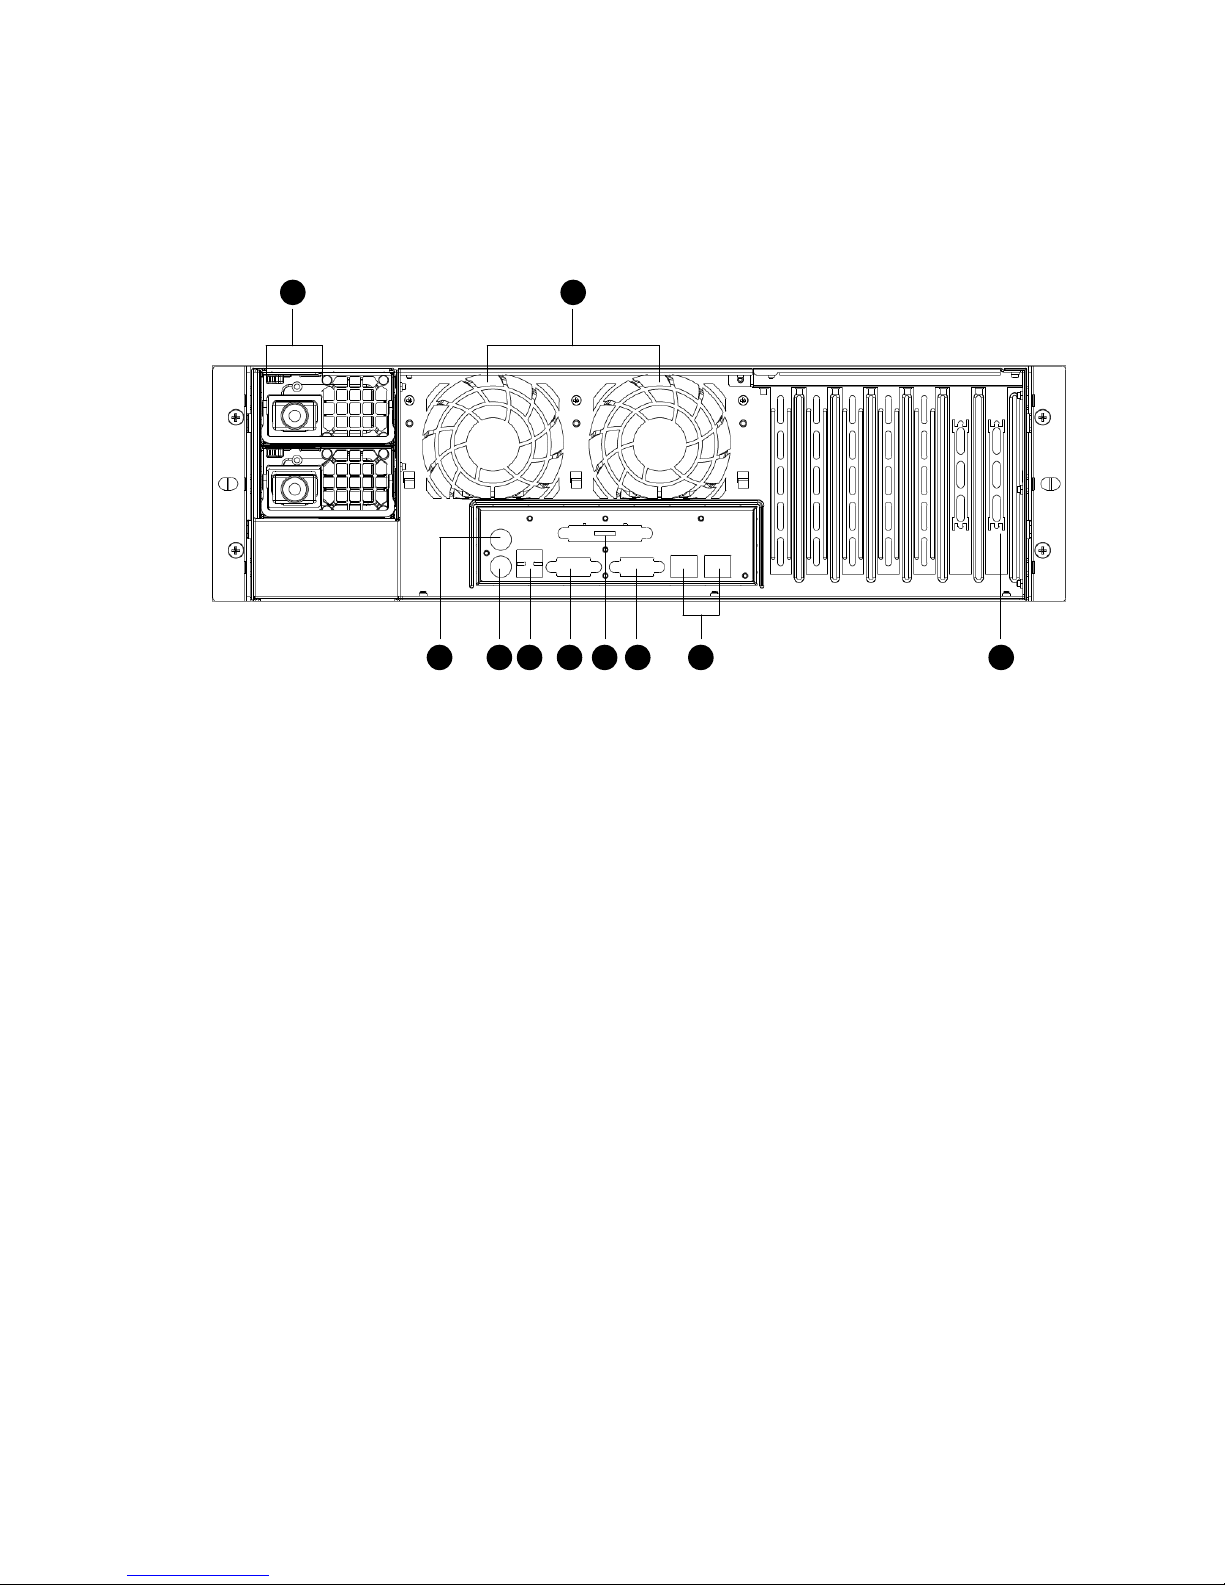
1.5. Rear Panel
1
2
34 5 6 7 8 9 10
1. Fan
Cools the FS-1600 Series. Blocking the ventilation may result in
overheating.
2. Power supply connector
Plug the power cord to into this connector.
3. HD-68 pin Ultra320 SCSI connector
Connector for external SCSI device.
4. PS/2 mouse connector
Connector for PS/2 mouse device.
5. PS/2 keyboard connector
Connector for PS/2 keyboard device.
6. USB connectors
Connectors for USB devices.
7. RS232 serial connector
Connector for UPS for other serial port device.
8. Parallel connector
Connector for printing device.
9. VGA console connector
Connector for a console monitor.
10. LAN connectors (LAN1 & LAN2)
RJ45 connectors for 10/100/1000 Base-T/X networks.
Page 11

Tandberg Data Overview
_____________________________________________________________
1-7 Tandberg Viking FS-1600 Series NAS Hardware User Manual
1.6. Rear Panel LED Indicators (LAN)
LED Green Orange Meaning
LINK-ACT On - Network link is established.
Blinking - Activity in network link.
Off - No link or cable faulty.
Speed On Off Network links is established and
operating at maximum speed.
Off On Network links is established and
operating at 100 Mbps speed.
Off Off Network links is established and
operating at 10 Mbps speed.
1.7. Storage
The Viking FS-1600 Series NAS appliance is equipped with the following
storage devices connectivity:
• DVD-ROM drive
• High-capacity Serial-ATA I or II hard disk drive
1.7.1. DVD-ROM Drive
The DVD-ROM drive allows installation of additional software and recovery
of the OS image to the factory default level using the accompanied OS
Recovery Disc.
Notes
Keep the Recovery Discs in a safe place when not in use to avoid scratches or
other damage. Any kind of dirt or damages can affect the data on the disc or stop
the drive from reading properly.
In case of emergency or in the event when there is no power to the FS-1600 Series
NAS appliance, a stuck disc can be retrieve by inserting a straightened paper clip in
to the eject slot.
Page 12

Tandberg Data Overview
_____________________________________________________________
1-8 Tandberg Viking FS-1600 Series NAS Hardware User Manual
1.7.2. Hard Disk Drives
The Viking FS-1600 Series NAS came supports four hot-swap Serial-ATA I
or II hard drives with the capability of configuring into various RAID
(Redundant Array of Independent Disk) settings.
Depending on your model of the FS-1600 Series NAS, they come with either
Areca ARC-1160 (FS-1600) or ARC-1261ML (FS-1610) Serial-ATA II RAID
controller to support the Serial-ATA hard drives.
When configured correctly, the FS-1600 Series NAS appliance can provide
non-stop service with a high degree of fault tolerance through the use of
RAID technology and advance array management feature. The hard drives
can be configured to RAID level 0, 1, 0+1, 3, 5 or 6.
Page 13

_____________________________________________________________
2-1 Tandberg Viking FS-1600 Series NAS Hardware User Manual
2. Setting Up
2.1. Requirements
When planning a site to house the Viking FS-1600 Series NAS appliance,
you may want to consider requirements for power and network availability,
as well as a space with well regulated temperature and humidity that is
relatively free of dust and other airborne contaminants. If your installation
calls for placement on a table top, apply the supplied rubber feet to the
bottom of the chassis.
Before unpacking and installing the FS-1600 Series NAS appliance, select a
suitable installation site for maximum efficiency. Consider the following
factors when choosing a site:
• Near a grounded power outlet
• Clean and dust-free
• Sturdy surface free from vibration
• Well-ventilated and away from sources of heat
• Protected from electromagnetic fields produced by electrical devices
such as air conditioners and radio and TV transmitters.
Take note of the following information when planning where and how to
install the FS-1600 Series NAS appliance.
Warnings
Do not attempt to modify or use the supplied AC power cord if it is not the
exact type required. A product with more than one power supply will have a
separate AC power cord for each supply.
The power button on the NAS does not turn off AC power. To remove the AC
power from the NAS, you must unplug the AC power cord from the wall outlet
or power supply. The power cord is considered the disconnect device to the
main (AC) power. The socket outlet that the NAS plugs into should be
installed near the equipment and should be easily accessible.
2.1.1. Ambient Temperature
The maximum operating temperature of the FS-1600 Series NAS appliance
is 95°F (35°C) and the relative humidity of the NAS is in the range 8% to
90% (non-condensing). Careful consideration should be given to installing
the NAS in an environment compatible with 95°F (35°C) maximum ambient
temperature.
2.1.2. Height and Weight
Before installing the FS-1600 Series NAS appliance, make sure that the
surface on which you are setting it is strong enough to bear its weight and
accommodate its size.
• Dimensions (including front bezel): 17.2 (W) × 5.2 (H) × 25.5 (D)
inches or (437 × 132 × 648 mm)
• Weight (approximately, depending on configuration): 72 lbs. (32.7
kg)
Page 14

Tandberg Data Setting Up
_____________________________________________________________
2-2 Tandberg Viking FS-1600 Series NAS Hardware User Manual
.
2.1.3. Rack Mounting
When mounting your FS-1600 Series NAS appliance into a cabinet
(equipment rack), make sure you maintain correct mechanical load leveling
to avoid hazardous conditions.
2.1.4. Power Source
The FS-1600 Series NAS appliance should be operated using only the type
of power source indicated on the product label.
• Voltage: 100-240 V
• Current: 4-10 A
• Frequency: 50/60 Hz
2.1.5. Circuit Overloading
Appropriate consideration should be given when connecting the supply
circuit to the FS-1600 Series NAS appliance to avoid any circuit overload.
The system nameplate rating should be used when addressing concerns
about circuit overload.
Warning
Make sure that the site has the necessary capacity to handle the FS-1600
Series NAS appliance. Overloading electrical supply circuits is extremely
hazardous.
2.1.6. Reliable Grounding
To avoid the potential for an electrical shock hazard, the rack assembly itself
must be suitably grounded, according to your local regional electrical codes.
This typically will require the rack to have its own separate ground. We
recommend you consult your local approved electrician.
2.1.7. Electrical Shock
Do not operate the FS-1600 Series NAS appliance without the top cover in
place. Opening or removing the cover may expose you to dangerous voltage
and can cause electrical shock.
2.1.8. Battery Precaution
There may be a danger of explosion if the CMOS battery is incorrectly
replaced. Replace this battery with model CR2032 only. Use of another
battery may present a risk of fire or explosion. Dispose of used batteries
according to manufacturer's instructions.
Page 15
Tandberg Data Setting Up
_____________________________________________________________
2-3 Tandberg Viking FS-1600 Series NAS Hardware User Manual
2.1.9. Sufficient Ventilation
The vents on the front panel and the fan openings on the rear panel provide
ventilation for the FS-1600 Series NAS appliance. Make sure that these
openings are not blocked and that adequate ventilation is provided where
the unit is installed.
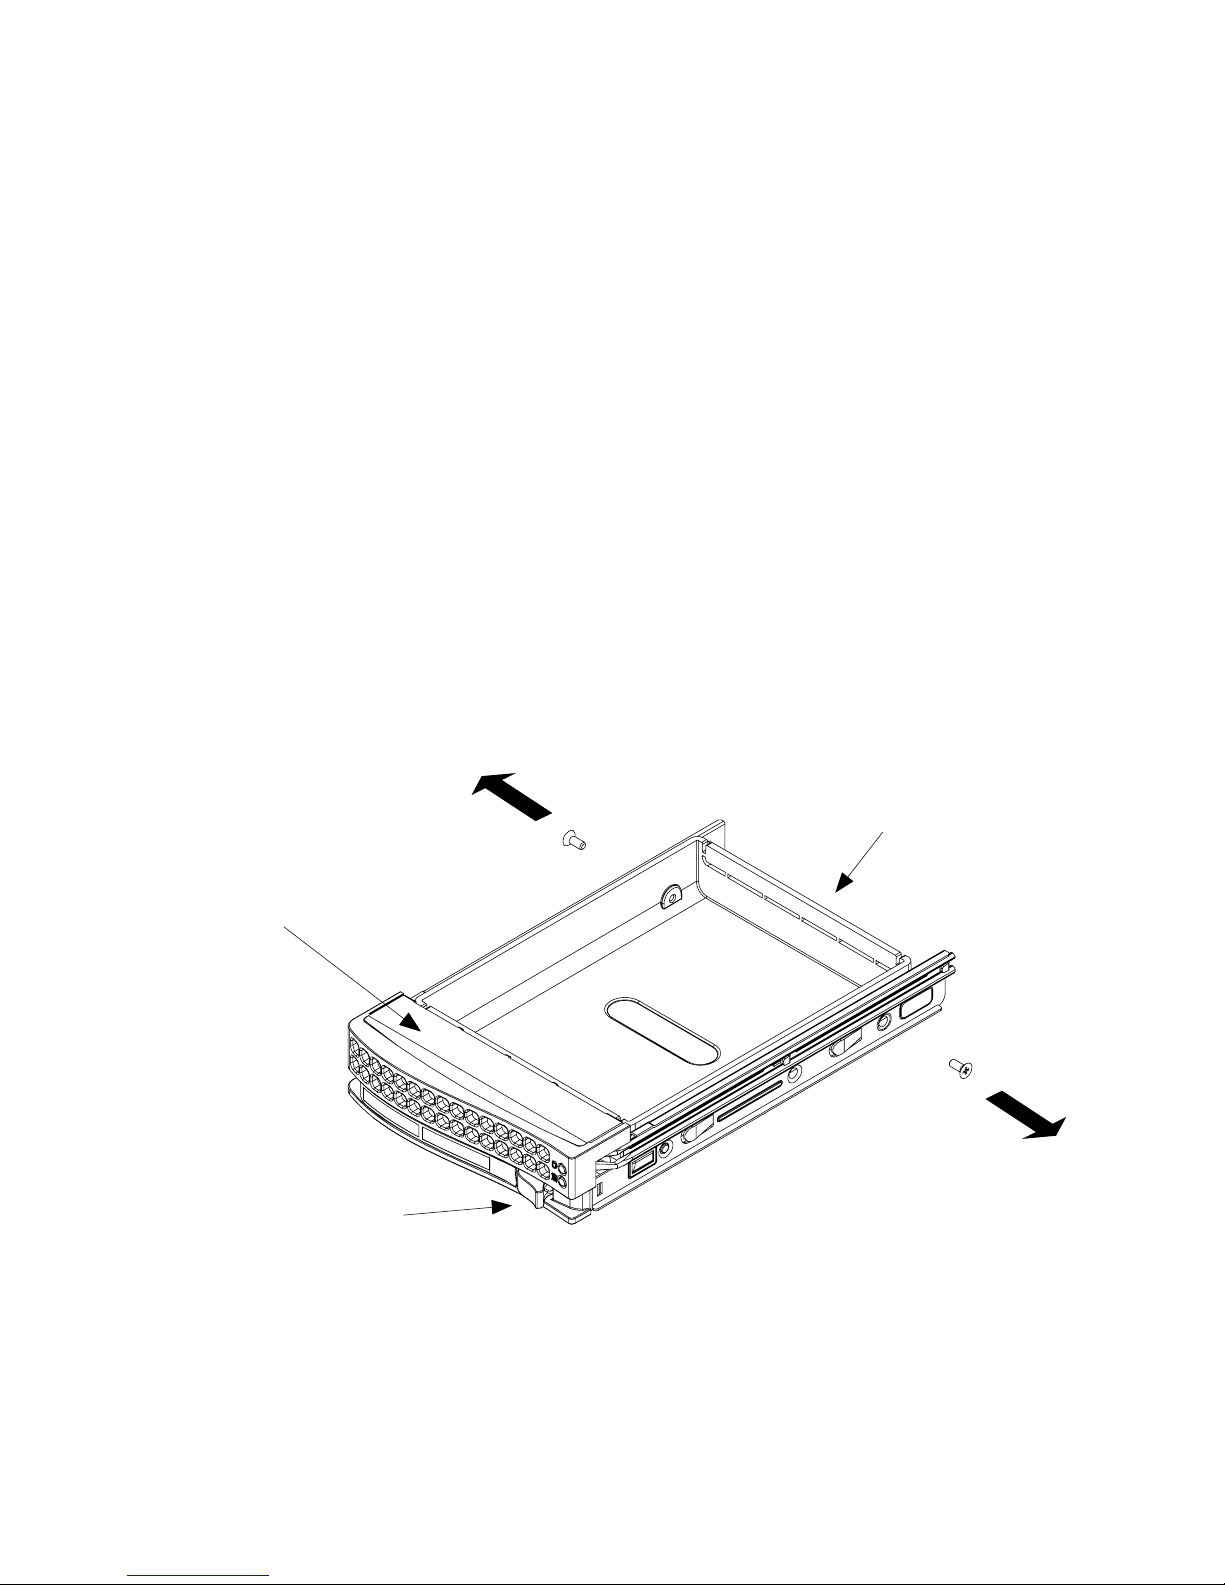
2.2. Accessing the HDD Tray & Installing Hard
Drives
To install HDD to the FS-1600 Series NAS appliance, remove the drive tray
from the chassis in order to mount any Serial-ATA I or II HDD.
1. Press the release tab to release the drive tray from its locking
position.
2. Pull the drive tray out from the chassis by:
a. Pressing the tray handle release button.
b. Grab the tray handle and pull out the drive tray from the
chassis.
3. Remove the 2 screws at each side of the dummy tray and take out
the dummy tray as shown below:
Drive Tray
Dummy Drive
Release Button
Page 16
Tandberg Data Setting Up
_____________________________________________________________
2-4 Tandberg Viking FS-1600 Series NAS Hardware User Manual
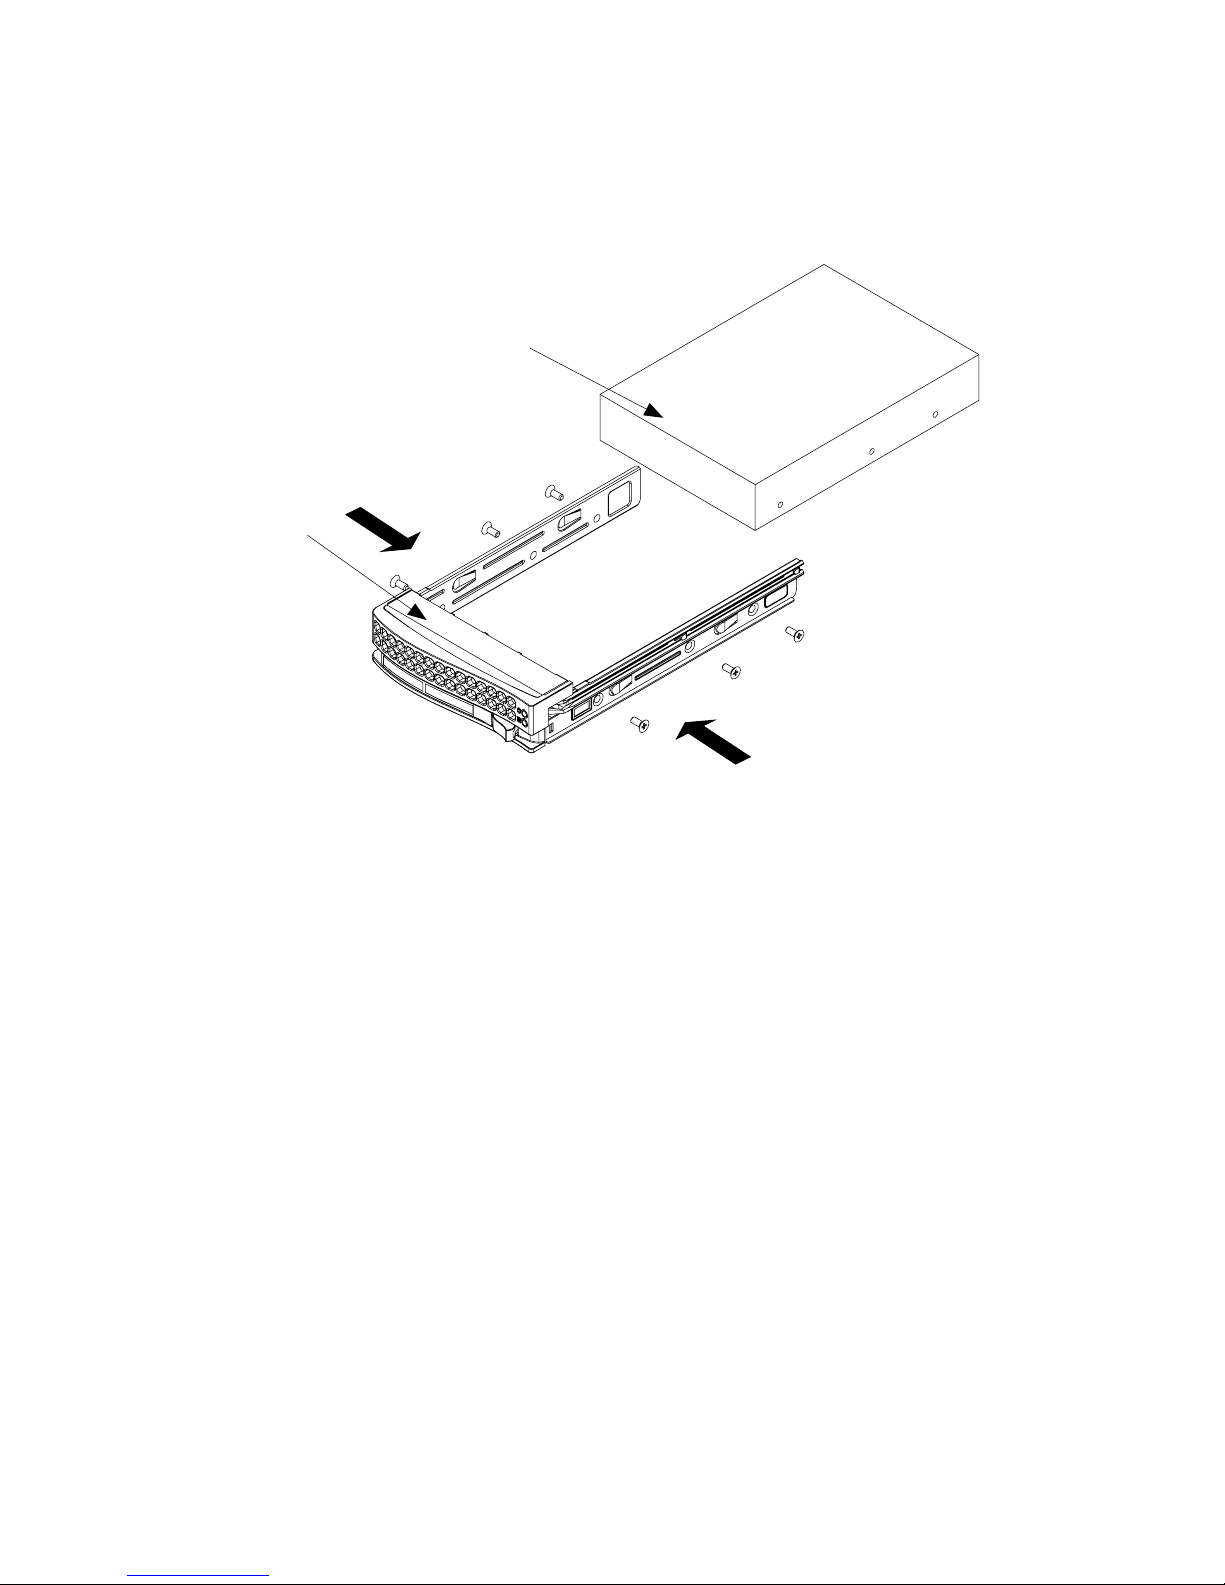
4. Slide the hard disk drive (HDD) into the tray and secure it with 3
screws on each side of the tray as shown below:
Hard Drive
Tray
Hard Drive
Use a Hard, Stable
Surface when installing
the Hard Drive
5. Once the HDD is securely fastened to the tray, slide it back to the
FS-1600 Series chassis.
Page 17

Tandberg Data Setting Up
_____________________________________________________________
2-5 Tandberg Viking FS-1600 Series NAS Hardware User Manual
2.3 Rack Installation: Content of Accessory Kit
The following items are included in the accessory kit in every FS-1600
Series NAS appliance:
Page 18

Tandberg Data Setting Up
_____________________________________________________________
2-6 Tandberg Viking FS-1600 Series NAS Hardware User Manual
2.4. Rack Mount Installation
Before installing the FS-1600 Series NAS appliance, take the following
precautions:
• The FS-1600 Series is heavy. To minimize the chances of injuries,
make sure that two or more people help in installing the unit.
• Do not place heavy objects on the FS-1600 Series NAS appliance.
• Before installing, mark its intended position in the rack with a felt-tip
pen. Mounting the appliance so it is not level could result in
malfunctions.
• There is one pair of inner rails to be installed on the FS-1600 Series
chassis, one pair of outer rails to be installed in the rack and one
pair of short brackets to be used on the rear side of the outer rails.
• The rack mounting rails are designed to fit rack system with depth
between 30 to 33 inches (762 to 838 mm).
1. Included in the shipping package is a pair of rail assemblies. Locate
the inner and the outer rails for each rail assembly.
2. Press the locking tab to release the inner rail from it s locking
position and pull it out of the rail assembly.
Note
The inner rails are to be attached to the FS-1600 Series chassis and the outer rails
are to be installed on the rack.
Inner Rack Rails
Page 19

Tandberg Data Setting Up
_____________________________________________________________
2-7 Tandberg Viking FS-1600 Series NAS Hardware User Manual
Outer Rail Bracket
3. Place the inner rail on the side of the FS-1600 Series chassis,
aligning the hooks (on chassis) with the locking holes of the inner
rail. Slide forward inner rail towards the front of the FS-1600 Series
chassis. Secure the inner rail to the FS-1600 Series chassis with the
4 screw as show in the diagram below.
Page 20

Tandberg Data Setting Up
_____________________________________________________________
2-8 Tandberg Viking FS-1600 Series NAS Hardware User Manual
3
2
1
Locking Tabs
4. Secure the inner rail to the FS-1600 Series chassis with Type G
screw and repeat step 1 to 4 for the left rail on the chassis. (Refer to
section 2.3 Rack Installation: Content for Accessory Kit for Type G
screw.)
5. In the remaining package, locate the pair of outer rails and REAR
brackets.
6. Secure the FRONT bracket of the outer rail with 2 x Type G screws.
Slide the outer rail through the 2 buttons and attach the REAR
bracket.
7. Measure the depth of your rack and adjust the length of the rail by
sliding the bracket accordingly.
8. Repeat step 5 to 7 for the left outer rail.
9. Once the outer rail assemblies are built, they are ready to be
installed on a rack. Use the Type I washer and Type H screw to
secure the rail assemblies to a rack.
Page 21

Tandberg Data Setting Up
_____________________________________________________________
2-9 Tandberg Viking FS-1600 Series NAS Hardware User Manual
10. Once the rail assemblies are securely installed on the rack, align the
FS-1600 Series inner rails with the grooves of the outer rail
assemblies on the rack. Gently push the FS-1600 Series chassis
inward till it fit nicely into the rack.
11. Secure the FS-1600 Series to the rack by tightening the screws on
the front sides of the FS-1600 Series chassis.
2.4. Connecting Cables
Peripherals such as monitor, keyboard and mouse can be connected to the
FS-1600 Series NAS appliance for direct administration. It is recommended
to connect them when powering the appliance for the first time to ensure that
hardware is functioning properly.
1. Connect the VGA monitor cable into the monitor/VGA port located
on the rear panel of the FS-1600 Series NAS appliance.
Page 22

Tandberg Data Setting Up
_____________________________________________________________
2-10 Tandberg Viking FS-1600 Series NAS Hardware User Manual
2. Connect the PS/2 keyboard and mouse into the PS/2 keyboard and
mouse ports on the rear panel of FS-1600 Series NAS appliance.
Notes
If USB keyboard and mouse are used, they can be connected on the rear panel of
the FS-1600 Series NAS appliance.
3. Connect the power cord to the power connector located on the rear
panel of the FS-1600 Series NAS appliance and connect the other
end of the power cable to a power outlet.
2.5. Turning ON the Viking FS-1600 Series NAS
Appliance
After making sure that you have set up the FS-1600 Series NAS appliance
correctly and connected all the required cables, you can turn on you can turn
on the appliance.
1. Press the power button. The FS-1600 Series NAS appliance starts
and displays a welcome message. After that, a series of power-on
self test (POST) messages appear. The POST messages indicate
whether the appliance is running correctly.
2. If the appliance does not turn on or boot after pressing the power
button, go to the next section for the possible cause of the boot
failure.
3. Aside from the POST messages, you can determine if the NAS is in
good condition by checking if the following occurred:
o Power indicator on the front panel is green.
o Num Lock, Caps Lock, and Scroll Lock LEDs on the
keyboard are on.
Notes
The default login and password for Windows Storage Server 2003 is
“Administrator” and “1234”.
2.6. Troubleshooting
If the FS-1600 Series NAS appliance does not boot after you turn it on,
check the following factors that might have caused the boot failure:
• The external power cable may be loosely connected. Check the
power cable connection from the power source to the power cable
connector on the rear panel. Make sure that the cable is correctly
connected to the power source and to the power cable connector.
Page 23

Tandberg Data Setting Up
_____________________________________________________________
2-11 Tandberg Viking FS-1600 Series NAS Hardware User Manual
• No power comes from the grounded power outlet. Have an
electrician check your power outlet.
• Loose or incorrectly connected internal power cables. Ask a qualified
technician to assist you.
• For more troubleshooting steps, see section on “Troubleshooting”.
Page 24

Tandberg Data Setting Up
_____________________________________________________________
2-12 Tandberg Viking FS-1600 Series NAS Hardware User Manual
2.7. Turning OFF the Viking FS-1600 Series NAS
Appliance
Do not use the power button to shut down the FS-1600 Series NAS
appliance when powering down. When the appliance shuts down, all
services running on it are forcibly terminated. Before shutting down the
appliance, make sure no users are currently accessing the NAS. If you shut
down the NAS while a file is being edited, the contents of the file may be
damaged or corrupted.
The FS-1600 Series NAS appliance can be shutdown using the OS
shutdown mechanism:
2.7.1. Using Microsoft® Windows®
On the Windows taskbar, click Start, Shut Down, then click OK. Wait for the
FS-1600 Series to complete the shutdown process; you can then turn off all
peripherals connected to your system.
- OR -
If your FS-1600 Series NAS appliance cannot receive input from the
keyboard or mouse, press and hold the power button for at least four
seconds. However, keep in mind that shutting down the NAS in this manner
may damage the file system. If this happens, the file system will attempt to
repair itself the next time the appliance starts (the larger the file system on
the NAS, the longer time is required for system repair.) If the file system
cannot repair itself, some or all of the data may be lost.
Page 25

_____________________________________________________________
3-1 Tandberg Viking FS-1600 Series NAS Hardware User Manual
3. RAID Configuration
3.1. Hardware RAID Layout
The FS-1600 Series NAS appliance uses ARC-1160 (FS-1600) or ARC1261ML (FS-1610) Serial-ATA RAID II controller that can aggregate a
maximum number of 16 HDD into user definable RAID levels. The minimum
number of required HDD is one (or RAID 0). Tandberg Data recommends
using a minimum of 4 HDD (Serial-ATA II type) in order to kick start an
implementation. Subsequent HDD can be added into an already configured
RAID set or a new RAID set. Please refer to the respective sections in RAID
controller User Guide for details.
Upon boot up of the FS-1600 Series NAS appliance, the RAID controller
BIOS can be accessed by pressing the F6 or TAB key. It is recommended
that a RAID set that comprises of a 4 HDD is created first before creating
subsequent Volume sets.
In this case Tandberg Data recommends two logical Volume sets consisting
of System Volume and Data Volume to be created within the RAID set. The
two logical volumes are to be configured to RAID levels 0+1 and 5. The
System Volume, installed with the host operating system (Windows
®
Storage
Server 2003), is organized as RAID 0+1 and the Data Volume is organized
as RAID 5. This is to allow OS redundancy if more than one HDD fails.
The Volume set layout for the appliance is illustrated below.
Page 26

Tandberg Data RAID configuraion
_____________________________________________________________
3-2 Tandberg Viking FS-1600 Series NAS Hardware User Manual
RAID1
RAID0 RAID0
R
A
ID5
HDD 0 HDD 1 HDD 2 HDD 3
System Volume
Data Volume
Page 27

Tandberg Data RAID configuraion
_____________________________________________________________
3-3 Tandberg Viking FS-1600 Series NAS Hardware User Manual
3.1.1. System Volume (SV)
This volume is organized as a RAID 0+1 volume. This volume includes the
operating system image (Windows
®
Storage Server 2003). The minimum
recommended size for this volume is 10 GB (default). The RAID level can be
customized using the RAID controller BIOS or web-based RAID manager.
The web-based RAID manager is only available after OS installation or
recovery. For more information on how to use the RAID Volume
Configuration utility, see “RAID Management” on 5.2.
3.1.2. Data Volume (DV)
The remaining hard drives space can be organized as the Data Volume
using RAID 5 or other RAID level definable by user. For a FS-1600 Series
NAS appliance installed with four 250 GB hard drives, the data volume size
can be set to 735 GB using the recommended RAID and Volume settings.
3.2. RAID Volume Calculation
Depending on the hard drive capacity, the System Volume and Data Volume
capacity can have different capacity sizes. A simple formula to calculate
Data Volume size (DV) per RAID level is shown in the table below (where
SV is the size of the System Volume in gigabytes) based on Tandberg
Data’s recommended settings:
RAID Level Formula
5 DV = {[(Per HDD capacity × 4) – 2 × SV] ÷ 4} × 3
0+1 DV = {[(Per HDD capacity × 4) – 2 × SV] ÷ 4} × 2
0 DV = (Per HDD capacity × 4) – 2 × SV
Refer to the following table for changing the Data Volume of your hard drive
or changing the default configuration setting according to your Data Volume
size preference:
HDD Capacity
(GB)
System
Volume (GB)
Data Volume
RAID 5 (GB)
Data Volume
RAID10 (GB)
Data Volume
RAID 0 (GB)
500 10 1485 990 1980
250 10 735 490 980
Use the Serial-ATA II RAID controller BIOS change the system volume size
and RAID level of your hard drive. For more information, see “RAID
Management” on 5.2.
The Serial-ATA II RAID controller also supports additional RAID level e.g. 6
and since the FS-1600 Series NAS appliance accommodates a maximum of
16 HDD, the flexibility of RAID configurations is up to the user entirely.
Please see the Serial-ATA II RAID User Guide for more details.
Page 28

Tandberg Data RAID configuraion
_____________________________________________________________
3-4 Tandberg Viking FS-1600 Series NAS Hardware User Manual
This Page Intentionally Left Blank
Page 29

_____________________________________________________________
4-1 Tandberg Viking FS-1600 Series NAS Hardware User Manual
4. Customizing the Viking FS-
1600 Series NAS Appliance
Before you install any computer component, we recommend that you read
the following sections. These sections contain important ESD precautions
along with pre-installation and post-installation instructions.
4.1. Preventing Static Electricity Discharge
The components inside your computer are extremely sensitive to static
electricity, also known as electrostatic discharge (ESD).
• ESD can permanently damage electrostatic discharge-sensitive
components in your FS-1600 Series NAS appliance. Prevent ESD
damage by following ESD guidelines every time you open the case.
• To avoid exposure to dangerous electrical voltages and moving
parts, turn off your FS-1600 Series NAS appliance and unplug the
power cord and network cables before opening the case.
Before opening the case, follow these guidelines:
• Turn off your FS-1600 Series NAS appliance.
• Wear a grounding wrist strap (available at most electronics stores)
and attach it to a bare metal part of your computer.
• Touch a bare metal surface on the back of the computer.
• Unplug the power cord and the network cables.
Before working with computer components, follow these guidelines:
• Avoid static-causing surfaces such as carpeted floors, plastic, and
packing foam.
• Remove components from their antistatic bags only when you are
ready to use them. Do not lay components on the outside of
antistatic bags because only the inside of the bags provide
electrostatic protection.
4.2. Expanding Connectivity
Ports allow you connect peripheral devices to your FS-1600 Series NAS
appliance. For instructions on how to connect different external devices to
the appliance, see your peripheral device user’s guide for instructions.
Page 30

Tandberg Data Customizing the Viking FS-1600 Series NAS Appliance
_____________________________________________________________
4-2 Tandberg Viking FS-1600 Series NAS Hardware User Manual
4.2.1. Built-in Networking
The built-in network feature lets you connect your NAS to an Ethernet-based
(10/100/1000 Mbps) network.
1. Connect an Ethernet cable from a LAN port (LAN0 or LAN1) on the
rear of the FS-1600 Series NAS appliance to a RJ45 network jack,
hub or switch on your network.
2. See your operating system user guide for information on how to
configure your network settings.
4.2.2. USB Connection
The USB (Universal Serial Bus) port is a high-speed serial bus which allows
connection to USB peripherals. The FS-1600 Series NAS appliance is
equipped with two USB 2.0 ports located at the rear panel.
4.3. Upgrading Storage Capacity
The Viking FS-1600 Series NAS appliance delivers superior power and
performance. However, some users and the applications they use may
demand more computational resources. As such, this appliance lets you
upgrade key components when you need increased performance or more
storage space.
One of the key components of the FS-1600 Series NAS appliance is the
hard drive. They can be changed and upgraded to meet performance and
capacity requirements from time to time.
The FS-1600 Series NAS appliance used hot-swap Serial-ATA I or II HDD,
they can be replaced without having to shut down the appliance.
Warning
Because all hard drives have different cooling power and vibration
characteristics, specific hard drive types have been validated to be
compatible with the NAS. For more information, contact Technical Support.
4.2.2. Removing/Installing Hot-Swap Hard Drive
1. Identify the defective hard drive by reading the drive LEDs on the
front panel. A defective drive LED does not light up. For information
about the location of the drive status indicators, see “Front Panel
Indicators”.
2. Unlock the front bezel cover by inserting the supplied key into the
lock and turning it counterclockwise until it points to the unlocked
icon.
Page 31

Tandberg Data Customizing the Viking FS-1600 Series NAS Appliance
_____________________________________________________________
4-3 Tandberg Viking FS-1600 Series NAS Hardware User Manual
3. Remove the front bezel by pressing the release latch on right side of
the front bezel, then pulling out the bezel.
4. Remove the defective hard drive by raising the hard drive carrier
handle, then sliding the hard drive carrier out of the bay.
5. Install a new drive into the hard drive carrier. Make sure that the new
hard drive is the same drive size as the failed hard drive.
6. Insert the hard drive carrier into the bay and lock it into place.
7. Replace the front bezel, then lock the control bay cover. The new
hard drive’s status LED lights up. The RAID will rebuild
automatically.
Page 32

Tandberg Data Customizing the Viking FS-1600 Series NAS Appliance
_____________________________________________________________
4-4 Tandberg Viking FS-1600 Series NAS Hardware User Manual
This Page Intentionally Left Blank
Page 33

_____________________________________________________________
5-1 Tandberg Viking FS-1600 Series NAS Hardware User Manual
5. System Management
This chapter gives information about the software programs and utilities
bundled with your Viking FS-1600 Series NAS appliance. Your appliance
supports the following system management utilities:
• Windows Installer. This component of any Microsoft Windows
operating system lets you install drivers for network, hard drive, and
other component functions. For more information, see “Windows
installer” on 5.1.
• RAID Configuration. This program lets you change the RAID
configuration. For more information, see “RAID Management” on
5.2.
• System Image Restoration. This process recovers your appliance’s
original factory default settings. For more information, see “System
Recovery” on 5.3.
5.1. Windows Installer
The FS-1600 Series NAS appliance Windows operating system includes
drivers and service support for network, hard drive, and other functions. For
installation procedures, refer to the related README documents in the
individual directories.
Notes
The NAS is preinstalled with all the drivers and services necessary for the NAS to
function correctly. This section is provided for software updates. If an upgrade or
patched driver is available, you can refer to the information below to update the
driver.
Page 34

Tandberg Data System Management
_____________________________________________________________
5-2 Tandberg Viking FS-1600 Series NAS Hardware User Manual
The Windows Installer includes the following components and drivers:
• Intel Network driver
Includes drivers and utilities to provide advanced NIC management
functions such as fail over or aggregation. For more information, see
the Intel Network driver’s online Help.
• Disk/RAID driver
Provides performance improvement for the drive IO(s). You can
update the driver using the Device Manager utility. In the SCSI and
RAID controller device type option, select a device such as SATA
PCI RAID Host Adapter to update your driver. For details on how to
update a driver, see the Device Manager utility’s online Help.
• SCSI driver
Additional IO bus for connecting SCSI peripherals. The driver is
found under the Device Manager utility, under the SCSI and RAID
controller device type option, Adaptec - Ultra320 SCSI.
Page 35

Tandberg Data System Management
_____________________________________________________________
5-3 Tandberg Viking FS-1600 Series NAS Hardware User Manual
5.2. RAID Management
The RAID volume of FS-1600 Series NAS appliance is configured using the
BIOS of ARECA ARC-1160 or ARC-1261ML Serial-ATA II RAID controller
hardware. Additional or subsequent configuration can be performed using
the web-based RAID manager once the OS is installed.
5.2.1. Configure and Creation of RAID Volumes
The RAID BIOS Configuration Utility is used to create or configure the
hardware RAID of FS-1600 Series NAS appliance. After any modification of
the hardware RAID, the appliance has to be rebooted in order for the
changes to take effect.
Notes
The RAID BIOS is accessed by pressing TAB / F6 key during boot. The default
BIOS password is “0000” when prompted.
Before restoring the factory default image to Viking FS-1600 Series NAS
appliance, the System Volume (SV) on the hardware RAID controller must
be created first. After the SV creation is finished, the appliance has to be
rebooted to make the volume effective before the image restoration.
1. During the boot process, depress TAB / F6 key to enter the RAID
BIOS.
2. Create RAID set that comprises of the physical member HDD. If you
have 4 HDD, you can select all 4 HDD into a RAID set.
3. Create the Volume set (SV) within the RAID set. Decide the RAID
level and strip size of SV and the desire capacity.
Notes
It is recommended that the minimum capacity of the System Volume is set to 10GB
and RAID level 0+1 for OS redundancy. Tandberg Data does not recommend
setting the capacity value of SV below 10GB.
4. Enter the default password word if prompted.
5. The system will start performing the RAID volume creation.
Depending on the capacity of the SV selected as well as its RAID
level, this process may take several hours to complete. Once
completed, the appliance has to be rebooted for the volume to take
effect.
Page 36

Tandberg Data System Management
_____________________________________________________________
5-4 Tandberg Viking FS-1600 Series NAS Hardware User Manual
Notes
Further RAID configuration can be performed using web-based RAID manager after
the OS is recovered using a web-browser and point to the following URL:
http://<your NAS appliance IP address>:81
The default user name is “admin”. The default password is “0000”.
6. Exit from the BIOS by pressing F10 key and system will restarted.
For further detail on configuring RAID and Volume sets using the controller
BIOS as well as using the web-based RAID manager, see ARECA ARC1160/ARC-1261ML Serial-ATA RAID Controller User Manual.
5.2.2. Changing RAID Level and Capacity Size
The RAID BIOS and web-based RAID manager are also used to change the
RAID level as well as the capacity size of the configured volumes. After the
creation of the System and the Data Volume, further alteration to their RAID
level and capacity is allowed via these means.
1. Access either the RAID BIOS or the web-based RAID manager, see
details in section 5.2.1.
Notes
See the ARECA ARC-1160/ARC-1261ML Serial-ATA RAID Controller User Manual
for further details.
2. The ARC-1160/ARC-1261ML Serial-ATA RAID controller will
perform the configuration change once confirmed. Depending on the
extend of change the process may take a few minutes to several
hours to complete. The appliance must be rebooted for the change
to take effect.
5.3. System Recovery
The Image Restoration lets you restore the system image factory default
settings.
Notes
Using the Image Restoration utility removes all data on the System Volume. Make
sure that you back up important files before starting the restoration process. Image
restoration can only be performed after System Volume has been created.
Page 37

Tandberg Data System Management
_____________________________________________________________
5-5 Tandberg Viking FS-1600 Series NAS Hardware User Manual
1. Insert the Recovery DVDROM disc into the DVDROM drive and boot
to the FS-1600 Series NAS appliance. Hit any key to perform CD or
DVDROM booting when prompted.
2. PC DOS will boot and Symantec GHOST 2003 will be loaded.
3. Click OK.
4. Select Yes Local > Disk > From Image.
Page 38

Tandberg Data System Management
_____________________________________________________________
5-6 Tandberg Viking FS-1600 Series NAS Hardware User Manual
5. Select DVDROM drive from the look in drop down box.
6. Select the GHOST Image listed.
Page 39

Tandberg Data System Management
_____________________________________________________________
5-7 Tandberg Viking FS-1600 Series NAS Hardware User Manual
7. Select local destination drive by choosing it from the pop-out
window.
8. Verify detail of the destination drive.
Page 40

Tandberg Data System Management
_____________________________________________________________
5-8 Tandberg Viking FS-1600 Series NAS Hardware User Manual
9. Click OK and the restoration will commence.
10. Once the restoration has completed, click Reset Computer to boot
the FS-1600 Series NAS appliance to the new OS image.
11. Follow the Windows
®
setup to configure the Product Key, server
Name, Administrator password and reboot.
Page 41

Tandberg Data System Management
_____________________________________________________________
5-9 Tandberg Viking FS-1600 Series NAS Hardware User Manual
Notes
Please note that in order to restore the image into the Viking FS-1600 Series NAS
appliance successfully, you should create the System volume and reboot the
appliance first prior to the restoration.
Notes
The default login and password for Windows Storage Server 2003 is
“Administrator” and “1234” despite the initial user specified configuration. The
user logon credential is hard-coded to the recovery image.
Default login password can be changed once the OS boots normally.
Page 42

Tandberg Data System Management
_____________________________________________________________
5-10 Tandberg Viking FS-1600 Series NAS Hardware User Manual
This Page Intentionally Left Blank
Page 43

_____________________________________________________________
6-1 Tandberg Viking FS-1600 Series NAS Hardware User Manual
6. Troubleshooting
6.1. Before Calling Tandberg Data Technical
Support
If you have a technical problem with your Viking FS-1600 Series NAS
appliance, follow these recommendations before contacting Tandberg Data
Technical Support:
• Make sure that your FS-1600 Series NAS appliance is connected
correctly to a grounded AC outlet that is supplying power.
• If a peripheral device, such as a keyboard or mouse, does not
appear to work, make sure that all cables are plugged in securely
and plugged into the correct port or jack.
• If you have recently installed hardware or software, make sure that
you have installed it following the instructions provided with it.
Please refer to the manufacturer’s documentation and technical
support resources.
• If you have “how to” questions about using a program, see:
o The program’s online Help
o The program’s documentation
o Your operating system’s documentation
o The software or hardware manufacturer’s Web site
• Have your client ID, serial number (located on the side or back of
your case), and order number available, along with a detailed
description of your issue, including the exact text of any error
messages, and the steps you have taken.
• Make sure that your FS-1600 Series NAS appliance is nearby at the
time of your call. The technician may have you follow appropriate
troubleshooting steps.
• Consider using Tandberg Data’s online technical support. Tandberg
Data’s Web site has FAQs, tips, and other technical help. You can
also use the Web site to e-mail Technical Support. For more
information, visit Tandberg Data’s web site at www.tandberg.com.sg.
Page 44

Tandberg Data Troubleshooting
_____________________________________________________________
6-2 Tandberg Viking FS-1600 Series NAS Hardware User Manual
6.2. Safety Guidelines
While troubleshooting your Viking FS-1600 Series NAS appliance, follow
these safety guidelines:
• Never remove the top cover while your appliance is turned on and
while the network cable and the power cords are connected.
• Make sure that you are grounded correctly before opening the
appliance. For more information about preventing damage from
static electricity, see “Preventing static electricity discharge” on 4.1.
• After you complete any maintenance task where you have to remove
the top cover, make sure that you close the case and reconnect all
cables before you restart your appliance.
Warning
To avoid bodily injury, do not attempt to troubleshoot your FS-1600 Series
NAS appliance problem if:
1) The power cords or plugs are damaged
2) Liquid has been spilled into your appliance
3) Your FS-1600 Series NAS appliance was dropped
4) The case was damaged
Instead, unplug your NAS and contact a qualified computer technician. If your
FS-1600 Series NAS appliance was damaged during shipment from Tandberg
Data, contact Tandberg Data Technical Support.
6.3. Troubleshooting Steps
The Viking FS-1600 Series NAS appliance does not work.
• Make sure that the power button on the front panel is turned on.
• Make sure that the power cable is connected correctly.
• Turn off the FS-1600 Series NAS appliance by pressing the power
button, and then restart again. During the startup procedure, the
appliance checks the file system. The length of this check varies
depending on the amount of data on the appliance (in some extreme
cases, it can take as long as two hours).
Page 45

Tandberg Data Troubleshooting
_____________________________________________________________
6-3 Tandberg Viking FS-1600 Series NAS Hardware User Manual
The Viking FS-1600 Series NAS appliance cannot be accessed from a
browser.
• Make sure that the network cable is connected correctly.
• Make sure that the LINK LED and ACT LED are lit.
• Make sure that the IP address entered on the browser is correct.
• Make sure that no other networked device is using the same IP
address as the appliance.
• Make sure that the network cable is not damaged.
• Make sure that there is no problem with the connection between the
network hub and the computer, appliance, or hub connectors.
The FS-1600 Series NAS appliance cannot read the CD/DVD information.
• Make sure that you are using the correct type of disc.
• Make sure the CD/DVD is correctly inserted in the drive.
• Make sure that the CD/DVD is clean and is not scratched.
A new peripheral is not working correctly.
• Make sure that the cables for the new peripherals are firmly
connected and that the pins are not bent.
• See the documentation that came with the new peripheral to see if
any device drivers need to be installed.
• Make sure that the network status indicator lights up.
• Check the cabling and network equipment for the correct
connection.
• Reinstall the network drivers.
A peripheral device connected to a USB connector does not work.
• Reduce the number of external devices connected to a USB hub.
• See the documentation that comes with the device.
FS-1600 Series NAS appliance cannot eject disc drive tray
• Insert the tip of a straightened paper clip into the manual eject hole
of the disc drive tray.
Page 46

Tandberg Data Troubleshooting
_____________________________________________________________
6-4 Tandberg Viking FS-1600 Series NAS Hardware User Manual
This Page Intentionally Left Blank
Page 47

_____________________________________________________________
7-i Tandberg Viking FS-1600 Series NAS Hardware User Manual
7. Glossary
10 Base-T
A UTP cable consisting of four pairs of two wires (8 conductors) each,
twisted together into a single unshielded set (the cable is not enclosed in a
metallic mesh for blocking electromagnetic noise). Also referred to as a
twisted pair cable, it is commonly used for connection in Ethernet-based
local area networks.
A cable of this type is capable of carrying unmodulated signal data at the
rate of 10 megabits per second over distances of up to 328 feet (100 meters)
(with the 10 Mbps base band system).
100 Base-TX
A UTP cable consisting of four pairs of two wires (8 conductors) each,
twisted together into a single unshielded set (the cable is not enclosed in a
metallic mesh for blocking electromagnetic noise). This is referred to as a
twisted pair cable. These cables meet the category 5 specifications for such
cables.
A cable of this type is capable of carrying unmodulated signal data at the
rate of 100 megabits per second over distances of up to 328 feet (100
meters) (with the 100 Mbps base band system). It is used for connecting to
local area networks using fast Ethernet, which operate at speeds in excess
of 10 Mbps (data transfer at the rate of 10 megabits per second).
Capacity limit
Limits the amount of drive space that a particular user can use. Also referred
to as a quota or disk quota.
DHCP (Dynamic Host Configuration Protocol)
A protocol for easily assigning dynamic IP addresses to devices on a
network. With DHCP, IP addresses can be traced by the software without
requiring an administrator to manually manage the task.
Page 48

Tandberg Data Glossary
_____________________________________________________________
7-ii Tandberg Viking FS-1600 Series NAS Hardware User Manual
Event Viewer
An administrative tool that is used to view and manage logs of system,
program, and security events on your NAS. The Event Viewer displays five
types of events:
• Error
An error log describes a significant problem that has occurred, such
as a loss of data or loss of functionality.
• Warning
A warning log indicates a potential problem in the future.
• Information
An information log describes operation of an application, driver, or
service.
• Success audit
A success audit event is a user’s successful attempt to log on to the
NAS.
• Failure audit
A failure audit log is a failure to access a network drive.
Hub
A switching device through which a number of devices (such as computers)
can be connected to a network. Since connected devices are arrayed with
the hub at the center, this type of connection is referred to as a star topology.
Most hubs used with the Internet are equipped with a signal amplifier
(repeater) to support physical extensions.
IP address
An identifier used to indicate the addresses of devices (such as computers)
that are connected to a network. Because this identifier is used to designate
a particular destination during data exchange, each IP address must be
unique. The address consists of four period-delimited fields, each field being
a number from 0 to 255.
LAN (Local Area Network)
A network encompassing a relatively limited area, such as a building, a floor,
an organization, or a company.
LED (Light-Emitting Diode)
A diode that emits light and is used as a status indicator.
Log
A record of events occurring during operation, along with their times of
occurrence, or the file containing such a record. For example, an error log
contains a list of errors occurring in the NAS appliance, while an access log
records access to the NAS appliance.
Page 49

Tandberg Data Glossary
_____________________________________________________________
7-iii Tandberg Viking FS-1600 Series NAS Hardware User Manual
Mount
To make accessible, either by connecting to the computer itself or by placing
onto the hard drive or other storage medium of a computer on the network.
Network card
A device installed in a computer or router to enable connection to a network.
A network card is equipped with a port (connector) for connection to a 1000
base-T, 100 Base-TX, 10 Base-T, or other network cable. Also referred to as
a LAN card, LAN board, or NIC (network interface card).
Network system
A system for sharing resources such as files and printers.
NFS (Network File System)
A method for sharing files over a network. NFS makes it possible to use files
located on another computer on the network as if they were located on your
own machine. A trademark of Sun Microsystems, it is primarily used with
UNIX, but has also been adapted for use with Microsoft Windows operating
systems.
Operating system
Basic software that manages and controls operation of a computer.
Microsoft® Windows® and UNIX are operating systems.
RAID
RAID (redundant array of independent disks) is an array of multiple,
independent hard drives that provide high performance and fault tolerance.
The RAID subsystem controller implements several levels of the Berkeley
RAID technology. An appropriate RAID level is selected when the volume
sets are defined or created. This decision is based on drive capacity, data
availability, (fault tolerance or redundancy), and drive performance.
RAID level
RAID level refers to the level of data performance and protection of a volume
set. RAID arrays can be implemented in several ways, using technologies
such as mirroring, striping, duplexing, and parity. The RAID levels supported
in the RAID subsystem are RAID 0, RAID 1, RAID 10 and RAID 5.
RAID 0
RAID 0, also known as striping, is the simplest RAID level. RAID 0 does not
involve data redundancy, but it does offer the best high-speed data
throughput. RAID 0 breaks up data into smaller blocks, then writes a block to
each drive in the array.
Page 50

Tandberg Data Glossary
_____________________________________________________________
7-iv Tandberg Viking FS-1600 Series NAS Hardware User Manual
RAID 1
RAID 1, also known as disk mirroring, writes data simultaneously to several
duplicate drives. If one drive fails, the other drive(s) continues to function as
a single drive until the failed drive is replaced.
RAID 5
RAID 5 is also known as striping with parity at byte level. In RAID 5, both
data and parity information are written to all of the drives in the subsystem. If
one drive in the system fails, the parity information can be used to
reconstruct the data from that drive. All drives in the array system can be
used for a seek operation at the same time, thereby increasing the
performance of the RAID system.
RAID 6
RAID 6 provides the highest reliability, but is not yet widely used. It is similar
to RAID 5, but it performs two different parity computations or the same
computation on overlapping subsets of data. RAID 6 can offer fault tolerance
greater than RAID 1 or RAID 5 but consumes the capacity of 2 disk drives
for distributed parity data. RAID 6 is an extension of RAID 5 but uses a
second, independent distributed parity scheme. Data is striped on a block
level across a set of drives, and then a second set of parity is calculated and
written across all of the drives.
RAID 10
RAID 10 is a combination of RAID 0 and RAID 1, striping and disk mirroring.
RAID Level 10 combines the fast performance of Level 0 with the data
redundancy of Level 1. In this configuration, data is distributed across
several drives, similar to Level 0. Then the data are duplicated to another set
of drives for data protection. RAID 10 provides the highest read/write
performance of any of the hybrid RAID levels.
RAID 0+1
RAID 0+1 is a mirrored array whose segments are RAID 0 arrays. It has the
same fault tolerance as RAID 5, and the same overhead for fault tolerance
as mirroring alone. This RAID has excellent performance, but not maximum
reliability.
Rack mount
Ordinarily, a 19-inch rack (cabinet) in which servers or drive units made to fit
such a rack are mounted. A rack mount kit is hardware, such as sliding rails,
for mounting devices in such a rack.
Router
Page 51

Tandberg Data Glossary
_____________________________________________________________
7-v Tandberg Viking FS-1600 Series NAS Hardware User Manual
A repeater for connecting multiple networks. A router determines the
optimum path (route) for forwarding received data, and provides control over
a higher level of processing than a device such as a hub. A router is used in
constructing medium- to large-scale networks.
Server
A computer that provides many types of services to computers attached to it.
Examples include file servers, Web servers, and data servers.
Service
A task (sometimes known as a process) or application that resides in the
system and runs in the background. Also referred to as a daemon or driver.
Subnet mask
A number that is used for dividing IP addresses used on a TCP/IP network
into network numbers and host numbers. This method is used to allow
different networks that are connected through a router to recognize that they
are different networks.
TCP/IP protocol
Generally used to refer to the established set of means and procedures by
which devices connected to a TCP/IP network communicate with one
another. TCP/IP is the most widely used of the various protocols, and is also
used on the Internet.
Volume set
Volume set is a single logical device. It is organized in a RAID level with one
or more physical drives. A volume set must be created either on an existing
RAID set or on a group of available individual drives.
Web server
A server machine that distributes data for viewing over the Web, or the
service provided by such a machine. Also referred to as a WWW (World
Wide Web) server.
Windows network
A network built from machines that use a Microsoft® operating system. Uses
a protocol called NetBEUI.
Windows Administrative tools
A collection of Windows tools (Component Services, Computer
Management,
Page 52

Tandberg Data Glossary
_____________________________________________________________
7-vi Tandberg Viking FS-1600 Series NAS Hardware User Manual
Data Sources, Event Viewer, Local Security Policy, Performance and
Services) for remotely managing a server from a computer running
Windows.
Page 53

Tandberg Data Glossary
_____________________________________________________________
7-vii Tandberg Viking FS-1600 Series NAS Hardware User Manual
This Page Intentionally Left Blank
 Loading...