


I N S T R U C T I O N M A N U A L
S p y d e r
Dive Computers

Decompression Dive Icon
Time Display
Surface Interval / No Flying Time
No-Decompression Time
Ceiling Depth / Total Ascent Time
Do Not Fly Icon
Multifunctional Bar Graph:
- Mode Indicator
- Ascent Rate Indicator
- Battery Power Indicator
Select Button
Depth Sensor
Arrows:
- Decompression Stop
at the Ceiling Depth
-Ascent Recommended
-Must descent
Personal Adjustment
Minus (-) Button
Mode text
Maximum Depth during Diving
Temperature
Day of the week
Stopwatch
Serial number on the case back
AVG |
m |
ft |
|
MAX |
|
SURF TIME |
NO DECTIME |
MAX ft m |
DIVE TIM R |
° F ° C |
|
Present Depth
Maximum Depth
at the Surface
Average Depth
in the Logbook Mode
Fast Ascent Warning (SLOW)
Multifunctional Bar Graph:
-Mode Indicator
-Reverse No-Decompression Time
Mode Button
Backlight Button
AM/PM Indicator
Water Contact
High Altitude Mode
Dive Time
Current Time during Diving Dive Counter
Month and Day Seconds Stopwatch
Plus (+) Button
Daily Alarm On Indicator
Depth Alarm On Indicator
Low Battery Warning
Fig. 1.1 Quick reference quide
SUUNTO SPYDER
ADVANCED COMPUTER WATCH
The Suunto Spyder Advanced Computer Watch is a true multilevel dive computer. The Spyder features:
Advanced Watch Functions
complete calendar clock, also during diving
stopwatch with elapsed time and split time measurement
alarm clock
Advanced Dive Computer Functions
personal adjustability
altitude adjustability
continuous decompression
ascent rate indicator and warnings
visual and audible alarms
complete memory capabilities including a 36-hour profile memory
planning mode for dive planning before and between dives
user definable display field
electroluminescent illumination
battery power indicator and low battery warning
PC-Interface capability
All the advanced features of the Spyder are bound in a durable high-quality metal case.
1

MENUSANDOPERATION
Fig. 1.2 Menus of the Spyder
2

DEFINITIONOFWARNINGS,CAUTIONSANDNOTES
Throughout this manual, special references are made when deemed important. Three classifications are used to separate these references by their order of importance.
WARNING is used in connection with a procedure or situation that may result in serious injury or death.
CAUTION is used in connection with a procedure or situation that will result in damage to the product.
NOTE is used to emphasize important information.
COPYRIGHT, TRADEMARK AND PATENT NOTICE
This instruction manual is copyrighted and all rights are reserved. It may not, in whole or in part, be copied, photocopied, reproduced, translated, or reduced to any media without prior written consent from SUUNTO.
SUUNTO, Spyder, Lux, ACW (Advanced Computer Watch), ACW Dive Log, User Definable Display Field, Continuos Decompression and their logos are all registered or unregistered trademarks of SUUNTO. All rights are reserved.
Patents have been issued or applied for one or several features of this product.
CE
The CE mark is used to mark conformity with the European Union EMC directive 89/336/EEC. The SUUNTO dive instruments fulfill all the required EU directives.
ISO 9001
SUUNTO Oyís Quality Assurance System is certified by Det Norske Veritas to be according to the ISO 9001 in all SUUNTO Oyís operations (Quality Certificate No. 96-HEL-AQ-220).
SUUNTO Oy does not assume any responsibility for losses or claims by third parties which may arise through the use of this device.
Due to continuous product development the Spyder is subject to change without notice.
3

WARNING!
ONLY DIVERS TRAINED IN THE PROPER USE OF SCUBA EQUIPMENT SHOULD USE THE SPYDER! No dive computer can replace the need for proper dive training. Insufficient or improper training may cause diver to commit errors that may lead to serious injury or death.
WARNING!
READ THIS MANUAL! Carefully read this instruction manual in its entirety, including Section 2, ìFor Your Safetyì. Make sure that you fully understand the use, displays and limitations of the Spyder. Any confusion resulting from improper use of this device may cause diver to commit errors that may lead to serious injury or death.
WARNING!
NOT FOR PROFESSIONAL USE! SUUNTO dive computers are intended for recreational use only. The demands of commercial or professional diving often expose the diver to depths and prolonged exposures including multiday exposures that tend to increase the risk of decompression sickness. Therefore, SUUNTO specifically recommends that the Spyder is not used for commercial or other severe diving activity.
WARNING!
PERFORM PRECHECKS! Always check the Spyder before diving in order to ensure that all LCD segments are completely displayed, that the Spyder has not run out of battery power, and that the altitude and personal adjust- 4ment mode is correct.

WARNING!
USE BACK-UP INSTRUMENTS! Make sure that you use back-up instrumentation including a depth gauge, submersible pressure gauge, timer or watch, and have access to decompression tables whenever diving with the Spyder.
WARNING!
NO DIVE COMPUTER WILL PREVENT THE POSSIBILITY OF DECOMPRESSION SICKNESS (DCS)! All divers must understand and accept that there is no procedure or dive computer that will totally prevent the possibility of a decompression accident. For example, the individual physiological make up can vary within an individual from day to day. The dive computer cannot account for these variations. As an added measure of safety, you should consult a physician regarding your fitness before diving with the Spyder. Decompression sickness can cause serious injury or death.
CAUTION!
ENSURE THE WATER RESISTANCE OF THE DEVICE! Ensure the water resistance of the device by servicing the push buttons and protective seals every two years. Avoid operating the push buttons unnecessarily underwater. Always check the water resistance of the device when replacing the battery. Moisture inside the device will seriously damage the unit. Battery replacement and other service activities should be done only by an authorized SUUNTO dealer or distributor.
5
TABLE OF CONTENTS
1. INTRODUCTION ...................................................................... |
8 |
||
1.1 |
IMPORTANT INFORMATION .................................................................... |
8 |
|
1.2 |
KEY FEATURES .............................................................................................. |
10 |
|
1.3 |
FUNCTIONS AND THE USE OF THE PUSH BUTTONS ........................ |
11 |
|
1.4 |
GETTING STARTED ...................................................................................... |
12 |
|
1.5 |
METRIC AND IMPERIAL UNITS ............................................................... |
13 |
|
2. FOR YOUR SAFETY ................................................................ |
14 |
||
2.1 |
SAFETY PRECAUTIONS .............................................................................. |
14 |
|
3. TIME MODE .............................................................................. |
20 |
||
3.1 TIMEKEEPING DISPLAY .............................................................................. |
21 |
||
3.2 |
STOPWATCH ................................................................................................. |
22 |
|
4. DIVING WITH THE SPYDER ................................................. |
24 |
||
4.1 |
USE OF PUSH BUTTONS AND WATER CONTACT ............................... |
25 |
|
4.2 |
BEFORE DIVING ............................................................................................ |
26 |
|
4.2.1 |
Activation, Prechecks and Battery Warning ............................................. |
26 |
|
4.2.2 |
Dive Planning ............................................................................................. |
31 |
|
4.2.3 |
Example Dive - For Easy Learning ........................................................... |
33 |
|
4.2.4 |
Presetting Displays and Alarms ............................................................... |
33 |
|
4.3 |
DIVING ............................................................................................................. |
37 |
|
4.3.1 |
Basic Dive Data ......................................................................................... |
37 |
|
4.3.2 |
Reverse No-decompression Time Bar Graph .......................................... |
38 |
|
4.3.3 |
Ascent Rate Indicator ................................................................................ |
39 |
|
4.3.4 |
Audible and Visual Alarms ........................................................................ |
41 |
|
4.3.5 |
Decompression dives ................................................................................ |
42 |
|
6
4.4 |
AT THE SURFACE .......................................................................................... |
47 |
|
4.4.1 |
Surface Interval .......................................................................................... |
47 |
|
4.4.2 |
Flying After Diving ................................................................................... |
49 |
|
4.5 |
HIGH ALTITUDE DIVES AND PERSONAL ADJUSTMENT .................. |
51 |
|
4.6 |
ERROR CONDITIONS ................................................................................... |
55 |
|
5. SETTING MODE ....................................................................... |
56 |
||
5.1 |
SETTING TIME AND DATE ........................................................................ |
57 |
|
5.2 |
DAILY ALARM SETTING ............................................................................. |
59 |
|
5.3 |
DEPTH ALARM SETTING ........................................................................... |
61 |
|
5.4 |
ALTITUDE ADJUSTMENT AND PERSONAL ADJUSTMENT SETTING ....... |
62 |
|
6. MEMORIES AND DATA TRANSFER ..................................... |
65 |
||
6.1 |
LOGBOOK AND DIVE PROFILE MEMORY ............................................. |
66 |
|
6.2 |
DIVE HISTORY MEMORY ........................................................................... |
71 |
|
6.3 |
DATA TRANSFER AND PC-INTERFACE .................................................. |
72 |
|
7. CARE AND MAINTENANCE ................................................. |
74 |
||
7.1 |
CARE OF YOUR ADVANCED COMPUTER WATCH .............................. |
74 |
|
7.2 |
MAINTENANCE ............................................................................................ |
75 |
|
7.3 |
WATER RESISTANCE INSPECTION ........................................................... |
76 |
|
8. TECHNICAL DESCRIPTION .................................................. |
76 |
||
8.1 |
OPERATING PRINCIPLES ............................................................................ |
76 |
|
8.2 |
TECHNICAL SPECIFICATION .................................................................... |
82 |
|
9. WARRANTY ............................................................................. |
84 |
||
10. GLOSSARY .............................................................................. |
86 |
||
7
1. INTRODUCTION
Congratulations on your choice of the SUUNTO Spyder Advanced Computer Watch. The Spyder is a compact and most sophisticated dive instrument that will give you years of trouble-free and joyful diving. The Spyder Advanced Computer Watch will provide you with important information that you will need during, between, and after your dives.
1.1 IMPORTANT INFORMATION
NEVER test the Spyder in a pressure chamber. Only authorized SUUNTO service personnel may test the Spyder and make test dives in a pressure chamber, as it requires special equipment and training.
Battery
Battery life of the Spyder is about 1.5 years when used as a watch. Diving, alarms and use of the backlight shorten the battery life. Note, that the battery loaded at the factory may discharge during the shipment and storage. Temperature affects the battery voltage. If the Spyder is stored at low temperatures (particularly below freezing point), the low battery warning may be displayed even though the battery has enough capacity in warmer conditions. The battery should be replaced only by an authorized SUUNTO dealer or distributor.
Water Resistance
This device will withstand the ingress of water at the static pressure of 20 ATM (200 m [660 ft]). Note, however, that dynamic pressure generated by movement underwater is greater than static pressure.
8
Depth Sensor
The built-in depth sensor of the Spyder is a sophisticated precision instrument. The depth sensor cover may be opened only by an authorized SUUNTO dealer or distributor. NEVER try to open the cover yourself. Keep the area around the depth sensor clear from dirt, sand, dust or other substances. Rinse the device thoroughly with fresh water and dry it with a soft towel. Never use pins, needles or other objects to clean the depth sensor.
Water Contact
The water contact controls the automatic activation of the Dive Mode, as well as the automatic return from the Dive Mode to the Time Mode. Contamination or dirt on the water contact may prevent these automatic operations. It is, therefore, important that the water contact is kept clean. The contact can be cleaned with fresh water and a soft pencil eraser.
NOTE: Water or moisture build-up around the water contact may cause the contact to activate automatically. This can happen, e.g., when washing your hands or sweating. If the water contact activates in the Time Mode, an ACW text will appear on display (see Fig. 4.2. b), and it will be shown until the water contact deactivates, or the Spyder enters the Dive Mode automatically. To save the battery power, you should deactivate the water contact by cleaning it and/or drying it with a soft towel.
Exposing the Spyder to great temperature changes may cause the Dive Mode to activate automatically. The Spyder will return to the normal display (timekeeping) 10 minutes after the water contact has dried. To save the battery power and also to enable the use of the timekeeping display, it is recommended to return to the normal display by using the push buttons.
9
1.2 KEY FEATURES
The Spyder Advanced Computer Watch has a built-in calendar clock, stopwatch and alarm clock.
The Spyder has complete dive computer features. It monitors and reports vital information such as your dive time, current depth, maximum depth, nodecompression time and ascent rate. It will give you visual and audible warnings, as required. Its built-in planning function allows you to plan dives before and between dives. The Spyder will also give you information you may need, if through carelessness or emergency you exceed the no-decompression limits for any dive.
The Spyder features versatile memory capabilities, including both detailed profiles and long-term historical data. It can interface with a PC, allowing for additional logbook features and dive simulation. The instrument can be adjusted for diving at different altitudes and to add a personal level of conservativness if desired.
The case of the Spyder is made of a high-quality metal. The special monolithic case makes the Spyder water resistant and pressure responsive. The unique triple-gasket push buttons are especially designed to withstand water, pressure and dirt, and to ensure reliable operation under demanding conditions. The display is protected against damage by a mineral crystal, which can be easily replaced. A flexible extension strap allows the easy fastening of the device also on an exposure suit.
The Spyder is equipped with a sophisticated electroluminescent backlight
10
display, which does not significantly reduce battery life because of the highly energy-efficient system design and because the lamp goes off automatically after a few seconds from activation. The electroluminescent lamp will give excellent backlight quality in darkness and low ambient light conditions. The backlight is not visible during daylight.
1.3 FUNCTIONS AND THE USE OF THE PUSH BUTTONS
In the Spyder Advanced Computer Watch, there are four main modes (TIME, DIVE, SET, MEM) and 13 submodes (see Fig. 1.2). You can scroll through the modes using the push buttons. The mode indicator at the left or the right side and the mode text at the bottom of the display indicate the selected mode.
The Spyder is controlled with four push buttons as follows (see Fig. 1.3).
 - button
To change from a main mode to another main mode press  . To exit from a submode to a main mode press
  .
.
To activate the electroluminescent backlight hold down  for more than two (2) seconds.
To accept the settings in the Setting Mode press  .
.
11

Fig. 1.3 The push buttons of the Spyder.
 -button
To select a submode press  .
.
To select the active segment in the Setting Mode press  .
.
To select the display in the Logbook Mode press  .
.
 and
and  buttons
To show the date or seconds in the time keeping display press  or
or  .
.
In the Setting Mode
press  to increase the value. press
  to decrease the value.
To operate the stopwatch see section 3.2, ìStopwatchì.
To select the dive in the Logbook Mode press  to move forward,
press  to move backwards.
1.4 GETTING STARTED
Before you start using the Spyder you must read and understand this manual in its entirety. Before your first actual dive it is of utmost importance that you read Section 2,
12

ìFor Your safetyì, and Section 4, ìDiving with the Spyderì. Section 3, ìTime Modeì, teaches you how to use the clock functions of the Spyder. Section 5, ìSetting Modeì, gives instructions on how to set the time, date, daily alarm and the time format in the clock, and the depth alarm and Altitude and Personal Adjustments in the dive computer. Section 6, ìMemories and Data Transferì teaches how to access the memory functions and how to transfer the data from the Spyder to a PC. Section 7, ìCare and Maintenanceì, gives you detailed information about the care and maintenance of your Spyder, and the battery replacement. Finally, there is technical information in Section 8, and information on service and warranty in Section 9.
1.5 METRIC AND IMPERIAL UNITS
All examples in this manual are shown in metric units, including meters and C. The corresponding imperial units are shown in brackets. The Spyder is also available in imperial units, i.e. feet and F. THE UNITS CANNOT BE CHANGEDBYTHEUSER.
WARNING!
VERIFY THAT THE UNITS OF MEASURE, WHETHER METRIC OR IMPERIAL, ARE CORRECT BEFORE DIVING! Any confusion resulting from improper units may cause the diver to commit errors that may lead to serious injury or death.
13

2. FOR YOUR SAFETY
Do not attempt to use the Spyder without reading this instruction manual in its entirety, including all the warnings in the beginning of this manual and the entire section 2, ìFor Your Safetyì. Make sure that you fully understand the use, displays and limitations of the Spyder. If you have any questions about the manual or the Spyder, contact your SUUNTO dealer before diving with the Spyder.
Always remember that THE DIVER IS RESPONSIBLE FOR HIS OR HER OWN SAFETY!
When used properly the Spyder is an outstanding tool for assisting properly trained, certified divers in planning and executing standard and multi-level sport dives within the described no-decompression limits. It is NOT A SUBSTITUTE FOR CERTIFIED SCUBA INSTRUCTION including training in the principles of decompression.
2.1 SAFETY PRECAUTIONS
Sharing the Spyder
WARNING!
THE SPYDER SHOULD NEVER BE TRADED OR SHARED BETWEEN USERS WHILE IT IS IN OPERATION! Its information will not apply to someone who has not been wearing it throughout a dive or sequence of repetitive dives. Its dive profiles must match that of the user. If it is left on the surface during any dive, it will give inaccurate information for subsequent dives. No
14

dive computer can take into account dives made without the computer. Thus any diving activity 48 hours prior to initial use of the computer may give misleading information, which may substantially increase the risk of decompression sickness and must be avoided.
Altitude and PersonalAdjustments
WARNING!
SET THE CORRECT ALTITUDE AND PERSONAL ADJUSTMENT MODES! Failure to properly select the Altitude and Personal Adjustment Modes correctly will result in erroneous data and can greatly increase the risk of decompression sickness. More information about this is given in Section 4.5, ìHigh Altitude Dives and Personal Adjustmentì.
WARNING!
SET THE CORRECT ALTITUDE ADJUSTMENT MODE WHEN DIVING AT ALTITUDES GREATER THAN 700 M [2300 FT]! When diving at altitudes greater than 700 m [2300 ft] the altitude adjustment feature must be correctly selected in order for the computer to calculate no-decompression status. Failure to select the Altitude Adjustment Mode correctly will result in erroneous data and can greatly increase the risk of decompression sickness.
15

WARNING!
THE SPYDER IS NOT INTENDED FOR USEATALTITUDES GREATER THAN 2400 M [8000 FT]. Diving at altitudes above this limit may significantly increase the risk of decompression sickness.
Decompression Dives
SUUNTO does not recommend this instrument to be used to conduct decompression dives. However, if through carelessness or emergency a diver exceeds the no-decompression limits on a dive, the Spyder will provide decompression information required for ascent. After this the Spyder will continue to provide subsequent interval and repetitive dive information.
WARNING!
DO NOT USE THIS INSTRUMENT TO CONDUCT DIVES WITH NECESSARY DECOMPRESSION STOPS! SUUNTO does not recommend this instrument to be used to conduct these types of dives. Decompression Diving limits the divers ability to ascend directly to the surface and may substantially increase the risk of decompression sickness.
EmergencyAscents
In the unlikely event that the Spyder malfunctions during a dive, follow the emergency procedures provided by your certified dive training agency or, alternatively, immediately ascend at a rate slower than 10 m/min [33 ft/min] to a depth between 3 and 6 meters [10 to 20 ft] and stay there as long as your air supply will safely allow.
16
Higher Risk Dive Profiles
The user must understand that all decompression devices (decompression tables and/or dive computers) are based on mathematical models and that many experts are currently concerned that these models may not under certain conditions adequately describe the physiological phenomena. These conditions are presently identified as dives which incorporate the following:
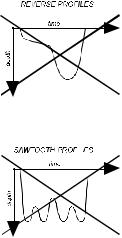
REVERSE PROFILES where the diver spends most of the dive at shallow depths and then descends to the maximum depth shortly before surfacing.
SAWTOOTH PROFILES where the diver alternates between greater and shallower depths repeatedly throughout the dive.
CONSECUTIVE DIVES where the diver performs repetitive dives to approximately the same maximum depth with only short surface intervals between dives. The risk of decompression sickness increases when depth and the number of repetitive dives increase and when the surface intervals are shortened.
Fig. 2.1 Reverse profiles.
Fig. 2.2 Sawtooth profiles.
17

Fig. 2.3 Consecutive dives, multiday dives.
Fig. 2.4 Recommended dive profile.
MULTIDAY DIVES. Repetitive dives performed during several consecutive days.
DECOMPRESSION DIVES. Any dive during which the no-decompression limit has been exceeded or the diver is advised by the computer that he may not return directly to the surface.
Dive Computer Limitations
While the Spyder is based on current decompression research and technology, the user/diver must realize that the computer cannot monitor the actual physiological functions of an individual diver. All decompression schedules currently known to the authors, including the U.S. Navy Tables, are based on a theoretical mathematical model which is intended to serve as a guide to reduce the probability of decompression sickness.
The mathematical model uses a fixed ascent rate of 10 m/min [33 ft/min] even at greater depths to reduce the build-up of microbubbles, which can grow larger and turn into harmful bubbles in a later phase of the dive. Therefore it is critical that a proper ascent rate is always used.
18
The reader/diver is forewarned that individual physiological differences, severe environmental conditions and predive activities, especially those which tend to increase dehydration, may increase the risk of decompression sickness.
As a safety precaution SUUNTO recommends that divers using the Spyder should maintain no less than 5 to 10 minutes of no-decompression time remaining at all times during the dive. This is especially important for divers in poor physical condition, in cold water or other arduous conditions.
Historically divers have been advised to always include a margin of safety in their diving activities. SUUNTO supports these practices and strongly recommends that the diver makes the deepest portion of the dive near the beginning of the dive and gradually progress into shallower depth, allowing time for a 3 to 5 minute ìsafety stopì at a depth range of 3 to 6 meters [10 to 20 ft]. This is believed to be effective in further reducing the risk of decompression sickness.
Furthermore, the reader/diver is advised that any dive carries some risk of decompression sickness and neither the authors, nor SUUNTO Oy will assume any responsibility or liability for accidents or injuries which might occur for any reason.
WARNING!
DO NOT USE THE SPYDER WITH NITROX MIXES! The mathematical calculation model of the Spyder applies for use with standard breathing air only (approximately 21% oxygen and 79% nitrogen by volume). Therefore, using the Spyder for diving with ìNitroxì or other mixed gases may lead to serious injury or death.
19
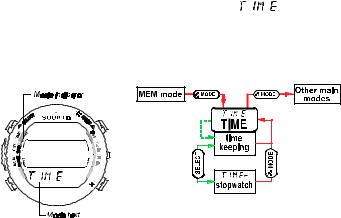
3. TIME MODE
The Spyder has calendar clock, stopwatch and alarm clock functions. The calendar clock and the stopwatch are operated in the Time Mode (Fig. 3.1).
Fig. 3.2 The Time Mode is indicated by the TIME text and a mode indicator.
Fig. 3.1 The Time Menu
The mode is indicated in the display by the TIME text and the mode indicator (Fig. 3.2). The time and date and the daily alarm are set in the Setting Mode (see section 5, ìSetting Modeì).
20
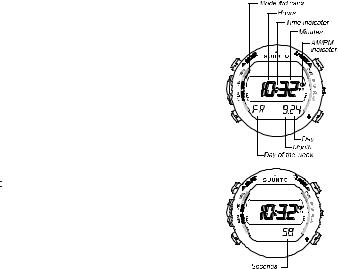
3.1 TIMEKEEPING DISPLAY
The timekeeping display (Fig. 3.3) is the primary display of the Spyder. When the Time Mode is entered from other modes, the timekeeping display activates within two seconds, if no button is operated.
In other modes (except in the Diving or Stopwatch Modes), if no button is operated within 10 minutes, the Spyder beeps and returns to the timekeeping display automatically.
Either the date (Fig. 3.3 a) or the seconds of the current time (Fig. 3.3 b) are shown on the bottom line of the timekeeping display. Press the  or
or  button to select the desired display option. Next time when you enter the timekeeping display, the Spyder will show the selected option. The TIMER text blinks on the display if the stopwatch is running.
The display is illuminated by holding down the
 button for more than two seconds.
To set the time and date, refer to section 5.1, ìSetting Time and Dateì.
a)
b)
Fig. 3.3 The timekeeping display
a)the date is displayed
b)the seconds are displayed.
21
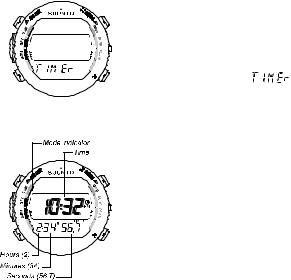
Fig. 3.4 The Stopwatch function is indicated by the TIMEr text and a mode indicator.
Fig. 3.5 The Stopwatch displays hours, minutes and seconds.
When diving, the dive entry time and date is registered in the Logbook Memory. Remember always to check before diving that the time and date are correctly set, especially when traveling to different time zones.
3.2 STOPWATCH
The Stopwatch function is entered by pressing
the  button when the time keeping display is shown. The text TIMEr at the bottom and the mode indicator (TIME) on the left side of the display indicate that you have entered the Stopwatch function (Fig. 3.4).
The stopwatch of the Spyder lets you measure elapsed time, split times and the times of two runners. The range of the stopwatch is 9 hours, 59 minutes, 59.9 seconds (Fig. 3.5). When the range is exceeded the computer watch gives a beep and returns to the time keeping display automatically.
22

Use the  and
and  buttons to operate the elapsed time measurement, split time measurement or the times of two runners as follows:
The stopwatch function is not available when diving or transferring data to a PC. Diving with the Spyder or data transfer will stop the stopwatch.
23
4. DIVING WITH THE SPYDER
This section contains instructions on how to operate the Spyder and interpret its displays. Each display has been carefully designed to provide important information you will need to plan your dive or dive series.
You will find that the Spyder is easy to use and read. Each display shows only the data relevant to that specific diving situation. You will also be able to preset the User Definable Display Field and depth and time alarms according to your personal preference.
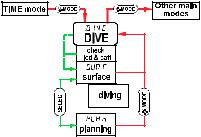
The Spyderís dive functions are operated in the Dive Mode (Fig. 4.1).
Fig. 4.1. The Dive Menu.
24

4.1USE OF PUSH BUTTONS AND WATER CONTACT
The Dive Mode is controlled with the  ,
,
 , and the
  and
and  push buttons and with the water contact as follows (see also Section 1.3):
Activation of the Dive Mode: press the  button until the Dive Mode is indicated or immerse the Spyder in water below 0.45 m [1.5 ft] for five
(5) seconds.
Dive Planning: in the Dive Mode, press the  button.
Return to Other Main Modes: press the  button.
The water contact is located on the right side of the case (Fig 4.2 a). When submerged the contact is connected to the case by the conductivity of the water. Active water contact is indicated on display by the ACW-text (Fig 4.2 b). When the Spyder is submerged below 0.45 [1.5 ft] it goes into Dive Mode and the Surface or Diving Mode is automatically activated.
a)
b)
Fig. 4.2
a)The water contact and depth sensor.
b)Active water contact is indicated by the ACW-text.
25

Fig. 4.3 Startup I. The Dive Mode is indicated by the DIVE text and mode indicator.
Contamination or invisible marine growth may create an unwanted electric current between the water contact and the case. This may cause problems with the water contact: the Dive Mode may activate on its own, Spyder does not return to the time keeping display automatically, or the ACW-text remains on display. It is therefore important that the Spyder is carefully washed in fresh water after the dayís diving is completed. The contact can be cleaned with a soft pencil eraser.
4.2 BEFORE DIVING
4.2.1 Activation, Prechecks and Battery Warning
The Spyder is always ready for diving and will activate if submerged. However, it is necessary to turn on the Dive Mode before diving to check the altitude or personal adjustment settings, battery warning, etc. This is done by pressing the  button or either by immersing the Spyder in at least 0.45 m [1.5 ft] depth for 5 seconds.
The Dive Mode is indicated by the DIVE text and mode indicator on the right side of the display (Fig. 4.3). Next, all display elements will
26
 Loading...