


en
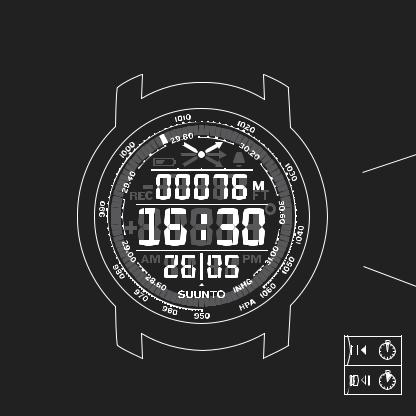
SUUNTO ELEMENTUM TERRA
USER GUIDE
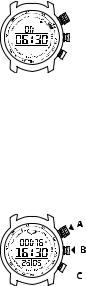
 A
A
 B
B
 C
C

CHRONOGRAPH /
SETTINGS |
DATE |
|
|
|
MEMORY |
ALTITUDE |
TIME |
RECORDING |
|
COMPASS |
CALIBRATION |

Functions:
_Time, date, alarm _Backlight _Altimeter
_Barometric pressure & trend _3D compass
_Chronograph _Cumulative asc./desc.
_Log: last 8 asc./desc., max. altitude
en
GETTING STARTED
Thank you for choosing Suunto Elementum Terra, a digital sports watch for mountaineering and outdoor activities. To get started:
1.Press any button to activate the watch.
2.Keep [A] pressed to enter settings. The active setting blinks on the display.
3.Rotate [A] to change the value.
4.Press [A] to accept the change and to move to the next setting.
After changing the settings, you will return to time mode.
Be sure to register your watch at www.suunto.com/register to get the full range of Suunto support. Also visit www.suunto.com/support to get the complete user guide and additional information.

SETTINGS
1.In time mode, keep [A] pressed to enter/exit settings.
2.Rotate [A] to change the values.
3.Press [A] to accept.
4.Press [B] or [C] or keep [A] pressed to exit.
TIME/ALTITUDE recording
Press [B] to switch between time and altitude recording mode.
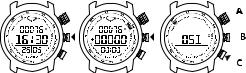
STOPWATCH (CHRONOGRAPH)
1.In time mode, rotate [A] upwards to toggle between stopwatch and date.
2.Press [A] to start/stop the stopwatch.
3.Keep [C] pressed to reset the existing time.
COMPASS
•Press [C] to enter.
•Keep [C] pressed to start the compass calibration.
•While calibrating compass, keep the device level and stabile when rotating. ‘Level’ blinks on the display if the device is not level or stabile.
•Press [B] or [C] to exit compass.

MEMORY |
en |
1. In time mode, rotate [A] downwards to enter memory. |
2.Rotate [A] upwards/downwards to browse the logs.
3.Press [A] to switch between the first and second view of the log.
4.Press [B] or [C] to exit.
BACKLIGHT
Keep [B] pressed to activate the backlight.
NOTE: To save power, backlight blinks when used in compass view.
MEASURING CUMULATIVE ASCENT/DESCENT
1.In altitude recording mode, press [A] to start measuring.
2.Rotate [A] to switch between ascent and descent.
3.Press [A] to stop the measurement.
4.Keep [C] pressed to reset the measurement.
BUTTON LOCK
Press [A] and [B] at the same time to activate/open button lock.
Compass calibration
1 Getting started . . . . . . . . . . . . . . . . . . . . . . . . . . . . . . . . . . . . . . . . . . . . . . . . . . . . . . . . . . . . . . . 4 1.1 Changing general settings . . . . . . . . . . . . . . . . . . . . . . . . . . . . . . . . . . . . . . . . 4 1.2 Using alarm . . . . . . . . . . . . . . . . . . . . . . . . . . . . . . . . . . . . . . . . . . . . . . . . . . . . . . . . 5 1.3 Using button lock . . . . . . . . . . . . . . . . . . . . . . . . . . . . . . . . . . . . . . . . . . . . . . . . . 6 1.4 Activating backlight . . . . . . . . . . . . . . . . . . . . . . . . . . . . . . . . . . . . . . . . . . . . . . . 6
2 Using Suunto Elementum Terra . . . . . . . . . . . . . . . . . . . . . . . . . . . . . . . . . . . . . . . . . . . . . 8 2.1 Time mode . . . . . . . . . . . . . . . . . . . . . . . . . . . . . . . . . . . . . . . . . . . . . . . . . . . . . . . . 8 2.1.1 Using stopwatch . . . . . . . . . . . . . . . . . . . . . . . . . . . . . . . . . . . . . . . 8 2.2 Altitude recording mode . . . . . . . . . . . . . . . . . . . . . . . . . . . . . . . . . . . . . . . . . 9 2.2.1 Recording altitude . . . . . . . . . . . . . . . . . . . . . . . . . . . . . . . . . . . . 10 2.2.2 Setting reference altitude . . . . . . . . . . . . . . . . . . . . . . . . . . . . 10 2.2.3 Measuring cumulative ascent/descent . . . . . . . . . . . . . . 11 2.2.4 Viewing altitude logs . . . . . . . . . . . . . . . . . . . . . . . . . . . . . . . . . 11
2.3 Compass view . . . . . . . . . . . . . . . . . . . . . . . . . . . . . . . . . . . . . . . . . . . . . . . . . . . . 13 2.3.1 Calibrating compass . . . . . . . . . . . . . . . . . . . . . . . . . . . . . . . . . . 13 3 Measuring weather . . . . . . . . . . . . . . . . . . . . . . . . . . . . . . . . . . . . . . . . . . . . . . . . . . . . . . . . . 16
3.1 Barometric trend arrow . . . . . . . . . . . . . . . . . . . . . . . . . . . . . . . . . . . . . . . . . . 16 3.2 Forecasting weather changes . . . . . . . . . . . . . . . . . . . . . . . . . . . . . . . . . . . 17 3.3 Automatically switching between measuring altitude and weather changes . . . . . . . . . . . . . . . . . . . . . . . . . . . . . . . . . . . . . . . . . . . . . . . . . . . . . . . . . . . . . . 17 3.4 At constant altitude . . . . . . . . . . . . . . . . . . . . . . . . . . . . . . . . . . . . . . . . . . . . . . 18 3.5 Moving in altitude . . . . . . . . . . . . . . . . . . . . . . . . . . . . . . . . . . . . . . . . . . . . . . . 19
4 Care and maintenance . . . . . . . . . . . . . . . . . . . . . . . . . . . . . . . . . . . . . . . . . . . . . . . . . . . . . . 21 4.1 Battery replacement . . . . . . . . . . . . . . . . . . . . . . . . . . . . . . . . . . . . . . . . . . . . . 21 5 Specifications . . . . . . . . . . . . . . . . . . . . . . . . . . . . . . . . . . . . . . . . . . . . . . . . . . . . . . . . . . . . . . . 23
2

5.1 Technical specifications . . . . . . . . . . . . . . . . . . . . . . . . . . . . . . . . . . . . . . . . . 23
5.2 Trademark . . . . . . . . . . . . . . . . . . . . . . . . . . . . . . . . . . . . . . . . . . . . . . . . . . . . . . . . 24 en 5.3 Copyright . . . . . . . . . . . . . . . . . . . . . . . . . . . . . . . . . . . . . . . . . . . . . . . . . . . . . . . . 24
5.4 Patent notice . . . . . . . . . . . . . . . . . . . . . . . . . . . . . . . . . . . . . . . . . . . . . . . . . . . . . 24 5.5 Disposal of device . . . . . . . . . . . . . . . . . . . . . . . . . . . . . . . . . . . . . . . . . . . . . . . 25 6 Warranty . . . . . . . . . . . . . . . . . . . . . . . . . . . . . . . . . . . . . . . . . . . . . . . . . . . . . . . . . . . . . . . . . . . . . 26 Warranty Period . . . . . . . . . . . . . . . . . . . . . . . . . . . . . . . . . . . . . . . . . . . . . . . . . . . . . 27 Exclusions and Limitations . . . . . . . . . . . . . . . . . . . . . . . . . . . . . . . . . . . . . . . . . 27 Access to Suunto warranty service . . . . . . . . . . . . . . . . . . . . . . . . . . . . . . . . . 28 Other important notices . . . . . . . . . . . . . . . . . . . . . . . . . . . . . . . . . . . . . . . . . . . . 29 Limitation of Liability . . . . . . . . . . . . . . . . . . . . . . . . . . . . . . . . . . . . . . . . . . . . . . . 29
3
1 GETTING STARTED
In Suunto Elementum Terra there are two modes: TIME and ALTITUDE RECORDING mode. Switch between them by pressing [B].
Suunto Elementum Terra also features COMPASS view. Press [C] to activate it.
In TIME mode the watch functions as a normal watch. ALTITUDE RECORDING mode includes altitude measuring and recording functions.
COMPASS view helps you to orient yourself in relation to magnetic North. Change the settings of your Suunto Elementum Terra in SETTINGS. View altitude logs in MEMORY.
1.1 Changing general settings
To change the general settings:
1.In TIME mode, keep [A] pressed to enter SETTINGS. The active setting is blinking on the display.
2.Rotate [A] to change the value.
3.Press [A] to accept the change and to move to the next setting.
4.After changing the settings you will return to TIME mode.
4
en
 TIP: You can exit SETTINGS at any time by pressing [B] or [C] or keeping [A] pressed.
You can change the following general settings on your Suunto Elementum Terra:
●altitude reference value
●alarm: on/off
●alarm time: hours and minutes
●time format: 12h/24h
●time: hours, minutes, and seconds
●date format: d/m or m/d
●date: year, month, day
●altitude format: m/ft
1.2 Using alarm
Set the alarm on/off and the alarm time in SETTINGS. When the alarm is on,  is shown on the display.
5
When the alarm goes off, press any button to turn it off. The alarm goes off the same time the following day.
1.3 Using button lock
The button lock can be activated in TIME and ALTITUDE RECORDING mode. To activate the button lock:
1.Press [A] and [B] at the same time. When the button lock is activated, only the backlight works.
2.To open the button lock, press [A] and [B] at the same time.
1.4 Activating backlight
The backlight can be activated in both modes and COMPASS view. Keep [B] pressed to activate the backlight. The backlight stays activated for 5 s.
6
 Loading...