


 Loading...
1. WELCOME TO THE WORLD OF SUUNTO DIVING INSTRUMENTS |
................ 5 |
2. WARNINGS, CAUTIONS, AND NOTES ................................................... |
6 |
3. SUUNTO Cobra2 AT A GLANCE ........................................................... |
9 |
3.1. Navigating in the menus ............................................................... |
9 |
3.2. Button symbols and functions ......................................................... |
9 |
4. GETTING STARTED WITH YOUR SUUNTO Cobra2 .................................. |
11 |
4.1. TIME mode settings ................................................................... |
11 |
4.1.1. Setting the alarm ................................................................. |
11 |
4.1.2. Setting the time .................................................................. |
11 |
4.1.3. Setting the date .................................................................. |
11 |
4.1.4. Setting the units .................................................................. |
12 |
4.1.5. Setting the backlight ............................................................. |
12 |
4.1.6. Setting the tones ................................................................. |
12 |
4.2. AC water contacts ..................................................................... |
12 |
4.3. Learning how to use your compass ................................................. |
13 |
4.3.1. Compass display ................................................................. |
13 |
4.3.2. Locking a bearing ................................................................ |
14 |
4.3.3. Compass settings ................................................................ |
14 |
5. BEFORE DIVING ........................................................................... |
16 |
5.1. The Suunto RGBM/Deep Stop Algorithm ........................................... |
16 |
5.2. Emergency ascents ................................................................... |
16 |
5.3. Dive computer limitations ............................................................. |
16 |
5.4. Nitrox .................................................................................... |
17 |
5.5. Audible and visual alarms ............................................................ |
17 |
5.6. Error conditions ........................................................................ |
18 |
5.7. Air integration .......................................................................... |
18 |
5.7.1. Connecting Suunto Cobra2 to a regulator .................................... |
19 |
5.8. DIVE mode settings ................................................................... |
19 |
5.8.1. Setting the depth alarm ......................................................... |
19 |
5.8.2. Setting the dive-time alarm ..................................................... |
19 |
5.8.3. Setting the nitrox values ........................................................ |
20 |
5.8.4. Setting the personal/altitude adjustments ..................................... |
20 |
5.8.5. Setting the sample rate .......................................................... |
21 |
5.8.6. Setting the Safety Stops/Deep Stops .......................................... |
21 |
5.8.7. Setting the RGBM values ....................................................... |
21 |
5.9. Activation and pre-checks ............................................................ |
21 |
5.9.1. Accessing DIVE mode .......................................................... |
21 |
5.9.2. DIVE mode activation ........................................................... |
22 |
5.9.3. Battery power indication ........................................................ |
22 |
5.9.4. Diving at altitude ................................................................. |
23 |
5.9.5. Personal adjustments ........................................................... |
23 |
5.10. Safety Stops .......................................................................... |
24 |
5.10.1. Recommended Safety Stops .................................................. |
24 |
5.10.2. Mandatory Safety Stops ....................................................... |
25 |
5.11. Deep stops ............................................................................ |
25 |
6. DIVING ....................................................................................... |
26 |
6.1. Diving in AIR mode (DIVEair) ....................................................... |
26 |
6.1.1. Basic dive data ................................................................... |
26 |
6.1.2. Bookmark ......................................................................... |
27 |
6.1.3. Tank pressure data .............................................................. |
27 |
6.1.4. Ascent rate indicator ............................................................. |
28 |
6.1.5. Safety Stops ...................................................................... |
28 |
6.1.6. Decompression dives ........................................................... |
28 |
|
3 |
6.2. Diving in NITROX mode (DIVEnitrox) ............................................... |
31 |
6.2.1. Before diving in NITROX mode ................................................ |
31 |
6.2.2. Oxygen displays ................................................................. |
31 |
6.2.3. Oxygen limit fraction (OLF) ..................................................... |
32 |
6.2.4. Gas change and multiple breathing gas mixes ............................... |
32 |
6.3. Diving in GAUGE mode (DIVEgauge) .............................................. |
32 |
7. AFTER DIVING ............................................................................. |
34 |
7.1. Surface interval ........................................................................ |
34 |
7.2. Dive numbering ........................................................................ |
34 |
7.3. Repetitive dive planning .............................................................. |
34 |
7.4. Flying after diving ...................................................................... |
35 |
7.5. PLAN mode ............................................................................ |
35 |
7.5.1. Dive Planning mode (PLANnodec) ............................................ |
35 |
7.5.2. Simulation Mode (PLANsimulator) ............................................. |
36 |
7.6. MEMORY mode ....................................................................... |
37 |
7.6.1. Dive logbook (MEMlogbook) ................................................... |
37 |
7.6.2. Dive history (MEMhistory) ...................................................... |
38 |
7.7. Suunto Dive Manager (SDM) ........................................................ |
38 |
7.8. www.suuntosports.com and Suunto Diving World at |
|
www.suunto.com/diving .................................................................... |
39 |
8. CARE AND MAINTENANCE .............................................................. |
40 |
8.1. Water contacts and buttons .......................................................... |
40 |
8.2. Care of your dive computer .......................................................... |
40 |
8.3. Maintenance ........................................................................... |
40 |
8.4. Water resistance inspection .......................................................... |
41 |
8.5. Battery replacement ................................................................... |
41 |
8.5.1. Battery kit ......................................................................... |
41 |
8.5.2. Required tools .................................................................... |
41 |
8.5.3. Battery replacement procedure ................................................ |
41 |
9. TECHNICAL DATA ......................................................................... |
44 |
9.1. Technical specifications ............................................................... |
44 |
9.2. RGBM .................................................................................. |
45 |
9.2.1. Suunto RGBM adaptive decompression ...................................... |
45 |
9.2.2. No-decompression limits ........................................................ |
46 |
9.2.3. Altitude diving .................................................................... |
47 |
9.3. Oxygen exposure ..................................................................... |
47 |
10. INTELLECTUAL PROPERTY ............................................................ |
48 |
10.1. Copyright .............................................................................. |
48 |
10.2. Trademark ............................................................................ |
48 |
10.3. Patent notice ......................................................................... |
48 |
11. DISCLAIMERS ............................................................................. |
49 |
11.1. User’s responsibility ................................................................. |
49 |
11.2. CE ..................................................................................... |
49 |
11.3. Limits of liability and ISO 9001 compliance ....................................... |
49 |
11.4. After sales service ................................................................... |
49 |
12. WARRANTY ............................................................................... |
50 |
13. DISPOSAL OF THE DEVICE ............................................................ |
51 |
GLOSSARY .................................................................................... |
52 |
4

1. WELCOME TO THE WORLD OF SUUNTO DIVING INSTRUMENTS
Suunto Cobra2 was designed to help you get the most out of your diving. By reading this manual and becoming familiar with the functions of your dive computer, you can begin a new era in your diving.
Withintegrateddigitalcompass,airintegration,andgasswitching,SuuntoCobra2simplifies your diving experience because all the information you need relating to depth, time, tank pressure, decompression status, and direction is available on one easy-to-read screen. To get the most out of your Suunto Cobra2, please read this instruction manual carefully and make sure you understand the use, displays, and limitations of the instrument before using it. To make life easier, we've included a glossary of dive-specific terminology at the back of the manual.
5
2. WARNINGS, CAUTIONS, AND NOTES
Throughout this manual, important safety icons are displayed. Three classifications are used to separate these icons by their order of importance:
WARNING |
is used in connection with a procedure or situation that could result |
|
in serious injury or death |
CAUTION |
is used in connection with a procedure or situation that could result |
|
in damage to the device |
NOTE |
is used to emphasize important information |
Before you go on to read the manual itself, it is extremely important that you read the following warnings. These warnings are intended to maximize your safety while using Suunto Cobra2 and must not be ignored.
WARNING |
READ THIS MANUAL! Carefully read this manual in its entirety, paying |
|
close attention to all the warnings listed below, including Section 5. |
|
BEFORE DIVING. Make sure that you fully understand the use, |
|
displays and limitations of the dive computer, because any confusion |
|
resulting from neglecting to follow this user's manual or from improper |
|
use of this device could cause you to commit errors that may lead to |
|
serious injury or death. |
WARNING |
NOT FOR PROFESSIONAL USE! Suunto dive computers are |
|
intended for recreational use only. The demands of commercial or |
|
professional diving may expose the diver to depths and conditions |
|
that tend to increase the risk of decompression illness (DCI). |
|
Therefore, Suunto strongly recommends that the device is not used |
|
for any commercial or professional diving activities. |
WARNING |
ONLY DIVERS TRAINED IN THE PROPER USE OF SCUBA DIVING |
|
EQUIPMENT SHOULD USE A DIVE COMPUTER! No dive computer |
|
can replace the need for proper dive training. Insufficient or improper |
|
training may cause you to commit errors that may lead to serious |
|
injury or death. |
WARNING |
THERE IS ALWAYS A RISK OF DECOMPRESSION ILLNESS (DCI) |
|
FOR ANY DIVE PROFILE, EVEN IF YOU FOLLOW THE DIVE PLAN |
|
PRESCRIBED BY DIVE TABLES OR A DIVE COMPUTER. NO |
|
PROCEDURE,DIVECOMPUTER,ORDIVETABLECANPREVENT |
|
THE POSSIBILITY OF DCI OR OXYGEN TOXICITY! An individual’s |
|
physiological make-up can vary from day to day. The dive computer |
|
cannot account for these variations. You are strongly advised to |
|
remain well within the exposure limits provided by the instrument to |
|
minimize the risk of DCI. As an added precaution, you should consult |
|
a physician regarding your fitness before diving. |
WARNING |
SUUNTO STRONGLY RECOMMENDS THAT SPORT DIVERS LIMIT |
|
THEIR MAXIMUM DEPTH TO 40 M/130 FT OR TO THE DEPTH |
|
CALCULATED BY THE COMPUTER BASED ON THE SELECTED |
|
O2% AND A MAXIMUM PO2 OF 1.4 BAR! |
6
WARNING |
DIVES THAT REQUIRE DECOMPRESSION STOPS ARE NOT |
|
RECOMMENDED. YOU SHOULD ASCEND AND BEGIN |
|
DECOMPRESSION IMMEDIATELY WHEN THE DIVE COMPUTER |
|
SHOWS YOU THAT A DECOMPRESSION STOP IS REQUIRED! |
|
Note the blinking ASC TIME symbol and the upward pointing arrow. |
WARNING |
USE BACK-UP INSTRUMENTS! Make sure that you use back-up |
|
instrumentation, including a depth gauge, submersible pressure gauge, |
|
timer or watch, and have access to decompression tables whenever |
|
diving with the dive computer. |
WARNING |
PERFORM PRE-CHECKS! Always activate and check the device |
|
before diving in order to ensure that all Liquid Crystal Display (LCD) |
|
segments are completely displayed, that the device has not run out |
|
of battery power, and that the oxygen, altitude, personal, Safety/Deep |
|
Stop, and RGBM adjustments are correct. |
WARNING |
YOU ARE ADVISEDTO AVOIDFLYINGANY TIME THECOMPUTER |
|
COUNTS DOWN THE NO-FLY TIME. ALWAYS ACTIVATE THE |
|
COMPUTER TO CHECK THE REMAINING NO-FLY TIME PRIOR |
|
TO FLYING! Flying or traveling to a higher altitude within the no-fly |
|
time can greatly increase the risk of DCI. Review the recommendations |
|
given by Diver’s Alert Network (DAN) in Section 7.4. Flying after diving. |
WARNING |
THE DIVE COMPUTER SHOULD NEVER BE TRADED OR SHARED |
|
BETWEEN USERS WHILE IT IS IN OPERATION! Its information will |
|
not apply to someone who has not been wearing it throughout a dive, |
|
or sequence of repetitive dives. Its dive profiles must match that of |
|
the user. If it is left on the surface during any dive, the dive computer |
|
will give inaccurate information for subsequent dives. No dive |
|
computer can take into account dives made without the computer. |
|
Thus, any diving activity up to four days prior to initial use of the |
|
computer may cause misleading information and must be avoided. |
WARNING |
DO NOT DIVE WITH A CYLINDER OF ENRICHED AIR IF YOU HAVE |
|
NOT PERSONALLY VERIFIED ITS CONTENTS AND ENTERED |
|
THE ANALYZED VALUE INTO YOUR DIVE COMPUTER! Failure to |
|
verify cylinder contents and enter the appropriate O2% into your dive |
|
computer will result in incorrect dive planning information. |
WARNING |
THE DIVE COMPUTER WILL NOT ACCEPT FRACTIONAL |
|
PERCENTAGEVALUESOFOXYGENCONCENTRATION.DO NOT |
|
ROUND UP FRACTIONAL PERCENTAGES! For example, 31.8% |
|
oxygen should be entered as 31%. Rounding up will cause nitrogen |
|
percentages to be understated and will affect decompression |
|
calculations. If you want to adjust the computer to provide more |
|
conservative calculations, use the personal adjustment feature to |
|
affect decompression calculations, or reduce the PO2 setting to affect |
|
oxygen exposure. |
7
WARNING |
SELECTTHECORRECTALTITUDEADJUSTMENTSETTING!When |
|
diving at altitudes greater than 300 m/1,000 ft the Altitude Adjustment |
|
feature must be correctly selected in order for the computer to |
|
calculate the decompression status. The dive computer is not intended |
|
for use at altitudes greater than 3,000 m/10,000 ft. Failure to select |
|
the correct Altitude Adjustment setting, or diving above the maximum |
|
altitude limit will result in erroneous dive and planning data. |
WARNING |
SELECT THE CORRECT PERSONAL ADJUSTMENT SETTING! |
|
Whenever it is believed that factors that tend to increase the possibility |
|
of DCI exist, it is recommended that you use this option to make the |
|
calculations more conservative. Failure to select the correct Personal |
|
Adjustment setting will result in erroneous dive and planning data. |
WARNING |
This device contains a Lithium cell battery. To reduce the risk of fire |
|
or burns, do not disassemble, crush, puncture, short external contacts, |
|
or dispose of in fire or water. Replace only with manufacturer-specified |
|
batteries. Recycle or dispose of used batteries properly. |
NOTE |
It is not possible to change between AIR, NITROX and GAUGE modes |
|
before the instrument has counted down the no-fly time. |
|
There is one exception to this: You can change from AIR to NITROX |
|
mode even during the no-fly time. When planning both air and nitrox |
|
dives during the same dive series, you should set the instrument in |
|
NITROX mode and modify the gas mix accordingly. |
|
In GAUGE mode, the no-fly time is always 48 hours. |
8

3. SUUNTO COBRA2 AT A GLANCE
3.1. Navigating in the menus
Suunto Cobra2 has four main operating modes - TIME mode (TIME), DIVE mode (DIVE), PLAN mode (PLAN), and MEMORY mode (MEMORY) – as well as the COMPASS submode, which can be activated from either TIME or DIVE modes. To toggle between the main modes, press the MODE button. To select a submode in DIVE, PLAN and MEMORY modes, press the UP/DOWN buttons.
3.2. Button symbols and functions
The table below explains the main functions of the dive computer's buttons. The buttons and their use will be explained in more detail in the relevant sections of the manual.
Table 3.1. Button symbols and functions
Symbol |
Button |
Press |
Main functions |
|
MODE |
Short |
Switch between main modes |
|
|
|
Switch from submode to main mode |
|
|
|
Activate backlight in DIVE mode |
|
MODE |
Long |
Activate backlight in other modes |
|
SELECT |
Short |
Select a submode |
|
|
|
Select and accept settings |
|
SELECT |
Long |
Activate compass in TIME and DIVE modes |
|
UP |
Short |
Toggle between alternative displays |
|
|
|
Change submode |
|
|
|
Increase values |
9

Symbol |
Button |
Press |
Main functions |
|
UP |
Long |
Enable gas switching in NITROX mode |
|
DOWN |
Short |
Toggle between alternative displays |
|
|
|
Change submode |
|
|
|
Decrease values |
|
DOWN |
Long |
Enter Setting mode |
|
|
|
Toggle between ceiling and remaining air time display |
10
4. GETTING STARTED WITH YOUR SUUNTO COBRA2
To get the most out of your Suunto Cobra2, take some time to personalize it and really make it YOUR computer. Set the correct time and date, as well as the alarms and tones, unit and backlight settings, then calibrate and test the compass function.
Suunto Cobra2 is a very user-friendly dive computer, and you will quickly become familiar with its functions. Make absolutely sure that you know your computer and have it set up as you want it BEFORE getting into the water.
4.1. TIME mode settings
The first thing you'll want to do with your Suunto Cobra2, is to set the TIME mode shortcuts: alarm, time, date, units, backlight, and tones. In this section, we look at how to do this.
NOTE |
The display is illuminated by holding down the MODE button for more |
|
than 2 seconds. |
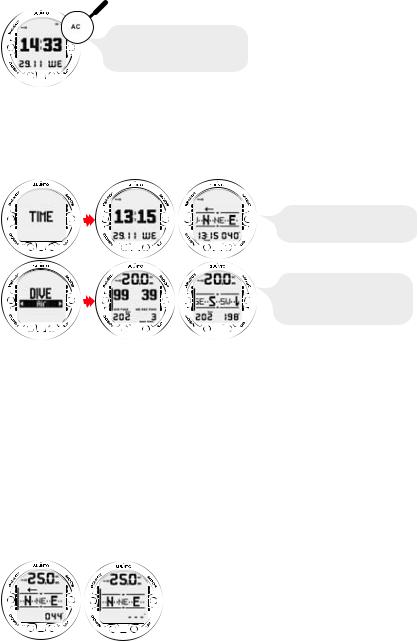
Now that you know how to toggle between the shortcuts, you can start to set them. The following figure shows how to enter the TIME SETTINGS menu.
USE UP AND DOWN BUTTONS TO TOGGLE BETWEEN ALARM, TIME,
DATE, UNITS, BACKLIGHT AND TONES.
4.1.1. Setting the alarm
The dive computer has a daily alarm function. When the daily alarm activates, the screen blinks and the alarm sounds for 24 seconds. Press any button to stop the alarm.
ADJUST WITH UP AND
DOWN BUTTONS. ACCEPT
WITH SELECT BUTTON.
4.1.2. Setting the time
In the TIME SETTING mode, you are able to set the hour, minute, and second, as well as choose between 12 and 24 hour display.
ADJUST WITH UP AND
DOWN BUTTONS. ACCEPT
WITH SELECT BUTTON.
4.1.3. Setting the date
Use the DATE SETTING mode to set the year, month, and day. The day of the week is automatically calculated in accordance with the date.
11

ADJUST WITH UP AND
DOWN BUTTONS. ACCEPT
WITH SELECT BUTTON.
4.1.4. Setting the units
In the UNITS SETTING mode you can choose to have the units displayed in either the metric or imperial system - meters/feet, Celsius/Fahrenheit etc.
ADJUST WITH UP AND
DOWN BUTTONS. ACCEPT
WITH SELECT BUTTON.
4.1.5. Setting the backlight
Use the BACKLIGHT SETTING mode to turn the backlight on or off and to define how long it stays on for (5, 10, 20, 30, or 60 seconds). When the backlight is turned off, it does not illuminate when an alarm sounds.
ADJUST WITH UP AND
DOWN BUTTONS. ACCEPT
WITH SELECT BUTTON.
4.1.6. Setting the tones
The TONE SETTING mode allows you to activate or deactivate the tones.
ADJUST WITH UP AND
DOWN BUTTONS. ACCEPT
WITH SELECT BUTTON.
NOTE |
When the tones are off, there are no alarms. |
4.2. AC water contacts
The water and data transfer contact is located on the rear of the case. When submerged, the water contact poles are connected by the conductivity of the water and the “AC” symbol appears on the display. The AC text is shown until the water contact deactivates.
12
AC APPEARS IN THE TOP RIGHT
CORNER OF THE DISPLAY, WHEN THE DIVE
COMPUTER IS IN CONTACT WITH WATER.
THIS ALSO ACTIVATES THE DIVE MODE.
Contamination or dirt on the water contact may prevent this automatic activation. It is therefore important that the water contact is kept clean. The contact can be cleaned with fresh water and a soft brush, for example a tooth brush.
4.3. Learning how to use your compass
Suunto Cobra2 integrates a digital compass, which can be used both while diving and on dry land, and can be accessed from either the DIVE mode or TIME mode.
|
IF ACCESSED FROM TIME MODE, |
|
TIME AND BEARING ARE DISPLAYED AT |
|
THE BOTTOM OF THE SCREEN. |
|
IF ACCESSED FROM DIVE MODE, |
|
CURRENT DEPTH AND TIME OR |
|
MAXIMUM DEPTH, AS WELL AS BEARING |
|
OR DIVE TIME OR TEMPERATURE ARE |
|
DISPLAYED. |
NOTE |
When accessed from DIVE mode, toggle between the alternative |
|
displays by pressing the UP/DOWN buttons. |
NOTE |
In order to save battery power, the compass display will automatically |
|
return to the TIME or DIVE mode 60 seconds after the last button- |
|
press. |
4.3.1. Compass display
The Suunto Cobra2 displays the compass as a graphical representation of a compass rose. The rose displays the cardinal and half cardinal points, in addition to which, the current bearing is also displayed numerically.
Tilt sensor
The compass has a tilt sensor, so it doesn't have to be completely level in order to display the correct bearing. As long as the device is held at an angle of +/- 5o to level, the compass will display the correct bearing. If the device is not held within this range, no bearing will be displayed.
13

4.3.2. Locking a bearing
A bearing can be locked to help you follow a selected course, and directional arrows point towards the locked bearing. Locked bearings are stored in the memory for later analysis and are available the next time the compass is activated.
TO LOCK A BEARING,
PRESS SELECT.
The Suunto Cobra2 also provides help for navigating square and triangular patterns, as well as navigating a return heading. This is made possible by following graphical symbols in the center of the compass display:
Table 4.1. Locked bearing symbols
 Symbol
  Explanation
You are traveling towards the locked bearing
You are 90 (or 270) degrees from the locked bearing
You are 180 degrees from the locked bearing
You are 120 (or 240) degrees from the locked bearing
4.3.3. Compass settings
You can define the compass settings (declination and calibration) when in COMPASS mode:
Declination
You can compensate for the difference between true north and magnetic north by adjusting the compass declination. The declination can be found, for example, from sea charts or topographic maps of the local area.
ADJUST WITH UP AND
DOWN BUTTONS. ACCEPT
WITH SELECT BUTTON.
14

Calibration
Because of changes in the surrounding magnetic field, the Suunto Cobra2 electronic compass occasionally needs to be re-calibrated. During the calibration process, the compass adjusts itself to the surrounding magnetic field. As a basic rule, you should calibrate the compass whenever it doesn’t seem to operate properly, or after replacing the dive computer's battery.
Strong electromagnetic fields, such as powerlines, stereo speakers, and magnets can affect the compass calibration. It is therefore advisable to calibrate the compass if your Suunto Cobra2 has been exposed to these fields.
NOTE |
When traveling overseas, it is recommended that you recalibrate the |
|
compass at the new location before using it. |
NOTE |
Remember to hold the Suunto Cobra2 level during the calibration |
|
process. |
To calibrate the compass:
HOLD THE
DEVICE LEVEL
AND SLOWLY
ROTATE 360°.
If the calibration fails several times in a row, it is possible that you are in an area with sources of magnetism, such as large metal objects, powerlines or electric appliances. Move to another location and try to calibrate the compass again. If the calibration continues to fail, contact an authorized Suunto service center.
15

5. BEFORE DIVING
Do not attempt to use the dive computer without reading this user's manual in its entirety, including all the warnings. Make sure that you fully understand the use, displays, and limitations of the instrument. If you have any questions about the manual or the Suunto Cobra2 please contact your Suunto representative before diving with the dive computer. Always remember that YOU ARE RESPONSIBLE FOR YOUR OWN SAFETY!
When used properly, Suunto Cobra2 is an outstanding tool for assisting properly trained, certified divers in planning and executing sport dives. It is NOT A SUBSTITUTE FOR CERTIFIED SCUBA INSTRUCTION,including training in the principles of decompression.
WARNING Diving with enriched air mixtures (nitrox) exposes you to risks that are different from those associated with diving with standard air. These risks are not obvious, and require training to understand and avoid. Risks include possible serious injury or death.
Do not attempt to dive with any gas mix other than standard air without first receiving certified training in this specialty.
5.1. The Suunto RGBM/Deep Stop Algorithm
Suunto’s Reduced Gradient Bubble Model (RGBM), utilized in the Suunto Cobra2, predicts both dissolved and free gas in the blood and tissues of divers. It is a significant advance on the classic Haldane models, which do not predict free gas. The advantage of Suunto RGBM is additional safety through its ability to adapt to a variety of situations and dive profiles.
The Suunto Cobra2 uses traditional recommended safety stops as well as deep stops.
YOU ARE ADVISED TO MAKE A
DEEPSTOP AT 18 M. THE SECOND
INDICATOR SHOWS THAT YOU HAVE 110
SECONDS LEFT OF YOUR DEEPSTOP.
Inordertooptimizetheresponsetodifferentincreasedrisksituations,anadditionalcategory of stop, referred to as a Mandatory Safety Stop, has been introduced. The combination of stop types depends on the user settings and the specific dive situation.
To get the most from the RGBM safety benefits, refer to Section 9.2. RGBM.
5.2. Emergency ascents
Intheunlikelyeventthatthedivecomputermalfunctionsduringadive,followtheemergency procedures provided by your certified dive training agency or, alternatively, follow these steps:
1.Assess the situation calmly and then move promptly to less than 18 m/60 ft.
2.At 18 m/60 ft, slow down your ascent rate to 10 m/33 ft per minute and move to a depth between 3 and 6 m/10 and 20 ft.
3.Stay there for as long as your air supply will safely allow. After reaching the surface, do not dive for at least 24 hours.
5.3. Dive computer limitations
While the dive computer's calculations are based on current decompression research and technology, it is important to realize that the computer cannot monitor the actual physiological functions of an individual diver. All decompression schedules currently known to the authors, including the U.S. Navy Tables, are based on theoretical mathematical models,whichareintendedtoserveasaguidetoreducetheprobabilityofdecompression illness.
16

5.4. Nitrox
Diving with nitrox provides you with an opportunity to increase bottom times or reduce the risk of decompression illness by reducing the nitrogen content in the gas mix. However, when the gas mix is altered, the oxygen content of the mix is generally increased. This increase exposes the diver to an oxygen toxicity risk not usually considered in recreational diving. In order to manage this risk, the dive computer tracks the time and intensity of the oxygen exposure and provides the diver with information to adjust the dive plan in order to maintain oxygen exposure within reasonably safe limits.
In addition to the physiological effects of enriched air on the body, there are operational considerations to be addressed when handling altered breathing mixes. Elevated concentrations of oxygen present a fire or explosion hazard. Consult the manufacturer of your equipment to check its compatibility with nitrox.
5.5. Audible and visual alarms
The dive computer features audible and visual alarms that advise when important limits are approached or that prompt you to acknowledge preset alarms. The table below describes the different alarms and their meanings.
Table 5.1. Audible and visual alarm types
Alarm type |
Alarm reason |
Short single beep |
Dive computer is activated. |
Dive computer automatically returns to the TIME mode.
Three beeps with a three second interval
Three beeps with a three second interval and activated backlight
Continuous beeps and activated backlight
Cylinder pressure reaches 50 bar/725 psi. The cylinder pressure display will start to blink.
Cylinder pressure reaches the selected alarm pressure.
Calculated remaining air time reaches zero.
No-decompression dive turns into a decompression stop dive. An arrow pointing upwards and the blinking ascent warning ASC TIME will appear.
Maximum allowed ascent rate, 10 m per min/33 ft per min,isexceeded.AscentratebargraphblinksandSTOP warning appears.
Decompression ceiling depth is exceeded. An error warning Er and a downward pointing arrow appear. You should immediately descend to, or below, the ceiling. The instrument will otherwise enter a permanent Error mode within three minutes, indicated by a permanent Er.
You can set alarms for maximum depth, dive time and tank pressure. See also Section 5.8. DIVE mode settings and Section 4.1. TIME mode settings.
Table 5.2. Preset alarm types
 Alarm type
Continuous beep series for 24 seconds
Maximumdepthblinksaslongasthecurrentdepthvalue exceeds the preset value.
Continuous beep series for 24 seconds or until any button is pressed.
Dive time blinks for one minute.
 Alarm reason
Preset maximum depth is reached.
Preset dive time is reached.
17
Loading...