


{
STIHL BG 56, 66, 86, SH 56, 86
Instruction Manual
Manual de instrucciones
 WARNING
Read Instruction Manual thoroughly before use and follow all safety precautions – improper use can cause serious or fatal injury.
 ADVERTENCIA
Antes de usar la máquina lea y siga todas las precauciones de seguridad dadas en el manual de instrucciones – el uso incorrecto puede causar lesiones graves o mortales.
Instruction Manual 1 - 33
Manual de instrucciones 34 - 70
English
Contents
Printing inks contain vegetable oils, paper can be recycled.
Printed on chlorine-free paper Original Instruction Manual
© ANDREAS STIHL AG & Co. KG, 2014 0458-296-8621-C. VA5.M14. 0000000925_018_GB
Guide to Using this Manual |
2 |
Safety Precautions and Working |
|
Techniques |
2 |
Assembling the Blower |
11 |
Assembling the Vacuum Shredder |
12 |
Fuel |
14 |
Fueling |
15 |
Starting / Stopping the Engine |
16 |
Cleaning the Air Filter |
18 |
Engine Management |
19 |
Adjusting the Carburetor |
19 |
Spark Plug |
20 |
Engine Running Behavior |
22 |
Rewind Starter |
22 |
Storing the Machine |
22 |
Spark Arresting Screen in Muffler |
23 |
Maintenance and Care |
24 |
Main Parts |
25 |
Specifications |
26 |
Maintenance and Repairs |
28 |
Disposal |
28 |
STIHL Incorporated Federal |
|
Emission Control Warranty |
|
Statement |
28 |
STIHL Incorporated California |
|
Exhaust and Evaporative |
|
Emissions Control Warranty |
|
Statement |
30 |
Trademarks |
33 |
Allowonlypersonswhofullyunderstand this manual to operate your blower.
To receive maximum performance and satisfactionfromyourSTIHLblower,itis importantthatyouread,understandand follow the safety precautions and the operating and maintenance instructions in chapter "Safety Precautions and Working Techniques" before using your blower. For further information you can go to www.stihlusa.com.
Contactyour STIHLdealer or theSTIHL distributor for your area if you do not understandanyoftheinstructionsinthis manual.
 WARNING
Because a blower is a high-speed tool, some special safety precautions must be observed as with any other power tool to reduce the risk of personal injury. Careless or improper use may cause serious or even fatal injury.
{This instruction manual is protected by copyright. All rights reserved, especially the rights to reproduce, translate and process with electronic systems.
BG 56, BG 56 C, BG 66, BG 86, BG 86 C, SH 56, SH 56 C, SH 86, SH 86 C |
1 |
English
Guide to Using this Manual
Pictograms
The meanings of the pictograms attached to or embossed on the machine are explained in this manual.
Dependingonthemodelconcerned,the following pictograms may be on your machine.
Fuel tank for gasoline and engine oil mixture
Press to operate manual fuel pump
Symbols in Text
Many operating and safety instructions are supported by illustrations.
The individual steps or procedures describedinthe manualmaybe marked in different ways:
N A bullet marks a step or procedure.
A description of a step or procedure that refers directly to an illustration may contain item numbers that appear in the illustration. Example:
N Loosen the screw (1). N Lever (2) ...
In addition to the operating instructions, this manual may contain paragraphs that require your special attention. Such
paragraphs are marked with the symbols and signal words described below:
 DANGER
Indicates an imminent risk of severe or fatal injury.
 WARNING
Indicates a hazardous situation which, if not avoided, could result in severe or fatal injury.
NOTICE
Indicates a risk of property damage, including damage to the machine or its individual components.
Engineering Improvements
STIHL’s philosophy is to continually improve all of its products. As a result, engineeringchangesandimprovements are made from time to time. Therefore, some changes, modifications and improvements may not be covered in this manual. If the operating characteristics or the appearance of your machine differs from those describedinthismanual,pleasecontact your STIHL dealer or the STIHL distributor for your area for assistance.
Safety Precautions and
Working Techniques
Because the use of any blower may be danger- ous, special safety
precautions must be observed to reduce the risk of personal injury.
It is important that you read, fully understand and observe the following safety precautions and warnings. Read the instruction manual and the safety precautions periodically. Careless or improper use may cause serious or fatal injury.
Have your STIHL dealer show you how to operate your power tool. Observe all applicable local safety regulations, standards and ordinances.
 WARNING
Do not lend or rent your power tool without the instruction manual. Be sure that anyone using it understands the information contained in this manual.
 WARNING
Use your blower for clearing leaves, twigs, grass, clippings, paper, debris, and dust in yards, gardens, sport stadiums, parks, paths, streets, driveways and parking lots and for similar tasks.Do not use it for other purposes, since misuse may result in personal injury or property damage, including damage to the machine.
2 |
BG 56, BG 56 C, BG 66, BG 86, BG 86 C, SH 56, SH 56 C, SH 86, SH 86 C |

 WARNING
Minors should never be allowed to use this power tool. Bystanders, especially children, and animals should not be allowed in the area where it is in use.
 WARNING
Toreducetheriskofinjurytobystanders and damage to property, never let your power tool run unattended. When it is not in use (e.g. during a work break), shut it off and make sure that unauthorizedpersonsdonotuseit.Most of these safety precautions and warnings apply to the use of all STIHL blowers. Different models may have different parts and controls. See the appropriate section of your instruction manual for a description of the controls and the function of the parts of your model.
Safe use of a blower involves
1.the operator
2.the power tool
3.the use of the power tool
THE OPERATOR
Physical Condition
You must be in good physical condition and mental health and not under the influence of any substance (drugs, alcohol, etc.) which might impair vision, dexterity or judgment. Do not operate this machine when you are fatigued.
 WARNING
Be alert – if you get tired, take a break. Tiredness may result in loss of control. Working with any power tool can be strenuous.Ifyouhaveanyconditionthat mightbeaggravatedbystrenuouswork, check with your doctor before operating this machine.
 WARNING
Prolonged use of a power tool (or other machines) exposing the operator to vibrations may produce whitefinger disease (Rayn aud's phenomenon) or carpal tunnel syndrome.
These conditions reduce the hand's ability to feel and regulate temperature, produce numbness and burning sensations and may cause nerve and circulation damage and tissue necrosis.
All factors which contribute to whitefinger disease are not known, but cold weather, smoking and diseases or physical conditions that affect blood vessels and blood transport, as well as high vibration levels and long periods of exposure to vibration are mentioned as factorsinthedevelopmentofwhitefinger disease. In order to reduce the risk of whitefinger disease and carpal tunnel syndrome, please note the following:
Most STIHL power tools are available with an anti-vibration ("AV") system designed to reduce the transmission of vibrations created by the machine to the operator's hands. An AV system is recommended for those persons using power tools on a regular or sustained basis.
Keep your hands warm.
English
Keep the antivibrationsystem well maintained. A power tool with loose components or with damaged or worn antivibration element will tend to have higher vibration levels.
Maintain a firm grip at all times, but do not squeeze the handles with constant, excessive pressure. Take frequent breaks.
All the above-mentioned precautions do not guarantee that you will not sustain whitefinger disease or carpal tunnel syndrome. Therefore, continual and regular users should closely monitor the condition of their hands and fingers. If any of the above symptoms appear, seek medical advice immediately.
 WARNING
The ignition system of the STIHL unit produces an electromagnetic field of a very low intensity. This field may interfere with some pacemakers. To reduce the risk of serious or fatal injury, persons with a pacemaker should consult their physician and the pacemaker manufacturer before operating this tool.
Proper Clothing
 WARNING
To reduce the risk of injury, the operator should wear proper protective apparel.
BG 56, BG 56 C, BG 66, BG 86, BG 86 C, SH 56, SH 56 C, SH 86, SH 86 C |
3 |

English
 WARNING
To reduce the risk of injury to your eyes never
operate your power tool unless wearing goggles or properly fitted protec- tive glasses with adequate top and side protection complying with ANSI Z87 "+" (or your applicable national standard).
Power tool noise may damage your hearing. Wear sound barriers (ear plugs or ear mufflers) to protect your hearing. Continual and regular users should have their hearing checked regularly.
Be particularly alert and cautious when wearing hearing protection because your ability to hear warnings (shouts, alarms, etc.) is restricted.
Clothing must be sturdy and snug-fitting, but allow complete freedom of movement.
Avoid loose-fitting jack- ets, scarfs, neckties, jewelry, flared or cuffed pants, unconfined long hair or anything that could become drawn into the air intake. Secure hair so it is above shoulder level.
Good footing is very important. Do not wear sandals or go barefoot.
THE POWER TOOL
For illustrations and definitions of the power tool parts see the chapter on "Main Parts."
 WARNING
Nevermodifythispowertoolinanyway. Only attachments supplied by STIHL or expressly approved by STIHL for use with the specific STIHL model are authorized. Although certain unauthorized attachments are useable with STIHL power tools, their use may, in fact, be extremely dangerous.
If this tool is subjected to unusually high loads for which it was not designed (e.g. heavy impact or a fall), always check that it is in good condition before continuing work.Checkin particularthat the fuel system is tight (no leaks) and that the controls and safety devices are working properly. Do not continue operating this machine if it is damaged. Incaseofdoubt,haveitcheckedbyyour STIHL servicing dealer.
 WARNING
Never operate your machine if it is damagedornotcompletelyandsecurely assembled.
To reduce the risk of injury, do not operate your blower unless it has a properly mounted blower tube.
 WARNING
Smallparticles(e.g.dust)blownthrough the blower tube and nozzle can cause a staticchargingoftheblowertube.Thisis especially true in low humidity and high dust conditions. In order to reduce the risk of shock from static charging and subsequent injury from loss of control, your blower has features designed to help reduce the build up of static electricity in the blower tube and equalize the charge with the engine and/or operator.
The control handle is designed to conduct static electricity through the throttle cable to the engine and from the handle through the operator to the ground.
THE USE OF THE POWER TOOL
Transporting the Power Tool
 WARNING
When transporting your power tool in a vehicle, properly secure it to prevent turnover, fuel spillage and damage to the unit.
Fuel
Your STIHL power tool uses an oilgasoline mixture for fuel (see the chapter on "Fuel" of your instruction manual).
4 |
BG 56, BG 56 C, BG 66, BG 86, BG 86 C, SH 56, SH 56 C, SH 86, SH 86 C |

Gasoline is an extremely flammable fuel. If spilled and ignited by a spark or other ignition source, it can cause fire and seri-
ous burn injury or property damage. Use extreme caution when handling gasoline or fuel mix. Do not smoke or bring any fire or flame near the fuel or the power tool. Note that combusti- ble fuel vapor may escape from the fuel system.
Fueling Instructions
 WARNING
Fuel your power tool in well-ventilated areas, outdoors. Always shut off the engine and allow it to cool before refueling. Gasoline vapor pressure may build up inside the fuel tank depending on the fuel used, the weather conditions and the tank venting system.
In order to reduce the risk of burns and other personal injury from escaping gas vapor and fumes, remove the fuel filler capon yourpowertool carefully so asto allow any pressure build-up in the tank to release slowly. Neverremovethe fuel filler cap while the engine is running.
Selectbare groundforfuelingandmove at least 10 feet (3 m) from the fueling spot before starting the engine. Wipe off any spilled fuel before starting your machine.
 WARNING
Check for fuel leakage while refueling and during operation. If fuel leakage is found, do not start or run the engine until the leak is fixed and
any spilled fuel has been wiped away. Take care not to get fuel on your clothing. If this happens, change your clothing immediately.
Unit vibrations can cause an improperly tightened fuel filler cap to loosen or
come off and spill quanti-
ties of fuel. In order to reduce the risk of fuel spillage and fire, tighten the fuel filler cap by hand as securely as possible.
Before Starting
 WARNING
Alwayscheck yourpowertool forproper condition and operation before starting, particularly the throttle trigger, throttle trigger interlock and stop switch. The throttle trigger must move freely. Never attempt to modify the controls or safety devices.
 WARNING
Check fuel system for leaks, especially the visible parts, e.g., filler cap, hose connections,manualfuelpump(onlyfor powertoolsequippedwithamanualfuel pump). Do not start the engine if there are leaks or damage – risk of fire! Have the machine repaired by a servicing dealer before using it.
BG 56, BG 56 C, BG 66, BG 86, BG 86 C, SH 56, SH 56 C, SH 86, SH 86 C
English
 WARNING
Never use a power tool that is damaged or not properly maintained.
 WARNING
Check that the spark plug boot is securely mounted on the spark plug – a loose boot may cause arcing that could ignite combustible fumes and cause a fire.
 WARNING
Keep the handles clean and dry at all times; it is particularly important to keep them free of moisture, pitch, oil, grease orresininorderforyoutomaintainafirm grip and properly control your power tool.
Starting
 WARNING
Start the engine at least 10 feet (3 meters) from the fueling spot, outdoors only.
 WARNING
Your power tool is a one-person machine. Do not allow other persons in the general work area, even when starting.
Forspecificstartinginstructions,seethe appropriate section of your manual. Place the power tool on firm ground or other solid surface in an open area. Maintain good balance and secure footing.
5
English
 WARNING
To reduce the risk of injury from loss of control, do not attempt to "drop start" your power tool.
 WARNING
When you pull the starter grip, do not wrap the starter rope around your hand. Do not let the grip snap back, but guide the starter rope to rewind it properly. Failure to follow this procedure may result in injury to your hand or fingers and may damage the starter mechanism.
 WARNING
Once the engine has started, immediately blip the throttle trigger, whichshouldreleasethestartingthrottle and allow the engine to slow down to idle.
 WARNING
This unit is equipped with an ignition system that is normally in operational readiness. Afterthesetting leverisused to stop the engine, it automatically springs back to the "on" position. If the engine is warm, it may be possible to start it by simply pulling the starter rope, with no further adjustments. To reduce the risk of injury, be particularly alert to keep children away from the unit.
During Operation
Holding and Controlling the Power Tool
295BA052 KN |
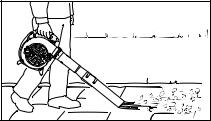
The blower is designed for singlehanded operation. It must be carried by the control handle in the right hand.
Watch out for small animals when using thebloweronopenground,inyardsand gardens.
 WARNING
Operate the unit only with a properly mounted blower tube.
The round nozzle is particularly suitable for use on uneven surfaces (e.g. fields and lawns).
The fan nozzle (either included with unit or available as special accessory) produces a broad and powerful airstream at ground level. It can be aimed and controlled very accurately. This nozzle is highly effective for blowsweeping sawdust, leaves, grass cuttings, etc. on paved surfaces.
Special care must be taken in slippery conditions (wet ground, snow) and in difficult, overgrown terrain. Watch for hidden obstacles such as tree stumps, rootsandditchestoavoidstumbling.For better footing, clear away fallen
branches, scrub and cuttings. Be extremely cautious when working on slopes or uneven ground.
 WARNING
To reduce the risk of injury from loss of control,neverworkonaladder,ina tree or any other insecure support. Never hold the machine above shoulder height.
Working conditions
To minimize blowing time, use a rake andbroomtoloosendirtparticlesbefore you start blowing.
Save water by using a blower instead of a water hose for lawn and garden work wherever possible, e.g. for cleaning yards and patios.
Recommended working technique to minimize air pollution:
–Ifconditionsareverydusty,dampen surfaces slightly before blowing.
–Pull out the nozzle to full length so that the airstream is at ground level.
–Donotblowparticlesinthedirection of bystanders, in particular in the direction of children, pets, open windows or freshly washed vehicles. Take special care in such situations.
–Remove the blow-swept debris in rubbishbins–donotblowitontothe neighbor's land.
6 |
BG 56, BG 56 C, BG 66, BG 86, BG 86 C, SH 56, SH 56 C, SH 86, SH 86 C |

Recommended working technique to |
WARNING |
minimize noise: |
–Operate your power tool at reasonable times only – not early in the morning, late at night or during midday rest periods when people could be disturbed. Observe local rest periods. Normal recommendation for professional use on weekdays: 9:00hrs to 12:00hrs and 15:00hrs to 17:00hrs. Be considerate of neighbors at weekends.
–Fewer engines mean less noise. Where possible, do not run more than one power tool at any time.
–Operate blowers at the lowest engine speed necessary to accomplish the task.
–Check your blower before starting work. Pay special attention to the muffler, air intakes and air filter.
Operate and start your power tool only outdoors in a well ventilated area. Operate it under good visibility and daylight conditions only. Work carefully.
As soon as the engine is running, this product gen- erates toxic exhaust
fumes containing chemi- cals, such as unburned hydrocarbons (including benzene) and carbon monoxide, that are known to cause respira- tory problems, cancer, birth defects, or other reproductive harm. Some of the gases (e.g. carbon monoxide) may be color- less and odorless. To reduce the risk of serious or fatal injury/illness from inhaling toxic fumes, never run the machine indoors or in poorly venti- lated locations.
 WARNING
Inhalation of certain dusts, especially organic dusts such as mold or pollen, can cause susceptible persons to have an allergic or asthmatic reaction.
Substantial or repeated inhalation of dustandotherairbornecontaminants,in particular those with a smaller particle size, may cause respiratory or other illnesses. Control dust at the source where possible. Use good work practices, such as operating the unit so that the wind or operating process directsanydustraisedbythepowertool away from the operator. Follow the recommendations of EPA/OSHA/NIOSH and occupational and trade associations with respect to dust ("particulate matter"). When the
BG 56, BG 56 C, BG 66, BG 86, BG 86 C, SH 56, SH 56 C, SH 86, SH 86 C
English
inhalation of dust cannot be substantially controlled, i.e., kept at or neartheambient(background)level,the operator and any bystanders should wear a respirator approved by NIOSH/MSHA for the type of dust encountered.
 WARNING
If the substance being blown is a commercial substance, review, understand and follow all warnings and instructions contained in the material safety data sheet for that substance and/or consult the material manufacturer/supplier. The state of California and some other authorities, for instance, have published lists of substances known to cause cancer, reproductive toxicity, etc.
 WARNING
Breathing asbestos dust is dangerous and can cause severe or fatal injury, respiratory illness or cancer. The use and disposal of asbestos-containing products have been strictly regulated by OSHAandtheEnvironmentalProtection Agency. If you have any reason to believe that you might be blowing or otherwise disturbing asbestos, immediately contact your employer or a local OSHA representative.
 WARNING
Dust with silica in its composition may containcrystallinesilica.Silicaisabasic component of sand, quartz, brick, clay, granite and numerous other minerals and rocks, including masonry and concrete products. Repeated and / or substantial inhalation of airborne
7

English
crystalline silica can cause serious or fatal respiratory disease, including silicosis. In addition, the state of California and some other authorities havelistedrespirablecrystallinesilicaas a substance known to cause cancer. When encountering such materials, always follow the respiratory precautions mentioned above.
Operating instructions
 WARNING
In the event of an emergency, switch off the engineimmediately– movetheslide control / stop switch to 0 or STOP

 In order to reduce
the risk of personal
or even fatal injury to bystanders from
blown objects keep bystanders at least 16 feet (5m) away when the power tool is running.
Stop the engine immediately if you are approached.
 WARNING
To reduce the risk of personal injury, do not direct air blast towards bystanders, since the high pressure of the air flow can injure eyes and can blow small objects at great speed. Do not direct airblast towards pets.
 WARNING
The blower fan between the air intake and output openings rotates whenever the engine is running.
Never insert any foreign object into the air intake of the machine or into the nozzle of the blower. It will damage the fan wheel and may cause serious injury to the operator or bystanders as a result of the object or broken parts being thrown out at high speed.
Do not place the blower on the ground when operating at high speed, because small objects such as sand, grass, dust, etc.maybepulledintotheairintakeand damage the fan wheel. It is best to turn the machine off when putting it on the ground.
 WARNING
Never modify your muffler. Any modification could cause an increase in heat radiation, sparks or sound level, thereby increasing the risk of fire, burn injury or hearing loss. You may also permanently damage the engine. Have your muffler serviced and repaired by your STIHL servicing dealer only.
 WARNING
Themufflerandotherpartsoftheengine (e.g. fins of the cylinder, spark plug) becomehotduringoperationandremain hot for a while after stopping the engine. Toreduceriskofburns,donottouchthe muffler and other parts while they are hot. Keep the area around the muffler clean. Remove excess lubricant and all debris such as pine needles, branches or leaves. Let the engine cool down sitting on concrete, metal, bare ground or solid wood away from any combustible substances.
 WARNING
An improperly mounted or damaged cylinder housing or a damaged/deformed muffler shell may interfere with the cooling process of the muffler. To reduce the risk of fire or burn injury, do not continue work with a damaged or improperly mounted cylinder housing or a damaged/deformed muffler shell.
Your muffler is furnished with a spark arresting screen designed to reduce the risk of fire from the emission of hot particles. Never operate your unit with a missing or damaged spark arresting screen.Ifyourgas/oilmixratioiscorrect (i.e., not too rich), this screen will normally stay clean as a result of the heat from the muffler and need no service or maintenance. If you experiencelossofperformanceandyou suspect a clogged screen, have your mufflermaintained byaSTIHL servicing dealer. Some state or federal laws or regulations may require a properly maintained spark arrestor for certain uses.Seethe"Maintenance,Repairand Storing" section of these Safety Precautions. Remember that the risk of a brush or forest fire is greater in hot or dry conditions.
8 |
BG 56, BG 56 C, BG 66, BG 86, BG 86 C, SH 56, SH 56 C, SH 86, SH 86 C |
 WARNING
Some STIHL power tools are equipped with a cata- lytic converter, which is
designed to reduce the exhaust emissions of the engine by a chemical process in the muffler. Due to this process, the muffler does not cool down as rapidly as con- ventional mufflers when the engine returns to idle or is shut off. To reduce the risk of fire and burn injuries when using a cat- alytic converter, always set your power tool down in the upright position and never locate it where the muffler is near dry brush, grass, wood chips or other combustible materi- als while it is still hot.
Using the Vacuum Attachment (only BG 56, BG 86, SH 56, SH 86)
For specific assembling instructions, see the appropriate section of your instructions manual. Do not use this appliance in vacuum mode without the catcher bag.
295BA053 KN |
The vacuum attachment is designed for two-handedoperation.Holdandoperate the unit with your right hand on the control handle and your left hand on the assist handle.
Wear the catcher bag shoulder strap over your left shoulder – not across your chest – so that you can quickly throw off the unit and catcher bag in an emergency.
 WARNING


 To reduce the risk
of injury, do not
operate the


 machine unless it


 is fully assembled with a properly mounted suction tube and catcher bag.
English
 WARNING
In order to reduce the risk of injury from contact with rotating parts and dam-
age to the engine, the intake screen must always be closed and the locking tab engaged when the suction tube is not mounted. Stop engine and wait until the fan is stopped before opening the intake screen.
 WARNING
To reduce the risk of per- sonal injury from fire and explosion, never attempt to vacuum hot or burning substances (e.g. smol- dering ashes, glowing cigarettes) or combusti- ble fluids (e.g. gasoline, paint thinners).
 WARNING
Vacuuming unsuitable materials may block the fanwheel. Switch off the unit immediately. Then clear the blockage.
Take particular care when vacuuming wet leaves since they may block the blower wheel and elbow.
BG 56, BG 56 C, BG 66, BG 86, BG 86 C, SH 56, SH 56 C, SH 86, SH 86 C |
9 |

English
 WARNING
Never vacuum solid objects such as nails, steel shavings, tacks, rocks or broken glass. These objects may be struck by the fan wheel and flung away at high speed and may cause injury to the operator or bystander.
NOTICE
Vacuuming abrasive material (such as grit,stonechips,etc.)causestheblower wheel and blower housing to wear at a rapid rate. This results in a considerable loss of suction power. In such a case you should contact your dealer. STIHL recommends a STIHL servicing dealer.
Watch out for small animals when using the vacuum on open ground, in yards and gardens.
MAINTENANCE, REPAIR AND STORING
Maintenance, replacement, or repair of the emission control devices and systems may be performed by any nonroad engine repair establishment or individual. However, if you make a warranty claim for a component which has not been serviced or maintained properly or if nonapproved replacement parts were used, STIHL may deny coverage.
 WARNING
Use only identical STIHL replacement partsformaintenanceandrepair.Useof non-STIHL parts may cause serious or fatal injury.
Strictly follow the maintenance and repair instructions in the appropriate section in this instruction manual.
Please refer to the maintenance chart in this instruction manual.
 WARNING
Always stop the engine and make sure that the fan is stopped before doing any maintenance or repair work or cleaning the power tool. Do not attempt any maintenance or repair work not described in this instruction manual. Have such work performed by your STIHL servicing dealer only.
Do not clean your machine with a pressure washer. The solid jet of water may damage parts of the machine.
 WARNING
Use the specified spark plug and make sure it and the ignition lead are always clean and in good condition. Always press spark plug boot snugly onto spark plugterminal ofthepropersize.(Note:If terminal has detachable SAE adapter nut, it must be securely attached.) A loose connection between spark plug terminal and the ignition wire connector in the boot may create arcing that could ignite combustible fumes and cause a fire.
 WARNING
Never test the ignition system with the boot removed from the spark plug or with a removed spark plug, since uncontained sparking may cause a fire.
 WARNING
Do not operate your power tool if the mufflerisdamaged,missingormodified. An improperly maintained muffler will increasetheriskoffireandhearingloss. Your muffler is equipped with a sparkarresting screen to reduce the risk of fire; never operate your power tool if the screen is missing, damaged or clogged. Remember that the risk of a brush or forest fire is greater in hot or dry weather.
In California, it is a violation of § 4442 or § 4443 of the Public Resources Code to use or operate gasoline-powered tools on forest-covered, brush-covered or grass-covered land unless the engine’s exhaust system is equipped with a complying spark arrester that is maintained in effective working order. The owner/operator of this product is responsible for properly maintaining the spark arrester. Other states or governmentalentities/agencies,suchas the U.S. Forest Service, may have similar requirements. Contact your local fire agency or forest service for the laws or regulations relating to fire protection requirements.
Tightenallnuts,boltsandscrewsexcept the carburetor adjustment screws after each use.
Formaintenanceitemspleasealsorefer to the maintenance chart in this instruction manual.
Store the power tool in a dry and high or locked location out of reach of children.
10 |
BG 56, BG 56 C, BG 66, BG 86, BG 86 C, SH 56, SH 56 C, SH 86, SH 86 C |
Before storing for longer than a few days, always empty the fuel tank. See chapter "Storing the machine" in this instruction manual.
Store fuel in an approved and properly labeled safety-type canister only. Take carewhenhandlinggasoline!Forhealth and safety reasons, avoid direct contact with the skin and avoid inhaling fuel vapor!
Assembling the Blower
Mounting the Blower Tube
1 |
3 |
KN |
|
|
296BA016 |
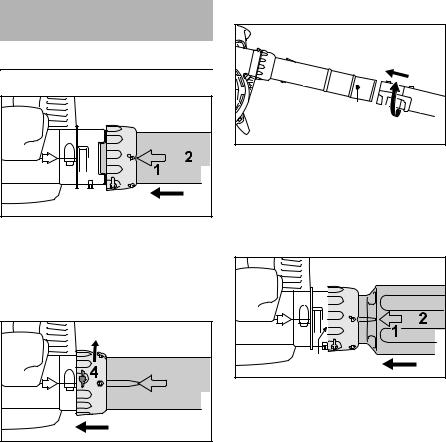
N Line up the arrows (1).
NPosition the union nut so that the symbol ‚ is in line with the arrows.
NPushtheblowertube (2)intothefan housing stub (3) as far as stop.
296BA017 KN |
NPush the union nut (4) over the fan housing stub as far as stop.
NRotate the union nut (4) in direction of arrow until symbol ƒis in line with the arrows – union nut snaps audibly into position.
English
BG 56, BG 86, SH 56, SH 86
2 |
|
|
|
|
|
6 |
a |
|
5 |
KN |
|
b |
296BA031 |
||||
|
|||||
|
|
|
|||
|
|
|
|
NPush nozzle (5) onto blower tube (2) as far as lug (6), position (a) (long) or position (b) (short), and rotate nozzle in
direction of arrow to lock in position.
BG 66
1 |
KN |
3 |
296BA018 |
N Line up the arrows (1).
NPosition the union nut so that the symbol ‚ is in line with the arrows.
NPushtheblowertube (2)intothefan housing stub (3) as far as stop.
BG 56, BG 56 C, BG 66, BG 86, BG 86 C, SH 56, SH 56 C, SH 86, SH 86 C |
11 |
English |
296BA019 KN |
NPush the union nut (4) over the fan housing stub as far as stop.
NRotate the union nut (4) in direction of arrow until symbol ƒis in line with the arrows – union nut snaps audibly into position.
2 |
|
|
|
|
6 |
a |
5 |
KN |
|
296BA032 |
||||
|
||||
|
|
|
NPush nozzle (5) in position (a) onto the blower tube (2) as far as lug (6) and rotate in direction of arrow to lock in position.
Removing the Blower Tube
296BA020 KN |
N Shut down the engine.
12
NInsert a suitable tool through the opening in the union nut to press down the tab.
NRotate the union nut in the direction of the arrow as far as the stop.
N Remove the blower tube.
Assembling the Vacuum
Shredder
Mounting the Elbow
|
3 |
|
1 |
4 |
2 |
|
295BA058 KN |
|
|
|
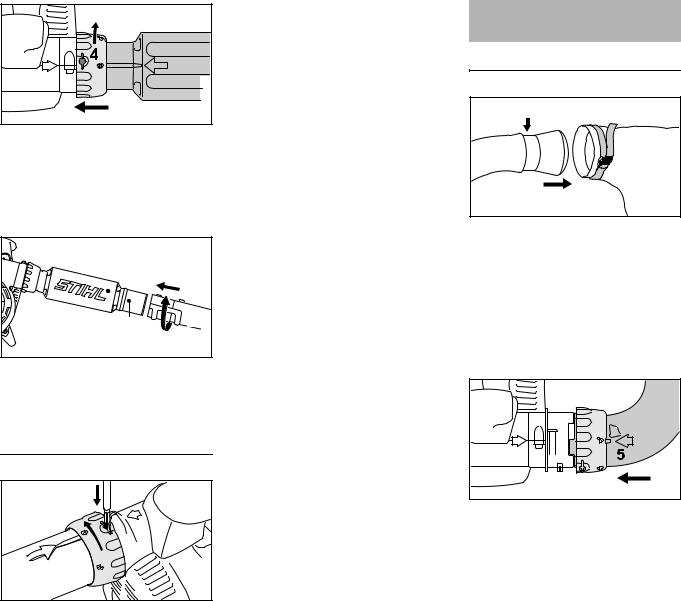
NPush the elbow (1) into the catcher bag (2) as far as the mark (smaller arrow).
NTighten strap (3) on catcher bag and press down the tab (4).
NOTICE
Makesurethezipperonthecatcherbag is closed.
5 |
6 |
KN |
|
|
296BA021 |
N Line up the arrows (5).
NPosition the union nut so that the symbol ‚ is in line with the arrows.
NPush the elbow into the recess in the fan housing stub (6) as far as stop.
BG 56, BG 56 C, BG 66, BG 86, BG 86 C, SH 56, SH 56 C, SH 86, SH 86 C
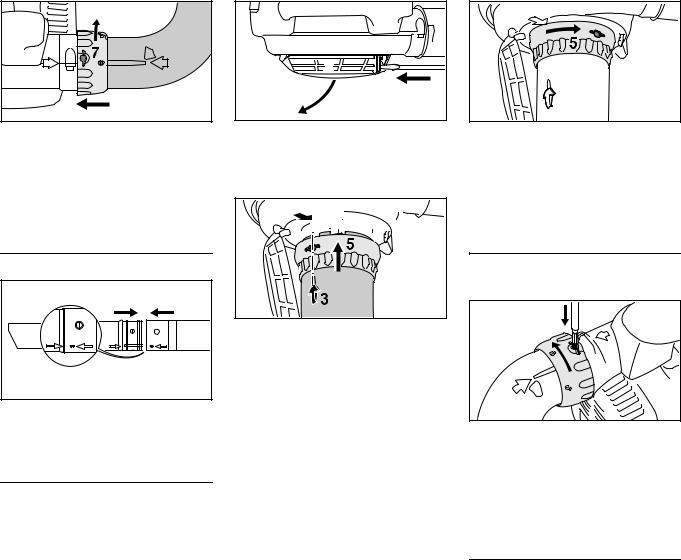
296BA022 KN |
NPush the union nut (7) over the fan housing stub as far as stop.
NRotate the union nut (7) in direction of arrow until symbol ƒis in line with the arrows – union nut snaps audibly into position.
Assembling the Suction Tube
295BA080 KN |
NLine up the arrows on the suction tube and extension tube. Push together and lock in position.
Mounting the Suction Tube
N Shut down the engine.
1 |
2 |
269BA030 KN |
NInsert screwdriver in the tab (1) and press down to disengage the intake screen (2) and then open the intake screen.
3 


 4
4


296BA023 KN
N Line up the arrows (3).
NPosition union nut (5) so that the openinglinesupwith thearrows (3).
NPush the suction tube into the fan housing stub (4) as far as stop.
NPush the union nut (5) over the fan housing stub.
English
296BA033 KN
NRotate union nut (5) in direction of arrow until it snaps audibly into position.
NContinue turning the union nut in direction of arrow and tighten it down firmly.
Removing the Elbow
N Shut down the engine.
296BA024 KN
NInsert a suitable tool through the opening in the union nut to press down the tab.
NRotate the union nut in the direction of the arrow as far as the stop.
N Remove the elbow.
Removing the Suction Tube
N Shut down the engine.
BG 56, BG 56 C, BG 66, BG 86, BG 86 C, SH 56, SH 56 C, SH 86, SH 86 C |
13 |

English |
296BA025 KN |
NRotate the union nut in the direction of the arrow as far as the stop.
NInsert a suitable tool through the opening in the union nut to press down the tab.
NContinueturningtheunionnutinthe direction of the arrow as far as the next stop.
N Remove the suction tube.
NClose the intake screen and lock it in position.
Fuel
This engine is certified to operate on unleaded gasoline and the STIHL twostroke engine oil at a mix ratio of 50:1.
Your engine requires a mixture of highquality gasoline and two-stroke air cooled engine oil.
Usemid-gradeunleadedgasolinewitha minimum octane rating of 89 ((R+M)/2) and no more than 10% ethanol content.
Fuel with a lower octane rating may increase engine temperatures. This, in turn, increases the risk of piston seizure and damage to the engine.
The chemical composition of the fuel is also important. Some fuel additives not only detrimentally affect elastomers (carburetor diaphragms, oil seals, fuel lines,etc.),butmagnesiumcastingsand catalytic converters as well. This could cause running problems or even damage the engine. For this reason STIHL recommends that you use only high-quality unleaded gasoline!
Gasoline with an ethanol content of more than 10% can cause running problems and major damage in engines and should not be used.
The ethanol content in gasoline affects engine running speed – it may be necessary to readjust the carburetor if you use fuels with various ethanol contents.
 WARNING
To reduce the risk of personal injury from loss of control and/or contact with the running cutting tool, do not use your
unit with incorrect idle adjustment. At correct idle speed, the cutting tool should not move.
Ifyourpowertoolshowsanincorrectidle adjustment, have your STIHL dealer check your power tool and make proper adjustments and repairs.
The idle speed and maximum speed of the engine change if you switch from a fuel with a certain ethanol content to another fuel with a much higher or lower ethanol content.
This problem can be avoided by always using fuel with the same ethanol content.
Use only STIHL two-stroke engine oil or equivalent high-quality two-stroke engine oils that are designed for use only in air cooled two-cycle engines.
WerecommendSTIHLHPUltra2-Cycle Engine Oil since it is specially formulated for use in STIHL engines.
Do not use BIA or TCW rated (twostroke water cooled) mix oils or other mixoilsthatstatetheyareforuseinboth water cooled and air cooled engines (e.g., outboard motors, snowmobiles, chain saws, mopeds, etc.).
 WARNING
Take care when handling gasoline. Avoid direct contact with the skin and avoid inhaling fuel vapor. When filling at the pump, first remove the container from your vehicle and place the containeronthegroundbeforefilling.To reduce the risk of sparks from static discharge and resulting fire and/or explosion, do not fill fuel containers that are sitting in or on a vehicle or trailer.
14 |
BG 56, BG 56 C, BG 66, BG 86, BG 86 C, SH 56, SH 56 C, SH 86, SH 86 C |
The container should be kept tightly closed in order to limit the amount of moisture that gets into the mixture.
The machine‘s fuel tank should be cleaned as necessary.
Fuel mix ages
Only mix sufficient fuel for a few days work, not to exceed 30 days of storage. Store in approved fuel-containers only. When mixing, pour oil into the container first, and then add gasoline. Close the container and shake it vigorously by hand to ensure proper mixing of the oil with the fuel.
Gaso- |
Oil (STIHL 50:1 or equiva- |
line |
lent high-quality oils) |
US gal. |
US fl.oz. |
12.6
2 1/2 |
6.4 |
512.8
Dispose of empty mixing-oil containers only at authorized disposal locations.
English
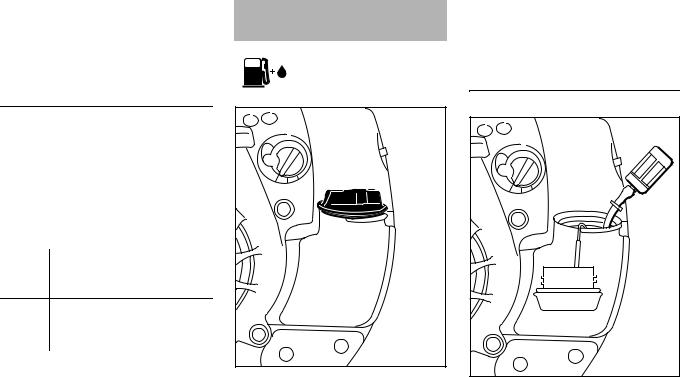
Fueling  WARNING
Afterfueling,tightenfuelcapassecurely as possible by hand.
Change the fuel pick up body every year
295BA064 KN
Before fueling, clean the filler cap and the area around it to ensure that no dirt falls into the tank.
Always thoroughly shake the mixture in the canister before fueling your machine.
 WARNING
In order to reduce the risk of fire and personalinjuryfromescapinggasvapor and fumes, remove the fuel filler cap carefully so as to allow any pressure build-up in the tank to release slowly.
295BA065 KN |
Before storing your machine for a long period,drainandcleanthefuel tankand run engine until carburetor is dry.
BG 56, BG 56 C, BG 66, BG 86, BG 86 C, SH 56, SH 56 C, SH 86, SH 86 C |
15 |

English
Starting / Stopping the
Engine
Starting the engine
N Observe safety precautions.

 1
1


 KN296BA009
NPress the manual fuel pump
bulb (1) at least five times – even if the bulb is filled with fuel.
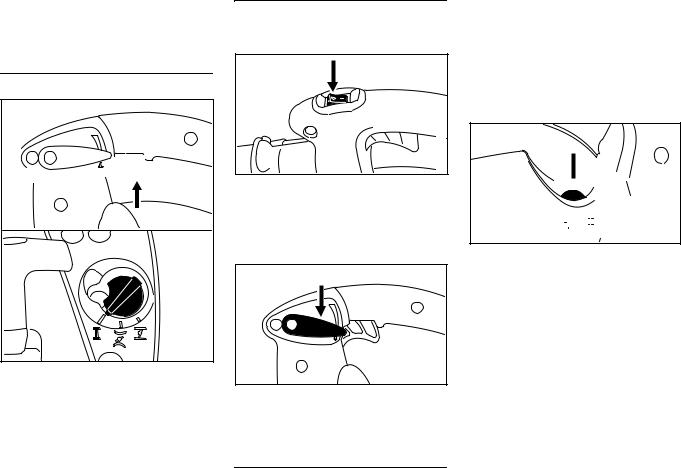
Adjusting the setting lever
BG 86, SH 86 only

 295BA069 KN
NTo start, move the setting lever to the run position F
3 |
KN |
|
296BA007 |
The setting lever (2) allows the throttle trigger (3) to be locked in the full throttle position during operation.
Adjusting the choke knob
If the engine is cold
295BA067 KN
N Set the choke knob to g If the engine is warm
295BA068 KN
N Set the choke knob to <
Also use this setting if the engine has been running but is still cold.
Cranking |
296BA006 KN |
N Place the unit on the ground.
NMake sure you have a firm footing: Hold the unit firmly with your right hand on the housing and press down.
NHold the starter grip with your left hand.
Version with Easy2Start
N Pull the starter grip steadily. Version without Easy2Start
NPull the starter grip slowly until you feelitengageandthengiveitabrisk strong pull.
NOTICE
Do not pull out the starter rope all the way – it might otherwise break.
16 |
BG 56, BG 56 C, BG 66, BG 86, BG 86 C, SH 56, SH 56 C, SH 86, SH 86 C |
NDonotletthestartergripsnapback. Guideitslowlybackintothehousing so that the starter rope can rewind properly.
As soon as the engine runs


 3
3
Stopping the Engine
BG 56, BG 66, SH 56
295BA072 KN
NMove the stop switch to 0 – the engine stops – the stop switch springs back to the on position.
BG 86, SH 86
296BA008 KN
NBlip the throttle trigger (3) – the choke knob moves to the run positionF–theenginereturnstoidle speed.
 295BA073 KN
NMove the setting lever to 0 – the engine stops – the setting lever springs back to the on position.
Other hints on starting
If the engine stopswhile the choke knob in on gor during acceleration
NMove the choke knob to <and continue cranking until the engine runs.
English
If the engine does not start
NMake sure all settings are correct (choke knob, setting lever in run position F).
N Repeat the starting procedure.
If fuel tank has been run completely dry and then refueled

 1
1


 KN296BA009
NPress the manual fuel pump
bulb (1) at least five times – even if the bulb is filled with fuel.
N Now start the engine.
BG 56, BG 56 C, BG 66, BG 86, BG 86 C, SH 56, SH 56 C, SH 86, SH 86 C |
17 |
English
Cleaning the Air Filter
Dirty air filters reduce engine power, increase fuel consumption and make starting more difficult.
Different Air Filters
Different models are equipped with different air filters. The models can be identifiedbythefilterhousingandtheair filter itself.
Version with Flat Filter Material


 1 2
1 2 


295BA074 KN
NTurn the filter cover lock (1) counterclockwise to the vertical position.
N Remove the filter cover (2).
NClean away loose dirt from around the filter.
5 |
3 |
|
|
|
2 |
|
295BA075KN |
NPull off the retainer (3) and take the air filter element (4) out of the filter housing (5).
NReplace the filter element. As a temporarymeasureyoucanknockit outonthepalmofyourhandorblow it out with compressed air – do not wash.
Replace any damaged parts.
Installing the filter element
NFit the filter (4) in the filter housing (5) and push the retainer (3) into position.
NRefit the filter cover (2) and turn the filter cover lock clockwise to the horizontal position.
Version with Pleated Filter Material

 1 2
1 2 


296BA026 KN
NUnscrew the filter cover lock (1) counterclockwise.
N Remove the filter cover (2).
NClean away loose dirt from around the filter.
 4
4 


 3
3 


 296BA027 KN
NTake the air filter (3) out of the filter housing (4).
Cleaning the air filter
NCarefully knock the filter out on the palm of your hand or blow it clear with compressed air from the inside outwards.
In case of stubborn dirt or sticky filter fabric
NWash the air filter in STIHL special cleaner (special accessory) or a clean, non-flammable solution (e.g. warm soapy water). Rinse the filter
18 |
BG 56, BG 56 C, BG 66, BG 86, BG 86 C, SH 56, SH 56 C, SH 86, SH 86 C |
from the insideoutwardsunderajet of water – do not use a pressure washer.
NDrythefilter– do not exposetohigh temperatures.
Place the filter in position.
NInstall the filter element in the filter housing.
NFit the filter cover and tighten the filter cover lock clockwise.
Engine Management
Exhaust emissions are controlled by the design of the fundamental engine parameters and components (e.g. carburation, ignition, timing and valve or port timing) without the addition of any major hardware.
English
Adjusting the Carburetor
General Information
The carburetor comes from the factory with a standard setting.
Thissettingprovidesanoptimumfuel-air mixture under most operating conditions.
Preparations
N Shut off the engine.
NCheck the air filter and clean or replace if necessary.
NCheck the spark arresting screen (not in all models, country-specific) in the muffler and clean or replace if necessary.
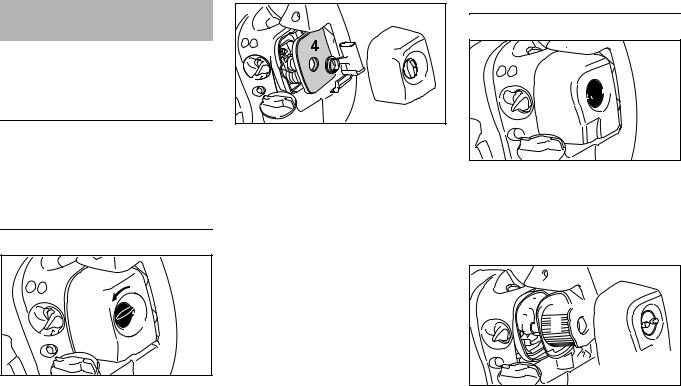
Standard Setting
296BA010 KN
NTurn high speed screw (H) counterclockwise as far as stop (no more than 3/4 turn).
NTurn the low speed screw (L) clockwise as far as stop, then turn it back 3/4 turn.
BG 56, BG 56 C, BG 66, BG 86, BG 86 C, SH 56, SH 56 C, SH 86, SH 86 C |
19 |

English
Adjusting Idle Speed
N Carry out the standard setting. N Start and warm up the engine.
296BA011 KN
Engine stops while idling
NTurn the idle speed screw (LA) clockwise until the engine runs smoothly.
Erraticidlingbehavior,pooracceleration (even though standard setting of low speed screw is correct)
Idle setting is too lean
NTurn the low speed screw (L) carefully counterclockwise, no further than stop, until the engine runs smoothly and accelerates well.
Erratic idling behavior, engine speed drops when swinging the machine
Idle setting is too rich
NTurn the low speed screw (L) clockwise (1/8 of a turn or 45° at a time) until the engine runs smoothly and still accelerates well.
It is usually necessary to change the settingoftheidlespeedscrew (LA)after every correction to the low speed screw (L).
Fine Tuning for Operation at High Altitude
A slight correction of the setting may be necessary if the engine does not run satisfactorily:
N Carry out the standard setting. N Warm up the engine.
NTurn high speed screw (H) slightly clockwise (leaner) – no further than stop.
NOTICE
After returning from high altitude, reset the carburetor to the standard setting.
If the setting is too lean there is a risk of engine damage due to insufficient lubrication and overheating.
Spark Plug
If engine is down on power, difficult to start or runs poorly at idling speed, first check the spark plug.
Fit a new spark plug after approx. 100 operating hours or earlier if the electrodes are badly eroded.
Wrong fuel mix (too much engine oil in the gasoline), a dirty air filter and unfavorable running conditions (mostly at part throttle etc.) affect the condition of the spark plug. These factors cause deposits to form on the insulator nose which may result in trouble in operation.
Removing the spark plug
1
 296BA015 KN
N Pull off the spark plug boot (1). N Unscrew the spark plug.
20 |
BG 56, BG 56 C, BG 66, BG 86, BG 86 C, SH 56, SH 56 C, SH 86, SH 86 C |
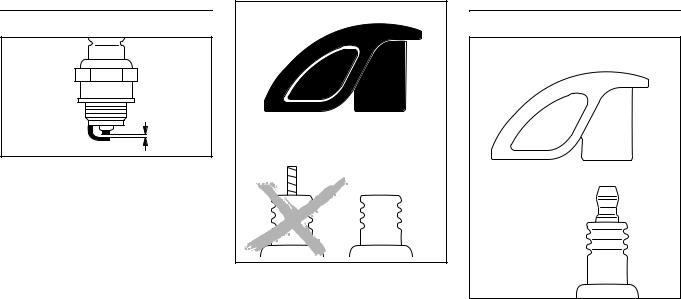
Checking the Spark Plug
|
KN |
A |
000BA039 |
|
N Clean dirty spark plug.
NCheck electrode gap (A) and readjust if necessary – see chapter "Specifications."
NUseonlyresistortypesparkplugsof the approved range.
Rectify problems which have caused fouling of spark plug:
–too much oil in fuel mix,
–dirty air filter,
–unfavorablerunningconditions,e.g. operating at part load.
 2
2
002BA363 KN
 WARNING
Toreducetheriskoffireandburninjury, use only spark plugs authorized by STIHL.Alwayspresssparkplugboot(1) snuglyontosparkplugterminal(2)ofthe proper size. (Note: If terminal has detachable SAE adapter nut, it must be securely attached.) A loose connection between spark plug boot and ignition wire connector in the boot may create arcing that could ignite combustible fumes and cause a fire.
English
Installing the spark plug
2
3
002BA178 KN
NScrew the spark plug (3) into the cylinder and fit the boot (2) (press it down firmly).
BG 56, BG 56 C, BG 66, BG 86, BG 86 C, SH 56, SH 56 C, SH 86, SH 86 C |
21 |
 Loading...