Page 1
t
1
Page 2

t
2
This PDF provides improved access for vision-impaired users. Please note that due to the complexity and
number of images in this document, it is not possible to include text descriptions of images.
The information in this document is subject to change without notice and does not represent a
commitment on the part of Sample Fuel, LLC or Steinberg Media Technologies GmbH. The software
described by this document is subject to a License Agreement and may not be copied to other media
except as specifically allowed in the License Agreement. No part of this publication may be copied,
reproduced, or otherwise transmitted or recorded, for any purpose, without prior written permission by
Sample Fuel, LLC. Registered licensees of the product described herein may print one copy of this
document for their personal use.
All product and company names are ™ or ® trademarks of their respective holders.
Release Date: February 28, 2018
© Sample Fuel, LLC, 2019.
© Steinberg Media Technologies GmbH, 2019.
All rights reserved.
Page 3

NEW FEATURES IN 2.0 UPDATE
3
NEW FEATURES IN 2.0 UPDATE
• Complete redesign of the GUI.
o Bigger and Improved look
o Simple Page added for quick and easy use
• Ove 1350 program presets included
• New User Envelope “LFO” shaped presets
• Over 1070 Wavetable options including:
o Morphing Oscillators
▪ These are waves that morph between various shapes giving the user many new
sonic possibilities. To find these waves, navigate to the folder “Sample Fuel
Morphing Oscillators” in the Wavetable Preset drop down menu. They have the
prefix “Morph” in the name followed by the wave shapes it morphs between in
order. To move between the wave shapes manually, just adjust the “Position”
parameter. If you’d for it to morph automatically, you can assign the “Position”
parameter as the destination in the Waveform Modulation Destination drop
down. To see it in action, check out this video.
• To double down on this feature, you can also create what we call
“Stacked Oscillators”. By turning on the “Multi” parameter and setting
the “Num” to the specific number of different Oscillators included in the
Wavetable, setting the “Spread” to 51 (or 49), and the “Position” to 50
you can play each oscillator simultaneously (stacking them). To see it in
action, check out this video.
o Morphing Variations
▪ Similar to the CM, XOR or PWM waveform type options you find in POLY, we’ve
sampled waves from POLY and a few other synths that take a basic waveform
shape and offer variations of that shape as you move the “Position” parameter.
To see this in action, check out this video.
o Single Cycle from Classic Synthesizers
▪ These are waveforms that are just single cycled. Many classic synths were
sampled to achieve the various colors and waveforms. To use these wavetables,
just navigate to the folder “Sample Fuel Single Cycle Waves” in the Wavetable
Preset drop down menu. To see it in action, check out this video.
o Classic Oscillator Stacks from Vintage Synthesizers
▪ Here we took the basic concept that we describe above in the Morphing and
Stacked Oscillators, but have stacked different waveforms from different classic
synths offering an extremely unique sound and color. To see it in action, check
out this video.
o Virtual Synth Wavetables
▪ Where as the Single Cycle Wavetables were intended to just capture the unique
waveform sounds in other synths, these are Wavetables that were intended to
capture the authenticity of various other popular classic synths’ patches. To see
it in action, check out this video.
Page 4
TABLE OF CONTENTS
4
Table of Contents
5 … Introduction
5 … Loading the VST Sound Instrument Set
5 … Loading and Saving Presets
6 … Plug-in Controls
6 … Plug-in Functions Section
6 … Quick Controls
6 … Sphere
7 … Trigger Pads
9 … Macro Page Parameters
9 … Automating Parameters
10 ... SIMPLE/ADVANCED
10 ... Simple Page
12 … Advanced Pages
13 … The Master Section
14 … The Synth Section
16 … The FX Section
17 … The Motion Section
18 … The Arp Section
19 … The MIDI Section
20 … The XY Section
21 … The About Section
22 … Factory Presets
22 … Naming Scheme
22 … The Browser Tab
24 … Additional Resources
Page 5

INTRODUCTION
5
Introduction
WAVE is our second instrument in a series of instruments that utilizes our simple and
intuitive CRE8 Engine powered by Steinberg's FREE HALion Sonic SE platform. Furthermore, you can
load the instrument set as a program in HALion, HALion Sonic, and HALion Sonic SE. For further
instructions on how to use HALion Sonic SE, HALion Sonic and HALion, follow the links below to their
respective manuals:
• HALion Sonic SE
• HALion Sonic
• HALion
Intuitive and flexible with the focus on quick and easy workflow is the concept behind
our CRE8 Engine. WAVE is a Modern dual oscillator Wavetable synthesizer powered by the WAVE CRE8
Engine. Presets have up to 2 Layers and you can load patches in up to 16 slots that can be used multitimbral or layered by assigning patches to the same midi channel. The main concept behind its design is
to provide you with a "SIMPLE Page" that provides all the functionality you would reach for during
composing or performing. Of course, there is an incredible amount of functionality and sound design
capabilities contained in the additional pages we provide all with the same concept of being simple and
intuitive.
Loading the VST Sound Instrument Set
To load the instrument set in HALion, HALion Sonic, or HALion Sonic SE, load any
of the presets that come with WAVE CRE8 library.
Loading and Saving Presets
When you are working with a Steinberg DAW, the Load and Save dialogs contain
MediaBay functionality, allowing you to make use of tags, for example.
• To load a preset, click the name field in the plug-in functions section and select the
preset in the dialog.
• When a preset is loaded, you can step through the available presets using the left
and right arrow buttons to the left of the preset name field.
• To save a preset, click the floppy disk icon to the right of the preset name and
enter a name for the preset.
• In a non-Steinberg DAW, you can only save presets in the predefined folder or a
subfolder of this folder. If you save presets using the preset manager of the DAW
that you are using, these presets are only accessible within this DAW and not in
other host applications.
Page 6
PULG-IN CONTROLS
6
Plug-In Controls
Performance Control Section
The performance control section in the lower part of the plug-in panel contains additional
elements that can quickly modify the instrument playback: Quick Controls, Sphere and
Trigger Pads.
Quick Controls
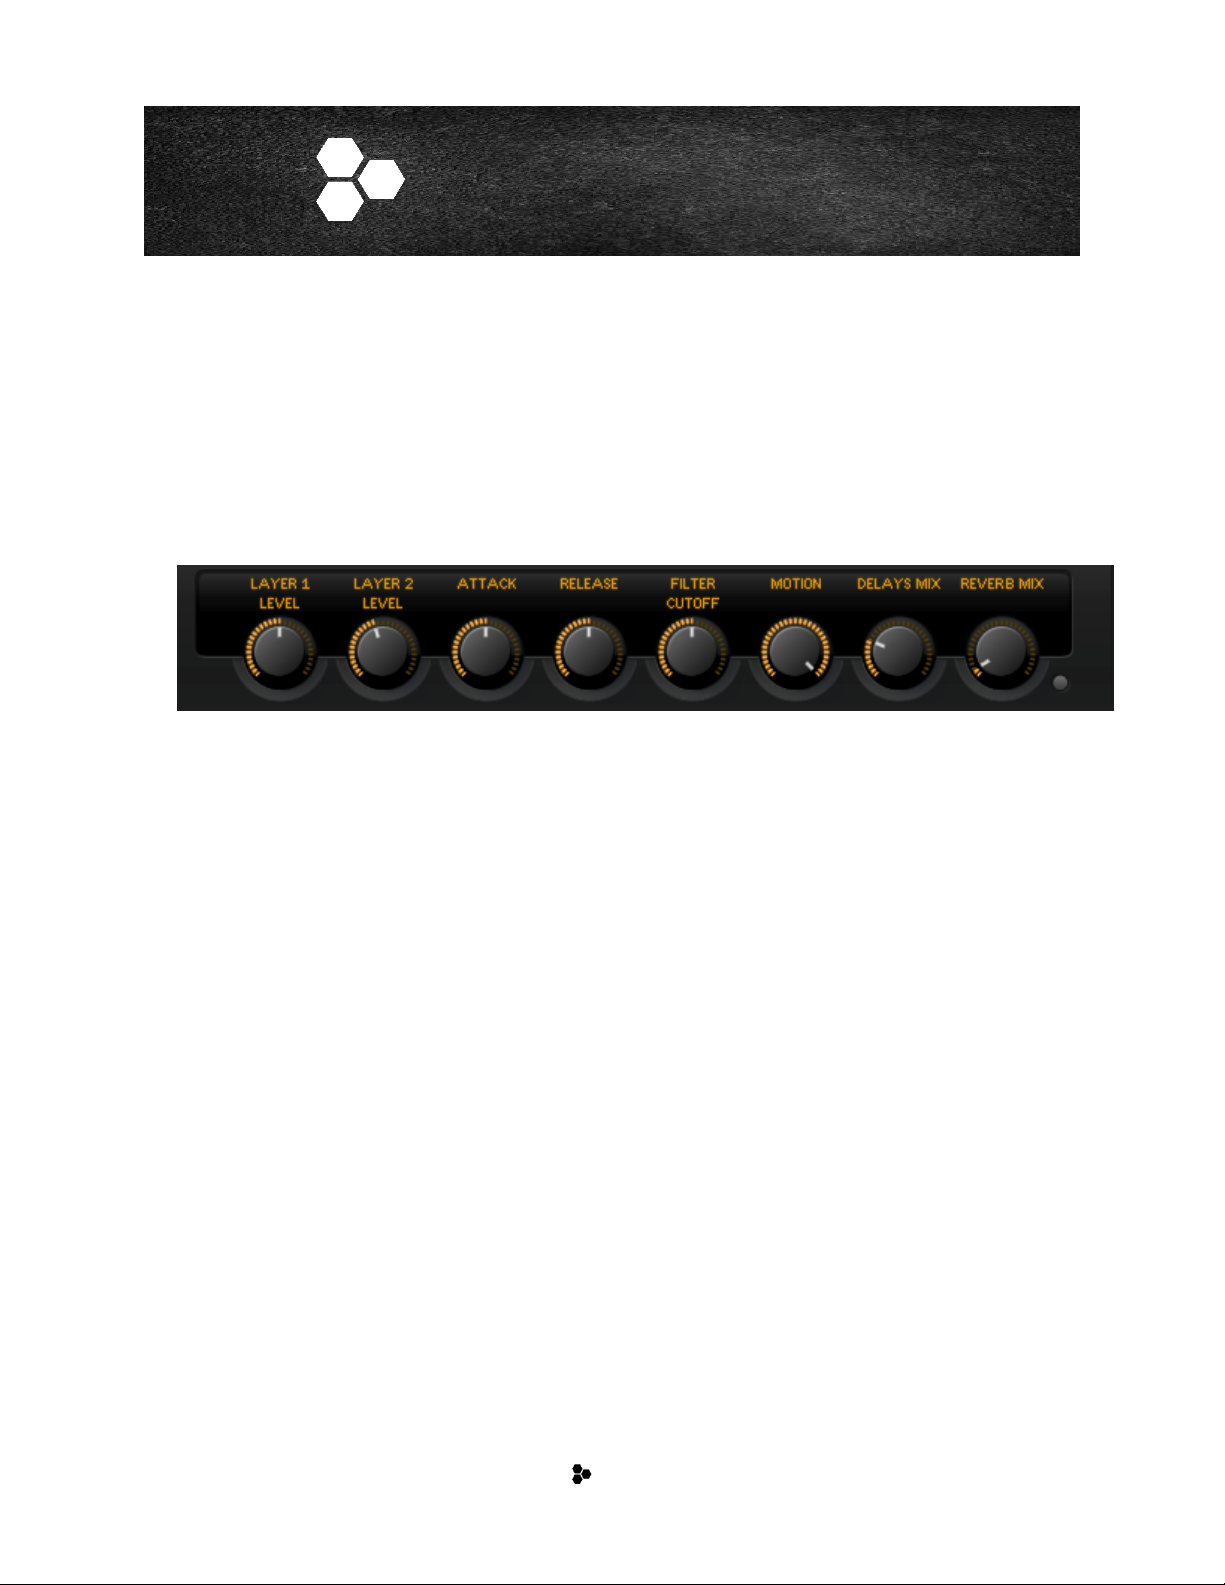
The eight potentiometer controls at the bottom are called quick controls. They allow you
to remote-control the most important sound parameters for the preset. The quick control
assignments cannot be modified in the VST Sound Instrument Set. You can modify the
assignments in HALion or HALion Sonic.
In WAVE CRE8, these 8 pre-assigned controls are assigned to both layers allowing you to
control for example the cutoff filter offset for both layers at the same time with one knob.
The Motion knob can control all the motion and pulsing of a patch. It defaults to full
motion but can dial the motion all the way down to no movement at all. A very creative
way to control many LFO's, Step Filters, and User Envelopes all with one simple knob.
* PAN LFO, Wavetable LFOs and the ARP is excluded from the Motion Quick control knob.
Sphere
The sphere is the ball on the bottom right of the HALion products. It is a two-dimensional
control, which allows you to adjust two quick controls simultaneously by dragging the
mouse horizontally and vertically within the sphere. The Sphere assignments cannot be
modified in the VST Sound Instrument Set. You can modify the assignments in HALion or
HALion Sonic.
In WAVE CRE8, the Sphere controls are pre-assigned to Hi Pass Filter Cutoff and
Resonance for both layers.
Page 7
PULG-IN CONTROLS
7
Ö The small triangles for indicating the horizontal and the vertical axis are only available if
parameters are assigned to Sphere H and V.
Center Horizontal/Center Vertical
You can set up the sphere to stay where you move it to or return to the center
automatically. This can be defined for each axis separately.
To do so, right click the Sphere and activate or deactivate the “Center Horizontal” or
“Center Vertical” options on the context menu for the sphere.
Trigger Pads
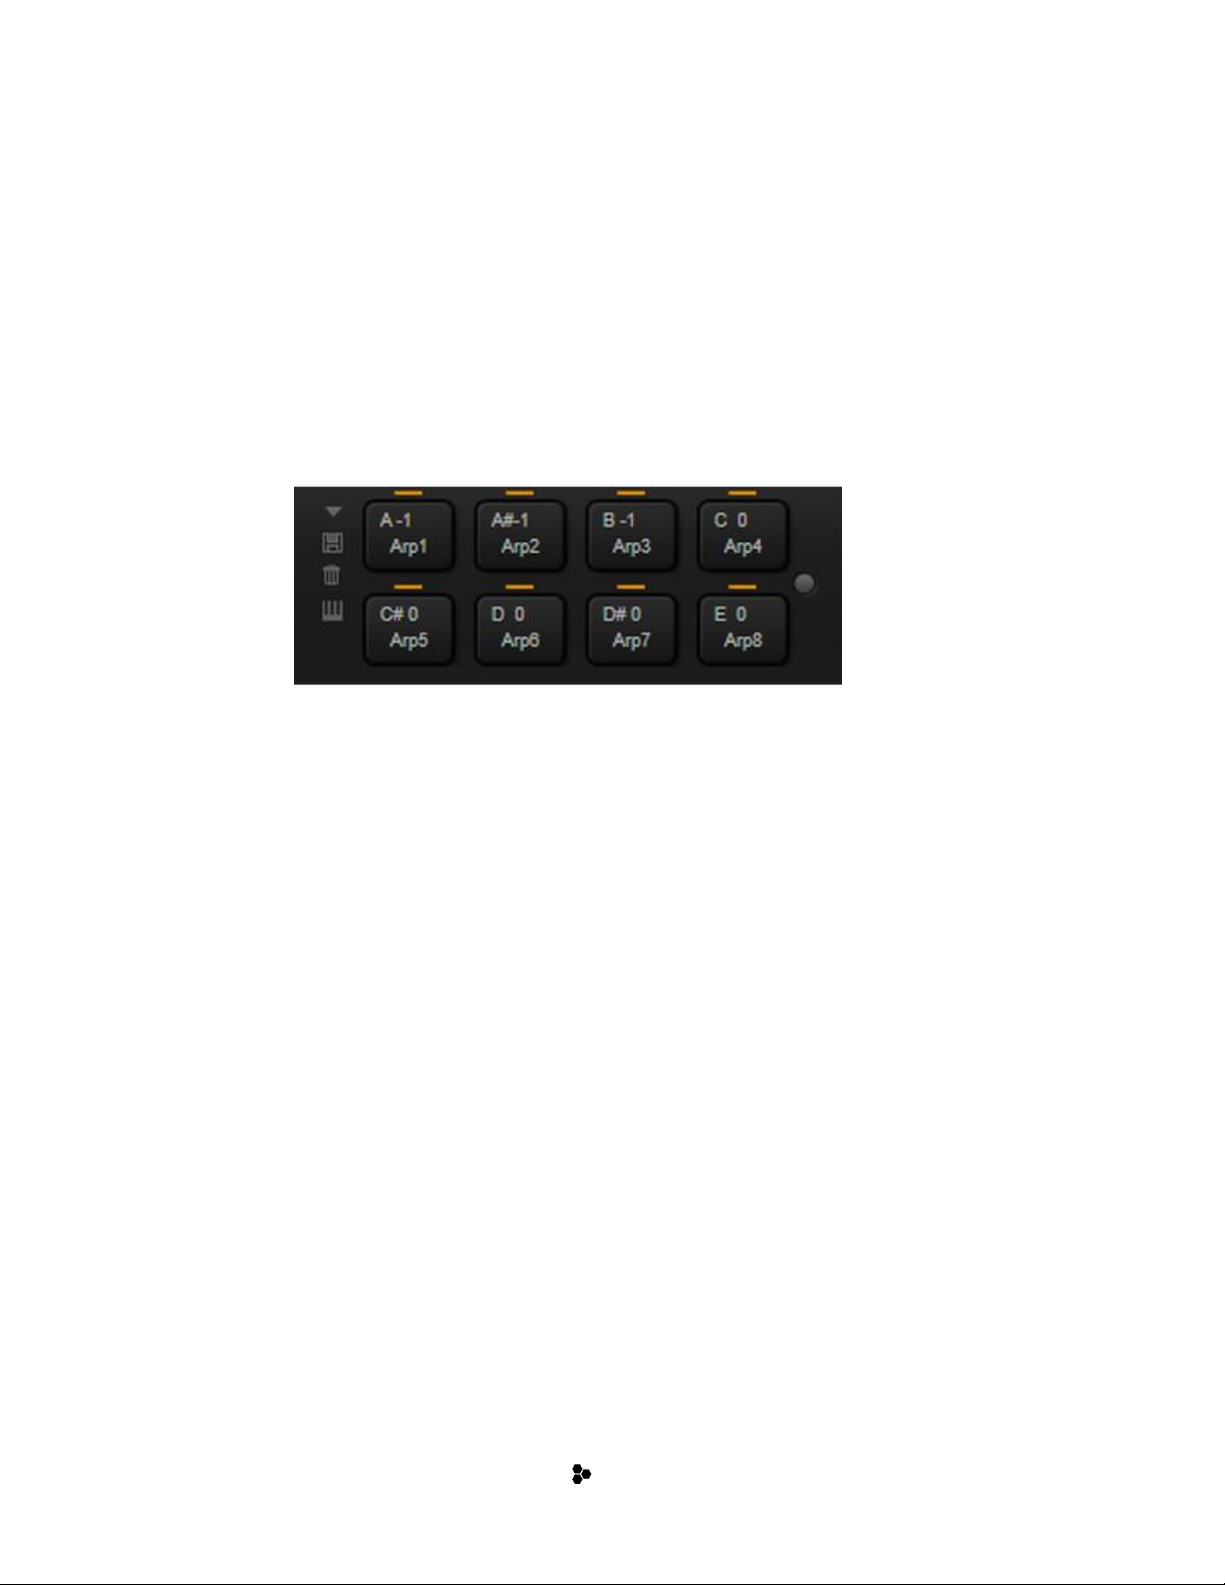
You can use the trigger pads on the left to remotely trigger single notes or whole chords.
Many of the presets make use of the trigger pads.
• Pads with a colored frame have single notes or whole chords assigned.
• The line above a pad lights up when the pad switches between FlexPhraser
variations.
• To trigger a pad with your mouse, simply click the corresponding pad.
In WAVE CRE8, these 8 Trigger pads are assigned to the Arpeggiater's 8 possible
patterns. These can be triggered "on the fly" all without losing sync in real time. This
allows you to perform pattern switches in real time creating almost endless pattern
possibilities from the 8 available "live" patterns. Once you play around with this feature it
becomes a very powerful creative tool.
The pads can also be assigned to the 8 patterns on the Midi Player page as well. Patterns
are set via drag and drop from the number 1-8 buttons on the Arp or Midi Player
page. All patches that utilize the Arp or Midi Player are pre-configured to trigger from
these pads by default.
In the upper left corner of the trigger pad window is a pull-down that contains 2
presets. One configures the pads to trigger via the bottom 8 keys of an 88-key
controller. The second will trigger notes below the keyboard range (C#-2 thru G#-2). The
pre-configured Touchosc and Liine Lemur templates included will trigger these notes from
the Tablet preset.
Page 8

PULG-IN CONTROLS
8
Assigning Trigger Notes to Pads
You can assign a MIDI note to a pad and trigger the pad by playing this note. Proceed as
follows:
1. Right-click the pad.
2. From the menu, select “Assign Trigger Note”.
3. From the submenus, select the octave and note that you want to assign.
Or:
1. Right-click the pad.
2. From the context menu, select “Learn Trigger Note”.
3. Play the note on your MIDI keyboard or click the note on the virtual keyboard.
The name of the MIDI note that you assigned as trigger note is displayed in the
top left corner of the pad.
Ö Keys that serve as trigger notes light up in blue on the virtual keyboard. These keys no
longer play sounds, but trigger the corresponding pads.
Removing Trigger Note Assignments
To remove a trigger note from a pad, proceed as follows:
1. Right-click the pad.
2. From the context menu, select “Forget Trigger Note”.
3.
Page 9

MACRO PAGE PARAMETERS
9
Macro Page Parameters
The Macro pages for the WAVE CRE8 VST Sound Instrument set is divided into 8 pages.
• SIMPLE/ADVANCED
o SIMPLE
o ADVANCED
▪ MASTER SECTION
▪ SYNTH
▪ FX
▪ MOTION
▪ ARP
▪ MIDI PLAYER
▪ XY
▪ ABOUT
Automating Parameters
All of the Macro page parameters can be automated, except for the Mono and Poly
parameters in the Master section and the Step, Level, and Snap parameters in the
Stepmod section on the Motion Page.
Page 10

MACRO PAGE PARAMETERS-SIMPLE
10
SIMPLE/ADVANCED
THE SIMPLE PAGE
The SIMPLE Page allows the user to make quick tweaks to the instrument without being overwhelmed
by too many parameters. This page is split into 4 different sections.
• Uppser Section contains:
o SIMPLE/ADVANCED Switches: These switch between the SIMPLE or ADVANCED views
o Layer Bypass: This will Bypass the currently viewed layer.
o Layer Lo Pass Cutoff and Resonance
o Layer Pan
o Layer Main Volume
o Layer Course Tune and Octave Control
o Midi Player Bypass: switches Midi Player state On or Off
o Arpeggiator Bypass: switches Arpeggiator On or Off
o Arpeggiator Octave: Changes the octave span used in the Arpeggiator
o Layer Hi Pass Cutoff and Resonance
• Upper Middle Section:
o WAVETABLE 1 and 2 controls:
Page 11

MACRO PAGE PARAMETERS-SIMPLE
11
▪ Wavetable Selector: a browser to select a number of wavetables
▪ Bypass: switches Wavetable state On or Off
▪ Octave: changes octave of oscillator
▪ Course: tunes the oscillator in cents
▪ Level: adjust the overall level of the Wavetable
▪ Pan: standard pan for each wavetable
▪ Speed: Dictates how slow or quick the wavetable plays back.
▪ Position: The position of the cursor in the wavetable
▪ Direction: Determines the direction the cursor moves in
▪ Formant Bypass: switches the formant state on or off
▪ Formant: Specify a certain value to shift the formants of the wavetable
▪ Multi Bypass: Enable this to add up to 8 oscillators to the Wavetable.
▪ Num: Specifies the number of oscillators to be played back when Multi is
enabled.
• Lower Middle Section:
o Amplitude Envelope Controls: Attack Offset, Decay Offset, Release Offset, Sustain
Offset, Amplitude Velocity
o Filter Controls: Cutoff, Filter Types, Resonance, Filter Envelope Amount, Distortion,
Distortion Types, Filter Velocity
• Lower Section
o Motion Contains two preassigned LFO’s. On assigned to Volume and the other to Pan.
Each LFO contains:
▪ Bypass: switches LFO state On or Off
▪ Waveform Type: chooses between 8 different waveform types per LFO
▪ Retrigger Mode: chooses between 3 different retrigger modes
▪ Amount: controls the amount the LFO effects the signal
▪ Rate: controls the frequency the LFO effects the signal
▪ Shape: morphs the shape of the LFO waveform
▪ Phase: changes the phase of the LFO waveform
o Modulation Contains: Modwheel and Aftertouch modulation parameters such as:
▪ Bypass
▪ Amount
▪ Destination
To learn more specifics about any of these parameters you can consult the HALion Operation manual.
Link found on the Additional Resources Page.
Page 12

MACRO PAGE PARAMETERS-ADVANCED
12
ADVANCED PAGES
The Advanced Page offers more complex controls and parameters to the user.
When switching to the ADVANCED Page, the Upper section remains fixed and is referred to as the
Master Section. This section all about having instant access to all the parameters that you will use most
of the time without the need to jump to other screens.
The Lower section is where you will find more in-depth parameters for the Oscillators, Motion Controls,
FX, Arpeggiator and Midi Player, and filter controls via XY Pads.
Page 13

MACRO PAGE PARAMETERS-ADVANCED
13
MASTER SECTION
The Main Section is all about having instant access to all the parameters that you will use most of the
time without the need to jump to other screens. The master section is split into 3 different sections.
The Left Section includes SIMPLE/ADVANCED switches, Layer Bypass, MIDI Player Bypass, Arpeggiator
Bypass and Octave parameter, Unison Bypass, Unison Controls (Voices, Detune, Pan, Delay,
Distribution), Main Volume, Level Meter, Octave, Course Tune, Fine Tune, Key Follow, Oscillator Volume
and Pan. Voices parameters (Mono/Poly Switch, Polyphonic Count, Legato Mode), Glide parameters
(Glide Bypass, Glide Amount, Glide Sync, Glide Fingered),
The Middle Section includes Mod Wheel parameters (Modwheel Bypass, amount and destination),
AfterTouch parameters (AfterTouch Bypass, amount and destination), ADSR offset controls for both
Amplitude and Filter, Filter Cutoff, Filter Type, Resonance, Envelope Amount, Distortion Level and
Distortion Type, a fixed Hi Pass and Lo Pass Filter, Amplitude and Filter Velocity settings.
The Right Section provides two preassigned LFO's. One for Volume and one for Pan. Each LFO
automatically syncs to the tempo and has amount, note division, shape and phase controls.
.
Page 14

MACRO PAGE PARAMETERS-ADVANCED
14
THE SYNTH SECTION
The WAVE CRE8 SYNTH page has two main wavetable oscillators, a classic sub oscillator, and a flexible
noise generator.
You can change the waveform of the included 1058 wavetables during playback. This can be
accomplished with the Position control or by modulating the wavetable via a fixed oscillator LFO that
can be assigned to one of 11 different parameters including position or formant. This makes it very easy
to create your own sweeping sounds quickly and easily.
Additionally, if you own one of Steinberg's products that include their instruments FLUX or ANIMA you
can utilize the wavetables from those instruments inside WAVE CRE8.
Wavetable Parameters:
• Wavetable Selector: a browser to select a number of wavetables
• Bypass: switches Wavetable state On or Off
• Octave: changes octave of oscillator
• Course: tunes the oscillator in stepwise
• Fine: tunes the oscillator in cents
• Level: adjust the overall level of the Wavetable
• Pan: standard pan for each wavetable
• Speed: Dictates how slow or quick the wavetable plays back.
• Key Flw: (Key Follow) Determines the speed of the playback of the wavetable depending on
what note you play.
• Position: The position of the cursor in the wavetable
• Rnd Pos: (Random Position) Adds a degree or randomization to the position when you play a
note
• Dir: (Direction) Determines the direction the cursor moves in
• Rnd Dir: (Random Direction) Adds a degree or randomization to the direction when you play a
note
• Loop: Determines how the Wavetable will loop when playing back. The direction of the loop is
depended on the Direction Parameter
Page 15

MACRO PAGE PARAMETERS-ADVANCED
15
• Rel: (Release) When enabled, the playback of the wavetable when continue to loop until the
note is released
• Legato: When Legato is enabled, the cursor will playback at its current position with each
subsequent note that is played
• Sync: Syncs the playback of the wavetable to the tempo of your host application
• Formant Bypass: switches the formant state on or off
• Formant: Specify a certain value to shift the formants of the wavetable
• Key Flw: (Formant Key Follow) Formant frequency changes depending on which note is struck
and the degree of the Key Follow parameter
• Multi Bypass: Enable this to add up to 8 oscillators to the Wavetable.
• Num: (Number) Specifies the number of oscillators to be played back when Multi is enabled.
• Detune: detunes the added oscillators added via the Num parameter
• M Pan: (Multi Pan) This is a stereo pan that controls the width of the Multi Oscillators
• Spread: Plays back the added oscillators at different positions of the wavetable.
Waveform Modulation Parameters:
• Bypass: switches the on-off state of the LFO
• Preset Menu: Navigate through factory presets or save and load your own
• Waveform: Choose between 8 different waveform types for the LFO
• Retrig: (Retrigger Mode) Controls when the LFO Restarts
• Destination: Select the destination to be modified by the LFO
• Amount: Specify how much the LFO will modify the destination
• Rate: (or Frequency) This is the speed of the LFO
• Shape: The shape of the waveform type of the LFO
• Phase: The initial phase of the waveform of the LFO
Sub Osc Parameters:
• Bypass: switches the on-off state of the Sub Oscillator
• Sub Oscillator Waveform Type: Choose between 6 different waveform types
• Sub Lvl: (Sub Level) The overall level of the Sub Oscillator
• Sub Pan: The pan specifically for the Sub Oscillator
Noise Osc Parameters:
• Bypass: Switches the on-off state of the Noise Oscillator
• Wavetable Noises: Choose between 201 different Noise Types
• S: (Sync): Sets the playback of the noise oscillator speed to sync with host app tempo
• LP: (Loop): Loops the playback of the noise sample
• FP: (Follow Pitch) Certain global parameters (Course, Fine, Octave) can affect the noise sample
playback duration when this parameter is enabled
• Nz Spd: (Noise Speed) The playback speed of the noise sample
• NZ KF: (Noise Speed Key Follow) Modulates the speed playback by the MIDI note number
• NZ ST: (Noise Start) Specifies where the playback of the noise sample starts
• NZ RND: (Noise Random) Picks a random start in the playback of the noise sample
• NZ LVL: (Noise Level) The overall level of the Noise Oscillator
• NZ Pan: (Noise Pan) The pan specifically for the Noise Oscillator
To learn more specifics about any of the parameters, you can consult the HALion Operation manual.
Link found on the Additional Resources Page.
Page 16

MACRO PAGE PARAMETERS-ADVANCED
16
The FX SECTION
The FX Page provides you with 18 different insert effects to enable or disable. The different effects are:
• Compressor
• Envelope Shaper
• Vintage Compressor which is at the end of the signal chain before the reverb to act like a
"Mastering Compressor".
• Distortion module with 4 distortion effect types.
• Guitar Amplifier modeling effect. Control over amp heads and cabinets as well as
microphone position.
• Chorus
• Phaser
• Flanger
• Ring Mod FX
• Stereo Widener
• Vintage Ensemble
• Main Synth Filter with VCF section that has 24 filter shapes and five distortion modes. There
are also unique morphing filters that seamlessly blend between up to 4 out of 24 filter types
via the XY Page.
• 4 Band Fully Parametric EQ
• Morph Filter with 2 filter shapes that can be controlled via the automatable XY controller
right on the Morph Filter FX module.
• 2 independent stereo Delays with 3 modes.
• Efficient Algorithmic Reverb with many parameters to tailor its sound.
• Convolution Reverb with many impulse choices.
* Additionally, there is a complete suite of 61 audio effect processors in total available via the AUX FX Sends
in the mixer portion of HALion Sonic SE.
Page 17

MACRO PAGE PARAMETERS-ADVANCED
17
MOTION SECTION
The Motion Page provides a 2 additional LFOs, 2 Step Modulators, User Envelope, Amp Envelope, and
Pitch Envelope.
LFO A and LFO B are located in the upper left part of the section. The LFOs have a frequency rate or
when set to sync will automatically lock to the tempo and also has amount, note division, shape and
phase controls. The LFOs also have a destination pull down menu that gives you many options like
Cutoff, Resonance, Distortion, etc.
The underneath the LFOs are the Step Modulators. The Step Modulators come equipped with a
destination pull down (similar to the pull down used with both the LFOs and User Envelope), a Step
parameter, Triplet toggle switch, Frequency Rate, Grid Snap, Sync Mode, Slope Mode and Slope
Amount, Sync Mode, Polarity Switch, Reset, Step Forward and Step Backward buttons and Step
Modulator Presets.
At the right of the section the user will find the Envelopes. There are three different kinds: User
Envelope, Pitch Envelope and Amplitude Envelope. Both the User and Pitch Envelopes can be bypassed.
The User Envelope remains on top while the user can switch between the Pitch and Amplitude
Envelopes on bottom via 2 buttons labeled appropriately. Both the User and the Pitch Envelopes have
an Amount knob, but only the User has a Destination pull down (pull down is similar to that of the LFO).
Page 18

MACRO PAGE PARAMETERS-ADVANCED
18
THE ARP SECTION
This is an advanced 32-step Arpeggiator based on Yamaha’s legendary Motif Technology with extensive
programming and modulation features. The Arpeggiator offers many parameters for programming
phrases and altering tempo, groove and swing. Three additional controller lanes are available for quick
and easy step modulation for oscillator and filter parameters.
The phrases of the arpeggiator can be recorded internally and exported to the DAW via drag and drop to
make them accessible as editable MIDI events. Additionally, you can store and trigger 8 different
phrases on the fly in real time without ever losing sync.
The entire Arpeggiator settings can be locked to keep phrases even when browsing the available
presets.
To learn more specifics about any of the parameters, you can consult the HALion Operation manual.
Link found on the Additional Resources Page.
Page 19

MACRO PAGE PARAMETERS-ADVANCED
19
THE MIDI PLAY SECTION
This is a simple midi file phrase player that you can drag and drop midi files to and from your
DAW. Additionally, you can store and trigger 8 different phrases on the fly in real time without ever
losing sync.
To learn more specifics about any of the parameters, you can consult the HALion Operation manual.
Link found on the Additional Resources Page.
Page 20

MACRO PAGE PARAMETERS-ADVANCED
20
THE XY SECTION
The XY Page is a simple layout with 3 XY controller boxes. The first XY box controls the Main FX Filter
when it is set to dual or quad Morphing modes. The second and third XY boxes are tied to the fixed Lo
Pass and Hi Pass Filters that are found on the Main Page. This is a very fun and creative way to
automate these filters.
Page 21

MACRO PAGE PARAMETERS-ADVANCED
21
THE ABOUT SECTION
This page includes links to the websites of Sample Fuel and Steinberg.
If you click on the SAMPLE FUEL logo in the middle of the page, you’ll have the option to visit our page
at, www.samplefuel.com .
If you click on the Steinberg logo on the bottom right, it will take you to Steinberg’s home page,
www.steinberg.net/home
Page 22

FACTORY PRESETS
22
Factory Presets
WAVE CRE8 includes hundreds of factory presets to get you started!
Naming Scheme
Prefix:
1L/2L: Designates how many layers the preset contains.
MORPHED: The preset is morphing between different waveforms in the Wavetable via
the Waveform Modulation or the “Speed” Parameter
STACKED: Multi is on and multiple different waveforms are stacked on top of each other
Suffix:
Null- Motion knob turned to the left, resulting in no motion
Gate: Gate-like effect on the sound via the Step Modulators
The Browser Tab
Page 23

FACTORY PRESETS
23
Browse through the patch library with ease and find what you need quickly thanks to the detailed
tagging system and large viewing window that is part of the MediaBay sound management system.
The browser can also open "undocked" and be resized up to full screen size.
Page 24

ADDITIONAL RESOURCES
24
Additional Resources
Videos:
• Installation
• SIMPLE Page (demonstrated using POLY 2.0)
• MAIN Section (demonstrated using POLY 2.0
• FX Section (demonstrated using POLY 2.0)
• MOTION Section (demonstrated using POLY 2.0)
• Motion Knob (demonstrated using POLY 2.0)
• Wave Synth Page (from update 1.5)
• Arp Page (from 1.5)
• Midi Player Page (from 1.5)
• Browser Page
More Videos on YouTube Channel
Manuals:
• HALion Sonic SE 3 Manual
• HALion Sonic Manual
• HALion 6 Manual
 Loading...