

Page 1
New features in Nuendo 2.1
Page 2

Manual by Ludvig Carlson, Anders Nordmark, Roger Wiklander
Quality Control: C. Bachmann, H. Bischoff, S. Pfeifer, C. Schomburg
The information in this document is subject to change without notice and does not represent a commitment on the part of Steinberg Media Technologies GmbH. The software
described by this document is subject to a License Agreement and may not be copied
to other media except as specifically allowed in the License Agreement. No part of this
publication may be copied, reproduced or otherwise transmitted or recorded, for any
purpose, without prior written permission by Steinberg Media Technologies GmbH.
All product and company names are ™ or ® trademarks of their respective owners.
Windows 2000 and Windows XP are trademarks of Microsoft Corporation. The Mac
logo is a trademark used under license. Macintosh and Power Macintosh are registered
trademarks.
© Steinberg Media Technologies GmbH, 2003.
All rights reserved.
Page 3

Table of Contents
Page 4

5 Features
6 Introduction
10 The Stacked cycle record mode
13 Editing in Lane Display mode
16 The Instrument Freeze function
19 Constrain Delay Compensation
20 Repeating parts and events
20 Using a dedicated toolbox
21 Editing several audio parts
23 Handling several parts in a MIDI editor
25 List Editor features
26 Editing Transpose and Velocity for MIDI parts
26 Transpose – Scale Correction
27 New Select options
27 Insert Velocity
28 The chord recognition function
28 Part to Groove
29 Score features
34 The Time Warp tool
45 Merge Tempo From Tapping
46 Recording tempo changes
46 Exporting and importing Tempo tracks
47 Exporting and importing MIDI files
48 Appearance
49 Index
NUENDO
4 New features in Nuendo 2.1
Page 5

Features
Page 6

Introduction
Welcome to Nuendo 2.1! This document lists and describes all features that have been added to the program since the original 2.0 version. To read more about a feature listed below, please click the green
cross-reference.
Recording
•
The “Stacked” cycle recording mode provides an easy way to compile
different takes (cycle laps) into one “perfect take”, allowing you to
view and edit the takes directly in the Project window. See page 10.
This makes use of the Lane Display Mode, where overlapping events or parts are
placed on separate lanes on the track. See page 13.
•
The Constrain Delay Compensation function provides a quick way to
temporarily disable delay compensation, useful for minimizing the latency when recording audio or playing VST Instruments in real time.
See page 19.
•
You can now choose whether a precount should follow the tempo
track (including tempo changes) or simply use the tempo at the
record start position.
To make the precount follow the tempo track, select the “From Tempo Track” option in
the Metronome Setup dialog (Precount Options section).
Networking
•
The Network feature is described in a separate pdf document.
VST Plug-ins and VST Instruments
•
The Instrument Freeze function renders the output of a VST Instrument
to a file, disables the instrument and plays back the rendered audio
from an “invisible” audio track instead, thereby saving CPU power.
Frozen VST Instruments can be unfrozen at any time if you need to edit the source
MIDI or adjust instrument settings. See page 16.
NUENDO
6 New features in Nuendo 2.1
Page 7

Editing – general
•
Events and parts can be repeated using tools. See page 20.
•
There is now a separate Pencil tool (for entering single events or notes)
and a Line tool (with a variety of modes, for drawing several events or
notes).
Previously, all these modes where available for a single Pencil tool.
•
You can choose to have a dedicated toolbox open when you right-click
(Windows) or [Ctrl]-click (Mac). See page 20.
Audio editing
•
It is now possible to open several audio parts (on the same or different
tracks) in a single Audio Part Editor window. See page 21.
MIDI editing
•
When you open a part for editing, the MIDI editor window will now
show the whole MIDI track. If you like, the boundaries of the edited
part can be indicated in the editor. See page 24.
•
Editing several parts in a MIDI editor has been simplified: You can
now specify which part should be active, have this indicated in the
editor and, if needed, restrict editing to that part only.
You can make a part active by selecting it from a list, by using key commands or by selecting an event belonging to the part. See page 23.
•
You can now open several parts from different tracks in the List Editor,
just as in the other MIDI editors.
Other List Editor changes include improved filtering and masking and the possibility to
hide the Value display from view. See page 25.
•
The Project window info line contains Transpose and Velocity settings, allowing you to make independent transpose and velocity shift
settings for different MIDI parts. See page 26.
•
The main Transpose function now includes a Scale Correction setting, allowing you to keep transposed notes within a specified scale.
See page 26.
•
New functions have been added to the Select menu. See page 27.
•
When you draw notes in a MIDI editor, their velocity values are determined by the Insert Velocity setting.
You can specify key commands for different Insert Velocity settings, making note entry
much quicker. See page 27.
New features in Nuendo 2.1 7
NUENDO
Page 8

•
The Key and List Editors can now show the chord made up by the
notes currently under the project cursor. See page 28.
•
The Part to Groove function lets you extract the timing of a MIDI part
and turn it into a groove template.
The groove is available for selection from the Quantize menu and can be edited if
needed. See page 28.
•
The editors have been changed graphically in two ways:
In the Key and Drum Editor, controllers are now displayed with their names and their
MIDI Controller numbers.
The Key Editor grid has been improved, making it easier to find the correct pitch.
Score editing
•
The MIDI Meaning function interprets note symbols and dynamics, affecting the length and velocity of notes during playback.
This means you can play back your score and hear all accents and dynamics you have
added. See page 29.
•
A “dynamic” crescendo symbol has been added, making use of the
MIDI Meaning function. See page 30.
•
When you create guitar symbols, you can choose from several symbol
sizes.
•
You can now create tablature for up to 12 strings.
•
Notes can be colorized. See page 31.
•
The handling of text and lyrics has been improved: You can assign lyrics to different verses and paste text or lyrics from the clipboard. See
page 32.
•
The Auto Layout functions have been improved. See page 33.
Tempo editing
•
The Time Warp tool provides a unique and efficient way to adjust the
Tempo track so that “musical time based” material (positions related
to the tempo) matches “linear time based” material (positions in time).
See page 34.
•
You can now tap the tempo to an audio recording, record your tapping
as a MIDI part and use the function Merge Tempo from Tapping to create a complete tempo track based on your tapping.
This function replaces the “Insert Multiple Tempi” feature in the Beat Calculator. See
page 45.
NUENDO
8 New features in Nuendo 2.1
Page 9

•
In the Tempo Track Editor you will find a slider which allows you to
record tempo changes in real time. See page 46.
•
Tempo tracks can be imported and exported, allowing you to use the
same tempo track for different projects. See page 46.
File handling
•
When you import or export MIDI files, several options and settings
have been added for greater versatility. See page 47.
•
You can now import a MIDI file by dragging it into a Project window.
Other improvements
•
A preference has been added, allowing you to choose whether audio
effect sends in pre-fader mode should be muted or not when you
mute a mixer channel.
You will find this setting in the Preferences dialog on the VST page.
•
The Appearance section in the Preferences dialog has been improved,
allowing for more control over the look and feel of the program. See
page 48.
•
You can use key commands to move the project cursor position forwards or backwards in steps of one bar.
This is done by assigning key commands to the functions “Step Bar” and “Step Back
Bar”, found in the Transport category in the Key Commands dialog.
•
The Cycle function has been improved for smoother playback.
•
The Chase MIDI Events function has been improved for better chase
performance.
New features in Nuendo 2.1 9
NUENDO
Page 10
The Stacked cycle record mode
When you record in cycle mode and Stacked is selected on the cycle
record mode pop-up menu on the Transport panel, each take will appear as an event or part on a separate “lane” on the track.
The details are slightly different for audio recording (described below)
and MIDI recording (described on page 12).
Recording audio in Stacked mode
When you record audio in cycle mode and the “Stacked” Cycle
Record Mode is selected, the following happens:
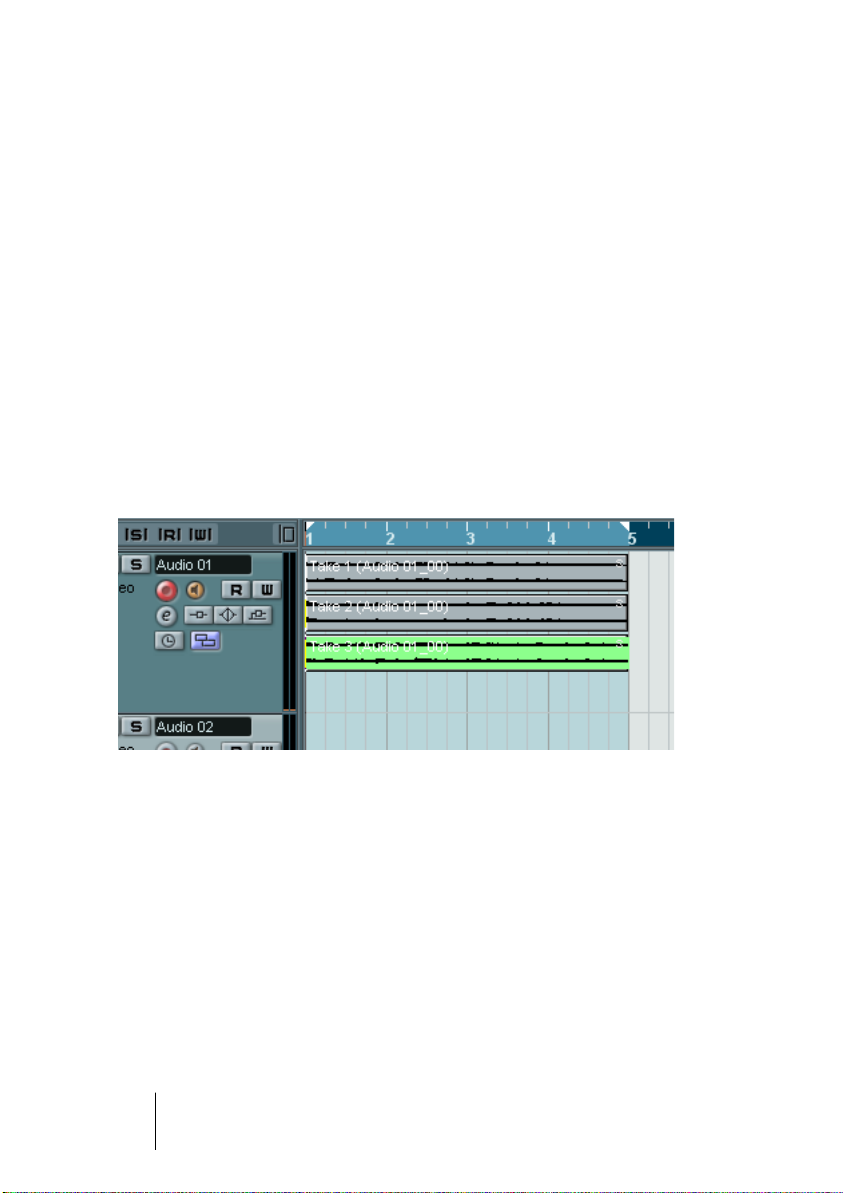
• Each complete recorded cycle lap is turned into a separate audio event.
• The track is divided into “lanes”, one for each cycle lap.
• The events are stacked on top of each other, each on a different lane.
This makes it easy to create a “perfect take” by combining the best
parts from the different cycle laps:
1.
Zoom in so you can work comfortably with the stacked events.
If you play back the recorded section, only the lowest (last) take will be heard.
2.
To audition another take, either mute the lower take(s) with the Mute
tool or move the takes between the lanes.
This can be done by dragging or by using the functions Move to Next Lane/Previous
Lane on the Quick menu or Edit menu.
NUENDO
10 New features in Nuendo 2.1
Page 11
3.
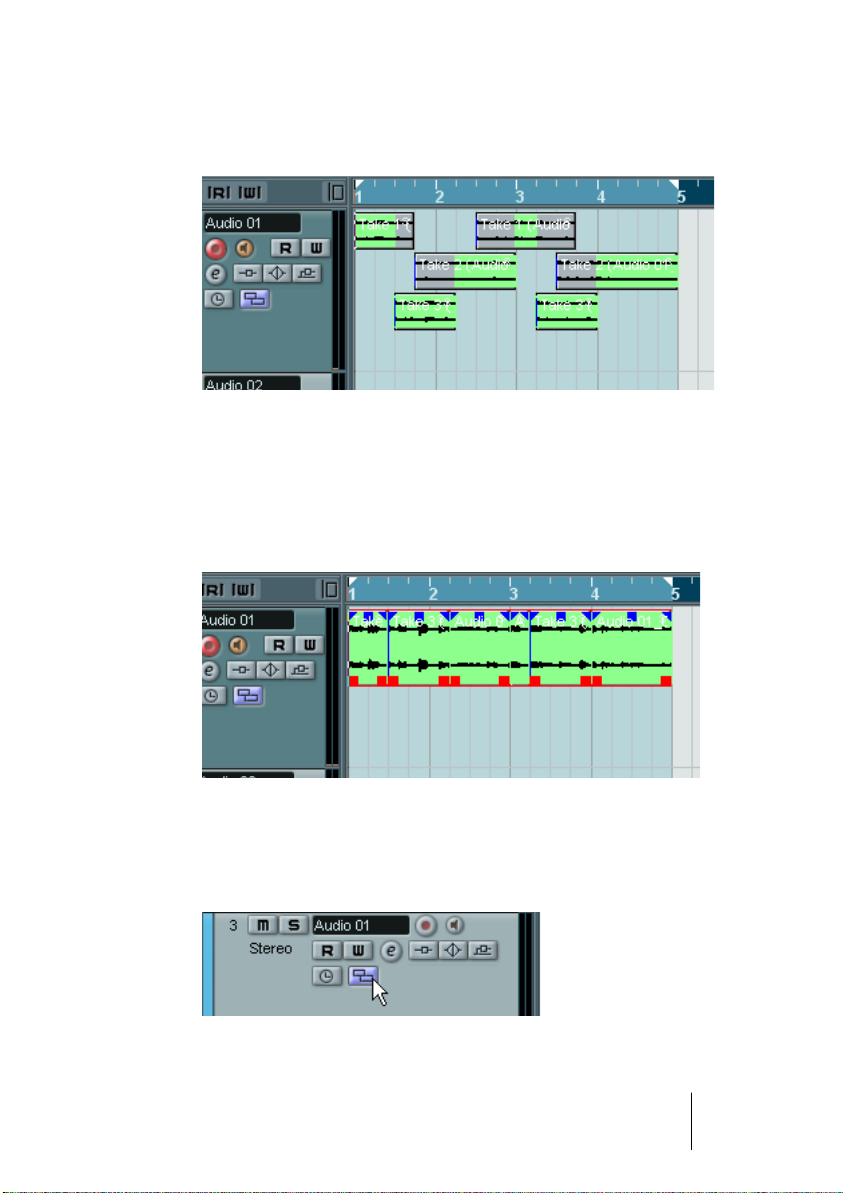
Edit the takes so that only the parts you want to keep can be heard.
You can cut events with the Scissors tool, resize them, mute them or delete them.
The sections that will be heard are indicated in green.
4.
When you are satisfied with the result, select all events on all lanes and
select “Delete Overlaps” from the Advanced submenu on the Audio
menu.
This puts all events back on a single lane and resizes events so that overlapped sections are removed.
5.
To turn off the lane display mode for the track, click the Lane Display
Type button in the track list and select “Lanes Off”.
If the button is hidden, you can bring it to view in the Track Controls Settings dialog –
see the Operation Manual.
The Lane Display Type button.
NUENDO
New features in Nuendo 2.1 11
Page 12
Recording MIDI in Stacked mode
When you record MIDI in cycle mode and the “Stacked” cycle record
mode is selected, the following happens:
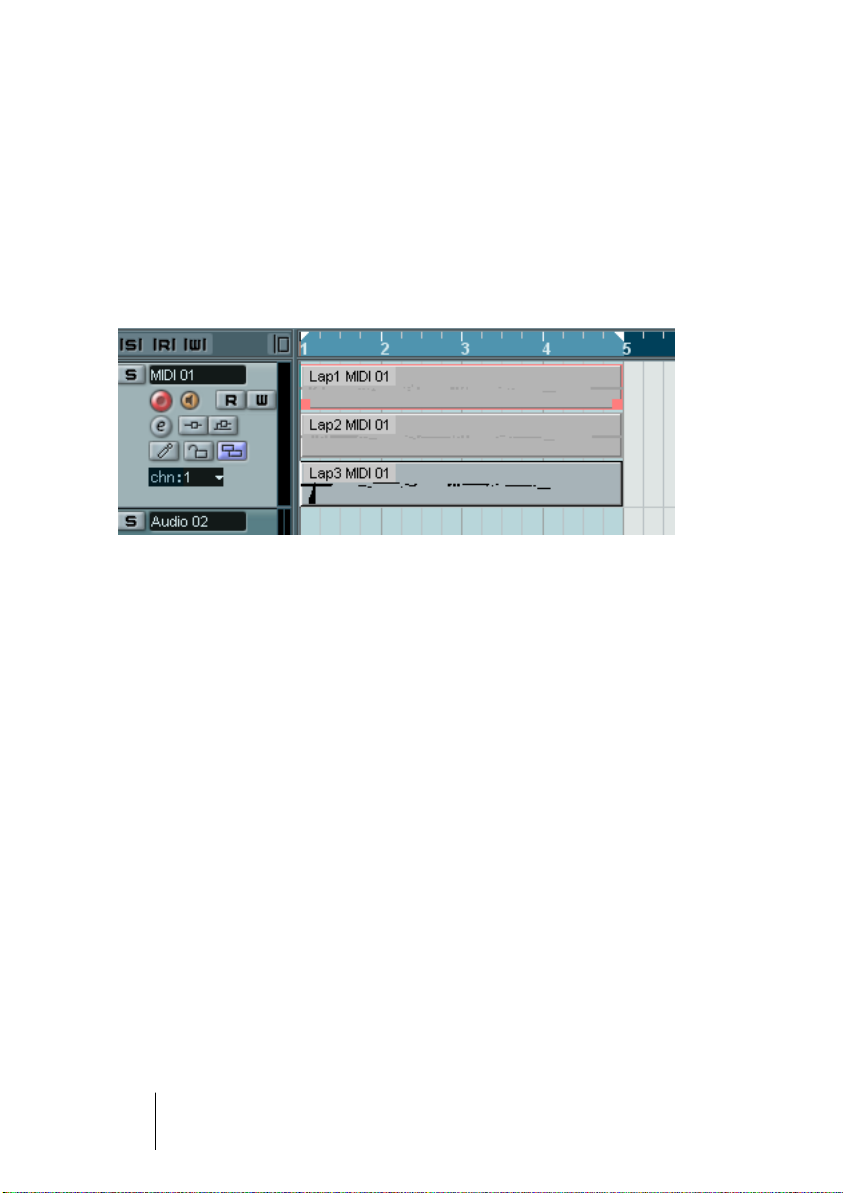
• Each recorded cycle lap is turned into a separate MIDI part.
• The track is divided into “lanes”, one for each cycle lap.
• The parts are stacked on top of each other, each on a different lane.
• All takes but the last one are muted.
This makes it easy to create a “perfect take” by combining the best
parts from the different cycle laps. You can edit the parts in the
Project window (by cutting, resizing and deleting) or you can use a
MIDI editor as in the following example:
1.
Unmute the muted takes by clicking the parts with the Mute tool.
2.
Select all takes (parts) and open them in the Key Editor for example.
3.
Use the part list pop-up menu on the toolbar to select which part to
edit.
See page 23.
4.
Remove or edit notes as desired.
5.
When you are happy with the result, close the editor.
6.
To turn it all into a single MIDI part (containing your “perfect take”), select all parts and select Merge MIDI in Loop from the MIDI menu.
7.
In the dialog that appears, activate the Erase Destination option and
click OK.
The remaining events in the parts are merged together into a single part.
NUENDO
12 New features in Nuendo 2.1
Page 13
Editing in Lane Display mode
When you are recording in Stacked cycle recording mode, each take
ends up on a separate lane on the track as described on page 10.
However, you can also select this lane mode manually for individual
tracks, and use it when editing in the Project window. This makes it
easier to view and handle overlapping events and parts.
Audio tracks
1.
Make sure the Lane Display Type button is visible in the track list.
If it is hidden, you need to select Track Controls Settings from the context menu for the
track and add the Lane Display Type item in the dialog that appears.
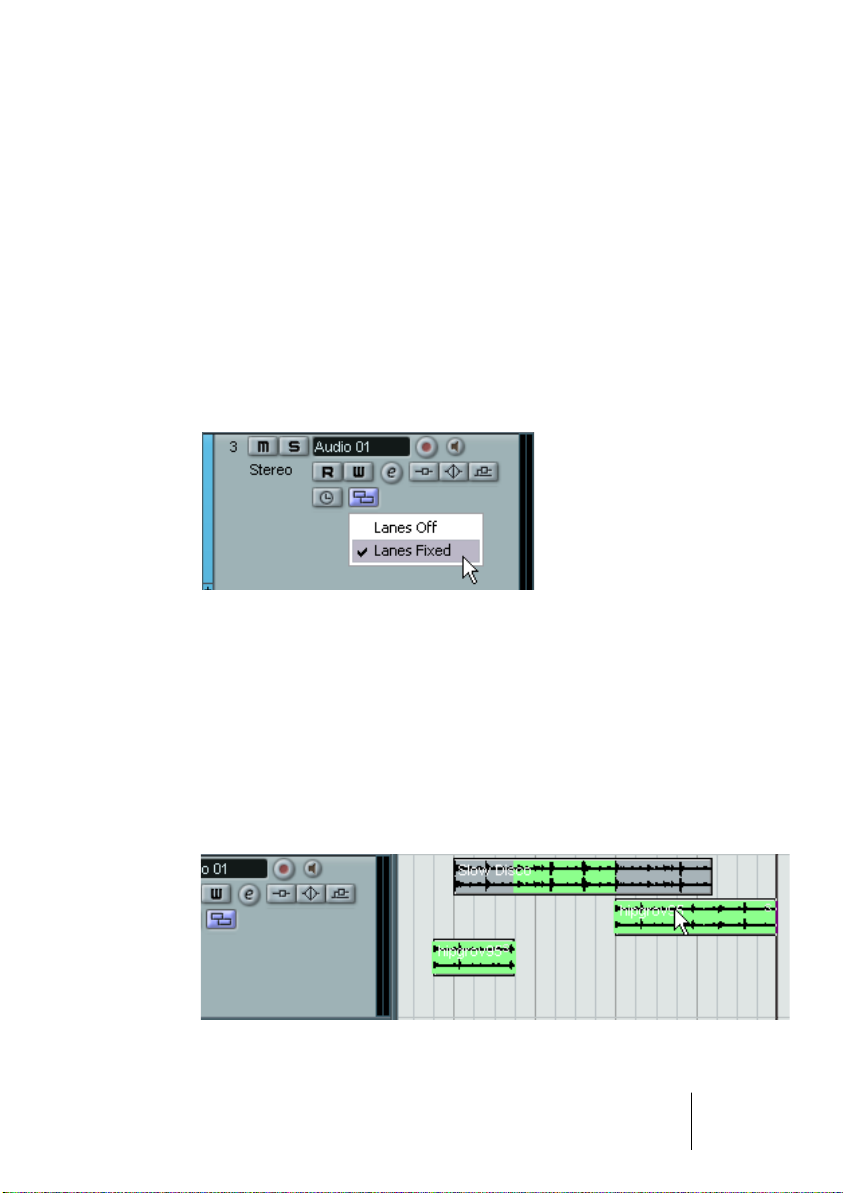
2.
Click the Lane Display Type button and select “Lanes Fixed” from the
pop-up menu that appears.
The audio track is divided vertically into two lanes. By default, all audio events end up
in the first (top) lane.
3.
Now you can move events or parts between lanes, either by dragging
or by using the “Move to Next Lane/Previous Lane” commands on the
Edit menu or Quick menu.
Note that if there are overlapping audio events, the audio on the lowest lane has playback priority – moving events between lanes affects what will be heard!
If the vertical zoom factor is sufficiently high, the sections that will be heard on
playback are indicated in green.
NUENDO
New features in Nuendo 2.1 13
Page 14

•
Note that there will always be an extra, empty lane at the bottom of the
track – if you move an event there, another lane will be added and so
on.
Depending on the number of lanes used, you may want to adjust the vertical zoom for
the track – simply drag the track edges in the track list.
4.
After rearranging the overlapping events so that you hear what you
want, you can select all events and select “Delete Overlaps” from the
Advanced submenu on the Audio menu.
This puts all events in the top lane and resizes events so that overlapping sections are
removed.
5.
To turn off Lanes mode, select “Lanes Off” from the Lane Display
Type pop-up menu.
If you do this without using the “Delete Overlaps” function, all overlapping sections will
be kept. However, the sections that were green will now be the sections visible (“on
top”) and thus the sections that will be heard.
MIDI tracks
1.
Make sure the Lane Display Type button is visible in the track list.
If it is hidden, you need to select Track Controls Settings from the context menu for the
track and add the Lane Display Type item in the dialog that appears.
2.
Click the Lane Display Type button and select “Lanes Auto” or “Lanes
Fixed”.
•
In Lanes Auto mode, extra lanes will automatically be added where
necessary – if two MIDI parts overlap, they will automatically be put on
separate lanes.
NUENDO
14 New features in Nuendo 2.1
Page 15

•
In Lanes Fixed mode, you have to move MIDI parts between lanes
manually (by dragging them or by using the “Move to Next Lane/Previous Lane” commands on the Edit menu or Quick menu).
In this mode, there will always be an extra, empty lane at the bottom of the track – if you
move a part there, another lane will be added and so on.
3.
You can edit the overlapping parts as usual – by cutting, deleting or
muting sections in the Project window or by opening them in a MIDI
editor.
In an editor, parts on different lanes will be treated just like parts on different tracks –
you can use the part list pop-up menu to select an active part for editing, etc.
Note that there is no playback priority between lanes on a MIDI track – all unmuted
parts will be heard during playback.
4.
To merge all overlapping parts into one, make sure the MIDI track is
selected, position the left and right locator around the parts and select
“Merge MIDI in Loop” from the MIDI menu.
In the dialog that appears, activate the Erase Destination option and click OK. This
merges all unmuted MIDI between the locators to a single part.
5. To turn off Lanes mode, select “Lanes Off” from the Lane Display
Type pop-up menu.
NUENDO
New features in Nuendo 2.1 15
Page 16

The Instrument Freeze function
Like all plug-ins, VST Instruments can sometimes require a lot of processor power. If you are using a moderately powerful computer or if
you are using a large number of VST Instruments, you may come to a
point where your computer cannot handle all VST Instruments playing
back in real time (the CPU overload indicator in the VST Performance
window lights up, you get crackling sounds, etc.).
Enter the Instrument Freeze function! This is how it works:
• When you freeze a VST Instrument, the program renders an audio file of its
output (taking into account all unmuted MIDI parts routed to that VST Instrument). This file is placed in the “Freeze” folder within the Project folder.
• All MIDI tracks routed to the VST Instrument are muted and locked (the controls
for these tracks will appear “greyed-out” in the Project window and Inspector,
and the parameters for the VST instrument).
• When you play back, the rendered audio file is played back from an “invisible”
audio track, routed to the VST Instrument’s mixer channel. Thus, any effects,
EQ or mixing automation will still be applied.
The result of all this is that you get exactly the same sound as before,
but the computer processor doesn’t have to calculate the sound of
the VST Instrument in real time.
• If you need to edit the MIDI parts routed to the VST Instrument or adjust the
settings on the instrument itself, you need to unfreeze the instrument first. This
removes the rendered file and restores the MIDI tracks and VST Instrument.
Once you have made the necessary adjustments you can freeze the instrument
again.
NUENDO
16 New features in Nuendo 2.1
Page 17

Performing the Freeze
1. Set up the Project so that the VST Instrument plays back the way you
want it.
This includes editing the MIDI parts routed to the VST Instrument and making parameter settings for the VST Instrument itself. If you have automated parameter changes for
the VST instrument, make sure the Read (R) button is activated.
2. Open the Project Setup dialog and make sure the Length setting
matches the actual project length.
The rendered freeze file will span the whole project length. Although empty (silent)
sections will not affect the size of the freeze file, the Instrument Freeze operation will
take longer if you have an unnecessarily high Length setting.
3. Open the VST Instruments window from the Devices menu.
4. Click the Freeze button for the VST Instrument (the button to the left
of the VST Instrument slot).
A progress dialog is shown while the program renders the VST Instrument audio to a
file on your hard disk.
The Freeze button lights up and the power, bypass and edit buttons
for the VST Instrument are greyed out (and the control panel closes if
it was open). If you check the Project window at this point you will find
that the relevant MIDI tracks have greyed out controls in the Track list
and Inspector. Furthermore, the MIDI parts are locked and cannot be
moved.
5. Try playing back the project.
You will hear exactly the same sound as before Freezing the VST Instrument – but the
CPU load will be considerably less! You can make settings for the VST Instrument
channel in the Mixer as usual – add EQ, effects, make level adjustments, etc.
NUENDO
New features in Nuendo 2.1 17
Page 18

Unfreezing
If you need to make adjustments (either to the MIDI tracks or to the
VST instrument parameters) you need to unfreeze the VST Instrument:
1. Click the Freeze button for the VST Instrument slot again.
You will be asked whether you really want to unfreeze the instrument.
2. Click “Unfreeze”.
The MIDI tracks and VST Instrument are restored and the rendered “freeze file” is
deleted.
NUENDO
18 New features in Nuendo 2.1
Page 19

Constrain Delay Compensation
Nuendo features full delay compensation throughout the entire audio
path. This means that any delay inherent in the VST plug-ins you use
will automatically be compensated for during playback, so that all
channels are kept in perfect sync.
However, when you play a VST Instrument in real time or record live
audio (with monitoring through Nuendo activated), this delay compensation may sometimes result in added latency – the delay between
when you press a key and hear the sound of the VST Instrument. To
avoid this, you can click the Constrain Delay Compensation button on
the Project window toolbar. This function tries to minimize the latency
effects of the delay compensation, while maintaining the sound of the
mix as far as possible.
• In the Preferences dialog on the VST page you will find a setting called
Delay Compensation Threshold. Only plug-ins with a delay higher than
this setting will be affected by the Constrain Delay Compensation
function.
• VST plug-ins (with higher delay than the threshold value) which are
activated for VST Instrument channels, audio track channels that are
record enabled, group channels and output channels will be turned
off when you activate Constrain Delay Compensation.
• VST plug-ins activated for FX channels are not turned off but their de-
lay is disregarded by the program (delay compensation is turned off).
After recording or using a VST Instrument with Constrain Delay Compensation, you should turn off the function to restore full delay compensation.
NUENDO
New features in Nuendo 2.1 19
Page 20

Repeating parts and events
In addition to the Repeat function on the Edit menu, you can also repeat parts or events (in the Project window or in an editor) in the following way:
1. Select the part(s) or event(s) to repeat.
2. Make sure the Arrow tool is selected and press [Alt]/[Option].
If you point on the lower right corner of the selected event it turns into a pencil.
3. Click and drag with the pencil tool to the right.
The longer to the right you drag, the more copies are created (as indicated by the tooltip).
4. When you release the mouse button, the parts or events are repeated
to fill the rectangle you have drawn.
Using a dedicated toolbox
Normally, right-clicking (or [Ctrl]-clicking under Mac OS X) will bring
up the Quick menu, listing the tools and the most relevant menu items
for the current window. If the option “Popup toolbox on right click” is
activated in the Preferences (Editing page), right-clicking will bring up
the toolbox instead. This shows the tools only and you select tools as
if from a menu.
Note that you can still bring up the Quick menu in this mode by pressing a modifier key (e.g. [Shift]) and right-clicking/[Ctrl]-clicking). Similarly, if the option isn’t activated in the Preferences dialog, you can
bring up the toolbox in that way.
NUENDO
20 New features in Nuendo 2.1
Page 21

Editing several audio parts
You can select several audio parts, on the same or different tracks, and
open them in the same Audio Part Editor window by double clicking
one of the parts (or by using the Edit-Open key command, by default
[Ctrl]/[Command]-[E]).
In the Audio Part Editor, parts from different tracks appear on different
lanes. On the toolbar you will find a few functions to make working
with multiple parts easier and more comprehensive:
• The Part List menu lists all parts that were selected when you opened
the editor, and lets you select which part should be active for editing.
When you select a part from the list, it is automatically made active and centered in the
display.
• Note that it is also possible to activate a part by using the Arrow tool and
clicking on it.
• The button “Edit Active Part Only” lets you restrict editing operations
to the active part only.
If you for example select “All” from the Select submenu on the Edit menu with this option activated, all events in the active part will be selected but not the events in other
parts.
“Edit Active Part Only” activated on the toolbar.
• You can zoom in on an active part so that it fills the screen by selecting “Zoom to Event” from the Zoom submenu on the Edit menu.
NUENDO
New features in Nuendo 2.1 21
Page 22

• The button “Show Part Borders” can be used if you want to see
clearly defined borders for the active part.
When this is activated, all parts except the active one are grayed out, making the borders easily discernible. There are also two “markers” in the ruler with the name of the
active part, marking its beginning and end. These can be moved freely to change the
part borders.
“Show Part Borders” activated on the toolbar.
• It is possible to cycle between parts, making them active, with key
commands.
In the Key Commands dialog – Edit category, there are two functions: “Activate Next
Part” and “Activate Previous Part”. If you assign key commands to these, you can use
them to cycle between parts.
NUENDO
22 New features in Nuendo 2.1
Page 23

Handling several parts in a MIDI editor
When you open a MIDI editor with several parts (or a MIDI track containing several parts) selected, you might find it somewhat hard to get
an overlook of the different parts when editing.
If so, the editor toolbar features a few functions to make working with
multiple parts easier and more comprehensive:
• The Part List menu lists all parts that were selected when you opened
the editor (or all parts on the track, if no parts were selected), and lets
you select which part should be active for editing.
When you select a part from the list, it is automatically made active and centered in the
note display.
• Note that it is also possible to activate a part by using the Arrow tool and
clicking on an event in a part.
• The button “Edit Active Part Only” lets you restrict editing operations
to the active part only.
If you for example select “All” from the Select submenu on the Edit menu with this option activated, only events in the active part will be selected. Similarly, if you select
notes by dragging with the Arrow tool (making a selection rectangle), only the notes in
the active part will be selected.
“Edit Active Part Only” activated on the toolbar.
• You can zoom in on the active part so that it fills the screen by selecting “Zoom to Event” from the Zoom submenu on the Edit menu.
NUENDO
New features in Nuendo 2.1 23
Page 24

• The button “Show Part Borders” can be used if you want to see
clearly defined borders for the active part.
When this is activated, all parts except the active one are grayed out, making the borders easily discernible. In the Key Editor, there are also two “markers” in the ruler with
the name of the active part, marking its beginning and end. These can be moved freely
to change the size of the part.
“Show Part Borders” activated on the toolbar.
• It is possible to cycle between parts, making them active, with key
commands.
In the Key Commands dialog – Edit category, there are two functions: “Activate Next
Part” and “Activate Previous Part”. If you assign key commands to these, you can use
them to cycle between parts in the editors.
NUENDO
24 New features in Nuendo 2.1
Page 25

List Editor features
Filtering
When you are using the filter bar to hide specific event types from
view, there is a quick way to view one event type only: Press [Ctrl]/
[Command] and click its checkbox. If you [Ctrl]/[Command]-click
again, all checkboxes are cleared (all events will be visible).
Masking
The Mask pop-up menu now contains the following options:
Option Description
Event Types Only events with the type of the selected event will be shown. This
does the same as the filter view but is quicker if you only want to
view a single event type.
Event Types and
Data 1
Event Channels Only events with the same MIDI channel value as the selected
In addition to the above options, the menu also gives you access to
the same presets available in the Logical Editor. Furthermore, the
“Setup...” item on the Mask pop-up menu gives you direct access to
the Logical Editor, with the aid of which you can create very complex
masking settings.
Only events of the same type and with the same “Data 1” value will
be shown. For example, if a note event is selected, only notes with
the same pitch will be shown. If a controller event is selected, only
controllers of the same type will be shown.
event will be shown.
• When you apply any of the presets from the Logical Editor or use the
Logical Editor to create masking settings yourself, only the events that
meet the criteria specified will be visible.
Hiding the Value display
You can hide or show the value display to the right of the event display
by clicking the Show List Value View button on the toolbar.
NUENDO
New features in Nuendo 2.1 25
Page 26

Editing Transpose and Velocity for MIDI parts
When one or several MIDI parts are selected in the Project window,
the info line contains Transpose and Velocity fields.
• Adjusting the Transpose field transposes the selected parts in semi-
tone steps.
Note that this transposition doesn’t change the actual notes in the part – it’s just a
“play parameter”, affecting the notes on playback. The transposition you specify for a
part on the info line is added to the transposition set for the whole track with the Transpose track parameter in the Inspector.
• Adjusting the Velocity field shifts the velocity for the selected parts –
the value you specify is added to the velocities of the notes in the parts.
Again, this velocity shift only affects the notes on playback, and again, the value you
specify is added to the Vel.Shift. value set for the whole MIDI track in the Inspector.
Transpose – Scale Correction
The Transpose dialog (accessed from the MIDI menu) now contains
Scale Correction settings. Scale Correction transposes the selected
notes by forcing them to the closest note of the selected scale type.
This can be used for creating interesting key and tonal changes, either
by itself or in conjunction with the other settings in the dialog.
• To activate Scale Correction, click the checkbox.
• Select a root note for the scale from the note drop-down menu.
Make sure to select the correct root note if you want to keep the result in the same key
as the original notes, or select an entirely different key if you want to experiment.
• Select the desired scale type from the Scale drop-down menu.
NUENDO
26 New features in Nuendo 2.1
Page 27

New Select options
Two new options have been added to the Select submenu on the Edit
menu. Both are available in the MIDI editors only:
Option Description
Equal Pitch – all Octaves This function requires that a single note is selected. It se-
lects all following notes that have the same pitch (in any
octave) as the currently selected note.
Equal Pitch – same Octave As above, but selects notes of the exact same pitch only
(same octave).
Insert Velocity
When you draw notes in a MIDI editor, the notes will get the value set
in the insert velocity field on the toolbar.
You can use one of three methods for setting the insert velocity:
• Selecting a predefined velocity value from the insert velocity pop-up menu.
The menu contains five different predefined velocity values. The “Setup...” item opens
a dialog that allows you to specify which five velocity values should be available on the
pop-up menu (you can also open this dialog by selecting “Insert Velocities...” from the
MIDI menu).
• Manually entering the desired velocity value by clicking in the insert velocity
field and typing the desired value.
• Using a key command.
You can assign a key command to each of the five available velocity values in the Key
Commands dialog (MIDI category – the items Insert Velocity 1-5). This allows for quick
switching between different velocity values when entering notes.
NUENDO
New features in Nuendo 2.1 27
Page 28

The chord recognition function
Nuendo features a handy chord recognition function that helps you
identify chords in the Key Editor or List Editor. To find out which chord
some simultaneously played notes make up, place the project cursor
over the notes. All MIDI notes currently “touched” by the project cursor are analyzed and the chord recognition display in the toolbar
shows you which chord the notes form.
In the picture above, the project cursor touches the notes C, Eb and G. As shown
in the chord recognition display, this results in a C minor chord.
Part to Groove
To extract the groove from a MIDI part, select the part and select “Part
to Groove” from the Advanced Quantize submenu on the MIDI menu.
The resulting groove appears on the Quantize menus and you apply it
as you would any Quantize preset. You can also view and edit the resulting quantize settings in the Quantize Setup dialog.
• To extract the groove from an audio event, you use hitpoints and the
“Create Groove Quantize” function, as described in the Operation
Manual.
NUENDO
28 New features in Nuendo 2.1
Page 29

Score features
The MIDI Meaning function
The MIDI Meaning function interprets note symbols and dynamics, affecting the length and velocity of notes during playback. This means
you can play back your score and hear all accents and dynamics you
have added.
• This is done in real time during playback – the actual notes are not affected!
Setting up
1. Select MIDI Meaning from the Score – Global Settings submenu.
A dialog appears.
As you can see, the dialog lists all note symbols and static dynamic
symbols to the left. To the right are two columns, allowing you to
specify in which way each symbol should affect the length and velocity of the notes as they are played back.
2. Set up the note symbols (at the top of the list) to your liking.
The Length and Velocity settings are expressed as percentages, with 100% meaning
no change from the actual note lengths and velocities on playback. For example, if you
set up a short accent symbol (^) to mean Length=50%, Velocity=130%, notes with
this accent would be played back with half their actual length and 1.3 times their actual
velocity.
NUENDO
New features in Nuendo 2.1 29
Page 30

3. Set up the dynamic symbols (at the bottom of the list).
These can only affect note velocity. If you set the fortissimo symbol (ff) to mean
Velocity=150% and insert a fortissimo symbol in the score, all notes will be played
back with 1.5 times their actual velocity, from that point in the score until the next dynamic symbol.
4. To turn MIDI Meaning on, click the Active checkbox.
5. Click OK to close the dialog.
Now, note symbols and dynamics will affect the notes on playback.
• For dynamic changes to take effect, the MIDI sound source must respond
to velocity.
Also, note that the maximum note velocity is always 127. If all notes were recorded or
entered with maximum velocity, velocity settings over 100% will not have any effect.
Dynamic crescendo symbols
In the Dynamics palette you will find a special crescendo symbol:
This allows you to enter a crescendo or diminuendo in the score and
have the note velocity adjusted accordingly during playback. The
same rules apply as for MIDI Meaning:
• The actual notes aren’t affected – the change happens on playback only.
• For the crescendo/diminuendo to be heard, the MIDI sound source must respond to velocity.
• The maximum note velocity is always 127. If the notes are recorded or entered
with high velocity values, you may not hear any difference between e.g. forte
and fortissimo.
Proceed as follows:
1. Select the dynamic crescendo symbol and make sure the Pencil tool
is selected.
2. Click where you want the crescendo or diminuendo to start, drag to
its end position and release the mouse button.
By default this inserts a crescendo from piano (p) to forte (f).
NUENDO
30 New features in Nuendo 2.1
Page 31

3. To adjust the dynamics at either end of the crescendo, right-click
(Windows) or [Ctrl]-click (Mac) to bring up a palette from which to select the desired dynamic symbol.
If you select a dynamic symbol at the start that is “louder” than the one at the end, the
crescendo symbol is automatically changed to a diminuendo symbol.
• In the palette for the start symbol you will find three additional options:
“cresc”, “dim” and “None” (no symbol is shown).
When any of these is selected, the crescendo or diminuendo will start from the “current dynamic”, i.e. with the level according to the previous dynamics symbol in the staff.
4. Select MIDI Meaning from the Global Settings submenu on the Score
menu and make sure the Active checkbox is ticked.
The dynamic crescendo/diminuendo makes use of the MIDI Meaning function and
uses the velocity scaling you have set up for the dynamics symbols in this dialog.
5. Try playing back.
You should now hear the crescendo or diminuendo affect the note velocities.
Coloring notes
You can use the color pop-up menu on the toolbar to colorize selected notes, e.g. for educational purposes.
• Only the note heads will be colored.
• The colors will be included when you print the score.
• Notes can also be colored automatically if the option Use Colors for Additional meanings is activated in the Preferences dialog (Scores page).
When this option is activated, color is used to indicate elements that are “special” in
any way (hidden notes, slurs and note symbols that are moved from their default positions, etc.)
NUENDO
New features in Nuendo 2.1 31
Page 32

Working with text and lyrics
Pasting text
You can paste text (e.g. from another program) into a text symbol in
the score by selecting the text symbol and selecting “Text from Clipboard” from the Text submenu on the Scores menu.
Adding a second verse
To insert a second line of lyrics, proceed as follows:
1. Enter the new lyrics above or below the existing verse.
2. Select all the words that should be in the new verse.
3. Pull down the Score menu and bring up the Text submenu.
4. Select the appropriate verse from the list at the bottom of the submenu
(Verse 1-6).
This assigns the selected lyrics to the selected verse.
To indicate that the words belong to another verse, they are automatically displayed in another color. However, all verses will print in black
as usual.
• To select all words in one verse only, press [Shift] and double click on
the first word in that verse.
This selects all following words in the verse.
Adding lyrics from the clipboard
If you want to prepare your lyrics in another program, you can import
them into Nuendo in the following way:
1. Create the lyrics in another program.
Separate words with space as usual, syllables within words with dash signs (-).
2. Copy the text.
3. In Nuendo, select the first note to which the lyrics should be added.
4. Pull down the Scores menu and select “Lyrics from Clipboard” from
the Text submenu.
The lyrics are added, starting at the selected note.
NUENDO
32 New features in Nuendo 2.1
Page 33

The Auto Layout dialog
The settings for the Auto Layout functions are now located in a separate Auto Layout dialog.
• The dialog appears when you use the Bars and Staves or Optimize All
functions (or click the Auto Layout icon on the score toolbar).
To make settings in the Auto Layout dialog, select e.g. the Bars and Staves option to
open the dialog, make all desired settings and click OK to apply the layout.
The dialog contains the following settings:
Setting Description
Max. Number of Bars This allows you to specify the maximum number of bars per staff
when using the “Bars and Staves” or “Optimize All” functions.
Minimum Distance
between Staves
Minimum Distance
between Grand
Staves
When you use an Auto Layout function that moves staves
(changes the vertical staff distance), this setting determines the
minimum allowed distance between the staves.
This sets the minimum allowed distance between Grand Staves
in the same way.
Auto Space/Page
Mode
Add to Auto Layout
Distance
‘Spread Page’ Bottom
Distance
The higher the value the more space is allowed for each element
in the score (and thus, the fewer the bars across the page).
This number adds to the distance between staves that will be
added when you use any of the Auto Layout functions. The
higher the number, the larger the distance between staves.
This adds to the white space that will appear on the bottom of a
page when using the Spread Page functions.
NUENDO
New features in Nuendo 2.1 33
Page 34

The Time Warp tool
The Time Warp tool lets you adjust the Tempo track so that “musical
time based” material (positions related to the tempo) matches “linear
time based” material (positions in time). Some typical applications:
• When you have recorded music (audio or MIDI) without tempo reference or
metronome click the Time Warp tool can be used for creating a tempo map
that fits the recording (allowing you to rearrange or add sequenced material).
• When you are creating music for a movie and want to match certain positions
in the video with certain positions in the music.
The Time Warp tool makes use of the fact that tracks can be based on
time positions (linear time base) or positions related to tempo (musical
time base) – see the Operation Manual for a description of these
modes.
Basic procedure
You use the Time Warp tool to drag a musical position (a position in
bars+beats format) to a certain position in time. This can be done in
the Project window or in editor windows, as described below. Here is
the general procedure:
1. Make sure Tempo track mode is selected.
You cannot use the Time Warp tool in Fixed tempo mode.
2. Select the Time Warp tool.
Bars+Beats format is automatically selected for the ruler in the active window and
the ruler is shown in dark red.
3. Click in the window at a musical position and drag it so that it matches
a position in the material you are editing – e.g. the start of an event, a
certain “hit” within an audio event, a frame in a video clip, etc.
When you click with the Time Warp tool it snaps to the grid in the window.
NUENDO
34 New features in Nuendo 2.1
Page 35

Dragging the start of bar 9 to the start of the audio event.
While you are dragging, the track(s) you are editing are temporarily
switched to linear time base – this means that the contents of the
tracks remain at the same time positions regardless of the tempo
(there is an exception to this in the Project window – see below).
4. When you release the mouse button the musical position you clicked
on matches the time position you dragged it to.
This is because the Time Warp tool changed the last tempo event on the Tempo track
(and/or added new ones, depending on window and usage), thereby scaling the
tempo track to fit.
Rules
• When you use the Time Warp tool, the tempo value of the last tempo
event (before the click position) is adjusted.
• If later tempo events exist, a new tempo event will be created at the
click position. This way, the later tempo event(s) will not be moved.
• If you press [Shift] and use the Time Warp tool, a new tempo event is
created at the click position.
[Shift] is the default modifier for this – you can adjust this in the Preferences dialog
(Editing–Tool Modifiers page, under the Warp Tool category).
• If you use the Time Warp tool in an editor, a tempo event will be cre-
ated at the start of the edited part or event. Only the track being edited will be affected – but note that events after the edited events or
parts (on the edited track) will be affected as well.
• If you have made a selection range (in the Project window, Audio Part
Editor or Sample Editor) and use the Time Warp tool within that
range, the tempo changes will be confined to that range.
This means tempo events will be inserted at the start and end of the selection range, if
needed – useful if you need to adjust the tempo within a certain area but want all material outside that range to stay in place.
• When you click with the Time Warp tool, it snaps to the tempo grid in
the window.
NUENDO
New features in Nuendo 2.1 35
Page 36

• When you drag the tempo grid to a new position, it can be magnetic
to events in the window.
In the Project window, this requires that Snap is activated and “Events” is selected on
the Snap pop-up menu – the grid will then snap to the start and end of events or parts,
and to markers. In the Sample Editor, this requires that Snap to Zero Crossings is activated – the grid will then snap to hitpoints (if any). In the MIDI editors, this requires
that Snap is activated – the grid will then snap to the start and end of notes.
• The function will create tempo values up to 300 bpm.
Viewing and adjusting tempo events
When you select the Time Warp tool, the ruler of the active window is
shown in dark red. Existing tempo events are shown in the ruler as
“flags” with the tempo values displayed.
This helps you see what’s going on, but you can also use this for editing the tempo track:
• If you press the create/erase modifier key (by default [Shift]) and click
on a tempo event in the ruler, it is deleted.
• You can click on a tempo event in the ruler and drag to move it.
This automatically edits the tempo value in the event so that elements to the right keep
their positions.
• If you press [Alt]/[Option] and move (or delete) a tempo event in the
ruler, the tempo value is not adjusted – this means elements to the
right will be moved.
This is the default modifier key for this – you can adjust this in the Preferences (Editing–
Tool Modifiers page, under the Warp Tool category).
NUENDO
36 New features in Nuendo 2.1
Page 37

Using the Time Warp tool in the Project window
In the Project window there are two modes for the Time Warp tool:
• In the default mode, all tracks are temporarily switched to linear time base
when you use the tool. This means that all tracks will keep their absolute time
positions when you adjust the tempo track.
• In the “musical events follow” mode, no tracks are switched to linear time
base. This means that all tracks (that are not set to linear time base) will follow
the changes you make to the tempo track.
You select the Time Warp mode by selecting the tool, clicking on the
tool icon and selecting from the pop-up menu that appears.
Matching a musical score to video
Here’s an example of how to use the Time Warp tool in “musical
events follow” mode. Let’s say you are creating the music for a film.
You have a video track, an audio track with a commentary and some
audio and/or MIDI tracks with your music. Now you want to match the
position of a musical cue to a position in a video film. The musical cue
happens in bar 33. There are no tempo changes in the project (yet).
1. Make sure tempo track mode is selected in the Transport panel.
2. Now you need to locate the position in the video. If you don’t need
very high precision, you can simply locate it looking at the thumbnails
on the video track – otherwise you can pinpoint the exact position and
add a marker to the Marker track (that you can snap to later on).
You can also make a note of the exact position and add an extra ruler track set to show
time code.
NUENDO
New features in Nuendo 2.1 37
Page 38

3. Make sure the correct tracks are set to linear time base or musical
time base, respectively.
In our example we want the video track and the audio track with a commentary
voiceover to be linear time based (as well as the marker track, if you are using one). All
other tracks should be set to musical time base. You change this by clicking the time
base button in the Track list or Inspector.
Musical time base selected. Linear time base selected.
4. Set up the Grid Type pop-up menu as desired.
When you click with the Time Warp tool, it snaps to the selected grid. In this case, the
musical cue happens at the start of bar 33, so we can set the grid to “Bar”.
• Note that this affects the snapping to the ruler (tempo grid) when you
click! In addition, the tool can be “magnetic” to events in the Project
window when you drag – for this you need to activate Snap and select “Events” on the Snap pop-up menu.
In our example, this would be useful if you created a marker at the desired position in
the video – when you drag the grid (see below), it will snap to the marker.
5. Select the Time Warp tool and select the “musical events follow”
mode.
NUENDO
38 New features in Nuendo 2.1
Page 39

6. Click in the event display at the start of bar 33 and drag to the desired
position in the video.
As mentioned above, this can mean dragging to a position indicated by the thumbnails
on the video track, to a marker on the Marker track or to a time position on an additional
ruler track.
When you drag, you will see the ruler being scaled – and the music
tracks will follow.
7. Release the mouse button.
If you look in the ruler at the beginning of the project, you will see that the first (and
only) tempo event has been adjusted.
8. Try playing back.
The musical cue should now happen at the correct position in the video.
OK, let’s say you need to match another cue to another position later
on in the video. If you simply repeat this procedure, you will find that
the first cue gets out of sync – since you are still changing the first
(and only) tempo event on the Tempo track!
NUENDO
New features in Nuendo 2.1 39
Page 40

You need to create a “lock point” – a tempo event at the first cue position:
9. Press [Shift] and click with the Time Warp tool in the event display at
the cue position.
In our case this is bar 33.
As you can see, a tempo event (with the same value as the first one) is
added at that position.
10.Now match the next musical cue to the next video position, by drag-
ging the musical position to the desired time position as before.
The new tempo event is edited – the first tempo event is unaffected and the original
cue is still matched.
• If you know you are going to match several cues this way, you should
make it a habit to press [Shift] each time you use the Time Warp tool
to match positions.
This adds a new tempo event – that way you don’t have to add tempo events afterwards as in step 9 above.
About snapping
If Snap is activated in the Project window and “Events” is selected on
the Snap pop-up menu, the Time Warp tool will be magnetic to events
when you drag the tempo grid. This makes it easier to snap a tempo
position to a marker, the start or end of an audio event, etc.
NUENDO
40 New features in Nuendo 2.1
Page 41

Using the Time Warp tool in an audio editor
Using the Time Warp tool in the Sample Editor or Audio Part Editor is
different from using it in the Project window, in the following ways:
• When you use the Time Warp tool, a tempo event is automatically inserted at
the beginning of the edited event or part – this tempo event will be adjusted
when you warp the tempo grid with the tool. This means that material before
the edited events won’t be affected.
• There is only one mode for the Time Warp tool in the audio editors: When you
use the tool, the edited track is temporarily switched to linear time base.
Making a tempo map for a “free” recording
The following example shows how to use the Time Warp tool in the
Sample Editor to create a tempo map matching freely recorded music.
Let’s say you have recorded a drummer, playing without a metronome
– this typically means the tempo varies every so slightly. To be able to
add sequenced material and easily rearrange the recorded audio, you
want the tempo in Nuendo to match the recorded drum track:
1. If necessary, move the recorded event to its desired start position.
Move it so that the first downbeat (“one”) happens on the start of the desired bar –
zoom in if needed.
2. Open the drum recording in the Sample Editor and make sure Hitpoint
mode isn’t selected.
The Time Warp tool cannot be used in Hitpoint mode – however, if you have calculated hitpoints already these will be visible when the Time Warp tool is selected (see
below).
3. Set the zoom so that you can see the individual drum hits clearly.
To achieve this type of “visual” beat matching, it’s important to have a fairly clean recording, such as the drum track in this example.
4. Select the Time Warp tool.
You have already matched the first downbeat with the start of a bar.
However, if the recording starts before the first downbeat (with a fill,
some silence, etc.) you want to “lock” the first downbeat so that it
stays in position:
NUENDO
New features in Nuendo 2.1 41
Page 42

5. Press [Shift] and click in the event at the position of the first downbeat
(the start of the bar).
When you press [Shift], the pointer turns into a pencil. Clicking adds a tempo event at
the first downbeat – when you later adjust the tempo with the Time Warp tool, the first
downbeat will stay in place. Note: if the event started exactly on the first downbeat (no
audio before the “one”) you wouldn’t need to do this. This is because a tempo event is
automatically added at the start of the edited event.
6. Now, locate the start of the next bar in the ruler.
7. Click at that position in the event display and drag the position to the
downbeat of the second bar in the recording.
When you click, the pointer will snap to the ruler grid.
You mustn’t necessarily match the downbeats (“ones”) – in this figure beat “2” in
the second bar is matched to the “two” in the recording’s second bar (simply
because the snare drum hits on the upbeats are easier to spot in the waveform
image).
When you dragged the grid you changed the tempo value in the
tempo event at the first downbeat. If the drummer held a fairly consistent tempo, the following bars should now match pretty well too.
NUENDO
42 New features in Nuendo 2.1
Page 43

8. Check the following bars and locate the first position where the audio
drifts from the tempo.
Now, if you simply adjusted that beat in the tempo grid to match the
beat in the recording, the tempo event at the first downbeat would be
changed – this would ruin the match in the previous bars! We need to
lock these by inserting a new tempo event.
9. Locate the last beat that’s in sync.
This would be the beat just before the position where the audio and tempo drift apart.
10.Press [Shift] and click at that position to insert a tempo event there.
This locks this matched position – the material to the left will not be affected when you
make adjustments further along.
11.Now match the tempo grid to the next (unmatched) beat by clicking
and dragging with the Time Warp tool.
The tempo event you inserted in step 10 will be adjusted.
12.Work your way through the recording this way – when you find that
the recording drifts from the tempo, repeat steps 9 to 11 above.
Now the Tempo track follows the recording and you can add sequenced material, rearrange the recording etc.
Matching to hitpoints
If you have calculated hitpoints for the audio event you are editing,
these will be shown when the Time Warp tool is selected.
• The number of hitpoints shown depends on the Hitpoint Sensitivity slider setting you’ve made in Hitpoint mode.
• If you activate the Snap to Zero Crossing button on the toolbar, the Time
Warp tool will snap to hitpoints when you drag the tempo grid.
• If you use the Create Markers function on the Audio-Advanced submenu,
markers will be created at the hitpoint positions. This can be useful when using the Time Warp tool in the Project window, as the tool will be magnetic to
markers (if Snap to Events is activated on the toolbar).
NUENDO
New features in Nuendo 2.1 43
Page 44

Using the Time Warp tool in a MIDI editor
This is very similar to using the tool in an audio editor:
• When you use the Time Warp tool, a tempo event is automatically inserted at
the beginning of the edited part – this tempo event will be adjusted when you
warp the tempo grid with the tool. This means that material before the edited
part won’t be affected.
• There is only one mode for the Time Warp tool in the MIDI editors: When you
use the tool, the edited MIDI track is temporarily switched to linear time base.
• The rulers in the MIDI editors can be set to “Time Linear” or “Bars+Beats Linear” mode (see the Operation Manual) – the Time Warp tool requires Time
Linear mode. If necessary, the ruler mode will be switched when you select
the Time Warp tool.
• If Snap is activated on the toolbar in the MIDI editor, the tool will snap to the
start and end of MIDI notes when you drag the tempo grid.
Typically, you would use the Time Warp tool in a MIDI editor to match
the Nuendo tempo to freely recorded MIDI material (much like the audio example above).
NUENDO
44 New features in Nuendo 2.1
Page 45

Merge Tempo From Tapping
This function allows you to create a complete tempo track based on
your tapping. Typically, you would use this if you have an audio file
with no tempo mapping, and want to be able to add sequenced material afterwards, etc.
1. Create an empty time-based MIDI track and, while playing back your
audio material, tap the new tempo on your MIDI keyboard and record
the created notes onto the new MIDI track.
Note that you must create note events – pedal events cannot be used for this function.
2. Play back the audio and check that the timing of the MIDI notes corre-
sponds to that of the audio.
If necessary edit the MIDI notes in an editor.
3. Select the part (or the individual notes, in an editor) that you want to
use for the calculation.
4. Select "Merge Tempo From Tapping" from the Functions submenu on
the MIDI menu.
A dialog opens.
5. In the dialog, specify what type of note (1/2, 1/4 etc.) you tapped dur-
ing the recording.
If you activate the “Begin at Bar Start” option, the first note will automatically start at
the beginning of a bar when calculating the new tempo curve.
6. Click OK.
The project’s tempo is adjusted to the tapped notes.
7. Open the Project menu and select “Tempo Track” to check that the
new tempo information is reflected in the tempo curve.
• Another way of creating a tempo map for freely recorded audio would be
to use the Time Warp tool – see page 34.
NUENDO
New features in Nuendo 2.1 45
Page 46

Recording tempo changes
The tempo record slider on the toolbar in the Tempo Track Editor allows you to record tempo changes “on the fly”: simply start playback
and use the slider to raise or lower the tempo at the desired positions.
Useful for creating natural sounding ritardandos, etc.
Exporting and importing Tempo tracks
On many occasions it is useful to have several different projects share
the same tempo track – e.g. when you are doing music for picture-work
in workgroups. You can export the current tempo track for use in other
projects by selecting “Tempo Track” from the “Export” submenu on the
File menu. This allows you to save the tempo track information (including time signature events) as a special xml file (file extension “.smt”).
To import a saved tempo track, select “Tempo Track” from the “Import”
submenu on the File menu. Note that this replaces all tempo track data
in the current project (although the operation can be undone if
needed).
NUENDO
46 New features in Nuendo 2.1
Page 47

Exporting and importing MIDI files
Export options
After you click Save in the Export MIDI File dialog, the Export Options
dialog appears, with the following settings:
Option Description
Export Inspector
Patch
Export Inspector
Volume/Pan
Export Automation If this is checked, recorded automation is converted to MIDI con-
Export Inserts If this is checked and you are using any MIDI plug-ins as insert ef-
Export Sends If this is checked and you are using any MIDI plug-ins as send ef-
Export Marker If this is checked, any markers you have added will be included in
Export as Type 0 If this is checked, the MIDI file will be of Type 0 (all data on a single
Export Resolution You can specify a MIDI resolution between 24 – 960 for the MIDI
If this is checked, the MIDI patch settings in the Inspector – Bank
Select and Program Select (used for selecting sounds in the connected MIDI instrument) are included as MIDI Bank Select and
Program Change events in the MIDI file.
If this is checked, Volume and Pan settings made in the Inspector
are included as MIDI Volume and Pan events in the MIDI file.
troller events and included in the MIDI file. This also includes automation recorded with the MIDI Control plug-in.
fects, the modifications to the original MIDI notes that occur as a
result of the effect(s) will be included in the MIDI file. A MIDI delay,
for example, will produce a number of repeats to a MIDI note
tually adding additional, “echoing” notes at rhythmic intervals – these
notes will be included in the MIDI file if the option is activated.
fects, the modifications to the original MIDI notes that occur as a
result of the effect(s) will be included in the MIDI file.
the MIDI file as Standard MIDI File Marker events.
track, but on different MIDI channels). If you don’t check this option, the MIDI file will be of Type 1 (data on separate tracks).
Which type to choose depends on what you want to do with the
MIDI file (in which application or sequencer it should be used, etc.).
file. The resolution is the number of pulses, or ticks, per quarter
note (PPQ) and determines the precision with which you will be
able to view and edit the MIDI data. The higher the resolution, the
higher the precision. The resolution should be chosen depending
on the application or sequencer with which the MIDI file should be
used though, since certain applications and sequencers may not
be able to handle certain resolutions.
by ac-
NUENDO
New features in Nuendo 2.1 47
Page 48

• You will also find these settings in the Preferences dialog (MIDI–MIDI
File page).
If you set these up once and for all in the Preferences dialog, you only need to click OK
in the Export Options dialog to proceed.
Import options
When you import a MIDI file, the result depends on the contents of the
MIDI file and the Import Options settings in the Preferences dialog –
MIDI–MIDI File page:
Option Description
Extract First Patch If this is checked, the first Program Change and Bank Select
events for each track are converted to Inspector settings for
the track.
Extract First Volume/Pan If this is checked, the first MIDI Volume and Pan events for
each track are converted to Inspector settings for the track.
Import Volume/Pan as
Automationtrack
Import to Left Locator If this is checked, the imported MIDI file will be placed so that
If this is checked, all MIDI Volume and Pan events in the MIDI
file will be converted to automation data for the MIDI tracks.
it starts at the position of the left locator – otherwise it will
start at the beginning of the project. Note that if you choose
to have a new project created automatically, the MIDI file will
always start at the beginning of the project.
• It is also possible to import a MIDI file from disk by dragging and dropping it from the Windows Explorer or the Mac OS Finder into the Nuendo
Project window.
The Import Options apply if you use this method as well.
Appearance
The Appearance page in the Preferences dialog has been expanded
with a number of Brightness/Intensity sliders, allowing you to fine-tune
the brightness and contrast in various areas in the program. Changes
take effect when you click Apply or OK.
NUENDO
48 New features in Nuendo 2.1
Page 49

Index
Page 50

A
Activate Next/Previous Part 24
Active Part 23
Appearance 48
Auto Layout dialog (Score) 33
C
Chord Recognition 28
Color pop-up menu (Score) 31
Constrain Delay Compensation 19
Crescendo affecting MIDI playback 30
D
Delay Compensation 19
Delete Overlaps (audio) 11, 14
Diminuendo affecting MIDI playback 30
Dynamics Symbols affecting MIDI playback 29
E
Edit Active Part Only 23
Equal Pitch (Selection) 27
Export MIDI files 47
Export Options (MIDI files) 47
Export Tempo track 46
F
Freeze VST Instruments 16
I
Import MIDI files 47
Import Tempo track 46
Insert velocity (MIDI Editors) 27
Instrument Freeze 16
L
Lane Display Type button 13
NUENDO
50 Index
Page 51

Lanes
Fixed vs. Auto 14
Stacked Audio Recording 10
Stacked MIDI Recording 12
Lyrics
From Clipboard 32
Verse 32
M
Mask (List Editor) 25
Merge Tempo From Tapping 45
MIDI files 47
MIDI Meaning 29
Mute Pre-Send when Mute 9
N
Note Symbols affecting MIDI playback 29
P
Part to Groove 28
Popup toolbox on right click 20
Precount from tempo track 6
R
Recording tempo changes 46
Repeating with tools 20
S
Scale Correction 26
Show Part Borders 24
Stacked Cycle Recording
Audio 10
MIDI 12
T
Tempo
Importing and exporting 46
Recording 46
Tempo record slider 46
NUENDO
Index 51
Page 52

Text from Clipboard (Score) 32
Time Warp tool 34
Toolbox 20
Transpose
Info line 26
Scale Correction 26
V
Value display (List Editor) 25
Velocity
Info line 26
When drawing MIDI notes 27
Verses (Lyrics) 32
VST Instruments Freeze 16
NUENDO
52 Index
 Loading...