

Page 1

Using Nuendo with DSP Factory
Page 2

Manual by Ludvig Carlson, Anders Nordmark, Roger Wiklander
Quality Control: C. Bachmann, H. Bischoff, S. Pfeifer, C. Schomburg
The information in this document is subject to change without notice and does not represent a commitment on the part of Steinberg Media Technologies GmbH. The software
described by this document is subject to a License Agreement and may not be copied
to other media except as specifically allowed in the License Agreement. No part of this
publication may be copied, reproduced or otherwise transmitted or recorded, for any
purpose, without prior written permission by Steinberg Media Technologies GmbH.
All product and company names are ™ or ® trademarks of their respective owners.
Windows 2000 and Windows XP are trademarks of Microsoft Corporation. The Mac
logo is a trademark used under license. Macintosh and Power Macintosh are registered
trademarks.
© Steinberg Media Technologies GmbH, 2003.
All rights reserved.
Page 3

Introduction
The Yamaha DSP Factory is an audio hardware system for professional
digital multitrack recording and mixing on personal computers. The
core of this system is the DS2416 Digital Mixing Card, a PCI-bus audio
card with professional specifications, extensive mixing capabilities and
on-board EQ, dynamics and effects. It is possible to install and digitally
connect two DS2416 cards in one computer. Each card can also be
used with one or two optional AX44 Audio Expansion Units, for up to
eight additional analog inputs and outputs per card.
This manual assumes that you have at least one DS2416 installed,
tested and running under Windows 2000 or XP.
❐
For information about how to install, test and troubleshoot the DS2416,
please refer to the documentation supplied with the card. There you will
also find detailed information about audio hardware specifications and
features.
The DSP Factory in Nuendo
By using the DSP Factory in conjunction with Nuendo, you get a complete graphical interface with full control over the card’s features. The
DS2416 audio card will behave like an external digital mixer, feeding
digital signals into Nuendo’s inputs and accepting digital signals from
Nuendo’s output buses.
The Nuendo/DSP Factory combination allows you to:
•
Record and play back using multiple inputs and outputs.
By itself, the DS2416 provides four inputs and outputs (two analog and two digital).
Each AX44 unit adds four analog inputs and outputs, and there is also support for
upcoming I/O units.
•
Use the DS2416 EQ, dynamics and effects for separate Nuendo audio
channels or for combinations of channels.
•
Route DSP Factory outputs to external effects, accessible from the
VST effect sends.
•
Synchronize audio playback to external wordclock.
– 3 –
Page 4
Setting up Nuendo for use with DSP Factory
❐
Again, this assumes that you have installed the DSP Factory hardware according to the instructions in the supplied manual, and tested that it runs
properly under Windows. Also, please note that the DSP Factory windows
require a screen resolution of at least 1024 x 768 to be fully viewable.
Before you can start working, you need to make a few settings:
1.
Pull down the Devices menu and select Device Setup.
2.
Select VST Multitrack.
The VST Multitrack Setup dialog appears.
3.
Make sure the “ASIO SW+DS32”Driver is selected on the ASIO
Driver pop-up menu.
See the note below about the two ASIO Devices.
About the Two ASIO Devices
❐
The ASIO drivers described below may have been included with the
Yamaha DS2416 package. However, make sure to check Yamaha’s web
site for updated drivers!
There are two ASIO Devices for the Yamaha DS2416, “ASIO
SW+DS32” and “ASIO SW+DS16”. Which one to select depends on
your computer power and whether you need 24 bit recording or not:
•
If you want to record and play back 24 bit audio, you need to select
the 32 bit device (“ASIO SW+DS32”).
It is possible to record in 24 bit mode with the 16 bit device selected, but the created
audio files will only have 16 bit accuracy.
•
If you experience performance problems with the 32 bit device (and
don’t use 24 bit audio), you should select the 16 bit device (“ASIO
SW+DS16”).
The data transfer between the program and the audio card requires quite a lot of computer power. This load is drastically reduced if you use the 16 bit device.
– 4 –
Page 5
Routing Audio between VST and the DSP Factory
Audio routing with the DSP Factory is extremely flexible, allowing you
to connect channels, aux sends and buses to various physical outputs
and inputs. This is done in the special DSP Factory windows, as described on page 13. However, first you need to “connect” Nuendo to
the DSP Factory:
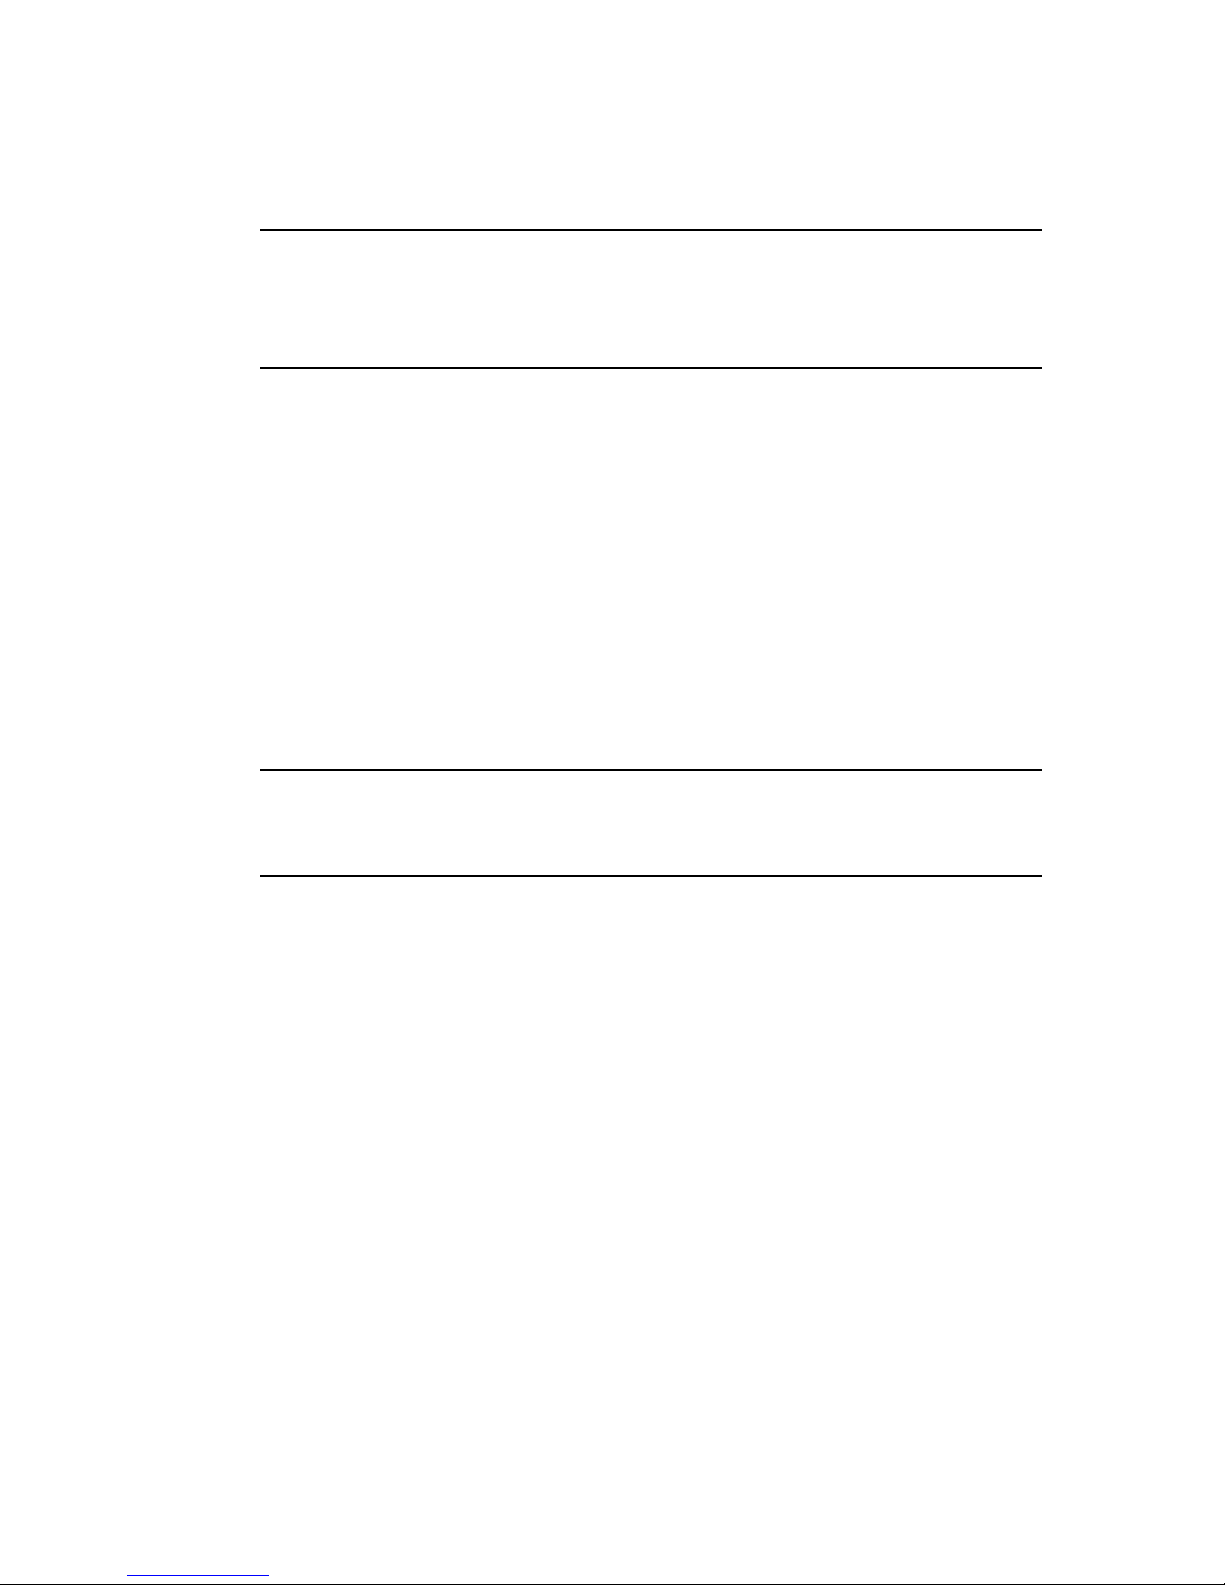
Assigning Inputs
1.
Pull down the Devices menu and select VST Connections.
The VST Connections window appears. This is where you view, add and set up input
and output busses.
2.
Open the “Inputs” tab by clicking on it.
By default, there is a stereo bus called “Stereo In”.
3.
Click the Add bus button.
The “Add bus” window is opened. Select the the Stereo format from the Speaker
Arrangement pop-up and click OK. Repeat this procedure until four input pairs are
shown for every installed DS2416 card.
4.
In the VST Connections window click the “+” button so that the individual inputs in the bus are shown.
The ASIO Device Port column shows the physical inputs that are used by the bus.
5.
Click in the ASIO Device Port column for the “Left” channel.
A pop-up menu appears, listing all inputs on your DS2416.
6.
Select the input you want to use for the left channel in the stereo bus.
7.
Select the input for the right channel in the same way.
8.
Close the VST Connections window and open the Mixer.
In the Mixer you can now see the assigned input busses and Nuendo accepts the digital signals from the DS2416 card as input sources.
– 5 –
Page 6
Assigning Output Buses
1.
Pull down the Devices menu, select VST Connections and open the
Outputs tab.
Repeat steps 3-7 of the description above until eight busses are shown in the Mixer.
2.
Make sure that each bus is assigned to the desired DS2416 PCI Out.
❐
These “PCI Outs” are not the physical outputs of the audio hardware, but
rather “output lines” connecting VST to the DS2416. The actual routing to
physical outputs is done in the DSP Factory windows, as described on
page 36.
3.
If you like, rename the busses by clicking in their name fields and typing in new names.
These names will be shown on the Output pop-up menus in Nuendo.
– 6 –
Page 7

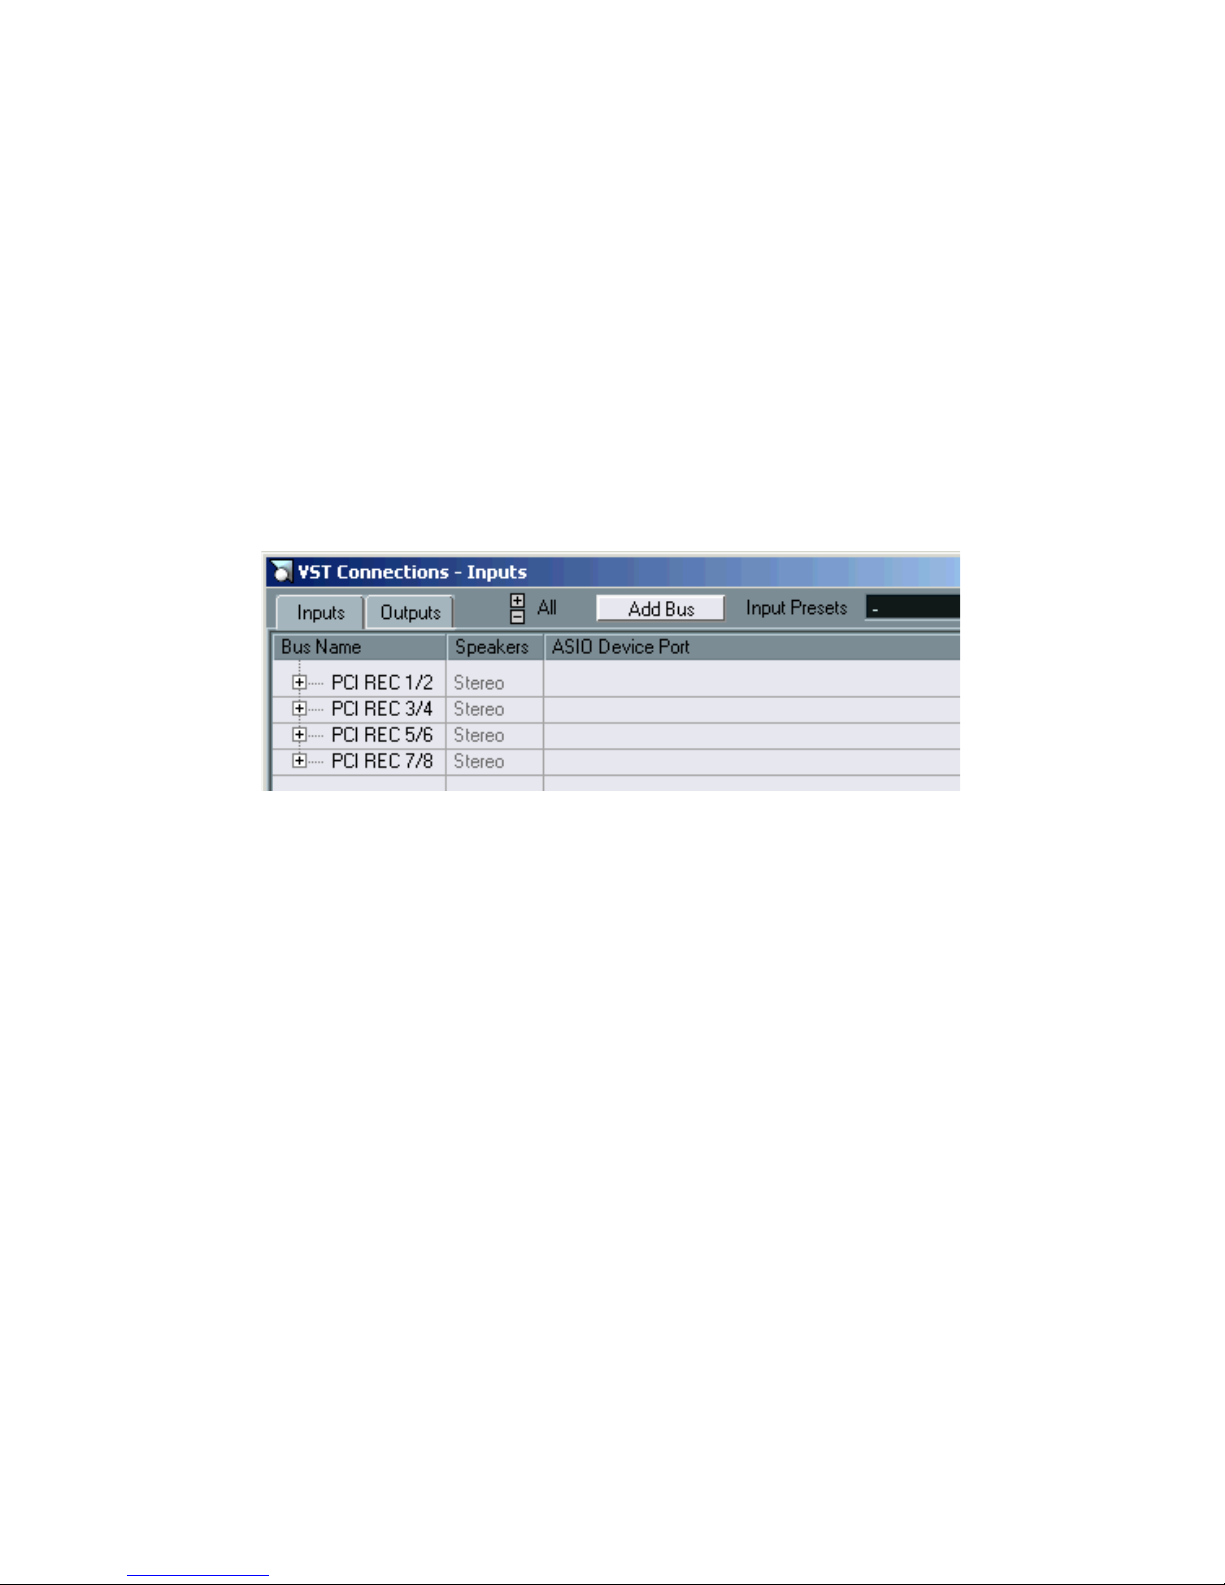
Selecting Inputs and Outputs for the Audio Channels
This description assumes that you have set the number of mono and
Stereo audio Tracks so that it corresponds with the number of output
bus channels (16 if you have one DS2416 card installed). It also assumes that you want each audio channel in Nuendo assigned to a
separate mixer channel strip in the DS2416 console. Of course, there
are other possible routings (you may want to send a combination of
audio channels to a Group or directly to the same DS2416 channel
strip, you may want to reserve some DS2416 channels for use as effect sends, etc).
1.
Open the Mixer.
2.
Select Inputs for the channels by pulling down the Input pop-up
menus at the top of the channel strips.
There should be eight Inputs available for each installed DS2416 card (four stereo
Input pairs).
3.
Route each stereo audio channel to a separate Output Bus, by using
the pop-up menus in the Input/Output Settings section of the channel
strips.
4.
For mono channels, select the same Output Bus for two (mono)
channels, and then pan the sides hard left/hard right.
Now, each audio channel is assigned to a separate channel strip in the DS2416
Factory Input console.
Assigning Group Channels to the DS2416
You can assign the outputs of Group channels to the DS2416 buses in
the same way as with the audio channels, by using the pop-up menus
in the Input/Output Settings section of the Group channel strips.
Assigning Effect Sends to the DS2416
By assigning VST Effect Sends to one of the Output Buses, you route
the send to a channel strip in the DS2416 console. You can use this
feature to address the on-board effects in the DS2416, to create several different monitor mixes during playback, etc. Note that this assignment is done individually for the effect sends of each audio channel (by
using the pop-up menus to the right in the Channel Settings window).
– 7 –
Page 8

The Default Signal Routing
This section describes how signals are routed by default, when you
first start using the DS2416 card with Nuendo. If you wish you can
change the signal routing, as described on page 34. However, this
default routing allows you to perform basic playback and recording,
and to use the built-in effects without having to change the routing.
❐
For additional info, please refer to the diagrams and list in the DS2416
documentation.
About the DS2416 “Channels”, Buses and Sends
Before we describe the actual signal routing, here’s some information
about how the DS2416 is configured:
•
Each DS2416 card handles 24 separate mixer channels.
To separate these from the audio channels in Nuendo, we will call them “DS channels”
from now on.
•
There is one main stereo mix out and eight Bus Sends (four stereo
pairs).
Each DS channel can be assigned to any combination of the buses and the stereo mix.
•
There are six Aux Sends.
Each DS channel has send levels and pre/post fader switches for the sends.
– 8 –
Page 9

The Default Routing of signals from Nuendo to DS2416
There are sixteen separate “lines” from Nuendo to the DS2416. In VST,
these appear as Output Buses (see page 6). In the DSP Factory Input
Console window, the “lines” from Nuendo are by default connected to
DS channel 1 to 16, as follows:
VST Output (and default Output Bus) DS2416 Channel
DS2416 #1 PCI 1/2 DS Channel 1
DS2416 #1 PCI 1/2 DS Channel 2
DS2416 #2 PCI 3/4 DS Channel 3
DS2416 #2 PCI 3/4 DS Channel 4
.
.
.
DS 2416 #8 PCI 15/16 DS Channel 15
DS 2416 #8 PCI 15/16 DS Channel 16
•
Please note that the Output assignment (PCI 1/2 etc) for each Output
.
.
.
Bus can be changed, as described on page 36.
To avoid confusion, we recommend that you keep the default order of the outputs.
– 9 –
Page 10

The Default Routing of signals from DS2416 into Nuendo
There are eight separate “lines” from the DS2416 card into Nuendo. In
Nuendo, these correspond to the four Audio Input pairs (see page 5).
In the DSP Factory Input Console window, the default configuration
uses the eight bus sends to route signals from the audio card into VST
(for recording). The following default routing scheme is used:
DS 2416 Bus Send VST Input
Bus 1 PCI Rec 1/2 1
Bus 2 PCI Rec 1/2 2
Bus 3 PCI Rec 3/4 1
Bus 4 PCI Rec 3/4 2
Bus 5 PCI Rec 5/6 1
Bus 6 PCI Rec 5/6 2
Bus 7 PCI Rec 7/8 1
Bus 8 PCI Rec 7/8 2
This means that to record something through the DSP Factory into
VST, you only need to activate the appropriate Bus Sends for the desired DS Channels. From that point, the recording procedure is the
same as when you run Nuendo with “standard” audio hardware.
– 10 –
Page 11

Physical Inputs and Outputs
By default, the physical inputs and outputs of the DSP Factory system
are connected to the DS channels in the following way:
Inputs
Physical Input DS Channel
DS2416 Analog In Left 17
DS2416 Analog In Right 18
DS2416 Digital In Left 19
DS2416 Digital In Right 20
Outputs
Bus/Send in the
DSP Factory Input Console
Master Stereo Out Left/Right DS2416 Analog Out Left/Right
Aux Send 1 IOA/IOB Output 1
Aux Send 2 IOA/IOB Output 2
Aux Send 3 IOA/IOB Output 3
Aux Send 4 IOA/IOB Output 4
Physical Output
and
DS2416 Digital Out Left/Right
“IOA” and “IOB” are the connections to additional input/output units
such as the AX44. For each DS2416 card, you can add two extra input/output units (IOA and IOB). Each unit may have 4 or 8 inputs and
outputs.
❐
As you see, the default routing only provides access to four extra outputs (for use with external effects, etc). To be able to use all additional
inputs and outputs, you will need to re-configure the input and output
routing. This is described on page 34.
– 11 –
Page 12

The On-Board Effects
The DS2416 card carries two powerful effect processors, which can
easily be accessed with the default routing:
•
Signals are routed to the effects using Aux Send 5 (FX Unit 1) and
Aux Send 6 (FX Unit 2).
The effect inputs are in mono.
•
The stereo output signals from the effects are routed to the “FX Return channels” (DS Channels 21/22 for FX Unit 1 and 23/24 for FX
Unit 2).
To avoid feedback, Aux Sends 5 and 6 are disabled for these DS channels.
– 12 –
Page 13

Opening the DSP Factory Windows
When Nuendo detects one or more DS2416 cards, special “DSP
Factory” menu items are added to the Devices menu. These are the
DSP Factory windows.
Below follows a brief description of each window. For detailed information, click on the page number links.
•
DSP Factory Input Console.
This is the main mixer window for the DSP Factory system. Here is where you set levels, panning, eq and dynamics, activate buses and aux sends and select input sources
for the DS channels. See page 14.
•
DSP Factory Channel Overview.
This window shows all settings (some of which are not available in the Input Console
window) for one DS channel at a time. See page 29.
•
DSP FactoryBus/Aux Console.
This window contains master send levels for the buses and aux sends. See page 28.
•
DSP Factory FX Editor.
This window is used to select effect types and make settings for the two FX Units. It
can also be opened directly from the Input Console. See page 30.
•
DSP Factory Output Patchbay.
This window provides an overview of the current output routing, and allows you to reroute buses and sends to other physical outputs. It also contains wordclock synchronization settings, for when you use the DSP Factory in conjunction with external digital
recorders or other audio hardware. See page 31.
– 13 –
Page 14
The Input Console window
The Input Console window is the main DSP Factory window. If you
view the DSP Factory as an external digital mixer, feeding and receiving audio signals to and from Nuendo, this window is the mixer panel.
❐
Static initial settings in the DSP Factory windows are saved with the Project.
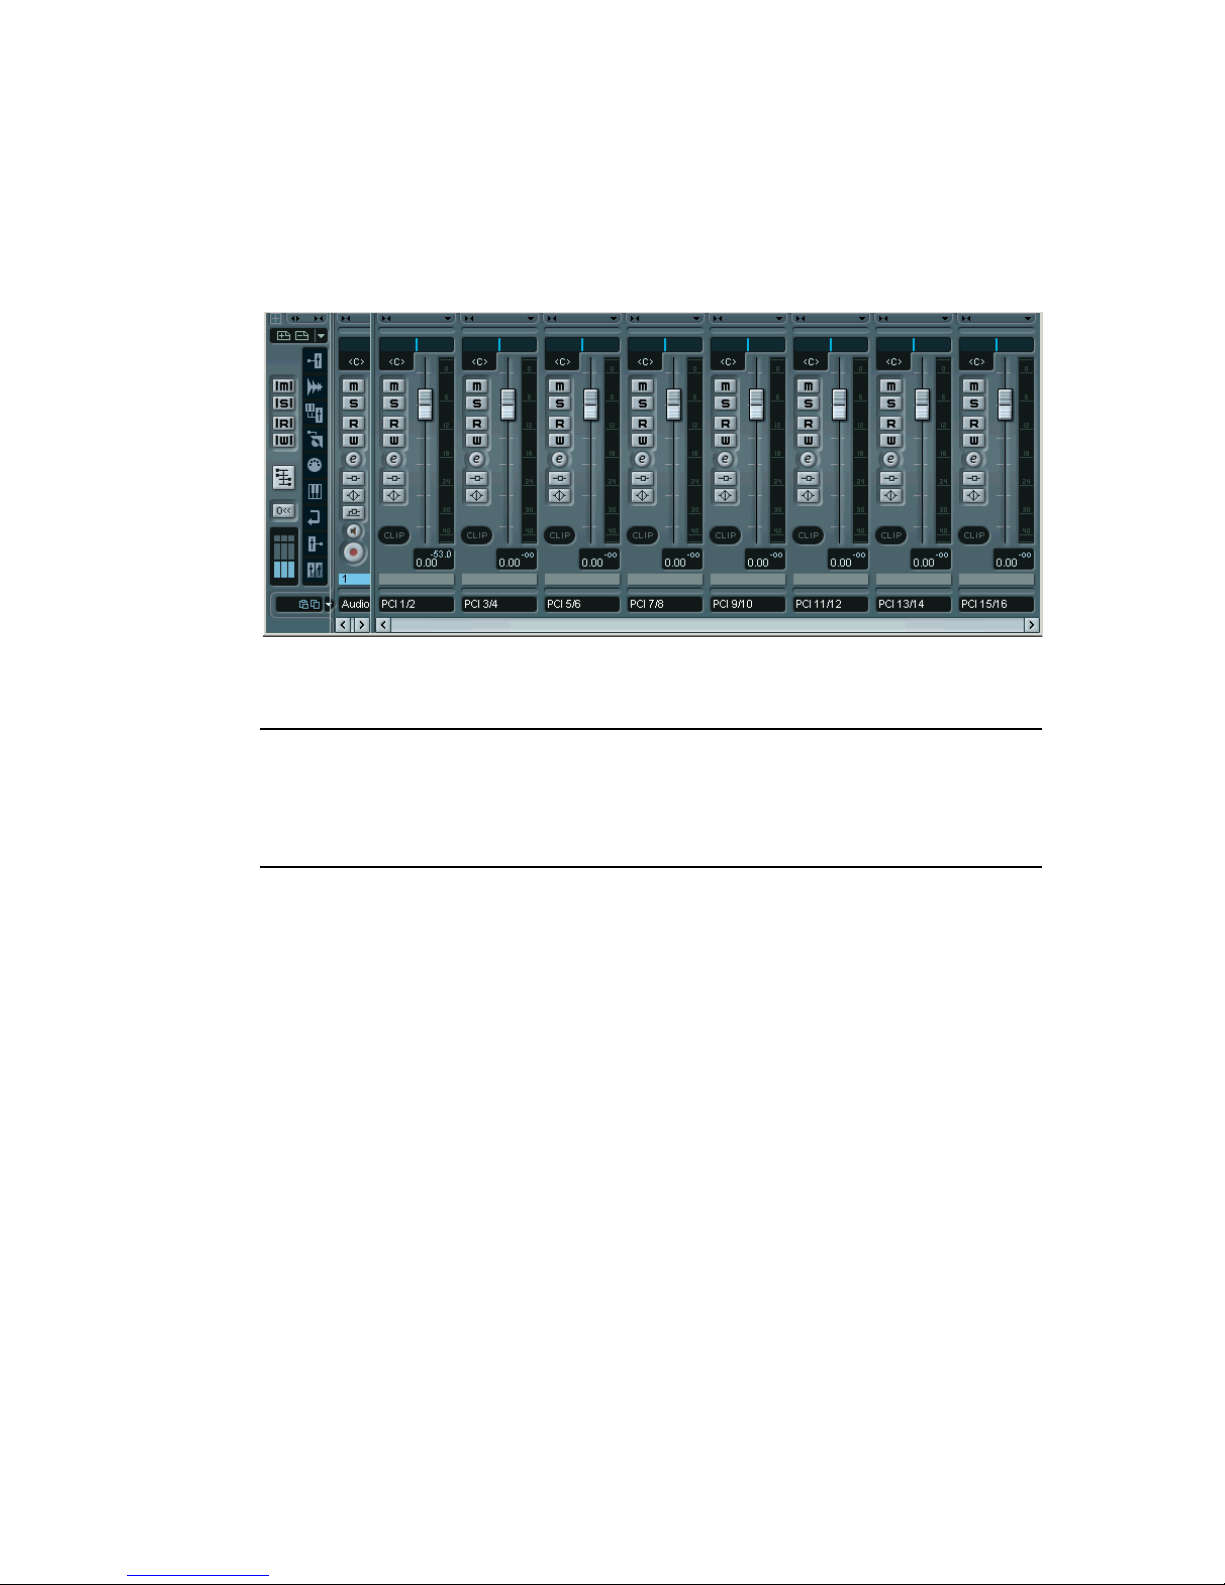
About the Upper and Lower displays
For each DS channel, there is a large number of controls and settings.
Showing them all at the same time would require an impossibly large
window. Therefore, each channel strip in the Input Console is divided
into two “halves”, the Upper and Lower display. You can select what
should be shown on these two displays, independently for each channel:
The Lower Display
1.
Locate the dividing line between the Upper and Lower display for the
channel strip.
You may have to scroll the window to see all of the Input Console.
2.
Point at the small triangle pointing downward, and press the mouse
button.
A pop-up menu appears with the three modes for the Lower display.
3.
Select one of the display modes.
If you select the “Narrow” mode, the channel strip will be as narrow as possible to conserve screen space, showing only the basic level and pan controls (see below). The
controls in the other modes are described on page 16.
– 14 –
Page 15
The Upper Display
1.
Locate the dividing line between the Upper and Lower display for the
channel strip.
2.
Point at the small triangle pointing upward, and press the mouse button.
A pop-up menu appears with the five modes for the Upper display.
3.
Select one of the display modes.
If you select the “Narrow” mode, the channel strip will be as narrow as possible to conserve screen space, with no controls in the Upper display (see below). The controls in
the other modes are described on page 19.
About the “Narrow” mode
The selection of display modes is independent for the Upper and
Lower displays, with one exception:
•
Selecting the “Narrow” mode for the Upper or Lower display will automatically select the “Narrow” mode for the other display as well.
Since the width of the whole channel strip is minimized, there is then no room for any
additional controls in either display.
– 15 –
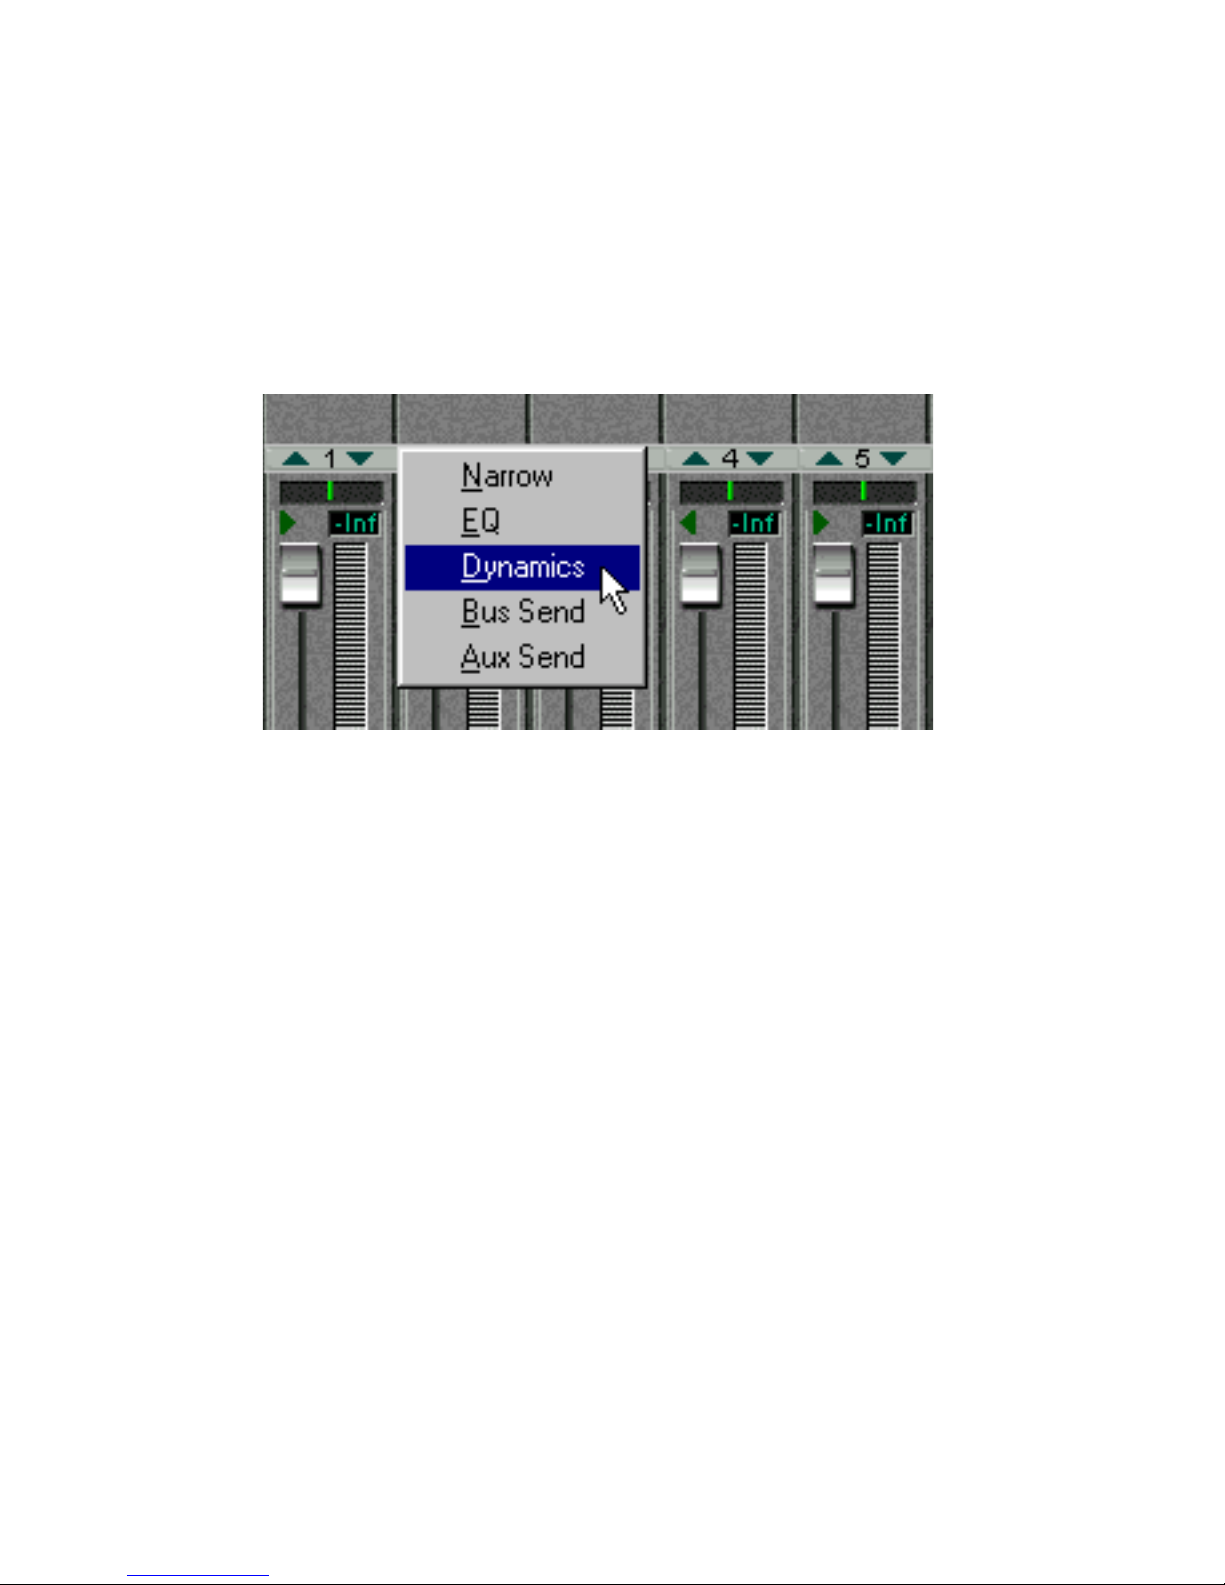
Page 16
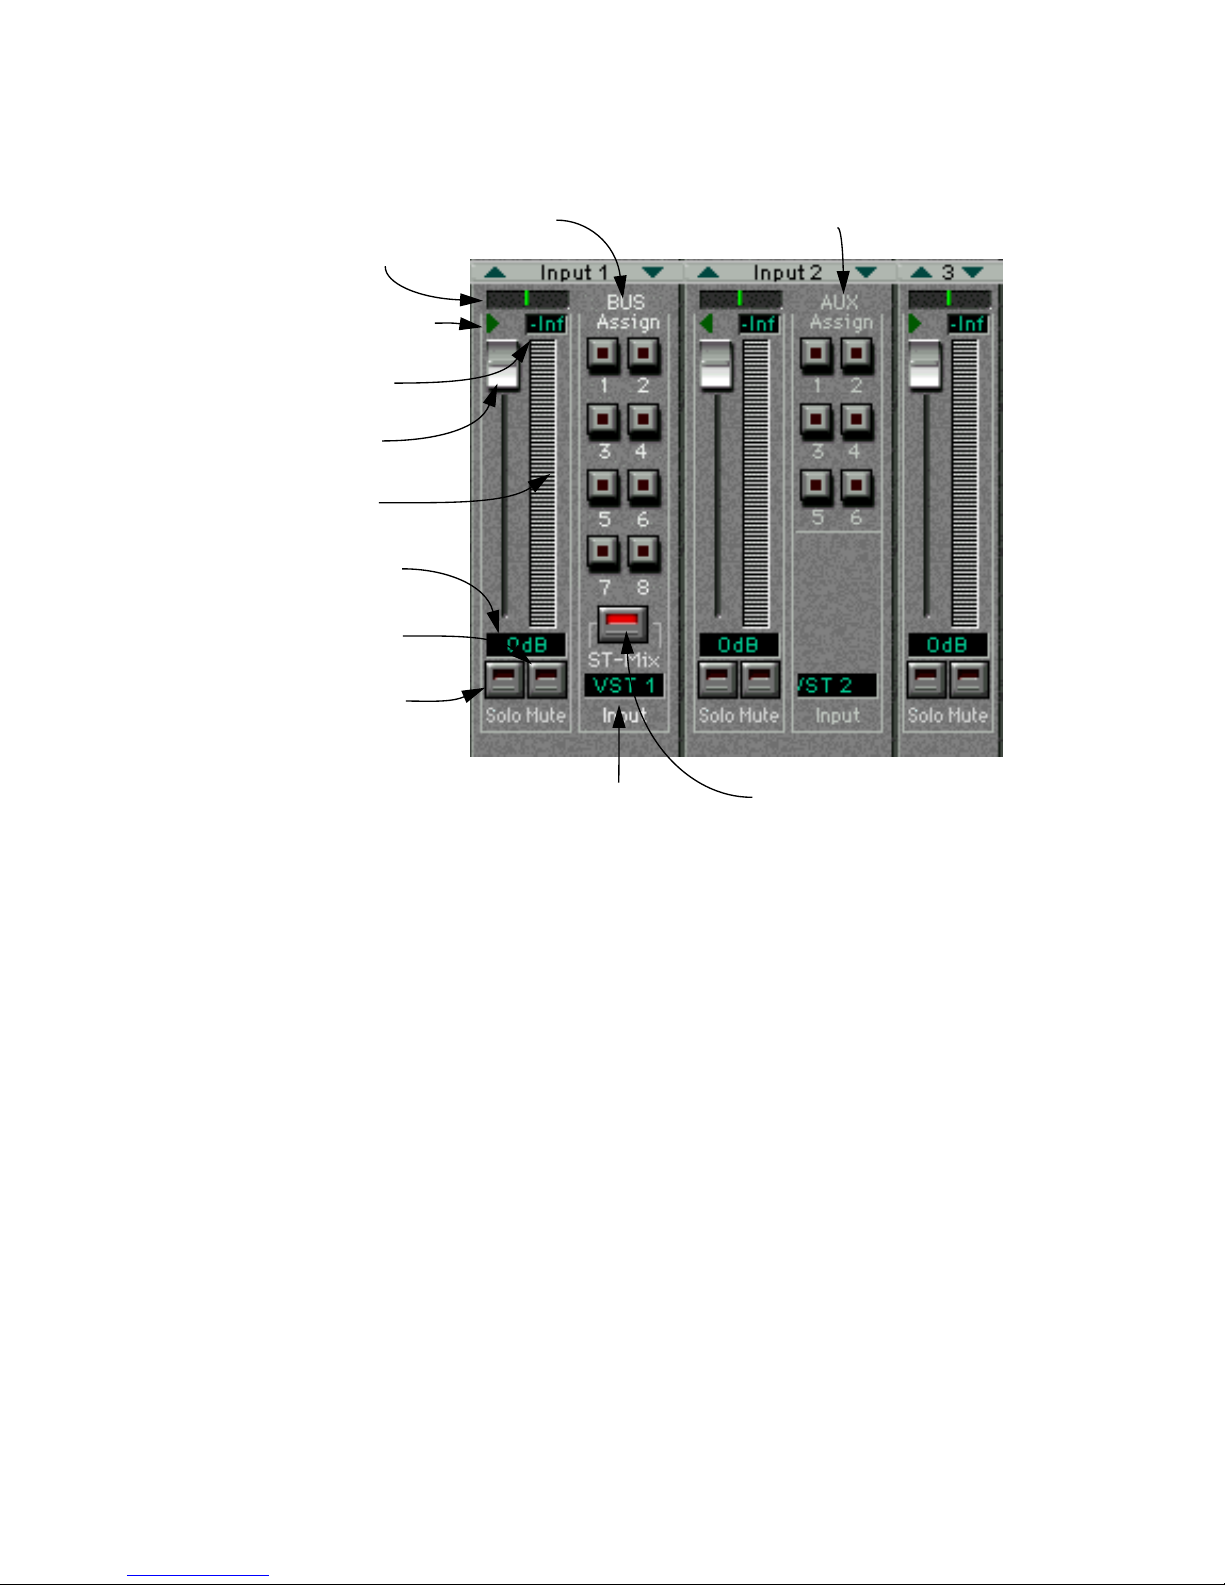
Channel Controls in the Lower Display
Bus On/Off buttons
Pan Control
Stereo link switch
Level Display
Level Fader
Level Meter
Fader Setting
Channel Solo
Channel Mute
Aux Send On/Off buttons
Input Selector
Stereo Mix on/off switch
The Lower Display in “Bus Assign”, “Aux Assign” and “Narrow” modes.
– 16 –
Page 17

Control Explanation
Pan Control Sets the stereo position of the channel. This is used when you are as-
signing channels to the buses (when the Bus Sends are in “Post Pan”
mode - see below).
Stereo link
switch
When this is activated (when the green arrow is lit), the two channels
in an odd-even pair are linked. This means that if you move a control
for one of the channels, the other channel will be affected in the same
way. Pan is not affected by the Stereo link.
• You can also momentarily “stereo-link” unlinked faders and other
controls by holding down [Alt] while moving the controls.
Conversely, for channel pairs with Stereo link activated, holding down
[Alt] allows you to adjust settings for each channel in the pair.
Level Fader Determines the level of the channel, both when playing back and
when recording signals into VST.
Level Meter Indicates the signal level of the channel. You can select globally how
fast the meters should respond (see page 27).
Level Display Indicates the signal level numerically, in Peak Hold or continuous
mode (see page 27).
Fader Setting Indicates the current fader setting in dB.
Channel Solo Mutes all other channels.
Channel Mute Turns off the sound of the channel.
Input Selector This display indicates the currently selected input source for the chan-
nel. Clicking on it brings down a pop-up menu, from which you can
select another input source.
Bus On/Off
buttons
Stereo Mix
on/off switch
Use these to turn the Bus sends on or off for the channel. These buttons are “mirrored” in the Bus Send panel in the Upper display.
This switch determines whether the channel is connected to the Stereo
Mix (the master fader to the right on the Input Console panel) or not.
You may want to deactivate this for channels which you have routed to
separate outputs, using the Bus or Aux Sends. The switch is duplicated
in the Bus Send panel in the Upper display.
Aux Send
On/Off buttons
Use these to turn the Aux sends on or off for the channel. These buttons are “mirrored” in the Aux Send panel in the Upper display.
– 17 –
Page 18

About the FX Return Channels
The channels labeled “1” - “4” to the right in the Input Console window,
are by default used as stereo effect returns for the on-board effect units.
FX Return channels 1 and 2 control the return level from FX Unit 1, and
FX Return channels 3 and 4 control the return level from FX Unit 2. The
FX Return channels differ from the regular channels in the following ways:
• There are no Solo buttons for the FX Return channels.
• The two channel pairs (1-2 and 3-4) are stereo linked by default.
• Aux Sends 5 and 6 (the sends to the on-board effects) are disabled
for the FX Return channels, to prevent feedback.
– 18 –
Page 19

Channel Controls in the Upper Display
The Upper display in “Aux Send”, “Dynamics”, “Bus Send” and “EQ” modes.
EQ Mode
When EQ Mode is selected for the Upper Display, you have access to
a four band parametric equalizer. Each EQ band has the following parameters:
Bypass Bypass-switch for the band. If the indicator is lit, the EQ band is disabled.
Q The Q value for the EQ band, ranging from 10 (narrow) to 0.1 (wide) in 41
steps. Also used to select LPF/HPF or Shelving modes for the Low and High
EQ bands (see below).
F The center frequency of the EQ band, from 21 Hz to 20 kHz in 120 steps.
G The boost or cut (± 18 dB in steps of 0.5 dB).
❐
Note that all four EQ bands have the same frequency range! The labels
“Low”, “L-Mid”, “H-Mid” and “Hi” are only there for convenience.
– 19 –
Page 20

Selecting High/Low Pass or Shelving EQ types
Normally, all four EQ bands are of the regular full parametric type, but
you can switch the High and Low bands to Shelving or High/Low
Pass Filter mode:
• To select High/Low Shelving mode for the High or Low EQ band, turn
the Q knob fully to the right.
• To select High/Low Pass Filter mode for the High or Low EQ band,
turn the Q knob fully to the left.
This converts the High EQ band to a Low Pass Filter and the Low EQ band to a High
Pass Filter. In this mode, the Gain (G) setting is disabled.
– 20 –
Page 21

Dynamics Mode
When Dynamics Mode is selected for the Upper Display, you have access to a complete multi-mode Dynamics processor for the channel.
You use the Type pop-up menu (right above the “Parameters” label)
to select which type of dynamics processing to use:
Type Description
Comp A compressor, attenuating signals above a specified threshold level.
Gate Mutes signals below a specified threshold level.
Ducking Attenuates the signal when the level exceeds a specified threshold. Nor-
mally, the signal used for level detection (the Key In signal - see below) is
another than the processed signal. For example, a common use for ducking would be voice-overs, when the background music level should be reduced each time the announcer speaks.
Expand An expander, attenuating signals below a specified threshold level, thus
reducing low-level noise and effectively increasing the dynamic range.
Compand
(H or S)
A combination of compressor, expander and limiter: The compressor
compresses signals that exceed a specified threshold level, while the
expander attenuates signals below a level determined by the threshold
level and the Width setting. The limiter prevents the signal from exceeding 0 dB.
The two compander types (H and S, for Hard and Soft) have different
expansion ratios; CompandH will attenuate low level signals more drastically than CompandS.
– 21 –
Page 22

Depending on which Dynamics Type you have selected, there are
different parameters available. However, some general controls are
available in all modes:
Key-In pop-up menu
In pop-up menu
ON button Click this to activate the Dynamics processor for the channel.
LINK button When this is activated, the dynamics processing is linked for the two
channels in an odd-even pair. This means that a mix of the two channels
is used to “trigger” the dynamics processor. Use this mode for stereo
channel pairs, to maintain the stereo balance.
Key-In pop-up
menu
In pop-up
menu
Determines which signal should be used to “trigger” the dynamics processing:
Self Post-EQ: The channel signal, post-EQ
Self Pre-EQ: The channel signal, pre-EQ
Aux 1: The total signal on the Aux 1 bus
Aux 2: The total signal on the Aux 2 bus
Left Post-EQ: The signal of the left channel in a pair, post-EQ
Left Pre-EQ: The signal of the left channel in a pair, pre-EQ
(“Left” options are only available for even-numbered channels)
This pop-up menu is only available when Link mode is activated. Use this
to determine which signal(s) the dynamics processor should affect; L
(left channel in the pair), R (right channel in the pair) or Both.
– 22 –
Page 23

In the lower half of the Dynamics panel, you will find the actual controls:
Parameter Description
Threshold Determines the threshold level at which the dynamics processor is “trig-
gered”. Whether signal levels above or below this level will trigger the
processing, depends on the selected dynamics type.
Ratio (Comp, Expander and Compander types only). Determines the amount
of compression/expansion. For the Compander types, this determines
the compression, while the expansion ratio is fixed.
Attack This determines how soon the signal is affected (compressed, gated, ex-
panded, etc) once the dynamics processor has been triggered.
Release (Comp, Expander and Compander types only). Determines how soon
the dynamics processor returns to normal gain once the signal level
goes back below/above the threshold level.
Gain / MGain (Comp, Expander and Compander types only). Sets the output signal
level. Use this to compensate for overall level changes caused by the dynamics processing.
Knee (Comp and Expander types only). Determines how compression/expan-
sion is applied at the threshold point. “Hard knee” means that the specified compression/expansion ratio is applied as soon as the threshold level
is reached, while the five “Soft knee” settings apply the compression/expansion gradually for a more natural sound.
Range (Gate and Ducking types only). Determines the amount of attenuation
when the processing is triggered, with lower values resulting in more attenuation. If you want the Gate/Ducker to mute the signal completely
when triggered, set this parameter to its lowest value (-70 dB).
Hold (Gate and Ducking types only). Determines how long the gate stays
open (or how long the ducking effect remains active) once the trigger
signal has fallen below the threshold level.
Decay (Gate and Ducking types only). Determines how fast the gate is closed
(or, with Ducking, how fast the gain returns to normal) after the Hold time.
Width (Compander types only). This determines how far below the threshold
level expansion is applied to the signal. If the Threshold level is -10 dB
and the Width is set to 20 dB, expansion will be applied to signals with
levels below -30 dB (20 dB below threshold).
Reduction
Meter
This meter indicates the dynamic gain reduction.
– 23 –
Page 24

Bus Send Mode
❐
The Bus Sends are always post-fader. This means that in many cases (e.g.
when using the buses for recording into Nuendo) there is no need to adjust the individual bus send levels - you only need to activate the desired
buses in the Lower display (Bus Assign mode) and set the recording level
using the faders. This assumes that you keep all bus send level knobs at
their maximum setting.
In this mode you can view and control the eight Bus Sends for the
channel. For each bus there is an on/off button (mirrored in the Lower
display in Bus Assign mode) and a level control. For each pair of Bus
Sends (1-2, 3-4, etc), there is also a Post Pan switch:
• When the Post Pan switch is activated for a Bus Send pair, the Pan
control for a channel is used to pan the signal between the two buses
in the pair.
Panning a signal fully left will send it to the odd-numbered bus only and vice versa.
When Post Pan is activated, the Bus on/off buttons are linked for each pair, so that activating or deactivating a Bus Send (in this panel or in the Lower display) automatically
activates/deactivates the other Bus Send in the pair.
This is useful when you are recording in stereo, or when you have assigned the buses
to separate outputs for stereo monitoring, etc.
• When the Post Pan switch is deactivated for a Bus Send pair, the chan-
nel signal is sent to each activated bus regardless of the Pan setting.
This may be preferable when you are recording in mono, since it allows you to route a
DS channel to a VST input without having to take the Pan setting into account.
Below the Bus Sends you will find a Stereo Mix on/off button, which
determines whether the channel should be sent to the main Stereo
Mix or not. This button is duplicated in the Bus Assign panel in the
Lower display.
– 24 –
Page 25

Aux Send Mode
In this mode you can view and control the six Aux Sends for the channel. For each send there is a level control with a numeric display
showing the current setting, an on/off switch (mirrored in the Lower
display in Aux Assign mode) and a Post-fader switch.
❐
Aux Sends 5 and 6 are “hard-wired” to the on-board effect units (FX Unit
1 and FX Unit 2, respectively). To avoid feedback, Aux Sends 5 and 6 are
disabled for the FX Return channels.
❐
If you have two DS2416 cards installed, you can address all four effect
units by using Aux Sends 3-6.
– 25 –
Page 26

The Stereo Mix Section
To the right in the Input Console window you will find the Stereo Mix
section. This differs slightly from the regular channel strips:
Lower Display
In the Stereo Mix section, there are no different modes for the Lower
display. It always contains a stereo master fader with a numerical display, stereo level meters and numeric level indicators, a balance control and a Mute button, for silencing the Stereo Mix output totally. The
Mute button does not affect the buses or Aux sends.
Upper Display
There are two modes for the Stereo Mix Section Upper display: EQ
and Dynamics. These both feature the same controls as in the regular
channel strips.
– 26 –
Page 27

The Common Panel
To the left of the channel strips you will find a section with common
controls:
Control Description
Meter Post
button
Meter Slow
button
Meter Peak
Hold button
Determines which signal the level meters
should show: When the button is activated, the meters will show the levels
post-fader. When it isn’t activated the
meters will show the input levels, regardless of fader positions (which is useful
when checking input levels from external
sound sources).
When this is activated, the level meters
will drop more slowly, making it easier to
discern quick level changes.
This switch will also affect the meters in
the Bus/Aux Console (see page 28).
When this is activated, the numeric level
indicator will keep the highest value displayed, making it easy to spot maximum
levels. To reset the indicator in Peak Hold
mode, click twice on the Peak Hold button.
This switch will also affect the numerical
level indicators in the Bus/Aux Console
(see page 28).
FX Show
button
– 27 –
Click this button to open the FX Editor
window.
Page 28

The Bus/Aux Console
This window contains master level controls for the eight buses and six
Aux sends, together with level meters and numerical level indicators.
There are also Mute buttons for each bus/send.
• The options for slow/fast metering and Peak Hold in the Input Console
window affects the meters and indicators in the Bus/Aux Console as
well.
– 28 –
Page 29

The Channel Overview
This window allows you to view and access all controls at the same
time for a single channel. You select which channel to view by using
the Channel Selection pop-up menu in the upper left corner.
The controls in the Channel Overview are the same as in the Input
Console window, with the addition of the following parameters:
Attenuator Allows you to adjust the input signal gain, with a range of -96 to +12 dB.
Delay Time Allows you to delay a channel by up to 2600 samples. The Delay On but-
ton turns the channel delay on or off.
Phase-Invert Inverts the phase of the signal.
– 29 –
Page 30

The FX Editor
This window allows you to select effect types and make settings for
the two on-board effect units (labelled “FX Unit 1” and “FX Unit 2”).
The window can be opened either from the Devices menu, or by clicking the FX Show button in the Input Console window.
You use the FX Unit pop-up menu to select which unit to make settings for, and then choose an effect type for the selected unit using
the FX Type pop-up menu (at the upper right corner). The File pop-up
menu allows you to save/load the settings for the currently selected
effect unit.
FX Unit pop-up menu
FX Type pop-up menu
There are 40 different effect types, all of which are available for both
FX Units (with the exception of the “HQ. Pitch” effect, which can only
be selected for FX Unit 2).
– 30 –
Page 31

Depending on the selected effect type, various parameters are displayed in the window. You can edit these freely but your changes are
lost when you select another effect type. For detailed descriptions of
the effect types and parameters, see the DSP Factory documentation.
• If you click the “Load Default” button in the top left corner, all parame-
ters for the current effect type are reset to their default values.
The DSP Factory Routing Window
This window allows you to view and change the output routing, i.e.
which buses and sends are routed to which outputs, and also contains
wordclock synchronization settings, for when you use the DSP Factory
in conjunction with external digital recorders or other audio hardware.
– 31 –
Page 32

Output Routing section
Each bus or send can be routed to any output or any combination of
outputs. However, it is not possible to route several different buses to
the same output.
In the Routing window, the output pairs are listed to the left:
Output Description
DS2416
#1 - #4
IOA 1-4 Outputs 1-4 on the first additional input/output unit (e.g. an AX44).
IOB 1-4 Outputs 1-4 on the second additional input/output unit.
Analog The analog outputs on the DS2416.
S/P DIF The digital outputs on the DS2416.
IOA 5-8 If you have an input/output unit with eight outputs, IOA 5-8 are used to
IOB 5-8 As above, but for a second 8-i/o unit (connected as “unit B”).
These are the recording outputs. In Nuendo, these are connected to the
Audio Inputs, so that Rec 1/2 corresponds to Input 1 L/R, etc.
address outputs 5-8 on this unit.
• To select another bus or send for an output pair, pull down the pop-up
menu to the right of the output and select another source from the list.
– 32 –
Page 33

Wordclock Settings
The right half of the Routing window contains wordclock settings.
These are used to determine which sample rate should be used for
the audio playback and recording. Use the buttons to select one of
the following options:
Option Description
Int 44.1 kHz The internal clock is used, with a sample rate of 44.1 kHz.
Int 48 kHz The internal clock is used, with a sample rate of 48 kHz.
Ext. SI This can be used when you have another DS2416 card or an
SW1000XG card installed. Selecting this option means that the current
DS2416 card is “slaved” to the other card so that they play back with
the exact same sample rate.
In a configuration with two DS2416 cards, this option also works as a
Cascade switch, as described on page 47.
Ext. IOA If you have an input/output unit which provides wordclock (connected
as unit A), selecting this option synchronizes the DS2416 to the wordclock signal received by the i/o unit.
You may for example have an input/output unit with an ADAT interface,
connected to another digital recorder - activating this option makes this
recorder the master and DS2416 the slave.
Ext. IOB As “ext. IOA” but for an i/o unit connected as unit B.
Ext. S/PDIF When this is selected, wordclock is received from the digital input on
the DS2416. The card accepts sample rates between 30.08 and 50.88
kHz (32 kHz to 48 kHz, ±6%).
Vari 44.1 kHz Select this if you need to make use of the DS2416’s varispeed capabil-
ity. Using the dial below, you can adjust the sample rate ± 6% around
44.1 kHz.
Vari 48 kHz As above, but variable ±6% around 48 kHz.
FS Detected Displays the sample rate currently detected by the system.
S/PDIF Prof. Switches the digital output between Professional and Consumer modes.
❐
If you switch sample rate between 44.1 and 48 kHz, the audio output will
be reset. When this happens, your mouse pointer may be “stuck” for a
short moment - this is nothing to worry about.
– 33 –
Page 34

Changing the Input Routing
With the default routing of physical Inputs (see page 11), you only have
access to the analog and digital inputs on the actual DS2416 card, not
to any inputs on additional input/output units. If you have one or two input/output units installed, you may want to connect the inputs on these
units to DS channels that normally take their input from Nuendo. This is
done using the Input pop-up menus in the Input Console window:
1. Open the Input Console window.
2. Locate a DS channel for which you want to change the input routing.
Note that there are restrictions as to which inputs can be connected to which channels.
This means that you cannot route any input to any DS channel - rather there is a fixed
connection between the different inputs and the DS channels, as described below.
3. Select “Bus Assign” or “Aux Assign” mode for the channel’s Lower
display, to show the Input pop-up menu.
It doesn’t matter which of these modes you select.
4. Pull down the Input pop-up menu and select the desired input.
The table on the next page shows which inputs can be selected for each
DS channel. Inputs on additional i/o units are labelled IOA1, IOA2, IOB1
or IOB2. “A/B” indicates whether the unit is connected as unit A or B,
and “1/2” indicates a four-input unit (“1”) or an eight-input unit (“2”).
“IOB2” therefore means “an eight-input unit connected as unit B”.
The “SUB” inputs are described on page 49.
– 34 –
Page 35

Channel Input Options
1 VST 1 IOB2-1
2 VST 2 IOB2-2
3 VST 3 IOB2-3
4 VST 4 IOB2-4
5 VST 5 IOB2-5
6 VST 6 IOB2-6
7 VST 7 IOB2-7
8 VST 8 IOB2-8
9 VST 9 IOB1-1 SUB 1 IOA2-1
10 VST 10 IOB1-2 SUB 2 IOA2-2
11 VST 11 IOB1-3 SUB 3 IOA2-3
12 VST 12 IOB1-4 SUB 4 IOA2-4
13 VST 13 IOA1-1 SUB 5 IOA2-5
14 VST 14 IOA1-2 SUB 6 IOA2-6
15 VST 15 IOA1-3 SUB 7 IOA2-7
16 VST 16 IOA1-4 SUB 8 IOA2-8
17 Analog In L IOA1-1 SUB 1 IOA2-1
18 Analog In R IOA1-2 SUB 2 IOA2-2
19 Digital In L IOA1-3 SUB 3 IOA2-3
20 Digital In R IOA1-4 SUB 4 IOA2-4
21 FX 1 Return L SUB 5 IOA2-5
22 FX 1 Return R SUB 6 IOA2-6
23 FX 2 Return L SUB 7 IOA2-7
24 FX 2 Return R SUB 8 IOA2-8
– 35 –
Page 36

Changing the Output Routing
It is possible to route each bus or send (except Aux 5-6) to any output
or any combination of outputs. However, it is not possible to route
several different buses to the same output. Output routing is done in
the Routing window:
1. Open the Routing window.
2. Locate the output you want to access, in the list to the left.
Note that the outputs listed are outputs pairs. The “DS2416” output pairs are connected to the Nuendo Inputs, while the “IOA” and “IOB” output pairs are outputs on
additional i/o units, connected as unit A and B, respectively.
– 36 –
Page 37

3. Pull down the pop-up menu next to the output and select the desired
Aux or Bus Send pair.
❐
Even though the Aux Sends are selected in pairs, it is not possible to use
them as “stereo sends”, since the pan setting of the channel is not taken
into account. If you need stereo sends (for external stereo input effects
or stereo monitoring), use the Bus sends in Post Pan mode.
– 37 –
Page 38

Single-Track Recording
Recording a single mono or stereo Track in Nuendo with the DSP
Factory is easily done, using the default signal routing:
Recording a Mono Track
❐
In this section we assume that you are recording a signal connected to
one of the analog or digital inputs on the DS2416 card, and that you are
monitoring using the analog or digital outputs on the card.
1. In Nuendo, Record Enable the desired audio mono Track.
2. Select an Input for the Track by pulling down the Input pop-up menu
in the Mixer.
In this example, we assume that you select “IN 1”.
3. Open the DSP Factory Input Console window and locate the DS
channel to which the input sound source is connected.
With the default signal routing, the analog inputs on the DS2416 are connected to
channels 17 and 18, while the digital inputs are connected to channels 19 and 20.
4. Make sure the Meter “Post” button is deactivated in the common
panel in the Input Console window.
This will make the channel level meters show the input level, pre-fader.
5. Open the Channel Overview window and select the relevant DS
Channel.
6. Play the input sound source and adjust the input level with the Atten-
uator control.
The signal should be as loud as possible, without reaching 0 dB.
7. Set up the sound the way you want it.
This may include EQ-ing and using the channel’s Dynamics processor. If you want to
record with effects, this is described on page 41.
8. Select the Bus Send mode for the channel’s Upper display.
The Bus Sends are displayed. By default, these are used to route signals into Nuendo
for recording.
9. Locate the Bus Send corresponding to the Input you selected in step 2.
In our example, this would be Bus Send 1.
– 38 –
Page 39

10.Make sure the Post Pan button is deactivated, activate the Bus Send
and turn its send level knob fully up.
❐
Make sure this Bus Send is deactivated for all other DS Channels, to
avoid leakage or re-recording background Tracks!
11.Open the Bus/Aux Console window and check the level for the acti-
vated Bus (in our example, Bus 1).
This shows you the level of the signal that will be recorded into Nuendo. Again, this
should be as high as possible without reaching 0dB - use the channel fader and the
Bus fader to adjust it.
❐
The Stereo Mix fader in the Input Console can not be used for adjusting
recording levels in this setup. Rather it is used for your monitoring level.
12.Activate recording in Nuendo as usual.
Recording a Stereo Track
❐
In this section we assume that you are recording a stereo signal connected to the analog or digital inputs on the DS2416 card, and that you
are monitoring using the analog or digital outputs on the card.
1. In Nuendo, Record Enable the desired stereo audio Track.
2. Select an Input for the Track by pulling down the Input pop-up menu
in the VST Mixer.
In this example, we assume that you select “IN 1/IN 2”.
3. Open the DSP Factory Input Console window and locate the DS
channels to which the input sound source is connected.
With the default signal routing, the analog inputs on the DS2416 are connected to
channels 17 and 18, while the digital inputs are connected to channels 19 and 20.
4. Pan the two channels fully left/right.
5. Link the two channels by clicking the green triangle just below the Pan
control.
Now all settings you make are automatically “mirrored” for the other channel in the
stereo pair.
– 39 –
Page 40

6. Make sure the Meter “Post” button is deactivated in the common
panel in the Input Console window.
This will make the channel level meters show the input level, pre-fader.
7. Open the Channel Overview window and select one of the channels
in the stereo pair.
8. Play the input sound source and adjust the input level with the Atten-
uator control.
The signal should be as loud as possible, without reaching 0 dB. You may want to
check the level of the other channel in the stereo pair as well, in case it is louder.
9. Set up the sound the way you want it.
This may include EQ-ing and using the channel’s Dynamics processor. If you want to
record with effects, this is described on page 41.
10.Select the Bus Send mode for the channels’ Upper displays and locate
the Bus Sends corresponding to the Inputs you selected in step 2
above.
In our example, this would be Bus Sends 1 and 2.
11.Make sure the Post Pan button is activated, activate the Bus Sends
and turn their send level knobs fully up.
With the Post Pan button activated, a left-panned channel sends its signal to the oddnumbered bus in a pair, and vice versa.
12.Make sure these Bus Sends are deactivated for all other DS Channels,
to avoid leakage or re-recording background Tracks!
13.Open the Bus/Aux Console window and check the level for the acti-
vated Buses (in our example, Bus 1 and 2).
This shows you the level of the signals that will be recorded into Nuendo. If necessary,
adjust the channel and Bus faders.
❐
The Stereo Mix fader in the Input Console can not be used for adjusting
recording levels in this setup. Rather it is used for your monitoring level.
14.Activate recording in Nuendo as usual.
– 40 –
Page 41

Recording with Effects
If you like to add effects to the signal you are recording, proceed as
follows:
1. Set up the controls as described above (for mono or stereo recording).
2. Activate Aux Sends 5 and/or 6 for the input channel(s), and set their
send level knobs to medium values.
If you want the sends to be Post fader, activate the Post buttons for the sends.
3. Make sure the FX Return channels are not muted or have their levels
turned down.
4. Open the FX Editor window.
A quick way to open this window is to click the FX Show button in the Input Console.
5. Play the input source, select effects and make adjustments until you
get the desired sound.
The adjustments may include changing the send levels, FX parameter settings, return
levels and even EQ or Dynamics on the FX Return channels.
6. Activate the Bus Sends for the FX Return channels, and set them up
in the same way as the input channels.
Now, the effect sound will be sent into VST along with the “dry” sound. Note that you
may have to lower the recording level in the Bus/Aux Console to avoid clipping.
7. Record as usual.
– 41 –
Page 42

Multi-Track Recording
The DSP Factory system makes it possible to record up to eight separate audio Tracks at the same time (in a setup with one DS2416
card). Proceed as follows:
❐
In this section we assume that you have at least one additional input/output unit installed, and that you are recording mono signals from several
different inputs at the same time, while monitoring through the analog or
digital outputs on the card.
1. In Nuendo, activate Record Enable for the Tracks on which you want
to record.
Make sure that the Tracks all have different Inputs selected.
2. In the DSP Factory Input Console window, use the Input pop-up
menus (in the Lower display in Aux or Bus Assign mode) to select the
physical inputs which you want to record from.
There is a fixed relation between the inputs and the DS channels - see page 34 for a
listing of the channels and their corresponding physical inputs.
3. Check and adjust the input level for each used channel, as in the
previous examples.
4. Select the Bus Send mode for the input channels’ Upper displays,
and make sure the Post Pan switches are deactivated and the send
levels are fully turned up.
In this example, we assume you are recording several separate mono signals. Therefore the Post Pan switches should be turned off, so that the panning doesn’t affect the
level of the recorded signals.
You could also record several stereo signals, or a mix of mono and stereo signals. In
those cases, you would want to use two buses for each stereo channel pair, activate
the Post Pan switches for these buses, and use the pan controls to direct the channel
signals to odd/even buses.
5. Activate one Bus Send for each input channel, so that they are routed
to different Nuendo Inputs.
❐
Make sure these Bus Sends are deactivated for all other DS Channels, to
avoid leakage or re-recording background Tracks!
– 42 –
Page 43

6. Rehearse the recording and adjust the sound (using Dynamics and/or
EQ).
7. Activate recording in Nuendo.
Mixing down to a Stereo Output
Once you have finished a piece of music, you may want to mix it down
to an external two track recorder (DAT, MD, tape, etc). This example
describes how to mix down sixteen separate VST audio channels to
stereo, adding the on-board effects, one external effect unit and the
stereo output of a MIDI instrument. The external two track recorder is
connected to the digital stereo output on the DS2416 with the analog
output used for monitoring.
❐
To be able to add external effects, you need at least one additional i/o unit
connected (this example assumes that you have one 4 in/4 out unit).
MIDI
16 channels
Nuendo
MIDI Instrument
DSP Factory mixer
Ext. FX
To 2-trk and
monitoring.
1. Connect your equipment in the following way:
Connect: to:
The digital outs on the DS2416 The digital ins on the two track recorder.
The analog outs on the DS2416 Your monitoring system.
Output 4 on the additional i/o unit The input on the external effect unit.
The stereo outs on the external effect Inputs 3 and 4 on the additional i/o unit.
The stereo outs on the MIDI instrument The analog inputs on the DS2416.
You also need a working MIDI connection from the computer to your MIDI instrument.
– 43 –
Page 44

2. In Nuendo, you should route mono channels (in pairs) to the same Out-
put Bus, and pan them fully left/right. In other words, if you have six
mono Tracks, these should be routed to three separate Output Buses.
This panning is only done to separate the channels, by directing them to separate
sides of one stereo Output Bus. The actual panning for the stereo mix is done in the
DSP Factory Input Console window.
3. In the Input Console window, make sure that DS channels 1 to 16
have the “VST” input option selected.
Now the sixteen audio channels from Nuendo will appear on DS channel 1 to 16.
4. Activate the stereo link for DS channels 17 and 18, and use the Input
pop-up menu to select the analog inputs (A In L/R) for these channels.
The sound of the MIDI instrument is now routed to these channels.
5. Activate the stereo link for DS channels 19 and 20, and use the Input
pop-up menu to select the inputs “IOA1-3/4” for these channels.
These channels will now serve as effect returns for the external effect.
❐
Make sure that Aux Send 4 is deactivated for channels 19 and 20, to
avoid feedback!
6. Open the Routing window and make sure the signals are routed in the
following way:
Output Bus/Aux Send Pair Comment
IOA3/4 Aux 3/4 External effect send (only output 4 is used).
Analog Stereo Monitoring.
S/P DIF Stereo Two track recorder.
7. Check that your audio channels play back as desired and adjust EQ/
Dynamics if necessary.
8. Make sure the input signals from the MIDI Instrument are as loud as
possible (without clipping), to avoid unnecessary noise.
9. Set up the effect sends for the desired DS channels.
Aux Send 4 is routed to the external effect and Aux Sends 5 and 6 are routed to the
on-board FX units. Again, make sure that Aux Send 4 is deactivated for channels 19
and 20 to avoid feedback!
– 44 –
Page 45

10.Make effect settings for the internal and external effects, and adjust
the effect return channels.
11.Put your two track recorder in “Record-stand by” mode or similar, so
that you can check the input levels.
❐
A word of caution: Most digital recorders automatically switch to the correct sample rate when recording, but there may be cases when you need
to adjust this manually. Make sure the recorder records at the sample
rate used by the DS2416 card - consult the manual for the two track recorder if necessary.
12.Play back the music and adjust the input level on the two track recorder
with the Stereo Mix fader.
It should be as high as possible, without ever clipping. If you need to amplify the signal,
use the Attenuator control in the Channel Overview for the Stereo Mix.
❐
In this setup, the Stereo Mix fader will also govern the monitoring volume.
If this is a problem, you could consider connecting your monitoring equipment to outputs 1 and 2 on the i/o unit instead, and use Buses for monitoring. However, you should make sure that all channels have these Buses
fully turned up and set to Post Pan mode (to hear exactly the same as what
you record).
13.Perform the mixdown.
– 45 –
Page 46

Mixing down to a new Track in Nuendo
An alternative to mixing down to a separate two track recorder is to
mix down to a new audio file. If you were using Nuendo alone, you
would use the Export Audio Mixdown feature for this, but this cannot
include the DSP Factory mixing and effects (since the DS2416 card
actually is an external mixer - albeit within your computer). Instead you
can re-record the mix to a new Stereo Track in Nuendo, thereby creating a mixdown audio file.
• When you re-record this way, the signal stays in the digital domain
and will not be degraded by D/A-A/D conversion etc.
• The example below does exactly the same as the previous example
(mixdown, adding internal and external effects plus the output of a MIDI
Instrument), although the result will be a new stereo audio file instead.
However, this method can also be used if you just want to mix a few channels (e.g. make
a stereo mix of the drums) or add effects to a single channel to free up the on-board effect processor, etc.
1. Set up the DSP Factory windows and make connections just as in the
previous example.
In this case you don’t have to connect any external two track recorder though.
2. Create a new stereo audio Track in Nuendo, set to Inputs 1/2.
3. In the Routing window, pull down the pop-up menu for the
“DS2416 #1” output pair and select “Stereo”.
This connects the Stereo Mix to Inputs 1/2 in Nuendo.
4. Activate playback and check the input level in Nuendo.
If necessary, adjust the level using the Stereo Mix fader and Attenuator control.
5. Activate recording.
– 46 –
Page 47

Working with two DS2416 Cards
If you have two DS2416 cards installed, these can be connected using
the SI/SO (Serial In/Out) connections on the cards, giving you access
to integrated 48-channel mixing with 4 separate on-board FX units.
1. Use the supplied serial cables to connect the SO output on card A to
the SI input on card B, and vice versa.
The two cards should be connected “both ways”. Follow the instructions in the documentation that was included with the cards.
2. Open the ASIO Control Panel and select the “Yamaha DS2416 2
cards” Preset.
3. Open the Routing window.
This will now have two additional columns containing output routing and wordclock
settings for the second card.
4. Select the “Ext. SI” option in the Wordclock section for one of the
cards.
This will cause one of the DS2416 cards to receive wordclock from the other card, ensuring stable synchronization. In effect, the card for which you activated the “ext. SI”
option is now the “Slave” and the other card is the “Master”.
Once you have connected the two cards as described above, there
will be 16 Output Buses in the VST Outputs window, and 8 Input pairs
in the VST Connections window. Furthermore, the Input Console will
hold the double number of channels (40 input channels, 8 effect return
channels and two Stereo Mix channel strips).
– 47 –
Page 48

Routing
With two DS2416 cards, the signal routing has the following properties:
• There are 32 separate “lines” from Nuendo to the DSP Factory (sixteen
stereo Output Buses).
By default, VST 1 to 16 are assigned as inputs to DS Channels 1 to 16, and VST 17
to 32 are assigned as inputs to DS Channels 21 to 36.
• The Buses, Aux Sends and Stereo Mix for the two cards are con-
nected in the following way:
DS 2416 Master
Bus Aux Stereo
Bus 1 - 8
Aux 3 / 4
Aux 1 - 6
Stereo
DS 2416 Slave
Bus Aux Stereo
The Buses, Aux Sends and Stereo Mix on the Slave card will receive
the signals from the corresponding buses on the Master card, and the
signals will be summed. In the opposite direction, only Aux Send 3/4
from the Slave card will be connected to the Master card’s Aux bus.
This makes it possible to access all four FX units from all channels, as
described below.
Due to this routing, it is not possible to record on all sixteen channels
simply by using the buses. Instead you would need to route the eight
Buses on the Slave card to VST Inputs 1 to 8, and route the Aux
Sends and Stereo Mix on the Master card to Inputs 9 to 16.
– 48 –
Page 49

Effects
When you have two DS2416 cards installed, the Aux 3-4 Sends will
automatically be routed to the FX Unit on the Master card. All DS
channels (regardless of which card they “belong to”) can access all
four FX units.
In the FX Editor, there will be four options on the “FX Unit” pop-up
menu, labelled FX Unit 1 to 4. Aux Sends 5 and 6 are routed to FX
Unit 1 and 2 (as with one card), while Aux Sends 3 and 4 are routed
to FX Unit 3 and 4.
❐
Do not route the FX Return channels to Aux Send 3-4 – this may cause a
feedback loop.
Combining a DS2416 with a SW1000XG Card
If you have a Yamaha SW1000XG sound card installed, you can connect it to the DS2416 card using the SI/SO (Serial In/Out) connections on the cards.
• Use the supplied serial cable to connect the SO output on the
SW1000XG to the SI input on the DS2416.
Follow the instructions in the documentation included with the cards.
• In the Routing window, select the “ext. SI” option in the Wordclock
section.
This will cause the DS2416 card to receive wordclock from the SW1000XG card,
ensuring stable synchronization.
Having connected the two cards, you will be able to receive 8 separate
audio channels from the SW1000XG and mix them in the DS mixer.
These 8 channels appear as the “SUB 1-8” input sources, selectable
using the Input pop-up menus for DS channels 9 to 16, or 17 to 24.
– 49 –
Page 50

Remote Controlling the DSP Factory Mixer
It is possible to use a Yamaha 01V digital mixer to remote control the
DSP Factory mixer in Nuendo.
Setting Up
❐
Make sure to read the chapter about Remote Control in the Operation
Manual as well, for general information about remote control in Nuendo.
1. Connect the 01V to your MIDI Interface.
The mixer should be connected “both ways” to allow feedback to indicators and motorized faders.
2. Make the following settings on the 01V (see the 01V manual for
details):
• Enable MIDI Parameter Change Receive and Transmit.
• Disable MIDI Control Change Receive and Transmit.
• Set Device ID / MIDI Channel Receive to “1”.
• Local Control on the 01V should be set to “Off”.
This ensures that you don’t change the internal settings on the 01V instead of the DSP
Factory parameters.
3. In Nuendo, pull down the Devices menu and select Device Setup.
4. Select “Yamaha 01V”.
5. Pull down the Input pop-up menu and select the MIDI Input to which
the 01V is connected.
6. Pull down the Output pop-up menu and select the MIDI Output that is
connected to the 01V.
7. Click OK to close the dialog.
You are now ready to use 01V as a remote control unit.
– 50 –
Page 51

About the Layouts
As when you are using the 01V to control the VST mixer parameters,
there are two different “Layouts” for controlling the DSP Factory Mixer
in Nuendo (there are two Layouts for controlling the VST Mixer, as described in the Operation Manual). Which channels on the 01V control
which DS-channels in Nuendo, depends on the selected Layout. However, the controllable parameters for each “channel strip” are the same
in each layout (see below).
• You switch between the Layouts by pressing the Memory button on
the 01V panel.
Page 1 displays VST Layout 1, page 2 VST Layout 2, page 3 DSP Factory Layout 1
and page 4 DSP Factory Layout 2.
Layout 1
Channels in 01V DS-Channels in Nuendo DSP Factory Mixer
1 to 12 1 to 12
13/14 13 (activate the Stereo Link for channel 13 to control channels 13
and 14 simultaneously)
15/16 15 (activate the Stereo Link for channel 15 to control channels 15
and 16 simultaneously)
Stereo Master Stereo Mix
Return 1 FX Return 1 (activate the Stereo Link for FX Return channel 1 to
control FX Return channels 1 and 2 simultaneously)
Return 2 FX Return 3 (activate the Stereo Link for FX Return channel 3 to
control FX Return channels 3 and 4 simultaneously)
Aux Master 1-6 Aux Master 1-6
– 51 –
Page 52

Layout 2
Channels in 01V DS-Channels in Nuendo DSP Factory Mixer
1 to 4 17 to 20
Stereo Master Stereo Mix
Return 1 FX Return 1 (activate the Stereo Link for FX Return channel 1 to
control FX Return channels 1 and 2 simultaneously)
Return 2 FX Return 3 (activate the Stereo Link for FX Return channel 3 to
control FX Return channels 3 and 4 simultaneously)
Aux Master 1-6 Aux Master 1-6
Controllable Parameters
Channels 1 to 20
• Volume.
• Pan.
• Mute.
• Aux Send 1-6 (“01V Effect 1 and 2” correspond to Aux 5 and 6).
• EQ Freq, Gain and Q-values (four bands).
• Stereo Link switch.
• Attenuator.
• Phase Invert Switch.
• Bus Send On 1 to 4.
• Stereo Mix switch.
FX Return Channels
• Volume.
• Pan.
• Mute.
• Aux Send 1-4.
• EQ Freq, Gain and Q-values (four bands).
• Bus Send On 1 to 4.
• Stereo Mix switch.
Stereo Mix Section
• Volume.
• Balance.
• Mute.
EQ Freq, Gain and Q-values (four bands).
– 52 –
Page 53

– 53 –
Index
Page 54

A
E
ASIO Drivers 4
Attenuator 29
Aux Assign Mode
Controls 16
Selecting 14
Aux Send Mode
Controls 25
Selecting 15
AX44 Audio Expansion Units 3
B
Bus Assign Mode
Controls 16
Selecting 14
Bus Send Mode
Controls 24
Selecting 15
Bus/Aux Console 28
C
Channel Overview 29
D
Delay (Channel) 29
Devices (16 bit) 4
DS2416 Digital Mixing Card 3
Dynamics Mode
Controls 23
Link 22
Selecting 15
Type 21
Effects
Default Routing 12
Return Channels 18
Sends 25
Settings 30
With Two Cards 49
EQ Mode
Controls 19
Selecting 15
Shelving/HPF/LPF 20
F
Fader 17
FX Editor 30
FX Return Channels 18
I
Input Console 14
Inputs
Activating in Nuendo 5
Default Routing 11
Routing 34
Selecting in Nuendo 7
IOA/IOB 11
L
Level Fader 17
Level Meter 17
Link (Dynamics Mode) 22
M
Meter Buttons 27
Mixing down 43
Monitoring 39
Mute 17
– 54 –
Page 55

N
S
Narrow mode 15
O
Output Buses (Nuendo) 6
Output Routing 31
Outputs
Default Routing 11
Physical 32
Routing 36
P
Pan 17
Peak Hold 27
Phase Invert 29
R
Recording
Mono 38
Multi-Track 42
Stereo 39
With Effects 41
Remote Control 50
Remote Control (01V) 50
Routing
Changing 34
Default 8
With two cards 48
Routing/Clock 31
Sample Rate 33
Solo 17
Stereo link 17
Stereo Mix 26
Stereo Mix on/off 17
SUB Inputs 49
SW1000XG Card 49
W
Wordclock 33
Y
Yamaha DS2416 Drivers 4
– 55 –
 Loading...