


SL-650100-BK
QUICK INSTALL GUIDE STRIKE NX – GAMEPAD WIRELESS
PLEASE INSTALL THE LATEST DRIVER VERSION FOR YOUR STRIKE NX GAMEPAD AT FIRST.
BITTE INSTALLIEREN SIE ZUNÄCHST DIE AKTUELLE VERSION DES TREIBERS FÜR IHR STRIKE NX GAMEPAD. DIESER STEHT ONLINE UNTER
1 2
LED FLASHES = CONNECTING
3
PRESS
BRIEFLY
LED 1 ON = ANALOG MODE (DIRECTINPUT)
LED 1 OFF = DIGITAL MODE (DIRECTINPUT)
LED 1, 2, 3 OR 4 ON = XINPUT MODE / PLAYER
5
TO DOWNLOAD IT, VISIT: WWW.SPEEDLINK.COM.
WWW.SPEEDLINK.COM ZUM DOWNLOAD ZUR VERFÜGUNG.
PRESS
LED GLOWS = CONNECTED
D-PAD MODE
4
1
4
2
3
NUMBER ASSIGNMENT
6
DIRECTINPUT MODE XINPUT MODE
PRESS
EN
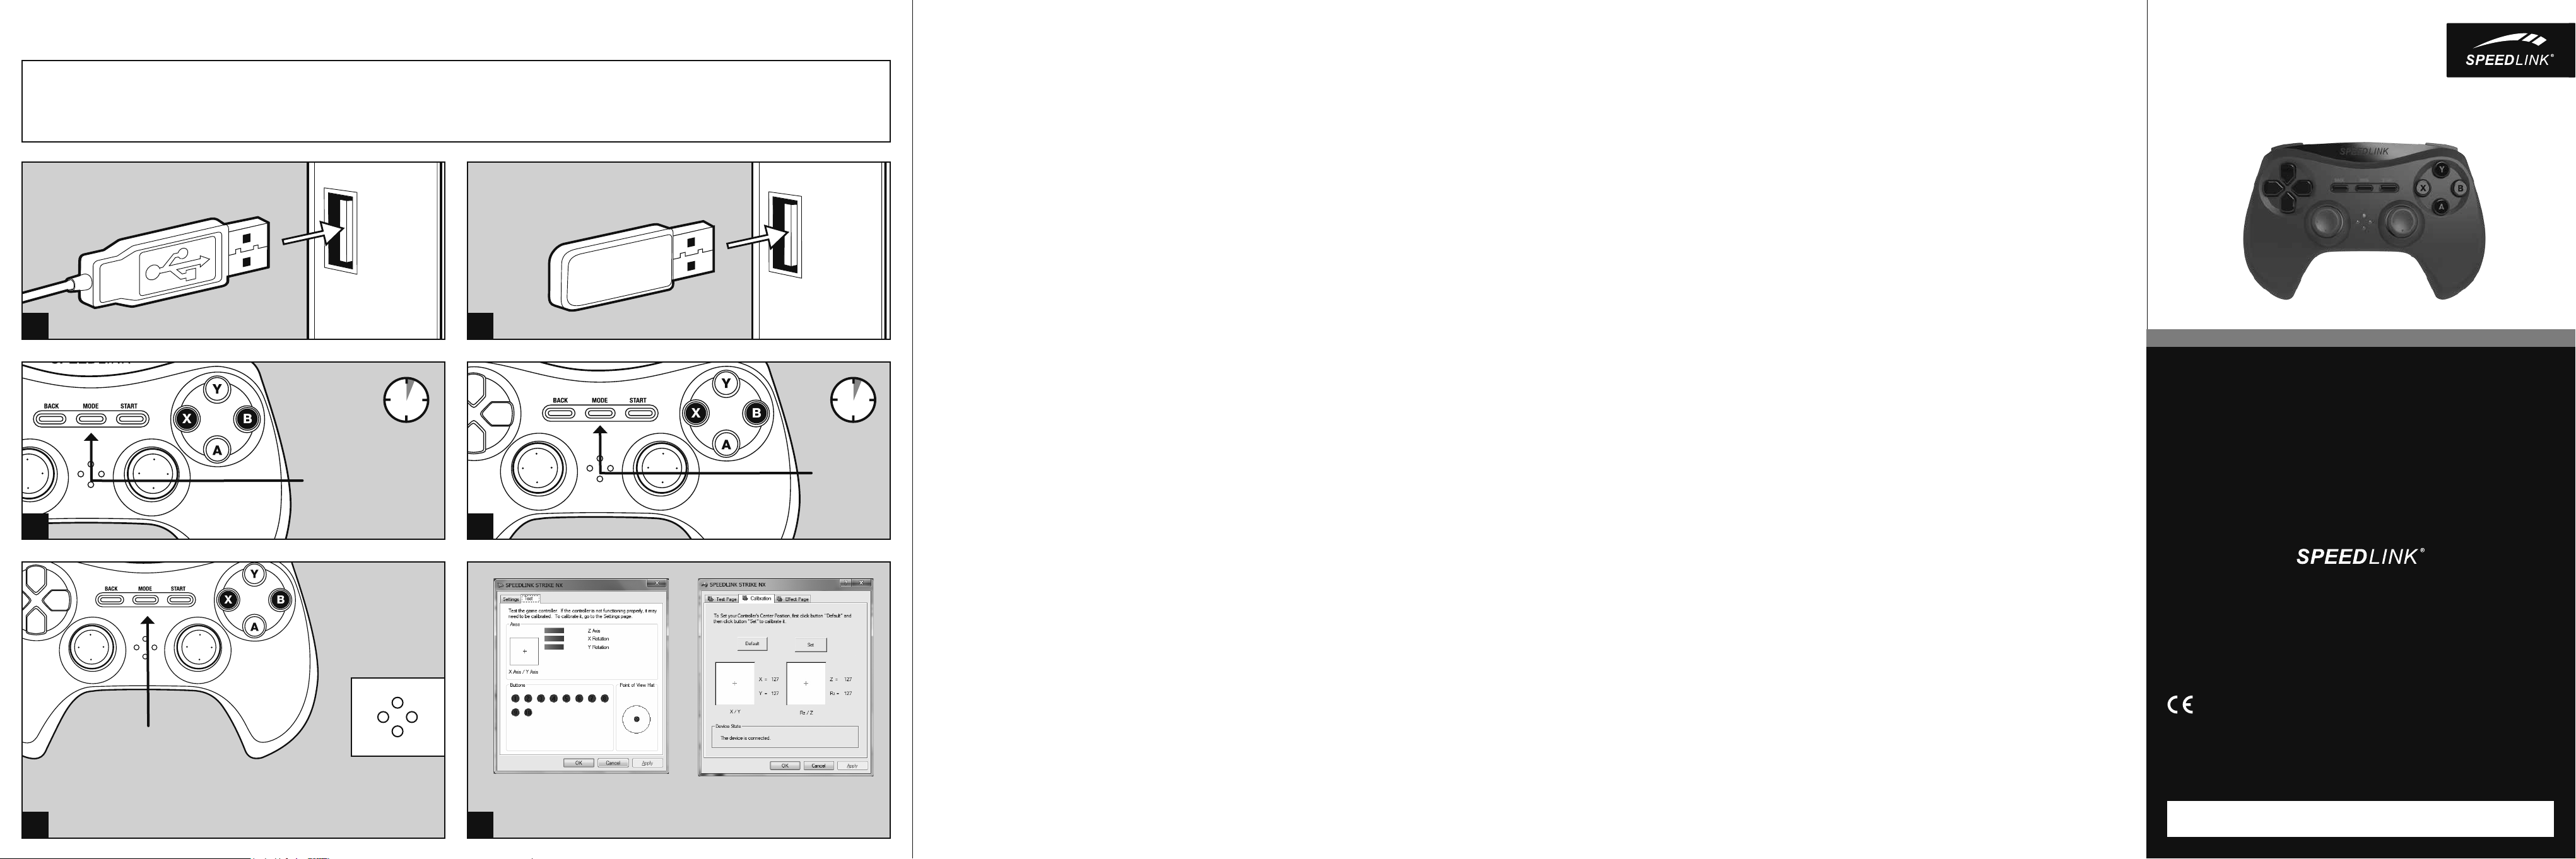
1. First, charge the gamepad. Using the USB
cable, connect the gamepad to any free USB
port on your computer or any other USB power
source (at least 500mA). The gamepad’s LED
status indicators will flash during charging
which takes around 3 hours; be aware, the
initial charge may take longer. As soon as the
LEDs go out, charging is complete and you can
disconnect the cable.
2. Plug the USB receiver into a free USB port on
your PC. The operating system will detect the
device automatically and it will be ready to use
in a few seconds.
3. To establish a connection, press the gamepad’s
Mode button and wait around five seconds.
Make sure the gamepad is positioned near the
receiver during this time. During the connection
process, the LEDs on the gamepad and on the
receiver will flash; as soon as a connection is
established, the receiver LED as well as at least
one of the gamepad LEDs will stay lit.
4. Keep the Mode button held depressed for three
seconds to switch between the gamepad’s two
operating modes: XInput (for the majority of
current games) and DirectInput (for all older and
some newer games). Set the gamepad to the
desired mode before starting a game. Switching
during gameplay may stop the game identifying
the controller correctly; if this happens, restart
the game. Please consult the manual that
accompanied the game, ask the publisher or
try both modes to establish which mode works
the best.
5. In DirectInput mode, press the Mode button
quickly to switch between the two digital D-pad
modes.
6. Test the gamepad’s functions by opening
the Windows* Control Panel and going to the
Game Controllers option (Windows* 8/7/Vista*/
Windows XP*).
You’ll also find options for configuring the
vibration function there (DirectInput). Please
note, vibrations only work if supported by the
game and the relevant option is enabled in the
game’s options settings.
7. After five minutes of inactivity, the gamepad
will switch to standby mode to save power; to
reactivate the gamepad, press the Mode button.
If the gamepad LEDs start flashing rapidly,
recharge the device.
DE
1. Laden Sie das Gamepad bitte zunächst auf:
Verbinden Sie es über das USB-Kabel mit einer
freien USB-Schnittstelle Ihres Computers oder
einer beliebigen anderen USB-Stromquelle
(mindestens 500 mA). Die LED-Anzeige am
Gamepad blinkt während des Ladevorgangs,
der ungefähr 3 Stunden benötigt. Beachten
Sie bitte, dass der erste Ladevorgang etwas
mehr Zeit beanspruchen kann. Sobald die LEDs
erlöschen, ist das Aufladen beendet und Sie
können die Kabelverbindung trennen.
2. Verbinden Sie den USB-Empfänger mit einem
freien USB-Anschluss Ihres PCs. Das Gerät wird
vom Betriebssystem automatisch erkannt und
ist nach wenigen Sekunden einsatzbereit.
3. Drücken Sie die Mode-Taste des Gamepads
und warten Sie etwa fünf Sekunden, um
eine Verbindung herzustellen. Bitte stellen
Sie sicher, dass sich das Gamepad dabei in
der Nähe des Empfängers befindet. Während
des Verbindungsvorgangs blinken die LEDs
am Gamepad und am Empfänger; sobald
die Verbindung hergestellt ist, leuchten die
Empfänger-LED sowie mindestens eine der
Gamepad-LEDs konstant.
4. Halten Sie die Mode-Taste für drei Sekunden
gedrückt, um zwischen den beiden
Betriebsmodi des Gamepads zu wechseln:
XInput (für die meisten aktuellen Spiele) und
DirectInput (für alle älteren und einige neuere
Spiele). Bitte versetzen Sie das Gamepad in
den gewünschten Modus, bevor Sie ein Spiel
starten. Das Umschalten im laufenden Spiel
kann dazu führen, dass der Controller von
diesem nicht mehr korrekt erkannt wird; in
diesem Fall starten Sie bitte das Spiel neu.
Mit welchem Modus ein Spiel am besten
funktioniert, erfahren Sie im zugehörigen
Handbuch, beim Hersteller oder durch
Ausprobieren.
5. Betätigen Sie die Mode-Taste im DirectInputModus nur kurz, wechseln Sie zwischen zwei
Modi für das digitale Steuerkreuz (D-Pad).
6. Die Funktion des Gamepads können Sie in
der Windows*-Systemsteuerung im Abschnitt
„Geräte und Drucker“ (Windows* 8/7/Vista*)
beziehungsweise „Gamecontroller“ (Windows
XP*) prüfen.
Dort finden Sie auch die Optionen für die
Vibrationsfunktion (DirectInput). Bitte beachten
Sie, dass Vibrationen nur dann wiedergegeben
werden, wenn ein Spiel diese nutzt und die
entsprechende Funktion in den Spieloptionen
aktiviert ist.
7. Das Gamepad wechselt nach fünf Minuten
Inaktivität in den Stand-by-Modus, um Energie
zu sparen. Drücken Sie dann die Mode-Taste,
um es zu reaktivieren. Beginnen die LEDs am
Gamepad schnell zu blinken, sollte es erneut
aufgeladen werden.
FR
1. Commencez par recharger la manette en la
reliant à l‘aide du câble USB à une prise USB
libre sur votre ordinateur ou à une autre source
de courant USB (500 mA au moins). Les voyants
sur la manette clignotent pendant toute la durée
de la recharge qui prend environ 3 heures. À
noter que la première recharge peut être un peu
plus longue. Dès que les voyants s‘éteignent,
cela signifie que la recharge est achevée et
vous pouvez débrancher le câble.
2. Reliez le récepteur USB à une prise USB libre
de votre ordinateur. Le périphérique est détecté
automatiquement par le système d‘exploitation
et prêt à l‘emploi en quelques secondes
seulement.
3. Appuyez sur la touche Mode de la manette et
attendez cinq secondes environ pour établir la
liaison (la manette doit se trouver à proximité
du récepteur). Les voyants clignotent sur la
manette et le récepteur durant l‘établissement
de la liaison ; dès que la liaison est établie,
les voyants du récepteur et l‘un au moins des
voyants de la manette restent allumés de
manière continue.
4. Maintenez la touche Mode enfoncée trois
secondes pour basculer entre les deux modes
d‘utilisation de la manette : XInput (convient
pour la plupart des jeux actuels) et DirectInput
(pour tous les jeux anciens et quelques jeux
plus récents). Réglez la manette dans le
mode souhaité avant de lancer un jeu. Si
vous changez de mode en cours de jeu, il est
possible que la manette ne soit plus reconnue
correctement ; dans ce cas, relancez le jeu.
Pour connaître le mode le mieux adapté
au jeu, veuillez consulter la notice du jeu,
demander conseil au fabricant ou bien essayer
alternativement les deux modes.
5. En mode DirectInput, appuyez brièvement sur
la touche Mode pour basculer entre les deux
modes de la croix directionnelle (D-pad).
6. Vous pouvez vérifier le bon fonctionnement
de la manette en allant dans le Panneau de
configuration Windows* dans la section «
Périphériques et imprimantes » (Windows* 8/7/
Vista*) ou « Contrôleurs de jeu » (Windows XP*).
Vous y trouverez également les options de
réglage de la fonction vibration (DirectInput).
Les vibrations ne sont restituées que si le
jeu les prend en charge et si la fonction
correspondante a été activée dans les options
du jeu.
7. Afin d‘économiser de l‘énergie, la manette
passe automatiquement en mode veille quand
vous ne vous en servez pas durant cinq
minutes. Appuyez dans ce cas sur la touche
Mode pour la réactiver. Quand les voyants se
mettent à clignoter rapidement sur la manette,
cela indique qu‘elle doit être rechargée.
ES
1. Primero carga el pad por completo: El cable
USB conecta el pad a un puerto libre USB de tu
ordenador o a cualquier otro puerto USB con
corriente (mínimo 500 mA). El indicador LED del
pad parpadea durante el proceso de carga que
necesita unas tres horas en total. Ten en cuenta
que la primera carga podría tardar más tiempo
de lo normal. En cuanto se apaguen los LEDs,
la carga está completa y puedes desenchufar
el cable.
2. Conecta el receptor USB a un puerto USB que
esté libre en tu ordenador. El sistema operativo
detecta automáticamente el dispositivo y
puedes utilizarlo sin más a los pocos segundos.
3. Pulsa el botón Mode del pad y espera unos
cinco segundos para establecer la conexión
de emparejamiento. Asegúrate de que en
esta operación el pad está cerca del receptor.
Durante el proceso de detección parpadean
los LEDs del pad y del receptor; cuando se
establece la conexión, se enciende el LED del
receptor y al menos uno de los LEDs del pad en
continuo.
4. Pulsa y mantén pulsado el botón Mode durante
tres segundos para alternar entre los dos
modos de funcionamiento del pad: XInput
(para la mayor parte de los juegos actuales)
y DirectInput (para los antiguos y algunos de
los juegos nuevos). Antes de iniciar cualquier
juego, pon el pad en el modo que vas a utilizar.
La conmutación de un modo a otro mientras
estás jugando podría tener como consecuencia
que no se detectase y no funcionase bien
el pad, en tal caso reinicia el juego. Cuál es
el modo con el que mejor funciona el pad lo
averiguarás en el manual correspondiente,
informándote en el fabricante o simplemente
probando.
5. Pulsa brevemente el botón Modeen DirectInput,
alterna entre dos modos para la cruceta digital
(D Pad).
6. La función del pad podrás controlarla en el
panel de control de Windows* „Ver dispositivos
e impresoras“ (Windows* 8/7/Vista*), o bien
„Dispositivos de juegos“ (Windows XP*).
Encontrarás ahí mismo las opciones para
la función de vibración (DirectInput). Ten en
cuenta que las vibraciones sólo se reproducen,
si vienen con un juego y están activadas las
opciones correspondientes del juego.
7. El pad cambia a modo stand by tras cinco
minutos de inactividad, para que ahorres
energía. Para volverlo a activar pulsa Mode una
vez más. Si los LEDs del pad parpadean con
intermitencia rápida, es el momento de volver
a cargarlo.
RU
1. Сначала зарядите геймпад: Соедините его
с помощью кабеля USB со свободным USBпортом компьютера или другого источника
тока USB (минимум 500мА). Светодиодный
индикатор на геймпаде во время процесса
зарядки мигает, сам процесс продолжается
около 3 часов. Помните о том, что для первой
зарядки нужно несколько больше времени.
Как только светодиодный индикатор
погаснет, зарядка завершена и можно
отсоединить кабель.
2. Соедините USB-приемник со свободным USBпортом компьютера. Система автоматически
распознает устройство и оно готово к работе
через несколько секунд.
3. Нажмите кнопку Mode геймпада и подождите
около пяти секунд, чтобы установилось
соединение. При этом геймпад должен
располагаться рядом с приемником. Во
время процесса соединения светодиоды на
геймпаде и приемнике мигают; как только
соединение будет установлено, светодиод
приемника и минимум один светодиод
геймпада начнут светиться непрерывно.
4. Удерживайте кнопку Mode нажатой в течение
трех секунд, чтобы переключаться между
рабочими режимами геймпада: XInput (для
большинства современных игр) и DirectInput
(для всех старых и некоторых более новых
игр). Переключите геймпад в нужный
режим до запуска игры. Переключение
во время игры может привести к тому,
что она больше не будет правильно
распознавать контроллер, в этом случае
игру нужно перезапустить. В каком режиме
игра функционирует лучше всего, можно
узнать из соответствующего руководства, у
изготовителя или методом пробы.
5. Если в режиме DirectInput коротко нажать
кнопку Mode, производится переключение
между двумя режимами цифровой
крестовины управления (D-Pad).
6. Функционирование геймпада под Windows*
можно проверить в разделе „Устройства
и принтеры“ (Windows* 8/7/Vista*) или
„Игровые контроллеры“ (Windows XP*).
Там также находятся опции виброфункции
(DirectInput). Помните о том, что вибрация
воспроизводится только в том случае, если
она используется в игре, а в настройках игры
активирована соответствующая функция.
7. Геймпад через пять минут его
неиспользования переключается в режим
ожидания, чтобы экономить энергию. Для
его активизации нажмите кнопку Mode. Если
светодиоды на геймпаде начинают быстро
мигать, его нужно снова зарядить.
STRIKE NX
GAMEPAD – WIRELESS
QUICK INSTALL GUIDE
SL-650100-BK
EN // DE // FR // ES // RU // IT // NL // PL // TR // HU
© 2015 Jöl lenbeck GmbH. All r ights reserved. S PEEDLINK, t he SPEEDLINK word ma rk and the SPEE DLINK
swoosh are reg istered trademarks of Jö llenbeck GmbH.
* M icrosoft , Windows, Windows XP a nd Vis ta are r egistered trademarks of Micr osoft Corpo rati on in the Unite d
States and ot her countries. All trademar ks are the prop ert y of the ir respective owner. Jölle nbeck GmbH sh all
not be ma de lia ble for a ny errors that may ap pear in this manual. Information contained here in is su bject t o
change without pr ior not ice. Please ke ep thi s informati on for later reference.
JÖLLENBECK GmbH, Kreuzberg 2, 27404 Weertzen, GERMANY
Having technical problems with this product? Get in touch with our Support team –
the quickest way is via our website: www.speedlink.com
TECHNICAL SUPPORT
V1.0
QUICK INSTALL GUIDE STRIKE NX – GAMEPAD WIRELESS
The Bluetooth word mark and logos are registered trademarks owned by Bluetooth SIG, Inc. and any use of such marks by Jöllenbeck GmbH is under license. PS4 is a registered trademark of Sony Computer
Entertainment Inc. Technical specifications are subject to change. All trademarks are the property of their respective owners.
PLEASE INSTALL THE LATEST DRIVER VERSION FOR YOUR STRIKE NX GAMEPAD AT FIRST.
BITTE INSTALLIEREN SIE ZUNÄCHST DIE AKTUELLE VERSION DES TREIBERS FÜR IHR STRIKE NX GAMEPAD. DIESER STEHT ONLINE UNTER
1 2
LED FLASHES = CONNECTING
3
PRESS
BRIEFLY
LED 1 ON = ANALOG MODE (DIRECTINPUT)
LED 1 OFF = DIGITAL MODE (DIRECTINPUT)
LED 1, 2, 3 OR 4 ON = XINPUT MODE / PLAYER
5
TO DOWNLOAD IT, VISIT: WWW.SPEEDLINK.COM.
WWW.SPEEDLINK.COM ZUM DOWNLOAD ZUR VERFÜGUNG.
PRESS
LED GLOWS = CONNECTED
4
D-PAD MODE
1
4
2
3
NUMBER ASSIGNMENT
6
DIRECTINPUT MODE XINPUT MODE
PRESS
IT
1. Innanzitutto caricare il gamepad collegandolo
tramite il cavo USB ad una porta USB libera del
computer o di una qualsiasi altra sorgente di
energia USB (minimo 500 mA). L‘indicatore LED
sul gamepad lampeggia durante la ricarica, che
dura circa 3 ore. Si precisa che la prima ricarica
può durare leggermente più del solito. Appena i
LED si spengono la ricarica è terminata e il cavo
può essere staccato.
2. Collegare il ricevitore USB ad una porta USB
libera del PC. Il dispositivo viene riconosciuto
automaticamente dal sistema operativo ed è
pronto per l‘uso in pochi secondi.
3. Premere il tasto Mode del gamepad e
attendere circa cinque secondi per creare
una connessione. Accertarsi che il gamepad
si trovi in prossimità del ricevitore. Durante
la procedura di connessione lampeggiano i
LED sul gamepad e sul ricevitore. Appena la
connessione è stata creata, i LED del ricevitore
e almeno uno dei LED del gamepad rimangono
accesi.
4 Tenere premuto il tasto Mode per tre secondi
per commutare le due modalità operative del
gamepad: XInput (per la maggior parte dei
giochi attuali) e DirectInput (per tutti i giochi più
vecchi ed alcuni nuovi). Impostare la modalità
desiderata sul gamepad prima di avviare il
gioco. Se la commutazione avviene durante il
gioco in corso, il controller potrebbe non essere
più riconosciuto correttamente. In tal caso
riavviare il gioco. Per trovare la modalità più
adatta a un gioco, consultare il manuale relativo,
chiedere informazioni al produttore o fare delle
prove.
5. Per commutare tra due modalità per la
croce direzionale digitale (D-Pad), azionare
brevemente il tasto „Mode“ nella modalità
DirectInput.
6. La funzione del gamepad può essere verificata
nel Pannello di controllo di Windows*, nella
sezione “Dispositivi e stampanti“ (Windows*
8/7/Vista*) ossia “Gamecontroller“ (Windows
XP*).
Vi troverete anche le opzioni per la funzione
vibrazione (DirectInput). Vi ricordiamo che le
vibrazioni saranno riprodotte solo se supportate
dal gioco e dopo aver attivato questa funzione
nelle opzioni del gioco.
7. Dopo cinque minuti di inattività il gamepad va
in modalità stand-by per risparmiare energia.
Premere il tasto Mode per riattivarlo. Quando
i LED sul gamepad iniziano a lampeggiare
velocemente, deve essere ricaricato.
NL
1. Laad de gamepad eerst op: Sluit de gamepad
met behulp van de USB-kabel aan op een vrije
USB-poort van uw computer of een andere
USB-stroombron (minimaal 500mA). De LEDindicators op de gamepad knipperen tijdens
het opladen, waarvoor ongeveer drie uur nodig
is. De eerste keer kan het opladen iets langer
duren. Zodra de LED‘s doven, is het opladen
voltooid en kunt u de kabel weer loskoppelen.
2. Sluit de USB-ontvanger aan op een vrije
USB-poort van de computer. Het apparaat
wordt automatisch herkend door het
besturingssysteem en is na een paar seconden
gereed voor gebruik.
3. Druk op de Mode-knop van de gamepad en
wacht ongeveer vijf seconden tot er verbinding
is gemaakt. Let erop dat de gamepad zich
daarbij in de buurt van de ontvanger bevindt.
Tijdens het maken van de verbinding knipperen
de LED‘s van de gamepad en de ontvanger;
zodra de verbinding tot stand is gebracht,
branden zowel de LED van de ontvanger als
minstens één van de gamepad-LED‘s constant.
4. Houd de Mode-knop drie seconden ingedrukt
om tussen de beide werkstanden van de
gamepad te wisselen: XInput (voor de meeste
huidige games) en DirectInput (voor alle oudere
en enkele nieuwe games). Zet de gamepad in
de gewenste modus voordat u de game start.
Als u tijdens een game overschakelt op een
andere modus, kan het gebeuren dat de game
de controller niet meer correct herkent; in dat
geval dient u de game opnieuw op te starten. In
welke modus een game het beste werkt, staat
in het bijbehorende handboek; u kunt het ook
navragen bij de fabrikant of het uitproberen.
5. Drukt u slechts kort op de Mode-knop in
DirectInput-modus, dan wisselt u tussen twee
modi voor het digitale stuurkruis (D-Pad).
6. U kunt controleren of de gamepad werkt in
het Configuratiescherm van Windows* bij
„Apparaten en printers“ (Windows* 8/7/Vista*),
resp. „Spelbesturingen“ (Windows XP*).
Daar vindt u ook de opties voor de trilfunctie
(DirectInput). Opties voor de trilfunctie worden
echter alleen weergegeven als ze relevant
zijn voor een game en als in die game de
desbetreende functie bij de instellingen is
ingeschakeld.
7. Als de gamepad vijf minuten niet wordt
gebruikt, wordt de stand-bymodus
ingeschakeld om energie te besparen. Druk in
dat geval op de Mode-knop om de gamepad
weer te activeren. Als de LED‘s van de gamepad
snel beginnen te knipperen, dient de gamepad
opnieuw te worden opgeladen.
PL
1. Najpierw naładuj gamepada: podłącz go
przewodem USB do wolnego złącza USB
włączonego komputera lub do innego źródła
zasilania USB (co najmniej 500mA). Podczas
ładowania wskaźnik LED na gamepadzie miga.
Ładowanie trwa ok. 3 godzin. Należy pamiętać,
że pierwsze ładowanie może trwać nieco dłużej.
Gdy wskaźnik LED zgaśnie, ładowanie jest
zakończone i można odłączyć kabel USB.
2. Podłącz odbiornik USB do wolnego portu USB
komputera. Urządzenie zostanie automatycznie
rozpoznane i po kilku sekundach będzie gotowe
do pracy.
3. Naciśnij przycisk Mode gamepada i odczekaj
ok. 5 sekund, by nawiązać połączenie. Upewnij
się przy tym, że gamepad znajduje się w
pobliżu odbiornika. Podczas nawiązywania
połączenia migają diody LED gamepada i
odbiornika; gdy zostanie nawiązane połączenie,
dioda LED odbiornika i co najmniej jedna dioda
LED gamepada świecą światłem ciągłym.
4. Naciśnij i przytrzymaj przez 3 sekundy przycisk
Mode, aby wybrać jeden z dwóch trybów pracy
gamepada: XInput (do większości aktualnych
gier) lub DirectInput (do starszych i niektórych
nowych gier). Zanim rozpoczniesz grę, przełącz
gamepad do odpowiedniego trybu. Przełączanie
w trakcie gry może spowodować, że kontroler
nie zostanie poprawnie rozpoznany. W takim
przypadku należy ponownie rozpocząć grę.
Odpowiedni tryb ustalisz na podstawie
instrukcji do gry, u producenta lub metodą prób
i błędów.
5. Naciśnij krótko przycisk Mode w trybie
DirectInput i wybierz jeden z dwóch trybów
cyfrowego krzyża sterującego.
6. Funkcje gamepada można sprawdzić w Panelu
sterowania Windows* w części „Urządzenia i
drukarki“ (Windows* 8/7/Vista*) lub „Kontrolery
gier“ (Windows XP*).
Znajdziesz tam też opcje funkcji wibracji
(DirectInput). Należy pamiętać, że wibracje
działają tylko wtedy, gdy są obsługiwane przez
grę, a odpowiednie opcje gry są aktywowane.
7. W celu oszczędzania energii, po 5 minutach
bezczynności gamepad przechodzi w stan
oczekiwania. Naciśnij przycisk Mode, aby go
reaktywować. Gdy diody LED na gamepadzie
zaczynają szybko migać, gamepad wymaga
ponownego naładowania.
TR
1. Oyun pedini öncelikle şarj edin: Mini-USB
kabloyla bilgisayarınızın boş USB portuna veya
başka bir USB akım kaynağına bağlayın (en az
500mA). Oyun pedi üzerindeki LED göstergesi
yaklaşık 3 saat süren şarj işlemi sırasında
yanıp söner. Birinci şarj işleminin biraz daha
fazla zaman alabileceğine dikkat edin. LED‘ler
söner sönmez şarj işlemi sona erer ve kablo
bağlantısını ayırabilirsiniz.
2. USB alıcısını PC‘nizin boş bir USB portuna takın.
Aygıt otomatik algılanır ve birkaç saniye sonra
kullanıma hazırdır.
3. Oyun pedinizin Mode tuşunu basın ve
bağlantının kurulması için yakl. beş saniye
bekleyin. Bu esnada oyun pedinin alıcının
yakınında bulunmasına dikkat edin. Bağlantı
süresinde oyun pedinin ve alıcının LED‘leri yanıp
söner; bağlantınız kurulduğunda alıcı LED‘leri
ve oyun pedinizin en az bir LED‘ii sürekli olarak
yanar.
4. Oyun pedinin iki işletim modu arasında geçiş
yapmak için Mode tuşunu 3 saniye basılı
tutun: XInput (güncel oyunların çoğu için)
ve DirectInput (tüm eski ve birkaç yeni oyun
için). Oyuna başlamadan önce lütfen oyun
pedini istenen moda getirin. Devam eden oyun
esnasında modu değiştirirseniz, kumanda oyun
tarafından doğru bir şekilde algılanmayabilir;
bu durumda lütfen oyunu tekrar başlatın. Bir
oyunun en iyi şekilde hangi modda çalıştığını,
ilgili el kitapçığından, üreticiden veya deneyerek
öğrenebilirsiniz.
5. DirectInput modunda Mode tuşuna kısa
basarsanız, dijital kumanda için (D-Pad) iki mod
arasında geçiş yapabilirsiniz.
6. Oyun pedinin işlevini Windows* Denetim
Masasında „Cihazlar ve Yazıcılar“ (Windows*
8/7/Vista*) ya da „Oyun Kumandaları“ (Windows
XP*) altında kontrol edin.
Burada ayrıca titreşim işlevine yönelik
seçenekleri de bulabilirsiniz (DirectInput).
Sadece bir oyun titreşimleri kullanıyorsa ve
oyun seçeneklerinde ilgili işlev etkinleştirilmişse
titreşimlerin mevcut olduğunu dikkate alın.
7. Oyun pedi yakl. beş dakika inaktif kalması
durumunda enerji tasarruf etmek için Stand-by
moduna geçer. Tekrar devreye almak için Mode
tuşuna basın. Oyun pedi üzerindeki LED‘ler
hızlı yanıp sönmeye başlarsa yeniden şarj
edilmelidir.
HU
1 Kérjük, először töltse fel a gamepadet: Kösse
rá az USB-kábellel számítógépe egy szabad
USB-portjára vagy egy tetszőleges egyéb USBáramforrásra (legalább 500 mA). A gamepad
LED-kijelzője villog a mintegy 3 órás töltési
folyamat közben. Kérjük, ügyeljen arra, hogy
az első töltési folyamat valamivel több időt
vehet igénybe. Amint a LED-ek kialszanak,
a feltöltés befejeződött és a kábelkapcsolat
megszüntethető.
2. Kösse össze az USB-vevőt a számítógép egy
szabad USB-portjával. Az eszközt az operációs
rendszer automatikusan felismeri és az néhány
másodperc múlva használható.
3. Nyomja meg a gamepad Mode gombját és
várjon mintegy 5 másodpercet kapcsolat
létrehozására. Kérjük, gondoskodjon arról, hogy
a gamepad ekkor a vevő közelében legyen. A
kapcsolatfelépítés közben villog a gamepad
és a vevő LED-jei; amikor a kapcsolat felépült,
a vevő LED-je és a gamepad LED-jei közül
legalább egy folyamatosan világít.
4. Tartsa a Mode gombot három másodpercig
nyomva a gamepad két üzemmódja közötti
váltáshoz: XInput (a legtöbb aktuális játékhoz)
és DirectInput (az összes régebbi és néhány
újabb játékhoz). Kérjük, tegye a gamepadet a
kívánt módba, mielőtt elindít egy játékot. A folyó
játék közbeni átkapcsolás következményeként
lehetséges, hogy a controllert ez nem ismeri
fel helyesen; ebben az esetben kérjük, indítsa
újra a játékot. Azt, melyik módban működik
legjobban a játék, a megfelelő kézikönyvből, a
gyártótól vagy kipróbálással tudhatja meg.
5. Ha a Mode gombot DirectInput-módban csak
röviden működteti, akkor átvált a digitális
vezérlőkereszt (D-Pad) két üzemmódja között.
6. A gamepad funkcióit a Windows* Vezérlőpult
„Eszközök és nyomtatók“ (Windows* 8/7/Vista*)
ill. „Gamecontroller“ (Windows XP*) részében
ellenőrizheti.
Ott megtalálja az opciókat is a vibráció
funkcióhoz (DirectInput). Kérjük, ügyeljen arra,
hogy vibráció csak akkor érzékelhető, ha azt
egy játék használja és a megfelelő funkció a
játékopciók között aktiválva van.
7. A gamepad öt perc tétlenség után
energiamegtakarítási célból készenléti (Standby) módba vált. Ekkor nyomja meg a Mode
gombot a gamepad újra aktiválásához. Ha a
játékpadon lévő LED-ek gyorsan kezdenek el
villogni, megint fel kell tölteni.
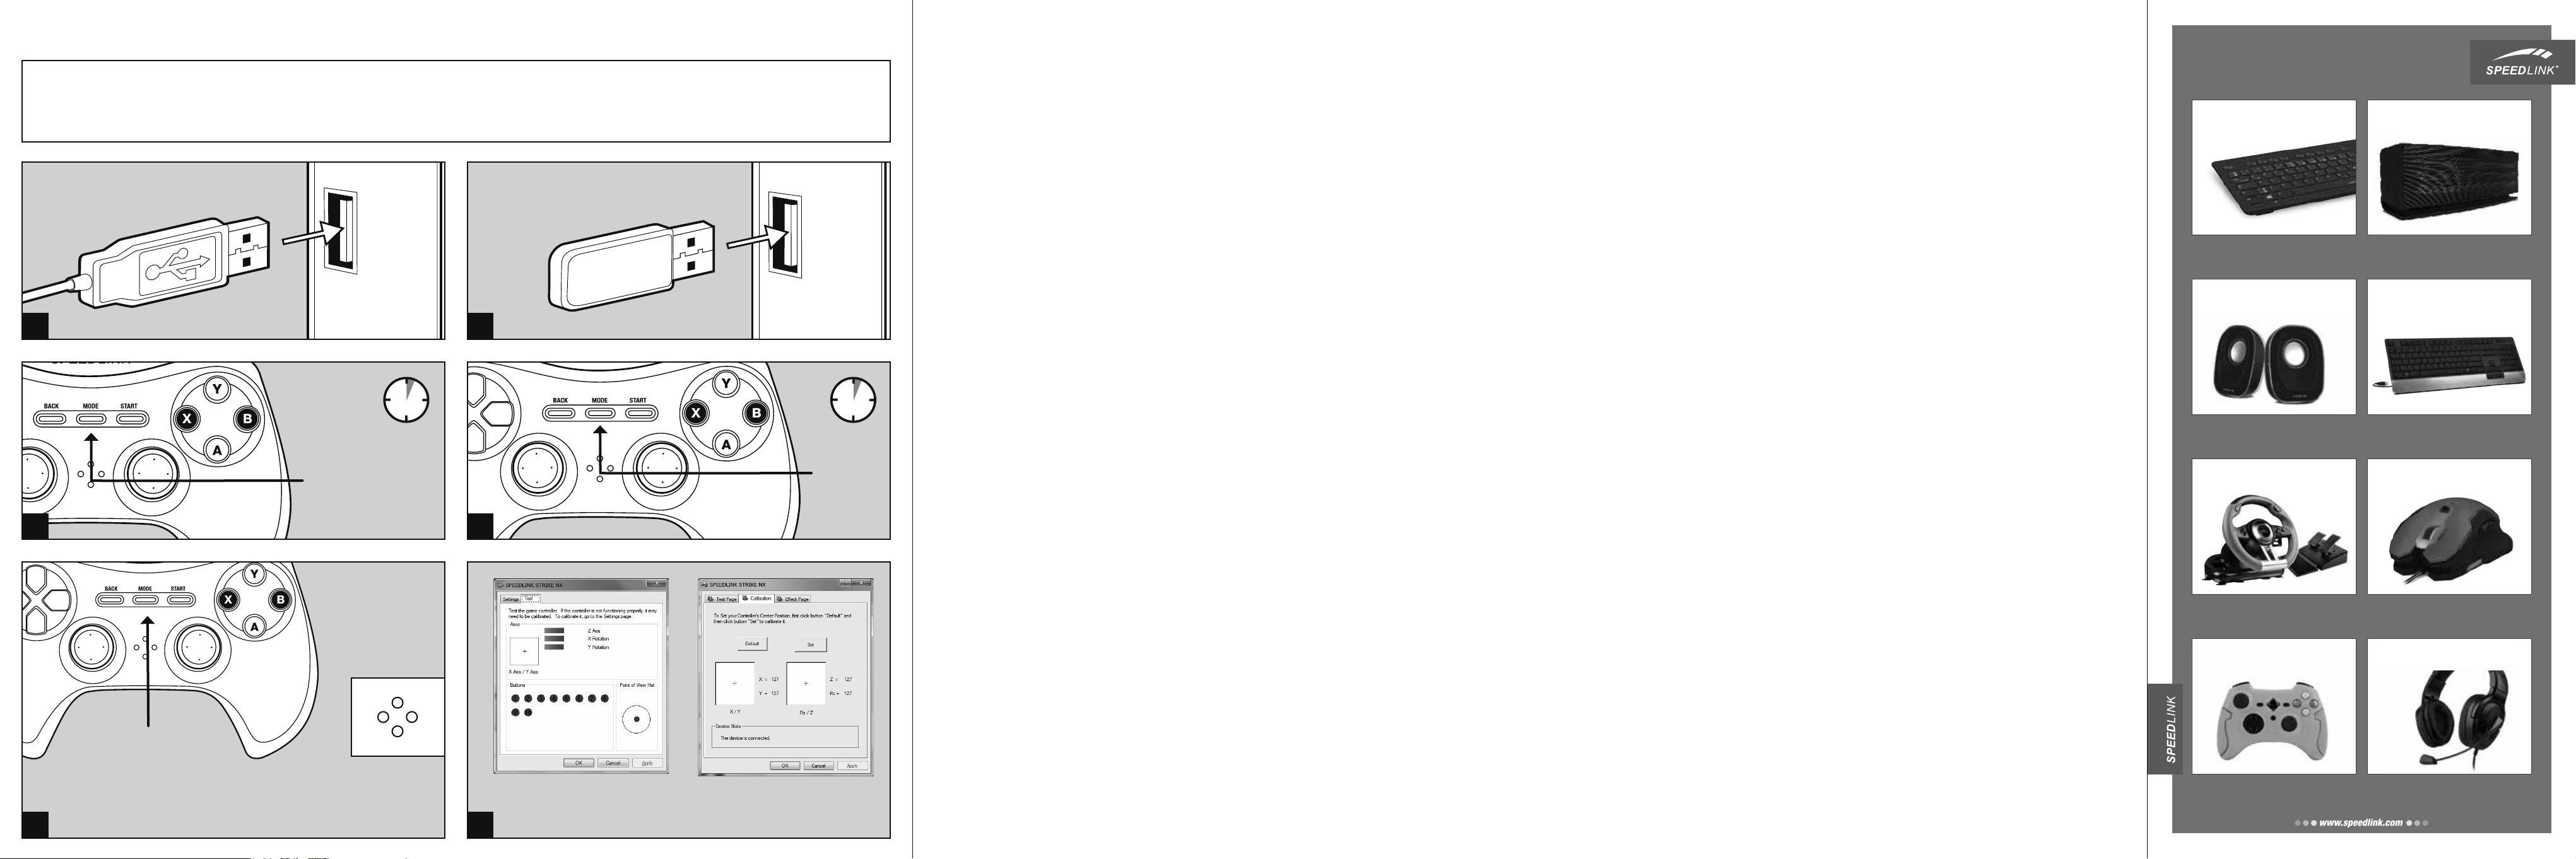
DO YOU KNOW THESE?
ATHERA XE
KEYBOARD – BLUETOOTH
Connect it to up to ve BLUETOOTH
devices and easily switch between them.
®
®
TOPICA
STEREO SPEAKERS
Enjoy dynamic multimedia sound for
music, video and chat.
DRIFT O.Z.
RACING WHEEL
Features a professional gear stick, precise
pedals and rapid-access shifter paddles.
TORID
GAMEPAD – WIRELESS
Gain control of virtual worlds with great
accuracy and in total strain-free comfort.
ARCUS
SOLITUNE
GRAPHICS TABLET – XL
STEREO SPEAKER – BLUETOOTH
Unites portability, great sound,
BLUETOOTH ® and NFC technology.
LUCIDIS
KEYBOARD – USB
Modern design with a shiny aluminium
wrist rest adds style to your desktop.
SVIPA
GAMING MOUSE
The changing colour patterns surround
this precision tool with a unique aura.
MEDUSA XE
STEREO HEADSET
The rst choice for long, action-packed
gaming sessions on the PS4
®
®
.
 Loading...