


Getting Started Guide
Handheld Platform for MobileMapper 120, ProMark 120 & ProMark 220
Copyright Notice
Copyright 2012-2013 Trimble Navigation Limited. All rights reserved.
Trademarks
All product and brand names mentioned in this publication are trademarks of their respective holders.
SPECTRA PRECISION LIMITED WARRANTY TERMS AND CONDITIONS
PRODUCT LIMITED WARRANTY - Subject to the following terms and conditions, Spectra Precision warrants that for a period of one (1) year from date of purchase this Spectra Precision product (the “Product”) will substantially conform to Spectra Precision’s publicly available specifications for the Product and that the hardware and any storage media components of the Product will be substantially free from defects in materials and workmanship.
PRODUCT SOFTWARE - Product software, whether built into hardware circuitry as firmware, provided as a standalone computer software product, embedded in flash memory, or stored on magnetic or other media, is licensed solely for use with or as an integral part of the Product and is not sold. If accompanied by a separate end user license agreement (“EULA”), use of any such software will be subject to the terms of such end user license agreement (including any differing limited warranty terms, exclusions, and limitations), which shall control over the terms and conditions set forth in this limited warranty.
SOFTWARE FIXES - During the limited warranty period you will be entitled to receive such Fixes to the Product software that Spectra Precision releases and makes commercially available and for which it does not charge separately, subject to the procedures for delivery to purchasers of Spectra Precision products generally. If you have purchased the Product from a Spectra Precision Authorized Distribution Partner rather than from Spectra Precision directly, Spectra Precision may, at its option, forward the software Fix to the Spectra Precision Authorized Distribution Partner for final distribution to you. Minor Updates, Major Upgrades, new products, or substantially new software releases, as identified by Spectra Precision, are expressly excluded from this update process and limited warranty. Receipt of software Fixes or other enhancements shall not serve to extend the limited warranty period.
For purposes of this warranty the following definitions shall apply: (1) “Fix(es)” means an error correction or other update created to fix a previous software version that does not substantially conform to its Spectra Precision specifications; (2) “Minor Update” occurs when enhancements are made to current features in a software program; and (3) “Major Upgrade” occurs when significant new features are added to software, or when a new product containing new features replaces the further development of a current product line. Spectra Precision reserves the right to determine, in its sole discretion, what constitutes a Fix, Minor Update, or Major Upgrade.
WARRANTY REMEDIES - If the Spectra Precision Product fails during the warranty period for reasons covered by this limited warranty and you notify Spectra Precision of such failure during the warranty period, Spectra Precision will repair OR replace the nonconforming Product with new, equivalent to new, or reconditioned parts or Product, OR refund the Product purchase price paid by you, at Spectra Precision’s option, upon your return of the Product in ac-
cordance with Spectra Precision’s product return procedures then in effect.
HOW TO OBTAIN WARRANTY SERVICE - To obtain warranty service for the Product, please contact your local Spectra Precision Authorized Distribution Partner. Alternatively, you may contact Spectra Precision to request warranty service at +1-303-323-4100 (24 hours a day) or e-mail your request to support@spectraprecision.com. Please be prepared to provide:
•your name, address, and telephone numbers
•proof of purchase
•a copy of this Spectra Precision warranty
•a description of the nonconforming Product including the model number
•an explanation of the problem
The customer service representative may need additional information
from you depending on the nature of the problem.
WARRANTY EXCLUSIONS AND DISCLAIMER - This Product limited warranty shall only apply in the event and to the extent that (a) the Product is properly and correctly installed, configured, interfaced, maintained, stored, and operated in accordance with Spectra Precision’s applicable operator's manual and specifications, and; (b) the Product is not modified or misused. This Product limited warranty shall not apply to, and Spectra Precision shall not be responsible for, defects or performance problems resulting from
(i) the combination or utilization of the Product with hardware or software products, information, data, systems, interfaces, or devices not made, supplied, or specified by Spectra Precision; (ii) the operation of the Product under any specification other than, or in addition to, Spectra Precision standard specifications for its products; (iii) the unauthorized installation, modification, or use of the Product; (iv) damage caused by: accident, lightning or other electrical discharge, fresh or salt water immersion or spray (outside of Product specifications); or exposure to environmental conditions for which the Product is not intended; (v) normal wear and tear on consumable parts (e.g., batteries); or (vi) cosmetic damage. Spectra Precision does not warrant or guarantee the results obtained through the use of the Product, or that software components will operate error free.
NOTICE REGARDING PRODUCTS EQUIPPED WITH TECHNOLOGY CAPABLE OF TRACKING SATELLITE SIGNALS FROM SATELLITE BASED AUGMENTATION SYSTEMS (SBAS) (WAAS/EGNOS, AND MSAS), OMNISTAR, GPS, MODERNIZED GPS OR GLONASS SATELLITES, OR FROM IALA BEACON SOURCES: SPECTRA PRECISION IS NOT RESPONSIBLE FOR THE OPERATION OR FAILURE OF OPERATION OF ANY SATELLITE BASED POSITIONING SYSTEM OR THE AVAILABILITY OF ANY SATELLITE BASED POSITIONING SIGNALS.
THE FOREGOING LIMITED WARRANTY TERMS STATE SPECTRA PRECISION’S ENTIRE LIABILITY, AND YOUR EXCLUSIVE REMEDIES, RELATING TO THE SPECTRA PRECISION PRODUCT. EXCEPT AS OTHERWISE EXPRESSLY PROVIDED HEREIN, THE PRODUCT AND ACCOMPANYING DOCUMENTATION AND MATERIALS ARE PROVIDED “AS-IS” AND WTHOUT EXPRESS OR IMPLIED WARRANTY OF ANY KIND, BY EITHER SPECTRA PRECISION OR ANYONE WHO HAS BEEN INVOLVED IN ITS CREATION, PRODUCTION, INSTALLATION, OR DIS-

TRIBUTION, INCLUDING, BUT NOT LIMITED TO, THE IMPLIED WARRANTIES OF MERCHANTABILITY AND FITNESS FOR A PARTICULAR PURPOSE, TITLE, AND NONINFRINGEMENT. THE STATED EXPRESS WARRANTIES ARE IN LIEU OF ALL OBLIGATIONS OR LIABILITIES ON THE PART OF SPECTRA PRECISION ARISING OUT OF, OR IN CONNECTION WITH, ANY PRODUCT. BECAUSE SOME STATES AND JURISDICTIONS DO NOT ALLOW LIMITATIONS ON DURATION OR THE EXCLUSION OF AN IMPLIED WARRANTY, THE ABOVE LIMITATION MAY NOT APPLY OR FULLY APPLY TO YOU.
LIMITATION OF LIABILITY - SPECTRA PRECISION’S ENTIRE LIABILITY UNDER ANY PROVISION HEREIN SHALL BE LIMITED TO THE AMOUNT PAID BY YOU FOR THE PRODUCT. TO THE MAXIMUM EXTENT PERMITTED BY APPLICABLE LAW, IN NO EVENT SHALL SPECTRA PRECISION OR ITS SUPPLIERS BE LIABLE FOR ANY INDIRECT, SPECIAL, INCIDENTAL, OR CONSEQUENTIAL DAMAGE WHATSOEVER UNDER ANY CIRCUMSTANCE OR LEGAL THEORY RELATING IN ANYWAY TO THE PRODUCTS, SOFTWARE, AND ACCOMPANYING DOCUMENTATION AND MATERIALS, (INCLUDING, WITHOUT LIMITATION, DAMAGES FOR LOSS OF BUSINESS PROFITS, BUSINESS INTERRUPTION, LOSS OF DATA, OR ANY OTHER PECUNIARY LOSS), REGARDLESS OF WHETHER SPECTRA PRECISION HAS BEEN ADVISED OF THE POSSIBILITY OF ANY SUCH LOSS AND REGARDLESS OF THE COURSE OF DEALING WHICH DEVELOPS OR HAS DEVELOPED BETWEEN YOU AND SPECTRA PRECISION. BECAUSE SOME STATES AND JURISDICTIONS DO NOT ALLOW THE EXCLUSION OR LIMITATION OF LIABILITY FOR CONSEQUENTIAL OR INCIDENTAL DAMAGES, THE ABOVE LIMITATION MAY NOT APPLY OR FULLY APPLY TO YOU.
PLEASE NOTE: THE ABOVE SPECTRA PRECISION WARRANTY PROVISIONS WILL NOT APPLY TO PRODUCTS PURCHASED IN THOSE JURISDICTIONS (E.G., MEMBER STATES OF THE EUROPEAN ECONOMIC AREA) IN WHICH PRODUCT WARRANTIES ARE THE RESPONSBILITY OF THE LOCAL SPECTRA PRECISION AUTHORIZED DISTRIBUTION PARTNER FROM WHOM THE PRODUCTS ARE ACQUIRED. IN SUCH A CASE, PLEASE CONTACT YOUR LOCAL SPECTRA PRECISION AUTHORIZED DISTRIBUTION PARTNER FOR APPLICABLE WARRANTY INFORMATION.
OFFICIAL LANGUAGE - THE OFFICIAL LANGUAGE OF THESE TERMS AND CONDITIONS IS ENGLISH. IN THE EVENT OF A CONFLICT BETWEEN ENGLISH AND OTHER LANGUAGE VERSIONS, THE ENGLISH LANGUAGE SHALL CONTROL.
REGISTRATION - To receive information regarding updates and new products, please contact your local Spectra Precision Authorized Distribution Partner or visit the Spectra Precision website at www.spectraprecision.com/register. Upon registration you may select the newsletter, upgrade, or new product information you desire.
CE
a. Caution:
•CAUTION: Danger of explosion if battery is incorrectly replaced. Replace only with the same or equivalent type recommended by the manufacturer.
•Dispose of used batteries according to the manufacturer instructions.
b. Please make sure the temperature for adapter will not be higher than 40 ˚C.
CE SAR Compliance
This device meets the EU requirements (1999/519/ EC) on the limitation of exposure of the general public to electromagnetic fields by way of health protection.
The limits are part of extensive recommendations for the protection of the general public. These recommendations have been developed and checked by independent scientific organizations through regular and thorough evaluations of scientific studies. The unit of measurement for the European Council's recommended limit for mobile devices is the "Specific Absorption Rate" (SAR), and the SAR limit is 2.0 W/ kg averaged over 10 gram of body tissue. It meets the requirements of the International Commission on Non-Ionizing Radiation Protection (ICNIRP).
For body worn operation, this device has been tested and meets the ICNIRP exposure guidelines and the European Standard EN 62311 and EN 62209-2, for use with dedicated accessories. Use of other accessories which contain metals may not ensure compliance with ICNIRP exposure guidelines.
EU Conformance
The following CE compliance information is applicable to this device that carry the following CE mark:
FCC
FCC Regulations:
This device complies with part 15 of the FCC Rules. Operation is subject to the following two conditions:
(1) This device may not cause harmful interference, and (2) this device must accept any interference received, including interference that may cause undesired operation.
This device has been tested and found to comply with the limits for a Class B digital device, pursuant to Part 15 of the FCC Rules. These limits are designed to provide reasonable protection against harmful interference in a residential installation. This equipment generates, uses and can radiate radio frequency energy and, if not installed and used in accordance with the instructions, may cause harmful interference to radio communications. However, there is no guarantee that interference will not occur in a particular installation if this equipment does cause harmful interference to radio or television reception, which can be determined by turning the equipment off and on. The user is encouraged to try to correct the interference by one or more of the following measures:
•Reorient or relocate the receiving antenna.
•Increase the separation between the equipment and receiver.
•Connect the equipment into an outlet on a circuit different from that to which the receiver is connected.
•Consult the dealer or an experienced radio/TV technician for help.
Changes or modifications not expressly approved by the party responsible for compliance could void the user‘s authority to operate the equipment.
The antenna(s) used for this transmitter must not be co-located or operating in conjunction with any other antenna or transmitter.
RF Exposure Information (SAR)
This device meets the government’s requirements for exposure to radio waves.
This device is designed and manufactured not to exceed the emission limits for exposure to radio frequency (RF) energy set by the Federal Communications Commission of the U.S. Government.
The exposure standard for wireless devices employs a unit of measurement known as the Specific Absorption Rate, or SAR. The SAR limit set by the FCC is 1.6W/kg. Tests for SAR are conducted using standard operating positions accepted by the FCC with the device transmitting at its highest certified power level in all tested frequency bands. Although the SAR is determined at the highest certified power level, the actual SAR level of the device while operating can be well below the maximum value. This is because the device is designed to operate at multiple power levels so as to use only the poser required to reach the network. In general, the closer you are to a wireless base station antenna, the lower the power output.
The highest SAR value for the device as reported to the FCC when worn on the body, as described in this user guide, is 0.39 W/kg for GSM850 / 1.23 W/kg for PCS1900 (Body-worn measurements differ among device models, depending upon available accessories and FCC requirements.)
While there may be differences between the SAR levels of various devices and at various positions, they all meet the government requirement.
The FCC has granted an Equipment Authorization for this device with all reported SAR levels evaluated as in compliance with the FCC RF exposure guidelines. SAR information on this device is on file with the FCC and can be found under the Display Grant section of www.fcc.gov/oet/ea/fccid after searching on FCC ID: NZI802111A.
This device is compliant with SAR for general population /uncontrolled exposure limits in ANSI/IEEE C95.1-1999 and had been tested in accordance with the measurement methods and procedures specified in OET Bulletin 65 Supplement C.
For body worn operation, this device has been tested and meets the FCC RF exposure guidelines for use with an accessory that contains no metal and the positions the handset a minimum of 0.5 cm from the body. Use of other accessories may not ensure compliance with FCC RF exposure guidelines. If you do not use a body-worn accessory and are not holding the device at the ear, position the handset a mini-
mum of 0.5 cm from your body when the device is switched on.
IC
This device complies with Industry Canada licenceexempt RSS standard(s). Operation is subject to the following two conditions: (1) this device may not cause interference, and (2) this device must accept any interference, including interference that may cause undesired operation of the device.
Le présent appareil est conforme aux CNR d’Industrie Canada applicables aux appareils radio exempts de licence. L’exploitation est autorisée aux deux conditions suivantes :
(1)l’appareil ne doit pas produire de brouillage , et
(2)l’utilisateur de l’appareil doit accepter tout brouillage radioélectrique subi, même si le brouillage est susceptible d’en compromettre le fonctionnement.
This Class B digital apparatus complies with Canadian ICES-003.
Cet appareil numérique de la classe B est conforme à la norme NMB-003 du Canada.
This Category II radio communication device complies with Industry Canada Standard RSS-310.
Ce dispositif de radiocommunication de catégorie II respecte la norme CNR-310 d’Industrie Canada.
IMPORTANT NOTE:
IC Radiation Exposure Statement
This EUT is compliant with SAR for general population/uncontrolled exposure limits in IC RSS-102 and had been tested in accordance with the measurement methods and procedures specified in IEEE 1528. This equipment should be installed and operated with minimum distance 0.5 cm between the radiator & your body.
This device and its antenna(s) must not be co-locat- ed or operating in conjunction with any other antenna or transmitter.
The County Code Selection feature is disabled for products marketed in the US/Canada.
Table of Contents |
|
First-Time Use ............................................................................. |
1 |
Unpacking .............................................................................. |
1 |
Inserting the Battery Into the Receiver....................................... |
1 |
Charging the Battery for the First Time ...................................... |
2 |
Installing the OS Language and Applications.............................. |
3 |
Adjusting Backlight Level ......................................................... |
5 |
Setting Backlight Idle Time ...................................................... |
5 |
Power Management.................................................................. |
6 |
Regional Settings .................................................................... |
6 |
Locking the Screen and the Keypad........................................... |
6 |
How to Hold the Receiver ......................................................... |
7 |
Switching to Suspend Mode...................................................... |
7 |
Turning the Receiver Off .......................................................... |
8 |
System Description....................................................................... |
9 |
Receiver Front View ................................................................. |
9 |
Display Screen..................................................................... |
9 |
Keypad, Scroll and Enter Buttons .......................................... |
9 |
Stylus and Stylus Holder....................................................... |
9 |
Built-in GNSS Antenna......................................................... |
9 |
Microphone ......................................................................... |
9 |
Built-in GSM Antenna ........................................................ |
10 |
Built-in Bluetooth Antenna.................................................. |
10 |
Receiver Rear View ................................................................ |
10 |
Camera Lens...................................................................... |
10 |
Loudspeaker ...................................................................... |
10 |
Battery Compartment ......................................................... |
10 |
Receiver Side View (Left)........................................................ |
10 |
Power Button..................................................................... |
10 |
Power & Battery LED .......................................................... |
11 |
SDIO Interface................................................................... |
11 |
External Antenna Input ....................................................... |
11 |
Receiver Bottom View ............................................................ |
11 |
Power/Data Connector......................................................... |
11 |
Docking Station..................................................................... |
12 |
Top View ........................................................................... |
12 |
Rear View .......................................................................... |
13 |
Advanced Features ..................................................................... |
14 |
Power Modes......................................................................... |
14 |
LED Indicator........................................................................ |
15 |
Internal Battery ..................................................................... |
16 |
Battery Charging Scenarios ................................................. |
17 |
Port Allocation Table.............................................................. |
18 |
Inserting a SIM Card .............................................................. |
19 |
Using the Internal Modem ...................................................... |
19 |
Enabling the Phone Function .............................................. |
20 |
Establishing a GPRS Connection.......................................... |
20 |
Establishing a GSM Connection in CSD Mode ....................... |
21 |
CDMA Connection Using an External Cell Phone ....................... |
21 |
Editing the Default Dialup String ......................................... |
22 |
Pairing Bluetooth Between Receiver and External Cell Phone . 22 |
|
Setting Up the Internet Connection...................................... |
24 |
Using the Camera .................................................................. |
25 |
Taking a Picture................................................................. |
25 |
Renaming a Picture............................................................ |
25 |
Rotating a Picture .............................................................. |
25 |
Cropping a Picture.............................................................. |
25 |
Auto-correcting a Picture .................................................... |
26 |
Deleting a Picture .............................................................. |
26 |
Changing Picture Settings ................................................... |
26 |
Making a Video...................................................................... |
26 |
Setting the Duration of a Video Film..................................... |
26 |
Starting a Video ................................................................. |
27 |
Ending a Video................................................................... |
27 |
Playing Back a Video .......................................................... |
27 |
Renaming a Video .............................................................. |
28 |
Deleting a Video................................................................. |
28 |
Voice Setting......................................................................... |
28 |
GNSS Toolbox............................................................................ |
29 |
Options................................................................................. |
29 |
GNSS Settings ...................................................................... |
30 |
Differential Mode................................................................... |
30 |
NMEA Output........................................................................ |
32 |
GNSS Status ......................................................................... |
33 |
Reset.................................................................................... |
34 |
Troubleshooting..................................................................... |
34 |
About ................................................................................... |
35 |
Turn Off GNSS ...................................................................... |
35 |
Platform Specifications............................................................... |
36 |
GNSS Characteristics ............................................................. |
36 |
Processor .............................................................................. |
36 |
Operating System .................................................................. |
36 |
Communication ..................................................................... |
36 |
Physical Characteristics.......................................................... |
36 |
User Interface ....................................................................... |
36 |
Memory ............................................................................... |
37 |
Environmental Characteristics................................................. |
37 |
Power Requirements .............................................................. |
37 |
Multimedia & Sensors ............................................................ |
37 |
Standard Accessories ............................................................. |
37 |

First-Time Use |
|
English |
Unpacking Open the receiver box and unpack the following items: |
||
• |
Receiver |
|
• SD card containing required applications (GNSS Toolbox, |
|
|
|
GNSS Service, etc.) |
|
Inserting the
Battery Into the
Receiver
•Battery
•Docking station
•Universal AC adapter
•USB cable
Follow the instructions below:
•Turn over the receiver and rotate the finger screw counterclockwise a quarter turn and pull the trap door open.
•Insert the battery as shown. The label must be outwards and the right way up.
•Put the trap door back into place by first inserting the two clips located at the top of the trap door.
•Then push the door against the case and rotate the finger screw clockwise by one-quarter turn for a secure and sealed closure.
1
|
Charging the |
|
English |
Battery for the First |
|
Time |
||
|
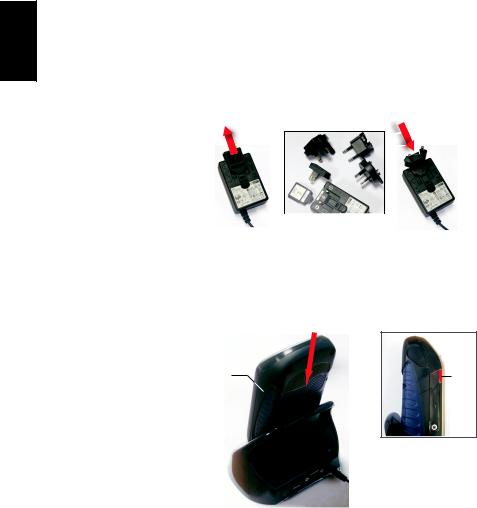
The fastest way to charge the battery before first use is to keep the receiver off until the battery is charged. In these conditions, it will take less than 4 hours to fully charge the battery. Follow the instructions below.
•Prepare the AC adapter:
–Remove the protective cover [1] by pushing the button then sliding the cover forward.
[1]
[3]
[2]
–Choose the plug that fits your country’s AC outlet standard (see [2]) and slide it into the AC adapter [3}. (A “click” must be heard when fully inserted.)
–Connect the AC adapter to an electric outlet.
•Put the docking station [4] on a horizontal plane.
[6] |
[7] |
 [5]
[5]
[4] 
•Connect the output cable [5] of the AC adapter to the back of the docking station.
•Insert the receiver [6] vertically, into the docking station. The light indicator [7] turns steady red, meaning the receiver is properly connected to the station and battery charging is in progress.
The light indicator [7] will turn green when the battery is fully charged.
2

Installing the OS
Language and
Applications
Important! Please keep the receiver on the docking station. |
|
|
This is to make sure the battery will not go low during the |
English |
|
installation step. |
||
|
||
• Insert the delivered SD card into the receiver’s SDIO card |
|
|
reader [16] (see also SDIO Interface on page 11). |
|
|
[8] |
|
[16]
•Press the Power button [8] until the Power LED (next to this button) lights up in green. This turns on the receiver.
[8]
When first turning on the receiver, screen [1] below is displayed. Follow the procedure below to install a language and then let the Microsoft Windows Embedded Handheld 6.5 Professional operating system install automatically applications from the SD card. These applications are required to run some Spectra Precision software applications such as ProMark Field or MobileMapper Field. The complete sequence takes about 4 minutes.
3

English |
[1] |
[2] |
[3] |
|
|
|
Up
Left Enter
Enter  Right
Right
Down
4
•Browse the list of available languages using the Up or Down key, until the desired language is selected.
•Press the Enter key to pre-select this language. Screen [2] is now displayed (see above).
•Press the Up key to access the check button setting on the screen.
•Press Enter again to activate the check button.
•Press the Down key then the Right key to select the Next button on the screen.
Warning! You are now ready to install the selected language. Once the installation is started, you will no longer be given the opportunity to install another language.
(So if you realize at this point that you selected the wrong language, you may still revert to the language selection screen by pressing the Left key, then the Enter key. This will take you back to screen [1] from which you can resume the language installation step from the beginning.)
•Press the Enter key again to start the language installation. Screen [3] is now displayed.
Let the receiver complete the language installation. The operating system will then automatically start installing the applications from the SD card (in the same language as the one you selected for the operating system).
Once the applications are installed, the receiver will be rebooted (blank screen for a few seconds). Then the operating system will ask you to initialize the receiver (screen calibration, time zone, date and time). Follow the instructions on the screen to complete this step.
NOTE: The receiver will also re-boot after language installation so it’s better to wait for the second re-boot before you start initializing the receiver.
Adjusting
Backlight Level
Setting Backlight
Idle Time
• Once the receiver has been initialized, you can remove the |
|
|
SD card and put that card away in a safe place. |
English |
|
Warning! For some reason, you may need to use |
> Settings |
|
> System > Reset to factory default to reset the receiver to its |
|
|
default settings. Be aware this will delete the applications |
|
|
you installed from the SD card. So please insert the SD card |
|
|
before you reset to factory settings, This will automatically re- |
|
|
start the installation of the applications once the reset |
|
|
sequence is complete. |
|
|
The screen backlight may be adjusted to match the ambient light for optimized visibility. You don’t need the same level of screen backlight in dark areas than in hot sun.
•On the Home screen, tap successively  , Settings, System and Brightness.
•Drag the cursor to the right or left to set the screen backlight to the desired level (between 0 and 10). The resulting brightness is obtained when you release the cursor.
•Tap OK to save your setting.
•Tap  to return to the Home screen.
One way of saving the battery is to avoid those periods of time during which the screen backlight is unnecessarily on.
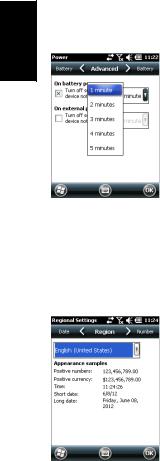
As the receiver automatically counts the time during which neither the keypad nor the touch screen is active, you can set the receiver to turn off the backlight automatically after a certain idle time.
•On the Home screen, tap successively  , Settings, System and Backlight.
•Choose the idle time before the backlight is turned off (10 seconds, 30 seconds or 1 to 5 minutes). For maximum power saving, you may clear the option that reactivates the screen backlight on touching the screen or pressing a key.
Different settings may be made for these two parameters depending on the power source used (battery or external).
•Tap OK to save the settings.
•Tap  to return to the Home screen
5
|
Power |
English |
Management |
|
Regional Settings
Locking the
Screen and the
Keypad
A better way of saving the battery is to allow the receiver to switch to Suspend mode automatically after a certain period of inactivity.
•On the Home screen, tap successively  , Settings and
Power.
•Tap on the Advanced tab. This tab allows you to ask for the receiver to switch automatically to Suspend mode if it stays idle for the period of time you choose. You may choose a different setting depending on whether the receiver is powered from the internal battery or from an external power source.
•Tap OK to save the settings.
•Tap  to return to the Home screen
It’s a good idea to customize your receiver so that it complies with a number of local preferences, such as country’s currency, decimal point representation, time and date formats, etc.
•On the Home screen, tap successively  , Settings, System and Regional Settings.
•On the Region tab, select your country.
•Use the other tabs to set your local settings:
–Number format
–Currency choice
–Time and date formats
•Tap OK to save the settings.
•Tap  to return to the Home screen
At some stage in your work, you may need to lock the receiver to make sure no user intervention from the screen or keypad can affect the work in progress.
•From the Home screen, tap  .
.
•At the bottom of the screen, tap  . As a result, the touch screen and keypad are made inactive.
6

• To unlock the touch screen and keypad, just drag the on- |
|
screen slide button either to the left or right. This will take |
English |
you back to the Home screen. |
|
|
How to Hold the Receiver
Switching to Suspend Mode
Tracking satellites with your receiver requires that you use the receiver outdoor and hold it in an appropriate manner.
The receiver will have the best view of the sky when you hold it at an angle of 30 to 45 degrees (38° ideally) from horizontal and not too close to your body.
You can check that your receiver is tracking enough satellites by running the GNSS Toolbox, and more particularly the GNSS Status function (see GNSS Status on page 33). When enough satellites are tracked, you can start using your receiver and run your application software.
Switching the receiver to Suspend mode is the right thing to do when you need to make a short pause in your work and you want to save the operating time of your battery. You should not however switch the receiver to Suspend mode when it is collecting raw data.
In Suspend mode, GNSS reception and the modem are off. The receiver is idle, using the minimum of energy required to save the use context. The Power & Battery LED flashes green every 5 seconds or so.
To switch to Suspend mode, just press briefly on the Power button [8].
[8]
[16]
7

English
Turning the
Receiver Off
To wake up the receiver, hold the same button pressed until the screen wakes up. This will instantly restore the use context in which the receiver was before entering the Suspend mode.
After you have finished your field work, turn off your receiver by holding the Power button [8] pressed until the message “Saving Parameters” is displayed on the screen. The power shutdown will be effective after about 10 seconds.
8
 Loading...