


 Loading...
Speco N8NRL8TB, N8NRL6TB, N8NRL4TB, N8NRL3TB, N8NRL2TB Quick Start Guide
...NRL (4 and 8 Channel)
Quick Start Guide
N4NRL
N8NRL
Version 1.0
Features and specifications are subject to change, please check www.specotech.com for firmware updates.
1

Welcome!
Thank you for purchasing this NVR.
This guide is designed to be a quick reference for installing the system.
Please read this guide carefully before installing and operating the unit.
For more detailed information, please refer to the user manual.
If technical assistance is needed, please contact Speco Technologies Technical Support.
Phone: 1-800-645-5516 option 3
Email: techsupport@specotech.com
Important Safeguards and Warnings
Speco Technologies assumes no liability or responsibility for any fires or electrical shock caused by improper handling or installation.
Speco Technologies is not liable for any problems caused by unauthorized modifications or attempted repair.
Note: All of the installation and operations here should conform to your local electric safety rules.
1. Contents
1.1 Check Unit and Accessories
After unpacking the unit, please check for any visible damage. Then check to make sure that all accessories are included. Check that the model number and serial number that’s listed on the label on the unit are the same as what’s listed on the package label.
1
1.2 Connections
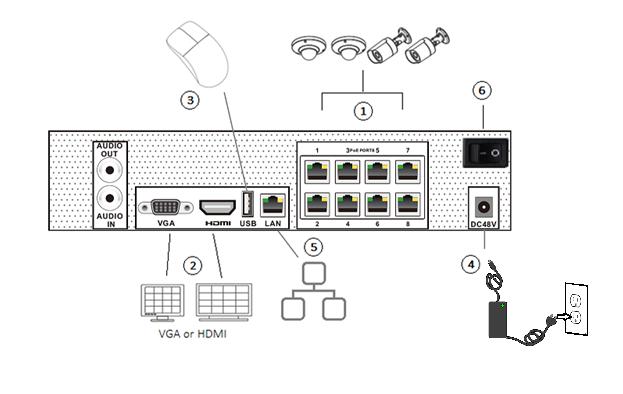
To quickly get started, connect the following to your recorder in the following order, please refer to Figure 1-2 (N8NRL shown for reference).
1.Connect IP cameras to the PoE ports of the recorder.
2.Connect a monitor to the recorder via VGA or HDMI cable (not included).
3.Connect the included optical mouse into any USB port of the recorder.
4.Connect the power adapter to the recorder and plug power cord into a 120VAC 50/60Hz outlet.
5.Connect recorder to network (optional)
6.Turn on power switch and allow recorder to boot up.
Figure 1-2 (8 channel unit shown)
2

2. Set and Security Questions
2.1 Enter a password
Note: You will be prompted to set a Password and security questions upon initial bootup. see Fig 2-1
The default login ID and administrator username is: admin
The password strength indicator can be used as a reference. Re-enter the password to confirm. Remember this password.
2.2 Enter answers for two security questions.
You can select which security questions to provide answers for. It is important that you remember the answers for these questions or you will not be able to reset your password and be locked out.
Note: These questions must be answered in exact form when resetting the password and is case-sensitive.
Figure 2-1
3

3. Update Firmware (if necessary)
Speco will continuously make improvements, please check the website to ensure you are running the latest firmware version.
3.1 Check firmware version on recorder
You can click Start→Settings→System→Information→Basic go to “About this machine” and click on “view”. You will then be able to see the firmware version number and build date. Now go to www.specotech.com, then click on Support, then Recorder Software updates and follow the prompts until you find the model of your recorder. Then compare the release date of the firmware on the website with the recorder’s firmware build date. See Figure 3-2 and 3-3.
Figure 3-2
Figure 3-3
If the web has a more recent firmware version than your recorders build date, then please update your device to the latest firmware.
4
Loading...