


Help Guide
Digital Camera
ZV-1
Use this manual if you encounter any problems, or have any questions about your product.
Looking for valuable information, such as essential points on shooting (Tutorials)
This website introduces convenient functions, ways of usage, and setting examples. Refer to the website when you set up your camera. (Another window will open.)
ZV-1 accessories compatibility information
This website provides the accessories compatibility information. (Another window will open.)
Names of parts/Icons and indicators
Identifying parts
Basic operations
Using the control wheel
Using MENU items
Assigning frequently used functions to buttons (Custom Key)
1
Using Fn (Function) button (Function menu)
How to use the keyboard
Icons and indicators
List of icons on the monitor
Switching the screen display (while shooting/during playback)
DISP Button
Preparing the camera
Checking the camera and the supplied items
Charging the battery pack
Inserting/removing the battery pack
Charging the battery pack while it is inserted in the camera
Charging by connecting to a computer
Battery life and number of recordable images
Supplying power from a wall outlet (wall socket)
Notes on the battery pack
Notes on charging the battery pack
Inserting a memory card (sold separately)
Inserting/removing a memory card
Memory cards that can be used
Notes on memory card
Setting language, date and time
In-Camera Guide
Shooting
Shooting still images
Focusing
Focus Mode
Auto focus
Focus Area
Phase detection AF
Focus Standard
2

AF/MF control
Focusing on eyes (Face/Eye AF Set.)
Tracking subject (Tracking function)
Focus Frame Color
Pre-AF (still image)
AF Area Auto Clear
Disp. cont. AF area
Phase Detect. Area
Circ. of Focus Point
Manual focus
Manual Focus (Set Focus)
Direct manual focus (DMF)
Focus Magnifier
MF Assist (still image)
Focus Magnif. Time
Initial Focus Mag. (still image)
Peaking Setting
Selecting a drive mode (Continuous shooting/Self-timer)
Drive Mode
Cont. Shooting
Self-timer
Self-timer(Cont)
Cont. Bracket
Single Bracket
Indicator during bracket shooting
WB bracket
DRO Bracket
Bracket Settings
Taking pictures of yourself by monitoring the screen
Self-portrait/ -timer
3

Interval shooting
Interval Shoot Func.
Using touch functions
Touch Operation
Func. of Touch Operation: Touch Shutter
Func. of Touch Operation: Touch Focus
Func. of Touch Operation: Touch Tracking
Selecting still image size/image quality
File Format (still image)
JPEG Quality (still image)
JPEG Image Size (still image)
Aspect Ratio (still image)
Panorama: Size
Panorama: Direction
Selecting a shooting mode
Changing shooting modes (Shoot Mode)
Intelligent Auto
About Scene Recognition
Program Auto
Aperture Priority
Shutter Priority
Manual Exposure
Bulb shooting
Sweep Panorama
Scene Selection
Recall (Camera Settings1/Camera Settings2)
HFR (High Frame Rate): Exposure Mode
Movie: Exposure Mode
Intelligent Auto (movie)
Controlling the exposure/metering modes
4

Exposure Comp.
Exposure Set. Guide
ND Filter
Metering Mode
Face Priority in Multi Metering
AE lock
Exp.comp.set
Zebra Setting
Switching the shooting style
Product Showcase Set
Background Defocus
Correcting brightness and contrast automatically
D-Range Optimizer (DRO)
Auto HDR
Selecting the ISO sensitivity
ISO
Using the zoom
The zoom features available with this product
Zoom
Zoom Setting
About zoom scale
Zoom Speed
White balance
White Balance
Priority Set in AWB
Capturing a standard white color to set the white balance (custom white balance)
Setting how to process images
Creative Style
Picture Effect
Soft Skin Effect
5
Auto Object Framing (still image)
Color Space (still image)
Shutter settings
Shutter Type (still image)
Release w/o Card
Reducing blur
SteadyShot (still image)
Noise reduction
Long Exposure NR (still image)
High ISO NR (still image)
Face detection
Regist. Faces Priority
Smile Shutter
Face Registration (New Registration)
Face Registration (Order Exchanging)
Face Registration (Delete)
Using the flash
Using flash (sold separately)
Flash Mode
Flash Comp.
Recording movies
Shooting movies
Movie w/ shutter
Movie recording formats
File Format (movie)
Record Setting (movie)
Shooting super-slow-motion movies (HFR Settings)
Capturing still images while recording movies (Dual Rec)
Quality(Dual Rec)
Img. Size(Dual Rec)
6

Auto Dual Rec
Proxy Recording
Audio Recording
Audio Level Display
Audio Rec Level
Wind Noise Reduct.
Picture Profile
Gamma Disp. Assist
Auto Slow Shutter (movie)
Initial Focus Mag. (movie)
AF drive speed (movie)
AF Tracking Sens. (movie)
SteadyShot (movie)
TC/UB Settings
TC/UB Disp. Switch
MOVIE Button
Marker Display (movie)
Marker Settings (movie)
4K Output Select (movie)
REC Lamp
Viewing
Viewing images
Playing back still images
Enlarging an image being played back (Enlarge Image)
Rotating recorded images automatically (Display Rotation)
Rotating an image (Rotate)
Playing back panoramic images
Enlarge Initial Mag.
Enlarge Initial Position
Playing back movies
7

Motion Shot Video
Motion Interval ADJ
Volume Settings
Photo Capture
Playing back images on the image index screen (Image Index)
Switching between still images and movies (View Mode)
Display as Group
Cont. PB for Interval
PB Speed for Interval
Playing back images using slideshow (Slide Show)
Editing images
Beauty Effect
Protecting data
Protecting images (Protect)
Setting Rating function
Rating
Rating Set(Custom Key)
Designating images for printing (DPOF)
Specifying images to be printed (Specify Printing)
Deleting images
Deleting a displayed image
Deleting multiple selected images (Delete)
Delete confirm.
Viewing images on a TV
Viewing images on a TV using an HDMI cable
Customizing the camera
Registering frequently used functions
Memory (Camera Settings1/Camera Settings2)
Customizing MENU (My Menu)
Add Item
8

Sort Item
Delete Item
Delete Page
Delete All
Display From My Menu
Checking images before/after recording
Auto Review
Live View Display
Monitor settings
Grid Line
Monitor Brightness
Power OFF w/ monitor
Auto Monitor OFF
Bright Monitoring
Memory card settings
Format
Select REC Folder
New Folder
File/Folder Settings (still image)
File Settings (movie)
Display Media Info.
Recover Image DB
Camera settings
Audio signals
Write Date (still image)
Tile Menu
Power Save Start Time
Auto Power OFF Temp.
NTSC/PAL Selector
HDMI Settings: HDMI Resolution
9

HDMI Settings: 24p/60p Output (movie) (Only for 1080 60i compatible models)
HDMI Settings: HDMI Info. Display
HDMI Settings: TC Output (movie)
HDMI Settings: REC Control (movie)
HDMI Settings: CTRL FOR HDMI
USB Connection
USB LUN Setting
USB Power Supply
Language
Date/Time Setup
Area Setting
Version
Demo Mode
Initializing the camera
Setting Reset
Using network functions
Connecting this product and a Smartphone
Imaging Edge Mobile
Ctrl w/ Smartphone
Controlling the camera using an Android smartphone (QR Code)
Controlling the camera using an Android smartphone (SSID)
Controlling the camera using an iPhone or iPad (QR Code)
Controlling the camera using an iPhone or iPad (SSID)
Transferring images to a Smartphone
Send to Smartphone Func.: Send to Smartphone
Send to Smartphone Func.: Sending Target (proxy movies)
Send to Smartphone Func.: Cnct. during Power OFF
Reading location information from a smartphone
Location Info. Link Set.
Using a remote commander with Bluetooth communication
10
Bluetooth Rmt Ctrl
Transferring images to a TV
View on TV
Changing the network settings
Airplane Mode
Wi-Fi Settings: WPS Push
Wi-Fi Settings: Access Point Set.
Wi-Fi Settings: Display Wi-Fi Info.
Wi-Fi Settings: SSID/PW Reset
Bluetooth Settings
Edit Device Name
Reset Network Set.
Using a computer
Recommended computer environment
Connecting/disconnecting the camera
Connecting to a computer
Disconnecting the camera from the computer
Managing/editing images on a computer
Introduction to computer software (PlayMemories Home/Imaging Edge)
Importing images to the computer without using computer software
Send to Computer
Operating the camera from a computer (PC Remote Function)
List of MENU items
Using MENU items
Camera Settings1
File Format (still image)
JPEG Quality (still image)
JPEG Image Size (still image)
Aspect Ratio (still image)
Panorama: Size
11

Panorama: Direction
Long Exposure NR (still image)
High ISO NR (still image)
Color Space (still image)
Changing shooting modes (Shoot Mode)
Intelligent Auto
Scene Selection
Drive Mode
Bracket Settings
Interval Shoot Func.
Recall (Camera Settings1/Camera Settings2)
Memory (Camera Settings1/Camera Settings2)
Focus Mode
Focus Area
Focusing on eyes (Face/Eye AF Set.)
Pre-AF (still image)
Focus Frame Color
AF Area Auto Clear
Disp. cont. AF area
Phase Detect. Area
Circ. of Focus Point
Manual Focus (Set Focus)
Exposure Comp.
ISO
ND Filter
Metering Mode
Face Priority in Multi Metering
Flash Mode
Flash Comp.
Exp.comp.set
12

White Balance
Priority Set in AWB
D-Range Optimizer (DRO)
Auto HDR
Creative Style
Picture Effect
Picture Profile
Soft Skin Effect
Focus Magnifier
Focus Magnif. Time
Initial Focus Mag. (still image)
MF Assist (still image)
Peaking Setting
Product Showcase Set
Face Registration (New Registration)
Face Registration (Order Exchanging)
Face Registration (Delete)
Regist. Faces Priority
Smile Shutter
Auto Object Framing (still image)
Self-portrait/ -timer
Camera Settings2
Movie: Exposure Mode
HFR (High Frame Rate): Exposure Mode
File Format (movie)
Record Setting (movie)
Shooting super-slow-motion movies (HFR Settings)
Quality(Dual Rec)
Img. Size(Dual Rec)
Auto Dual Rec
13

Proxy Recording
AF drive speed (movie)
AF Tracking Sens. (movie)
Auto Slow Shutter (movie)
Initial Focus Mag. (movie)
Audio Recording
Audio Rec Level
Audio Level Display
Wind Noise Reduct.
SteadyShot (movie)
Marker Display (movie)
Marker Settings (movie)
REC Lamp
Movie w/ shutter
Shutter Type (still image)
Release w/o Card
SteadyShot (still image)
Zoom Setting
Zoom Speed
DISP Button
Zebra Setting
Grid Line
Exposure Set. Guide
Live View Display
Auto Review
Assigning frequently used functions to buttons (Custom Key)
Using Fn (Function) button (Function menu)
Func. of Touch Operation: Touch Shutter
Func. of Touch Operation: Touch Focus
Func. of Touch Operation: Touch Tracking
14

MOVIE Button
Audio signals
Write Date (still image)
Network
Send to Smartphone Func.: Send to Smartphone
Send to Smartphone Func.: Sending Target (proxy movies)
Send to Smartphone Func.: Cnct. during Power OFF
Send to Computer
View on TV
Ctrl w/ Smartphone
Operating the camera from a computer (PC Remote Function)
Airplane Mode
Wi-Fi Settings: WPS Push
Wi-Fi Settings: Access Point Set.
Wi-Fi Settings: Display Wi-Fi Info.
Wi-Fi Settings: SSID/PW Reset
Bluetooth Settings
Location Info. Link Set.
Bluetooth Rmt Ctrl
Edit Device Name
Reset Network Set.
Playback
Protecting images (Protect)
Rotating an image (Rotate)
Deleting multiple selected images (Delete)
Rating
Rating Set(Custom Key)
Specifying images to be printed (Specify Printing)
Beauty Effect
Photo Capture
15

Enlarging an image being played back (Enlarge Image)
Enlarge Initial Mag.
Enlarge Initial Position
Motion Interval ADJ
Cont. PB for Interval
PB Speed for Interval
Playing back images using slideshow (Slide Show)
Switching between still images and movies (View Mode)
Playing back images on the image index screen (Image Index)
Display as Group
Rotating recorded images automatically (Display Rotation)
Setup
Monitor Brightness
Gamma Disp. Assist
Volume Settings
Tile Menu
Delete confirm.
Auto Monitor OFF
Power Save Start Time
Power OFF w/ monitor
Auto Power OFF Temp.
NTSC/PAL Selector
Touch Operation
Demo Mode
TC/UB Settings
HDMI Settings: HDMI Resolution
HDMI Settings: 24p/60p Output (movie) (Only for 1080 60i compatible models)
HDMI Settings: HDMI Info. Display
HDMI Settings: TC Output (movie)
HDMI Settings: REC Control (movie)
16

HDMI Settings: CTRL FOR HDMI
4K Output Select (movie)
USB Connection
USB LUN Setting
USB Power Supply
Language
Date/Time Setup
Area Setting
Format
Select REC Folder
New Folder
File/Folder Settings (still image)
File Settings (movie)
Recover Image DB
Display Media Info.
Version
Setting Reset
My Menu
Add Item
Sort Item
Delete Item
Delete Page
Delete All
Display From My Menu
Precautions/This product
Precautions
On cleaning
Number of recordable images
Recordable movie times
Using the battery charger abroad
17

AVCHD format
License
Specifications
Trademarks
If you have problems
Troubleshooting
Self-diagnosis display
Warning messages
5-016-934-11(1) Copyright 2020 Sony Corporation
18
Help Guide
Digital Camera
ZV-1
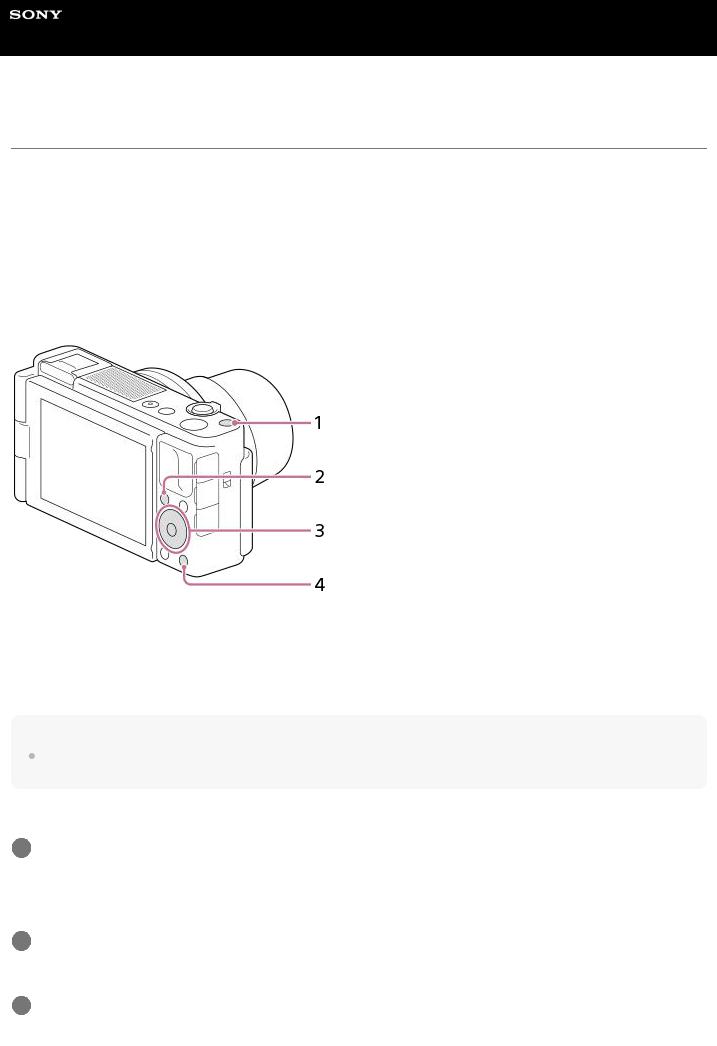
Identifying parts
1.ON/OFF (Power) button
2.Power/Charge lamp
3.MODE (Mode) button
4.MOVIE (Movie) button
5.C1 (Custom 1) button
6.Shutter button
7.For shooting: W/T (zoom) lever
For viewing:  (Index) lever/Playback zoom lever
8.Self-timer lamp/Recording lamp
9.Internal microphone
 Do not cover this part during movie recording. Doing so may cause noise or lower the volume.
10. Multi Interface Shoe
 Some accessories may not go in all the way and protrude backward from the Multi Interface Shoe. However, when the accessory reaches the front end of the shoe, the connection is completed.
 For details on compatible accessories for the Multi Interface Shoe, visit the Sony website, or consult your Sony dealer or local authorized Sony service facility. Accessories for the Accessory Shoe can also be used. Operations with other manufacturers’ accessories are not guaranteed.
11. Lens
19
12. Monitor/Touch panel
 You can adjust the monitor to an easily viewable angle and shoot from any position.
(A): Approx. 176°
(B): Approx. 270°
 If you open the monitor from the closed position with the screen facing inwards, the camera will turn on.
 To choose whether or not the camera turns off when the monitor is closed with the screen facing inwards, select MENU →
  (Setup) → [Power OFF w/ monitor].
 You may not be able to adjust the monitor angle depending on the type of a tripod you use. In such a case, release the tripod screw once to adjust the monitor angle.
 Do not apply excessive force when opening, closing, or rotating the monitor. Doing so may cause a malfunction.
13.  (Microphone) jack
 When an external microphone is connected, the built-in microphone turns off automatically. When the external microphone is a plugin-power type, the power of the microphone is supplied by the camera.
14. Multi/Micro USB Terminal
 This terminal supports Micro USB-compatible devices.
 For details on compatible accessories for the Multi/Micro USB Terminal, visit the Sony website, or consult your Sony dealer or local authorized Sony service facility.
15.HDMI micro jack
16.Wi-Fi/Bluetooth antenna (built-in)
17.For shooting: Fn (Function) button
For viewing:  (Send to Smartphone) button
18.MENU button
20
19.Control wheel
20.Center button
21. (Playback) button
22.C2/ (Custom button 2/Delete) button
23.Hook for strap
24.Battery insertion slot
25.Battery lock lever
26.Access lamp
27.Memory card slot
28.Tripod socket hole
Supports 1/4-20 UNC screws
 Use a tripod with a screw less than 5.5 mm (7/32 inches) long. Otherwise, you cannot firmly secure the camera, and damage to the camera may occur.
29.Battery/Memory card cover
30.Speaker
Using the wind screen (supplied)
Use the wind screen to reduce wind noise picked up by the internal microphone when recording a movie. Remove the shoe cap from the camera, and then attach the wind screen to the Multi Interface Shoe.
Note
When attaching the wind screen, make sure that the wind screen does not get caught in the Multi Interface Shoe. Be careful not to lose the shoe cap when you remove it from the camera.
5-016-934-11(1) Copyright 2020 Sony Corporation
21

Help Guide
Digital Camera
ZV-1
Using the control wheel
 You can select setting items by turning or pressing the top/bottom/left/right side of the control wheel. Your selection is determined when you press the center of the control wheel.
 The DISP (Display Setting),
  (Exposure Comp.), and
  /
/ (Drive Mode) functions are assigned to the top/bottom/left side of the control wheel. In addition, you can assign selected functions to the left/right side and the center of the control wheel.
 During playback, you can display the next/previous image by pressing the right/left side of the control wheel or by turning the control wheel.
Related Topic
 Assigning frequently used functions to buttons (Custom Key)
5-016-934-11(1) Copyright 2020 Sony Corporation
22
Help Guide
Digital Camera
ZV-1
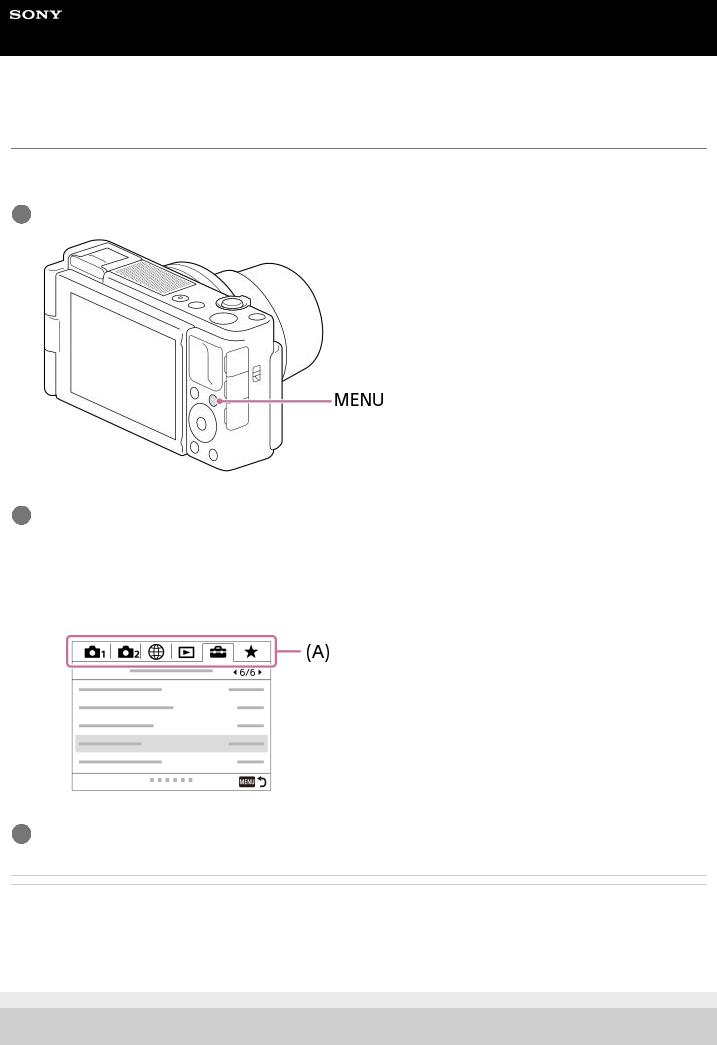
Using MENU items
You can change settings related to all the camera operations including shooting, playback, and operating method. You can also execute camera functions from the MENU.
1Press the MENU button to display the menu screen.
2Select the desired setting you want to adjust using the top/bottom/left/right sides of the control wheel or by turning the control wheel, and then press the center of the control wheel.
 Select a MENU tab (A) at the top of the screen, and press the left/right side of the control wheel to move to another MENU tab.
 You can move to the next MENU tab by pressing the Fn button.
 You can go back to the previous screen by pressing the MENU button.
3Select the desired setting value, and press the center to confirm your selection.
Related Topic
 Tile Menu
 Add Item
 Display From My Menu
5-016-934-11(1) Copyright 2020 Sony Corporation
23
Help Guide
Digital Camera
ZV-1
Assigning frequently used functions to buttons (Custom Key)
You can use the custom key function to assign the functions you use most frequently to easily operable keys. This lets you skip the process of selecting items from MENU, so you can recall the functions more quickly. You can also assign [Not set] to easily operable keys to prevent accidental operation.
You can separately assign functions to custom keys for the still image shooting mode (  Custom Key), movie shooting mode (
  Custom Key), and playback mode (
  Custom Key).
 Assignable functions vary depending on the keys.
You can assign functions to the following keys.
1.Custom Button 1
2.Fn/ Button
3.Center Button /Left Button/Right Button
4.Custom Button 2
Hint
You can recall functions more quickly by using the Function menu to configure each setting directly from the Fn button, along with the custom keys. Refer to the related functions under “Related Topic” at the bottom of this page.
The following is the procedure for assigning the [Eye AF] function to the C2 button.
1MENU →  (Camera Settings2) → [
 Custom Key].
 If you want to assign a function to recall while shooting movies, select [
 Custom Key]. If you want to assign a function to recall while playing back images, select [
 Custom Key].
2Move to the [Rear] screen using the left/right side of the control wheel. Then, select [Custom Button 2] and press the center of the control wheel.
3Press the left/right side of the control wheel until [Eye AF] is displayed. Select [Eye AF], and then press the center.
24

 If you press the C2 button in the still image shooting mode and eyes are detected, [Eye AF] will activate, and the camera will focus on the eyes. Shoot images while holding down the C2 button.
Note
If you assign [Follow Custom ( movie shooting mode such as [ movie shooting mode.
)] to a custom key using [ Custom Key], but the function is one that is unavailable in the JPEG Quality] or [Flash Mode], the function will not be recalled when you press the key in the
If you assign [Follow Custom ( /
/ )] to a custom key using [
 Custom Key], the camera will switch to the shooting mode and recall the assigned function when you press the key in the playback mode.
Related Topic
 Using Fn (Function) button (Function menu)
5-016-934-11(1) Copyright 2020 Sony Corporation
25
Help Guide
Digital Camera
ZV-1
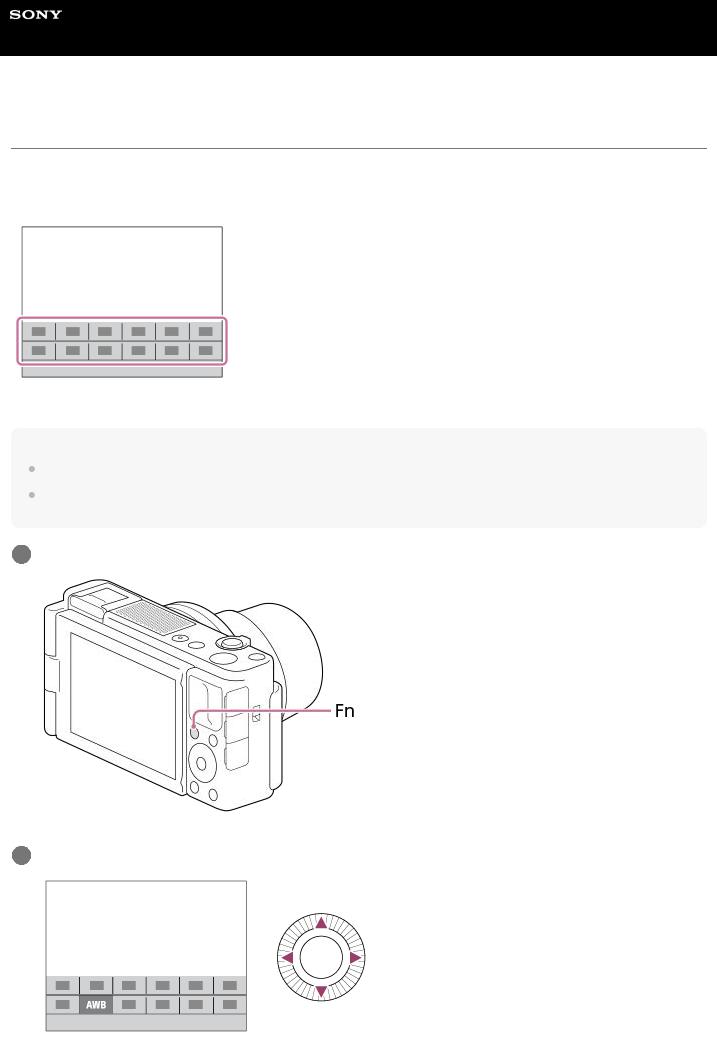
Using Fn (Function) button (Function menu)
The Function menu is a menu of 12 functions that is displayed at the bottom of the screen when you press the Fn (Function) button in the shooting mode. You can access frequently used functions more quickly by registering them to the function menu.
Hint
You can register twelve functions to the Function menus for still image shooting and movie shooting, respectively.
You can recall functions more quickly by using the custom key function to assign frequently used functions to desired keys, along with the function menu. Refer to the related functions under “Related Topic” at the bottom of this page.
1Press the Fn (Function) button in shooting mode.
2Select the desired function by pressing the top/bottom/left/right side of the control wheel.
26
3Select the desired setting by turning the control wheel, and press the center of the control wheel.
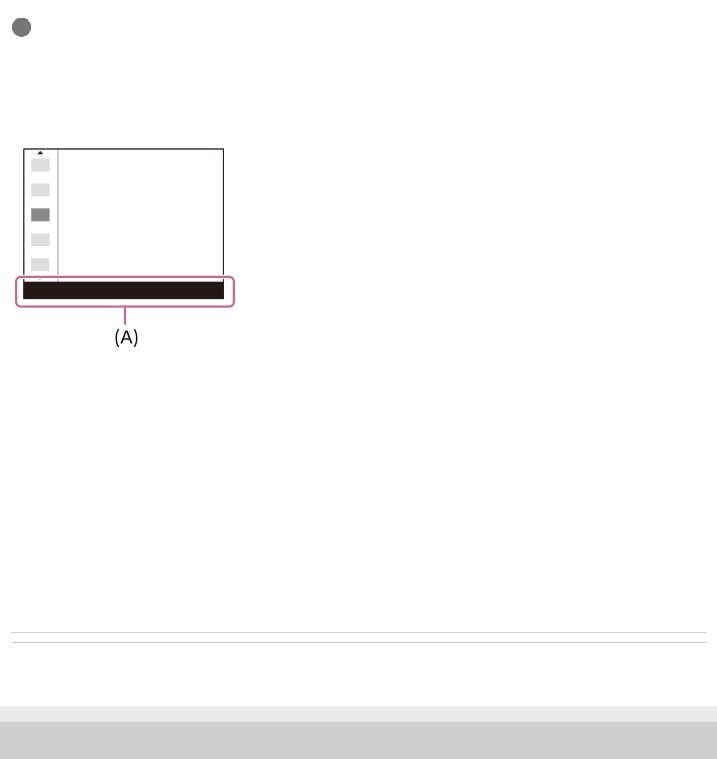
To adjust settings from the dedicated setting screens
Select the desired function in step 2, then press the center of the control wheel. The dedicated setting screen for the function will appear. Follow the operating guide (A) to adjust settings.
To change the functions in the function menu (Function Menu Set.)
The following is the procedure for changing [Drive Mode] in the still image function menu to [Grid Line].
 To change the movie function menu, select a movie function menu item in Step 2.
1.MENU →  (Camera Settings2) → [Function Menu Set.].
2.Select 
 (Drive Mode) from among the twelve still image function menu items using the top/bottom/left/right side of the control wheel, and then press the center.
3.Move to the [Display/Auto Review] screen using the left/right side of the control wheel. Then, select [Grid Line] and press the center of the control wheel.

 (Grid Line) will be displayed in the former location of
 (Drive Mode) in the function menu.
Related Topic
 Assigning frequently used functions to buttons (Custom Key)
5-016-934-11(1) Copyright 2020 Sony Corporation
27
Help Guide
Digital Camera
ZV-1
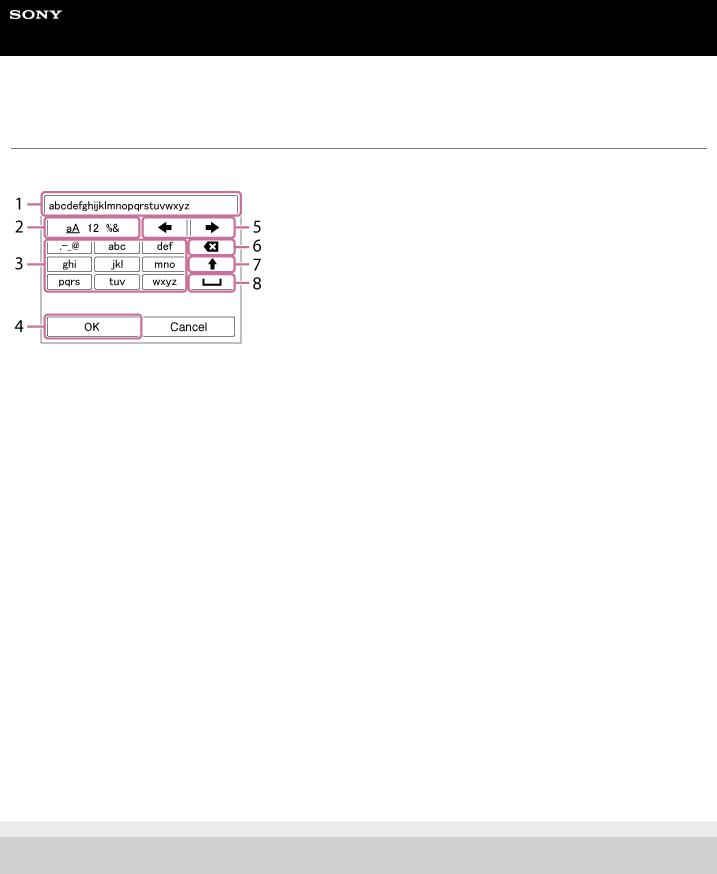
How to use the keyboard
When manual character entry is required, a keyboard is displayed on the screen.
Move the cursor on desired key using the control wheel, then press the center to enter.
1.Input box
The characters you entered are displayed.
2.Switch character types
Each time you press this key, the character type will switch between alphabet letters, numerals and symbols.
3.Keyboard
Each time you press this key, the characters corresponding to that key will be displayed one-by-one in order.
For example: If you want to enter “abd”
1.Press the key for “abc” once to display “a.”
2.Press “ ” (the right-pointing arrow in the “Move cursor” area, marked as No.5).
3.Press the key for “abc” twice to display “b.”
4.Press the key for “def” once to display “d.”
4.Finalize
Finalizes the entered characters.
5.Move cursor
Moves the cursor in the input box to the right or left.
6.Delete
Deletes the character preceding the cursor.
7. (upward-pointing arrow)
Switches the next character to a capital or lowercase letter.
8. (space) Enters a space.
 To cancel input, select [Cancel].
5-016-934-11(1) Copyright 2020 Sony Corporation
28
Help Guide
Digital Camera
ZV-1
List of icons on the monitor
The displayed contents and their positions shown below are just a guideline, and may differ from the actual display. Descriptions are given below the indications of the icons.
Icons on the shooting screen
1.Shooting mode/Scene recognition

 P P* A S M


Shooting mode Register number
Scene Recognition icons Scene Selection
2.Camera settings
 NO CARD
Memory card status
100/1 h 30 m
Remaining number of recordable images/Recordable time of movies
Writing data / Number of images left to write
CAPTURE
Capturing still image Unable to shoot still images Auto Dual Rec
Aspect ratio of still images
20M / 18M / 17M / 13M / 10M / 7.5M / 6.5M / 5.0M / 4.2M / 3.7M / VGA
Image size of still images
RAW
RAW recording
X.FINE FINE STD
JPEG Quality
XAVC S 4K XAVC S HD AVCHD
29
File format of movies
Record setting of movies
120p 100p 60p 50p 60i 50i 30p 25p 24p
Frame rate of movies
Proxy Recording
240fps 250fps 480fps 500fps 960fps 1000fps
Frame rate for HFR shooting Flash charge in progress Setting Effect OFF
SteadyShot off/on, Camera shake warning
Smart Zoom/ClearImage Zoom/Digital Zoom
PC Remote
Bright Monitoring
No audio recording of movies
Remote control
Wind Noise Reduct.
 REC Timing
Gamma Disp. Assist
Touch Shutter
Focus Cancel
Tracking Cancel
Spot Focus
Performing [Spot Focus]
Bluetooth connection available / Bluetooth connection unavailable Connected to smartphone / Not connected to smartphone
Obtaining location information / Location information cannot be obtained Airplane Mode
Overheating warning
20 sec
Remaining recordable time when overheating warning is displayed Database file full / Database file error
30
 Loading...