

Sony XR-C6090R, XR-C5090R User Manual
FM/MW/LW
Cassette Car
Stereo
3-861-723-12 (1)
Operating Instructions
Manual de instrucciones
Bruksanvisning
Manual de instruções
For installation and connections, see the supplied Installation/Connections
manual.
Con respecto a la instalación y las conexiones, consulte el manual de Instalación/
conexiones suministrado.
Vi hänvisar till det medföljande häftet angående montering/anslutningar.
Para a instalação e as ligações, consulte o manual de instalação/ligações
fornecido.
XR-C6090R
EN
ES
S
P
XR-C5090R
1998 by Sony Corporation

EN
Welcome!
Thank you for purchasing the Sony Cassette
Car Stereo. This unit lets you enjoy a variety of
features by using a rotary commander.
In addition to the tape playback and the radio
operation you can expand your system by
connecting optional CD/MD unit*.
* You can connect to an CD changer, MD changer, or an
CD player, MD player.
2

Table of contents
This Unit Only
Getting Started
Resetting the unit ................................................ 4
Detaching the front panel .................................. 4
Preparing the rotary commander ..................... 4
Setting the clock .................................................. 5
Cassette Player
Listening to a tape ............................................... 5
Playing a tape in various modes ....................... 6
Radio
Memorizing stations automatically
— Best Tuning Memory (BTM) ................... 7
Memorizing only the desired stations ............. 7
Receiving the memorized stations.................... 7
RDS
Overview of the RDS function .......................... 8
Displaying the station name .............................. 8
Re-tuning the same programme automatically
— Alternative Frequencies (AF) .................. 9
Listening to traffic announcements .................. 9
Presetting the RDS stations with the AF
and TA data ................................................. 10
Locating a station by programme type .......... 11
Setting the clock automatically ....................... 11
Other Functions
Using the rotary commander .......................... 12
Adjusting the sound characteristics ............... 13
Attenuating the sound ..................................... 13
Changing the sound and beep tone ............... 13
With Optional Equipment
CD/MD Unit
Playing a CD/MD ............................................. 14
Scanning the tracks
— Intro scan .................................................. 15
Playing tracks repeatedly
— Repeat play .............................................. 15
Playing tracks in random order
— Shuffle play .............................................. 15
Labeling a CD (XR-C6090R only)
— Disc Memo (CD unit with
custom file function) .............................. 16
Selecting the specific tracks for playback
(XR-C6090R only)
— Bank (CD unit with custom file function)
................................................................... 16
EN
Additional Information
Precautions ......................................................... 17
Maintenance ....................................................... 18
Dismounting the unit ....................................... 19
Location of controls .......................................... 20
Specifications ..................................................... 21
Troubleshooting guide ..................................... 22
Index ................................................................... 24
3
Getting Started
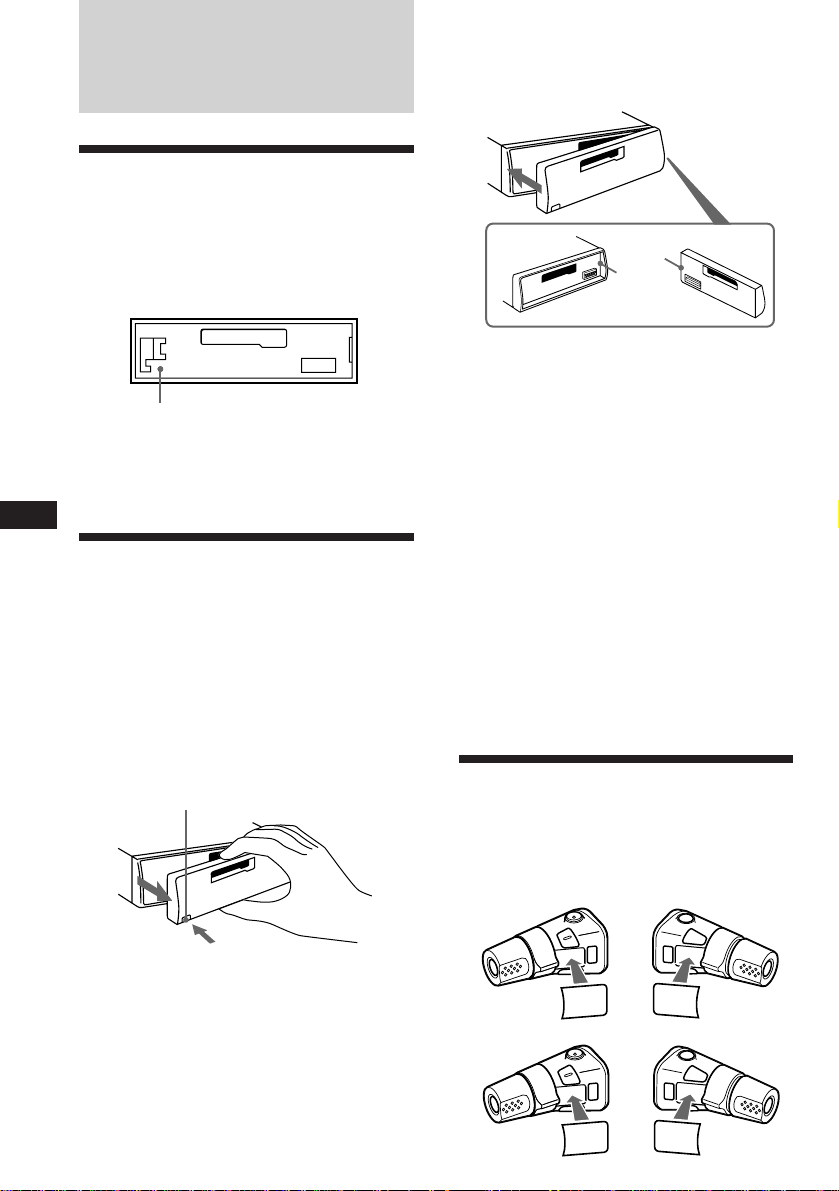
Resetting the unit
Before operating the unit for the first time or
after replacing the car battery, you must reset
the unit.
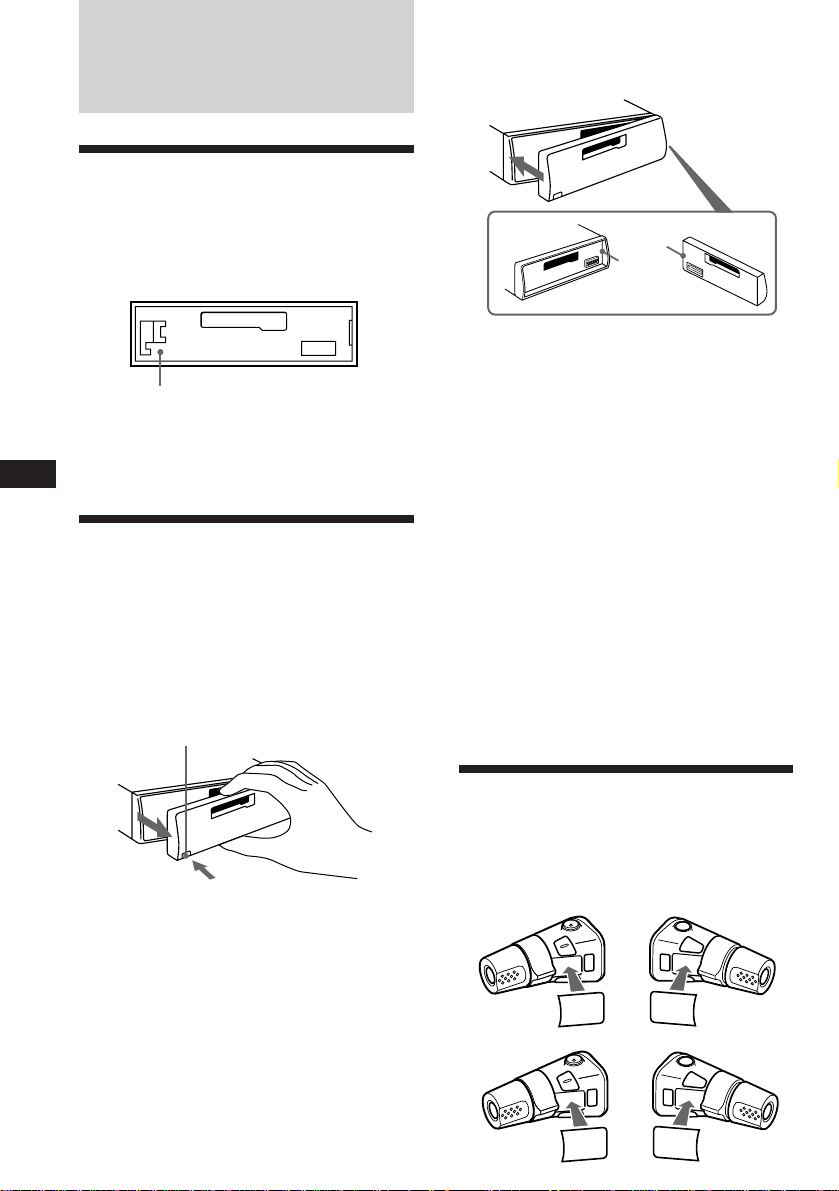
Press the reset button with a pointed object,
such as a ball-point pen.
Reset button
Note
Pressing the reset button will erase all the memorized
programme and memory functions.
EN
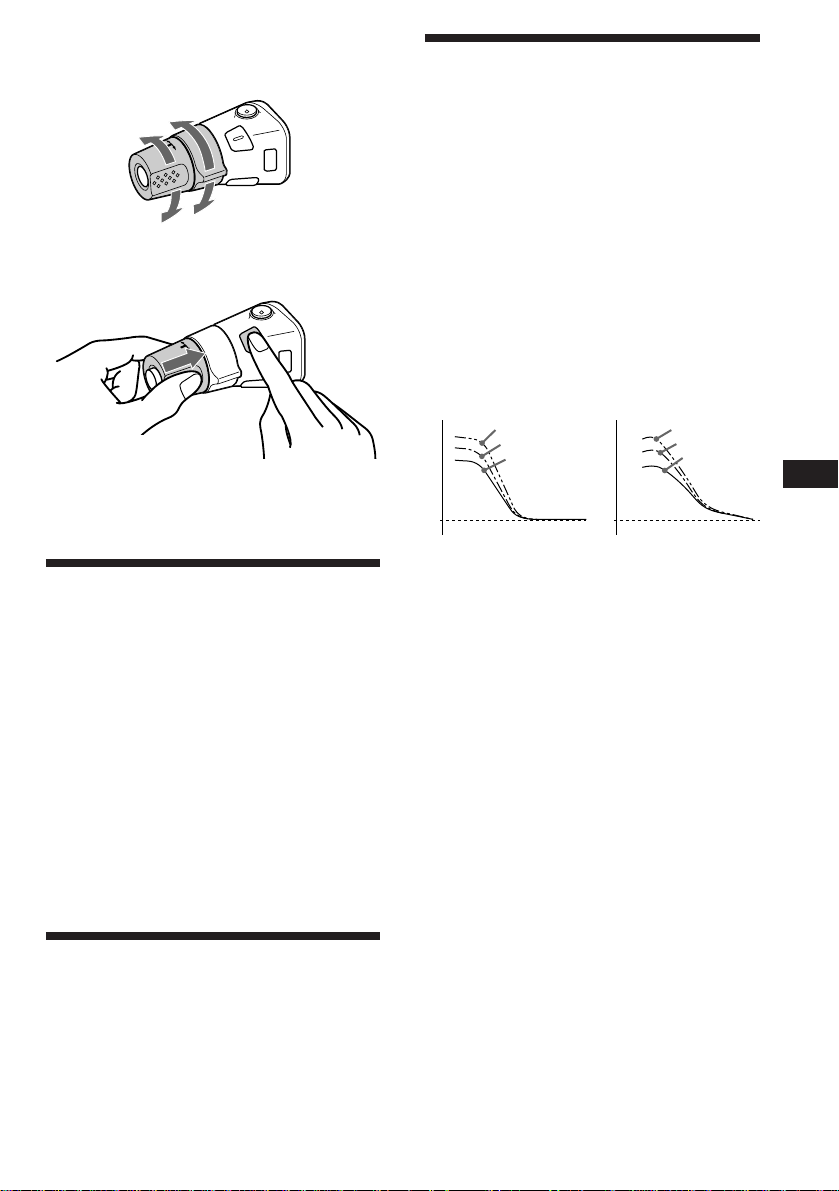
Detaching the front panel
The front panel of this unit can be detached to
prevent the unit from being stolen.
1 Press (OFF).
2 Press (RELEASE) to detach the front
panel then gently pull it out.
(RELEASE)
Attaching the front panel
Attach part A of the front panel to part B of
the unit as illustrated and push until it clicks.
A
B
Notes
• Make sure the front panel is right side up when attaching
it to the unit as it cannot be attached upside down.
• Do not press the front panel too hard when attaching it
to the unit. It can easily be attached by pressing it lightly
against the unit.
• When you carry the front panel with you, keep it in the
supplied case.
• Do not press hard or put excessive pressure on the
display windows of the front panel.
• Do not expose the front panel to direct sunlight, heat
sources such as hot air ducts or leave it in a humid place.
Never leave it on the dashboard etc. of a car parked in
direct sunlight where there may be a considerable rise in
temperature inside the car.
Caution alarm
If you turn the ignition key to the OFF position
without removing the front panel, the caution
alarm will beep for a few seconds (only when
the POWER SELECT switch is set to the A
position).
If you connect an optional power amplifier to
the LINE OUT, and do not use the built-in
amplifier, the beep tone will be disabled.
Notes
• Be sure not to drop the panel when detaching it from the
unit.
• If you press (RELEASE) to detach the panel while the
unit is still turned on, the power will automatically turn
off to protect the speakers from being damaged.
4
Preparing the rotary
commander
When you mount the rotary commander,
attach the appropriate label, as in the
illustration below.
XR-C6090R:
F
IL
E
M
O
D
E
S
E
L
D
S
P
L
M
O
D
E
S
E
L
XR-C5090R:
L
E
S
E
D
O
M
FILE
L
E
S
E
D
O
M
L
P
S
D
Setting the clock
The clock has a 24-hour digital indication.
For example, setting it to 10:08
Cassette Player
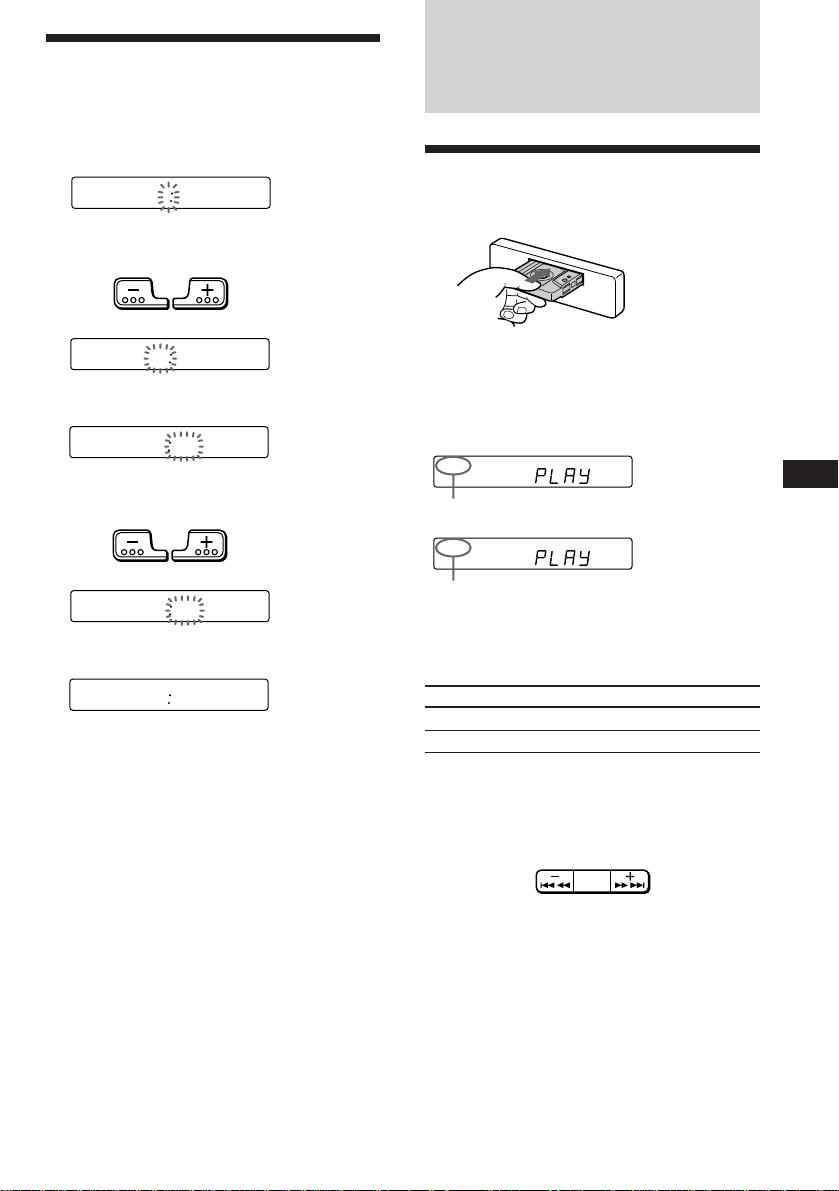
1 Press (DSPL) for two seconds.
100
The hour digit blinks.
1 Set the hour digits.
to go backword to go forward
1000
2 Press (SEL) momentarily.
1000
The minute digit blinks.
3 Set the minute digits.
to go backword
1008
to go forward
2 Press (DSPL) momentarily.
1008
The clock activates.
Note
If the POWER SELECT switch on the top of the unit is set
to the B position, the clock cannot be set unless the power
is turned on. Set the clock after you have turned on the
radio.
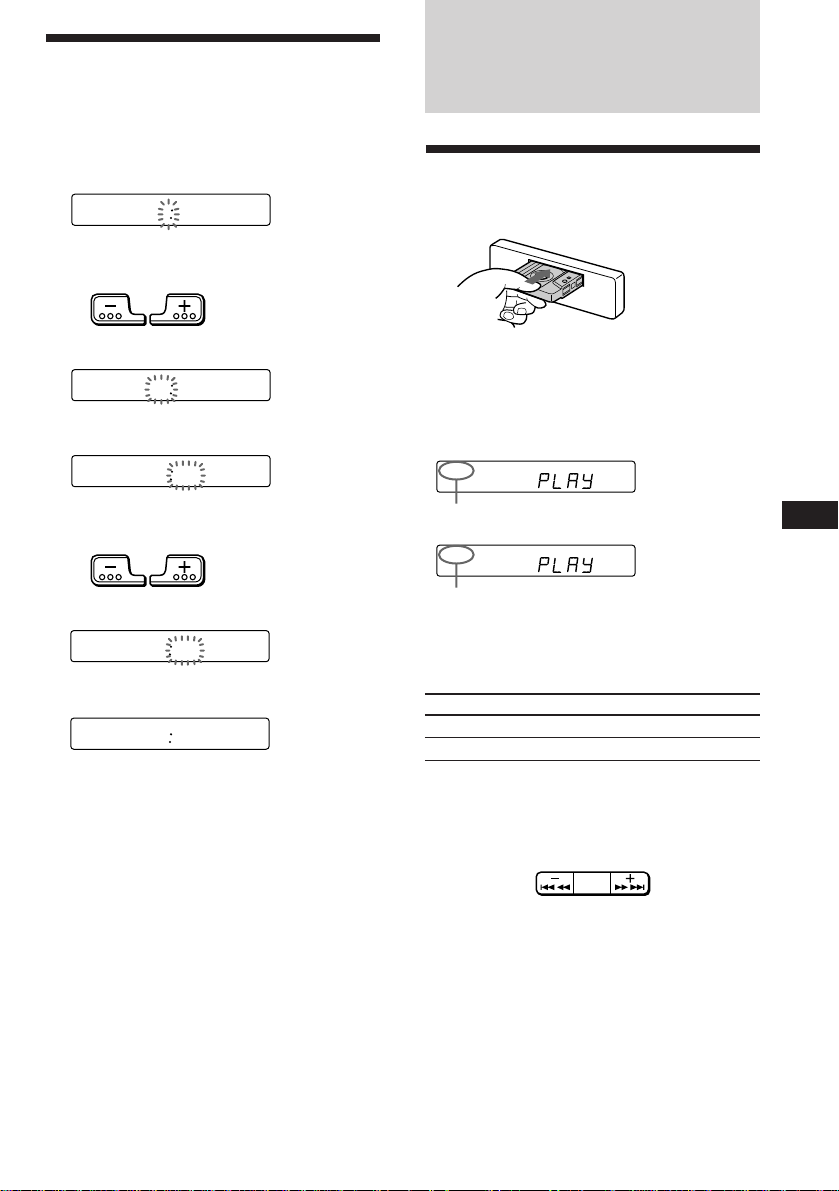
Listening to a tape
Insert a cassette.
Playback will start automatically.
If a cassette is already inserted, press
(SOURCE) repeatedly until “PLAY” is
displayed.
FWD
The side facing up is being played.
REV
The side facing down is being played.
Tip
To change the tape transport direction, press (MODE)
(*) during tape playback.
To Press
Stop playback (OFF)
Eject the cassette 6
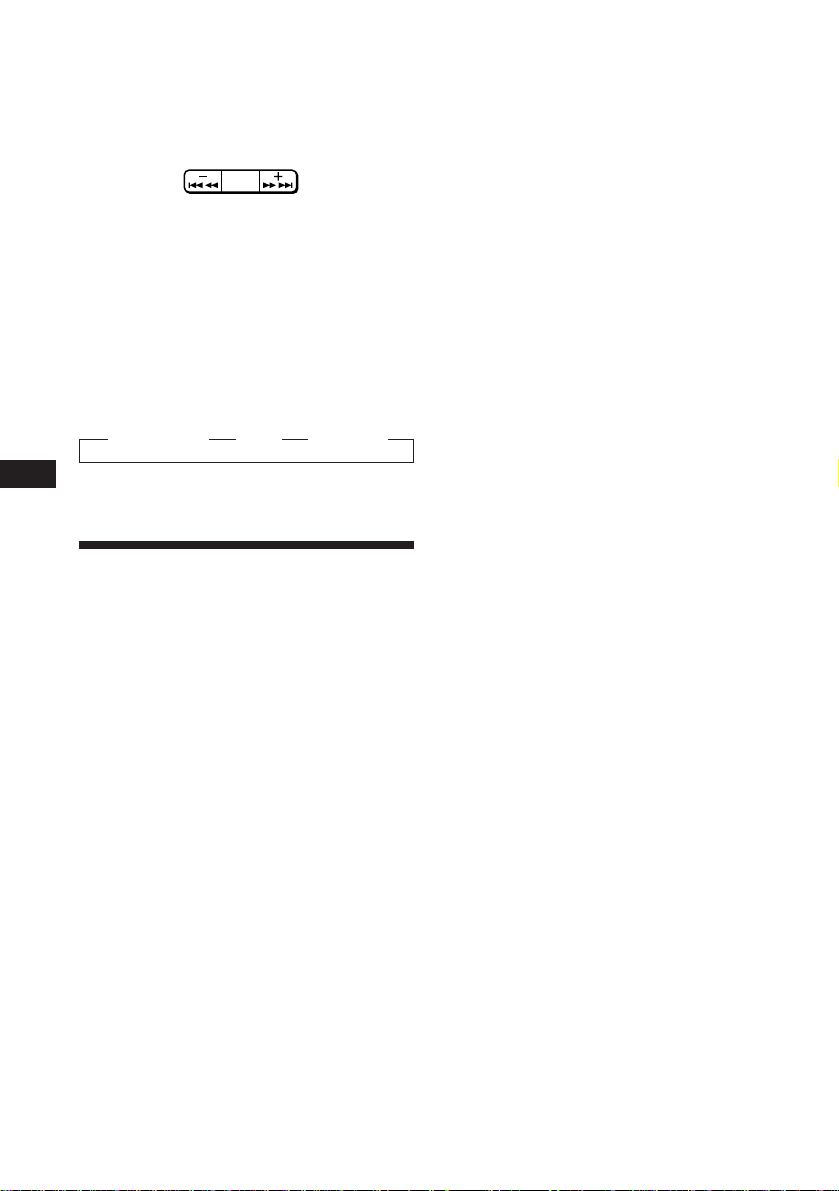
Fast-winding the tape
During playback, press either side of
(SEEK/AMS) more than two second.
EN
Getting Started/Cassette Player
SEEK
AMS
Fast-forwardRewind
To start playback during fast-forwarding or
rewinding, press (MODE) (*).
5
Locating the beginning of a track
— Automatic Music Sensor (AMS)
You can skip up to nine tracks at one time.
During playback, press either side of
(SEEK/AMS) momentarily.
SEEK
AMS
To locate the
preceding tracks
Note
The AMS function may not work when:
• the blanks between tracks are shorter than 4 seconds.
• there is noise between tracks.
• there are long sections of low volume or quiet sections.
To locate the
succeeding tracks
Changing the displayed items
Each time you press (DSPL) momentarily
during tape playback, the displayed item
changes as follows:
z Tape playback z Clock z Frequency*
EN
* While the AF/TA function activated.
Playing a tape in various
modes
Searching for the desired track
— Intro scan
Press (1) during playback.
“INTRO” appears on the display.
The first 10 seconds of all the tracks are played.
When you find the desired track, press again.
The unit returns to the normal playback mode.
Switching to the radio while fastwinding a tape
— Automatic Tuner Activation (ATA)
Press (5) during playback.
“ATA” appears on the display.
While fast-forwarding or rewinding, press
(SEEK/AMS), after two seconds the tuner
automatically turns on.
To cancel this function, press (5) again.
Skipping blanks during tape
playback — Blank skip
Press (6) during playback.
“BL SKIP” appears on the display.
Blanks longer than eight seconds will
automatically be skipped during tape
playback.
To cancel this function, press (6) again.
Playing a tape recorded in the
Dolby B NR system
(XR-C6090R only)
Press the (3) when you want to listen to
a tape recorded in the Dolby* B NR
system.
“a” appears on the display.
To cancel this function, press (3) again.
* Dolby noise reduction manufactured under license from
Dolby Laboratories Licensing Corporation.
“DOLBY” and the double-D symbol a are trademarks
of Dolby Laboratories Licensing Corporation.
Playing tracks repeatedly
— Repeat play
Press (2) during playback.
“REP” appears on the display.
When the current played track is over, it will
be played again from the beginning.
To cancel this function, press (2) again.
6
Radio
Memorizing stations
automatically
— Best Tuning Memory (BTM)
This function selects from the currently
received band the stations with the strongest
signals and memorizes them in order of their
frequency.
PREVENTING ACCIDENTS!
When tuning in while driving, use the
automatic tuning or memory preset search
function instead of manual tuning.
1 Press (SOURCE) repeatedly to select the
tuner.
Each time you press (SOURCE), the source
changes as follows:
z TAPE z TUNER z CD z MD
2 Press (MODE) repeatedly to select the
band.
Each time you press (MODE), the band
changes as follows:
z FM1 z FM2 z FM3 z MW z LW
Memorizing only the
desired stations
Up to 6 stations on each band (FM1, FM2, FM3,
MW and LW) can be stored on the preset
number buttons in the order of your choice.
Therefore, 18 FM stations can be memorized.
If you try to store another station on the same
preset number button, the most recent stored
station will be erased.
1 Press (SOURCE) repeatedly to select the
tuner.
2 Press (MODE) repeatedly to select the
band.
3 Press (SEEK/AMS) to search for the
station you wish to store on a preset
number button.
4 Press the desired preset number button
((1) to (6)) for two seconds.
The number of the selected preset number
button appears on the display.
Receiving the memorized
stations
EN
Cassette Player/Radio
3 Press (SENS/BTM) for two seconds.
Notes
• The unit will not store stations with weak signals on the
preset number buttons. If there are only a few stations
received, some preset number buttons will remain empty.
• When a preset number indicated on the display, the unit
starts storing station from the one currently display.
1 Press (SOURCE) repeatedly to select the
tuner.
2 Press (MODE) repeatedly to select the
band.
3 Press the preset number button
momentarily ((1) to (6)) on which the
desired station is stored.
Tip
Press either side of (PRESET/DISC) to receive in order the
stations stored in the memory (Preset Search Function).
7

If FM stereo reception is poor
BBC 1 FM
FM1
— Monaural mode
Press (SENS/BTM) momentarily until
“MONO” lights up on the display.
The sound will improve, but it will become
monaural. (The “ST” indication will
disappear.)
Changing the displayed items
Each time you press (DSPL), the display
changes between the frequency and the clock.
If you cannot tune in a preset
station
Press either side of (SEEK/AMS)
momentarily to search for the station
(automatic tuning).
Scanning stops when a station is received.
Press either side of the button repeatedly
until the desired station is received.
Note
EN
If the automatic tuning stops too frequently, press
(SENS/BTM) momentarily until “LCL” light up on the
display (local seek mode). Only the stations with relatively
strong signals are tuned in.
Tip
If you know the frequency, press and hold either side of
(SEEK/AMS) until the desired station is received (manual
tuning).
RDS
Overview of the RDS
function
Radio Data System (RDS) is a broadcasting
service that allows FM stations to send
additional digital information along with the
regular radio programme signal. Your car
stereo offers you a variety of services. Here
are just a few: Re-tuning the same programme
automatically, Listening to traffic
announcements and Locating a station by
programme type.
Notes
• Depending on the country or region, not all of the RDS
functions are available.
• RDS may not work properly if the signal strength is
weak or if the station you are tuned in is not
transmitting RDS data.
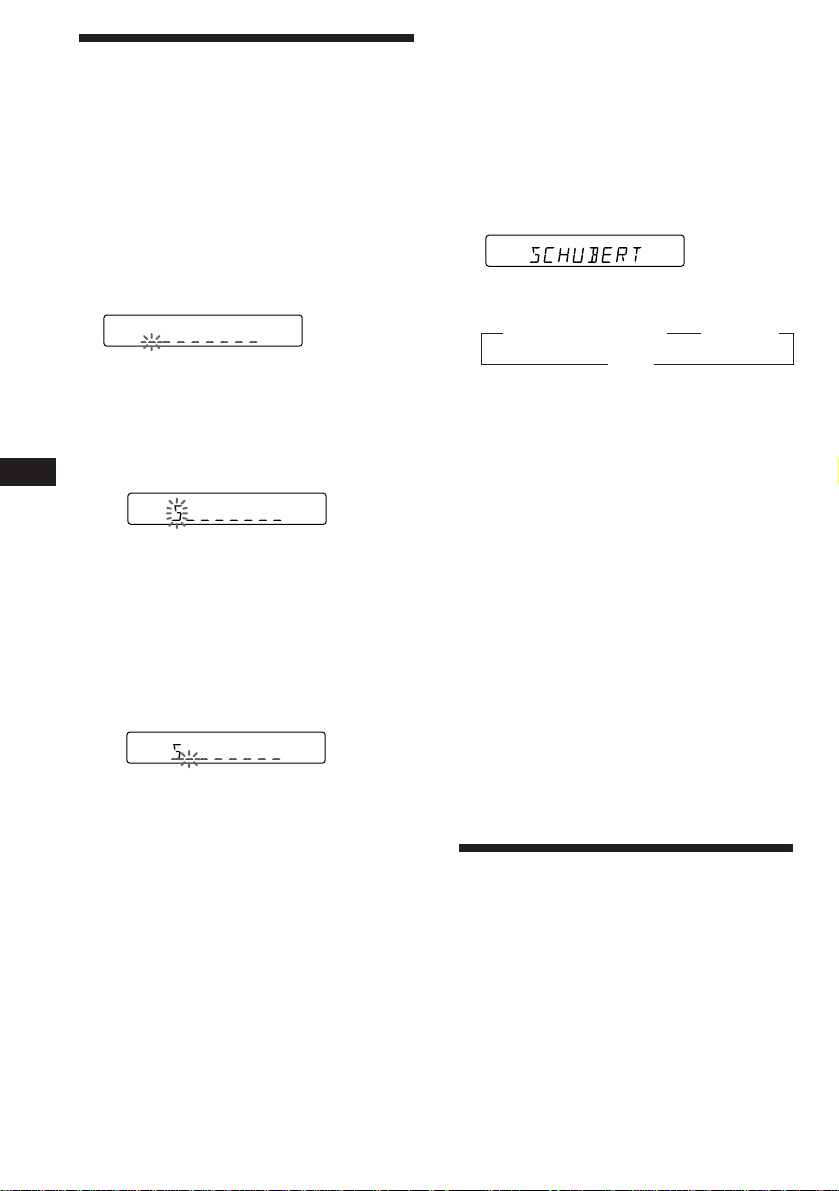
Displaying the station
name
The name of the station currently received
lights up on the display.
Select an FM station.
When you tune in an FM station that
transmits RDS data, the station name lights
up on the display.
Note
The “*” indication means that an RDS station is being
received.
Changing the displayed items
Each time you press (DSPL), the displayed
items change as follows:
z Frequency z Time z Station name
Note
“NO NAME” lights up if the station received does not
transmit RDS data.
8
Re-tuning the same
programme automatically
—Alternative Frequencies (AF)
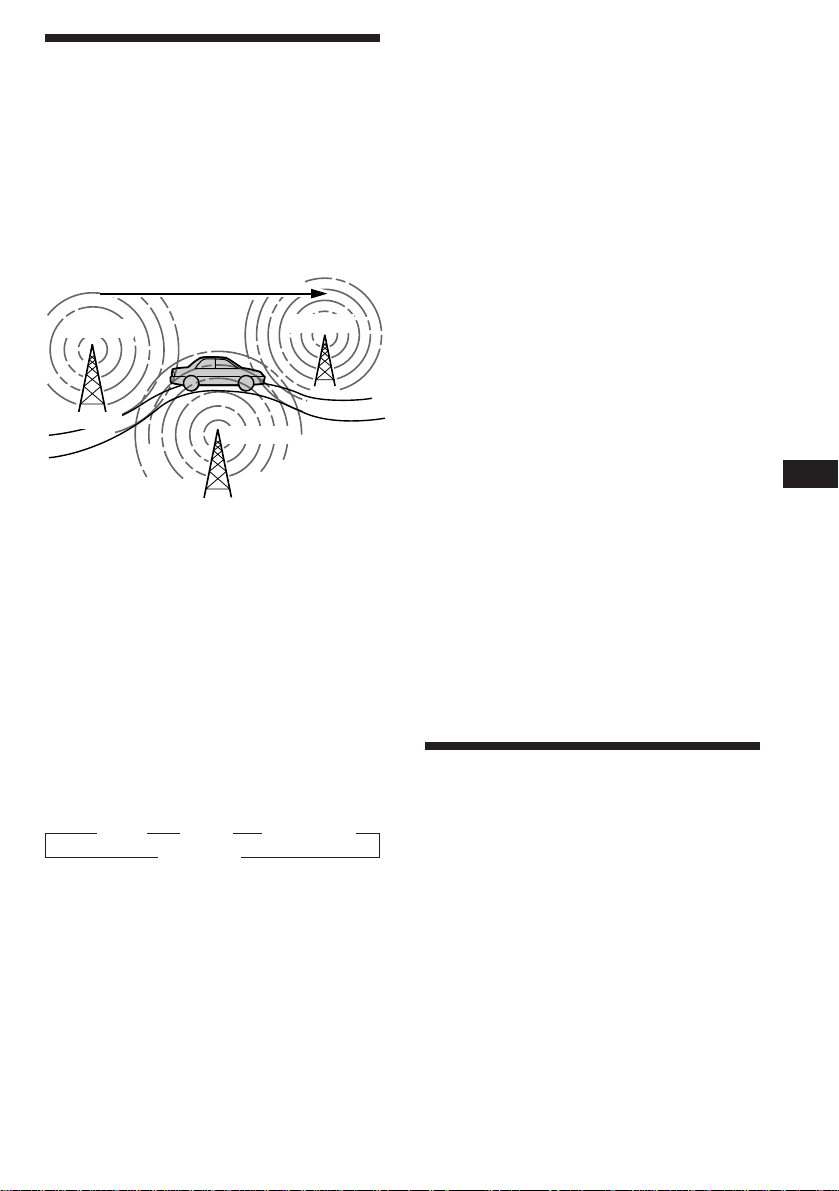
The Alternative Frequencies (AF) function
automatically selects and re-tunes the station
with the strongest signal in a network. By
using this function, you can continuously
listen to the same programme during a longdistance drive without having to re-tune the
station manually.
Frequencies change automatically.
98.5 MHz
Station
1 Select an FM station.
102.5 MHz
96.0 MHz
Listening to a regional programme
The “REG” (regional on) function of this unit
lets you stay tuned to a regional programme
without being switched to another regional
station. (Note that you must turn the AF
function on.) The unit is factory preset to
“REG“ but if you want to turn off the function,
do the following.
Press (AF/TA) for more than two seconds
until “REG” disappears.
Note that turning the “REG” function off
might cause the unit to switch to another
regional station within the same network.
Note
This function does not work in the United Kingdom and in
some other areas.
Local link function (United
Kingdom only)
The Local Link function lets you select other
local stations in the area, even though they are
not stored in your presets.
1 Press a preset number button that has
stored a local station.
EN
Radio/RDS
2 Press (AF/TA) until “AF” lights up on the
display.
The unit starts searching for an alternative
station with a stronger signal in the same
network.
Note
When there is no alternative station in the area, and you
don’t need to search for an alternative station, turn the AF
function off by pressing (AF/TA) until “AF” disappears.
Changing the displayed items
Each time you press (AF/TA), the displayed
items change as follows:
z AF z TA z AF TA*
Blank Z
* Select this to turn on both AF and TA functions.
Notes
• “NO AF” and the station name flashes alternately, if the
unit cannot find an alternative station in the network.
• If the station name starts flashing after selecting a
station with the AF function on, this indicates that no
alternative frequency is available. Press (SEEK/AMS)
while the station name is flashing (within eight seconds).
The unit starts searching for another frequency with the
same PI (Programme Identification) data (“PI seek”
appears and no sound is heard). If the unit cannot find
another frequency, “NO PI” appears, and the unit
returns to the originally selected frequency.
2 Within five seconds, press again the
preset number button of the local
station.
3 Repeat this procedure until the desired
local station is received.
Listening to traffic
announcements
The Traffic Announcement (TA) and Traffic
Programme (TP) data let you automatically
tune in an FM station that is broadcasting
traffic announcements even though you are
listening to other programme sources.
Press (AF/TA) until “TA” or “AF TA” lights
up on the display.
The unit starts searching for traffic
information stations. “TP” lights up on the
display when the unit finds a station
broadcasting traffic announcements.
When the traffic announcement starts,
“TA” flashes, then flashing stops when the
traffic announcement is over.
continue to next page n
9

Tip
When the traffic announcement starts while you are
listening to another programme source, the unit
automatically switches to the announcement and goes back
to the original source when the announcement is over.
Notes
• “NO TP” flashes for five seconds if the received station
doesn’t broadcast traffic announcements. Then, the unit
starts searching for a station that does broadcast traffic
announcements.
• When the “EON” indication appears with “TP” on the
display, the current station makes use of broadcast traffic
announcements of other stations in the same network.
To cancel the current traffic
announcement
Press (AF/TA) momentarily.
To cancel all traffic announcements, turn
off the function by pressing (AF/TA) until
“AF” disappears.
Presetting the volume of traffic
announcements
EN
You can preset the volume level of the traffic
announcements beforehand, so you will not
miss the announcement. When a traffic
announcement starts, the volume will be
automatically adjusted to the preset level.
1 Select the desired volume level.
2 Press (3) while holding down (SEL).
“TA VOL” appears and the setting is
stored.
Receiving emergency
announcements
If an emergency announcement comes in while
you are listening to the radio, the programme
will be automatically switched to the
announcement. If you are listening to a source
other than the radio, the emergency
announcements will only be heard if you set
AF or TA to on. The unit will then
automatically switch to these announcements
no matter what you are listening to at the time.
Presetting the RDS
stations with AF and TA
data
When you preset the RDS stations, the unit
stores each station’s data as well as its
frequency, so you don’t have to turn on the AF
or TA function every time you tune in the
preset station. You can select different setting
(AF, TA, or both) for individual preset stations,
or the same setting for all preset stations.
Presetting the same setting for all
preset stations
1 Select an FM band.
2 Press (AF/TA) repeatedly and select
either “AF“, “TA” or “AF TA” (for both AF
and TA functions).
Note that turning the “AF TA” function off
stores RDS stations as well as non-RDS FM
stations.
3 Press (SENS/BTM) for two seconds.
Presetting different settings for
each preset station
1 Select an FM band, and tune in the
desired station.
2 Press (AF/TA) repeatedly and select
either “AF“, “TA” or “AF TA” (for both AF
and TA functions).
3 Press the desired preset number button
for two seconds until ”MEM“ appears.
Repeat from step 1 for presetting other
stations.
Tip
If you want to change the preset AF and/or TA setting
after you tuned in the preset station, you can do so by
turning on/off the AF or TA function.
10
Locating a station by
programme type
You can locate the station you want by
selecting one of the programme types shown
below.
Note
If the countries or regions where EON data is not
transmitted, you can use this function only for the stations
you have tuned in once.
Programme types Display
News NEWS
Current Affairs AFFAIRS
Information INFO
Sports SPORT
Education EDUCATE
Drama DRAMA
Culture CULTURE
Science SCIENCE
Varied VARIED
Popular Music POP M
Rock Music ROCK M
Middle of the Road Music M.O.R. M
Light Classical LIGHT M
Classical CLASSICS
Other Music Type OTHER M
Weather WEATHER
Finance FINANCE
Children's programms CHILDREN
Social Affairs SOCIAL A
Religion RELIGION
Phone In PHONE IN
Travel TRAVEL
Leisure LEISURE
Jazz Music JAZZ
Country Music COUNTRY
National Music NATION M
Oldies Music OLDIES
Folk Music FOLK M
Documentary DOCUMENT
Not specified NONE
Note
You can not use this function in some countries where no
PTY (Programme Type selection) data is available.
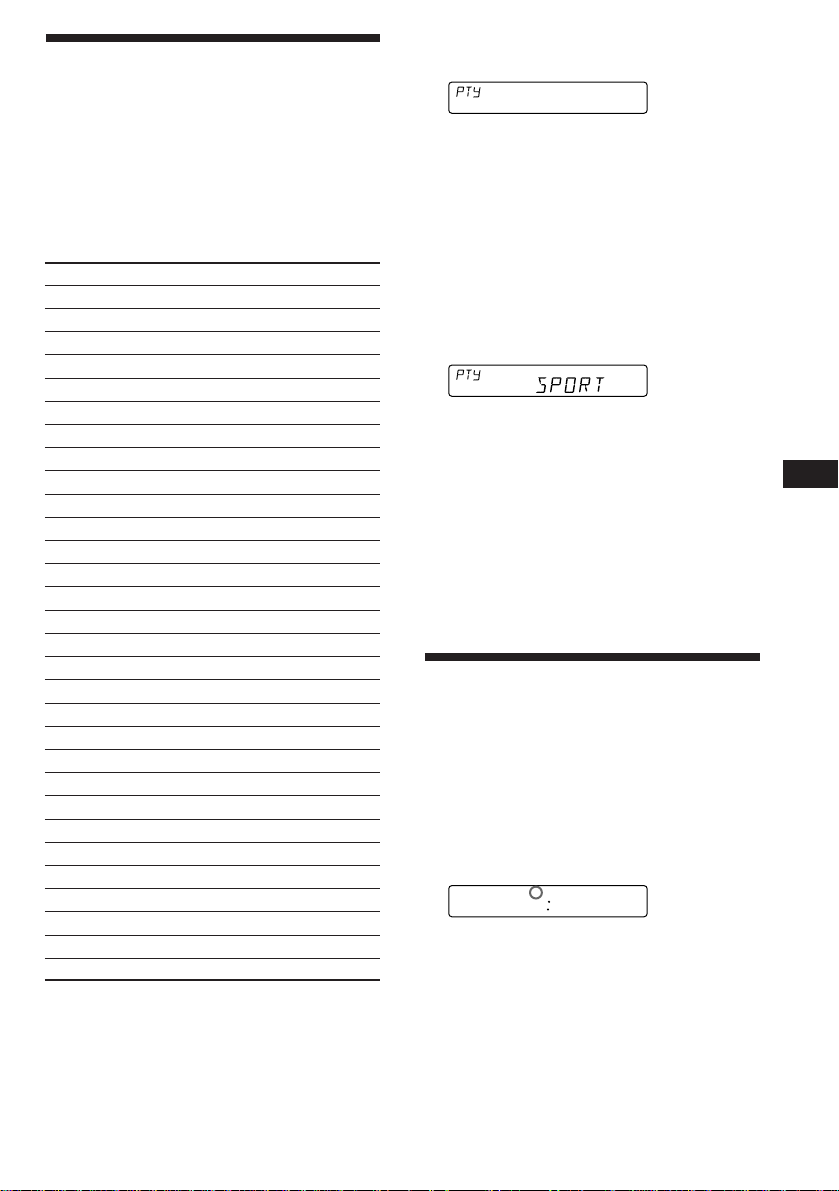
1 Press (PTY) during FM reception until
“PTY” lights up on the display.
INFO
The current programme type name appears
if the station is transmitting the PTY data.
“--------” appears if the received station is
not an RDS station or if the RDS data has
not been received.
2 Press (PTY) repeatedly until the desired
programme type appears.
The programme types appear in the order
as shown in the above table. Note that you
cannot select “NONE” (Not specified) for
searching.
3 Press either side of (SEEK/AMS).
The unit starts searching for a station
broadcasting the selected programme type.
When the unit finds the programme, the
programme type appears again for five
seconds.
“NO” and the programme type appear
alternately for five seconds if the unit
cannot find the programme type and it
returns to the previous station.
Setting the clock
automatically
By receiving CT (Clock Time) data, the clock of
this unit can be set automatically.
During FM reception, press (2) while
pressing (SEL).
“CT” will be displayed, and the clock will
be set.
FM1
To cancel the CT function
Repeat the above procedure.
Notes
• The CT function may not work even though an RDS
station is being received.
• The time set by the CT function may not be exact.
CT
100
EN
RDS
11
Other Functions
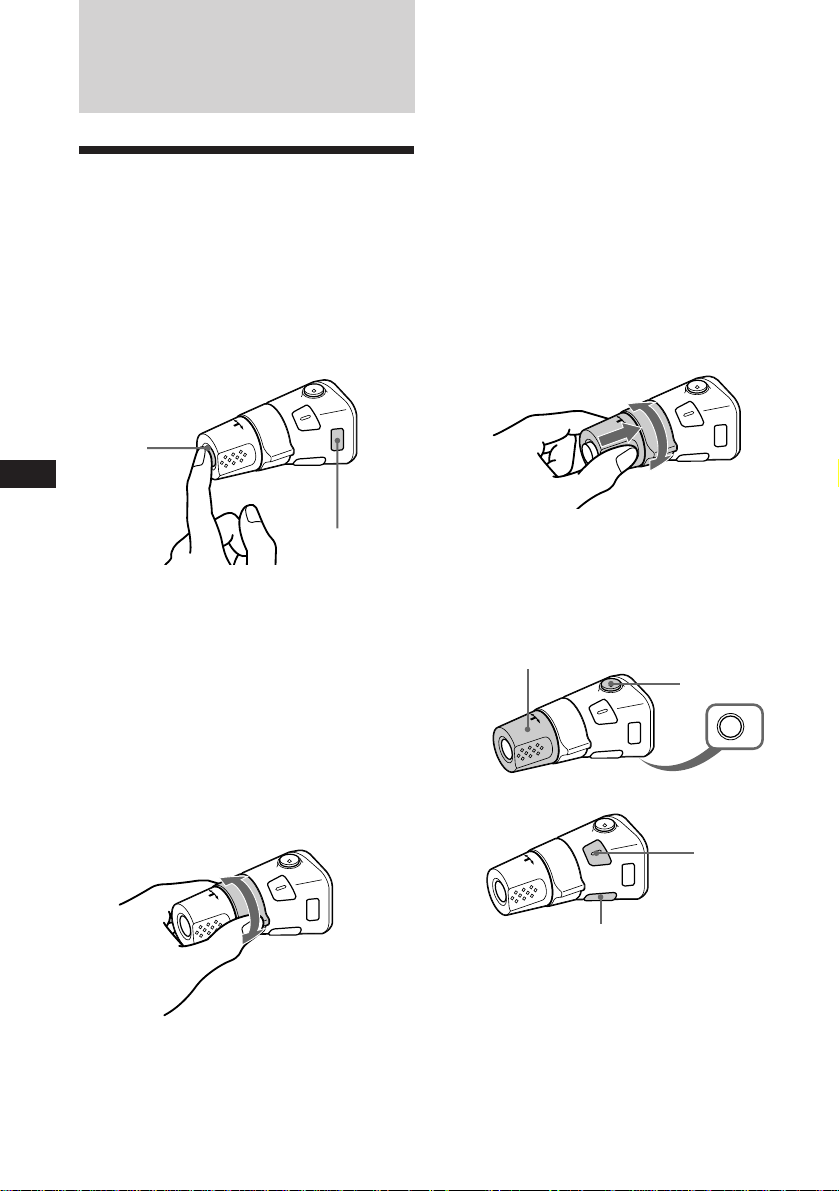
Using the rotary
commander
The rotary commander works by pressing
buttons and/or rotating controls.
You can control the optional CD/MD unit by
the rotary commander.
By pressing buttons (the SOURCE
and the MODE buttons)
(SOURCE)
EN
Rotate the control momentarily and
release it to:
•Locate the beginnings of the tracks on the
tape. Rotate and hold the control, and
release it to fast-wind the tape. To
playback, rotate and hold the control
again, and release it.
•Locate a specific track on a disc. Rotate
and hold the control to locate the specific
point in a track, then release it to start
playback.
•Tune in the stations automatically. Rotate
and hold the control to tune in the specific
station.
By rotating the control while
pushing in (the PRESET/DISC
control)
(MODE)
Every time you press (SOURCE), the
source changes as follows:
TAPE n TUNER n CD n MD
Pressing (MODE) changes the operation in the
following ways:
• the tape transport.
• the band, FM1 n FM2 n FM3 n MW n LW.
• the CD/MD unit.
Tip
You can turn on this unit by pressing (SOURCE) on the
rotary commander.
By rotating the control (the SEEK/
AMS control)
Push in and rotate the control to:
•Receive the stations memorized on the
preset buttons.
•Change the disc.
Other operations
Rotate the VOL control
to adjust the volume.
XR-C6090R:
Press (FILE) for two seconds
to change the Disc memo.
XR-C5090R:
Press (DSPL) to change the
displayed items.
Press (ATT)to
attenuate the
sound.
Press (OFF) to
turn off the unit.
Press (SEL)
to adjust
and select.
OFF
12
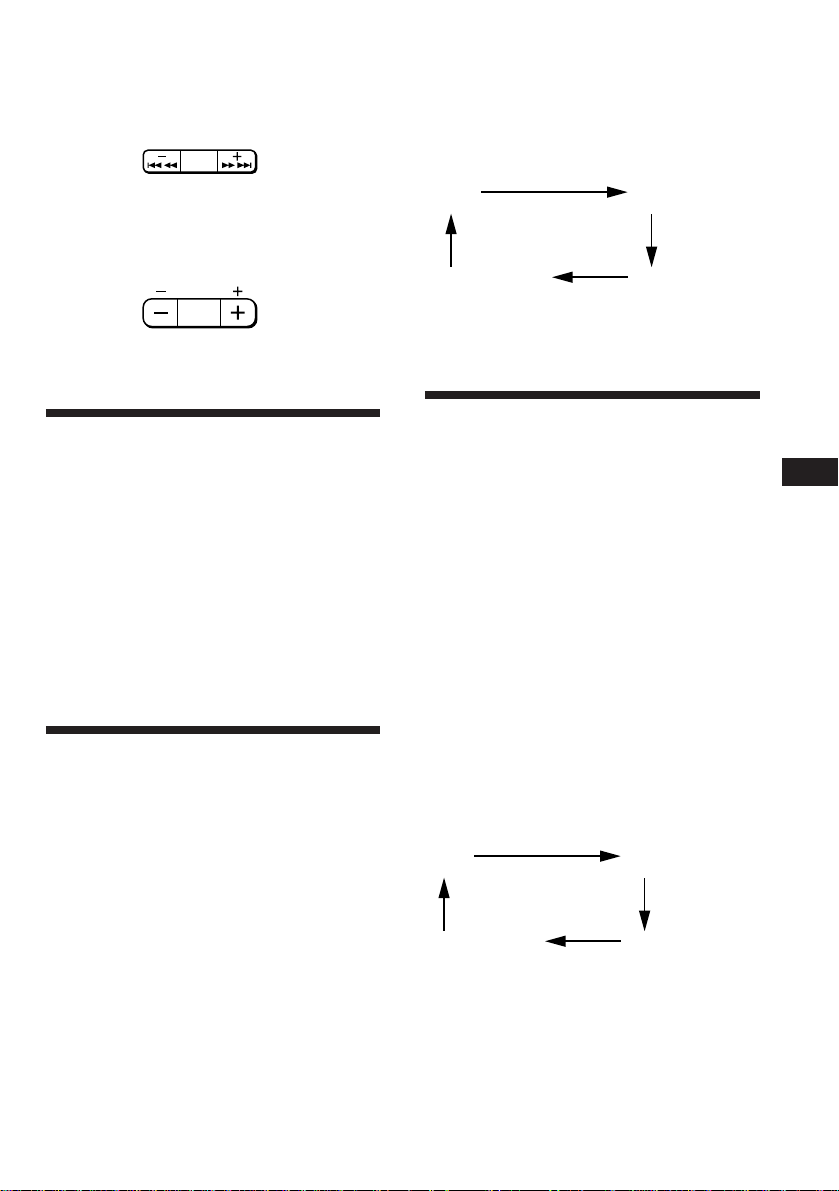
Changing the operative direction
The operative direction of controls is factory
preset as in the illustration below.
To increase
To decrease
If you need to mount the rotary commander
on the right side of the steering column, you
can reverse the controls operative direction.
Press (SEL) for two seconds while
pushing in the VOL control.
Changing the sound and
beep tone
Boosting the bass sound — D-bass
You can enjoy clear and powerful bass sound.
The D-bass function boosts the low frequency
signal with a sharper curve than conventional
bass boost.
You can hear the bass line more clearly even if
the vocal volume remains the same. You can
emphasize and adjust the bass sound easily
with the D-BASS control. This effect is similar
to the one you get when you use an optional
subwoofer system.
Moreover, the Digital D-bass* function creates
even sharper and more powerful bass sounds
than Analog D-bass.
Digital D-bass Analog D-bass
Level
Frequency (Hz)Frequency (Hz)
D-BASS 3
D-BASS 2
D-BASS 1
0dB
Level
D-BASS 3
D-BASS 2
D-BASS 1
0dB
EN
Other Functions
Adjusting the sound
characteristics
1 Select the item you want to adjust by
pressing (SEL) repeatedly.
VOL (volume) n BAS (bass) n TRE
(treble) n BAL (left-right) n FAD
(front-rear)
2 Adjust the selected item by pressing
either (+) or (–).
Adjust within three seconds after selecting.
(After three seconds the button will again
serve as the volume control button.)
Attenuating the sound
Press (ATT).
The “ATT” indication flashes.
To restore the previous volume level, press
again.
Adjusting the bass curve
Turn the D-BASS control to adjust the
bass level (1, 2 or 3).
“D-BASS”* appears in the display.
To cancel, turn the control to the OFF position.
* If the CD changer has the digital D-bass function,
“DIGITAL D-BASS” appears on the display during CD
playback.
Note
If the bass sound becomes distorted, adjust the D-BASS
control or volume button.
13

Attenuating the beep tone
SEEK
AMS
Press (6) while pressing (SEL).
To obtain the beep tone again, press these
buttons once more.
Note
If you connect an optional power amplifier to the LINE
OUT and do not use the built-in amplifier, the beep tone
will be disabled.
Changing the illumination color
Press (1) while pressing (SEL).
You can choose the color between amber and
green.
EN
With Optional Equipment
CD/MD Unit
This unit can control a maximum of seven
external CD/MD units in this configuretion:
CD unit - maximum of five
MD unit - maximum of five.
Any combination up to seven will work.
Playing a CD/MD
Press (SOURCE) until the desired unit
indication appears on the display.
CD/MD playback starts.
When a CD/MD unit is connected, all the
tracks play from the beginning.
Selecting CD/MD units (when
several CD/MD units are connected)
Press (MODE) repeatedly to select the desired
CD/MD unit.
Changing the displayed items
Each time you press (DSPL) during CD/MD
playback, the item changes as follows:
Elapsed playback time
Disc name (XR-C6090R only)*1
$
$
$
Track name*2
$
Clock
14
*1 If there is no prerecorded name for a CD or MD, “NO
NAME” appears in the display.
*2 If the track name of an MD is not prerecorded “NO
NAME” appears in the display.
Tip
If the name of the MD is too long, only the first eight
characters appear in the display.
Locating a specific track
— Automatic Music Sensor (AMS)
During playback, press either side of
(SEEK/AMS) once for each track you wish
to skip the tracks.
To locate the
preceding tracks
To locate the
succeeding tracks
Locating a specific point in a track
— Manual Search
During playback, press and hold either
side of (SEEK/AMS). Release the button
when you have found the desired part.
SEEK
AMS
To search forwardTo search backward
Switching to other discs
During playback, press either side of
(PRESET/DISC).
PRESET
DISC
To return to the
previous disc
To advance to the
next disc
To repeat all the discs in the
current unit
Press (2) repeatedly during CD/MD
playback until “REP 3” is displayed.
Each time you press (2) the display changes as
follows:
REP 1
(Track repeat)
Cancel
(Normal disc
playback mode)
* “REP 3” only when two or more CD/MD units are
connected the unit.
REP 2
(Disc repeat)
REP 3*
(Unit repeat)
Scanning the tracks
— Intro scan
The first 10 seconds of all the tracks on the
current disc are played in order. After the first
disc is over, the next disc is played.
Press (1) during playback.
“INTRO” appears on the display.
When you find the desired track, press again .
The unit returns to the normal CD/MD
playback mode.
Playing tracks repeatedly
— Repeat play
To repeat a track
Press (2) repeatedly during CD/MD
playback until “REP 1” is displayed.
To repeat a disc
Press (2) repeatedly during CD/MD
playback until “REP 2” is displayed.
Playing tracks in random
order
To play the tracks on the current
disc in random order
To play all the discs in the unit in
random order
To play all the discs in the current
connected CD/MD units in random
order
Each time you press (3) the display changes as
follows:
SHUF 1
(Disc shuffle)
Cancel
(Normal disc
playback mode)
* “SHUF 3” only when two or more CD/MD units are
Note
CD/MD units are operated separately.
If you press (1) during shuffle play, the first 10
seconds of all tracks will be played in random order.
— Shuffle play
Press (3) repeatedly during CD/MD
playback until “SHUF 1” is displayed.
Press (3) repeatedly during CD/MD
playback until “SHUF 2” is displayed.
Press (3) repeatedly during CD/MD
playback until “SHUF 3” is displayed.
SHUF 2
(Unit shuffle)
SHUF 3*
(All shuffle)
connected the unit.
EN
Other Functions/CD/MD Unit
15
CD
Labeling a CD (XR-C6090R only)
— Disc Memo
(CD unit with custom file function)
You can label each disc with a personalized
name. You can enter up to 8 characters for a
disc. If you label a CD, you can locate a disc by
name and select the specific tracks for
playback.
1 Play the CD and press (PTY/FILE) for two
seconds.
CD
2 Enter the characters.
1 Press (+) to select the desired
characters.
(A n B n C n ··· Z n 0 n 1 n 2 n
··· 9 n + n – n * n / n \ n > n <
EN
n . n _ )
CD
If you press (–), the characters appear
in the reverse order.
If you want to put a blank space
between characters, select “_” (underbar).
2 Press (SEL) after locating the desired
character.
The flashing cursor moves to the next
space.
CD
If you press (SEL) when the eighth
character (farthest right character) is
flashing, the flashing part goes back to
the first character (farthest left
character).
3 Repeat steps 1 and 2 to enter the
entire name.
3 To return to the normal CD playback
mode, press (PTY/FILE) for two seconds.
Tip
To erase/correct a name, enter “_” (under-bar) for each
character.
Displaying the disc memo
Press (DSPL) during CD playback.
Each time you press (DSPL) during CD
playback, the item changes as follows:
z Elapsed playback time z Disc name
Clock Z
Erasing the disc memo
1 Press (SOURCE) to select the CD unit.
2 Play the CD and press (PTY/FILE) for two
seconds.
3 Press (5) while pressing (SEL).
4 Press (+) or (–) to select the name that
you want to erase.
5 Press (SEL) for two seconds.
The name is erased.
Repeat steps 4 and 5 if you want to erase
other names.
6 Press (PTY/FILE) for two seconds.
The unit returns to the normal CD playback
mode.
Selecting the specific
tracks for playback
(XR-C6090R only)
— Bank
(CD unit with custom file function)
If you label the disc, you can set the unit to
skip tracks and play only the tracks you want.
16
1 Start playing the disc and press
(PTY/FILE) for two seconds. Then press
(PTY/FILE) momentarily.
Bank edit mode
DISC TRACK
CD2
5 1
Note
If you have not labeled the disc, you cannot use this
function. For more information on “Labelling a CD”,
refer to page16.
2 Press either side of (SEEK/AMS) to select
the track number you want to skip and
press (SEL).
DISC TRACK
CD2
5 3
The indication changes from “PLAY” to
“SKIP.” If you want to return to “PLAY,"
press (SEL) again.
3 Repeat step 2 to set the “PLAY” to “SKIP”
mode on all the tracks.
4 Press (PTY/FILE) for two seconds.
The unit returns to the normal CD playback
mode.
Notes
• You can set the “SKIP” mode on up to 24 tracks.
• You cannot set the “SKIP” mode on all the tracks.
Playing the specific tracks only
You can select:
•BANK-ON to play the tracks with “PLAY”
setting.
•BANK-INV (inverse) to play the tracks with
the “SKIP” setting.
Additional
Information
Precautions
•If your car was parked in direct sunlight
resulting in a considerable rise in
temperature inside the car, allow the unit to
cool off before operating it.
•If no power is being supplied to the unit,
check the connections first. If everything is in
order, check the fuse.
•If no sound comes from the speakers of a
2-speaker system, set the fader control to the
center position.
•When the tape is played back for a long
period, the cassette may become warm
because of the built-in power amplifier.
However, this is not a sign of malfunction.
If you have any questions or problems
concerning your unit that are not covered in
this manual, please consult your nearest Sony
dealer.
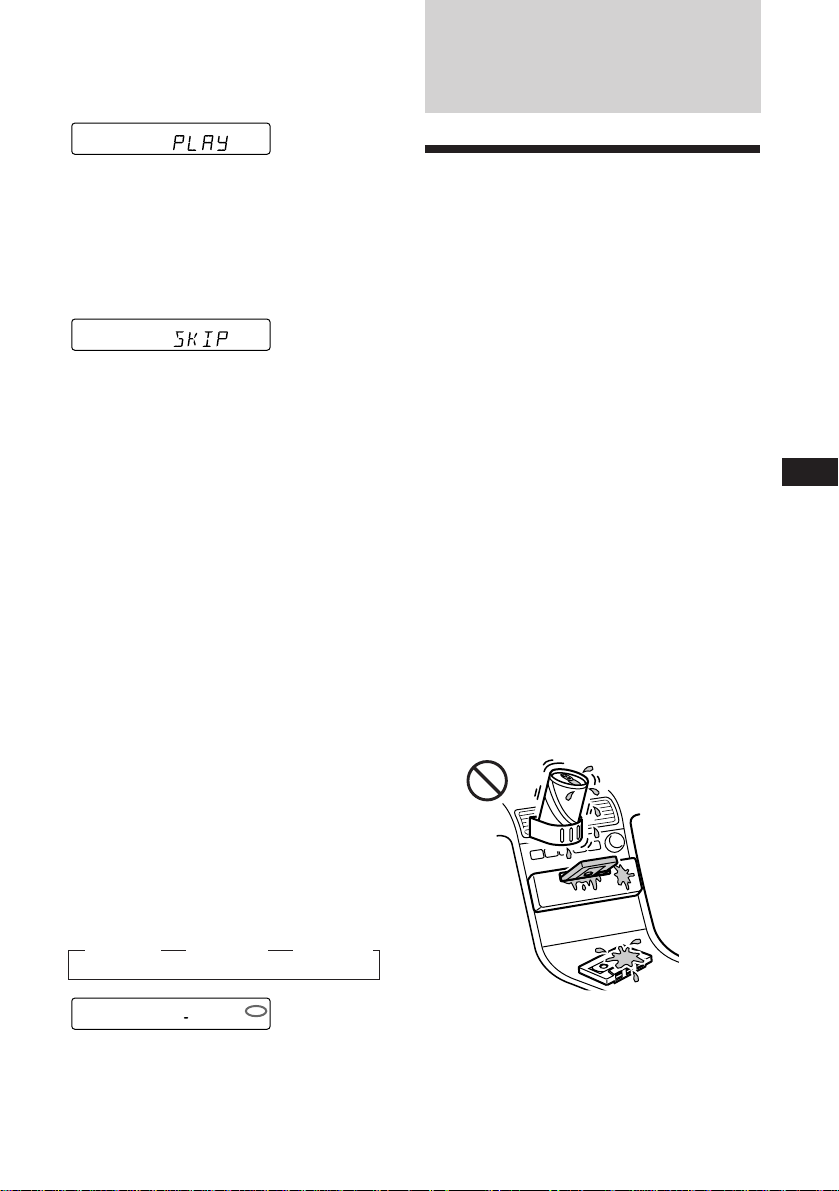
To maintain high quality sound
If you have drink holders near your audio
equipment, be careful not to splash juice or
other soft drinks onto the car audio. Sugary
residues on this unit or cassette tapes may
contaminate the playback heads, reduce the
sound quality, or prevent sound reproduction
altogether.
Cassette cleaning kits cannot remove sugar
from the tape heads.
EN
CD/MD Unit/Additional Information
1 During playback, press (4).
“BANK” appears on the display.
2 Press (4) to select the desired mode.
Each time you press (4), the display
changes as follows:
z BANK-ON z BANK-INV z BANK-OFF
CD1
BANK ON
Playback starts from the track following the
current one.
To go back to the normal playing mode, select
“BANK-OFF” in step 2.
BANK
17
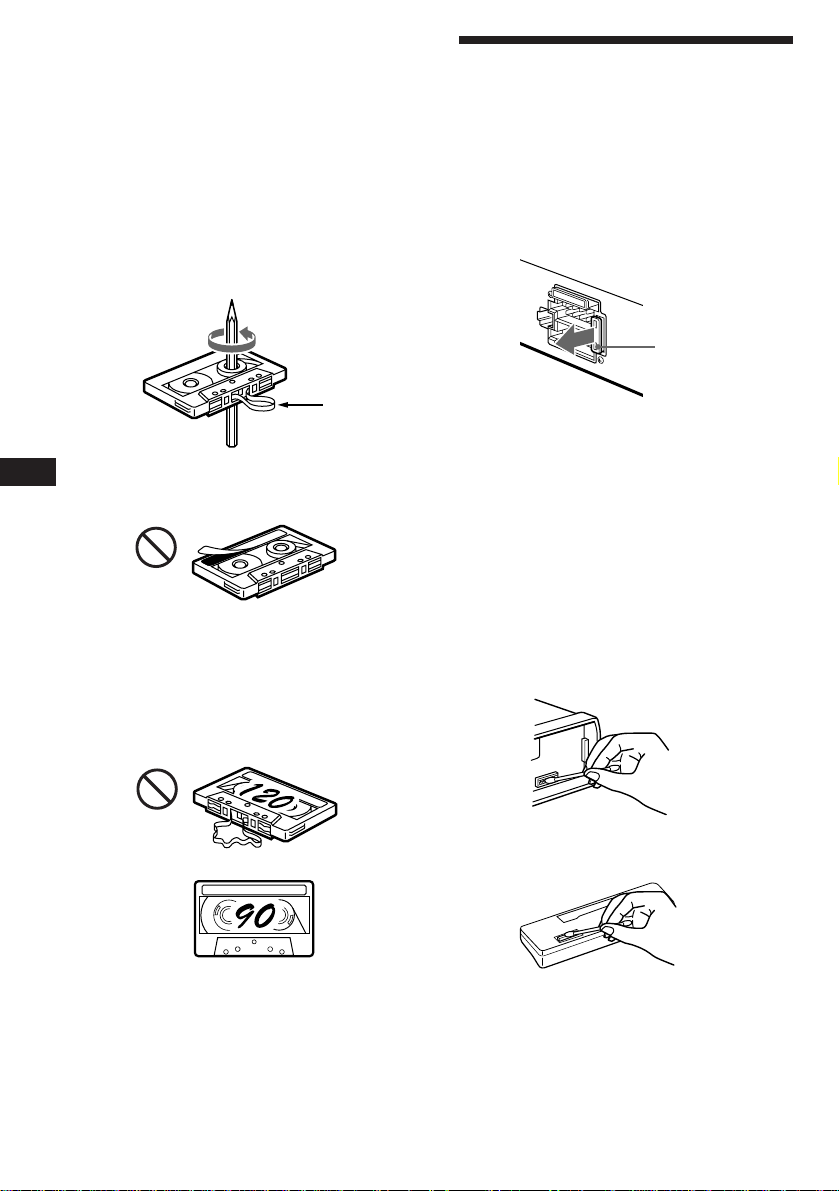
Notes on Cassettes
Cassette care
•Do not touch the tape surface of a cassette, as
any dirt or dust will contaminate the heads.
•Keep cassettes away from equipment with
built-in magnets such as speakers and
amplifiers, as erasure or distortion on the
recorded tape could occur.
•Do not expose cassettes to direct sunlight,
extremely cold temperatures or moisture.
•Slack in the tape may cause the tape to be
caught in the machine. Before you insert the
tape, use a pencil or similar object to turn the
reel and take up any slack.
• Distorted cassettes and loose labels can cause
EN
problems when inserting or ejecting tapes.
Remove or replace loose labels.
Cassettes longer than 90 minutes
The use of cassettes longer than 90 minutes is
not recommended except for long continuous
play. The tapes used for these cassettes are
very thin and tend to be stretched easily.
Frequent playing and stopping of these tapes
may cause them to be pulled into the cassette
deck mechanism.
Maintenance
Fuse Replacement
When replacing the fuse, be sure to use one
matching the amperage rating stated on the
original fuse. If the fuse blows, check the
power connection and replace the fuse. If the
fuse blows again after replacement, there may
be an internal malfunction. In such a case,
consult your nearest Sony dealer.
Fuse (10 A)
Slack
Warning
Never use a fuse with an amperage rating
exceeding the one supplied with the unit as
this could damage the unit.
Cleaning the Connectors
The unit may not function properly if the
connectors between the unit and the front
panel are not clean. In order to prevent this,
open the front panel by pressing (RELEASE),
then detach it and clean the connectors with a
cotton swab dipped in alcohol. Do not apply
too much force. Otherwise, the connectors may
be damaged.
18
Main unit
Back of the front panel
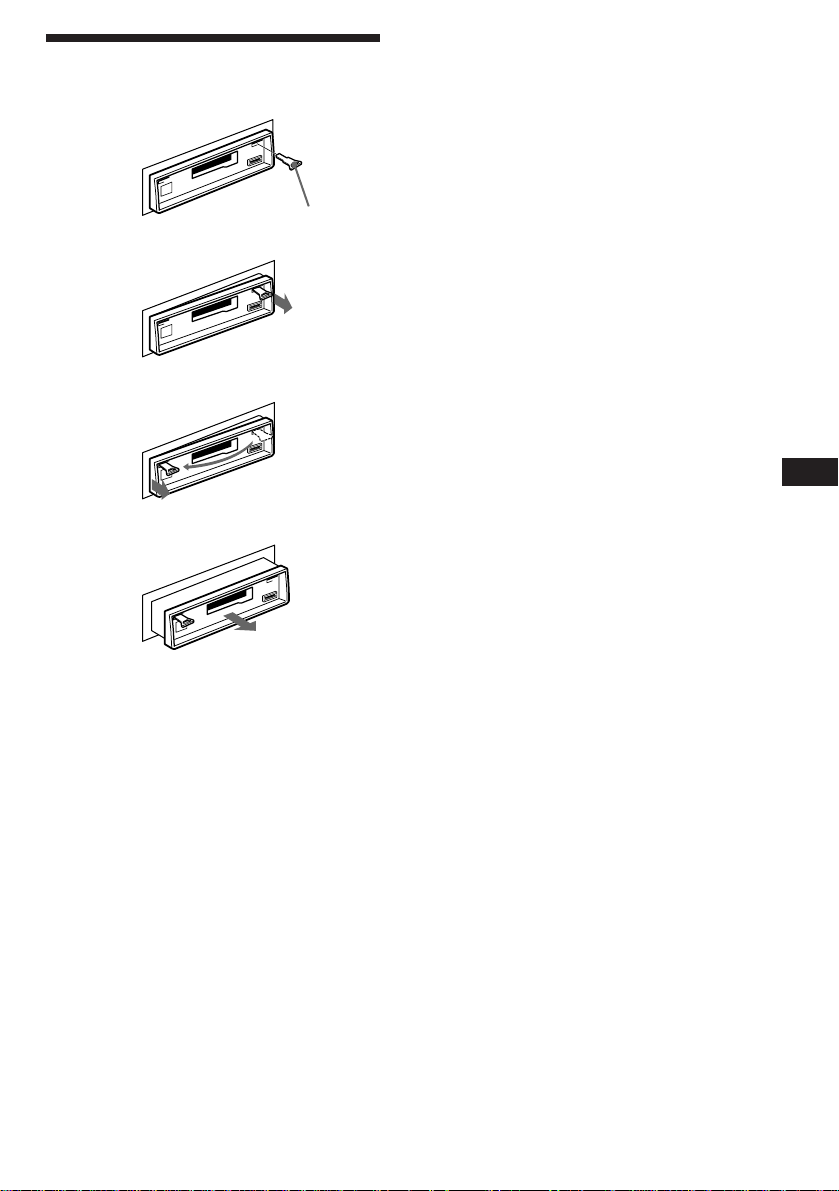
Dismounting the unit
1
Release key (supplied)
2
3
4
EN
Additional Information
19
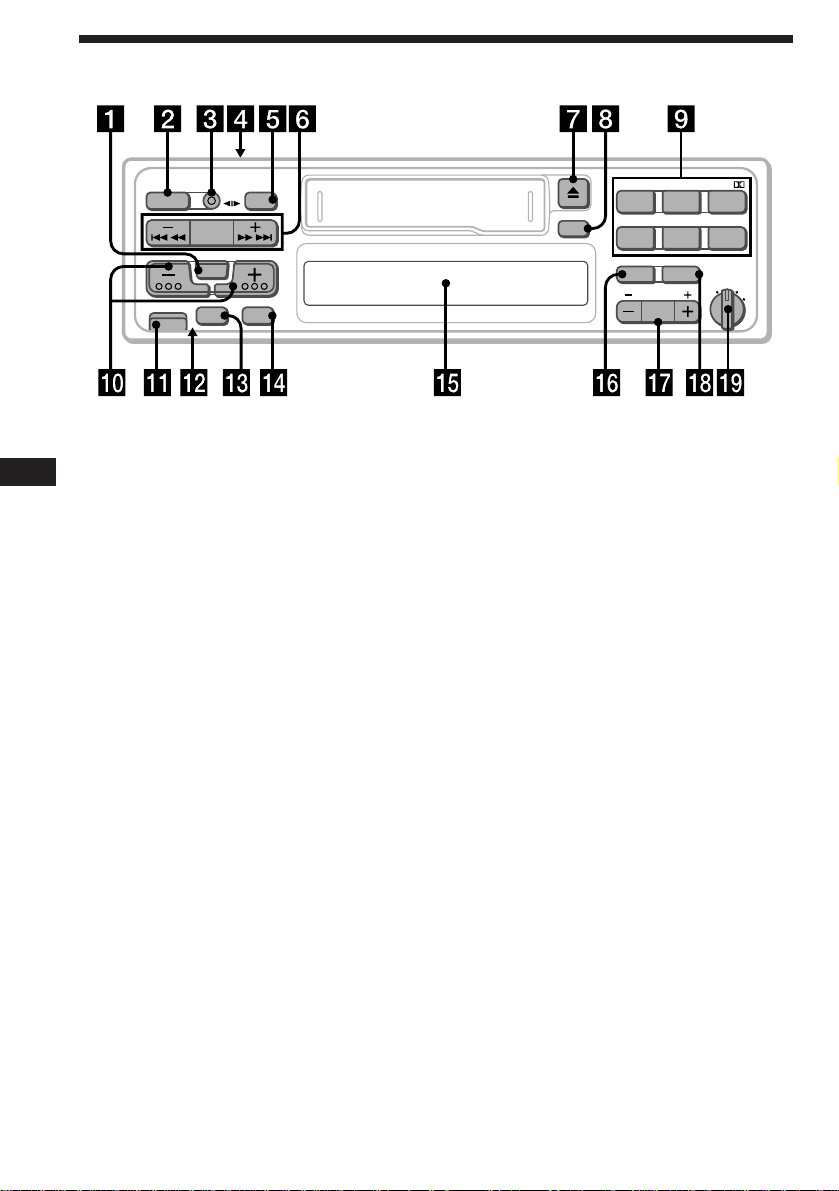
Location of controls
SEEK
AMS
SEL
ATT
MODE
OFF
BTM
SENS
SOURCE
RELEASE
Refer to the pages for further details.
1 SEL (control mode select) button
EN
5, 10, 11, 13, 14, 16, 17
2 SOURCE button (TAPE/TUNER/CD/MD) 5,
7, 14, 16
3 MODE (*) button
During Tuner reception:
BAND select 7
During Tape playback:
Transport direction change 5
During CD/MD playback:
Unit select 14
4 POWER SELECT switch (located on the
top of the unit)
See “POWER SELECT Switch” in the
Installation/Connections manual.
5 OFF button 4, 5
6 SEEK/AMS button 5, 6, 7, 8, 9, 11, 14, 15,
17
7 6 (eject) button 5
8 DSPL (display mode change/time set)
button 5, 6, 8, 14, 16
9 During radio reception:
Preset number buttons 7
During tape/CD/MD playback:
(1) INTRO button 6, 15
(2) REPEAT button 6, 15
(3) XR-C6090R:
SHUF/a (Shuffle/Dolby B NR)
button 6, 15
XR-C5090R:
SHUF (Shuffle) button 15
(4) BANK button 17
20
INTRO REPEAT
SHUF/
231
ATA BL SKIP
DSPL
BANK
FILE
PTY
PRESET
DISC
564
AF/TA
D-BASS
1
OFF
2
3
(5) ATA (Automatic Tuner
Activation) button 6
(6) BL SKIP (Blank Skip) button 6
0 (+)(–) (volume/bass/treble/left-right/
front-rear control) button 5, 13, 16
!¡ RELEASE (front panel release) button 4,
18
!™ Reset button (located on the front side
of the unit hidden by the front panel)
Press this button when you use this unit
for the first time, when you have changed
the car battery, or when the buttons of this
unit do not function properly.
!£ ATT button 13
!¢ SENS/BTM (sensitivity adjust/Best
tuning memory function) button 7, 8, 10
!∞ Display window
!§ XR-C6090R:
PTY/FILE (programme type/custom file
mode select • set) button 11, 16, 17
XR-C5090R:
PTY (programme type) button 11
!¶ PRESET/DISC button 7, 15
During Tuner reception:
Preset station select 7
During CD/MD playback:
Disc change 15
!• AF/TA (alternative frequency/traffic
announcement) button 9, 10
!ª D-BASS control 13
The illustration of the front panel in this manual is of the
XR-C6090R.

Specifications
Cassette player section
Tape track 4-track 2-channel stereo
Wow and flutter 0.08 % (WRMS)
Frequency response 30 – 18,000 Hz
Signal-to-noise ratio 64dB (Dolby B NR*)
* XR-C6090R only
58dB (Dolby NR off)
Tuner section
FM
Tuning range 87.5 – 108.0 MHz
Antenna terminal External antenna connector
Intermediate frequency 10.7 MHz
Usable sensitivity 9 dBf
Selectivity 75 dB at 400 kHz
Signal-to-noise ratio 65 dB (stereo),
Harmonic distortion at 1 kHz
Separation 35 dB at 1 kHz
Frequency response 30 – 15,000 Hz
68 dB (mono)
0.7 % (stereo),
0.4 % (mono)
MW/LW
Tuning range MW: 531 – 1,602 kHz
Antenna terminal External antenna connector
Intermediate frequency 10.71 MHz/450 kHz
Sensitivity MW: 30 µV
LW: 153 – 281 kHz
LW: 50 µV
Power amplifier section
Outputs Speaker outputs
Speaker impedance 4 – 8 ohms
Maximum power output 40 W × 4 (at 4 ohms)
(sure seal connectors)
General
Outputs Power amplifier control
lead
Rear line out (1)
Tone controls Bass ±8 dB at 100 Hz
Treble ±8 dB at 10 kHz
Power requirements 12 V DC car battery
(negative ground)
Dimensions Approx. 188 × 58 × 181 mm
(w/h/d)
Mounting dimensions Approx. 182 × 53 × 164 mm
(w/h/d)
Mass Approx. 1.2 kg
Supplied accessories Parts for installation and
connections (1 set)
Rotary commander
RM-X4S
Front panel case (1)
Optional accessories Bus cable (supplied with
an RCA pin cord)
RC-61 (1 m), RC-62 (2 m)
Optional equipment CD changer
CDX-715, CDX-605
(10 discs)
MD changer MDX-62
Source selector XA-C30
Design and specifications are subject to change without
notice.
EN
Additional Information
21
Troubleshooting guide
The following checklist will assist in the correction of most problems you may encounter with your
unit.
Before going through the checklist below, refer to the operating procedures.
General
Problem
No sound
Indications do not appear on
the display window.
No beep tone.
Tape playback
Problem
EN
Playback sound is distorted.
The AMS does not operate
correctly.
Cause/Solution
• Adjust the volume with (+).
• Set the fader control to the centre position for 2-speaker
systems.
Remove the front panel and clean the connectors. See “Cleaning
the Connectors” in “Maintenance” for details.
• An optional power amplifier is connected to the LINE OUT
and you are not using the built-in amplifier.
• The beep tone is attenuated (page 14).
Cause/Solution
Contamination of the tape head. n Clean the head.
• There is noise in the space between tracks.
• A blank space is too short (less than four seconds).
• + on (SEEK/AMS) is pressed immediately before the
following track.
• = on (SEEK/AMS) is pressed immediately after the track
starts.
• A long pause, or a passage of low frequencies or very low
sound level is treated as a blank space.
Radio reception
Problem
Preset tuning is not possible.
Automatic tuning is not possible.
The “ST” indication flashes.
RDS functions
Problem
A SEEK starts after a few
seconds of listening.
No traffic announcements
PTY displays “NONE”.
22
Cause/Solution
• Store the correct frequency.
• The broadcast is too weak.
The broadcast is too weak. n Use manual tuning.
• Tune in precisely.
• The broadcast is too weak.
n Press (SENS/BTM) to enter the MONO mode.
Cause/Solution
The station is non-TP or weaken signal.
n Press (AF/TA) until “AF TA” disappears.
• Activate “TA”.
• The station does not broadcast any traffic announcements
despite being TP. n Tune in another station.
The station does not specify the programme type.

Disc play
Problem
Playback sound skips.
Error displays (when the optional CD/MD unit(s) is connected)
The following indications will flash for about five seconds and an alarm sound will be heard.
Display Cause
NO MAG
NO DISC
NG DISCS
ERROR
RESET
HI TEMP
If the above-mentioned solutions do not help to improve the situation, consult your nearest Sony
dealer.
The disc magazine is not inserted in
the CD/MD unit.
No disc is inserted in the disc
magazine.
A CD/MD cannot play because of
some problem.
The disc is dirty.
The disc is inserted upside down.
The CD/MD unit cannot be
operated because of some problem.
The ambient temperature is more
than 50°C.
Cause/Solution
A dusty or defective disc.
Solution
Insert the disc magazine with discs
into the CD/MD unit.
Take out the magazine and insert a
disc.
Insert another CD/MD.
Clean the disc.
Insert the disc correctly.
Press the reset button on the unit.
Wait until the temperature goes
below 50°C.
EN
Additional Information
23

Index
EN
A
Alternative Frequencies (AF) 9, 10
ATT 13
Automatic Music Sensor (AMS) 6, 14
Automatic tuning 7, 8
Automatic Tuner Activation (ATA) 6
B
BAL (left-right) 13
BAS (bass) 13
Bank play 16, 17
Beep tone 14
Best Tuning Memory (BTM) 7
Blank skip 6
C
Caution alarm 4
CD playback 14, 15, 16, 17
Clock 5
D, E
D-Bass 13
Disc Memo 16
Display 6, 8, 9, 14, 16, 17
Dolby 6
F, G, H
FAD (front-rear) 13
Fast-forward 5
Front panel 4
Fuse 18
R
Radio 7, 8
Radio Data System (RDS) 8, 9, 10
Repeat play 6, 15
Reset 4
Rewind 5
Rotary commander 4, 12, 13
S
Shuffle play 15
T, U, V, W, X, Y, Z
Tape playback 5
Traffic Announcement (TA) 9, 10
Traffic Programme (TP) 9
TRE (treble) 13
24
I, J, K
Intro scan 6, 15
L
Local seek mode (LCL) 8
M, N, O
Manual search 15
Manual tuning 7, 8
MD playback 14, 15
Monaural mode 8
P, Q
Preset search 7
Programme Type (PTY) 11

EN
25

ES
¡Bienvenido!
Enhorabuena por la adquisición del sistema
estéreo de cassettes para automóvil de Sony.
Esta unidad permite disfrutar de diversas
funciones mediante un mando rotativo.
Además de las operaciones de reproducción de
cintas y recepción de radio, es posible ampliar
el sistema mediante la conexión de una unidad
opcional de CD/MD*.
* Es posible conectar un cambiador de CD, de MD o un
reproductor de CD y de MD.
2

Indice
Sólo para esta unidad Con el equipo opcional
Procedimientos iniciales
Restauración de la unidad ................................. 4
Extracción del panel frontal............................... 4
Preparación del mando rotativo ....................... 4
Puesta en hora del reloj ...................................... 5
Reproductor de cassettes
Escucha de cintas ................................................ 5
Reproducción de la cinta en varios modos ..... 6
Radio
Memorización automática de emisoras
— Función de memorización de la mejor
sintonía (BTM) ................................................ 7
Memorización de las emisoras deseadas......... 7
Recepción de emisoras memorizadas .............. 7
RDS
Descripción general de la función RDS ........... 8
Visualización del nombre de la emisora.......... 8
Resintonización automática del mismo
programa
— Frecuencias alternativas (AF) .................. 9
Recepción de anuncios de tráfico ................... 10
Memorización de las emisoras RDS con los
datos AF y TA .............................................. 10
Localización de emisoras mediante el tipo de
programa ....................................................... 11
Ajuste automático del reloj .............................. 12
Otras funciones
Uso del mando rotativo ................................... 12
Ajuste de las características del sonido.......... 13
Atenuación del sonido ..................................... 14
Cambio de los ajustes de sonido y tono del
pitido ............................................................. 14
Unidad de CD/MD
Reproducción de discos compactos (CD)/
minidiscos (MD) .......................................... 15
Exploración de los temas
— Exploración de introducciones ............. 15
Reproducción repetida de temas
— Reproducción repetida........................... 15
Reproducción de temas en orden aleatorio
— Reproducción aleatoria .......................... 16
Asignación de títulos a los discos compactos
(sólo para XR-C6090R)
— Memorando de discos (Unidad de discos
compactos con función de archivo de
usuario) ......................................................... 16
Selección de temas específicos para su
reproducción (sólo para XR-C6090R)
— Función de banco (Unidad de discos
compactos con función de archivo de
usuario) ......................................................... 17
ES
Información complementaria
Precauciones ...................................................... 18
Mantenimiento .................................................. 19
Desmontaje de la unidad ................................. 19
Ubicación de los controles ............................... 20
Especificaciones ................................................. 21
Guía para la solución de problemas ............... 22
Indice alfabético ................................................ 24
3
Procedimientos
iniciales
Restauración de la unidad
Antes de emplear la unidad por primera vez, o
bien después de sustituir la batería del
automóvil, es necesario restaurar dicha
unidad.
Presione la tecla de restauración con un objeto
puntiagudo, como un bolígrafo.
Tecla de restauración
Nota
Al presionar la tecla de restauración se borrarán todos los
programas memorizados y las funciones de memoria.
ES
Extracción del panel
frontal
Es posible extraer el panel frontal de la unidad
para evitar que lo roben.
1 Presione (OFF).
2 Presione (RELEASE) para extraer el panel
frontal y, a continuación, tire de él hacia
fuera con suavidad.
(RELEASE)
Inserción del panel frontal
Fije la parte A del panel frontal a la parte B
de la unidad tal como muestra la ilustración y
ejerza presión hasta oír un chasquido.
A
B
Notas
• Cerciórese de colocar correctamente el panel frontal al
fijarlo en la unidad, ya que no podrá fijarse al revés.
• No ejerza excesiva presión sobre el panel frontal al fijarlo
en la unidad. Puede fijarse fácilmente presionándolo
ligeramente contra dicha unidad.
• Para llevar consigo el panel frontal, métalo en la caja
suministrada.
• No ejerza excesiva presión sobre el visor del panel
frontal.
• No exponga el panel frontal a la luz solar directa, fuentes
térmicas tales como conductos de aire caliente, ni lo deje en
lugares húmedos. No lo deje nunca en el salpicadero, etc.
con el automóvil aparcado al sol, porque la temperatura del
interior del mismo podría aumentar considerablemente.
Alarma de aviso
Si pone en OFF la llave de encendido sin haber
extraído el panel frontal, se activará la alarma
de aviso, y durante algunos segundos sonará
un pitido (solamente cuando el selector
POWER SELECT esté en la posición A). Si
conecta un amplificador opcional de potencia a
la toma LINE OUT y no utiliza el incorporado,
los pitidos se desactivarán.
Preparación del mando
rotativo
Cuando monte el mando rotativo, adhiérale la
etiqueta adecuada como se muestra en la
siguiente ilustración.
XR-C6090R:
Notas
• Tenga cuidado de no dejar caer el panel frontal cuando lo
extraiga de la unidad.
• Si presiona (RELEASE) para extraer el panel frontal con
la alimentación de la unidad conectada, ésta se
desconectará automáticamente a fin de evitarque se
dañen los altavoces.
4
XR-C5090R:
F
IL
L
E
S
E
D
O
M
FILE
L
E
S
E
D
O
M
L
P
S
D
E
M
O
D
E
S
E
L
D
S
P
L
M
O
D
E
S
E
L
Puesta en hora del reloj
El reloj posee una indicación digital de 24
horas.
Por ejemplo, ajuste el reloj en 10:08
Reproductor de
cassettes
1 Presione (DSPL) durante dos segundos.
100
Los dígitos de la hora parpadean.
1 Ajuste los dígitos de la hora.
para
retroceder
2 Presione ligeramente (SEL).
Los dígitos de los minutos parpadean.
3 Ajuste los dígitos de los minutos.
para
retroceder
para
avanzar
1000
1000
para
avanzar
1008
2 Presione ligeramente (DSPL).
1008
El reloj comienza a funcionar.
Nota
Si el selector POWER SELECT de la parte superior de la
unidad se ajusta en la posición B, no es posible poner en
hora el reloj a no ser que la alimentación esté activada.
Ponga en hora el reloj cuando haya encendido la radio.
Escucha de cintas
Inserte el cassette.
La reproducción se iniciará de forma
automática.
Si ya ha insertado un cassette, presione
(SOURCE) varias veces hasta que aparezca
“PLAY”.
FWD
La cara superior está reproduciéndose.
REV
La cara inferior está reproduciéndose.
Consejo
Para cambiar la dirección de transporte de cinta, presione
(MODE) (*) durante la reproducción.
Para Presione
Detener la reproducción (OFF)
Expulsar el cassette 6
Bobinado rápido de cintas
Durante la reproducción, presione
cualquier lado de (SEEK/AMS) durante
más de dos segundos.
SEEK
AMS
Rebobinado
Para iniciar la reproducción durante el
rebobinado o el avance rápido, presione
(MODE) (*).
Avance rápido
ES
Procedimientos iniciales/Reproductor de cassettes
5

Localización del comienzo de los
temas
— Sensor de música automático (AMS)
Es posible omitir un máximo de nueve temas
de una vez.
Durante la reproducción, presione
momentáneamente cualquier lado de
(SEEK/AMS).
SEEK
AMS
Para localizar los
temas anteriores
Nota
La función AMS puede no activarse si:
• el espacio en blanco entre temas es inferior a 4 segundos.
• hay ruido entre los temas.
• existen largas secciones con volumen bajo, o bien
secciones sin sonido.
Para localizar los
temas posteriores
Cambio de los elementos
mostrados
Cada vez que presione (DSPL) durante la
reproducción de la cinta, los elementos
mostrados cambian de la siguiente forma:
ES
” Reproducción de cintas ” Reloj
Frecuencia* “
* Mientras la función AF/TA esté activada.
Reproducción de la cinta
en varios modos
Búsqueda de un tema determinado
— Función de exploración de
introducciones
Presione (1) durante la reproducción.
“INTRO” aparece en el visor.
Se reproducen los 10 primeros segundos de
todos los temas.
Cuando localice el tema que desee, vuelva a
presionar la tecla. La unidad volverá al modo
de reproducción normal.
Sintonización de la radio durante el
bobinado rápido de cintas
— Activación automática del
sintonizador (ATA)
Presione (5) durante la reproducción.
“ATA” aparece en el visor.
Durante el avance rápido o el rebobinado,
presione (SEEK/AMS); transcurridos dos
segundos, el sintonizador se encenderá
automáticamente.
Para cancelar esta función, vuelva a presionar
(5).
Omisión de los espacios en blanco
durante la reproducción de cintas
— Omisión de espacios en blanco
Presione (6) durante la reproducción.
“BL SKIP” aparece en el visor.
Los espacios en blanco superiores a ocho
segundos se omitirán automáticamente
durante la reproducción de cintas.
Para cancelar esta función, vuelva a presionar
(6).
Reproducción de cintas grabadas
con el sistema Dolby B NR
(sólo XR-C6090R)
Presione (3) si desea escuchar una cinta
grabada con el sistema Dolby* B NR.
El visor muestra “a”.
Para cancelar esta función, vuelva a presionar
(3).
* Reducción de ruido Dolby fabricado bajo licencia de
Dolby Laboratories Licensing Corporation.
DOLBY y el símbolo de la doble D a son marcas de
Dolby Laboratories Licensing Corporation.
Reproducción repetida de temas
— Función de reproducción repetida
Presione (2) durante la reproducción.
Aparece “REP” en el visor.
Cuando finalice la reproducción del tema
actual, éste volverá a reproducirse desde el
principio.
Para cancelar esta función, vuelva a presionar
(2).
6
 Loading...