

Page 1

FM/MW/LW
Cassette Car
Stereo
3-860-413-11 (1)
Operating Instructions
Instrukcja obłsugi
Инструкция за експлоатация
Használati Útmutató
Инструкция по эксплуатации
For installation and connections, see the supplied installation/connections
manual.
Informacji o instalacji i podłączeniu należy szukać w załączonej instrukcji
instalacji/podłączania.
За инсталиране и свързване на апарата, използувайте приложения
наръчник.
A készülék üzembehelyezéséről s csatlakoztatásáról részletes tájékoztatást talál
az Üzembehelyezési/csatlakoztatási útmutatóban.
Перед установкой и подключениями обратитесь к прилагаемой инструкции
по установке и подключению.
EN
PL
BG
H
RF
XR-C453RDS
1997 by Sony Corporation
Page 2

EN
Welcome!
Thank you for purchasing the Sony Cassette
Car Stereo. This unit lets you enjoy a variety of
features by using a rotary remote.
In addition to the tape playback and the radio
operation you can expand your system by
connecting optional CD/MD changer.
2
Page 3

Table of contents
This Unit Only
Getting Started
Resetting the unit ................................................ 4
Detaching the front panel .................................. 4
Preparing the rotary remote .............................. 4
Setting the clock .................................................. 5
Cassette Player
Listening to a tape............................................... 5
Playing a tape in various modes....................... 6
Radio
Memorizing stations automatically
— Best Tuning Memory (BTM) ................... 7
Memorizing only the desired stations ............. 7
Receiving the memorized stations.................... 7
RDS
Overview of the RDS function .......................... 8
Displaying the station name.............................. 8
Re-tuning the same programme automatically
— Alternative Frequencies (AF) .................. 9
Listening to traffic announcements .................. 9
Presetting the RDS stations with AF
and TA data ................................................. 10
Locating a station by programme type.......... 11
Setting the clock automatically ....................... 11
Other Functions
Using the rotary remote ................................... 12
Adjusting the sound characteristics ............... 13
Muting the sound.............................................. 13
Changing the sound and beep tone ............... 13
With Optional Equipment
CD/MD Changer
Playing a CD/MD ............................................. 14
Scanning the tracks
— Intro scan.................................................. 15
Playing tracks repeatedly
— Repeat play .............................................. 15
Playing tracks in random order
— Shuffle play .............................................. 15
EN
Additional Information
Precautions ......................................................... 16
Maintenance....................................................... 17
Dismounting the unit ....................................... 17
Location of controls .......................................... 18
Specifications ..................................................... 19
Troubleshooting guide ..................................... 20
Index ................................................................... 22
3
Page 4
EN
Getting Started
Resetting the unit
Before operating the unit for the first time or
after replacing the car battery, you must reset
the unit.
Press the reset button with a pointed object,
such as a ball-point pen.
Reset button
Note
Pressing the reset button will erase all the memorized
programme and memory functions.
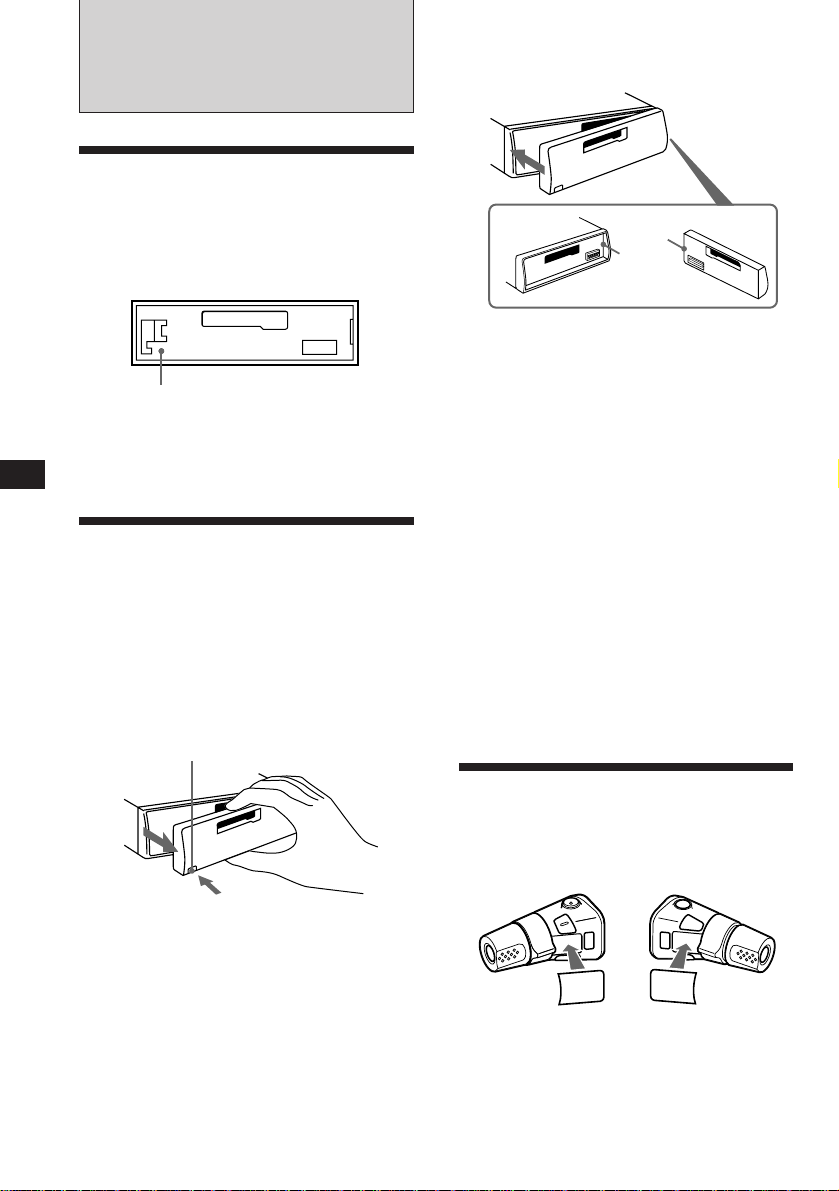
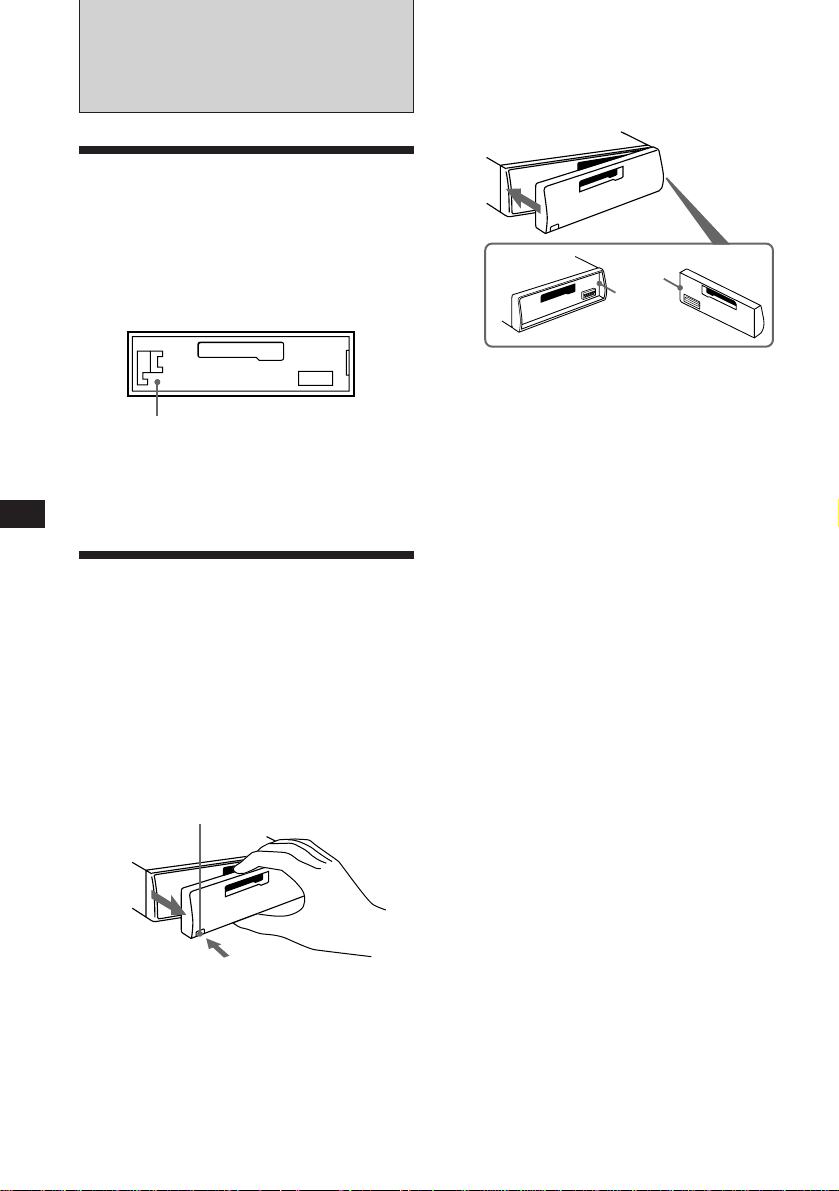
Detaching the front panel
Attaching the front panel
Attach part A of the front panel to part B of
the unit as illustrated and push until it clicks.
A
B
Notes
• Make sure the front panel is the right way up when
attaching it to the unit as it cannot be attached upside
down.
• Do not press the front panel hard against the unit when
attaching it to the unit. It can easily be attached by
pressing it lightly against the unit.
• When you carry the front panel with you, put it in the
supplied front panel case.
• Do not press hard or give excessive pressure to the
display windows of the front panel.
• Do not expose the front panel to direct sunlight, heat
sources such as hot air ducts or leave it in a humid place.
Never leave it on the dashboard etc. of a car parked in
direct sunlight where there may be a considerable rise in
temperature inside the car.
The front panel of this unit can be detached to
prevent the unit from being stolen.
1 Press (OFF).
2 Press (RELEASE) to open up the front
panel, and detach the panel by pulling it
towards you.
(RELEASE)
Notes
• Be sure not to drop the panel when detaching it from the
unit.
• If you press (RELEASE) to detach the panel while the
unit is still turned on, the power will automatically turn
off to protect the speakers from being damaged.
4
Caution alarm
If you turn the ignition key to the OFF position
without removing the front panel, the caution
alarm will beep for a few seconds (only when
the POWER SELECT switch is set to the A
position).
If you connect an optional power amplifier
and do not use the built-in amplifier, the beep
tone will be disabled.
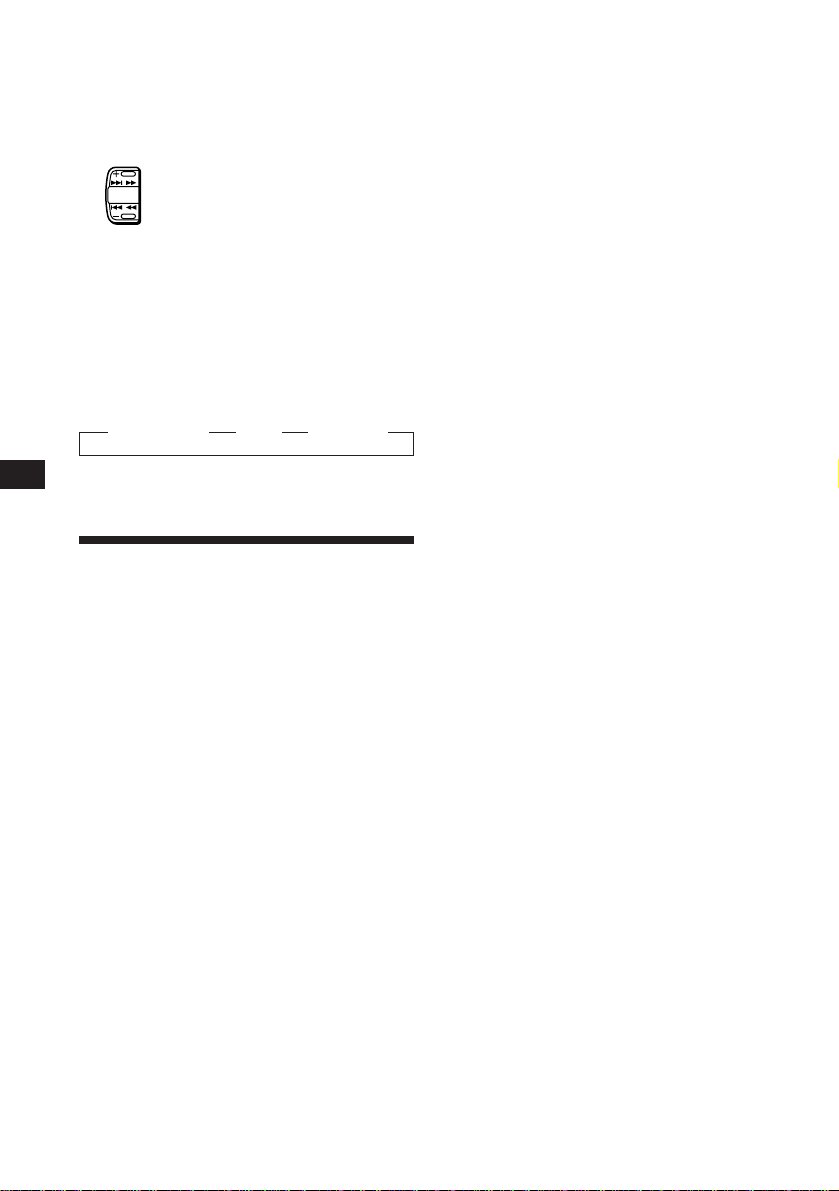
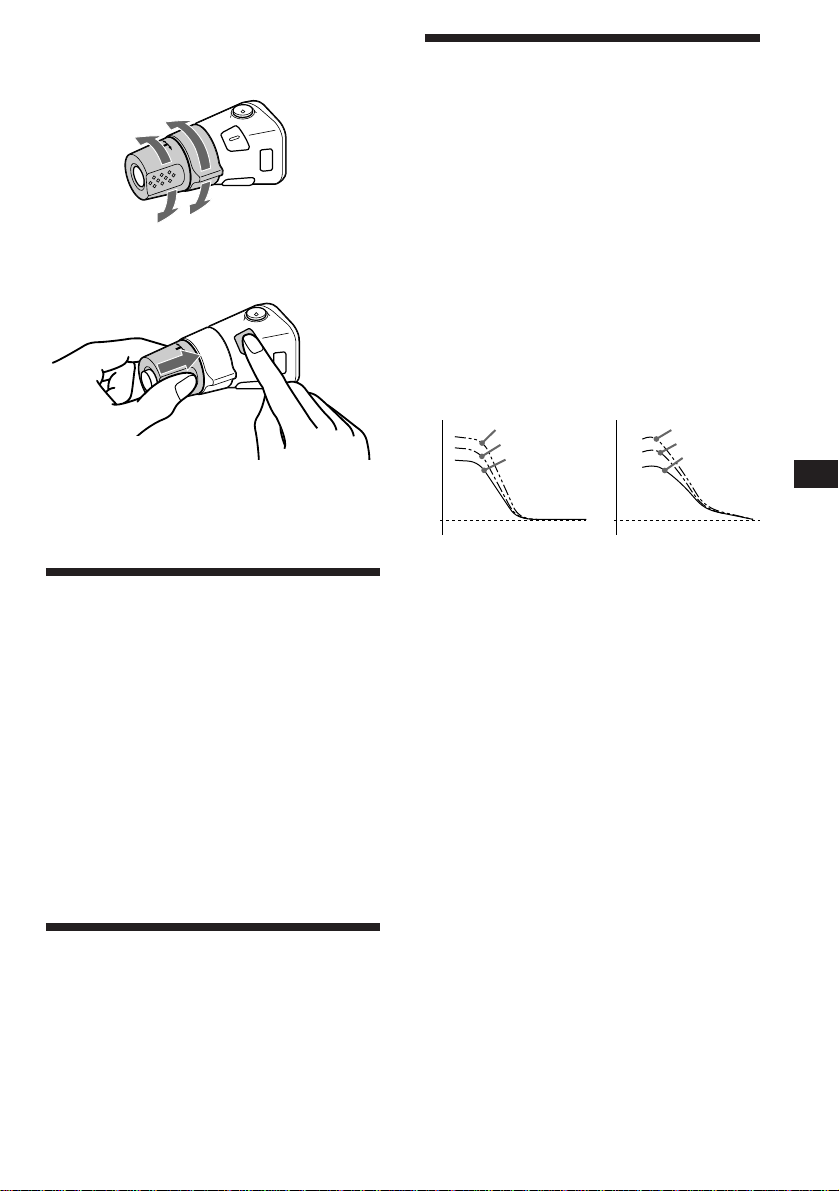
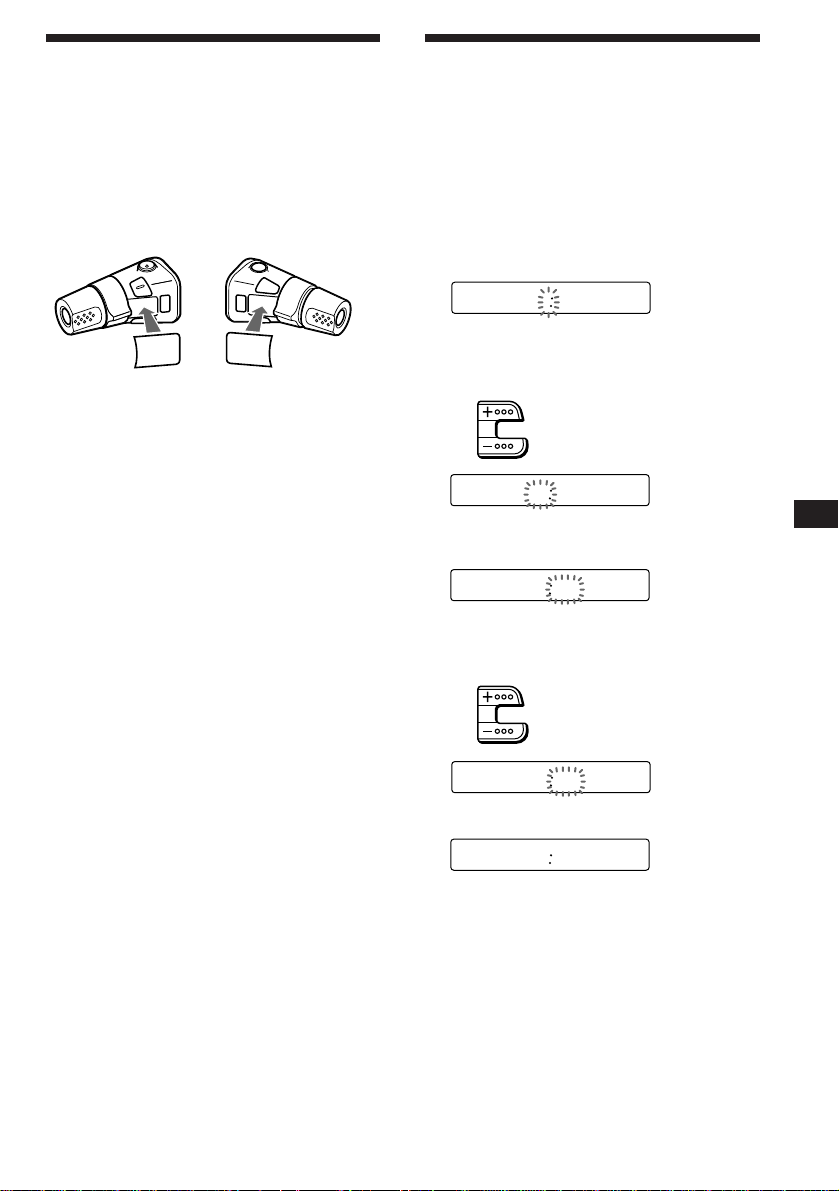
Preparing the rotary
remote
When you mount the rotary remote, attach the
label in the illustration below.
SEL
DSPL
MODE
MODE
DSPL
SEL
Page 5

Setting the clock
The clock has a 24-hour digital indication.
For example, setting it to 10:08
Cassette Player
1 Press (OFF) or (DSPL) during operation.
2 Press (DSPL) for two seconds.
100
The hour digit blinks.
1 Set the hour digits.
to go forward
to go backward
1000
2 Press (SEL) momentarily.
1000
The minute digit blinks.
3 Set the minute digits.
to go forward
to go backward
1008
3 Press (DSPL) momentarily.
1008
The clock activates.
Note
If the POWER SELECT switch on the top of the unit is set
to the B position, the clock cannot be set unless the power
is turned on. Set the clock after you have turned on the
radio.
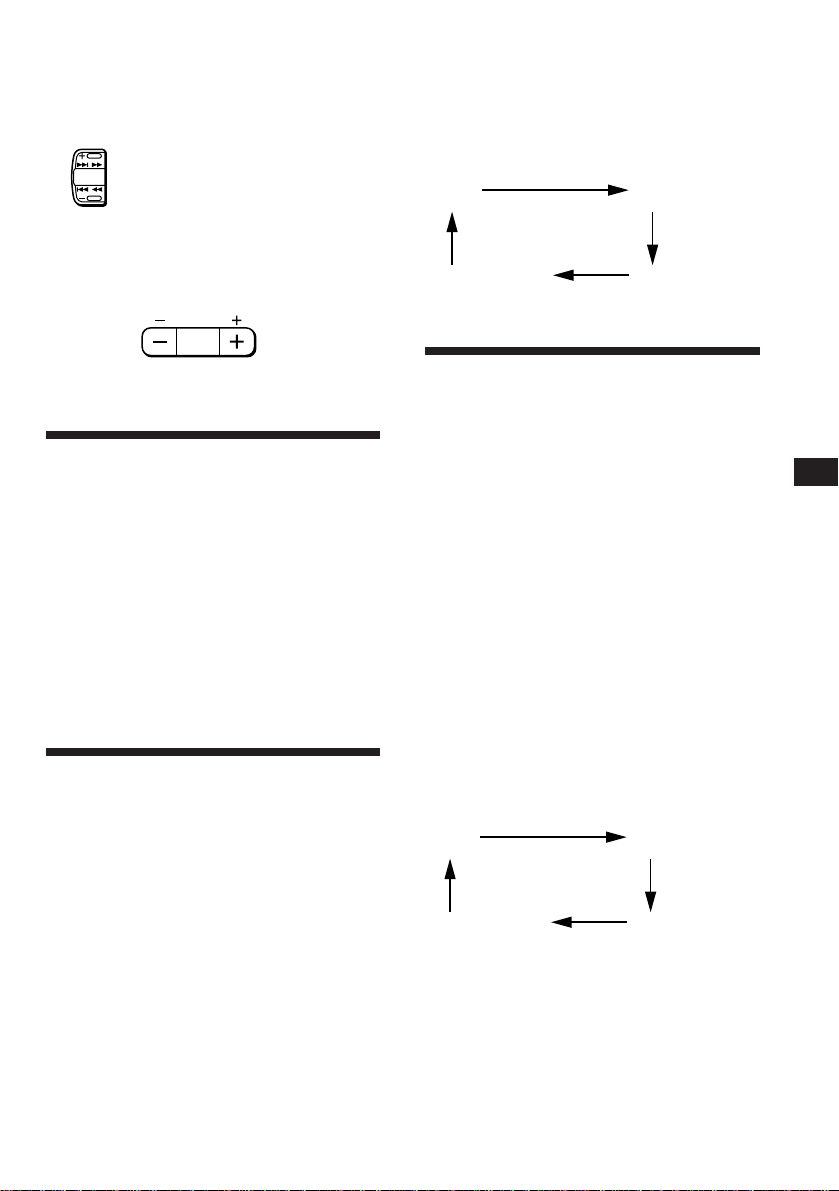
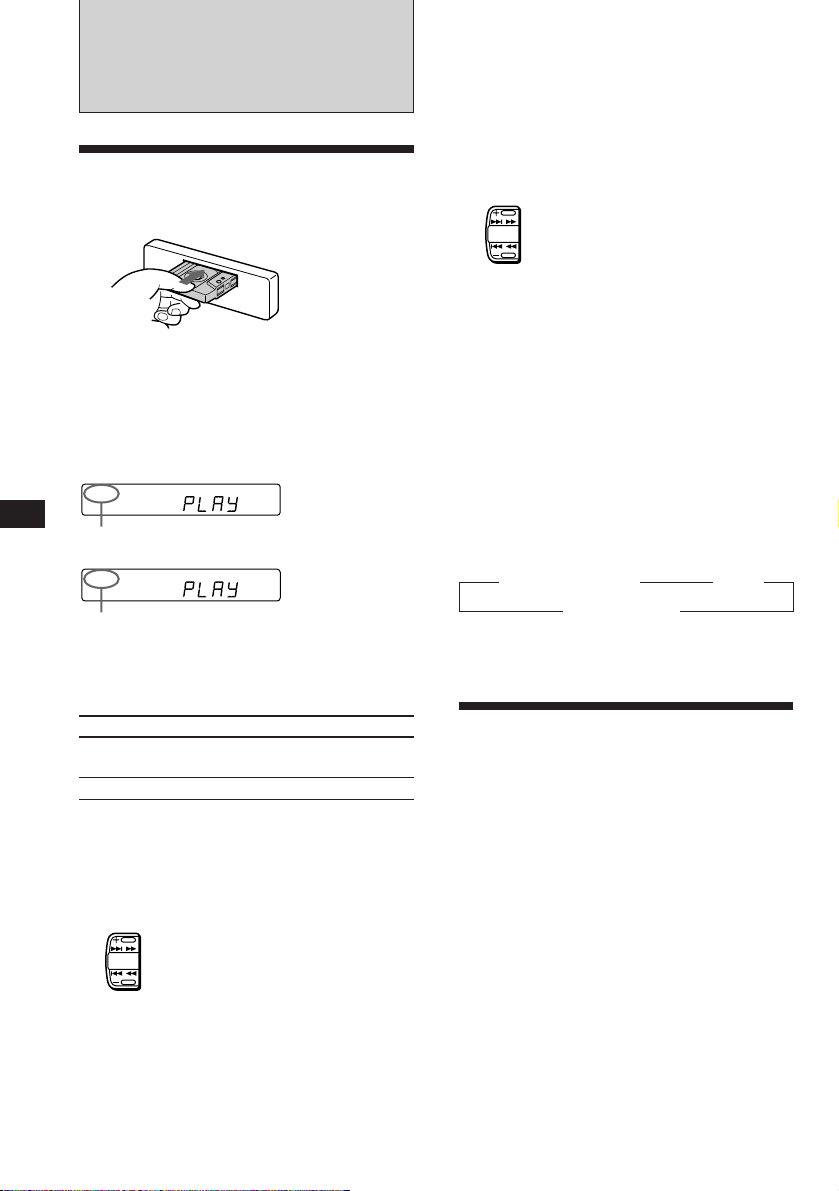
Listening to a tape
Insert a cassette.
Playback will start automatically.
If a cassette is already inserted, press
(SOURCE) repeatedly until “PLAY” is
displayed.
FWD
The side facing up is being played.
REV
The side facing down is being played.
Tip
To change the tape transport direction, press (MODE)
(*) during tape playback.
To
Stop playback
Eject the cassette
Fast-winding the tape
During playback, press either side of
(SEEK/AMS) more than two second.
Fast-forward
SEEK
AMS
Rewind
Press
(OFF)
6
EN
Getting Started/Cassette Player
To start playback during fast-forwarding or
rewinding, press (MODE) (*).
5
Page 6
EN
Locating the beginning of a track
— Automatic Music Sensor (AMS)
You can skip up to nine tracks at one time.
During playback, press either side of
(SEEK/AMS) momentarily.
To locate the succeeding tracks
SEEK
AMS
To locate the preceding tracks
Note
The AMS function may not work when :
• the blanks between tracks are shorter than 4 seconds
• there is noise between tracks
• there are long sections of low volume or quiet sections.
Changing the displayed items
Each time you press (DSPL) during tape
playback, the displayed item changes as
follows:
z Tape playback z Clock z Frequency*
* While the AF/TA function activated.
Playing a tape in various
modes
Searching for the desired track
— Intro scan
Press (1) during playback.
“INTRO” appears on the display.
Switching to the radio while fastwinding a tape
— Automatic Tuner Activation (ATA)
Press (5) during playback.
“ATA” appears on the display.
When fast-forwarding or rewinding with
(SEEK/AMS) for two seconds, the tuner will
turn on automatically.
To cancel this function, press (5).
Skipping blanks during tape
playback — Blank skip
Press (6) during playback.
“BL.SKIP” appears on the display.
Blanks longer than eight seconds will
automatically be skipped during tape
playback.
To cancel this function, press (6).
Playing a CrO2 or metal tape
Press (4) when you want to listen to a
CrO2 (TYPE II) or metal (TYPE IV) tape.
“MTL” appears on the display.
To cancel this function, press (4).
The first 10 seconds of all the tracks are played.
When you find the desired track, press again.
The unit returns to the normal playback mode.
Playing tracks repeatedly
— Repeat play
Press (2) during playback.
“REP” appears on the display.
When the current played track is over, it will
be played again from the beginning.
To cancel this mode, press again.
6
Page 7
Radio
The frequency ranges this unit can receive and
memorize are 87.5-108.0MHz (FM1, FM2) and
65.0-74.0MHz (FM3).
Memorizing stations
automatically
— Best Tuning Memory (BTM)
This function selects from the currently
received band the stations with the strongest
signals and memorizes them in order of their
frequency.
PREVENTING ACCIDENTS!
When tuning in while driving, use the
automatic tuning or memory preset search
function instead of manual tuning.
1 Press (SOURCE) repeatedly to select the
tuner.
Each time you press (SOURCE), the source
changes as follows:
z TAPE z TUNER z CD/MD
Memorizing only the
desired stations
Up to 6 stations on each band (FM1, FM2, FM3,
MW and LW) can be stored on the preset
number buttons in the order of your choice.
Therefore, 18 FM stations can be memorized.
If you try to store another station on the same
preset number button, the previously stored
station will be erased.
1 Press (SOURCE) repeatedly to select the
tuner.
2 Press (MODE) repeatedly to select the
band.
3 Press (SEEK/AMS) to search for the
station you wish to store on a preset
number button.
4 Press the desired preset number button
((1) to (6)) for two seconds.
The number of the selected preset number
button appears on the display.
EN
Cassette Player/Radio
2 Press (MODE) repeatedly to select the
band.
Each time you press (MODE), the band
changes as follows:
z FM1 z FM2 z FM3
LW Z MW Z
3 Press (SENS/BTM) for two seconds.
Notes
• During FM1 and FM2 band reception, the BTM
function searches only the 87.5-108.0MHz frequency
range, and during FM3 band reception, it searches only
the 65.0-74.0MHz frequency range.
• The unit will not store stations with weak signals on the
preset number buttons. If there are only a few stations
received, some preset number buttons will remain empty.
• When there is a preset number indicated on the display,
the unit will store stations on all preset number buttons
from the one currently displayed.
Receiving the memorized
stations
1 Press (SOURCE) repeatedly to select the
tuner.
2 Press (MODE) repeatedly to select the
band.
3 Press the preset number button ((1) to
(6)) momentarily on which the desired
station is stored.
Tip
Press either side of (PRESET/DISC) to receive in order the
stations stored in the memory (Preset Search Function).
During FM1 or FM2 reception, the FM3 band cannot be
received directly with (PRESET/DISC) because the
frequency ranges are different. Select the band with
(MODE).
7
Page 8

EN
BBC 1 FM
FM1
If FM stereo reception is poor
— Monaural mode
Press (SENS/BTM) momentarily until
“MONO” lights up on the display.
The sound will improve, but it will become
monaural. (The “ST” indication will
disappear.)
Changing the displayed items
Each time you press (DSPL), the display
changes between the frequency and the clock.
If you cannot tune in a preset
station
Press either side of (SEEK/AMS)
momentarily to search for the station
(automatic tuning).
Scanning stops when a station is received.
Press either side of the button repeatedly
until the desired station is received.
Note
If the automatic tuning stops too frequently, press
(SENS/BTM) momentarily until “LCL” lights up on the
display (local seek mode). Only the stations with relatively
strong signals can be tuned in.
Tip
If you know the frequency, press and hold either side of
(SEEK/AMS) until the desired station is received (manual
tuning).
RDS
Overview of the RDS
function
Radio Data System (RDS) is a broadcasting
service that allows FM stations to send
additional digital information along with the
regular radio programme signal. Your car
stereo offers you a variety of services. Here
are just a few: Re-tuning the same programme
automatically, Listening to traffic
announcements and Locating a station by
programme type.
The RDS function is available only for FM1
and FM2 bands.
Notes
• Depending on the country or region, not all of the RDS
functions are available.
• RDS may not work properly if the signal strength is
weak or if the station you are tuned in is not
transmitting RDS data.
Displaying the station
name
The name of the station currently received
lights up on the display.
Select an FM station.
When you tune in an FM station that
transmits RDS data, the station name lights
up on the display.
Note
The “*” indication means that an RDS station is being
received.
Changing the displayed items
Each time you press (DSPL), the displayed
items change as follows:
z Frequency z Time z Station name
Note
“NO NAME” lights up if the station received does not
transmit RDS data.
8
Page 9

Re-tuning the same
programme automatically
— Alternative Frequencies (AF)
The Alternative Frequencies (AF) function
automatically selects and re-tunes the station
with the strongest signal in a network. By
using this function, you can continuously
listen to the same programme during a longdistance drive without having to re-tune the
station manually.
Frequencies change automatically.
98.5 MHz
96.0 MHz
Listening to a regional programme
The “REG” (regional on) function of this unit
lets you stay tuned to a regional programme
without being switched to another regional
station. (Note that you must turn the AF
function on.) The unit is factory preset to
“REG“ but if you want to turn off the function,
do the following.
Press (AF/TA) for more than two seconds
until “REG” disappears.
Note that turning the “REG” function off
might cause the unit to switch to another
regional station within the same network.
Note
This function does not work in the United Kingdom and in
some other areas.
Station
102.5 MHz
1 Select an FM station.
2 Press (AF/TA) until “AF” lights up on the
display.
The unit starts searching for an alternative
station with a stronger signal in the same
network.
Notes
• When the (AF/TA) button is pressed during FM3 band
reception, the band changes automatically to FM1.
• When there is no alternative station in the area, and you
don’t need to search for an alternative station, turn the
AF function off by pressing (AF/TA) until “AF”
disappears.
Changing the displayed items
Each time you press (AF/TA), the displayed
items change as follows:
z AF z TA z AF TA*
Blank Z
* Select this to turn on both AF and TA functions.
Notes
• “NO AF” and the station name flashes alternately, if the
unit cannot find an alternative station in the network.
• If the station name starts flashing after selecting a
station with the AF function on, this indicates that no
alternative frequency is available. Press (SEEK/AMS)
while the station name is flashing (within eight seconds).
The unit starts searching for another frequency with the
same PI (Programme Identification) data (“PI seek”
appears and no sound is heard). If the unit cannot find
another frequency, “NO PI” appears, and the unit
returns to the originally selected frequency.
Listening to traffic
announcements
The Traffic Announcement (TA) and Traffic
Programme (TP) data let you automatically
tune in an FM station that is broadcasting
traffic announcements even though you are
listening to other programme sources.
Press (AF/TA) until “TA” or “AF TA” lights
up on the display.
The unit starts searching for traffic
information stations. “TP” lights up on the
display when the unit finds a station
broadcasting traffic announcements.
When the traffic announcement starts,
“TA” flashes, then flashing stops when the
traffic announcement is over.
Tip
When the traffic announcement starts while you are
listening to another programme source, the unit
automatically switches to the announcement and goes back
to the original source when the announcement is over.
Notes
• “NO TP” flashes for five seconds if the received station
doesn’t broadcast traffic announcements. Then, the unit
starts searching for a station that does broadcast traffic
announcements.
• When the “EON” indication appears with “TP” on the
display, the current station makes use of broadcast traffic
announcements of other stations in the same network.
EN
Radio/RDS
9
Page 10

EN
To cancel the current traffic
announcement
Press (AF/TA) momentarily.
To cancel all traffic announcements, turn
off the function by pressing (AF/TA) until
“AF” disappears.
Presetting the volume of traffic
announcements
You can preset the volume level of the traffic
announcements beforehand, so you will not
miss the announcement. When a traffic
announcement starts, the volume will be
automatically adjusted to the preset level.
1 Select the desired volume level.
2 Press (3) while holding down (SEL).
“TA VOL” appears and the setting is
stored.
Receiving emergency
announcements
If an emergency announcement comes in while
you are listening to the radio, the programme
will be automatically switched to the
announcement. If you are listening to a source
other than the radio, the emergency
announcements will only be heard if you set
AF or TA to on. The unit will then
automatically switch to these announcements
no matter what you are listening to at the time.
Presetting the RDS
stations with AF and TA
data
When you preset the RDS stations, the unit
stores each station’s data as well as its
frequency, so you don’t have to turn on the AF
or TA function every time you tune in the
preset station. You can select different setting
(AF, TA, or both) for individual preset stations,
or the same setting for all preset stations.
Presetting the same setting for all
preset stations
1 Select an FM band.
2 Press (AF/TA) repeatedly and select
either “AF“, “TA” or “AF TA” (for both AF
and TA functions).
Note that turning the “AF TA” function off
stores RDS stations as well as non-RDS FM
stations.
3 Press (SENS/BTM) for two seconds.
Presetting different settings for
each preset station
1 Select an FM band, and tune in the
desired station.
10
2 Press (AF/TA) repeatedly and select
either “AF“, “TA” or “AF TA” (for both AF
and TA functions).
3 Press the desired preset number button
for two seconds until “MEM” appears.
Repeat from step 1 for presetting other
stations.
Tip
If you want to change the preset AF and/or TA setting
after you tuned in the preset station, you can do so by
turning on/off the AF or TA function.
Page 11

Locating a station by
programme type
You can locate the station you want by
selecting one of the programme types shown
below.
Note
If the countries or regions where EON data is not
transmitted, you can use this function only for the stations
you have tuned in once.
Programme types Display
News NEWS
Current Affairs AFFAIRS
Information INFO
Sports SPORT
Education EDUCATE
Drama DRAMA
Culture CULTURE
Science SCIENCE
Varied VARIED
Popular Music POP M
Rock Music ROCK M
Middle of the Road Music M.O.R. M
Light Classical LIGHT M
Classical CLASSICS
Other Music Type OTHER M
Weather WEATHER
Finance FINANCE
Children's programms CHILDREN
Social Affairs SOCIAL A
Religion RELIGION
Phone In PHONE IN
Travel TRAVEL
Leisure LEISURE
Jazz Music JAZZ
Country Music COUNTRY
National Music NATION M
Oldies Music OLDIES
Folk Music FOLK M
Documentary DOCUMENT
Not specified NONE
Note
You can not use this function in some countries where no
PTY (Programme Type selection) data is available.
1 Press (PTY) during FM reception until
“PTY” lights up on the display.
INFO
The current programme type name appears
if the station is transmitting the PTY data.
“--------” appears if the received station is
not an RDS station or if the RDS data has
not been received.
Note
The PTY function is not available for the FM3 band.
2 Press (PTY) repeatedly until the desired
programme type appears.
The programme types appear in the order
as shown in the above table. Note that you
cannot select “NONE” (Not specified) for
searching.
3 Press either side of (SEEK/AMS).
The unit starts searching for a station
broadcasting the selected programme type.
When the unit finds the programme, the
programme type appears again for five
seconds.
“NO” and the programme type appear
alternately for five seconds if the unit
cannot find the programme type and it
returns to the previous station.
Setting the clock
automatically
By receiving CT (Clock Time) data, the clock of
this unit can be set automatically.
During FM reception, press (2) while
pressing (SEL).
“CT” will be displayed, and the clock will
be set.
FM1
To cancel the CT function
Repeat the above procedure.
Notes
• The CT function may not work even though an RDS
station is being received.
• The time set by the CT function may not be exact.
CT
100
EN
RDS
11
Page 12
EN
Other Functions
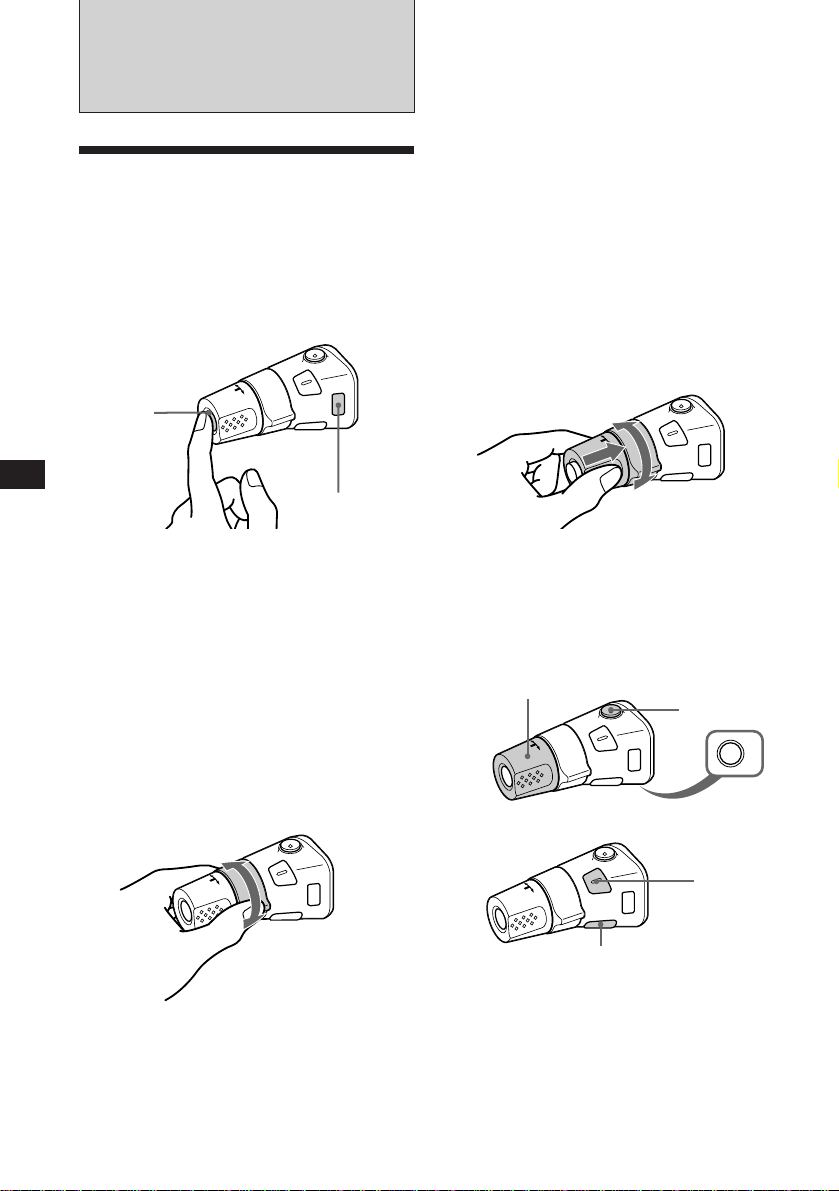
Using the rotary remote
The rotary remote works by pressing buttons
and/or rotating controls.
You can control the optional CD/MD changer
by the rotary remote.
By pressing buttons (the SOURCE
and the MODE buttons)
(SOURCE)
(MODE)
Rotate the control momentarily and
release it to:
• Locate the beginnings of the tracks on the
tape. Rotate and hold the control, and
release it to fast-wind the tape. To
playback, rotate and hold the control
again, and release it.
• Locate a specific track on a disc. Rotate
and hold the control until you locate the
specific point in a track, then release it to
start playback.
• Tune in the stations automatically.
Rotate and hold the control to tune in the
specific station.
By rotating the control while
pushing in (the PRESET/DISC
control)
Every time you press (SOURCE), the
source changes as follows:
TAPE n TUNER n CD/MD
Pressing (MODE) changes the operation in the
following ways:
• the tape transport.
• the band, FM1 n FM2 n FM3 n MW n LW.
• the CD/MD changer.
Tip
You can turn on this unit by pressing (SOURCE) on the
rotary remote.
By rotating the control (the SEEK/
AMS control)
Push in and rotate the control to:
• Receive the stations memorized on the
preset buttons.
• Change the disc.
Other operations
Rotate the VOL control
to adjust the volume.
Press (DSPL) to change the
displayed items.
Press (MUTE)to
mute the sound.
Press(OFF) to
turn off the unit.
Press (SEL)
to adjust
and select.
OFF
12
Page 13
Changing the operative direction
The operative direction of controls is factory
preset as in the illustration below.
To increase
To decrease
If you need to mount the rotary remote on the
right side of the steering column, you can
reverse the controls operative direction.
Press (SEL) for two seconds while
pushing in the VOL control.
Changing the sound and
beep tone
Boosting the bass sound — D-bass
You can enjoy clear and powerful bass sound.
The D-bass function boosts the low frequency
signal with a sharper curve than conventional
bass boost.
You can hear the bass line more clearly even if
the vocal sound is the same volume. You can
emphasize and adjust the bass sound easily
with the D-BASS control. This effect is similar
to the one you get when you use an optional
subwoofer system.
Moreover, the Digital D-bass* function creates
even sharper and more powerful bass sound
than Analog D-bass.
Digital D-Bass Analog D-Bass
Level
D-BASS 3
Frequency (Hz)Frequency (Hz)
D-BASS 2
D-BASS 1
0dB
Level
D-BASS 3
D-BASS 2
D-BASS 1
0dB
EN
Other Functions
Adjusting the sound
characteristics
1 Select the item you want to adjust by
pressing (SEL) repeatedly.
VOL (volume) n BAS (bass) n TRE
(treble) n BAL (balance) n FAD (fader)
2 Adjust the selected item by pressing
either (+) or (–).
Adjust within three seconds after selecting.
(After three seconds the button will again
serve as the volume control button.)
Muting the sound
Press (MUTE).
The “MUTE” indication flashes.
To restore the previous volume level, press
again.
Tip
The unit decreases the volume automatically when a
telephone call comes in (Telephone-mute function).
Adjusting the bass curve
Turn the D-BASS control to adjust the
bass level (1, 2 or 3).
“D-BASS”* appears in the display.
To cancel, turn the control to the OFF position.
* If the CD changer has the digital D-bass function,
“DIGITAL D-BASS” appears on the display during CD
playback.
Note
If the CD changer does not have a D-bass function, the
bass sound may be distorted when the volume is increased.
In this case, turn on the D-BASS control and adjust the
volume.
13
Page 14

Muting the beep tone
Press (6) while pressing (SEL).
To obtain the beep tone again, press these
buttons again.
Note
If you connect an optional power amplifier and do not use
the built-in amplifier, the beep tone will be disabled.
With Optional Equipment
CD/MD Changer
You can control up to five CD/MD changers
with this unit.
EN
Changing the illumination color
Press (1) while pressing (SEL).
You can choose the color between amber and
green.
Playing a CD/MD
Press (SOURCE) until the desired
changer indication appears on the
display.
CD/MD playback starts.
When a CD/MD changer is connected, all the
tracks play from the beginning.
Note
Even if you select an MD changer, “CD” appears in the
display.
Selecting CD/MD changers (when
several CD/MD changers are
connected)
Press (MODE) repeatedly to select the desired
CD/MD changer.
Changing the displayed items
Each time you press (DSPL) during CD/MD
playback, the item changes as follows:
Elapsed playback time ˜ Clock
Locating a specific track
— Automatic Music Sensor (AMS)
During playback, press either side of
(SEEK/AMS) once for each track you wish
to skip the tracks.
To locate the succeeding tracks
SEEK
AMS
To locate the preceding tracks
14
Page 15
Locating a specific point in a track
— Manual Search
During playback, press and hold either
side of (SEEK/AMS). Release the button
when you have found the desired part.
To search forward
SEEK
AMS
To search backward
Switching to other discs
During playback, press either side of
(PRESET/DISC).
PRESET
DISC
To return to the
previous disc
To advance to the
next disc
To repeat all the discs in the
current changer
Press (2) repeatedly during CD/MD
playback until “REP 3” is displayed.
Each time you press (2) the display changes as
follows:
REP 1
(Track repeat)
Cancel (Normal
disc playback
mode)
REP 2
(Disc repeat)
REP 3
(Changer repeat)
Playing tracks in random
order
— Shuffle play
Scanning the tracks
— Intro scan
The first 10 seconds of all the tracks on the
current disc are played in order. After the first
disc is over, the next disc is played.
Press (1) during playback.
“INTRO” appears on the display.
When you find the desired track, press again .
The unit returns to the normal CD/MD
playback mode.
Playing tracks repeatedly
— Repeat play
To repeat a track
Press (2) repeatedly during CD/MD
playback until “REP 1” is displayed.
To repeat a disc
Press (2) repeatedly during CD/MD
playback until “REP 2” is displayed.
To play the tracks on the current
disc in random order
Press (3) repeatedly during CD/MD
playback until “SHUF 1” is displayed.
To play all the discs in the changer
in random order
Press (3) repeatedly during CD/MD
playback until “SHUF 2” is displayed.
To play all the discs in the current
connected changers in random
order
Press (3) repeatedly during CD/MD
playback until “SHUF 3” is displayed.
Each time you press (3) the display changes as
follows:
SHUF 1
(Disc shuffle)
Cancel (Normal
disc playback
mode)
If you press (1) during shuffle play, the first 10
seconds of all tracks will be played in random
order.
SHUF 2
(Changer shuffle)
SHUF 3
(All shuffle)
EN
Other Functions/CD/MD Changer
15
Page 16
EN
Additional
Information
Precautions
• If your car was parked in direct sunlight
resulting in a considerable rise in
temperature inside the car, allow the unit to
cool off before operating it.
• If no power is being supplied to the unit,
check the connections first. If everything is in
order, check the fuse.
• If no sound comes from the speakers of a
2-speaker system, set the fader control to the
center position.
• When the tape is played back for a long
period, the cassette may become warm
because of the built-in power amplifier.
However, this is not a sign of malfunction.
If you have any questions or problems
concerning your unit that are not covered in
this manual, please consult your nearest Sony
dealer.
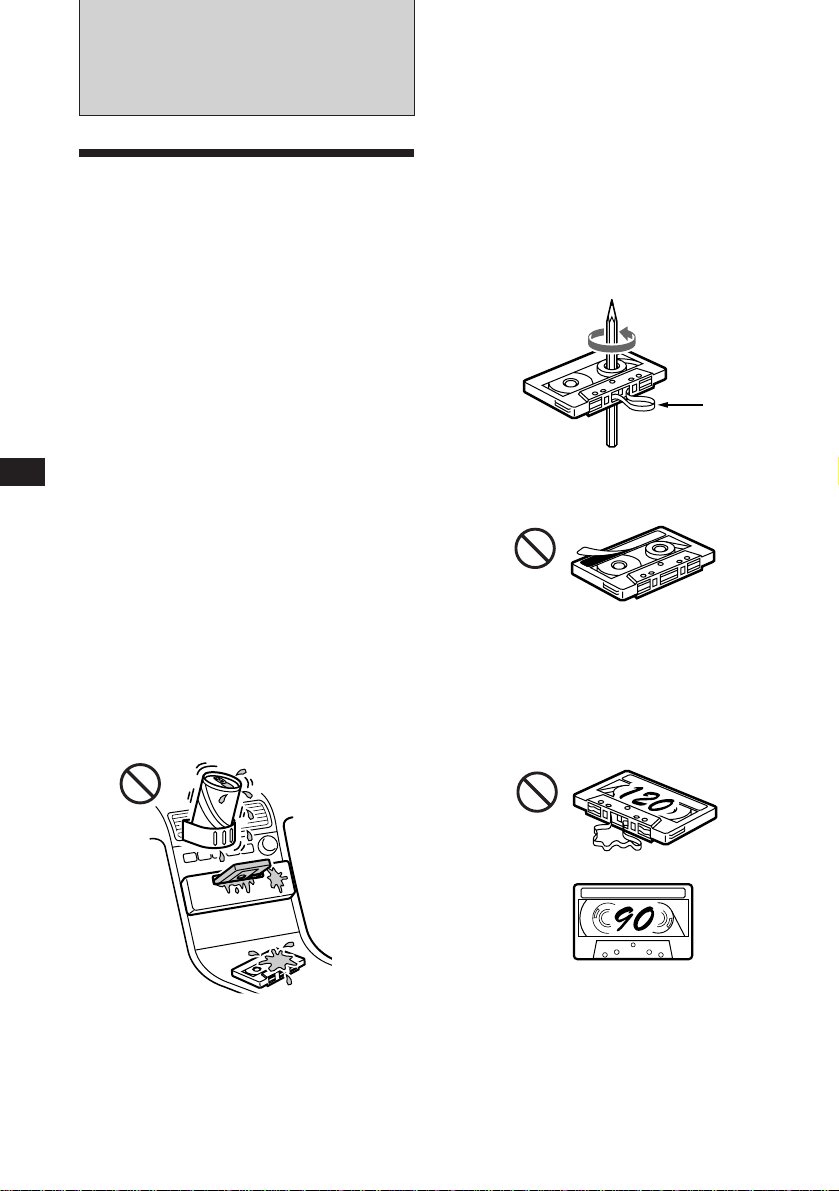
To maintain high quality sound
If you have drink holders near your audio
equipment, be careful not to splash juice or
other soft drinks onto the car audio. Sugary
residues on this unit or cassette tapes may
contaminate the playback heads, reduce the
sound quality, or prevent sound reproduction
altogether.
Cassette cleaning kits cannot remove sugar
from the tape heads.
Notes on Cassettes
Cassette care
• Do not touch the tape surface of a cassette, as
any dirt or dust will contaminate the heads.
• Keep cassettes away from equipment with
built-in magnets such as speakers and
amplifiers, as erasure or distortion on the
recorded tape could occur.
• Do not expose cassettes to direct sunlight,
extremely cold temperatures or moisture.
• Slack in the tape may cause the tape to be
caught in the machine. Before you insert the
tape, use a pencil or similar object to turn the
reel and take up any slack.
Slack
• Distorted cassettes and loose labels can cause
problems when inserting or ejecting tapes.
Remove or replace loose labels.
Cassettes longer than 90 minutes
The use of cassettes longer than 90 minutes is
not recommended except for long continuous
play. The tapes used for these cassettes are
very thin and tend to be stretched easily.
Frequent playing and stopping of these tapes
may cause them to be pulled into the cassette
deck mechanism.
16
Page 17
Maintenance
Fuse Replacement
When replacing the fuse, be sure to use one
matching the amperage rating stated on the
fuse. If the fuse blows, check the power
connection and replace the fuse. If the fuse
blows again after replacement, there may be an
internal malfunction. In such a case, consult
your nearest Sony dealer.
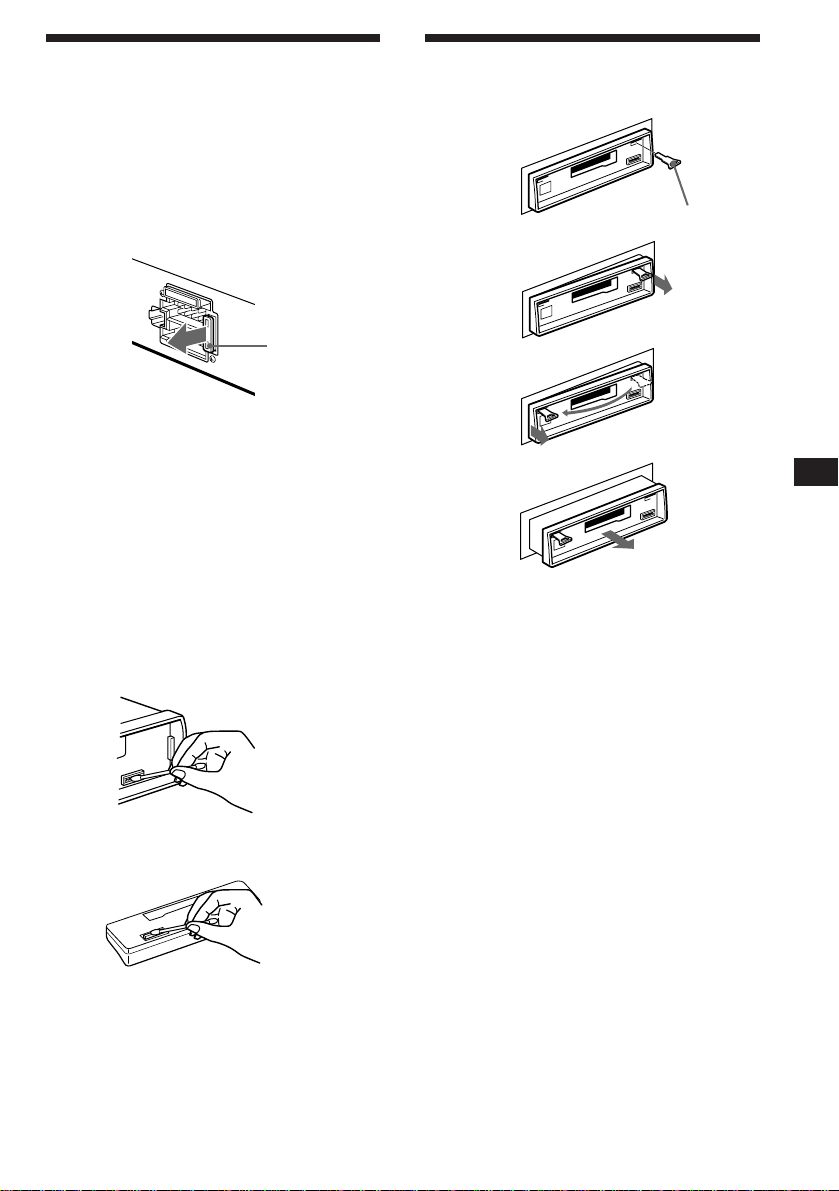
Dismounting the unit
1
Release key (supplied)
2
Fuse (10 A)
Warning
Never use a fuse with an amperage rating
exceeding the one supplied with the unit as
this could damage the unit.
Cleaning the Connectors
The unit may not function properly if the
connectors between the unit and the front
panel are not clean. In order to prevent this,
open the front panel by pressing (RELEASE),
then detach it and clean the connectors with a
cotton swab dipped in alcohol. Do not apply
too much force. Otherwise, the connectors may
be damaged.
Main unit
3
4
EN
Additional Information
Back of the front panel
17
Page 18
Location of controls
EN
AMS
MODE
MUTE
SEL
OFF
DSPL
SOURCE
SEEK
RELEASE
Refer to the pages for further details.
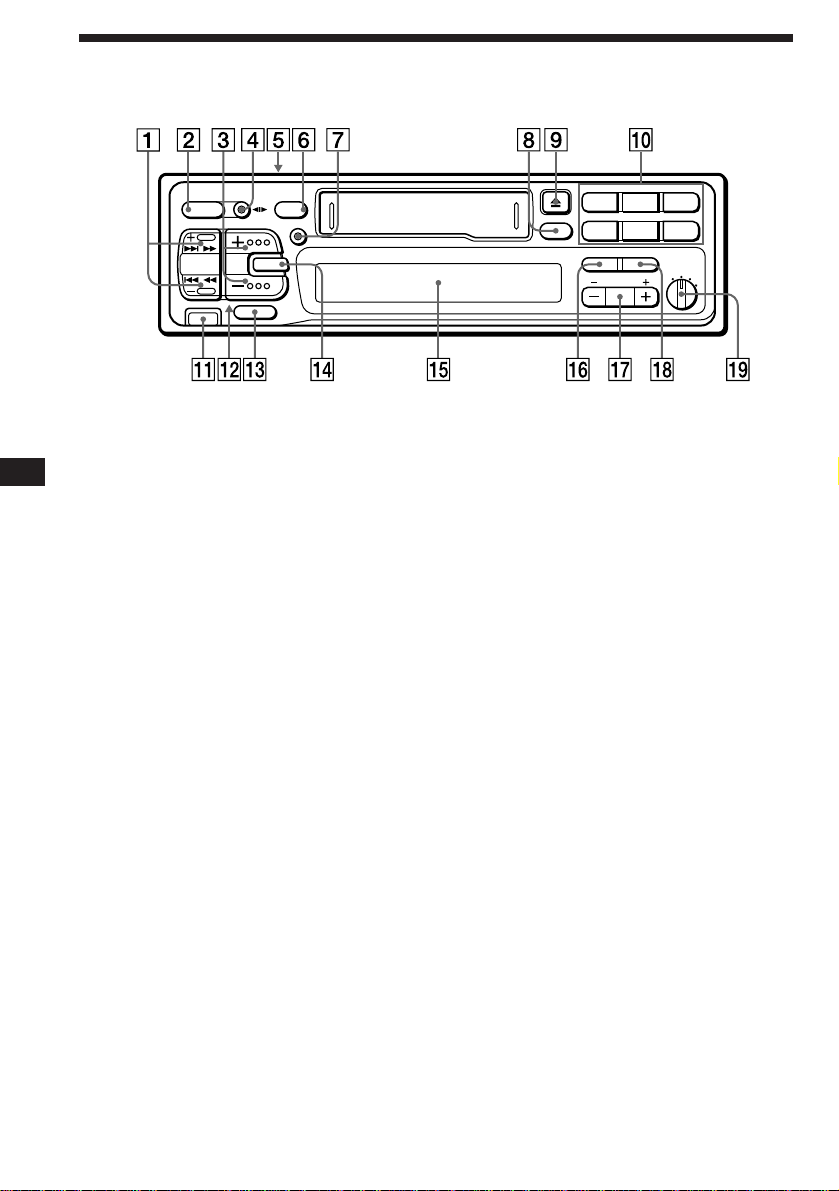
1 SEEK/AMS button 5, 6, 7, 8, 9, 11, 14, 15
2 SOURCE button (TAPE/TUNER/CD/MD) 5,
7, 14
3 (+)(–) (volume/bass/treble/balance/
fader control) button 13
4 MODE (*) button
During Tuner reception:
BAND select 7
During Tape playback:
Transport direction change 5
During CD/MD playback:
Changer select 14
5 POWER SELECT switch (located on the
top of the unit)
See “POWER SELECT Switch” in the
Installation/Connections manual.
6 OFF button 4, 5
7 DSPL (display mode change/time set)
button 5, 6, 8, 14
8 SENS/BTM (sensitivity adjust/Best
tuning memory function) button 7, 8, 10
9 6 (eject) button 5
0 During radio reception:
Preset number buttons 7
During tape/CD/MD playback:
(1) INTRO button 6, 15
(2) REPEAT button 6, 15
(3) SHUF (Shuffle) button 15
(4) MTL button 6
(5) ATA (Automatic Tuner
Activation) button 6
(6) BL.SKIP (Blank Skip) button 6
18
INTRO REPEAT SHUF
213
ATA BL.SKIP
MTL
BTM
SENS
546
PRESET
DISC
AF/TA
D-BASS
OFF
PTY
1
2
3
!¡ RELEASE (front panel release) button
4, 17
!™ Reset button (located on the front side
of the unit hidden by the front panel)
Press this button when you use this unit
for the first time, when you have changed
the car battery, or when the buttons of this
unit do not function properly.
!£ MUTE button 13
!¢ SEL (control mode select) button
5, 10, 11, 13, 14
!∞ Display window
!§ PTY (programme type) button 11
!¶ PRESET/DISC button 7, 15
During Tuner reception:
Preset stations select 7
During CD/MD playback:
Disc change 15
!• AF/TA (alternative frequency/traffic
announcement) button 9, 10
!ª D-BASS control 13
Page 19

Specifications
Cassette player section
Tape track 4-track 2-channel stereo
Wow and flutter 0.08 % (WRMS)
Frequency response 30 – 18,000 Hz
Signal-to-noise ratio 61 dB (TYPE II, IV)
58 dB (TYPE I)
Tuner section
FM
Tuning range FM1, FM2:
87.5 – 108.0 MHz
FM3:65.0 – 74.0 MHz
Antenna terminal External antenna connector
Intermediate frequency 10.7 MHz
Usable sensitivity 8 dBf
Selectivity 75 dB at 400 kHz
Signal-to-noise ratio 63 dB (stereo),
65 dB (mono)
Harmonic distortion at 1 kHz
0.5 % (stereo),
0.3 % (mono)
Separation 35 dB at 1 kHz
Frequency response 30 – 15,000 Hz
Capture ratio 2 dB
MW/LW
Tuning range MW: 531 – 1,602 kHz
LW: 153 – 281 kHz
Antenna terminal External antenna connector
Intermediate frequency 10.71 MHz/450 kHz
Sensitivity MW: 30 µV
LW: 50 µV
Power amplifier section
Outputs Speaker outputs
(sure seal connectors)
Speaker impedance 4 – 8 ohms
Maximum power output 35 W × 4 (at 4 ohms)
General
Outputs Telephone mute control
lead
Power amplifier control
lead
Power antenna control
lead
Line out (1)
Tone controls Bass ±8 dB at 100 Hz
Treble ±8 dB at 10 kHz
Power requirements 12 V DC car battery
(negative ground)
Dimensions Approx. 188 × 58 × 181 mm
(w/h/d)
Mounting dimensions Approx. 182 × 53 × 164 mm
(w/h/d)
Mass Approx. 1.2 kg
Supplied accessories Parts for installation and
connections (1 set)
Rotary commander
RM-X2S (1)
Front panel case (1)
Optional accessories Bus cable (supplied with
an RCA pin cord)
RC-61 (1 m), RC-62 (2 m)
RCA pin cord
RC-63 (1 m), RC-64 (2 m),
RC-65 (5 m)
Optional equipment CD changer
CDX-705, CDX-605
(10 discs),
CDX-T65, CDX-T62
(6 discs)
MD changer
MDX-61
Source selector XA-C30
Design and specifications are subject to change without
notice.
EN
Additional Information
19
Page 20

EN
Troubleshooting guide
The following checklist will assist in the correction of most problems you may encounter with your
unit.
Before going through the checklist below, refer to the operating procedures.
General
Problem
No sound
Indications do not appear on
the display window.
No beep tone.
Tape playback
Problem
Playback sound is distorted.
The AMS does not operate
correctly.
Cause/Solution
• Adjust the volume with (+).
• Set the fader control to the centre position for 2-speaker
systems.
Remove the front panel and clean the connectors. See “Cleaning
the Connectors” in “Maintenance” for details.
• An optional power amplifier is connected and you are not
using the built-in amplifier.
• The beep tone is muted (page 14).
Cause/Solution
Contamination of the tape head. n Clean the head.
• There is noise in the space between tracks.
• A blank space is too short (less than four seconds).
• + on (SEEK/AMS) is pressed immediately before the
following track.
• = on (SEEK/AMS) is pressed immediately after the track
starts.
• A long pause, or a passage of low frequencies or very low
sound level is treated as a blank space.
Radio reception
Problem
Preset tuning is not possible.
Automatic tuning is not possible.
The “ST” indication flashes.
RDS functions
Problem
The RDS function does not
operate
A SEEK starts after a few
seconds of listening.
No traffic announcements
PTY displays “NONE”.
20
Cause/Solution
• Store the correct frequency.
• The broadcast is too weak.
The broadcast is too weak. n Use manual tuning.
• Tune in precisely.
• The broadcast is too weak.
n Press (SENS/BTM) to enter the MONO mode.
Cause/Solution
The RDS function is available only for the FM1 and FM2 bands.
The station is non-TP or weaken signal.
n Press (AF/TA) until “AF TA” disappears.
• Activate “TA”.
• The station does not broadcast any traffic announcements
despite being TP. n Tune in another station.
The station does not specify the programme type.
Page 21

Disc play
Problem
Playback sound skips.
Error displays (when the optional CD/MD changer(s) is connected)
The following indications will flash for about five seconds and an alarm sound will be heard.
Cause/Solution
A dusty or defective disc.
Display Cause
NO MAG
NO DISC
NG DISCS
ERROR
RESET
HI TEMP
If the above-mentioned solutions do not help to improve the situation, consult your nearest Sony
dealer.
The disc magazine is not inserted in
the CD/MD changer.
No disc is inserted in the disc
magazine.
A CD/MD cannot play because of
some problem.
The disc is dirty.
The disc is inserted upside down.
The CD/MD changer cannot be
operated because of some problem.
The ambient temperature is more than
50°C.
Solution
Insert the disc magazine with discs
into the CD/MD changer.
Take out the magazine and insert a
disc.
Insert another CD/MD.
Clean the disc.
Insert the disc correctly.
Press the reset button on the unit.
Wait until the temperature goes
below 50°C.
EN
Additional Information
21
Page 22

Index
EN
A
Alternative Frequencies (AF) 9
Automatic Music Sensor (AMS) 6
Automatic tuning 7
Automatic Tuner Activation (ATA) 6
B
Bass 13
Balance 13
Beep tone 14
Best Tuning Memory (BTM) 7
Blank skip 6
C
Caution alarm 4
CD playback 14
Clock 5
D, E
D-Bass 13
Display 6, 8, 9, 14
F, G, H
Fader 13
Fast-forward 5
Front panel 4
Fuse 17
I, J, K
Intro scan 6, 15
R
Radio 7
Radio Data System (RDS) 8, 9, 10
Repeat play 6, 15
Reset 4
Rewind 5
Rotary remote 4, 12, 13
S
Shuffle play 15
T, U, V, W, X, Y, Z
Tape playback 5
Telephone-mute 13
Traffic Announcement (TA) 9, 10
Traffic Programme (TP) 9
Treble 13
22
L
Local seek mode (LCL) 8
M, N, O
Manual search 15
Manual tuning 7
MD playback 14
METAL 6
Monaural mode 8
Mute 13, 14
P, Q
Preset search 7
Programme Type (PTY) 11
Page 23

EN
23
Page 24

PL
Witamy !
Dziękujemy za zakupienie Odtwarzacza Kaset
Sony. Nasz sprzęt zapewni Państwu sporo
przyjemności polegającej na wygodzie
korzystania z wielu funkcji przy pomocy pilota
zdalnego sterowania, typu obrotowego.
Zakupiony sprzęt spełnia nie tylko funkcje
odtwarzcza kaset i radioodbiornika, lecz
oferuje również możliwości poszerzenia
systemu przez podłączenie dodatkowych opcji
jak np. odtwarzacza dysków CD/MD.
2
Page 25

Spis treści
Informacje dotyczące wylącznie
tego sprzętu
Przygotowania wstępne
Wyzerowanie .................................................. 4
Zdejmowanie przedniego panela ....................4
Przygotowanie obrotowego pilota zdalnego
sterowania do użytkowania ....................... 5
Nastawianie zegara......................................... 5
Odtwarzacz taśm kasetowych
Słuchanie taśmy .............................................6
Odtwarzanie taśmy w różnych trybach .......... 6
Radio
Automatyczne kodowanie stacji nadawczych
w pamięci sprzętu
— Tryb Best Tuning memory
(BTM) (pamięć optymalnego strojenia) .. 8
Kodowanie wyłącznie wybranych stacji
nadawczych ............................................... 8
Odbiór zakodowanych w pamięci sprzętu
radiowych stacji nadawczych .................... 9
Funkcja RDS
Ogólny opis funkcji RDS ...............................10
Wyświetlanie nazwy stacji nadawczej .......... 10
Automatyczne, ponowne dostrajanie
poprzednio odbieranego programu
— Alternative Frequencies
(AF=częstotliwości alternatywne) ........10
Odbiór migawek o ruchu drogowym ............ 11
Wstępne kodowanie stacji nadawczych
oferujących funkcję RDS z danymi AF oraz
TA .............................................................12
Lokalizowanie stacji nadawczych według
rodzaju nadawanego przez nie
programu ................................................. 12
Automatyczne nastawianie zegara ............... 14
Pozostałe funkcje
Korzystanie z obrotowego pilota zdalnego
sterowania ................................................14
Regulacja charakterystyk dźwięku ............... 15
Wyciszanie dźwięku ...................................... 16
Zmienianie nastawionych charakterystyk
dźwięku i wskaźników akustycznych .......16
Sprzęt opcjonalny
Odtwarzacz zmieniający dyski CD/
MD
Odtwarzanie dysku CD/MD .......................... 17
Szybkie przesłuchiwanie dysków
Funkcja — Intro scan ...............................17
Powtórne odtwarzanie nagrań
Funkcja — Repeat play ............................18
Odtwarzanie nagrań w dowolnej kolejności
— Tryb Shuffle play.................................. 18
PL
Informacje dodatkowe
Środki Ostrożności ....................................... 19
Konserwacja .................................................20
Demontaż sprzętu .........................................20
Umiejscowienie kontrolek .............................21
Dane Techniczne ..........................................22
Usuwanie usterek .........................................23
Indeks ...........................................................25
3
Page 26
PL
Przygotowania
wstępne
Wyzerowanie
Sprzęt należy wyzerować przed rozpoczęciem
użytkowania poraz pierwszy lub po wymianie
akumulatora pojazdu.
Proszę nacisnąć przycisk zerowania (reset)
przy pomocy śpiczasto zakończonego
przedmiotu, takiego jak np. długopis.
Przycisk zerowania (Reset)
Uwaga
Naciśnięcie przycisku zerowania spowoduje
wymazanie wszystkich funkcji pamięci i programów.
Zdejmowanie
przedniego panela
Zdjęcie przedniego panela zabezpiecza sprzęt
przed kradzieżą.
1 Proszę nacisnąć przycisk (OFF).
2 Proszę nacisnąć przycisk (RELEASE) aby
otworzyć przedni panel i zdjąć przez
pociągnięcie do siebie.
(RELEASE)
Zakładanie przedniego panela
Element przedniego panelu oznaczony A
proszę zamocować do elemntu oznaczonego
B na korpusie głównym, zgodnie z ilustracją,
a następnie wcisnąć do zaskoczenia.
A
B
Uwagi
•
Proszę uważać by nie umieścić przedniego panelu
odwrotnie, gdyż w przeciwnym wypadku nie
zostanie on odpowiednio zabezpieczony.
•
Przy zakładaniu przedniego panelu nie należy
dopychać go zbyt silnie do głównego korpusu
sprzętu. Wystarczy lekki nacisk.
•
Zabierając przedni panel ze sobą, należy umieścić
go w przeznaczonym do tego celu etui.
•
Należy unikać wywierania nacisku na okienko
konsoli umieszczone na przednim panelu.
•
Nie narażać przedniego panelu na nadmierne
działanie promieni słonecznych, ciepłego powietrza
pochodzącego z systemu ogrzewczego pojazdu,
lub na działanie wilgoci. Nie należy też
pozostawiać go na desce rozdzielczej w
samochodzie zaparkowanym w nasłonecznionym
miejscu gdzie może nastąpić znaczny wzrost
temperatury wewnątrz pojazdu.
Alarm ostrzegawczy
Alarm ostrzegawczy uaktywnia się na parę
sekund po przełączeniu kluczyka zapłonu na
pozycję OFF (wyłączenie) jeżeli przedni panel
nie został uprzednio zdjęty. (tylko w przypadku
kiedy przełącznik źródła zasilania “POWER
SELECT” znajduje się w pozycji A).
W przypadku kiedy podłączono opcjonalny
wzmacniacz mocy i nie korzysta się z
wmontowanego do sprzętu wzmacniacza,
sygnał alarmowy nie zostanie uaktywniony.
Uwagi
•
Przy zdejmowaniu panela proszę uważać by go nie
upuścić.
•
Naciśnięcie przycisku
panelu przy jednocześnie włączonym zasilaniu
sprzętu, powoduje automatyczne wyłączenie
zasilania, mające na celu zebezpieczenie głośników
przed ewentualnym uszkodzeniem.
(RELEASE)
przed zdjęciem
4
Page 27
Przygotowanie
obrotowego pilota
zdalnego sterowania do
użytkowania
Przy montażu obrotowego pilota zdalnego
sterowania należy nakleić załączoną etykietkę
zgodnie z ilustracją poniżej.
SEL
DSPL
MODE
MODE
DSPL
SEL
Nastawianie zegara
Zegar jest wyposażony w cyfrowy, 24godzinny system wskaźników.
Na przykład, nastawianie zegara na godzinę 10:08
1 Podczas użytkowania sprzętu, proszę
nacisnąć przycisk (OFF) lub (DSPL).
2 Proszę przez dwie sekundy naciskać
przycisk (DSPL).
100
Cyfry wskazujące godzinę migają.
1 Proszę nastawić odpowiednią
godzinę.
do przodu
do tyłu
1000
2 Proszę krótko nacisnąć przycisk
(SEL).
1000
Cyfry wskazujące minuty migają.
3 Proszę nastawić odpowiednie
minuty.
do przodu
PL
Przygotowania wstępne
do tyłu
1008
3 Proszę krótko nacisnąć przycisk (DSPL).
1008
Działanie zegara zostało uaktywnione.
Uwaga
Jeżeli przełącznik POWER SELECT (wybór źródła
zasilania), umieszczony na górnej powierzchni
sprzętu, znajduje się w pozycji
nastawić przed włączeniem zasilania. Proszę
włączyć radio a następnie nastawić zegar.
B
, zegara nie można
5
Page 28
PL
Odtwarzacz taśm
kasetowych
Słuchanie taśmy
Proszę wsunąć kasetę.
Odtwarzanie rozpoczyna się automatycznie.
Jeżeli kaseta została już umieszczona w
odtwarzaczu, proszę kilkakrotnie nacisnąć
przycisk (SOURCE) źródło odtwarzania, do
wyświetlenia wskaźnika “PLAY”.
FWD
Odtwarzana jest strona taśmy skierowana ku górze.
REV
Odtwarzana jest strona taśmy skierowana ku dołowi.
Wskazówka
Aby zmienić kierunek transportu taśmy, proszę
nacisnąć przycisk
odtwarzania.
Aby
Zatrzymać
odtwarzanie
Wysunąć kasetę
Szybkie przewijanie taśmy
Podczas odtwarzania, proszę przez dwie
sekundy naciskać jedną ze stron
przycisku (SEEK/AMS).
SEEK
AMS
Aby rozpocząć odtwarzanie podczas
szybkiego przewijania do przodu lub podczas
cofania, proszę nacisnąć przycisk
(MODE) (*).
(MODE) (*)
Szybkie przewijanie taśmy do przodu
Cofanie taśmy
podczas
Proszę nacisnąć
(OFF)
6
Lokalizowanie początku nagrania
— Automatic Music Sensor
(AMS) =
automatyczny sensor muzyki
Pominąć można do dziewięciu nagrań naraz.
Podczas odtwarzania taśmy, proszę
krótko nacisnąć jedną ze stron
przycisku (SEEK/AMS).
Aby zlokalizować następne nagrania
SEEK
AMS
Aby zlokalizować poprzednie nagrania
Uwaga
Funkcja AMS może nie działać w następujących
wypadkach:
•
odstępy między nagraniami wynoszą mniej niż 4
sekundy
•
między poszczególnymi nagraniami występują
dźwięki
•
występują długie odcinki niskiego poziomu
głośności lub bardzo spokojnej muzyki.
Zmienianie się wyświetlanych
wskaźników
Każdorazowe naciśnięcie przycisku (DSPL)
podczas odtwarzania taśmy, powoduje
zmianę wskaźników świetlnych w natępującej
kolejności:
z Odtwarzanie taśmy z Zegar
Częstotliwość* Z
Przy uaktywnionej funkcji AF/TA.
*
Odtwarzanie taśmy w
różnych trybach
Poszukiwanie dowolnego nagrania
— Tryb Intro scan
Proszę nacisnąć przycisk (1) podczas
odtwarzania taśmy.
Wskaźnik “INTRO” zostaje wyświetlony w
okienku konsoli.
Odtwarzanie pierwszych 10 sekund
wszystkich nagrań.
Po znalezieniu poszukiwanego nagrania,
proszę ponownie nacisnąć ten sam przycisk.
Zostaje przywrócony normalny tryb
odtwarzania.
6
Page 29

Powtórne odtwarzanie nagrań
— Tryb Repeat play
Podczas odtwarzania, proszę nacisnąć
przycisk (2).
Wskaźnik “REP” zostaje wyświetlony w
okienku konsoli.
Po zakończeniu odtwarzania aktualnego
nagrania, odtwarzanie zostanie powtórzone od
początku.
Aby wyłączyć ten tryb odtwarzania, proszę
ponownie nacisnąć ten sam przycisk.
Przełączanie na tryb odbioru audycji
radiowych podczas szybkiego
przewijania taśmy
— Tryb Automatic Tuner Activation
(ATA) (automatyczne auktywnienie
tunera)
Podczas odtwarzania, proszę nacisnąć
przycisk (5).
Wskaźnik “ATA” zostaje wyświetlony w
okienku konsoli.
Tuner zostanie automatycznie włączony
podczas trwającej 2 sekundy operacji
szybkiego przewijania lub cofania taśmy przy
pomocy przycisku (SEEK/AMS).
Odtwarzanie taśmy metalowej lub
taśmy CrO
Proszę nacisnąć przycisk (4) aby
słuchać taśmy typu CrO2 (TYPE II) lub
taśmy typu metal (TYPE IV).
Wskaźnik “MTL” zostaje wyświetlony w
okienku konsoli.
Aby wyłączć tę funkcję, proszę nacisnąć
przycisk (4).
2
PL
Odtwarzacz taśm kasetowych
Naciśnięcie przycisku (5) wyłącza tę funkcję.
Omijanie przerw między nagraniami
podczas odtwarzanie taśmy, tryb
— Blank skip
Podczas odtwarzania proszę nacisnąć
przycisk (6).
Wskaźnik “BL.SKIP” zostaje wyświetlony w
okienku konsoli.
Przerwy powyżej 8 sekund zostaną
automatycznie pominięte podczas
odtwarzania taśmy.
Naciśnięcie przycisku (6) wyłącza tę funkcję.
7
Page 30

PL
Radio
Nabyty przez Państwa sprzęt jest w stanie
odbierać i kodować w pamięci następujące
zakresy częstotliwości: 87,5 - 108,0 MHz
(FM1, FM2) oraz 65,0-74,0 MHz (FM3).
Automatyczne kodowanie
stacji nadawczych w
pamięci sprzętu
— Tryb Best Tuning Memory (BTM)
(pamięć optymalnego strojenia)
Funkcja wybierania z aktualnie odbieranego
pasma i kodowania w pamięci sprzętu według
emitowanych częstotliwości, radiowych stacji
nadawczych o najsilniejszych sygnałach
emisji.
ZAPOBIEGANIE WYPADKOM!
Strojąc radio podczas jazdy samochodem,
proszę korzystać z trybu automatycznego
strojenia lub z funkcji zakodowanego w
pamięci sprzętu poszukiwania zamiast
manualnego nastawiania stacji nadawczych.
1 Proszę kilkakrotnie nacisnąć przycisk
(SOURCE) aby wybrać pozycję tuner.
Każdorazowe naciśnięcie przycisku
(SOURCE), powoduje następujące zmiany
źródła odbioru:
z TAPE z TUNER z CD/MD
Uwagi
•
Podczas odbioru transmisji na pasmach FM1 i
FM2, funkcja BTM przeszukuje wyłącznie zakres
częstotliwości od 87,5 - 108,0 MHz, a na paśmie
FM3 zakres od 65,0 - 74,0 MHz.
•
W pamięci sprzętu, pod odpowiednimi przyciskami
numerycznymi, nie zostaną zapisane stacje
nadawcze o słabym sygnale emisji. Jeżeli sprzęt
odbiera tylko kilka radiowych stacji nadawczych,
niektóre przyciski numeryczne nie będą
wykorzystane.
•
Jeżeli w okienku konsoli widoczny jest wskaźnik
numeryczny, sprzęt automatycznie zakoduje dalsze
radiowe stacje nadawcze w pamięci pod
numerami, od aktualnie wyświetlanego numeru,
wzwyż.
Kodowanie wyłącznie
wybranych stacji
nadawczych
Pod przyciskami numerycznymi można, w
dowolnej kolejności, zakodować maksymalnie
6 stacji nadawczych dla każdego pasma (FM1,
FM2, FM3, MW and LW). A więc, w pamięci
sprzętu można w sumie zakodować 18 stacji
nadawczych pasma FM.
Jeżeli pod danym przyciskiem numerycznym
zakoduje się nową stację nadawczą,
poprzednio zakodowana zostanie z pamięci
wymazana.
1 Proszę kilkakrotnie nacisnąć przycisk
(SOURCE) aby wybrać tuner.
2 Proszę kilkakrotnie nacisnąć przycisk
(MODE) aby wybrać pasmo.
2 Proszę kilkakrotnie nacisnąć przycisk
(MODE) aby wybrać odpowiednie
pasmo.
Każdorazowe naciśnięcie przycisku
(MODE), powoduje zmianę pasm w
następującej sekwencji:
z FM1 z FM2 z FM3
LW Z MW Z
3 Proszę przez dwie sekundy naciskać
przycisk (SENS/BTM).
8
3 Proszę nacisnąć przycisk (SEEK/AMS)
aby dostrojić stację nadawczą do
zakodowania pod wybranym
przyciskiem numerycznym.
4 Proszę przez dwie sekundy naciskać
wybrany przycisk numeryczny
((1) do (6)).
Wskaźnik wybranego przycisku numerycznego
zostaje wyświetlony w okienku konsoli.
Page 31

Odbiór zakodowanych w
pamięci sprzętu radiowych
stacji nadawczych
1 Proszę kilkakrotnie nacisnąć przycisk
(SOURCE) aby wybrać tuner.
2 Proszę kilkakrotnie nacisnąć przycisk
(MODE) aby wybrać odpowiednie
pasmo.
3 Proszę krótko nacisnąć przycisk
numeryczny pod którym zakodowano
wybraną stację nadawczą ((1) to (6)).
Wskazówka
Proszę nacisnąć jedną ze stron przycisku
(PRESET/DISC)
nadawczych w kolejności, w której zostały one
zakodowane w pamięci (Preset Search Function =
funkcja przeszukiwania zakodowanych danych).
Podczas odbioru transmisji na paśmie FM1 lub FM2,
nie można bezpośrednio dostrojić pasma FM3 przy
pomocy przycisku
zakres częstotliwości. Proszę dostrojić pasmo
korzystając z przycisku
Jeżeli jakość odbioru trybu stereo w
paśmie FM jest niezadowalająca
— Tryb monofoniczny
Proszę krótko nacisnąć przycisk
oznaczony (SENS/BTM), do wyświetlenia
wskaźnika “MONO” w okienku konsoli.
Jakość dźwięku ulegnie poprawie, lecz
odbiór stanie się monofoniczny. (Wskaźnik
“ST” zgaśnie.)
aby umożliwić odbiór stacji
(PRESET/DISC)
(MODE)
, gdyż jest to inny
.
Uwaga
Jeżeli tryb automatycznego dostrajania stacji
nadawczych zostaje zbyt często zatrzymywany,
proszę krótko nacisnąć przycisk
(SENS/BTM)
okienku konsoli (local seek mode=tryb lokalnego
przeszukiwania). Dostrojone zostaną wyłącznie stacje
emitujące relatywnie silne sygnały nadawcze.
Wskazówka
Jeżeli wiadoma jest częstotliwość wybranej stacji,
proszę nacisnąć i przytrzymać jedną ze stron
przycisku
poszukiwanej stacji nadawczej (strojenie manualne).
do wyświetlenia wskaźnika “LCL” w
(SEEK/AMS)
do momentu odebrania
PL
Radio
Zmienianie wyświetlonych
wskaźników
Każdorazowe naciśnięcie przycisku (DSPL),
powoduje zmianę kolejności wyświetlanych
wskaźników częstotliwości oraz zegara.
Jeżeli nie można dostrojić zakodowanej
w pamięci stacji nadawczej
Proszę krótko nacisnąć jedną ze stron
przycisku (SEEK/AMS) aby zlokalizować
poszukiwaną stację nadawczą
(automatic tuning = automatyczne
dostrajanie).
Przeszukiwanie zostaje zakończone w
momencie odbioru wybranej stacji
nadawczej. Proszę kilkakrotnie nacisnąć
jedną ze stron przycisku aby włączyć
odbiór audycji wybranej stacji nadawczej.
9
Page 32

PL
Funkcja RDS
Ogólny opis funkcji RDS
Radio Data System (RDS=system danych
radiowych) jest serwisem specjalnym
transmitowanym przez radiowe stacje
nadawcze, umożliwiający stacjom pasma FM
przesyłanie systemem sygnałów cyfrowych,
dodatkowych informacji wraz ze zwykłym
sygnałem audycji radiowych. Nabyty,
samochodowy zestaw stereo, oferuje wiele
różnych możliwości. Oto niektóre z nich:
Automatyczne, ponowne dostrajanie
poprzednio odbieranego programu, odbiór
migawek na temat ruchu drogowego oraz
lokalizacja radiowych stacji nadawczych
według typu transmitowanych programów.
Z funkcji RDS można korzystać wyłącznie na
pasmach FM1 i FM2.
Uwagi
•
Ilość dostępnych funkcji RDS zależy od kraju lub
regionu.
•
Funkcja RDS może nie działać prawidłowo, jeżeli
moc sygnału jest za słaba lub jeżeli nastrojona
stacja nadawcza nie transmituje sygnałów RDS.
Zmiana wyświetlanych wskaźników
Po każdorazowym naciśnięciu przycisku
(DSPL), wyświetlane wskaźniki zmieniają się w
następującej kolejności:
z Częstotliwość z Godzina
Nazwa stacji Z
Uwaga
Wskaźnik “NO NAME” zostaje wyświetlony, jeżeli
odbierana stacja nadawcza nie transmituje sygnałów
RDS.
Automatyczne, ponowne
dostrajanie poprzednio
odbieranego programu
— Alternative Frequencies
(AF=częstotliwości alternatywne)
Funkcja “Alternative Frequencies” (AF)
automatycznie wybiera i ponownie dostraja
stację nadawczą o najsilniejszym na danej
sieci, sygnale. Korzystanie z tej funkcji
umożliwia stały odbiór tego samego programu
podczas długodystansowej jazdy, bez
konieczności manualnego dostrajania.
Automatyczna zmiana częstotliwości.
98.5 MHz
96.0 MHz
Wyświetlanie nazwy
stacji nadawczej
Nazwa aktualnie odbieranej stacji zostaje
wyświetlona w okienku konsoli.
Proszę wybrać stację nadawczą
transmitującą na paśmie FM.
Po dostrojeniu stacji nadawczej
transmitującej sygnały RDS na paśmie FM,
nazwa stacji zostanie wyświetlona w
okienku konsoli.
FM1
BBC 1 FM
Uwaga
Wskaźnik świetlny “
nadawcza transmituje sygnały RDS.
*
” oznacza, że odbierana stacja
10
Stacja
102.5 MHz
1 Proszę wybrać stację nadawczą
transmitującą na paśmie FM.
2 Proszę naciskać przycisk (AF/TA) do
wyświetlenia wskaźnika “AF” w okienku
konsoli.
Sprzęt rozpoczyna poszukiwanie
alternatywnej stacji o najsilniejszym na
danej sieci, sygnale transmisyjnym.
Page 33

Uwagi
•
Naciśnięcie przycisku
transmisji na paśmie FM3, powoduje automatyczne
przełączenie na pasmo FM1.
•
Przy braku alternatywnej stacji nadawczej w danym
rejonie lub jej poszukiwanie, nie jest konieczne,
proszę wyłączyć funkcję AF przez naciskanie
przycisku
(AF/TA)
(AF/TA)
podczas odbioru
do zniknięcia wskaźnika “AF”.
Zmienianie wyświetlonych
wskaźników
Po każdorazowym naciśnięciu przycisku
(AF/TA), wyświetlane wskaźniki zmieniają się
w następującej kolejności:
z AF z TA z AF TA *
Puste miejsce Z
Proszę wybrać ten wskaźnik aby włączyć funkcje
*
AF oraz TA.
Uwagi
•
Jeżeli sprzęt nie odszuka alternatywnej stacji
nadawczej, transmitującej na danej sieci, wskaźnik
“NO AF” oraz nazwa stacji migają na zmianę.
•
Jeżeli nazwa stacji miga po odnalezieniu stacji
nadawczej przy pomocy funkcji AF, oznacza to
brak alternatywnej częstotliwości. Podczas migania
nazwy stacji, proszę (w przeciągu ośmiu sekund)
nacisnąć przycisk
poszukiwanie alternatywnej częstotliwości o tych
samych danych PI (Programme
Identification=identyfikacja programu) (wskaźnik “PI
seek” zostaje wyświetlony przy jednoczesnym
braku dźwięku). Wskaźnik “NO PI” zostanie
wyświetlony, jeżeli sprzęt nie odnajdzie
alternatywnej częstotliwości a następnie,
poprzednio wybrana częstotliwość zostanie
przywrócona.
(SEEK/AMS)
. Sprzęt rozpoczyna
Odbiór programów regionalnych
Funkcja “REG” (regional on=włączenie
programu regionalnego) zezwala na
nastrojenie programu regionalnego bez
konieczności przełączania na inną, regionalną
stację nadawczą. (Proszę pamiętać o
uprzednim włączeniu funkcji AF). Sprzęt został
fabrycznie nastrojony na funkcję “REG” lecz
aby wyłączyć tę funkcję, proszę wykonać
następującą czynność.
Proszę przez przynajmniej dwie sekundy
naciskać przycisk (AF/TA) do zniknięcia
wskaźnika “REG”.
Proszę pamiętać, że wyłączenie funkcji
“REG” może spowodować przełączenie się
sprzętu na inną stację regionalną,
transmitującą na tej samej sieci.
Odbiór migawek o ruchu
drogowym
Funkcje “Traffic Announcement” (TA=migawki
o ruchu drogowym) oraz Traffic Programme
(TP=program o ruchu drogowym) umożliwiają
automatyczne nastrojenie odpowiedniej stacji
pasma FM transmitującej migawki o ruchu
drogowym, podczas odbioru programu z
innego źródła.
Proszę naciskać przycisk (AF/TA) do
momentu wyświetlenia wskaźnika “TA”
lub “AF TA” w okienku konsoli.
Sprzęt rozpoczyna poszukiwanie stacji
nadawczych transmitujących migawki o
ruchu drogowym. Wskaźnik “TP” zostaje
wyświetlony w okienku konsoli w
momencie zlokalizowania przez sprzęt,
odpowiedniej stacji nadawczej.
Wskaźnik “TA” zaczyna migać w
momencie rozpoczęcia migawek o ruchu
drogowym, miganie wyłącza się po
zakończeniu transmisji.
Wskazówka
Jeżeli transmisja migawek o ruchu drogowym
rozpoczyna się podczas słuchania programu z
innego źródła, sprzęt automatycznie przełącza na
migawki a po ich zakończeniu powraca do uprzednio
odbieranego źródła programu.
Uwagi
•
Wskaźnik “NO TP” miga przez pięć sekund , jeżeli
aktualnie odbierana stacja nadawcza nie
transmituje migawek o ruchu drogowym. Następnie
sprzęt rozpoczyna poszukiwanie odpowiedniej
stacji nadawczej oferującej tę funkcję.
•
Jednoczesne wyświetlenie w okienku konsoli
wskaźnika “EON” przy włączonej funkcji “TP”,
oznacza, że aktualnie odbierana stacja nadawcza,
korzysta z transmisji migawek o ruchu drogowym
nadawanych przez inną stację nadawczą, na tej
samej sieci.
Wyłączanie aktualnych migawek o
ruchu drogowym
Proszę krótko nacisnąć przycisk
(AF/TA).
Aby wyłączyć wszystkie transmisje
migawek o ruchu drogowym, proszę
wyłączyć funkcję przez naciskanie
przycisku (AF/TA) do wyłączenia
wskaźnika “AF”.
PL
Funkcja RDS
Uwaga
Ta funkcja nie działa na terenie Wielkiej Brytanii oraz
w niektórych, innych regionach.
11
Page 34

PL
Wstępne kodowanie poziomu
głośności dla migawek o ruchu
drogowym w pamięci sprzętu
Poziom głośności dla migawek o ruchu
drogowym można wstępnie zakodować przed
rozpoczęciem odbioru odpowiedniego
programu. W momencie rozpoczęcia
ogłoszeń, poziom głośności zostanie
automatycznie naregulowany na wstępnie
zakodowany poziom.
1 Proszę wybrać odpowiedni poziom
głośności.
2 Proszę nacisnąć przycisk (3)
jednocześnie naciskając przycisk (SEL).
Wskaźnik “TA VOL” zostaje wyświetlony a
odpowiedni nastaw zakodowany w pamięci
sprzętu.
Odbiór ważnych ogłoszeń
państwowych
W przypadku transmisji ważnego ogłoszenia
państwowego podczas odbioru audycji
radiowej, program zostanie automatycznie
przełączony na odbiór transmitowanego
ogłoszenia. Podczas odbioru z innego źródła
niż programy radiowe, przełączenie na odbiór
ważnego ogłoszenia państwowego będzie
możliwy tylko w takim przypadku, jeżeli
funkcja AF lub TA została uprzednio włączona.
Sprzęt wówczas automatycznie przełączy na
ten typ ogłoszeń, bez względu na aktualnie
odbierane źródło dźwięku.
Wstępne kodowanie identycznych
nastawów dla wszystkich,
zakodowanych w pamięci, stacji
nadawczych
1 Proszę wybrać pasmo FM.
2 Proszę kilkakrotnie nacisnąć przycisk
(AF/TA) i wybrać nastaw “AF”, “TA” lub
“AF TA” (dla obu funkcji AF oraz TA).
Uwaga: wyłączenie funkcji “AF TA”
powoduje zakodowanie stacji oferujących
RDS jak również stacji nie oferujących
RDS, na paśmie FM.
3 Proszę przez dwie skundy naciskać
przycisk (SENS/BTM).
Wstępne kodowanie różnych
nastawów dla każdej ze wstępnie
kodowanej w pamięci sprzętu, stacji
nadawczej
1 Proszę wybrać pasmo FM1 i dostrojić
odpowiednią stację.
2 Proszę kilkakrotnie nacisnąć przycisk
(AF/TA) i wybrać funkcję “AF”, “TA” lub
“AF TA” (dla obu funkcji AF oraz TA).
3 Proszę przez dwie sekundy naciskać
odpowiedni przycisk numeryczny do
wyświetlenia wskaźnika “MEM”.
Proszę powtórzyć czynności od etapu 1
aby wstępnie zakodować pozostałe stacje
nadawcze.
Wstępne kodowanie
stacji nadawczych
oferujących funkcję RDS
z danymi AF oraz TA
Jeżeli stacje oferujące funkcję RDS, zostały
wstępnie zakodowane w pamięci sprzętu,
jednocześnie kodowane są również wszystkie
dane stacji łącznie z jej częstotliwością, w
związku z czym nie ma potrzeby
każdorazowego włączania funkcji AF lub TA
przed każdorazowym dostrojeniem wstępnie
zakodowanej stacji nadawczej. Dla każdej
indywidualnej, wstępnie zakodowanej stacji
nadawczej, można wybrać różne nastawy (AF,
TA, lub oba) lub też identyczne nastawy dla
wszystkich, wstępnie zakodowanych stacji.
12
Wskazówka
Aby zmienić wstępny nastaw AF oraz/lub TA po
dostrojeniu wstępnie zakodowanej w pamięci stacji
nadawczej, proszę funkcję AF lub TA włączyć
względnie wyłączyć.
Lokalizowanie stacji
nadawczych według
rodzaju nadawanego
przez nie programu
Poszukiwaną stację nadawczą można
zlokalizować przez wybranie jednego z
podanych poniżej typów programu.
Page 35

Uwaga
W krajach lub regionach gdzie dane EON nie są
transmitowane, można korzystać z tej funkcji tylko
dla stacji nadawczych, które zostały już raz
nastrojone.
Typy programów Wskaźniki
Wiadomości NEWS
Aktualne wydarzenia AFFAIRS
Informacje ogólne INFO
Sport SPORT
Oświata EDUCATE
Dramaturgia DRAMA
Kultura CULTURE
Wiadomości naukowe SCIENCE
Różne VARIED
Muzyka popularna POP M
Muzyka Rock ROCK M
Muzyka łatwa M.O.R. M
Lekka muzyka klasyczna LIGHT M
Muzyka klasyczna CLASSICS
Inne rodzaje muzyki OTHER M
Metereologia WEATHER
Finanse FINANCE
Programy dla dzieci CHILDREN
Sprawy socjalne SOCIAL A
Religia RELIGION
Programy z telefonicznym
udziałem słuchaczy
Podróże TRAVEL
Odpoczynek LEISURE
Jazz JAZZ
Muzyka typu “Country
Music”
Muzyka Narodowa NATION M
Stare szlagiery OLDIES
Muzyka ludowa FOLK M
Programy Dokumentalne DOCUMENT
Bez specyfykacji NONE
PHONE IN
COUNTRY
1 Podczas odbioru audycji stacji
nadawczej transmitowanej na paśmie
FM, proszę naciskać przycisk (PTY) do
wyświetlenia wskaźnika “PTY” w
okienku konsoli.
INFO
Nazwa aktualnie odbieranego programu
zostaje wyświetlona, jeżeli dana stacja
nadawcza emituje sygnały PTY. Natomiast
jeżeli aktualnie odbierana stacja nadawcza
nie transmituje serwisu RDS lub jeżeli dane
RDS nie są odbierane, zostaje wyświetlony
wskaźnik wskaźnik “--------”.
Uwaga
Funkcja PTY jest niedostępna na paśmie FM3.
2 Proszę kilkakrotnie naciskać przycisk
(PTY) do wyświetlenia wskaźnika
odpowiedniego typu programu.
Typy programów zostają wyświetlone w
kolejności zilustrowanej w powyższej
tabeli. Uwaga: jako poszukiwanego typu
programu nie można wybrać wskaźnika
“NONE” (bez specyfikacji).
3 Proszę nacisnąć jedną ze stron
przycisku (SEEK/AMS).
Sprzęt rozpoczyna poszukiwanie stacji
nadawczej transmitującej wybrany typ
programu. Po zlokalizowaniu programu,
odpowiednia nazwa typu zostaje przez pięć
sekund ponownie wyświetlona.
Jeżeli sprzęt nie odszuka wybranego typu
programu, przez pięć sekund są
wyświetlane wskaźniki “NO” oraz nazwa
wybranego programu, na zmianę, po czym
sprzęt powraca do odbioru programu
poprzedniej stacji nadawczej.
PL
Funkcja RDS
Uwaga
Z wyżej opisanej funkcji nie można korzystać w
krajach gdzie dane PTY (Programme Type
selection=wybór typów programu) nie są emitowane.
13
Page 36

PL
Automatyczne
nastawianie zegara
Funkcja odbioru danych CT (Clock
Time=zegar godzina) umożliwia automatyczne
nastawienie, zintegrowanego ze sprzętem
zegara.
Podczas odbioru transmisji na paśmie
FM, proszę nacisnąć przycisk (2)
jednocześnie naciskając przycisk (SEL).
Wskaźnik “CT” zostanie wyświetlony a
zegar nastawiony.
FM1
Wyłączanie funkcji CT
Proszę powtórzyć wyżej opisane
czynności.
Uwagi
•
Funkcja CT może nie działać, choć odbierana jest
stacją emitująca serwis RDS.
•
Godzina nastawiona przy pomocy funkcji CT może
być niedokładna.
CT
100
Pozostałe funkcje
Korzystanie z
obrotowego pilota
zdalnego sterowania
Obrotowy pilot zdalnego sterowania działa
przez naciskanie przycisków oraz/lub przez
przekręcanie kontrolek.
Przy jego pomocy można sterować działaniem
opcjonalnego sprzętu odtwarzania dysków CD
lub MD.
Przez naciskanie przycisków
(SOURCE oraz MODE)
(SOURCE)
(MODE)
14
Każdorazowe naciśnięcie przycisku
(SOURCE), powoduje następujące
zmiany wyświetlania wskaźników źródła
odbioru dźwięku:
TAPE n TUNER n CD/MD
Naciskanie przycisku
następujący sposób:
•
Kierunek transportu taśmy.
•
Pasmo, FM1 n FM2 n FM3 n MW n LW.
•
Odtwarzacz dysków CD/MD.
Wskazówka
Sprzęt można włączyć przez naciśnięcie przycisku
(SOURCE)
sterowania.
na obrotowym pilocie zdalnego
(MODE)
zmienia operacje w
Przez przekręcenie kontrolki
(kontrolka SEEK/AMS)
Page 37

Proszę przekręcić i szybko zwolnić
kontrolkę, aby:
• Zlokalizować początek nagrań na taśmie.
Proszę ponownie przekręcić,
przytrzymać i zwolnić kontrolkę, aby
szybko przewinąć taśmę. Aby odtworzyć
taśmę, proszę ponownie przekręcić,
przytrzymać i zwolnić kontrolkę.
• Zlokalizować wybrane nagranie na
dysku. Przekręcić i przytrzymać
kontrolkę do momentu zlokalizowania
odpowiedniego miejsca na nagraniu, a
następnie zwolnić kontrolkę aby
rozpocząć odtwarzanie.
• Automatycznie dostrojić stacje
nadawcze. Przekręcić i przytrzymać
kontrolkę aby dostrojić wybraną stację
nadawczą.
Przez przekręcanie kontrolki i jej
jednoczesne wciśnięcie (sterowanie
trybem PRESET/DISC)
Zmiana kierunku operatywnego
Kierunek operatywny kontrolek jest fabrycznie
nastawiony, patrz ilustracja poniżej.
Aby zwiększyć
Aby zredukować
Jeżeli obrotowy pilot zdalnego sterowania ma
zostać umieszczony na prawo od kolumny
kierownicy, można zmienić kierunek
operatywny kontrolek.
Proszę nacisnąć i przekręcić kontrolkę
aby:
• Umożliwić odbiór stacji nadawczych
zakodowanych pod przyciskami
numerycznymi.
• Zmienić dysk.
Pozostałe operacje
Proszę przekręcić kontrolkę VOL
aby wyregulować poziom
głośności.
Proszę nacisnąć przycisk
(DSPL) aby zmienić
wyświetlone wskaźniki.
Proszę nacisnąć
przycisk (MUTE)
aby wyciszyć
dźwięk.
Proszę nacisnąć
przycisk (OFF) aby
wyłączyć sprzęt.
Proszę nacisnąć
przycisk (SEL)
aby wyregulować
i wybrać.
Proszę przez dwie sekundy naciskać
przycisk (SEL) jednocześnie wciskając
kontrolkę VOL.
PL
Funkcja RDS/Pozostałe funkcje
Regulacja
charakterystyk dźwięku
1 Kilkakrotnie naciskając przycisk (SEL),
proszę wybrać charakterystykę, która
zostanie wyregulowana.
VOL (głośność) n BAS (tony niskie) n
TRE (tony wysokie) n BAL (równowaga)
n FAD (fader)
OFF
2 Proszę wyregulować wybraną
charakterystykę dźwięku przez
naciskanie przycisku (+) lub (–).
Regulację należy przeprowadzić w ciągu
trzech sekund od dokonania wyboru. (Po
upływie trzech sekund, przycisk będzie
ponownie służył sterowaniu poziomem
głośności.)
15
Page 38

PL
Wyciszanie dźwięku
Proszę nacisnąć przycisk (MUTE).
Wskaźnik “MUTE” miga.
Aby powrócić do poprzedniego poziomu
głośności, proszę ponownie nacisnąć ten sam
przycisk.
Wskazówka
Poziom głośności zostanie automatycznie
zredukowany w momencie otrzymania sygnału
rozmowy telefonicznej (funkcja Telephone-Mute).
Zmienianie nastawionych
charakterystyk dźwięku i
wskaźników akustycznych
Wspomaganie dźwięków niskich funkcja — D-Bass
Umożliwia odbiór czystego i silnego dźwięku
tonów niskich. Funkcja D-bass wspomaga
sygnał o niskich częstotliwościach silniej niż
konwencjonalne metody wspomagania tonów
niskich.
Wyraźniejszy odbiór tonów niskich przy
normalnym poziomie głośności dźwięków
wokalnych. Kontrolka D-bass ułatwia
uwydatnianie i regulację tonów niskich.
Otrzymuje się więc ten sam efekt, jak przez
podłączenie opcjonalnego sub-systemu tonów
niskich.
Ponadto, funkcja Digital D-bass* stwarza
wyostrzony i silniejszy dźwięk basów niż
analogowy system funkcji D-bass.
Cyfrowy system
D-BASS
D-BASS 3
D-BASS 2
Poziom
D-BASS 1
Analogowy system
D-BASS
D-BASS 3
D-BASS 2
Poziom
D-BASS 1
*
Jeżeli odtwarzacz dysków CD ze zmiennikiem
dysków jest wyposażony w cyfrową funkcję Dbass, podczas odtwarzania dysku CD w okienku
konsoli zostaje wyświetlony wskaźnik “DIGITAL DBASS”.
Uwaga
Na wysokim poziomie głośności dźwięk basów może
być zniekształcony, jeżeli odtwarzacz dysków CD ze
zmiennikiem dysków nie jest wyposażony w funkcję
D-bass.
W takim przypadku, proszę przekręcić kontrolkę DBASS i odpowiednio wyregulować poziom głośności.
Wyciszanie sygnału akustycznego
Proszę nacisnąć przycisk (6) jednocześnie
naciskając (SEL).
Aby przywrócić sygnał akustyczny, proszę
ponownie nacisnąć te same przyciski.
Uwaga
Jeżeli podłączono opcjonalny zasilacz i nie korzysta
się ze zintegrowanego z zestawem zasilacza, sygnał
akustyczny nie zostanie uaktywniony.
Zmiana kolorów iluminacji świetlnej
Proszę nacisnąć przycisk (1)
jednocześnie naciskając przycisk (SEL).
Wybrać można kolor żółty lub zielony.
0dB
Częstotliwość (Hz)
0dB
Regulacja korektora graficznego tonów
niskich
Proszę przekręcić kontrolkę D-BASS
aby wyrównać poziom tonów niskich (1,
2 lub 3).
Wskaźnik “D-BASS”* zostaje wyświetlony
w okienku konsoli.
Aby wyłączyć, proszę przekręcić kontrolkę na
pozycję OFF.
16
Częstotliwość (Hz)
Page 39

Sprzęt opcjonalny
Odtwarzacz zmieniający
dyski CD/MD
Nabyty sprzęt umożliwia sterowanie
maksymalnie pięcioma zmiennikami dysków
CD/MD.
Odtwarzanie dysku CD/
MD
Proszę nacisnąć przycisk (SOURCE) do
wyświetlenia wskaźnika oznaczającego
wybrany zmiennik dysków.
Odtwarzanie rozpoczyna się.
Jeżeli podłączono zmiennik dysków CD/MD,
wszystkie nagrania zostaną odtworzone od
początku.
Uwaga
Nawet jeżeli wybrano zmiennik MD, w okienku
konsoli zostaje wyświetlony wskaźnik “CD”.
Lokalizowanie poszczególnych
tytułów nagrań
— Automatic Music Sensor (AMS) =
funkcja automatycznego sensora
muzyki
Celem pominięcia nagrania lub kilku
nagrań, proszę każdorazowo nacisnąć
jedną ze stron przycisku (SEEK/AMS)
podczas odtwarzania tytułów.
Aby zlokalizować następne nagrania
SEEK
AMS
Aby zlokalizować poprzednie nagrania
Lokalizowanie poszczególnych miejsc
na nagraniu
— Manual Search (manualne
przeszukiwanie)
Podczas odtwarzania, proszę
jednokrotnie nacisnąć jedną ze stron
przycisku (SEEK/AMS). Po zlokalizowaniu
poszukiwanego miejsca, proszę zwolnić
przycisk.
Przeszukiwanie do przodu
SEEK
AMS
Przeszukiwanie przez cofanie
PL
Pozostałe funkcje/
Wybór odpowiedniego odtwarzacza/
zmiennika dysków CD/MD (jeżeli
podłączono kilka urządzeń
odtwarzających dyski CD/MD)
Proszę kilkakrotnie nacisnąć przycisk (MODE)
aby wybrać odpowiedni odtwarzacz CD/MD.
Zmiana wyświetlanych wskaźników
Każdorazowe naciśnięcie przycisku (DSPL)
podczas odtwarzania dysków CD/MD,
powoduje następujące zmiany w wyświetlaniu
wskaźników:
Czas odtworzonych dysków ˜ Zegar
Przełączanie na inny dysk
Podczas odtwarzania, proszę nacisnąć
jedną ze stron przycisku (PRESET/DISC).
PRESET
DISC
Aby powrócić do
poprzedniego dysku
Aby przejść do
następnego dysku
Szybkie przesłuchiwanie
dysków
Odtwarzanie pierwszych 10 sekund
wszystkich nagrań danego dysku po koleji.
Podobnie w przypadku kolejnych dysków.
Proszę nacisnąć przycisk (1) podczas
odtwarzania.
Wskaźnik “INTRO” zostaje wyświetlony w
okienku konsoli.
Po zlokalizowaniu poszukiwanego nagrania,
proszę ponownie nacisnąć ten sam przycisk.
Powrót do trybu normalnego odtwarzania
dysków CD/MD.
Funkcja — Intro scan
Odtwarzacz zmieniający dyski CD/MD
17
Page 40

PL
Powtórne odtwarzanie
nagrań
Aby powtórnie odtworzyć nagranie
Proszę kilkakrotnie nacisnąć przycisk
(2) podczas odtwarzania dysku CD/MD
do wyświetlenia wskaźnika “REP 1”.
Aby powtórnie odtworzyć dysk
Proszę kilkakrotnie nacisnąć przycisk
(2) podczas odtwarzania dysku CD/MD
do momentu wyświetlenia wskaźnika
“REP 2”.
Aby powtórnie odtworzyć wszystkie
dyski aktualnie wybranego
odtwarzacza
Proszę kilkakrotnie nacisnąć przycisk
(2) podczas odtwarzania dysku CD/MD
do momentu wyświetlenia wskaźnika
“REP 3”.
Każdorazowe naciśnięcie przycisku
powoduje następujące zmiany w wyświetlaniu
wskaźników:
REP 1
(powtórne
odtworzenie
nagrania)
Funkcja — Repeat play
(2)
REP 2
(powtórne
odtworzenie
dysku)
Odtwarzanie nagrań w
dowolnej kolejności
— Tryb Shuffle play
Odtwarzanie wszyskich nagrań
danego dysku w dowolnej ich
kolejności
Proszę kilkakrotnie nacisnąć przycisk
(3) podczas odtwarzania dysku CD/MD,
do momentu wyświetlenia wskaźnika
“SHUF 1”.
Aby odtworzyć wszystkie dyski
umieszczone w wybranym
odtwarzaczu, w dowolnej ich
kolejności
Proszę kilkakrotnie nacisnąć przycisk
(3) podczas odtwarzania dysku CD/MD
do momentu wyświetlenia wskaźnika
“SHUF 2”.
Celem odtworzenia wszystkich
dysków znajdujących się w aktualnie
podłączonych zmiennikach dysków, w
przypadkowej kolejności
Proszę kilkakrotnie nacisnąć przycisk
(3) podczas odtwarzania dysku CD/MD
do momentu wyświetlenia wskaźnika
“SHUF 3”.
18
Cancel (tryb
normalnego
odtwarzania)
REP 3
(powtórny wybór
tego samego
odtwarzacza)
Każdorazowe naciśnięcie przycisku
powoduje następujące zmiany w wyświetlaniu
wskaźników:
SHUF 1
(dowolna kolejność
odtwarzania dysków)
Cancel (powrót
do normalnego
trybu odtwarzania
dysków)
Naciśnięcie przycisku
trybie dowolnej kolejności, włącza tryb
odtwarzania pierwszych 10 sekund wszystkich
nagrań w dowolnej ich kolejności.
(1)
podczas odtwarzania w
(3)
SHUF 2 (dowolna
kolejność wyboru
odtwarzaczy)
SHUF 3
(dowolna kolejność
wszystkich trybów
odtwarzania)
Page 41

Informacje
dodatkowe
Środki Ostrożności
•Jeżeli pojazd był zaparkowany w
nasłonecznionym miejscu, co mogło
spowodować duży wzrost temperatury w
jego wnętrzu, należy odczekać by sprzęt
uległ schłodzeniu przed rozpoczęciem
użytkowania.
•Jeżeli do sprzętu nie dochodzi zasilanie,
należy przede wszystkim sprawdzić łącza.
Jeżeli są one prawidłowo podłączone,
proszę sprawdzić bezpiecznik.
•W przypadku braku dźwięku z głośników w
systemie dwu-głośnikowym, proszę ustawić
kontrolkę funkcji “fader” (zanik) w pozycji
środkowej.
•Sprzęt jest wyposażony we własny
wzmacniacz mocy, co może spowodować
pewne przegrzanie kasety odtwarzanej przez
dłuższy czas. Ten objaw nie jest znakiem
defektu sprzętu.
Z wszelkimi pytaniami lub ewentualnymi
niejasnościami związanymi z użytkowaniem
zakupionego sprzętu, które nie zostały
omówione w instrukcji obsługi, należy zwrócić
się do fachowców najbliższego punktu obsługi
lub punktu prowadzącego sprzedaż
produktów firmy Sony.
Uwagi dotyczące kaset
Środki ostrożności dotyczące kaset
• Nie należy dotykać taśmy, gdyż brud lub
kurz mogą zanieczyścić głowice
odtwarzające.
• Kasety należy przechowywać z dala od
sprzętu wyposażonego w magnesy, takiego
jak np. głośniki lub wzmacniacze mocy, gdyż
mogłoby to spowodować wymazanie lub
zniekształcenie dźwięku.
• Nie należy kaset narażać na bezpośrednie
działanie słońca, bardzo niskich temperatur
lub wilgoci.
• Rozciągnięte taśmy mogą zostać wciągnięte
przez mechanizm odtwarzacza. Przed
wsunięciem taśmy, proszę przy pomocy
ołówka lub innego, podobnego przedmiotu,
przekręcić rolkę aby zlikwidować luz taśmy.
Luz taśmy
PL
Odtwarzacz zmieniający dyski CD/MD/Informacje dodatkowe
• Zniekształcona kaseta i odstające etykiety
mogą spowodować komplikacje przy
wsuwaniu i wysuwaniu kaset. Proszę usunąć
lub wymienić luźne etykietki.
Aby utrzymać wysoką jakość
odtwarzanego dźwięku
Jeżeli w pobliżu sprzętu umieszczono obsady
do przechowywania puszek z napojami,
proszę uważać by nie wylać na sprzęt soków
itp.. Większość tego rodzaju napoji zawiera
cukier, którego resztki mogą spowodować
zanieczyszczenie kaset i tym sposobem
głowic odtwarzających lub zanik dźwięku.
Zestawy czyszczące głowice odtwarzające nie
są w stanie oczyścić lepkich zanieczyszczeń.
Kasety o dłuższym niż 90 minut czasie
odtwarzania
Nie zaleca się korzystania z kaset o czasie
odtwarzania dłuższym niż 90 minut, poza
trybem ciągłego odtwarzania. Taśmy takich
kaset są bardzo cienkie i łatwiej rozciągają się.
Częste odtwarzanie i zatrzymywanie, może
spowodować wciągnięcie taśmy przez
mechanizm odtwarzacza.
19
Page 42

Konserwacja
Wymiana bezpiecznika
Przed wymianą bezpiecznika, należy
sprawdzić czy wartość amperów odpowiada
wartości podanej na starym bezpieczniku.
Jeżeli bezpiecznik przepalił się, należy
sprawdzić podłączenie zasilania i wymienić
bezpiecznik. Jeżeli bezpiecznik ponownie
ulegnie przepaleniu, może być to sygnałem
miejscowego defektu. W takim wypadku
proszę skonsultować się z najbliższym
punktem obsługi firmy Sony.
Demontaż sprzętu
1
Klucz zwalniający (dostarczony)
2
PL
proszę użyć
beziecznika (10 A)
Ostrzeżenie
Nie należy nigdy korzystać z bezpiecznika o
wyższej wartości amperów od podanej na
dostarczonym ze sprzętem bezpieczniku, gdyż
mógłby on spowodować uszkodzenie sprzętu.
Czyszczenie łączy
Sprzęt może nie działać prawidłowo jeżeli
łącza pomiędzy panelem a głównym
korpusem są zanieczyszczone. Aby temu
zapobiec, należy otworzyć przedni panel przez
lekkie naciśnięcie w miejscu oznaczonym
(RELEASE), zdjąć panel i wyczyścić łącza
wacikiem, lekko zwilżonym alkoholem. Nie
należy wywierać nacisku, gdyż w przeciwnym
wypadku łącza mogą ulec uszkodzeniu.
Główny korpus sprzętu
3
4
20
Tylna część przedniego panela
Page 43

Umiejscowienie kontrolek
SEEK
AMS
RELEASE
MODE
MUTE
SEL
OFF
DSPL
SOURCE
Szczegóły podano na oznaczonych stronach.
1 Przycisk SEEK/AMS 6, 7, 8, 9, 11, 13, 14,
17
2 Przycisk SOURCE (TAPE/TUNER/CD/
MD) 6, 8, 14
3 Przyciski (+)(–) (volume/bass/treble/
balance/fader control) 5, 15
4 Przycisk MODE (*)
Podczas odbioru audycji radiowych:
Wybór pasma = BAND 8, 14
Podczas odtwarzania taśm:
Zmiana kierunku transportu taśmy 6
Podczas odtwarzania dysków CD/MD:
Wybór zmiennika dysków 17
5 Przełącznik POWER SELECT (wybór
źródła zasilania) (umieszczony na
górnej powierzchni sprzętu)
Patrz w rozdziale “Przełącznik POWER
SELECT” w Instrukcjach Montażu/
Podłączeń.
6 Przycisk OFF 5, 6
7 Przycisk DSPL (zmiana trybu
wyświetlania/nastawianie godziny) 5, 6,
15, 17
8 Przycisk SENS/BTM (regulacja
czułości/Funkcja BTM=Pamięć
optymalnego dostrajania) 8, 9
9 6 Przycisk (eject) wysuwanie taśmy 6
!º Podczas odbioru audycji radiowych:
Przyciski numeryczne 8
Podczas odtwarzania dysków CD/MD:
(1) Przycisk INTRO 6, 17
(2) Przycisk REPEAT 7, 18
(3) Przycisk SHUF (Shuffle) 18
INTRO REPEAT SHUF
213
ATA BL.SKIP
MTL
BTM
SENS
546
PRESET
DISC
AF/TA
D-BASS
OFF
PTY
1
2
3
(4) Przycisk MTL 7
(5) Przycisk ATA (Automatic Tuner
Activation) 7
(6) Przycisk BL.SKIP (Blank Skip) 7
!¡ Przycisk RELEASE (zwolnienie
przedniego panela) 4, 20
!™ Przycisk zerowania “Reset”
(umieszczony z przodu sprzętu,
schowany po przednim panelem)
Przycisk ten należy nacisnąć przed
rozpoczęciem użytkowania sprzętu po raz
pierwszy, po wymianie akumulatora, lub
jeśli przyciski umieszczone na sprzęcie nie
działają prawidłowo.
!£ Przycisk MUTE 16
!¢ Przycisk SEL (wybór trybu sterowania)
5, 12, 14, 15
!∞ Okienko konsoli
!§ Przycisk PTY (typ programu) 13
!¶ Przycisk PRESET/DISC 9, 17
Podczas odbioru stacji nadawczych
przez tuner sprzętu:
Wybór zakodowanej w pamięci
sprzętu radiowej stacji nadawczej 9
Podczas odtwarzania dysków CD/MD:
Wybór dysku 17
!• Przycisk AF/TA (częstotliwości
alternatywne/migawki o ruchu
drogowym) 10, 11, 12
!ª Kontrolka D-BASS 16
PL
Informacje dodatkowe
21
Page 44

Dane Techniczne
PL
Część odtwarzacza kaset
Ścieżka taśmy 4-ścieżkowy 2-kanałowy
stereo
Zniekształcenia dźwięku (spowodowane
nierównomiernym przesuwem taśmy)
0,08 % (WRMS)
Odpowiedź częstotliwościowa
30 – 18.000 Hz
Odstęp psofometryczny 61 dB (TYPE II, IV)
58 dB (TYPE I)
Część tunera
FM
Zakres strojenia FM1, FM2:
87.5 – 108.0 MHz
FM3:65.0 – 74.0 MHz
Gniazdko antenowe Zewnętrzne łącze
antenowe
Częstotliwość pośrednia 10,7 MHz
Czułość używalna 8 dBf
Wyborczość 75 dB przy 400 kHz
Odstęp psofometryczny 63 dB (stereo),
65 dB (mono)
Harmoniczne zniekształcenie przy 1 kHz
0,5 % (stereo),
0,3 % (mono)
Rozdzielczość 35 dB przy 1 kHz
Odpowiedź częstotliwościowa
30 – 15.000 Hz
Współczynnik przechwytu
2 dB
MW/LW
Zakres strojenia MW: 531 – 1.602 kHz
LW: 153 – 281 kHz
Gniazdko antenowe Zewnętrzne łącze
antenowe
Częstotliwość pośrednia 10,71 MHz/450 kHz
Czułość MW: 30 µV
LW: 50 µV
Ogólne
Wyjścia Przewód telefonicznych
sterowania zasilaniem
wzmacniacza mocy
Przewód sterowania
funkcją wyciszania dla
odbioru rozmów
Przewód sterujący
zasilanie anteny
Przewody zasilające (1)
Kontrolki dźwięku Basy ±8 dB przy 100 Hz
Tony wysokie ±8 dB przy
10 kHz
Zapotrzebowanie mocy bateria samochodowa
12 V DC (negatywne
uziemienie)
Wymiary Około 188 × 58 × 181 mm
(szer./wys./gł.)
Wymiary montażowe Około 182 × 53 × 164 mm
(szer./wys./gł.)
Waga Około. 1,2 kg
Dostarczony osprzęt Części montażowe i złącza
(1 zestaw)
Pilot zdalnego sterowania
RM-X2S (1)
Etui na przedni panel (1)
Akcesoria opcjonalne Kabel Bus (dostarczony z
łączem o wtyku typu RCA)
RC-61 (1 m), RC-62 (2 m)
Łącze o wtyku typu RCA
RC-63 (1 m), RC-64 (2 m),
RC-65 (5 m)
Sprzęt opcjonalny Odtwarzacz dysków CD ze
zmiennikiem dysków
CDX-705, CDX-605 (10
dysków),
CDX-T65, CDX-T62
(6 dysków)
Zmiennik dysków MD
MDX-61
Wybór źródła XA-C30
Część wzmacniacza mocy
Wyjścia Wyjścia głośników
Impedancja głośników 4 – 8 ohmów
Maksymalna moc na wyjściu
22
(złączniki szczelne)
35 W × 4 (przy 4 ohmach)
Wygląd oraz dane techniczne mogą ulec zmianie bez
uprzedzenia.
Page 45

Usuwanie usterek
Niżej podana lista kontrolna może służyć jako pomoc w usuwaniu ewentualnych usterek , które
mogą wystąpić podczas użytkowania sprzętu.
Przed skorzystaniem z listy kontrolnej, zaleca się sprawdzenie tekstu odpowiednich opisów
działania sprzętu.
Ogólne
Usterka
Brak dźwięku.
Brak wskaźników w okienku
konsoli.
Brak sygnału akustycznego.
Odtwarzanie taśm
Usterka
Odtwarzany dźwięk jest
zniekształcony.
Funkcja AMS nie działa
prawidłowo.
Przyczyna/Sposób usunięcia usterki
•Proszę wyregulować poziom głośności przyciskiem (+).
•Kontrolkę zaniku należy ustawić w pozycji środkowej dla dwu-
głośnikowgo systemu.
Należy usunąć przedni panel i oczyścić łącza. Szczegóły, patrz
opis “Czyszczenie Łączy” w rozdziale “Konserwacja”.
•Podłączono dodatkowy wzmacniacz mocy i nie korzysta się
ze zintegrowanego ze sprzętem wzmacniacza.
•Sygnał akustyczny został wyciszony (strona 14).
Przyczyna/Sposób usunięcia usterki
Zanieczyszczenie głowicy odtwarzającej.
n Proszę oczyścić głowicę.
•Szmery w przerwach między nagraniami.
•Przerwa między nagraniami jest za krótka (mniej niż cztery
sekundy).
•+ na przycisku (SEEK/AMS) został naciśnięty bezpośrednio
przed odtworzeniem następnego nagrania.
•= na(SEEK/AMS) został naciśnięty natychmiast po
rozpoczęciu odtwarzania.
•Długa przerwa lub część nagrania o niskiej częstotliwości lub
bardzo niskim poziomie dźwięku, jest traktowana przez sprzęt
jako przerwa w nagraniu.
PL
Informacje dodatkowe
Odbiór audycji radiowych
Usterka
Zaprogramowane strojenie nie
funkcjonuje.
Automatyczne strojenie nie
funkcjonuje.
Wskaźnik “ST” miga.
Przyczyna/Sposób usunięcia usterki
•Proszę zakodować prawidłową częstotliwość w pamięci
sprzętu.
•Sygnał emitowanej audycji jest za słaby.
Sygnał emitowanej audycji jest za słaby.
n Proszę dostrojić manualnie.
•Proszę dokładnie dostrojić właściwą częstotliwość.
•Sygnał emitowanej audycji jest za słaby.
n Proszę nacisnąć (SENS/BTM) aby przejść na tryb MONO.
23
Page 46

PL
Funkcje RDS
Usterka
Funkcja RDS nie działa
Tryb A SEEK włącza się po
paru sekundach od
rozpoczęcia słuchania.
Brak migawek o ruchu
drogowym
Funkcja PTY wskazuje
“NONE”.
Przyczyna/Sposób usunięcia usterki
Funkcja RDS jest dostępna wyłącznie na pasmach FM1 i FM2.
Stacja nie emituje sygnału TP lub sygnał jest zbyt słaby.
n Proszę naciskać przycisk (AF/TA) do zniknięcia wskaźnika
“AF TA”.
•Uaktywnić funkcję “TA”.
•Stacja nadawcza nie emituje migawek o ruchu drogowym
choć należy do grupy stacji TP.
n Proszę dostrojić inną stację.
Stacja nie sygnalizuje typów programu.
Odtwarzanie dysku
Usterka
Odtwarzany dźwięk “ślizga
się”.
Przyczyna/Sposób usunięcia usterki
Zakurzony lub uszkodzony dysk.
Świetlne wskaźniki błędów (przy podłączonym/-ych opcjonalnym/-ych zmienniku/kach dysków)
Następujące wskaźniki świetlne migają przez około pięć sekund i rozlega się alarmowy sygnał
dźwiękowy.
Okienko konsoli Przyczyna
Magazynek dysków nie został
NO MAG
NO DISC
NG DISCS
ERROR
RESET
HI TEMP
Jeżeli wyżej podane wskazówki nie pomogą w usunięciu usterki, należy skonsultować się z
najbliższym punktem obsługi lub sprzedaży produktów firmy Sony.
umieszczony w zmienniku dysków
CD/MD.
Brak dysku w magazynku.
Dysk CD/MD nie jest odtwarzany z
niewiadomego powodu.
Dysk jest zanieczyszczony.
Dysk został odwrotnie ułożony.
Użytkowanie zmiennika dysków CD/
MD jest z przyczyn nieznanych
niemożliwe.
Temperatura otoczenia wynosi ponad
50°C.
Sposób usunięcia usterki
Proszę wsunąć magazynek z dyskami
do zmiennika dysków CD/MD.
Proszę wyjąć magazynek i włożyć
dysk.
Proszę wymienić dysk CD/MD.
Proszę oczyścić dysk.
Proszę dysk właściwie ułożyć.
Proszę nacisnąć przycisk “reset” na
korpusie sprzętu.
Proszę odczekać aż temperatura
otoczenia spadnie poniżej 50°C.
24
Page 47

Indeks
A
Alarm ostrzegawczy 4
Automatic Music Sensor (AMS) 6
Automatic Tuner Activation (ATA) 7
Automatyczne strojenie 8
B, C
Balans 15
Bass 16
Best Tuning Memory (BTM) 8
Bezpiecznik 20
Blank skip - Omijanie przerw między
nagraniami 7
Częstotliwości alternatywne (AF) 10
D, E
Dźwięki wysokie 15
F, G, H
Fader 15
Funkcja DIGITAL D-BASS (D-Bass) 16
Funkcja “Mute” (wyciszanie) 15, 16
Funkcja “Radio Data System” (RDS) 10, 11, 12
I, J, K, L
Intro scan 6, 17
M, N
Manualne przeszukiwanie 17
Manualne strojenie 8
METAL 7
Migawki o ruchu drogowym (TA) 11, 12
P, Q
Pilot zdalnego sterowania 5, 14, 15
Programy emitujące sygnał migawek o ruchu
drogowym (TP) 11
Przedni panel 4
Przeszukiwanie zakodowanych danych 8
Przewijanie 6
Przycisk “Reset” (zerowanie) 4
R
Radio 8
S
Sygnał akustyczny 16
Szybkie przewijanie do przodu 6
T, U, V
Tony wysokie 15
Tryb “Local seek mode” (LCL) 9
Tryb monofoniczny 9
Typ programu (PTY) 13
Tryb “Repeat play” (odtwarzanie z
powtórzeniem) 7, 18
Tryb “Shuffle play” (odtwarzanie w dowolnej
kolejności) 18
W, X, Y, Z
Wyciszanie dźwięku na rozmowy
telefoniczne 16
Zegar 5
PL
Informacje dodatkowe
O
Odtwarzanie dysków MD 17
Odtwarzanie dysku CD 17
Odtwarzanie Taśm 6
Okienko konsoli 6, 10, 11, 17
25
Page 48

BG
Добре дошли!
Благодарим Ви, че избрахте да купите
стерео авторадиокасетофон Sony. Този
апарат Ви дава възможност да се
насладите на различни отличителни
характеристики с помощта на ротационно
дистанционно управление.
В допълнение към възпроизвеждането от
касета и към работата с радиоапарата,
имате възможност да разширите
системата си като свържете по избор
устройство за смяна на CD/MD.
2
Page 49

Съдържание
Само за този апарат
Начални действия
Пренастройка на апарата ............................4
Сваляне на лицевия панел .......................... 4
Подготовка на ротационното дистанционно
управление ............................................... 5
Сверяване на часовника.............................. 5
Касетофон
Слушане на записи от лента ....................... 6
Възпроизвеждане от лента в различни
режими ...................................................... 6
Радиоапарат
Автоматично запаметяване на станции
— Функция Best Tuning Memory (BTM) ...7
Запаметяване само на желаните
радиостанции ........................................... 8
Приемане на запаметените
радиостанции ........................................... 8
Функция RDS
Преглед на функцията RDS ........................ 9
Показване на името на радиостанцията .... 9
Автоматично пренастройване на същата
радиостанция
— Функция Alternative Frequencies
(AF) .....................................................10
Прослушване на информации за пътната
обстановка .............................................. 11
Предварителна настройка на RDS
станции с помощта на данните
AF и TP ....................................................11
Откриване на радиостанция по типа на
програмата .............................................. 12
Автоматично сверяване на часовника .....13
Други функции
Използване на ротационното дистанционно
управление ............................................. 13
Регулиране на характеристиките на
звука ........................................................14
Заглушаване на звука ................................15
Промяна на звука и предупредителния
сигнал ......................................................15
С допълнително оборудване
Устройство за смяна на CD/MD
Възпроизвеждане на CD/MD .....................16
Преглед на записи
— Функция Intro scan ............................. 16
Последователно възпроизвеждане на
записи — Функция Repeat play ............. 17
Възпроизвеждане на записи в произволен
ред — Функция Shuffle play ...................17
BG
Допълнителна информация
Мерки за безопасност ................................18
Поддържане ................................................19
Сваляне на апарата ................................... 20
Разположение на уредите за
управление ............................................. 21
Технически характеристики ...................... 22
Ръководство за отстраняване на
неизправности ........................................23
Индекс ......................................................... 25
3
Page 50

BG
Начални действия
Пренастройка на
апарата
Преди да започнете работа с апарата за
пръв път или след смяна на
акумулаторната батерия на автомобила,
Вие трябва да пренастроите апарата.
Натиснете бутона за пренастройка с върха
на някакъв предмет като например
химикалка.
Бутон Reset
Забележка
С натискането на бутона за пренастройка ще се
изтрият всички запаметени програми и функции
на паметта.
Сваляне на лицевия
панел
Лицевият панел на този апарат може да
бъде свален, за да се предотврати
кражбата му.
1 Натиснете бутона (OFF).
2 Натиснете бутона (RELEASE), за да
освободите лицевия панел и след
това свалете панела, като го
издърпате към себе си.
(RELEASE)
Забележки
• Внимавайте да не изпуснете лицевия панел при
свалянето му от апарата.
• В случай, че натиснете бутона (RELEASE) за
освобождаване на лицевия панел, докато
апарата е включен за работа,
електрозахранването автоматично ще се
изключи, за да се предотврати повреда на
високоговорителите.
Поставяне на лицевия панел
Прилепете детайла A към детайла B на
апарата, както е показано на фигурата и
натиснете до прищракване.
A
B
Забележки
• Уверете се, че лицевия панел е обърнат
правилно нагоре при поставането му към
апарата, тъй като той не може да бъде
поставен, ако е обърнат обратно.
• Лицевият панел не бива да се натиска силно
към апарата при поставянето му. Поставянето
на лицевия панел може да стане с леко
притискане на панела към апарата.
• Поставяйте лицевия панел в доставяния калъф
за носене, когато го взимате със себе си.
• Не натискайте силно и не подлагайте на голямо
напрежение визуалните екрани на лицевия
панел.
• Не излагайте лицевия панел на въздействието
на директна слънчева светлина, на източници
на топлина като въздуховоди за парното, както
и не го оставяйте на влажно място. Никога не
оставяйте лицевия панел на арматурното табло
или на други открити места в автомобил,
паркиран под директна слънчева светлина,
където е възможно температурата в купето да
се повиши значително.
Предупредителен сигнал
В случай, че поставите ключа за запалване
в положение OFF, без да сте свалили
лицевия панел, ще прозвучи
предупредителен сигнал в продължение на
няколко секунди (само, ако
превключвателят POWER SELECT е
поставен в положение A).
В случай, че сте свързали допълнителен
усилвател и не използвате вградения,
предупредителният сигнал ще бъде
дезактивиран.
4
Page 51

Подготовка на
ротационното
дистанционно
управление
Когато монтирате ротационното
дистанционно управление, залепете
етикета, показан на долната фигура.
SEL
DSPL
MODE
MODE
DSPL
SEL
Сверяване на
часовника
Часовникът има 24-часова цифрова
индикация.
Пример за сверяване на часовника за 10:08
часа
1 Натиснете бутона (OFF) или бутона
(DSPL) по време на работа.
2 Натиснете бутона (DSPL) и задръжте
за около 2 секунди.
100
Цифрите за часа светят с мигаща светлина.
1 Сверете цифрите за часа.
напред
назад
1000
2 Натиснете кратко бутона (SEL).
1000
Цифрите за минутите светват с мигаща
светлина.
3 Сверете цифрите за минутите.
напред
назад
1008
3 Натиснете кратко бутона (DSPL).
1008
Часовникът започва да работи.
Забележка
В случай, че превключвателят POWER SELECT е
поставен в положение B, часовникът не може да
бъде сверен освен, ако не се включи
електрозахранването. Сверете часовника след
като сте включили радиоапарата.
BG
Начални действия
5
Page 52

Касетофон
Намиране началото на запис
—
Функция Automatic Music Sensor
(AMS)
Можете да прескочите до девет записа
наведнъж.
BG
Слушане на записи от
лента
Поставете касета.
Възпроизвеждането ще започне
автоматично.
В случай, че вече има поставена касета,
натискайте бутона (SOURCE)
поледователно, докато се покаже
индикацията “PLAY”.
FWD
Възпроизвежда се от горната страна на
касетата.
REV
Възпроизвежда се от долната страна на
касетата.
Съвет
За да смените посоката на движение на лентата,
натиснете бутона (MODE) (*) по време на
възпроизвеждане.
За
Спиране на
възпроизвеждането
Изваждане на
касетата
Натиснете
(OFF)
6
Бързо пренавиване на лентата
По време на възпроизвеждане
натиснете една от страните на бутона
(SEEK/AMS) за две секунди.
Пренавиване напред
SEEK
AMS
Пренавиване назад
За да започнете възпроизвеждането,
докато пренавивате напред или назад,
натиснете бутона (MODE) (*).
6
По време на възпроизвеждане,
натиснете кратко една от страните на
бутона (SEEK/AMS).
За да намерите следващи записи
SEEK
AMS
За да намерите предишни записи
Забележка
Функцията AMS може да не работи, когато:
• паузите между записите са по-къси от 4
секунди
• има шум между записите
• има дълги участъци със слаба сила на звука
или тихи участъци.
Променяне на показваните
индикации
При всяко натискане на бутона (DSPL), по
време на възпроизвеждане от лента,
показваната индикация се изменя както
следва:
z Възпроизвеждане от лента z Часовник
Честота* Z
* При активирана функция AF/TA
Възпроизвеждане от
лента в различни
режими
Търсене на желан запис
— Функция Intro scan
Натиснете бутона (1) по време на
възпроизвеждане.
На екрана се появява индикацията
“INTRO”.
Възпроизвеждат се първите десет секунди
от всички записи.
Когато намерите желания запис, натиснете
бутона отново. Апаратът се връща в
нормален режим за възпроизвеждане.
Page 53

Последователно възпроизвеждане
на запис — Функция Repeat play
Натиснете бутона (2) по време на
възпроизвеждане.
На екрана се появява индикацията
“REP”.
След като свърши възпроизвежданият в
момента запис, той ще започне отначало.
Радиоапарат
Честотните обхвати, които този апарат
може да приема са 87,5 – 108,0MHz (FM1,
FM2) и 65,0 – 74,0MHz (FM3).
За да анулирате този режим, натиснете
отново бутона.
Превключване за радиоприемане по
време на бързо пренавиване на
лента — Функция Automatic Tuner
Activation (ATA)
Натиснете бутона (5) по време на
възпроизвеждане.
На екрана се появява индикацията
“АТА”.
При бързо пренавиване на лентата напред
или назад, с активирана функция,
(SEEK/AMS) за време по-дълго от 2
секунди, автоматично се включва
радиоапарата.
За да анулирате действието на тази
функция, натиснете бутона (5).
Прескачане на паузи по време на
възпроизвеждане
— Функция Blank skip.
Натиснете бутона (6) по време на
възпроизвеждане.
На екрана се появява индикация “BL.
SKIP”.
Паузи, по-дълти от осем секунди, ще бъдат
автоматично прескочени по време на
възпроизвеждане.
За да анулирате действието на тази
функция, натиснете бутона (6).
Възпроизвеждане от лента тип CrO2
или metal.
Натиснете бутона (4), когато искате
да възпроизвеждате от лента тип
CrO2 (TYPE II) или metal (TYPE IV).
На екрана се появява индикация “МTL”.
Автоматично
запаметяване на
станции
— Функция Best Tuning Memory
(BTM)
С помощта на тази функция от текущия
честотен обхват се избират само станциите
с най-силен сигнал и се запаметяват по
реда на тяхната честота.
ПРЕДОТВРАТЯВАНЕ НА ИНЦИДЕНТИ!
При настройване по време на шофиране,
използвайте функцията за автоматична
настройка или функцията за търсене на
предварително запаметени станции вместо
ръчна настройка.
1 Натискайте последователно бутона
(SOURCE), за да изберете за източник
радиоапарата.
При всяко натискане на бутона
(SOURCE) източникът се променя, както
следва:
z TAPE z TUNER z CD/MD
2 Натискайте последователно бутона
(MODE), за да изберете честотен
обхват.
Всеки път, когато натиснете бутона
(MODE), честотният обхват се променя,
както следва:
z FM1 z FM2 z FM3
LW Z MW Z
3 Натиснете бутона (SENS/BTM) за две
секунди.
продължава на следващата страница n
BG
Касетофон/Радиоапарат
За да анулирате действието на функцията,
натиснете бутона (4).
7
Page 54

BG
Забележки
• По време на приемане в обхвати FM1 и FM2,
функцията BTM претърсва само честотния
обхват 87,5 – 108,0МHz, а при радиоприемане в
обхват FM3, претърсва само честотния обхват
65,0 – 74,0MHz.
• Апаратът няма да запаметява радиостанции с
лоши сигнали с номерираните бутони за
предварителна настройка. В случай, че могат
да се приемат добре по-малко станции от
номерираните бутони, някои бутони ще останат
неизползвани.
• В случай, че на екрана има показан номер на
бутон, апаратът ще запаметява радиостанции
на всички номерирани бутони за
предварителна настройка от него нагоре.
Запаметяване само на
желаните
радиостанции
От всеки обхват могат да бъдат
запаметени до 6 радиостанции (FM1, FM2,
FM3, MW и LW) с помощта на
номерираните бутони за предварителна
настройка в ред по Ваш избор.
Следователно, в обхват FM могат да се
запаметят 18 радиостанции.
В случай, че искате да запаметите нова
радиостанция с вече използван номериран
бутон, ще се изтрие предишната
запаметена радиостанция.
1 Натискайте последователно бутона
(SOURCE), за да изберете за източник
радиоапарата.
Приемане на
запаметените
радиостанции
1 Натискайте последователно бутона
(SOURCE), за да изберете за източник
радиоапарата.
2 Натискайте последователно бутона
(MODE) за избор на честотен обхват.
3 Натиснете за кратко номерирания
бутон за предварителна настройка (от
(1) до (6)), с който е запаметена
желаната радиостанция.
Съвет
Натиснете една от страните (PRESET/DISC) за
приемане на радиостанциите по реда на
запаметяването (Функция Preset Search).
По време на приемане в обхват FM1 или FM2,
честотният обхват FM3 не може да бъде приеман
директно с бутона (PRESET/DISC), тъй като
честотите са различни. Изберете честотния
обхват с помощта на бутона (MODE).
В случай, че приемането на стерео
FM е лошо
— Функция Manual mode
Натискайте последователно и кратко
(SENS/BTM), докато на екрана светне
индикацията “MONO”.
Качеството на звука ще се подобри, но
ще бъде моно. (Изчезва индикацията
“ST”.)
2 Натискайте последователно бутона
(MODE), за да изберете честотния
обхват.
3 Натискайте бутона (SEEK/AMS), за да
намерите радиостанцията, която
искате да запаметите с номериран
бутон за предварителна настройка.
4 Натиснете и задръжте за около две
секунди желания номериран бутон
(от (1) до (6)).
Номерът на избрания бутон за
предварителна настройка се появява на
екрана.
8
Смяна на показваната индикация
При всяко натискане на бутона (DSPL), на
екрана се сменят индикациите за
честотата и за часовника.
В случай, че не можете да се
настроите на предварително
настроена радиостанция
Натискайте кратко една от страните
на бутона (SEEK/AMS), за да намерите
станцията (автоматична настройка).
Претърсването спира щом започне
приемане на радиостанция. Натискайте
последователно една от страните на
бутона, докато започне приемането на
желаната радиостанция.
Page 55

Забележка
В случай, че автоматичната настройка спира
твърде често, натиснете кратко бутона
(SENS/BTM), за да светне на екрана индикацията
“LCL” (режим за местно търсене). В този режим
могат да бъдат приемани само радиостанции с
относително силни сигнали.
Функция RDS
Съвет
В случай, че знаете честотата, натиснете и
задръжте една от страните на бутона
(SEEK/AMS), докато се приема желаната
радиостанция (ръчна настройка).
Преглед на функцията
RDS
Допълнителният сигнал Radio Data System
(RDS) се излъчва, за да могат FM
радиостанциите да изпращат
допълнителна цифрова информация,
заедно с обикновения радиосигнал.
Вашият стерео апарат предлага
разнообразни функции. Ето само някои от
тях: автоматично пренастройване на
същата радиостанция, информация за
обстановката по пътищата, както и
откриване на радиостанция по типа на
програмата.
Функцията RDS може да се използва само
за обхвати FM1 и FM2.
Забележки
• В зависимост от страната или областта, в
която се намирате, не всички действия на
функцията RDS са на разположение.
• Функцията RDS може да не функционира
правилно, ако силата на сигнала не е
достатъчна или ако радиостанцията, на която
сте настроени не излъчва данни RDS.
Показване на името на
радиостанцията
Името на радиостанцията, която приемате
в момента светва на екрана.
Изберете станция от FM обхват.
При настройването на FM станция,
която излъчва данни RDS, името на
радиостанцията светва на екрана.
FM1
BBC 1 FM
Забележка
Индикацията “*” означава, че в момента
приемате RDS радиостанция.
BG
Радиоапарат/Функция RDS
продължава на следващата страница n
9
Page 56

BG
Смяна на екранната индикация
При всяко натискане на бутона (DSPL), се
изменя екранната индикация, както
следва:
z Честота z Време z Име на станция
Забележка
Индикацията “NO NAME” светва, ако станцията,
която приемате, не излъчва RDS данни.
Автоматично
пренастройване на
същата радиостанция
— Функция Alternative Frequencies
(AF)
Функцията Alternative Frequencies (AF)
автоматично избира и пренастройва
станцията с най-силен сигнал от една
радио мрежа. С помощта на тази функция,
Вие можете да слушате непрекъснато една
и съща радиостанция по време на дълго
пътуване, без да е необходимо ръчно да
пренастройвате радиостанцията.
Честотите се сменят автоматично.
98.5 MHz
Радиостанция
102.5 MHz
1 Изберете FM станция.
2 Натиснете бутона (AF/TA), докато на
екрана светне индикацията “AF”.
Апаратът започва търсенето на
алтернативна радиостанция от същата
радио мрежа, но с по-силен сигнал.
Забележки
• При натиснат бутон (AF/TA), по време на
приемане в обхват FM3, обхватът автоматично
се сменя от FM3 на FM1.
• В случай, че в района няма алтернативна
радиостанция и за Вас не е необходимо да
търсите другаде такава, изключете функцията
AF, като натиснете бутона (AF/TA), докато
индикацията “AF” изчезне от екрана.
10
96.0 MHz
Смяна на екранната информация
При всяко натискане на бутона (AF/TA),
показваната информация се изменя, както
следва.
z AF z TA z AF TA*
Интервал Z
* Изберете това, за едновременно активиране на
функциите AF и TA.
Забележки
• Индикацията “NO AF” и името на
радиостанцията се редуват с мигаща светлина
на екрана, ако апаратът не може да намери
алтернативна станция от радиомрежата.
• В случай, че името на радиостанцията започне
да свети с мигаща светлина, след избиране на
дадена радиостанция, при активирана функция
AF, това означава, че няма алтернативни
честоти на разположение. Натиснете бутона
(SEEK/AMS), докато името на станцията свети с
мигаща светлина (в рамките на 8 секунди).
Апаратът започва търсенето на други честоти
със същите данни за програмна идентификация
PI (“PI seek” се появява без звуков сигнал на
екрана). В случай, че апаратът не може да
намери други честоти, появява се “NO PI” и
апаратът се връща към първоначално
избраните честоти.
Слушане на регионална програма
Функцията “REG” (включена регионална)
на този апарат Ви дава възможност да
останете настроени на дадена регионална
програма, без да се превключвате на друга
регионална програма. (Отбележете, че
трябва да изключите функцията AF.)
Апаратът е фабрично настроен на “REG”,
но ако искате да изключите функцията,
направете следното.
Натиснете бутона (AF/TA) и задръжте
за повече от две секунди, докато
индикацията “REG” изчезне.
Забележете, че изключването на
функцията “REG” може да предизвика
превключването на апарата на друга
регионална станция от същата радио
мрежа.
Забележка
Тази функция не работи в Обединеното
Кралство, както и в някои други области.
Page 57

Прослушване на
информации за
пътната обстановка
Данните на Traffic Announcement (TA) и
Traffic Programme (TP) Ви дават
възможност автоматично да се настроите
на FM радиостанция, която излъчва
информации за обстановката по пътищата,
дори ако в момента слушате други
програми.
Натиснете и задръжте бутона (AF/TA)
докато индикациите “TA” или “AF TA”
светнат на екрана.
Апаратът започва търсенето на станции
с излъчване на информации за пътната
обстановка. Индикацията “TP” светва,
когато апаратът открие станция с
излъчване на информации за пътната
обстановка.
При начало на информация за пътната
обстановка, индикацията “TP” започва
да примигва, а в края на информацията
спира примигването и.
Съвет
При започване на инфомацията за пътната
обстановка, когато слушате друга програма,
радиоапаратът автоматично се превключва на
станцията с пътната информация и отново се
връща към първоначалната станция при
завършване на бюлетина на пътната обстановка.
Забележки
• Индикацията “NO TP” примигва в продължение
на пет секунди, ако приеманата радиостанция
не излъчва информации за пътната обстановка.
След това радиоапаратът започва търсенето
на станция, която излючва информации за
пътната обстановка.
• При появата на индикацията “EON”, когато на
екрана е и индикацията “TP”, слушаната
радиостанция използва излъчванията на други
радиостанции от същата радио мрежа.
За да прекъснете текущата
информация за пътната обстановка
Натиснете кратко бутона (AF/TA).
За да анулирате всички информации за
пътната обстановка, дезактивирайте
функцията, като натиснете бутона
(AF/TA) и го задържите, докато изчезне
индикацията “AF”.
Предварителна настройка на силата
на звука при информации за
пътната обстановка
Можете да извършите предварителна
настройка за нивото на силата на звука
при информациите за пътната обстановка,
така че да не пропуснете информацията.
При започване на информация за пътната
обстановка, нивото на силата на звука
автоматично ще се установи на
предварително настроеното.
1 Изберете желаното ниво за силата на
звука.
2 Натиснете бутона (3), като в същото
време сте натиснали и задържате
бутона (SEL).
Индикацията “TA VOL” се появява на
екрана и настройката се запаметява.
Приемане на спешни информации за
пътната обстановка
В случай, че дойде спешна информация за
пътната обстановка, докато Вие слушате
радио, програмата автоматично ще се
превключи на информацията за пътната
обстановка. В случай, че слушате друг
източник, освен радиоапарата, ще чуете
спешната информация за пътната
обстановка само, ако активирате една от
функците AF или TP. В този случай,
апаратът ще се превключи автоматично на
информацията за пътната обстановка, без
значение, какво слушате в момента.
Предварителна
настройка на RDS
станции с помощта на
данните AF и TP
При извършване на предварителна
настройка на RDS станции, апаратът
запаметява данните за всяка станция
както и честотата и, така че не е
необходимо да активирате функциите AF и
TP при всяко включване на предварително
настроената радиостанция. Можете да
изберете различни предварителни
настройки (AF, TA, или и двете) за отделни
предварително настроени станции или
еднаква предварителна настройка за
всички предварително настроени
радиостанции.
BG
Функция RDS
11
Page 58

BG
INFO
Еднаква предварителна настройка
за всички предварително настроени
радиостанции
1 Изберете FM обхват.
2 Натискайте последователно бутона
(AF/TA) и изберете или “AF”, “TA”, или
“AF TA” (и двете функции AF и TA).
Забележете, че изключването на
функцията “AF TA” запазва, както RDS
станции, така и станции без RDS.
3 Натиснете бутона (SENS/BTM) за две
секунди.
Различна предварителна настройка
за всяка преварително настроена
радиостанция
1 Изберете FM обхват и настройте на
желаната радиостанция.
2 Натискайте последователно бутона
(AF/TA) и изберете или “AF”, “TA” или
“AF TA” (и двете функции AF and TA).
3 Натиснете и задръжте желания бутон
за предварителна настройка за около
2 секунди, докато се появи
индикацията “MEM”.
Повторете всичко от стъпка 1 за
предварителна настройка на други
радиостанции.
Съвет
В случай, че искате да смените направените
предварително настройки за АF и/или TP след
като сте настроили радиоапарата на
предварително настроена радиостанция, можете
да направите това като активирате или
деазактивирате функциите AF или TP.
Типове програми На екран
Новини NEWS
Текущи събития AFFAIRS
Информация INFO
Спорт SPORT
Образование EDUCATE
Драма DRAMA
Култура CULTURE
Наука SCIENCE
Разни VARIED
Популярна музика POP M
Рок музика ROCK M
Музика за пътуване M.O.R. M
Лека класическа LIGHT M
Класическа CLASSICS
Друг тип музика OTHER M
Времето WEATHER
Финанси FINANCE
Детски програми CHILDREN
Социални дела SOCIAL A
Религия RELIGION
Позвъняване PHONE IN
Пътуване TRAVEL
Свободно време LEISURE
Джаз JAZZ
Кънтри музика COUNTRY
Национална музика NATION M
Стари шлагери OLDIES
Фолклорна музика FOLK M
Документална DOCUMENT
Други NONE
Забележка
Не можете да използвате тази функция в някои
страни, където липсват PTY (Programme Type
selection) данни.
Откриване на
радиостанция по типа
на програмата
Можете да откриете желаната
радиостанция, като изберете един от
следните програмни типове:
Забележка
В страните или регионите, където не се предават
EON данни, можете да използвате тази функция
само за радиостанции, на които веднъж вече сте
настройвали апарата.
12
1 Натиснете и задръжте бутона (PTY)
по време на приемане на FM станция,
докато на екрана светне индикацията
“PTY”.
Типът на текущата програма се появява,
ако радиостанцията излъчва PTY данни.
На екрана се появява индикацията
“--------” , ако приеманата станция не е
RDS или ако RDS данните не са били
приети.
Забележка
Функцията PTY не е на разположение за обхват
FM3.
Page 59

2 Натискайте последователно бутона
(PTY), докато индикацията за
желания тип програма се появи.
Типовете програми се появяват в реда,
в който са описани по-горе. Забележете,
че не можете да използвате типа
“NONE” (Други) за търсене.
3 Натиснете една от страните на бутона
(SEEK/AMS).
Апаратът започва претърсването за
станция, която излъчва съответния тип
програма. Програмният тип се появява
отново за пет секунди, когато апаратът
намери станцията.
Обратното, на екрана се появява
индикацията “NONE” за време пет
секунди, ако апаратът не е могъл да
намери типа програма и се връща към
предишната радиостанция.
Автоматично
сверяване на часовник
Чрез получаваните данни CT (Clock Time),
часовникът на апарата може да бъде
автоматично сверен.
По време на приемане в FM обхват,
натиснете бутона (2), докато
държите натиснат бутона (SEL).
На екрана ще се покаже индикацията
“CT” и часовникът ще бъде сверен
автоматично.
FM1
За да анулирате функцията CT
Повторете горните действия.
Забележки
• Възможно е функцията CT да не работи, дори
ако се приема RDS станция.
• Времето, сверено с помощта на функцията CT
може да не бъде съвсем точно.
CT
100
Други функции
Използване на
ротационното
дистанционно
управление
Ротационното дистанционно управление
действува чрез натискане на бутони и/или
завъртане на регулатори.
Вие можете да управлявате опцията
устройство за смяна на CD или MD с
помощта на ротационното дистанционно
управление.
Чрез натискане на бутони (бутоните
SOURCE и MODE)
(SOURCE)
(MODE)
Всеки път, когато натиснете бутона
(SOURCE), източникът се променя,
както следва:
TAPE n TUNER n CD/MD
Натискането на бутона (MODE) променя
работата, както следва:
• посоката на движение на лентата
• обхвата, FM1 n FM2 n FM3 n MW n LW.
• устройство за смяна на CD/MD.
Съвет
Вие можете да включите апарата като натиснете
бутона (SOURCE) на ротационното дистанционно
управление.
Чрез завъртане на регулатора
(SEEK/AMS)
BG
Функция RDS/Други функции
продължава на следващата страница n
13
Page 60

Завъртете леко регулатора и го
освободетезaдa:
• Намерите началата на записите на
лентата. За бързо пренавиване на
лентата, завъртете и задръжте и след
това освободете регулатора. За
възпроизвеждане завъртете и
задръжте регулатора отново и накрая
го освободете.
• Намерите определен запис на диска.
Завъртете и задръжте регулатора,
докато намерите определено място от
записа и след това го освободете, за
да започне възпроизвеждането.
• Настроите на станциите автоматично.
Завъртете и задръжте регулатора, за
да настроите на определена станция.
Чрез натискане на регулатора и
едновременното му завъртане
(регулатора PRESET/DISC)
Смяна на посоката на работа
Посоката на работа на уредите за
управление е фабрично настроена, както е
показано на долната фигура.
За увеличаване
За намаляване
Ако е необходимо да монтирате
ротационното дистанционно управление от
дясната страна на волана, Вие можете да
обърнете работните посоки на уредите за
управление.
BG
Натиснете и завъртете регулатора за:
• Приемане на радиостанциите,
запаметени с бутоните за
предварителна настройка.
• Смяна на диска.
Други действия
Завъртете регулатора
VOL за настройка на
силата на звука.
Натиснете бутона (DSPL),
за да смените екранната
информация.
Натиснете бутона
(MUTE), за да
заглушите звука.
Натиснете бутона
(OFF), за да изключите
апарата.
Натиснете
бутона (SEL)
за
настройване и
избор.
Натиснете бутона (SEL) за две
секунди, като същевременно
натискате регулатора VOL.
Регулиране на
характеристиките на
звука
1 Изберете характеристиката, която
искате да регулирате, като натискате
OFF
бутона (SEL) последователно.
VOL (сила) n BAS (ниски) n TRE
(високи) n BAL (баланс) n FAD
(баланс предни/задни)
2 Настройте избраната характеристика
чрез натискане на един от бутоните
(+) или (–).
Извършете регулирането в рамките на три
секунди след избора. (След три секунди
бутонът ще действува отново като
регулатор за силата на звука.)
14
Page 61

Заглушаване на звука
Натиснете бутона (MUTE).
Индикаторът “MUTE” започва да
примигва.
За да възстановите предишното ниво на
звука, натиснете бутона отново.
Съвет
Апаратът намалява силата на звука автоматично
при телефонно позвъняване (Функция Telephone
mute).
Промяна на звука и
предупредителния
сигнал
Подсилване на ниските честоти на
звука — Функция D-Bass
Можете да се наслаждавате на ясен и
мощен нискочестотен звук. Функцията
D-Bass подсилва нискочестотния сигнал
по-силно, отколкото обикновения
нискочестотен усилвател.
В резултат можете да чуете
нискочестотния звук по-ясно, дори ако
партията на вокала е със същата сила на
звука. С помощта на регулатора D-Bass
можете да подчертаете и настроите лесно
нискочестотния звук. Ефектът е същия,
както при допълнителен нискочестотен
високоговорител.
Функцията Digital D-Bass* създава още поотчетлив и по-мощен нискочестотен звук, в
срaвнение с функцията Analog D-Bass.
Функция Digital D-Bass
D-BASS 3
Ниво
D-BASS 2
D-BASS 1
Функция Analog D-Bass
D-BASS 3
Ниво
D-BASS 2
D-BASS 1
* В случай, че устройството за смяна на CD има
функцията D-bass, по време на
възпроизвеждане от компакт диск, на екрана
се появява индикацията “DIGITAL D-BASS”
Забележка
В случай, че устройството за смяна на CD няма
функцията D-bass, басовият звук може да бъде с
изкривявания при увеличаване на силата на
звука.
В такъв случай, включете регулатора D-BASS и
регулирайте силата на звука.
Заглушаване на звуковия сигнал
Натиснете бутона (6), докато
натискате бутона (SEL).
Натиснете отново тези бутони, за да
активирате предупредителния сигнал.
Забележка
В случай, че свържете допълнителен усилвател
и не използвате вградения усилвател, звуковият
сигнал ще бъде дезактивиран.
Смяна на цвета на осветлението.
Натиснете бутона (1), докато
натискате бутона (SEL).
Можете да избирате между жълт и зелен
цвят.
BG
Други функции
0dB
Честота
0dB
Честота
Настройка на нискочестотната крива
Завъртете регулатора D-Bass, за да
регулирате нивото на ниските честоти
(1,2 или 3).
На екрана се появява индикацията
“D-Bass”*
За да анулирате, завъртете регулатора в
положение OFF.
15
Page 62

DISC
PRESET
С допълнително оборудване
Устройство за
смяна на CD/MD
Вие можете да управлявате до 5
устройства за смяна на CD/MD с помощта
на този апарат.
Намиране на определен запис
— Функция Automatic Music Sensor
(AMS)
По време на възпроизвеждане,
натискайте една от страните на
бутона (SEEK/AMS), по един път за
всеки запис, който искате да
прескочите.
За намиране на следващи записи
SEEK
AMS
За намиране на предишни записи
BG
Възпроизвеждане на
CD/MD
Натискайте бутона (SOURCE), докато
на екрана се появи индикацията за
желаното устройство.
Започва възпроизвеждане на CD/MD.
Когато има свързано устройство за CD/MD,
всички записи се възпроизвеждат
отначало.
Забележка
На екрана се появява индикация “CD”, дори ако
сте избрали MD устройство.
Избор на устройство за смяна на
CD/MD (kогато има свързани
няколко CD/MD устройства)
Натискайте бутона (MODE)
последователно, за да изберете желаното
устройство за смяна на CD/MD.
Промяна на екранната информация
Винаги когато натиснете бутона (DSPL) по
време на възпроизвеждане на CD/MD,
екранната информация се променя, както
следва:
Изминало време на
възпроизвеждане
˜ Часовник
Намиране на определено място
—Функция Manual Search
По време на възпроизвеждане
натиснете и задръжте една от
страните на бутона (SEEK/AMS).
Освободете бутона, след като
намерите желаното място.
За търсене напред
SEEK
AMS
За търсене назад
Превключване на други дискове
По време на възпроизвеждане
натиснете една от страните на бутона
(PRESET/DISC).
За връщане към
предишен диск
За преминаване
към следващ диск
Преглед на записи
— Функция Intro scan
Последователно се възпроизвеждат
първите десет секунди от всички записи на
текущия диск. След края на първия диск,
се възпроизвежда следващият.
16
Натиснете бутон (1) по време на
възпроизвеждане.
На екрана се появява индикацията
“INTRO”.
Когато намерите желания запис, натиснете
отново бутона. Уредът се връща в
нормален режим за възпроизвеждане на
CD/MD.
Page 63

Последователно
възпроизвеждане на
записи
За възпроизвеждане на запис
Натискайте последователно бутона
(2) по време на възпроизвеждане на
CD/MD, докато се появи индикация
“REP 1”.
За повтаряне на диск
Натискайте последователно бутон
(2) по време на възпроизвеждане на
CD/MD, докато се появи индикация
“REP 2”.
За повторно възпроизвеждане на
всички дискове в текущото
устройство за смяна на дискове
Натискайте последователно бутон
(2) по време на възпроизвеждане на
CD/MD, докато се появи индикация
“REP 3”.
Всеки път когато натискате бутон (2),
информацията на екрана се променя, както
следва:
REP 1
(Повтаря записи)
Cancel (Режим
на нормално
възпроизвеждане
от диск)
— Функция Repeat play
REP 2
(Повтаря дискове)
REP 3
(Повтаря
устройство)
За възпроизвеждане на всички
дискове в устройството в
произволен ред
Натискайте бутона (3)
последователно по време на
възпроизвеждане от CD/MD, докато
на екрана се появи индикацията
“SHUF 2”.
За възпроизвеждане в произволен
ред на всички дискове от всички
свързани в момента устройства за
смяна на дискове.
Натискайте бутона (3)
последователно по време на
възпроизвеждане от CD/MD, докато
на екрана се появи индикацията
“SHUF 3”.
Всеки път когато натиснете бутона (3),
показваната на екрана информация се
променя както следва:
SHUF 1
(Произволно диск)
Cancel
(Нормален
режим на
възпроизвеждане)
В случай, че натиснете бутон (1) по време на
възпроизвеждане в произволен ред, първите
10 секунди от всички записи ще се
възпроизведат в произволен ред.
SHUF 2
(Произволно
устройство)
SHUF 3
(Произволно
всички)
BG
Устройство за смяна на CD/MD
Възпроизвеждане на
записи в произволен
— Функция Shuffle play
ред
За възпроизвеждане на записите от
текущия диск в произволен ред.
Натискайте бутона (3)
последователно по време на
възпроизвеждане от CD/MD, докато
на екрана се появи индикацията
“SHUF 1”.
17
Page 64

BG
Допълнителна
информация
Мерки за безопасност
• В случай,че Вашият автомобил е
паркиран под въздействието на директна
слънчева светлина и в резултат на това
температурата в купето се е повишила
значително, оставете апарата да се
охлади преди употреба.
• В случай, че към апарата не се подава
електрозахранване, първо проверете
свързванията. Ако всичко е наред,
проверете електрическия предпазител.
• В случай, че липсва звук от
високоговорителите, при система с два
високоговорителя, поставете лостчето за
баланс между предни и задни колони в
средно положение.
• В случай, че възпроизвеждате от касета
за продължително време, касетата може
да се загрее от вградения усилвател.
Това обаче не е признак за повреда.
В случай, че имате някакви въпроси или
проблеми относно Вашия апарат, които не
са включени в това ръководство, моля
консултирайте се с най-близкия до Вас
търговски посредник на Sony.
За да поддържате високо качество
на звука
В случай, че имате поставки за чаши в
близост до Вашето аудиооборудване,
внимавайте да не разлеете сок или друга
безалкохолна напитка върху
авторадиокасетофона. Остатъци от
засъхнала захар върху апарата или лентата
на касетата, могат да замърсят главите за
възпроизвеждане, да намалят качеството
на звука или да направят невъзможно
възпроизвеждането на звук въобще.
Комплектите за почистване с помощта на
касети не могат да отстраняват
засъхналата захар от главите.
Забележки относно касетите
Грижи за касетите
• Не докосвайте с пръсти повърхността на
лентата, тъй като всякакъв прах или
замърсяване ще зацапа главите.
• Съхранявайте касетите далеч от
оборудване с вградени магнити, като
например високоговорители или
усилватели, тъй като може да се получи
изтриване или увреждане на записите
върху лентата.
• Не излагайте касетите на въздействието
на директна слънчева светлина, на
изключително ниски температури или на
влага.
• Свободни провисвания на лентата могат
да предизвикат уплитането и в
механиката на апарата. Преди да
поставите касетата, опънете добре
лентата като използвате молив или друг
предмет за завъртане на макарата.
18
Paзвита
лента
Page 65

• Изкривени кутии на касети и отлепени
етикети могат да предизвикат проблеми
при поставяне или изваждане на
касетата. Отлепете или заменете такива
етикети.
Касети с продължителност поголяма от 90 минути
Касети с продължителност по-голяма от 90
минути не се препоръчват, освен за
продължително и непрекъснато
възпроизвеждане. Лентите използвани за
такива касети са много тънки и имат
склонност към по-лесно разтегляне.
Честото им пускане и спиране може да
доведе до уплитане в механиката на
авторадиокасетофона.
Внимание
Никога не използвайте ел. предпазител с
означена сила на тока, по-голяма от тази
на ел. прeдпазител, с който е доставен
апарата, тъй като това може да доведе до
повреда на апарата.
Почистване на свързващите клеми
Апаратът може да функционира както
трябва, ако свързващите клеми между
него и лицевия панел не са чисти. С цел да
се предотврати това, освободете лицевия
панел чрез натискане на бутона
(RELEASE), след това свалете лицевия
панел и почистете свързващите клеми с
помощта на напоен със спирт памук. Не
прилагайте излишна сила. В противен
случай, свързващите клеми могат да се
увредят.
Главен апарат
BG
Допълнителна информация
Поддържане
Подмяна на ел. предпазител
При смяна на бушона, уверете се, че
поставяте нов със същата сила на тока,
както означената на стария бушон. В
случай, че бушонът изгори, проверете
свързванията за електрозахранването и
подменете бушона. В случай, че
електропредпазителят изгори отново,
възможно е да има вътрешна повреда. В
такъв случай, консултирайте се при найблизкия до Вас търговски посредник на
Sony.
Ел. предпазител
(10 A)
Задна страна на лицевия панел
19
Page 66

BG
Сваляне на апарата
1
Ключ за освобождаване
(доставя се)
2
3
4
20
Page 67

Разположение на уредите за управление
SOURCE
SEEK
AMS
RELEASE
MODE
MUTE
SEL
OFF
DSPL
BTM
SENS
INTRO REPEAT SHUF
MTL
PTY
Направете справка на съответните страници за повече подробности.
1 Бутон SEEK/AMS 6, 8, 10, 15, 16, 20
2 Бутон SOURCE (TAPE/TUNER/CD/MD)
6, 7, 8, 16
3 Бутони (+)(–) (сила/ниски/високи/
баланс/баланс предни/задни) 14, 23
4 Бутон MODE (*)
При радиоприемане:
Избор BAND 6, 7
При възпроизвеждане от касета:
Промяна посоката на лентата 6, 13
При възпроизвеждане от CD/MD:
Избор на устройство за смяна на CD
13, 16
5 Превключвател POWER SELECT
(разположен на горната страна на
апарата) 4, 5
Вижте раздел “Превключвател
POWER/SELECT” в ръководството за
Инсталиране/Свързване.
6 Бутон OFF 5, 6
7 Бутон DSPL (смяна на режима на
екрана/сверяване на времето) 5, 6,
10, 16
8 Бутон SENS/BTM (sensitivity adjust/
функция Best tuning memory) 8, 12,
23
9 Бутон 6 (eject) 6
0 При радиоприемане:
Номерирани бутони за
предварителна настройка 8
(3) Бутон SHUF (Shuffle) 11, 17
(4) Бутон MTL 7
(5) Бутон ATA (Automatic Tuner
Activation) 7
(6) Бутон BL.SKIP (Blank Skip) 7,
15
!¡ Бутон RELEASE (освобождава
лицевия панел) 4
!™ Бутон Reset (разположен на
предната страна на апарата и скрит
под лицевия панел)
Натиснете този бутон при
първоначално пускане на апарата, при
смяна на акумулаторната батерия или
когато бутоните на апарата не
фунционират правилно.
!£ Бутон MUTE 15
!¢ Бутон SEL (избор на режим на
управление) 11, 13, 14, 15
!∞ Екран
!§ Бутон PTY (тип програма) 12, 13
!¶ Бутон PRESET/DISC
При радиоприемане:
Избор на предварително настроена
станция 8, 14
При възпроизвеждане на CD/MD:
Избор на диск 14, 16
!• Бутон AF/TA (alternative frequency/
traffic announcement) 10, 11, 12, 13, 24
!ª Регулатор D-BASS 15
При възпроизвеждане от CD/MD:
(1) Бутон INTRO 6, 15, 16
(2) Бутон REPEAT 7, 17
213
ATA BL.SKIP
546
D-BASS
AF/TA
1
OFF
PRESET
DISC
2
3
BG
Допълнителна информация
21
Page 68

Технически характеристики
BG
Раздел касетофон
Лентови писти 4-пистов, 2-канално
стерео
Трептене и изкривявания
0,08 % (WRMS)
Чеcтотна характеристика
30 – 18.000 Hz
Ниво сигнал/шум 61 dB (TYPE II, IV)
58 dB (TYPE I)
Раздел радиоапарат
FM
Приеман обхват FM1, FM2:
87,5-108,0 MHz
FM3: 65,0-76,0 MHz
Антенен куплунг Външен антенен куплунг
Междинна честота 10,7 MHz
Използваема чувствителност
8 dBf
Чувствителност 75 dB при 400 kHz
Ниво сигнал/шум 63 dB (стерео),
65 dB (моно)
Хармонични изкривявания при 1 kHz
0,5 % (стерео),
0,3 % (моно)
Разделяне 35 dB при 1 kHz
Честотна характеристика
30 – 15.000 Hz
Ниво на захват 2 dB
MW/LW
Oбхват за настройка MW: 531 – 1.602 kHz
LW: 153 – 281 kHz
Антенен куплунг Външен антенен куплунг
Междинна честота 10,71 MHz/450 kHz
Чувствителност MW: 30 µV
LW: 50 µV
Раздел усилвател
Изводи Изводи за
високоговорители
(клеми със сигурно
захващане)
Импеданс на високоговорителите
4 – 8 ohms
Максимална изходяща мощност
35 W × 4 (при 4 ohms)
Раздел общи
Изводи Проводник за
управление на
телефонното
заглушаване
Проводник за
управление на усилвател
Проводник за
управление на
автоматична антена
Изводи (1)
Регулатори на звука Нискочестотен ± 8 dB
при 100 Hz
Високочестотен ± 8 dB
при 10 kHz
Изисквания към електрозахранването
12 V постоянен ток от
автоакумулатор
(заземяване на
отрицателната клема)
Размери около 188 × 58 × 181 мм (ш/в/д)
Монтажни размери 182 × 53 × 164 мм (ш/в/д)
Тегло около 1,2 кг.
Доставяни принадлежности
Детайли за инсталиране
и свързване (1 комплект)
Ротационно
дистанционно
управление RM-X2S (1)
Калъф за лицевия панел
(1)
Допълнителни принадлежности
Bus кабел (доставя се с
RCA пинов кабел)
RC-61 (1 м), RC-62 (2 м)
RCA пинов кабел
RC-63 (1 м),RC-64 (2 м),
RC-65 (5 м)
Допълнително оборудване
Устройство за смяна на
CD
CDX-705, CDX-605
(10 диска),
CDX-T65, CDX-T62
(6 диска)
Устройство за смяна на
MD
MDX-61
Избор на източник
XA-C30
22
Фирмата си запазва правото на промени в
конструкцията и техническите характеристики
без предизвестие.
Page 69

Ръководство за отстраняване на неизправности
Следният контролен лист ще Ви помогне да отстраните най-често срещаните проблеми при
работа с Вашия апарат.
Преди да започнете проверка по контролния лист, направете справка за работните
процедури.
Общи
Проблем
Липсва звук.
Индикациите не се появяват
на екрана.
Липсва звуков сигнал.
Възпроизвеждане от лента
Проблем
Звукът при възпроизвеждане
е изкривен.
Функцията AMS не работи
правилно
Причина/Решение
• Настройте силата на звука с бутона (+).
• Поставете регулатора на баланса между предни и задни
колони в средно положение при система с 2
високоговорителя.
Свалете лицевия панел и почистете свързващите клеми. За
подробности, вижте раздел “Почистване на свързващите
клеми” от “Поддържане”.
• Свързан е допълнителен усилвател и не използвате
вградения усилвател.
• Звуковият сигнал е заглушен. (страница 14)
Причина/Решение
Замърсена е главата
n Почистете главата.
• Има шум в паузите между записите.
• Паузата е твърде къса (по-малка от 4 секунди).
• Страната + на бутона (SEEK/AMS) е натисната точно
преди следващия запис.
• Страната = на бутона (SEEK/AMS) е натисната веднага
след началото на записа.
• Дълга пауза, нискочестотен участък или много слабо ниво
на звука се третират като пауза.
BG
Допълнителна информация
Радиоприемане
Проблем
Предварителна настройка не
е възможна.
Автоматична настройка не е
възможна.
Индикацията “ST” примигва.
Причина/Решение
• Запаметете правилната честота.
• Радиоизлъчването е твърде слабо.
Радиоизлъчването е твърде слабо.
n Използвайте ръчна настройка.
• Настройте прецизно.
• Радиоизлъчването е твърде слабо.
n Натиснете бутона (SENS/BTM) за да влезете режим
MONO.
23
Page 70

BG
Функци RDS
Проблем
Функцията RDS не работи
Функцията A SEEK се
активира след няколко
секунди прослушване.
Няма информация за пътната
обстановка
Функцията PTY връща
индикация “NONE”.
Причина/Решение
Функцията RDS може да се използва само в обхватите FM1
и FM2.
Станцията не носи TP-сигнал или сигналът е слаб.
n Натискайте бутона (AF/TA), докато “AF TA” изчезне.
• Активирайте функцията “TA”.
• Радиостанцията не излъчва други информации за пътната
обстановка, освен TP. n Настройте на друга станция.
Радиостанцията не дефинира типа на програмата.
Възпроизвеждане от диск
Проблем
Възпроизвежданият звук
прескача.
Причина/Решение
Прашен или дефектен диск.
Показване на грешки (при свързано допълнително устройство(а) за смяна на
CD/MD)
Следните индикации ще присветват за около пет секунди и ще прозвучи предупредителен
сигнал.
Екран Причина
Магазинната касета с дискове не е
NO MAG
поставена в устройството за смяна
на CD/MD.
Липсва диск в магазинната касета.
NO DISC
Устройството за CD/MD не може да
NG DISCS
ERROR
RESET
HI TEMP
В случай, че споменатите решения не доведат до подобрение, консултирайте се с найблизкия до Вас търговски посредник на Sony.
възпроизвежда поради някаква
причина.
Дискът е замърсен.
Дискът е поставен обратно.
Устройството за смяна на CD/MD не
може да бъде задействано поради
някаква причина.
Околната температура е по-висока
от 50°C.
Решение
Поставете магазинната касета с
дискове в устройството за смяна
на CD/MD.
Издърпайте магазинната касета и
поставете диск.
Поставете друг CD/MD.
Почистете диска.
Поставете диска правилно.
Натиснете бутона за пренастройка
на апарата.
Изчакайте докато температурата
се понижи под 50°C.
24
Page 71

Индекс
А
Автоматична настройка 8
Б
Баланс 14
Баланс предни/задни високоговорители 14
Бързо пренавиване назад 6
Бързо пренавиване напред 6
В, Г, Д
Високочестотни 15
Възпроизвеждане на CD 16
Възпроизвеждане на MD 16
Възпроизвеждане от лента 6
Възпроизвеждане в произволен ред 17
Е, Ж
Екран 6, 7, 9, 10, 24
Ел. предпазител 19
З, И, Й, К
Заглушаване 14
Звуков сигнал 15
Л
Лицев панел 4
П
Повтарящо се възпроизвеждане 7, 17
Пренастройка 4
Прескачане на паузи 7
Предупредителен звуков сигнал 4, 15
Р
Радиоприемане 7
Режим моно 8
Ротационно дистанционно управление 5,
13, 14
Ръчна настройка 16
Ръчно търсене 16
C, Т, У
Телефонно заглушаване 15
Търсене по предварителна настройка 6
Тип на програма (PTY) 12, 13
Ф, Х, Ц
Функция Alternative Frequencies (AF) 10
Функция Automatic Music Sensor (AMS) 6,
16
Функция Automatic Tuner Activation (ATA) 7
Функция Best Tuning Memory (BTM) 7
Функция DIGITAL D-BASS (D-BASS) 15
Функция Intro scan 6, 16
Функция Local seek mode (LCL) 9
Функция Traffic Announcement (TA) 11
Функция Traffic Programme (TP) 11
Функция Radio Data System (RDS) 9, 10, 11
BG
Допълнителна информация
М
METAL 7
Н, О
Нискочестотни 15
Ч, Ш, Щ, Ъ, Ю, Я
Часовник 5
25
Page 72

Isten hozta!
Köszönjük, hogy megvásárolta a Sony
Cassette Car Stereo-t. Ez a készülék egy
forgatható távirányító használatával a
szolgáltatások széles választékát nyújtja
Önnek.
A hangszalag lejátszáson és a rádió
üzemeltetésén kívül kiterjesztheti a rendszerét
egy megfelelő CD/MD váltó
csatlakoztatásával.
H
2
Page 73

Tartalomjegyzék
A készülék használata
Bevezetés
A készülék újraállítása..................................... 4
Az előlap levétele ............................................4
A forgatható távirányító előkészítése ..............4
Az óra beállítása ............................................. 5
Kazetta lejátszó
Kazetta lejátszása ...........................................5
Kazetta lejátszása többféleképpen................. 6
Rádió
Rádióállomások automatikus tárolása
— Legjobb Hangolás Tárolása
(BTM) .....................................................7
A kívánt csatornák tárolása ............................7
A tárolt adók vétele......................................... 7
RDS
Az RDS funkció áttekintése ............................ 8
Az állomás nevének kijelzése ......................... 8
Ugyanazon program automatikus
újrahangolása
— Alternatív frekvenciák (AF) ..................... 9
Közlekedési hírek hallgatása .......................... 9
RDS állomások előzetes beállítása AF és TA
adatokkal ................................................. 10
Egy állomás megkeresése a műsor típusa
alapján ......................................................11
Az óra automatikus beállítása ....................... 12
Más funkciók
A forgó távirányító használata ...................... 12
A hangjellemzők beállítása ...........................13
A hang elnémítása ........................................ 14
A hang és a csipogó jelzés
megváltoztatása .......................................14
Megfeleiö felszerelésekkel
CD/MD váltó
CD/MD lejátszása ......................................... 15
A zeneszámok áttekintése
— Számkezdetek végigpásztázása ......... 15
Zeneszámok ismételt lejátszása
— Ismételt lejátszás .................................15
Zeneszámok véletlenszerű sorrendben történő
lejátszása
— Véletlen sorrend .................................. 16
H
Egyéb információ
Óvintézkedések ............................................17
Karbantartás .................................................18
A készülék kiszerelése ..................................18
Szabályozó gombok elrendezése .................19
Részletes leírás .............................................20
Hibajavító útmutató ...................................... 21
Tárgymutató ..................................................23
3
Page 74

Bevezetés
A készülék újraállítása
A készülék legelső üzembe helyezése előtt,
illetve az autó akkumulátorának cseréje után,
újra be kell állítani a készüléket.
Nyomja meg az újraállító gombot egy hegyes
tárggyal, például egy golyóstoll hegyével.
Újraállító gomb
Megjegyzés
Az újraállító gomb megnyomása minden tárolt
programot és memóriafunkciót törölni fog.
Az előlap levétele
A készülék ellopásának megakadályozására az
H
előlapot le lehet venni.
1 Nyomja meg az (OFF) gombot.
2 Az előlap felnyitásához nyomja meg a
(RELEASE) gombot, a készüléket húzza
maga felé és emelje ki.
(RELEASE)
Az előlap visszahelyezése
Az előlap A részét az ábrán látható módon
tegye rá a B részre és nyomja fel addig, amíg
bekattan.
A
B
Megjegyzések
•
Ügyeljen arra, hogy a felhelyezésnél az előlap
megfelelő helyzetben legyen, mert fejjel lefelé nem
lehet felhelyezni.
•
A felhelyezésnél az előlapot nem szabad erővel
rányomni a készülékre. Az előlap enyhe nyomással,
könnyen felhelyezhető.
•
Amikor magával viszi az előlapot, tegye be a
készülékhez mellékelt előlaptokba.
•
Az előlap kijelző ablakait nem szabad erősen
megnyomni vagy túl nagy nyomásnak kitenni.
•
Az előlapot nem szabad kitenni a közvetlen
napfény vagy hő, például forró levegő hatásának és
nem szabad nedves helyen tárolni. Sohasem
szabad az előlapot a napon parkoló gépkocsi
műszerfalán hagyni, mert a gépkocsi belsejében a
hőmérséklet jelentősen megemelkedhet.
Figyelmeztető riasztás
Ha a gyújtáskapcsoló kulcsot kikapcsolt
állásba fordítja anélkül, hogy az előlapot
levették volna, néhány másodpercig szól a
figyelmeztető hangjelzés (csak akkor, ha a
POWER SELECT kapcsoló az A állásban
van).
A hangjelzés hatástalan, ha különálló
teljesítményerősítőt használn és nem használja
a beépített teljesítményerősítőt.
4
Megjegyzések
•
Ügyeljen arra, hogy a készülékről való levétel
közben ne ejtse le az előlapot.
•
Ha az előlap levételéhez a
nyomja meg, hogy a készülék még be van
kapcsolva, akkor a hangszórók károsodásának
megakadályozására a készülék automatikusan
lekapcsol.
(RELEASE)
gombot úgy
A forgatható távirányító
előkészítése
Amikor felhelyezi a távirányítót, tegye fel a
címkét az ábrán látható módon.
SEL
DSPL
MODE
MODE
DSPL
SEL
Page 75

Az óra beállítása
Az óra 24 órás digitális kijelzéssel működik.
Állítson be például 10 óra 8 percet:
Kazetta lejátszó
1 Működés közben nyomja meg az (OFF)
vagy (DSPL) gombot.
2 Két másodpercig nyomja meg a (DSPL)
gombot.
100
Az óra számjegyek villognak.
1 Állítsa be az óraérték számjegyeit.
Az előreléptetéshez
A visszaléptetéshez
1000
2 Egy pillanatra nyomja meg a (SEL)
gombot.
1000
A perc számjegy villog.
3 Állítsa be a percérték számjegyeit.
Az előreléptetéshez
A visszaléptetéshez
1008
3 Nyomja meg egy pillanatra a (DSPL)
gombot.
1008
Az óra aktív állapotra vált.
Megjegyzés
Ha a készülék tetején a POWER SELECT kapcsoló
B
állásban van, az óra mindaddig nem állítható be,
amíg be nem kapcsolja a tápfeszültséget. Az órát a
rádió bekapcsolása után állítsa be.
Kazetta lejátszása
Helyezzen be egy kazettát
A lejátszás automatikusan elindul.
Ha már van kazetta a készülékben, nyomja
meg ismételten a (SOURCE) gombot,
ameddig a “PLAY” kijelzés meg nem jelenik.
FWD
A felfelé irányuló oldalt játssza le
REV
A lefelé irányuló oldalt játssza le
Tipp
A szalag mozgatásának irányát lejátszás közben a
(MODE) (*
meg.
Művelet
Lejátszás megállítása
Kazetta kiadása
Szalag gyorstekercselése
Lejátszás közben legalább 2 mp
hosszan nyomja meg a (SEEK/AMS)
gomb bármelyik oldalát.
Gyors előretekerés és visszatekerés közbeni
lejátszás elindításához nyomja meg a (MODE)
(*) gombokat.
) gombok benyomásával változtathatja
Nyomja meg
(OFF)
6
Gyors előretekerés
SEEK
AMS
Visszatekerés
H
Bevezetés/Kazetta lejátszó
5
Page 76

Szám kezdetének meghatározása
—
Automatikus Zene Érzékelö (AMS)
Maximum kilenc zeneszámot ugorhat át
egyszerre ennek segítségével.
Lejátszás közben legalább 2 mp
hosszan nyomja meg a (SEEK/AMS)
gomb bármelyik oldalát.
A következő zeneszámok
SEEK
kijelöléséhez
AMS
Az előző zeneszámok kijelöléséhez
Megjegyzés
Az AMS funkció nem működik, amikor:
•
A zeneszámok közötti üres szalagrész rövidebb 4
másodpercnél
•
Ha zaj van a zeneszámok között
•
Ha hosszú időtartamú alacsony hangerejű illetve
csendes részek vannak a zeneszámban.
A kijelző feliratának megváltoztatása
Ha kazetta lejátszása közben megnyomja a
(DSPL) gombot, a kijelzés a következők
szerint változik meg:
z Kazetta lejátszás z Óra z Frekvencia*
*
Mikor az AF/TA funkció aktív állapotban van.
H
Kazetta lejátszása
többféleképpen
A kívánt zeneszám megkeresése
— Bevezetés végigpásztázása
Lejátszás közben nyomja meg az (1)-t.
Az “INTRO” felirat jelenik meg a kijelzőn.
Rádió üzemmódra való átváltás egy
kazetta gyorstekerése közben
— Automatikus Hangoló Aktiválás
(ATA)
Lejátszás közben nyomja meg az (5)-t.
Az “ATA” felirat jelenik meg a kijelzőn.
Ha a (SEEK/AMS) gombbal két másodpercig
gyorsan előre- vagy visszatekercsel, a rádió
automatikusan bekapcsol.
Ezt a funkciót az (5) gomb megnyomásával
lehet hatástalanítani.
Üres helyek átugrása kazetta lejátszás
közben — Üres átugrása
Lejátszás közben nyomja meg (6)-t .
A “BL.SKIP” felirat olvasható a kijelzőn.
A nyolc másodpercnél hosszabb
szalagrészeket lejátszás közben
automatikusan átugorja.
Ezt a funkciót a (6) gomb megnyomásával
lehet hatástalanítani.
CrO2 vagy Metál szalag lejátszása
Ha egy CrO2 (TYPE II) vagy metál (TYPE
IV) szalagot akar hallgatni, nyomja meg
a (4) gombot.
Az “MTL” felirat jelenik meg a kijelzőn.
E funkció megszüntetéséhez, nyomja meg a
(4)-t.
Minden zeneszám első 10 másodperce kerül
lejátszásra.
Ha megtalálta a kívánt számot, nyomja meg
újra. A készülék visszaáll normá lejátszási
üzemmódba.
Zeneszámok ismételt lejátszása
— Lejátszás megismétlése
Lejátszás közben nyomja meg a (2)-t.
A “REP” felirat jelenik meg a kijelzőn.
Ha az éppen lejátszott zeneszám a végéhez
érkezik, a készülék az elejétöl kezdve ismét
lejátssza azt.
Az ismétlés megszüntetésének érdekében
nyomja meg még egyszer a gombot.
6
Page 77

Rádió
Ez a készülék a 87,5 – 108,0MHz (FM1, FM2)
és 65,0 – 74,0MHz (FM3) közötti
frekvenciasávokat tudja venni és tárolni.
RRádióállomások
automatikus tárolása
— Legjobb Hangolás Tárolása (BTM)
A pillanatnyilag befogott hullámsávról választja
ki a legerősebb jelű állomásokat és a
frekvenciájuk szerinti rendben tárolja azokat.
BALESETEK ELKERÜLÉSÉÉRT !!!
Ha vezetés közben hangolja a készüléket,
használja az automata hangolást, vagy a
manuális hangolás helyett az előre beállított
memóriakeresést.
1 A hangolóegység kiválasztásához
ismételten nyomja meg a (SOURCE)
gombot.
Minden esetben, ha megnyomja a
(SOURCE) gombot, a hangforrás a
következőképpen fog változni:
z TAPE z TUNER z CD/MD
A kívánt csatornák
tárolása
Mindegyik hullámsávon (FM1, FM2, FM3, KH,
HH) legfeljebb 6 adó tárolható, így összesen
18 URH adót lehet tárolni.
Ha másik adó eltárolását akarja elvégezni egy
adott programhelyre, a már ottlévő adó
törlődik a készülék memóriájából.
1 A hangolóegység kiválasztásához
ismételten nyomja meg a (SOURCE)
gombot.
2 A megfelelő hullámsáv kijelöléséhez
ismételten nyomja meg a (MODE)
gombot.
3 Nyomja meg a (SEEK/AMS) gombot, és a
készülék megkeresi azt az adót,
amelyiket az adott programhelyre kíván
tárolni.
4 2 másodpercre nyomja meg a kívánt
programhely gombot ((1)-től (6)-ig).
A kiválasztott beállított számgomb megjelenik
a kijelzőn.
H
Kazetta lejátszó/Rádió
2 A megfelelő hullámsáv kijelöléséhez
ismételten nyomja meg a (MODE)
gombot.
Minden esetben ha megnyomja a (MODE)
gombot, a hullámsáv a következőképpen
fog változni:
z FM1 z FM2 z FM3
LW Z MW Z
3 2 másodpercig nyomja meg a
(SENS/BTM) gombot.
Megjegyzések
•
Az FM1 és FM2 sáv vételénél a BTM funkció csak a
87,5 – 108,0 MHz frekvenciasávot keresi, az FM3
sáv vételénél pedig csak a 65,0 – 74,0 MHz
frekvenciasávot keresi.
•
A készülék nem tárol gyenge jelű állomásokat a
programhely gombokon. Ha csak kevés állomás
fogható, néhány programhely gombnál üres marad
a kijelző.
•
Ha van egy kijelölt programhely gomb a kijelzőn, a
készülék ezen a gombon kívül mindegyik
programhely gombhoz rendel egy rádióadót.
A tárolt adók vétele
1 A hangolóegység kiválasztásához
ismételten nyomja meg a (SOURCE)
gombot.
2 A megfelelő hullámsáv kijelöléséhez
ismételten nyomja meg a (MODE)
gombot.
3 Nyomja le a kívánt programhely gombok
((1)-től (6)-ig) közül azt, amelyiken a
hallgatni kívánt adó el van tárolva.
Tipp
Nyomja meg a
oldalát, hogy sorrendben foghassa a memóriában
tárolt rádióadókat. (Előre beállított keresési funkció).
Az FM1 vagy FM2 sáv vétele közben az FM3 sáv
közvetlenül nem vehető a
segítségével, mert a frekvenciasávok eltérőek. A
vételi sávot a
kiválasztani.
(PRESET/DISC)
(PRESET/DISC)
(MODE)
gomb segítségével kell
gomb bármelyik
gomb
7
Page 78

Ha az URH sztereó vétel nem kielégítő
BBC 1 FM
FM1
— Mono vételi mód
Nyomja meg a (SENS/BTM) gombot
addig, amíg a “MONO” felirat ki nem
gyullad a kijelzőn.
A hangminőség javulni fog, de
egycsatornássá válik. (Az “ST” kijelzés
eltűnik.)
A kijelzés megváltoztatása
A (DSPL) gomb minden egyes megnyomására
a kijelző átvált a frekvencia- és órakijelzés
között.
Ha nem tud behangolni egy tárolt adót
Nyomja meg a (SEEK/AMS) gomb
bármelyik oldalát, hogy keresni tudja az
adót (automata hangolás).
A pásztázás akkor áll meg, ha egy adót
talál. Nyomja meg ismételten a gomb
bármelyik oldalát addig, amíg a kívánt adót
meg nem találja.
Megjegyzés
Ha az automatikus hangolás túl gyakran megáll,
nyomja meg egy pillanatra a
mindaddig, amíg a kijelzőn feltűnik a “LCL” (helyi adó
keresési üzemmód) felirat. Ebben az üzemmódban
csak a viszonylag erős jeleket adó állomásokat lehet
behangolni.
H
Tipp
Ha ismeri a frekvenciát, nyomja meg és tartsa
benyomva a
addig, amíg a kívánt adót venni nem tudja (manuális
hangolás).
(SEEK/AMS)
(SENS/BTM)
gomb bármelyik oldalát
gombot
RDS
Az RDS funkció
áttekintése
A rádiós adatrendszer (RDS, Radio Data
System) olyan műsorszóró szolgáltatás, amely
lehetővé teszi az URH sávban működő FM
adók részére a rendes rádióműsor-jelek
mellett kiegészítő digitális információ
továbbítását is. Az Ön sztereó autórádiója
sokféle szolgáltatást nyújt. Ízelítőként íme
néhány szolgáltatás: ugyanazon állomás
automatikus újrahangolása, közlekedési hírek
vétele és állomások keresése a műsor típusa
szerint.
Az RDS funkció csak az FM1 és FM2
sávokban érhető el.
Megjegyzések
•
Az országtól vagy körzettől függően nem áll
rendelkezésre az összes RDS funkció.
•
Előfordulhat, hogy gyenge térerősség vagy RDS
adatokat nem sugárzó rádióállomásra hangolás
esetén az RDS funkció nem működik megfelelően.
Az állomás nevének
kijelzése
A kijelzőn az éppen vett állomás neve világít.
Válasszon ki egy URH sávban működő
FM adóállomást.
Ha olyan URH állomásra hangolnak, amely
sugároz RDS adatokat, a kijelzőn
megjelenik az adóállomás neve.
Megjegyzés
*
” jel azt jelenti, hogy RDS állomást vesz a
A “
készülék.
A kijelzett adatok megváltoztatása
A (DSPL) gomb minden egyes megnyomására
a kijelző a következők szerint változik:
z Frekvencia z Idő z Az adóállomás neve
Megjegyzés
Ha az adóállomás nem sugároz RDS adatokat, a
8
kijelzőn a “NO NAME” (“nincs név”) felirat világít.
Page 79

Ugyanazon program
automatikus
újrahangolása
— Alternatív frekvenciák (AF)
Az alternatív frekvencia (AF) funkció
automatikusan kiválasztja és újrahangolja a
hálózat legerősebb jelű állomását. Ezzel a
funkcióval hosszú távú vezetés közben is
folyamatosan hallgathatjuk ugyanazt a műsort
az állomás kézi utánhangolása nélkül.
A frekvenciák automatikusan megváltoznak.
98.5 MHz
Állomás
102,5 MHz
1 Válasszon ki egy URH adóállomást.
2 Az (AF/TA) gombot nyomja meg addig,
hogy a kijelzőn az “AF” felirat világítson.
A készülék elkezd keresni egy azonos
műsort sugárzó, de erősebb jelet adó
állomást.
Megjegyzések
•
Ha az
(AF/TA)
nyomja meg, a készülék automatikusan az FM1
sávra vált.
•
Ha az adott körzetben nincs azonos műsort
sugárzó alternatív állomás, kapcsolja ki az AF
funkciót úgy, hogy az
megnyomásával a kijelzőről eltünteti az “AF”
feliratot.
A kijelzés megváltoztatása
Az (AF/TA) gomb minden egyes
megnyomására a kijelzőn megjelenő
információ az alábbiak szerint változik:
*
Ezzel a választással mind az AF, mind a TA funkciót
bekapcsolja.
gombot az FM3 sáv vétele közben
(AF/TA)
z AF z TA z AF TA*
Üres Z
96,0 MHz
gomb
Megjegyzések
•
Ha a készülék nem talál azonos műsort sugárzó
alternatív adóállomást, a “NO AF” felirat és az
állomás neve felváltva villog.
•
Ha egy bekapcsolt AF funkciójú adóállomás
kiválasztása után az állomás neve villogni kezd, ez
azt jelzi, hogy nincs alternatív frekvencia. Az
állomás nevének villogása közben (nyolc
másodpercen belül) nyomja meg a
gombot. A készülék elkezd keresni egy másik
frekvenciát, amelynek ugyanaz a PI (műsor
azonosító) adata (a kijelzőn megjelenik a “PI seek”
felirat és közben nincs hang). Ha a készülék nem
talál másik frekvenciát, a “NO PI” (nincs
műsorazonosító) üzenet jelenik meg és a készülék
visszatér az eredetileg kiválasztott frekvenciára.
(SEEK/AMS)
Helyi adó hallgatása
A készülék “REG” (helyi adó bekapcsolva)
funkciója segítségével a helyi adóra hangolva
maradunk anélkül, hogy a készülék
átkapcsolna egy másik helyi adóra
(megjegyezzük, hogy az AF funkció
bekapcsolt állapotban van). Gyárilag a
készüléket “REG” funkcióra kapcsolja, de ha
ezt ki akarja kapcsolni, a következőket kell
tennie:
Két másodpercnél hosszabb ideig tartsa
lenyomva az (AF/TA) gombot, amíg el
nem tűnik a “REG” felirat.
Megjegyezzük, hogy a “REG” funkció
kikapcsolásának hatására a készülék
átkapcsolhat egy másik, ugyanahhoz a
hálózathoz tartozó helyi adó műsorára.
Megjegyzés
Ez a funkció Angliában és néhány más területen nem
működik.
Közlekedési hírek
hallgatása
A közlekedési hírek (TA) és a közlekedési
műsorok (TP) adatai segítségével
automatikusan akkor is rá lehet hangolni egy
olyan URH adóállomásra, amely közlekedési
híreket sugároz, ha közben egy másik műsort
hallgatunk.
Folytatás a követkeyő n oldalon n
H
Rádió/RDS
9
Page 80

Az (AF/TA) gombot nyomja meg addig,
hogy a kijelzőn a “TA” vagy “AF TA”
felirat világítson.
A készülék elkezdi keresni a közlekedési
információt sugárzó adóállomást. Ha a
készülék közlekedési információt sugárzó
adóállomást talál, a kijelzőn megjelenik a
“TP” felirat.
Amikor az adón elkezdődik egy
közlekedéssel kapcsolatos bejelentés, a
“TA” felirat villogni kezd, és a villogás
megszűnik, ha a bejelentésnek vége.
Javaslat
Ha a közlekedési híradás akkor kezdődik el, amikor
Ön egy másik műsort hallgat, a készülék
automatikusan a közlekedéssel kapcsolatos
bejelentésre kapcsol, majd a bejelentés elhangzása
után visszakapcsol az eredeti műsorra.
Megjegyzések
•
Ha a vett állomás nem közvetít közlekedési híreket,
öt másodpercig villog a “NO TP” felirat. Ezután a
készülék olyan állomást keres, amely közvetít
közlekedési információt.
•
Ha a kijelzőn az “EON” felirat a “TP” felirattal együtt
jelenik meg, az adott műsorszóró állomás az
ugyanahhoz a műsorhoz tartozó más adóállomások
közlekedési híreit használja fel.
A közlekedési hírek vételének
törléséhez:
H
Egy pillanatra nyomja meg az (AF/TA)
gombot.
A közlekedési hírek vételének törléséhez az
adott funkciót kapcsolja ki úgy, hogy az
(AF/TA) gomb megnyomásával a kijelzőről
eltüntetik az “AF” feliratot.
Vészhelyzettel kapcsolatos
bejelentések vétele
Ha a rádióműsor hallgatása közben egy
vészhelyzettel kapcsolatos bejelentés érkezik,
a műsor automatikusan átkapcsol a
bejelentésre. Ha nem rádióműsort, hanem más
jelforrást hallgat, a vészhelyzettel kapcsolatos
bejelentés csak akkor hallható, ha az AF vagy
TA be van kapcsolva. A készülék
automatikusan átkapcsol a bejelentésre
függetlenül attól, hogy az adott időpontban Ön
éppen mit hallgat.
RDS állomások előzetes
beállítása AF és TA
adatokkal
Az RDS állomások előzetes beállítása során a
készülék tárolja az egyes állomások adatait és
frekvenciáit, így nem kell minden egyes
alkalommal bekapcsolni az AF vagy TA
funkciót, ha az előre beállított állomásra
hangolnak. Az egyes előre beprogramozott
állomásokhoz választhat eltérő beállítást (AF,
TA, vagy mindkettőt), de választhat
valamennyi előre beprogramozott állomáshoz
azonos beállítást is.
Azonos beállítások valamennyi előre
beprogramozott állomáshoz
1 Válassza ki az URH sávot.
A közlekedési hírek hangerejének
előzetes beállítása
A közlekedési hírek hangerejét előre be lehet
állítani, így nem fogja elmulasztani a
bejelentést. A közlekedéssel kapcsolatos
bejelentés kezdetekor a hangerő
automatikusan az előzetesen beprogramozott
szintre áll be.
1 Válassza ki a kívánt hangerőt.
2 A (SEL) gomb nyomva tartása közben
nyomja le a (3) gombot.
A kijelzőn megjelenik a “TA VOL” felirat és
a beállítás a memóriában tárolódik.
10
2 Ismételten nyomja meg többször az
(AF/TA) gombot és válassza ki az “AF”,
“TA” vagy “AF TA” funkciót (utóbbit az
együttes AF és TA funkcióhoz).
Megjegyezzük, hogy az “AF TA” funkció
kikapcsolásával az RDS valamint nem-RDS
URH-adóállomások tárolódnak.
3 Legalább két másodpercre nyomja meg
a (SENS/BTM) gombot.
Eltérő beállítások az egyes előre
beprogramozott állomásokhoz
1 Válasszon ki egy URH-sávot és
hangoljon a kívánt adóállomásra.
2 Ismételten nyomja meg többször az
(AF/TA) gombot és válassza ki az “AF”,
“TA” vagy “AF TA” funkciót (utóbbit az
együttes AF és TA funkcióhoz).
Page 81

3 Legalább két másodpercig nyomja le a
kívánt előzetes beállításhoz tartozó
számgombot, hogy a kijelzőn jelenjen
meg a “MEM” felirat.
A többi állomás előzetes beállításához az 1.
lépéstől kezdődően ismételje meg a
műveleteket.
Tipp
Ha az előzetesen beprogramozott AF és/vagy TA
beállításokat egy előzetesen beprogramozott
állomásra hangolás után akarja megváltoztatni, ezt az
AF vagy TA funkciók ki/be kapcsolásával lehet
végrehajtani.
Egy állomás
megkeresése a műsor
típusa alapján
A kívánt állomást az alábbiakban bemutatott
műsortípusok egyikének kiválasztásával is
meg lehet keresni.
Megjegyzés
Olyan országokban vagy tartományokban, ahol EON
adatokat nem továbbítanak, ezt a funkciót csak az
egyszer már behangolt állomásokra lehet használni.
Műsortípusok Kijelző
Hírek NEWS
Friss események AFFAIRS
Információ INFO
Sport SPORT
Oktatás EDUCATE
Színdarab DRAMA
Kultúra CULTURE
Tudomány SCIENCE
Változó VARIED
Popzene POP M
Rockzene ROCK M
Zene útközben M.O.R. M
Könnyű klasszikus zene LIGHT M
Klasszikus zene CLASSICS
Egyéb zene OTHER M
Időjárás WEATHER
Pénzügyek FINANCE
Gyermekműsorok CHILDREN
Társadalmi ügyek SOCIAL A
Vallás RELIGION
Bejövő telefonhívás PHONE IN
Utazás TRAVEL
Szórakozás LEISURE
Műsortípusok Kijelző
Jazz JAZZ
Countryzene COUNTRY
Nemzeti zene NATION M
Könnyűzenei klasszikusok OLDIES
Népzene FOLK M
Dokumentumműsorok DOCUMENT
Nem meghatározott NONE
Megjegyzés
Ez a funkció nem használható olyan országokban,
ahol a PTY (programtípus kiválasztás) nem áll
rendelkezésre.
1 URH vétel közben nyomja meg a (PTY)
gombot addig, hogy a kijelzőn a “PTY”
felirat világítson.
INFO
Ha az adóállomás PTY adatokat továbbít, a
kijelzőn megjelenik a programtípus neve. A
kijelzőn “--------” látható, ha a vett állomás
nem RDS állomás vagy a készülék nem
veszi az RDS adatokat.
Megjegyzés
A PTY funkció az FM3 sávban nem áll rendelkezésre.
2 A (PTY) gombot nyomja meg egymás
után többször addig, amíg a kijelzőn
megjelenik a kívánt programtípus neve.
A programtípusok neve a fenti táblázatnak
megfelelő sorrendben jelenik meg.
Megjegyezzük, hogy a kereséshez nem
választhatja a “NONE” (nem
meghatározott) programtípust.
3 Nyomja meg a (SEEK/AMS) gomb egyik
oldalát.
A készülék elkezd keresni egy olyan
adóállomást, amelyik a kiválasztott
programtípust sugározza. Amikor a
készülék megtalálta a műsort, a
programtípus neve öt másodpercre ismét
megjelenik a kijelzőn.
Ha a készülék nem tudja megtalálni a
programtípust, a kijelzőn öt másodpercre
megjelenik a “NO” üzenet és a
programtípus neve, majd a készülék
visszatér az előzőleg vett állomásra.
H
RDS
11
Page 82

Az óra automatikus
beállítása
A CT (órajel) adatok vételével a készülék órája
automatikusan beállítható.
URH vétel esetén a (SEL) lenyomása
alatt nyomja meg a (2) gombot.
A kijelzőn megjelenik a “CT” felirat és az
óra beáll a pontos időre.
FM1
A CT funkció blokkolásához:
Ismételje meg a fenti eljárást.
Megjegyzések
•
Előfordulhat, hogy a CT funkció nem működik
annak ellenére, hogy egy RDS állomást vesz a
készülék.
•
Ilyen esetekben előfordulhat, hogy a CT funkcióval
beállított idő nem lesz pontos.
CT
100
Más funkciók
A forgó távirányító
használata
A forgó távirányító gombok le nyomásával és/
vagy vezérlők forgatásával működik.
A távirányító segítségével a megfelelő CD
vagy MD váltó vezérelhető.
Ha lenyomja a gombokat (SOURCE és
MODE gombok)
(SOURCE)
(MODE)
H
12
Minden egyes alkalommal, ha a
(SOURCE) gombot benyomja, a
hangforrás a következőképpen változik:
TAPE n TUNER n CD/MD
A
(MODE)
következőképpen változnak:
•
•
•
Tipp
Ezt a készüléket a
történő benyomásával kapcsolhatja be.
megnyomásával a műveletek a
kazetta szalagjának haladási iránya
hullámsáv, FM1 n FM2 n FM3 n MW n LW.
CD/MD váltó
(SOURCE)
gomb távirányítón
Ha elforgatja a vezérlőt (SEEK/AMS
vezérlés)
Page 83

Egy pillanatra forgassa el a vezérlőt,
majd engedje el, és
•A kazettán lévő zeneszámok kezdetét
lokalizálni tudja. Forgassa el, tartsa meg,
majd engedje el a kazettán lévő
zeneszámok kezdetét lokalizálni tudja.
Forgassa el, tartsa meg, majd engedje el
a vezérlőt, és a szalag gyorsan előre
tekercsel. Lejátszáshoz forgassa és tartsa
meg újra, majd engedje el..
•Egy zeneszám Kijelölése a CD-n.
Forgassa el és tartsa meg a vezérlőt,
amíg a keresett pontot a számban meg
nem találja, majd engedje el, hogy
elkezdődjön a lejátszás.
•Automatikusan hangolja be az adókat.
Forgassa el és tartsa meg a vezérlőt,
hogy be tudja hangolni a kívánt adót.
Ha benyomja és közben elforgatja a
vezérlőt (PRESET/DISC vezérlés)
A keresőt nyomja be és forgassa el:
•Az előzetesen beállított és tárolt
állomások vételére.
•Lemez cseréjéhez.
Más műveletek
A műveletek irányának
megváltoztatása
A működési irány gyárilag beállított, amint az
alábbi illusztráción látható:
Növelés
Csökkentés
Ha a forgatható távirányítót a kormányoszlop
jobb oldalára kívánja szerelni, akkor ehhez
meg lehet változtatni a vezérlő műveletek
irányát.
Nyomja meg a (SEL) gombot két
másodpercig, miközben benyomva tartja
a VOL szabályozót.
H
RDS/Más funkciók
A hangjellemzők
beállítása
A hangerő beállításához
forgassa meg a VOL
szabályozót.
A kijelzőn megjelenő információ
megváltoztatására nyomja meg
a (DSPL) gombot.
A hang
elnémításához
nyomja meg a
(MUTE) gombot.
OFF
A készülék
kikapcsolásához nyomja
meg az (OFF) gombot.
Beállításhoz és
kiválasztáshoz
nyomja meg a
(SEL) gombot.
1 A (SEL) gomb ismételt benyomásával
válassza ki a azt a jellemzőt, amit be
akar állítani.
VOL (hangerő) n BAS (Basszus) n TRE
(Magas hang) n BAL (Balansz) n FAD
(előre/hátra balansz)
2 A (+) vagy a (–) gomb megnyomásával
állítsa be a kiválasztott jellemzőt.
A beállítást a kiválasztás után 3 másodpercen
belül kell elvégezni. (3 másodperc után a
gomb ismét csak a hangerö szabályozására
szolgál.)
13
Page 84

A hang elnémítása
Nyomja meg a (MUTE) gombot.
A “MUTE” kijelzés villog.
Az előző hangerő visszaállításához nyomja
meg még egyszer.
Tipp
A készülék automatikusan leveszi a hangerőt, mikor
egy telefonhívás érkezik be. (Telefon - némító
funkció).
A hang és a csipogó
jelzés megváltoztatása
Basszus hangzás felerősítése
— D-Bass
A készülék tiszta és erőteljes basszus hangzás
élvezetét teszi lehetővé. A D-Bass funkció a
hagyományos erősítőnél meredekebb
karakterisztika szerint erősíti fel az alacsony
frekvenciájú jelet.
A basszus sokkal tisztább lesz még akkor is,
ha a vokál hangzás azonos hangerejű.
Könnyen kiemelheti és beállíthatja a basszus
H
hangzást a D-Bass vezérlés segítségével. Ez
azonos hatást vált ki, mint egy megfelelő
mélynyomó rendszer használata.
Ezen túlmenően a Digitális D-Bass* funkció
jóval élesebb és erősebb basszus hangzást
hoz létra, mint az Analóg D-Bass.
Digitális D-Bass
D-BASS 3
Szint
D-BASS 2
D-BASS 1
Analóg D-Bass
Szint
D-BASS 3
D-BASS 2
D-BASS 1
Megjegyzés
Ha a CD-váltón nincs D-basszus funkció,
előfordulhat, hogy a hangerő növelésénél a mély
hang torz lesz.
Ebben az esetben kapcsolja be a D-BASS beállítást
és állítsa be a hangerőt.
A csipogó jelzés elnémítása
Nyomja meg a (6)-t, míg a (SEL)
gombot benyomva tartja.
A sípoló hangjelzés visszaállításához
nyomja meg ismét ezeket a gombokat.
Megjegyzés
Ha egy megfelelő erősítőt csatlakoztat és nem
használja a beépített erősítőt, a csipogó hangjelzés
nem fog működni.
Megvilágítás színének
megváltoztatása
Nyomja meg a (1) gombot, miközben
benyomva tartja a (SEL) gombot.
Borostyánsárga és zöld színek közül
választhat.
0dB
Frekvencia (Hz)
0dB
A basszus görbe beállítása
Forgassa el a D-Bass szabályozót, hogy
be tudja állítani a basszus szintjét (1, 2
vagy 3).
A “D-BASS”* felirat megjelenik a kijelzőn.
Megszüntetéséhez forgassa a szabályozót
OFF állásba.
*
Ha a CD-váltón van digitális D-basszus funkció, a
CD lejátszás közben a kijelzőn “DIGITAL D-BASS”
üzenet jelenik meg.
14
Frekvencia (Hz)
Page 85

Megfelelő felszerelésekkel
CD/MD váltó
Maximum öt CD/MD váltót vezérelhet ezzel a
készülékkel.
CD/MD lejátszása
Meghatározott pont keresése egy
számban — Kézi keresés
Lejátszás alatt nyomja meg, és tartsa
lenyomva a (SEEK/AMS) gomb
valamelyik oldalát. Engedje el a gombot,
amikor a keresett részt megtalálta.
Előre keresés
SEEK
AMS
Hátra keresés
Nyomja meg a (SOURCE) gombot addig,
amíg a kívánt váltó kijelzése olvasható a
kijelzőn.
A CD/MD lejátszása elkezdődik.
Ha egy CD/MD váltó van csatlakoztatva,
minden zeneszám lejátszása az elejéről indul.
Megjegyzés
Abban az esetben is, ha MD váltót használ, a kijelzőn
a “CD” felirat lesz olvasható.
CD/MD váltók kiválasztása (ha több
CD/MD váltó van csatlakoztatva)
Nyomja meg ismételten a (MODE) gombot,
hogy a kívánt CD/MD váltót ki tudja választani.
A kijelző feliratának megváltoztatása
CD/MD lejátszása közben a (DSPL) gomb
minden egyes benyomásakor, a kijelző felirata
a következők szerint változik:
Eltelt lejátszási idő ˜ Óra
Bizonyos zeneszám kiválasztása
— Automatikus Zene érzékelő (AMS)
Ha lejátszás közben át akar ugrani egy
sávot, minden ilyen sávnál egyszer
nyomja meg a (SEEK/AMS) gomb
valamelyik oldalát.
A következő zeneszámok kiválasztása
SEEK
AMS
Az előző zeneszámok kiválasztása
Másik lemezre váltás
Lejátszás alatt nyomja meg a
(PRESET/DISC) gomb valamelyik oldalát.
PRESET
DISC
Vissza az előző
lemezhez
Előre a következő
lemezhez
A zeneszámok
áttekintése
— Számkezdetek végigpásztázása
Az adott lemezen sorrendben minden
számból az első 10 másodpercet lejátssza. Ha
az első lemez végére ért, akkor a következő
lemezzel folytatja.
Nyomja meg az (1)-et lejátszás közben.
Az “INTRO” felirat jelenik meg a kijelzőn.
Ha megtalálta a kívánt zeneszámot, akkor
nyomja meg még egyszer. A lejátszó visszatér
a normális CD/MD lejátszó üzemmódba.
Zeneszámok ismételt
lejátszása
Műsorszám ismétlése
Egy zeneszám ismételt lejátszásához
CD/MD lejátszás alatt nyomja meg a
(2)-es gombot többször, egészen addig,
amíg a “REP 1” megjelenik a kijelzőn.
— Ismételt lejátszás
H
Más funkciók/CD/MD váltó
Lemez ismétlése
Egy lemez ismételt lejátszásához CD/
MD lejátszás alatt nyomja meg a (2)-es
gombot többször, egészen addig, amíg a
“REP 2” megjelenik a kijelzőn.
15
Page 86

A jelenlegi váltóban levő összes lemez
ismétlése
Lejátszás alatt többször nyomja meg a
(2)-es gombot CD/MD, egészen addig,
amíg a “REP 3” megjelenik a kijelzőn.
Valahányszor megnyomja a
kijelző a következőképpen változik:
REP 1
(Zeneszám ismétlése)
Törlés (Normál
lemez lejátszó
mód)
(2)
Zeneszámok véletlenszerű
sorrendben történő
lejátszása
Az aktuális lemez műsorszámainak
lejátszása véletlenszerű sorrendben
Az aktuális lemezen levő zeneszámok
véletlen sorrend szerinti lejátszásához
H
CD/MD lejátszás alatt többször nyomja
meg a (3)-as gombot, amíg a
“SHUF 1” felirat megjelenik meg a
kijelzőn.
— Véletlen sorrend
-es gombot, a
REP 2
(Lemez ismétlés)
REP 3
(Teljes váltó
ismétlése)
A csatlakoztatott váltóban lévő összes
lemez véletlenszerű sorrendben való
lejátszásához:
CD/MD lejátszás alatt többször nyomja
meg a (3)-as gombot egészen addig,
amíg a “SHUF 3” megjelenik a kijelzőn.
Valahányszor megnyomja a
kijelző felirata a következőképpen fog változni:
SHUF 1
(Lemez véletlen
lejátszása)
Törlés (Normál
lemez lejátszás
mód)
Véletlen lejátszás közben ha megnyomja az
es gombot, akkor véletlen sorrendben minden
zeneszámból az első 10 másodpercet játssza le.
(3)
-as gombot, a
SHUF 2
(Váltóban levő
lemezek véletlen
lejátszása)
SHUF 3
(Mindent
véletlenszerűen
játszik le)
(1)
-
Az aktuális CD-váltó műsorszámainak
lejátszása véletlenszerű sorrendben
A váltóban levő összes lemez véletlen
sorrendben történő lejátszásához CD/
MD lejátszás alatt többször nyomja meg
a (3)-as gombot, amíg a “SHUF 2”
felirat megjelenik a kijelzőn.
16
Page 87

Egyéb információ
Óvintézkedések
•Ha olyan helyen parkolt az autójával, ahol
közvetlen napsugárzásnak volt kitéve, és az
autó belseje nagyon felmelegedett, akkor
Használatba vétel előtt hagyjon időt a
készülék lehűlésére.
•Ha az egység nem kap áramot, akkor először
az érintkezéseket ellenőrizze. Ha mindent
rendben talál, ellenőrizze a biztosítékot!
•Ha egy kéthangszórós rendszerben a
hangszórók nem szólnak, akkor állítsa a
hangerőszabályozót középső állásba.
•Ha hosszú időn keresztül kazettát hallgat,
akkor a kazetta a beépített erősítő miatt
átmelegedhet. Ez azonban nem jelez hibás
működést.
Ha A készülékkel kapcsolatban bármilyen
olyan kérdése vagy problémája van, amire
ebben a kézikönyvben nem találja meg a
választ, akkor forduljon a legközelebbi Sony
márkakereskedőhöz.
A magas minőségű hangzás
fenntartása
Ha pohártartó van az autórádió közelében,
akkor vigyázzon, nehogy bármit is ráöntsön az
eszközre. Az eszközre, vagy a kazettára kerülő
cukros lerakódás szennyezi a lejátszófejet,
csökkenti a hang minőségét, vagy akár
teljesen meggátolja a lejátszást.
A kazettatisztító eszközök nem képesek
eltávolítani a rárakódott cukrot a szalag
olvasófejéről.
Megjegyzések a kazettákról
Kazettaápolás
•Ne érintse meg a kazettában a szalag
felületét, mivel minden piszok vagy por
szennyezi a fejeket.
•A kazettákat tartsa távol olyan eszköztől,
amelyben beépített mágnes van, például
hangszóró és erősítő, mert a szalagon levő
felvétel torzulhat vagy kitörlődhet.
•Ne tegye ki a kazettákat erős napsütés,
különlegesen alacsony hőmérséklet, vagy
pár.
•Laza, lötyögő szalag esetén a készülék
begyűrheti a szalagot. Mielőtt beteszi a
szalagot, egy ceruzával, vagy valami hasonló
tárggyal tekerje meg a tengelyeket, és
feszítse meg a laza részt.
Laza rész
•A megvetemedett kazetta, gyűrődött címke
problémákat okozhat a kazetta
behelyezésénél, illetve kivételénél. Vegye le,
vagy cserélje ki ezeket a címkéket.
A 90 percnél hosszabb kazetták
90 percnél hosszabb kazetták lejátszása nem
javasolt, kivéve a hosszú, folyamatos
lejátszást. Ezekben a kazettákban ugyanis
nagyon vékony szalagokat használnak, és
ezek könnyen megnyúlnak. Gyakori
megállítás-elindítás esetén előfordulhat, hogy
a szalag beszorul a lejátszó mechanizmusba.
H
CD/MD váltó/Egyéb információ
17
Page 88

Karbantartás
Biztosítékcsere
A biztosíték cseréjénél ügyeljen arra, hogy a
biztosítékon szereplő jelzésnek megfelelő
amper-értékű új biztosítékot használjon. Ha
kiégett a biztosíték, ellenőrizze a tápfeszültség
csatlakozásait és cserélje ki a biztosítékot. Ha
a csere után a biztosíték ismét kiég, a
készülékben valamilyen belső hiba lehet.
Ebben az esetben forduljon a legközelebbi
Sony-kereskedőhöz.
A készülék kiszerelése
1
Kioldó kulcs (a készülékhez
mellékelve)
2
Figyelmeztetés
Ne használjon olyan biztosítékot, mely az
eredeti biztosítéknál magasabb áramerősségértékre van beállítva, mert ellenkező esetben a
készüléke károsodhat.
A csatlakozók megtisztítása
A készülék nem működik megfelelően, ha a
H
készülék és az előlap közötti csatlakozók nem
tiszták. Ennek megszüntetésére a (RELEASE)
gomb megnyomásával nyissa le az előlapot és
alkoholba mártott vattacsomóval tisztítsa meg
az érintkezőket. Eközben ne alkalmazzon túl
nagy erőt, mert ellenkező esetben az
érintkezők megsérülhetnek.
Fő egység
Használjon
10 amperes
biztosítékot
3
4
18
Az előlap hátoldala
Page 89

Szabályozó gombok elrendezése
SEEK
AMS
RELEASE
MODE
MUTE
SEL
OFF
DSPL
SOURCE
Részletes leírást lásd a megfelelő oldalon!
1 SEEK/AMS gomb 5, 6, 7, 8, 9, 11, 15
2 SOURCE gomb (TAPE/TUNER/CD/MD)
5, 7, 15
3 (+)(–) (hang / basszus / szoprán /
egyensúly (balance) / hangerő) gomb 13
4 MODE (*) gomb
Rádió hallgatás alatt:
BAND kiválasztó 7
Kazetta hallgatás alatt:
Lejátszási irány váltó 5
CD/MD lejátszás alatt:
Váltó kiválasztás 15
5 POWER SELECT (tápfeszültség
választó) kapcsoló (a készülék felső
részén található)
Lásd a “POWER SELECT” kapcsolóról
szóló részt az üzembehelyezési/bekötési
kézikönyvben.
6 OFF gomb 4, 5
7 DSPL (a kijelzési üzemmód váltása/
időbeállítás) gomb 5, 6, 8, 15
8 SENS/BTM (érzékenység beállítás/
legjobb beállítás memória funkció)
gomb 7, 8, 10
9 6 (kazetta kidobó) gomb 5
!º Rádió hallgatás alatt
Előre beállított állomások 7
CD/MD lejátszás esetén
(1) INTRO (bemutató) gomb 6, 15
(2) REPEAT (ismétlés) gomb 6, 15,
16
INTRO REPEAT SHUF
213
ATA BL.SKIP
MTL
BTM
SENS
546
PRESET
DISC
AF/TA
D-BASS
OFF
PTY
1
2
3
(3) SHUF (véletlen lejátszás) gomb
16
(4) MTL gomb 6
(5) ATA (Automatikus
Állomáskereső Aktiváló) gomb 6
(6) BL.SKIP (üres helyek átugrása)
gomb 6
!¡ RELEASE (előlap kioldás) gomb 4, 18
!™ Törlés gomb (a készülék első oldalán,
az előlap alatt rejtve található). Ezt a
gombot kell megnyomni:
- a készülék első használatbavételekor,
- az autó-akkumulátor cseréje után,
- ha a készülék gombjai nem működnek
megfelelően.
!£ MUTE (csönd) gomb 14
!¢ SEL (Szabályozási mód kiválasztó)
gomb 5, 10, 12, 13, 14
!∞ Kijelző
!§ PTY (programtípus) gomb 11
!¶ PRESET/DISK gomb 7, 15
Rádió hallgatása közben:
Előre beállított állomás kiválasztása 7
CD/MD lejátszásnál
Lemez kiválasztó 15
!• AF/TA (alternatív frekvencia/
közlekedési hírek) gomb 9, 10
!ª D-BASS szabályozó 14
H
Egyéb információ
19
Page 90

Részletes leírás
Kazetta lejátszó egység
Szalag sávok : 4 sávos, 2 csatornás sztereo
Frekvenciaingadozás: 0,08 % (WRMS)
Átviteli frekvencia : 30 – 18.000 Hz
Jel-zaj viszony 61 dB (II, IV típus)
58 dB (I típus)
Rádió egység
FM
Keresési tartomány: FM1, FM2:
Antenna terminál külső antenna csatlakozó
Középfrekvencia 10,7 MHz
Felhasználható
érzékenység 8 dBf
Szelektivitás 75 dB 400 kHz-en
Jel-zaj arány 63 dB (sztereo)
Harmonikus torzítás 1 kHz-en
Elválasztás 35 dB 1 kHz-en
Átviteli frekvencia 30 – 15.000 Hz
Befogási arány 2 dB
87,5 - 108,0 MHz
FM3:65,0 - 74,0 MHz
65 dB (mono)
0,5 % (stereo)
0,3 % (mono)
MW/LW
Keresési tartomány MW: 531 – 1.602 kHz
Antenna terminál: Külső antenna csatlakozó
H
Közbülső frekvencia 10,71 MHz/450 kHz
Érzékenység MW: 30 µV
LW: 153 – 281 kHz
LW: 50 µV
Erősítő egység
Kimenetek Hangszóró kimenet
Hangszóró impedancia 4 – 8 Ohm
Maximális teljesítmény
kimenet 35 W × 4 (4 Ohmon)
(biztonságos szigetelt
csatlakozók)
Általános adatok
Kimenetek Elnémítás szabályozó
vezeték telefonhoz
Erősítő szabályozó vezeték
Motoros antenna
szabályozó vezeték
Kimenet (1)
Tónus szabályozás Basszus ±8 dB 100 Hz-en
Szoprán ±8 dB 10 kHz-en
Feszültség igény 12 V DC (egyenáram) autó
akkumulátor (negatív föld)
Méretek kb. 188 × 58 × 181 mm
(szélesség/magasság/
mélység)
Foglalat méretek kb. 182 × 53 × 164 mm
(szélesség/magasság/
mélység)
Tömeg kb. 1,2 kg
Leszállított kiegészítők Felszerelési és
csatlakoztatási készlet
(1 csomag)
RM-X2S forgó vezérlő (1)
Előlap doboz (1)
Választható kiegészítők Busz csatlakozó (RCA pin
kábellel együtt szállítva)
RC-61 (1 m), RC 62 (2 m)
RCA pin kábel
RC-63 (1 m) RC-64 (2 m),
RC-65 (5 m)
Választható felszerelés CD váltó
CDX-705, CDX-605
(10 lemezes)
CDX-T65, CDX-T62
(6 lemezes)
MD váltó
MDX-61
Forrás kiválasztó XA-C30
A kivitel és a specifikációk külön értesítés nélkül
változhatnak.
20
Page 91

Hibajavító útmutató
A következő lista segít az eszközzel előforduló leggyakoribb hibák megoldásában.
Mielőtt a listát nézné, olvassa el az üzemeltetési útmutatót!
Általános
Probléma
Nincs hang.
A kijelzőn nem jelennek meg
üzenetek.
Nincs csipogó hang.
Kazetta lejátszás
Probléma
A lejátszott felvétel torz.
Az AMS nem megfelelően
működik.
Ok/Megoldás
•Állítson a hangerőn a (+) gombbal.
•Kéthangszórós rendszer esetén állítsa a hangerőszabályozót
középső állásba.
Vegye le az előlapot és tisztítsák meg az érintkezőket. A
részleteket illetően lásd a “Karbantartás” fejezetben az
“Érintkezők megtisztítása” című részt.
•Egy külső, kiegészítő erősítőt csatlakozatott, és nem a
beépített erősítőt használja.
•A csipogó hang ki van kapcsolva (14. oldal).
Ok/Megoldás
Az olvasófej szennyezett. n Tisztítsa meg az olvasófejet.
•A zeneszámok közötti szünetben zaj van.
•Az üres hely túl rövid (kevesebb, mint 4 másodperc).
•A (SEEK/AMS) gombon +-t nyomott, közvetlenül a
következő zeneszám előtt.
•A (SEEK/AMS) gombon =-t nyomott, közvetlenül a
zeneszám elkezdése után.
•Hosszú szünet, alacsony frekvenciás átvezetés, vagy nagyon
alacsony hang üres helyként történő kezelése.
H
Egyéb információ
Rádió hallgatás
Probléma
Előre beállított állomások nem
elérhetők.
Nem működik az automatikus
hangolás.
Az “ST” jelzés villog.
Ok/Megoldás
•Tárolja el a helyes frekvenciát.
•A rádióadás túl gyenge.
A rádióadás túl gyenge.
n Állítsa be kézzel a kívánt értéket.
•Hangoljon be pontosan.
•TA rádióadás túl gyenge. n Nyomja meg a (SENS/BTM)
gombot a MONO mód beállításához.
21
Page 92

RDS
Probléma
Az RDS funkció nem működik.
Néhány másodperces hallgatás
után megindul a SEEK
(keresés) funkció.
Nincsenek közlekedési hírek.
A PTY kijelzés “NONE”.
Ok/Megoldás
Az RDS funkció csak az FM1 és FM2 sávokban áll
rendelkezésre.
Az adóállomás nem-TP adó vagy a jel gyenge.
n Nyomja meg az (AF/TA) gombot addig, hogy eltűnjön az “AF
TA” felirat.
•Aktiválja a “TA” funkciót.
•Az adóállomás nem sugároz közlekedési híreket annak
ellenére, hogy TP adóról van szó. n Hangoljon egy másik
adóra.
Az adóállomás nem határozza meg a program típusát.
CD lemez lejátszás
Probléma
A lejátszott hang kihagy.
Ok/Megoldás
Poros vagy sérült lemez.
Hibaüzenetek (amikor az opcionális váltó(k) csatlakoztatva van(nak))
A következő jelzések kb. 5 másodpercig villognak, és közben hangjelzés hallatszik.
Kijelző Ok
H
NO MAG
NO DISC
NG DISCS
ERROR
RESET
HI TEMP
Ha a fent említett megoldások nem oldották meg a problémáját, kérjük, forduljon a legközelebbi
Sony márkakereskedőhöz.
A lemeztartó nincs bent a CD/MD
váltóban.
Nincs lemez a lemeztartóban.
A CD/MD valamilyen probléma miatt
nem képes lejátszani.
A lemez piszkos.
A lemez fordítva került be.
A CD/MD valamilyen probléma miatt
nem működik.
A környezet hőmérséklete magasabb
50°C-nál.
Megoldás
Helyezze be a lemeztartót a
lemezekkel a váltóba.
Vegye ki a tartót, és tegyen bele
lemezeket.
Tegyen be egy másik CD/MD-t.
Tisztítsa meg a lemezt.
Megfelelően helyezze be a lemezt.
Megfelelően helyezze be a lemezt.
Várjon, amíg a hőmérséklet 50°C alá
megy.
22
Page 93

Tárgymutató
A
Alternatív frekvenciák (AF) 9
Automatikus adó-hangolás 7
Automatikus keresés aktiválás (ATA) 6
Automatikus Zene Érzékelés (AMS) 6
B
Basszus 14
Balansz 13
Bevezetők lejátszása 6, 15
Biztosíték 18
C
CD lejátszás 15
D
DIGITÁLIS D-BASSZUS (D-Bass) 14
E
Egyensúly 13
Elnémítás 8
Első/hátsó egyensúly hangerőszabályozó 13
Előlap 4
Előre beállított állomások keresése 7
F
Figyelmeztető hangjelzés 4
Forgó távirányító 12, 13
L
Legerősebben fogható állomások beállítása
(BTM) 7
M, N, O
MD lejátszás 15
Metál 6
Mute 14
Óra 5
P, Q
Programtípus (PTY) 11
R
Rádió 7
Rádiós adatrendszer (RDS) 8, 9, 10, 11
S
Sípoló hangjelzés 14
Szoprán 13
T
Telefon csönd 14
U
Üres helyek kihagyása 6
H
Egyéb információ
G
Gyors előretekerés 5
H
Helyi keresési mód (LCL) 8
I, J
Ismételt lejátszás 6, 15, 16
K
Kazetta lejátszás 5
Kézi beállítás 7
Kézi keresés 7, 11
Kijelző 6, 8, 9, 15
Közlekedési hírek (TA) 9, 10
Közlekedési műsor (TP) 9
V, W, X, Y, Z
Véletlen sorrendű lejátszás 16
Visszaállítás 4
Visszatekerés 5
23
Page 94

RF
Поздравляем с
покупкой!
Благодарим Вас за то, что Вы выбрали
кассетную стереомагнитолу фирмы Sony.
Ваша магнитола оборудована
вращающимся дистанционным
переключателем, с помощью которого
можно управлять многими из ее функций.
Помимо воспроизведения магнитных
записей и приема радиопередач Вы
можете расширить возможности Вашей
стереосистемы, подключив к ней
приобретенный дополнительно
многозарядный проигрыватель компактдисков/MD-проигрыватель.
2
Page 95

Содержание
Магнитолa без дополнительного
oборудования
Перед началом пользования
Перенастройка аппарата .............................4
Снятие передней панели ............................. 4
Подготовка к пользованию вращающимся
дистанционным переключателем .......... 5
Установка часов ........................................... 5
Магнитофон
Прослушивание магнитных записей ........... 6
Различные режимы воспроизведения
магнитной записи ..................................... 6
Радиоприемник
Автоматический ввод радиостанций в
память
— Запоминание оптимальной настройки
(BTM). ........................................................ 7
Ввод в память только тех станций, которые
Вас интересуют ........................................ 8
Включение хранящихся в памяти
радиостанций ........................................... 8
RDS
Обзор функции RDS ..................................... 9
Индикация названия станции ......................9
Автоматическая перенастройка той же
программы
— Альтернативные частоты (AF) .........10
Прослушивание дорожных сообщений .....10
Предустановка станций RDS с данными AF
и TA .......................................................... 11
Обнаружение станции по типу
программы ..............................................12
Автоматическая установка часов .............13
Дополнительная аппаратура
Многозарядный компакт/MDпроигрыватель
Воспроизведение компакт/МD-диска .......16
Сканирование дорожек
— Сканирвание по вступительным
фрагментам ............................................ 17
Повторное воспроизведение дорожек
— Повтор воспроизведения .................17
Воспроизведение дорожек в случайной
последовательности
— Перетасованное воспроизведение ..18
RF
Прочие функции
Пользование вращающимся
переключателем дистанционного
управления ............................................. 13
Регулировка параметров звучания........... 15
Отключение звука ......................................15
Подстройка звучания магнитолы и
тональности предупредительного
сигнала ....................................................15
Дополнительная информация
Меры предосторожности ........................... 18
Уход за аппаратом ......................................19
Демонтаж прибора ..................................... 20
Расположение органов управления .......... 21
Технические данные ..................................22
Руководство по устранению неполадок .. 23
Алфавитный указатель ..............................25
3
Page 96

RF
Перед началом
пользования
Перенастройка
аппарата
Прежде, чем начать пользоваться
магнитолой, а также после замены
аккумулятора в автомобиле аппарат
необходимо заново настроить.
Для этого нажмите кнопку перенастройки
каким-либо заостренным предметом,
например шариковой ручкой.
Кнопка перенастройки
Примечание
При нажатии кнопки перенастройки все
хранящиеся в памяти программы и данные
стираются.
Снятие передней
панели
Для предохранения прибора от воровства
его передняя панель может быть снята.
Установка передней панели
Соедините часть A на передней панели с
частью B на приборе, как показано на
иллюстрации, и нажмите до щелчка.
A
B
Примечания
• Убедитесь, что передняя панель находится
правой стороной вверх при установке ее в
прибор, поскольку она не может быть
установлена наоборот.
• Не производите сильного нажатия на
переднюю панель в сторону прибора при
установке ее в прибор. Она может быть
установлена легким нажатием в сторону
прибора.
• Если Вы берете переднюю панель с собой,
помещайте ее во входящий в комплект футляр.
• Не оказывайте сильного давления на окошко
дисплея передней панели.
• Не подвергайте переднюю панель прямому
воздействию солнечных лучей, горячих
источников, таких как автомобильная печь и не
оставляйте ее во влажном месте. Никогда не
оставляйте ее на приборной доске и т.д.
автомобиля, запаркованного под прямым
солнечным светом, где возможно значительное
повышение температуры внутри салона
автомобиля.
1 Нажмите (OFF).
2 Нажмите (RELEASE), чтобы открыть
переднюю панель и снимите ее,
вытягивая на себя.
(RELEASE)
Примечания
• Не уроните панель при снятии ее с прибора.
• Если Вы нажмете (RELEASE) для снятия
панели, когда прибор еще включен, питание
автоматически отключится, чтобы защитить
громкоговорители от повреждения.
4
Предупредительный сигнал
Если Вы установили ключ зажигания в
позицию OFF, не отсоединив переднюю
панель, предупредительный сигнал будет
слышен несколько секунд (только если
переключатель POWER SELECT
установлен в позицию A).
Если Вы подключите дополнительный
усилитель мощности и не будете
использовать встроенный усилитель,
предупредительный сигнал будет
выключен.
Page 97

Подготовка к
пользованию
вращающимся
дистанционным
переключателем
При подключении вращающегося
дистанционного переключателя
прикрепите наклейку, как показано на
рисунке ниже.
SEL
DSPL
MODE
MODE
DSPL
SEL
Установка часов
Часы имеют 24-часовую цифровую
индикацию.
Например, установка их на 10:08
1 Нажмите (OFF) или (DSPL) во время
работы прибора.
2 Нажмите (DSPL) на две секунды.
100
Цифра часов мигает.
1 Установите цифры часов.
для перемещения вперед
для перемещения назад
1000
2 Нажмите и быстро отпустите (SEL).
1000
Цифра минут мигает.
3 Установите цифры минут.
для перемещения назад
для перемещения вперед
RF
Перед началом пользования
1008
3 Нажмите и быстро отпустите (DSPL).
1008
Часы активируются.
Примечание
Если переключатель POWER SELECT на верхней
панели прибора установлен в позицию B, часы
не смогут быть установлены до тех пор, пока
прибор не включен. Установите часы после
включения системы.
5
Page 98

Магнитофон
Поиск начала звуковой дорожки
— Автоматический музыкальный
сенсор (AMS)
При поиске можно за один раз пропустить
до девяти дорожек.
RF
Прослушивание
магнитных записей
Установите кассету.
Воспроизведение начинается
автоматически.
Если в магнитофоне уже есть кассета,
нажимайте кнопку (SOURCE) до тех пор,
пока на дисплее не появится слово “PLAY”.
FWD
Воспроизводится сторона, обращенная вверх.
REV
Воспроизводится сторона, обращенная вниз.
Совет
Чтобы изменить направление движения ленты во
время воспроизведения, нажмите кнопку (MODE)
(*).
Чтобы
Остановить
воспроизведение
Извлечь кассету
Перемотка ленты
Во время воспроизведения нажмите с
одной или другой стороны кнопку
(SEEK/AMS) и не отпускайте ее в
течение двух секунд.
Перемотка вперед
SEEK
AMS
Перемотка назад
Чтобы перейти от перемотки ленты к
воспроизведению, нажмите (MODE) (*).
Нажмите
(OFF)
6
Во время воспроизведения нажмите с
одной или другой стороны кнопку
(SEEK/AMS) и сразу же отпустите ее.
Для нахождения одной из
последующих дорожек
SEEK
AMS
Для нахождения одной из
предыдущих дорожек
Примечание
Функция AMS может не сработать, если:
• Паузы между дорожками продолжаются
меньше четырех секунд
• В паузах между дорожками присутствует шум
• В записи имеются длинные участки с
пониженной громкостью или без звука.
Смена параметров, выводимых на
дисплей
При каждом нажатии (DSPL) во время
воспроизведения показания дисплея
изменяются следующим образом:
z Индикатор движения ленты
Частота* Z Часы Z
* При включенной функции АF/ТА.
Различные режимы
воспроизведения
магнитной записи
Поиск нужной дорожки
— Сканирование вступительных
фрагментов
Во время воспроизведения нажмите
(1).
На дисплее появляется слово “INTRO”.
Магнитофон воспроизводит первые десять
секунд каждой дорожки, записанной на
ленте.
Найдя нужную дорожку, нажмите ту же
кнопку еще раз.
Магнитофон возвращается в обычный
режим воспроизведения.
6
Page 99

Повторное прослушивание дорожек
— Повтор воспроизведения
Во время воспроизведения нажмите
(2).
На дисплее появляется надпись“REP”.
По окончании воспроизведения текущей
дорожки она будет повторена от начала до
конца.
Чтобы отменить повторное
воспроизведение, снова нажмите ту же
кнопку.
Прослушивание радиопередач во
время перемотки ленты
— Автоматическое включение
радио (функция ATA)
Во время воспроизведения нажмите
(5).
На дисплее появляется надпись “ATA”.
При перемотке вперед или назад с
помощью (SEEK/AMS) в течение двух
секунд приемник автоматически
включается.
Для отмены этой функции нажмите (5).
Воспроизведение магнитной записи
без пауз
— Пропуск пауз
Во время воспроизведения нажмите
(6).
На дисплее появляется надпись
“BL.SKIP”.
Теперь при воспроизведении магнитофон
будет автоматически пропускать паузы
длиной более восьми секунд.
Для отмены этой функции нажмите (6).
Воспроизведение кассет с лентой
типа CrO
2 или металл
Для воспроизведения ленты CrO2
(TYPE II) или металл (TYPE IV)
нажмите (4).
На дисплее появляется надпись “MTL”.
Радиоприемник
Данный прибор может принимать и
заносить в память в следующих частотных
диапазонах: 87,5-108,0 МГц (FM1, FM2) и
65,0-74,0 МГц (FM3).
Автоматический ввод
радиостанций в память
— Запоминание оптимальной
настройки (BTM).
Эта функция позволяет выбирать в
принимаемом диапазоне радиостанции с
наиболее сильным сигналом и заносить их
в память по порядку частот.
ПОМНИТЕ О БЕЗОПАСНОСТИ
ДВИЖЕНИЯ!
Во время управления автомобилем следует
пользоваться функцией автоматической
настройки приемника или настройкой по
памяти, но не настройкой вручную.
1 Переключитесь на радиоприемник
последовательным нажатием кнопки
(SOURCE).
При каждом нажатии кнопки (SOURCE)
источник воспроизводимого сигнала
переключается в следующем порядке:
z TAPE z TUNER z CD/MD
2 Выберите диапазон
последовательным нажатием кнопки
(MODE).
При каждом нажатии кнопки (MODE)
диапазон переключается в следующем
порядке:
z FM1 z FM2 z FM3
LW Z MW Z
3 Нажмите кнопку (SENS/BTM) и не
отпускайте ее в течение двух секунд.
продолжение на следующей странице n
RF
Магнитофон/Радиоприемник
Чтобы отменить этот режим, нажмите (4).
7
Page 100

RF
Примечания
• Во время приема в диапазонах FM1 и FM2
функция BTM осуществляет поиск только в
частотном диапазоне 87,5-108,0 МГц , а во
время приема в диапазоне FM3 - только в
частотном диапазоне 65,0-74,0 МГц.
• Приемник не заносит в память радиостанции с
недостаточно сильным сигналом. Если хорошо
принимаются лишь немногие радиостанции, то
некоторые программные позиции могут
остаться незаполненными.
• Если на дисплее показан номер той или иной
программной позиции, радиоприемник будет
заносить новые станции в память под номерами
программных позиций, следующими после
указанного номера.
Ввод в память только
тех станций, которые
Вас интересуют
Под соответствующими номерами
программных позиций Вы можете в
произвольном порядке занести в память до
шести радиостанций в каждом из
диапазонов (FM1, FM2, FM3, MW и LW).
Таким образом, в памяти приемника может
храниться до восемнадцати станций
диапазона FM.
При вводе в память новой станции под уже
занятым номером программной позиции
хранившаяся под этим номером станция из
памяти стирается.
1 Переключитесь на радиоприемник
последовательным нажатием кнопки
(SOURCE).
Включение
хранящихся в памяти
радиостанций
1 Переключитесь на радиоприемник
последовательным нажатием кнопки
(SOURCE).
2 Выберите диапазон
последовательным нажатием кнопки
(MODE).
3 Нажмите и отпустите кнопку с
номером ((1) – (6)), под которым
занесена в память нужная станция.
Совет
Для последовательного переключения между
хранящимися в памяти радиостанциями
нажимайте с одной или другой стороны кнопку
(PRESET/DISC) (функция поиска по памяти).
Во время приема в диапазоне FM1 или FM2
диапазон FM3 не может быть принят напрямую с
использованием (PRESET/DISC), поскольку
частотные дипазоны различны. Выберите
диапазон с помощью кнопки (MODE).
Как улучшить качество приема
стереопрограмм в диапазоне FM
— Режим ручной подстройки
Нажмите и отпустите кнопку
(SENS/BTM), чтобы на дисплее
появилась надпись “MONO”.
Качество приема улучшится, но звук
будет монофоническим (при этом
индикатор “ST” исчезает с дисплея).
2 Выберите диапазон
последовательным нажатием кнопки
(MODE).
3 Нажатием кнопки (SEEK/AMS) начните
поиск станции, которую Вы хотите
занести в память под тем или иным
номером программной позиции.
4 Нажмите кнопку с соответствующим
номером ((1) – (6)) и удерживайте ее
в течение двух секунд.
Номер выбранной программной позиции
появляется на дисплее.
8
Изменение показаний дисплея
При каждом нажатии (DSPL) показания
дисплея изменяются между частотой и
часами.
Если обнаружить занесенную в
память станцию не удается
Нажмите и отпустите с любой
стороны кнопку (SEEK/AMS), чтобы
начать автоматический поиск нужной
станции (функция автоматической
настройки).
Поиск останавливается при
обнаружении той или иной станции.
Нажимайте соответствующую сторону
кнопки последовательно до тех пор,
пока не найдете нужную станцию.
 Loading...