


N
User Guide
Personal Computer
V G X - X L s e r i e s

n 2 N
Contents |
|
Before Use ......................................................................................................................................................................... |
5 |
Notice........................................................................................................................................................................... |
6 |
Documentation............................................................................................................................................................. |
7 |
Getting Started ................................................................................................................................................................. |
11 |
Locating Controls and Ports....................................................................................................................................... |
12 |
About the Indicator Lights .......................................................................................................................................... |
14 |
Connecting a Display (TV) ......................................................................................................................................... |
15 |
Connecting the Power Cord....................................................................................................................................... |
17 |
Shutting Down Your Computer Safely ....................................................................................................................... |
19 |
Using Your VAIO Computer ............................................................................................................................................. |
20 |
Using the Keyboard ................................................................................................................................................... |
21 |
Using the Touch Pad ................................................................................................................................................. |
27 |
Using the Optical Disc Drive ...................................................................................................................................... |
29 |
Using the TV Function ............................................................................................................................................... |
38 |
Using the Memory Stick Media .................................................................................................................................. |
46 |
Using Other Memory Cards ....................................................................................................................................... |
52 |
Using the Internet....................................................................................................................................................... |
56 |
Using Wireless LAN (WLAN) ..................................................................................................................................... |
57 |

n 3 N
Using Peripheral Devices................................................................................................................................................. |
66 |
Connecting a Universal Serial Bus (USB) Device...................................................................................................... |
67 |
Connecting a Printer .................................................................................................................................................. |
70 |
Connecting an i.LINK Device ..................................................................................................................................... |
71 |
Connecting to a Network (LAN) ................................................................................................................................. |
73 |
Customizing Your VAIO Computer .................................................................................................................................. |
75 |
Setting the Password ................................................................................................................................................. |
76 |
Setting Up Your Computer with VAIO Control Center................................................................................................ |
79 |
Using the Power Saving Modes ................................................................................................................................. |
80 |
Upgrading Your VAIO Computer...................................................................................................................................... |
82 |
Before Upgrading Your Computer ............................................................................................................................. |
83 |
Opening and Closing the Computer........................................................................................................................... |
84 |
Adding and Removing Memory.................................................................................................................................. |
87 |
Installing the Hard Disk Drive..................................................................................................................................... |
93 |
Precautions .................................................................................................................................................................... |
100 |
On Using the Power Source .................................................................................................................................... |
101 |
On Handling Your Computer.................................................................................................................................... |
102 |
On Handling Floppy Disks ....................................................................................................................................... |
104 |
On Handling Discs ................................................................................................................................................... |
105 |
On Using Headphones............................................................................................................................................. |
107 |
On Handling Memory Stick Media............................................................................................................................ |
107 |
On Handling the Hard Disk ...................................................................................................................................... |
108 |

n 4 N
Troubleshooting ............................................................................................................................................................. |
109 |
Computer ................................................................................................................................................................. |
110 |
System Security ....................................................................................................................................................... |
115 |
Networking ............................................................................................................................................................... |
116 |
Optical Discs ............................................................................................................................................................ |
119 |
Display ..................................................................................................................................................................... |
123 |
Printing..................................................................................................................................................................... |
127 |
Microphone .............................................................................................................................................................. |
128 |
Speakers.................................................................................................................................................................. |
129 |
Keyboard.................................................................................................................................................................. |
130 |
Touch Pad................................................................................................................................................................ |
131 |
Floppy Disks ............................................................................................................................................................ |
132 |
Audio/Video.............................................................................................................................................................. |
133 |
Memory Stick Media ................................................................................................................................................ |
134 |
Peripherals ............................................................................................................................................................... |
135 |
Support Options ............................................................................................................................................................. |
136 |
Sony Support Information ........................................................................................................................................ |
136 |
e-Support ................................................................................................................................................................. |
137 |
Trademarks .............................................................................................................................................................. |
139 |

n 5 N
Before Use
Before Use
Congratulations on your purchase of this Sony VAIO® computer, and welcome to the on-screen User Guide. Sony has combined leading-edge technology in audio, video, computing, and communications to provide state-of-the-art personal computing.
!
External views illustrated in this manual may look slightly different from those of your computer.

n 6 N
Before Use
Notice
© 2007 Sony Corporation. All rights reserved.
This manual and the software described herein, in whole or in part, may not be reproduced, translated, or reduced to any machine-readable form without prior written approval.
Sony Corporation provides no warranty with regard to this manual, the software, or other information contained herein and hereby expressly disclaims any implied warranties or merchantability or fitness for any particular purpose with regard to this manual, the software, or such other information. In no event shall Sony Corporation be liable for any incidental, consequential, or special damages, whether based on tort, contract, or otherwise, arising out of or in connection with this manual, the software, or other information contained herein or the use thereof.
Macrovision: This product incorporates copyright protection technology that is protected by U.S. patents and other intellectual property rights. Use of this copyright protection technology must be authorized by Macrovision, and is intended for home and other limited viewing uses only, unless otherwise authorized by Macrovision. Reverse engineering or disassembly is prohibited.
In the manual, the ™ or ® marks are not specified.
Sony Corporation reserves the right to make any modification to this manual or the information contained herein at any time without notice. The software described herein is governed by the terms of a separate user license agreement.

n 7 N
Before Use
Documentation
Your documentation includes printed information and user guides to read on your VAIO computer.
Guides are provided in PDF format, which you can easily browse through and print out.
The My Club VAIO portal is a perfect starting point to use your computer — a comprehensive collection of everything you need to get the most from your computer.
The user guides are collected under Documentation, which can be shown by clicking the VAIO Documentation icon on the desktop or following these steps:
1Click Start  , All Programs, and My Club VAIO.
2Click Documentation.
3Select the guide you want to read.
You can manually browse to the user guides by going to Computer > VAIO (C:) (your C drive) > Documentation > Documentation and opening the folder for your language.
You may have a separate disc for the documentation of bundled accessories.

n 8 N
Before Use
Printed Documentation
A Setting Up Poster — Describes the process from unpacking to starting up your VAIO.
Troubleshooting Guide — Contains solutions to common problems.
Recovery Guide — Contains an explanation of how to make a backup copy of your data and recover your computer system, and solutions to computer malfunctions.
Booklets containing the following information: Sony GUARANTEE conditions, Safety / Regulations, Modem Regulations, Wireless LAN Regulations, Bluetooth Regulations, End User Software License Agreement, and Sony Support services.
Non-printed Documentation
User Guide (this manual) — Contains features of your computer. It also includes information about the software programs included with your computer, as well as information on solving common problems.
Specifications — The online Specifications describe the hardware and software configuration of your VAIO computer. To view the online Specifications:
1 Connect to the Internet.
2 Go to the Sony online support Web site at http://www.vaio-link.com/.

n 9 N
Before Use
My Club VAIO
In My Club VAIO you can find:
Documentation, which gives you:
Access to the User Guide. This manual explains the features of your computer in detail, how to use these features confidently and safely, connect peripheral devices and more.
Access to Help & Training. This is the portal of VAIO Help and Support Center.
Important information about your computer, in the form of notices and announcements.
In My Club VAIO you can also find:
Accessories
Want to expand the capabilities of your computer? Click this icon and have a look at your compatible accessories.
Software
Feeling creative? Click this icon for an overview of your software and check out our upgrade options.
Wallpapers
Click this icon and check out our most popular Sony and Club VAIO wallpapers.
Links
Click this icon and check out our most popular Sony and Club VAIO Web sites.

n 10 N
Before Use
Windows Help and Support
Windows Help and Support is a comprehensive resource for practical advice, tutorials, and demonstrations to help you learn to use your computer.
Use the Search feature, Index, or table of contents to view all Windows Help resources, including those that are on the Internet.
To access Windows Help and Support, click Start and Help and Support. Or go to Windows Help and Support by pressing and holding the Microsoft Windows key and pressing the F1 key.
Further Sources
Consult the help files on the software you are using for detailed information on features and troubleshooting.
Go to http://www.club-vaio.com to find online tutorials about your favorite VAIO software.
n 11 N
Getting Started
Getting Started
This section describes how to get started with using your VAIO computer.
Locating Controls and Ports (page 12)
About the Indicator Lights (page 14)
Connecting a Display (TV) (page 15)
Connecting the Power Cord (page 17)
Shutting Down Your Computer Safely (page 19)

n 12 N
Getting Started
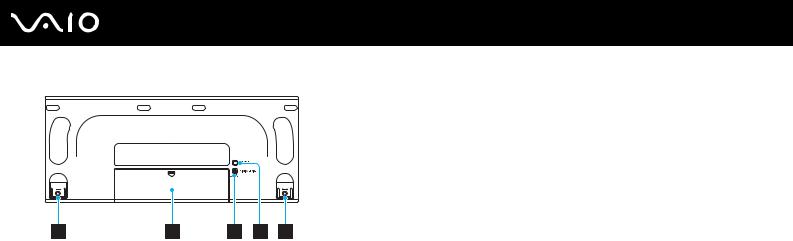
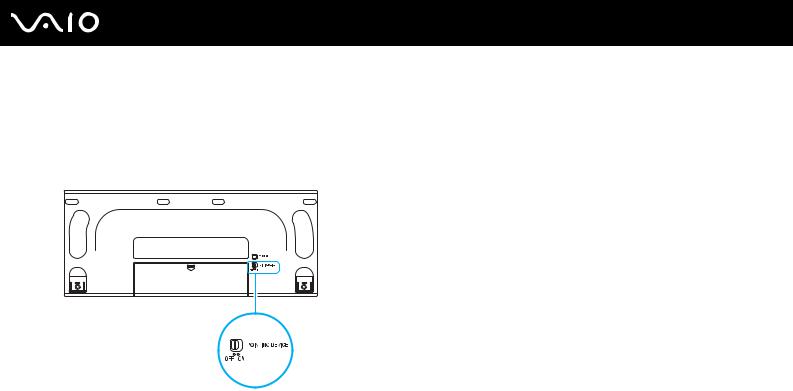
Locating Controls and Ports
Take a moment to identify the controls and ports shown on the following pages.
Front
A Power button
B Power indicator (page 14)
C Hard disk drive/Optical disc drive indicator (page 14)
D WLAN (Wireless LAN) indicator (page 14)
E Optical disc drive (page 29)
F Drive eject button (page 30)
GInfrared receiver
Point the supplied remote commander to this sensor for operations.
H SM/xD-Picture Card slot (page 52)
I CF (CompactFlash®) memory card slot (page 52)
J Media Access indicator (page 14)
K Memory Stick PRO/Duo media slot*1 (page 47)
L SD memory card slot (page 52)
M Hi-Speed USB (USB 2.0) ports*2 (page 67)
N i.LINK (IEEE 1394) S400 port (page 71)
OMIC (microphone) jack
Connect an external microphone.
PPHONES (headphones) jack
Connect external headphones or speakers.
QS VIDEO In port
Connect an AV device, such as a VCR.
RComposite VIDEO In jack
Connect an AV device, such as a VCR.
SComposite Audio In (L / R) jacks Connect an AV device, such as a VCR.
T CONNECT button (page 24)
*1 Your computer supports Memory Stick Duo media and Memory Stick PRO media with high speed and high capacity capabilities.
*2 Supports high-/full-/low- speeds.

n 13 N
Getting Started
Back
A HDMI OUT port (page 15)
BComposite Audio In (L / R) jacks Connect an AV device, such as a VCR.
CComposite Video In jacks
Connect an AV device, such as a VCR.
DS Video In ports
Connect an AV device, such as a VCR.
E VHF/UHF ports (page 38)
FFM antenna ports Connect an FM radio.
G Network (Ethernet) port (page 73)
H Hi-Speed USB (USB 2.0) ports* (page 67)
I AC In port (page 17)
JLINE OUT (R / L) jacks Connect an audio device.
KLINE IN (R / L) jacks Connect an audio device.
LOPTICAL OUT port
Connect a digital device, such as an AV amplifier.
MOPTICAL IN port
Connect a digital device, such as a CD player.
N i.LINK (IEEE 1394) S400 ports (page 71)
O COMPONENT (Y / Pb / Pr) jacks (page 15)
PCOAXIAL OUT port
Connect a digital device, such as an AV amplifier.
QINFRARED TRANSMITTER OUT ports
Connect the supplied infrared blaster cable to either port.
R WIRELESS LAN ANTENNA port (page 59)
*Supports high-/full-/low- speeds.

n 14 N
Getting Started
About the Indicator Lights
Your computer is equipped with the following indicator lights.
Indicator |
Functions |
|
|
|
|
Power 1 |
The indication behavior varies depending on the state of your computer: |
|
|
Green lit: the computer is on. |
|
|
Orange lit: the computer is in Sleep mode. |
|
|
Off: the computer is off. |
|
|
|
|
Media Access |
Illuminates when data is read from or written to a memory card. (Do not enter Sleep mode or turn off the |
|
|
computer when this indicator is on.) When the indicator is off, the memory card is not being used. |
|
|
|
|
Hard disk drive/Optical disc drive |
Illuminates when data is read from or written to the hard disk or the optical disc. Do not enter Sleep mode or |
|
turn off the computer when this indicator is on. |
||
|
||
|
|
|
Wireless LAN |
Illuminates when the wireless LAN function is running. |
|
|
|
n 15 N
Getting Started
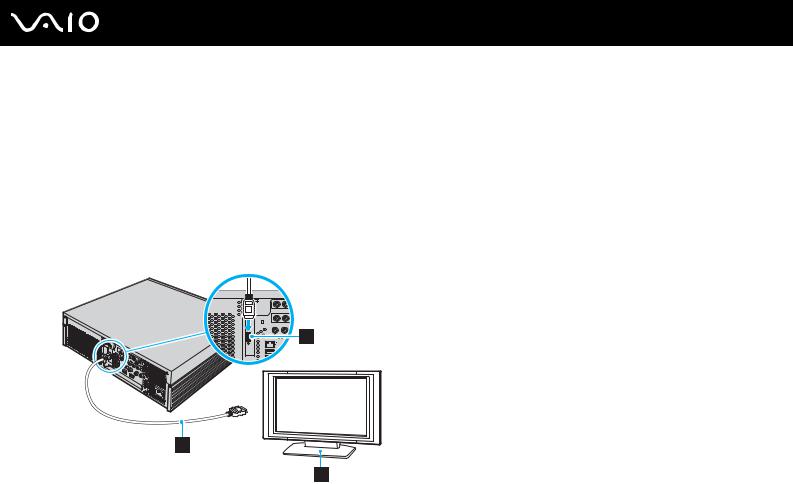
Connecting a Display (TV)
You can connect an HDMI-compatible TV directly to your computer.
If your TV is equipped with a DVI-D port, you can use the HDMI cable and the HDMI to DVI-D adapter (both supplied) for connection. If your TV is equipped with component jacks, you can use an RCA cable (not supplied) for connection.
To connect an HDMI-compatible TV
1Plug one end of the HDMI cable (supplied) (1) to the HDMI OUT port (2) on the computer
2Plug the other end to the TV (3).

n 16 N
Getting Started
!
If your TV is equipped with an HDMI port and a DVI-D port, we recommend that you use the HDMI port.
The HDMI cable carries both video and audio signals.
You cannot use HDMI and Component connections at the same time.
If a device driver other than the ones provided by Sony is used, the image will not be displayed and the audio will not be heard. Always use the device driver provided by Sony for updates.
Your computer is compliant with the HDCP standard and capable of encrypting the transmission channel of digital video signals for the purpose of copyright protection, which enables you to play and view a wide variety of copyright protected, high-quality contents. Note that you need to connect an HDCP-compliant external display to your computer to view the copyright protected contents. If your computer has a non-compliant display connected, you will not be able to play or view any copyright protected contents, including Blu-ray movie contents.
To change the sound output device
Once you have connected a device to the HDMI port or the S/PDIF port, you need to change the device for sound output if you want to hear sound from the device.
1Close all open programs.
2Click Start and Control Panel.
3Click Hardware and Sound.
4Click Manage audio devices under Sound.
5On the Playback tab, select the desired device for sound output and click Set Default.

n 17 N
Getting Started
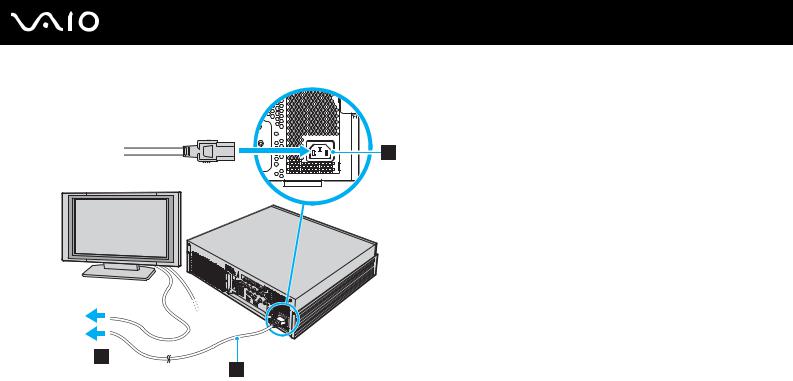
Connecting the Power Cord
Your computer's power cord must be plugged into an AC power source, such as an AC wall outlet, surge protector, or Uninterruptible Power Supply (UPS), before you can establish communication with your wireless keyboard.
!
Use your computer only with the supplied power cord.
To connect the power cord
1Insert the power cord (1) into the AC In port (2) on the back of the computer.
2Insert the power cord plugs from the display and computer into a grounded AC wall outlet, surge protector, or Universal Power Supply (UPS) (3).
n 18 N
Getting Started
To disconnect your computer completely from AC power, unplug the power cord.
Make sure that the AC outlet is easily accessible.

n 19 N
Getting Started
Shutting Down Your Computer Safely
To avoid losing unsaved data, be sure to shut down your computer properly, as described below.
To shut down your computer
1Turn off any peripherals connected to the computer.
2Click Start, the arrow  next to the Lock button, and Shut Down.
3Respond to any prompts warning you to save documents or to consider other users and wait for the computer to turn off automatically.
The power indicator light turns off.

n 20 N
Using Your VAIO Computer
Using Your VAIO Computer
This section describes how to get the most out of using your VAIO computer.
Using the Keyboard (page 21)
Using the Touch Pad (page 27)
Using the Optical Disc Drive (page 29)
Using the TV Function (page 38)
Using the Memory Stick Media (page 46)
Using Other Memory Cards (page 52)
Using the Internet (page 56)
Using Wireless LAN (WLAN) (page 57)
n 21 N
Using Your VAIO Computer
Using the Keyboard
A wireless keyboard is supplied with your computer.
The wireless keyboard uses a standard key arrangement with additional keys that perform specific functions.
The VAIO-Link Web site (http://www.vaio-link.com) also contains glossary information to help you use the keyboard.
Using the Wireless Keyboard
Illustrated above is the English keyboard as an example.
AFunction keys
Perform certain tasks. The task associated with each function key varies among software applications.
BMuting button
Turns the volume on and off.
CVolume control buttons
Increase (+) or decrease (-) the volume.
DShortcut buttons
Perform the pre-assigned tasks. The default tasks are as follows:
 : Launches Windows Mail.
 : Launches VAIO Living Browser.
S1: Launches Resolution Setting Utility.
EStandby button
Provides for the lower level of power consumption.
For details on power management, see Using the Power Saving Modes (page 80).
FPOWER switch
Slide the POWER switch to turn on and off the wireless keyboard.

n 22 N
Using Your VAIO Computer
G Indicators

 (Battery):
 turns on while the AA batteries for the wireless keyboard are sufficient and switches to
 when the batteries wear out.
 (Num lock): Turns on while in the Num Lock state.
 (Caps lock): Turns on while in the Caps Lock state.
 (Scroll lock): Turns on while in the Scroll Lock state.
 (Connect): Turns on while connection between the computer and the wireless keyboard is in place to indicate that the keyboard is ready for use (page 25).
HWindows key
Displays the Start menu.
IApplications key
Displays a shortcut menu in certain software applications.
JDirectional arrow keys
Move the pointer on the screen.
KTouch pad
See Using the Touch Pad (page 27) for more information.
n 23 N
Using Your VAIO Computer
AKeyboard feet
Flip open to adjust the keyboard angle.
BBattery compartment
Storage compartment for the AA batteries.
CPOINTING DEVICE switch
See To disable/enable the touch pad (page 28) for more information.
DCONNECT button
Press to enable the wireless keyboard to communicate with the main unit.

n 24 N
Using Your VAIO Computer
Before you use the keyboard
Four AA alkaline batteries are supplied with your computer for use in the wireless keyboard. Before attempting to use the wireless keyboard, you must install the batteries and establish communication between the computer and the keyboard.
!
To maintain good communication, operate the wireless keyboard within the distance limitations of keyboard: 10 m from your computer. Confirm that the supplied AA batteries are properly installed.
Press the CONNECT button located on the front of your computer first, and then press the CONNECT button on the bottom of the wireless keyboard.
Avoid using any wireless devices that exchange radio signals on the 2.4 GHz frequency band near the wireless keyboard. These devices may cause interference, causing the keyboard to stop working properly.
Do not place metal furniture near your computer or wireless keyboard, as this may create interference, causing the keyboard to stop working properly. Do not mix old (used) and new batteries when replacing batteries in the wireless keyboard. Always use the same type and manufacture of battery.
Do not mix alkaline with manganese batteries. Using incompatible batteries or mixing used, new or different types of batteries can damage the wireless keyboard.

n 25 N
Using Your VAIO Computer
To connect the wireless keyboard
!
To connect your wireless keyboard, it must be located within a range of 30 cm to 1 m from the computer.
1Insert the supplied four AA batteries (1) into the battery compartment (2) on the bottom of the wireless keyboard.
2Turn on the computer.
3Slide the POWER switch (3) at the top of the keyboard to the ON position.
4Press the CONNECT button (4) on the front of the computer.
5Press the CONNECT button (5) on the bottom of the keyboard.
The connect indicator  turns on in the indicator window on the keyboard when connection is established between the computer and the keyboard. If not, repeat the procedure.
!
Steps 4 and 5 must be completed within 10 seconds of each other.
If the wireless keyboard is left unused for 20 minutes or longer, the connect indicator  will turn off. This could indicate that the connection between your computer and the keyboard is lost. Press the Fn key to check that the connect indicator turns on before using the keyboard.

n 26 N
Using Your VAIO Computer
You can check the battery indicator (
 or
or 
 ) in the indicator window on the wireless keyboard for its battery power level.
If the wireless keyboard does not operate properly, the batteries may need to be replaced. If the wireless keyboard is not being used for an extended period of time, remove the batteries to avoid possible damage from battery leakage.
If you want to put the wireless keyboard in a more 'ergonomic' position, flip open the keyboard feet.
n 27 N
Using Your VAIO Computer
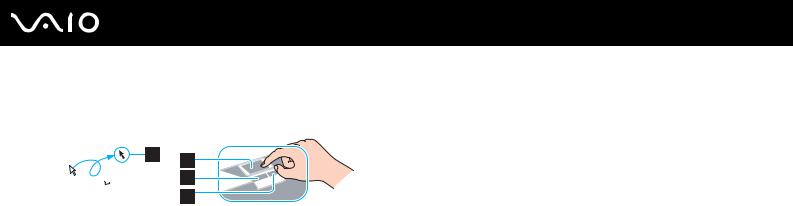
Using the Touch Pad
You can point to, select, drag, and scroll objects on the screen using the touch pad.
|
|
|
|
|
|
|
|
|
Action |
Description |
|
|
|
|
|
|
Point |
Slide one finger on the touch pad (1) to place the pointer (2) on an item or object. |
|
|
|
|
|
|
Click |
Press the left button (3) once. |
|
|
|
|
|
|
Double-click |
Press the left button twice. |
|
|
|
|
|
|
Right-click |
Press the right button (4) once. In many applications, this action displays a shortcut menu. |
|
|
|
|
|
|
Drag |
Slide one finger on the touch pad while pressing the left button. |
|
|
|
|
|
|
Scroll |
Move your finger along the right edge of the touch pad to scroll vertically (the scroll function is available only with |
|
|
|
|
applications that support a touch pad scroll feature). |
|
|
|
|
n 28 N
Using Your VAIO Computer
If you want to use a mouse, instead of the touch pad, as your pointing device, you can disable the touch pad on the wireless keyboard.
To disable/enable the touch pad
To disable the touch pad, slide the POINTING DEVICE switch on the bottom of your keyboard to the OFF position. To enable the touch pad, slide it back to the ON position.
n 29 N
Using Your VAIO Computer
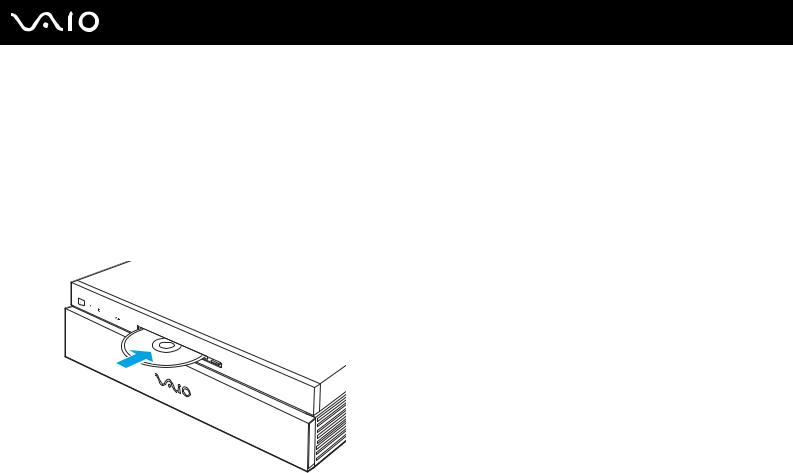
Using the Optical Disc Drive
Your computer is equipped with an optical disc drive.
To insert a disc
!
Be sure to attach the supplied 8cm disc adapter to an 8cm disc before inserting the disc into the optical disc drive slot. For the supported 8cm disc types, see Reading and Writing Optical Discs (page 31).
1Turn on the computer.
2With the label side facing upward, slide a disc into the optical disc drive slot.
If you plan to use an external optical disc drive, connect the drive before you launch any preinstalled CD/DVD program.
n 30 N
Using Your VAIO Computer
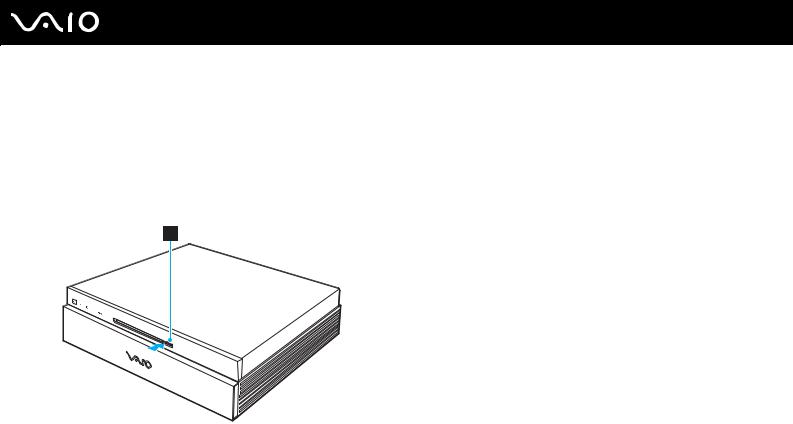
To remove a disc
!
When your computer is in Sleep mode, pressing the drive eject button automatically brings the computer back into Normal mode and ejects an optical disc, if any, from the drive.
When your computer is off, pressing the drive eject button turns on the computer, launches Windows, and ejects an optical disc, if any, from the drive.
1Press the drive eject button (1). The optical disc slides out.
 Loading...