

Page 1
TM
3-973-676-12(1)
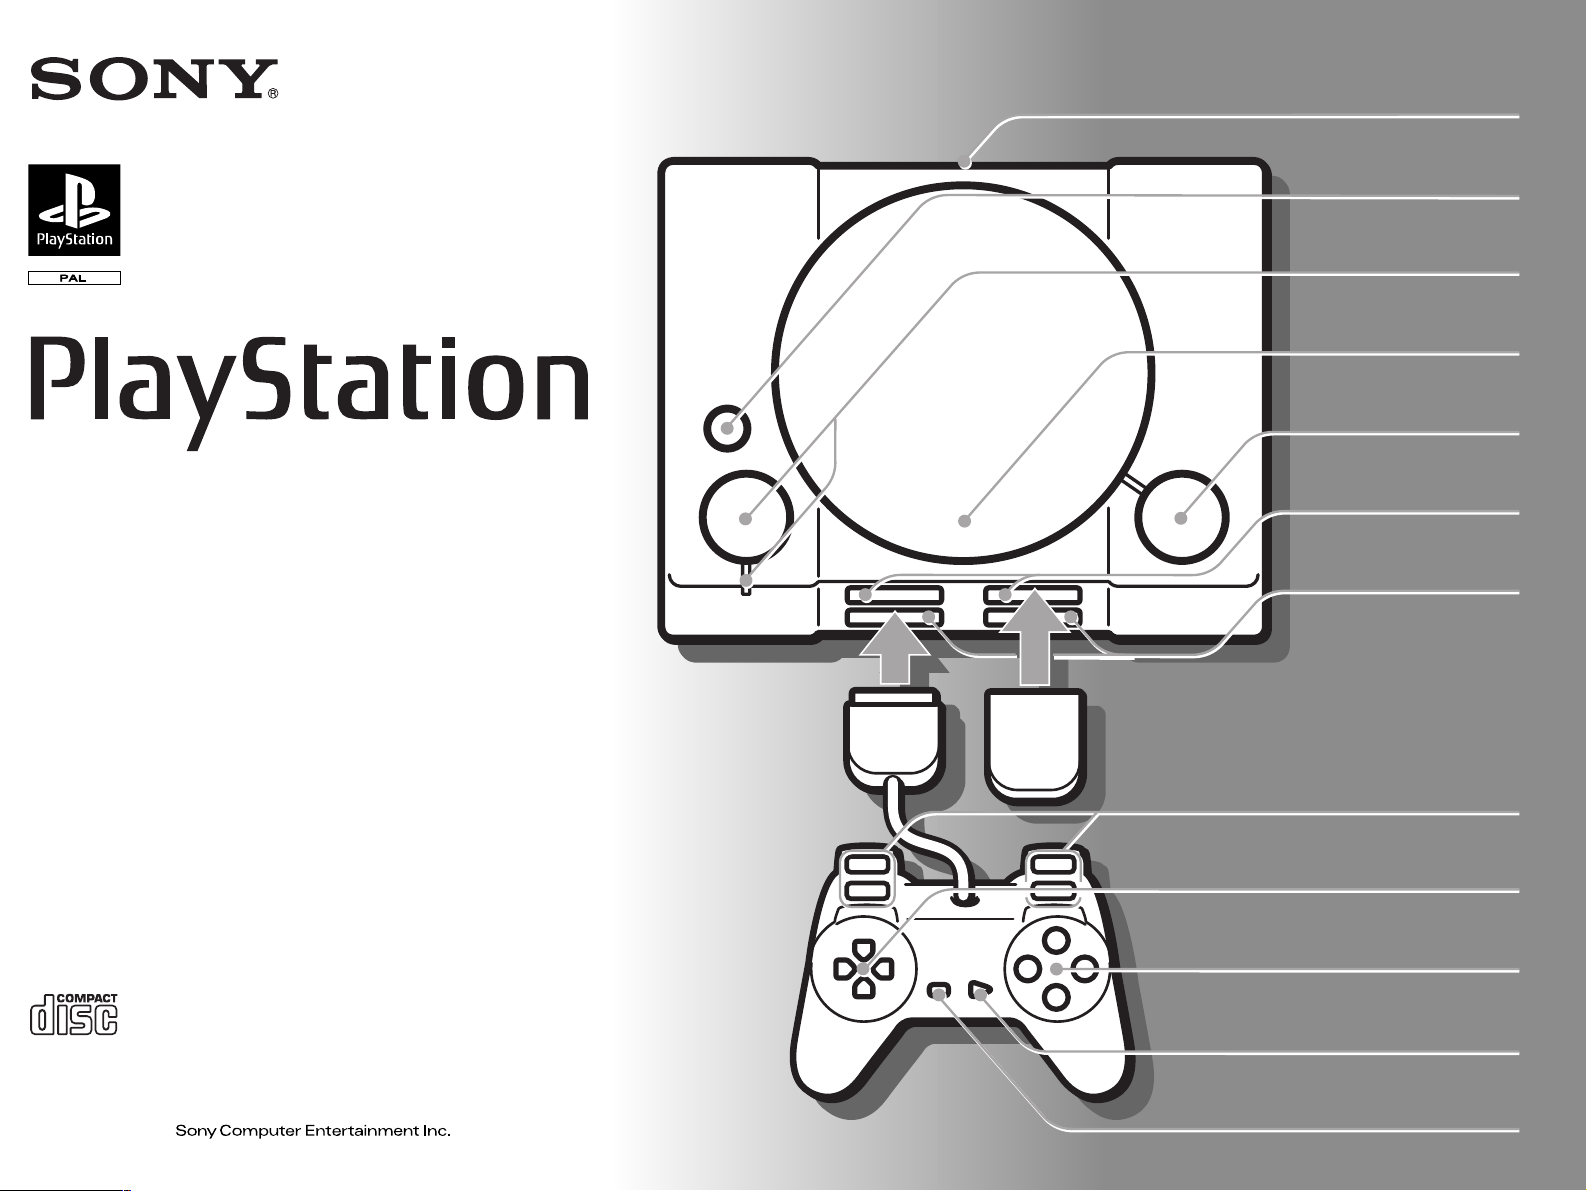
Connector section
RESET button
1/u button
and indicator
Disc cover
Instruction manual
Thank you for purchasing the “PlayStation”video game console.
You can enjoy playing CD-ROM discs with both the “PlayStation” logo and
[PAL] designation, and audio CDs with this unit. Before operating the unit,
please read this manual and retain it for future reference.
TM
§ button
Memory card slots
Controller ports
L2 button, R2button,
L1 button, R1 button
Directional buttons
¢ , ® , ✕ , π buttons
SCPH-5502 A
© 1995, 1996, 1997
START button
SELECT button
Page 2
2
PrecautionsWARNING
To prevent fire or shock hazard, do not
expose the unit to rain or moisture.
To avoid electrical shock, do not open the
cabinet. Refer servicing to qualified
personnel only.
WARNING
To prevent shock hazard, do not insert the plug
cut off from the mains lead into a socket outlet.
This plug cannot be used and should be
destroyed.
Caution
The use of optical instruments with this
product will increase eye hazard.
Read before playing with your
“PlayStation”
A few people may experience epileptic seizures
when viewing flashing lights or patterns in our
daily environment. These persons may
experience seizures while watching TV pictures
or playing video games. Even players who
have never had any seizures may nonetheless
have an undetected epileptic condition.
Consult your doctor before playing video
games if you have an epileptic condition or
should you experience any of the following
symptoms during play: altered vision, muscle
twitching, other involuntary movements, loss
of awareness of your surroundings, mental
confusion, and/or convulsions.
This appliance is classified as a CLASS 1 LASER product.
The CLASS 1 LASER PRODUCT MARKING is located on
the bottom of the “PlayStation”.
On safety
• The laser beam emitted from the lens of your
“PlayStation” is harmful to the eyes. Do not
disassemble the casing. Servicing should be carried
out by qualified personnel only.
• Should any solid objects or liquid fall into your
“PlayStation”, unplug it immediately and have it
checked by qualified personnel before any further
use.
• When not in use, disconnect your “PlayStation”
from the mains. When disconnecting, grasp the
plug and pull it from the wall socket. Never pull
the cord itself.
For your health
• Be sure to take a break of about 15 minutes during
every hour of play.
• Do not play a game when you are very tired or
short of sleep.
• Play in a well lit room, sitting as far from the screen
as the cord will allow.
On operation
• Operate your “PlayStation” only on 220 - 240 V AC,
50 Hz.
• Do not cover your “PlayStation” during use as heat
may build up internally.
• Avoid rough handling or mechanical shock and do
not put any heavy objects on your “PlayStation”.
This could damage the console or the disc.
• Do not leave your “PlayStation” near heat sources,
or in a place subject to direct sunlight (operating
temperature: 5˚C-35˚C), excessive dust or sand,
moisture, rain, on an uneven surface, or in a car
with its windows closed.
• If your “PlayStation” causes interference to radio or
television receptions, turn it off or move it away
from those appliances.
• Do not touch the lens inside the disc cover. To
protect the lens from dust, keep the disc cover
closed except when inserting or removing a disc. If
the lens is not clean, your “PlayStation” may not
operate properly.
• Your “PlayStation” is not disconnected from the AC
power source (mains) as long as it is connected to
the wall outlet, even if the unit itself has been
turned off.
About the discs
You can use the two kinds of discs with your
“PlayStation”: CD-ROM discs with both “PlayStation”
logo and [PAL] designation, and audio CDs.
About the nameplate
The nameplate is located on the bottom of the unit.
On handling discs
• Do not leave the discs near heat sources or in direct
sunlight or excessive moisture.
• Store the discs in their cases when they’re not in
use.
• When handling the discs, do not touch the surface.
Hold them by the edge.
• Do not stick paper or tape on the discs.
• Do not write on the discs with a marker, etc.
On moisture condensation
If your “PlayStation” is brought directly from a cold to
a warm location, or is placed in a very damp room,
moisture may condense on the lens inside. Should
this occur, your “PlayStation” may not operate
properly. In this case, remove the disc for several
hours until the moisture evaporates. If your
“PlayStation” still does not operate properly, ring the
“PlayStation” service line number listed on your
customer service card.
Do not connect your “PlayStation” to a
projection TV
Do not connect your “PlayStation” to a projection TV
unless it is the LCD type. Permanent damage to your
TV screen could otherwise result.
Never analyze or remodel your
“PlayStation”
Use your “PlayStation” following the instructions in
this manual. Sony Computer Entertainment Inc.
expressly prohibits the analysis or remodelling of the
“PlayStation”, and also prohibits the analysis, use of
its circuit configurations without express written
permission of Sony Computer Entertainment Inc.
Precautions
Your”PlayStation” is not disconnected from the AC power
source (mains) as long as it is connected to the wall outlet,
even if the unit itself has been turned off.
Page 3
Unpacking Table of contents
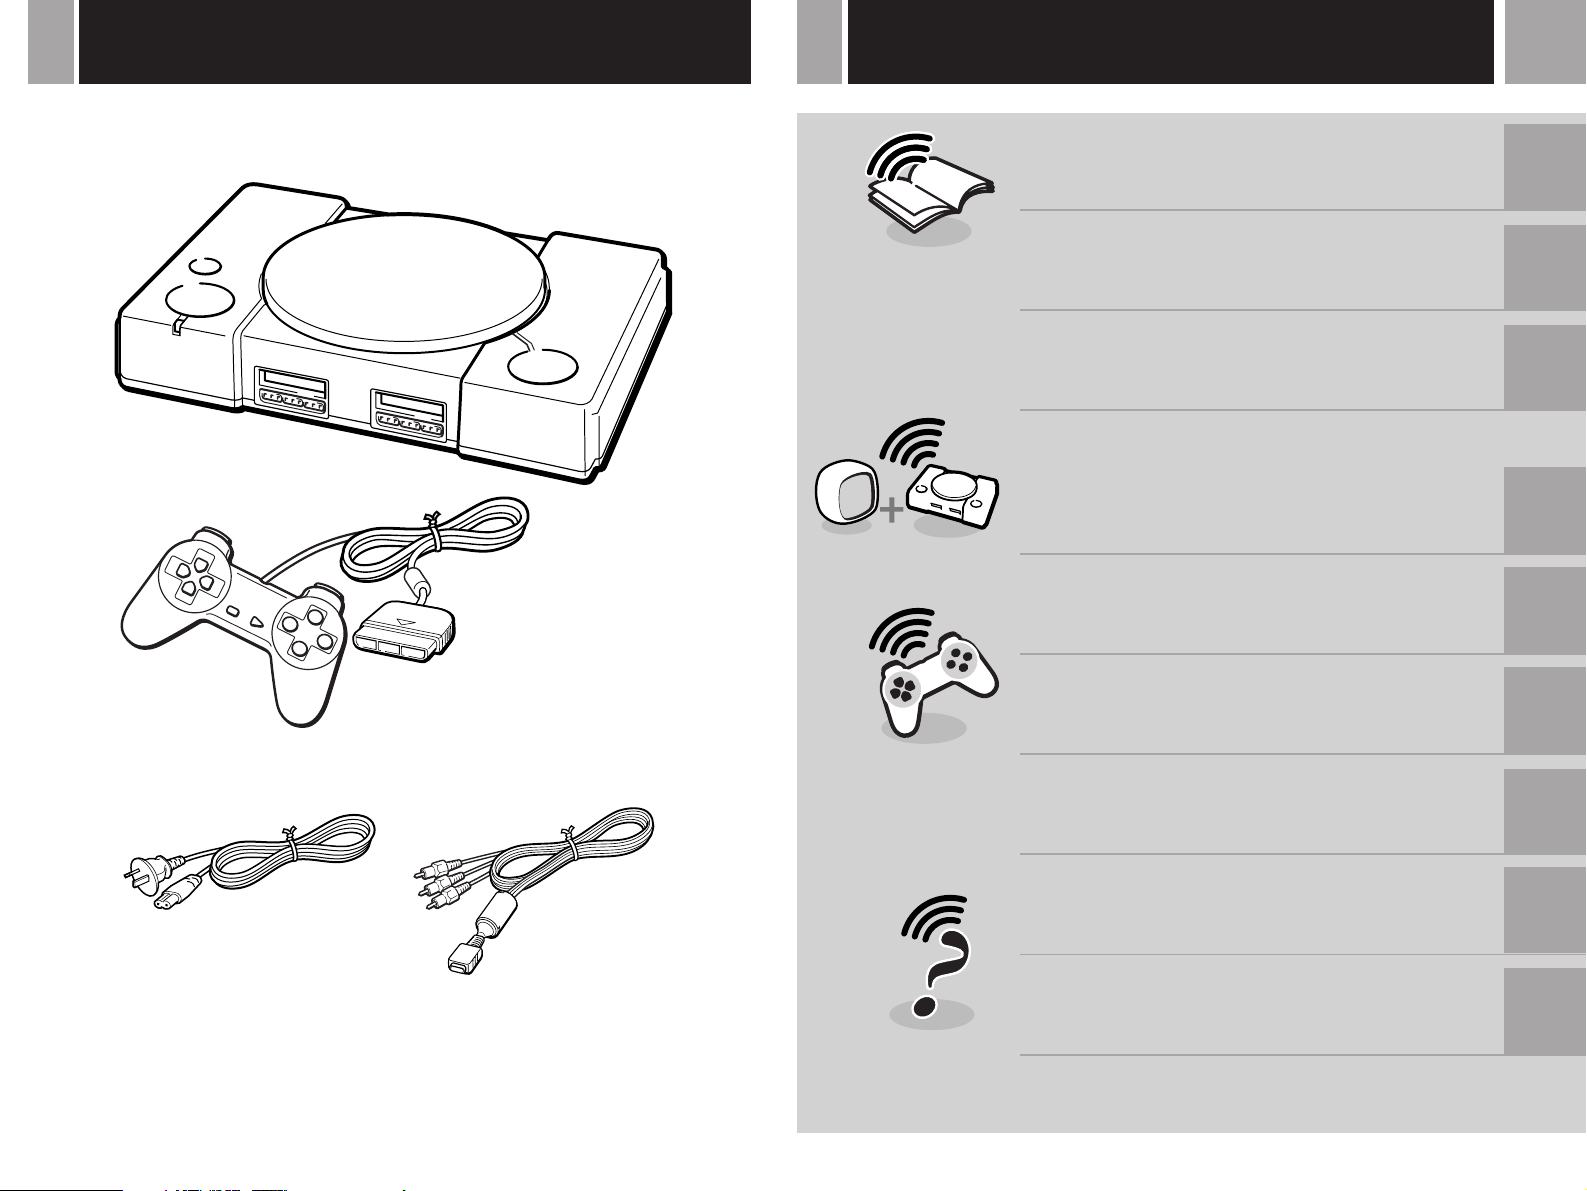
Check that you have the following items:
Console
3
WARNING 2
Precautions 2
Unpacking 3
Connecting your
“PlayStation” to a TV set 4
Playing a game 5
Controller
AC power cord AV cable (integrated
audio/video)
Using a memory card 6
Playing an audio CD 7
Troubleshooting 8
Specifications 11
Page 4
4
Connecting your ”PlayStation” to a TV set
IMPORTANT INFORMATION
For the customers in Australia
A few models of television sets or monitors may display a bouncing or other incorrect screen effect when
connected to the “PlayStation”. Any applicable warranties offered by Sony Computer Entertainment
Australia Pty. Ltd. may be limited or disclaimed in some particular cases of this occurrence. Should you
experience any difficulties for whatever reason with your “PlayStation” please contact the nearest
“PlayStation” Hardware Help Line listed in every “PlayStation“ game manual.
For the customers in New Zealand
A few models of television sets or monitors may display a bouncing or other incorrect screen effect when
connected to the “PlayStation”. Any applicable warranties offered by Sony Computer Entertainment
New Zealand, a division of Sony Music Entertainment (New Zealand) Ltd. may be limited or disclaimed
in some particular cases of this occurrence. Should you experience any difficulties for whatever reason
with your “PlayStation” please contact your country “PlayStation” Hardware Help Line listed in every
“PlayStation“ game manual.
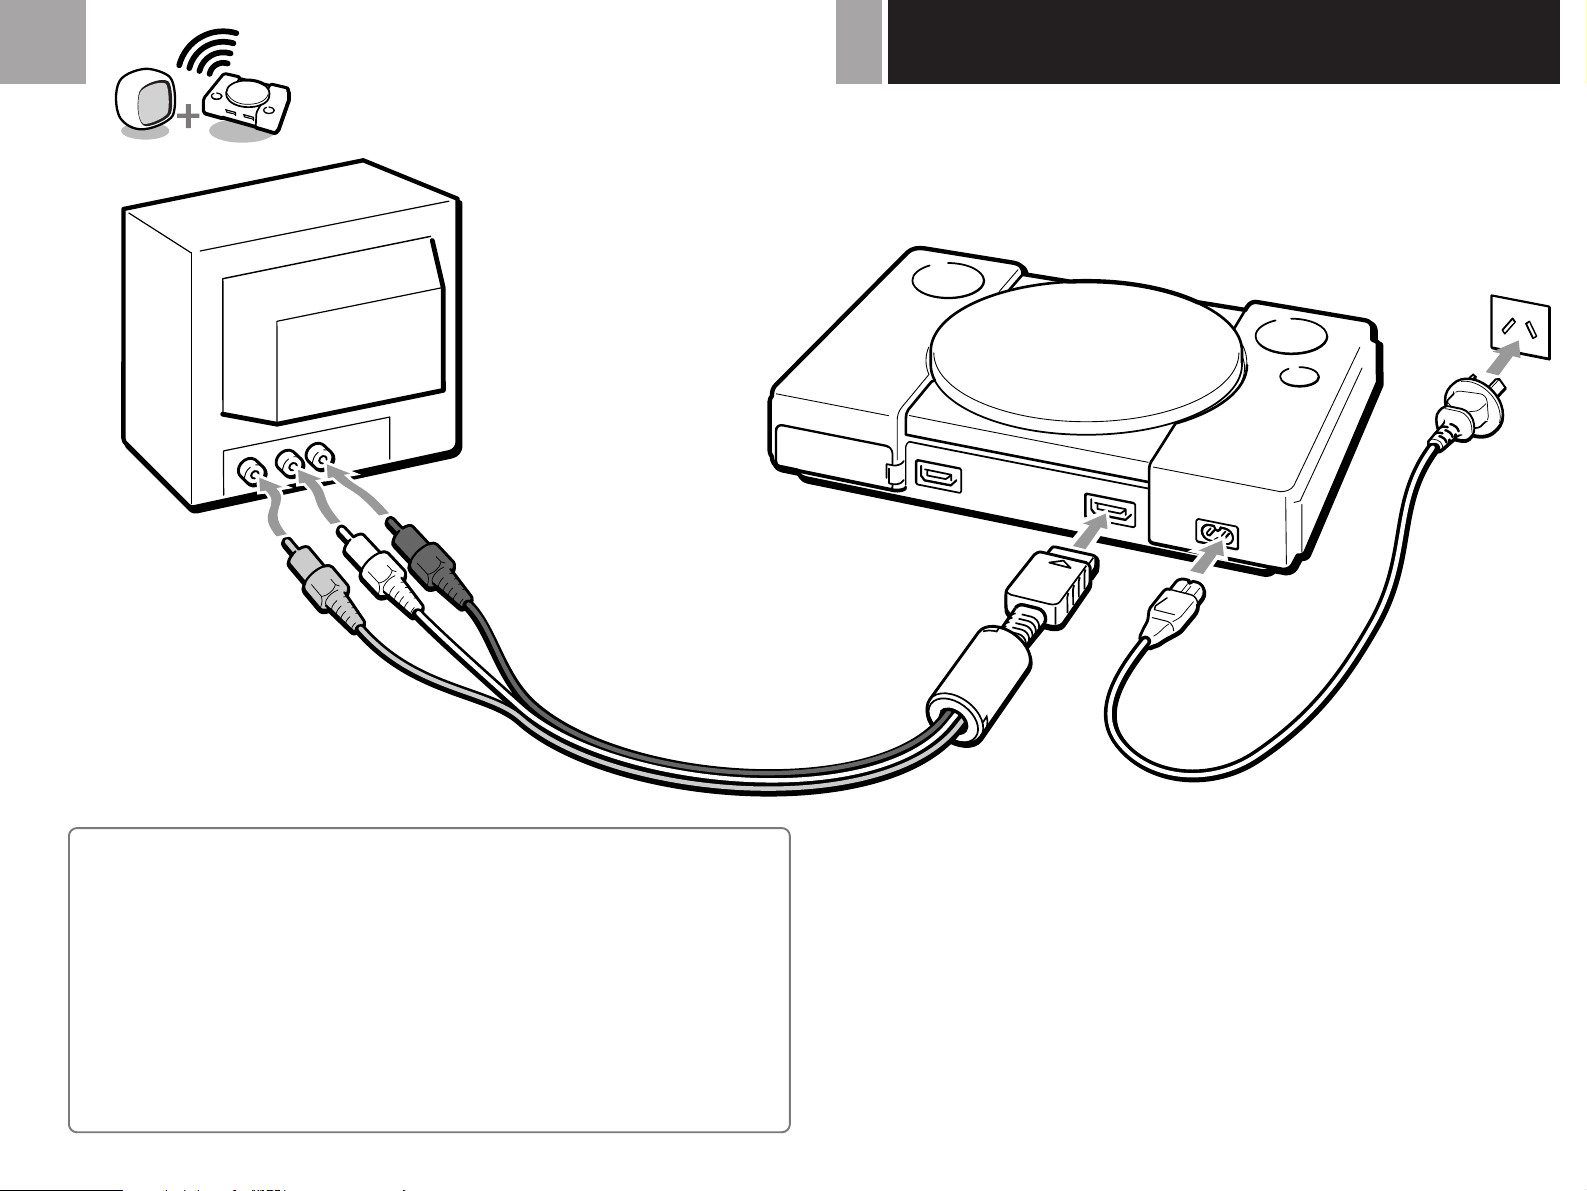
Connecting to a TV with audio/video inputs
Connect your “PlayStation” to the TV using the supplied AV cable (integrated audio/video), making
sure you match the colours on the plugs and terminals.
If your TV is monaural, do not connect the red plugs.
After connecting
Set your TV to the appropriate video input mode. (Refer to the instruction manual of your TV.)
Page 5

AB
RESET
Playing a game
Press § (open) button.
1
The disc cover opens.
Insert a disc with the label side up.
2
Close the disc cover.
3
Press 1/u (on/standby) button.
4
The 1/u indicator lights up.
After the start-up screen, screen C1
appears and the game begins.
Tips
• When you end a game, press §, remove a disc and
press 1/u to turn off the “PlayStation”.
• If you turn on your “PlayStation” without first
inserting a disc, screen C2 appears. It gives you
access to the audio CD control screen and the memory
card activity screen, described later on in this manual.
If you insert a CD-ROM disc of the “PlayStation”
format while screen C2 is on, the game will start
automatically.
• If the screen C3 appears, the inserted disc might be
of a different format. Check if it has both the
“PlayStation” logo and [PAL] designation on it. A
damaged or dirty disc would also produce this screen.
See ”Troubleshooting“ on page 8.
Notes
• Before starting the game, press RESET.
• There is no need to turn off the “PlayStation” if you
want to change games. Just open the disc cover and
wait until the disc stops spinning, swap the discs over
and then press RESET.
• When inserting a disc, push the disc gently but firmly
until it sits snugly on the central spindle.
5
A Restarting a game
Press RESET.
Be careful not to press RESET while playing the
game, or the game will end.
B Removing a disc
While pressing the central spindle gently, pick
up the disc holding the edge.
C Screens that appear after
the start-up screen
When you turn on your “PlayStation”, one of
the following screens will appear.
1 A CD-ROM with both “PlayStation” logo
and [PAL] designation is inserted.
2 No disc is inserted.
3 A disc that cannot be played with the
“PlayStation” is inserted.
C
2
MWARNING
Before removing a disc, press the § button and make sure
that the disc completely stops.
Never touch the disc while it is spinning. Otherwise, you
may hurt yourself or damage the disc or your
“PlayStation”.
31
Page 6

6
Using a memory card
A
1
2
3
4
B
56
7
9
8
You can save and load game data using the
optional SCPH-1020 memory card.
Each memory card has 15 memory blocks.
You can copy game data from one memory
card to another or delete unnecessary data, by
bringing up the memory card screen.
1...... Turn on your “PlayStation” before
inserting a disc.
2 .... Insert a memory card (or two memory
cards).
3 .... Select the icon for memory card operation
with the directional buttons and press the
® button.
Cancelling the memory card screen
Select “EXIT” on the memory card screen with
the directional buttons and press the ® button.
A Memory card screen
1 Contents of memory card 1. The game data
is displayed as icons.
2 Icon. The number of icons corresponds to
the number of used memory blocks.
3 Arrow pointer.
4 Display the game name and other details of
the selected data.
5 Copy the selected game data.
6 Delete the selected game data.
7 Copy all the game data on the selected
card.
8 Contents of memory card 2.
9 Exit from this screen.
B Memory card operation
How to use the controller for the memory
card screen
• To move the arrow pointer: Press the
directional buttons.
• To select the items: Press the ® button.
Copying game data
1 ... Check that the card you’re copying to has
enough memory blocks, then select
“ ”.
2 ... Select the card containing the data to be
copied.
3 ... Select the icon for the data to be copied.
4 ... Select “✓”.
Or select “✕” to cancel copying.
Notes
• You cannot copy the data to a card that does not have
enough empty blocks. Delete unnecessary data.
• Do not remove the card until the icons stop moving.
Copying all the game data
1 ... Check that the card you’re copying to has
enough memory blocks, then select
“ ”.
2 ... Select the card to be copied .
3 ... Select “✓”.
Or select “✕” to cancel copying.
Notes
• Do not remove the card until the icons stop moving.
• If the data you want to copy already exists on the card,
the data will not be copied.
Deleting game data
1 ... Select “ ”.
2 ... Select the card that has the data you wish
to delete.
3 ... Select the icon of the data you wish to
delete.
4 ... Select “✓”.
Or select “✕” to cancel deleting.
Directional buttons
® button
Tip
You can also operate using the optional SCPH-1090
mouse.
MEMORY CARD 1 MEMORY CARD 2
Page 7

Playing an audio CD
7
A
1
2
@£
3
@™
4
@¡
5
@º
6
!ª
7
!•
8
!¶
9 0 !¡ !™ !£ !¢
!∞
!§
BC
=
0
(, P
Directional buttons
+
)
® button
p
Your “PlayStation” can also play audio CDs.
There are two control methods for the audio
CD facility.
• Selecting the buttons on the audio CD screen
operation (A)
• Pressing the buttons on the controller (direct
key operation, C)
Note
As the two ways above work at the same time, be sure not
to confuse the operation.
Selecting audio CD operation
Insert an audio CD and turn on the power.
You can also insert an audio CD after turning
on the power. (You do not have to turn off your
“PlayStation” when changing CDs.)
Cancelling audio CD operation
Select “EXIT” on the screen with the directional
buttons and press the ® button.
A Audio CD screen
1 Display the current track number, and the
elapsed or remaining playback time. Press
the “TIME” button to switch the display.
2 Display the selected playback mode.
3 Play all tracks on the disc in order.
4 Play the tracks in random order.
5 Play selected tracks in a specified order.
6 Play a single track or all tracks repeatedly.
7 Change the playback time display.
8 Arrow pointer
9 Play
0 Pause
!¡ Stop
!™ Find the start of the current or previous
track
!£ Find the start of the next track
!¢ Go backward quickly
!∞ Go forward quickly
!§ Cancel audio CD operation
!¶ - @¡ Various acoustic effects:
!¶ No acoustic effects
!• A “dead” room (vocals are emphasised)
!ª A church
@º A large hall
@¡ A dome stadium
@™ Display track numbers higher than 20
(appears only when there are more than 20
tracks on a CD)
@£ Select the track number(s) from a grid
showing all the tracks on the CD.
B Various playback modes
How to use the controller for the CD
operation screen
• To move the arrow pointer: Press the
directional buttons.
• To select the items: Press the ® button.
Tip
You can also operate using the optional SCPH-1090
mouse.
Playing a CD through to the end once
Select “(”.
Playing tracks on a loop
• To repeat the current track, select “REPEAT”
until “REPEAT 1” appears.
• To repeat all the tracks, select “REPEAT”
until “REPEAT ALL” appears.
To resume normal play, select “REPEAT” until
“REPEAT” indication disappears.
Programming a sequence of tracks
1 .... Select “PROGRAM”.
2 .... Select the track number you want to play.
Repeat this step until you have selected all
the tracks you want to include.
3 .... Select “(”.
To resume normal play, select
“CONTINUE”.
Playing tracks in random order
1 .... Select “SHUFFLE”.
2 .... Select “(”.
To resume normal play, select
“CONTINUE”.
Page 8

8
Troubleshooting
1 No sound ___________________________________ Check 1
2 No picture on the screen. ______________________ Check 2
3 The picture and the sound skip. _________________ Check 11
4 The screen and the sound freeze
Symptoms
If you experience any of the following problems,
read the instructions for the specified
“Check” or “Diagnosis”.
or the game (or audio CD) stops playing. _________ Check
12
5 The game (or audio CD) does not start. ___________ Check 6
6 The controller does not work.___________________ Check 13
7 A game (or audio CD) that once worked
perfectly, now no longer does. __________________ Check
15
8 The picture and the sound are picking up
noise or static _______________________________ Diagnosis
E
Page 9

9
Checks
1 Is the TV volume set properly?
If not, adjust the volume. Make sure “mute” is not selected
on the TV.
If the problem persists, bCheck 2
2 Is the channel position or input selector of the TV
set correctly?
If not, set it to the correct position.
If the problem persists, bCheck 3
3 Is your “PlayStation” correctly connected to the
TV or the VCR with the correct cable?
If not, connect it correctly.
If the problem persists, bCheck 4
4 Is the AC power cord connected to your
“PlayStation” and the mains socket?
If not, connect the AC power cord firmly to the
“PlayStation” and to the mains socket .
If the problem persists, bCheck 5
5 Is the power turned on to both your “PlayStation”
and the TV?
If not, turn on the “PlayStation” and the TV.
If the problem persists, bCheck 6
6 Is a disc inserted in your “PlayStation”?
If not, insert a disc.
If the problem persists, bCheck 7
7 Is the inserted disc either a CD-ROM disc with both
the “PlayStation” logo and [PAL] designation or
an audio CD?
Insert such a CD-ROM disc or an audio CD.
If the problem persists, bCheck 8
9 Is the disc inserted with the label side up?
If not, insert the disc with the label side up.
If the problem persists, bCheck 10
10 Did you bring your “PlayStation” directly from a
cold to a warm location before you inserted the
disc?
If “Yes”, b Diagnosis C
If “No”, b Check 12
11 Is your “PlayStation” placed on a stable surface?
Install the “PlayStation” in a flat stable place.
Do not shake or vibrate the “PlayStation”.
If the problem persists, bCheck 12
12 Check to see if other games (or audio CDs) work
correctly.
If “Yes”, b Diagnosis A
If “No”, b Diagnosis B
13 Is the controller connected to your “PlayStation”?
If not, connect it to the controller connector
of the “PlayStation”.
If the problem persists, bCheck 14
14 Check to see if other controllers work correctly.
If “Yes”, b Diagnosis D
If “No”, b Diagnosis F
15 Check to see if other games (or audio CDs) work
correctly.
If “Yes”, b Diagnosis A
If “No”, b Diagnosis F
8 Is the disc cover closed firmly?
If not, close it firmly.
If the problem persists, bCheck 9
Page 10

10
A There is a problem with the disc.
Clean the underside of the disc with a CD cleaner and try to play it again.
To clean the disc, refer to the instruction manual of the CD cleaner.
If the problem persists, the disc may be defective.
B The lens may be dirty.
Clean the lens by using a lens cleaning kit.
To clean the lens, refer to the instruction manual of the lens cleaning kit.
If the problem persists, ring the “PlayStation” service line number listed on your customer service card.
C Moisture condensation has occured on the disc.
Remove the disc and leave it until the moisture evaporates, or clean the underside of the disc using a CD cleaner.
Diagnoses
D There is a problem with the controller.
Ring the “PlayStation” service line number listed on your customer service card.
E Check the connection between your “PlayStation”
and the TV (or VCR).
Insert the plugs of the connecting cable firmly into the connectors. If the picture and the sound are still noisy, the
plugs may be dirty or there may be a short circuit inside the cable. If the problem persists even after trying another
cable, ring the “PlayStation” service line number listed on your customer service card.
F There is a problem with your “PlayStation”.
Ring the “PlayStation” service line number listed on your customer service card.
Page 11

Specifications
General
Power requirements: 220 - 240 V AC, 50 Hz
Power consumption: 9W
Dimensions: 270 x 60 x 188 mm (w/h/d)
Mass: 1.4 kg
Operating Temperature: 5˚C-35˚C
Laser diode properties
•Material: GaAlAs
•Wavelength: l=780 nm
•Emission duration: Continuous
•Laser output: Less than 44.6 µW
(measured at a distance of 200 mm from the lens surface on the optical
pick-up block)
Inputs/outputs on the front
Controller ports (2)
Memory card slots (2)
Input/output on the rear
SERIAL I/O port (1)
Outputs on the rear
AV MULTI OUT output (1)
11
Supplied accessories
AC power cord (mains lead) (1)
AV cable (integrated audio/video) (1)
Controller (1)
Instruction manual (1)
Optional accessories
SCPH-1020 E Memory card
SCPH-1040 E Link cable
SCPH-1080 E Controller
SCPH-1090 E Mouse
SCPH-1110 E Analog joystick
SCPH-1122 RFU adaptor
SCPH-1140 E AV cable (integrated audio/video)
Design and specifications are subject to change without notice.
Page 12

“ ” and “PlayStation” are trademarks of Sony Computer Entertainment Inc.
“Sony” is a registered trademark of Sony Corporation.
Printed in Japan.
 Loading...