

Page 1
English
US ➔ P.2
MEMORY CARD slots
” product family logo
“
Español
ES ➔ P.32
Ranuras para
MEMORY CARD
(tarjeta de memoria)
Logotipo de la familia de
productos “
”
Instruction manual
Thank you for purchasing the PlayStation®2
computer entertainment system.
Before using this product, carefully read this
manual and retain it for future reference.
Manual de instrucciones
Gracias por adquirir el sistema de entretenimiento
computarizado PlayStation®2.
Antes de utilizar este producto, lea detenidamente
este manual y consérvelo para consultarlo en el
futuro.
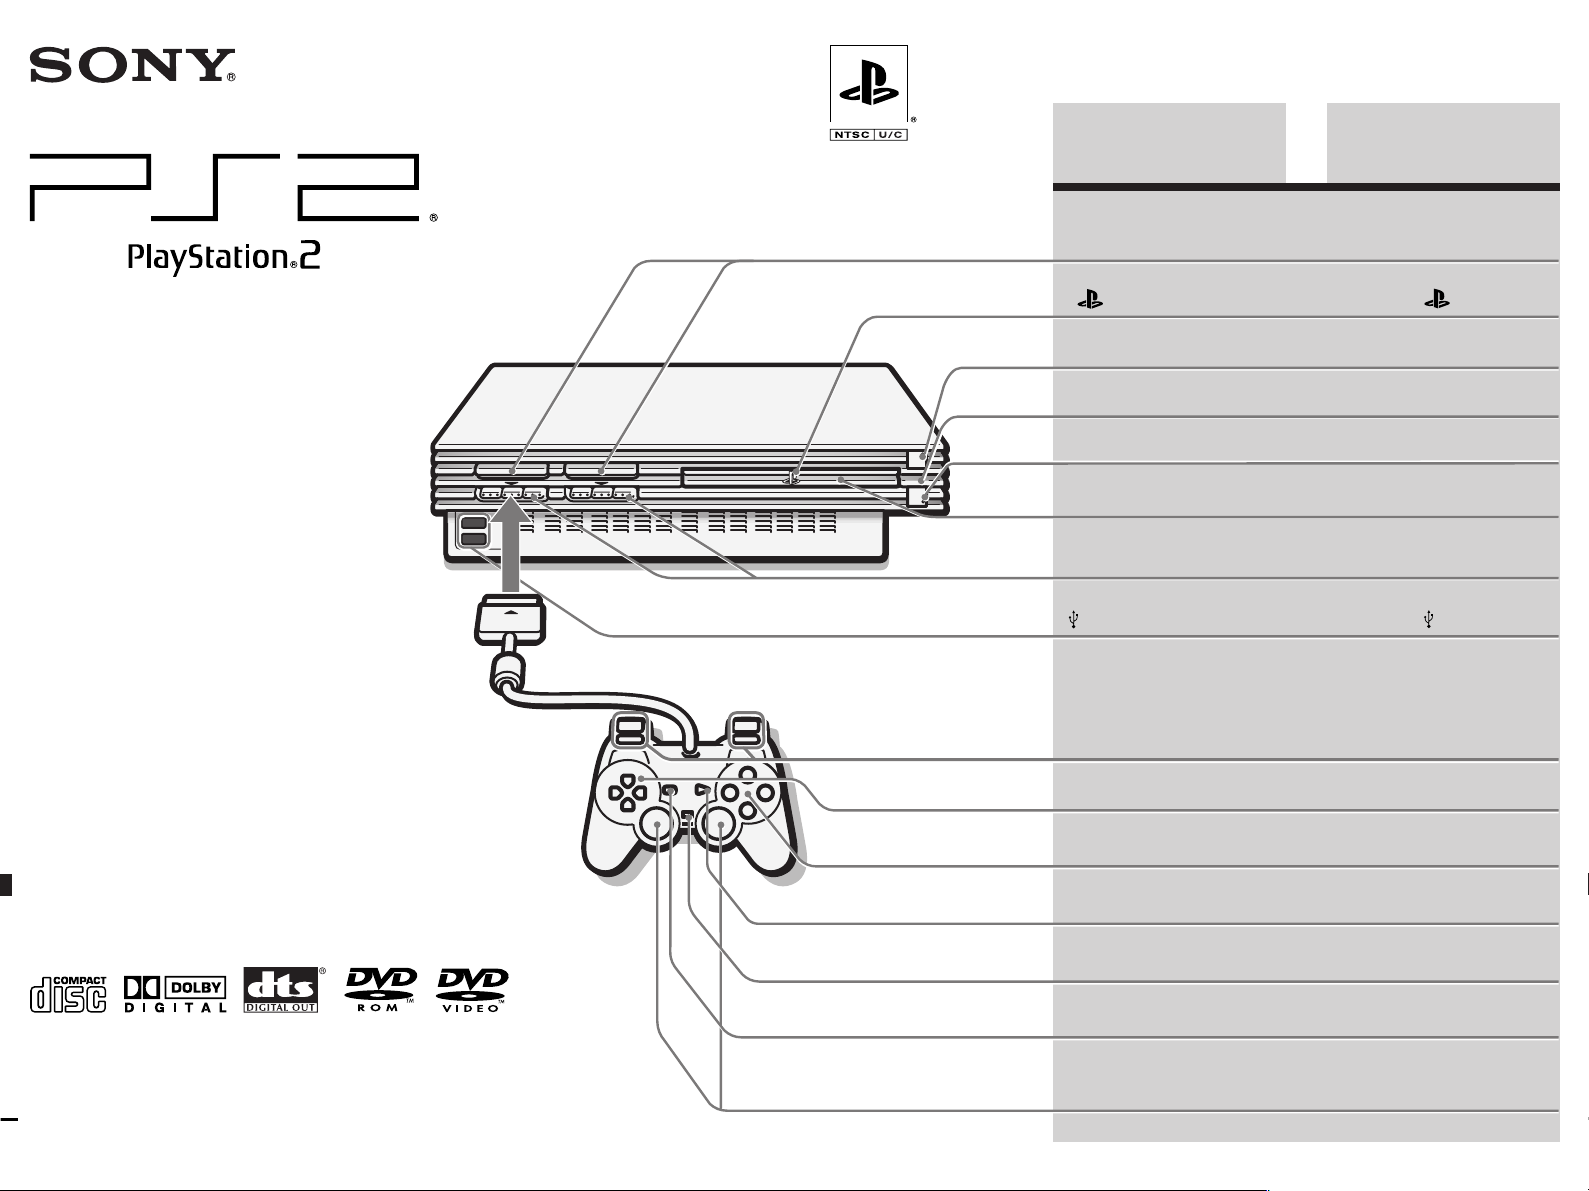
1 (standby)/RESET
and 1 indicator
IR receiver
A (open) button and
A indicator
Disc tray
Controller ports
USB connectors
L2 button, R2 button,
L1 button, R1 button
Directional buttons
¢ button, a button,
✕ button, s button
START button
button
Botón 1 (espera) /RESET
(reinicio) e indicador 1
Receptor infrarrojo
Botón A (abrir) e indicador A
Bandeja del disco
Puertos de control
Conectores
Botón L2, botón R2,
botón L1, botón R1
Botones de dirección
Botón ¢, botón a,
botón ✕, botón s
Botón START (inicio)
USB
SCPH-50011
© 2004 Sony Computer Entertainment Inc. All rights reserved.
ANALOG mode button
SELECT button
Left analog stick,
right analog stick,
L3 button, R3 button
Botón modo ANALOG
(analógico)
Botón SELECT (selección)
Joystick analógico
izquierdo, joystick
analógico derecho,
botón L3, botón R3
2-176-152-11(1)
Page 2
2
WARNING
To prevent fire or shock hazard, do not
expose the unit to rain or moisture.
To avoid electrical shock, do not disassemble.
Refer servicing to qualified personnel
only.
Caution
The use of optical instruments with this
product will increase eye hazard. As the
laser beam used in this unit is harmful to
eyes, do not attempt to disassemble the
cabinet.
Refer servicing to qualified personnel only.
This label is located on the Laser protective housing inside
the enclosure of the PlayStation
2 console.
®
Before operating your PlayStation®2
console
A very small percentage of individuals may experience
epileptic seizures when exposed to certain light patterns or
flashing lights. Exposure to certain patterns or backgrounds on a television screen or while playing video
games, including games played on the PlayStation
console, may induce an epileptic seizure in these
individuals. Certain conditions may trigger previously
undetected epileptic symptoms even in persons who have
no history of prior seizures or epilepsy.
If you, or anyone in your family, has an epileptic
condition, consult your physician prior to playing. If you
experience any of the following symptoms while playing a
video game - dizziness, altered vision, eye or muscle
twitches, loss of awareness, disorientation, any involuntary movement, or convulsions - IMMEDIATELY
discontinue use and consult your physician before
resuming play.
2
®
Information
If this equipment causes harmful interference to radio or
television reception, which can be determined by turning
the equipment off and on, the user is encouraged to try to
correct the interference by one or more of the following
measures:
– Reorient or relocate the receiving antenna.
– Increase the separation between the equipment and
receiver.
– Connect the equipment into an outlet on a circuit
different from that to which the receiver is connected.
– Consult the dealer or an experienced radio/TV
technician for help.
Owner’s record
The model and serial numbers of the PlayStation®2
console are located on the rear of the console (when placed
in the horizontal position). Record the serial number in the
space provided below. Refer to these numbers whenever
you call for technical assistance at 01-800-759-7669 or 5002-
9819.
Model No.
SCPH-50011
Serial No.
___________________________
Some PlayStation® format software titles may perform
differently on the PlayStation
the PlayStation
the PlayStation
technical support line at 01-800-759-7669 or 5002-9819.
This product may fall within the scope of national export
control legislation. You must comply fully with the
requirements of such legislation and of all other applicable
laws of any jurisdiction in relation to this product.
console, or may not perform properly on
®
2 console. For more information, call our
®
2 console than they did on
®
This graphical symbol with supplemental marking is
located on the right surface of the PlayStation
(when it is in a vertical position).
This symbol is intended to alert the user to the
presence of uninsulated “dangerous voltage”
within the product’s enclosure that may be of
sufficient magnitude to constitute a risk of
electric shock to persons.
This symbol is intended to alert the user to the
presence of important operating and
maintenance (servicing) instructions in the
literature accompanying the console.
2 console
®
Caution
TO PREVENT ELECTRIC SHOCK, MATCH
WIDE BLADE OF PLUG TO WIDE SLOT,
FULLY INSERT.
Page 3

Precautions
3
Safety
This product has been designed with the highest concern
for safety. However, any electrical device, if used
improperly, has the potential for causing fire, electrical
shock or personal injury. To help ensure accident-free
operation, follow these guidelines:
• Observe all warnings, precautions and instructions.
• Stop use immediately if the device functions in an
abnormal manner, or produces unusual sounds or
smells.
• If the device does not function properly, contact our
technical support line at 01-800-759-7669 or 5002-9819
for assistance.
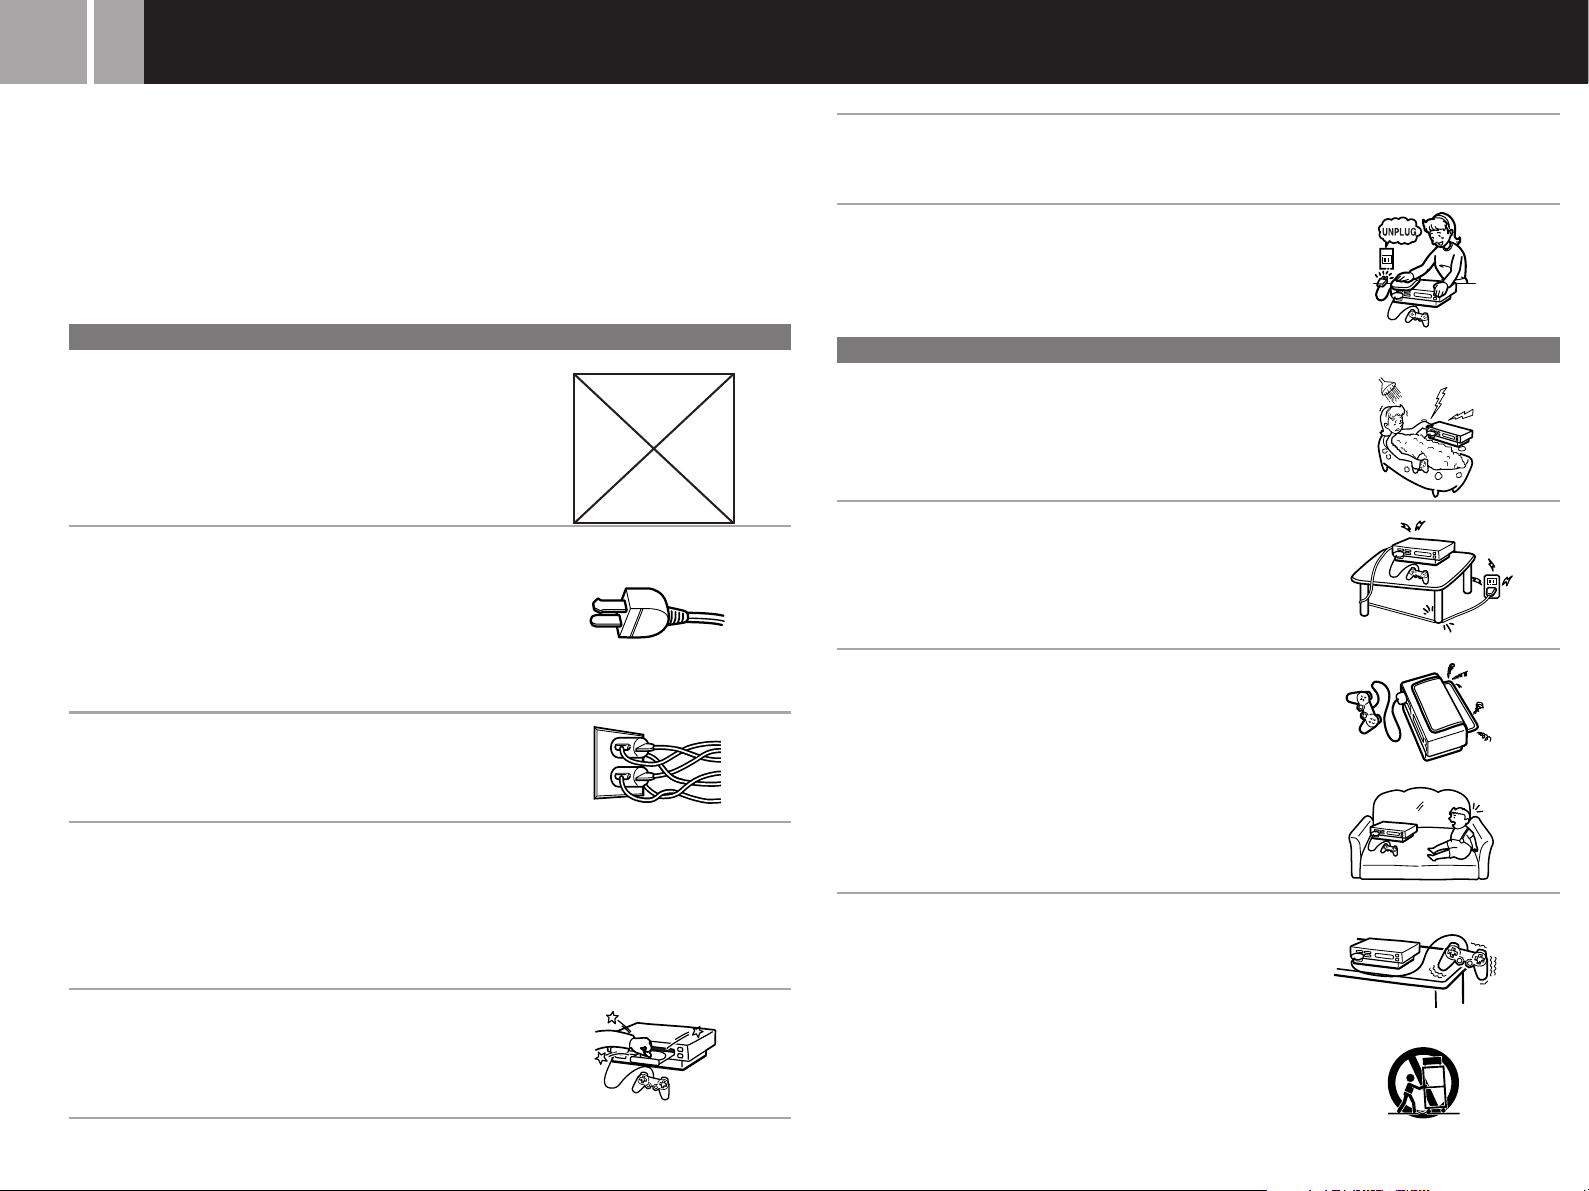
Use and handling
• Do not throw or drop the console or subject it to strong
physical shock.
• Do not place the console on a surface that is unstable,
tilted or subject to vibration.
• Never move or change the position of a console while it
is turned on.
• Do not expose the console to high temperatures, high
humidity or direct sunlight (use in an environment
where temperatures range 5°C – 35°C/41°F – 95°F).
• Do not place the console in a location subject to sudden
temperature change (e.g. temperature changes of 10°C/
18°F per hour or more).
• Do not leave the console in a car with its windows
closed (particularly in summer) as this may warp the
product exterior or cause the product to malfunction.
• Do not use the console in a dusty location.
• Do not allow liquid or small particles to get into the
console.
• Do not put heavy objects on the console.
• Do not touch the metal parts or insert foreign objects
into the connectors of the console.
• When you do not intend to use the console for an
extended period of time, disconnect the power plug for
the PlayStation
• When disconnecting the power plug from an electrical
outlet, pull it out by grasping the plug. Never pull the
cord itself.
• Do not place any rubber or vinyl materials on the
exterior of the console for an extended period of time.
Doing so may damage the plastic surface.
• To help prevent eye strain, take a break of about 15
minutes during every hour of play.
• Use only the supplied AC power cord.
• Unplug all cords and cables before moving the console.
®2 console from the electrical outlet.
Checking the AC power cord
To help ensure safe operation of this product, regularly
inspect the AC power cord for wear and tear. If the cord is
damaged, discontinue use immediately and contact our
technical support line at 01-800-759-7669 or 5002-9819 for
assistance.
Do not touch the connectors on the console
Do not touch the metal parts of, or insert foreign objects
into, the connectors on the console. To help protect the
expansion bus connector within the expansion bay, keep
the expansion bay cover in place on the console rear when
the bay is not in use.
Do not expose the console to cigarette
smoke or dust
When setting up the PlayStation®2 console, avoid places
subject to excessive cigarette smoke or dust. Cigarette
smoke residue or dust build-up on internal components
such as the lens, may cause the console to malfunction.
Cleaning the vents
Dust can accumulate in both the front and rear vents of the
PlayStation
and remove any accumulated dust with a low-powered
vacuum cleaner.
®2 console. Check the vents from time to time
Disc handling
• Do not leave discs near a heat source, in direct sunlight,
or in high humidity.
• Store discs in their cases when they are not being used.
Stacking discs or standing them at an angle without
putting them in their cases can cause the discs to warp.
• Do not touch the disc surface when handling a disc;
hold it by the edges.
• Do not stick paper or tape onto the disc.
• Do not write on the disc with a marker, etc.
• Fingerprints, dust, dirt or scratches on the disc can
distort the picture or reduce sound quality. Always
handle carefully and make sure discs are clean before
use.
• Clean discs using a soft cloth, lightly wiping from the
center outwards.
• Do not use solvents such as benzine, commercially
available cleaners not intended for CDs or anti-static
spray intended for vinyl LPs as these may damage your
disc.
Moisture condensation
If the console or the disc is brought directly from a cold
location to a warm one, moisture may condense on the
lens inside the console or on the disc. Should this occur,
the console may not operate properly. In this case, remove
the disc and do not put it back in until the moisture
evaporates (this could take several hours). If the console
still does not operate properly, call 01-800-759-7669 or
5002-9819 for technical assistance.
Cleaning the exterior of the console
When cleaning the exterior of the console, be sure to turn
the power off with the main power switch on the back of
the console and disconnect the power plug from the
electrical socket.
• Do not use paint thinner, solvents or other chemicals to
clean the exterior of the console, as these may damage
the surface. When using a commercially available
cleaning cloth, follow the instructions supplied with the
cloth.
• If the exterior of the console becomes dirty, soak a soft
cloth in a mild detergent solution diluted with water,
tightly squeeze the cloth to remove the excess liquid,
wipe the affected area of the exterior, and finish by
wiping with a dry cloth.
Never disassemble the console
• Use your PlayStation®2 console according to the
instructions in this manual. No authorization for the
analysis or modification of the PlayStation®2 console,
nor the analysis and use of its circuit configurations, is
provided.
• There are no user-serviceable components inside the
PlayStation
void the warranty. Additionally, there is a risk of
exposure to laser radiation as well as to electrical shock
hazards.
®2 console. Disassembling the console will
Notes on safety when using the analog
controller (DUALSHOCK
• Stop using the console immediately if you begin to feel
tired or if you experience discomfort or pain in your
hands or arms while operating the analog controller
(DUALSHOCK
doctor.
• The analog controller (DUALSHOCK
use with the hands only. Do not bring it into close
contact with your head, face or the bones of any other
part of the body.
• The vibration function of the analog controller
(DUALSHOCK
the vibration function if you have any ailment or injury
to the bones, joints or muscles of your hands or arms.
Note that some PlayStation®2 and PlayStation® format
software titles set the vibration function to “On” by
default. In most cases, the vibration function can be set
to “Off” in the options menu of the software. Do not
play such titles using the analog controller
(DUALSHOCK
function to “Off”.
• Avoid prolonged use of the analog controller
(DUALSHOCK
intervals.
* These notes also apply to the analog controller
(DUALSHOCK
®2). If the condition persists, consult a
®2) can aggravate injuries. Do not use
®2) unless you have set the vibration
®2). Take a break at about 30 minute
®).
®2)
*
®2) is intended for
US
Getting started
Page 4
4
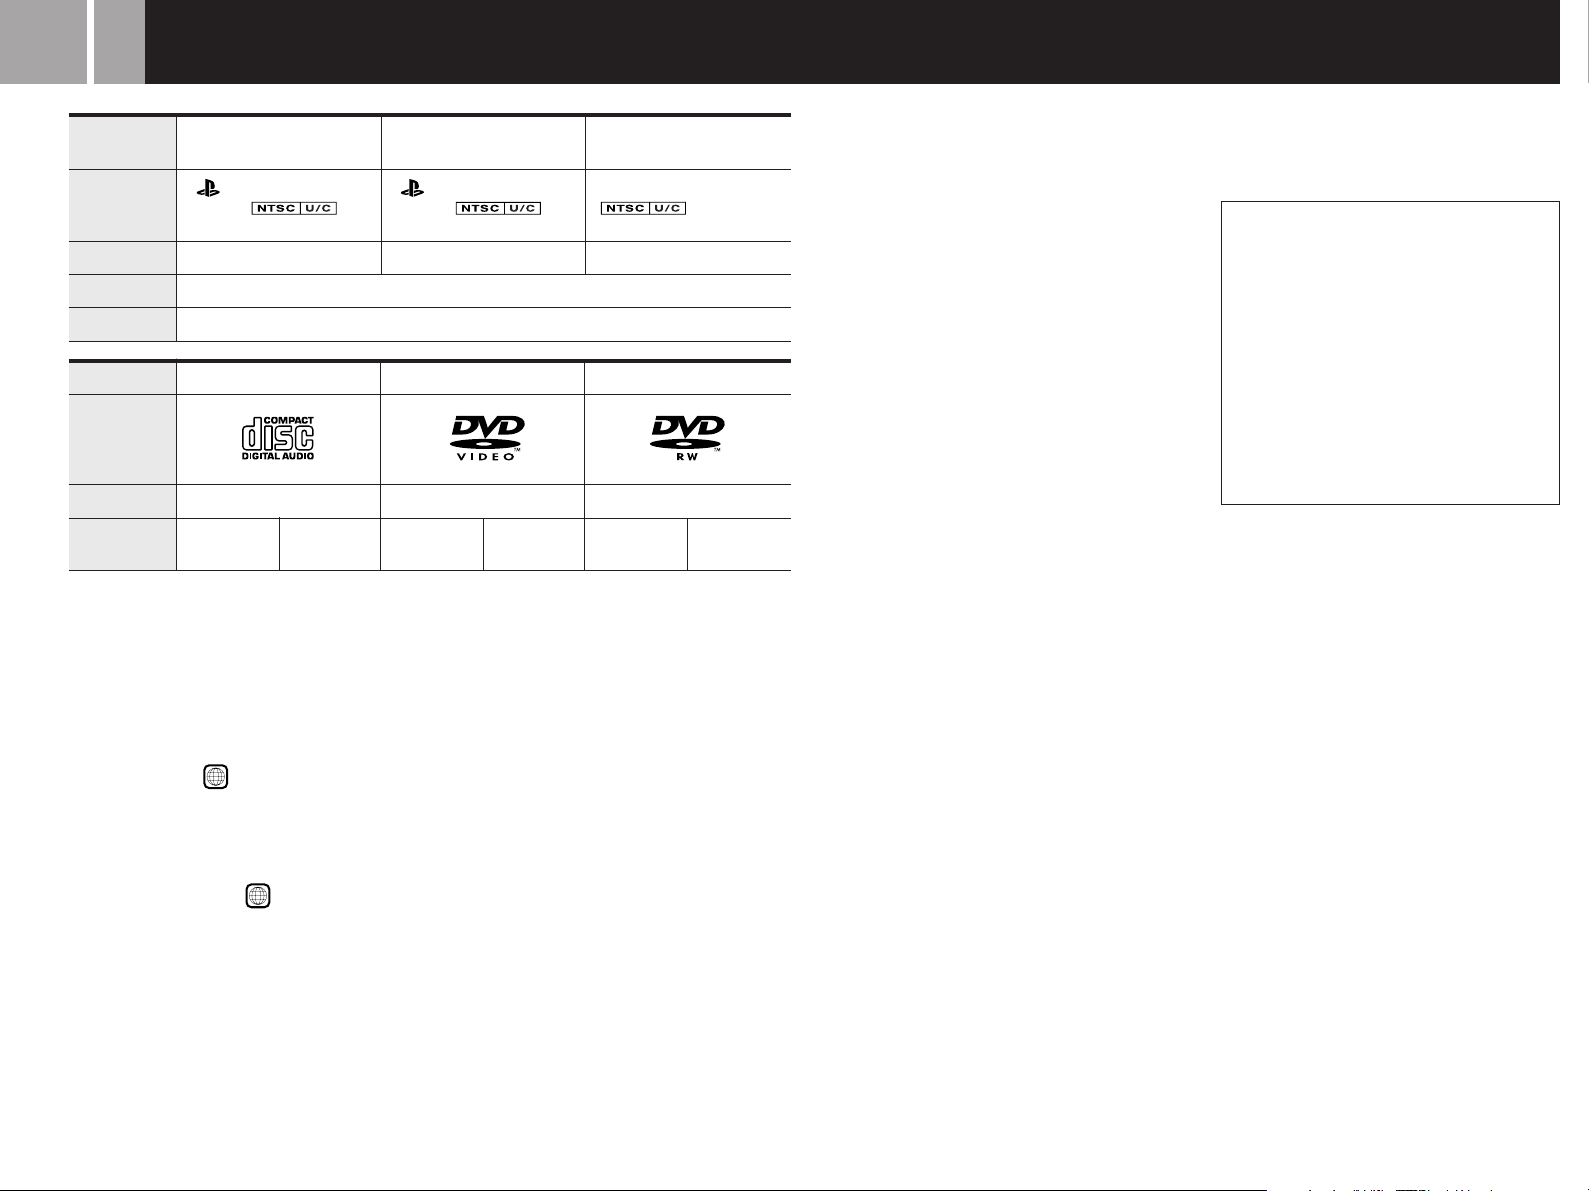
Discs that can be played with the PlayStation®2 console
Disc logo
Disc color
Contents
Disc size
PlayStation®2 format
DVD-ROM
“ ”, PlayStation®2 logo
and
designation
Silver
Audio CDs
PlayStation®2 format
CD-ROM
“ ”, PlayStation®2 logo
and
designation
Blue
Audio and video
12 cm
DVD videos
*3
PlayStation® format
CD-ROM
PlayStation® logo and
designation
Black
DVD-RW (VR mode)
Disc logo
Contents
Disc size
*1 When you position the console vertically and play an 8 cm audio CD, use an optional adaptor.
*2 When playing an 8 cm DVD video or DVD-RW disc, always place the console in the horizontal position.
*3 The term “DVD videos” refers to DVD-VIDEO, DVD-R, DVD+R, DVD+RW discs as well as DVD-RW discs recorded in
Video mode.
Audio
12 cm 8 cm
Audio and video
*1
12 cm
The “DVD VIDEO” and “DVD-RW” logos are trademarks.
8 cm
*2
Audio and video
12 cm
8 cm
*2
Notes on the playback of DVD-R/DVD-RW/
DVD+R/DVD+RW discs*
Some discs recorded using DVD-R/DVD-RW/
DVD+R/DVD+RW devices may not be
playable due to scratches, dirt, dust,
fingerprints or problems encountered during
recording, or due to the state of the disc when
the recording was made. Only discs that have
been finalized (a process that concludes
recording) after recording are playable.
Video recorded on CPRM (Content Protection
for Recordable Media) compatible DVD-RW
discs using the copy-once capability, will not
play that section of video, and the message
"Playback is restricted. Cannot play." will be
displayed. For details, refer to the instructions
supplied with the DVD recording device.
(CPRM is a copy protection system with
scramble capability for recorded “copy-once”
broadcast programs.)
* For details on each type of DVD media, refer to the
Glossary on page 31 of this instruction manual.
Irregularly shaped discs
Do not use irregularly shaped CDs or DVDs
(for example, heart- or star-shaped discs) as
they may cause the console to malfunction.
Notes on playback operations of DVD
video
• This console plays back DVD video as originally
designed by the software producers. Some of the
playback features of this console may not have been
incorporated into the DVD video design. As a result
some playback features may not be available with
certain software. Refer to the instructions supplied
with your DVD video for details.
• In rare instances, certain DVD videos may not
operate properly with PlayStation
primarily due to variations in the manufacturing
process or software encoding of the DVD video
software. If you experience problems, try restarting
your DVD video. If problems persist, for more
information call the publisher of the DVD video or
contact Sony Mexico’s customer service.
2. This is
®
DVD video systems and regional restrictions
•Some DVD VIDEOs are marked with region
numbers such as 4. The number contained
within the symbol represents the region
number of DVD players on which the disc can
be played. DVD VIDEOs that do not bear this
symbol, or that do not display the number 4
cannot be played on your console.
•DVD VIDEOs with the
ALL
label can also be
played on this console.
If you attempt to play any other DVD
VIDEOs, a message stating “This disc cannot
be played due to regional restrictions” will
appear on the screen.
•Some DVD VIDEOs that have no region code
markings may still be subject to area
restrictions and may not be playable on the
console.
Page 5
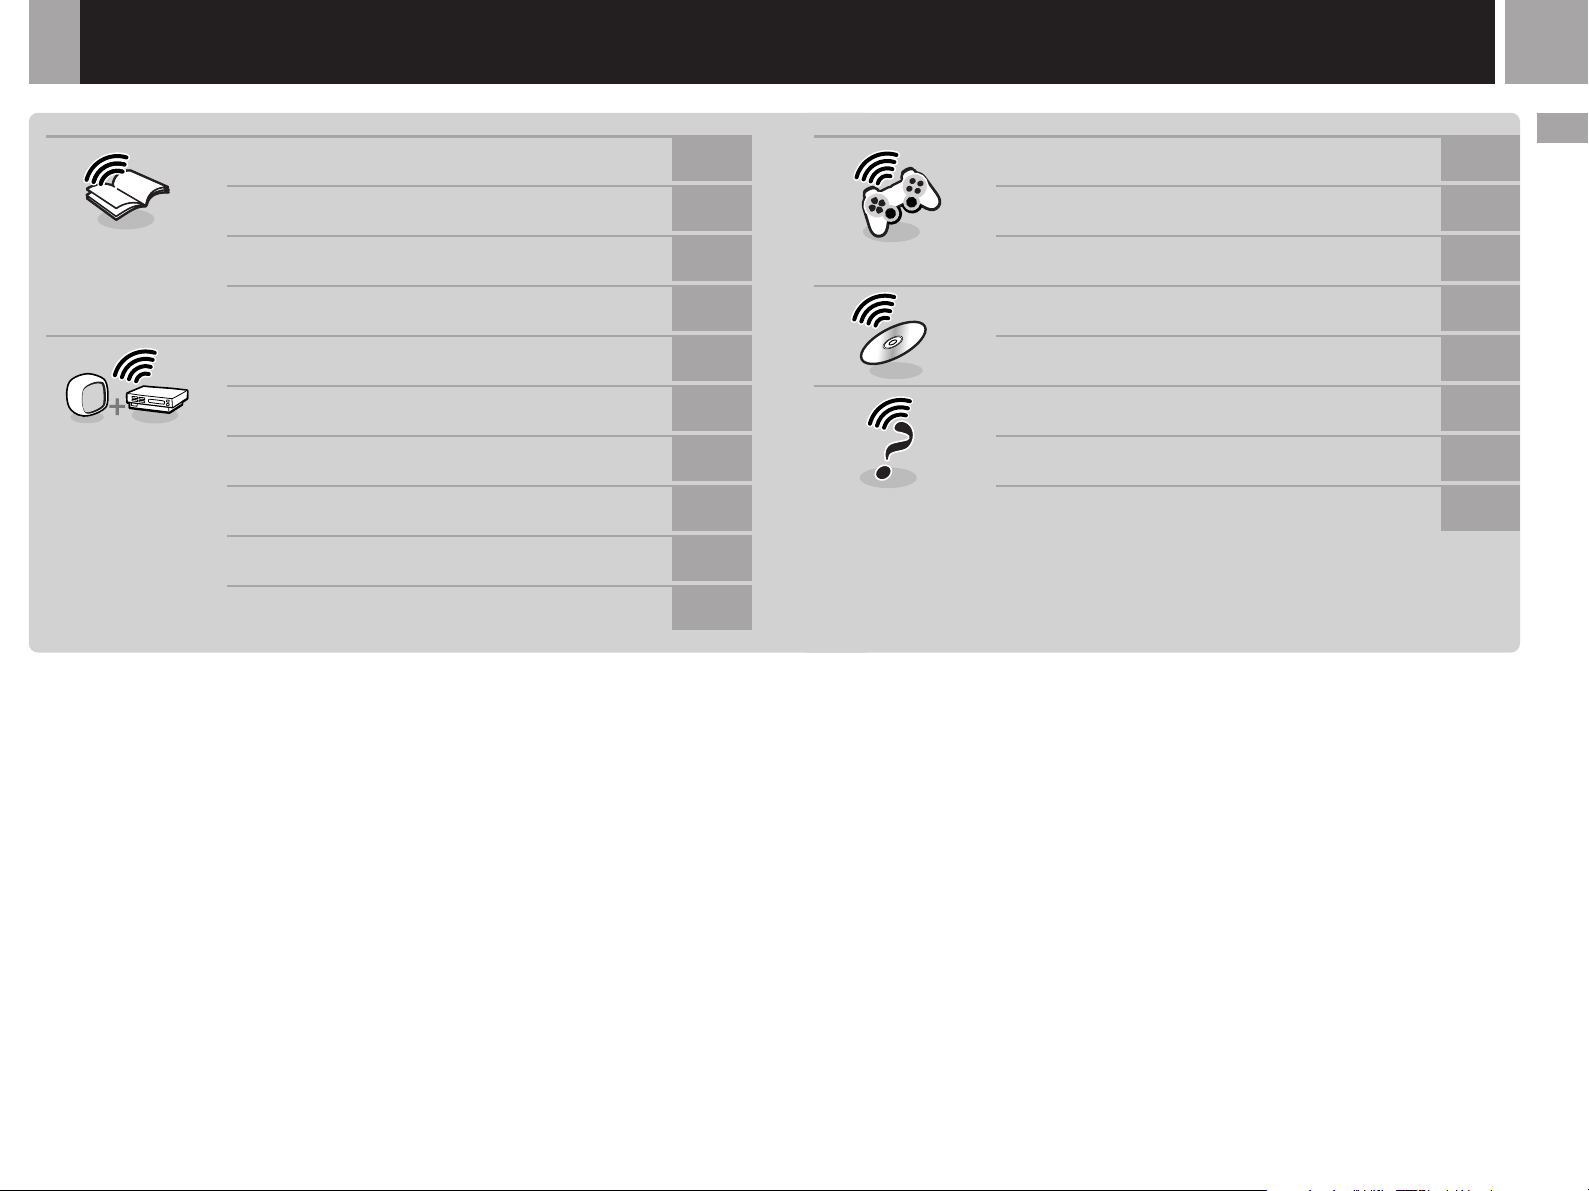
Table of contents
WARNING
2
Playing a game
5
US
Getting started
13
Getting started
Connection
Precautions
Discs that can be played with the PlayStation®2 console
Important safeguards
Checking the package contents
Positioning the console
Connecting your console to a TV set
Connecting digital audio equipment
Connecting other digital equipment
Using the main menu
3
4
6
8
8
9
10
11
11
Games / Audio CDs
DVD videos
Additional information
Using memory cards
Playing an audio CD
Playing a DVD video
Settings and adjustments for the DVD player
Troubleshooting
Specifications
Glossary
15
15
17
22
29
31
31
Page 6
6
Important safeguards
For your protection, please read these safety instructions
completely before operating the PlayStation®2 console, and
keep this manual for future reference.
Carefully observe all warnings, precautions and instructions
on the console, or those described in the instruction manual
and adhere to them.
USE
Power sources
This console should be operated only from the type of power
source indicated on the marking label. If you are not sure of the
type of electrical power supplied to your home, consult your
dealer or local power company. For those units designed to
operate from battery power, or other sources, refer to the
operating instructions.
Grounding or polarization
The console is equipped with a polarized AC power cord plug (a
plug having one blade wider than the other). This plug will fit
into the power outlet only one way. This is a safety feature. If you
are unable to insert the plug fully into the outlet, try reversing the
plug. If the plug should still fail to fit, contact your electrician to
have a suitable outlet installed. Do not defeat the safety purpose
of the polarized plug by forcing it in.
Overloading
Do not overload wall outlets, extension cords or convenience
receptacles beyond their capacity, since this can result in fire or
electric shock.
Dust and foreign matter
Do not allow dust or foreign matter to build up around the ~AC
IN connector. Before connecting or plugging in the AC power
cord, check that there is no dust or foreign matter in or on the
power plug or connecting end of the cord, the socket of the wall
outlet or the ~AC IN connector on the console rear. Dust or other
matter on the connectors can result in fire or electrical shock.
Liquid and foreign objects
Never push objects of any kind, other than authorized items, into
the console openings as they may touch dangerous voltage points
or short out parts that could result in a fire or electrical shock.
Never spill liquid of any kind on the console.
Attachments
Do not use attachments not recommended by the manufacturer,
as they may cause hazards.
Cleaning
Refer to the precautions section of this manual (page 3) for a
complete description of a safe method for cleaning the exterior of
the console.
INSTALLATION
Water and moisture
Do not use the powerline operated console near water – for
example, near a bathtub, kitchen sink, in a wet basement or near a
swimming pool.
Power cord protection
Route the power cord so that it is not likely to be walked on or
pinched by items placed upon or against it, paying particular
attention to the plugs, receptacles, and the point where the cord
exits from the console.
Ventilation
The slots and openings in the console exterior are provided for
necessary ventilation. To ensure reliable operation of the console,
and to protect it from overheating, these slots and openings must
never be blocked or covered.
– Never cover the slots and openings with a cloth or other
materials.
– Never block the slots and openings by placing the console on a
bed, sofa, rug or other similar surface.
Accessories
Do not place the console on an unstable cart, stand, bracket or
table. The console may fall, causing serious injury to a child or an
adult, and serious damage to the console.
Use only the vertical or horizontal stand or other accessories
recommended by the manufacturer to stabilize the console.
An appliance and cart combination should be moved with care.
Quick stops, excessive force, and uneven surfaces may cause the
appliance and cart combination to overturn.
Page 7
7
– Never place the console in a confined space, such as a bookcase,
or built-in cabinet, unless proper ventilation is provided.
– Do not place the console near or over a radiator or heat register,
or where it is exposed to direct sunlight.
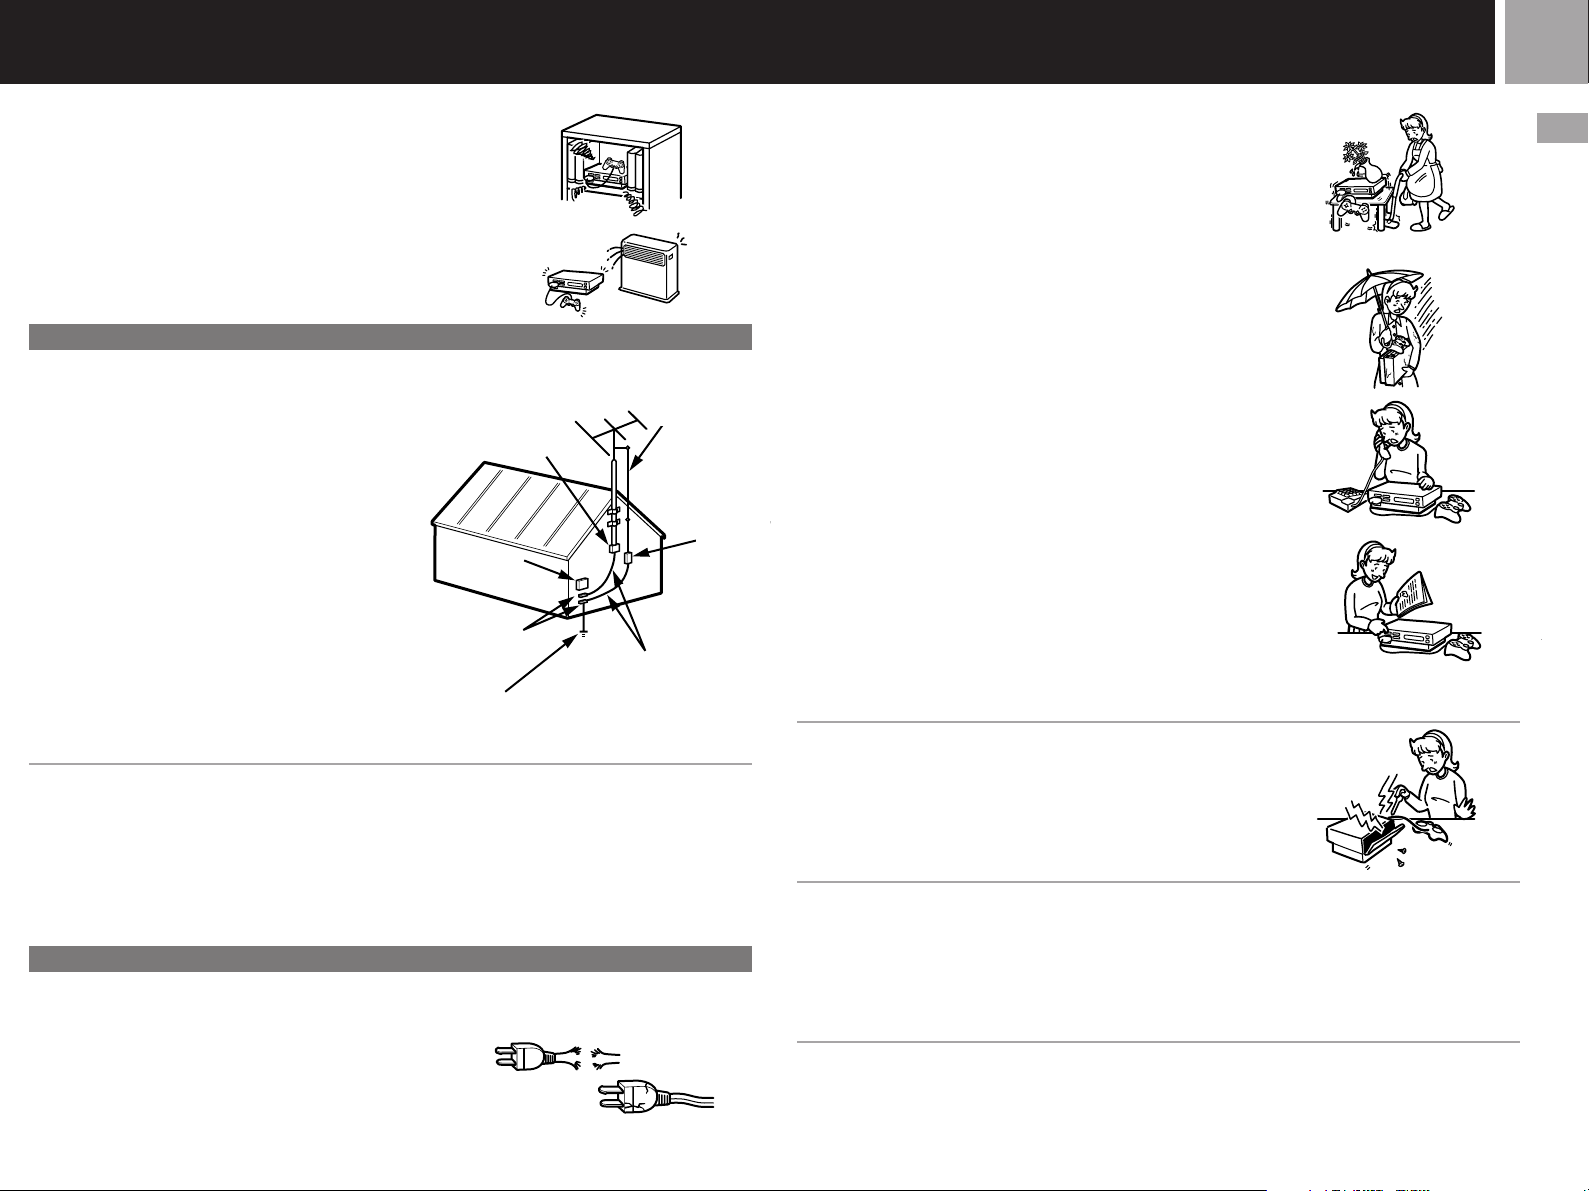
ANTENNAS
Outdoor antenna grounding – If an outdoor antenna or
cable system is installed, follow the precautions below.
An outdoor antenna system should not be located in the
vicinity of overhead power lines or other electric light or
power circuits, or where it can come in contact with
such power lines or circuits.
WHEN INSTALLING AN OUTDOOR ANTENNA
SYSTEM, EXTREME CARE SHOULD BE TAKEN TO
KEEP FROM CONTACTING SUCH POWER LINES
OR CIRCUITS AS CONTACT WITH THEM IS
ALMOST INVARIABLY FATAL.
Be sure the antenna system is grounded so as to provide
some protection against voltage surges and built-up
static charges. Section 810 of the National Electrical
Code provides information with respect to proper
grounding of the mast and supporting structure,
grounding of the lead-in wire to an antenna discharge
unit, size of grounding conductors, location of antennadischarge unit, connection to grounding electrodes, and
requirements for the grounding electrode.
Ground clamps
Power service grounding
electrode system
(NEC Art 250, Part H)
Lightning
For added protection of this console during a lightning storm, or
when it is left unattended and unused for long periods of time,
unplug it from the wall outlet, and disconnect the antenna or
cable system. This will prevent damage to the console due to
lightning and power-line surges. Do not touch the console during
a lightning storm as this may expose you to the risk of electrical
shock.
SERVICE
Damage requiring service
Unplug the console from the wall outlet and refer servicing to
qualified service personnel under the following conditions:
– When the AC power cord or plug is damaged or frayed.
Ground clamp
Electric
service
equipment
Grounding conductors
(NEC Section 810-21)
NEC- National Electrical Code
FRAYED OR TAUT AC power cord
CRACKED PLUG
Antenna lead-in
wire
Antenna
discharge unit
(NEC Section
810-20)
– If liquid has been spilled or objects have fallen onto the console.
– If the console has been exposed to rain or water.
– If the console has been subject to excessive physical shock by
being dropped, or the console exterior has been damaged.
– If the console does not operate normally when following the
instruction manual. Adjust only those controls that are specified
in the instruction manual. Improper adjustment of other
controls may result in damage and will often require extensive
work by a qualified technician to restore the console to normal
operation.
– When the console exhibits a distinct change in performance –
this indicates a need for service.
Servicing
Do not attempt to service the console yourself, as removing the
exterior casing may expose you to dangerous voltage or other
hazards.
Refer all servicing to an authorized service center. Call
01-800-759-7669 or 5002-9819 to receive instructions on obtaining
repair/replacement services.
Replacement parts
When replacement parts are required, be sure the service
technician has used replacement parts specified by the
manufacturer that have the same characteristics as the original
parts.
Unauthorized substitutions may result in fire, electric shock, or
other hazards.
Safety check
Upon completion of any service or repairs to the console, ask the
service technician to perform routine safety checks (as specified
by the manufacturer) to determine that the unit is in safe
operating condition.
US
Getting started
Page 8
8
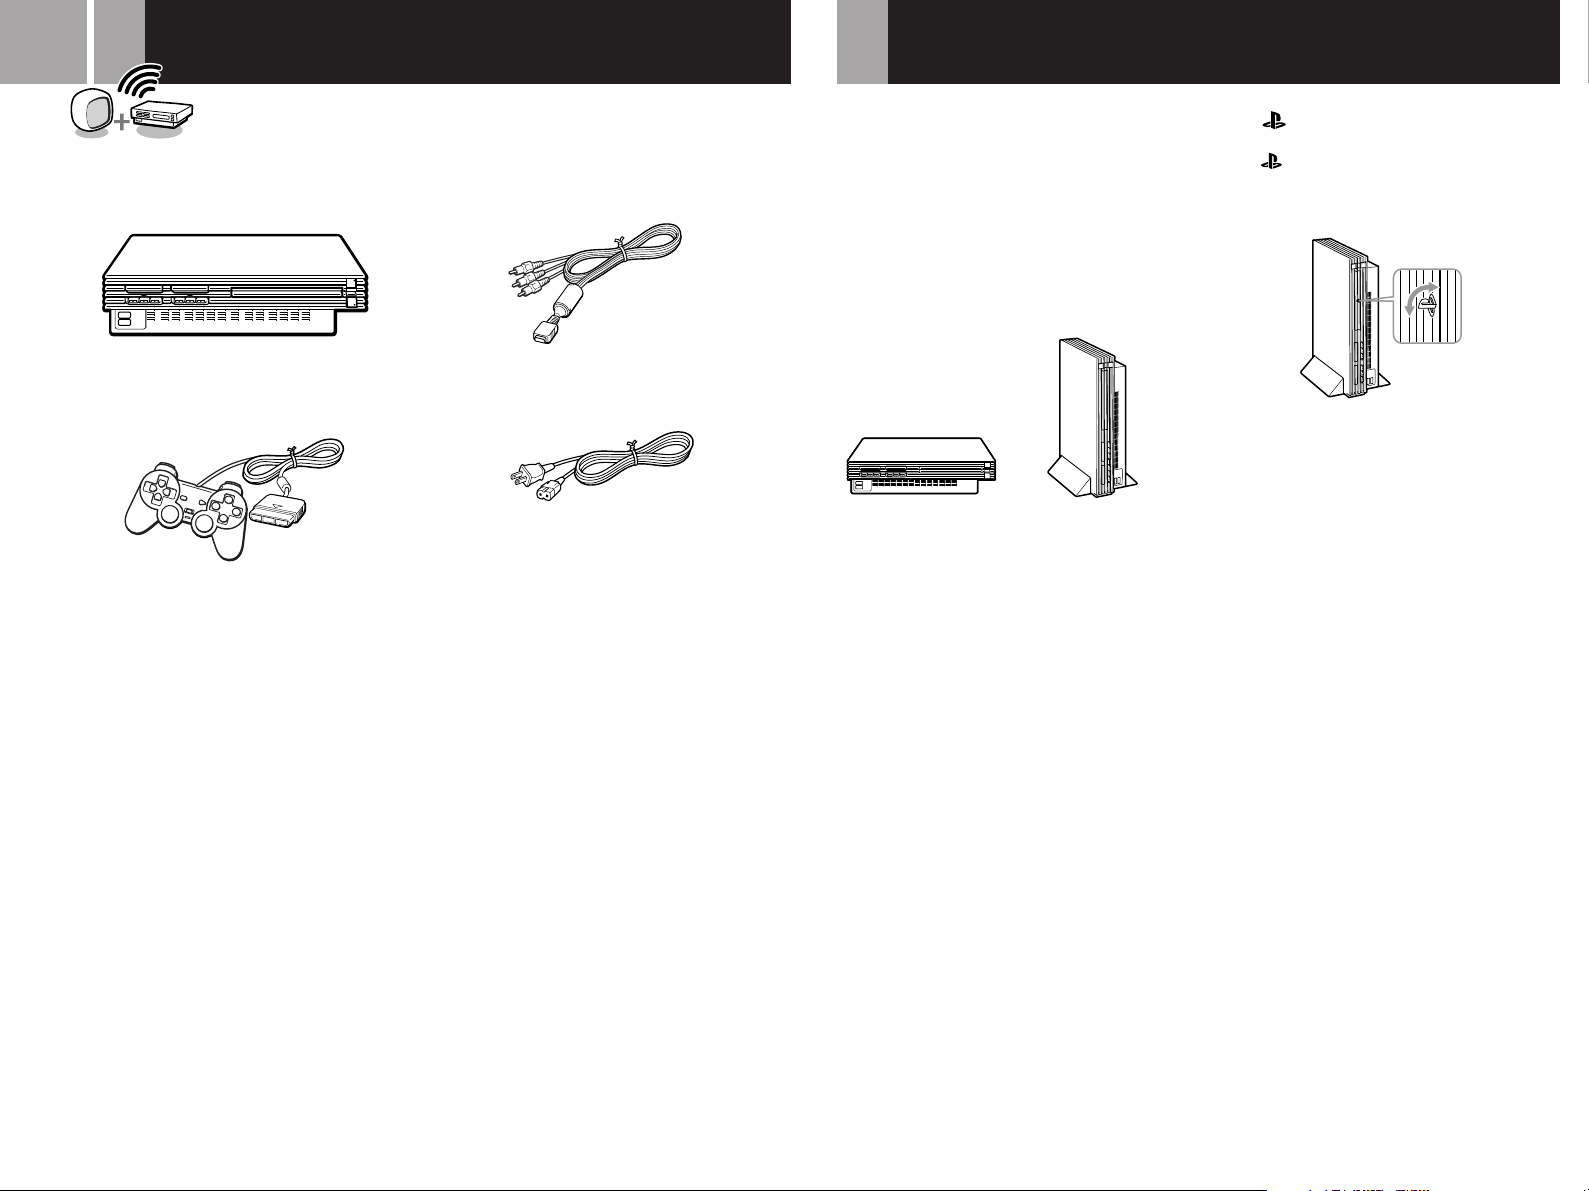
Checking the package contents
Positioning the console
Check that you have the following items:
• PlayStation
• Analog controller (DUALSHOCK®2)
• Instruction manual (1 set)
If any items are missing, contact our technical support line at 01-800-759-7669 or 5002-9819.
®2 console
• AV cable (integrated audio/video)
• AC power cord
You can position the console either horizontally
or vertically.
When positioning the console vertically, use the
SCPH-10040 U vertical stand (for PlayStation®2)
(sold separately). If a vertical stand (for
PlayStation®2) is not available, set the console
in the horizontal position as shown below.
When positioning the console horizontally, you
can use the SCPH-10110
PlayStation®2) (sold separately).
Notes
•
Do not place the console in any position other than the
horizontal or vertical positions as doing so may damage it.
•
Do not change the position of the console while it is in
operation. Doing so may damage the disc or cause the
console to malfunction.
U
horizontal stand (for
Vertical positionHorizontal position
The ” ” product family logo on the disc
tray
The “ ” product family logo on the disc tray
can be rotated to match the horizontal or
vertical positioning of the console.
Logo adjustment
Page 9

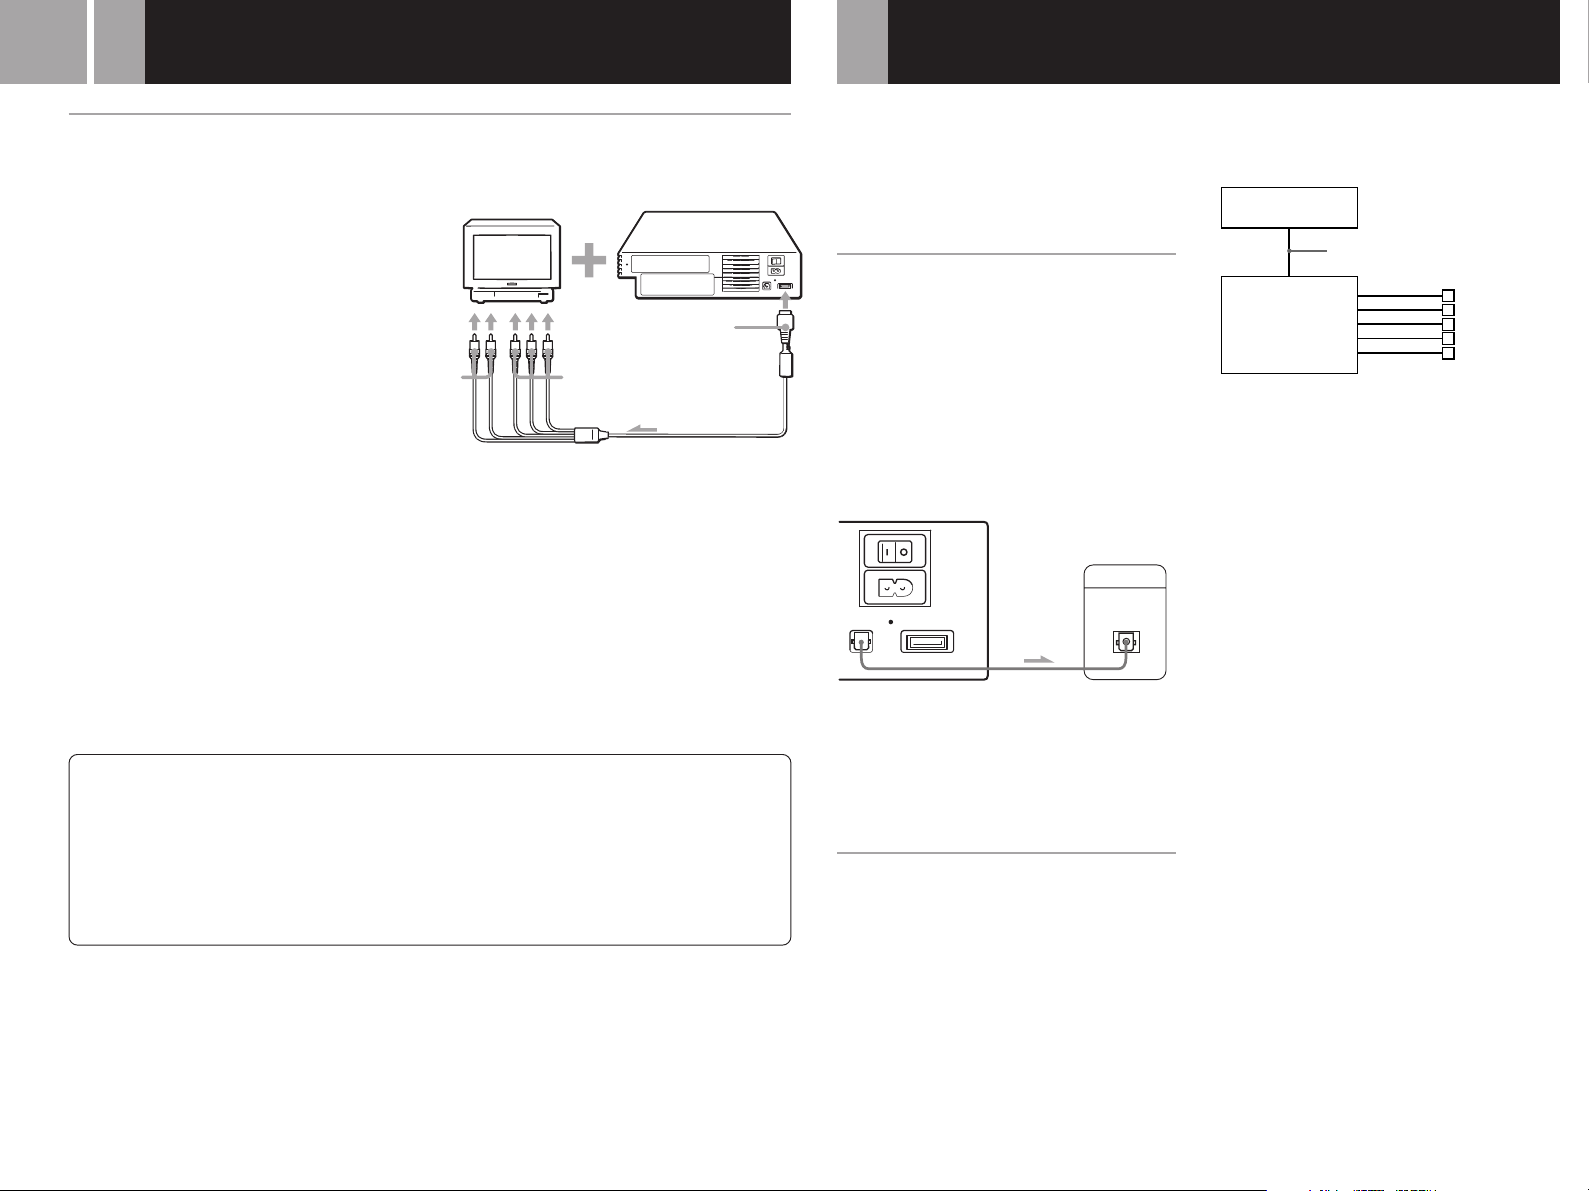
Connecting your console to a TV set
9
You can connect the PlayStation®2 console to most TVs or VCRs using the supplied AV cable
(integrated audio/video) as described below. The console can also be connected to other types of TVs
using specialized cables and adaptors, which are sold separately. For details, see the following
sections:
•Connecting to a TV with an S VIDEO input connector (this page)
•Connecting to a TV with an antenna input (this page)
•Connecting to a TV with component video input connectors (page 10)
The instructions in the above sections assume audio output through TV speakers.
Caution
For safety reasons, turn off the console and remove the power plug from the electrical outlet before making or adjusting
connections.
Note
If the picture quality is reduced when using progressive scan with a TV that supports progressive scan, try viewing in
standard interlace mode. For details on progressive mode, see “Progressive” on page 25.
Connecting to a TV with audio/video inputs
Connect your PlayStation®2 console to the TV using the supplied AV cable (integrated audio/video).
When connecting, match the color-coded cords to the appropriate jacks on the components: yellow
(video) to yellow, red (right audio) to red and white (left audio) to white.
After connecting
Set your TV to the appropriate video input mode. Refer to the instruction manual supplied with your
TV for details.
When connecting to a wide screen TV (16:9 aspect ratio)
Set “Screen Size” in the System Configuration menu to “16:9.” For details on the System
Configuration menu, see pages 11-12.
If your TV is monaural
Do not connect the red plug. If you want to hear both left and right sounds from a monaural TV, use a commercially
available dual phono to single phono (stereo to monaural) type audio cable (sold separately).
EXPANSION BAY
Connecting to a VCR
Connect your PlayStation®2 console to the VCR
using the supplied AV cable (integrated audio/
video) matching the plug colors.
If your VCR is monaural, do not connect the
red plug.
However, when playing a DVD video, do not
connect the console to a VCR. If you do,
picture quality may be reduced. Connect the
console directly to the TV.
After connecting
Set your TV and VCR adjustments
appropriately.
Refer to the instruction manuals supplied with
your TV and VCR for details.
When playing a DVD video
VCR
Connect directly
console
2
®
PlayStation
Connecting to a TV with an S VIDEO input connector
Connect your PlayStation®2 console to the
S VIDEO input connector on the TV using the
SCPH-10060 U S VIDEO cable (sold separately).
You will get a better picture than when using
the AV cable (integrated audio/video).
After connecting
Set your TV to the appropriate video input
mode (such as “S VIDEO”).
To S VIDEO
input
To audio input
(left)
To audio input
(right)
TV
To AV MULTI OUT
connector
US
Connection
To video input
To audio input
(left)
To audio input
(right)
DIGITAL OUT (OPTICAL)
connector
AV MULTI OUT
connector
AV cable (integrated audio/video)
AC power cord
MAIN POWER
switch
~ AC IN connector
Connecting to a TV with an antenna input
Connect your PlayStation®2 console to the
antenna input on the TV using the SCPH-10071
RFU adaptor (sold separately). In this case, the
sound is monaural.
After connecting
Set the channel switch on the RFU adaptor and
the channel selector of your TV to VHF channel
CH 3 or CH 4, whichever is not active in your
area.
To antenna
input
To AV MULTI OUT
connector
Page 10
10
Connecting your console to a TV set(continued)
Connecting digital audio equipment
Connecting to a TV with component video input connectors
If your monitor or projector has component
video input connectors (Y, CB/PB, CR/PR),
connect your PlayStation®2 console using the
SCPH-10100 U component AV cable (for
PlayStation®2) (sold separately). This will
provide the best picture.
Before connecting
If you connect your PlayStation®2 console to a
television using the component AV cable
without first setting the “Component Video
Out” option under the System Configuration
menu to “Y Cb/Pb Cr/Pr,” the TV screen
might not display properly. Before connecting
your console with the component AV cable,
first use the supplied AV cable (integrated
audio/video) and make sure that the
“Component Video Out” option is set to
“Y Cb/Pb Cr/Pr.”
Notes
• The PlayStation®2 console is not compatible with
HDTV unless the proper software and connecting
cables are used. Refer to the instruction manual
supplied with your TV for details.
• You must use the component AV cable to view DVD
video in progressive scan. If picture quality is reduced
when using progressive scan, try viewing in normal
(interlace) mode. For details, see “Progressive” on page
25.
About connecting the PlayStation®2
console to a plasma TV or a projection TV
Static, non-moving images, such as DVD menus,
configuration displays or paused images may leave a
faint image permanently on a plasma TV or a projection
TV (except those of LCD screen types) if left on for
extended periods of time. Do not operate the
PlayStation
occur. Refer to the instruction manual supplied with
your TV for details.
®2 console in such a way that this could
To audio
input
Note about bouncing effect
Some TVs or monitors may experience a bouncing effect
in their pictures when using the PlayStation
There is nothing wrong with the PlayStation
or the way it is manufactured. The problem technically
lies within the television. If you encounter such a
problem with your television/monitor, please contact
our technical support line at
9819
.
To AV MULTI OUT
connector
To component
video input
connectors
01-800-759-7669 or 5002-
®2 console.
®2 console
This section explains how to connect the
PlayStation®2 console to audio equipment with
digital connectors (such as Dolby Digital
optical (AC-3) output). Using digital receivers
and amplifiers, you can enjoy features such as
multi-channel sound and surround sound.
Connecting to a receiver or
amplifier, “MD (Minidisc)” deck
or “DAT (Digital Audio Tape)”
deck with a digital connector
Use a commercially available optical digital
cable (sold separately) and set “DIGITAL OUT
(OPTICAL)” in the System Configuration menu
to “On” (the default setting).
For details on the System Configuration menu,
see pages 11-12.
PlayStation®2 console rear
DIGITAL OUT
(OPTICAL)
AV MULTI OUT
MAIN
POWER
~
AC IN
Connected device
DIGITAL INPUT
OPTICAL
Notes
• Refer also to the instructions supplied with the device
to be connected.
• You cannot directly make digital audio recordings of
discs recorded in Dolby Digital format or DTS format
using an MD or a DAT deck.
Connecting to an audio device
with a built-in DTS*1 or Dolby
Digital*2 decoder (DVD video
only)
By connecting to audio equipment with a builtin DTS or Dolby Digital decoder (sold
separately), you can play back sound recorded
on DVD videos in Dolby Digital (AC-3) or DTS
format to reproduce the effect of listening in a
movie theater or concert hall.
Connect the device through the DIGITAL OUT
(OPTICAL) connector using an optical digital
cable (sold separately).
console
2
®
Optical digital cable
(sold separately)
Speakers
PlayStation
Audio device with a
built-in DTS or Dolby
Digital decoder
Settings for the DVD player on your
PlayStation
2 console
®
You may need to adjust settings for the DVD
player depending on the devices to be
connected.
For details on using the Setup display, see
pages 23-28.
• When you connect an audio device with a builtin DTS decoder
Set “DIGITAL OUT (OPTICAL)” to “On” and
then set “DTS” to “On” in the “Audio Setup”
display.
• When you connect an audio device with a builtin Dolby Digital decoder
Set “DIGITAL OUT (OPTICAL)” to “On” and
then set “Dolby Digital” to “On” in the
“Audio Setup” display.
Note
Refer to the operating and setup instructions for the audio
device to be connected.
*1 “DTS” and “DTS Digital Out” are trademarks of Digital
Theater Systems, Inc.
*2 Manufactured under license from Dolby Laboratories.
“Dolby” and the double-D symbol are trademarks of
Dolby Laboratories.
Confidential unpublished works. ©1992-1997 Dolby
Laboratories. All rights reserved.
Page 11
Connecting other digital equipment
Using the main menu
11
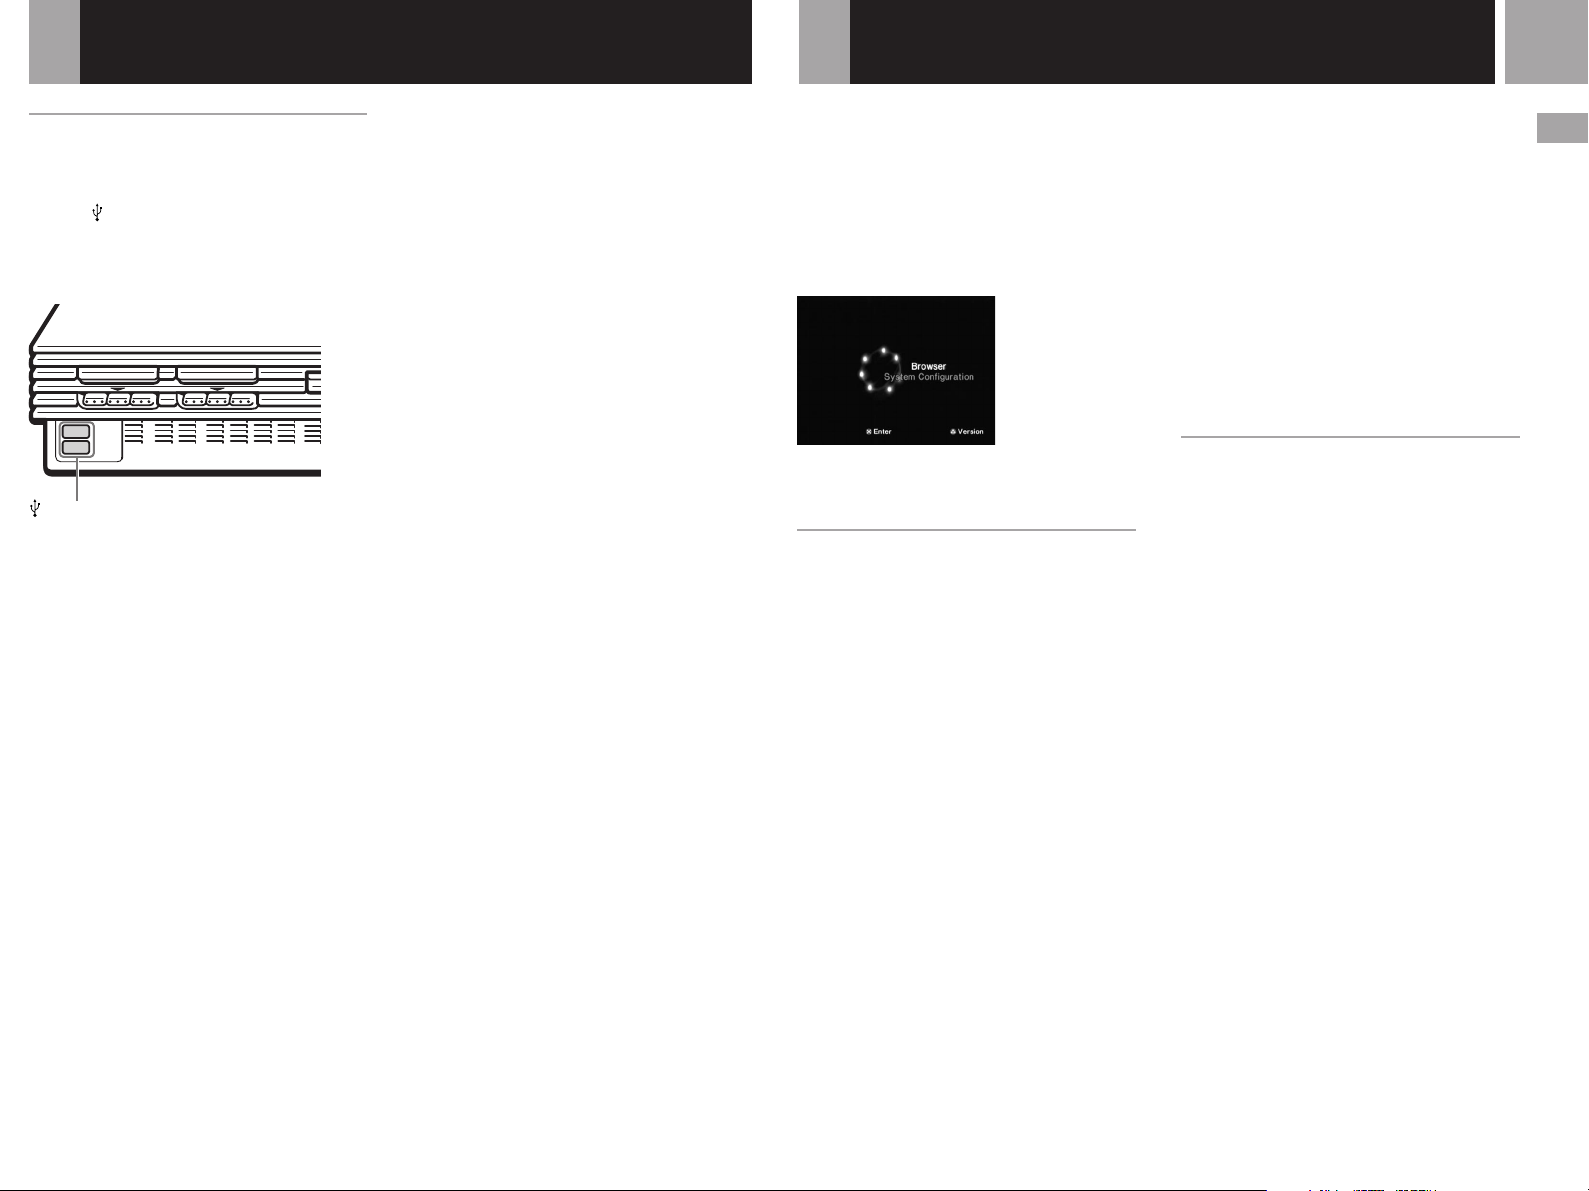
Connecting a device using the
Universal Serial Bus (USB)
interface
The two USB connectors on the front of the
console can be used to connect USB-compatible
devices. Also refer to the instructions supplied
with the device to be connected.
USB connectors
Note
Not all USB-compatible products work with the
PlayStation
compatible product’s user manual for more information.
2 console. See the appropriate USB-
®
When you turn on the console for the first time
you will be prompted to adjust basic language
and time settings. These settings can be
changed later through the System
Configuration menu. For details, see “Using the
System Configuration menu” (pages 11-12).
After setup, the main menu is displayed
whenever you turn on the console without a
disc inserted.
You can move to the Browser screen or the
System Configuration menu from the main
menu.
Using the Browser screen
You can do the following operations using the
Browser screen:
•Check/copy/delete game data on the
memory card (8MB) (for PlayStation®2) or
memory card
•Start PlayStation® or PlayStation®2 format
software
•Play an audio CD
•Play a DVD video
Select “Browser” using the directional buttons
and press the ✕ button.
The Browser screen is displayed.
card (8MB) (for PlayStation®2),
disc inserted in the console are displayed as
icons.
Checking/copying/deleting data
You can copy data from one memory card (8MB)
(for PlayStation®2) or memory card to another or
delete data you no longer wish to keep.
You cannot, however, copy data of the
PlayStation®2 format software to an
SCPH-1020 U memory card.
Insert the memory card (8MB) (for
PlayStation®2) or memory card in advance.
The memory
memory card or
1 Select the icon of the memory
card (8MB) (for PlayStation
memory card where the data you
want to check/copy/delete is
saved, and then press the ✕
button.
®2) or
2 Check/copy/delete data
according to the instructions on
the screen.
Note
While copying or deleting data, do not remove the
memory card (8MB) (for PlayStation
2) or memory card.
®
Using the System Configuration
menu
Using the System Configuration menu, you can
change or update your system settings for the
PlayStation®2 console.
Changes to these settings are saved and remain
in effect even after you turn off the console.
The default settings are underlined.
1 Select “System Configuration”
using the directional buttons and
press the ✕ button.
The System Configuration menu is
displayed.
2 Select the item you want using
the directional buttons and press
the ✕ button.
x Clock Adjustment
Sets the clock.
1 Use the directional buttons to set
the month and then press the
right directional button.
Use the same method to set the day,
year, hour, minute and second. To
return to the previous menu, press the
left directional button.
US
Connection
2 Press the ✕ button to start the
clock.
Page 12

12
Using the main menu(continued)
Select optional settings for the clock
Select “Clock Adjustment” using the
directional buttons and press the ¢ button. You
can set the following optional items.
Time Format
•12 hour clock
•24 hour clock
Date Format
•MM/DD/YYYY
•DD/MM/YYYY
•YYYY/MM/DD
Time Zone
Select the appropriate time zone.
Daylight Savings Time (Summer Time)
Set this item to “Daylight Savings Time
(Summer Time)” when daylight savings time is
in effect.
•Standard (Winter Time)
•Daylight Savings (Summer Time)
x Screen Size
Selects the display mode according to the TV to
be connected.
•4:3 : Select this when you connect a standard
TV to the console.
•Full : Select this when you connect a standard
TV to the console. The black margins on the
upper and lower portions of the screen are cut
off.
•16:9 : Select this when you connect a widescreen TV to the console.
x DIGITAL OUT (OPTICAL)
Selects whether to output signal through the
DIGITAL OUT (OPTICAL) connector.
•On : Select this when you connect with an
optical digital cable (sold separately).
Normally select this option.
•Off : Select this when you do not want sound
signal to be output via the DIGITAL OUT
(OPTICAL) connector.
x Component Video Out
If your TV, monitor or projector has an RGB
input connector or component video input
connectors (Y, CB/PB, CR/PR) that conform to
the output signals of the console, set this item.
When connecting the console using the
supplied AV cable (integrated audio/video) or
S VIDEO cable (sold separately), you do not
need to set this item.
•Y Cb/Pb Cr/Pr : Select this when you connect
the console to the component video input
connectors.
•RGB : Select this when you connect the
console to the RGB input connector.
Note
You can output PlayStation® and PlayStation®2 format
software in either RGB or Y Cb/Pb Cr/Pr format.
However, the PlayStation
override the “Component Video Out” setting in the
System Configuration menu and output all DVD video
software in Y Cb/Pb Cr/Pr.
2 console has been designed to
®
x Remote Control
Set this option when using the DVD remote
control (for PlayStation®2) which is sold
separately.
•Gameplay Function On: Select this when
operating PlayStation®2 or PlayStation
format software using the DVD remote
control.
•Gameplay Function Off: Select this when not
operating PlayStation®2 or PlayStation
format software using the DVD remote
control.
Notes
• When Remote Control is set to “Gameplay Function
On”, some PlayStation
software may stop operating normally when a
controller is removed from controller port 1. Set to
“Gameplay Function Off” if this happens.
• Operation using the DVD remote control buttons may
not work in some cases. Also, the DVD remote control
will not work when you press two or more buttons at
the same time.
• Some unlicensed 3rd party peripherals may not work
with “Gameplay Function” set to “On”. Note that the
use of such peripherals is not recommended and will
void your warranty.
2 or PlayStation® format
®
®
®
x Language
Selects the language for the on-screen display.
•English
•French
•Spanish
•German
•Italian
•Dutch
•Portuguese
Checking version information
You can check version information or settings of
various features.
At the main menu, press the ¢ button.
The Version Information screen is displayed.
The default settings are underlined.
x Auto-diagnosis
The PlayStation
its internal settings for best possible disc
playback.
However, when auto-diagnosis is set to “On”
the console makes additional adjustments that
may allow discs that were previously
unplayable to be played.
2 console automatically adjusts
®
Diagnosis
•Off
•On
1 Select “Console” using the
directional buttons and press the
f button.
2 Select “On” using the directional
buttons and press the ✕ button.
3 Insert a disc.
The console automatically starts the
diagnosis.
Note
The diagnosis setting automatically returns to “Off”
(default setting) when you press the 1/reset button or
start playing a PlayStation
format disc or a DVD video disc.
format disc, PlayStation®2
®
x PlayStation® Driver
The PlayStation® Driver is a program for
loading PlayStation® format software.
Disc Speed
•Standard: Normally select this position.
•Fast: Loading time for a PlayStation® format
software disc can be shortened.
Depending on the software, there may be no
effect or the software may unexpectedly fail.
In this case, select “Standard.”
Texture Mapping
•Standard: Normally select this position.
•Smooth: You can make the display smoother
when playing certain PlayStation® format
software titles.
Depending on the software, there may be no
effect. In this case, select “Standard.”
1 Select “PlayStation® Driver”
using the directional buttons and
press the f button.
2 Select the item you want using
the directional buttons and press
the ✕ button.
Note
Adjusted settings automatically return to
(default setting) when you press the 1/reset
turn off the console.
x Clearing the Progressive setting
You can clear the DVD player’s Progressive
setting.
Clear Progressive Setting
•No
•Yes
“Standard”
button or
1 Use the directional buttons to
select “DVD player”, and press
the f button.
2 Press the ✕ button.
3 Use the directional buttons to
select “Yes” and press the ✕
button.
The Progressive setting is not cleared
immediately after it is turned off. The
setting will only be cleared when the
DVD video starts playback.
4 Press the a button to return to
the main menu. Then use the
directional buttons to select
“Browser”, and press the ✕
button.
5 Use the directional buttons to
select the DVD video icon, and
press the ✕ button.
The DVD player’s Progressive setting
is cleared, and playback begins.
Notes
• This setting can be cleared only when “Progressive” is
set to “On”. When “Progressive” is set to “Off”, the
Options menu under DVD Player is not displayed.
• For details on setting “Progressive” to “On”, see
“Progressive” under “Settings and adjustments for the
DVD player” on page 25.
• The progressive setting is not cleared if any of the
following occur before step 5 is completed:
– The console enters standby mode after the
1 (standby)/reset button has been pressed.
– The console is turned off using the main power
switch on the console rear.
Page 13
Playing a game
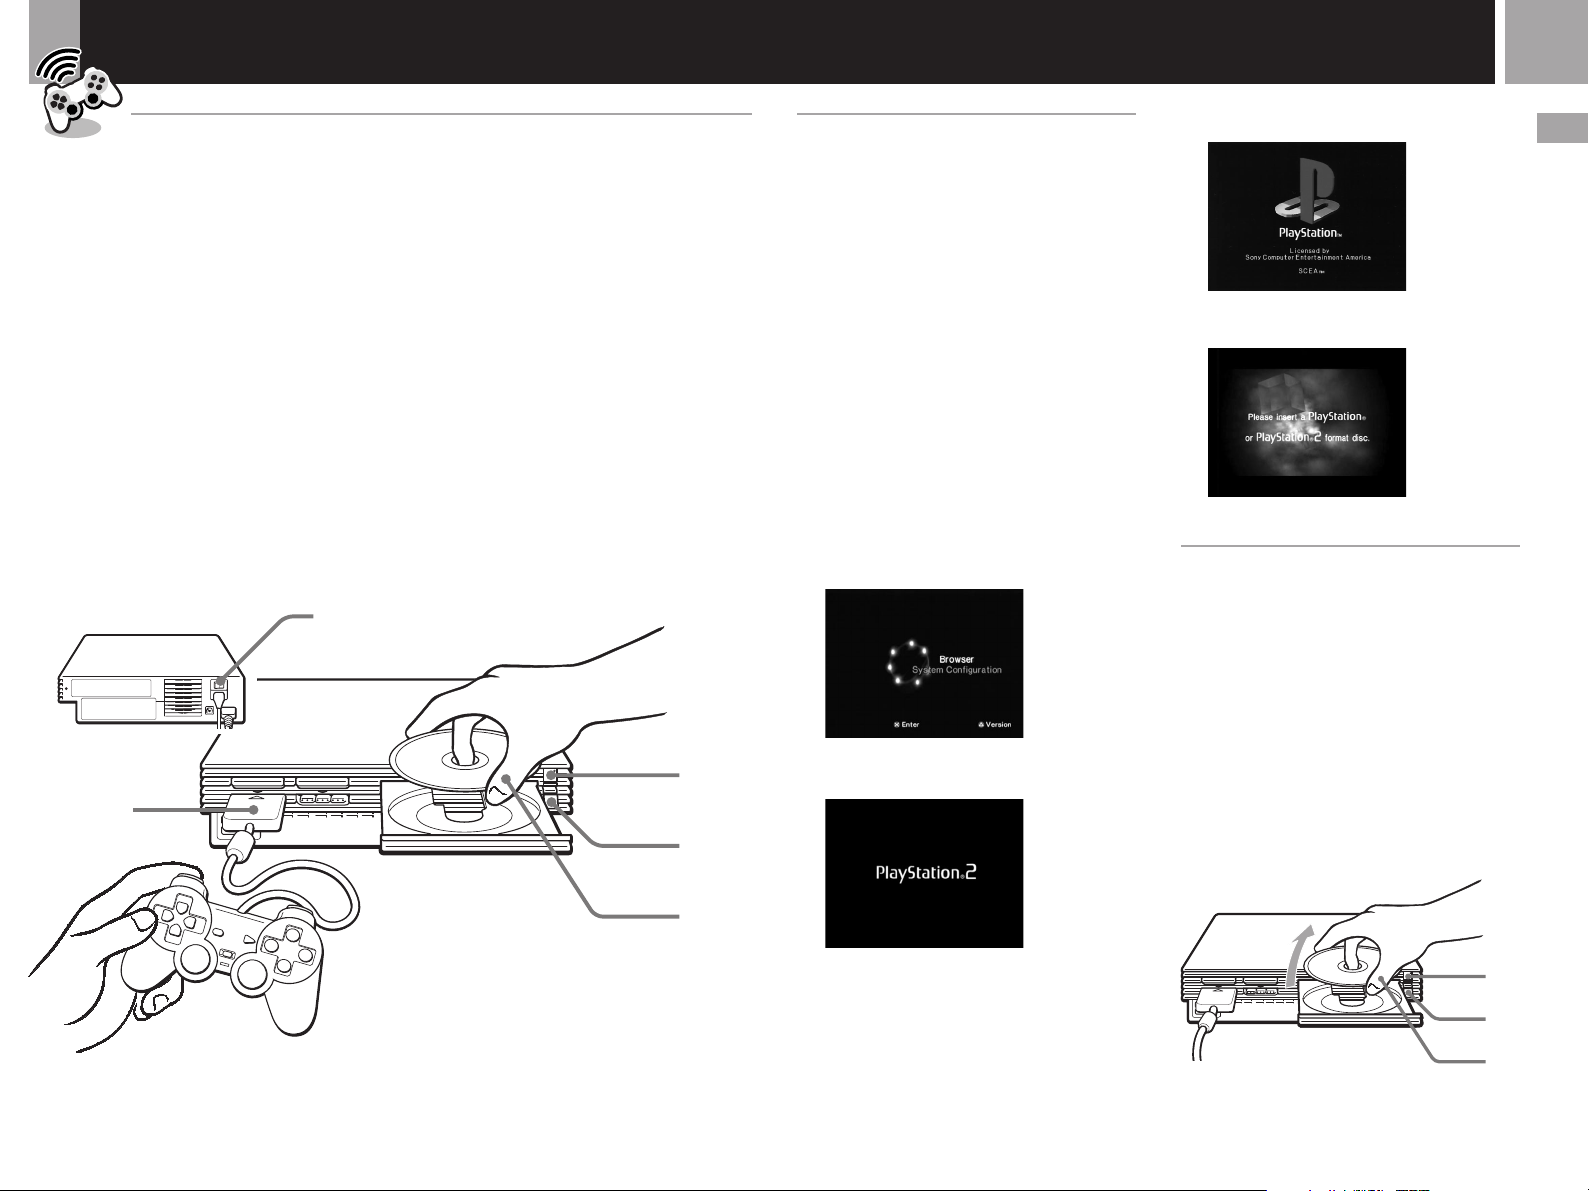
Starting a game
1 Turn on the console using the
main power switch on the
console rear.
The 1 (standby) indicator on the
console front lights up in red to
indicate that the console is now in
standby mode.
2 Press the 1 (standby)/reset
button.
The 1 indicator turns green and the
start-up screen is displayed.
3 Plug the analog controller
(DUALSHOCK
port of the console.
®2) into a controller
1
4 Press the A (open) button.
The disc tray opens.
5 Place a disc on the disc tray with
the label side facing up (data
side down).
6 Press the A button.
The disc tray closes. Screen 2 or 3 is
displayed and the game is ready to
begin.
Note
Set the analog controller (DUALSHOCK®2) to the
appropriate mode for the software (see “Mode switching
and the mode indicator” on page 14). Refer to the
appropriate software manual for details.
Screens that appear at start-up
When turning on the console without first
inserting a disc
Screen 1 is displayed.
•When you insert a PlayStation®2 or
PlayStation® format disc after screen 1 has
appeared, screen 2 or 3 will be displayed
and you can start the game.
•You can move to the Browser screen or the
System Configuration menu from screen 1.
(For details, see “Using the main menu” on
page 11.)
When turning on the console with a disc
already inserted
Depending on the type of disc inserted, screen
2, 3 or 4 will be displayed.
If screen 4 is displayed, it is possible that the
inserted disc is not a PlayStation® or
PlayStation®2 format disc. Check the disc type
(page 4).
1 No disc is inserted (main menu).
3
PlayStation® format CD-ROM is inserted.
4 A disc that cannot be played with the
PlayStation
2 console is inserted.
®
Ending a game
1 Press the A (open) button.
The disc tray opens.
13
US
Games / Audio CDs
3
2
4,6
5
Restarting a game
Press the 1/reset button. (Be sure not to hold
the button down for any length of time, as that
will put the console in standby mode.)
Do not accidentally press the 1/reset button
while playing a game, or the game will restart.
2 PlayStation
CD-ROM is inserted.
2 format DVD-ROM /
®
2 Remove the disc.
3 Press the A button.
The disc tray closes.
4 Press the 1/reset button for
more than three seconds.
The 1 indicator turns red and the
console enters standby mode.
4
1,3
2
Page 14
14
Playing a game (continued)
When not intending to play a game for an
extended period of time
Turn the power off at the main power switch
on the console rear and disconnect the power
plug from the electrical socket.
Changing from one game to
another
There is no need to turn off the console when
you want to change games.
1 Press the A (open) button.
The disc tray opens.
2 Remove the disc.
3 Place a new disc in the disc tray.
4 Press the A button.
The disc tray closes.
5 Press the 1 (standby)/reset
button to reset.
(Note: holding the 1/reset button
down for any length of time may
cause the console to go into standby
mode.)
After the start-up screen, screen 2 or
3 is displayed and the game begins.
Using the analog controller
(DUALSHOCK®2)
•The analog controller (DUALSHOCK®2) can
be used with PlayStation®2 and PlayStation
format software.
•You can switch between digital and analog
modes. When the controller is in analog
mode, the following buttons and sticks may
operate in analog fashion depending on the
features supported by the software title. Refer
to the software manual for details.
PlayStation®2 format software
Directional buttons, ¢ , a , ✕ , s buttons, left
analog stick, right analog stick, L1, R1, L2, R2
buttons
PlayStation® format software
Left analog stick / right analog stick
•You can use the vibration function.
Using the analog controller
(DUALSHOCK
•The analog controller (DUALSHOCK®) can
also be used with PlayStation®2 and
PlayStation® format software.
®) (sold separately)
•You can switch between digital and analog
modes. When in analog mode, you can enjoy
the analog operation of the left analog stick
and right analog stick.
®
PlayStation®2 format software
Left analog stick / right analog stick
PlayStation® format software
Left analog stick / right analog stick
•You can use the vibration function.
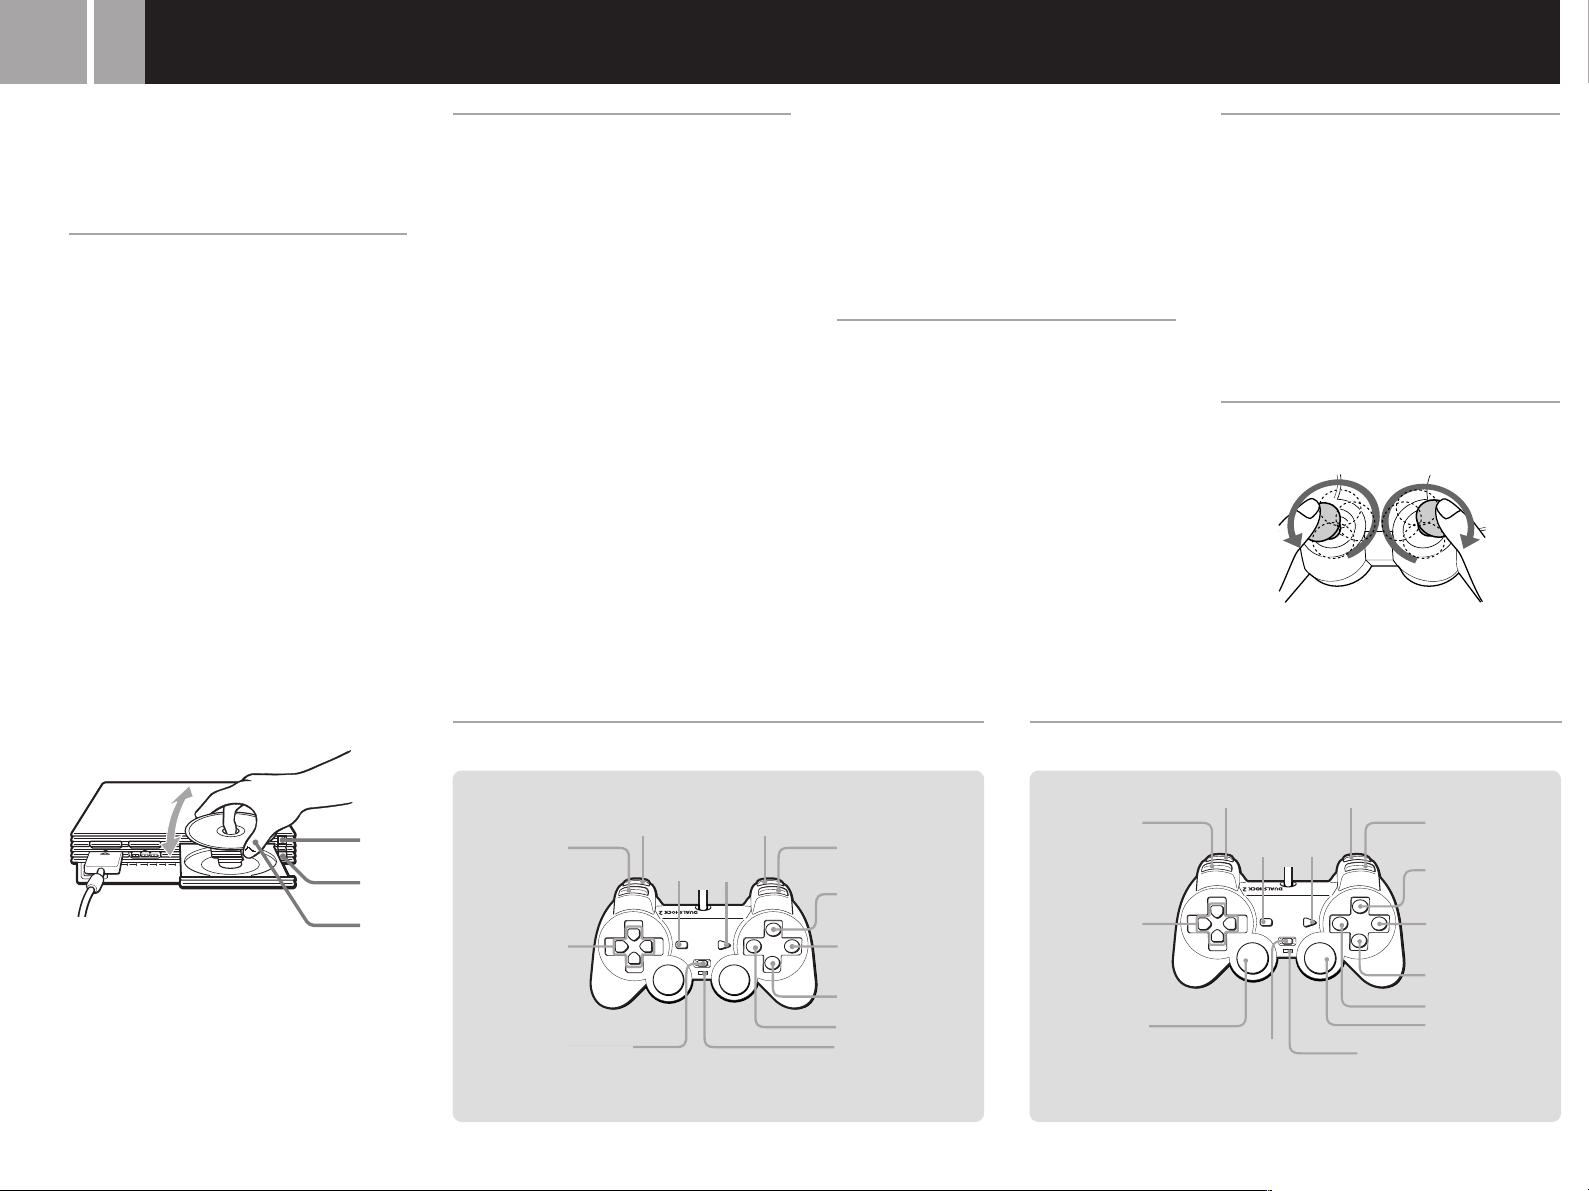
Mode switching and the mode
indicator
The analog controller (DUALSHOCK®2) can be
switched between two modes by pressing the
analog mode button.
Each time the analog mode button is pressed,
the mode changes as follows:
Digital mode (indicator: off)
Xx
Analog mode (indicator: red)
Note
Switch to the appropriate mode for use.
Note, however, that some software makes this adjustment
automatically. In such cases, the analog mode button is
overridden by the software. For details, refer to the
software manual.
Vibration function
The analog controller (DUALSHOCK®2)
features a vibration function when the function
is supported by the software title. The vibration
function can be set to ON or OFF on the
software option screen.
Notes
• When the analog controller (DUALSHOCK®2) is not
being used, turn the console off or unplug the
controller from the console.
• Before using the vibration function, please read “
on safety when using the
(DUALSHOCK
Before using the
®2)
”
on page 3.
analog controller
analog
Notes
controller (DUALSHOCK®2)
After turning the console on, rotate the left and right
analog sticks once with your thumbs before starting a
game. Do not twist the analog sticks, but rotate as if
drawing a circle as shown in the diagram above.
Analog mode (indicator: red)Digital mode (indicator: off)
5
1,4
2,3
Note
With a multi-disc game, follow steps 1 through 4 to switch
discs. Refer to the software manual for details.
L1 button
Directional
buttons
ANALOG mode button
L2 button R2 button
START
SELECT
button
button
R1 button
¢ button
a button
✕ button
s button
Mode indicator: Off
L1 button
Directional
buttons
Left analog stick /
L3 button*
* The R3 and L3 buttons function when the sticks are pressed.
L2 button R2 button
SELECT
button
ANALOG mode button
START
button
Mode indicator: Red
R1 button
¢ button
a button
✕ button
s button
Right analog stick /
R3 button*
Page 15

Using memory cards
Playing an audio CD
15
You can save and load game or other data using
the memory card (8MB) (for PlayStation®2) or
memory card (each sold separately).
Differences between the memory
card (8MB) (for PlayStation®2) and
memory card
When playing PlayStation®2 format
software, use the memory card (8MB*)
(for PlayStation®2) (1).
When playing PlayStation® format software,
use the memory card (2).
For the PlayStation® game console, units of
game data are described as “memory blocks,”
however for the PlayStation®2 console, they are
described as “KB” (kilobytes).
* 8 MB = 8,000 KB
1 Memory card (8MB) (for PlayStation®2)
(sold separately)
The memory card (8MB) (for PlayStation®2)
can save and load PlayStation®2 format
software game data. Each memory card (8MB)
(for PlayStation®2) can save about 8 MB of
game data, but some of this may be used as file
control information.
The memory card (8MB) (for PlayStation®2)
uses MAGICGATE, a technology that helps
protect copyrighted content through data
encryption and hardware authentication.
technology developed by Sony Group.
other products bearing the “MagicGate” trademark.
2 Memory card (sold separately)
The memory card can save and load
PlayStation® format software game data. Each
memory card can save 120 KB (15 memory
blocks) of game data.
Note
You cannot copy data to a memory card (8MB) (for
PlayStation
memory available. Before playing, check how much space
is needed to save the game and how much space is
available on the memory card (8MB) (for PlayStation
memory card. Check the appropriate software manual to
determine the amount of space needed to save the data for
a given game.
is a term of copyright protection
does not guarantee compatibility with
2) or memory card that does not have enough
®
®
2) or
Inserting
the memory card (8MB)
(for PlayStation®2) or memory
card
Insert the memory card (8MB) (for PlayStation®2)
or the memory card into the MEMORY CARD
slot, with the arrow side up.
MEMORY CARD slot 2MEMORY CARD slot 1
Notes on using the memory card (8MB) (for
PlayStation
multitap
•When using PlayStation®2 format software,
use the SCPH-10090 U multitap
(for PlayStation®2).
When using PlayStation® format software,
use the SCPH-1070 UH multitap.
•When you insert the SCPH-1070 UH multitap into
controller port 1, do not insert the memory card
(8MB) (for PlayStation®2) or memory card into
memory card slot 1 of the PlayStation®2
console. This also applies when you insert a
multitap into controller port 2. If you do so, the
data may be lost.
2) or memory card with a
®
Checking/copying/deleting
game data
You can copy game data from one memory
card (8MB) (for PlayStation®2) or memory card
to another or delete data you no longer wish to
keep.
You cannot, however, copy game data of the
PlayStation®2 format software to the memory
card.
You can check, copy and delete game data in
the Browser screen. For details on the browser,
see “Checking/copying/deleting data” on
page 11.
Note
You cannot save or load game data in the Browser screen.
For details on game data saving or loading, refer to the
software manual.
Playing an audio CD
1 Press the A (open) button.
The disc tray opens.
2 Place a disc on the disc tray with
the label side facing up (data
side down).
3 Press the A button.
The disc tray closes.
4 Use the directional buttons to
select the audio CD icon, and
press the ✕ button.
The audio CD screen is displayed.
5 Select the track number you
want to play and press the ✕
button.
Playback begins.
Ending audio CD playback
1 Press the A (open) button.
The disc tray opens.
2 Remove the disc.
3 Press the A button.
The disc tray closes.
4 Press and hold down the
1 (standby)/reset button for
more than three seconds.
The console enters standby mode.
Operating the CD player
The CD player can be operated using the
Control Panel or directly with the buttons on
the analog controller (DUALSHOCK®2). You
can also operate the CD player using the
SCPH-10420 U DVD remote control (for
PlayStation®2), which is sold separately.
During playback, select the icon in the CD
operation screen using the directional buttons.
Then press the X button.
N Start playback
X Pause
x Stop playback
. Find the beginning of the current or
previous track
> Find the beginning of the next track
m Fast reverse
M Fast forward
L2 button:
m (Fast
reverse)
L1 button:
.
(Previous)
SELECT button:
x (Stop)
Music discs encoded with copyright
protection technologies
The audio CD playback feature of this product is
designed to conform to the Compact Disc (CD)
standard. Recently, some record companies have
started marketing music discs encoded with
copyright protection technologies. Some of these
music discs do not conform to the CD standard,
and may not be playable on this product.
START button:
N (Start)/ X (Pause)
R2 button:
M(Fast
forward)
R1 button:
> (Next)
US
Games / Audio CDs
Page 16

16
Playing an audio CD (continued)
Playing in various modes
You can change between various play modes.
The default setting for “Play Mode” is
“Normal”, and the default for “Repeat” is
“Off”.
Select the audio CD icon in the Browser screen,
and then press the f button to change the
settings.
To play the desired tracks in a
specified order
1 Select “Play Mode” using the
directional buttons and press the
✕ button.
2 Select “Program” using the
directional buttons and press the
✕ button.
3 Select the number of the specific
track using the directional
buttons, and then press the ✕
button.
Repeat this step to select all the tracks
you want to play.
4 Press the a button to return to
the Browser screen.
5 Select the audio CD icon and
press the ✕ button.
The tracks are displayed in their
programmed order. Select the track
number you want to play, and press
the ✕ button. Playback begins.
To play the desired tracks repeatedly
Follow steps 1 to 4, and then follow the
instructions on playing all tracks repeatedly, or
on playing one track repeatedly. For details, see
“To play all tracks repeatedly” or “To play a
track repeatedly” at right.
To play the tracks in random
order
1 Select “Play Mode” using the
directional buttons and press the
✕ button.
2 Select “Shuffle” using the
directional buttons and press the
✕ button.
3 Press the a button to return to
the Browser screen.
4 Select the audio CD icon, and
press the ✕ button.
The tracks are displayed in random
order. Select the track number you
want to play, and press the ✕ button.
Playback begins.
To play random tracks repeatedly
Follow steps 1 to 3, and then follow the
instructions on playing all tracks repeatedly, or
on playing one track repeatedly. For details, see
“To play all tracks repeatedly” or “To play a
track repeatedly” below.
To play all tracks repeatedly
1 Select “Repeat” using the
directional buttons and press the
✕ button.
2 Select “All” using the directional
buttons and press the ✕ button.
3 Press the a button to return to
the Browser screen.
4 Select the audio CD icon, and
press the ✕ button.
The tracks are displayed. Select the
track number you want to play, and
press the ✕ button. Playback begins.
To play desired or random tracks repeatedly
Follow steps 1 to 3, then follow the instructions
on playing the desired tracks in a specified or
random order. For details, see “To play the
desired tracks in a specified order” or “To play
the tracks in random order” at left.
To play a track repeatedly
1 Select “Repeat” using the
directional buttons and press the
✕ button.
2 Select “1” using the directional
buttons and press the ✕ button.
3 Press the a button to return to
the Browser screen.
4 Select the audio CD icon, and
press the ✕ button.
The tracks are displayed. Select the
track number you want to play, and
press the ✕ button. Playback begins.
To play a track in Program Play or Shuffle
Play repeatedly
Follow steps 1 to 3, then follow the instructions
on playing desired tracks or tracks in random
order. For details, see “To play the desired
tracks in a specified order” or “To play the
tracks in random order” at left.
You can go to the Play Options screen from
the screen displaying the track numbers.
Select the small audio CD icon on the top left of
the screen using the up or left directional
button, and press the f button.
The Play Options screen is displayed, and you
can operate the CD player in the same manner
as in “Playing in various modes” at left.
Press the a button in the Play Options screen
and the tracks are displayed.
Choose the track you want to play, and press
the ✕ button. Playback begins.
Notes on playing an audio CD with a DTS
audio track
• If you play an audio CD recorded in DTS format, an
extremely loud noise will be emitted from the analog
audio output of an audio device connected to the AV
MULTI OUT connector. Be careful not to cause damage
to your audio system when the audio device's analog
audio output is connected to the receiver (amplifier).
You must connect a DTS decoder to the DIGITAL OUT
(OPTICAL) connector to playback DTS audio tracks.
• When DIGITAL OUT (OPTICAL) is set to "Off" in the
System Configuration menu, you will not be able to
hear the DTS audio from an audio CD even if the audio
device is connected using an optical digital cable.
Page 17
Playing a DVD video
DUALSHOCK
2
17
Playing a DVD video
Depending on the DVD video, some operations
may be different or restricted. Refer to the
instructions supplied with your disc.
1 Turn on the console using the
main power switch on the
console rear.
The 1 (standby) indicator on the
console front lights up in red to
indicate that the console is now in
standby mode.
2 Press the 1 (standby) /reset
button.
The 1 indicator turns green and the
start-up screen is displayed.
3 Press the A (open) button.
The disc tray opens.
4 Place a disc on the disc tray with
the label side facing up (data
side down).
5 Press the A button.
The disc tray closes and DVD content
is displayed on the screen.
Notes
• The PlayStation®2 console is equipped with advanced
playback features that can optimize audio/video
quality. For details on adjusting settings to enable these
advanced features, see pages 22-28.
• If you press the A button during or after playback, the
Browser screen appears.
• When playing a DVD video, do not connect the console
to a VCR. If you do, picture quality may be reduced.
Connect the console directly to the TV.
Ending DVD video playback
When you have finished viewing a DVD,
follow the steps below to save DVD player
settings, return to the Browser screen or put the
console in standby mode.
1 Press the A (open) button.
The disc tray opens and the Browser
screen is displayed.
2 Remove the disc.
3 Press the A button to close the
disc tray.
4 Press and hold down the 1/reset
button for more than three
seconds.
The 1 indicator turns red and the
console enters standby mode.
Note
To save changes to DVD player settings you must eject the
DVD before pressing the 1 (standby)/reset button or
turning off the console using the main power switch on
the console rear.
If you experience problems playing a DVD video:
In rare instances, certain DVD videos may not operate
properly with PlayStation
variations in the manufacturing process or software
encoding of the DVD video software. If you experience
problems, try restarting your DVD video. If problems
persist, for more information call the publisher of the
DVD video or contact Sony Mexico’s customer service.
®2. This is primarily due to
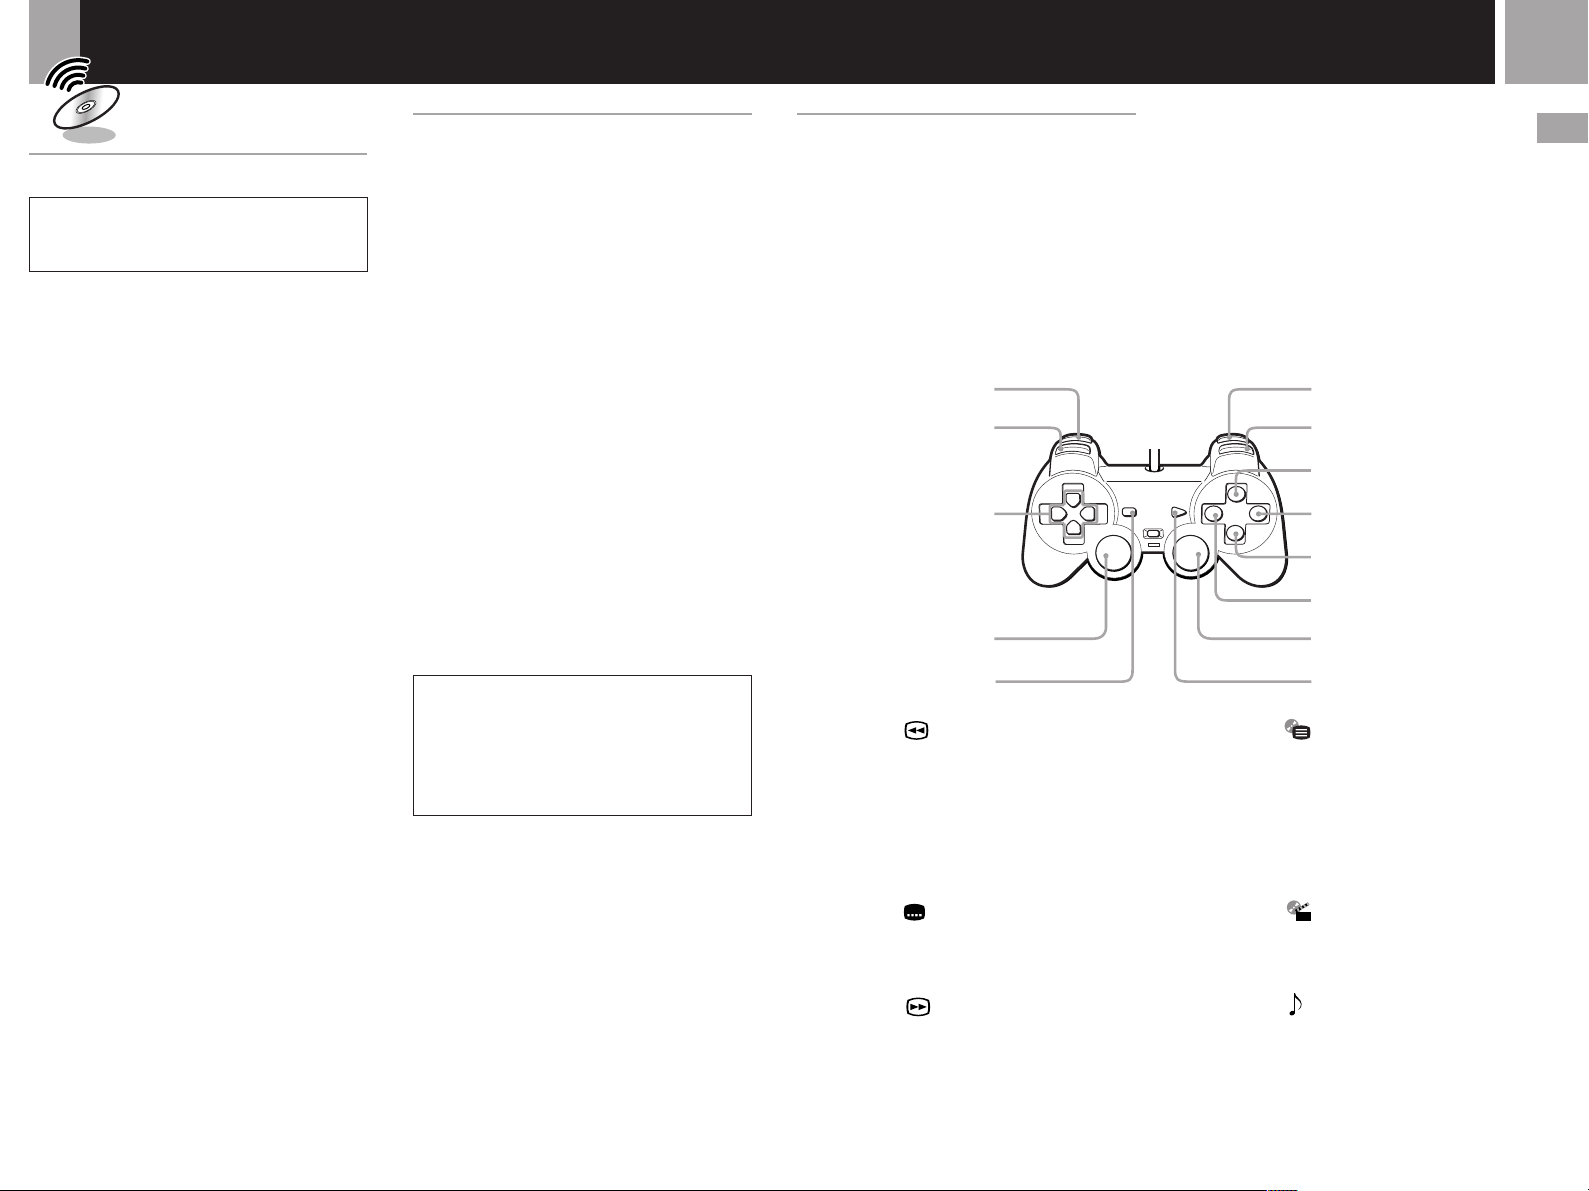
Operating the DVD player
There are three ways to operate the DVD
player:
•You can operate the DVD player directly
using the analog controller (DUALSHOCK®2)
as explained below.
•You can operate the DVD player through the
on-screen Control Panel. The Control Panel
allows access to additional DVD player
options and settings. For details, see “Using
the Control Panel” on page 18.
1
2
3
4
5
1 L2 button ( Fast Reverse Search)
Fast reverses playback on the screen to aid
in looking for a particular scene.
2 L1 button (. Previous)
Returns to the beginning of the current or
previous chapter.
3
Up, down, right, and left directional buttons
Used to select items displayed on the screen.
4 L3 button ( Subtitle Options)
Displays and changes DVD subtitle options.
5 SELECT button
Displays the Control Panel.
6 R2 button ( Fast Forward Search)
Fast forwards playback on the screen to aid
in looking for a particular scene.
7 R1 button (> Next)
Skips to the beginning of the next chapter.
*
•You can also operate the DVD player using
the DVD remote control (for PlayStation®2),
which is sold separately.
Using the analog controller (DUALSHOCK®2)
The function of each button on the analog
controller (DUALSHOCK®2) is explained
below.
Note
The direct button functions of the analog controller
(DUALSHOCK
is displayed.
2) cannot be used when the Control Panel
®
6
7
8
9
q;
qa
qs
qd
8 f button ( Menu)
Displays the disc menu of DVD-Video
discs. The content of the menu varies from
disc to disc.
9 a button (x Stop)
Stops playback.
0 ✕ button (Enter)
Enters the item selected on the screen.
qa s button ( Top Menu)
Displays the disc menu of DVD-Video
discs. The content of the menu varies from
disc to disc.
qs R3 button ( Audio Options)
Displays and changes DVD audio options.
qd START button (N Play/X Pause)
Starts playback/Pauses and resumes
playback.
* When using a controller without the L3 or R3 buttons,
use the Control Panel to select among available subtitle
and audio options.
*
US
DVD videos
Page 18
18
Playing a DVD video (continued)
Using the Control Panel
You can select various playback modes and
adjust DVD player settings using the on-screen
Control Panel.
Navigate the Control Panel using the analog
controller (DUALSHOCK®2) as described
below.
DUALSHOCK
2
buttons
Display or turn off
the Control Panel
Enter
Cancel
Select
SELECT
button
SELECT button
✕ button
a button
Up, down, left, and right
directional buttons
a button✕ buttonDirectional
1 Press the SELECT button.
The Control Panel is displayed.
2 Select the item you want using
the directional buttons.
3 Press the ✕ button.
For details on each Control Panel
display item, see pages 19-28.
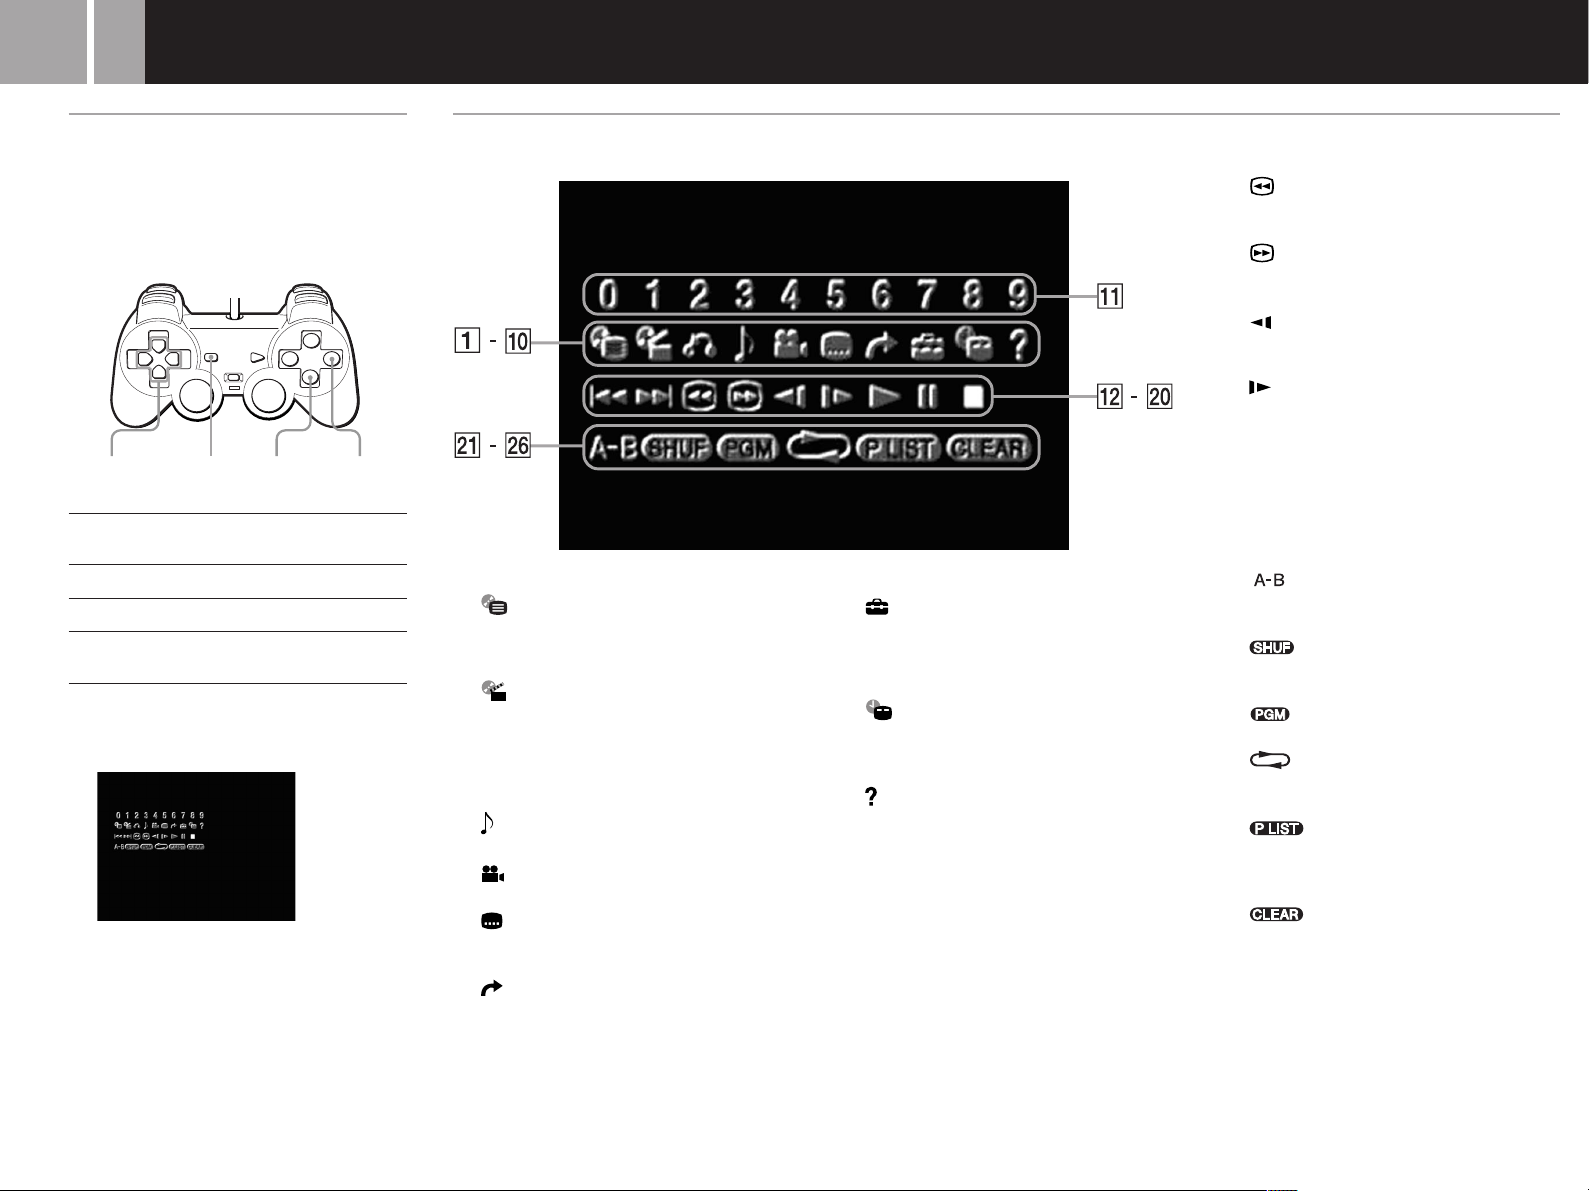
Control Panel item list
1 Menu (page 19)
Displays the disc menu of DVD-Video
discs. The content of the menu varies from
disc to disc.
2 Top Menu (page 19)
Displays the disc menu of DVD-Video
discs. The content of the menu varies from
disc to disc.
3 O Return (page 19)
Returns to the previously selected screen.
4 Audio Options (page 22)
Displays and changes DVD audio options.
5 Angle Options (page 22)
Displays and changes DVD viewing angles.
6 Subtitle Options (page 22)
Displays and changes DVD subtitle
options.
7 Go To (page 22)
Skips to the selected title or chapter
number or the specified time, and starts
playback.
8 Setup (page 23)
Displays the Setup display for changing
various picture and audio options. You can
also choose a language for subtitles and the
menu, set Parental Control level, and so on.
9 Time Display (page 22)
Displays the current title or chapter
number, and the elapsed or remaining
time.
0 Help (page 22)
Displays the direct button functions of the
analog controller (DUALSHOCK®2).
qa Go to Chapter (page 22) /Number icons
Used to enter the number of a chapter you
wish to play, or numerical codes.
qs . Previous
Returns to the beginning of the current or
previous chapter.
qd > Next
Skips to the beginning of the next chapter.
qf Search (page 23)
Fast reverses playback on the screen to aid
in looking for a particular scene.
qg Search (page 23)
Fast forwards playback on the screen to aid
in looking for a particular scene.
qh Slow (page 23)
Changes to reverse playback in slowmotion.
qj Slow (page 23)
Changes to playback in slow-motion.
qk N Play
Starts playback.
ql X Pause
Pauses and resumes playback.
w; x Stop
Stops playback.
wa A-B Repeat (page 21)
Specifies a scene for playback, and starts
playback of the scene that has been set.
ws Shuffle Play (page 20)
Starts playback of titles or chapters in
random order.
wd Program Play (page 19)
Displays the Program setup screen.
wf Repeat Play (page 20)
Selects repeated playback of all the titles on
the disc, or one title or chapter.
wg Original/Play List (page 21)
For DVD-RW discs recorded in VR mode.
Selects Original or Play List content to play
back.
wh Clear
Clears selected numbers or playback
modes.
Page 19
19
You can use the Control Panel to set various
playback modes.
Using the DVD disc menu
Some DVDs allow you to select disc contents
from a menu. When you play such DVDs, you
can select the language for the subtitles, the
language for the sound, and other options
using the menu.
1 Use the directional buttons to
select the
Menu) icon, and press the ✕
button.
The menu is displayed. Menu content
may vary depending on the DVD.
(Menu) or (Top
2 Use the directional buttons to
select an item, and press the ✕
button.
To return to the previous screen in the
menu
Use the directional buttons to select the O
(Return) icon, and press the ✕ button.
This function may not be available on some
DVDs.
Using the analog controller
(DUALSHOCK
®2)
1 Press the f or s button.
The menu is displayed. Menu content
may vary depending on the DVD.
2 Use the directional buttons to
select an item, and press the ✕
button.
Notes
• Some DVDs do not have a menu.
• Depending on the DVD, a menu may be referred to as
“DVD Menu”, “Title Menu” or “Titles” in the
instructions supplied with the disc.
To check playback settings
When playing a disc use the directional buttons
to select the (Time Display) icon, and press
the X button. Icons for currently set playback
modes will be displayed in the top right corner
of the screen.
To clear all playback settings and return to
normal playback
Use the directional buttons to select the
icon, and press the ✕ button.
Playback from the last
stopping point (Resume Play)
The DVD player remembers the point where
you stopped the disc, and resumes playback
from that point.
1 During playback, press the a
button to stop playback.
The message, “Press [Play] to resume
viewing. To start from the beginning,
press [Stop] and then [Play].” appears,
and then the Control Panel (page 18) is
displayed.
If the message “Resume function
cannot be used here. Play will restart
from the beginning.” appears, Resume
Play is not available.
2 Select the N (Play) icon using
the directional buttons and press
the ✕ button.
The DVD player starts playback from
the point where you stopped the disc
in step 1.
To clear the last stopping point
After step 1, select the x (Stop) icon and press
the ✕ button.
To clear Resume Play
If you resume playback after stopping, the
DVD player enters Resume Play mode. Many
advanced settings for the DVD player are not
available during Resume Play. If you want to
clear Resume Play to adjust settings, select the
x (Stop) icon and press the ✕ button twice.
Notes
• Resume Play may not be available on some DVDs or
for some video scenes.
• Depending on where you stop playback, the console
may resume playback from a slightly different point.
• Resume Play is not available when:
– Program Play or Shuffle Play is selected.
– The disc tray on the console front is opened using
the A button.
– The console is reset or goes into standby mode after
the 1/reset button has been pressed.
– The power is turned off using the main power
switch on the console rear.
– The x (Stop) icon is selected and the X button is
pressed twice during playback.
Playback in desired order
(Program Play)
You can create a program to play back titles
and chapters in any order you like.
1 Use the directional buttons to
select the
icon, and press the ✕ button.
(Program Play)
2 Use the directional buttons to
select the item number, and
press the ✕ button.
3 Use the directional buttons to
select the title number, and press
the ✕ button.
4
Use the directional buttons to
select the chapter number, and
press the
✕
button.
5 Repeat steps 2 - 4 to set other
titles or chapters.
6 Press the START button.
Program Play begins.
Program Play settings are saved and remain in
effect even after playback ends. Use the
directional buttons to select the (Program
Play) icon, and then press the ✕ button.The
Program Setup screen is displayed. Press the
START button to play the programmed
sequence again.
Changing or clearing Program
Play settings
1 Use the directional buttons to
select the
icon, and press the ✕ button.
(Program Play)
2 Use the directional buttons to
select the item number you want
to change, and press the ✕
button.
3 Use the directional buttons to
select the title number you want
to play, and press the ✕ button.
4 Use the directional buttons to
select the chapter number you
want to play, and press the ✕
button.
To clear Program Play settings, select “Clear” at
step 3, and press the ✕ button.
To clear all Program Play settings
1 Use the directional buttons to
select the
icon, and press the ✕ button.
(Program Play)
2 Use the directional buttons to
select “Clear all”, and press the
✕ button.
US
DVD videos
Page 20

20
Playing a DVD video (continued)
To use Program Play with Shuffle Play or
Repeat Play
• Program Play with Shuffle Play
During playback in Program Play mode, use
the directional buttons to select the
(Shuffle Play) icon, and press the ✕ button.
Shuffle Play is turned on.
When Shuffle Play is used with Program
Play, Shuffle Play options are limited to
“Shuffle On” and “Shuffle Off”.
• Program Play with Repeat Play
During playback in Program Play mode, use
the directional buttons to select the
(Repeat) icon, and press the ✕ button.
Repeat Play is turned on.
When Repeat Play is used with Program
Play, Repeat Play options are limited to
“Repeat On” and “Repeat Off”.
For details on Shuffle Play and Repeat Play, see
“Playback in random order (Shuffle Play)”, and
“Repeated Playback (Repeat Play)” at right.
Notes
• Program Play settings cannot be changed while playing
in Program Play mode.
• A-B Repeat is cleared when Program Play is set.
• Program Play may not be available for some discs.
• Only the number of titles and chapters recorded in the
disc will be displayed on the screen.
• Program Play is stopped when:
– A-B Repeat is set.
– The DVD disc menu is displayed.
• Program Play settings are cleared when:
– The disc tray is opened using the A button on the
console front.
– The console is reset or goes into standby mode after
the 1/reset button has been pressed.
– The power is turned off using the main power
switch on the console rear.
Playback in random order
(Shuffle Play)
The console will automatically select a random
order to play titles and chapters. Playback
order will be different each time Shuffle Play is
used.
During playback, use the directional buttons to
select the (Shuffle Play) icon, and press
the ✕ button.
The screen will display the following shuffle
modes in turn each time the ✕ button is
pressed. Shuffle Play will begin as soon as the
playback mode is selected.
Title Shuffle
(Playback of titles in random order)
Chapter Shuffle
(Playback of chapters in random order)
Shuffle Off
(Clear Shuffle Play)
To end Shuffle Play
Use the directional buttons to select the
(Shuffle Play) icon, and press the ✕ button until
“Shuffle Off” is displayed.
To use Shuffle Play with Program Play or
Repeat Play
• Shuffle Play with Program Play
When playing in Shuffle Play mode, use the
directional buttons to select the
(Program Play) icon, and press the ✕ button
to select program settings. Press the START
button. Shuffle Play is turned on.
When Program Play is used with Shuffle
Play, Shuffle Play options are limited to
“Shuffle On” and “Shuffle Off”.
• Shuffle Play with Repeat Play
When playing in Shuffle Play mode, use the
directional buttons to select the
(Repeat) icon, and press the ✕ button. Repeat
Play is turned on.
When Repeat Play is used with Shuffle Play,
Repeat Play options are limited to “Repeat
On” and “Repeat Off”.
For details on Program Play and Repeat Play,
see “Playback in desired order (Program Play)”
on page 19, or “Repeated playback (Repeat
Play)” below.
To set Shuffle Play when a disc is not
playing
Use the directional buttons to select the
(Shuffle Play) icon, and press the ✕ button until
the shuffle mode you want to set is displayed.
Use the directional buttons to select the N
(Play) icon, and press the ✕ button. Shuffle
Play begins.
Notes
• A-B Repeat is cleared when Shuffle Play is set.
• Shuffle Play may not be available on some discs.
• Shuffle Play is cleared when:
– A-B Repeat is set.
– The DVD disc menu is displayed.
– The disc tray is opened using the A button on the
console front.
– The console is reset or goes into standby mode after
the 1/reset button has been pressed.
– The power is turned off using the main power
switch on the console rear.
• When Chapter Shuffle is selected, up to 200 chapters
can be played in random order. If the disc has more
than 200 chapters, 200 chapters will be selected at
random.
Repeated playback (Repeat
Play)
All of the titles on the DVD, or one title or
chapter can be repeatedly played back using
Repeat Play.
During playback, press the directional buttons
to select the (Repeat) icon, and press the
✕ button.
The screen will display the following repeat
modes in turn each time the ✕ button is
pressed. Repeat Play will begin as soon as the
repeat playback mode is selected.
Disc Repeat
(Repeated playback of all titles)
Title Repeat
(Repeated playback of one title)
Chapter Repeat
(Repeated playback of one chapter)
Repeat Off
(Clear Repeat Play)
To end Repeat Play
Use the directional buttons to select the
(Repeat) icon, and press the ✕ button until
“Repeat Off” is displayed.
To use Repeat Play with Program Play or
Shuffle Play
• Repeat Play with Program Play
During playback in Repeat Play mode, use
the directional buttons to select the
(Program Play) icon, and press the ✕ button.
Make program selections and press the
START button. Repeat Play is turned on.
When Program Play is used with Repeat
Play, Repeat Play options are limited to
“Repeat On” and “Repeat Off”.
• Repeat Play with Shuffle Play
During playback in Repeat Play mode, use
the directional buttons to select the
(Shuffle Play) icon, and press the ✕ button.
Repeat Play is turned on.
When Shuffle Play is used with Repeat Play,
Repeat Play options are limited to “Repeat
On” and “Repeat Off”.
For details on Program Play and Shuffle Play,
see “Playback in desired order (Program Play)”
on page 19, or “Playback in random order
(Shuffle Play)” at left.
Page 21

21
To set Repeat Play when a disc is not
playing
Use the directional buttons to select the
(Repeat) icon, and press the ✕ button until the
Repeat mode you want is displayed. Use the
directional buttons to select the N (Play) icon,
and press the ✕ button. Repeat Play begins.
Notes
• A-B Repeat is cleared when Repeat Play is set.
• Repeat Play may not be available on some discs.
• Repeat Play is cleared when:
– A-B Repeat is set.
– The disc tray is opened using the A button on the
console front.
– The console is reset or goes into standby mode after
the 1/reset button has been pressed.
– The power is turned off using the main power
switch on the console rear.
Repeated playback of a
selected scene (A-B Repeat)
You can set a specific section of the disc to be
repeatedly played back.
1 During playback, use the
directional buttons to select the
(A-B Repeat) icon, and press
the ✕ button at the point you
want to start repeated playback.
The starting point (point A) is set.
2 Use the directional buttons to
select the
and press the ✕ button at the
point you want to end repeated
playback.
The ending point (point B) is set, and
repeated playback of the section from
A to B begins.
Notes
• A-B Repeat Play may not be available on some discs or
some sections of a disc.
• The A-B Repeat function can be set for only one section
at a time.
• A-B Repeat cannot be set to select a section of video
from more than one title.
• A-B Repeat is cleared when:
– Program Play, Shuffle Play, or Repeat Play has been
set
– Playback has been stopped.
– The DVD disc menu is displayed.
– The disc tray is opened using the A button on the
console front.
– The console is reset or goes into standby mode after
the 1/reset button has been pressed.
– The power is turned off using the main power
switch on the console rear.
• When A-B Repeat is set, Program Play, Shuffle Play,
and Repeat Play are cleared.
(A-B Repeat) icon,
Selecting Original/Play List for
DVD-RW playback
DVD-RW discs (VR mode) can play back both
original content recorded using a DVD
recorder, and Play List content created by
editing original content. When using this kind
of disc you can select the type of title you want
to play.
This setting is not available during Resume
Play.
Stop playback, and use the directional buttons
to select the (Original/Play List) icon.
Then press the ✕ button.
Original and Play List will be selected in turn
each time you press the ✕ button.
•Original: Playback of originally recorded
content.
•Play List: Playback of edited content.
Notes
• The default setting for this option is Play List.
• Note that you cannot record or edit content using this
console.
• If a disc has no Play List, the original content will be
played back. Play List cannot be selected.
• A-B Repeat cannot be set to select a section of video
from more than one title.
• Slow-motion play (in reverse) is not available for DVDRW discs (VR mode).
• The “Original” setting is cleared when:
– The disc tray is opened using the A button on the
console front.
– The console is reset or goes into standby mode after
the 1/reset button has been pressed.
– The power is turned off using the main power
switch on the console rear.
• Content recorded on DVD-RW discs in VR mode must
be finalized to be viewed on the PlayStation
2 console.
®
US
DVD videos
Page 22

22
Settings and adjustments for the DVD player
You can use the Control Panel to navigate the
DVD and adjust DVD player settings.
Note that not all functions are available on all
DVD discs.
Changing the audio language
Some DVDs are recorded with audio tracks for
multiple languages (multilingual tracks). When
you play such DVDs you can select the
language you want to hear during playback.
The languages you can select may vary
depending on the DVD.
Use the directional buttons to select the
(Audio Options) icon, and press the ✕ button.
The language changes each time you press the
✕ button.
Using the analog controller
(DUALSHOCK
Press the R3 button.
The language changes each time you press the
R3 button.
Notes
• Due to the programming on some DVDs, you may not
be able to change languages even if multilingual tracks
are recorded on the DVD.
• When playing a DVD, the audio settings may change
when you change titles.
• When you set the “DTS” option of “Audio Digital Out”
to “Off” under “Audio Setup” in the Setup display, the
sound recording system will not be set to DTS even
when playing a DVD with DTS sound recorded.
®2)
Changing the viewing angle
With DVDs on which multiple angles (multiangles) are recorded, you can change the
viewing angle on scenes for which multiple
angles are available. For example, while
playing the scene of a train in motion, you can
change the view from the front of the train, the
left window, or the right window, without
interrupting the movement of the train.
Use the directional buttons to select the
(Angle Options) icon, and press the ✕ button.
The angle changes each time you press the ✕
button.
Notes
• The number of angles varies depending on the disc and
the scene. For any given scene you can choose from
among the angles recorded for that scene.
• Due to the programming on some DVDs, you may not
be able to change angles even if multiple angles are
recorded on the DVD.
Displaying subtitles
If subtitles are recorded on a DVD, you can
turn the subtitles on and off during playback.
When multilingual subtitles are available, you
can also change the subtitle language.
Use the directional buttons to select the
(Subtitle Options) icon, and press the ✕ button.
The subtitle language changes each time you
press the ✕ button. The subtitle languages you
can select will vary depending on the DVD.
To turn the subtitles off
Use the directional buttons to select the
icon, and press the ✕ button until “Subtitles
Off” is displayed.
Using the analog controller
(DUALSHOCK
Press the L3 button.
The subtitle language changes each time you
press the L3 button. The subtitle languages you
can select will vary depending on the DVD.
To turn the subtitle language off
Press the L3 button until “Subtitles Off” is
displayed.
Notes
• When playing a DVD on which no subtitles are
recorded, no subtitles can be displayed.
• Due to the programming on some DVDs, you may not
be able to display subtitles or switch among subtitle
languages even if subtitles are recorded on the DVD.
• Depending on the DVD, you may not be able to turn
the subtitles off.
• The type and number of languages for subtitles varies
from disc to disc.
• While playing a DVD, the subtitle setting may change
when you change titles.
®2)
Selecting a specific scene for
playback
You can select a specific scene for playback by
specifying the title or chapter number, or by
entering the elapsed time for the starting point
of the scene that you want to play.
Selecting a scene by chapter number
During playback, use the directional buttons to
select the desired chapter number, and press
the ✕ button.
Playback of the selected chapter begins.
Selecting a scene by title number,
chapter number, or by specifying the
time.
1 During playback, use the
directional buttons to select the
(Go To) icon, and press the ✕
button.
2 Use the directional buttons to
select an item, and press the ✕
button.
• Title = Title number
• Chapter = Chapter number
• C XX:XX:XX (or T XX:XX:XX)
= Elapsed time for the chapter
(or title)
3 Use the directional buttons to
select the playback point, and
press the ✕ button.
Playback of the selected scene begins.
Note
You cannot select a scene by specifying the remaining time
of the chapter or title (only elapsed time can be used).
Displaying playback
information
You can display information such as the
current title or chapter number, or the elapsed
or remaining time on a disc. When Program
Play or Shuffle Play modes are set, this
information will also be displayed in the top
right corner of the screen.
During playback or when the disc is paused,
use the directional buttons to select the
(Time Display) icon, and press the ✕ button.
The display changes as shown below, each time
you press the ✕ button.
Title X Chapter X
(Title number and chapter number)
Title X Chapter X C XX:XX:XX
(Elapsed time of current chapter)
Title X Chapter X C -XX:XX:XX
(Remaining time of current chapter)
Title X Chapter X T XX:XX:XX
(Elapsed time of current title)
Title X Chapter X T -XX:XX:XX
(Remaining time of current title)
Note
You cannot display the remaining time for some titles.
Displaying the list of direct
button functions (Help)
You can display a list that shows the function
of each button on the analog controller
(DUALSHOCK®2).
Use the directional buttons to select the
(Help) icon, and press the ✕ button.
The list of button functions is displayed.
The display is turned on and off each time you
press the ✕ button.
Page 23

23
Finding a particular point on a
disc (Search)
You can use the Search function to quickly
locate a particular point on a DVD. You can
search either forward or backward and can
switch between 3 speeds and slow-motion
playback speed. This function is also available
using the analog controller (DUALSHOCK®2)
when the Control Panel is not displayed.
1 During playback, use the
directional buttons to select the
(Search, Fast Reverse) or
(Search, Fast Forward) icon. Then
press and hold down the ✕
button to begin searching. Press
the directional buttons to change
speeds while searching.
Search speed changes as shown below
when you press the directional
buttons while holding down the ✕
button.
Search 3
Search 2
Search 1
Slow
2 Release the ✕ button when you
reach the point you are searching
for.
Playback returns to normal speed.
Using the analog controller
(DUALSHOCK
®2)
1 During playback, press and hold
down the L2 or R2 button to
begin searching. Press the
directional buttons to change
speeds while searching.
Search speed changes as shown below
when you press the directional
buttons while holding down the L2 or
R2 button.
Search 3
Search 2
Search 1
Slow
2 Release the L2 or R2 button
when you reach the point you are
searching for.
Playback returns to normal speed.
Note
This function may not be available on some DVDs.
Playing in slow-motion
During playback, use the directional buttons to
select the (Slow Backward) or (Slow
Forward) icon, and press the ✕ button.
Slow-motion playback begins.
To end slow-motion playback
Use the directional buttons to select the N
(Play) icon, and press the ✕ button.
Playback returns to normal speed.
Using the Setup display
You can change the initial settings, adjust the
picture and sound, and set various other output
options using the Setup display. You can also
select a language for subtitles and menus,
restrict playback by children, and so on. For
details on the Setup display, see pages 24-28.
Before using the Setup display
Some menu items cannot be selected during
Resume Play as noted on the pages that follow.
For details on clearing Resume Play see “To
clear Resume Play” on page 19.
1 Use the directional buttons to
select the
press the ✕ button.
The Setup icon bar is displayed, giving
you the access to the menus shown on
page 24.
2
Use the directional buttons to
select the icon for the setting you
would like to change, and press
the ✕ button.
The menu for the icon selected is
displayed.
3
Use the directional buttons to
choose a menu item, and press
the ✕ button.
The options for the menu item selected
are displayed.
4
Use the directional buttons to
select an option, and press the ✕
button.
The option selected is set.
(Setup) icon, and
After using the Setup display
To save changes made during playback, you
must stop playback* or eject the DVD before
pressing the 1 (standby)/reset button on the
console front or turning off the console using
the main power switch on the console rear.
Note that changes will not be saved if you reset
or turn off the console before stopping
playback, or without first ejecting the DVD.
* Stopping playback during Resume Play is included.
US
DVD videos
Page 24

24
Settings and adjustments for the DVD player (continued)
Setup display menus
The Setup display menus are organized as shown below. The default settings are underlined.
Language Setup (pages 24-25)
OSD
Menu
Audio
Subtitles
Spanish
English
French
German
Italian
Dutch
Portuguese
English
French
German
Italian
Spanish
Dutch
Danish
Swedish
Finnish
Norwegian
Portuguese
Russian
Chinese
Japanese
Korean
Language Options ,
(same as Menu)
English
French
German
Italian
Spanish
Dutch
Danish
Swedish
Finnish
Norwegian
Portuguese
Russian
Chinese
Japanese
Korean
Audio Follow
Language Options ,
Screen Setup (page 25)
TV Type
DNR
Outline Sharpening
Display
Progressive
16:9
4:3 Letter Box
4:3 PAN SCAN
Custom Setup (pages 25-27)
Pause Mode Auto
Frame
Parental Control
Region
Level
Change Password
Off
DNR1
DNR2
+2
+1
0
–1
–2
On
Off
On
Off
USA
Other (see page 26)
Off
8
7
6
5
4
3
2
1
Audio Setup (pages 27-28)
Audio Digital Out
DIGITAL OUT (OPTICAL)
Dolby Digital
DTS
Audio Track Auto Select Mode
DVD Volume
+2
+1
Standard
On
Off
On
Off
On
Off
On
Off
Setting language options
(Language Setup)
“Language Setup” allows you to choose from
among various languages for the on-screen
display (OSD), DVD audio, and other items.
The default setting for each menu item is
underlined in the explanations below.
Select the (Language Setup) icon in the Setup
display. For details, see “Using the Setup
display” on page 23.
Notes
• When you select a language that is not recorded on the
DVD, one of the recorded languages is automatically
selected for the “Menu,” “Audio” and “Subtitles”
settings.
• Depending on the DVD, the language you have
selected for the “Menu,” “Audio” or “Subtitles” may
not be used.
x OSD
Selects the language for the on-screen display.
• Spanish
• English
• French
• German
• Italian
• Dutch
• Portuguese
x Menu
Selects the language for the DVD disc menu.
This setting is not available during Resume
Play.
• English
• French
• German
• Italian
• Spanish
• Dutch
• Danish
• Swedish
• Finnish
• Norwegian
• Portuguese
• Russian
• Chinese
• Japanese
• Korean
• Language Options
* When you select “Language Options,” you can choose
from an extensive list of languages.
*
Page 25

25
x Audio
Selects the language for the audio track.
This setting is not available during Resume
Play.
• English
• French
• German
• Italian
• Spanish
• Dutch
• Danish
• Swedish
• Finnish
• Norwegian
• Portuguese
• Russian
• Chinese
• Japanese
• Korean
• Language Options
* When you select "Language Options," you can choose
from an extensive list of languages.
*
x Subtitle
Selects the language for the subtitles.
This setting is not available during Resume
Play.
• English
• French
• German
• Italian
• Spanish
• Dutch
• Danish
• Swedish
• Finnish
• Norwegian
• Portuguese
• Russian
• Chinese
• Japanese
• Korean
• Audio Follow
• Language Options
*1 When you select “Audio Follow,” the language for
subtitles automatically changes to match the language
you have selected for the audio track.
*2 When you select “Language Options,” you can choose
from an extensive list of languages.
*1
*2
Setting TV display options
(Screen Setup)
You can set the aspect ratio and other display
options for the connected TV using this setting.
The default setting for each menu is underlined
in the explanations below.
Select the (Screen Setup) icon in the Setup
display. For details, see “Using the Setup
display” on page 23.
x TV Type
Sets the aspect ratio of the TV.
This setting is not available during Resume
Play.
• 16:9: Select this option when using a widescreen TV, or a standard TV that displays in
wide mode.
• 4:3 Letter Box: Select this option when using
a standard TV. This setting displays a wide
picture with margins on the upper and lower
portions of the screen.
• 4:3 PAN SCAN: Select this option when
using a standard TV. This setting displays a
wide picture adjusted to the height of the
screen, cutting off the portions at left and
right that do not fit.
16:9
4:3 Letter Box
4:3 PAN SCAN
Notes
• Some DVDs may automatically set the aspect ratio of
the TV.
• When “Progressive” is set to “On”, the aspect ratio of
the TV is set to 16:9 and cannot be changed.
x DNR (Digital Noise Reduction)
This setting may help reduce roughness in the
on-screen image and produce a cleaner picture.
• Off: Normally select this position.
• DNR1: Increases picture clarity
• DNR2: Increases picture clarity (maximum).
Notes
• DNR2 is more effective for reducing image roughness
than DNR1, but in some cases an afterimage may
appear. If this occurs, select “Off.”
• The DNR function may produce limited results on
some DVDs.
• When “Progressive” is set to “On”, DNR is
automatically turned off and cannot be turned on.
x Outline Sharpening
You can sharpen or soften the outline of the onscreen image using this setting. The higher the
value, the sharper the outline.
• +2
• +1
• 0: Normally select this position.
• -1
• -2
x Display
You can display or turn off playback status
information in the top right corner of the
screen.
• On: When playing a DVD, the playback
status information is displayed for a few
seconds.
• Off: Playback status information is not
displayed.
x Progressive
This method of displaying a picture updates all
the lines in one pass, resulting in most cases in
a more stable, clearer, flicker-free image than
standard interlace mode.
This setting is not available during Resume
Play.
•
On: Select this when the console is connected
to a TV that supports progressive scan (480p).
• Off: Select this when the console is connected
to a normal TV.
Notes
• To use progressive scan you must have a TV that
supports progressive scan (480p) and you must connect
your console using the SCPH-10100 U component AV
cable (for PlayStation
• If you set “Progressive” to “On” without the necessary
equipment, picture quality may be reduced, or the
picture may not be displayed.
• If you accidentally set this option to “On” and need to
clear the setting, with the DVD inserted in the console
press the 1 (standby)/reset button on the console
front. Then hold down the START button of the analog
controller (DUALSHOCK
port 1 until the DVD picture is displayed. When DVD
playback begins, “Progressive” will be set to “Off”,
allowing the DVD video to be displayed as normal.
“Progressive” can also be set to “Off” in the Version
Information screen. See page 12 for details.
• Progressive scan is not available when playing a DVDRW disc with content recorded in VR mode.
• DVDs can contain video based material and film based
material, which use different frame rates. When playing
video based material using progressive scan, some
video images may appear unnatural. This is due to an
image conversion process. If this occurs, set
“Progressive” to “Off” and view in standard interlace
mode.
2), which is sold separately.
®
2) inserted into controller
®
Setting viewer options
(Custom Setup)
You can set the Parental Control level and
adjust other playback features using Custom
Setup.
The default setting for each menu is underlined
in the explanations below.
Select the (Custom Setup) icon in the Setup
display. For details see “Using the Setup
display” on page 23.
x Pause Mode
Sets the picture status in pause mode.
• Auto: A picture with a lot of moving
elements can be displayed without jitter.
Normally select this position.
• Frame: A picture without a lot of moving
elements can be displayed in high resolution.
US
DVD videos
Page 26

26
Settings and adjustments for the DVD player (continued)
x Parental Control
The viewing of some DVD content may be
restricted based on viewer age or other factors
in some regions. You can use the Parental
Control feature to restrict the level of content
that may be viewed on your console.
This setting is not available during Resume
Play.
Setting Parental Control
Select the (Custom Setup) icon in the Setup
display.
1 Use the directional buttons to
select “Parental Control”, and
press the ✕ button.
If you have not registered a password
The screen for registering a password
is displayed.
If a password has already been
registered
The screen for confirming the
password is displayed.
2 Use the directional buttons to
select a number, and press the ✕
button.
Repeat this step to enter a four-digit
password.
The screen for setting the region,
Parental Control level, and for
changing your password is displayed.
3 Use the directional buttons to
select “Region”, and press the ✕
button.
4 Use the directional buttons to
select the region to base
Parental Control levels on, and
press the ✕ button.
If you select “Other”, refer to the
“Region code list” at right for the
region code to select.
Use the directional buttons to select
the first letter, and press the right
directional button. Use the directional
buttons to select the second letter, and
press the ✕ button.
5 Use the directional buttons to
select “Level”, and press the ✕
button.
The list of level options is displayed.
6 Use the directional buttons to
select a restriction level, and
press the ✕ button.
Parental Control is set.
The lower the value, the stricter the
restriction.
Region code list
Region Code Region Code
Austria AT Malaysia MY
Belgium BE Mexico MX
Canada CA Netherlands NL
China CN Norway NO
Denmark DK Philippines PH
Finland FI Russia RU
France FR Singapore SG
Germany DE Spain ES
Hong Kong HK Sweden SE
Indonesia ID Switzerland CH
Italy IT Taiwan TW
Japan JP Thailand TH
Korea KR
United Kingdom
GB
Page 27

27
To change your password
1 In step 2 under “Setting Parental
Control” use the directional
buttons to select “Change
Password”, and press the ✕
button.
The screen for changing the password
is displayed.
2
Use the directional buttons to
select a number, and press the
✕
button.
Repeat this step to enter a four-digit
password. To confirm your password,
enter it once again. The password is
changed.
Playing a disc which is restricted
by Parental Control
1 Insert the disc.
Playback begins automatically, and at
the point where Parental Control is
set, the screen changes to a display
requesting confirmation to
temporarily change the Parental
Control level.
2 Use the directional buttons to
select “Yes”, and press the ✕
button.
The screen for confirming the
password is displayed.
3
Use the directional buttons to
select a number, and press the
button.
Repeat this procedure to
enter the four-digit password.
Playback begins.
When DVD playback is stopped, the
Parental Control level returns to the
original setting.
✕
If you forget your password
1 Press the SELECT button when
the screen for confirming the
password is displayed.
The screen for deleting the password
is displayed.
2
Use the directional buttons to
select a number, and press the
button.
Repeat this procedure to enter the
four-digit number “7444”. The current
password is deleted and the screen for
registering a new password is
displayed.
3 Follow step 2 in “Setting
Parental Control”, to register a
new password.
Notes
• If you play a DVD that does not have the Parental
Control function, playback will not be restricted even if
you set a playback restriction level on your console.
• If you do not set a password, you cannot change the
Parental Control settings.
• Some DVDs may require you to enter only the
password without changing the Parental Control level.
• Program Play, Shuffle Play, Repeat Play, and A-B
Repeat may not be available on some DVDs with the
Parental Control feature.
To clear Parental Control
With DVD playback stopped, go to step 6 in
“Setting Parental Control” and set “Level” to
“Off”.
This setting cannot be cleared during Resume
Play.
✕
Setting sound options
(Audio Setup)
You can adjust your audio settings based on
the playback conditions or the equipment in
use.
The default setting for each menu is underlined
in the explanations below. For details see
“Using the Setup display” on page 23.
Select the (Audio Setup) icon in the Setup
display.
x Audio Digital Out
You can switch the methods of outputting
audio signal when you connect the following
audio devices to the DIGITAL OUT (OPTICAL)
connector on the PlayStation®2 console rear
using an optical digital cable (sold separately).
•A digital device such as a receiver (amplifier)
with a digital connector.
•An audio device with a built-in Dolby Digital
or DTS decoder.
•A DAT (Digital Audio Tape) or MD
(MiniDisc) deck. For connection details, see
page 10.
x DIGITAL OUT (OPTICAL)
Selects whether to output signal through the
DIGITAL OUT (OPTICAL) connector.
• On: Select this when you connect with an
optical digital cable (sold separately).
Normally select this option.
If you select “On”, make the appropriate
settings for “Dolby Digital” and “DTS”.
• Off: Select this when you do not want sound
(audio signal) to be output through the
DIGITAL OUT (OPTICAL) connector.
Note
If you select “Off”, you cannot set “Dolby Digital” or
“DTS”.
x Dolby Digital
Selects the Dolby Digital signal to be output
through the DIGITAL OUT (OPTICAL)
connector.
• On: Select this option when the console is
connected to an audio device with a built-in
Dolby Digital decoder.
If the console is connected to an audio device
without a built-in Dolby Digital decoder, do
not turn this option on. If you select this
option by mistake, when you play a Dolby
Digital audio track, a loud noise (or no
sound) will come out from the speakers,
possibly hurting your ears or damaging the
speakers.
• Off: Select this option when the console is
connected to an audio device without a builtin Dolby Digital decoder.
x DTS
Selects the DTS signal to be output through the
DIGITAL OUT (OPTICAL) connector when
you connect to the console with an optical
digital cable (sold separately).
This setting is not available during Resume
Play.
• On: Select this option when the console is
connected to an audio device with a built-in
DTS decoder.
If the console is connected to an audio device
without a built-in DTS decoder, do not turn
this option on. If you select this option by
mistake, when you play a DTS audio track, a
loud noise (or no sound) will come out from
the speakers, possibly hurting your ears or
damaging the speakers.
• Off: Select this option when the console is
connected to an audio device without a builtin DTS decoder.
US
DVD videos
Page 28

28
Settings and adjustments for the DVD player (continued)
x Audio Track Auto Select Mode
Gives the audio track that contains the highest
number of channels priority when you play a
DVD on which multiple audio formats (PCM,
Dolby Digital or DTS) are recorded.
This setting is not available during Resume
Play.
• On: Priority given
• Off: No priority given
Notes
• If you set this item to “On,” the language may change
because the “Audio Track Auto Select Mode” setting
has higher priority than the “Audio” settings in
“Language Setup” (page 25).
• If you set “DIGITAL OUT (OPTICAL)” to “On” and
“DTS” to “Off” in “Audio Setup”, the DTS audio track
is not played even if you set this item to “On” and the
highest-numbered audio channel is recorded in DTS
format.
• If PCM, DTS and Dolby Digital audio tracks have the
same number of channels, the console selects PCM,
Dolby Digital and DTS audio tracks in this order.
• Depending on the DVD, the audio channel with
priority may be predetermined. In this case, you cannot
give priority to the DTS or Dolby Digital format by
selecting “On”.
x DVD Volume
If the audio output level of the DVD is low, you
can turn up the volume of the DVD. DIGITAL
OUT (OPTICAL) must be set to “Off” to change
this setting.
• +2: Turns up the volume (maximum).
• +1: Turns up the volume.
• Standard: Original audio volume. Normally
select this position.
Note
If you set this option to “+1” or “+2”, the sound may be
distorted in places where loud sound is present. If the
sound becomes distorted, select "Standard".
Caution
If you turn up the volume too high, your ears may be
injured or the speakers may be damaged.
This product incorporates copyright protection
technology that is protected by method claims
of certain U.S. patents and other intellectual
property rights owned by Macrovision
Corporation and other rights owners. Use of
this copyright protection technology must be
authorized by Macrovision Corporation, and is
intended for home and other limited viewing
uses only unless otherwise authorized by
Macrovision Corporation. Reverse engineering
or disassembly is prohibited.
Page 29

Troubleshooting
29
Please go through this
section if you experience
difficulty in operating the
PlayStation®2 console.
• If you experience any of the following
difficulties, use this troubleshooting
guide to help remedy the problem before
requesting repair. Should any problem
persist, contact our technical support line
at 01-800-759-7669 or 5002-9819 for
assistance.
• Make sure the AC power cord is
connected to the console and the wall
outlet, and the TV (or VCR) or the
supplied accessories are connected to the
console correctly.
Power
The power is not turned on.
, Check that the AC power cord is connected
securely.
, The console is not turned on. Turn on the
console using the main power switch on
the console rear.
Picture
There is no picture.
, Check that the console is connected to the
TV (or VCR) with the AV cable (integrated
audio/video).
, Check that
VCR)
, Check that you have selected the video
input on the TV (or VCR).
, Check that the AV cable (integrated audio/
video) is connected securely.
, Check that the inserted disc can be played
with this console. (see page 4)
, Check that the disc is placed with the label
side facing up (data side down).
, The disc is not inserted correctly.
the console and the TV (or
are turned on.
, DVD playback has been stopped.
, Try another set of AV cables .
, The progressive scan option is set to “On”
when using a TV that does not support
progressive scan (480p), or when using a
cable other than the component AV cable
(for PlayStation®2).
With the DVD inserted in the console, press
the 1 (standby)/reset button on the
console front. Then hold down the START
button of the analog controller
(DUALSHOCK®2) inserted into controller
port 1 until the DVD picture is displayed.
When DVD playback begins, “Progressive”
will be set to “Off”, allowing the DVD
video to be displayed as normal.
“Progressive” can also be set to “Off” in the
Version Information screen (page 12).
Picture noise appears.
, The console is placed on an unstable
surface. Place the console on a stable and
flat surface. Do not shake or vibrate the
console.
, Clean the disc.
, Moisture has condensed inside the console.
(see page 3)
, If the video signal from the console has to
go through the VCR to get to the TV, the
copy protection applied to some DVD
videos could affect picture quality. When
playing a DVD video, connect the console
to the TV directly. (see page 9)
, The progressive scan option is set to “On”
when using a TV that does not support
progressive scan (480p), or when using a
cable other than the component AV cable
(for PlayStation®2).
Do not open the disc tray or remove the
DVD. With the DVD inserted in the
console, press the 1 (standby)/reset button
on the console front. Then hold down the
START button of the analog controller
(DUALSHOCK®2) inserted into controller
port 1 until the DVD picture is displayed.
When DVD playback begins, “Progressive”
will be set to “Off”, allowing the DVD
video to be displayed as normal.
“Progressive” can also be set to “Off” in the
Version Information screen (page 12).
, Some video images appear unnatural when
using progressive scan, even when the TV
supports progressive mode.
Set “Progressive” to “Off”, and view in
standard interlace mode.
The aspect ratio cannot be changed
according to the TV when playing wide
picture DVD videos.
, Depending on the disc, the aspect ratio is
fixed.
, Check that the console is connected to the
TV directly. (The selector or receiver
(amplifier) may be connected between the
console and the TV.)
, Depending on the TV, the aspect ratio is
fixed.
When playing a DVD-RW disc recorded in VR
mode, the message “Playback is restricted.
Cannot play.” is displayed on the screen and
then the screen turns blue.
, You may be playing a disc that contains
“copy-once” content. Video recorded on
CPRM-compatible DVD-RW discs using
the copy-once feature cannot be played
back. For details, see “Notes on the
playback of DVD-R/DVD-RW/DVD+R/
DVD+RW discs” on page 4.
Sound
There is no sound.
, Check that the console is connected to the
TV (or VCR) with the AV cable (integrated
audio/video).
, Check that the console and the TV (or VCR)
are turned on.
, Check that you have selected the video
input on the TV (or VCR).
, Check that the TV volume is set properly or
“mute” is not selected on the TV.
, Check that the AV cable (integrated audio/
video) is connected securely.
, Check that the inserted disc can be played
with this console. (see page 4)
, Check that the disc is placed with the label
side facing up (data side down).
, Check that
to the audio input connectors on the receiver
(amplifier) correctly. Refer also to the
instructions supplied with your amplifier.
, Try another set of AV cables.
, Check the speaker connections and
settings. Refer also to the instructions
supplied with your amplifier.
, Check that you have selected the
appropriate input on the receiver
(amplifier) so that you can listen to sound
from the console. Refer also to the
instructions supplied with your amplifier.
, The console is in pause mode.
, The console is in search/slow-motion mode
(when playing a DVD video).
, You are playing an audio CD or DVD with
a DTS audio track.
Do not play back DTS audio tracks when
the console is connected to an audio device
without a built-in DTS decoder. (see page
27)
, The system setting is not correct for when
the console is connected to audio
equipment with DIGITAL OUT (OPTICAL)
connectors. (see page 10)
you have connected the console
Poor sound quality.
,
The console is placed on an unstable surface.
Place the console on a stable and flat surface.
Do not shake or vibrate the console.
, Clean the disc.
, Moisture has condensed on the disc.
(see page 3)
, You are playing an audio CD or a DVD
with DTS audio tracks.
You can play an audio CD or DVD with
DTS audio tracks only when the console is
connected to audio equipment with a builtin DTS decoder.
The surround effect is difficult to hear when
you are playing a DVD video with a Dolby
Digital audio track.
,
Check the speaker connections and settings.
Refer to the operating manual of your
receiver (amplifier).
US
Additional information
Page 30

30
,
Depending on the DVD, the output signal
may not comprise the entire 5.1 channel
range. It may be monaural or stereo even if
the audio track is recorded in Dolby Digital.
Troubleshooting (continued)
The sound comes from the center speaker
only.
, Depending on the disc, the sound may
come from the center speaker only.
Operation
The controller does not function.
, Check that the controller is connected to the
console.
, Check that the analog controller
(DUALSHOCK®2) is set to the appropriate
mode for the software. (see page 14)
, Try another set of controllers.
, Try setting the “Remote Control” setting of
the System Configuration menu to
“Gameplay Function Off”.
Some unlicensed 3rd party peripherals may
not operate with “Gameplay Function” set
to “On”. Note that use of such peripherals
is not recommended and will void your
warranty.
, Check that there are empty blocks/free
space on the memory card (8MB) (for
PlayStation®2) or memory card.
, Try another memory card (8MB) (for
PlayStation®2) or memory card.
The console does not function properly.
, Static electricity, etc. may affect the
console’s operation.
Turn off the main power switch and then
turn it back on.
The 1 indicator flashes in red and the
console does not work.
, A flashing red light indicates a console
“fault” condition and the unit will not
operate. Remove any obstructions from the
vents to allow the console to cool down.
Resume play after the console returns to
standby mode.
The disc tray does not open.
, Check that the AC power cord is connected
securely.
, Check that the console is turned on.
Turn on the console using the main power
switch on the back of the console.
DVD video operation
The console does not play from the
beginning when playing a disc.
, Resume Play has been selected.
Select the x (Stop) icon and press the ✕
button twice before you start playing (see
page 19).
, Depending on the disc, the DVD disc menu
is automatically displayed.
The disc does not play even if the DVD title
is selected.
, A Parental Control level has been set on the
disc (see page 26).
Playback stops automatically.
, The disc may contain an auto pause signal.
While playing such a disc, the console stops
playback at the signal.
You cannot perform some functions such as
Stop, Search, Slow-motion Play, Program
Play, Shuffle Play or Repeat Play.
, Depending on the disc, you may not be
able to do some of the operations above.
The angles cannot be changed when you
play a DVD.
, Multi-angles are not recorded on the DVD.
, Changing the angles is prohibited on the
DVD.
The icon cannot be selected.
, Insert a DVD-RW (VR mode) disc in the
console. (see page 21)
The software title does not start.
, Check that the inserted disc can be played
with this console. (see page 4)
, Check that the disc is placed with the label
side facing up (data side down).
, Check that the disc is inserted correctly.
, Clean the disc.
, Moisture has condensed on the disc. (see
page 3)
, Try another copy of the disc.
, Check that the DVD-R or DVD-RW you are
playing has been finalized.
You cannot save data on the memory card
(8MB) (for PlayStation
, Check that the memory card (8MB) (for
PlayStation®2) or memory card is inserted
securely.
, Check that you are playing the game
correctly.
Refer to the appropriate software manual.
2) or memory card.
®
The language for the audio track cannot be
changed.
, Multilingual tracks are not recorded on the
DVD.
, Changing the language for the track is
prohibited on the DVD.
The subtitle language cannot be changed.
, Multilingual subtitles are not recorded on
the DVD.
, Changing the language for the subtitles is
prohibited on the DVD.
The subtitles cannot be turned off.
, Depending on the DVD, you may not be
able to turn the subtitles off.
Page 31

Specifications
Glossary
31
General
Power requirements
120 V AC, 60 Hz
Power consumption
93 W
Dimensions (approx.)
301 × 78 × 182 mm (w/h/d)
1
/8 × 7 1/4 in)
(12 × 3
Weight (approx.)
2.0 kg (4 lb 14 oz)
Operating temperature
5˚C - 35˚C (41˚F - 95˚F)
Laser diode properties
• Material: GaAlAs
• Wavelength: l=650/780 nm
Inputs/outputs on the console front
Controller port (2)
Memory card slot (2)
USB connector (2)
Inputs/outputs on the console rear
AV MULTI OUT connector (1)
DIGITAL OUT (OPTICAL) connector (1)
Expansion bay (1)
Supplied accessories
See page 8.
Optional accessories
SCPH-10010 U Analog Controller
(DUALSHOCK
SCPH-10020 U Memory Card (8MB)
(for PlayStation
SCPH-10040 U Vertical Stand
(for PlayStation
SCPH-10060 U S VIDEO Cable
SCPH-10090 U Multitap (for PlayStation
SCPH-10100 U Component AV Cable
(for PlayStation
SCPH-10110 U Horizontal Stand
(for PlayStation
SCPH-10420 U DVD Remote Control (for
PlayStation
®2)
2)
®
2)
®
®
2)
®
2)
®
2)
®
Limited warranty
For details on the warranty, refer to the enclosed warranty
card or contact Sony Mexico at 01-800-759-7669 or 5002-
9819.
For additional parts, please call 01-800-759-7669 or 5002-9819.
Design and specifications are subject to change without
notice.
Chapter (page 22)
Sections of a movie or a music piece on a DVD
that are smaller than titles. A title is composed
of several chapters. Each chapter is assigned a
chapter number enabling you to locate the
chapter you want.
2)
Dolby Digital (page 10, 27)
Digital audio compression technology
developed by Dolby Laboratories. This
technology conforms to 5.1-channel surround
sound. The rear channel is stereo and there is a
discrete subwoofer channel in this format.
Dolby Digital provides the same 5.1 discrete
channels of high quality digital audio found in
Dolby Digital cinema audio systems. Good
channel separation is realized because all of the
channel data is recorded discretely and
processed in digital.
DTS (page 10, 27)
Digital audio compression technology that
Digital Theater Systems, Inc. developed. This
technology conforms to 5.1-channel surround
sound. The rear channel is stereo and there is a
discrete subwoofer channel in this format. DTS
provides the same 5.1 discrete channels of high
quality digital audio. Good channel separation
is realized because all of the channel data is
recorded discretely and processed in digital.
DVD-VIDEO (page 4, 17)
DVD VIDEO discs can contain up to 8 hours of
moving pictures on a disc with the same
diameter as a CD. The picture data uses the
MPEG 2 format, one of the worldwide
standards of digital compression technology.
Audio data is recorded in a multi-channel
format allowing you to enjoy a more real audio
presence. DVD VIDEO discs also can contain
advanced functions such as multiple viewing
angles, multilingual tracks and Parental
Control playback restrictions.
DVD-RW (page 4)
DVD-RW is a recordable and rewritable disc
that is the same size as a DVD VIDEO disc.
•VR (Video Recording) mode - enables various
programming and editing functions, some of
which are not available in Video mode.
DVD+RW (page 4)
DVD+RW (read “plus RW”) is a recordable and
rewritable disc. DVD+RW discs use a recording
format that is comparable to the DVD VIDEO
format.
DVD material (page 25)
DVD material can be divided into two types:
video based material and film based material.
Video based material is recorded at 30 frames
(60 fields) per second, and is normally used for
TV programs. Film based material is recorded
at 24 video images per second, and is used for
most movies. Some DVDs contain both video
based and film based material.
Parental Control (page 26)
A function of the DVD used to restrict playback
of the disc according to the age of the user and
the restriction level in each country. The
restriction varies from disc to disc; when it is
activated, playback can be completely
prohibited, violent scenes are skipped or
replaced with other scenes, and so on.
Progressive scan (page 25)
Compared to standard interlace mode that
alternatively shows every other line of an
image to create one frame, progressive scan
shows the entire image at once as a single
frame. This means that while interlace mode
can show 30 frames per second, progressive
scan can show 60. The overall picture quality
increases and still images, text and horizontal
lines appear sharper.
Title (page 22)
The longest section of a movie or a music piece
on a DVD; a movie, etc., for a picture piece on
video software; or an album, etc., for a music
piece on audio software. Each title is assigned
a title number enabling you to locate the title
you want.
US
Additional information
DVD-RW discs have two modes: VR mode and
Video mode.
•Video mode - complies with DVD-VIDEO
format and is compatible with most DVD
players once finalized, whereas a DVD-RW
recorded in VR mode can only be played on
DVD-RW compliant DVD players.
Page 32

32
ADVERTENCIA
Para evitar el riesgo de incendio o de
descarga eléctrica, no exponga la unidad a
la lluvia ni a la humedad.
Para evitar descargas eléctricas, no desmonte
la unidad. Solicite asistencia técnica
únicamente al personal especializado.
Precaución
El uso de instrumentos ópticos con este
producto aumentará el riesgo de daños
oculares. No desmonte la máquina, ya que el
haz láser utilizado en ella es perjudicial para los
ojos. Solicite asistencia sólo al personal
especializado.
Precaucion:
Radiacion Laser al abrirse.
No mire el rayo de luz.
Esta etiqueta está situada en la caja protectora
de láser dentro de la consola PlayStation®2.
Precaucion:
Riesgo de choque electrico.
No abrir.
Precaucion: Para reducir el riesgo de
choque electrico, no remover la
cubierta.
Dentro del equipo no se encuentran
piezas de repuesto.
Solicite apoyo de personal calificado
en caso de servicio.
Este símbolo gráfico con marcas suplementarias está
ubicado en la parte derecha de la consola PlayStation
esta última está colocada en la posición vertical).
Este símbolo se utiliza para prevenir al usuario
de la existencia de un “voltaje peligroso” sin
aislante dentro del producto que podría ser de
suficiente magnitud como para constituir un
riesgo de descarga eléctrica para las personas.
Este símbolo se utiliza para avisar al usuario
que dispone de importantes instrucciones de
utilización y mantenimiento (servicio) en los
materiales impresos adjuntos al aparato.
®2 (si
Precaución
PARA EVITAR DESCARGA ELÉCTRICA,
ACERQUE LA CLAVIJA MÁS ANCHA A LA
RANURA ANCHA E INSÉRTELA
COMPLETAMENTE.
Lea lo siguiente antes de utilizar su consola
PlayStation
Existe la posibilidad de que un pequeño porcentaje de
personas sufran ataques epilépticos al exponerse a ciertos
patrones luminosos o luces intermitentes. Estas personas
podrían sufrir un ataque epiléptico al exponerse a ciertos
patrones o fondos en la pantalla del televisor o en los
videojuegos, incluyendo los juegos vistos en la consola
PlayStation
síntomas de una epilepsia no detectada previamente
incluso en personas sin un historial de ataques o epilepsia.
Si usted, o cualquier miembro de su familia, sufre de
epilepsia, consulte a su médico antes de utilizar un
videojuego. Deje de utilizar este último
INMEDIATAMENTE y consulte a su médico antes de
volver a utilizarlo, si usted tiene alguno de los siguientes
síntomas al utilizar un videojuego: mareo, alteraciones en
la visión, contracciones musculares u oculares, pérdida del
conocimiento, desorientación, movimientos involuntarios
o convulsiones.
®2
®2. Algunas condiciones podrían provocar
Información
Si el presente equipo causa interferencia en la recepción de
radio o de televisión, la cual puede determinarse al apagar
y encender el equipo, se recomienda que el usuario intente
corregir la interferencia mediante una o más de las
medidas siguientes:
– Cambie la orientación o ubicación de la antena de
recepción.
– Aumente la separación entre el equipo y el receptor.
– Conecte el equipo en un tomacorriente de circuito
distinto al que está conectado el receptor.
– Consulte con su distribuidor o con un técnico
especializado en radio/televisión para solicitar
asistencia.
Registro del propietario
Los números de modelo y de serie de la consola
PlayStation
misma (puesta en posición horizontal). Registre lo número
de serie en lo espacio señalado abajo. Menciónelos siempre
que se ponga en contacto con nuestro servicio de
asistencia técnica, llamando al 01-800-759-7669 y
5002-9819.
Modelo No.
No. de Serie
Es posible que algunos títulos de software de formato
PlayStation
PlayStation
PlayStation
consola PlayStation
póngase en contacto con nuestro servicio de asistencia
técnica, llamando al 01-800-759-7669 y 5002-9819.
Este producto podría estar dentro del ámbito de la
legislación nacional en materia de control de
exportaciones. Usted debe cumplir plenamente con los
requerimientos de dicha legislación y de todas las leyes
pertinentes de cualquier otra jurisdicción en relación a este
producto.
®2 se encuentran en la parte posterior de la
SCPH-50011
_______________________________
funcionen de forma distinta con la consola
®
2 de cómo lo hacían con la consola
®
, o que no funcionen adecuadamente con la
®
2. Para obtener más información,
®
Page 33

Precauciones
33
Seguridad
Este producto ha sido diseñado prestando la máxima
atención a las medidas de seguridad. Sin embargo, si se
utiliza inadecuadamente, cualquier dispositivo eléctrico
puede causar un incendio, descargas eléctricas o lesiones
personales. Para ayudar a asegurar un manejo exento de
accidentes, siga las siguientes indicaciones:
• Observe todas las advertencias, precauciones e
instrucciones.
• Deje de utilizar inmediatamente el dispositivo si éste
funciona de forma inadecuada o produce sonidos u
olores extraños.
• Si el aparato no funciona adecuadamente, póngase en
contacto con nuestro servicio de asistencia técnica,
llamando al 01-800-759-7669 y 5002-9819.
Utilización y manejo
• No arroje o deje caer la consola, ni la someta a golpes
fuertes.
• No coloque la consola en una superficie inestable,
inclinada o sometida a vibracion.
• Nunca mueva ni cambie la posición de una consola
mientras esté encendida.
• No exponga la consola a altas temperaturas, humedad
elevada o luz solar directa (se debe utilizar en un
ambiente donde la temperatura oscile entre
5 °C y 35 °C/41 °F y 95 °F).
• No sitúe la consola en una ubicacion sujeta a cambios
bruscos de temperatura (ej. cambios de temperatura de
10 °C/18 °F por hora o más).
• No deje la consola en un automóvil con las ventanillas
cerradas (particularmente en verano), ya que puede
deformarse el exterior de la consola o causar fallas de
funcionamiento de la consola.
• No utilice la consola en una ubicación polvorienta.
• No permita que penetre líquido ni partículas en la
consola.
• No coloque objetos pesados encima de la consola.
• No toque las partes metálicas ni inserte objetos extraños
en los conectores de la consola.
• Cuando no piense utilizar la consola por un periodo
prolongado, desconecte el enchufe de alimentación de
la consola PlayStation
• Para desconectar el enchufe de alimentación del
tomacorriente, sujete directamente el enchufe. Nunca
sujete por el cable.
• No coloque ningún tipo de material de goma o vinilo
en el exterior de la consola durante un período
prolongado, porque podría dañar la superficie de
plástico.
• Para prevenir el cansancio de la vista, descanse
aproximadamente 15 minutos por cada hora que
juegue.
• Utilice únicamente el cable de alimentación ca
suministrado.
• Desconecte todos los cordones y cables antes de mover
la consola.
2 desde el tomacorriente.
®
Revisión del cable de alimentación ca
Para ayudar a garantizar un funcionamiento seguro de
este producto, compruebe regularmente que el cable de
alimentación ca no se ha desgastado. Si el cable está
dañado, deje de usarlo inmediatamente y póngase en
contacto con nuestro servicio de asistencia técnica,
llamando al 01-800-759-7669 y 5002-9819.
No toque los conectores de la consola
No toque las partes metálicas ni inserte objetos extraños en
los conectores de la consola. Para ayudar a proteger el
conector de bus que se encuentra dentro de la
EXPANSION BAY (bahía de expansión), mantenga la tapa
de la EXPANSION BAY (bahía de expansión) inserida en
la parte trasera de la consola cuando la bahía no está en
uso.
No exponga la consola al humo de cigarrillo
o al polvo
Cuando instale la consola PlayStation®2, evite lugares en
los que haya humo de cigarrillo o polvo excesivo. Los
residuos de humo de cigarrillo o la acumulación de polvo
en los componentes internos, como los lentes, pueden
ocasionar problemas de funcionamiento de la consola.
Limpieza de las rejillas
Puede acumularse polvo en las rejillas de ventilación tanto
delantera como trasera de la consola. Revise las rejillas de
vez en cuando y extraiga el polvo acumulado con una
aspiradora de baja potencia.
Manejo de los discos
• No deje los discos cerca de fuentes de calor, bajo la luz
solar directa ni en lugares con mucha humedad.
• Guarde los discos en sus cajas cuando no los utilice. Los
discos pueden deformarse si los apila o los coloca
inclinados sin haberlos guardado en sus cajas.
• No toque la superficie de los discos cuando los maneje;
sujételos por el borde.
• No adhiera papel ni cinta sobre el disco.
• No escriba en el disco con un marcador, etc.
• La existencia de huellas dactilares, polvo, suciedad o
rasguños en el disco puede distorsionar la imagen o
reducir la calidad de sonido. Siempre maneje los discos
con cuidado y compruebe que están limpios antes de
utilizarlos.
• Limpie los discos con un paño suave, frotando con
suavidad desde el centro hacia fuera.
• No utilice disolventes como bencina, limpiadores
disponibles en el mercado que no hayan sido diseñados
para discos CD ni aerosoles antiestáticos diseñados
para discos de vinilo, ya que estos podrían dañar el
disco.
Condensación de humedad
Si traslada la consola o el disco directamente de un lugar
frío a uno cálido, puede condensarse humedad en la lente
del interior de la consola o en el disco. Si esto ocurre, es
posible que la consola no funcione correctamente. En este
caso, extraiga el disco y no lo introduzca hasta que se haya
evaporado la humedad (podrían transcurrir varias horas).
Si la consola sigue sin funcionar correctamente, póngase
en contacto con nuestro servicio de asistencia técnica,
llamando al 01-800-759-7669 y 5002-9819.
Limpieza del exterior de la consola
Cuando limpie el exterior de la consola, asegúrese de
desactivar la alimentación con el interruptor principal
MAIN POWER de la parte trasera de la consola y
desconectar el enchufe de alimentación de la toma
eléctrica.
• No utilice diluyente de pintura, disolventes ni otros
productos químicos para limpiar el exterior de la
consola, ya que podrían dañar la superficie. Si utiliza
un paño de limpieza disponible comercialmente, siga
las instrucciones suministradas con el mismo.
• Si el exterior de la consola se ensucia, humedezca un
paño suave en una solución detergente diluida con
agua, exprima bien el paño para eliminar el exceso de
líquido, limpie la zona afectada del exterior y, para
finalizar, pase un paño seco.
Por ningún motivo desarme la consola
• Utilice la consola PlayStation®2 en conformidad con
este manual de instrucciones. No se otorga autorización
para el análisis ni la modificación de la consola
PlayStation
de su circuito.
• No hay componentes que el usuario pueda reparar en
el interior de la consola PlayStation
consola anula la garantía. Además, existe el riesgo de
exposición a radiación láser y a descargas eléctricas.
2, ni el análisis y uso de la configuración
®
2. Desmontar la
®
Notas sobre seguridad al utilizar el control
analógico (DUALSHOCK
• Deje de utilizar esta consola inmediatamente si
comienza a sentirse cansado o si experimenta una
sensación de malestar o dolor en las manos o brazos
mientras utiliza el control analógico (DUALSHOCK
Si el malestar persiste, consulte a un médico.
• El control analógico (DUALSHOCK
únicamente con las manos. No lo ponga en contacto
directo con la cabeza, la cara o los huesos de cualquier
otra parte del cuerpo.
• La función de vibración del control analógico
(DUALSHOCK
utilice la función de vibración si sufre de dolencias o
tiene lesiones en los huesos, articulaciones o músculos
de las manos o brazos. Tenga en cuenta que el ajuste
predeterminado de la función de vibración de algunos
títulos de software de formato PlayStation
PlayStation
función de vibración puede ajustarse en “Desactivada”
mediante el menú de opciones del software. No utilice
tales títulos con el control analógico (DUALSHOCK
a menos que haya ajustado la función de vibración en
“Desactivada”.
• Evite el uso prolongado del control analógico
(DUALSHOCK
minutos aproximadamente.
* Estas notas se aplican también al control analógico
(DUALSHOCK
®2) puede agravar las dolencias. No
® es “Activada”. En la mayoría de casos, la
®2). Descanse a intervalos de 30
®).
*
®2)
®2) se debe utilizar
®2 y
®2).
®2)
ES
Procedimientos iniciales
Page 34

34
Discos que pueden reproducirse con la consola PlayStation®2
Logotipo del
disco
Color del disco
Contenido
Ta ma ño del disco
DVD-ROM de formato
PlayStation
Logotipo “ ”,
PlayStation®2 y
designación
Plateado
®2
CD audio
CD-ROM de formato
PlayStation
Logotipo “ ”,
PlayStation®2 y
designación
Audio y vídeo
®
Azul
12 cm
Vídeos DVD
2
*3
CD-ROM de formato
PlayStation
Logotipo PlayStation® y
designación
®
Negro
DVD-RW (modo VR)
Logotipo del
disco
Contenido
Ta ma ño del disco
*1 Si coloca la consola en posición vertical y reproduce un CD audio de 8 cm, utilice el adaptador opcional.
*2 Siempre que utilice un vídeo DVD o un disco DVD-RW de 8 cm, coloque la consola en posición horizontal.
*3 El término “vídeos DVD” se refiere tanto a los discos DVD-VIDEO, DVD-R, DVD+R, y DVD+RW como a los discos DVD-
RW grabados en modo de Vídeo.
Audio
12 cm 8 cm
Audio y vídeo
*1
12 cm
Los logotipos de “DVD VIDEO” y “DVD-RW” son marcas comerciales.
8 cm
*2
Audio y vídeo
12 cm
8 cm
*2
Notas sobre la reproducción de discos
DVD-R/DVD-RW/DVD+R/DVD+RW
*
Es posible que algunos discos que han sido
grabados mediante dispositivos de DVD-R/
DVD-RW/DVD+R/DVD+RW no puedan
reproducirse debido a rasguños, suciedad,
polvo, huellas dactilares, problemas durante la
grabación o al estado del disco en el momento
de la grabación. Sólo se podrán reproducir los
discos que hayan sido finalizados (mediante un
proceso que finaliza la grabación) después de
realizada la grabación.
No se reproducirán las imágenes de vídeo que
hayan sido grabadas en discos DVD-RW
compatibles con CPRM (Content Protection for
Recordable Media o protección de contenidos
en soportes grabables) usando la capacidad de
copiar una sola vez, y aparecerá el mensaje
“Reproducción restringida. No se puede
reproducir”. Para más información, consulte el
manual de instrucciones suministrado con el
dispositivo grabador de DVD. (CPRM es un
sistema de protección de copias con capacidad
para perturbar las emisiones que se usa en
programas de radiodifusión con el fin de que
puedan ser “copiados una sola vez”.)
* Para más información sobre cada tipo de soporte de
DVD, consulte el Glosario en la página 62 de este
manual.
Discos con formas irregulares
No utilice discos CD o DVD con formas
irregulares (por ejemplo, con forma de corazón
o estrella), ya que pueden producir fallas de
funcionamiento de la consola.
Notas sobre funciones de reproducción
de vídeos DVD
• Esta consola reproduce un vídeo DVD conforme al
diseño original de los productores de software. Es
posible que algunas funciones de reproducción de
esta consola no hayan sido incorporadas al diseño
del vídeo DVD. Consecuentemente, es posible que
dichas funciones no estén disponibles con ciertos
títulos de software. Para más información, consulte
las instrucciones suministradas con su vídeo DVD.
• En pocos casos, es posible que ciertos vídeos DVD no
funcionen adecuadamente con la consola
PlayStation
variaciones en el proceso de fabricación o en la
codificación del software del vídeo DVD. Si tiene
problemas, intente reiniciar la reproducción del
vídeo DVD. Si los problemas persisten, para más
información, sírvase llamar al editor del vídeo DVD
o póngase en contacto con el servicio de atención al
cliente de Sony de México.
®2. Esto se debe principalmente a las
Sistemas de vídeo DVD y restricciones
regionales
•Algunos discos DVD-VIDEO están marcados
con números de región, como 4. El número
incluido en el símbolo representa el número
de región de reproductores de DVD en los
que puede reproducirse el disco. Los discos
DVD-VIDEO que no tengan este símbolo, o
los que no muestren el número 4, no pueden
reproducirse en su consola.
•Los discos DVD-VIDEO con la etiqueta
ALL
también pueden reproducirse en esta consola.
Si intenta reproducir cualquier otro tipo de
discos DVD-VIDEO, la pantalla mostrará el
mensaje “El disco no se puede reproducir
debido a restricciones regionales”.
•Algunos discos DVD-VIDEO que no tengan
marca de código de región también pueden
estar sujetos a restricciones de zona, y es
posible que no puedan reproducirse en la
consola.
Page 35

Índice
35
Procedimientos
iniciales
Conexión
ADVERTENCIA
Precauciones
Discos que pueden reproducirse con la consola
PlayStation®2
Advertencias de seguridad
Comprobación del contenido del paquete
Colocación de la consola
Conexión de la consola a un televisor
Conexión de equipos de audio digital
Conexión de otros equipos digitales
Uso del menú principal
32
33
34
36
38
38
39
40
41
42
Juego / CD audio
Vídeo DVD
Información
complementaria
Para jugar
Uso de la memory card (tarjeta de memoria)
Reproducción de CD audio
Reproducción de vídeos DVD
Ajustes para el reproductor de DVD
Solucíón de problemas
Especificationes
Glosario
43
46
46
48
53
60
62
62
ES
Procedimientos iniciales
Page 36

36
Advertencias de seguridad
Para su protección, por favor lea detenidamente estas instrucciones de
seguridad antes de utilizar la consola PlayStation®2 y mantenga este
manual disponible para realizar consultas en el futuro.
Observe cuidadosamente todas las advertencias, precauciones e
instrucciones sobre la consola o las que se describen en el manual de
instrucciones.
USO
Fuentes de alimentación
Esta consola deberá utilizarse únicamente con el tipo de fuente de
alimentación que se indica en la etiqueta con la señal para dicho
propósito. Si no está seguro(a) del tipo de alimentación eléctrica que se
suministra a su casa, consulte con su distribuidor o su compañia de
electricidad local. Para aquellas unidades diseñadas para utilizarse con
alimentación mediante baterías u otras fuentes, consulte las instrucciones
de utilización.
Conexión a tierra o polarización
Esta consola está dotada de un enchufe de alimentación ca polarizado
(enchufe con una hoja más ancha que la otra). Este enchufe sólo podrá
insertarse en el tomacorriente de alimentación de una sola forma. Este es un
elemento de seguridad. Si no es posible insertar el enchufe totalmente en el
tomacorriente, intente invertir la posición del enchufe. Si todavía no es
posible insertarlo, póngase en contacto con su electricista o haga que le
instalen un tomacorriente adecuado. No contravenga el propósito de
seguridad del enchufe polarizado forzándolo hacia adentro.
Sobrecarga
No sobrecargue los tomacorrientes de pared, cables de extensión o salidas
de conveniencia más allá de su capacidad, ya que lo anterior podría
resultar en un incendio o descarga eléctrica.
Polvo y materias extrañas
No permita que polvo o materias extrañas se acumulen alrededor del
conector ~AC IN. Antes de conectar el enchufe de alimentación ca, revise
que no haya polvo o materias extrañas dentro o sobre el enchufe de
alimentación o el extremo de conexión del cable, el tomacorrientes de pared
o el conector ~AC IN en la parte posterior de la consola. El polvo o materias
extrañas en los conectores pueden resultar en un incendio o descarga eléctrica.
Entrada de objetos y líquido
Nunca introduzca objetos de ninguna clase, más que los autorizados, en las
aperturas de la consola, ya que estos podrían tocar puntos de voltaje
peligrosos o causar un corto circuito en las piezas, lo que podría resultar en
un incendio o descarga eléctrica. Nunca derrame líquidos de ninguna clase
sobre la consola.
Dispositivos periféricos
No utilice dispositivos periféricos que no sean recomendados por
el fabricante, puesto que podrían ocasionar daños.
Limpieza
Sobre la descripción completa del método seguro para la limpieza
del exterior de la consola, consulte la sección de precauciones en
la página 64.
INSTALACIÓN
Agua y humedad
No use la consola que funciona a base de electricidad cerca de
fuentes de agua; por ejemplo, cerca de una bañera, lavabo de
cocina, un sótano húmedo o cerca de una piscina.
Protección del cable de alimentación
Coloque el cable de alimentación de forma que haya poca
probabilidad de pisarlo o perforarlo con objetos apoyados en o
sobre aquél, dando especial atención a los enchufes, receptáculos
y al punto en el que el cable sale de la consola.
Ventilación
Las ranuras y aperturas del exterior de la consola sirven para
proveer la ventilación necesaria. Para asegurar un
funcionamiento confiable de la consola, y para protegerla contra
el sobrecalentamiento, estas ranuras y aperturas nunca deben
bloquearse o cubrirse.
– Nunca cubra las ranuras y aperturas con un paño o cualquier
otro tipo de tela.
– Nunca bloquee las ranuras y aperturas colocando la consola en
una cama, sofá alfombra u otra superficie similar.
Accesorios
No coloque la consola en un carrito, soporte, repisa o mesa que
sea inestable. La consola podría caerse, causando lesiones graves
a niños o adultos, y daños graves a la consola.
Utilice solamente el soporte vertical o el horizontal, u otros
accesorios que recomiende el fabricante para estabilizar la
consola.
Debe tenerse cuidado al mover un aparato utilizando un carrito.
Detenerse súbitamente, empujar con fuerza excesiva o ir por
superficies irregulares podría hacer que se vuelque el carrito con
el aparato que está llevando.
Page 37

Advertencias de seguridad
(continuación)
37
– Nunca coloque la consola en un espacio reducido, como un
librero o gabinete incorporado, a menos que se provea una
ventilación adecuada.
– No coloque la consola cerca de un radiador, sobre éste o una
rejilla de calefacción, o donde esté expuesto a la luz solar
directa.
ANTENAS
Conexión a tierra de antenas exteriores. Si se instala una
antena o un sistema de cable para exteriores, observe las
precauciones que se dan a continuación.
Los sistemas de antenas para exteriores no deberán
estar ubicados en lugares adyacentes a líneas eléctricas
aéreas u otros circuitos eléctricos, o donde puedan
entrar en contacto con dichas líneas y circuitos.
AL INSTALAR UN SISTEMA DE ANTENAS PARA
EXTERIORES, DEBERÁ TENER EXTREMO CUIDADO DE
EVITAR EL CONTACTO CON DICHAS LÍNEAS O
CIRCUITOS ELÉCTRICOS, YA QUE EL CONTACTO CON
ÉSTOS ES CASI INVARIABLEMENTE FATAL.
Cerciórese de que el sistema de antena tenga conexión a
tierra de forma que proporcione alguna protección
contra la sobretensión y cargas estáticas acumuladas. La
Sección 810 del Código Eléctrico Nacional proporciona
información respecto a la conexión a tierra adecuada del
mástil y estructura de apoyo, conexión a tierra del
conductor de entrada a la unidad de descarga de la
antena, tamaño de los conductores a tierra, ubicación de
la unidad de descarga de la antena, conexión a los
electrodos de conexión a tierra y los requerimientos
para el electrodo de conexión a tierra.
Abrazadera de
conexión a tierra
Equipo de
servicio
eléctrico
Abrazadera de
conexión a tierra
Sistema de electrodos de
conexión a tierra del
servicio eléctrico (Artículo
250, Parte H del CEN)
CEN- Código Eléctrico Nacional
Rayos
Para obtener protección adicional para esta consola en una tormenta eléctrica,
o cuando se deja sin atender o no se utiliza durante mucho tiempo,
desenchúfela del tomacorriente de pared, desconecte el sistema de antena o
cable. Esto evitará daños a la consola ocasionados por los rayos y la
sobretensión de las líneas eléctricas.
Evite el contacto con la consola durante una tormenta eléctrica, ya que puede
exponerse al riesgo de recibir una descarga eléctrica.
SERVICIO DE REPARACIÓN
Daños que requieren servicio de reparación
Desenchufe la consola del tomacorriente de pared y contrate los
servicios de personal de servicio calificado bajo las condiciones
siguientes:
– Cuando el cable o enchufe de alimentación están dañados o
raídos.
Cable de alimentación ca raído o tieso
Conductor de
entrada de la
antena
Unidad de
descarga de la
antena (Sección
810-20 del CEN)
Conductores a tierra
(Sección 810-21 del CEN)
Clavija agrietada
– Si se ha derramado líquido o han caído objetos sobre la consola.
– Si la consola ha sido expuesto a la lluvia o humedad.
– Si la consola ha sido objeto de golpes físicos excesivos ocasionados
por haberlos dejado caer, o si se ha dañado el exterior de la consola.
– Si la consola no funciona normalmente al seguir el manual de
instrucciones. Ajuste únicamente los controles que se especifican en
el manual de instrucciones. El ajuste inadecuado de otros controles
podría ocasionar daños, lo que frecuentemente requerirá arduo
trabajo de un técnico calificado para restaurar la consola a su
funcionamiento normal.
– Cuando la consola muestra un claro cambio en su funcionamiento,
ello indica la necesidad de servicio de reparación.
Servicio de reparación
No intente reparar la consola por su cuenta, ya que extracción de
la cubierta exterior de la consola podría exponerlo a un voltaje
peligroso u otros peligros.
Para recibir instrucciones sobre reparación y reemplazo, delegue
todo servicio de reparación al centro de servicio autorizado
llamando al 01-800-759-7669 y 5002-9819.
Piezas de reemplazo
Cuando se necesiten piezas de reemplazo, cerciórese de que el
técnico de servicio haya utilizado las piezas de reemplazo
especificadas por el fabricante que tengan las mismas
características de las piezas originales. Las substituciones sin
autorización podrían resultar en un incendio, descarga eléctrica u
otros daños.
Revisión de seguridad
Al final de cada revisión o reparación de la consola, pídale al
técnico de servicio que realice verificaciones de seguridad de
rutina (como lo especifica el fabricante) para determinar si el
equipo está en una condición de funcionamiento segura.
ES
Procedimientos iniciales
Page 38

38
Comprobación del contenido del paquete
Colocación de la consola
Compruebe que dispone de los siguientes elementos:
• Consola PlayStation®2
• Control analógico (DUALSHOCK
• Manual de instrucciones (1 juego)
Si faltara algún elemento, póngase en contacto con nuestro servicio de asistencia técnica, llamando al
01-800-759-7669 y 5002-9819.
®2)
• Cable AV (audio/vídeo integrados)
• Cable de alimentación ca
Es posible colocar la consola en posición
horizontal o vertical.
Para colocar la consola en posición vertical,
utilice el soporte vertical (para PlayStation®2),
modelo SCPH-10040 U (vendido por separado).
Si no dispone de un soporte vertical (para
PlayStation®2), coloque la consola en posición
horizontal como se muestra a continuación.
Si coloca la consola en posición horizontal,
puede utilizar el soporte horizontal (para
PlayStation®2), modelo SCPH-10110 U
(vendido por separado).
Posición verticalPosición horizontal
Notas
• Coloque la consola sólo en posición horizontal o
vertical, ya que en cualquier otra posición, podría
resultar dañada.
• No cambie la posición de la consola mientras la utiliza.
Si lo hace, puede dañar el disco o causar fallas de
funcionamiento de la consola.
Logotipo de la familia de productos “ ”
de la bandeja del disco
El logotipo de la familia de productos “ ” de
la bandeja del disco puede girarse para que
corresponda con la posición horizontal o
vertical de la consola.
Posición del logotipo
Page 39

Conexión de la consola a un televisor
39
Puede conectar la consola PlayStation®2 a la mayoría de televisores y videograbadoras mediante el
cable AV (audio/vídeo integrados) como se describe más abajo. También es posible conectar la
consola a otros tipos de televisores mediante cables y adaptadores especiales, que se venden por
separado. Para más información, consulte las siguientes secciones:
•Conexión a un televisor con conector de entrada S VIDEO (en esta página)
•Conexión a un televisor con entrada de antena (en esta página)
•Conexión a un televisor con conectores de entrada de vídeo en componentes (página 40)
En las instrucciones en las secciones arriba mencionadas se asume que la salida del audio se realiza
mediante los altavoces del televisor.
Precaución
Por razones de seguridad, apague la consola y desconecte el cable de alimentación del tomacorriente antes de realizar o
ajustar las conexiones.
Nota
Si la calidad de las imágenes disminuye al usar el modo progresivo con un televisor compatible con dicho modo, pruebe en el
modo entrelazado estándar. Para más información sobre el modo progresivo, consulte “Modo Progresivo” en la página 56.
Conexión a un televisor con entradas de audio/vídeo
Conecte su consola PlayStation®2 al televisor mediante el cable AV suministrado (audio/vídeo
integrados).
Al conectar los cables, haga coincidir el cable codificado con colores con los enchufes
correspondientes de los componentes: amarillo (vídeo) con amarillo, rojo (derecho) con rojo y blanco
(izquierdo) con blanco.
Después de la conexión
Ajuste el televisor en el modo de entrada de vídeo apropiado. Para más información, consulte el
manual de instrucciones suministrado con su televisor.
Al conectar a un televisor de pantalla panorámica (relación de aspecto de 16:9)
Ajuste “Tamaño de la Pantalla” en el menú Configuración del Sistema en el valor “16:9”. Para más
información sobre el menú Configuración del Sistema, consulte las páginas 42 y 44.
Si su televisor es monofónico
No conecte la clavija roja. Si desea escuchar el sonido de los canales izquierdo y derecho de un televisor monofónico,
utilice un cable de audio tipo bifónico a monofónico (estéreo a monofónico) disponible en el mercado (vendido por
separado).
A la entrada de
vídeo
A la entrada de
audio (izquierda)
A la entrada de
audio (derecha)
EXPANSION BAY
(bahía de expansión)
Conector DIGITAL OUT
(OPTICAL)
Conector
AV MULTI OUT
Interruptor
principal MAIN
POWER
Conector ~AC IN
Conexión a una videograbadora
Conecte su consola PlayStation®2 a la
videograbadora mediante el cable AV
Al reproducir un vídeo DVD
suministrado (audio/vídeo integrados)
haciendo coincidir los colores de las clavijas.
Si la videograbadora es monofónica, no conecte
Videograbadora
la clavija roja.
No obstante, al reproducir un vídeo DVD, no
conecte la consola a una videograbadora. Si lo
hace, se puede disminuir la calidad de la imagen.
Conecte la consola directamente al televisor.
Después de la conexión
Realice los ajustes apropiados del televisor y la
Consola
PlayStation
2
®
Conéctela
directamente
videograbadora.
Para más información, consulte los manuales
de instrucciones suministrados con su televisor
y con su videograbadora.
Conexión a un televisor con conector de entrada S VIDEO
Conecte su consola PlayStation®2 al conector
de entrada S VIDEO del televisor mediante el
cable S VIDEO, modelo SCPH-10060 U
(vendido por separado).
Obtendrá una imagen de mejor calidad que al
usar el cable AV (audio/vídeo integrados).
Después de la conexión
Ajuste el televisor en el modo de entrada de
Al conector
AV MULTI OUT
vídeo apropiado (como “S VIDEO”).
A la entrada
S VIDEO
A la entrada de
audio (izquierda)
Al entrada de
audio (derecha)
Conexión a un televisor con entrada de antena
Conecte su consola PlayStation®2 a la entrada
de antena del televisor mediante el adaptador
RFU, modelo SCPH-10071 (vendido por
separado). En este caso, el sonido es
monofónico.
Después de la conexión
Ajuste el selector de canal del adaptador RFU y
el selector de canales del televisor en el canal 3
ó 4 de VHF, según el que no esté activo en su
zona.
Al entrada de
antena
Al conector
AV MULTI OUT
Televisor
ES
Conexión
Cable AV (audio/vídeo integrados)
Cable de alimentación
ca
Page 40

40
Conexión de la consola a un televisor
(continuación)
Conexión de equipos de audio digital
Conexión a un televisor con conectores de entrada de vídeo en
componentes
Si su monitor o proyector dispone de
conectores de entrada de vídeo en
componentes (Y, CB/PB, CR/PR), conecte su
consola PlayStation®2 mediante el cable AV en
componentes (para PlayStation®2), modelo
SCPH-10100 U (vendido por separado).
Obtendrá una imagen de mejor calidad.
Antes de la conexión
Si conecta su consola Playstation®2 a un
televisor utilizando el cable AV en
componentes sin ajustar primero la opción
“Salida de Componentes de Imagen” bajo el
menú Configuración del Sistema en “Y Cb/Pb
Cr/Pr”, es posible que las imágenes no se
visualicen adecuadamente. Antes de conectar
su consola con el cable AV en componentes,
primero utilice el cable AV (audio/vídeo
integrados) suministrado y cerciórese de que la
opción “Salida de Componentes de Imagen”
esté ajustada en “Y Cb/Pb Cr/Pr”.
Notas
• La consola PlayStation®2 no es compatible con un
televisor de alta definición, a menos que se utilicen el
software y los cables adecuados. Para más información,
consulte el manual de instrucciones suministrado con
su televisor.
• Debe usar el cable AV en componentes para poder ver
vídeos DVD en modo progresivo. Si la calidad de las
imágenes disminuye al usar el modo progresivo,
pruebe en el modo normal (entrelazado). Para más
información, consulte “Modo Progresivo” en la página
56.
Acerca de conectar la consola
PlayStation®2 a un televisor con pantalla
de plasma o a un televisor de proyección
Imágenes estáticas sin movimiento, como los menús del
DVD, pantallas de configuración o imágenes paradas
en pantalla con la función de pausa, podrán dejar leves
trazos permanentes en la pantalla del televisor con
pantalla de plasma o en la pantalla del televisor de
proyección (excepto aquellos de pantalla LCD), si se
dejan durante mucho tiempo. No utilice la consola de
una manera que pueda producir este efecto. Para más
detalles, consulte el manual de instrucciones
suministrado con su televisor.
A la
entrada
de audio
A los conectores de
entrada de vídeo en
componentes
Nota sobre el efecto de salto de las imágenes
Algunos televisores o monitores pueden experimentar
un efecto de salto de las imágenes al utilizar la consola
PlayStation
PlayStation
técnicamente al televisor. Si se produce tal problema con
su televisor/monitor, póngase en contacto con nuestro
servicio de asistencia técnica, llamando al
01-800-759-7669 y 5002-9819.
2. No existe ningún problema con la consola
®
®2 ni con su fabricación. El problema se debe
Al conector
AV MULTI OUT
En esta sección se describe cómo conectar la
consola PlayStation®2 a un equipo de audio con
conectores digitales (como la salida óptica Dolby
Digital (AC-3)). El uso de receptores y
amplificadores digitales permite disfrutar de
funciones como sonido multicanal y envolvente.
Conexión a un receptor o
amplificador, platina MD
(Minidisco) o DAT (Cinta de
Audio Digital) con conector
digital
Utilice un cable digital óptico (vendido por
separado) y ajuste “DIGITAL OUT (OPTICAL)”
del menú Configuración del Sistema en
“Activado” (ajuste predeterminado).
Para más información sobre el menú
Configuración del Sistema, consulte las páginas
42 y 43.
Parte posterior de la consola
PlayStation
DIGITAL OUT
Notas
• Consulte también el manual de instrucciones
• No es posible realizar directamente grabaciones de
®2
MAIN
POWER
~
AC IN
AV MULTI OUT
(OPTICAL)
suministrado con el dispositivo que va a conectar.
audio digital de discos grabados en formato Dolby
Digital o DTS utilizando una platina MD o DAT.
Dispositivo
conectado
DIGITAL INPUT
OPTICAL
Conexión a un dispositivo de
audio con decodificador DTS
*1
o Dolby Digital*2 incorporado
(sólo vídeo DVD)
La conexión a un equipo de audio con
decodificador DTS o Dolby Digital incorporado
(vendido por separado) permite reproducir el
sonido grabado en vídeos DVD en formato
Dolby Digital (AC-3) o DTS para obtener el
efecto de audición de una sala de cine o de
conciertos.
Conecte el dispositivo mediante el conector
DIGITAL OUT (OPTICAL) con un cable digital
óptico (vendido por separado).
Consola
PlayStation
Dispositivo de
audio con
decodificador DTS
o Dolby Digital
incorporado
Configuraciones para el reproductor de DVD
en su consola PlayStation
En función de los dispositivos que vaya a
conectar, será necesario realizar algunos ajustes
de configuración para el reproductor de DVD.
Para más información sobre el uso de la
pantalla Ajustar, consulte las páginas 54 a 59.
• Si conecta un dispositivo de audio con
decodificador DTS incorporado
Ajuste “DIGITAL OUT (OPTICAL)” en
“Activada” y, a continuación, “DTS” en
“Activada” en la pantalla “Audio”.
• Si conecta un dispositivo de audio con
decodificador Dolby Digital incorporado
Ajuste “DIGITAL OUT (OPTICAL)” en
“Activada” y, a continuación, “Dolby Digital”
en “Activada” en la pantalla “Audio”.
2
®
Cable digital óptico
(vendido por separado)
®
Altavoces
2
Page 41

Conexión de otros equipos digitales
41
Nota
Consulte las instrucciones de utilización y configuración
del dispositivo de audio que vaya a conectar.
*1 “DTS” y “DTS Digital Out” son marcas comerciales de
Digital Theater Systems, Inc.
*2 Fabricado bajo licencia de Dolby Laboratories.
“Dolby” y el símbolo de la doble D son marcas
comerciales de Dolby Laboratories.
Trabajos confidenciales no publicados. ©1992-1997
Dolby Laboratories. Todos los derechos reservados
Conexión de un dispositivo
mediante la interfaz Universal
Serial Bus (USB)
Los dos conectores USB de la parte frontal de
la consola pueden utilizarse para conectar
dispositivos compatibles con USB. Consulte
también el manual de instrucciones
suministrado con el dispositivo que va a
conectar.
Conectores USB
Nota
No todos los productos compatibles con USB funcionan
la consola
con
usuario del producto compatible con USB correspondiente
para obtener más información.
PlayStation®2. Consulte el manual del
ES
Conexión
Page 42

42
Uso del menú principal
Al encender la consola por primera vez, se le
pedirá que realice los ajustes básicos para el
idioma y la hora. Estos ajustes pueden
cambiarse posteriormente en el menú
Configuración del Sistema. Para más
información, consulte “Uso del menú
Configuración del Sistema” en las páginas 42 y
43.
Después de la instalación inicial, aparecerá el
menú Principal siempre que encienda la
consola sin haber insertado un disco
previamente.
Puede acceder a la pantalla Navegador o al
menú Configuración del Sistema desde el menú
principal.
Uso de la pantalla Navegador
Puede realizar las siguientes operaciones
mediante la pantalla Navegador:
•Comprobar/copiar/eliminar datos de juego
de la
memory card (tarjeta de memoria) (8MB)
(para PlayStation®2) o la memory card (tarjeta
de memoria)
•Iniciar el software de formato PlayStation® o
PlayStation®2
•Reproducir CD audio
•Reproducir vídeos DVD
Use los botones de dirección para seleccionar
“Navegador”, y pulse el botón ✕. Aparece el
Navegador. La
memoria) (8MB) (para PlayStation®2), la
memory card (tarjeta de memoria)
insertado en la consola aparecen como iconos.
Comprobación/copia/eliminación de datos
Puede copiar datos de una memory card
(tarjeta de memoria) (8MB) (para PlayStation®2)
o de una memory card (tarjeta de memoria) a
otra o eliminar los datos que no desee
conservar.
No obstante, no es posible copiar datos del
software de formato PlayStation®2 a una
memory card (tarjeta de memoria), modelo
SCPH-1020 UHI.
Inserte previamente la memory card (tarjeta de
memoria) (8MB) (para PlayStation®2) o la
memory card (tarjeta de memoria).
memory card (tarjeta de
o el disco
1
Seleccione el icono de la memory
card (tarjeta de memoria) (8MB)
®
(para PlayStation
2) o el de la
memory card (tarjeta de memoria)
en la que se encuentren los datos
que desee comprobar/copiar/
eliminar, y pulse el botón ✕.
2 Compruebe/copie/elimine datos
de acuerdo con las instrucciones
en pantalla.
Nota
No extraiga la memory card (tarjeta de memoria) (8MB)
(para PlayStation
memoria) mientras copia o elimina datos.
®2) o la memory card (tarjeta de
Uso del menú Configuración del
Sistema
El menú Configuración del Sistema permite
cambiar o configurar los ajustes del sistema
para la consola PlayStation®2.
Los ajustes realizados se guardarán y serán
efectivos aunque apague la consola.
Los ajustes predeterminados aparecen
subrayados.
1 Use los botones de dirección
para seleccionar “Configuración
del Sistema”, y pulse el botón ✕.
Aparece el menú Configuración del
Sistema.
2 Use los botones de dirección
para seleccionar el elemento que
desee, y pulse el botón ✕.
x Ajustar Reloj
Ajuste el reloj.
1
Use los botones de dirección para
ajustar el mes, y pulse el botón
de dirección hacia la derecha.
Utilice el mismo método para ajustar
el día, año, hora, minutos y segundos.
Para volver al menú anterior, pulse el
botón de dirección hacia la izquierda.
2
Pulse el botón ✕ para que el reloj
empiece a funcionar.
Seleccione los ajustes opcionales para el reloj
Use los botones de dirección para seleccionar
“Ajustar Reloj”, y pulse el botón ¢. Puede
ajustar los siguientes elementos opcionales.
Notación de la hora
•Reloj de 12 horas
•Reloj de 24 horas
Notación de la fecha
•MM/DD/AAAA
•DD/MM/AAAA
•AAAA/MM/DD
Zona horaria
Seleccione la zona horaria apropiada.
Horario de verano
Ajuste este elemento en “Horario de verano”
cuando el horario de verano sea efectivo.
•Horario de invierno
•Horario de verano
x Tamaño de la Pantalla
Seleccione el modo de visualización en función
del televisor que conecte.
•4:3: seleccione este elemento cuando conecte
un televisor estándar a la consola.
•Pantalla Completa: seleccione este elemento
cuando conecte un televisor normal a la
consola. Las bandas negras de las partes
superior e inferior de la pantalla se suprimen.
•
16:9: seleccione este elemento cuando conecte un
televisor de pantalla panorámica a la consola.
x DIGITAL OUT (OPTICAL)
Seleccione si la salida de señal se realizará por
el conector DIGITAL OUT (OPTICAL).
•Activado:
un cable digital óptico (vendido por separado).
Seleccione esta opción como su opción normal.
•Desactivado: si selecciona esta opción, la señal
de sonido no será emitida a través del
conector DIGITAL OUT (OPTICAL).
x Salida de Componentes de Imagen
Ajuste este elemento si su televisor, monitor o
proyector dispone de conector de entrada RGB
o de conectores de entrada de vídeo en
componentes (Y, CB/PB, CR/PR) que admitan
las señales de salida de la consola.
Si conecta la consola mediante el cable AV
suministrado (audio/vídeo integrados) o el
cable S VIDEO (vendido por separado), no será
preciso ajustar este elemento.
•Y Cb/Pb Cr/Pr: seleccione este elemento si
conecta la consola a los conectores de entrada
de vídeo en componentes.
•RGB: seleccione este elemento si conecta la
consola al conector de entrada RGB.
seleccione esta opción cuando conecte
Nota
Se puede hacer que la señal de los discos del formato
PlayStation® y PlayStation®2 salga en el formato RGB o Y Cb/
Pb Cr/Pr.
Sin embargo, la consola PlayStation®2 ha sido diseñada para
anular el ajuste de la “Salida de Componentes de Imagen” en el
menú de la Configuración del Sistema y reproducir todos los
discos de vídeo DVD en el formato Y Cb/Pb Cr/Pr.
x Control Remoto
Ajuste esta opción cuando utilice el control
remoto de DVD (para PlayStation®2), que se
vende por separado.
•Función para jugar Activada: seleccione esta
opción cuando utilice un software de formato
PlayStation® o PlayStation®2 mediante el
control remoto de DVD.
•Función para jugar Desactivada: seleccione
esta opción cuando no utilice un software de
formato PlayStation® o PlayStation®2
mediante el control remoto de DVD.
Notas
• Cuando la opción de Control Remoto esté ajustada en
“Función para jugar Activada”, es posible que algunos
software de formato PlayStation
de funcionar de forma normal si el control analógico se
desconecta del puerto de control 1. Si esto sucediera,
ajuste esta opción en “Función para jugar Desactivada”.
• Es posible que en algunos casos los botones del control
remoto de DVD no funcionen. Además, el control
remoto para DVD no funcionará si pulsa dos o más
botones a la vez.
• Es posible que algunos dispositivos periféricos no
autorizados fabricados por terceros no funcionen
cuando la “Función para jugar” esté “Activada”. Tenga
en cuenta que el uso de tales dispositivos periféricos no
es recomendable y anulará su garantía.
x Idioma
Seleccione el idioma de las indicaciones en pantalla.
•Inglés
•Francés
•Español
•Alemán
•Italiano
•Holandés
•Portugués
o PlayStation®2 dejen
®
Page 43

43
Comprobación de la versión
Puede comprobar la versión o los ajustes de las
diferentes características.
En el menú principal, pulse el botón ¢.
Aparece la pantalla Versión.
Los ajustes predeterminados están subrayados
en las explicaciones más abajo.
x Autodiagnóstico
La consola PlayStation®2 regula automáticamente
sus ajustes internos para obtener la mejor
reproducción posible del disco.
Sin embargo, cuando se ajusta el autodiagnóstico
en “Activada”, la consola realiza ajustes
adicionales que permiten reproducir discos que no
se podían reproducir anteriormente.
Diagnóstico
•Desactivada
•Activada
1 Use los botones de dirección
para seleccionar “Consola”, y
pulse el botón f.
2 Use los botones de dirección
para seleccionar “Activada”, y
pulse el botón ✕.
3 Inserte un disco.
La consola inicia el diagnóstico de
forma automática.
Nota
El ajuste de diagnóstico recupera el valor “Desactivada”
automáticamente (ajuste predeterminado) al pulsar el botón
1/RESET o iniciar la reproducción de un disco de formato
PlayStation
®
, PlayStation®2 o un disco de vídeo DVD.
x PlayStation® Driver
PlayStation® Driver es un programa de carga del
software de formato PlayStation®.
Velocidad del Disco
•Normal: normalmente seleccione esta posición.
•Rápida: el tiempo de carga del software de
formato PlayStation® puede reducirse.
Dependiendo del software, es posible que no se
obtenga ningún efecto o que el software falle
inesperadamente. En este caso, seleccione “Normal”.
Diseño de Texturas
•Estándar: normalmente seleccione esta posición.
•Suave: la pantalla se muestra con mayor
suavidad al reproducir ciertos software de
formato PlayStation®. Dependiendo del software,
es posible que no se obtenga ningún efecto. En
este caso, seleccione “Estándar”.
1
Use los botones de dirección abajo
para seleccionar “PlayStation
®
Driver”, y pulse el botón f.
2 Use los botones de dirección
para seleccionar el elemento
deseado, y pulse el botón ✕.
Nota
Los ajustes realizados recuperan el valor “Normal/
Estándar” (ajuste predeterminado) automáticamente al
pulsar el botón 1/RESET o apagar la consola.
x Desactivación del Modo Progresivo
Puede desactivar el modo progresivo del
reproductor de DVD.
Desactivar Modo Progresivo
•No
•Sí
1 Use los botones de dirección
para seleccionar “Reproductor
de DVD”, y pulse el botón f.
2 Pulse el botón ✕.
3
Use los botones de dirección para
seleccionar “Sí”, y pulse el botón ✕.
El modo progresivo no se cancela
inmediatamente después de haber
seleccionado “Sí”. Lo hará sólo cuando
empiece la reproducción del vídeo
DVD.
4 Pulse el botón a para regresar al
menú principal. Luego use los
botones de dirección para
seleccionar “Navegador”, y pulse
el botón ✕.
5 Use los botones de dirección
para seleccionar el icono del
vídeo DVD, y pulse el botón ✕.
El modo progresivo del reproductor
de DVD se ha desactivado y se inicia
la reproducción.
Notas
• Sólo se puede cancelar este ajuste cuando el Modo
Progresivo esté en “Activado”. Cuando este modo esté
desactivado, no aparecerá el menú de Opciones para el
Reproductor de DVD.
• Para más información sobre la forma de ajustar el modo
progresivo en “Activado”, consulte “Modo Progresivo”
en la sección “Ajustes para el reproductor de DVD” en
la página 57.
• El modo progresivo no se desactivará si, antes de que el
paso 5 haya finalizado, realiza lo siguiente:
– pulsa el botón 1/RESET y la consola entra en el
modo de espera.
– apaga la consola mediante el interruptor principal
MAIN POWER de la parte posterior de la misma.
ES
Conexión
Page 44

44
Para jugar
Inicio del juego
1 Encienda la consola con el
interruptor principal MAIN
POWER de la parte posterior de
la misma.
El indicador 1 (espera) de la parte
frontal de la consola se ilumina en rojo
para indicar que ésta se encuentra en
el modo de espera.
2 Pulse el botón 1 (espera)/RESET.
El indicador 1 cambia a verde y
aparece la pantalla de inicio.
3 Conecte el control analógico
(DUALSHOCK
puertos de control de la consola.
®2) en uno de los
1
4 Pulse el botón A (abrir).
La bandeja del disco se abre.
5 Coloque un disco en la bandeja
con el lado de la etiqueta hacia
arriba (con el lado de grabación
hacia abajo).
6 Pulse el botón A.
La bandeja del disco se cierra. Aparece
la pantalla 2 ó 3 y el juego está
preparado para iniciarse.
Nota
Ajuste el control analógico (DUALSHOCK®2) en el modo
apropiado al software (consulte “Cambio de modo e
indicador de modo” en la página 45). Consulte el manual
del software correspondiente para más información.
Pantallas que aparecen en el
inicio
Si enciende la consola sin haber insertado
un disco previamente
Aparecerá la pantalla 1.
•Si inserta un disco de formato PlayStation®2 o
PlayStation® después de que aparezca la
pantalla 1, aparecerá la pantalla 2 ó 3 y
podrá iniciar el juego.
•Puede desplazarse a la pantalla Navegador o
al menú Configuración del Sistema desde la
pantalla 1. (Para más información, consulte
“Uso del menú principal” en la página 42.)
Al encender la consola con un disco ya
insertado
Dependiendo del tipo de disco insertado,
aparecerá la pantalla 2, 3 ó 4.
Si aparece la pantalla 4, es posible que el disco
insertado no sea de formato PlayStation® o
PlayStation®2. Compruebe el tipo de disco
(página 34).
1 No hay ningún disco insertado (menú
principal).
4 Ha insertado un disco que no puede
reproducirse con la consola
PlayStation
2.
®
Finalización del juego
1 Pulse el botón A (abrir).
La bandeja del disco se abre.
2 Extraiga el disco.
3 Pulse el botón A.
La bandeja del disco se cierra.
4 Pulse el botón 1/RESET durante
más de tres segundos.
El indicador 1 se ilumina en rojo y la
consola entra en el modo de espera.
3
2
4,6
5
Reinicio del juego
Pulse el botón 1/RESET. (Asegúrese de no
mantener el botón pulsado, ya que si lo hace, la
consola se ajustará en el modo de espera.)
Tenga cuidado de no pulsar el botón 1/RESET
accidentalmente mientras juega, o el juego
volverá a iniciarse.
2 Ha insertado un DVD-ROM / CD-ROM de
formato PlayStation
3 Ha insertado un CD-ROM de formato
PlayStation®.
2.
®
4
1,3
2
Page 45

45
Cuando no tenga intención de jugar durante
mucho tiempo
Desactive la alimentación con el interruptor
principal MAIN POWER de la parte posterior de
la consola y desconecte el enchufe de
alimentación del tomacorriente.
Cambio de un juego a otro
No es necesario apagar la consola cuando desee
cambiar de juego.
1 Pulse el botón A (abrir).
La bandeja del disco se abre.
2 Extraiga el disco.
3 Coloque un disco nuevo en la
bandeja del disco.
4 Pulse el botón A.
La bandeja del disco se cierra.
5 Pulse el botón 1 (espera)/RESET
para reiniciar.
(Nota: si mantiene pulsado el botón 1/
RESET, la consola puede entrar en el modo
de espera.)
Después de la pantalla de inicio, aparece la
pantalla 2 ó 3 y el juego se inicia.
Uso del control analógico
(DUALSHOCK®2)
•El control analógico (DUALSHOCK®2) puede
utilizarse con el software de formato
PlayStation®2 y PlayStation®.
•Puede cambiar entre el modo digital y el
modo analógico. Cuando el control está en el
modo analógico, pueden funcionar en el
modo analógico los siguientes botones y
joysticks, dependiendo de las funciones que
soporta el título de software. Para más
información, consulte el manual del software.
Software de formato PlayStation®2
Botones de dirección, botones ¢, a, ✕, s,
joystick analógico izquierdo, joystick
analógico derecho, botones L1, R1, L2, R2
Software de formato PlayStation
Joystick analógico izquierdo / joystick
analógico derecho
•Puede usar la función de vibración.
Uso del analógico (DUALSHOCK®)
(vendido por separado)
•El control analógico (DUALSHOCK®)
también puede utilizarse con el software de
formato PlayStation®2 y PlayStation®.
®
•Puede cambiar entre el modo digital y el
analógico. Cuando cambie al modo analógico,
podrá utilizar la función analógica de los
joysticks analógicos izquierdo y derecho.
Software de formato PlayStation®2
Joystick analógico izquierdo / joystick
analógico derecho
Software de formato PlayStation
Joystick analógico izquierdo / joystick
analógico derecho
•Puede usar la función de vibración.
®
Cambio de modo e indicador de
modo
El control analógico (DUALSHOCK®2) puede
cambiarse entre dos modos pulsando el botón
modo ANALOG.
Cada vez que pulse el botón modo ANALOG,
el modo cambiará de la siguiente forma:
Modo digital (indicador: apagado)
Xx
Modo analógico (indicador: rojo)
Nota
Cambie al modo adecuado al uso.
No obstante, tenga en cuenta que ciertos tipos de software
realizan este ajuste de forma automática. En tales casos, el
software ignora el botón modo ANALOG. Para más
información, consulte el manual del software.
Función de vibración
El control analógico (DUALSHOCK®2)
de una función de vibración cuando el título de
software cuenta con dicha función. La función
de vibración puede ajustarse en Activada o
Desactivada en la pantalla de opciones del
software.
Notas
• Cuando no utilice el control analógico
(DUALSHOCK
control.
• Antes de utilizar la función de vibración, lea “Notas
sobre seguridad al utilizar el control analógico
(DUALSHOCK
®2), apague la consola o desconecte el
®2)” en la página 34.
dispone
Antes de utilizar el control
analógico (DUALSHOCK®2)
Después de haber encendido la consola, haga girar los
joysticks analógicos derecho e izquierdo con los pulgares
una vez antes de empezar a jugar. No retuerza los
joysticks, hágalos girar como si dibujara un círculo, como
se muestra en el diagrama de arriba.
ES
Juego/CD audio
5
1,4
2,3
Nota
Con juegos de varios discos, realice los pasos 1 a 4 para
cambiar los discos. Consulte el manual del software para
más información.
Botón L1
Botones de
dirección
Botón modo ANALOG
(analógico)
Botón L2 Botón R2
Botón
SELECT
(selección)
Botón
START
(inicio)
Botón R1
Botón ¢
Botón a
Botón ✕
Botón s
Indicador de modo:
apagado
Modo analógico (indicador: rojo)Modo digital (indicador: apagado)
Botón L1
Botones de
dirección
Joystick analógico
izquierdo / Botón L3 *
Botón L2 Botón R2
Botón
SELECT
(selección)
Botón modo
* Los botones R3 y L3 funcionan al pulsar el joystick respectivo.
ANALOG (analógico)
Botón
START
(inicio)
Indicador de modo: rojo
Botón R1
Botón ¢
Botón a
Botón ✕
Botón s
Joystick analógico
derecho / Botón R3 *
Page 46

46
Uso de la memory card (tarjeta de memoria)
Reproducción de CD audio
Puede guardar y cargar datos de juego utilizando la
memory card (tarjeta de memoria) (8MB) (para
PlayStation®2) o la memory card (tarjeta de memoria)
(cada una de ellas vendida por separado).
Diferencias entre la memory card
(tarjeta de memoria) (8MB) (para
PlayStation®2) y la memory card
(tarjeta de memoria)
Cuando reproduzca software de formato
PlayStation®2, utilice la memory card (tarjeta de
memoria) (8MB*) (para PlayStation
Cuando reproduzca software de formato PlayStation
utilice la memory card (tarjeta de memoria) (2).
Para la consola de juegos de vídeo PlayStation®,
las unidades de datos de juego se describen como
“bloques de memoria”. No obstante, para la
consola PlayStation
(kilobytes).
*8 MB = 8 000 kB
2, se describen como “kB”
®
1 Memory card (tarjeta de memoria) (8MB)
(para PlayStation
®
separado)
La memory card (tarjeta de memoria) (8MB) (para
PlayStation
juego de software de formato PlayStation
tarjeta puede guardar unos 8 MB de datos de
juego, aunque algunos de éstos pueden utilizarse
como información de control de archivos.
La memory card (tarjeta de memoria) (8MB) (para
PlayStation
tecnología que ayuda a proteger el contenido
cuyos derechos de autor están registrados,
mediante la encriptación de los datos y la
autenticación del hardware.
derechos de autor, desarrollada por el Grupo Sony.
productos que lleven la marca comercial “MagicGate”.
2) puede guardar y cargar datos de
®
2) está dotada de , una
®
es una tecnología de protección de los
no garantiza la compatibilidad con otros
2 Memory card (tarjeta de memoria)
(vendida por separado)
La memory card (tarjeta de memoria) puede guardar
y cargar datos de juego de software de formato
PlayStation
bloques de memoria) de datos de juego.
Nota
No es posible copiar datos a una memory card (tarjeta de
memoria) (8MB) (para PlayStation
card (tarjeta de memoria) que no disponga de suficiente
memoria. Antes de la reproducción, compruebe la
cantidad de espacio necesario para guardar el juego y el
espacio disponible en la memory card (tarjeta de memoria)
(8MB) (para PlayStation
memoria). Consulte el manual del software
correspondiente para determinar la cantidad de espacio
necesario para guardar los datos de un determinado juego.
. Cada tarjeta puede guardar 120 kB (15
®
®2) o memory card (tarjeta de
2) (1).
®
2) (vendida por
®2) o en una memory
2. Cada
®
,
®
Inserción de la memory card
(tarjeta de memoria) (8MB) (para
PlayStation®2) o de la memory
card (tarjeta de memoria)
Inserte la memory card (tarjeta de memoria)
(8MB) (para PlayStation®2) o la memory card
(tarjeta de memoria) en la ranura para
MEMORY CARD (tarjeta de memoria), con el
lado de la flecha hacia arriba.
Ranura para MEMORY CARD
(tarjeta de memoria) 1
Ranura para MEMORY CARD
(tarjeta de memoria) 2
Notas sobre el uso de la memory card (tarjeta
®
de memoria) (8MB) (para PlayStation
2) o
memory card (tarjeta de memoria) con un
multitap
•Cuando utilice software de formato
PlayStation®2, emplee el multitap, modelo
SCPH-10090 U (para PlayStation®2).
Cuando utilice software de formato
emplee el multitap
•Si inserta el multitap, modelo SCPH-1070 UH en el
puerto de control 1, no inserte la memory card
(tarjeta de memoria) (8MB) (para PlayStation®2) o
la memory card (tarjeta de memoria) en la ranura
para MEMORY CARD 1 de la consola PlayStation®2.
Esto también es aplicable a la ranura para MEMORY
CARD 2. Si lo hace, los datos pueden perderse.
, modelo
PlayStation®,
SCPH-1070 UH.
Comprobación/copia/
eliminación de datos de juego
Puede copiar datos de juego de una memory card
(tarjeta de memoria) (8MB) (para PlayStation®2) o
memory card (tarjeta de memoria) a otra o eliminar
los datos que no desee conservar.
No obstante, no es posible copiar datos de juego del
software de formato PlayStation®2 a la memory card
(tarjeta de memoria).
Puede comprobar, copiar y eliminar datos de juego
de la pantalla Navegador. Para más información
sobre el navegador, consulte “Comprobación/
copia/eliminación de datos” en la página 42.
Nota
No es posible guardar ni cargar datos de juego en la
pantalla
Navegador
almacenamiento o la carga de datos de juego, consulte el
manual del software.
. Para más información sobre el
Reproducción de CD audio
1 Pulse el botón A (abrir).
La bandeja del disco se abre.
2 Coloque un disco en la bandeja
con el lado de la etiqueta hacia
arriba (con el lado de grabación
hacia abajo).
3 Pulse el botón A.
La bandeja del disco se cierra.
4 Use los botones de dirección
para seleccionar el icono del CD
audio, y pulse el botón
Aparece la pantalla CD Audio.
✕
.
5 Seleccione el número de la pista
que desee reproducir, y pulse el
botón
✕
.
Se inicia la reproducción.
Finalización de la reproducción
de un CD audio
1 Pulse el botón A (abrir).
La bandeja del disco se abre.
2 Retire el disco.
3 Pulse el botón A.
La bandeja del disco se cierra.
4 Mantenga pulsado el botón
1 (espera)/RESET durante más
de tres segundos.
La consola entra en modo de espera.
Uso del reproductor de CD
Se puede hacer funcionar el reproductor de CD
mediante el Panel de Control o directamente
con los botones del control analógico
(DUALSHOCK®2), así como también mediante
el control remoto (para PlayStation®2), modelo
SCPH-10420 U (vendido por separado).
Mientras se reproduce un disco, use los botones
de dirección para seleccionar el icono de la
pantalla de control del CD, y pulse el botón ✕.
N Iniciar la reproducción
X Hacer una pausa
x Detener la reproducción
. Ir al principio de la pista actual o
anterior
> Ir al principio de la siguiente pista
m Retroceder rápidamente
M Avanzar rápidamente
Botón L2:
m
(Retroceder
rápidamente)
L1 button:
.
(Anterior)
Botón SELECT:
x (Parar)
Discos de música codificados con tecnología
de protección de los derechos de autor
La función de reproducción de CD audio de este
producto está diseñada en conformidad con las normas
del formato CD (Compact Disc o disco compacto).
Recientemente, algunas compañías discográficas han
empezado a comercializar discos de música codificados
con tecnología de protección de los derechos de autor.
Algunos de estos discos de música no están en
conformidad con las normas del formato CD y es
posible que este producto no los pueda reproducir.
Botón R2:
M(Avanzar
rápidamente)
R1 button:
>
(Siguiente)
Botón START:
N (Reproducir)/
X (Pausa)
Page 47

47
Reproducción en distintos
modos
Puede cambiar los modos de reproducción.
El ajuste predeterminado del “Modo de
Reproducción” es “Normal”, y el de la
“Reproducción Repetida ” es “Desactivado”.
Seleccione el icono del CD Audio en la pantalla
Navegador y pulse el botón f para cambiar los
ajustes.
Reproducción de las pistas
deseadas en un orden
especificado
1 Use los botones de dirección
para seleccionar “Modo de
Reproducción”, y pulse el botón
✕.
2 Use los botones de dirección
para seleccionar “Programada”,
y pulse el botón ✕.
3 Use los botones de dirección
para seleccionar el número de la
pista específica, y pulse el botón
✕.
Repita este paso hasta seleccionar
todas las pistas que desee reproducir.
4 Pulse el botón a para volver a la
pantalla Navegador.
5 Seleccione el icono del CD Audio
y pulse el botón ✕.
Las pistas aparecen en el orden
programado. Seleccione el número de
la pista que desea reproducir, y pulse
el botón ✕. La reproducción se inicia.
Para repetir las pistas que desee
Siga los pasos 1 al 4, y luego siga las
instrucciones para repetir todas las pistas, o
una sola pista. Para más información, consulte
“Repetición de todas las pistas” o “Repetición
de una pista” a la derecha.
Reproducción de las pistas en
orden arbitrario
1 Use los botones de dirección
para seleccionar “Modo de
Reproducción”, y pulse el botón
✕.
2 Use los botones de dirección
para seleccionar “Aleatoria”, y
pulse el botón ✕.
3 Pulse el botón a para volver a la
pantalla Navegador.
4 Seleccione el icono del CD Audio
y pulse el botón ✕.
Las pistas aparecen en orden
arbitrario. Seleccione el número de la
pista que desea reproducir, y pulse el
botón ✕. La reproducción se inicia.
Para repetir las pistas del orden arbitrario
Siga los pasos 1 al 3, y luego siga las
instrucciones para repetir todas las pistas o una
sola pista. Para más información, consulte
“Repetición de todas las pistas” o “Repetición
de una pista” más abajo.
Repetición de todas las pistas
1 Use los botones de dirección
para seleccionar “Modo de
Repetición”, y pulse el botón ✕.
2 Use los botones de dirección
para seleccionar “Todas”, y pulse
el botón ✕.
3 Pulse el botón a para volver a la
pantalla Navegador.
4 Seleccione el icono del CD Audio
y pulse el botón ✕.
Aparecen las pistas. Seleccione el
número de la pista que desea
reproducir, y pulse el botón ✕. La
reproducción se inicia.
Para repetir las pistas deseadas o las del
orden arbitrario
Siga los pasos 1 al 3, y luego siga las
instrucciones sobre la reproducción de las
pistas deseadas en un orden especificado o en
orden arbitrario. Para más información,
consulte “Reproducción de las pistas deseadas
en un orden especificado” o “Reproducción de
las pistas en orden arbitrario” a la izquierda.
Repetición de una pista
1 Use los botones de dirección
para seleccionar “Modo de
Repetición”, y pulse el botón ✕.
2 Use los botones de dirección
para seleccionar “1”, y pulse el
botón ✕.
3 Pulse el botón a para volver a la
pantalla Navegador.
4 Seleccione el icono del CD Audio
y pulse el botón ✕.
Aparecen las pistas. Seleccione el
número de la pista que desea
reproducir, y pulse el botón ✕. La
reproducción se inicia.
Para repetir una pista deseada o una del
orden arbitrario
Siga los pasos 1 al 3, y luego siga las
instrucciones sobre la reproducción de las
pistas deseadas en un orden especificado o en
orden arbitrario. Para más información,
consulte “Reproducción de las pistas deseadas
en un orden especificado” o “Reproducción de
las pistas en orden arbitrario” a la izquierda.
Puede ir a la pantalla Opciones de
Reproducción desde la pantalla que muestra
los números de las pistas
Seleccione el icono pequeño de CD Audio en la
esquina superior izquierda de la pantalla
mediante los botones de dirección hacia arriba
o hacia la izquierda, y pulse el botón f.
Aparece la pantalla Opciones de Reproducción
y puede utilizar el reproductor de CD de la
misma manera que en “Reproducción en
distintos modos” a la izquierda.
Pulse el botón a en la pantalla Opciones de
Reproducción y se visualizarán todas las pistas.
Elija la pista que desee y pulse el botón ✕. Se
inicia la reproducción.
Notas sobre la reproducción de un CD audio
con pistas de audio DTS
• Si reproduce un CD audio grabado en formato DTS, un
ruido extremadamente alto se emitirá por la salida de
audio analógica del dispositivo de audio conectado al
conector AV MULTI OUT. Tenga cuidado de no causar
daños a su sistema de audio cuando la salida de audio
analógica del dispositivo de audio esté conectada al
receptor (amplificador). Debe conectar un
decodificador DTS al conector DIGITAL OUT
(OPTICAL) para reproducir pistas de audio DTS.
• Si ajusta la opción DIGITAL OUT (OPTICAL) en
“Desactivada” en el menú Configuración del Sistema,
no podrá escuchar el audio DTS de un CD audio
aunque el dispositivo de audio esté conectado mediante
un cable óptico digital.
ES
Juego/CD audio
Page 48

48
DUALSHOCK
2
Reproducción de vídeos DVD
Reproducción de vídeos DVD
Algunas operaciones pueden ser distintas o
estar limitadas en función del vídeo DVD.
Consulte las instrucciones suministradas con el
disco.
1 Encienda la consola con el
interruptor principal MAIN
POWER de la parte posterior de
la misma.
El indicador 1 (espera) de la parte
frontal de la consola se ilumina en rojo
para indicar que ésta se encuentra en
el modo de espera.
2 Pulse el botón 1/RESET.
El indicador 1 cambia a verde y
aparece la pantalla de inicio.
3 Pulse el botón A (abrir).
La bandeja del disco se abre.
4 Coloque un disco en la bandeja
con el lado de la etiqueta hacia
arriba (con el lado de grabación
hacia abajo).
5 Pulse el botón A.
La bandeja del disco se cierra y el
contenido del DVD se visualiza en la
pantalla.
Notas
• La consola PlayStation®2 cuenta con funciones de
reproducción avanzadas que pueden optimizar la
calidad del audio y vídeo. Para más información sobre
cómo realizar los ajustes para activar estas funciones,
consulte “Uso de la pantalla Ajustar” en las páginas 54
a 59.
• Si pulsa el botón A durante o después de la
reproducción, aparecerá la pantalla Navegador.
• Al reproducir un vídeo DVD, no conecte la consola a
una videograbadora, ya que si lo hiciera, se reduciría la
calidad de la imagen. Conecte la consola directamente a
un televisor.
Finalización de la reproducción
de un vídeo DVD
Cuando haya terminado de ver un DVD, siga
los siguientes pasos para guardar los ajustes del
reproductor de DVD, regresar a la pantalla
Navegador o apagar la consola.
1 Pulse el botón A (abrir).
La bandeja del disco se abre y aparece
la pantalla Navegador.
2 Extraiga el disco.
3 Pulse el botón A para cerrar la
bandeja del disco.
4 Mantenga pulsado el botón 1/
RESET durante más de tres
segundos.
El indicador 1 cambia a rojo y la
consola entra en el modo de espera.
Nota
Para guardar los cambios del reproductor de DVD
realizados, debe extraer el disco DVD antes de pulsar el
botón 1/RESET o de apagar la consola mediante el
interruptor principal MAIN POWER de la parte posterior
de la misma.
Si tiene problemas para reproducir un vídeo DVD:
En pocos casos, es posible que ciertos vídeos DVD no
funcionen adecuadamente con la consola PlayStation
Esto se debe principalmente a las variaciones en el
proceso de fabricación o en la codificación del software
del vídeo DVD. Si tiene problemas, intente reiniciar la
reproducción del vídeo DVD. Si los problemas
persisten, para más información, sírvase llamar al
editor del vídeo DVD o póngase en contacto con el
servicio de atención al cliente de Sony de México.
2.
®
Uso del reproductor de DVD
Existen tres maneras para hacer funcionar el
reproductor de DVD:
•mediante el control analógico
(DUALSHOCK®2), como se explica a
continuación.
•mediante el Panel de Control en la pantalla. El
Panel de Control le permite acceder a
opciones y ajustes adicionales del reproductor
de DVD. Para más información, consulte
“Uso del Panel de Control” en la página 80.
1
2
3
4
5
1 Botón L2( Buscar hacia atrás)
Retrocede rápidamente la reproducción en
pantalla para ayudar a buscar una
determinada escena.
2 Botón L1 (. Anterior)
Regresa al principio del capítulo que está
viendo o del anterior.
3
Botones de dirección hacia arriba, hacia
abajo, hacia la derecha y hacia la izquierda.
Se utilizan para seleccionar elementos
visualizados en la pantalla.
4 Botón L3 ( Opción de subtítulos)*
Muestra y cambia las opciones de los
subtítulos del DVD.
5 Botón SELECT (selección)
Muestra el Panel de Control.
6 Botón R2 ( Buscar hacia adelante)
Avanza rápidamente la reproducción en
pantalla para ayudar a buscar una
determinada escena.
7 Botón R1 (> Siguiente)
Permite ir hasta el principio del siguiente
capítulo.
•mediante el control remoto de DVD (para
PlayStation®2), vendido por separado.
Uso del control analógico (DUALSHOCK®2)
Las funciones de todos los botones del control
analógico (DUALSHOCK®2) se explican a
continuación.
Nota
Las funciones con los botones directos del control
analógico (DUALSHOCK®2) no pueden realizarse cuando
se visualiza el Panel de Control.
6
7
8
9
q;
qa
qs
qd
8 Botón f ( Menú)
Muestra el menú de los discos de vídeo DVD.
El contenido del menú varía según el disco.
9 Botón a (x Parar)
Detiene la reproducción.
0 Botón ✕ (Aceptar)
Se utiliza para aceptar el elemento
seleccionado en la pantalla.
qa Botón s ( Menú de títulos)
Muestra el menú de los discos de vídeo DVD.
El contenido del menú varía según el disco.
qs Botón R3 ( Opciones de audio)*
Muestra y cambia las opciones de audio.
qd Botón START (N Play (Reproducir)/
X Parar)
Inicia la reproducción/
Hace una pausa o reanuda la reproducción.
* Al utilizar un control que no cuente con los botones L3 ó
R3, utilice el Panel de Control o para seleccionar las
opciones de subtítulos o de audio disponibles.
Page 49

49
Uso del Panel de Control
Puede seleccionar varios modos de reproducción
y realizar ajustes para el reproductor de DVD
mediante el Panel de Control en la pantalla.
Navegue dentro del Panel de Control mediante
el control analógico (DUALSHOCK®2) como se
describe a continuación.
DUALSHOCK
2
dirección
Visualizar o
desactivar el
Panel de Control
Aceptar
Cancelar
Seleccionar
1
Pulse el botón SELECT.
Botón
SELECT
(selección)
Botón SELECT
Botón ✕
Botón a
Botones de dirección hacia
arriba, hacia abajo, hacia la
izquierda y hacia la derecha
Botón aBotón ✕Botones de
Aparece el Panel de Control.
2
Seleccione el elemento que desee
mediante los botones de dirección.
3 Pulse el botón ✕.
Para más información sobre cada
elemento mostrado en el panel de
control, consulte las páginas 50 a 59.
Lista de elementos del Panel de Control
1 Menú (página 50)
Muestra el menú de los discos de vídeo DVD.
El contenido del menú varía según el disco.
2 Menú de títulos (página 50)
Muestra el menú de los discos de vídeo DVD.
El contenido del menú varía según el disco.
3 O Volver (página 50)
Regresa a la pantalla seleccionada
anteriormente.
4 Opciones de audio (página 53)
Muestra y cambia las opciones de audio del
DVD.
5 Opciones de ángulo (página 53)
Muestra y cambia los ángulos de visión del
DVD.
6 Opción de subtítulos (página 53)
Muestra y cambia las opciones de los
subtítulos del DVD.
7 Ir a (página 53)
Permite ir al número del título o capítulo
seleccionado, o al tiempo especificado y
empieza la reproducción.
8 Ajustar (página 54)
9 Presentación del tiempo (página 53)
0 Ayuda (página 54)
qa Ir al capítulo (página 53) / Iconos
qs . Anterior
qd > Siguiente
Muestra la pantalla Ajustar para cambiar las
diferentes opciones de visualización y audio.
También podrá escoger el idioma para los
subtítulos y el menú, ajustar el nivel del
Control Paterno, etc.
Muestra el número del título o capítulo que
esté reproduciendo, y el tiempo transcurrido o
el restante.
Muestra las funciones con botones de acceso
directo del control analógico
(DUALSHOCK®2).
numéricos
Permiten introducir tanto el número de un
capítulo que desee reproducir como valores
numéricos.
Regresa al principio del capítulo que está
viendo o del anterior.
Permite ir hasta el principio del siguiente
capítulo.
qf Búsqueda (página 54)
Retrocede rápidamente la reproducción en
pantalla para ayudar a buscar una
determinada escena.
qg Búsqueda (página 54)
Avanza rápidamente la reproducción en
pantalla para ayudar a buscar una
determinada escena.
qh Cámara lenta (página 54)
Cambia a la reproducción en cámara lenta
hacia atrás.
qj Cámara lenta (página 54)
Cambia a la reproducción en cámara lenta.
qk N Play (Reproducir)
Empieza la reproducción.
ql X Pausa
Hace una pausa en la reproducción o la
reanuda.
w; x Parar
Detiene la reproducción.
wa A-B Repetición (página 52)
Especifica una escena para su reproducción, y
empieza a reproducir en el punto de la escena
que se ha establecido.
ws Aleatoria (página 51)
Empieza la reproducción de títulos o capítulos
en orden arbitrario.
wd Programada (página 50)
Muestra la pantalla Configuración del
programa.
wf Repetición (página 51)
Selecciona la reproducción repetida de todos
los títulos del disco, o de un título o capítulo.
wg Original/Play List (página 52)
Para discos DVD-RW grabados en modo VR.
Selecciona el contenido Original o el de la lista
Play List que se ha de reproducir.
wh Borrar
Borra los números o cancela los modos de
reproducción seleccionados.
ES
Vídeos DVD
Page 50

50
Reproducción de vídeos DVD (continuación)
Puede usar el Panel de Control para ajustar
diversos modos de reproducción.
Uso del menú del disco DVD
Algunos discos DVD permiten seleccionar el
contenido mediante un menú. Al reproducir
este tipo de DVD, podrá seleccionar el idioma
de los subtítulos, el del sonido, y otras
opciones, mediante el menú.
1 Use los botones de dirección para
seleccionar el icono
(Menú de títulos), y pulse el
botón ✕.
Aparece el Menú. El contenido del
Menú puede variar según el DVD.
(Menú) o
2 Use los botones de dirección para
seleccionar un elemento, y pulse
el botón ✕.
Para volver a la pantalla anterior del menú
Use los botones de dirección para seleccionar el
icono O (Volver) y pulse el botón ✕.
Es posible que algunos discos DVD no cuenten
con esta función.
Uso del control analógico
(DUALSHOCK
®2)
1 Pulse el botón f o el s.
Aparece el menú. El contenido del
menú puede variar según el DVD.
2 Use los botones de dirección para
seleccionar un elemento, y pulse
el botón ✕.
Notas
• Algunos discos DVD no tienen un menú.
• Según el disco DVD, es posible que menú se denomine
“Menú del DVD”, “Menú de títulos” o “Títulos” en las
instrucciones suministradas con los mismos.
Para comprobar los ajustes de reproducción
Mientras esté reproduciendo un disco, use los
botones de dirección para seleccionar el icono
(Presentación del tiempo), y pulse el botón
✕. Los iconos de los modos de reproducción
activados aparecerán en la esquina superior
derecha de la pantalla.
Para cancelar todos los ajustes de la
reproducción y volver a la reproducción
normal
Use los botones de dirección para seleccionar el
icono (Borrar), y pulse el botón ✕.
Reproducción desde el último
punto de detención
(Reanudación de la Reproducción)
El reproductor recuerda el punto en el que se
detuvo el disco, y es posible reanudar la
reproducción a partir de ese punto.
1 Mientras esté reproduciendo un
disco, pulse el botón a para
detener la reproducción.
Aparece el mensaje “Pulse [Play
(Reproducir)] para reanudar la
reproducción. Para comenzar desde el
principio pulse [Parar] y, a
continuación, [Play (Reproducir)].” y,
después, aparece el Panel de Control
(página 49).
Si aparece el mensaje “La función
Reanudar programa no se puede usar
aquí. La reproducción comenzará
desde el principio.”, no es posible
reanudar la reproducción.
2
Use los botones de dirección para
seleccionar el icono N (Play
(Reproducir)), y pulse el botón ✕.
El reproductor de DVD inicia la
reproducción a partir del punto en el
que detuvo el disco en el paso 1.
Para borrar el último punto de detención
Después del paso 1, seleccione el icono x
(Parar) y pulse el botón ✕.
Para cancelar la Reanudación de la
Reproducción
Si reanuda la reproducción después de haberla
detenido, el reproductor de DVD entra en el
modo de Reanudación de la Reproducción. No
es posible realizar muchos ajustes avanzados
del reproductor de DVD durante dicho modo.
Si desea cancelar este modo para realizar
ajustes, seleccione el icono x (Parar) y pulse el
botón ✕ dos veces.
Notas
• Es posible que no se pueda reanudar la reproducción
en algunos discos DVD o algunas escenas de vídeos.
• Dependiendo del punto donde haya detenido la
reproducción, es posible que la consola reanude la
reproducción desde un punto ligeramente diferente.
• No podrá reanudar la reproducción cuando:
– haya seleccionado Reproducción Programada o
Reproducción Aleatoria.
– abra la bandeja del disco mediante el botón A de la
parte frontal de la consola.
– reinicie la consola o cuando ésta entre en el modo de
espera después de que haya pulsado el botón
1/RESET (reinicio).
– apague la consola mediante el interruptor principal
MAIN POWER de la parte posterior de la misma.
– seleccione el icono x (Parar) y pulse el botón ✕ dos
veces.
Reproducción en el orden
deseado
(Reproducción Programada)
Puede crear un Programa para reproducir los
títulos y capítulos en el orden que desee.
1 Use los botones de dirección
para seleccionar el icono
(Programa), y pulse el botón ✕.
2 Use los botones de dirección
para seleccionar el número de un
elemento, y pulse el botón ✕.
3 Use los botones de dirección
para seleccionar el número del
título, y pulse el botón ✕.
4 Use los botones de dirección
para seleccionar el número del
capítulo, y pulse el botón ✕.
5 Repita los pasos 2 al 4 para
seleccionar otros títulos o
capítulos.
6 Pulse el botón START.
El Reproducción Programada se inicia.
Los ajustes de la Reproducción Programada se
guardan y siguen en efecto incluso después de
que haya terminado la reproducción. Use los
botones de dirección para seleccionar el icono
(Programa), y pulse el botón ✕. Aparece
la pantalla de Configuración del programa.
Pulse el botón START para reproducir la
secuencia programada otra vez.
Cambio o cancelación de los ajustes
de la Reproducción Programada
1 Use los botones de dirección
para seleccionar el icono
(Programa), y pulse el botón ✕.
2 Use los botones de dirección
para seleccionar el número del
elemento que desea cambiar, y
pulse el botón ✕.
3 Use los botones de dirección
para seleccionar el número del
título que desea reproducir, y
pulse el botón ✕.
4 Use los botones de dirección
para seleccionar el número del
capítulo que desea reproducir, y
pulse el botón ✕.
Para cancelar los ajustes del Reproducción
Programada, seleccione “Borrar” en el paso 3, y
pulse el botón ✕.
Para cancelar todos los ajustes de
la Reproducción Programada
1 Use los botones de dirección
para seleccionar el icono
(Programa), y pulse el botón ✕.
2 Use los botones de dirección
para seleccionar “Cancelar
todo”, y pulse el botón ✕.
Page 51

51
Para usar la Reproducción Programada con
la Reproducción Aleatoria o la Reproducción
Repetida
• Reproducción Programada con
Reproducción Aleatoria
Durante la Reproducción Programada, use
los botones de dirección para seleccionar el
icono (Aleatoria), y pulse el botón ✕.
Se activa la Reproducción Aleatoria.
Cuando se activa la Reproducción Aleatoria
con la Reproducción Programada, las
opciones de la primera se limitan a
“Selección aleatoria activada” y “Selección
aleatoria desactivada”.
• Reproducción Programada con
Reproducción Repetida
Durante la Reproducción Programada, use
los botones de dirección para seleccionar el
icono (Repetición), y pulse el botón ✕.
La Reproducción Repetida se activa.
Cuando use la Reproducción Repetida con la
Reproducción Programada, las opciones de
la primera se limitarán a “Repetición
activada” y “Repetición desactivada”.
Para más información sobre la Reproducción
Aleatoria y la Reproducción Repetida, consulte
“Reproducción en orden arbitrario
(Reproducción Aleatoria)” más abajo, y
“Reproducción Repetida (Repetición)” a la
derecha.
Notas
• No se pueden cambiar los ajustes de la Reproducción
Programada durante dicha reproducción.
• La Repetición A-B se cancelará cuando active la
Reproducción Programada.
• Es posible que la Reproducción Programada no se
pueda utilizar con algunos discos.
• Sólo los números de los títulos y capítulos grabados en
el disco aparecerán en la pantalla.
• La Reproducción Programada se detendrá cuando:
– ajuste la Repetición A-B.
– visualice el menú del disco DVD.
• La Reproducción Programada se cancelará cuando:
– abra la bandeja del disco mediante el botón A de la
parte frontal de la consola.
– reinicie la consola o cuando ésta entre en el modo de
espera después de que haya pulsado el botón
1/RESET.
– apague la consola mediante el interruptor principal
MAIN POWER de la parte posterior de la misma.
Reproducción en orden arbitrario
(Reproducción Aleatoria)
La consola seleccionará automáticamente un
orden arbitrario para reproducir títulos y
capítulos. El orden de la reproducción será
diferente cada vez que use la Reproducción
Aleatoria.
Mientras esté reproduciendo un disco, use los
botones de dirección para seleccionar el icono
(Aleatoria), y pulse el botón ✕.
Los siguientes modos aleatorios aparecerán en
la pantalla en este orden cada vez que pulse el
botón ✕. La Reproducción Aleatoria empezará
en cuanto seleccione el modo de reproducción.
Selección aleatoria de títulos
(reproducción de títulos en orden
arbitrario)
Selección aleatoria de capítulos
(reproducción de capítulos en orden
arbitrario)
Selección aleatoria desactivada
(cancelación de la Reproducción Aleatoria)
Para cancelar la Reproducción Aleatoria
Use los botones de dirección para seleccionar el
icono (Aleatoria), y pulse el botón ✕
hasta que aparezca “Selección aleatoria
desactivada”.
Para usar la Reproducción Aleatoria con la
Reproducción Programada o la
Reproducción Repetida
• Reproducción Aleatoria con Reproducción
Programada
Durante la Reproducción Aleatoria, use los
botones de dirección para seleccionar el
icono (Programa), y pulse el botón ✕
para seleccionar los ajustes del programa.
Pulse el botón START. La Reproducción
Aleatoria se activará.
Cuando use la Reproducción Programada
con la Reproducción Aleatoria, las opciones
de esta última se limitarán a “Selección
aleatoria activada” y “Selección aleatoria
desactivada”.
• Reproducción Aleatoria con la Reproducción
Repetida
Durante la Reproducción Aleatoria, use los
botones de dirección para seleccionar el
icono (Repetición), y pulse el botón ✕.
La Reproducción Repetida se activará.
Cuando use la Reproducción Repetida con la
Reproducción Aleatoria, las opciones de la
primera se limitarán a “Repetición activada”
y “Repetición desactivada”.
Para más información sobre la Reproducción
Programada y la Reproducción Repetida,
consulte “Reproducción de pistas en el orden
deseado (Reproducción Programada)” en la
página 50, o “Reproducción Repetida
(Repetición)” a la derecha.
Para ajustar la Reproducción Aleatoria
cuando no esté reproduciendo ningún disco
Use los botones de dirección para seleccionar el
icono (Aleatoria), y pulse el botón ✕
hasta que aparezca el modo de la Reproducción
Aleatoria que desee. Use los botones de
dirección para seleccionar el icono N (Play
(Reproducir)), y pulse el botón ✕. Se inicia la
Reproducción Aleatoria.
Notas
• La Repetición A-B se cancelará cuando se active la
Reproducción Aleatoria.
• Es posible que la Reproducción Aleatoria no se pueda
utilizar con algunos discos.
• La Reproducción Aleatoria se cancelará cuando:
– active la Repetición A-B.
– visualice el menú del disco DVD.
– abra la bandeja del disco mediante el botón A de la
parte frontal de la consola.
– reinicie la consola o cuando ésta entre en el modo de
espera después de que haya pulsado el botón
1/RESET.
– apague la consola mediante el interruptor principal
MAIN POWER de la parte posterior de la misma.
• Si selecciona Selección aleatoria de capítulos, puede
reproducir hasta 200 capítulos en orden arbitrario. Si el
disco tiene más de 200 capítulos, se elegirán 200
arbitrariamente.
Reproducción Repetida
(Repetición)
Mediante la función de Reproducción Repetida,
se pueden repetir todos los títulos del DVD, o
sólo un título o capítulo.
Mientras esté reproduciendo un disco, use los
botones de dirección para seleccionar el icono
(Repetición) y pulse el botón ✕.
Los siguientes modos de repetición aparecerán
en la pantalla en este orden cada vez que pulse
el botón ✕. La Reproducción Repetida
empezará en cuanto seleccione el modo de
reproducción.
Repetir disco
(repetición de todos los títulos)
Repetir título
(repetición de un título)
Repetir capítulo
(repetición de un capítulo)
Repetición desactivada
(cancelación de la repetición)
Para cancelar la Reproducción Repetida
Use los botones de dirección para seleccionar el
icono (Repetición), y pulse el botón ✕
hasta que aparezca “Repetición desactivada”.
ES
Vídeos DVD
Page 52

52
Reproducción de vídeos DVD (continuación)
Para usar la Reproducción Repetida con la
Reproducción Programada o la
Reproducción Aleatoria
• Reproducción Repetida con Reproducción
Programada
Mientras esté repitiendo pistas, use los
botones de dirección para seleccionar el
icono (Programa), y pulse el botón ✕.
Realice los ajustes del programa y pulse el
botón START. La Reproducción Repetida se
activa.
Cuando use la Reproducción Programada
con la Reproducción Repetida, las opciones
de esta última se limitarán a “Repetición
activada” y “Repetición desactivada”.
• Reproducción Repetida con Reproducción
Aleatoria
Mientras esté repitiendo pistas, use los
botones de dirección para seleccionar el
icono (Aleatoria), y pulse el botón ✕.
La Reproducción Repetida se activa.
Cuando use la Reproducción Aleatoria con la
Reproducción Repetida, las opciones de esta
última se limitarán a “Repetición activada” y
“Repetición desactivada”.
Para más información sobre la Reproducción
Programada y la Reproducción Aleatoria,
consulte “Reproducción en el orden deseado
(Reproducción Programada)” en la página 50, o
“Reproducción en orden arbitrario
(Reproducción Aleatoria)” en la página 51.
Para ajustar la Reproducción Repetida
cuando no esté reproduciendo ningún disco
Use los botones de dirección para seleccionar el
icono (Repetición), y pulse el botón ✕
hasta que aparezca el modo de repetición que
desee. Use los botones de dirección para
seleccionar el icono N (Play (Reproducir)), y
pulse el botón 5. Se inicia la Reproducción
Repetida.
Notas
• La Repetición A-B se cancelará cuando se active la
Reproducción Repetida.
• Es posible que la Reproducción Repetida no se pueda
utilizar con algunos discos.
• La Reproducción Repetida se cancelará cuando:
– active la Repetición A-B.
– abra la bandeja del disco mediante el botón A de la
parte frontal de la consola.
– reinicie la consola o cuando ésta entre en el modo de
espera después de que haya pulsado el botón
1/RESET.
– apague la consola mediante el interruptor principal
MAIN POWER de la parte posterior de la misma.
Reproducción Repetida de la
sección seleccionada
(Repetición A-B)
Puede señalar una sección específica del disco
para repetirla.
1 Cuando esté reproduciendo un
disco, use los botones de
dirección para seleccionar el
icono
pulse el botón
(A-B Repetición), y
✕
en el punto
desde el cual desee que empiece
la reproducción repetida.
Se ha establecido el punto A de inicio.
2 Use los botones de dirección
para seleccionar el icono
B Repetición), y pulse el botón
en el punto en el cual desee que
termine la reproducción repetida.
Se ha establecido el punto B de
finalización, y empezará la
reproducción repetida de la sección
A-B.
Notas
• Es posible que la Repetición A-B no se pueda utilizar
con algunos discos o en algunas secciones de un disco.
• Sólo se puede ajustar la función de Repetición A-B para
una sección a la vez.
• No se puede ajustar la Repetición A-B para una sección
de vídeo que abarque más de un título.
• La Repetición A-B se cancelará cuando:
– active la Reproducción Programada, la Aleatoria o la
Repetida.
– haya detenido la reproducción.
– visualice el menú del disco DVD.
– abra la bandeja del disco mediante el botón A de la
parte frontal de la consola.
– reinicie la consola o cuando ésta entre en el modo de
espera después de que haya pulsado el botón
1/RESET.
– apague la consola mediante el interruptor principal
MAIN POWER de la parte posterior de la misma.
• Cuando active la Repetición A-B, las Reproducciones
Programada, Aleatoria y Repetida se cancelarán.
(A-
✕
Selección de Original/Play List
para la reproducción de discos
DVD-RW
Se pueden reproducir discos DVD-RW (modo
VR) que contengan tanto imágenes originales
grabadas mediante una grabadora DVD, como
una lista que se crea al editar las imágenes
originales, Play List. Al usar este tipo de disco,
puede seleccionar el tipo de título que desea
reproducir.
No se puede realizar este ajuste durante la
Reanudación de la Reproducción.
Detenga la reproducción y use los botones de
dirección para seleccionar el icono
(Original/Play List), y pulse el botón ✕.
Cada vez que pulse el botón ✕, Original
cambiará a Play List y viceversa.
• Original: reproducción del contenido como
fue grabado originalmente.
• Play List: reproducción del contenido
editado.
Notas
• El ajuste predeterminado de esta opción es Play List.
• Tenga en cuenta que no puede grabar ni editar el
contenido mediante esta consola.
• Si un disco carece de Play List, se reproducirá el
contenido original. No se puede seleccionar Play List.
• No se puede ajustar la Repetición A-B para una sección
de vídeo que abarque más de un título.
• No es posible usar la reproducción en cámara lenta
(hacia atrás) con los discos DVD-RW (modo VR).
• El ajuste de Original se cancelará cuando:
– abra la bandeja del disco mediante el botón A de la
parte frontal de la consola.
– reinicie la consola o cuando ésta entre en el modo de
espera después de que haya pulsado el botón
1/RESET.
– apague la consola mediante el interruptor principal
MAIN POWER de la parte posterior de la misma.
• El contenido grabado en los discos DVD-RW en modo
VR debe estar finalizado para poder reproducirse con la
consola PlayStation
®2.
Page 53

Ajustes para el reproductor de DVD
53
Puede usar el Panel de Control para navegar en
el DVD y realizar ajustes para el reproductor de
DVD.
Tenga en cuenta que no todos los discos DVD
disponen de todas las funciones.
Cambio del idioma para el
audio
Algunos DVD tienen grabadas pistas de audio
para diferentes idiomas (pistas multilingües).
Cuando reproduzca tales discos DVD, puede
seleccionar el idioma que desea escuchar
durante la reproducción. Los idiomas que
puede seleccionar varían según el disco DVD.
Use los botones de dirección para seleccionar el
icono (Opciones de audio), y pulse el botón
✕.
El idioma cambiará cada vez que pulse el botón
✕.
Uso del control analógico (DUALSHOCK®2)
Pulse el botón R3.
El idioma cambiará cada vez que pulse el botón
R3.
Notas
• Debido a la programación de ciertos discos DVD, es
posible que no pueda cambiar el idioma aunque haya
pistas grabadas en varios idiomas en los mismos.
• Si cambia el título mientras se reproduce el DVD, los
ajustes del sonido pueden cambiar.
• Cuando está “Desactivada” la opción “DTS” de la
“Salida de Audio Digital” del “Audio” de la pantalla
Ajustar, no podrá ajustar el sistema de grabación de
sonido en DTS aunque esté reproduciendo un disco
DVD con sonido DTS.
Cambio del ángulo de visión
Es posible cambiar los ángulos de las escenas si
el DVD dispone de diversos ángulos grabados
para dichas escenas. Por ejemplo, mientras se
reproduce una escena de un tren en
movimiento, puede visualizarla desde la parte
frontal del tren o desde la ventanilla izquierda
o derecha del mismo sin que se interrumpa el
movimiento del tren.
Use los botones de dirección para seleccionar el
icono (Opciones de ángulo), y pulse el
botón ✕.
Cada vez que pulse el botón ✕, el ángulo
cambiará.
Notas
• El número de ángulos varía según el disco o la escena.
En una determinada escena, puede elegir entre los
ángulos grabados para esa escena.
• Debido a la programación de ciertos discos DVD, es
posible que no pueda cambiar los ángulos aunque haya
distintos ángulos grabados en dichos discos.
Visualización de subtítulos
Con discos DVD en los que haya subtítulos
grabados, es posible activar y desactivar dichos
subtítulos durante la reproducción. Con discos
DVD en los que haya subtítulos multilingües
grabados, también puede cambiar el idioma de
los subtítulos.
Use los botones de dirección para seleccionar el
icono (Opción de subtítulos), y pulse el
botón ✕.
Cada vez que pulse el botón ✕, el idioma de los
subtítulos cambiará. Los idiomas de los
subtítulos que pueda seleccionar varían según
el disco DVD.
Para desactivar los subtítulos
Use los botones de dirección para seleccionar el
icono (Opción de subtítulos), y pulse el
botón ✕ hasta que aparezca “Subtítulos
Desactivada”.
Uso del control analógico (DUALSHOCK®2)
Pulse el botón L3.
El idioma cambiará cada vez que pulse el botón
L3. Los idiomas de los subtítulos que pueda
seleccionar varían según el disco DVD.
Para desactivar el idioma de los subtítulos
Pulse el botón L3 hasta que aparezca
“Subtítulos Desactivada”.
Notas
• Si reproduce un DVD en el que no haya subtítulos
grabados, no aparecerán subtítulos.
• Debido a la programación de ciertos discos DVD,
aunque tenga subtítulos, es posible que no pueda
activarlos o cambiar el idioma de los mismos.
• Algunos discos DVD no permiten desactivar los
subtítulos.
• El tipo y número de idiomas para subtítulos varían
según el disco.
• Si cambia el título mientras está reproduciendo el DVD,
el idioma de los subtítulos puede cambiar.
Selección de la escena que
desea reproducir
Es posible seleccionar la escena que desee
reproducir especificando el número del título o
del capítulo, o introduciendo el tiempo
transcurrido para el punto de inicio de la
escena que desee reproducir.
Selección de una escena por el
número del capítulo
Durante la reproducción de un disco, use los
botones de dirección para seleccionar el
número del capítulo que desee, y pulse el botón
✕.
Se inicia la reproducción del capítulo
seleccionado.
Selección de una escena por el
número del título, número del
capítulo, o especificando el tiempo
1
Durante la reproducción de un
disco, use los botones de
dirección para seleccionar el
icono
(Ir a), y pulse el botón
✕.
2 Use los botones de dirección
para seleccionar un elemento y,
pulse el botón ✕.
• Título = Número del título.
• Capítulo = Número de capítulo
• C XX:XX:XX (o T XX:XX:XX)
= Tiempo transcurrido para el
capítulo (o título).
3 Use los botones de dirección
para seleccionar el punto de
reproducción, y pulse el botón ✕.
Se inicia la reproducción de la escena
seleccionada.
Nota
No es posible seleccionar una escena especificando el
tiempo restante del capítulo o del título (sólo podrá
especificarse el tiempo transcurrido).
Visualización de la información
de la reproducción
Puede visualizar la información sobre el
número del título o capítulo que se está
reproduciendo, o el tiempo transcurrido o el
restante de un disco. Cuando la Reproducción
Programada y la Reproducción Aleatoria están
activadas, esta información también aparecerá
en la esquina superior derecha de la pantalla.
Mientras esté reproduciendo un disco o cuando
el disco esté en modo de pausa, use los botones
de dirección para seleccionar el icono
(Presentación del tiempo), y pulse el botón ✕.
Cada vez que pulse el botón ✕, la información
cambiará como se muestra a continuación:
Título X Capítulo X
(número del título y número del capítulo)
Título X Capítulo X C XX:XX:XX
(tiempo transcurrido del capítulo que esté
viendo)
Título X Capítulo X C -XX:XX:XX
(tiempo restante del capítulo que esté
viendo)
Título X Capítulo X T XX:XX:XX
(tiempo transcurrido del título que esté
viendo)
Título X Capítulo X T -XX:XX:XX
(tiempo restante del título que esté viendo)
Nota
No es posible visualizar el tiempo restante de algunos
títulos.
ES
Vídeos DVD
Page 54

54
Ajustes para el reproductor de DVD (continuación)
Visualización de la lista de
funciones con botones directos
(Ayuda)
Puede visualizar una lista que muestra la
función de cada botón del control analógico
(DUALSHOCK®2).
Use los botones de dirección para seleccionar el
icono (Ayuda), y pulse el botón ✕.
Aparece la lista de funciones de los botones.
La lista aparece o desaparece cada vez que
pulse el botón ✕.
Búsqueda de un punto
determinado en el disco
(Búsqueda)
Puede usar la función Búsqueda para localizar
rápidamente un punto específico del DVD.
Puede buscar hacia adelante o hacia atrás, así
como cambiar entre 3 velocidades y reproducir
en cámara lenta. También puede realizar esta
función mediante el control analógico
(DUALSHOCK®2) cuando no se visualice el
Panel de Control.
1 Mientras esté reproduciendo un
disco, use los botones de
dirección para seleccionar el
icono
(Búsqueda). Mantenga pulsado el
botón ✕ para empezar a buscar.
Pulse los botones de dirección
hacia arriba o hacia abajo para
cambiar la velocidad mientras
está buscando.
Cuando pulse los botones de dirección
mientras mantiene pulsado el botón ✕,
la velocidad de la búsqueda cambiará
como se muestra a continuación:
Búsqueda 3
Búsqueda 2
Búsqueda 1
Cámara lenta
(Búsqueda) ó
2 Deje de pulsar el botón ✕ cuando
encuentre el punto que estaba
buscando.
La reproducción volverá a la
velocidad normal.
Uso del control analógico
(DUALSHOCK
1
Mientras esté reproduciendo un
®2)
disco, mantenga pulsado el botón
L2 o el R2 para empezar a buscar.
Pulse los botones de dirección
para cambiar la velocidad
mientras está buscando.
Cuando pulse los botones de dirección
mientras mantiene pulsado el botón
L2 o el R2, la velocidad de la búsqueda
cambiará como se muestra a
continuación:
Búsqueda 3
Búsqueda 2
Búsqueda 1
Cámara lenta
2 Deje de pulsar el botón L2 o el
R2 cuando encuentre el punto
que estaba buscando.
La reproducción volverá a la
velocidad normal.
Nota
Es posible que esta función no se pueda realizar con
algunos discos DVD.
Reproducción en cámara lenta
Mientras esté reproduciendo un disco, use los
botones de dirección para seleccionar el icono
(Cámara lenta) o el (Cámara lenta), y
pulse el botón ✕.
Se inicia la reproducción en cámara lenta.
Para cancelar la reproducción en cámara lenta
Use los botones de dirección para seleccionar el
icono N (Play (Reproducir)), y pulse el botón ✕.
La reproducción volverá a la velocidad normal.
Uso de la pantalla Ajustar
Mediante la pantalla Ajustar, puede cambiar
los ajustes de imagen y de sonido, y definir las
distintas salidas. También puede establecer un
idioma para los subtítulos y menús, limitar la
reproducción para niños, etc. Para más
información sobre la pantalla Ajustar, consulte
las páginas 54 a 59.
Antes de usar la pantalla Ajustar
Algunos elementos del menú no pueden
seleccionarse durante la Reanudación de la
Reproducción como se indica en las siguientes
páginas. Para más información sobre la forma
de cancelar la Reanudación de la Reproducción,
consulte “Para cancelar la Reanudación de la
Reproducción” en la página 50.
1 Use los botones de dirección
para seleccionar el icono
(Ajustar) y pulse el botón ✕.
Aparece la barra de los iconos de los
ajustes, mediante la que puede acceder a
los menús mostrados en la página 55.
2 Use los botones de dirección y
para seleccionar el icono del
ajuste que desee cambiar, y
pulse el botón ✕.
Aparece el menú para el icono que ha
seleccionado.
3 Use los botones de dirección
para seleccionar un elemento del
menú, y pulse el botón ✕.
Aparecen las opciones para el
elemento del menú que ha
seleccionado.
4 Use los botones de dirección
para seleccionar una opción, y
pulse el botón ✕.
Se ha ajustado la opción seleccionada.
Después de usar la pantalla Ajustar
Para guardar los cambios realizados durante la
reproducción, debe detenerla* o extraer el disco
DVD antes de pulsar el botón 1/RESET de la
parte frontal de la consola, o de apagar la
consola mediante el interruptor principal
MAIN POWER de la parte posterior de la
misma.
Tenga en cuenta que no se guardarán los
cambios si reinicia o apaga la consola antes de
detener la reproducción, o de extraer el disco
DVD.
* La reproducción también se considera detenida antes de
la Reanudación de la Reproducción.
Page 55

55
Menús de la pantalla Ajustar
Los menús de la pantalla Ajustar están organizados como se muestra abajo. Los ajustes predeterminados aparecen subrayados.
Selección de idioma (páginas 55 y 56)
Menú Pantalla
Menú
Audio
Subtítulos
Español
Inglés
Francés
Alemán
Italiano
Holandés
Portugués
Inglés
Francés
Alemán
Italiano
Español
Holandés
Danés
Sueco
Finlandés
Noruego
Portugués
Ruso
Chino
Japonés
Coreano
Opciones de idioma ,
(igual que Menú)
Inglés
Francés
Alemán
Italiano
Español
Holandés
Danés
Sueco
Finlandés
Noruego
Portugués
Ruso
Chino
Japonés
Coreano
Seguimiento Audio
Opciones de idioma ,
Ajuste de la pantalla (páginas 56)
Formato TV
DNR
Nitidez de contornos
Presentación
Modo Progresivo
16:9
4:3 Tipo buzón
4:3 EXPLO PAN
Desactivada
DNR1
DNR2
+2
+1
0
–1
–2
Activada
Desactivada
Activado
Desactivado
Ajuste personalizado (páginas 57 y 58)
Modo Pausa Auto
Fotograma
Control Paterno
Región
Nivel
Cambiar contraseña
EE.UU.
Otros (consulte la página 88)
Desactivada
8
7
6
5
4
3
2
1
Audio (páginas 58 y 59)
Salida Audio Digital
DIGITAL OUT (OPTICAL)
Dolby Digital
DTS
Modo Automático de Selección de Pistas
Volumen DVD
+2
+1
Normal
Activada
Desactivada
Activada
Desactivada
Activada
Desactivada
Activada
Desactivada
Ajuste de las opciones de
idioma (Selección de idioma)
“Selección de idioma” permite definir varios
idiomas para las indicaciones en pantalla, el
audio del DVD y otros elementos. El ajuste
predeterminado de cada menú aparece
subrayado en las explicaciones más abajo.
Seleccione el icono (Selección de idioma) en
la pantalla Ajustar. Para más información,
consulte “Uso de la pantalla Ajustar” en la
página 54.
Notas
• Si selecciona un idioma que no esté grabado en el DVD,
se seleccionará automáticamente uno de los idiomas
grabados para los ajustes “Menú”, “Audio” y
“Subtítulos”.
• Dependiendo del disco DVD, es posible que no se
pueda usar el idioma que ha seleccionado en las
opciones “Menú”, “Audio” o “Subtítulos”.
x Menú Pantalla
Seleccione el idioma de las indicaciones en la
pantalla.
• Español
• Inglés
• Francés
• Alemán
• Italiano
• Holandés
• Portugués
x Menú
Seleccione el idioma del menú del disco DVD.
No se puede realizar este ajuste durante la
Reanudación de la Reproducción.
• Inglés
• Francés
• Alemán
• Italiano
• Español
• Holandés
• Danés
• Sueco
• Finlandés
• Noruego
• Portugués
• Ruso
• Chino
• Japonés
• Coreano
• Opciones de idioma
* Si selecciona “Opciones de idioma”, puede seleccionar
uno de una extensa lista de idiomas.
*
ES
Vídeos DVD
Page 56

56
Ajustes para el reproductor de DVD (continuación)
x Audio
Seleccione el idioma de la pista de sonido.
No se puede realizar este ajuste durante la
Reanudación de la Reproducción.
• Inglés
• Francés
• Alemán
• Italiano
• Español
• Holandés
• Danés
• Sueco
• Finlandés
• Noruego
• Portugués
• Ruso
• Chino
• Japonés
• Coreano
• Opciones de idioma
* Si selecciona “Opciones de idioma”, puede seleccionar
uno de una extensa lista de idiomas.
*
x Subtítulos
Seleccione el idioma de los subtítulos.
No se puede realizar este ajuste durante la
Reanudación de la Programación.
• Inglés
• Francés
• Alemán
• Italiano
• Español
• Holandés
• Danés
• Sueco
• Finlandés
• Noruego
• Portugués
• Ruso
• Chino
• Japonés
• Coreano
• Seguimiento de audio
• Opciones de idioma
*1 Si selecciona “Seguimiento Audio”, el idioma de los
subtítulos cambiará automáticamente al idioma que ha
seleccionado para la pista de sonido.
*2 Si selecciona “Opciones de idioma”, puede seleccionar
uno de una extensa lista de idiomas.
*1
*2
Ajuste del modo de
visualización del televisor
(Ajuste de la pantalla)
Mediante esta pantalla puede ajustar la relación
de aspecto y otras opciones para la
visualización en el televisor conectado.
El ajuste predeterminado de cada menú
aparece subrayado en las explicaciones más
abajo.
Seleccione el icono (Ajuste de la pantalla) en
la pantalla Ajustar. Para más información,
consulte “Uso de la pantalla Ajustar” en la
página 54.
x Formato del televisor
Seleccione la relación de aspecto del televisor.
No se puede realizar este ajuste durante la
Reanudación de la Reproducción.
• 16:9: seleccione esta opción cuando esté
utilizando un televisor de pantalla
panorámica o un televisor estándar que
proyecte en modo panorámico.
• 4:3 Tipo buzón: seleccione esta opción
cuando esté utilizando un televisor estándar.
Este ajuste mostrará una imagen panorámica
con márgenes en las partes superior e
inferior de la pantalla.
• 4:3 EXPLO PAN: seleccione esta opción
cuando esté utilizando un televisor estándar.
Este ajuste mostrará automáticamente una
imagen panorámica ajustada a la altura de la
pantalla y cortará automáticamente las
secciones a la izquierda y derecha que no
encajen.
16:9
4:3 Tipo buzón
4:3 EXPLO PAN
Notas
• Es posible que algunos discos DVD ajusten
automáticamente la relación de aspecto del televisor.
• Cuando el “Modo progresivo” esté “Activado”, la
relación de aspecto del televisor es 16:9 y no puede
cambiarse.
x DNR (Digital Noise Reduction o reducción
digital del ruido)
Este ajuste podría ayudar a reducir las
interferencias en las imágenes en pantalla y a
visualizarlas más claramente.
• Desactivada: normalmente seleccione esta
posición.
• DNR1: la imagen aparece con nitidez gracias
a la reducción del ruido.
• DNR2: la imagen aparece con la mayor
nitidez gracias a la reducción del ruido.
Notas
• DNR2 permite ver la imagen con mayor nitidez que
DN1 pero en algunos casos puede aparecer una imagen
residual. En este caso, seleccione “Desactivada”.
• La función DNR puede producir resultados limitados
con algunos discos DVD.
• Cuando active el modo progresivo, DNR se desactiva
automáticamente y no puede activarse.
x Nitidez de contornos
Permite mostrar el contorno de la imagen de
forma más o menos nítida. Cuanto mayor sea el
valor, más nítido será el contorno.
• +2
• +1
• 0: normalmente seleccione esta posición.
• –1
• –2
x Presentación
Muestra o desactiva la información del estado
de reproducción en la esquina superior derecha
de la pantalla.
• Activada: al utilizar el reproductor de DVD,
la información sobre el estado de
reproducción aparece durante unos
segundos.
• Desactivada: no se muestra la información
sobre el estado de reproducción.
x Modo Progresivo
Este método de mostrar las imágenes actualiza
todas las líneas de una sola vez, produciendo,
en la mayoría de casos, una imagen más
estable, nítida y libre de oscilaciones que
mediante el modo entrelazado estándar.
No se puede realizar este ajuste durante la
Reanudación de la Reproducción.
• Activado: seleccione esta opción cuando la
consola esté conectada a un televisor
compatible con el modo progresivo (480p).
• Desactivado: seleccione esta opción cuando
la consola esté conectada a un televisor
normal.
Notas
• Para utilizar el modo progresivo (480p) debe tener un
televisor compatible con dicho modo y debe conectarlo
a la consola mediante el cable AV en componentes
(para PlayStation
por separado.
• Si activa el “Modo Progresivo” sin tener el equipo
necesario, la calidad de las imágenes disminuirá, o no
aparecerá ninguna imagen.
• Si activa esta opción accidentalmente y necesita
cancelar el ajuste, con el DVD insertado en la consola,
pulse el botón 1/RESET de la parte frontal de la
consola y mantenga pulsado el botón START del
control analógico (DUALSHOCK
puerto de control 1, hasta que aparezcan las imágenes
del DVD. Cuando empiece la reproducción del DVD, se
desactivará el “Modo Progresivo” permitiendo
visualizar las imágenes del DVD de manera normal. La
opción “Modo Progresivo” también puede desactivarse
en la pantalla Versión. Para más información, consulte
la página 51.
• En el “Modo Progresivo”, no es posible reproducir el
contenido de discos DVD-RW grabado en modo VR.
• Los discos DVD pueden contener material basado tanto
en vídeo como en película, los que se diferencian en el
número de fotogramas por minuto.. Al reproducir
material basado en vídeo en el modo progresivo, es
posible que algunas imágenes no parezcan naturales
debido al proceso de conversión por el cual las
imágenes deben pasar. Si esto ocurre, desactive el
“Modo Progresivo” y utilice el modo entrelazado
estándar.
2), modelo SCPH-10100 U, vendido
®
2) insertado en el
®
Page 57

57
Ajuste de las opciones de
visualización (Ajuste
personalizado)
El Ajuste personalizado permite ajustar el nivel
del Control Paterno y otras funciones de
reproducción.
El ajuste predeterminado de cada menú
aparece subrayado en las explicaciones más
abajo.
Seleccione el icono (Ajuste personalizado) en
la pantalla Ajustar. Para más información,
consulte “Uso de la pantalla Ajustar” en la
página 54.
x Modo de Pausa
Seleccione la imagen para el modo de pausa.
• Auto: se emite una imagen estable
incluyendo motivos con movimiento
dinámico.
Normalmente seleccione esta posición.
• Fotograma: se emite una imagen incluyendo
motivos sin movimiento dinámico con alta
resolución.
x Control Paterno
Es posible que la reproducción del contenido
de algunos DVD esté restringida según la edad
del espectador u otros factores en algunas
regiones. Puede usar la función de Control
Paterno para restringir el nivel del contenido
que puede verse en su consola.
No se puede realizar este ajuste durante la
Reanudación de la Reproducción.
Ajuste del Control Paterno
Seleccione el icono (Ajuste personalizado) en
la pantalla Ajustar.
1 Use los botones de dirección
para seleccionar “Control
Paterno”, y pulse el botón ✕.
Si no ha introducido ninguna contraseña
Aparece la pantalla de introducción de
contraseñas.
Si ya ha registrado una contraseña
Aparece la pantalla de confirmación
de la contraseña.
2 Use los botones de dirección
para seleccionar un número, y
pulse el botón ✕.
Repita este paso para introducir una
contraseña de cuatro dígitos.
Aparece la pantalla para ajustar la
región, el nivel del Control Paterno y
para cambiar su contraseña.
3 Use los botones de dirección
para seleccionar “Región”, y
pulse el botón ✕.
4 Use los botones de dirección
para seleccionar la región que
servirá de referencia para los
niveles del Control Paterno, y
pulse el botón ✕.
Si selecciona “Otros”, consulte la
“Lista de los códigos de regiones” en
esta página para conocer el código de
la región que desea seleccionar.
Use los botones de dirección para
seleccionar la primera letra, y pulse el
botón de dirección hacia la derecha.
Use los botones de dirección para
seleccionar la segunda letra, y pulse el
botón ✕.
5 Use los botones de dirección
para seleccionar “Nivel”, y pulse
el botón de ✕.
Aparece la lista de opciones de nivel.
6 Use los botones de dirección
para seleccionar un nivel de
restricción, y pulse el botón ✕.
Se ha ajustado el Control Paterno.
La restricción será más estricta cuanto
más bajo sea el valor.
ES
Vídeos DVD
Lista de los códigos de regiones
RegiónCódigo RegiónCódigo
Alemania DE Italia IT
Austria AT JapónJP
Bélgica BE Malasia MY
Canadá CA México MX
China CN Noruega NO
Corea KR Países Bajos NL
Dinamarca DK Reino Unido GB
España ES Rusia RU
Filipinas PH Singapur SG
Finlandia FI Suecia SE
Francia FR Suiza CH
Hong Kong HK Tailandia TH
Indonesia ID TaiwánTW
Page 58

58
Ajustes para el reproductor de DVD (continuación)
Para cambiar su contraseña
1 En el paso 2 de “Ajuste del
Control Paterno”, use los
botones de dirección para
seleccionar “Cambiar de
contraseña”, y pulse el botón ✕.
Aparece la pantalla para cambiar la
contraseña.
2 Use los botones de dirección
para seleccionar un número, y
pulse el botón ✕.
Repita este paso para introducir una
contraseña de cuatro dígitos.
Para confirmar su contraseña,
introdúzcala una vez más.
La contraseña se ha cambiado.
Reproducción de un disco que
está restringido con el Control
Paterno
1 Inserte el disco.
La reproducción empieza
automáticamente, y en el punto donde
se ha ajustado el Control Paterno,
aparece una pantalla que solicita su
confirmación para cambiar el nivel del
Control Paterno temporalmente.
2 Use los botones de dirección
para seleccionar “Sí”, y pulse el
botón ✕.
Aparece la pantalla para confirmar la
contraseña.
3 Use los botones de dirección
para seleccionar un número, y
pulse el botón ✕.
Repita este paso para introducir
una contraseña de cuatro dígitos.
La reproducción se inicia.
Cuando la reproducción del DVD se
detiene, el nivel del Control Paterno
vuelve al ajuste original.
Si ha olvidado su contraseña
1 Pulse el botón SELECT cuando
aparezca la pantalla para
confirmar la contraseña.
Aparece la pantalla para borrar la
contraseña.
2 Use los botones de dirección
para seleccionar un número, y
pulse el botón ✕.
Repita este paso para introducir el
número de cuatro dígitos “7444”.
La contraseña vigente se ha borrado y
aparece la pantalla para registrar una
nueva contraseña.
3 Siga el paso 2 en “Ajuste del
Control Paterno” para registrar
una nueva contraseña.
Notas
• Si reproduce discos DVD que no dispongan de la
función Control Paterno, no se restringirá la
reproducción aunque haya ajustado un nivel de
restricción de la reproducción en su consola.
• Si no define ninguna contraseña, no podrá cambiar los
ajustes del Control Paterno.
• Es posible que algunos discos DVD le pidan sólo que
introduzca la contraseña sin cambiar el nivel del
Control Paterno.
• Es posible que no se puedan usar las funciones de la
Reproducción Programada, Aleatoria, Repetida y
Repetición A-B con algunos discos DVD que cuenten
con la función de Control Paterno.
Para cancelar el Control Paterno
Detenga la reproducción del DVD, vaya al paso
6 de “Ajuste del Control Paterno” y ajuste el
“Nivel” en “Desactivado”.
No se puede cancelar el este ajuste durante la
Reanudación de la Reproducción.
Ajuste de la opciones de
sonido (Audio)
Puede realizar ajustes de audio según las
condiciones de reproducción o el equipo que
esté utilizando.
El ajuste predeterminado de cada menú
aparece subrayado en las explicaciones más
abajo. Para más información, consulte “Uso de
la pantalla Ajustar” en la página 54.
Seleccione el icono (Audio) en la pantalla
Ajustar.
x Salida Audio Digital
Puede cambiar los métodos de salida de la
señal de audio cuando conecte los siguientes
dispositivos de audio al conector DIGITAL
OUT (OPTICAL) de la parte posterior de la
consola PlayStation®2 mediante un cable óptico
digital (vendido por separado):
• Un dispositivo digital, como un receptor
(amplificador) con un conector digital
• Un dispositivo de audio con un
decodificador Dolby Digital o DTS
incorporado.
• Una platina DAT (Digital Audio Tape o
casete de audio digital) o MD (MiniDisc).
Para más información sobre la conexión,
consulte la página 40.
x DIGITAL OUT (OPTICAL)
Selecciona si la salida de señal se realizará por
el conector DIGITAL OUT (OPTICAL).
• Activada: seleccione esta opción cuando
realice la conexión mediante un cable digital
óptico (vendido por separado).
Seleccione esta opción como su opción
normal.
Si selecciona “Activada”, podrá ajustar
“Dolby Digital” y “DTS”.
• Desactivada: si selecciona esta opción, la
señal de sonido no será emitida a través del
conector DIGITAL OUT (OPTICAL).
Nota
Si selecciona “Desactivada”, no podrá ajustar “Dolby
Digital” ni “DTS”.
x Dolby Digital
Selecciona el modo de la señal Dolby Digital
que se emite cuando haya conectado la consola
con un cable digital óptico.
• Activada: seleccione esta opción si ha
conectado la consola a un dispositivo de
audio con decodificador Dolby Digital
incorporado.
Si la consola está conectada a un dispositivo
de audio sin decodificador Dolby Digital
incorporado, no active esta opción. Si
selecciona esta opción por error, cuando
reproduzca una pista de audio Dolby Digital,
los altavoces no emitirán el sonido o emitirán
un ruido intenso, lo que podría lastimar sus
oídos o dañar los altavoces.
• Desactivada: seleccione esta opción si ha
conectado la consola a un dispositivo de
audio sin decodificador Dolby Digital
incorporado.
x DTS
Selecciona la señal DTS que saldrá cuando
conecte la consola con un cable digital óptico.
No se puede realizar este ajuste durante la
Reanudación de la Programación.
• Activada: seleccione esta opción si ha
conectado la consola a un dispositivo de
audio con decodificador DTS incorporado.
Si ha conectado la consola a un dispositivo
de audio sin decodificador DTS incorporado,
no active esta opción. Si selecciona esta
opción por error, cuando reproduzca una
pista de audio DTS, los altavoces no emitirán
el sonido o emitirán un ruido intenso, lo que
podría lastimar sus oídos o dañar los
altavoces.
• Desactivada: seleccione esta opción si ha
conectado la consola a un dispositivo de
audio sin decodificador DTS incorporado.
Page 59

x Modo Automático de Selección de Pistas
Da prioridad a la pista de sonido que contenga
el número más alto de canales al reproducir un
DVD en el que haya varios formatos de audio
(PCM, DTS o Dolby Digital) grabados.
No se puede realizar este ajuste durante la
Reanudación de la Programación.
• Activada: se da prioridad.
• Desactivada: no se da prioridad.
Notas
• Si ajusta este elemento en “Activada”, el idioma puede
cambiar debido a que el ajuste de “Modo Automático
de Selección de Pistas” tiene mayor prioridad que los
ajustes de “Audio” dentro de “Selección de idioma”
(página 56).
• Si ajusta “DIGITAL OUT (OPTICAL)” en “Activada” y
“DTS” en “Desactivada” dentro de “Audio”, la pista de
sonido DTS no se reproducirá aunque ajuste este
elemento en “Activada” y el canal de audio de número
más alto esté grabado en formato DTS.
• Si las pistas de sonido PCM, DTS y Dolby Digital tienen
el mismo número de canales, la consola seleccionará las
pistas de sonido PCM, Dolby Digital y DTS por este
orden.
• En algunos discos DVD, el canal de audio con prioridad
puede estar predeterminado. En este caso, no podrá dar
prioridad al formato DTS o Dolby Digital mediante la
selección de “Activada”.
59
ES
Vídeos DVD
x Volumen DVD
Si el nivel de salida de audio del DVD es bajo,
puede aumentar el volumen de dicho DVD.
DIGITAL OUT (OPTICAL) debe estar ajustado
en “Desactivado” para cambiar esta opción.
• +2: aumenta el volumen al máximo.
• +1: aumentar el volumen.
• Normal: volumen original de audio.
Normalmente seleccione esta posición.
Nota
Si ajusta esta opción en “+1” ó “+2”, el sonido puede
distorsionarse en lugares donde haya sonidos altos. Si el
sonido se distorsiona, seleccione “Normal”.
Precaución
Si aumenta demasiado el volumen, puede lastimarse
los oídos o dañar los altavoces.
Este producto incorpora tecnología de
protección de los derechos de autor amparada
por demandas de patentes de EE.UU. y otros
derechos de propiedad intelectual de
Macrovision Corporation y otros propietarios.
El uso de dicha tecnología debe contar con la
autorización de Macrovision Corporation y es
únicamente para uso doméstico y otros usos de
visualización limitados, a menos que
Macrovision Corporation autorice lo contrario.
Está prohibida la ingeniería inversa o
desmontaje de la consola.
Page 60

60
Solución de problemas
Revise esta sección si tiene
problemas en hacer funcionar la
consola.
• Si experimenta cualquiera de las
dificultades siguientes, trate de
solucionarla utilizando esta guía de
solución de problemas antes de solicitar la
reparación de la unidad. Si el problema
persiste, póngase en contacto con nuestro
servicio de asistencia técnica, llamando al
01-800-759-7669 y 5002-9819.
• Compruebe que el cable de alimentación
ca está conectado a la consola y al
tomacorriente, y que el televisor (o
videograbadora) o los accesorios
suministrados están conectados a la
consola correctamente.
Alimentación
La alimentación no se activa.
, Compruebe que el cable de alimentación ca
está correctamente conectado.
, La consola no se enciende. Encienda la
consola con el interruptor principal MAIN
POWER de la parte posterior de la misma.
Imagen
La imagen no aparece.
, Compruebe que la consola está conectada
al televisor (o videograbadora) con el cable
AV (audio/vídeo integrados).
, Compruebe que la consola y el televisor (o
videograbadora) están encendidos.
, Compruebe que ha seleccionado la entrada
de vídeo en el televisor (o videograbadora).
, Compruebe que el cable AV (audio/vídeo
integrados) está firmemente conectado.
, Compruebe que el disco insertado puede
reproducirse con esta consola (consulte la
página 40).
, Compruebe que el disco está colocado con
el lado de la etiqueta hacia arriba (con el
lado de grabación hacia abajo).
, El disco no está insertado correctamente.
, Se ha detenido la reproducción del DVD.
, Pruebe otro conjunto de cable AV.
, El modo progresivo (480p) está ajustado en
“Activado” pero está usando un televisor
que no es compatible con dicho modo, o
está usando un cable que no es el cable AV
en componentes (para PlayStation®2).
Con el DVD insertado en la consola, pulse
el botón 1/RESET de la parte frontal de la
consola, y luego mantenga pulsado el
botón START del control analógico
(DUALSHOCK®2) insertado en el puerto
de control 1 hasta que se visualicen las
imágenes del DVD. Cuando empiece la
reproducción del DVD, se desactivará el
Modo Progresivo permitiendo visualizar
las imágenes del vídeo DVD de manera
normal. La opción “Modo progresivo”
también puede desactivarse en la pantalla
Versión (consulte la página 43).
Aparece ruido en la imagen.
, La consola está colocada sobre una
superficie inestable. Coloque la consola
sobre una superficie estable y plana. No
agite la consola ni la someta a vibraciones.
, Limpie el disco.
, Se ha condensado humedad en el interior
de la consola (consulte la página 33).
, Si la señal de vídeo de la consola tiene que
transmitirse a través de la videograbadora
para llegar al televisor, la protección contra
copias aplicada a algunos vídeos DVD
podría afectar a la calidad de imagen.
Cuando reproduzca un vídeo DVD, conecte
la consola al televisor directamente
(consulte la página 39).
, El modo progresivo (480p) está ajustado en
“Activado” pero está usando un televisor
que no es compatible con dicho modo, o
está usando un cable que no es el cable AV
en componentes (para PlayStation®2).
Con el DVD insertado en la consola, pulse
el botón 1/RESET de la parte frontal de la
consola, y luego mantenga pulsado el
botón START del control analógico
(DUALSHOCK®2) insertado en el puerto
de control 1 hasta que se visualicen las
imágenes del DVD. Cuando empiece la
reproducción del DVD, se desactivará el
Modo Progresivo permitiendo visualizar
las imágenes del vídeo DVD de manera
normal. La opción “Modo progresivo”
también puede desactivarse en la pantalla
Versión (consulte la página 43).
, Algunas imágenes de vídeo no parecen
naturales al usar el modo progresivo,
incluso utilizando un televisor compatible
con dicho modo.
Desactive el “Modo progresivo” y use el
modo entrelazado estándar.
La relación de aspecto no podrá modificarse
según el televisor al reproducir la imagen
panorámica del vídeo DVD.
, En algunos discos, la relación de aspecto es
fija.
, Compruebe que la consola está conectada
al televisor directamente. (Es posible que el
selector o receptor (amplificador) esté
conectado entre la consola y el televisor.)
, Con algunos televisores, la relación de
aspecto es fija.
Al reproducir un disco DVD-RW grabado en
modo VR, aparece el mensaje
“Reproducción restringida. No se puede
reproducir.”, y la pantalla se vuelve azul.
, Es posible que esté reproduciendo un disco
cuyo contenido puede ser “copiado una
sola vez”. No se pueden reproducir las
imágenes de vídeo de los discos DVD-RW
compatibles con CPRM grabadas con la
capacidad de “copiarse una sola vez”. Para
más información, consulte “Notas sobre la
reproducción de discos DVD-R/DVD-RW/
DVD+R/DVD+RW” en la página 34.
Sonido
Ausencia de sonido.
, Compruebe que la consola está conectada
al televisor (o videograbadora) con el cable
AV (audio/vídeo integrados).
, Compruebe que la consola y el televisor (o
videograbadora) están encendidos.
, Compruebe que ha seleccionado la entrada
de vídeo en el televisor (o videograbadora).
, Compruebe que el volumen del televisor
está ajustado adecuadamente o que “mute”
(silenciamiento) no está seleccionado en el
televisor.
, Compruebe que el cable AV (audio/vídeo
integrados) está firmemente conectado.
, Compruebe que el disco insertado puede
reproducirse con esta consola (consulte la
página 34).
, Compruebe que el disco está colocado con
el lado de la etiqueta hacia arriba (con el
lado de grabación hacia abajo).
, Compruebe que ha conectado la consola a
los conectores de entrada de audio del
receptor (amplificador) correctamente.
Consulte también las instrucciones
proporcionadas con su amplificador.
, Pruebe otro conjunto de cable AV.
, Compruebe el ajuste y conexiones de los
altavoces. Consulte también las
instrucciones proporcionadas con su
amplificador.
, Compruebe que ha seleccionado la entrada
apropiada en el receptor (amplificador) con
el fin de poder oír el sonido de la consola.
Consulte también las instrucciones
proporcionadas con su amplificador.
, La consola está en el modo de pausa.
, La consola está en el modo de búsqueda/
cámara lenta (al reproducir un vídeo DVD).
, Está reproduciendo un CD audio o un
DVD con pistas de audio DTS.
No reproduzca pistas de audio DTS cuando
la consola está conectada a un dispositivo
de audio sin decodificador DTS
incorporado (consulte la página 58).
, El ajuste de sistema no es correcto con la
consola conectada a un equipo de audio
con los conectores DIGITAL OUT
(OPTICAL) (consulte la página 40).
Sonido de mala calidad.
, La consola está colocada sobre una
superficie inestable.
Coloque la consola sobre una superficie
estable y plana. No agite la consola ni la
someta a vibraciones.
, Limpie el disco.
, Se ha condensado humedad en el disco
(consulte la página 33).
, Reproduce un CD audio o un DVD con
pistas de sonido DTS.
Podrá reproducir un CD audio o un DVD
con pistas de sonido DTS solamente si
conecta la consola a un equipo de audio
con decodificador DTS incorporado.
Page 61

61
El efecto envolvente es difícil de apreciar al
reproducir un vídeo DVD con pista de
sonido Dolby Digital.
, Compruebe el ajuste y conexiones de los
altavoces.
Consulte el manual de instrucciones del
receptor (amplificador).
, Con algunos discos DVD, es posible que la
señal de salida no sea de 5.1 canales. Puede
ser monofónica o estéreo aunque la pista de
sonido esté grabada en Dolby Digital.
El sonido sólo se oye por el altavoz central.
, Con algunos discos, es posible que el
sonido sólo se emita a través del altavoz
central.
Funcionamiento
El control no funciona.
, Compruebe que el control está conectado a
la consola.
, Compruebe que el control analógico
(DUALSHOCK®2) está ajustado en el modo
apropiado al software (consulte la página
45).
, Pruebe otro conjunto de controles.
, Pruebe con la opción “Función para jugar
Desactivada” del “Control Remoto” dentro
del menú Configuración del Sistema.
Es posible que algunos dispositivos
periféricos no autorizados fabricados por
terceros no funcionen cuando la “Función
para jugar” esté “Activada”. Tenga en
cuenta que el uso de tales dispositivos
periféricos no es recomendable y anulará su
garantía.
El título de software no se inicia.
, Compruebe que el disco insertado puede
reproducirse con esta consola (consulte la
página 34).
, Compruebe que el disco está colocado con
el lado de la etiqueta hacia arriba (con el
lado de grabación hacia abajo).
, Compruebe que ha insertado el disco
correctamente.
, Limpie el disco.
, Se ha condensado humedad en el disco
(consulte la página 33).
, Pruebe otra copia del disco.
, Compruebe que el disco DVD-R o DVD-
RW que está reproduciendo ha sido
finalizado.
No es posible guardar datos en la memory
card (tarjeta de memoria) (8MB) (para
PlayStation
®2) o en la memory card (tarjeta
de memoria)
, Compruebe que la memory card (tarjeta de
memoria) (8MB) (para PlayStation®2) o la
memory card (tarjeta de memoria) está
firmemente insertada.
, Compruebe que emplea el juego
correctamente.
Consulte el manual del software apropido.
, Compruebe que hay espacio libre en la
memory card (tarjeta de memoria) (8MB)
(para PlayStation®2) o bloques vacíos en la
memory card (tarjeta de memoria).
, Pruebe con otra memory card (tarjeta de
memoria)(8MB)(para PlayStation®2) o
memory card (tarjeta de memoria).
La consola no funciona adecuadamente.
, Es posible que la electricidad estática, etc.,
afecte al funcionamiento de la consola.
Apague el interruptor principal MAIN
POWER y luego vuelva a encenderlo.
El indicador 1 parpadea en rojo y la consola
no funciona.
, Una luz roja parpadeante indica una
condición de “falla” de la consola y ésta no
funcionará. Retire cualquier obstrucción de
las rejillas para que se enfríe la consola.
Reanude la reproducción cuando la consola
vuelva al modo de espera.
La bandeja del disco no se abre.
, Compruebe que el cable de alimentación ca
está correctamente conectado.
, Compruebe que la consola está encendida.
Encienda la consola con el interruptor
principal MAIN POWER de la parte
posterior de la misma.
Funcionamiento de vídeo DVD
La consola no reproduce el disco desde el
principio.
, Ha seleccionado la reanudación de
reproducción.
Seleccione el icono x (Parar) y pulse el
botón ✕ dos veces antes de iniciar la
reproducción (consulte la página 50).
, Según el disco, el menú del disco DVD
aparece automáticamente.
El disco no se reproduce aunque está
seleccionado el título DVD.
, El control paterno está ajustado en el disco
(consulte las páginas 57 y 58).
La reproducción se para automáticamente.
, Es posible que el disco contenga una señal
de pausa automática.
Al reproducir este tipo de discos, la consola
deja de reproducir cuando recibe la señal.
No es posible realizar algunas funciones,
como Parar, Buscar, Reproducción en
cámara lenta, Reproducción Programada,
Reproducción Aleatoria o Reproducción
Repetida.
, Con algunos discos, es posible que no
pueda realizar algunas de las funciones
mencionadas.
No es posible cambiar el idioma de la pista
de sonido.
, El DVD no dispone de pistas grabadas en
varios idiomas.
, El cambio del idioma de las pistas está
prohibido en el DVD.
No es posible cambiar el idioma de los
subtítulos.
, El DVD no dispone de subtítulos grabados
en varios idiomas.
, El cambio del idioma de los subtítulos está
prohibido en el DVD.
No es posible desactivar los subtítulos.
, Algunos discos DVD no permiten
desactivar los subtítulos.
No es posible cambiar los ángulos al
reproducir un DVD.
, El DVD no dispone de varios ángulos
grabados.
, El cambio de los ángulos está prohibido en
el DVD.
No puede seleccionarse el icono .
, Inserte un disco DVD-RW (modo VR) en la
consola (consulte la página 52).
ES
Informaci
ón complementaria
Page 62

62
Especificaciones
Glosario
Generales
Requisitos de alimentación
ca 120 V, 60 Hz
Consumo de energía
93 W
Dimensiones (aprox.)
301 × 78 × 182 mm (an/al/prf)
1
/8 × 7 1/4 pulgadas)
(12 × 3
Peso (aprox.)
2,0 kg (4 lb 14 oz.)
Temperatura de funcionamiento
5 °C a 35 °C (41 °F a 95 °F)
Propiedades del diodo láser
• Material: GaAlAs
• Longitud de onda: l=650/780 nm
Entradas/salidas de la parte frontal de la
consola
Puerto de control (2)
Ranura para MEMORY CARD
(tarjeta de memoria) (2)
Conector
USB (2)
Entradas/salidas de la parte posterior de la
consola
Conector AV MULTI OUT (1)
Conector DIGITAL OUT (OPTICAL) (1)
EXPANSION BAY (bahía de expansión) (1)
Accesorios suministrados
Consulte la página 38.
Accesorios opcionales
SCPH-10010 U Control Analógico
(DUALSHOCK
SCPH-10020 U Memory Card
(Tarjeta de memoria) (8MB)
(para PlayStation
SCPH-10040 U Soporte vertical
(para PlayStation
SCPH-10060 U Cable S VIDEO
SCPH-10090 U Multitap
(para PlayStation
SCPH-10100 U Cable AV en componentes
(para PlayStation
SCPH-10110 U Soporte horizontal
(para PlayStation
SCPH-10420 U Control Remoto de DVD
(para PlayStation
2)
®
2)
®
2)
®
2)
®
2)
®
2)
®
2)
®
Garantía en México
Para cualquier duda referente con la garantia, favor de
consultar la Poliza de Garantía anexa al producto.
Con respecto a componentes adicionales, llame al
01-800-759-7669 y 5002-9819
El diseño y las especificaciones están sujetos a cambios sin
previo aviso.
Capítulo (página 53)
Secciones de una imagen o de una pieza
musical de un DVD que son de menor tamaño
que los títulos. Un título se compone de varios
capítulos. A cada capítulo se le asigna un
número que permite localizar el capítulo que
desee.
Control paterno (páginas 57, 58)
Función del DVD utilizada para limitar la
reproducción del disco de acuerdo con la edad
del usuario y el nivel de limitación de cada
país. La limitación varía según el disco; cuando
está activada, la reproducción estará
completamente prohibida (las escenas violentas
se omiten o se sustituyen por otras, etc.).
Dolby Digital (páginas 40, 58)
Tecnología de compresión de audio digital
desarrollada por Dolby Laboratories. Esta
tecnología admite el sonido envolvente de 5.1
canales. El canal posterior es estéreo y existe
un canal de potenciación de graves
independiente en este formato. Dolby Digital
proporciona los mismos 5.1 canales
independientes de audio digital de alta calidad
presentes en los sistemas de audio
cinematográfico Dolby Digital. La óptima
separación entre canales se obtiene gracias a
que todos los datos de los canales se registran
por separado y se procesan digitalmente.
DTS (páginas 40, 58)
Tecnología de compresión de audio digital
desarrollada por Digital Theater Systems, Inc.
Esta tecnología admite el sonido envolvente de
5.1 canales. El canal posterior es estéreo y
existe un canal de potenciación de graves
independiente en este formato. DTS
proporciona los mismos 5.1 canales
independientes de sonido digital de alta
calidad. La óptima separación entre canales se
obtiene gracias a que todos los datos de los
canales se registran por separado y se procesan
digitalmente.
DVD-VIDEO (páginas 34, 48)
Los discos DVD VIDEO contienen hasta 8
horas de imágenes en movimiento en un disco
del mismo diámetro que un CD. Los datos de
imagen utilizan el formato MPEG 2, uno de los
estándares mundiales de tecnología de
compresión digital. Los datos de audio se
graban en formato de canales múltiples, lo cual
permite obtener una presencia de audio más
real. Los discos DVD VIDEO también pueden
contener diversas funciones avanzadas, como
los ángulos de visión múltiples, pistas
multilingües y restricciones de reproducción
mediante el Control Paterno.
DVD-RW (página 34)
El disco DVD-RW es del mismo tamaño que el
disco DVD VIDEO y se puede grabar y
regrabar. Los discos DVD-RW tienen dos
modos: modo VR y modo de vídeo.
•Modo de vídeo - cumple con las normas del
formato DVD-VIDEO y, una vez finalizado,
es compatible con la mayoría de
reproductores de DVD, mientras que un
DVD-RW grabado en modo VR sólo puede
reproducirse en reproductores de DVD
compatibles con DVD-RW.
•Modo VR (Video Recording o grabación de
vídeo) - hace posible realizar diversas
funciones de programación y edición, algunas
de las cuales no son posibles en el modo de
vídeo.
DVD+RW (página 34)
El disco DVD+RW (léase "más RW") se puede
grabar y regrabar.
Los discos DVD+RW usan un formato de
grabación que es comparable al formato DVD
VIDEO.
Material de DVD (página 56)
El material de DVD se puede dividir en dos
tipos: material basado en vídeo y material
basado en película. En el material basado en
vídeo se graban 30 fotogramas (60 campos) por
segundo, y normalmente se usa en los
programas de televisión. En el material basado
en película se graban 24 imágenes de vídeo por
segundo, y es el que se usa en la mayoría de las
películas. Algunos discos DVD contienen
material basado tanto en vídeo como en
película.
Page 63

63
Modo progresivo (página 56)
A diferencia del modo entrelazado estándar
que muestra alternadamente una de cada dos
líneas de una imagen para crear un fotograma,
el modo progresivo muestra la imagen
completa de una sola vez. Esto significa que
mientras el modo entrelazado puede mostrar
30 fotogramas por segundo, el progresivo
puede mostrar 60. La calidad de las imágenes
mejora y las imágenes estáticas, los textos y las
líneas horizontales se ven con mayor nitidez.
Título (página 53)
La sección más larga de una película o de una
pieza musical de un DVD. En relación con un
software de vídeo, sería una secuencia de
imágenes de una película, etc. En relación con
un software de audio, sería una pieza musical
de un álbum, etc. A cada título se le asigna un
número para facilitar su localización.
AC
AC In
CD
CD-ROM
CPRM
DIGITAL OUT
OPTICAL
DNR
DVD+R
DVD+RW
DVD-R
DVD-ROM
DVD-RW
JOYSTICK
Analog
L1 BUTTON
CA (Corriente Alterna)
Corriente Alterna de
Entrada (Corriente CA)
Disco Compacto
Disco Compacto de
Memoria Sólo Lectura
Protección de Contenido
para Medio Grabable
Salida Digital Óptica
Reducción Digital del
Ruído
Disco de Video Digital
más Grabable
Disco de Video Digital
más Regrabable
Disco de Video Digital
Grabable
Disco de Video Digital de
Memoria Sólo Lectura
Disco de Video Digital
Regrabable
Perilla Analógica
Botón L1
MAIN POWER
MEMORY CARD
PCM
PLAY LIST
R1 BUTTON
RESET
RGB
RFU
SELECT
SELECT Button
START
VHF
VR
USB
Interruptor Principal
Tarjeta de Memoria
Modulación por Pulsos
Codificados
Lista de Reproducción
Botón R1
Reiniciar
Señal por Componentes
(Formato RGB)
Unidad de Radio
Frecuencia
Seleccionar
Botón SELECT (Selección)
Iniciar
Muy Alta Frecuencia
Videograbación
Puerto Serial Universal
ES
Informaci
ón complementaria
LCD
Pantalla de Cristal
Líquido
Page 64

“ ”, “ ”, “PlayStation” and “DUALSHOCK“ are registered trademarks of Sony Computer Entertainment Inc.
“SONY” and “ ” are registered trademarks and is a trademark of Sony Corporation.
“ ”, “ ”, “PlayStation” y “DUALSHOCK” son marcas comerciales registradas de Sony Computer Entertainment Inc.
“SONY” y “ ” son marcas comerciales registradas y es una marca comercial de Sony Corporation.
Printed in China
 Loading...