

Sony PXW-X180, PXW-X160 User Manual
4-581-336-11(1)
Solid-State Memory
Camcorder
ファームウェアアップグレー
ドのお知らせ(
Firmware update (Ver. 3.0)
Mise à jour du
micrologiciel (Ver. 3.0)
Firmware-Update (Ver. 3.0)
Actualización de firmware
(versión 3,0)
Aggiornamento del
firmware (Ver. 3.0)
Ver. 3.0
)
JP
GB
CS
FR
DE
ES
IT
PXW-X180/PXW-X160

日本語
本機は、アップグレードにより、新しい機能の追加に対応しております。
Ver. 3.0で追加された機能
• オートNDフィルター(3ページ)
• ネットワーククライアントモードによる高品質なストリーミング(PXW-X180のみ)(3ペー
ジ)
•LANケーブルを使用したネットワーク接続で次の機能に対応(PXW-X180のみ)(4ページ)
- ファイル転送
-Wi-Fiリモコンの使用
-Webメニューの操作
-「Content Browser Mobile」アプリケーションを使用した本機のリモート操作
•USBワイヤレスLANモジュール「CBK-WA02」に対応(PXW-X180のみ)(5ページ)
• クリップのシームレス再生(6ページ)
• リモコンでレックレビュー(6ページ)
•DVCAM(AVI)記録・再生(6ページ)
•「1280 × 720:6Mbps(VBR)」でプロキシー記録(PXW-X180のみ)(6、11ページ)
Ver. 3.0で削除された機能
• モニタリングの「640 × 360:3Mbps(VBR)」設定(5ページ)
Ver. 2.0で追加された機能
• ピクチャーキャッシュレック
•NDフィルターポジションごとのホワイトバランスメモリー
• 3G/4G/LTE回線、ワイヤレスLAN経由でのストリーミング伝送(以降「ライブストリーミン
グ」)(
PXW-X180のみ)
ここでは、
いて説明します。「
アアップグレードのお知らせ」をご覧ください。また、本機の「取扱説明書」もあわせてお読
みください。
JP
PXW-X180/PXW-X160の「Ver. 3.0」以降で追加された機能の紹介や使いかたにつ
Ver. 2.0」で追加された機能について詳しくは、Ver. 2.0の「ファームウェ
2
明るさを調整する
(オートNDフィル
ター)
• バリアブルモードでフルオートモードをONにし
た場合、オート
なっていても
れます。
• プリセットモード、バリアブルモードについて
詳しくは、取扱説明書の「光量を調節する(
フィルター)」をご覧ください。
NDフィルターの設定がOFFと
NDフィルターの濃度が自動調整さ
ND
CameraメニューのAuto ExposureにAuto
ND Filter
映像の明るさに応じて
を自動調整できます。
が追加されました(11ページ)。
NDフィルターの濃度
オートNDフィルターを設定する
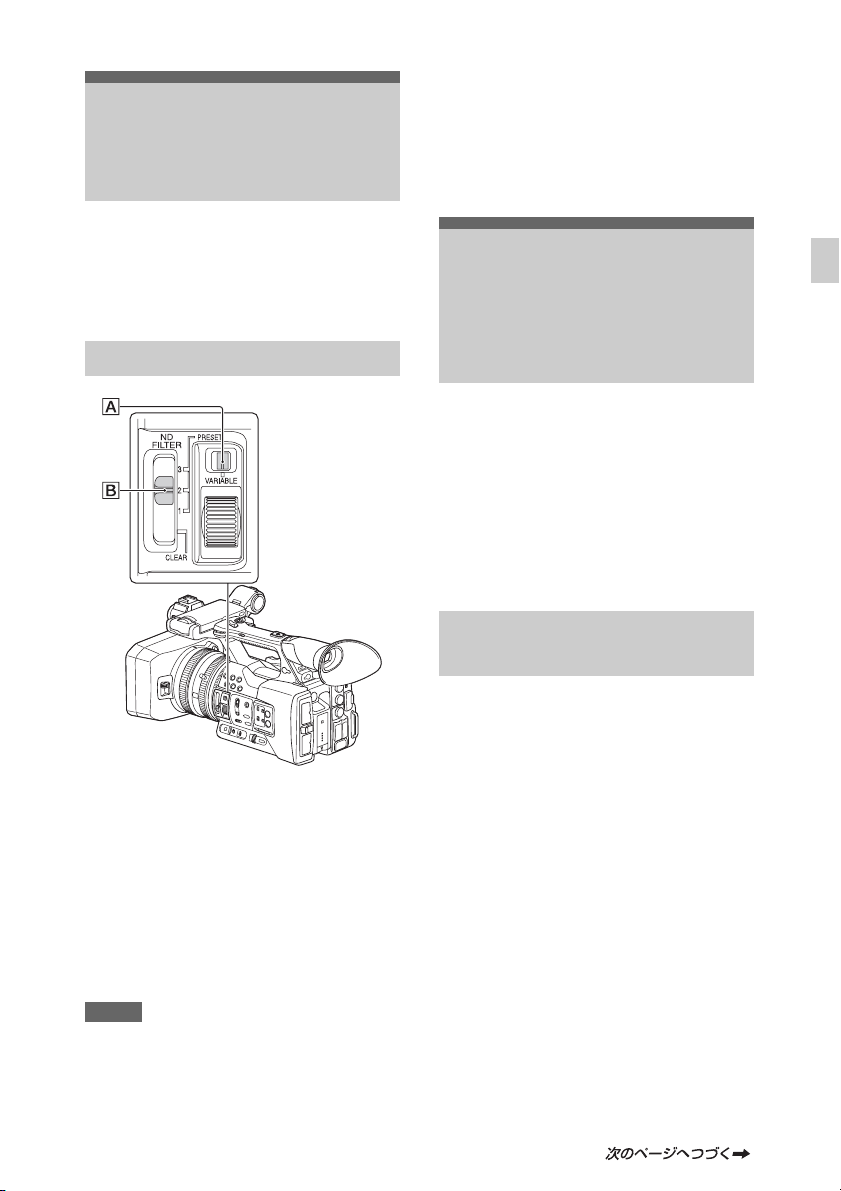
1 ND FILTERモード切り替えスイッチ
VARIABLEに設定する。
Aを
2 ND FILTERスイッチBを1/2/3のい
ずれかに設定する。
NDフィルターモードがバリアブルモー
ドに設定されます。
3 CameraメニューのAuto Exposure
のAuto ND FilterをOnにする。
ご注意
• オートNDフィルターのON/OFF切り替えは、バ
リアブルモードのときのみ可能です。
• プリセットモード、およびND FILTERスイッチ
Bを
CLEARに設定しているときは、オートND
フィルターは設定できません。
ネットワーククライア
ントモードによる高品
質なストリーミング
(PXW-X180のみ)
SystemメニューにNetwork Client Modeが
追加されました(
ネットワーククライアントモードを有効に
し、本機とソニー製ネットワーク
ション
PWS-100RX1(別売)のConnection
Control Manager
て使うことで、ソニーの
高品質なストリーミングが可能になります。
ネットワーククライアントモー
ドを設定する
1 本機をネットワークに接続する。
詳しくは、Ver. 2.0の「ファームウェア
アップグレードのお知らせ」の「デバ
イスとワイヤレス
X180
PXW-X180のみ)」をご覧ください。
(
2 SystemメニューのNetwork Client
Mode
設定する。
• CCM Address:接続先のCCMのアド
レスを入力します。(ホスト名または
IPアドレス)
•CCM Port:接続先のCCMのポート番
号を入力します。
•User Name:ユーザー名を入力しま
す。
• Password:パスワードを入力しま
す。
12ページ)。
RXステー
(以降「CCM」)を接続し
QoS技術を用いた
LAN接続する(PXW-
のみ)」「インターネット接続する
のDetail Settingsで各項目を
JP
JP
3

ご注意
• 本設定画面内のすべての項目に値が入力されな
いと、設定を完了できません。
3 SystemメニューのNetwork Client
のSettingをOnにする。
Mode
ネットワーククライアントモードが有
効になり、ネットワーク
PWS-100RX1と接続します。
ン
ネットワーク
100RX1
ミングが開始されます。
操作について詳しくは、ネットワーク
RXステーションPWS-100RX1の取扱説
明書をご覧ください。
なお、
(On/Off)は、本機のアサイナブルボタ
ンに割り当てることができます。割り
当てかたについては、取扱説明書の
「アサイナブルボタン」をご覧くださ
い。
ご注意
• ネットワーククライアントモードに移行すると、
ストリーミング、モニタリング、プロキシー記
録およびファイル転送はできません。
• モニタリング中、プロキシー記録中またはファ
イル転送中にネットワーククライアントモード
に移行すると、これらの動作は停止します。ス
トリーミング中はネットワーククライアント
モードに移行できません。
RXステーションPWS-
の操作により、ライブストリー
Network Client ModeのSetting
RXステーショ
LANケーブルを使用
したネットワーク接続
による対応機能
(PXW-X180のみ)
LANケーブルでネットワークに接続してい
るとき、次の機能が可能になりました。
• 本機に記録したオリジナルファイル/プロ
キシーファイルの転送
•Wi-Fiリモコンの使用
•Webメニューの操作
•「Content Browser Mobile」アプリケー
ションをインストールしたデバイスでの
リモート操作、映像モニタリング(スト
リーミング)
Content Browser Mobile のモニタリング
について
ご使用時の電波環境およびモバイル端末に
よっては、モニタリング時に、画が停止す
る場合があります。
プロキシーファイルの自動転送、ライブス
トリーミングについて詳しくは、
「ファームウェアアップグレードのお知ら
せ」をご覧ください。
Ver. 2.0の
設定する
1 本機をLANケーブルでネットワークに
接続する。
詳しくは、Ver. 2.0の「ファームウェア
アップグレードのお知らせ」の「
ケーブルを使用して接続する」をご覧
ください。
LAN
2 SystemメニューのNetworkの
SettingをWired LANに設定する。
ご注意
• 本機に記録したオリジナルファイル/プロキシー
ファイルの転送、
ニューの操作、「
リケーションでの映像モニタリングをするには、
SystemメニューのNetworkのWired LAN
RemoteをOnにしてください(12ページ)。
• インターネットからの不正アクセスを防ぐため、
LANケーブルを使用したネットワークがイン
ターネットに接続していないときに
RemoteをOnにすることを推奨します。イン
ターネットに接続する場合は、接続先がセキュ
アなネットワークであることをご確認のうえ、
使用してください。
• 本機に記録したオリジナルファイルは、AVCHD
を除くすべてのフォーマットで転送できます。
Wi-Fiリモコンの使用、Webメ
Content Browser Mobile」アプ
Wired LAN
JP
4

USBワイヤレスLAN
モジュール「CBK-
WA02
」について
(PXW-X180のみ)
スマートフォンやタブレットなどのデバイ
スと本機をワイヤレス
USBワイヤレスLANモジュール IFU-
従来の
(付属)に加えて、CBK-WA02(別
WLM3
売)を使用できるようになりました。
ワイヤレス
Ver. 2.0の「ファームウェアアップグレード
のお知らせ」の「デバイスとワイヤレス
LAN接続する(PXW-X180のみ)」、「イン
ターネット接続する(
ご覧ください。
LAN接続の方法については、
CBK-WA02を本機に取り付ける
1 USBワイヤレスLANモジュール格納部
のカバーを開ける。
2 CBK-WA02に付属しているネット
ワークモジュール延長アダプターを
本機に取り付ける。
凸端子を本機のUSBワイヤレスLANモ
ジュール用端子に接続し、凹端子に
CBK-WA02を取り付けます。本機のア
クセサリーシュー取り付け部のねじ穴
1/4インチ)を使って固定できます。
(
3 CBK-WA02をネットワークモジュー
ル延長アダプターに装着する。
LAN接続する際に、
PXW-X180のみ)」を
ご注意
• CBK-WA02を取り付けたり取り外したりすると
きは、
RecordingメニューのProxy Recording
ModeのSettingとSystemメニューのNetworkの
Settingの両方をOffにするか、本機の電源を切っ
てください。
• ネットワークモジュール延長アダプターを使用
USBワイヤレスLANモジュールや3G/4G/
して、
LTEモデム(別売)を本機に装着すると、GPS
のアンテナ部分が遮蔽されるためにGPSの受信
ができなくなります。
ワイヤレスLANのチャンネルに
ついて
CBK-WA02に対応可能となったことにより、
ワイヤレス
変更されました。
SystemメニューのNetworkのChannelで、
設定をしてください(
ご注意
• Auto(5GHz)は、ご使用になるワイヤレスLANモ
ジュールにより、表示されない場合があります。
•5GHz帯の屋外使用が禁止されている国/地域向
けの場合、表示されません。ワイヤレス
ジュールが、ご使用になる国
るかご確認ください。詳しくは、ワイヤレス
LANモジュールの取扱説明書をご覧ください。
LANのチャンネル設定の一部が
12ページ)。
LANモ
/地域に対応してい
Webメニューについ
て(PXW-X180のみ)
ストリーミングフォーマット設
Streaming Format」
定「
JP
モニタリング設定
デバイスでモニターされる際のフォーマッ
トから「
定値が削除されました。サイズとビット
レートが次の項目となります。
640 × 360:3Mbps(VBR)」の設
JP
5

Size(Monitoring)
モニタリング用の映像のサイズとビット
レートを設定します。
「
480 × 270」:1Mbps(VBR)
480 × 270」:0.5Mbps(VBR)
「
ご注意
• ビットレートは平均値であり、この値を超える
場合があります。
Bit Rate
映像のビットレートを表示します。
「
1Mbps(VBR)」:480 × 270
「0.5Mbps(VBR)」:480 × 270
プロキシーフォーマット設定
Proxy Format」
「
本機のSDカードに記録されるプロキシー
ファイルのフォーマットに、新しい設定値
が追加されました。サイズとビットレート
が次の項目となります。
Size
プロキシーファイル用の映像のサイズと
ビットレートを設定します。
「
1280 × 720」:9Mbps(VBR)
1280 × 720」:6Mbps(VBR)
「
「
640 × 360」:3Mbps(VBR)
480 × 270」:1Mbps(VBR)
「
「
480 × 270」:0.5Mbps(VBR)
Bit Rate
映像のビットレートを表示します。
9Mbps(VBR):1280 × 720
6Mbps
(VBR):1280 × 720
3Mbps
(VBR):640 × 360
1Mbps
(VBR):480 × 270
0.5Mbps
(VBR):480 × 270
その他の追加機能
クリップのシームレス再生
クリップを連続再生する際、クリップ間を
つなげて再生できるようになりました
(シームレス再生)。なお、シームレス再生
を行うには次の条件が必要です。
•1つのクリップの再生時間が4秒以上ある
こと
• 連続するクリップが同じコーデック、記
録フォーマットであること
• 編集・撮影時に削除したクリップがク
リップ間にないこと
• 推奨メディアを使用していること
リモコンでレックレビュー
リモートコマンダー
レックレビューすることができるようにな
りました。
操作について詳しくは、リモートコマン
ダー
RM-1BPの取扱説明書をご覧ください。
DVCAM(AVI)記録・再生
従来のフォーマットに加えて、
(AVI)での記録・再生、およびサムネイル
画の表示ができるようになりました。
DVCAM(AVI)での記録メディアは、
SDHCメモリーカード(SDスピードクラ
Class10)のみ対応しています。
ス:
SDHCメモリーカードに記録する場合、SD
カードアダプター MEAD-SD02(付属)を
使用してください。
RM-1BP(別売)から
DVCAM
ご注意
• 特殊記録には対応していません。
JP
6
画面表示
追加・変更になった機能のみ記載しています。
ステータス画面
ステータス画面のうち、ネットワークステータス画面に次の項目が追加されました。
ネットワークステータス画面
ネットワークの設定や状態を表示します。
Wired LAN Remote
CCM Name
NW Client Mode Status*
Number of Distribution
* ネットワーククライアントモードの状態は、次のように表示されます。
LAN
ケーブルを使用した接続時のリモート操作の有効・無効状態表示
ネットワーククライアントモード時に接続中のCCMの名称
ネットワーククライアントモードの状態
現在配信中のストリーミングの送信先数
状態表示 状態 説明
Off
Connected
Connecting
Awaiting
Address Error
Auth. Failed
No Inet Access
Cert. not Valid
CCM
非接続状態 ネットワーククライアントモードがOFFの状態です。
CCM
接続済状態 ネットワーククライアントモードがONでCCMに接
接続中(切断中)状態 CCMへの接続(または切断)をしようとしている状
CCM
接続待機状態 ネットワーククライアントモードはONですが、ネッ
CCM
CCM
アドレスエラー 接続先のCCMのホスト名またはIPアドレスが間違っ
CCM
ユーザー名/パスワード
エラー
インターネット接続エラー ネットワークに接続できません。
証明書無効エラー CCMの証明書が有効ではありません。
CCM
続しており、
態です。接続(または切断)完了まで、しばらくお
待ちください。
Connectingのまま状態が変化しない場合はCCMのア
ドレス設定が間違っている可能性があります。正し
いアドレスが設定されているか確認してください。
トワーク設定が有効でない状態です。
るにはネットワーク設定を有効にしてください。
ている可能性があります。
正しく設定されているか確認してください。
CCMに接続するためのユーザー名またはパスワード
が間違っている可能性があります。
正しく設定されているか確認してください。
ネットワークの接続状況および設定を確認してくだ
さい。
日付設定が不正である可能性があります。
日付設定を確認してください。
CCMからの制御が可能な状態です。
CCMに接続す
JP
JP
7
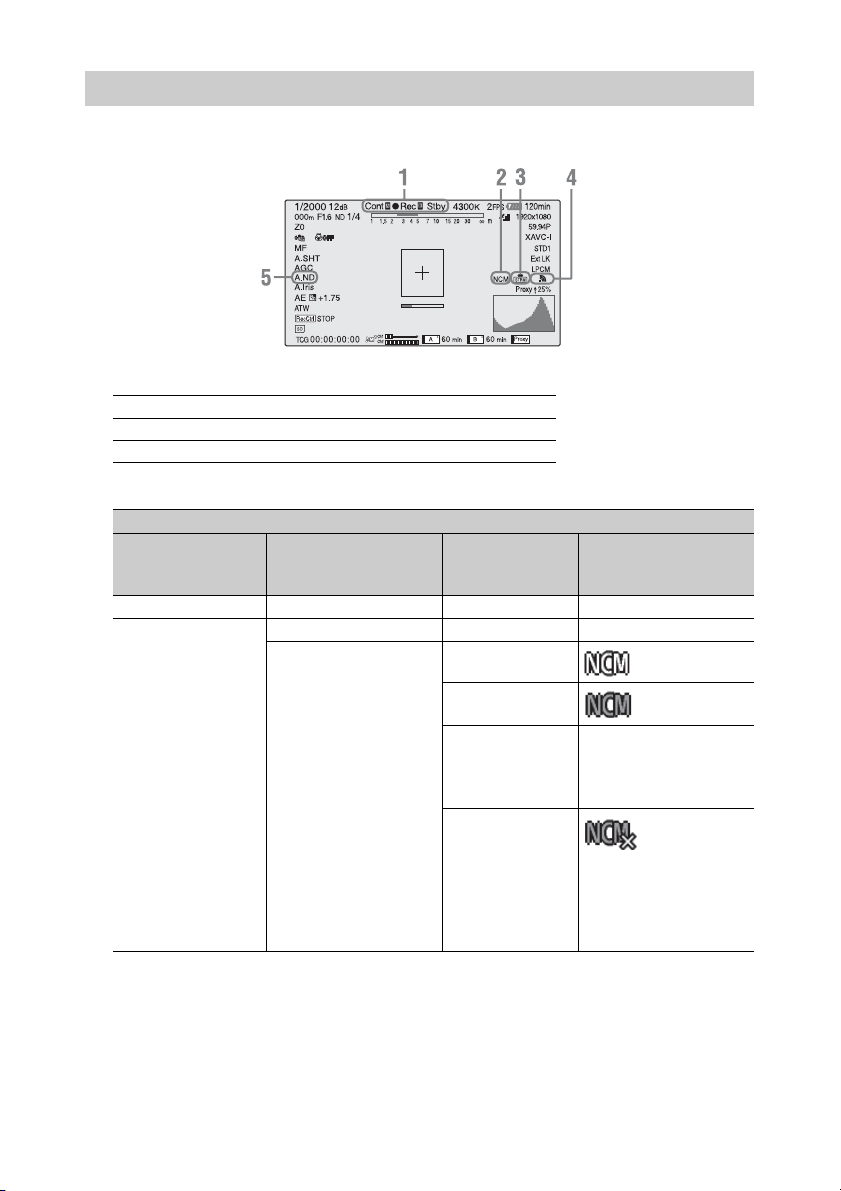
液晶画面/ビューファインダー画面
撮影中の画面に表示される情報
1. 記録モード/スロットA/B/動作状態表示
●Rec 録画中
Stby 録画待機中
●
Cache ピクチャーキャッシュモードで記録中
2. ネットワーククライアントモード状態表示(PXW-X180のみ)
条件
LCD/VFメニュー→
Display On/Off→NW
Client Mode Status
Off
On Off
Systemメニュー→
状態 表示内容
Network Client Mode→
Setting
― ― 表示なし
―表示なし
On
CCM
接続済
CCM接続中(切断
中)
CCM接続待機中 表示なし ネットワー
CCM接続エラー ネットワー
JP
点滅表示
ク設定が有
効でない場
合
クステータ
ス画面にて
エラー内容
を確認でき
ます(
7
ページ)。
8
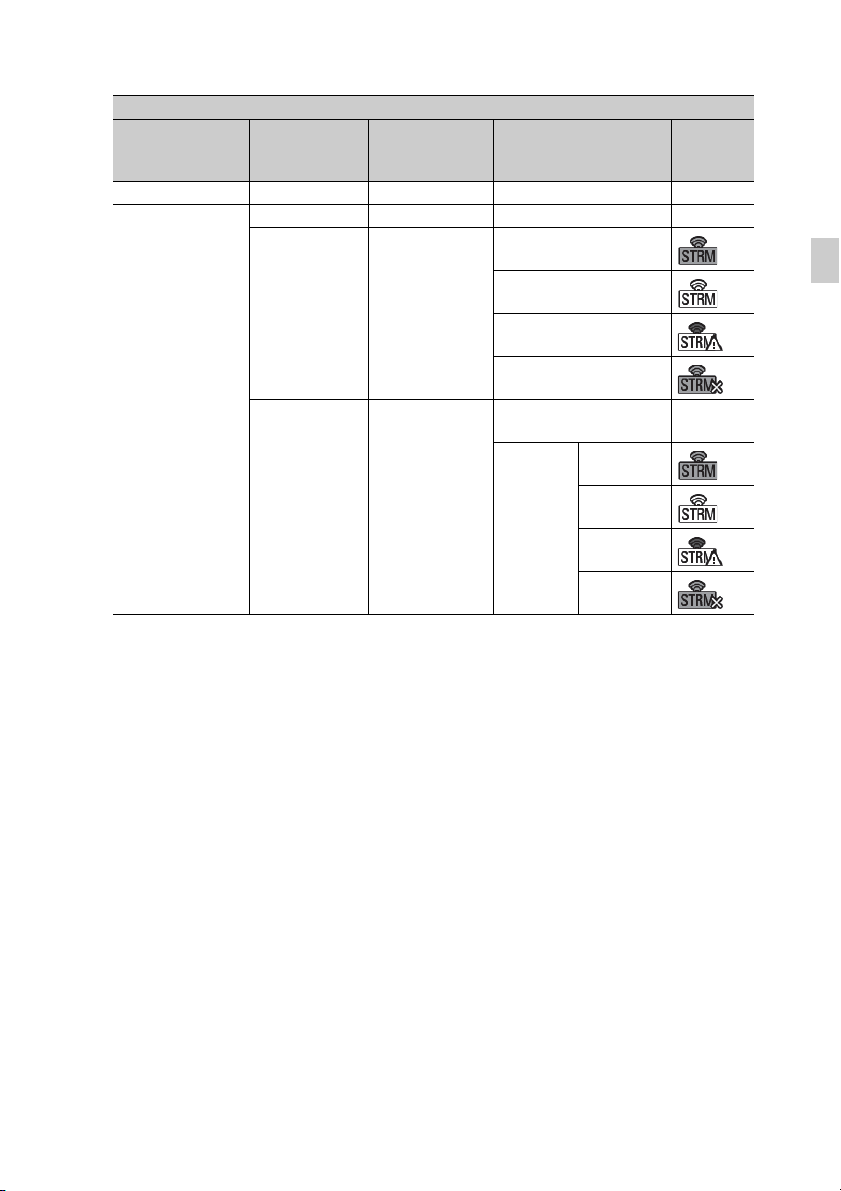
3. ストリーミング状態表示(PXW-X180のみ)
条件
LCD/VFメニュー→
Display On/Off→
Streaming Status
Off
On Off Off
Systemメニュー
Streaming→
→
Setting
― ― ― 表示なし
On Off
Systemメニュー
Network Client
→
Mode
状態 表示内容
→Setting
― 表示なし
未配信状態
JP
映像配信中状態
警告状態
エラー状態
Off On
からの操作によるス
CCM
トリーミング前
CCMからの
操作による
ストリーミ
ング中
表示なし
未配信状態
映像配信中状
態
警告状態
エラー状態
JP
9
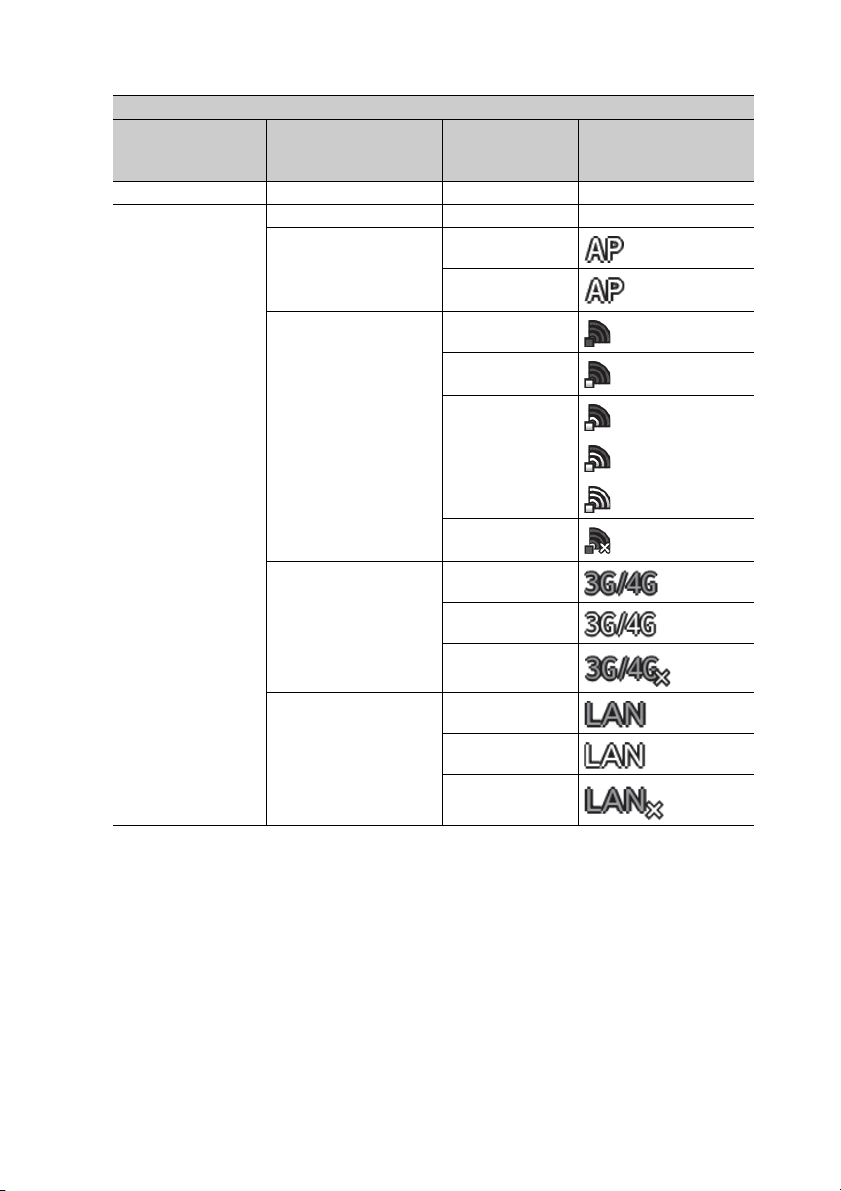
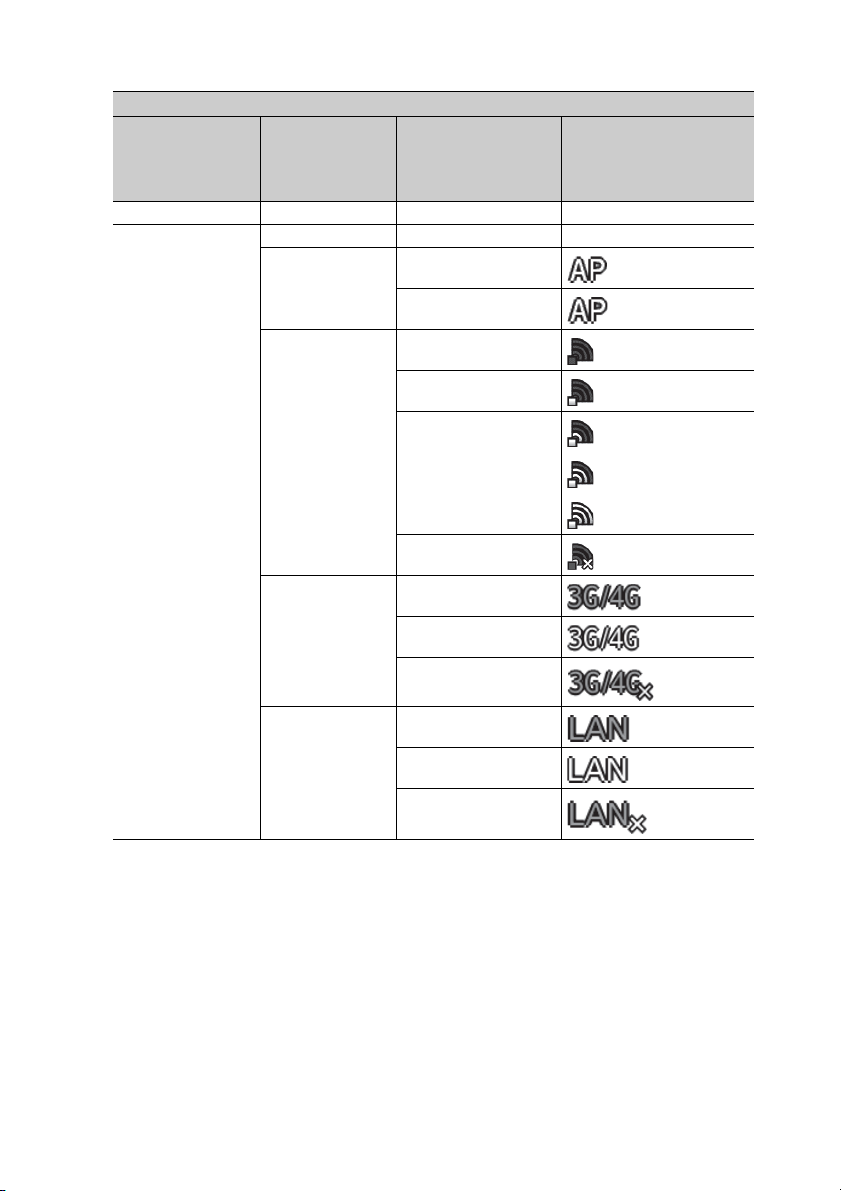
4. ネットワーク接続状態表示(PXW-X180のみ)
条件
LCD/VFメニュー→
Display On/Off→
Network Condition
Off
On Off
Systemメニュー→
Network→Setting
― ― 表示なし
Wi-Fi Access point
Wi-Fi Station
Modem
状態 表示内容
―表示なし
Wi-Fi
準備中 点滅表示
Wi-Fiスタンバイ中
(接続中)
Wi-Fi
準備中 点滅表示
アクセスポイント探
索中
アクセスポイント接
続中
アクセスポイント接
続エラー
3G/4G
準備中 点滅表示
3G/4G接続中
電波強度に
よりアイコ
ンが変化
3G/4G接続エラー
Wired LAN
LAN
準備中 点滅表示
LAN接続中
LAN接続エラー
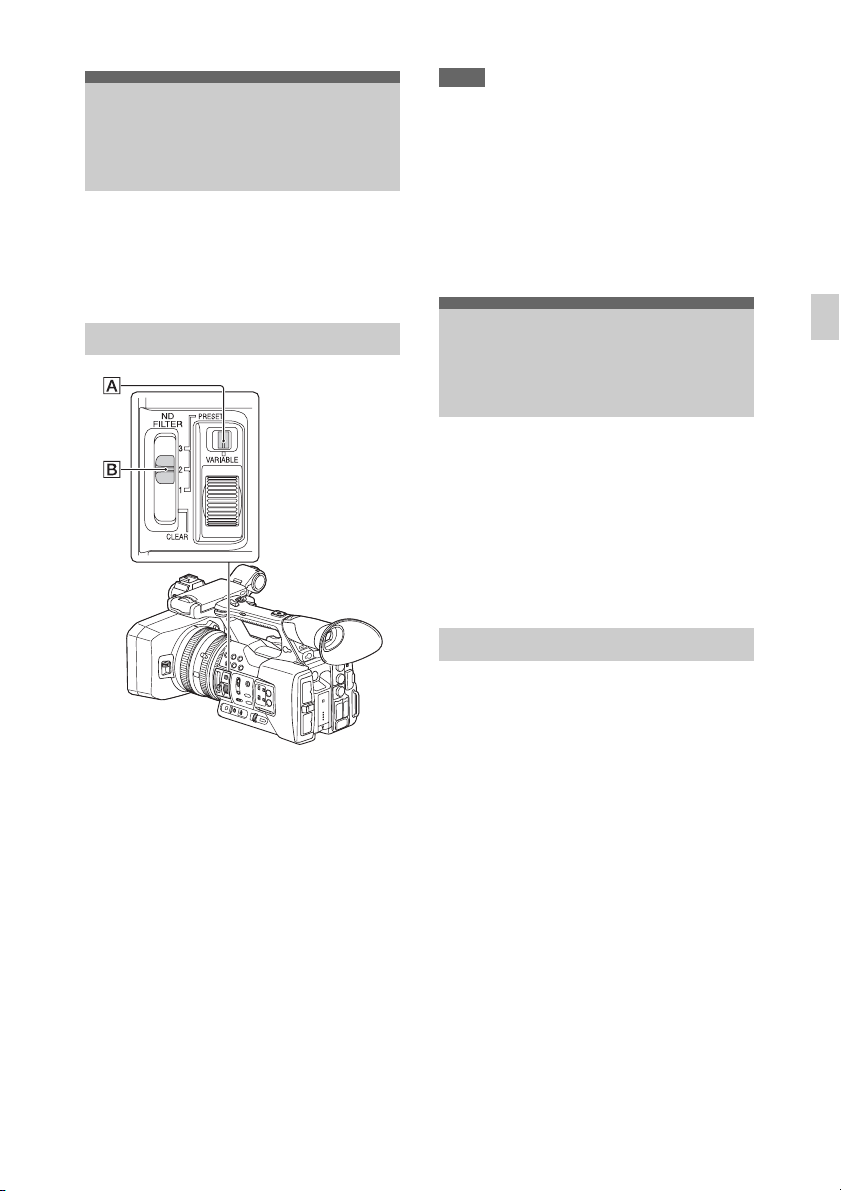
5. オートNDフィルター状態表示
LCD/VFメニューのDisplay On/OffのAuto ND FilterがOnで、オートNDフィルターが有効な場合
に表示されます(
11ページ)。
再生中の画面に表示される情報
ネットワーククライアントモード、ストリーミング、ネットワーク接続については、撮影中の
画面と同じ情報が表示されます。
JP
10

セットアップメニュー
追加・変更になった各メニュー項目を記載します。
出荷時の初期設定値は、太文字(例:
Camera
メニュー項目 細目と設定値 内容
Auto Exposure
トータルレベル
コントロールシ
ステムの設定
Auto ND Filter
On / Off
LCD/VF
メニュー項目 細目と設定値 内容
VF Setting
ビューファイン
ダーの設定
Display On/Off
画面表示項目の
設定
Brightness
〜+99(±0)
–99
Auto ND Filter
On / Off
Network Condition
(PXW-X180のみ)
On / Off
Focus Assist Bar
On / Off
Focus Area Marker
On / Off
NW Client Mode Status
(PXW-X180のみ)
On / Off
Streaming Status
(PXW-X180のみ)
On / Off
Off )で示します。
オートNDフィルターをON/OFFします。
ビューファインダー映像の明るさを調整します。
液晶画面やビューファインダー画面に表示する項目
を選択します。
JP
Recording
メニュー項目 細目と設定値 内容
Proxy
Recording
Mode
(PXW-X180の
み)
プロキシー記録
モードの設定
Size
×720(9Mbps) /
1280
1280
×720(6Mbps) /
640×360(3Mbps) /
480
×270(1Mbps) /
480
×270(0.5Mbps)
プロキシーファイル用の映像のサイズを設定します。
JP
11
Paint
メニュー項目 細目と設定値 内容
Matrix
マトリクス補正
の設定
Setting
On / Off
マトリクス補正機能をON/OFFします。
System
メニュー項目 細目と設定値 内容
Codec
Select
記録・再生モードを設定します。
XAVC-I / XAVC-L / MPEG
HD 422 / MPEG HD 420 /
AVCHD / DVCAM(MXF) /
DVCAM(AVI)
Rec Format
記録フォーマッ
トの設定
Video Format
•NTSC系の場合:
CodecのSelectでDVCAM(AVI)
を選択しているとき
720×480 59.94i
録画フォーマットを設定します。
SET:実行
•PAL系の場合:
CodecのSelectでDVCAM(AVI)
を選択しているとき
720×576 50i
Network
(PXW-X180の
み)
ネットワーク接
続に関する設定
と表示
Network Client
Mode
ネットワークク
ライアントモー
ドの設定
Aspect Ratio (SD)
16:9 / 4:3
Setting
Wi-Fi Access point /
Wi-Fi Station / Modem / Wired
LAN / Off
Channel
Auto(5GHz) / Auto / CH1 /
CH2 / CH3 / CH4 / CH5 /
CH6 / CH7 / CH8 / CH9 /
CH10 / CH11
Wired LAN Remote
On / Off
Setting
On / Off
Detail Settings
CCM Address / CCM Port
(1〜65535(8443))/ User
Name / Password
DVCAM(MXF) / DVCAM(AVI)
を設定します。
ネットワーク接続の動作モードを設定します。
記録時のアスペクト比
ご注意
• USB-RJ45アダプターを使用する場合は「Wired
LAN」に設定してください。
ワイヤレスLANのチャンネルを設定します。
ご注意
•Ver. 3.0では、CH12とCH13は使用できません。
• Auto(5GHz)は、ご使用になるワイヤレスLANモ
ジュールにより、表示されない場合があります。
LAN
ケーブルでネットワーク接続したときに、Wi-Fi
リモコン、Webメニュー、「Content Browser
Mobile
」アプリケーションからの操作を有効にしま
す。
ネットワーククライアントモードをON/OFFします。
接続先CCMの各項目を設定します。
ご注意
• すべての項目に値が入力されないと、設定を完了
できません。
12
JP
主な仕様
使用上のご注意
追加になった仕様のみ記載します。
一般仕様
記録フォーマット(ビデオ)
DVCAM(AVI)
CBR、25Mbps
記録フォーマット(オーディオ)
DVCAM(AVI)
LPCM 16ビット、48kHz、2チャンネル
記録フレームレート
DVCAM(AVI)
720x480/59.94i
720x576/50i
記録・再生時間
DVCAM(AVI)
125分:32GBメモリーカード使用時
約
約
62分:16GBメモリーカード使用時
約
29分:8GBメモリーカード使用時
ご注意
記録再生時間は、使用条件やメモリーの特
性などにより、多少の誤差が生じる場合が
あります。
ネットワーク接続時のご注意
• 本機とワイヤレスLANアクセスポイント
または端末機器間の障害物や電波状況、
壁の材質など周囲の環境によって、通信
可能距離が短くなったり、接続できなく
なることがあります。本機の場所を移動
したり、本機とアクセスポイントまたは
端末機器の距離を近づけて、接続
態を確認してください。
/通信状
• ワイヤレスLANモジュールは国・地域に
よって利用できない場合があります。
• ワイヤレスLANモジュールが使用する周
波数帯は、さまざまな機器が共有して使
用する電波帯です。使用環境によっては、
他の機器の影響によって、通信速度や通
信距離が低下することや、通信が切断す
ることがあります。
• 3G/4G/LTE回線を利用するには、携帯電
話事業者との契約が必要です。
• 本機に対応しているネットワーク接続に
必要な機器については、お買い上げ店ま
たはソニーのサービス窓口にお問い合わ
せください。
セキュリティに関するご注意
• 通信を行う機器でセキュリティ対策を行
わなかった結果、または、通信仕様上の、
やむを得ない事情により、データ漏洩等、
セキュリティ上の問題が発生した場合、
弊社ではそれによって生じたあらゆる損
害に対する責任を負いかねます。
• 使用環境によってはネットワーク上の意
図せぬ第三者から製品にアクセスされる
可能性があります。本機をネットワーク
に接続する際には、セキュアなネット
ワークであることをご確認のうえご使用
ください。
JP
JP
13

• 利用者が気づかないうちに、電波が届く
ところから意図せぬ第三者に通信内容を
盗み見られてしまう恐れがあります。
ヤレス
LAN通信を利用する際は、通信内
容を保護するために、適切なセキュリ
ティ対策をしてください。
ワイ
• セキュリティの面から、製品をネット
ワークに接続してご使用になる際は、ア
クセス制限設定を工場出荷時の設定値か
ら変更して設定することを強く推奨しま
す。設定について詳しくは、取扱説明書
の「セットアップメニュー一覧」で
「
Basic Authentication」をご覧ください。
また、定期的にパスワードを変更するこ
とを推奨します。
• 設定作業中または設定作業後のブラウ
ザーで他のサイトを閲覧しないでくださ
い。ブラウザーにログインした状態が残
りますので、意図しない第三者の使用や
悪意のあるプログラムの実行を防ぐため
に、設定作業が完了したら必ずブラウ
ザーを終了してください。
14
JP

JP
JP
15

English
New functions have been added to your camcorder by the firmware update.
Functions added with Ver. 3.0
• Auto ND filter (page 3)
• High quality streaming with network client mode (PXW-X180 only) (page 3)
• Supported for the following by network connection with LAN cable (PXW-X180 only) (page 4)
– Uploading files
– Using the Wi-Fi remote commander
– Operating the Web menu
– Remote operation of the camcorder using the “Content Browser Mobile” application
• Supported for the USB wireless LAN module “CBK-WA02” (PXW-X180 only) (page 5)
• Seamless playback of clips (page 6)
• Rec review with the remote commander (page 6)
• DVCAM (AVI) recording/playback (page 6)
• Proxy recording with “1280 × 720: 6 Mbps (VBR)” (PXW-X180 only) (page 6, 11)
Functions deleted from Ver. 3.0
• Monitoring settings “640 × 360: 3 Mbps (VBR)” (page 6)
Functions added with Ver. 2.0
• Picture cache rec
• White balance memory corresponding to the ND filter position
• Streaming transmissions via 3G/4G/LTE nework (hereafter called “live streaming”) (PXW-X180 only)
The new functions and respective operations added to the PXW-X180/PXW-X160 camcorders with the
“Ver. 3.0” firmware update are described here. For details about the functions added with “Ver. 2.0,” refer
to the “Firmware update” for Ver. 2.0. Also, refer to the Operating Guide of your camcorder.
GB
2
Adjusting the Image Brightness (Auto ND Filter)
“Auto ND Filter” has been added to the “Auto
Exposure” of the Camera menu (page 11). The
camcorder can adjust the density of the ND filter
automatically.
Setting auto ND filter
Notes
• Switching the auto ND filter to on or off is enabled in
variable mode only.
• When the camcorder is in the preset mode or the ND
FILTER switch B is set to CLEAR, the auto ND filter
is disabled.
• When the Full Auto mode is set to on in the variable
mode, the density of the ND filter is automatically
adjusted, even if the auto ND filter is off.
• For details about the preset mode or variable mode,
refer to “Adjusting the volume of light (ND filter)” in
the Operating Guide.
High Quality Streaming with the Network Client Mode (PXW-X180 only)
“Network Client Mode” has been added to the
System menu (page 12).
By enabling the network client mode and
connecting the camcorder to Connection Control
Manager (hereafter called “CCM”) of the PWS100RX1 network RX station (sold separately),
high quality streaming using the Sony QoS
technology is available.
Setting the network client mode
GB
1 Set the ND FILTER mode switch A to
VARIABLE.
2 Set the ND FILTER switch B to 1, 2, or
3.
The ND filter mode is set to variable mode.
3 Set “Auto ND Filter” of “Auto
Exposure” in the Camera menu to
“On.”
1 Connect the camcorder to the network.
For details, refer to the “Connecting to Other
Device via Wireless LAN (PXW-X180
only)” or “Connecting to the
Internet (PXW-X180 only)” in “Firmware
update” for Ver. 2.0.
2 Set items of “Detail Settings” in
“Network Client Mode” of the System
menu.
• CCM Address: Input the address of the
connected CCM (Host name or IP address).
• CCM Port: Input the port number of the
connected CCM.
• User Name: Input the user name.
• Password: Input the password.
Continued ,
GB
3

Notes
• This setting cannot be completed if any of the items in
the setting screen remain blank.
3 Set “Setting” of “Network Client
Mode” in the System menu to “On.”
The network client mode is enabled and the
camcorder is connected with the PWS100RX1 network RX station.
Live streaming is started by operating the
PWS-100RX1 network RX station.
For details on the operation, refer to the
operating instructions of the PWS-100RX1
network RX station.
“Network Client Mode” can be assigned to
the assignable button. For details on how to
assign, refer to “Assignable buttons” in the
Operating Guide.
Notes
• Streaming, monitoring, proxy recording, and file
uploading cannot be performed when switched to the
network client mode.
• If switching to the network client mode during
monitoring, proxy recording, or file uploading, these
operations stop. You cannot switch the camcorder to
the network client mode during streaming.
Supporting Functions
when Connecting to the
For details about the auto upload of the proxy
files and live streaming, refer to the “Firmware
update” for Ver. 2.0.
Setting
1 Connect the camcorder to the network
via LAN cable.
For details, refer to the “Connecting to the
Internet with a LAN cable” in “Firmware
update” for Ver. 2.0.
2 Set “Setting” of “Network ” in the
System menu to “Wired LAN.”
Notes
• To perform following, set “Wired LAN Remote” of
“Network” in the System menu to “On” (page 12):
– Uploading original files/proxy files recorded on the
camcorder
– Using the Wi-Fi remote commander
– Operating the Web menu
– Video monitoring by the “Content Browser Mobile”
application
• To prevent unauthorized access from the Internet, we
recommend setting “Wired LAN Remote” to “On”
when the network connection using LAN cable is not
connected to the Internet. When connecting to the
Internet, confirm whether the connecting destination is
a secure network.
• Original files recorded on the camcorder can be
uploaded in any format except AVCHD.
Network via LAN Cable
(PXW-X180 only)
The following functions are enabled when the
camcorder is connected to the network via LAN
cable.
• Uploading original files/proxy files recorded on
the camcorder
• Using the Wi-Fi remote commander
• Operating the Web menu
• Remote operation or video monitoring
(streaming) with a device on which the
“Content Browser Mobile” application is
installed
Monitoring function of Content Browser Mobile
The video image may stop while monitoring due
to signal conditions when used or mobile devices.
GB
4

USB Wireless LAN Module “CBK-WA02” (PXW-X180 only)
When you conne ct the camcorder to a smartphone
or tablet via wireless LAN, the USB wireless
LAN module “CBK-WA02” (sold separately) is
available, in addition to the supplied IFU-WLM3.
For details on wireless LAN connections, refer to
“Connecting to Other Device via Wireless LAN
(PXW-X180 only)” and “Connecting to the
Internet (PXW-X180 only)” in the “Firmware
update” for Ver. 2.0.
Attaching the CBK-WA02 to the
camcorder
1 Open the cover of the USB wireless
LAN module retracting part.
2 Attach the extension adapter for
network module supplied with the
CBK-WA02 to the camcorder.
Connect the convex terminal to the terminal
for the USB wireless LAN module on the
camcorder and connect the concave terminal
to the CBK-WA02. You can attach the
adapter to the screw hole (1/4 in.) of the
accessory shoe mount.
Wireless LAN channel
A part of the channel settings for wireless LAN
has been changed due to newly-supported “CBKWA02.”
Adjust the settings in “Channel” of “Network” in
the System menu (page 12).
Notes
• “Auto(5GHz)” may not be displayed depending on the
wireless LAN module you use.
• When using the camcorder in a country/region which
prohibits using the frequency band of 5 GHz outside,
“Auto(5GHz)” is not displayed. Be sure that the
wireless LAN module is available in the country/
region you use beforehand. For details, refer to the
operating instruction of the wireless LAN module.
GB
3 Attach the CBK-WA02 to the extension
adapter for network module.
Notes
• When you attach or remove the CBK-WA02 to
the camcorder, perform one of the following:
– Set both “Setting” in “Proxy Recording Mode”
of the Recording menu, and “Setting” in
“Network” of the System menu to “Off.”
– Turn the camcorder off.
• When you attach a wireless LAN USB module or
3G/4G/LTE modem (sold separately) to the
camcorder via the extension adapter for network
module, the camcorder cannot receive a GPS
signal because the GPS antenna is blocked.
GB
5

About the Web Menu (PXW-X180 only)
Other Added Functions
Seamless playback of clips
Streaming format settings
Monitoring settings
The setting value “640 × 360: 3 Mbps (VBR)” has
been deleted from the format when monitoring
clips on a device. The size and bit rate of the
setting values are as follows.
“Size” (“Monitoring”)
Set the size and bit rate of the video for the
monitoring.
“480 × 270”: 1 Mbps (VBR)
“480 × 270”: 0.5 Mbps (VBR)
Notes
• This bit rate is the average value. The actual bit rate
may be more than the average value.
“Bit Rate”
“1Mbps (VBR)”: 480 × 270
“0.5Mbps (VBR)”: 480 × 270
Proxy format settings
A new setting value has been added for
formatting proxy files to be recorded on the SD
card inserted in the camcorder. The size and bit
rate of the setting values are as follows.
“Size”
Set the size and bit rate of the video for the proxy
file.
“1280 × 720”: 9 Mbps (VBR)
“1280 × 720”: 6 Mbps (VBR)
“640 × 360”: 3 Mbps (VBR)
“480 × 270”: 1 Mbps (VBR)
“480 × 270”: 0.5 Mbps (VBR)
“Bit Rate”
Displays the bit rate of the video.
“9 Mbps (VBR)”: 1280 × 720
“6 Mbps (VBR)”: 1280 × 720
“3 Mbps (VBR)”: 640 × 360
“1 Mbps (VBR)”: 480 × 270
“0.5 Mbps (VBR)”: 480 × 270
When you play back multiple clips continuously
on the camcorder, gaps between clips are filled
(seamless playback). To perform seamless
playback, be sure that the following conditions
are met.
• The length of each clip to be played back is
more than 4 seconds.
• The codecs and recording formats of the
continuing clips are same.
• There is no clips that were deleted during
editing or recording.
• The clips have been recorded to the
recommended type of memory card.
Rec review with the remote
commander
Rec review with the remote co mmander RM-1BP
(sold separately) has been enabled. For details
about the operation, refer to the Operating
Instructions of the remote commander RM-1BP.
DVCAM (AVI) recording/playback
Recording/playback clips with DVCAM (AVI)
has been enabled, and these clips will be
displayed as thumbnail clips on the screen.
The only compatible recording media for
DVCAM (AVI) recording is an SDHC memory
card (speed class: Class 10).
Use SD card adaptor MEAD-SD02 (supplied)
when recording clips on th e SDHC memory card.
Notes
• DVCAM (AVI) recording is not compatible with
special recording.
GB
6
On-screen Indication
The following describes added/changed functions only.
Status screen
The following items have been added to the network status screen.
Network status screen
Displays the settings or status of the network.
Wired LAN Remote Displays whether the remote operation is enabled or disabled for a connection via
CCM Name Name of CCM which the camcorder is connected to during the network client
NW Client Mode Status* Status of the network client mode.
Number of Distribution The number of destinations for current streaming.
* Status of the network client mode is displayed as follows.
Indication Status Description
Off Not connected to CCM. Network client mode is off.
Connected Connected to CCM. The camcorder is connected to CCM while the network client
Connecting Connecting to (disconnecting
from) CCM.
Awaiting Awaiting CCM connection. The network setting is disabled, though the network client
Address Error CCM address error. Host name and IP address of CCM for the camcorder
Auth. Failed CCM user name/password error. User name or password to connect to CCM may be incorrect.
No Inet Access Internet connection error. The camcorder cannot connect to the network. Check the
Cert. not Valid CCM certificate error. The certificate for CCM is invalid. The date may be set to an
LAN cable.
mode.
mode is on, and the camcorder control from CCM is enabled.
The camcorder is connecting to (disconnecting from) CCM.
Wait until the connection (or disconnection) completes.
If “Connecting” remains on the LCD screen, the CCM
address you input may be incorrect. Check whether the
address setting is correct.
mode is on. To connect to CCM, enable the network setting.
connected may be incorrect. Check whether the setting is
correct.
Check whether the setting is correct.
network connection or network settings.
invalid value. Check the date setting.
GB
GB
7
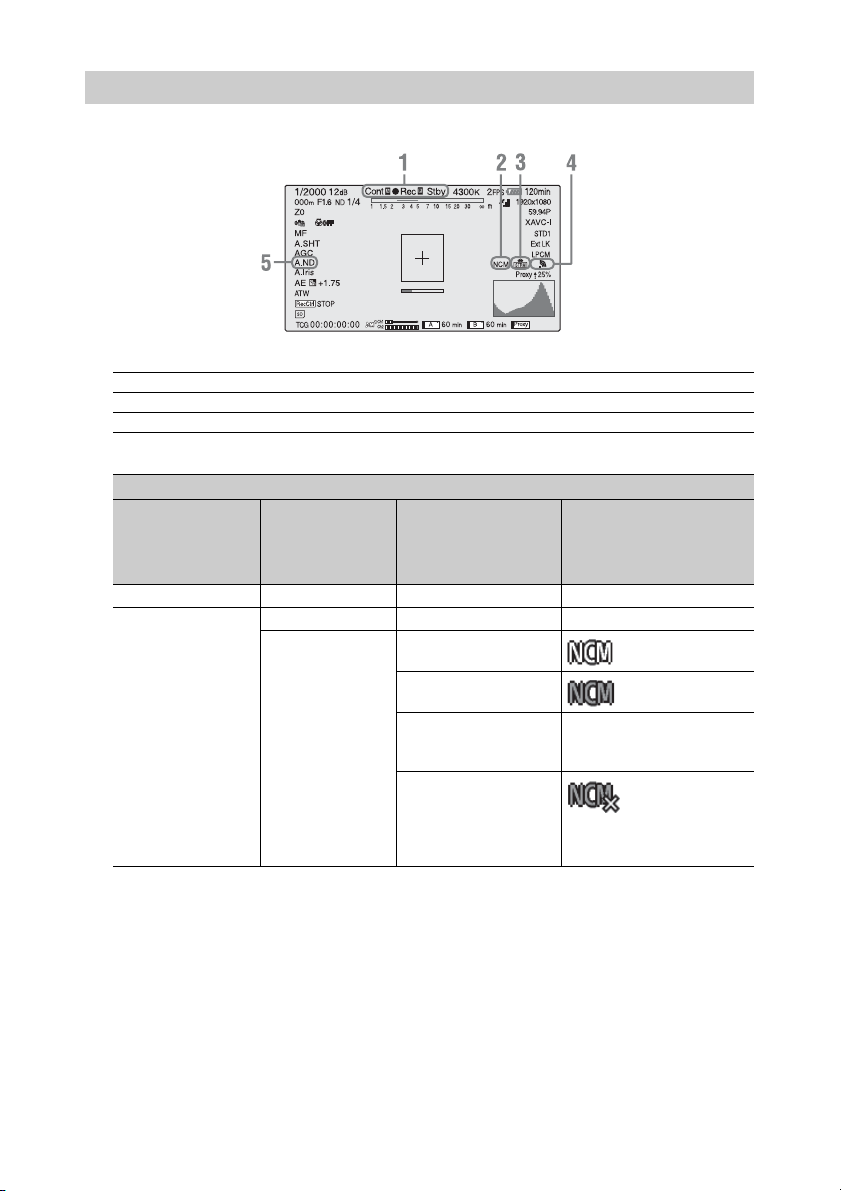
LCD/viewfinder screen
Information displayed on the screen while recording
1. Recording mode/slot A/B operation status indication
zRec Recording in progress
Stby Standby for recording
zCache Recording in picture cache mode
2. Network client mode status indication (PXW-X180 only)
Condition
LCD/VF menu >
“Display On/Off” >
“NW Client Mode
Status”
Off — — Not displayed
On Off — Not displayed
System menu >
Status Indicator
“Network Client
Mode” > “Setting”
On Connected to CCM
Connecting to
(disconnecting from) CCM
Waiting to connect to CCM Not displayed Network
CCM connection error Error contents
GB
Blinking
setting is
disabled.
can be seen on
the network
status screen
(page 7).
8
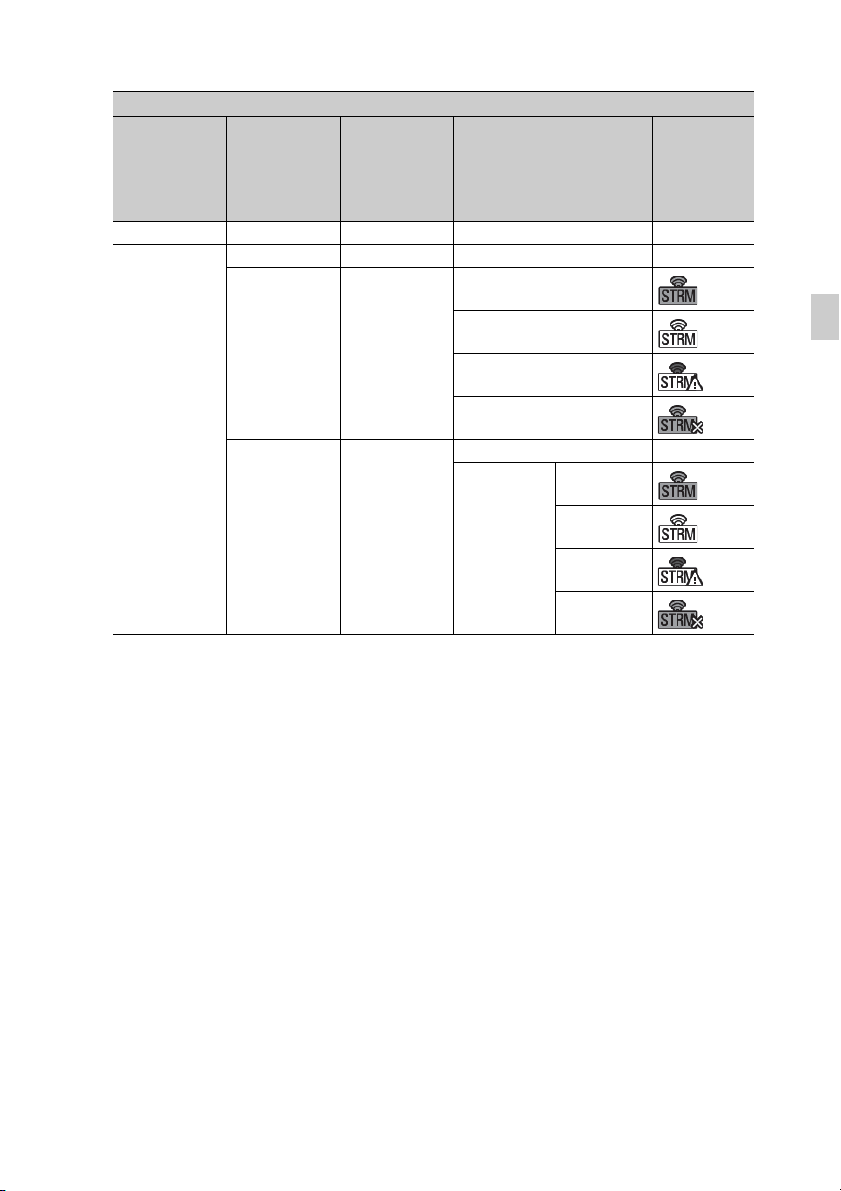
Streaming status indication (PXW-X180 only)
3.
Condition
LCD/VF menu
> “Display On/
Off” >
“Streaming
System menu >
“Streaming” >
“Setting”
System menu >
“Network
Client Mode”>
“Setting”
Status Indicator
Status”
Off — — — Not displayed
On Off Off — Not displayed
On Off Not streaming
Currently streaming
Alert
Error
Off On Before streaming from CCM Not displayed
Currently
streaming from
CCM
Not streaming
Currently
streaming
Alert
Error
GB
GB
9
4. Network connection status indication (PXW-X180 only)
Condition
LCD/VF menu >
“Display On/Off” >
“Network
Condition”
Off — — Not displayed
On Off — Not displayed
System menu >
Status Indicator
“Network” >
“Setting”
Wi-Fi Access point Preparing Wi-Fi Blinking
Wi-Fi is in stand-by
(connected to Wi-Fi)
Wi-Fi Station Preparing Wi-Fi Blinking
Searching for an access
point
Connected to an access
point
Access point connection
error
Modem Preparing 3G/4G Blinking
Connected to 3G/4G
Indicator
changes
according to
the signal
strength.
3G/4G connection error
Wired LAN Preparing LAN Blinking
Connecting to LAN
Connection error of LAN
5. Auto ND filter status indication
An indicator is displayed when “Auto ND Filter” in “Display On/Off” of the LCD/VF menu is “On”
and the auto ND filter function is enabled (page 11).
Information displayed on the playback screen
Information about the network client mode, streaming, and network connection is the same as what is
displayed while recording.
GB
10
Setup Menu List
The following describes added or changed functions and available settings.
The default settings set at the factory are shown in bold (example: Off).
Camera
Menu items Sub items and setting values Contents
Auto Exposure
Settings for the
total level control
system
Auto ND Filter
On / Off
LCD/VF
Menu items Sub items and setting values Contents
VF Setting
Settings for the
viewfinder
Display On/Off
Settings for the
items to be
displayed
Brightness
-99 to +99 (±0)
Auto ND Filter
On / Off
Network Condition
(PXW-X180 only)
On / Off
Focus Assist Bar
On / Off
Focus Area Marker
On / Off
NW Client Mode Status
(PXW-X180 only)
On / Off
Streaming Status
(PXW-X180 only)
On / Off
Turn the auto ND filter function on/off.
Adjusts the brightness of the viewfinder images.
Selects the items to be displayed on the LCD/viewfinder
screen.
GB
Recording
Menu items Sub items and setting values Contents
Proxy
Recording
Mode
(PXW-X180 only)
Settings for the
proxy recording
mode
Size
1280×720(9Mbps) /
1280×720(6Mbps) /
640×360(3Mbps) /
480×270(1Mbps) /
480×270(0.5Mbps)
Sets the picture size for the proxy file.
GB
11
System
Menu items Sub items and setting values Contents
Codec
Rec Format
Settings for the
recording format
Select
XAVC-I / XAVC-L / MPEG HD
422 / MPEG HD 420 / AVCHD /
DVCAM(MXF) / DVCAM(AVI)
Video Format Sets the recording format.
•NTSC Area:
When “Select” in “Codec” is set to
“DVCAM(AVI)”
720×480 59.94i
Sets the recording/playback mode.
SET: Executes.
• PAL Area:
When “Select” in “Codec” is
set to “DVCAM(AVI)”
720×576 50i
Network
(PXW-X180 only)
Settings for the
network
connection and
respective display
items
Network Client
Mode
Settings for the
network client
mode
Aspect Ratio (SD)
16:9 / 4:3
Setting
Wi-Fi Access point / Wi-Fi
Station / Modem / Wired LAN /
Off
Channel
Auto(5GHz) / Auto / CH1 / CH2
/ CH3 / CH4 / CH5 / CH6 / CH7 /
CH8 / CH9 / CH10 / CH11
Wired LAN Remote
On / Off
Setting
On / Off
Detail Settings
CCM Address / CCM Port (1 to
65535 (8443)) / User Name /
Password
Set the aspect ratio of DVCAM(MXF) / DVCAM(AVI)
recording.
Sets the operation mode of the network connection.
Notes
• When you use the USB-RJ45 adapter, select “Wired
LAN.”
Set the channel of wireless LAN.
Notes
• CH12 and CH13 are not available in Ver. 3.0.
• “Auto(5GHz)” may not be displayed, depending on the
wireless LAN module you use.
Enables remote operation of the camcorder from the Wi-Fi
remote commander, Web menu, or “Content Browser
Mobile” application when the camcorder is connected to the
network via LAN cable.
Turns the network client mode function on/off.
Sets items for CCM to be connected.
Notes
• This setting cannot be completed if any of the items
remain blank.
12
GB
Specifications
Important Notes on
The following describes added specifications
only.
General
Recording Format (Video)
DVCAM (AVI)
CBR, 25 Mbps
Recording Format (Audio)
DVCAM (AVI)
LPCM 16-bit, 48 kHz, 2 channels
Recording Frame Rate
DVCAM (AVI)
720 × 480/59.94i
720 × 576/50i
Recording/Playback Time
DVCAM (AVI)
When using a memory card of 32 GB:
Approx. 125 minutes
When using a memory card of 16 GB:
Approx. 62 minutes
When using a memory card of 8 GB:
Approx. 29 minutes
Notes
• These approximate recording/playback
times depend on operating conditions,
available memory, etc.
Operation
Notes on connecting to the network
• Obstructions and electromagnetic interference
between the wireless adapter and wireless LAN
access point or terminal device, or the ambient
environment (such as wall materials) could
shorten the communication range or prevent
connections altogether. If you experience these
problems, check the connection/
communication status after moving the
camcorder to a new location, or bringing the
wireless adapter and access point/terminal
device closer together.
• The wireless LAN module may not be available
in some countries/regions.
• The frequency band for the wireless LAN
module is shared by various devices.
Depending on the use environment,
transmission speed and distance may be
decreased, or communication may be
disconnected, by using other devices.
• To use the 3G/4G/LTE services, you need to
contract with a cell phone company.
• For details about the required c ompatible device
for the network connection, contact your Sony
dealer or a Sony service representative.
Notes on security
• SONY WILL NOT BE LIABLE FOR
DAMAGES OF ANY KIND RESULTING
FROM A FAILURE TO IMPLEMENT
PROPER SECURITY MEASURES ON
TRANSMISSION DEVICES,
UNAVOIDABLE DATA LEAKS
RESULTING FROM TRANSMISSION
SPECIFICATIONS, OR SECURITY
PROBLEMS OF ANY KIND.
• Depending on the operating environment,
unauthorized third parties on the network may
be able to access the unit. When connecting the
unit to the network, be sure to confirm that the
network is protected securely.
• Communication content may be unknowingly
intercepted by unauthorized third parties in the
vicinity of the signals. When using wireless
LAN communication, implement security
GB
Continued ,
GB
13

measures properly to protect the
communication content.
• From a safety standpoint, when using the unit
connected with the network, it is strongly
recommended to change the access limitation
settings from the factory preset values. For
detail on the setting, refer to “Basic
Authentication” of “Setup Menu List” in the
Operating Guide.
Changing the password regularly is also
recommended.
• Do not browse any other website in the Web
browser while making settings or after making
settings. Since the login status remains in the
Web browser, close the Web browser when you
complete the settings to prevent unauthorized
third parties from using the unit or harmful
programs from running.
14
GB

GB
GB
15

中文
由于固件更新,本机新增了一些新功能。
3.0版新增的功能
• 自动ND滤镜 (第3页)
• 使用网络客户端模式的高质量流媒体 (仅限PXW-X180)(第3页)
• 通过LAN电缆的网络连接支持以下操作 (仅限PXW-X180)(第4页)
– 上传文件
– 使用Wi-Fi遥控器
– 操作Web菜单
– 使用 “Content Browser Mobile”应用程序的本机遥控操作
• 支持USB无线LAN模块 “CBK-WA02”(仅限PXW-X180)(第5页)
• 片段无缝播放 (第6页)
• 遥控器摄像预览 (第6页)
• DVCAM (AVI)录制/播放 (第6页)
• 以 “1280 × 720: 6 Mbps (VBR)”进行Proxy录制 (仅限PXW-X180)(第6页、第11
页)
3.0版删除的功能
• 监控设置 “640 × 360: 3 Mbps (VBR)”(第6页)
2.0版新增的功能
• 图像缓存录制
• 对应于ND滤镜位置的白平衡存储器
• 通过3G/4G/LTE网络的流媒体传送 (以下称为 “实时流媒体”)(仅限PXW-X180)
此处说明 “3.0版”固件更新后PXW-X180/PXW-X160摄录一体机新增的新功能和相关
操作。 有关 “2.0版”新增功能的详细信息,请参阅2.0版的 “固件更新”。 也请参
阅本机的操作指南。
CS
2
 Loading...