

Sony PXW-FS5, PXW-FS5K Operating Guide

4-581-849-11 (1)
Solid-State Memory
Camcorder
Operating Guide
Table of Contents
Getting Started
Recording
Playback
Editing
Using the Menu
Troubleshooting
Additional Information
PXW-FS5/FS5K
®
Read this first
Before operating this unit, please read this manual thoroughly, and retain it for future
reference.
Precautions when using the
camcorder
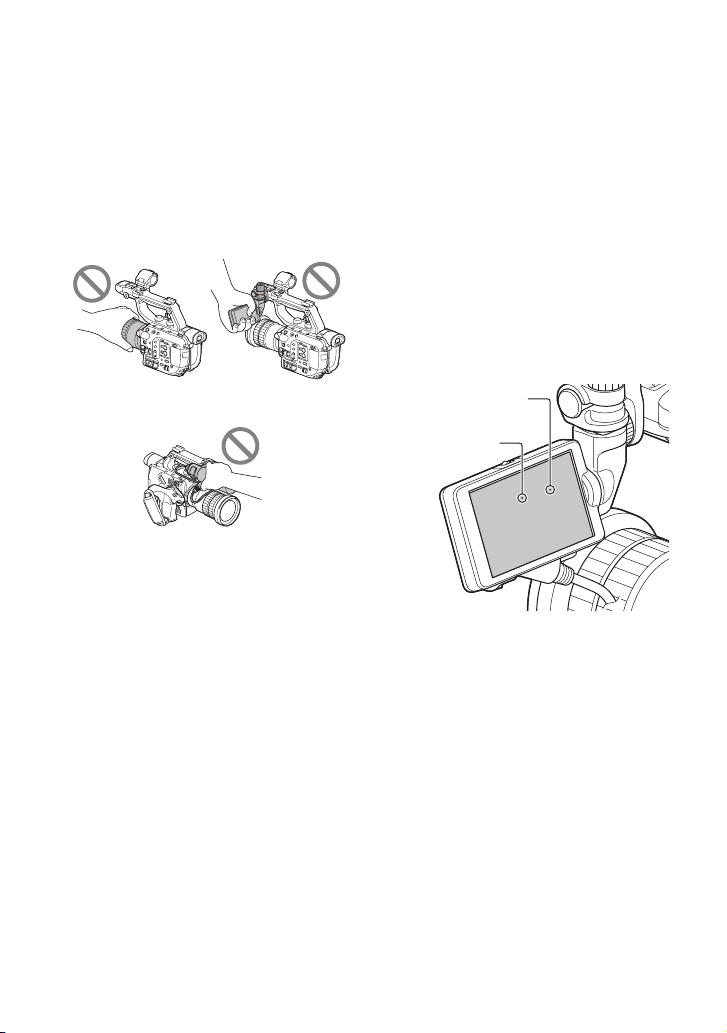
• Do not hold the camcorder by the following
parts, and also do not hold the camcorder by the
jack covers.
Lens LCD screen
Microphone (sold separately) or
Microphone holder
b Notes
• The camcorder is not dustproof, dripproof or
waterproof. See “About handling of your
camcorder” (p. 161).
• When connecting the camcorder to another
device with communication cables, be sure to
insert the connector plug in the correct way.
Pushing the plug forcibly into the terminal will
damage the terminal and may result in a
malfunction of the camcorder.
• Use your camcorder in accordance with country/
region regulations.
On the LCD screen
• A menu item that is grayed out is not available
under the current recording or playback
conditions.
• The LCD screen is manufactured using
extremely high-precision technology, so over
99.99% of the pixels are operational for
effective use. However, there may be some tiny
black points and/or bright points (white, red,
blue, or green in color) that appear constantly on
the LCD screen. These points are normal results
of the manufacturing process and do not affect
the recording in any way.
White, red, blue or
green point
Black point
On sunlight
• Do not record the sun or leave the camcorder
under the sun. The internal parts of the
camcorder may be damaged. If sunlight is
focused on a nearby object, it may cause a fire.
When you must place the camcorder under
direct sunlight, attach the front lens cap.
• Do not expose your camcorder’s viewfinder,
lens, or LCD screen to the sun or strong light
source for extended periods. Doing so may
cause a malfunction of the camcorder.
• Do not attempt to record the sun directly. Doing
so may cause a malfunction of the camcorder.
• Do not look at the sun or a strong light through a
removed lens. This may cause irrecoverable
damage to your eyes. Also, this may cause a
malfunction.
2

On the temperature of your camcorder
and battery pack
• Your camcorder has a protective function that
disables recording or playback if the
temperature of your camcorder or battery pack
is beyond the safely operable range. In this case,
a message appears on the LCD screen (p. 149).
On recording
• When the memory card access lamp is lit or
flashing in red, your camcorder is reading or
writing data. Do not apply any vibrations or
shocks to your camcorder. Do not turn the
power off, and do not remove the memory
cards, battery pack, or the AC Adaptor. The
image data may be destroyed.
• In order to stabilize memory card operation, it is
recommended that you format the memory card
when you use it with your camcorder for the
first time. All data recorded on the memory card
will be erased by formatting, and cannot be
recovered. Save important data on the memory
card on other media, such as a computer, before
formatting the memory card.
• Before starting to record, test the recording
function to make sure the picture and sound are
recorded without any problems.
• Compensation for the loss of the content of
recordings or the loss of recording opportunities
cannot be provided, even if recording or
playback is not possible due to a malfunction of
the camcorder, storage media, etc., or even if
images or sounds are distorted due to the limits
of the capabilities of the camcorder.
• TV color systems differ depending on the
countries/regions. To view your recordings on a
TV, you need to set [60i/50i SEL] in accordance
with the country/region.
• Television programs, films, video tapes, and
other materials may be copyrighted.
Unauthorized recording of such materials may
be contrary to the copyright laws.
• Because of the way that the image device
(CMOS sensor) reads out image signals, the
following phenomena may occur.
– The subjects passing by the frame rapidly
might appear crooked depending on the
recording conditions. (This phenomenon may
be notable in displays having high motion
resolution.)
– Horizontal lines appear on the LCD screen
during recording under fluorescent lights,
sodium lamps or mercury lamps. The
phenomena can be reduced by adjusting the
shutter speed (p. 49).
– Images on the LCD screen look horizontally
divided when a subject is continuously lit
with a flash. The effect of this phenomenon
may be reduced by using a slower shutter
speed. Also, you may try using software to
repair the image.
Save all your recorded image data
• To prevent your image data from being lost,
save all your recorded images on external media
periodically.
To handle the recorded images on
your computer
• Download the “Catalyst Browse” software.
Format the memory card using
[MEDIA FORMAT] if images are not
recorded or played back properly
• If you continue recording and deleting images
on memory cards for a long time, the files on
that memory card may become fragmented. As a
result, you may not be able to record and save
images properly. If this happens, save the
images on a separate recordable media, such as
a disc or computer, then format the memory
card. See “Formatting a memory card” (p. 110).
Continued ,
3

Read this first (continued)
About the operation of the camcorder
• The operation of the camcorder is controlled
using the SEL/SET dial (p. 6, 113) or the multiselector on the grip (p. 9).
About this manual
• Operations in this manual are described using
the “SELP18105G” lens. When the operation
differs depending on the lens used, you will find
the relevant information in “Notes” or “Tips.”
• The values you can set in [REC FORMAT] and
other menus depend on the [60i/50i SEL]
setting. In this manual, the values for both [60i]
and [50i] settings are described.
• The images of the LCD screen used in this
manual for illustration purposes are captured
using a digital still camera.
• The on-screen displays in each local language
are used for illustrating the operating
procedures. Change the screen language before
using your camcorder if necessary (p. 138).
• Design and specifications of memory cards and
other accessories are subject to change without
notice.
4

Identifying parts and controls
Body
The numbers in ( ) are reference pages.
A Accessory shoe (with cold shoe
attached)
For details about attachment, see
page 25.
B XLR handle (attached)
For details about attachment, see
page 24.
C Cable clamper
D Tape measure hook (p. 43)
E LCD screen connection jack (p. 27)
F Shoulder strap attachment point
G Image sensor position index (p. 43)
H REMOTE jack (p. 29)
I INPUT 1 (LINE/MIC/MIC+48V)
switch (p. 62)
J Handle record button (p. 38)
The handle record button is disabled
when set to the HOLD position.
K Handle zoom lever (p. 41)
L Multi-interface shoe (p. 62)
M Internal microphone (p. 61)
N Microphone holder
O INPUT 2 (LINE/MIC/MIC+48V)
switch (p. 62)
P INPUT 2 jack (p. 61)
Q Cable clamper
R Cable clamper
S Recording lamp (front) (p. 38)
The recording lamp flashes if the
remaining capacity of the memory card
or battery is low.
T Mounting index point (p. 21)
U Lens contacts
b Note
• Do not touch directly with your hands.
V WB SET button (p. 53)
W Lens lock pin
X Lens release button (p. 21)
Y Grip attachment point (p. 29)
Z Grip release button (p. 30)
Continued ,
5
Identifying parts and controls (continued)
A FULL AUTO button (p. 81)
B HOLD switch (p. 91)
C START/STOP button (p. 38)
D ND FILTER dial (p. 51)
E PRESET/VARIABLE switch (p. 51)
F ASSIGN3/STATUS button (p. 97)
G ND/IRIS switch (p. 48, 51) — ND/IRIS
dial (p. 51)
H IRIS — PUSH AUTO button (p. 48)
I SHUTTER button (p. 49)
J ISO/GAIN button — L/M/H switch
(p. 49)
K WHT BAL button — B/A/PRESET
switch (p. 52)
L DISPLAY button (p. 96)
M THUMBNAIL button (p. 93)
N MENU button — SEL/SET dial (p. 113)
O SLOT SEL button (p. 37)
6
A ❙/1 (ON/STANDBY) switch (p. 31)
B Shoulder strap attachment point
C Recording lamp (rear) (p. 38)
The recording lamp flashes if the
remaining capacity of the memory card
or battery is low.
D Remote control sensor
E ASSIGN1/S&Q button (p. 56)
F ASSIGN2/P PROFILE button (p. 81)
G AUTO/MAN (CH-1) switch (p. 63)
H AUDIO LEVEL (CH-1) dial (p. 63)
I AUDIO LEVEL (CH-2) dial (p. 63)
J AUTO/MAN (CH-2) switch (p. 63)
K FOCUS (AUTO/MAN) switch —
PUSH AUTO button (p. 43)
L i (headphones) jack
M DC IN jack
N Tripod receptacles (1/4 inch, 3/8 inch)
Supports 1/4-20UNC and 3/8-16UNC
screws.
For mounting on a tripod with screw
length 5.5 mm or shorter (sold
separately).
The tripod may not be able to mount in
some orientations, depending on the
tripod specifications.
Continued ,
7
Identifying parts and controls (continued)
A Diopter adjustment dial (p. 33)
B Viewfinder (p. 33)
C Eye sensor
D BATT RELEASE button (p. 19)
E Memory card slot B (p. 37)
F Memory card access lamp (p. 3)
G Memory card slot A (p. 37)
H Memory card access lamp (p. 3)
I Multi/micro USB jack (p. 98)
J Battery pack (p. 19)
K SDI OUT jack (p. 98)
L HDMI OUT jack (p. 98)
M Wired LAN port (p. 75)
N INPUT 1 jack (p. 61)
z Tip
• Although a GPS mark is displayed on the
handle, GPS is a function that is planned for a
future firmware update.
8
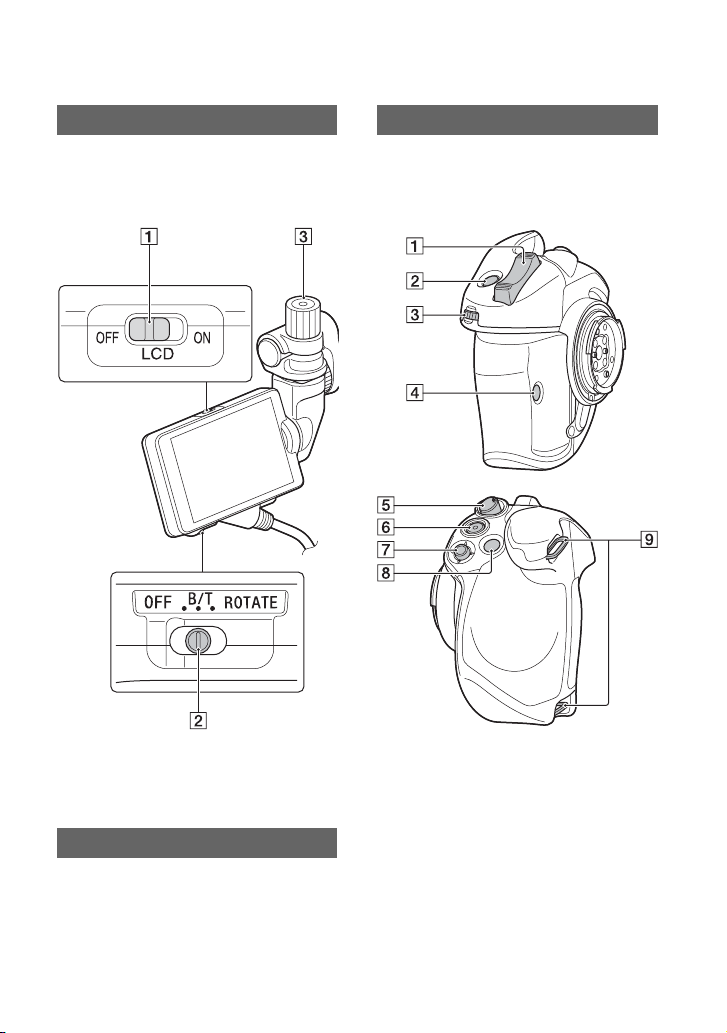
LCD screen
The numbers in ( ) are reference pages.
Grip
The numbers in ( ) are reference pages.
For details about attaching the LCD screen,
see page 27.
A LCD ON/OFF switch (p. 32)
B MIRROR switch (p. 92)
C LCD screen mounting clamp
Lens (PXW-FS5K only)
For details, refer to the instruction manual
supplied with the lens.
For details about attaching the grip, see
page 29.
A Grip zoom lever (p. 41)
B ASSIGN4/FOCUS MAG button (p. 44)
C ASSIGN dial (p. 63)
D ASSIGN6 button (p. 63)
E Grip rotate lever (p. 34)
F START/STOP button (p. 38)
G Multi-selector (p. 54)
H ASSIGN5/Fn button (p. 54)
Continued ,
9
Identifying parts and controls (continued)
I Grip belt attachment point
The grip belt is attached at the time of
purchase.
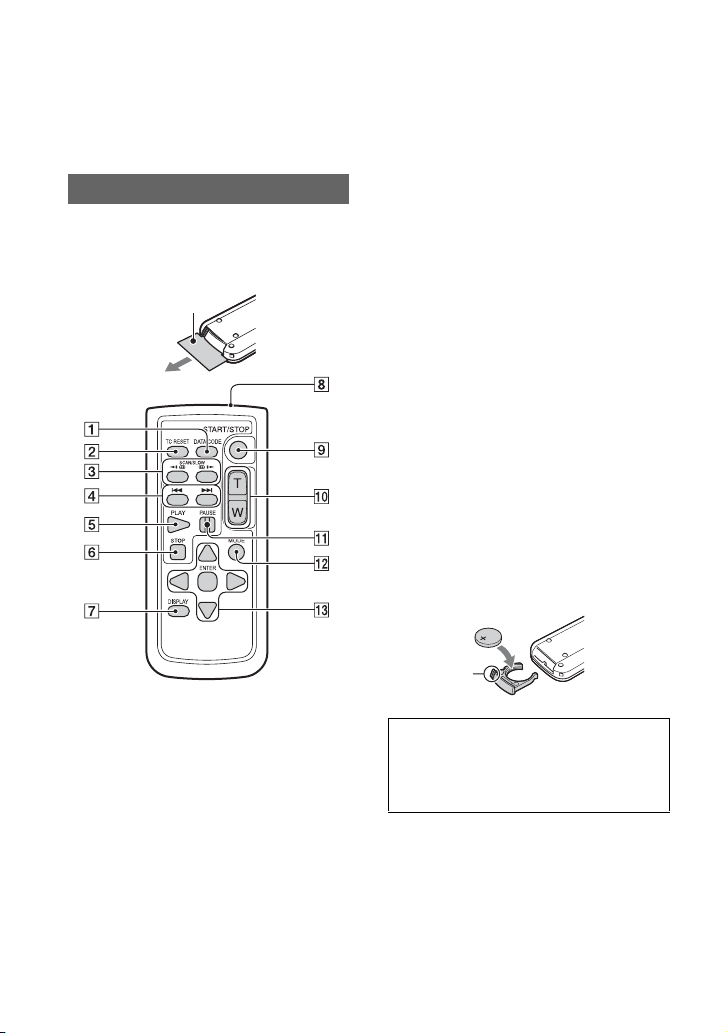
Wireless Remote Commander
The numbers in ( ) are reference pages.
Remove the insulation sheet before using
the Wireless Remote Commander.
Insulation sheet
A DATA CODE button (p. 96)
B TC RESET button (p. 90)
C SCAN/SLOW buttons (p. 93)
D . > (PREV/NEXT) buttons
(p. 93)
E PLAY button (p. 93)
F STOP button (p. 93)
G DISPLAY button (p. 96)
H Transmitter
I START/STOP button (p. 38)
J Zoom buttons (p. 41)
K PAUSE button (p. 93)
10
L MODE button (p. 93)
M b/B/v/V/ENTER buttons
b Notes
• Aim the Wireless Remote Commander towards
the remote sensor to operate your camcorder.
• Point the remote sensor away from strong light
sources, such as direct sunlight or overhead
lighting. Otherwise, the Wireless Remote
Commander may not function properly.
• When you are operating with the Wireless
Remote Commander supplied with your
camcorder, your video device may also operate.
In that case, select a commander mode other
than DVD2 for your video device, or cover the
sensor of your video device with black paper.
To change the battery of the Wireless
Remote Commander
1 While pressing on the tab, inset your
fingernail into the slit to pull out the
battery case.
2 Place a new battery with the + side
facing up.
3 Insert the battery case back into the
Wireless Remote Commander until it
clicks.
Tab
WARNING
Battery may explode if mistreated. Do not
recharge, disassemble or dispose of in
fire.
• When the lithium battery becomes weak, the
operating distance of the Wireless Remote
Commander may shorten, or the Wireless
Remote Commander may not function properly.
In this case, replace the battery with a Sony
CR2025 lithium battery. Use of another battery
may present a risk of fire or explosion.
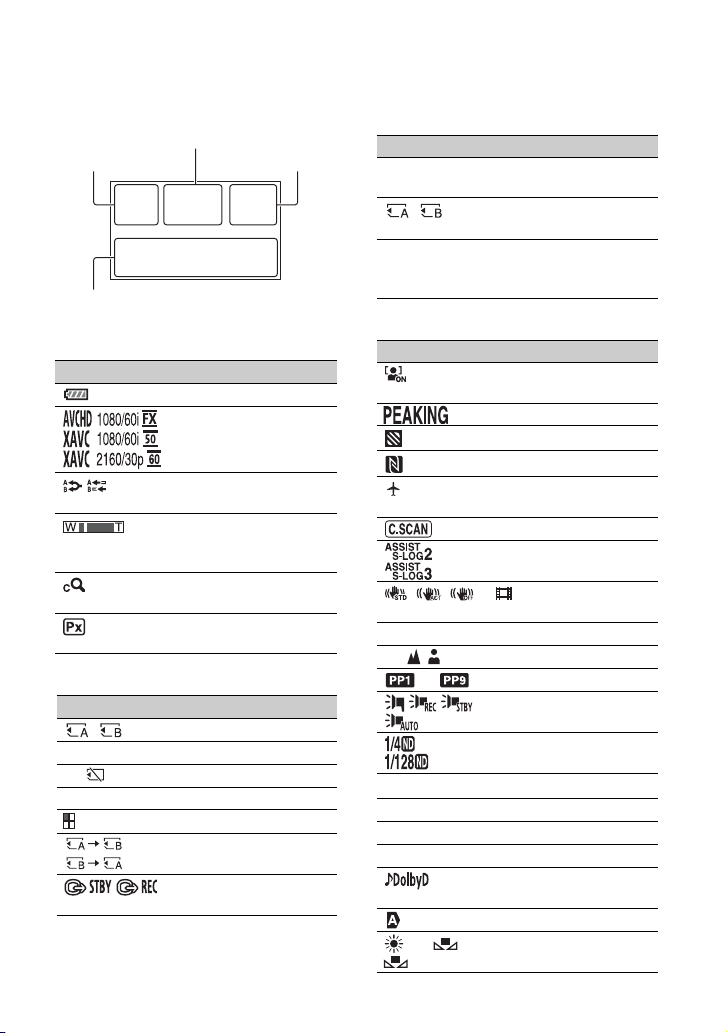
Screen indicators
The numbers in ( ) are reference pages.
Upper left Upper right
Bottom
Center
Upper left
Indicator Meaning
100% Remaining battery
REC FORMAT (p. 46)
SIMUL/RELAY REC
(p. 39, 40)
Zxx
× xx Clear Image Zoom
Optical zoom (BAR)
(p. 133)
Optical zoom (NUMBER)
(p. 124)
PROXY REC MODE
[ON] (p. 47)
Center
Indicator Meaning
Memory card (p. 36)
REC STBY Recording status (p. 38)
E Warning (p. 149)
N Playback indicator (p. 93)
Processing
Relay recording (p. 39)
SDI/HDMI REC
CONTROL (p. 128)
Upper right
Indicator Meaning
0min Estimated remaining
recording time (p. 151)
Recording/playback
media (p. 36)
00:00:00:00 Time code
(hour:minute:second:
frame) (p. 135)
Bottom
Indicator Meaning
Face detection [ON]
(p. 45)
PEAKING (p. 131)
ZEBRA (p. 131)
NFC active (p. 66)
AIRPLANE MODE
(p. 74)
CENTER SCAN (p. 123)
Gamma display assist
(p. 89)
STEADYSHOT
(p. 124)
–2.0EV AE SHIFT (p. 123)
9 Manual focus (p. 42)
to Picture profile (p. 81)
Multi-interface shoe
video light (p. 125)
to ND filter (p. 51)
F5.6 Iris (p. 48)
ISO800 ISO sensitivity (p. 49)
9dB Gain (p. 49)
100 180° Shutter speed (p. 49)
AVCHD AUDIO
FORMAT (p. 128)
Auto setting (p. 48)
n A B White balance (p. 52)
Continued ,
11

Screen indicators (continued)
Indicator Meaning
HISTOGRAM (p. 131)
AUDIO LEVEL
DISPLAY (p. 133)
Manual volume
adjustment (p. 63)
z Tip
• Indicators may look different or appear at
different positions.
Data code during recording
For AVCHD, the recording date, time, and
shooting conditions are recorded
automatically.
They are not displayed while recording.
However, you can check them by selecting
the data to display using (DISPLAY
SET) t [DATA CODE] (p. 134) or by
pressing an ASSIGN button assigned with
the DATA CODE function.
12

Table of Contents
Read this first ...........................................................................................2
Identifying parts and controls ...................................................................5
Body ..................................................................................................... 5
LCD screen .......................................................................................... 9
Lens (PXW-FS5K only) ......................................................................... 9
Grip ...................................................................................................... 9
Wireless Remote Commander ........................................................... 10
Screen indicators ....................................................................................11
Getting Started
Step 1: Checking supplied items ............................................................17
Step 2: Using a battery pack or AC adaptor ...........................................19
Step 3: Attaching the lens ......................................................................21
Step 4: Attaching the handle, accessory shoe, microphone, LCD screen,
and grip .........................................................................................24
Step 5: Turning on the camcorder and setting the date and time ..........31
Step 6: Adjusting the LCD screen and viewfinder ..................................32
Step 7: Adjusting the angle of the grip ...................................................34
Step 8: Inserting a memory card ............................................................36
Recording
Table of Contents
Recording ...............................................................................................38
Recording .......................................................................................... 38
Continuous recording on the memory cards (Relay Rec) .................. 39
Recording movies using both memory card A and B (Simul Rec) .... 40
Changing the setting of the START/STOP button and handle record
button ................................................................................................. 40
Adjusting the zoom ............................................................................ 41
Adjusting the focus .................................................................................42
Using automatic focus/fixed focus temporarily (push auto focus/
focus hold) ......................................................................................... 43
Using the focus magnifier .................................................................. 44
Focusing on a detected face (Face detection) .................................. 45
Changing the recording setting/image size ............................................46
Selecting the file format and recording format ................................... 46
Proxy recording .................................................................................. 47
Adjusting the brightness .........................................................................48
Adjusting the iris ................................................................................ 48
Adjusting the ISO sensitivity/gain ...................................................... 49
Adjusting the shutter speed ............................................................... 49
To adjust the amount of light (ND filter) ............................................. 51
Continued ,
13

Table of Contents (continued)
Adjusting the color tone .........................................................................52
Adjusting the white balance ...............................................................52
Adjusting the black balance ............................................................... 53
Using Direct Menu .................................................................................54
Slow & Quick Motion /Super Slow Motion recording .............................. 56
Slow & Quick Motion recording .......................................................... 56
Recording in Super Slow Motion ........................................................58
Audio setup ............................................................................................61
Recording sound from the internal microphone ................................. 61
Recording sound from an external audio device ...............................62
Recording with a Multi-Interface Shoe-compatible microphone
(sold separately) ................................................................................. 62
Adjusting the audio recording level ................................................... 63
Assigning functions to the ASSIGN buttons/dial ....................................63
Using the Wi-Fi function .........................................................................65
What you can do with the Wi-Fi function of the camcorder ................ 65
Downloading “Content Browser Mobile” ............................................ 66
Connecting the camcorder to an Android smartphone equipped with
the NFC function using One-touch connection .................................. 66
Using a smartphone as a camcorder remote control ........................ 67
Connecting without using the NFC function (Android) ....................... 68
Connecting without using the NFC function (iPhone/iPad) ................69
Using network functions .........................................................................70
Configuring a wireless LAN ................................................................ 70
Using airplane mode .......................................................................... 74
Configuring a wired LAN .................................................................... 75
Using the streaming function (STREAMING) ..................................... 75
Using the FTP transfer function .......................................................... 77
Importing a root certificate ................................................................. 79
Resetting network settings ................................................................. 80
Useful functions .....................................................................................81
Selecting suitable settings automatically (full auto mode setting) ..... 81
Customizing the picture quality (Picture profile) ................................ 81
Using the gamma display assist function .......................................... 89
Setting time data ................................................................................ 90
Preventing accidental operation (HOLD switch) ................................ 91
Reviewing the most recently recorded scene
(Last Scene Review) ........................................................................... 91
Inverting the LCD screen display ....................................................... 92
14

Playback
Playback .................................................................................................93
Playback ............................................................................................ 93
Changing/checking the settings in your camcorder ................................96
Changing the screen display ............................................................. 96
Displaying recording data (Data code) ............................................. 96
Checking the camcorder settings (Status check) .............................. 97
Connecting to a monitor or a TV ............................................................98
Selecting jacks for external output ..................................................... 99
Output signal formats ......................................................................... 99
Editing
Protecting recorded movies (Protect) ...................................................108
Dividing a movie ...................................................................................108
Deleting movies ....................................................................................109
Formatting a memory card ...................................................................110
Preventing data on a memory card from being recovered ...................111
Repairing the image database file ........................................................112
Using the Menu
Operating the menu ..............................................................................113
Menu items ...........................................................................................115
(CAMERA/PAINT) menu ...............................................................121
Settings to adjust your camcorder to the recording conditions
(GAIN SET/ STEADYSHOT, etc.)
(REC/OUT SET) menu ...................................................................126
Recording settings, input and output settings (REC SET/VIDEO OUT)
(AUDIO SET) menu .........................................................................128
Settings for audio recording (AVCHD AUDIO FORMAT/XLR SET, etc.)
(DISPLAY SET) menu ....................................................................131
Display settings (MARKER/DISPLAY OUTPUT, etc.)
(TC/UB SET) menu ........................................................................135
Time code settings (TC PRESET/UB PRESET/TC FORMAT, etc.)
(NETWORK SET) menu .................................................................137
Settings for the Wi-Fi function (CTRL W/SMARTPHONE, etc.)
(SYSTEM) menu ............................................................................137
Settings while recording or other basic settings (AREA SET/BEEP, etc.)
Table of Contents
Continued ,
15

Table of Contents (continued)
Troubleshooting
Troubleshooting ...................................................................................141
Warning indicators and messages .......................................................149
Additional Information
Recording time .....................................................................................151
Function limitations when recording ..................................................... 153
Proxy recording supported formats ......................................................155
Streaming supported formats ............................................................... 156
Using your camcorder abroad .............................................................. 157
File/folder structure on the memory card .............................................158
Maintenance and precautions ..............................................................159
Specifications .......................................................................................164
Index .................................................................................................... 167
Recording format limitations ............................................................. 153
Slow & Quick Motion and Super Slow Motion limitations ................. 154
About the XAVC format .................................................................... 159
About the AVCHD format ................................................................. 159
About memory cards ........................................................................ 159
About the battery pack ..................................................................... 160
About handling of your camcorder .................................................. 161
16
Getting Started
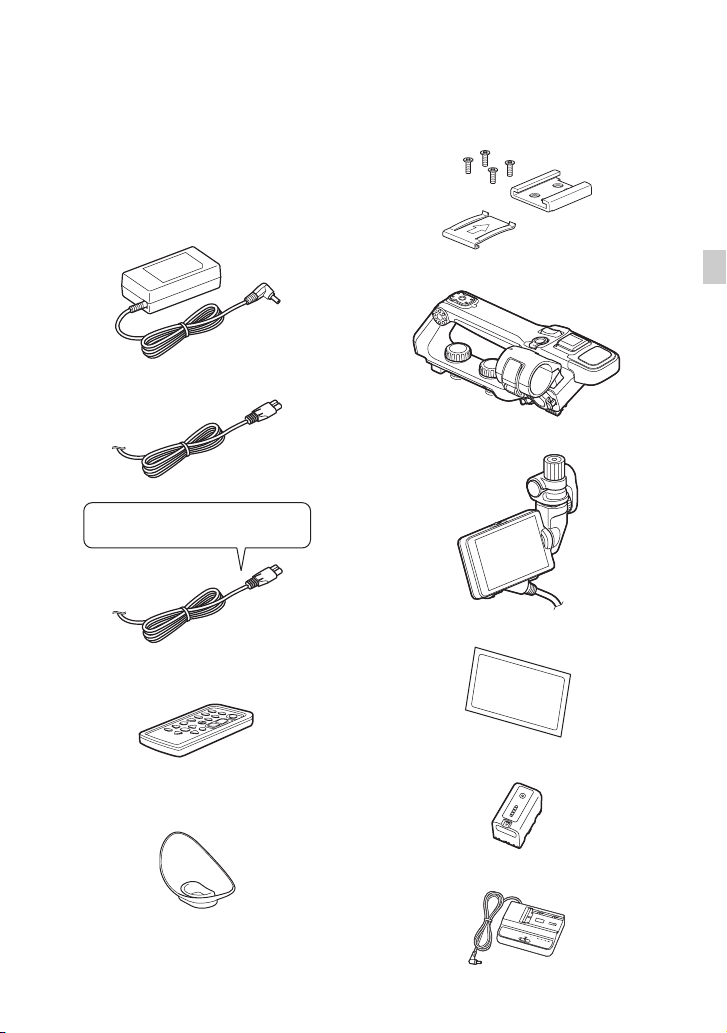
Step 1: Checking supplied items
Make sure that you have following items
supplied with your camcorder. If, for any
reason, there is something missing, contact
your Sony dealer.
The number in brackets indicates the
number of items supplied.
AC Adaptor (AC-UES1230) (p. 20)
Power cord (mains lead) [2] (p. 20)
IS1293 power cord for India.
Not supplied in some countries. [2]
Wireless Remote Commander (RMT-845)
(p. 10)
Accessory shoe kit (Accessory shoe,
Accessory shoe plate, screws [4]) (p. 25)
XLR handle (p. 24)
LCD screen (p. 27)
LCD screen protective sheet (p. 27)
Getting Started
A button-type lithium battery is already installed.
Large eyecup (p. 34)
Rechargeable battery pack (BP-U30)
Battery charger (BC-U1)
Continued ,
17
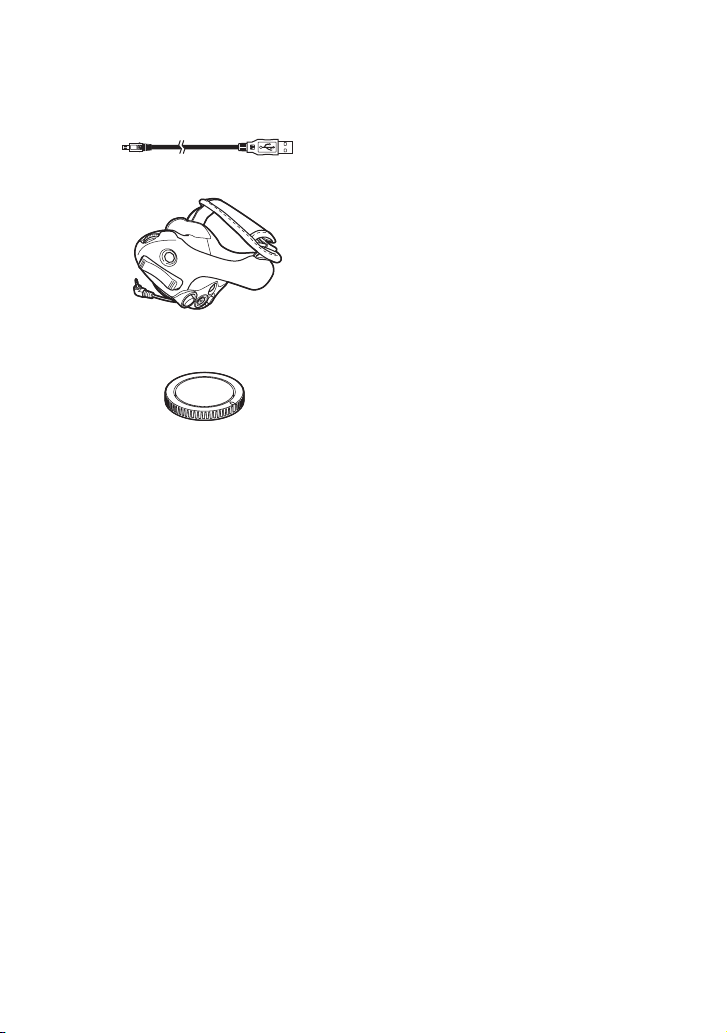
Step 1: Checking supplied items (continued)
USB cable
Grip (p. 29)
Body cap (attached to the camcorder)
(p. 21)
Handle connector protective cap (attached
to the camcorder)
Grip attachment point cover (attached to
the camcorder)
“Manuals for Solid-State Memory
Camcorder” CD-ROM
Operating Guide [2]
A lens and lens hood are supplied with the
PXW-FS5K.
Software Downloads
When the unit is used with a PC
connection, download any device drivers,
plug-ins, and application software you
require from the following websites.
Sony Professional products website:
U.S.A. http://pro.sony.com
Canada http://www.sonybiz.ca
Latin America
http://sonypro-latin.com
Europe, Middle East and Africa
http://www.pro.sony.eu
Japan http://www.sonybsc.com
Asia Pacific
http://pro.sony-asia.com
Korea http://bp.sony.co.kr
China http://pro.sony.com.cn
Although the data regarding recorded
materials are stored over multiple files and
folders, you can easily handle the clips
without considering the data and directory
structure, by using the dedicated application
software.
18
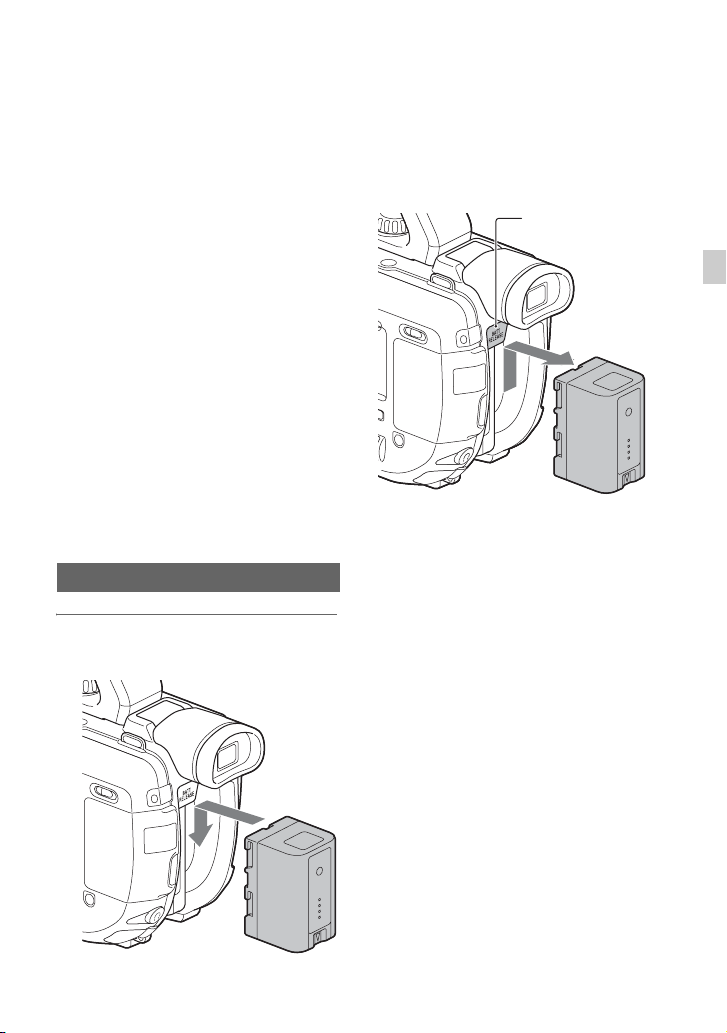
Step 2: Using a battery pack or AC adaptor
The camcorder can be powered by a battery
pack or via an AC Adaptor.
For safety, do not use power sources other
than genuine Sony battery packs.
Lithium-ion battery packs
BP-U30
BP-U60
BP-U60T
BP-U90
Battery charger
BC-U1
BC-U2
AC Adaptor (supplied)
AC-UES1230
b Notes
• Do not place the battery pack in hot locations,
such as in direct sunlight or near naked flames.
• The BC-U1/BC-U2 battery charger cannot be
used as an external power source for the
camcorder.
• Use the supplied AC Adaptor to power the
camcorder from a power outlet.
Using a battery pack
1 Push the battery in and slide it
down into position.
To remove the battery pack
Set the ON/STANDBY switch to
STANDBY (
Press and hold the BATT RELEASE
button, and slide the battery up and out.
1
).
BATT RELEASE
button
On the battery pack
• Always set the ON/STANDBY switch to
STANDBY (1) before changing the battery
pack.
• The Battery Info may not be correctly displayed
under the following conditions.
– The battery pack is not attached correctly.
– The battery pack is damaged.
– The battery pack is worn out.
Getting Started
Continued ,
19
Step 2: Using a battery pack or AC adaptor (continued)
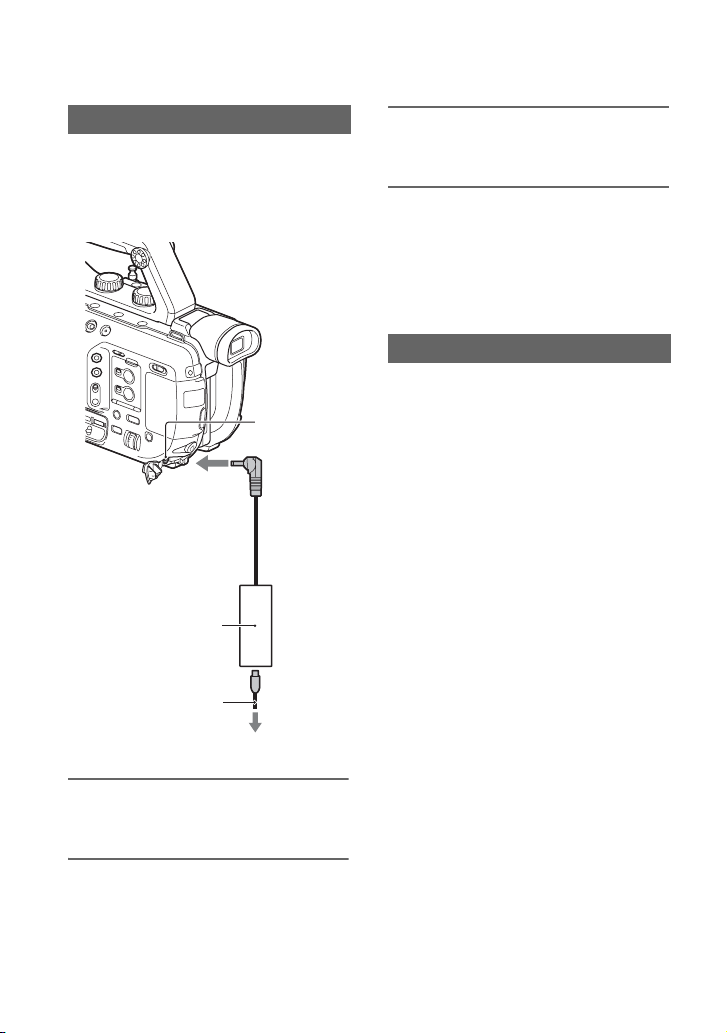
Using a power outlet
You can use the AC Adaptor to power the
camcorder from a power outlet. While you
are using the AC Adaptor, the battery pack
will not lose its charge even when it is
attached to your camcorder.
DC IN jack
DC plug
AC Adaptor
3 Connect the power cord to the
power outlet (wall socket).
b Notes
• Do not short-circuit the DC plug of the AC
Adaptor or battery terminal with any metallic
objects. This may cause a malfunction.
• The attached battery pack cannot be charged
while the AC Adaptor is connected.
Charging the battery pack
The battery pack can be charged using the
BC-U1 battery charger.
For details about charging, refer to the
manual for the battery charger.
b Note
• Even if the CHG lamp is not lit, the battery
charger is not disconnected from the AC power
source (mains) as long as it is connected to the
wall outlet (wall socket).
Power cord
(mains lead)
To the wall outlet
1 Connect the power cord to the AC
Adaptor.
2 Connect the AC Adaptor to the
DC IN jack of your camcorder.
20
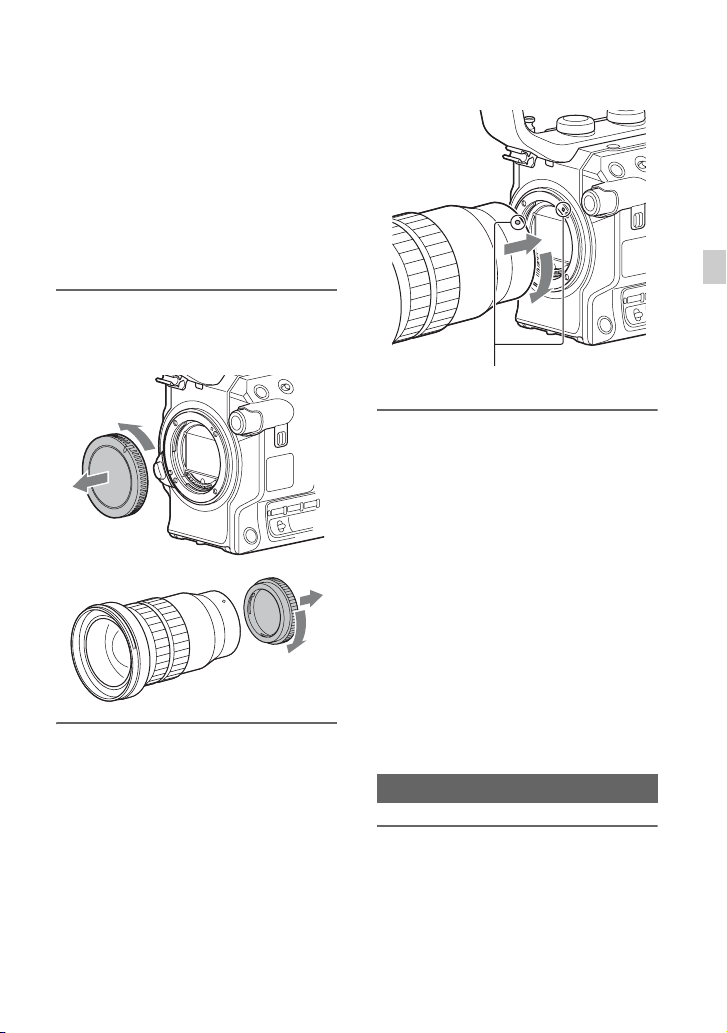
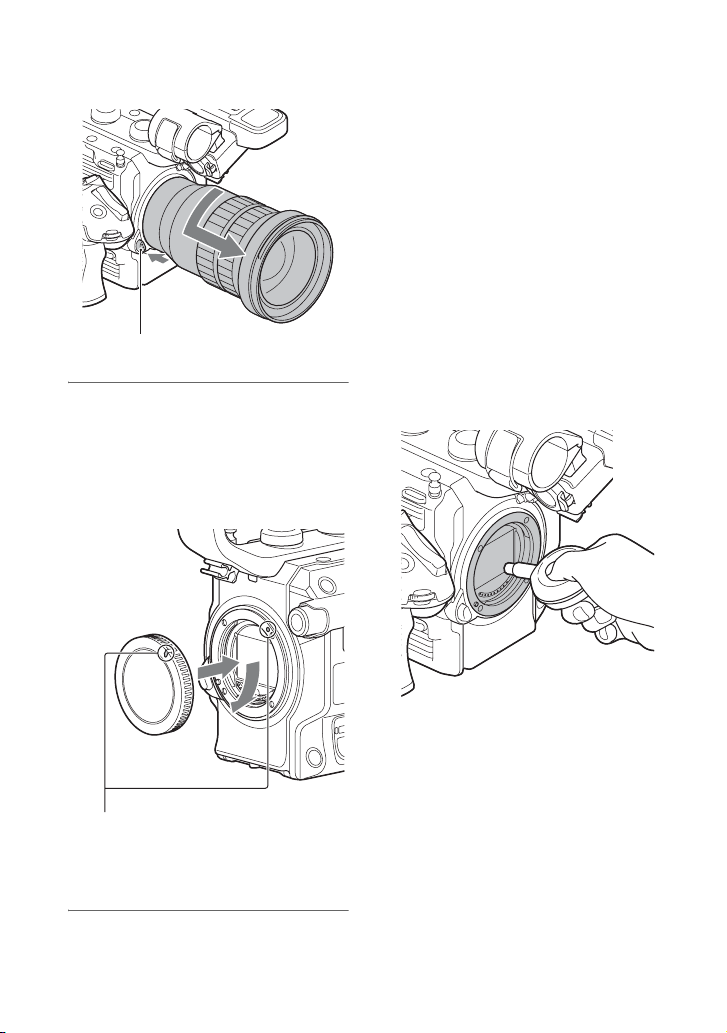
Step 3: Attaching the lens
This manual explains how to attach an
SELP18105G lens.
For details about using other lenses, refer to
the manual supplied with your lens.
Hold the camcorder body with the front end
downward, and quickly change the lens
somewhere away from dusty locations so as
to keep dust or debris from getting inside
the camcorder body.
1 Remove the body cap from the
camcorder body and the rear lens
cap from the lens.
2 Mount the lens by aligning the
mounting indexes (white) on the
lens and the camcorder body.
While pushing the lens lightly
toward the camcorder body, turn
the lens clockwise.
The lens is attached when it clicks into
the locked position.
Mounting indexes (white)
b Notes
• When attaching a lens, do not press the lens
release button.
• Attach the lens to the camcorder squarely,
without excessive force. Mounting the lens
forcibly may result in a malfunction or damage
of the lens mount and ND filter.
• There may be slight lens backlash when the lens
is attached, depending on the lens used. This is
not a fault.
• When attaching a heavy lens or a lens attached
to a tripod, attach individual tripods to the lens
and camera, as required, to maintain balance.
z Tip
• After changing the lens, it is recommended to
adjust the black balance (p. 53) before
recording. When you adjust the black balance,
make sure that the front lens cap is attached.
Removing the lens
1 While pressing the lens release
button all the way in, turn the lens
counterclockwise until it stops.
When you remove the lens, make sure
that you hold both of the lens and the
camcorder body.
Getting Started
Continued ,
21
Step 3: Attaching the lens (continued)
Lens release button
2 Replace the rear lens cap on the
lens and attach the body cap to
the camcorder body.
Align the mark on the body cap to the
mounting index, and turn the cap
clockwise.
b Notes
• When changing the lens, if dust or debris
adheres to the glass surface of the mount, it may
appear on the image, depending on the shooting
conditions. The glass surface of the mount has
an anti-dust coating to prevent dust from
adhering to the image sensor. However, attach
or remove the lens quickly somewhere away
from dusty locations.
• Do not leave the camcorder body with the lens
or body cap removed.
If dust or debris adheres on the glass
surface of the mount
Turn off the camcorder and detach the lens.
Clean the glass surface of the mount and the
surrounding area using a blower (sold
separately), and then reattach the lens.
Align the marks.
Before you attach caps, remove dust
from them.
22
b Notes
• Do not use a spray blower because it may scatter
water droplets inside the camcorder body.
• Hold the camcorder’s face downward to prevent
the dust from resettling in the camcorder.
• If you cannot clean the glass surface of the
mount by the above procedure, consult your
Sony dealer or local authorized Sony service
facility.
Mount adaptors
Using a mount adaptor (sold separately),
you can attach an A-mount lens (sold
separately) to your camcorder. For details,
refer to the operating instructions supplied
with the mount adaptor.
The available functions differ depending on
the mount adaptor type.
LA-EA1/LA-EA3
• The autofocus function is not supported.
• The iris can be adjusted using the
ND/IRIS dial of the camcorder.
LA-EA2/LA-EA4
Function
Autofocus Continuous
AF system Phase-detection AF
AF/MF select SAM: Switchable on the lens
SSM: Switchable on the lens
and with the FOCUS switch
of the camcorder
Other lenses: Switchable with
the FOCUS switch of the
camcorder
Operations when using LA-EA2/
LA-EA4
• Aperture is set to F3.5 when you record
movies with autofocusing. When you are
using a lens with an F3.5 or smaller Fstop, aperture is set to the maximum Fstop of the lens. When you want to set
your own value for aperture, select
manual focusing. Adjusting the aperture
during recording may cause noise or turn
the LCD screen brighter.
• The iris will not adjust automatically in
movie mode.
b Notes
• Some lenses may not be usable or may have
limited functionality. Check the dedicated
support web site or consult your local
authorized Sony service facility on compatible
lenses.
• The sound of the lens and the camcorder in
operation may be recorded during movie
recording. You can avoid this by recording
without the microphone, or by setting the
AUTO/MAN (CH-1) switch or AUTO/MAN
(CH-2) switch to “MAN” and the AUDIO
LEVEL (CH-1, CH-2) dial to 0 (p. 61).
• It may take a long time or may be difficult for
the camcorder to focus, depending on the lens
used or the subject.
Getting Started
Continued ,
23
Step 3: Attaching the lens
(continued)
AF area display
When using an A-mount lens with a mount
adaptor, the camcorder displays in-focus
frames.
Autofocusing: The frame of the area that is
in focus turns green.
Manual focusing: The frame of the area that
is in focus turns green. This can assist
focusing.
When using LA-EA2/LA-EA4
Autofocusing
Manual focusing
b Note
• AF areas are not displayed during Super Slow
Motion recording.
Step 4: Attaching the handle, accessory shoe, microphone, LCD screen, and grip
Attaching the handle
1 Remove the protective cap from
the handle connector terminal.
2 Place the handle in position,
aligning the screws and
connector with the camcorder.
3 While pressing each screw down,
turn clockwise to fasten the
handle.
24
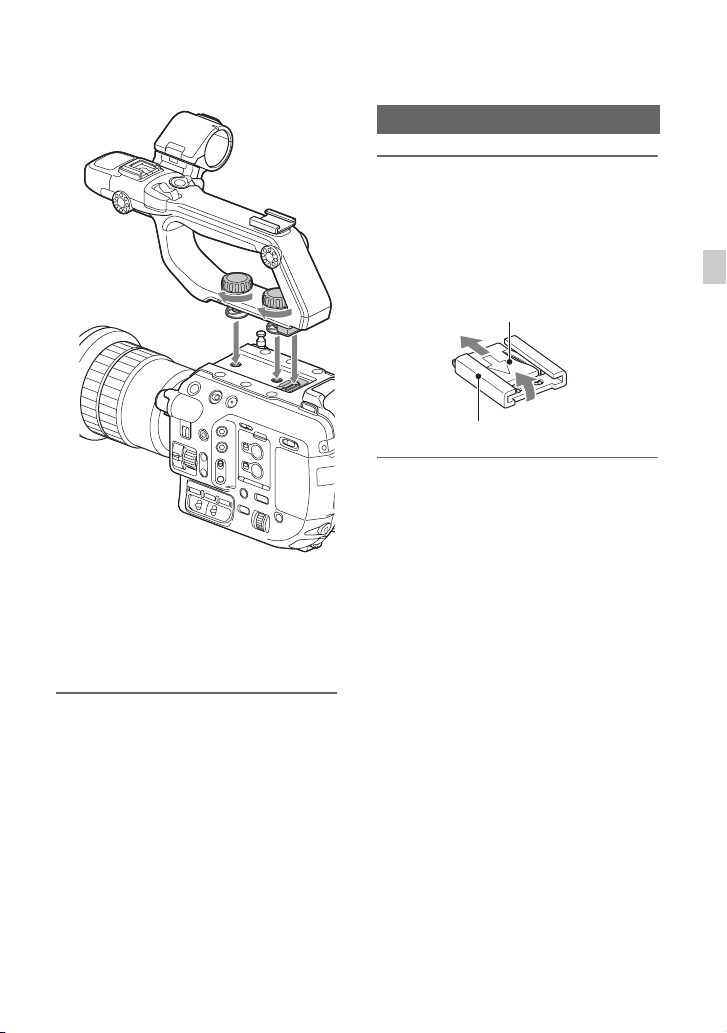
b Note
• Make sure to securely tighten both handle
mounting screws before use. The handle may
uncouple, causing the camcorder to fall, if the
unit is used without securely tightening the
screws.
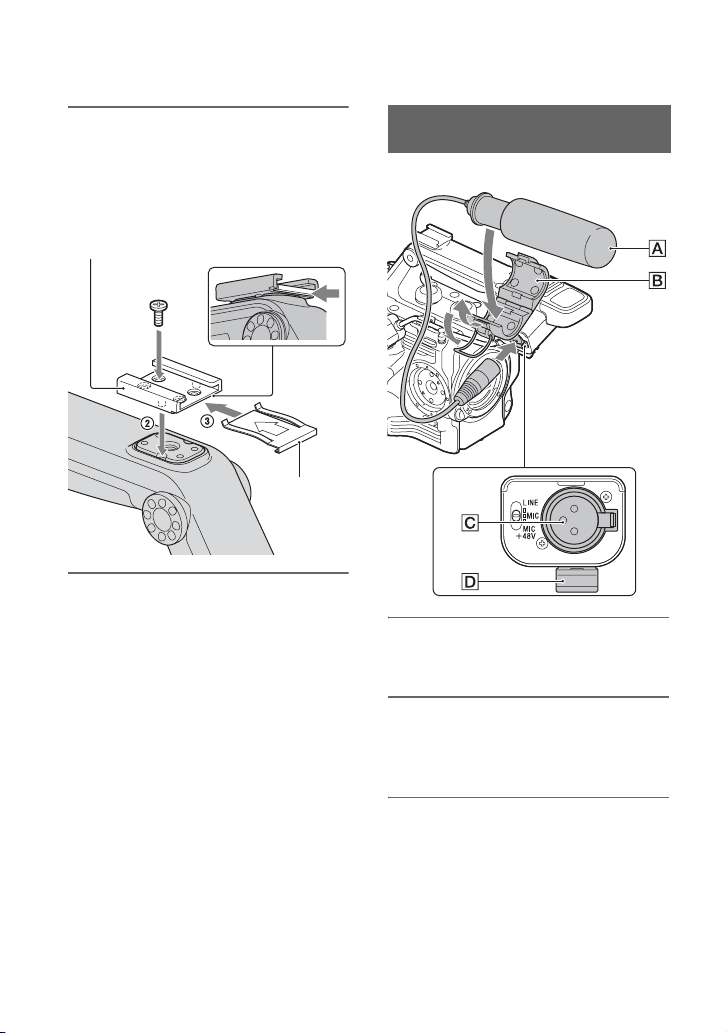
Attaching the accessory shoe
1 Lift the edge of the accessory
shoe plate and pull it in the
direction opposite to that of the
arrow on the accessory shoe
plate and remove it from the
accessory shoe.
Shoe plate
Accessory shoe
2 Place the accessory shoe with its
protrusions matching the
recesses on the accessory shoe
mount, then fix it to the mount
with the four screws.
Getting Started
Removing the handle
Remove the handle using the reverse
procedure for attaching.
b Note
• When using the camcorder with the handle
removed, attach the protective cap to the
connector terminal to protect the connector.
Continued ,
25
Step 4: Attaching the handle, accessory shoe, microphone, LCD screen,
and grip (continued)
3 Insert the accessory shoe plate in
the direction of the arrow on the
plate surface until the end of the
plate engages the end of the
shoe.
Accessory shoe
Shoe plate
To remove the accessory shoe
Remove the shoe plate in the same way as
described in step 1 of “Attaching the
accessory shoe”.
Attaching the microphone (sold
separately)
Attach the microphone holder to the handle.
1 Place the microphone A into the
microphone holder B.
26
2 Connect the plug of the
microphone to the INPUT 1 or
INPUT 2 jack C.
3 Place the microphone cable into
the cable holder D.
z Tips
• If the microphone cannot be attached securely,
use the spacer supplied with the microphone.
• The tip of the microphone may appear in the
picture, depending on the type of lens that is
attached. Adjust the position of the microphone.
Put the cable in the outer cable holder.
Attaching the LCD screen
1 Insert the LCD screen mounting
clamp into the LCD screen
attachment point on the handle.
2 Turn the screw clockwise to
fasten the clamp.
The mounting clamp can be secured at
45° increments, although it is
recommended that the clamp be
positioned directly above the screw.
Screw
LCD screen mounting clamp
3 Attach the supplied protective
sheet to the LCD screen as shown
in the diagram.
b Note
• Wipe the LCD screen to remove any smudges or
dust before attaching the protective sheet.
z Tips
• When peeling the protective sheet off the LCD
screen, it is recommended to use cellophane
tape to help peel off the sheet.
• Small air bubbles may disappear naturally if left
overnight.
Getting Started
4 Attach the LCD screen to the LCD
screen mounting clamp.
Continued ,
27
Step 4: Attaching the handle, accessory shoe, microphone, LCD screen,
and grip (continued)
5 Turn the lock knob clockwise to
secure the LCD screen.
b Note
• Securely tighten the LCD screen knob before
use. The LCD screen may fall off if the unit is
used without securely tightening the knob.
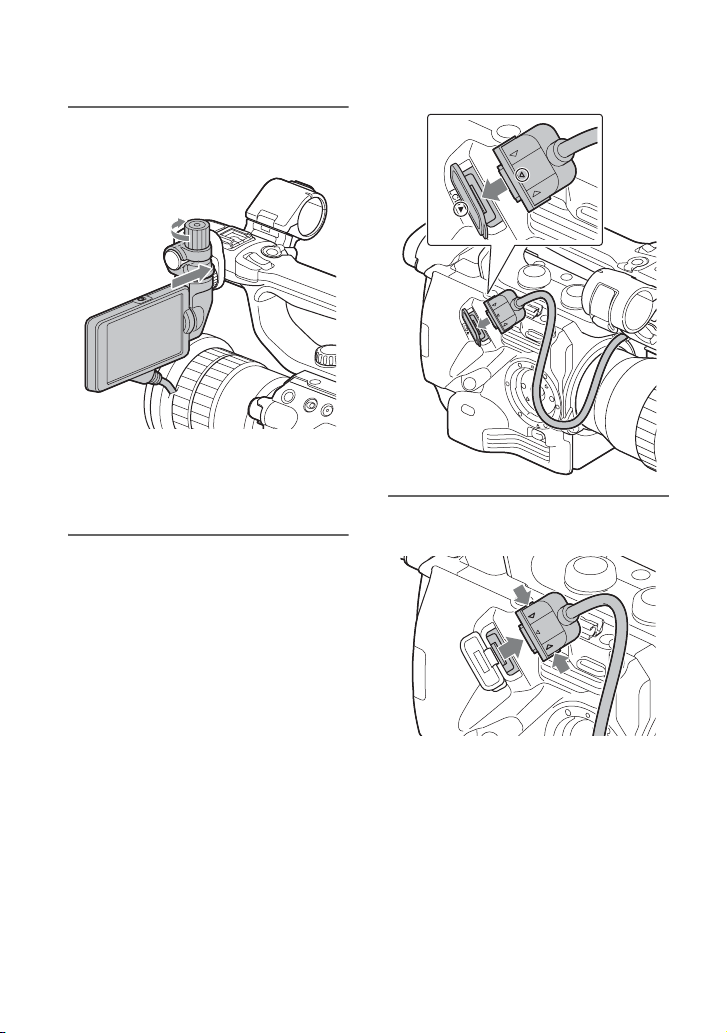
To remove the cable
6 Align the “LCDv” mark on the
camcorder with the “V” mark on
the LCD screen connection jack,
and plug in the cable.
Check the cable orientation to make
sure the V faces outwards, and then
insert the cable.
28
Press both sides (B and b) of the LCD
screen connection jack, and then remove
the connector.
To change the angle of the LCD screen
See “Step 6: Adjusting the LCD screen and
viewfinder” (p. 32).
To attach the LCD screen to different
positions on the handle
There are also LCD screen attachment
points on the back of the handle (2
locations). The attachment procedure is the
same as described in “Attaching the LCD
screen”.
Removing the LCD screen
Remove the LCD screen using the reverse
procedure of attaching.
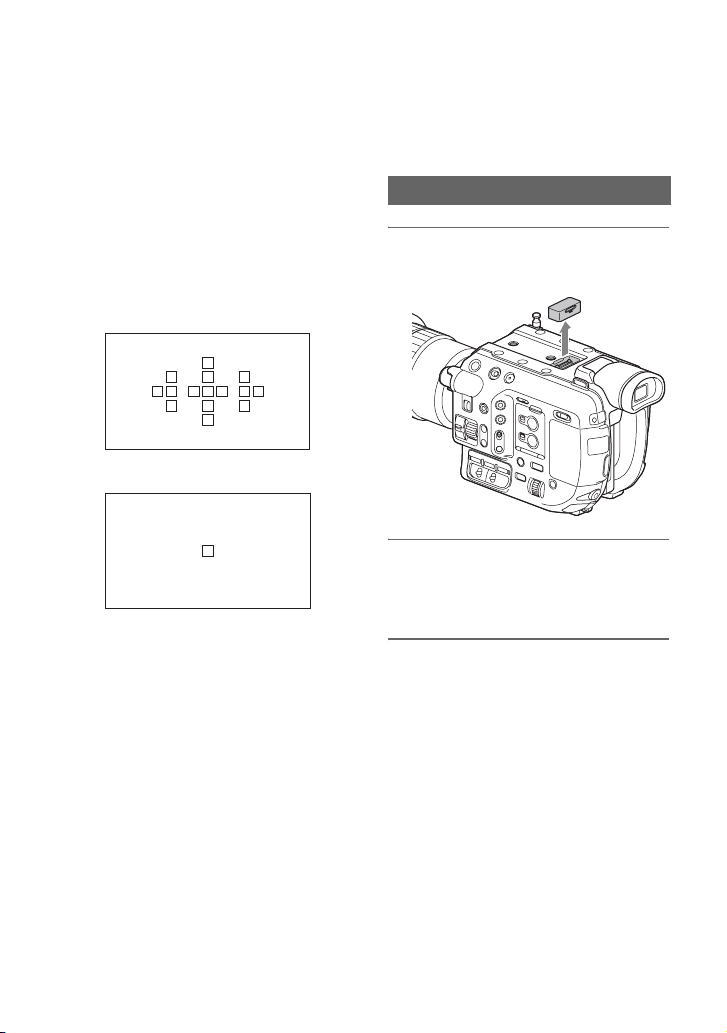
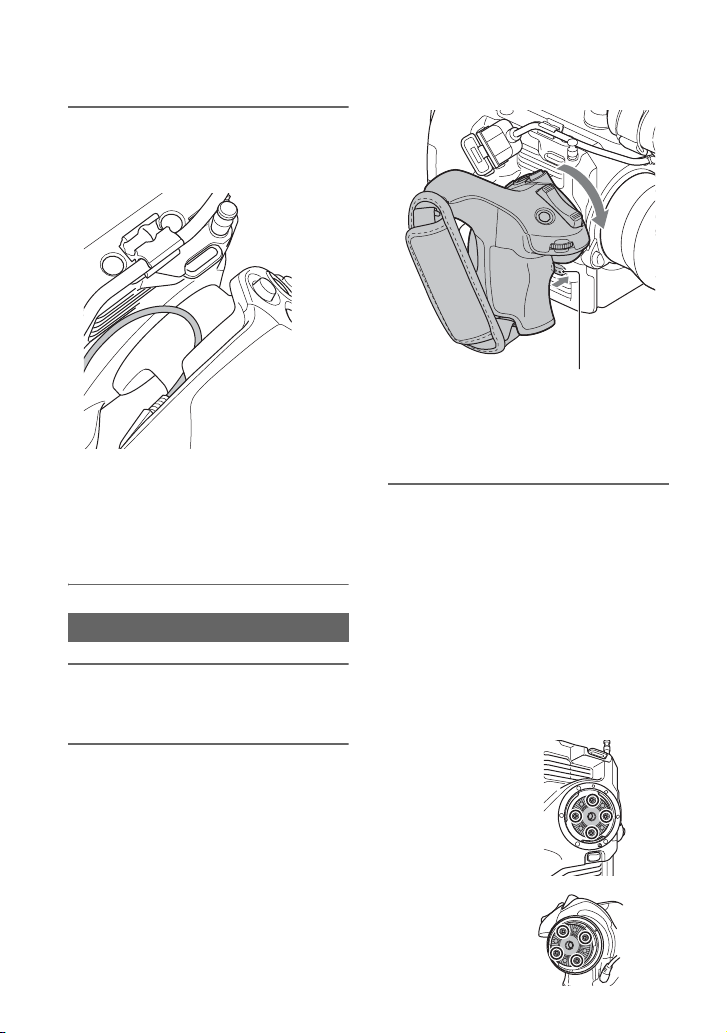
Attaching the grip
2 Connect the cable to the REMOTE
jack.
Getting Started
3 Align the grip mounting index
with the attachment point index
on the camcorder, and turn the
grip counterclockwise gently.
Indexes
1 Remove the grip attachment
cover.
The grip is attached when it clicks into
the locked position.
b Note
• If the grip does not attach correctly, try to
attach the grip again without using
excessive force.
Continued ,
29
Step 4: Attaching the handle, accessory shoe, microphone, LCD screen,
and grip (continued)
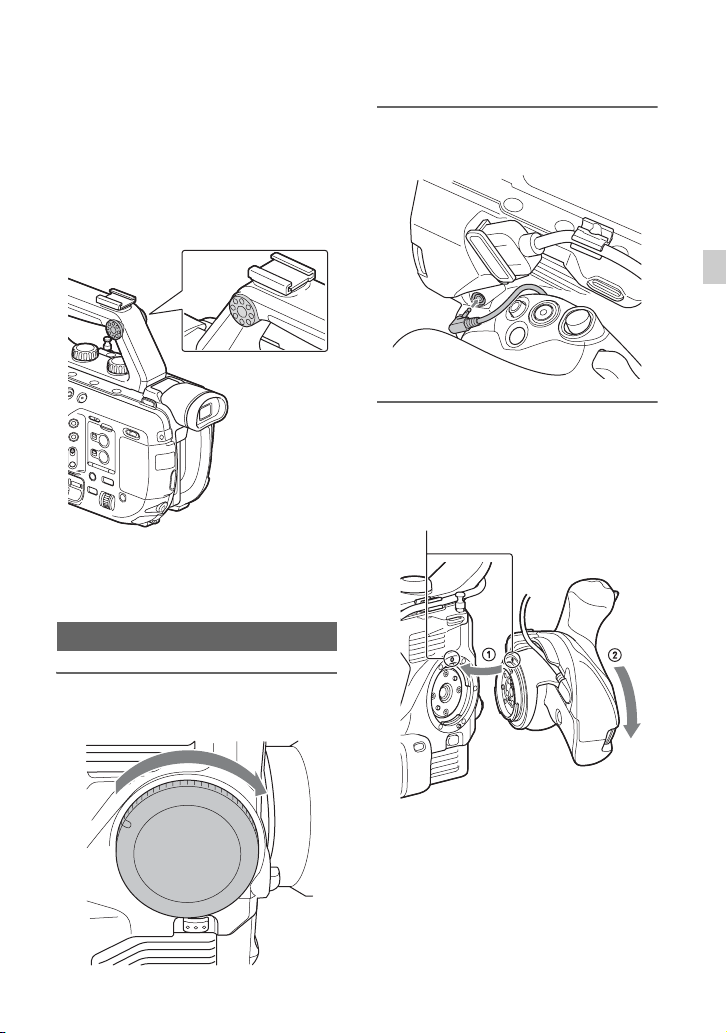
4 Insert the cable connected in
step 2 into the slot on the side of
the grip as shown in the diagram.
Grip release button
b Note
• Always place the camcorder on a desk or other
b Note
• If the cable is not inserted in the slot, undue
force may be applied to the cable when
changing the mounting angle of the grip or
the cable may become snagged in the
rotation mechanism.
Removing the grip
1 Disconnect the cable from the
REMOTE connector.
horizontal surface when removing the grip.
z Tip
• You can attach rosettes to the grip attachment
point on the camcorder and to the mounting
point on the grip.
Rosette mount components are available from
Sony dealers or service representatives.
– Camcorder side: 4-546-932 (sold separately)
– Grips side: 4-547-089 (sold separately)
– Mounting screws: 7-627-556 (sold
separately)*
* 4 screws/rosette are required.
(screw holes indicated by a in the
following diagram)
2 Press and hold the grip release
button on the camcorder, and
turn the grip clockwise until it
detaches.
30
Camcorder side
Grip side
 Loading...