

Page 1
4-539-415-21(1)
Home Audio System
Système audio maison
Operating Instructions GB
Mode d’emploi FR
MHC-ECL99BT/MHC-ECL77BT
Page 2

WARNING
To reduce the risk of fire or electric
shock, do not expose this apparatus to
rain or moisture.
To reduce the risk of fire, do not cover the
ventilation opening of the appliance with
newspapers, tablecloths, curtains, etc.
Do not expose the appliance to naked
flame sources (for example, lighted
candles).
To reduce the risk of fire or electric shock,
do not expose this appliance to dripping
or splashing, and do not place objects
filled with liquids, such as vases, on the
appliance.
Do not install the appliance in a confined
space, such as a bookcase or built-in
cabinet.
As the main plug is used to disconnect
the unit from the mains, connect the unit
to an easily accessible AC outlet. Should
you notice an abnormality in the unit,
disconnect the main plug from the AC
outlet immediately.
Do not expose batteries or appliances
with battery-installed to excessive heat,
such as sunshine and fire.
The unit is not disconnected from the
mains as long as it is connected to the
AC outlet, even if the unit itself has been
turned off.
CAUTION
The use of optical instruments with this
product will increase eye hazard.
Notice for the customers in the USA
Owner’s Record
The model and serial numbers are
located on the rear of the unit. Record
these numbers in the space provided
below. Refer to them whenever you call
upon your Sony dealer regarding this
product.
Model No.
Serial No.
Important Safety Instructions
1) Read these instructions.
2) Keep these instructions.
3) Heed all warnings.
4) Follow all instructions.
5) Do not use this apparatus near water.
6) Clean only with dry cloth.
7) Do not block any ventilation
openings. Install in accordance with
the manufacturer’s instructions.
8) Do not install near any heat sources
such as radiators, heat registers,
stoves, or other apparatus (including
amplifiers) that produce heat.
9) Do not defeat the safety purpose
of the polarized or grounding-type
plug. A polarized plug has two
blades with one wider than the
other. A grounding type plug has
two blades and a third grounding
prong. The wide blade or the third
prong are provided for your safety.
If the provided plug does not fit into
your outlet, consult an electrician for
replacement of the obsolete outlet.
10) Protect the power cord from being
walked on or pinched particularly at
plugs, convenience receptacles, and
the point where they exit from the
apparatus.
11) Only use attachments/accessories
specified by the manufacturer.
12) Use only with the cart,
stand, tripod, bracket,
or table specified by
the manufacturer, or
sold with the apparatus.
When a cart is used, use caution
when moving the cart/apparatus
combination to avoid injury from tipover.
GB
2
Page 3

13) Unplug this apparatus during
lightning storms or when unused for
long periods of time.
14) Refer all servicing to qualified service
personnel. Servicing is required when
the apparatus has been damaged in
any way, such as power-supply cord
or plug is damaged, liquid has been
spilled or objects have fallen into the
apparatus, the apparatus has been
exposed to rain or moisture, does
not operate normally, or has been
dropped.
This symbol is intended
to alert the user to the
presence of uninsulated
“dangerous voltage”
within the product’s
enclosure that may be of
sufficient magnitude to
constitute a risk of electric
shock to persons.
This symbol is intended
to alert the user
to the presence of
important operating and
maintenance (servicing)
instructions in the
literature accompanying
the appliance.
The following FCC statement applies
only to the version of this model
manufactured for sale in the USA.
Other versions may not comply with
FCC technical regulations.
NOTE:
This equipment has been tested and
found to comply with the limits for
a Class B digital device, pursuant to
Part 15 of the FCC Rules. These limits
are designed to provide reasonable
protection against harmful interference
in a residential installation. This
equipment generates, uses and can
radiate radio frequency energy and, if
not installed and used in accordance
with the instructions, may cause harmful
interference to radio communications.
However, there is no guarantee that
interference will not occur in a particular
installation. If this equipment does
cause harmful interference to radio
or television reception, which can be
determined by turning the equipment off
and on, the user is encouraged to try to
correct the interference by one or more
of the following measures:
Reorient or relocate the receiving
antenna.
Incr
ease the separation between the
equipment and receiver.
Connect the equipment into an outlet
on a circuit different from that to
which the receiver is connected.
Consult the dealer or an experienced
radio/TV technician for help.
CAUTION
You are cautioned that any changes or
modifications not expressly approved in
this manual could void your authority to
operate this equipment.
Properly shielded and grounded cables
and connectors must be used for
connection to host computers and/
or peripherals in order to meet FCC
emission limits.
This equipment must not be co-located
or operated in conjunction with any other
antenna or transmitter.
This equipment complies with FCC
radiation exposure limits set forth for an
uncontrolled environment and meets
the FCC radio frequency (RF) Exposure
Guidelines. This equipment has very low
levels of RF energy that it deemed to
comply without maximum permissive
exposure evaluation (MPE). But it is
desirable that it should be installed and
operated keeping the radiator at least
20cm or more away from person’s body
(excluding extremities: hands, wrists, feet
and ankles).
GB
GB
3
Page 4

For customers in Canada
This equipment complies with Industry
Canada licence-exempt RSS standard(s).
Operation is subject to the following two
conditions:
(1) this equipment may not cause
interference, and
(2) this equipment must accept any
interference, including interference
that may cause undesired operation
of the equipment.
This equipment complies with IC
radiation exposure limits set forth for an
uncontrolled environment and meets
RSS-102 of the IC radio frequency (RF)
Exposure rules.
This equipment has very low levels of
RF energy that it deemed to comply
without maximum permissive exposure
evaluation (MPE). But it is desirable
that it should be installed and operated
keeping the radiator at least 20 cm
or more away from person’s body
(excluding extremities: hands, wrists, feet
and ankles).
Disposal of waste batteries and
electrical and electronic equipment
(applicable in the European Union
and other European countries with
separate collection systems)
This symbol on the product,
the battery or on the
packaging indicates that the
product and the battery shall
not be treated as household
waste. On certain batteries
this symbol might be used in
combination with a chemical symbol. The
chemical symbols for mercury (Hg) or
lead (Pb) are added if the battery
contains more than 0.0005% mercury or
0.004% lead. By ensuring these products
and batteries are disposed of correctly,
you will help prevent potentially negative
consequences for the environment and
human health which could otherwise be
caused by inappropriate waste handling.
The recycling of the materials will help to
conserve natural resources.
In case of products that for safety,
performance or data integrity reasons
require a permanent connection with an
incorporated battery, this battery should
be replaced by qualified service staff
only. To ensure that the battery and the
electrical and electronic equipment will
be treated properly, hand over these
products at end-of-life to the applicable
collection point for the recycling of
electrical and electronic equipment.
For all other batteries, please view the
section on how to remove the battery
from the product safely. Hand the battery
over to the applicable collection point for
the recycling of waste batteries. For more
detailed information about recycling of
this product or battery, please contact
your local Civic Office, your household
waste disposal service or the shop where
you purchased the product or battery.
Notice for customers: the following
information is only applicable
to equipment sold in countries
applying EU directives.
This product has been manufactured by
or on behalf of Sony Corporation, 1-7-1
Konan Minato-ku Tokyo, 108-0075 Japan.
Inquiries related to product compliance
based on European Union legislation
shall be addressed to the authorized
representative, Sony Deutschland GmbH,
Hedelfinger Strasse 61, 70327 Stuttgart,
Germany. For any service or guarantee
matters, please refer to the addresses
provided in the separate service or
guarantee documents.
Hereby, Sony Corp., declares that this
equipment is in compliance with the
essential requirements and other
relevant provisions of Directive 1999/5/
EC.
For details, please access the following
URL:
http://www.compliance.sony.de/
GB
4
Page 5

Note on DualDiscs
A DualDisc is a two sided disc product
which mates DVD recorded material on
one side with digital audio material on
the other side. However, since the audio
material side does not conform to the
Compact Disc (CD) standard, playback on
this product is not guaranteed.
Music discs encoded with copyright
protection technologies
This product is designed to play back
discs that conform to the Compact Disc
(CD) standard. Recently, various music
discs encoded with copyright protection
technologies are marketed by some
record companies. Please be aware that
among those discs, there are some that
do not conform to the CD standard and
may not be playable by this product.
Home Audio System is designed to be
used for playing back music sources
on CDs or USB devices, transferring
music to USB devices, listening to radio
stations, and listening to music on
BLUETOOTH devices.
GB
5
Page 6

Table of Contents
Guide to parts and controls ...... 7
Getting Started
Hooking up the system
securely .................................... 10
Inserting batteries .................... 11
Setting the clock ....................... 11
About the power
management ............................ 11
Disc
Playing a CD/MP3 disc .............12
Tuner
Listening to the radio .............. 14
USB Device
Before using the USB device ....15
Transferring music from
a disc ........................................ 16
Playing a file .............................17
Other Operations
Using an optional audio
component ..............................26
Adjusting the sound ................ 26
Changing the display .............. 27
Using the timers ...................... 27
Additional Information
Information about compatible
devices ..................................... 29
Troubleshooting ......................29
Messages ................................. 34
Precautions ..............................34
Specifications ...........................36
License and Trademark
Notice ....................................... 39
BLUETOOTH Device
About the BLUETOOTH
wireless technology .................20
Listening to music wirelessly
on a BLUETOOTH device ..........20
Setting the BLUETOOTH audio
codecs ...................................... 24
Setting the BLUETOOTH
standby mode .........................24
Turning on or off
the BLUETOOTH signal ............ 25
Using “SongPal” via
BLUETOOTH ............................. 25
GB
6
Page 7

Guide to parts and controls
This manual mainly explains operations using the remote control, but the same
operations can also be performed using the buttons on the unit having the same
or similar names.
Unit
For North American, European,
Russian and Australian models
For Mideastern, African and
Latin American models
About the child lock function
You can lock the buttons except (on/standby) on the unit to prevent them
from being operated by mistake. Hold down (stop) on the unit until “LOCK ON”
or “LOCK OFF” appears on the display. The buttons except on the unit will be
locked or unlocked.
GB
7
Page 8
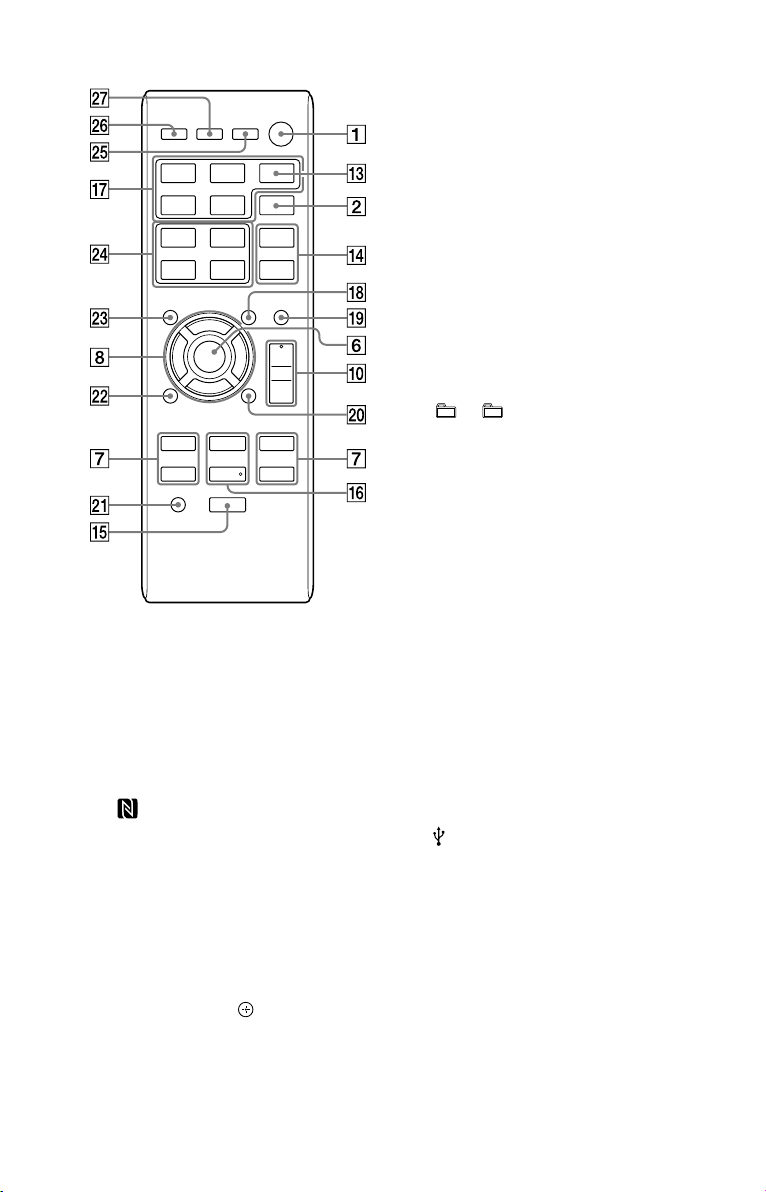
Remote control
(on/standby) button
Press to turn on or off the system.
MEGA BASS button (page 26)
Press to create a more dynamic
sound.
Remote control sensor
(N-Mark) (page22)
Near Field Communication (NFC)
touchpoint indication.
REC TO USB button (page 16)
Press to transfer music from a disc
to the connected optional USB
device.
Unit: ENTER button
Remote control:
Press to enter/confirm the
settings.
button
TUNING+/TUNING– button
Press to tune to the desired
station.
(go backward)/ (go
forward) button
Press to select a track or file.
(rewind)/ (fast forward)
button
Press to find a point in a track or
file.
Remote control: PRESET+/PRESET–
button
Press to select a preset radio
station.
+/ – (select folder) button
(page 12, 17)
Press to select a folder.
Unit: PRESET+/PRESET– button
Press to select a preset radio
station.
Remote control: /// button
Press to select an item.
OPEN/CLOSE button
Press to open or close the disc
tray.
Unit: VOLUME control
Turn to adjust the volume.
Remote control: VOLUME +*/–
button
Press to adjust the volume.
(USB) port
Connect an optional USB device.
AUDIO IN jack (for North
American, European, Russian and
Australian models)
AUDIO IN L/R jacks (for
Mideastern, African and Latin
American models)
Connect an external audio
component.
GB
8
Page 9

BLUETOOTH (page21)
Press to select the BLUETOOTH
function.
Hold down to activate
BLUETOOTH pairing in the
BLUETOOTH function.
Unit: BLUETOOTH indicator
(page20)
Unit: EQ button
Remote control: EQ +/EQ – button
(page 26)
Press to select the preset sound
effect.
(stop) button
Press to stop playback.
Press to stop transfer during
music transfer.
Unit: (play/pause) button
Press to start or pause playback.
Remote control: (play)* button
Press to start playback.
Remote control: (pause) button
Press to pause playback.
FUNCTION button
Press to select the function.
RETURN button
Press to return to the previous
display.
TUNER MEMORY button (page
14)
Press to preset the radio station.
TUNER MEMORY NUMBER button
(page 14)
Press to tune to a preset radio
station.
DISPLAY button (page 27)
Press to change the information
on the display.
SLEEP button (page 27)
Press to set the Sleep Timer.
TIMER MENU button (page 11,
27)
Press to set the clock and the Play
Timer.
* The VOLUME + and buttons on the
remote control have a tactile dot. Use the
tactile dot as a reference when operating
the system.
PLAY MODE/TUNING MODE
button
Press to select the play mode
of a CD, MP3 disc or USB device
(page 12, 17).
Press to select the tuning mode
(page 14).
REPEAT/FM MODE button
Press to activate repeat playback
mode (page 12, 17).
Press to select the FM reception
mode (monaural or stereo) (page
14).
OPTIONS button
Press to enter or exit the option
menus.
CLEAR button (page 13, 19)
Press to delete the last step from
the program list.
GB
9
Page 10

Getting Started
Hooking up the system securely
For MHC-ECL77BT
For North American model
To subwoofer
To left speaker
To right speaker
Speaker cord (Red/)
Speaker cord (Black/)
SUBWOOFER (MHC-ECL99BT only)
Connect the subwoofer cord to
the SUBWOOFER jack. Place the
subwoofer vertically to obtain a better
bass reproduction. Also, position the
subwoofer:
on a solid floor where resonance is
unlikely to occur.
at least a few centimeters away from
the wall.
away from the center of the room or
place a bookshelf against a wall, to
avoid generating a standing wave.
FRONT SPEAKERS (MHC-
ECL99BT)/SPEAKERS (MHCECL77BT)
Connect the speaker cords.
GB
10
FM lead antenna (Extend it
horizontally.)
AM loop antenna (except for North
American model)
To wall outlet
ANTENNA
When inserting the connector of
antenna, make sure to insert it in the
correct orientation.
Find a location and orientation that
provide good reception when you set
up the antenna.
Keep the antenna away from the
speaker cords and the power cord to
avoid picking up noise.
Power
Connect the power cord to a wall
outlet.
Page 11

When carrying this system
Make sure that there is no disc loaded
and no USB device is connected, and
remove the power cord from the wall
outlet.
Inserting batteries
Insert an R6 (size AA) battery
(supplied), matching the polarity
shown below.
Notes on using the remote control
ˎ With normal use, the battery should last
for about six months.
ˎ If you do not use the remote control for a
long period of time, remove the battery to
avoid damage from battery leakage and
corrosion.
Setting the clock
1
Press to turn on the
system.
2
Press TIMER MENU to select
the clock set mode.
If “SELECT” appears, press /
repeatedly to select “CLOCK,” and
then press (ENTER).
3
Press / repeatedly to set
the hour, then press
4
Use the same procedure to
set the minutes.
Notes
ˎ The clock settings are lost when you
disconnect the power cord or if a power
failure occurs.
ˎ When setting the clock, select a function
other than the audio in function
beforehand.
To display the clock when the
system off
Press DISPLAY. The clock is displayed
for a few seconds.
.
Getting Started
About the power
management
By default, this system is set to turn
off automatically in about 15 minutes
when there is no operation, and no
audio signal is detected. For details,
see “To turn off the automatic standby
function” (page33).
11
GB
Page 12
Disc
Playing a CD/MP3 disc
1
Select the CD function.
Press CD.
2
Place a disc.
Press OPEN/CLOSE on the unit
to open the disc tray, then place a
disc with the label side up in the
disc tray.
3
Press OPEN/CLOSE on the
unit to close the disc tray.
4
Start playback.
Press (play).
Other operations
To Press
Pause
playback
Stop
playback
Select a
folder on an
MP3 disc
Select a track
or file
Find a point
in a track or
file
Select Repeat
Play
Change the
play mode
. To resume play,
press .
. To resume play,
press . To cancel
resume play, press
again.
+/ – repeatedly.
/
.
Hold down /
during playback, and
release the button at
the desired point.
REPEAT/FM MODE
repeatedly until “REP
1)
ONE
,” “REP FLDR2)” or
“REP ALL3)” appears.
PLAY MODE/TUNING
MODE repeatedly while
the player is stopped.
You can select normal
play (“FLDR” for all MP3
files in the folder on
the disc), shuffle play
(“SHUF” or “FLDRSHUF”
for folder shuffle),
or program play
(“PROGRAM”).
1)
“REP ONE”: Repeats the current track or
file.
2)
“REP FLDR” (MP3 disc only): Repeats the
current folder.
3)
“REP ALL”: Repeats all tracks or files.
Notes on playing MP3 discs
ˎ Do not save other types of files or
unnecessary folders on a disc that has
MP3 files.
ˎ Folders that have no MP3 files are skipped.
ˎ MP3 files are played back in the order that
they are recorded onto the disc.
ˎ The system can only play MP3 files that
have a file extension of “.mp3.”
ˎ Even when file name has the correct file
extension, if the actual file differs, playing
this file may generate a loud noise by
which the system may malfunction.
ˎ The maximum number of:
folders is 256 (including the root folder).
MP3 files is 999.
folder levels (the tree structure of files)
is 8.
ˎ Compatibility with all MP3 encoding/
writing software, recording device, and
recording media cannot be guaranteed.
Incompatible MP3 discs may produce
noise or interrupted audio or may not play
at all.
Note on playing multisession discs
The system can play back continuous
sessions on a disc when they are recorded
in the same session format as the first
session. When a session recorded in a
different session format is encountered, that
session and the ones following it cannot be
played back. Note that even if the sessions
are recorded in the same format, some
sessions may not play back.
12
GB
Page 13
Creating your own program
(Program Play)
1
Select the CD function.
Press CD.
2
Select the play mode.
Press PLAY MODE/TUNING MODE
repeatedly until “PROGRAM”
appears while the player is
stopped.
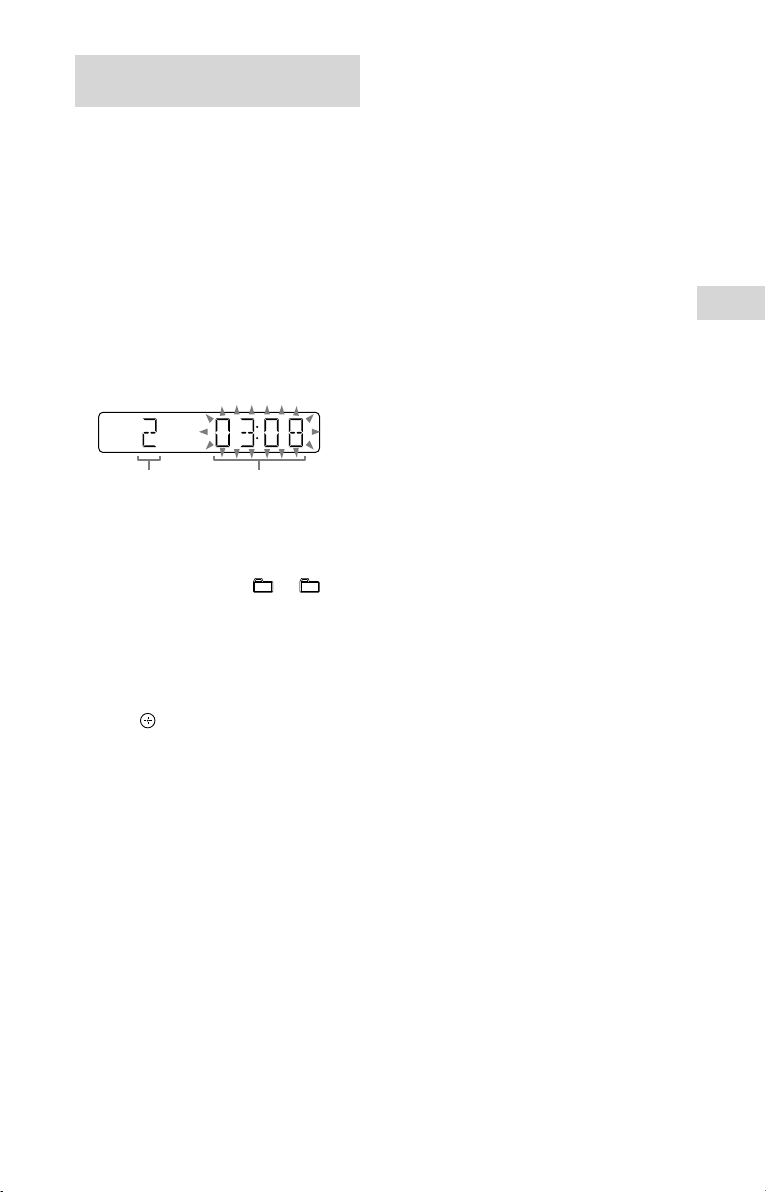
3
Select the desired track or file
number.
Press / repeatedly until
the desired track or file number
appears.
To cancel Program Play
Press PLAY MODE/TUNING MODE.
To delete the last step from the
program list
Press CLEAR when playback is
stopped.
Disc
Selected
track or file
number
When programming MP3 files in a
specific folder, press +/ –
repeatedly to select the desired
folder, and then select the desired
file.
4
Program the selected track or
file.
Press to enter the selected track
or file.
5
Repeat steps 3 through 4 to
program additional tracks or
files, up to a total of 64 tracks
or files.
6
To play your program of
tracks or files, press .
The program is cleared when
you perform one of the following
operations:
changing the function.
turning off the system.
disconnecting the power cord.
opening the disc tray.
To play the same program again,
press .
Total playing time
of the selected
track (CD-DA disc
only)
13
GB
Page 14
Tuner
Listening to the radio
1
Select the tuner function.
For North American model
Press TUNER (or FUNCTION on the
unit repeatedly) to select the FM
function.
For other models
Press TUNER (or FUNCTION on the
unit) repeatedly to select the FM or
AM function.
2
Perform tuning.
For automatic scanning
Press PLAY MODE/TUNING MODE
repeatedly until “AUTO” appears,
and then press TUNING+/TUNING–.
Scanning stops automatically when
a station is found.
If the scanning does not stop, press
to stop scanning, then perform
manual tuning (below).
For manual tuning
Press PLAY MODE/TUNING MODE
repeatedly until “MANUAL” appears,
and then press TUNING+/TUNING–
repeatedly to tune to the desired
station.
When you tune to a station that
provides RDS services, the station
name appears on the display
(European model only).
Hint
To reduce static noise on a weak FM stereo
station, press REPEAT/FM MODE repeatedly
until “MONO” appears to turn off stereo
reception. You will lose stereo effect, but
reception will improve.
Presetting radio stations
1
Tune to the desired station.
2
Press TUNER MEMORY to
select the tuner memory
mode.
3
Press PRESET+/PRESET–
repeatedly to select the
desired preset number.
If another station is already
assigned to the selected preset
number, the station is replaced by
the new station.
4
Press to store the station.
5
Repeat steps 1 through 4 to
store other stations.
The preset stations are retained
for about half a day even if you
disconnect the power cord or if a
power failure occurs.
For North American model
You can preset up to 20 FM
stations.
For other models
You can preset up to 20 FM and
10AM stations.
To tune to a preset radio station
If you registered a radio station to a
preset number 1 to 4, the radio station
will be tuned in by just pressing the
TUNER MEMORY NUMBER (1 to 4)
when the tuner function is selected.
If you registered a radio station to a
preset number 5 or higher, press PLAY
MODE/TUNING MODE repeatedly
until “PRESET” appears then press
PRESET+/PRESET– repeatedly to select
the desired preset number.
14
GB
Page 15

USB Device
Before using the USB
device
For compatible USB devices, see
“Information about compatible
devices” (page29).
(You can use your Apple devices
with this system via BLUETOOTH
connection only.)
Notes
ˎ When USB cable connection is necessary,
connect the USB cable supplied with
the USB device to be connected. See the
operation manual supplied with the USB
device to be connected for details on the
operation method.
ˎ It may take a long time before “SEARCH”
appears depending on the type of USB
device connected.
ˎ Do not connect the system and the USB
device through a USB hub.
ˎ When the USB device is inserted, the
system reads all the files on the USB
device. If there are many folders or files on
the USB device, it may take a long time to
finish reading the USB device.
ˎ With some connected USB devices, after
an operation is performed, there may
be a delay before it is performed by this
system.
ˎ Compatibility with all encoding/writing
software cannot be guaranteed. If audio
files on the USB device were originally
encoded with incompatible software,
those files may produce noise or
interrupted audio, or may not play at all.
ˎ This system does not necessarily support
all the functions provided in a connected
USB device.
ˎ Do not remove the USB device during
transferring or erase operations. Doing
so may corrupt the data on the device or
damage the device itself.
To use the system as a battery
charger
You can use the system as a battery
charger for USB devices that have a
rechargeable function.
Connect the USB device to the
(USB) port.
The charging begins when the USB
device is connected to the
port. For details, see the user’s guide
of your USB device.
(USB)
USB Device
15
GB
Page 16

Transferring music from
a disc
You can transfer music from a disc
(CD-DA disc or MP3 disc) by using
the following transfer modes of this
system.
CD SYNC transfer: Transfer all the CDDA tracks from the CD-DA disc.
MP3 folder transfer: Transfer MP3
files in a specific folder from the MP3
disc.
REC1 transfer: Transfer a currently
playing track or MP3 file from the disc.
1
Select the CD function.
Press CD.
2
Connect the USB device to the
(USB) port.
3
Load a disc you want to
transfer.
4
Prepare for transferring.
Proceed to step 5 in case of CD
SYNC transfer.
For MP3 folder transfer
To transfer MP3 files in a specific
folder, press +/ – repeatedly
to select the folder you want. Then
start playback and press once.
Make sure the elapsed playing time
has stopped on the display.
For REC1 transfer
Press / to select the track
or MP3 file you want to transfer,
then start playback.
To transfer an MP3 file in a specific
folder, press +/ – repeatedly
to select the folder you want, then
press / to select the MP3
file you want to transfer. Then start
playback.
5
Press REC TO USB on the unit.
“READY” appears on the display.
6
Press .
Transferring starts, then “USB REC”
appears on the display.
Do not remove the USB device until
transferring is completed.
When transferring is completed,
“COMPLETE” appears on the display
and audio files in MP3 format will
be created.
To stop transfer
Press .
Folder and file generation rules
When first transferring to a USB
device, a folder (“CDDA001*,”
“MP3_REC1” or “CD_REC1”) is created
directly below the “ROOT” (in case of
MP3 folder transfer, a folder that has
the same name as the transferring
source is created below the “ROOT”).
Folders and files are generated as
follows.
CD SYNC transfer
Transferring
source
CD-DA
MP3 folder transfer
Transferring
source
MP3 Same as the
REC1 transfer
Transferring
source
MP3
CD-DA
* Folder and file numbers are assigned
serially thereafter.
Folder
name
“CDDA001”* “TRACK001”*
Folder
name
transferring source
Folder
name
“MP3_REC1”
“CD_REC1” “TRACK001”*
File name
File name
File name
Same as the
transferring
source
16
GB
Page 17

Notes
ˎ If you start transferring in shuffle play or
repeat play mode, the selected play mode
is automatically changed to normal play.
ˎ CD-TEXT information is not transferred in
the created MP3 files. This system does
not support the CD-TEXT standard.
ˎ Transferring stops automatically if:
the USB device runs out of space during
transferring.
the number of audio files and folders
on the USB device reaches the limit
for the number that the system can
recognize.
ˎ If a folder or file that you are trying
to transfer already exists on the USB
device with the same name, a sequential
number is added after the name without
overwriting the original folder or file.
ˎ Do not use buttons on the remote control
or unit during transferring to prevent
transferring from stopping.
Note on copyright-protected content
The transferred music is limited to private
use only. Use of the music beyond this
limit requires permission of the copyright
holders.
Playing a file
The audio formats that can be played
back on this system are MP3/WMA*.
* Files with DRM (Digital Rights
Management) copyright protection
cannot be played back on this system.
Files downloaded from an online music
store may not be played back on this
system.
1
Select the USB function.
Press USB.
2
Connect the USB device to the
(USB) port.
3
Start playback.
Press .
Other operations
To Press
Pause
playback
Stop
playback
Select a
folder
Select a file /.
Find a point
in a file
Select Repeat
Play
Change the
play mode
. To resume play,
press .
. To resume play,
press
1)
. To cancel
resume play, press
again.
+/ – repeatedly.
Hold down /
during playback, and
release the button at
the desired point.
REPEAT/FM MODE
repeatedly until “REP
2)
ONE
,” “REP FLDR3)” or
“REP ALL4)” appears.
PLAY MODE/TUNING
MODE repeatedly
while the USB device
is stopped. You can
select normal play
(“FLDR” for all files in
the folder on the USB
device), shuffle play
(“SHUF” or “FLDRSHUF”
for folder shuffle),
or program play
(“PROGRAM”).
USB Device
17
GB
Page 18

1)
When playing a VBR MP3/WMA file, the
system may resume playback from a
different point.
2)
“REP ONE”: Repeats the current file.
3)
“REP FLDR”: Repeats the current folder.
4)
“REP ALL”: Repeats all files on a USB
device.
Notes
ˎ This system cannot play audio files on the
USB device in the following cases;
when the number of audio files in a
folder exceeds 999.
when the total number of audio files on
a USB device exceeds 999.
when the number of folders on a USB
device exceeds 256 (including the
“ROOT” folder and empty folders).
These numbers may vary depending on
the file and folder structure. Do not save
other types of files or unnecessary folders
on a USB device that has audio files.
ˎ The system can play back to a depth of 8
folders only.
ˎ Files and folders are displayed in the order
of their creation on the USB device.
ˎ Folders that have no audio files are
skipped.
ˎ The audio formats that you can listen to
with this system are as follows:
MP3: file extension “.mp3”
WMA: file extension “.wma”
Note that even when file name has the
correct file extension, if the actual file
differs, the system may produce noise or
may malfunction.
To erase audio files or folders from
the USB device
1
Select the USB function.
Press USB.
2
Connect the USB device to the
(USB) port.
3
Press / or +/ –
repeatedly to select the audio file
or folder you want to erase, then
start playback.
4
Press OPTIONS.
5
Press / repeatedly to select
“ERASE,” then press
6
Press / to select “FOLDER” or
“FILE,” then press
“ERASE??” flashes on the display.
7
Press .
“COMPLETE” appears on the
display.
.
.
18
GB
Page 19

Creating your own program
(Program Play)
1
Select the USB function.
Press USB.
2
Select the play mode.
Press PLAY MODE/TUNING MODE
repeatedly until “PROGRAM”
appears while the player is
stopped.
3
Select the desired file number.
Press / repeatedly until the
desired file number appears.
Selected file number
When programming MP3/WMA
files in a specific folder, press
+/ – repeatedly to select the
desired folder, and then select the
desired file.
4
Program the selected file.
Press to enter the selected file.
5
Repeat steps 3 through 4 to
program additional files, up
to a total of 64 files.
6
To play your program of files,
press .
The program is cleared when
you perform one of the following
operations:
changing the function.
turning off the system.
disconnecting the power cord.
To play the same program again,
press .
To cancel Program Play
Press PLAY MODE/TUNING MODE.
To delete the last step from the
program list
Press CLEAR when playback is
stopped.
USB Device
19
GB
Page 20

BLUETOOTH Device
About the BLUETOOTH
wireless technology
BLUETOOTH wireless technology is a
short-range wireless technology that
enables wireless data communication
between digital devices. BLUETOOTH
wireless technology operates within a
range of about 10 meters (33 feet).
Listening to music
wirelessly on a
BLUETOOTH device
You can listen to music from your
BLUETOOTH device over a wireless
connection.
About the BLUETOOTH indicator
Supported BLUETOOTH version,
profiles and codecs
Supported BLUETOOTH version:
ˎ BLUETOOTH Standard version 3.0
Supported BLUETOOTH profiles:
ˎ A2DP (Advanced Audio Distribution
Profile)
ˎ AVRCP 1.3 (Audio Video Remote
Control Profile)
ˎ SPP (Serial Port Profile)
Supported BLUETOOTH codecs:
ˎ SBC (Sub Band Codec)
ˎ AAC (Advanced Audio Coding)
(except for North American model)
In the BLUETOOTH function, the
BLUETOOTH indicator lights up
or flashes in blue to show the
BLUETOOTH status.
System status Indicator status
BLUETOOTH
standby
BLUETOOTH
pairing
BLUETOOTH
connecting
BLUETOOTH
connection is
established
Flashes slowly
Flashes quickly
Flashes
Lights up
20
GB
Page 21

Pairing this system with a
BLUETOOTH device
Pairing is an operation where
BLUETOOTH devices register with
each other beforehand. Once a
pairing operation is performed, it
does not need to be performed again.
If your device is an NFC-compatible
smartphone, the manual pairing
procedure is not necessary.
1
Place the BLUETOOTH device
within 1meter (3 feet) from
the system.
2
Press BLUETOOTH to select
the BLUETOOTH function.
If the BLUETOOTH function is
selected when the system has
no pairing information, the
system enters the pairing mode
automatically.
Note
If the BLUETOOTH connection is
established, terminate the BLUETOOTH
connection. See “To terminate the
BLUETOOTH connection” (page23).
3
Hold down BLUETOOTH for
5seconds or more.
“PAIRING” flashes on the display.
6
Perform the BLUETOOTH
connection on the
BLUETOOTH device.
When pairing is completed and
the BLUETOOTH connection is
established, “BT AUDIO” appears on
the display.
Depending on the BLUETOOTH
device, connection may start
automatically after pairing is
completed.
Notes
ˎ You can pair up to 8 BLUETOOTH devices.
If the 9th BLUETOOTH device is paired, the
oldest paired device will be deleted.
ˎ “Passkey” may be called “Passcode,” “PIN
code,” “PIN number” or “Password,” etc.,
depending on the device.
ˎ The pairing standby status of the system
is canceled after about 5 minutes. If
pairing is not successful, repeat from
step 1.
ˎ If you want to pair with another
BLUETOOTH device, repeat steps 1 to 6.
To cancel the pairing operation
Press BLUETOOTH.
BLUETOOTH Device
4
Perform the pairing procedure
on the BLUETOOTH device.
For details, refer to the operating
instructions of your BLUETOOTH
device.
5
Select the model number of
the unit on the display of the
BLUETOOTH device.
For example, select
“SONY:MHC-ECL99BT” or
“SONY:MHC-ECL77BT.”
If passkey is required on the
BLUETOOTH device, enter “0000”.
21
GB
Page 22

Connecting a smartphone with
one touch (NFC)
When you touch the system with an
NFC-compatible smartphone, the
system automatically:
turns on in the BLUETOOTH function.
completes pairing.
completes the BLUETOOTH
connection.
What is “NFC”?
NFC (Near Field Communication) is
a technology enabling short-range
wireless communication between
various devices, such as mobile
phones and IC tags. Thanks to the NFC
function, data communication can be
achieved easily just by touching the
designated touchpoint on the NFCcompatible devices.
1
Download and install the
“NFC Easy Connect” app.
Download the free Android™ app
from Google Play™ by searching
for “NFC Easy Connect” or access it
by using the two-dimensional code
below. Data communication fees
may be charged.
Two-dimensional code* for direct
access
* Use a two-dimensional code reader
app.
2
Start the “NFC Easy Connect”
app on the smartphone.
Make sure that the application
screen is displayed.
3
Touch the smartphone to the
N-Mark on the system until
the smartphone vibrates.
Complete the connection by
following the instructions displayed
on the smartphone.
When the BLUETOOTH connection
is established, the BLUETOOTH
indicator stops flashing and
remains light up. “BT AUDIO”
appears on the display.
You can switch the sound source
from the smartphone to another
NFC-compatible BLUETOOTH
device.
For details, refer to the operating
instructions of your BLUETOOTH
device.
Hint
If pairing and the BLUETOOTH connection
fail, do the following.
Relaunch “NFC Easy Connect” and move
the smartphone slowly over the N-Mark.
Remove the case from the smartphone
if using a commercially available
smartphone case.
22
Notes
ˎ The App may not be available in some
countries and/or regions.
ˎ Depending on your smartphone, you
can use the NFC function without
installing the app. In this case, the
operations and specifications may
differ. For details, refer to the operating
instructions of your smartphone.
Compatible smartphones
Smartphones with a built-in
NFC function (OS: Android 2.3.3
or later, excluding Android 3.x)
GB
Page 23

Listening to music on a
BLUETOOTH device
You can operate a BLUETOOTH device
by connecting the system and the
BLUETOOTH device using AVRCP.
Check the following before playing
music:
The BLUETOOTH function of the
BLUETOOTH device is turned on.
Pairing has been completed.
To play music on an NFCincompatible BLUETOOTH device
1
Press BLUETOOTH to select
the BLUETOOTH function.
“BT AUDIO” appears on the display.
2
Establish connection with the
BLUETOOTH device.
The last connected BLUETOOTH
device will be connected
automatically.
Perform the BLUETOOTH
connection from the BLUETOOTH
device if the device is not
connected.
3
Press .
Depending on the BLUETOOTH
device,
you may need to press twice.
you may need to start playback
of an audio source on the
BLUETOOTH device.
Notes
ˎ When the system is not connected to
any BLUETOOTH device, the system
will connect from the last connected
BLUETOOTH device automatically when
you press .
ˎ If you try to connect another BLUETOOTH
device to the system, the current
connected BLUETOOTH device will be
disconnected.
To play music on an NFC-compatible
smartphone
Touch the smartphone to the N-Mark
on the system to establish the
BLUETOOTH connection.
Start playback of an audio source
on the smartphone. For details on
playback, refer to the operating
instructions of your smartphone.
To terminate the BLUETOOTH
connection
For NFC-incompatible BLUETOOTH
devices
1
Press OPTIONS.
2
Press / repeatedly to select
“DISCONNECT,” then press
Depending on the BLUETOOTH device,
the BLUETOOTH connection may be
terminated automatically when you
stop playback.
For NFC-compatible smartphones
Touch the smartphone to the N-Mark
on the system again.
.
Erasing all the pairing
registration information
To erase all the pairing registration
information, the system should be
reset to the factory settings. See “To
reset the system to factory settings”
(page33).
BLUETOOTH Device
23
GB
Page 24

Setting the BLUETOOTH
audio codecs
(except for North American model)
1
Press BLUETOOTH to select
the BLUETOOTH function.
“BT AUDIO” appears on the display.
Note
If the BLUETOOTH connection is
established, terminate the BLUETOOTH
connection. See “To terminate the
BLUETOOTH connection” (page23).
2
Press OPTIONS.
3
Press / repeatedly to select
“BT:AAC,” then press
4
Press / repeatedly to select
“ON” or “OFF,” then press
ˎ ON: Select this setting if the
BLUETOOTH device supports
Advanced Audio Coding (AAC).
ˎ OFF: Select this setting if the
BLUETOOTH device only supports
Sub Band Codec (SBC).
Note
You can enjoy high quality sound if the AAC
is selected. In case you cannot listen to AAC
sound from your device, select “OFF.”
.
.
Setting the BLUETOOTH
standby mode
The BLUETOOTH standby mode
enables the system to turn on
automatically when you establish
the BLUETOOTH connection with a
BLUETOOTH device.
1
Press OPTIONS.
2
Press / repeatedly to select
“BT:STBY,” then press
3
Press / repeatedly to select
“ON” or “OFF,” then press
When the BLUETOOTH standby
mode is set to on, the system waits
for a BLUETOOTH connection even
when the system has been turned
off. When a BLUETOOTH connection
is established, the system turns on
automatically.
Hint
Disable the BLUETOOTH standby mode to
reduce the power consumption in standby
mode (eco mode).
.
.
24
GB
Page 25

Turning on or off the
BLUETOOTH signal
You can connect to the system
from a paired BLUETOOTH device
in all functions when the system’s
BLUETOOTH signal is set to on. The
BLUETOOTH signal is turned on by
default.
Use the buttons on the unit to perform
this operation.
Hold down EQ and ENTER for
about 5 seconds.
“BT ON” or “BT OFF” appears on the
display.
Notes
ˎ You cannot perform the following
operations when BLUETOOTH signal is set
to off:
Pairing with BLUETOOTH device
Setting the BLUETOOTH audio codecs
Setting the BLUETOOTH standby mode
Using “SongPal” via BLUETOOTH
ˎ When the BLUETOOTH signal is set to
off, this system cannot be detected and
connection cannot be established from
BLUETOOTH device.
Using “SongPal” via
BLUETOOTH
(except for North American model)
About App
A dedicated app for this model is
available on both Google Play and
App Store. Search for “SongPal” and
download the free app to find out
more about the convenient features.
BLUETOOTH Device
25
GB
Page 26

Other Operations
Adjusting the sound
Using an optional audio
component
1
Prepare the sound source.
Connect an optional audio
component to the AUDIO IN jack(s)
on the unit using an audio analog
cord (not supplied).
2
Press VOLUME – repeatedly
until “VOL MIN” appears on
the display.
3
Select the audio in function.
Press AUDIO IN.
4
Start playback.
Start playback of the connected
component and adjust the volume.
Note
The system may enter standby mode
automatically if the volume level of the
connected component is too low. Adjust
the component’s volume accordingly. See
“To turn off the automatic standby function”
(page33).
To Press
Adjust the
volume
Generate
a more
dynamic
sound
Set the sound
effect
VOLUME +/–.
MEGA BASS.
EQ +/EQ – repeatedly
until desired sound
effect is displayed.
26
GB
Page 27

Changing the display
Using the timers
To Press
Change
information
on the
display*
* For example, you can view information,
such as track number, file/folder name,
album name and artist name.
The system offers the following
display mode.
Display
mode
Power Saving
mode
Notes on the display information
ˎ Characters that cannot be displayed
appear as “_”.
ˎ The following are not displayed;
total playing time for an MP3 disc and a
USB device.
remaining playing time for an MP3/
WMA file.
ˎ The following are not displayed correctly;
elapsed playing time of an MP3/WMA
file encoded using VBR (variable bit
rate).
folder and file names that do not follow
either the ISO9660 Level 1/Level 2 in
the expansion format.
DISPLAY repeatedly
when the system is on.
When the system
is off
The display is turned
off to conserve power.
The clock continues to
operate.
The system offers two timer functions.
If you use both timers, the Sleep Timer
has priority.
Sleep Timer:
You can fall asleep to music. This
function works even if the clock is not
set.
Press SLEEP repeatedly. If you select
“AUTO,” the system automatically
turns off after the current disc or USB
device stops, or within 100minutes.
Play Timer:
You can wake up to a CD, FM
reception, AM reception (except for
North American model) or USB device
at a preset time.
Make sure you have set the clock.
1
Prepare the sound source.
Prepare the sound source, and then
press VOLUME +/– to adjust the
volume.
2
Select the timer set mode.
Press TIMER MENU.
If the clock is not set, the system
will be in clock set mode. In that
case, set the clock.
3
Set the play timer.
Press / repeatedly to select
“PLAY SET,” then press .
4
Set the time to start playback.
Press / repeatedly to set the
hour, then press . Follow the
same procedure to set the minutes.
Other Operations
5
Follow the same procedure
as in step 4 to set the time to
stop playback.
6
Select the sound source.
Press / repeatedly until the
desired sound source appears, then
press .
27
GB
Page 28

7
Turn off the system.
Press . The system
automatically turns on before the
preset time.
If the system is on at the preset
time, the Play Timer will not be
activated. Do not operate the
system from the time the system
turns on until the playback starts.
To check the setting
1
Press TIMER MENU.
2
Press / repeatedly to
select “SELECT,” and then press
3
Press / repeatedly to
select “PLAY SEL,” and then press
.
To cancel the timer
Repeat the same procedure as in “To
check the setting” until “OFF” appears
in step 3, and then press .
To change the setting
Start over from step 1 of “Using the
timers.”
Hint
The Play Timer setting remains as long as
the setting is not canceled manually.
.
28
GB
Page 29

Additional Information
Troubleshooting
Information about
compatible devices
About supported USB devices
ˎ This system supports USB Mass
Storage Class only.
ˎ This system supports FAT formatted
USB devices only (except exFAT).
ˎ Some USB devices may not work
with this system.
About BLUETOOTH communication
for iPhone and iPod touch
iPhone 5s
iPhone 5c
iPhone 5
iPhone 4s
iPhone 4
iPod touch (5th generation)
iPod touch (4th generation)
1
Make sure the power
cord and speaker cords
are correctly and firmly
connected.
2
Find your problem in the
checklist below, and take the
indicated corrective action.
If the issue persists, contact your
nearest Sony dealer.
If “PROTECT” appears on the
display
Immediately unplug the power
cord, and check the following items
after “PROTECT” disappears.
ˎ Are you using only the supplied
speakers?
ˎ Is anything blocking the
ventilation holes of the system?
After you have checked these
above items and found no
problems, reconnect the power
cord, and turn on the system. If the
issue persists, contact your nearest
Sony dealer.
If “OVER CURRENT” appears on
the display
A problem has been detected
with the level of electrical current
from the (USB) port. Turn off
the system and remove the USB
device from the (USB) port. Make
sure there is no problem with the
USB device. If this display pattern
persists, contact your nearest Sony
dealer.
Additional Information
29
GB
Page 30

General
The system does not turn on.
ˎ Is the power cord plugged in?
The system has entered standby
mode unexpectedly.
ˎ This is not a malfunction. The system
enters standby mode automatically
in about 15minutes when there is
no operation and no audio signal is
detected.
See “To turn off the automatic
standby function” (page 33).
The clock setting or the Play Timer
operation has been canceled
unexpectedly.
ˎ If about a minute elapses with
no operation, the clock setting
or Play Timer setting is canceled
automatically. Perform the operation
again from the beginning.
There is no sound.
ˎ Check the speaker connections.
ˎ Are you using only the supplied
speakers?
ˎ Is anything blocking the ventilation
holes of the system?
ˎ The specified station may have
temporarily stopped broadcast.
Sound comes from one channel, or
the left and right volumes are
unbalanced.
ˎ Place the speakers as symmetrically
as possible.
ˎ Connect only the supplied speakers.
There is severe hum or noise.
ˎ Move the system away from sources
of noise.
ˎ Connect the system to a different
wall outlet.
ˎ Install a noise filter (available
separately) to the power cord.
The remote control does not function.
ˎ Remove any obstacles between
the remote control and the remote
control sensor on the unit, and
position the unit away from
fluorescent lights.
ˎ Point the remote control at the
system’s sensor.
ˎ Move the remote control closer to
the system.
Except , no buttons on the unit
work, and “LOCK ON” appears on the
display.
ˎ The child lock function has been
enabled. To disable the child lock,
hold down on the unit until
“LOCK OFF” appears on the display.
A disc cannot be ejected and
“LOCKED” appears on the display.
ˎ Contact your Sony dealer or local
authorized Sony service facility.
“SEARCH” or “READING” appears on
the display.
ˎ Operate the system after the
message disappears.
CD/MP3 disc
The sound skips, or the disc will not
play.
ˎ Wipe the disc clean, and replace it.
ˎ Move the system to a location away
from vibration (for example, on top
of a stable stand).
ˎ Move the speakers away from the
system, or place them on separate
stands. At high volume, speaker
vibration may cause the sound to
skip.
Playback does not start from the first
track.
ˎ Set the play mode to normal play
mode.
30
GB
Page 31

Starting playback takes more time
than usual.
ˎ The following discs can increase the
time it takes to start playback;
a disc recorded with a complicated
tree structure.
a disc recorded in multisession
mode.
a disc that has not been finalized
(a disc to which data can be
added).
a disc that has many folders.
USB device
The connected USB device cannot be
charged.
ˎ Make sure the USB device is
connected securely.
The USB device does not work
properly.
ˎ If you connect an unsupported
USB device, the following problems
may occur. See “Information about
compatible devices” (page 29).
The USB device is not recognized.
File or folder names are not
displayed on this system.
Playback is not possible.
The sound skips.
There is noise.
A distorted sound is output.
There is no sound.
ˎ The USB device is not connected
correctly. Turn off the system, then
reconnect the USB device.
There is noise, skipping, or distorted
sound.
ˎ Turn off the system, then reconnect
the USB device.
ˎ The music data itself contains noise,
or the sound is distorted. Noise may
have been entered during music
creation process using this system
or the computer. Create the music
data again.
ˎ The bit rate used when encoding
the files was low. Send files encoded
with higher bit rates to the USB
device.
“SEARCH” is displayed for an
extended time, or it takes a long time
before playback starts.
ˎ The reading process can take a long
time in the following cases.
There are many folders or files on
the USB device.
The file structure is extremely
complex.
The memory capacity is excessive.
The internal memory is
fragmented.
Erroneous display
ˎ Characters that cannot be displayed
appear as “_”.
The USB device is not recognized.
ˎ Turn off the system and reconnect
the USB device, then turn on the
system.
ˎ See “Information about compatible
devices” (page 29).
Transferring results in an error.
ˎ See “Information about compatible
devices” (page 29).
ˎ The USB device is not formatted
correctly. Refer to the operating
instructions of the USB device on
how to format.
ˎ Turn off the system and remove
the USB device. If the USB device
has a power switch, turn the USB
device off and then on again after
removing it from the system. Then
perform transferring again.
ˎ The USB device was disconnected
or the power was turned off during
transferring. Delete the partially
transferred file, and perform
transferring again. If this does not
fix the problem, the USB device may
be broken. Refer to the operating
instructions of the USB device on
how to deal with this problem.
Additional Information
31
GB
Page 32

Audio files or folders on the USB
device cannot be erased.
ˎ Check if the USB device is write-
protected.
ˎ The USB device was disconnected
or the power was turned off during
the erase operation. Delete the
partially-erased file. If this does
not fix the problem, the USB device
may be broken. Refer to operating
instructions of the USB device on
how to deal with this problem.
Playback does not start.
ˎ Turn off the system and reconnect
the USB device, then turn on the
system.
ˎ See “Information about compatible
devices” (page 29).
ˎ Press to start playback.
Playback does not start from the first
track.
ˎ Set the play mode to normal play
mode.
Files cannot be played back.
ˎ The audio files may have
inappropriate file extensions. The file
extensions supported by this system
are as follows:
MP3: file extension “.mp3”
WMA: file extension “.wma”
ˎ USB storage devices formatted with
file systems other than FAT16 or
FAT32 are unsupported.*
ˎ If you use a partitioned USB storage
device, only files on the first partition
can be played back.
ˎ Files that are encrypted or protected
by passwords, etc. cannot be played
back.
* This system supports FAT16 and FAT32,
but some USB storage devices may not
support all of these FAT. For details, see
the operation manual of each USB storage
device or contact the manufacturer.
Tuner
There is severe hum or noise, or
stations cannot be received.
ˎ Connect the antenna properly.
ˎ Try another place and orientation for
better antenna reception.
ˎ Keep the antenna away from the
speaker cords and the power cord to
avoid picking up noise.
ˎ Turn off nearby electrical equipment.
BLUETOOTH device
Pairing cannot be performed.
ˎ Move the BLUETOOTH device closer
to the system.
ˎ Pairing may not be possible if other
BLUETOOTH devices are present
around the system. In this case, turn
off the other BLUETOOTH devices.
ˎ Make sure to enter the correct
passkey when selecting the model
number (this system) on the
BLUETOOTH device.
Connection is not possible.
ˎ The BLUETOOTH device you
attempted to connect does not
support the A2DP profile, and
cannot be connected with the
system.
ˎ Enable the BLUETOOTH function of
the BLUETOOTH device.
ˎ Establish a connection from the
BLUETOOTH device.
ˎ The pairing registration information
has been erased. Perform the
pairing operation again.
ˎ Erase the pairing registration
information of the BLUETOOTH
device by resetting the system to
factory settings (page33) and
perform the pairing operation again
(page21).
32
GB
Page 33

The sound skips or fluctuates, or the
connection is lost.
ˎ The system and the BLUETOOTH
device are too far apart.
ˎ If there are obstacles between the
system and your BLUETOOTH device,
remove or avoid the obstacles.
ˎ If there is equipment that generates
electromagnetic radiation, such as
a wireless LAN, other BLUETOOTH
device, or a microwave oven nearby,
move them away.
The sound of your BLUETOOTH device
cannot be heard on this system.
ˎ Increase the volume on your
BLUETOOTH device first, then adjust
the volume using VOLUME +/–.
There is severe hum, noise or
distorted sound.
ˎ If there are obstacles between the
system and your BLUETOOTH device,
remove or avoid the obstacles.
ˎ If there is equipment that generates
electromagnetic radiation, such as
a wireless LAN, other BLUETOOTH
device, or a microwave oven nearby,
move them away.
ˎ Turn down the volume of the
connected BLUETOOTH device.
To change the AM tuning interval
(except for North American,
European and Russian models)
The AM tuning interval is preset to
9kHz or 10 kHz by factory default.
Use buttons on the unit to change the
AM tuning interval.
1
Tune to any AM station.
2
Hold down MEGA BASS on the unit
until “530” (10 kHz) or “531” (9 kHz)
appears on the display.
All the AM preset stations are
erased.
To reset the system to factory
settings
If the system still does not operate
properly, reset the system to factory
settings.
1
Disconnect and reconnect the
power cord, and then turn on the
system.
2
Hold down and EQ on the unit
until “RESET” appears.
All user-configured settings, such
as preset radio stations, the pairing
registration information, timer,
and the clock are reset to factory
default settings.
To turn off the automatic standby
function
This system is equipped with an
automatic standby function. With
this function, the system enters
standby mode automatically in about
15minutes when there is no operation
and no audio signal is detected.
By default, the automatic standby
function is turned on.
Hold down while the system
is on, until “AUTO STANDBY OFF”
appears.
To turn on the function, repeat the
procedure until “AUTO STANDBY ON”
appears.
Notes
ˎ The automatic standby function is invalid
for the tuner function.
ˎ The system may not enter standby mode
automatically in the following cases:
when an audio signal is detected.
during playback of audio tracks or files.
while the preset Play Timer or Sleep
Timer is in process.
Additional Information
33
GB
Page 34

Messages
Precautions
DISC ERR
You have loaded a disc that cannot be
played.
ERROR
You cannot transfer music to the USB
device because the USB device is
write-protected or the memory of the
USB device is full.
FULL
You tried to program more than 64
tracks or files (steps).
NO FILE
There are no playable files on the
CD-R/CD-RW discs or on the USB
device.
NO STEP
All of the programmed steps have
been erased.
NO USB
No USB device is connected or an
unsupported USB device is connected.
PLAY SET
You tried to select the timer when the
Play Timer is not set.
PLS STOP
You pressed PLAY MODE/TUNING
MODE during playback.
SELECT
You pressed TIMER MENU during timer
operation.
TIME NG
The Play Timer start and end times are
set to the same time.
Discs that this system CAN play
ˎ Audio CD
ˎ CD-R/CD-RW (audio data/MP3 files)
Discs that this system CANNOT play
ˎ CD-ROM
ˎ CD-R/CD-RW other than those recorded in
music CD format, conforming to ISO9660
Level 1/Level 2
ˎ CD-R/CD-RW recorded in multisession
that have not ended by “closing the
session”
ˎ CD-R/CD-RW of poor recording quality,
CD-R/CD-RW that have scratches or are
dirty, or CD-R/CD-RW recorded with an
incompatible recording device
ˎ CD-R/CD-RW which is finalized incorrectly
ˎ Discs containing files other than MPEG 1
Audio Layer-3 (MP3) files
ˎ Discs of non-standard shape (for example,
heart, square, star)
ˎ Discs that have adhesive tape, paper, or
sticker attached to them
ˎ Rental or used discs with attached seals
where the glue extends beyond the seal
ˎ Discs that have labels printed using ink
that feels tacky when touched
Notes on discs
ˎ Before playing, wipe the disc with a
cleaning cloth from the center outward to
the edge.
ˎ Do not clean discs with solvents, such as
benzine, thinner, or commercially available
cleaners or anti-static spray intended for
vinyl LPs.
ˎ Do not expose discs to direct sunlight
or heat sources such as hot air ducts,
nor leave them in a car parked in direct
sunlight.
On safety
ˎ Completely disconnect the power cord
(mains lead) from the wall outlet (mains) if
it is not going to be used for an extended
period of time. When unplugging the unit,
always grip the plug. Never pull the cord
itself.
ˎ Should any solid object or liquid get into
the system, unplug the system, and have
it checked by qualified personnel before
operating it again.
ˎ The AC power cord can be changed only
by a qualified service facility.
34
GB
Page 35

On placement
ˎ Do not place the system in an inclined
position or in locations that are extremely
hot, cold, dusty, dirty, or humid or lacking
adequate ventilation, or subject to
vibration, direct sunlight or a bright light.
ˎ Be careful when placing the unit or
speakers on surfaces that have been
specially treated (for example, with wax,
oil, polish) as staining or discoloration of
the surface may result.
ˎ If the system is brought directly from a
cold to a warm location or is placed in a
very damp room, moisture may condense
on the lens inside the CD player, and
cause the system to malfunction. In this
situation, remove the disc, and leave the
system turned on for about an hour until
the moisture evaporates.
On heat buildup
ˎ Heat buildup on the unit during operation
is normal and is not cause for alarm.
ˎ Do not touch the cabinet if it has been
used continuously at a high volume
because the cabinet may have become
hot.
ˎ Do not obstruct the ventilation holes.
On the speaker system
This speaker system is not magnetically
shielded, and the picture on nearby TV
sets may become magnetically distorted.
In this situation, turn off the TV, wait 15 to
30 minutes, and turn it back on.
If there is no improvement, move the
speakers far away from the TV.
Cleaning the cabinet
Clean this system with a soft cloth slightly
moistened with a mild detergent solution.
Do not use any type of abrasive pad,
scouring powder, or solvent, such as thinner,
benzine, or alcohol.
On BLUETOOTH Communication
ˎ BLUETOOTH devices should be used
within approximately 10 meters (33 feet)
(unobstructed distance) of each other.
The effective communication range may
become shorter under the following
conditions.
When a person, metal object, wall
or other obstruction is between the
devices with a BLUETOOTH connection
Locations where a wireless LAN is
installed
Around microwave ovens that are in
use
Locations where other electromagnetic
waves occur
ˎ BLUETOOTH devices and wireless LAN
(IEEE 802.11b/g) use the same frequency
band (2.4 GHz). When using your
BLUETOOTH device near a device with
wireless LAN capability, electromagnetic
interference may occur. This could result
in lower data transfer rates, noise, or
inability to connect. If this happens, try the
following remedies:
Try connecting this system and
BLUETOOTH device when you are at
least 10 meters (33 feet) away from the
wireless LAN equipment.
Turn off the power to the wireless
LAN equipment when using your
BLUETOOTH device within 10 meters
(33 feet).
ˎ The radio waves broadcast by this system
may interfere with the operation of some
medical devices. Since this interference
may result in malfunction, always turn off
the power on this system and BLUETOOTH
device in the following locations:
In hospitals, on trains, in airplanes,
at gas stations, and any place where
flammable gases may be present
Near automatic doors or fire alarms
ˎ This system supports security functions
that comply with the BLUETOOTH
specification as a means of ensuring
security during communication using
BLUETOOTH technology. However, this
security may be insufficient depending
on the setting contents and other factors,
so always be careful when performing
communication using BLUETOOTH
technology.
ˎ Sony cannot be held liable in any way
for damages or other loss resulting from
information leaks during communication
using BLUETOOTH technology.
ˎ BLUETOOTH communication is not
necessarily guaranteed with all
BLUETOOTH devices that have the same
profile as this system.
Additional Information
35
GB
Page 36

ˎ BLUETOOTH devices connected with this
system must comply with the BLUETOOTH
specification prescribed by the Bluetooth
SIG, Inc., and must be certified to comply.
However, even when a device complies
with the BLUETOOTH specification, there
may be cases where the characteristics or
specifications of the BLUETOOTH device
make it impossible to connect, or may
result in different control methods, display
or operation.
ˎ Noise may occur or the audio may
cut off depending on the BLUETOOTH
device connected with this system,
the communications environment, or
surrounding conditions.
Specifications
Main unit
AUDIO POWER SPECIFICATIONS
POWER OUTPUT AND TOTAL HARMONIC
DISTORTION:
(The United States model only)
With 3ohms loads, both channels
driven, from 120 10,000Hz; rated
30watts per channel minimum
RMS power, with no more than
0.7% total harmonic distortion from
250milliwatts to rated output.
Amplifier section
MHC-ECL99BT
U.S. model:
Front speaker:
Output power (reference):
235 W + 235 W (per channel at
3ohms, 1 kHz)
Subwoofer:
Output power (reference):
230 W (at 3 ohms, 100 Hz)
Other models:
Front speaker:
Power output (rated):
60 W + 60 W (at 3 ohms, 1 kHz, 1%
THD)
Output power (reference):
235 W + 235 W (per channel at
3ohms, 1 kHz)
Subwoofer:
Output power (reference):
230 W (at 3 ohms, 100 Hz)
36
MHC-ECL77BT
U.S. model:
Output power (reference):
235 W + 235 W (per channel at
3ohms, 1 kHz)
Brazilian model:
Output power (reference):
320 W (160 W per channel, at
3ohms, 1kHz, 10% THD)
Other models:
Power output (rated):
60 W + 60 W (at 3 ohms, 1 kHz, 1%
THD)
Output power (reference):
235 W + 235 W (per channel at
3ohms, 1 kHz)
GB
Page 37

Input
Mideastern, African and Latin American
models:
AUDIO IN L/R: Sensitivity 800mV,
impedance 10kilohms
Other models:
AUDIO IN (stereo mini jack):
Sensitivity 800 mV, impedance
10kilohms
Outputs
FRONT SPEAKERS (MHC-ECL99BT)/
SPEAKERS (MHC-ECL77BT): Accepts
impedance of 3ohms
SUBWOOFER (MHC-ECL99BT only):
Accepts impedance of 3ohms
CD player section
System: Compact disc and digital audio
system
Laser Diode Properties
Emission Duration: Continuous
Laser Output*: Less than 44.6µW
* This output is the value
measurement at a distance of
200mm from the objective lens
surface on the Optical Pick-up Block
with 7mm aperture.
USB section
(USB) port: Type A, maximum current
1.5A
Tuner section
FM stereo
North American model:
FM superheterodyne tuner
Other models:
FM/AM superheterodyne tuner
Antenna:
FM lead antenna
AM loop antenna (except for North
American model)
FM tuner section:
Tuning range:
North American and Brazilian
models: 87.5MHz – 108.0MHz
(100kHz step)
Other models: 87.5MHz – 108.0MHz
(50kHz step)
AM tuner section (except for North
American model):
Tuning range:
European and Russian models:
531kHz – 1,602kHz (9kHz step)
African and Mideastern models:
531kHz – 1,602kHz (9kHz step)
530kHz – 1,610kHz (10kHz step)
Other models:
531kHz – 1,710kHz (9kHz step)
530kHz – 1,710kHz (10kHz step)
Additional Information
Supported audio formats (MP3 discs and
USB devices only)
Supported bit rate:
MP3 (MPEG 1 Audio Layer-3):
32kbps 320kbps, VBR
WMA*: 32kbps 192kbps, VBR
Sampling frequencies:
MP3 (MPEG 1 Audio Layer-3):
32/44.1/48 kHz
WMA*: 44.1 kHz
* USB devices only
37
GB
Page 38

BLUETOOTH section
Communication system:
BLUETOOTH Standard version 3.0
Output:
BLUETOOTH Standard Power Class 2
Maximum communication range:
Line of sight approx. 10 m (33 feet)
Frequency band:
2.4 GHz band (2.4000 GHz –
2.4835GHz)
Modulation method:
FHSS (Freq Hopping Spread
Spectrum)
Compatible BLUETOOTH profiles
A2DP (Advanced Audio Distribution
Profile)
AVRCP 1.3 (Audio Video Remote
Control Profile)
SPP (Serial Port Profile)
Supported codecs:
SBC (Sub Band Codec)
AAC (Advanced Audio Coding)
1)
The actual range will vary depending
on factors such as obstacles between
devices, magnetic fields around a
microwave oven, static electricity,
reception sensitivity, antenna’s
performance, operating system, software
application, etc.
2)
BLUETOOTH standard profiles indicate the
purpose of BLUETOOTH communication
between devices.
3)
Except for North American model
2)
:
3)
Speaker
Front speaker
North American, European, Russian and
Australian models: SS-EC719iP
Other models: SS-ECL77BT
1)
Speaker system: 2-way speaker system,
Bass reflex
Speaker units:
Woofer: 160mm (6 /in), cone type
Tweeter: 40mm (1 /in), horn type
Rated impedance: 3 ohms
Dimensions (W/H/D):
Approx. 230 mm × 304 mm ×
205mm (9in × 12in × 8/in)
Mass: Approx. 2.5kg (5lb 8 /oz) net
per speaker
Quantity: 2 pieces
Subwoofer for MHC-ECL99BT only
North American, European, Russian and
Australian models: SS-WG919iP
Other models: SS-WEC99BT
Speaker system: Subwoofer system, Bass
reflex
Speaker unit: 200 mm (8in), cone type
Rated impedance: 3ohms
Dimensions (W/H/D):
Approx. 280mm × 304mm ×
290mm (11in × 12in × 11/in)
Mass: Approx. 5.0kg (11lb /oz) net per
speaker
Quantity: 1 piece
38
GB
Page 39

General
Power requirements:
North American model: AC 120V,
60 Hz
Mexican and Brazilian models:
AC120V – 240V, 60Hz
Other models: AC 120V 240V,
50/60Hz
Power consumption:
MHC-ECL99BT: 90W
MHC-ECL77BT: 75W
Standby power consumption (at the
Power Saving mode):
When BLUETOOTH standby mode is
set to off: 0.5W (eco mode)
When BLUETOOTH standby mode is
set to on: 4W (all wireless network
ports on)
Dimensions (W/H/D, including largest
protrusions) (excl. speakers):
MHC-ECL99BT: Approx. 193mm
× 300mm × 260mm (7 /in ×
11/in × 10 /in)
MHC-ECL77BT: Approx. 193mm
× 300mm × 260mm (7 /in ×
11/in × 10 /in)
Mass (excl. speakers):
MHC-ECL99BT: Approx. 3.1kg (6lb
13 /oz)
MHC-ECL77BT: Approx. 3.1kg (6lb
13 /oz)
Quantity of the main unit: 1 piece
Supplied accessories:
Remote control (1)
R6 (size AA) battery (1)
FM lead antenna (1)
AM loop antenna (1) (except for
North American model)
Design and specifications are subject to
change without notice.
License and Trademark
Notice
ˎ MPEG Layer-3 audio coding
technology and patents licensed
from Fraunhofer IIS and Thomson.
ˎ Windows Media is either a registered
trademark or trademark of Microsoft
Corporation in the United States
and/or other countries.
ˎ This product is protected by
certain intellectual property rights
of Microsoft Corporation. Use or
distribution of such technology
outside of this product is prohibited
without a license from Microsoft or
an authorized Microsoft subsidiary.
ˎ The BLUETOOTH® word mark and
logos are registered trademarks
owned by Bluetooth SIG, Inc. and
any use of such marks by Sony
Corporation is under license. Other
trademarks and trade names are
those of their respective owners.
ˎ The N Mark is a trademark or
registered trademark of NFC Forum,
Inc. in the United States and in other
countries.
ˎ Android™ is a trademark of Google
Inc.
ˎ Google Play™ is a trademark of
Google Inc.
ˎ iPhone and iPod touch are
trademarks of Apple Inc., registered
in the U.S. and other countries. App
Store is a service mark of Apple Inc.
ˎ All other trademarks and registered
trademarks are of their respective
holders. In this manual,
marks are not specified.
TM
and ®
Additional Information
39
GB
Page 40

AVERTISSEMENT
Pour éviter les risques d’incendie, ne
couvrez pas l’orifice de ventilation de
l’appareil avec des journaux ou des
nappes, des rideaux, etc.
Ne placez pas l’appareil à proximité de
flammes nues, telles que des bougies
allumées.
Pour éviter les risques d’incendie ou
de décharge électrique, n’exposez
pas l’appareil aux gouttes ou aux
éclaboussures, et ne placez pas sur ce
dernier d’objets contenant des liquides,
tels que des vases.
N’installez pas l’appareil dans un endroit
exigu tel qu’une bibliothèque ou un
meuble encastré.
La fiche principale étant utilisée pour
déconnecter l’appareil du secteur,
branchez l’appareil sur une prise secteur
facilement accessible. Si vous constatez
une anomalie de l’appareil, débranchez
immédiatement la fiche principale de la
prise secteur.
N’exposez pas les batteries ou les
équipements dans lesquelles des
batteries sont installées à une chaleur
excessive, par exemple la lumière directe
du soleil ou le feu.
L’appareil n’est pas déconnecté du
secteur tant qu’il est branché à la prise
secteur, même si l’appareil lui-même a
été éteint.
ATTENTION
L’utilisation d’instruments optiques avec
ce produit augmente les risques pour
les yeux.
FR
2
Pour les clients situés au Canada
Le présent équipement est conforme
aux CNR d’Industrie Canada applicable
aux appareils radio exempts de licence.
L’exploitation est autorisée aux deux
conditions suivantes:
(1) l’équipement ne doit pas produire de
brouillage, et
(2) l’équipement doit accepter
tout brouillage radioélectrique
subi, même si le brouillage est
susceptible d’en compromettre le
fonctionnement.
Cet équipement est conforme aux
limites d’exposition aux rayonnements
IC énoncées pour un environnement non
contrôlé et il satisfait le CNR 102 des règles
d’exposition aux radiofréquences IC.
Cet équipement émet de très faibles
niveaux d’énergie de radiofréquence
et il est jugé conforme sans évaluation
d’exposition maximale admissible. Il
est toutefois souhaitable de l’installer
et de l’utiliser en éloignant l’élément
rayonnant d’au moins 20 cm du corps
d’une personne (sauf les extrémités:
mains, poignets, pieds et chevilles).
Elimination des piles et accumulateurs
et des Equipements Electriques et
Electroniques usagés (Applicable dans
les pays de l’Union Européenne et aux
autres pays européens disposant de
systèmes de collecte sélective)
Ce symbole apposé sur le
produit, la pile ou
l’accumulateur ou sur
l’emballage, indique que le
produit et les piles et
accumulateurs fournis avec
ce produit ne doivent pas être traités
comme de simples déchets ménagers.
Sur certains types de piles, ce symbole
apparaît parfois combiné avec un
symbole chimique. Les symboles pour le
mercure (Hg) ou le plomb (Pb) sont
rajoutés lorsque ces piles contiennent
plus de 0,0005% de mercure ou 0,004%
de plomb. En vous assurant que les
produits, piles et accumulateurs sont mis
au rebut de façon appropriée, vous
participez activement à la prévention des
conséquences négatives que leur
mauvais traitement pourrait provoquer
sur l’environnement et sur la santé
humaine. Le recyclage des matériaux
contribue par ailleurs à la préservation
des ressources naturelles.
Page 41

Pour les produits qui pour des raisons
de sécurité, de performance ou
d’intégrité de données nécessitent
une connexion permanente à une pile
ou à un accumulateur, il conviendra
de vous rapprocher d’un Service
Technique qualifié pour effectuer
son remplacement. En rapportant
votre appareil électrique, les piles et
accumulateurs en fin de vie à un point
de collecte approprié vous vous assurez
que le produit, la pile ou l’accumulateur
incorporé sera traité correctement. Pour
tous les autres cas de figure et afin
d’enlever les piles ou accumulateurs
en toute sécurité de votre appareil,
reportez-vous au manuel d’utilisation.
Rapportez les piles et accumulateurs,
et les équipements électriques et
électroniques usagés au point de
collecte approprié pour le recyclage.
Avis aux clients : les informations
suivantes ne concernent que les
appareils vendus dans les pays
appliquant les directives de l’Union
européenne.
Ce produit a été fabriqué par ou pour le
compte de Sony Corporation, 1-7-1 Konan
Minato-ku Tokyo, 108-0075 Japon. Toutes
les questions relatives à la conformité
des produits basées sur la législation
européenne doivent être adressées à
son représentant, Sony Deutschland
GmbH, Hedelfinger Strasse 61, 70327
Stuttgart, Allemagne. Pour toute
question relative au Service Après-Vente
ou à la Garantie, merci de bien vouloir
vous référer aux coordonnées qui vous
sont communiquées dans les documents
«Service (SAV) » ou Garantie.
Par la présente Sony Corp. déclare que
l’appareil est conforme aux exigences
essentielles et aux autres dispositions
pertinentes de la directive 1999/5/CE.
Pour toute information complémentaire,
veuillez consulter l’URL suivante :
http://www.compliance.sony.de/
Remarque sur les DualDiscs
Un DualDisc est un disque double face
qui comporte les données d’un DVD
sur une face et des données audio
numériques sur l’autre face. La face du
contenu audio des DualDiscs n’étant
pas conforme à la norme Compact
Disc (CD), la lecture de ces disques sur
cet appareil n’est pas garantie.
Disques audio encodés par des
technologies de protection des
droits d’auteur
Cet appareil est conçu pour la lecture
de disques conformes à la norme
Compact Disc (CD). Récemment,
des disques audio encodés par des
technologies de protection des droits
d’auteur ont été mis en vente par
certaines compagnies de disques.
Veuillez noter que, parmi ces disques,
certains ne sont pas conformes à la
norme CD et qu’il est possible qu’ils ne
puissent pas être lus sur cet appareil.
Le système audio maison est conçu
pour lire des sources musicales
présentes sur des CD ou des
périphériques USB, pour transférer de
la musique sur des périphériques USB,
pour écouter des stations de radio et
pour écouter de la musique présente
sur des périphériques BLUETOOTH.
FR
FR
3
Page 42

Table des matières
Guide des pièces et
commandes ............................... 5
Préparation
Installation du système en
sécurité ......................................9
Insertion des piles ................... 10
Réglage de l’horloge ............... 10
À propos de la gestion de
l’énergie ................................... 10
Disque
Lecture d’un CD/disque MP3 ... 11
Tuner
Écoute de la radio .....................13
Périphérique USB
Avant d’utiliser le périphérique
USB ........................................... 14
Transfert de musique à partir
d’un disque ...............................15
Lecture d’un fichier .................. 16
Autres opérations
Utilisation d’un composant
audio facultatif ........................25
Réglage du son........................ 25
Changement de l’affichage .....26
Utilisation des minuteries .......26
Informations
supplémentaires
Informations sur les
périphériques compatibles ..... 28
Guide de dépannage ..............28
Messages ................................. 33
Précautions ..............................34
Spécifications ...........................36
Avis concernant la licence et
les marques commerciales .....39
Périphérique BLUETOOTH
À propos de la technologie
sans fil BLUETOOTH ................. 19
Écouter de la musique sans fil
sur un périphérique
BLUETOOTH ............................. 19
Réglage des codecs audio
BLUETOOTH ............................. 23
Réglage du mode veille
BLUETOOTH ............................. 23
Activation ou désactivation du
signal BLUETOOTH ................... 24
Utilisation de «SongPal» via
BLUETOOTH ............................. 24
FR
4
Page 43

Guide des pièces et commandes
Ce manuel explique comment exécuter les opérations principalement avec la
télécommande. Il est également possible d’exécuter les mêmes opérations à
l’aide des touches de l’unité dont les noms sont identiques ou ressemblants.
Unité
Modèles destinés à l’Amérique du Nord, à
l’Europe, à la Russie et à l’Australie
Modèles destinés au MoyenOrient, à l’Afrique et à
l’Amérique latine
À propos de la fonction de verrouillage enfant
Vous pouvez verrouiller les touches de l’unité sauf (marche/veille) pour éviter
qu’elles soient actionnées par erreur. Appuyez sur la touche (arrêt) sur l’unité
jusqu’à ce que «LOCK ON» ou «LOCK OFF» s’affiche à l’écran. À l’exception de
, les touches de l’unité sont verrouillées ou déverrouillées.
FR
5
Page 44

Télécommande
Touche (marche/veille)
Appuyez sur cette touche pour
allumer ou éteindre le système.
Touche MEGA BASS (page 25)
Appuyez sur cette touche pour
obtenir un son plus dynamique.
Capteur de télécommande
(Marque N) (page21)
Indication du point tactile NFC
(Near Field Communication).
Touche REC TO USB (page 15)
Appuyez sur cette touche pour
transférer de la musique à partir
d’un disque vers le périphérique
USB en option connecté.
Unité: Touche ENTER
Télécommande: Touche
Appuyez sur cette touche pour
entrer/vérifier les paramètres.
Touche TUNING+/TUNING–
Appuyez sur cette touche pour
sélectionner la station de votre
choix.
Touche (précédent)/
(suivant)
Appuyez sur cette touche pour
sélectionner une plage ou un
fichier.
Touche (arrière)/ (avant)
Appuyez sur cette touche pour
localiser un point dans une plage
ou un fichier.
Télécommande: Touche
PRESET+/PRESET–
Appuyez sur cette touche pour
sélectionner une station de radio
préréglée.
Touche +/ – (sélectionner
dossier) (page 11, 16)
Appuyez sur cette touche pour
sélectionner un dossier.
Unité : Touche PRESET+/PRESET–
Appuyez sur cette touche pour
sélectionner une station de radio
préréglée.
Télécommande: Touche ///
Actionnez pour sélectionner un
élément.
Touche OPEN/CLOSE
Appuyez sur cette touche pour
ouvrir ou fermer le plateau de
disque.
Unité: Commande VOLUME
Tournez cette commande pour
régler le volume.
Télécommande: Touche VOLUME
+*/–
Appuyez sur cette touche pour
régler le volume.
Port (USB)
Permet de raccorder un
périphérique USB en option.
FR
6
Page 45

Prise AUDIO IN (modèles destinés
à l’Amérique du Nord, à l’Europe,
à la Russie et à l’Australie)
Prises AUDIO IN L/R (modèles
destinés au Moyen-Orient, à
l’Afrique et à l’Amérique latine)
Branchez un composant audio
externe.
BLUETOOTH(page20)
ˋ Appuyez sur cette touche
pour sélectionner la fonction
BLUETOOTH.
ˋ Maintenez cette touche
enfoncée pour activer le pairage
BLUETOOTH dans la fonction
BLUETOOTH.
Unité : Indicateur BLUETOOTH
(page19)
Unité : Touche EQ
Télécommande: Touche
EQ +/EQ – (page 25)
Appuyez sur cette touche pour
sélectionner l’effet sonore
préréglé.
Touche (arrêt)
ˋ Appuyez sur cette touche pour
arrêter la lecture.
ˋ Appuyez sur cette touche pour
arrêter un transfert de musique
en cours.
Unité : Touche (lire/pause)
Appuyez sur cette touche pour
commencer la lecture ou passer en
pause de lecture.
Télécommande: Touche (lire)*
Appuyez sur cette touche pour
commencer la lecture.
Télécommande: Touche
(pause)
Appuyez sur cette touche pour
mettre la lecture en pause.
Touche FUNCTION
Appuyez sur cette touche pour
sélectionner le mode.
Touche PLAY MODE/TUNING
MODE
ˋ Appuyez sur cette touche
pour sélectionner le mode de
lecture d’un CD, d’un disque
MP3 ou d’un périphérique USB
(page11, 17).
ˋ Appuyez sur cette touche pour
sélectionner le mode de sélection
des stations (page 13).
Touche REPEAT/FM MODE
ˋ Appuyez sur cette touche pour
activer le mode de lecture en
boucle (page 11, 16).
ˋ Appuyez sur cette touche pour
sélectionner le mode de réception
FM (mono ou stéréo) (page 13).
Touche OPTIONS
Appuyez sur cette touche pour
ouvrir ou fermer les menus
d’options.
Touche CLEAR (page 12, 18)
Appuyez sur cette touche pour
supprimer la dernière étape de la
liste du programme.
Touche RETURN
Appuyez sur cette touche pour
revenir à l’écran précédent.
Touche TUNER MEMORY
(page13)
Appuyez sur cette touche pour
mémoriser une station de radio.
Touche TUNER MEMORY NUMBER
(page 13)
Appuyez sur cette touche pour
sélectionner une station de radio
préréglée.
FR
7
Page 46

Touche DISPLAY (page 26)
Appuyez sur cette touche pour
changer les informations sur
l’affichage.
Touche SLEEP (page 26)
Appuyez sur cette touche pour
régler la minuterie d’arrêt.
Touche TIMER MENU
(page10,26)
Appuyez sur cette touche pour
régler l’horloge et la minuterie de
lecture.
* Les touches VOLUME + et de la
télécommande disposent d’un point
tactile. Utilisez ce point tactile comme
repère lorsque vous commandez le
système.
FR
8
Page 47

Préparation
Installation du système en sécurité
Pour MHC-ECL77BT
Pour le modèle destiné à l’Amérique du Nord
Préparation
Vers le caisson de basses
Vers le haut-parleur gauche
Vers le haut-parleur droit
Cordon haut-parleur (rouge/)
Cordon haut-parleur (noir/)
SUBWOOFER (MHC-ECL99BT
seulement)
Connectez le cordon du caisson de
basses à la prise SUBWOOFER. Placez
le caisson de basses en position
verticale pour obtenir une meilleure
reproduction des basses. De même,
placez le caisson de basses :
ˋsur un sol dur lorsque le risque de
résonance est faible.
ˋà au moins quelques centimètres
du mur.
ˋloin du centre de la pièce ou en
plaçant une étagère contre un mur,
afin d’éviter de générer une onde
stationnaire.
Cordon d’antenne FM (à étendre
horizontalement.)
Antenne cadre AM (sauf pour le
modèle destiné à l’Amérique du Nord)
Vers prise murale
FRONT SPEAKERS (MHC-
ECL99BT)/SPEAKERS (MHCECL77BT)
Branchez les cordons des hautparleurs.
ANTENNA
Veillez à introduire le connecteur de
l’antenne dans le bon sens.
Lorsque vous mettez l’antenne en
place, trouvez un emplacement et
une orientation offrant une bonne
réception.
Maintenez l’antenne loin des cordons
de haut-parleurs et du cordon
d’alimentation pour éviter de capter
du bruit parasite.
Alimentation
Branchez le cordon d’alimentation à
une prise murale.
FR
9
Page 48

Avant de transporter le système
Vérifiez qu’aucun disque n’est chargé
et qu’aucun périphérique USB n’est
connecté, et débranchez le cordon
d’alimentation de la prise murale.
Insertion des piles
Insérez une pile R6 (format AA)
(fournie), qui correspond à la polarité
présentée ci-dessous.
Remarques sur l’utilisation de la
télécommande
ˎ En utilisation normale, l’autonomie de la
pile est d’environ six mois.
ˎ Si vous n’utilisez pas la télécommande
pendant longtemps, retirez la pile pour
éviter toute détérioration en cas de fuite
ou de corrosion.
Réglage de l’horloge
1
Appuyez sur pour allumer
le système.
2
Appuyez sur TIMER MENU
pour sélectionner le mode de
réglage de l’horloge.
Si «SELECT» s’affiche, appuyez
sur / plusieurs fois pour
sélectionner «CLOCK», puis
appuyez sur (ENTER).
3
Appuyez plusieurs fois sur
/ pour régler l’heure, puis
appuyez sur
4
Procédez de la même manière
pour régler les minutes.
Remarques
ˎ Les paramètres de l’horloge sont perdus
lorsque vous déconnectez le cordon
d’alimentation ou si une panne de courant
se produit.
ˎ Lorsque vous réglez l’horloge,
sélectionnez d’abord une autre fonction
que la fonction Audio in.
Pour afficher l’horloge lorsque le
système est éteint
Appuyez sur DISPLAY. L’horloge
s’affiche quelques secondes.
.
10
À propos de la gestion
de l’énergie
Par défaut, ce système se désactive
automatiquement après environ
15 minutes d’inactivité, et si aucun
signal audio n’est détecté. Pour des
informations détaillées, voir «Pour
désactiver la fonction de veille
automatique» (page33).
FR
Page 49

Disque
Lecture d’un CD/disque
MP3
1
Passez en mode CD.
Appuyez sur CD.
2
Mettez un disque en place.
Appuyez sur OPEN/CLOSE sur
l’unité pour ouvrir le plateau de
disque, puis placez un disque côté
imprimé vers le haut sur le plateau.
3
Appuyez sur OPEN/CLOSE
sur l’unité pour fermer le
plateau de disque.
4
Commencez la lecture.
Appuyez sur (lecture).
Autres opérations
Pour Appuyez
Passer en
pause de la
lecture
Arrêter la
lecture
Sélectionner
un dossier
sur un disque
MP3
Sélectionner
une plage ou
un fichier
Localiser un
point d’une
plage ou
d’un fichier
Sélectionner
la lecture
répétée
Sur . Pour reprendre
la lecture, appuyez sur
.
Sur . Pour reprendre
la lecture, appuyez sur
. Pour annuler la
reprise de la lecture,
appuyez encore sur .
Plusieurs fois sur
+/ –.
Sur /.
Maintenez /
enfoncé pendant la
lecture, puis relâchez
la touche au moment
souhaité.
Plusieurs fois sur
REPEAT/FM MODE
jusqu’à ce que
«REP ONE
FLDR2)» ou «REP
ALL3)»s’affiche.
1)
», «REP
Pour Appuyez
Changer de
mode de
lecture
1)
«REP ONE»: Lit en boucle la plage ou le
fichier actuel.
2)
«REP FLDR» (disque MP3 seulement) : Lit
en boucle le dossier actuel.
3)
«REP ALL»: Lit en boucle toutes les
plages ou tous les fichiers.
Remarques sur la lecture de disques MP3
ˎ N’enregistrez pas d’autres types de fichiers
ou des dossiers inutiles sur un disque sur
lequel sont copiés des fichiers MP3.
ˎ Les dossiers qui ne contiennent pas de
fichiers MP3 sont ignorés.
ˎ Les fichiers MP3 sont relus dans leur ordre
d’enregistrement sur le disque.
ˎ Le système peut seulement lire des fichiers
MP3 dont l’extension de fichier est «.mp3».
ˎ Même lorsque le nom de fichier possède
la bonne extension, si le fichier réel diffère,
sa lecture peut entraîner l’émission d’un
bruit puissant susceptible de provoquer
un dysfonctionnement du système.
ˎ Le nombre maximum de:
ˋ dossiers est 256 (y compris le dossier
racine).
ˋ fichiers MP3 est 999.
ˋ niveaux de dossiers (arborescence de
fichiers) est 8.
ˎ La compatibilité avec tous les logiciels
de codage/écriture MP3, dispositifs et
supports d’enregistrement n’est pas
garantie. Des disques MP3 incompatibles
peuvent produire du bruit ou des
interruptions de son ou ne pas être lus.
Plusieurs fois sur PLAY
MODE/TUNING MODE
tandis que le lecteur
est arrêté. Vous pouvez
sélectionner la lecture
normale («FLDR» pour
tous les fichiers MP3
présents dans le dossier
sur le disque), la lecture
aléatoire («SHUF» ou
«FLDRSHUF»pour
la lecture aléatoire
de dossiers), ou la
lecture de programme
(«PROGRAM»).
Disque
11
FR
Page 50

Remarque sur la lecture de disques
multisession
Le système peut lire des sessions continues
sur un disque lorsque celles-ci sont
enregistrées au même format de session
que la première. Lorsqu’une session
enregistrée dans un format de session
différent est trouvée, cette session et celles
qui suivent ne peuvent pas être relues.
Notez que même si les sessions sont
enregistrées au même format, certaines
risquent de ne pas être lues.
Création d’un programme de
lecture (lecture programmée)
1
Passez en mode CD.
Appuyez sur CD.
2
Sélectionnez le mode de
lecture.
Appuyez plusieurs fois sur PLAY
MODE/TUNING MODE jusqu’à ce
que «PROGRAM» s’affiche tandis
que le lecteur est arrêté.
3
Sélectionnez le numéro de
plage ou de fichier désiré.
Appuyez plusieurs fois sur
/ jusqu’à ce que le numéro
de plage ou de fichier souhaité
s’affiche.
5
Répétez les opérations
des étapes 3 à 4 pour
programmer d’autres plages
ou fichiers (64 plages ou
fichiers au maximum).
6
Pour lire votre programme
de plages ou de fichiers,
appuyez sur .
Le programme s’efface lorsque
vous effectuez l’une des opérations
suivantes :
ˋ changement de fonction.
ˋ mise hors tension du système.
ˋ débranchement du cordon
d’alimentation.
ˋ ouverture du plateau de disque.
Pour rejouer le même programme,
appuyez sur .
Pour annuler la lecture programmée
Appuyez sur PLAY MODE/TUNING
MODE.
Pour supprimer la dernière étape de
la liste du programme
Appuyez sur CLEAR lorsque la lecture
est arrêtée.
12
Numéro de
plage ou
de fichier
sélectionné
Lors de la programmation de
fichiers MP3 dans un dossier
spécifique, appuyez plusieurs fois
sur +/ – pour sélectionner
le dossier souhaité, puis choisissez
un fichier.
4
Programmez la plage ou le
Durée de lecture
totale de la plage
sélectionnée
(disque CD-DA
seulement)
fichier sélectionné.
Appuyez sur pour entrer la plage
ou le fichier sélectionné.
FR
Page 51

Tuner
Écoute de la radio
1
Sélectionnez la fonction tuner.
Pour le modèle destiné à l’Amérique
du Nord
Appuyez sur TUNER (ou plusieurs
fois sur FUNCTION sur l’unité) pour
sélectionner la fonction FM.
Pour les autres modèles
Appuyez plusieurs fois sur TUNER
(ou sur FUNCTION sur l’unité) pour
sélectionner la fonction FM ou AM.
2
Effectuez la sélection de
station.
Pour un balayage automatique
Appuyez plusieurs fois sur PLAY
MODE/TUNING MODE jusqu’à
ce que «AUTO» s’affiche, puis
appuyez sur TUNING+/TUNING–.
Le défilement s’arrête
automatiquement lorsqu’une
station est trouvée.
Si le défilement ne s’arrête pas,
appuyez sur pour l’arrêter, puis
effectuez une synchronisation
manuelle (voir ci-dessous).
Pour l’accord manuel
Appuyez plusieurs fois sur PLAY
MODE/TUNING MODE jusqu’à
ce que «MANUAL» s’affiche,
puis appuyez plusieurs fois
sur TUNING+/TUNING– pour
sélectionner la station voulue.
Lorsque vous sélectionnez une
station qui propose des services
RDS, le nom de cette station
s’affiche à l’écran (modèle destiné
à l’Europe seulement).
Astuce
Pour réduire le bruit statique sur une station
stéréo FM mal captée, appuyez plusieurs
fois sur REPEAT/FM MODE jusqu’à ce que
«MONO» s’affiche, afin de désactiver la
réception stéréo. Vous perdez l’effet stéréo,
mais la réception est meilleure.
Préréglage des stations de radio
1
Sélectionnez la station de
votre choix.
2
Appuyez sur TUNER MEMORY
pour sélectionner le mode de
mémorisation de tuner.
3
Appuyez plusieurs fois sur
PRESET+/PRESET– pour
sélectionner le numéro de
préréglage souhaité.
Si une autre station est déjà
attribuée au numéro de station
préréglée sélectionné, elle est
remplacée par la nouvelle station.
4
Appuyez sur pour
mémoriser la station.
5
Pour mémoriser d’autres
stations, répétez les
opérations 1 à 4.
Les stations préréglées restent
mémorisées pendant une
demi-journée environ même
si vous débranchez le cordon
d’alimentation ou s’il y a une
coupure de courant.
Pour le modèle destiné à l’Amérique
du Nord
Vous pouvez prérégler jusqu’à 20
stations FM.
Pour les autres modèles
Vous pouvez programmer jusqu’à
20 stations FM et 10 stations AM.
Pour sélectionner une station de
radio préréglée
Si vous avez associé une station de
radio à un numéro de préréglage de
1 à 4, il suffit d’appuyer sur le numéro
TUNER MEMORY NUMBER (1 à 4) pour
sélectionner la station lorsque la
fonction tuner est activée.
Si vous avez associé une station de
radio à un numéro de préréglage de
5 ou plus, appuyez plusieurs fois sur
PLAY MODE/TUNING MODE jusqu’à ce
que «PRESET» s’affiche, puis appuyez
plusieurs fois sur PRESET+/PRESET–
pour sélectionner le numéro de
préréglage souhaité.
13
Tuner
FR
Page 52

Périphérique USB
Avant d’utiliser le
périphérique USB
Pour connaître les périphériques
USB compatibles, voir «Informations
sur les périphériques compatibles»
(page28).
(Vous pouvez utiliser vos
périphériques Apple avec ce système
uniquement via une connexion
BLUETOOTH.)
Remarques
ˎ Lorsqu’une connexion par câble USB est
nécessaire, branchez le câble USB fourni
avec le périphérique USB à connecter.
Pour plus d’informations sur la procédure
d’utilisation, consultez le mode d’emploi
fourni avec le périphérique USB à
connecter.
ˎ Selon le type de périphérique USB
connecté, un long délai peut être
nécessaire avant que «SEARCH» s’affiche.
ˎ Ne connectez pas le système et le
périphérique USB par l’intermédiaire d’un
concentrateur USB.
ˎ Une fois le périphérique USB inséré, le
système lit tous les fichiers qu’il contient.
S’il y a de nombreux dossiers ou fichiers
sur le périphérique USB, cette lecture peut
prendre longtemps.
ˎ Avec certains périphériques USB
connectés, un délai peut être observé
avant que ce système effectue une
opération.
ˎ La compatibilité avec tous les logiciels
de codage/écriture n’est pas garantie.
Si les fichiers audio sur le périphérique
USB ont été encodés, à l’origine, avec un
logiciel incompatible, ces fichiers peuvent
produire du bruit ou des interruptions de
son, ou ne pas être lus du tout.
ˎ Ce système ne prend pas nécessairement
en charge toutes les fonctions proposées
par le périphérique USB connecté.
ˎ Ne retirez pas le périphérique USB
pendant les opérations de transfert ou
d’effacement. Vous pourriez altérer les
données présentes sur le périphérique,
voire l’endommager.
Pour utiliser le système comme
chargeur de batterie
Vous pouvez utiliser le système
comme chargeur de batterie pour les
périphériques USB qui possèdent une
fonction de recharge.
Connectez le périphérique USB au
port
(USB).
La charge démarre lorsque le
périphérique USB est connecté au
(USB). Pour plus d’informations,
port
consultez le mode d’emploi de votre
périphérique USB.
14
FR
Page 53

Transfert de musique à
partir d’un disque
Vous pouvez transférer de la musique
à partir d’un disque (CD-DA ou MP3)
en utilisant les modes de transfert
suivants qu’offre ce système.
Transfert CD SYNC: Transfère toutes
les plages CD-DA à partir du disque
CD-DA.
Transfert de dossier MP3: Transfère
les fichiers MP3 dans un dossier
spécifique à partir du disque MP3.
Transfert REC1 : Transfère la plage ou
le fichier MP3 en cours de lecture à
partir du disque.
1
Passez en mode CD.
Appuyez sur CD.
2
Connectez le périphérique
USB au port
3
Chargez le disque que vous
voulez transférer.
4
Préparez le transfert.
Passez à l’étape 5 en cas de
transfert CD SYNC.
Pour transférer un dossier MP3
Pour transférer des fichiers MP3
dans un dossier spécifique,
appuyez plusieurs fois sur +/
– pour sélectionner le dossier
souhaité. Ensuite, démarrez la
lecture et appuyez une fois sur .
Vérifiez que le temps de lecture
écoulé s’est arrêté sur l’afficheur.
Pour le transfert REC1
Appuyez sur / pour
sélectionner la plage ou le fichier
MP3 que vous voulez transférer,
puis démarrez la lecture.
Pour transférer un fichier MP3 dans
un dossier spécifique, appuyez
plusieurs fois sur +/ – pour
sélectionner le dossier souhaité,
puis appuyez sur / pour
sélectionner le fichier MP3 que
vous voulez transférer. Ensuite,
démarrez la lecture.
5
Appuyez sur REC TO USB sur
l’unité.
«READY» s’affiche à l’écran.
(USB).
6
Appuyez sur .
Le transfert démarre, puis
«USB REC» apparaît sur l’écran.
Ne retirez pas le périphérique USB
tant que le transfert n’est pas fini.
Une fois le transfert terminé,
«COMPLETE» s’affiche à l’écran
et les fichiers audio sont créés au
format MP3.
Pour arrêter le transfert
Appuyez sur .
Règles de génération de dossiers
et fichiers
Lors du premier transfert vers
un périphérique USB, un dossier
(«CDDA001*», «MP3_REC1» ou
«CD_REC1») est créé directement
sous le dossier «ROOT» (en cas de
transfert de dossier MP3, un dossier
possédant le même nom que la source
du transfert est créé sous le dossier
«ROOT»).
Les dossiers et fichiers sont générés
comme suit.
Transfert CD SYNC
Source du
transfert
CD-DA
Transfert de dossier MP3
Source du
transfert
MP3 Identique à la source
Transfert REC1
Source du
transfert
MP3
CD-DA
* Les numéros de dossiers et de fichiers
sont ensuite attribués en série.
Nom de
dossier
«CDDA001»* «TRACK001»*
Nom de
dossier
de transfert
Nom de
dossier
«MP3_REC1»
«CD_REC1» «TRACK001»*
Nom de
fichier
Nom de
fichier
Nom de
fichier
Identique à
la source de
transfert
Périphérique USB
FR
15
Page 54

Remarques
ˎ Si vous débutez le transfert en mode de
lecture aléatoire ou en boucle, le mode de
lecture sélectionné est automatiquement
changé en mode de lecture normale.
ˎ Les informations CD-TEXT ne sont pas
transférées dans les fichiers MP3 créés. Ce
système ne prend pas en charge la norme
CD-TEXT.
ˎ Le transfert s’arrête automatiquement si:
ˋ l’espace sur le périphérique USB
devient insuffisant pendant le transfert.
ˋ le nombre de fichiers audio et de
dossiers présents dans le périphérique
USB atteint la limite numérique que le
système peut reconnaître.
ˎ Si un dossier ou un fichier que vous
essayez de transférer possède le même
nom sur le périphérique USB, un numéro
séquentiel est ajouté après le nom sans
que le dossier ou le fichier d’origine ne
soit écrasé.
ˎ N’utilisez pas les touches de la
télécommande ou de l’unité pendant
le transfert pour éviter qu’il ne soit
interrompu.
Remarque sur les contenus protégés
par des droits d’auteur
L’utilisation de la musique transférée
est limitée à un usage strictement privé.
Une utilisation de la musique au-delà de
cette limite nécessite l’autorisation des
détenteurs des droits d’auteur.
Lecture d’un fichier
Les formats audio que ce système
peut lire sont MP3/WMA*.
* Il est impossible de lire des fichiers dont
les copyrights sont protégés par DRM
(Digital Rights Management).
Il se peut que des fichiers téléchargés
depuis une boutique de musique en ligne
ne puissent pas être lus sur ce système.
1
Sélectionnez le mode USB.
Appuyez sur USB.
2
Connectez le périphérique
USB au port
3
Commencez la lecture.
Appuyez sur .
Autres opérations
Pour Appuyez
Passer en
pause de la
lecture
Arrêter la
lecture
Sélectionner
un dossier
Sélectionner
un fichier
Localiser un
point d’un
fichier
Sélectionner
la lecture
répétée
(USB).
Sur . Pour reprendre
la lecture, appuyez sur
.
Sur . Pour reprendre
la lecture, appuyez sur
1)
. Pour annuler la
reprise de la lecture,
appuyez encore sur .
Plusieurs fois sur
+/ –.
Sur /.
Maintenez /
enfoncé pendant la
lecture, puis relâchez
la touche au moment
souhaité.
Plusieurs fois sur
REPEAT/FM MODE
jusqu’à ce que
«REP ONE
FLDR3)» ou «REP
ALL4)»s’affiche.
2)
», «REP
16
FR
Page 55

Pour Appuyez
Changer de
mode de
lecture
Plusieurs fois sur
PLAY MODE/TUNING
MODE tandis que le
périphérique USB
est arrêté. Vous
pouvez sélectionner
la lecture normale
(«FLDR » pour tous
les fichiers présents
dans le dossier sur
le périphérique
USB), la lecture
aléatoire («SHUF» ou
«FLDRSHUF» pour
la lecture aléatoire
de dossier), ou la
lecture de programme
(«PROGRAM»).
1)
Lors de la lecture d’un fichier VBR MP3/
WMA, le système peut reprendre la
lecture à partir d’un point différent.
2)
«REP ONE»: Lit en boucle le fichier
actuel.
3)
«REP FLDR»: Lit en boucle le dossier
actuel.
4)
«REP ALL»: Lit en boucle tous les fichiers
sur un périphérique USB.
Remarques
ˎ Ce système ne peut pas lire les fichiers
audio présents sur un périphérique USB
dans les cas suivants:
ˋ lorsque le nombre de fichiers audio
présents dans un dossier dépasse 999.
ˋ lorsque le nombre total de fichiers
audio présents sur un périphérique USB
dépasse 999.
ˋ lorsque le nombre de dossiers présents
sur un périphérique USB dépasse 256
(y compris le dossier «ROOT» et les
dossiers vides).
Il est possible que ces nombres varient
en fonction de la structure des fichiers
et dossiers. Ne sauvegardez pas d’autres
types de fichiers ou des dossiers inutiles
sur un périphérique USB contenant des
fichiers audio.
ˎ Le système ne peut lire que jusqu’à huit
niveaux hiérarchiques d’arborescence.
ˎ Les fichiers et les dossiers s’affichent dans
leur ordre de création sur le périphérique
USB.
ˎ Les dossiers qui ne contiennent pas de
fichiers audio sont ignorés.
ˎ Les formats audio que vous pouvez
écouter avec ce système sont les
suivants:
ˋ MP3: extension de fichier «.mp3»
ˋ WMA : extension de fichier «.wma»
Notez que même lorsqu’un nom de fichier
porte l’extension de fichier correcte,
si le fichier réel est différent, il se peut
que le système produise du bruit ou
dysfonctionne.
Pour effacer des fichiers audio ou
dossiers du périphérique USB
1
Sélectionnez le mode USB.
Appuyez sur USB.
2
Connectez le périphérique USB au
port
(USB).
3
Appuyez plusieurs fois sur
/ ou
sélectionner le fichier audio ou le
dossier que vous voulez effacer,
puis démarrez la lecture.
4
Appuyez sur OPTIONS.
5
Appuyez plusieurs fois sur /
pour sélectionner «ERASE», puis
appuyez sur
6
Appuyez sur / pour
sélectionner «FOLDER» ou
«FILE», puis appuyez sur
«ERASE??» clignote sur l’écran.
7
Appuyez sur .
«COMPLETE» s’affiche à l’écran.
+/ – pour
.
.
Périphérique USB
17
FR
Page 56

Création d’un programme de
lecture (lecture programmée)
1
Sélectionnez le mode USB.
Appuyez sur USB.
2
Sélectionnez le mode de
lecture.
Appuyez plusieurs fois sur PLAY
MODE/TUNING MODE jusqu’à ce
que «PROGRAM» s’affiche tandis
que le lecteur est arrêté.
3
Sélectionnez le numéro de
fichier souhaité.
Appuyez plusieurs fois sur
/ jusqu’à ce que le numéro
de fichier souhaité s’affiche.
Numéro de fichier sélectionné
Lors de la programmation de
fichiers MP3/WMA dans un dossier
spécifique, appuyez plusieurs fois
sur +/ – pour sélectionner
le dossier souhaité, puis choisissez
un fichier.
Pour annuler la lecture programmée
Appuyez sur PLAY MODE/TUNING
MODE.
Pour supprimer la dernière étape de
la liste du programme
Appuyez sur CLEAR lorsque la lecture
est arrêtée.
18
4
Programmez le fichier
sélectionné.
Appuyez sur pour entrer le
fichier sélectionné.
5
Répétez les étapes 3 à 4 pour
programmer d’autres fichiers,
jusqu’à un total de 64 fichiers.
6
Pour lire votre programme de
fichiers, appuyez sur .
Le programme s’efface lorsque
vous effectuez l’une des opérations
suivantes :
ˋ changement de fonction.
ˋ mise hors tension du système.
ˋ débranchement du cordon
d’alimentation.
Pour rejouer le même programme,
appuyez sur .
FR
Page 57

Périphérique BLUETOOTH
À propos de la
technologie sans fil
BLUETOOTH
La technologie sans fil BLUETOOTH
est une technologie à courte portée
qui permet à des périphériques
numériques d’échanger des données
sans fil. La technologie sans fil
BLUETOOTH fonctionne dans un rayon
d’environ 10 mètres (33 pieds).
Écouter de la musique
sans fil sur un
périphérique BLUETOOTH
Vous pouvez écouter de la musique
à partir de votre périphérique
BLUETOOTH sur une connexion sans
fil.
À propos de l’indicateur
BLUETOOTH
Version, profils et codecs
BLUETOOTH pris en charge
Version BLUETOOTH prise en charge:
ˎ Version BLUETOOTH standard 3.0
Profils BLUETOOTH pris en charge:
ˎ A2DP (Advanced Audio Distribution
Profile)
ˎ AVRCP 1.3 (Audio Video Remote
Control Profile)
ˎ SPP (Serial Port Profile)
Codecs BLUETOOTH pris en charge:
ˎ SBC (Sub Band Codec)
ˎ AAC (Advanced Audio Coding) (sauf
pour le modèle destiné à l’Amérique
du Nord)
Dans la fonction BLUETOOTH,
l’indicateur BLUETOOTH s’allume ou
clignote en bleu pour afficher l’état
BLUETOOTH.
État du système État de l’indicateur
Veille
BLUETOOTH
Pairage
BLUETOOTH
Connexion
BLUETOOTH
La connexion
BLUETOOTH est
établie
Clignote lentement
Clignote rapidement
Clignote
S’allume fixement
Périphérique BLUETOOTH
19
FR
Page 58

Pairage de ce système avec un
périphérique BLUETOOTH
Le pairage est une opération
qui permet à des périphériques
BLUETOOTH de s’enregistrer
mutuellement au préalable. Une
fois qu’une opération de pairage
est exécutée, il est inutile de la
réexécuter. Si votre périphérique est
un smartphone compatible NFC, la
procédure de pairage manuel est
inutile.
1
Placez le périphérique
BLUETOOTH dans un rayon
d’un mètre (3 pieds) du
système.
2
Appuyez sur BLUETOOTH
pour sélectionner la fonction
BLUETOOTH.
Si la fonction BLUETOOTH est
sélectionnée lorsque le système n’a
pas d’informations de pairage, le
système passe automatiquement
en mode de pairage.
Remarque
Si la connexion BLUETOOTH est établie,
interrompez-la. Voir «Pour mettre fin à
la connexion BLUETOOTH» (page22).
3
Maintenez BLUETOOTH
enfoncé pendant au moins
cinq secondes.
«PAIRING» clignote sur l’écran.
4
Effectuez la procédure de
pairage sur le périphérique
BLUETOOTH.
Pour des informations détaillées,
reportez-vous au mode d’emploi
de votre périphérique BLUETOOTH.
5
Sélectionnez le numéro de
modèle de l’unité sur l’écran
du périphérique BLUETOOTH.
Par exemple, sélectionnez
«SONY:MHC-ECL99BT» ou
«SONY:MHC-ECL77BT».
Si une clé de passe est requise sur
le périphérique BLUETOOTH, entrez
«0000».
6
Effectuez la connexion
BLUETOOTH sur le
périphérique BLUETOOTH.
Une fois le pairage terminé et la
connexion BLUETOOTH établie,
«BT AUDIO»s’affiche à l’écran.
Selon le périphérique BLUETOOTH,
la connexion peut démarrer
automatiquement une fois le
pairage terminé.
Remarques
ˎ Vous pouvez effectuer le pairage d’un
maximum de 8 périphériques BLUETOOTH.
Si un 9e périphérique BLUETOOTH est
inclus au pairage, le périphérique le plus
anciennement associé est supprimé.
ˎ Selon le périphérique, la «clé de passe»
peut être également appelée «code de
passe», «code PIN», «numéro PIN» ou
«mot de passe», etc.
ˎ L’état de veille du pairage du système
est annulé après 5 minutes environ. Si le
pairage échoue, redémarrez à partir de
l’étape 1.
ˎ Si vous voulez effectuer un pairage
avec un autre périphérique BLUETOOTH,
répétez les étapes 1 à 6.
Pour annuler l’opération de pairage
Appuyez sur BLUETOOTH.
20
FR
Page 59

Connexion d’un smartphone
avec une touche (NFC)
Lorsque vous touchez le système avec
un smartphone compatible NFC, le
système effectue automatiquement:
ˋl’activation de la fonction
BLUETOOTH.
ˋle pairage.
ˋla connexion BLUETOOTH.
Que signifie «NFC»?
NFC (Near Field Communication) est
une technologie sans fil qui permet à
différents périphériques, tels que des
téléphones portables et des puces
électroniques, de communiquer sans
fil à courte portée. Grâce à la fonction
NFC, il est possible d’échanger
simplement des données en touchant
le point tactile désigné sur les
périphériques compatibles NFC.
1
Téléchargez et installez l’app
«Connexion NFC facile».
Téléchargez l’app gratuite
Android™ à partir de Google
Play™ en recherchant
«Connexion NFC facile» ou
accédez-y en utilisant le code
2D ci-dessous. Des frais de
communication de données
peuvent vous être facturés.
Code 2D* pour l’accès direct
* Utilisez une app de lecture de code 2D.
Remarques
ˎ Il est possible que l’application ne soit
pas disponible dans certains pays et/
ou dans certaines régions.
ˎ Selon votre smartphone, vous pouvez
utiliser la fonction NFC sans installer
l’app. Dans ce cas, le fonctionnement
et les caractéristiques peuvent différer.
Pour des informations détaillées,
reportez-vous au mode d’emploi de
votre smartphone.
Smartphones compatibles
Smartphones intégrant la
fonction NFC (SE: Android 2.3.3
ou supérieur, sauf Android 3.x)
2
Démarrez l’app
«Connexion NFC facile» sur le
smartphone.
Vérifiez que l’écran de l’application
s’affiche.
3
Avec le smartphone, touchez
la marque N sur le système
jusqu’à ce que le smartphone
vibre.
Terminez la connexion en suivant
les instructions qui s’affichent sur le
smartphone.
Une fois la connexion BLUETOOTH
établie, l’indicateur BLUETOOTH
cesse de clignoter et s’allume
fixement. «BT AUDIO» s’affiche à
l’écran.
Vous pouvez commuter la source
audio entre un smartphone et un
autre périphérique BLUETOOTH
compatible NFC.
Pour des informations détaillées,
reportez-vous au mode d’emploi
de votre périphérique BLUETOOTH.
Astuce
Si le pairage et la connexion BLUETOOTH
échouent, procédez comme suit:
ˋ Relancez «Connexion NFC facile» et
déplacez lentement le smartphone sur la
marque N.
ˋ Si vous utilisez un étui vendu dans le
commerce, retirez le smartphone de
celui-ci.
Périphérique BLUETOOTH
21
FR
Page 60

Écouter de la musique sur un
périphérique BLUETOOTH
Vous pouvez commander un
périphérique BLUETOOTH en
connectant le système et le
périphérique BLUETOOTH à l’aide
d’AVRCP.
Vérifiez les points suivants avant de
lire de la musique :
ˋLa fonction BLUETOOTH du
périphérique BLUETOOTH est
activée.
ˋLe pairage est terminé.
Pour lire de la musique sur un
périphérique BLUETOOTH non
compatible NFC
1
Appuyez sur BLUETOOTH
pour sélectionner la fonction
BLUETOOTH.
«BT AUDIO» s’affiche à l’écran.
2
Établissez la connexion avec
le périphérique BLUETOOTH.
Le dernier périphérique
BLUETOOTH connecté est
automatiquement connecté.
Exécutez la connexion BLUETOOTH
à partir du périphérique
BLUETOOTH si celui-ci n’est pas
connecté.
3
Appuyez sur .
Avec certains périphériques
BLUETOOTH,
ˋ vous devez appuyer deux fois
sur .
ˋ vous devez démarrer la lecture
d’une source audio sur le
périphérique BLUETOOTH.
Remarques
ˎ Lorsque le système n’est connecté à
aucun périphérique BLUETOOTH, il se
connecte automatiquement à partir
du dernier périphérique BLUETOOTH
connecté lorsque vous appuyez sur .
ˎ Si vous essayez de connecter un autre
périphérique BLUETOOTH au système, le
périphérique BLUETOOTH actuellement
connecté est déconnecté.
Pour lire de la musique sur un
smartphone compatible NFC
Avec le smartphone, touchez la
marque N sur le système pour établir
la connexion BLUETOOTH.
Démarrez la lecture d’une source
audio sur le smartphone. Pour des
informations détaillées sur la lecture,
reportez-vous au mode d’emploi de
votre smartphone.
Pour mettre fin à la connexion
BLUETOOTH
Périphériques BLUETOOTH non
compatibles NFC
1
Appuyez sur OPTIONS.
2
Appuyez plusieurs fois sur /
pour sélectionner «DISCONNECT»,
puis appuyez sur
Avec certains périphériques
BLUETOOTH, la connexion BLUETOOTH
peut être automatiquement
interrompue lorsque vous arrêtez la
lecture.
Smartphones compatibles NFC
Avec le smartphone, touchez à
nouveau la marque N sur le système.
.
Effacement de toutes les
informations d’enregistrement
de pairage
Pour effacer toutes les informations
d’enregistrement de pairage,
vous devez réinitialiser le système
aux réglages d’usine. Voir «Pour
réinitialiser le système aux réglages
d’usine» (page33).
22
FR
Page 61

Réglage des codecs
audio BLUETOOTH
(sauf le modèle destiné à l’Amérique
du Nord)
1
Appuyez sur BLUETOOTH
pour sélectionner la fonction
BLUETOOTH.
«BT AUDIO» s’affiche à l’écran.
Remarque
Si la connexion BLUETOOTH est établie,
interrompez-la. Voir «Pour mettre fin à
la connexion BLUETOOTH» (page22).
2
Appuyez sur OPTIONS.
3
Appuyez plusieurs fois
sur / pour sélectionner
«BT:AAC», puis appuyez sur
.
4
Appuyez plusieurs fois sur
pour sélectionner «ON»
/
ou «OFF», puis appuyez sur
.
ˎ ON : Sélectionnez ce paramètre
si le périphérique BLUETOOTH
prend en charge le codage AAC
(Advanced Audio Coding).
ˎ OFF : Sélectionnez ce paramètre
si le périphérique BLUETOOTH
ne prend en charge que le codec
SBC (Sub Band Codec).
Remarque
Vous pouvez bénéficier d’un son haute
qualité si le codage AAC est sélectionné. Si
vous ne pouvez pas écouter le son AAC à
partir de votre périphérique, sélectionnez
«OFF».
Réglage du mode veille
BLUETOOTH
Le mode veille BLUETOOTH
permet au système de s’allumer
automatiquement lorsque vous
établissez la connexion BLUETOOTH
avec un périphérique BLUETOOTH.
1
Appuyez sur OPTIONS.
2
Appuyez plusieurs fois
sur / pour sélectionner
«BT:STBY», puis appuyez sur
.
3
Appuyez plusieurs fois sur
pour sélectionner «ON»
/
ou «OFF», puis appuyez sur
.
Lorsque le mode veille BLUETOOTH
est activé, le système attend
une connexion BLUETOOTH
même lorsqu’il est hors tension.
Lorsqu’une connexion BLUETOOTH
est établie, le système s’allume
automatiquement.
Astuce
Désactivez le mode de veille BLUETOOTH
pour réduire la consommation d’énergie en
mode veille (mode éco).
Périphérique BLUETOOTH
23
FR
Page 62

Activation ou
désactivation du signal
BLUETOOTH
Utilisation de «SongPal»
via BLUETOOTH
(sauf le modèle destiné à l’Amérique
du Nord)
Vous pouvez vous connecter au
système à partir d’un périphérique
BLUETOOTH associé dans toutes les
fonctions lorsque le signal BLUETOOTH
du système est activé. Par défaut, le
signal BLUETOOTH est activé.
Utilisez les touches de l’unité pour
exécuter cette opération.
Maintenez EQ et ENTER enfoncés
pendant 5 secondes environ.
«BT ON» ou «BT OFF» s’affiche à
l’écran.
Remarques
ˎ Lorsque le signal BLUETOOTH est
désactivé, vous ne pouvez pas effectuer
les opérations suivantes:
ˋ Pairage avec un périphérique
BLUETOOTH
ˋ Réglage des codecs audio BLUETOOTH
ˋ Réglage du mode veille BLUETOOTH
ˋ Utilisation de «SongPal» via
BLUETOOTH
ˎ Lorsque le signal BLUETOOTH est
désactivé, ce système ne peut pas être
détecté et il est impossible d’établir une
connexion à partir d’un périphérique
BLUETOOTH.
À propos de l’app
Une app dédiée à ce modèle est
disponible sur Google Play et dans
l’App Store. Recherchez «SongPal»
et téléchargez l’app gratuite pour
en savoir plus sur les fonctionnalités
pratiques.
24
FR
Page 63

Autres opérations
Réglage du son
Utilisation d’un
composant audio
facultatif
1
Préparez la source audio.
Connectez un composant audio
supplémentaire à la prise ou aux
prises AUDIO IN de l’unité à l’aide
d’un cordon analogique audio (non
fourni).
2
Appuyez plusieurs fois sur
VOLUME – jusqu’à ce que
«VOL MIN» s’affiche à l’écran.
3
Sélectionnez la fonction
Audio in.
Appuyez sur AUDIO IN.
4
Commencez la lecture.
Démarrez la lecture de l’élément
connecté et réglez le volume.
Remarque
Le système peut entrer automatiquement
en mode veille si le niveau de volume de
l’élément connecté est trop bas. Réglez
le volume de l’élément en conséquence.
Voir «Pour désactiver la fonction de veille
automatique » (page 33).
Pour Appuyez
Ajuster le
volume
Générer un
son plus
dynamique
Régler l’effet
sonore
Sur VOLUME +/–.
Sur MEGA BASS.
Plusieurs fois sur
EQ +/EQ – jusqu’à
ce que l’effet audio
souhaité s’affiche.
Autres opérations
25
FR
Page 64

Changement de
l’affichage
Utilisation des
minuteries
Pour Appuyez
Changer les
informations
sur
l’affichage*
* Par exemple, vous pouvez afficher des
informations, telles que le numéro de
plage, le nom du fichier/dossier, le nom
de l’album et le nom de l’artiste.
Le système offre les modes
d’affichage suivants.
Mode
d’affichage
Mode
Économie
d’énergie
Remarques sur les informations sur
l’affichage
ˎ Les caractères impossibles à afficher
apparaissent sous forme de «_».
ˎ Les informations suivantes ne s’affichent
pas :
ˋ durée de lecture totale pour un disque
MP3 et un périphérique USB.
ˋ durée de lecture restante pour un
fichier MP3/WMA.
ˎ Les informations suivantes ne s’affichent
pas correctement :
ˋ durée de lecture écoulée d’un fichier
MP3/WMA codé à l’aide de VBR (débit
binaire variable).
ˋ noms de dossier et de fichier non
conformes aux formats ISO9660 Niveau
1/Niveau 2 dans le format d’expansion.
Plusieurs fois sur
DISPLAY lorsque le
système est sous
tension.
Lorsque le système
est éteint
l’affichage est
désactivé pour
économiser l’énergie.
L’horloge continue de
fonctionner.
Ce système est doté de deux fonctions
de minuterie. Si vous utilisez les
deux minuteries en même temps, la
minuterie d’arrêt a priorité.
Minuterie d’arrêt :
Cette fonction vous permet de vous
endormir en musique. Elle peut être
utilisée même si l’horloge n’a pas été
réglée.
Appuyez plusieurs fois sur SLEEP.
Si vous sélectionnez «AUTO», le
système s’éteint automatiquement
après l’arrêt du disque ou du
périphérique USB, ou dans un délai de
100minutes.
Minuterie de lecture :
Vous pouvez programmer un réveil par
CD, réception FM, réception AM (sauf
pour le modèle destiné à l’Amérique
du Nord) ou périphérique USB à une
heure prédéfinie.
Assurez-vous que l’horloge a été
réglée.
1
Préparez la source audio.
Préparez la source sonore, puis
appuyez sur VOLUME +/– pour
régler le volume.
2
Passez en mode de réglage
de la minuterie.
Appuyez sur TIMER MENU.
Si l’horloge n’est pas réglée, le
système est en mode de réglage
d’horloge. Dans ce cas, réglez
l’horloge.
3
Réglez la minuterie de lecture.
Appuyez plusieurs fois sur
/
«PLAY SET», puis appuyez sur .
pour sélectionner
26
4
Réglez l’heure de
commencement de la lecture.
Appuyez plusieurs fois sur /
pour régler l’heure, puis appuyez
sur . Suivez la même procédure
pour régler les minutes.
FR
Page 65

5
Suivez la même procédure
que l’étape 4 pour régler
l’heure d’arrêt de la lecture.
6
Sélectionnez la source de son.
Appuyez plusieurs fois sur /
jusqu’à ce que la source sonore
souhaitée s’affiche, puis appuyez
sur .
7
Éteignez le système.
Appuyez sur . Le système
s’allume automatiquement avant
l’heure prédéfinie.
Si le système est allumé à l’heure
programmée, la minuterie de
lecture ne sera pas activée.
N’utilisez pas le système du
moment où il s’allume jusqu’à ce
que la lecture commence.
Pour vérifier le réglage
1
Appuyez sur TIMER MENU.
2
Appuyez plusieurs fois sur
/
«SELECT», puis appuyez sur .
3
Appuyez plusieurs fois sur
/
«PLAY SEL», puis appuyez sur .
pour sélectionner
pour sélectionner
Autres opérations
Pour annuler la minuterie
Répétez la même procédure que
celle décrite dans «Pour vérifier le
réglage»jusqu’à ce que «OFF»
s’affiche à l’étape 3, puis appuyez sur
.
Pour changer le réglage
Recommencez à partir de l’étape 1 de
«Utilisation des minuteries».
Astuce
Le réglage de la minuterie de lecture
est conservé tant qu’il n’est pas annulé
manuellement.
27
FR
Page 66

Informations supplémentaires
Guide de dépannage
Informations sur
les périphériques
compatibles
À propos des périphériques USB
pris en charge
ˎ Ce système prend en charge
uniquement la classe de stockage
de masse USB.
ˎ Ce système prend en charge
uniquement les périphériques USB
formatés FAT (sauf exFAT).
ˎ Certains périphériques USB peuvent
ne pas fonctionner avec ce système.
À propos de la communication
BLUETOOTH pour l’iPhone et
l’iPod touch
ˋ iPhone 5s
ˋ iPhone 5c
ˋ iPhone 5
ˋ iPhone 4s
ˋ iPhone 4
ˋ iPod touch (5e génération)
ˋ iPod touch (4e génération)
1
Assurez-vous que le cordon
d’alimentation et les cordons
d’enceinte sont correctement
et fermement raccordés.
2
Recherchez votre problème
sur la liste des contrôles
ci-dessous et appliquez le
remède indiqué.
Si le problème persiste, adressezvous au revendeur Sony le plus
proche.
Si «PROTECT» s’affiche à
l’écran
Débranchez immédiatement le
cordon d’alimentation et vérifiez
les points suivants dès que
«PROTECT» disparaît.
ˎ Utilisez-vous seulement les haut-
parleurs fournis?
ˎ Les orifices d’aération du
système sont-ils obstrués?
Si vous avez vérifié les points
ci-dessus et n’avez découvert
aucun problème, reconnectez le
cordon d’alimentation, et allumez
le système. Si le problème persiste,
adressez-vous au revendeur Sony
le plus proche.
28
Si «OVER CURRENT» s’affiche
à l’écran
Un problème de niveau de courant
électrique du port (USB) a été
détecté. Éteignez le système et
débranchez le périphérique USB
du port (USB). Assurez-vous que
le périphérique USB ne présente
aucun problème. Si cette indication
continue à apparaître, adressezvous au revendeur Sony le plus
proche.
FR
Page 67

Généralités
Le système ne s’allume pas.
ˎ Le cordon d’alimentation est-il
branché?
Le système est passé, de manière
inattendue, en mode de veille.
ˎ Il ne s’agit pas d’un
dysfonctionnement. Le système
passe automatiquement en mode
veille après un délai d’environ 15
minutes d’inactivité et si aucun
signal audio n’est détecté.
Voir «Pour désactiver la fonction de
veille automatique» (page 33).
Le réglage de l’horloge ou le
fonctionnement de la minuterie de
lecture s’est arrêté de manière
inattendue.
ˎ Si environ une minute s’écoule
sans fonctionnement, le réglage
de l’horloge ou le paramètre
de la minuterie de lecture est
automatiquement annulé. Effectuez
à nouveau les opérations depuis le
début.
Il n’y a pas de son.
ˎ Vérifiez les connexions des haut-
parleurs.
ˎ Utilisez-vous seulement les haut-
parleurs fournis?
ˎ Les orifices d’aération du système
sont-ils obstrués?
ˎ La station sélectionnée a peut-être
momentanément cessé d’émettre.
Vous n’entendez le son que d’un seul
canal ou les niveaux du son droit et
gauche sont déséquilibrés.
ˎ Placez les haut-parleurs dans une
position la plus symétrique possible.
ˎ Ne connectez que les haut-parleurs
fournis.
Un ronflement ou un bruit important
est émis.
ˎ Éloignez le système des sources
sonores.
ˎ Connectez le système à une autre
prise murale.
ˎ Installez un filtre sonore (disponible
séparément) sur le cordon
d’alimentation.
La télécommande ne fonctionne pas.
ˎ Éliminez tous les obstacles situés
entre la télécommande et son
capteur sur l’unité, et éloignez
l’unité des lumières fluorescentes.
ˎ Orientez la télécommande vers le
capteur du système.
ˎ Rapprochez la télécommande du
système.
À l’exception de , aucune touche
de l’unité ne fonctionne et
«LOCK ON» s’ache à l’écran.
ˎ La fonction de verrouillage enfant
a été activée. Pour désactiver la
fonction de verrouillage enfant,
maintenez enfoncé sur l’unité
jusqu’à ce que «LOCK OFF»
apparaisse à l’écran.
Il est impossible d’éjecter un disque
et «LOCKED» apparaît sur l’écran.
ˎ Contactez votre distributeur Sony
ou le site de réparation Sony agréé
local.
« SEARCH » ou « READING » s’ache à
l’écran.
ˎ Utilisez le système lorsque le
message disparaît.
Disque CD/MP3
Le son sautille ou le disque n’est pas
lu.
ˎ Nettoyez le disque, et réinsérez-le.
ˎ Placez le système dans un lieu ne
subissant pas de vibrations (par
exemple sur une base stable).
ˎ Éloignez les haut-parleurs du
système ou placez-les sur leurs
propres bases. À fort volume,
il se peut que les vibrations
des enceintes provoquent le
sautillement du son.
La lecture ne démarre pas à la
première plage.
ˎ Sélectionnez le mode de lecture
normale.
Informations supplémentaires
29
FR
Page 68

La lecture met plus de temps à
commencer que d’habitude.
ˎ Les disques suivants peuvent
ralentir le temps nécessaire pour le
démarrage de la lecture:
ˋun disque enregistré avec une
arborescence complexe.
ˋun disque enregistré en mode
multisession.
ˋun disque qui n’a pas été finalisé
(un disque sur lequel il est
possible d’ajouter des données).
ˋun disque qui possède de
nombreux dossiers.
Périphérique USB
Impossible de charger le
périphérique USB connecté.
ˎ Vérifiez que le périphérique USB est
bien connecté.
Le périphérique USB ne fonctionne
pas correctement.
ˎ Si vous connectez un périphérique
USB non pris en charge, les
problèmes suivants risquent
d’apparaître. Voir «Informations
sur les périphériques compatibles»
(page 28).
ˋLe périphérique USB n’est pas
reconnu.
ˋLes noms de fichiers ou de
dossiers ne s’affichent pas sur ce
système.
ˋLa lecture est impossible.
ˋLe son saute.
ˋDu bruit est émis.
ˋUne distorsion sonore est émise.
Il n’y a pas de son.
ˎ Le périphérique USB n’est pas
correctement connecté. Éteignez
le système, puis reconnectez le
périphérique USB.
Bruits parasites, sautillement ou son
déformé.
ˎ Éteignez le système, puis
reconnectez le périphérique USB.
ˎ Les données musicales elles-mêmes
contiennent du bruit, ou une
distorsion sonore est émise. Du bruit
a pu être introduit lors du processus
de création de musique avec ce
système ou l’ordinateur. Recréez les
données audio.
ˎ La vitesse de transmission utilisée
pour coder les fichiers était basse.
Transférez les fichiers encodés au
périphérique USB en utilisant un
débit binaire supérieur.
«SEARCH»s’ache pendant
longtemps, ou il faut du temps avant
le démarrage de la lecture.
ˎ La lecture peut prendre longtemps
dans les cas suivants.
ˋDe nombreux dossiers ou fichiers
sont présents sur le périphérique
USB.
ˋLa structure de fichiers est
extrêmement complexe.
ˋLa capacité mémoire est excessive.
ˋLa mémoire interne est
fragmentée.
Achage incorrect
ˎ Les caractères qui ne peuvent pas
s’afficher apparaissent sous forme
de «_».
Le périphérique USB n’est pas
reconnu.
ˎ Éteignez le système et reconnectez
le périphérique USB, puis allumez le
système.
ˎ Voir «Informations sur les
périphériques compatibles»
(page28).
30
FR
Page 69

Le transfert a entraîné une erreur.
ˎ Voir «Informations sur les
périphériques compatibles»
(page28).
ˎ Le périphérique USB n’est pas
correctement formaté. Consultez le
mode d’emploi du périphérique USB
pour savoir comment le formater.
ˎ Éteignez le système et retirez le
périphérique USB. Si le périphérique
USB comporte un interrupteur
d’alimentation, éteignez le
périphérique USB puis rallumez-le
après l’avoir retiré du système. Puis
effectuez à nouveau le transfert.
ˎ Le périphérique USB a été
déconnecté ou l’alimentation a
été coupée pendant le transfert.
Supprimez le fichier partiellement
transféré et recommencez le
transfert. Si cela ne résout pas le
problème, il est possible que le
périphérique USB soit endommagé.
Consultez le mode d’emploi du
périphérique USB pour savoir
comment résoudre ce problème.
Impossible d’eacer les fichiers
audio ou les dossiers sur le
périphérique USB.
ˎ Vérifiez si le périphérique USB est
protégé contre l’écriture.
ˎ Le périphérique USB a été
déconnecté ou l’alimentation a
été coupée pendant l’opération
d’effacement. Supprimez le fichier
partiellement effacé. Si cela ne
résout pas le problème, il est
possible que le périphérique USB
soit endommagé. Consultez le
mode d’emploi du périphérique USB
pour savoir comment résoudre ce
problème.
La lecture ne démarre pas.
ˎ Éteignez le système et reconnectez
le périphérique USB, puis allumez le
système.
ˎ Voir «Informations sur les
périphériques compatibles»
(page28).
ˎ Appuyez sur pour démarrer la
lecture.
La lecture ne démarre pas à la
première plage.
ˎ Sélectionnez le mode de lecture
normale.
Les fichiers ne peuvent pas être lus.
ˎ Les fichiers audio peuvent avoir des
extensions de fichier inadaptées.
Les extensions de fichier prises
en charge par ce système sont les
suivantes:
ˋMP3: extension de fichier «.mp3»
ˋWMA : extension de fichier
«.wma»
ˎ Les périphériques de stockage USB
formatés avec des systèmes de
fichiers autres que FAT16 ou FAT32
ne sont pas pris en charge.*
ˎ Si vous utilisez un périphérique de
stockage USB partitionné, seuls
les fichiers de la première partition
peuvent être lus.
ˎ Les fichiers codés ou protégés par
mots de passe ou autre ne peuvent
pas être lus.
* Ce système prend en charge FAT16 et
FAT32, mais certains périphériques de
stockage USB ne prennent pas en charge
ces formats. Pour plus d’informations,
consultez le mode d’emploi de chaque
périphérique de stockage USB ou
adressez-vous au fabricant.
Tuner
Un ronflement ou un bruit important
est émis, ou les stations ne sont pas
reçues.
ˎ Connectez correctement l’antenne.
ˎ Déplacez l’antenne et modifiez
son orientation pour obtenir une
meilleure réception.
ˎ Maintenez l’antenne loin des
cordons de haut-parleurs et du
cordon d’alimentation pour éviter de
capter du bruit parasite.
ˎ Éteignez les équipements
électriques situés à proximité.
Informations supplémentaires
31
FR
Page 70

Périphérique BLUETOOTH
Impossible d’eectuer le pairage.
ˎ Rapprochez le périphérique
BLUETOOTH du système.
ˎ Le pairage peut être impossible si
d’autres périphériques BLUETOOTH
sont présents à proximité du
système. Dans ce cas, mettez hors
tension les autres périphériques
BLUETOOTH.
ˎ Pensez à entrer la bonne clé de
passe lorsque vous sélectionnez le
numéro de modèle (ce système) sur
le périphérique BLUETOOTH.
La connexion est impossible.
ˎ Le périphérique BLUETOOTH que
vous avez essayé de connecter ne
prend pas en charge le profil A2DP,
et il est impossible de le connecter
au système.
ˎ Activez la fonction BLUETOOTH du
périphérique BLUETOOTH.
ˎ Établissez une connexion à partir du
périphérique BLUETOOTH.
ˎ Les informations d’enregistrement
de pairage ont été effacées.
Recommencez le pairage.
ˎ Effacez les informations
d’enregistrement du pairage
du périphérique BLUETOOTH
en réinitialisant le système aux
paramètres d’usine (page33)
et recommencez le pairage
(page20).
Le son saute ou fluctue, ou la
connexion est perdue.
ˎ Le système et le périphérique
BLUETOOTH sont trop éloignés l’un
de l’autre.
ˎ S’il y a des obstacles entre le
système et votre périphérique
BLUETOOTH, retirez-les ou évitez-les.
ˎ Si un équipement génère un
rayonnement électromagnétique,
par exemple un réseau local sans fil,
un autre périphérique BLUETOOTH
ou un four micro-ondes proche,
éloignez-le.
Le son de votre périphérique
BLUETOOTH est inaudible sur ce
système.
ˎ Augmentez le volume d’abord sur
votre périphérique BLUETOOTH, puis
réglez le volume à l’aide de VOLUME
+/–.
Un ronflement, un bruit puissant ou
une distorsion sonore est émis.
ˎ S’il y a des obstacles entre le
système et votre périphérique
BLUETOOTH, retirez-les ou évitez-les.
ˎ Si un équipement génère un
rayonnement électromagnétique,
par exemple un réseau local sans fil,
un autre périphérique BLUETOOTH
ou un four micro-ondes proche,
éloignez-le.
ˎ Baissez le volume du périphérique
BLUETOOTH connecté.
Pour changer l’intervalle de
synchronisation AM (sauf
pour les modèles destinés à
l’Amérique du Nord, à l’Europe
et à la Russie)
L’intervalle de synchronisation AM
est préréglé par défaut sur 9 kHz ou
10kHz.
Utilisez les touches de l’unité pour
changer l’intervalle de synchronisation
AM.
1
Synchronisez-vous à une station
AM.
2
Maintenez enfoncé MEGA BASS
sur l’unité jusqu’à ce que «530»
(10 kHz) ou «531» (9 kHz) s’affiche
à l’écran.
Toutes les stations AM préréglées
sont effacées.
32
FR
Page 71

Pour réinitialiser le système aux
réglages d’usine
Si le système ne fonctionne toujours
pas correctement, réinitialisez-le aux
réglages d’usine.
1
Débranchez et rebranchez le
cordon d’alimentation, puis
allumez le système.
2
Maintenez enfoncés et EQ sur
l’unité jusqu’à ce que «RESET»
s’affiche.
Tous les paramètres configurés
par l’utilisateur, par exemple les
stations de radio préréglées, les
informations d’enregistrement de
pairage, la minuterie et l’horloge
sont restaurés aux paramètres
d’usine par défaut.
Pour désactiver la fonction de
veille automatique
Ce système est équipé d’une fonction
de veille automatique. Grâce à
cette fonction, le système passe
automatiquement en mode veille
après un délai d’environ 15 minutes
d’inactivité et si aucun signal audio
n’est détecté.
Par défaut, la fonction de veille
automatique est activée.
Maintenez enfoncé tandis que le
système est allumé, jusqu’à ce que
«AUTO STANDBY OFF» s’affiche.
Pour activer la fonction, répétez
la procédure jusqu’à ce que
«AUTO STANDBY ON » s’affiche.
Remarques
ˎ La fonction de veille automatique n’est
pas valide pour la fonction tuner.
ˎ Le système risque de ne pas passer
automatiquement en mode veille dans les
cas suivants:
ˋ lorsqu’un signal audio est détecté.
ˋ pendant la lecture de plages ou de
fichiers audio.
ˋ lorsque la minuterie de lecture ou la
minuterie d’arrêt de préréglage est
active.
Messages
DISC ERR
Vous avez chargé un disque qui ne
peut pas être lu.
ERROR
Il est impossible de transférer de la
musique sur le périphérique USB car
celui-ci est protégé contre l’écriture ou
sa mémoire est pleine.
FULL
Vous avez essayé de programmer plus
de 64 plages ou fichiers (étapes).
NO FILE
Aucun fichier pouvant être lu ne se
trouve sur les disques CD-R/CD-RW ou
sur le périphérique USB.
NO STEP
Toutes les étapes programmées ont
été effacées.
NO USB
Aucun périphérique USB n’est
connecté ou celui qui l’est n’est pas
pris en charge.
PLAY SET
Vous avez essayé de sélectionner la
minuterie alors que la minuterie de
lecture n’était pas programmée.
PLS STOP
Vous avez appuyé sur PLAY MODE/
TUNING MODE pendant la lecture.
SELECT
Vous avez appuyé sur TIMER MENU
pendant le fonctionnement de la
minuterie.
TIME NG
L’heure de début de minuterie de
lecture est la même que l’heure de fin.
Informations supplémentaires
33
FR
Page 72

Précautions
Disques POUVANT être lus sur ce
système
ˎ CD audio
ˎ CD-R/CD-RW (fichiers de données audio/
MP3)
Disques NE POUVANT PAS être lus sur
ce système
ˎ CD-ROM
ˎ CD-R/CD-RW autres que ceux enregistrés
au format CD musical, conformes à
ISO9660 Niveau 1/Niveau 2
ˎ CD-R/CD-RW enregistrés en multisession
qui ne sont pas terminés par une
«fermeture de session»
ˎ CD-R/CD-RW de mauvaise qualité
d’enregistrement, CD-R/CD-RW rayés ou
sales, ou encore CD-R/CD-RW enregistrés
avec un périphérique incompatible
ˎ CD-R/CD-RW mal finalisés
ˎ Disques contenant des fichiers autres que
des fichiers MPEG 1 Audio Layer-3 (MP3)
ˎ Disques de forme non standard (par
exemple cœur, carré, étoile)
ˎ Disques sur lesquels est apposé du ruban
adhésif, du papier ou un autocollant
ˎ Disques de location ou usés avec une
étiquette où la colle dépasse de celle-ci
ˎ Disques sur lesquels est apposée une
étiquette imprimée qui est poisseuse au
toucher
Remarques sur les disques
ˎ Avant la lecture, nettoyez le disque avec
un chiffon de nettoyage à partir du centre
vers le bord.
ˎ Ne nettoyez pas les disques avec des
solvants tels que la benzine, des diluants,
des nettoyants du commerce, ou des
aérosols antistatiques destinés aux
disques en vinyle.
ˎ N’exposez pas les disques à la lumière
directe du soleil ou à des sources de
chaleur, par exemple des conduites d’air
chaud, et évitez de les laisser dans une
voilure garée au soleil.
Sécurité
ˎ Débranchez complètement le cordon
d’alimentation de la prise murale s’il ne
doit pas être utilisé pendant une longue
période. Lorsque vous débranchez
le système, tenez toujours le cordon
d’alimentation par la fiche. Ne tirez jamais
directement sur le cordon.
ˎ Si un objet solide ou un liquide s’introduit
dans le système, débranchez-le et faitesle vérifier par du personnel qualifié avant
de le réutiliser.
ˎ Le cordon d’alimentation secteur ne doit
être remplacé que par une installation de
service après-vente qualifiée.
Lieu d’installation
ˎ Ne mettez pas le système dans une
position inclinée et ne le laissez pas
dans des lieux extrêmement chauds,
froids, poussiéreux, sales, humides ou
sans aération appropriée. Évitez de le
soumettre à des vibrations, et ne l’exposez
pas directement au soleil ou à une lumière
vive.
ˎ Soyez attentif si vous devez placer l’unité
ou les haut-parleurs sur des surfaces qui
ont subi un traitement particulier (par
exemple de la cire, de l’huile ou du polish)
pour éviter l’apparition de tache ou de
décoloration de la surface.
ˎ Si le système est déplacé sans transition
d’un lieu froid vers un lieu chaud ou s’il
est placé dans une pièce très humide,
de la condensation risque d’apparaître
sur la lentille située à l’intérieur du
lecteur de CD, ce qui peut entraîner un
dysfonctionnement. Retirez alors le disque
et laissez le système allumé pendant une
heure environ pour permettre à l’humidité
de s’évaporer.
Accumulation de chaleur
ˎ L’apparition de chaleur sur l’unité pendant
le fonctionnement est normale et n’est
pas matière à inquiétude.
ˎ Ne touchez pas le boîtier s’il a été utilisé
sans interruption à haut volume car il est
peut-être devenu chaud.
ˎ N’obstruez pas les orifices d’aération.
Enceintes
Ces enceintes ne sont pas magnétiquement
blindées et peuvent causer une distorsion
de l’image sur un téléviseur à proximité.
Dans ce cas, éteignez le téléviseur et
patientez 15 à 30 minutes avant de le
rallumer.
Si vous ne constatez pas d’amélioration,
éloignez davantage les enceintes du
téléviseur.
34
FR
Page 73

Nettoyage du boîtier
Nettoyez ce système avec un chiffon
doux légèrement imbibé d’une solution
détergente douce. N’utilisez pas de
tampons abrasifs, de poudre à récurer ou
des solvants tels que diluants, benzine ou
alcool.
Communication BLUETOOTH
ˎ Les périphériques BLUETOOTH doivent
être utilisés à une distance maximale
d’environ 10 mètres (33 pieds) (sans
obstacle) les uns des autres. Le rayon de
communication efficace peut se réduire
dans les conditions suivantes.
ˋ Lorsqu’une personne, un objet
métallique, un mur ou toute autre
obstruction se trouve entre les
périphériques disposant d’une
connexion BLUETOOTH
ˋ Emplacements où une connexion de
réseau local sans fil est installée
ˋ À proximité de fours micro-ondes en
cours d’utilisation
ˋ Dans des lieux où sont présents
d’autres types d’ondes
électromagnétiques
ˎ Les périphériques BLUETOOTH et LAN
sans fil (IEEE 802.11b/g) utilisent la
même bande de fréquences (2,4 GHz).
Lorsque vous utilisez votre périphérique
BLUETOOTH près d’un périphérique
doté de la fonctionnalité LAN sans fil,
une interférence électromagnétique
peut apparaître. Cela peut entraîner
des vitesses de transfert des données
inférieures, du bruit ou l’impossibilité de
se connecter. Si cela se produit, essayez
les solutions suivantes:
ˋ Essayez de connecter ce système et le
périphérique BLUETOOTH lorsque vous
vous trouvez à au moins 10 mètres
(33pieds) de l’équipement du réseau
LAN sans fil.
ˋ Mettez hors tension l’équipement de
réseau LAN sans fil lorsque vous utilisez
votre périphérique BLUETOOTH dans un
rayon de 10 mètres (33 pieds).
ˎ Les ondes radio émises par ce système
peuvent interférer avec le fonctionnement
de certains appareils médicaux. Ces
interférences pouvant entraîner un
dysfonctionnement, éteignez toujours ce
système et le périphérique BLUETOOTH
dans les lieux suivants:
ˋ Dans les hôpitaux, les trains, les avions,
les stations-service et partout où
des gaz inflammables peuvent être
présents
ˋ Près de portes automatiques ou
d’alarmes à incendie
ˎ Ce système prend en charge les
fonctions de sécurité conformes avec les
spécifications BLUETOOTH comme moyen
de sécurité pendant les communications
qui mettent en œuvre la technologie
BLUETOOTH. Toutefois, cette sécurité peut
être insuffisante selon les paramètres
sélectionnés et d’autres facteurs. Vous
devez donc rester prudent lorsque
vous communiquez avec la technologie
BLUETOOTH.
ˎ Sony ne saurait être tenu pour
responsable de quelque manière que ce
soit pour tout dommage ou toute perte
qui résulterait de fuites d’informations
liées à l’utilisation de la technologie
BLUETOOTH.
ˎ La communication BLUETOOTH n’est
pas nécessairement garantie avec tous
les périphériques BLUETOOTH qui ont le
même profil que ce système.
ˎ Les périphériques BLUETOOTH connectés
à ce système doivent respecter les
spécifications BLUETOOTH fixées par
Bluetooth SIG, Inc., et ils doivent être
certifiés conformes. Toutefois, même
lorsqu’un périphérique est conforme
aux spécifications BLUETOOTH, il peut
y avoir des cas où les caractéristiques
ou les spécifications du périphérique
BLUETOOTH l’empêchent de se connecter,
ou peuvent entraîner des différences dans
les méthodes de contrôle, l’affichage ou le
fonctionnement.
ˎ Du bruit peut apparaître ou le son être
coupé selon le périphérique BLUETOOTH
connecté au système, l’environnement
de communications ou les conditions
environnantes.
Informations supplémentaires
35
FR
Page 74

Spécifications
Appareil principal
Section amplificateur
MHC-ECL99BT
Modèle destiné aux États-Unis:
Enceinte avant :
Puissance de sortie (référence) :
235 W + 235 W (par canal à 3ohms,
1kHz)
Caisson de basses :
Puissance de sortie (référence) :
230 W (à 3ohms, 100 Hz)
Autres modèles :
Enceinte avant :
Puissance de sortie (nominale) :
60 W + 60 W (à 3ohms, 1kHz, 1 %
THD)
Puissance de sortie (référence) :
235 W + 235 W (par canal à 3ohms,
1kHz)
Caisson de basses :
Puissance de sortie (référence) :
230 W (à 3ohms, 100 Hz)
MHC-ECL77BT
Modèle destiné aux États-Unis:
Puissance de sortie (référence) :
235 W + 235 W (par canal à 3ohms,
1kHz)
Modèles destinés au Brésil:
Puissance de sortie (référence) :
320 W (160 W par canal, à 3ohms,
1kHz, 10% THD)
Autres modèles :
Puissance de sortie (nominale) :
60 W + 60 W (à 3ohms, 1kHz, 1 %
THD)
Puissance de sortie (référence) :
235 W + 235 W (par canal à 3ohms,
1kHz)
Entrée
Modèles destinés au Moyen-Orient, à
l’Afrique et à l’Amérique latine:
AUDIO IN L/R : Sensibilité 800mV,
impédance 10kilohms
Autres modèles :
AUDIO IN (mini fiche stéréo):
Sensibilité 800mV, impédance
10kilohms
Sorties
FRONT SPEAKERS (MHC-ECL99BT)/
SPEAKERS (MHC-ECL77BT) : Accepte
une impédance de 3ohms
SUBWOOFER (MHC-ECL99BT
seulement): Accepte une
impédance de 3ohms
Section lecteur CD
Système : Système audionumérique
Compact Disc
Propriétés des diodes laser
Durée d’émission: continue
Sortie laser*: Moins de 44,6µW
* Cette sortie est la valeur mesurée
à une distance de 200 mm de la
surface de l’objectif sur le bloc
capteur optique avec une ouverture
de 7 mm.
Section USB
Port (USB): Type A, intensité maximum
1,5A
Formats audio pris en charge (disques
MP3 et périphériques USB seulement)
Vitesse de transmission prise en charge:
MP3 (MPEG 1 Audio Layer-3) :
32kbit/s ˋ 320kbit/s, VBR
WMA*: 32 kbit/s ˋ 192kbit/s, VBR
Fréquences d’échantillonnage :
MP3 (MPEG 1 Audio Layer-3) :
32/44,1/48 kHz
WMA*: 44,1 kHz
* Périphériques USB seulement
36
FR
Page 75

Section tuner
FM stéréo
Modèle nord-américain :
Tuner superhétérodyne FM
Autres modèles :
Tuner superhétérodyne FM/AM
Antenne :
Cordon d’antenne FM
Antenne cadre AM (sauf pour le
modèle destiné à l’Amérique du
Nord)
Section tuner FM :
Plage de fréquences :
Modèles destinés à l’Amérique
du Nord et au Brésil: 87,5MHz –
108,0MHz (intervalle de 100kHz)
Autres modèles : 87,5MHz –
108,0MHz (intervalle de 50kHz)
Section tuner AM (sauf pour le modèle
destiné à l’Amérique du Nord):
Plage de fréquences :
Modèles destinés à l’Europe et
à la Russie: 531kHz – 1602kHz
(intervalle de 9kHz)
Modèles destinés à l’Afrique et au
Moyen-Orient:
531kHz – 1602kHz (intervalle de
9kHz)
530kHz – 1610kHz (intervalle de
10kHz)
Autres modèles :
531kHz – 1710kHz (intervalle de
9kHz)
530kHz – 1710kHz (intervalle de
10kHz)
Section BLUETOOTH
Système de communication:
Version BLUETOOTH standard 3.0
Sortie:
Classe de puissance BLUETOOTH
standard 2
Plage de communication maximum:
Ligne de visée env. 10 m (33 pieds)
Bande de fréquence:
Bande 2,4 GHz (2,4000 GHz à
2,4835GHz)
Méthode de modulation:
FHSS (Freq Hopping Spread
Spectrum)
Profils BLUETOOTH compatibles
A2DP (Advanced Audio Distribution
Profile)
AVRCP 1.3 (Audio Video Remote
Control Profile)
SPP (Serial Port Profile)
Codecs pris en charge:
SBC (Sub Band Codec)
AAC (Advanced Audio Coding)
1)
La plage effective varie selon des facteurs
tels que les obstacles entre périphériques,
les champs magnétiques situés autour
d’un four à micro-ondes, l’électricité
statique, la sensibilité de réception, les
performances de l’antenne, le système
d’exploitation, les logiciels, etc.
2)
Les profils standard BLUETOOTH
indiquent l’objet de la communication
BLUETOOTH entre périphériques.
3)
Sauf pour le modèle destiné à l’Amérique
du Nord
2)
:
3)
1)
Informations supplémentaires
37
FR
Page 76

Enceinte
Haut-parleur avant
Modèles destinés à l’Amérique du Nord,
à l’Europe, à la Russie et à l’Australie:
SS-EC719iP
Autres modèles : SS-ECL77BT
Système : Système de haut-parleur
bidirectionnel, Bass reflex
Unités de haut-parleur:
Haut-parleur de graves : 160 mm
(6/ po), type cône
Haut-parleur d’aigus : 40 mm
(1/po), type pavillon
Impédance nominale: 3 ohms
Dimensions (L/H/P) :
Env. 230 mm × 304 mm × 205 mm
(9po × 12po × 8/po)
Poids: Env. 2,5kg (5lb 8 /oz) net par
haut-parleur
Quantité: 2 éléments
Caisson de basses pour MHC-ECL99BT
seulement
Modèles destinés à l’Amérique du Nord,
à l’Europe, à la Russie et à l’Australie:
SS-WG919iP
Autres modèles : SS-WEC99BT
Système : Système de caisson de basses,
Bass reflex
Unités d’enceintes : 200 mm (8 po), type
cône
Impédance nominale: 3 ohms
Dimensions (L/H/P) :
Env. 280mm × 304mm × 290mm
(11po × 12po × 11/po)
Poids: Env. 5,0kg (11lb /oz) net par
haut-parleur
Quantité: 1 élément
Généralités
Alimentation :
Modèle nord-américain : 120V CA,
60 Hz
Modèles destinés au Mexique et
auBrésil : 120V – 240V CA, 60Hz
Autres modèles : 120V ˋ 240V CA,
50/60Hz
Consommation électrique :
MHC-ECL99BT : 90W
MHC-ECL77BT : 75W
Consommation électrique en veille (en
mode Économie d’énergie):
Lorsque le mode veille BLUETOOTH
est désactivé: 0,5W (mode éco)
Lorsque le mode veille BLUETOOTH
est activé: 4W (tous les ports de
réseau sans fil activés)
Dimensions (L/H/P, avec les saillies les
plus importantes) (sans haut-parleurs):
MHC-ECL99BT : Env. 193mm ×
300mm × 260mm (7 /po ×
11/po × 10 /po)
MHC-ECL77BT : Env. 193mm ×
300mm × 260mm (7 /po ×
11/po × 10 /po)
Poids (enceintes non comprises) :
MHC-ECL99BT : Env. 3,1kg (6lb
13/ oz)
MHC-ECL77BT : Env. 3,1kg (6lb
13/ oz)
Quantité de l’unité principale: 1 élément
Accessoires fournis :
Télécommande (1)
Pile R6 (format AA) (1)
Cordon d’antenne FM (1)
Antenne cadre AM (1) (sauf pour
le modèle destiné à l’Amérique du
Nord)
La conception et les spécifications
peuvent être modifiées sans préavis.
38
FR
Page 77

Avis concernant la
licence et les marques
commerciales
ˎ Licence de la technologie de
codage audio MPEG Layer-3 et des
brevets obtenue de Fraunhofer IIS et
Thomson.
ˎ Windows Media est une marque
commerciale ou déposée de
Microsoft Corporation aux Etats-Unis
et/ou dans d’autres pays.
ˎ Ce produit est protégé par certains
droits de propriété intellectuelle
de Microsoft Corporation.
L’utilisation ou la distribution de
cette technologie en dehors de ce
produit est interdite sans licence
de Microsoft ou d’une filiale de
Microsoft autorisée.
ˎ La marque et les logos BLUETOOTH®
sont des marques déposées
de Bluetooth SIG, Inc. Toute
utilisation de ces marques par Sony
Corporation est soumise à une
licence. Les autres marques et noms
de commerce sont ceux de leurs
propriétaires respectifs.
ˎ La marque N est une marque
commerciale, déposée ou non, de
NFC Forum, Inc., aux États-Unis et
dans d’autres pays.
ˎ Android™ est une marque de
commerce de Google Inc.
ˎ Google Play™ est une marque de
commerce de Google Inc.
ˎ iPhone et iPod touch sont des
marques de commerce d’Apple Inc.,
enregistrées aux États-Unis et dans
d’autres pays. App Store est une
marque de service d’Apple Inc.
ˎ Toutes les autres marques et
marques déposées appartiennent
à leurs détenteurs respectifs. Dans
ce manuel, les sigles ™ et
pas spécifiés.
ne sont
®
Informations supplémentaires
39
FR
Page 78

40
FR
Page 79

41
Informations supplémentaires
FR
Page 80

©2014 Sony Corporation
Printed in China/Imprimé en Chine
 Loading...