

Page 1
MiniDisc Deck
4-227-585-13(2)
Operating Instructions
Mode d’emploi
TM
GB
FR
MDS-LSA1
2000 Sony Corporation
S200
Page 2
WARNING
To prevent fire or shock
hazard, do not expose the
unit to rain or moisture.
This appliance is classified as a CLASS 1
LASER product.
The CLASS 1 LASER PRODUCT
MARKING is located on the rear exterior.
The following caution label is located
inside the unit.
Welcome!
Thank you for purchasing the Sony
MiniDisc Deck. Before operating the
deck, please read this manual
thoroughly and retain it for future
reference.
About This
Manual
Conventions
• Controls in these instructions are
those on the deck; these may,
however, be substituted by controls
on the supplied remote that are
similarly named, or, when different,
appear in the instructions within
parentheses.
Example: Press HX (or X).
• The following icons are used in this
manual:
ZIndicates a procedure that
requires use of the remote.
z Indicates hints and tips for
making the task easier.
IN NO EVENT SHALL SELLER BE
LIABLE FOR ANY DIRECT,
INCIDENTAL OR CONSEQUENTIAL
DAMAGES OF ANY NATURE, OR
LOSSES OR EXPENSES RESULTING
FROM ANY DEFECTIVE PRODUCT OR
THE USE OF ANY PRODUCT.
Don’t throw a battery, dispose
it as the injurious wastes.
GB
2
Page 3

TABLE OF CONTENTS
Location and Function of Parts 4
Front Panel Parts Descriptions 4
Remote Parts Descriptions 6
Display Window Descriptions 8
Getting Started 10
Before You Start the Hookup 10
Hooking Up the i.LINK Components 11
Recording on MDs 12
Recording on an MD 12
Notes on Recording 14
Recording for Long Times 15
Adjusting the Recording Level 16
Recording Tips 16
Marking Track Numbers While Recording
(Track Marking) 17
Starting Recording With 6 Seconds of Prestored
Audio Data (Time Machine Recording) 18
Synchro-recording With the Audio Component of
Your Choice (Music Synchro-recording) 19
Synchro-recording With a Sony CD Player
(Normal/High-Speed CD Synchrorecording) 19
Playing MDs 21
Playing an MD 21
Playing a Specific Track 22
Locating a Particular Point in a Track 22
Playing Tracks Repeatedly 23
Playing Tracks in Random Order (Shuffle Play) 24
Creating Your Own Programme
(Programme Play) 24
Tips for Recording From MDs to Tape 25
Editing Recorded MDs 27
Before You Start Editing 27
Erasing Tracks 28
Dividing Tracks 30
Combining Tracks 31
Moving Tracks 31
Naming Tracks or MDs 32
Undoing the Last Edit 34
Changing the Track Level After Recording (S.F
Edit) 35
Other Functions 36
Fade In and Fade Out 36
Adjusting the Brightness of the Display 37
Other Settings Using the Setup Menu 37
About i.LINK 38
Additional Information 40
Precautions 40
Handling MDs 41
System Limitations 41
Troubleshooting 42
Specifications 42
Display Messages 43
Edit Menu Table 44
Setup Menu Table 45
Self-Diagnosis Function 46
Index 47
GB
GB
3
Page 4

Location and Function of Parts
This chapter tells you about the
location and function of the various
buttons and controls on the front
panel and the supplied remote.
Further details are provided on the
pages indicated in the parentheses.
It also tells you about the information
that appears in the display window.
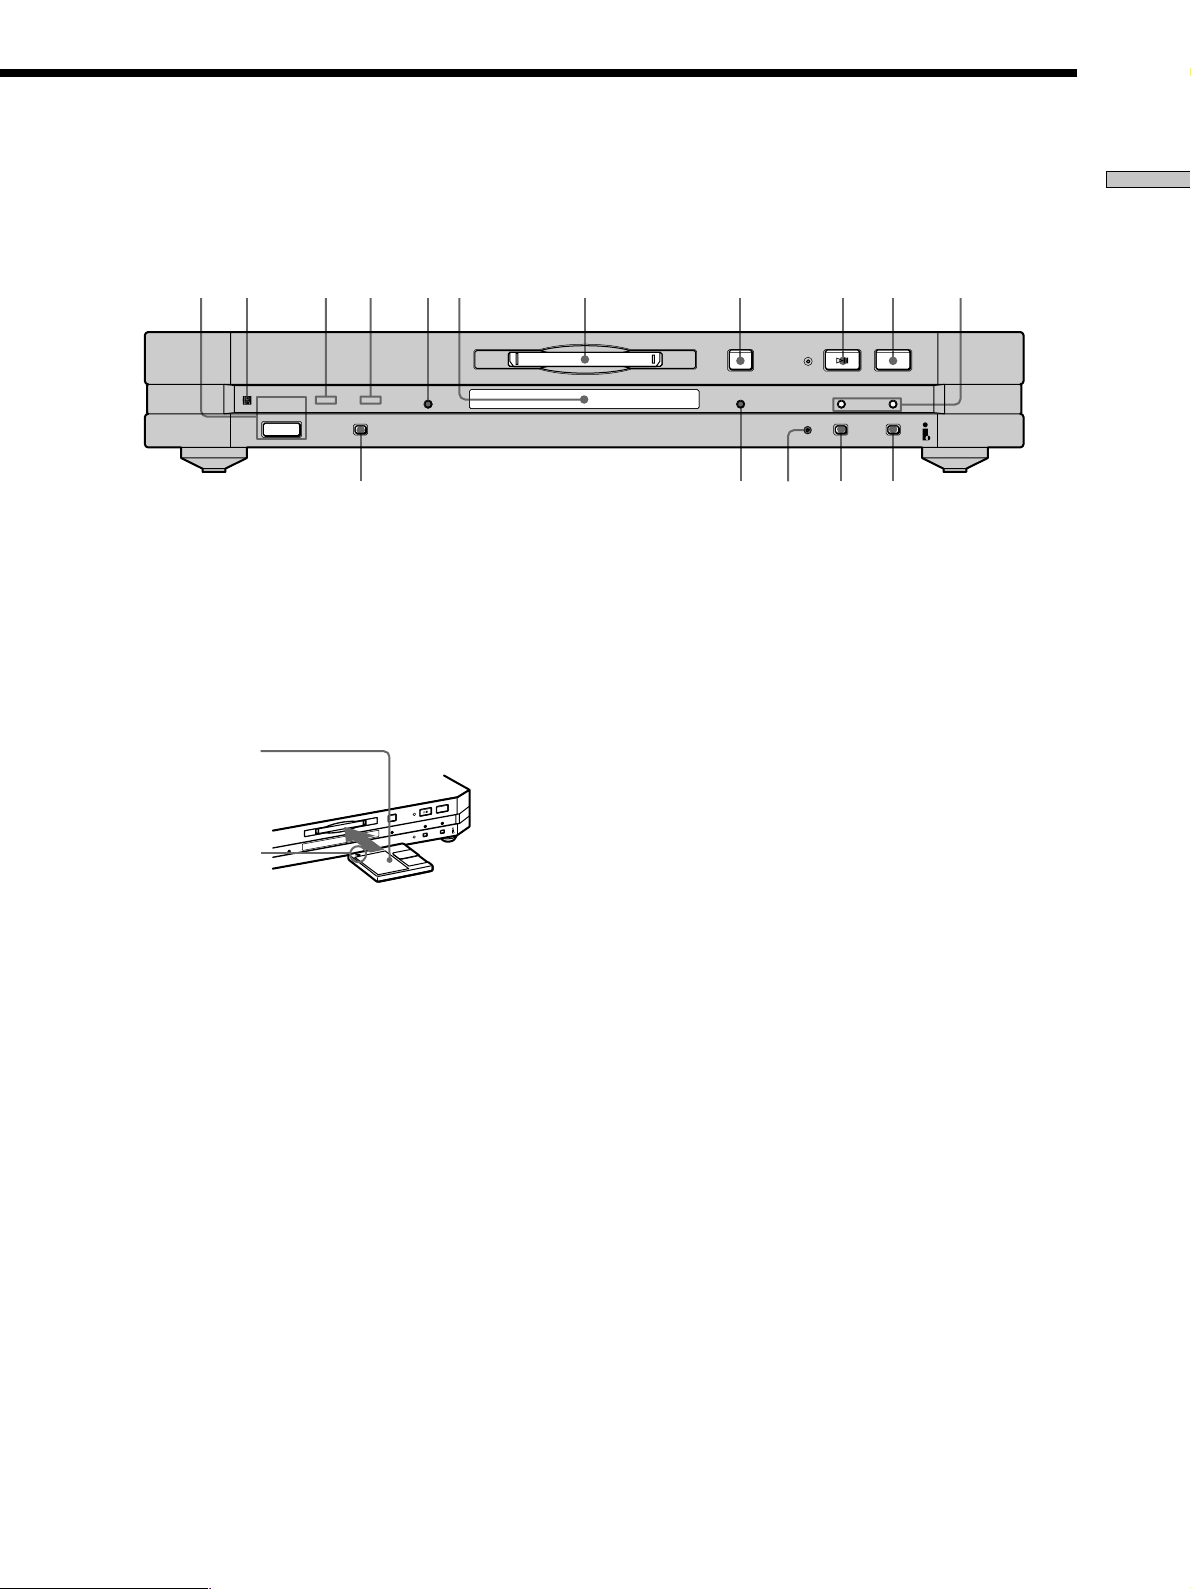
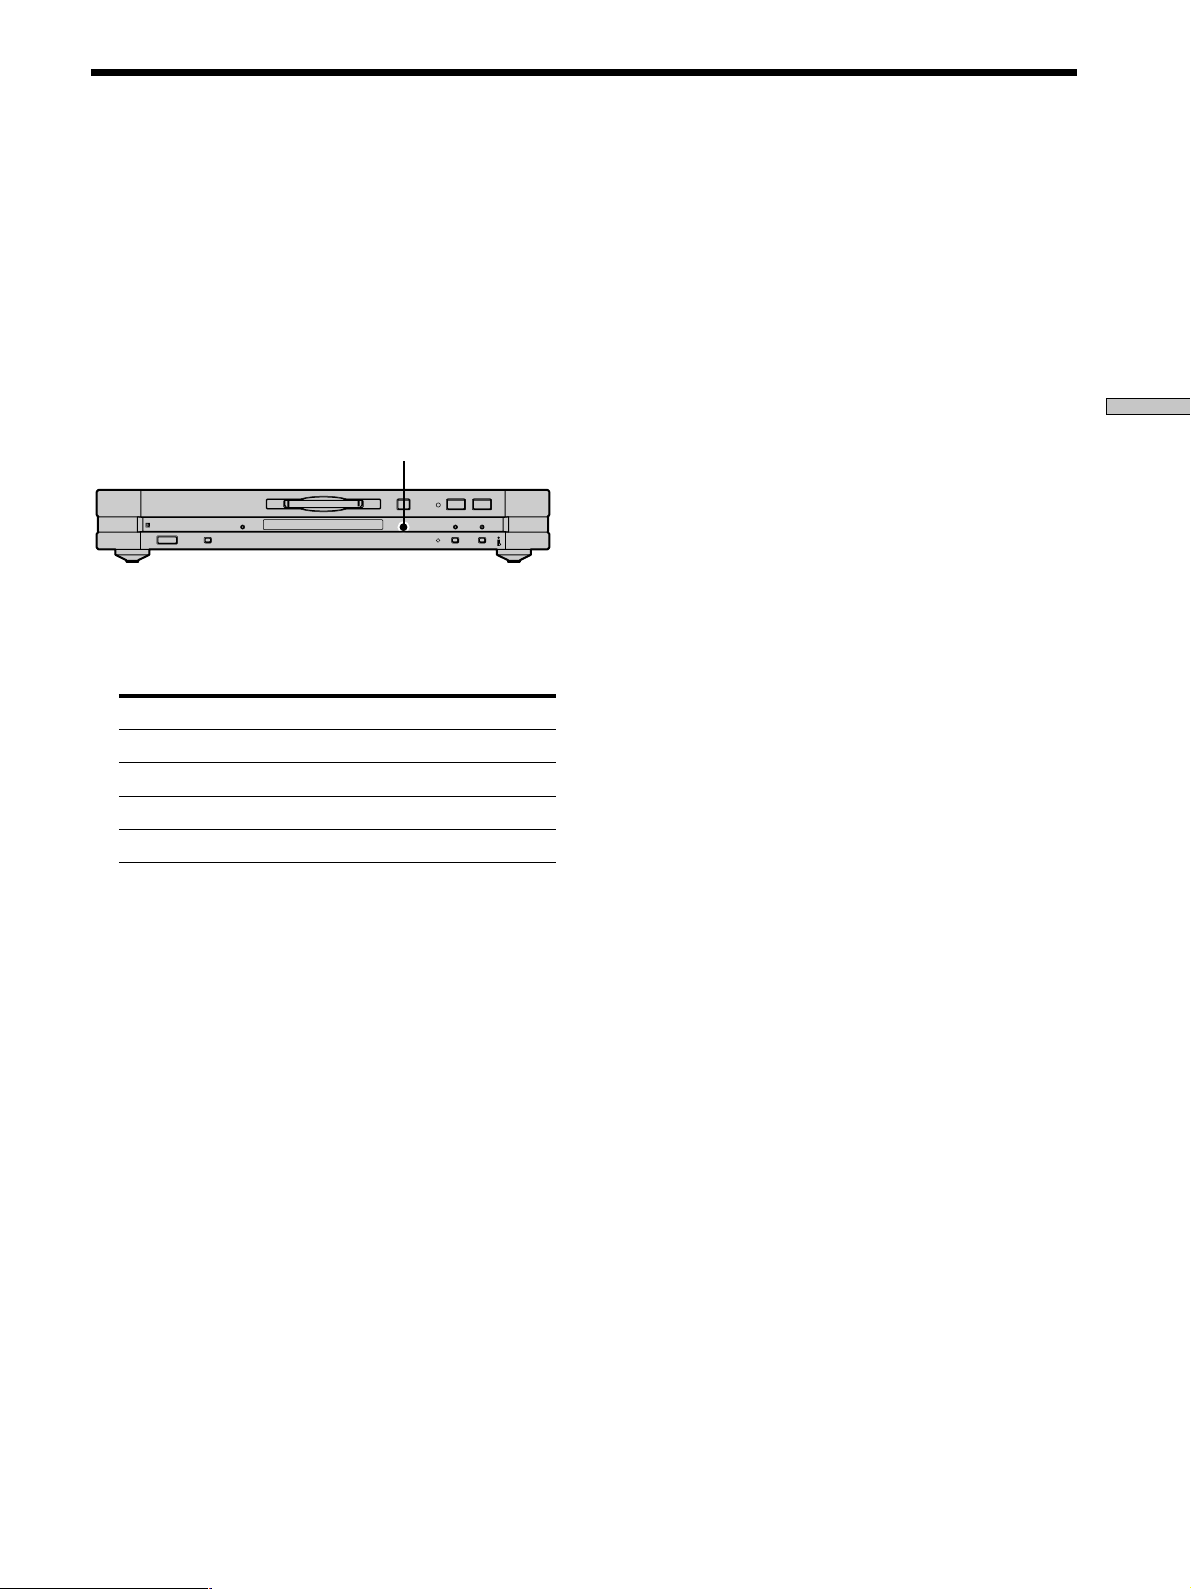
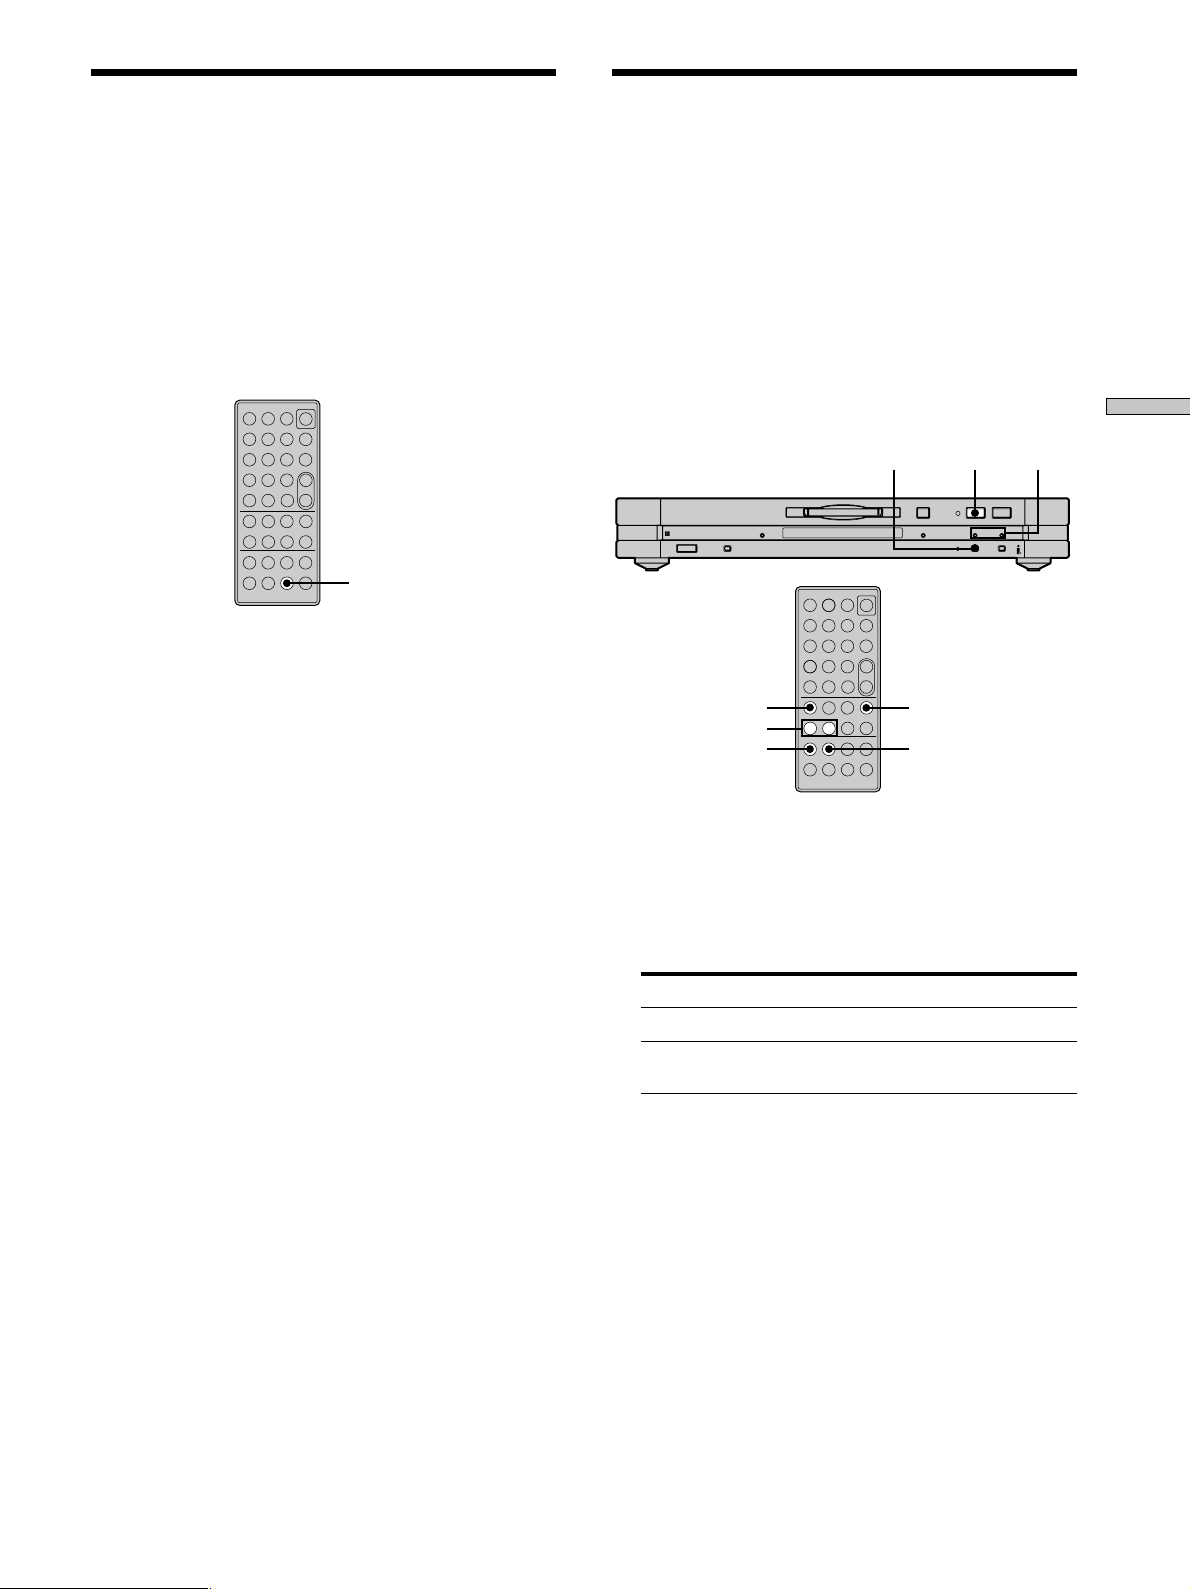
Front Panel Parts Descriptions
1 ~/1 (power) switch (12, 21)
Press to turn on the deck. When you turn on the deck,
the STANDBY indicator turns off. When you press the
switch again, the deck turns off and the indicator
lights up.
2 Remote sensor
Point the remote towards this sensor (
operations.
3 LP indicator (15)
Lights up when LP2 or LP4 mode is selected, or when
a track recorded in LP2 or LP4 mode is being played.
4 H.A.T.S. indicator
Lights up when the H.A.T.S. function is activated on
the receiver.
z
What is the H.A.T.S. function?
The H.A.T.S. (High-quality digital Audio Transmission
System) function on the receiver causes digital audio signals
output from an MD deck or the recording source (e.g., a CD
player) to be momentarily stored in a buffer in the receiver
prior to output. This reduces jitter that sometimes occurs
during digital audio transmission.
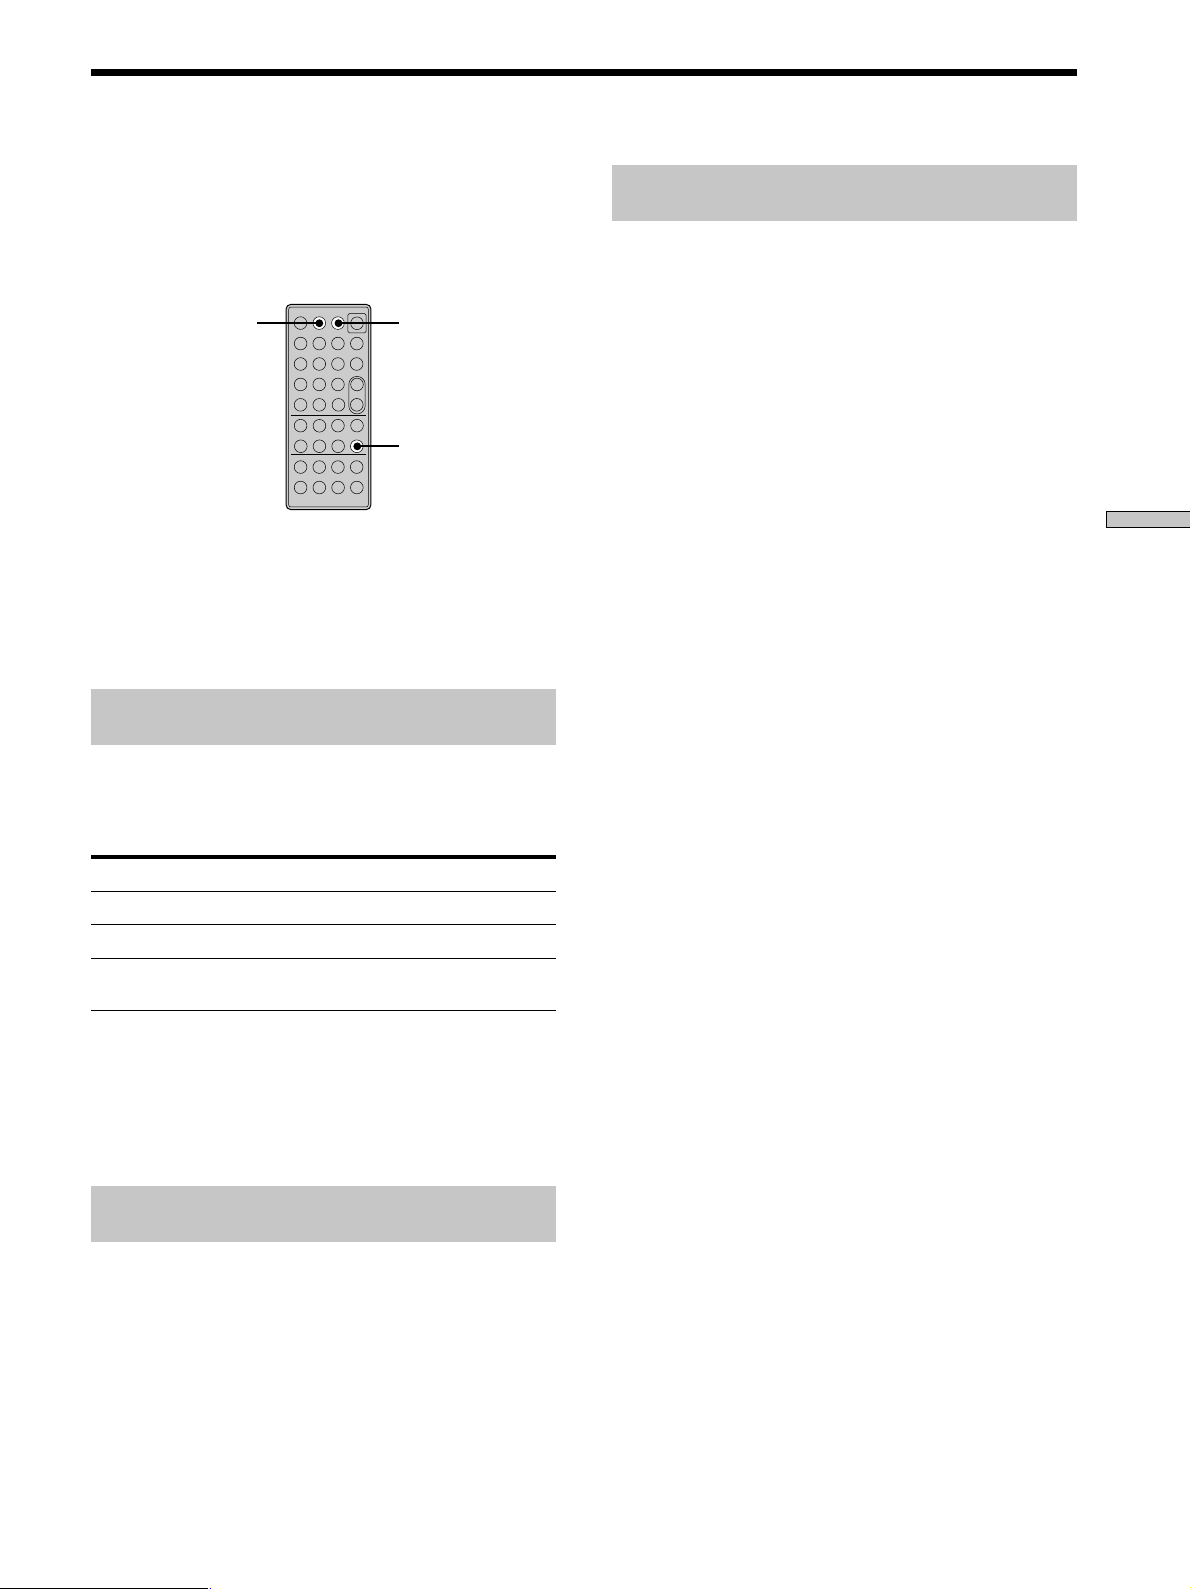
5 DISPLAY button (9, 13, 16, 20, 21)
• Press when the deck is stopped to display disc
information.
• Press during recording to display information on the
track being recorded or recordable time on the MD.
• Press during play to display information on the
current track.
• Press during Programme Play to display the number
of the track currently being played in the
programme.
• Press during recording or recording pause to adjust
the recording level.
) for remote
GB
4
Page 5
1
23456 7
Location and Function of Parts
890qa
STANDBY LP H.A.T.S
?/1
INPUT
DISPLAY REC MODE
qh qg qf qd qs
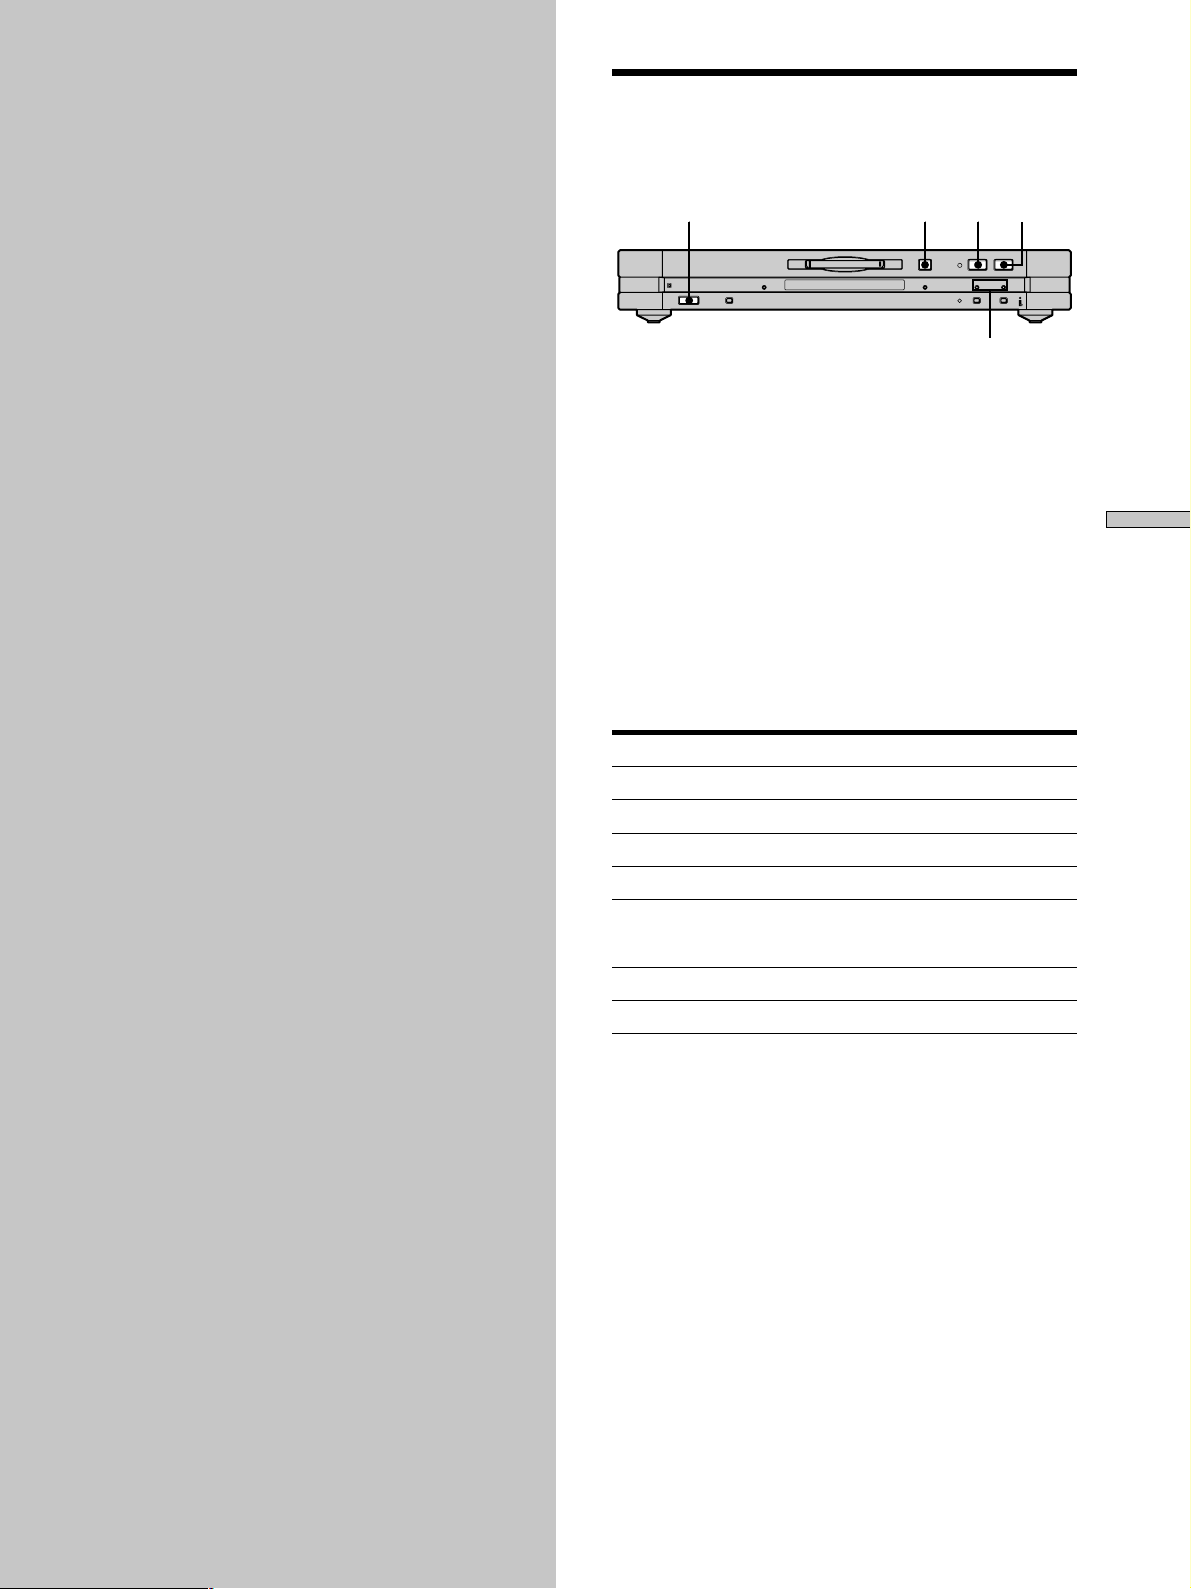
6 Display window (8, 16, 32, 35)
Shows various information. For details, see “Display
Window Descriptions” on page 8.
7 MD insertion slot (12, 21)
Insert the MD as illustrated below.
With the labelled
side up
x
A
>
.
z
With the arrow
pointing towards
the deck
8 A button (12, 21)
Press to eject the MD.
A
HIGH SPEED CD SYNCHRO REC
x
. >
z
qf HIGH SPEED indicator (20)
Lights up when the deck is in High-speed CD
Synchro-recording mode.
qg REC MODE button (15)
Press to select one of the following four recording
modes: MONO mode (monaural recording), stereo
mode (stereo recording), LP2 mode (2 times long
recording), and LP4 mode (4 times long recording).
qh INPUT button (12)
Press once to display the selected programme source.
If the programme source is either the STR-LSA1 or the
CDP-LSA1, “N N n n” appears momentarily
in the display window of the component. Press the
button again to switch to another programme source.
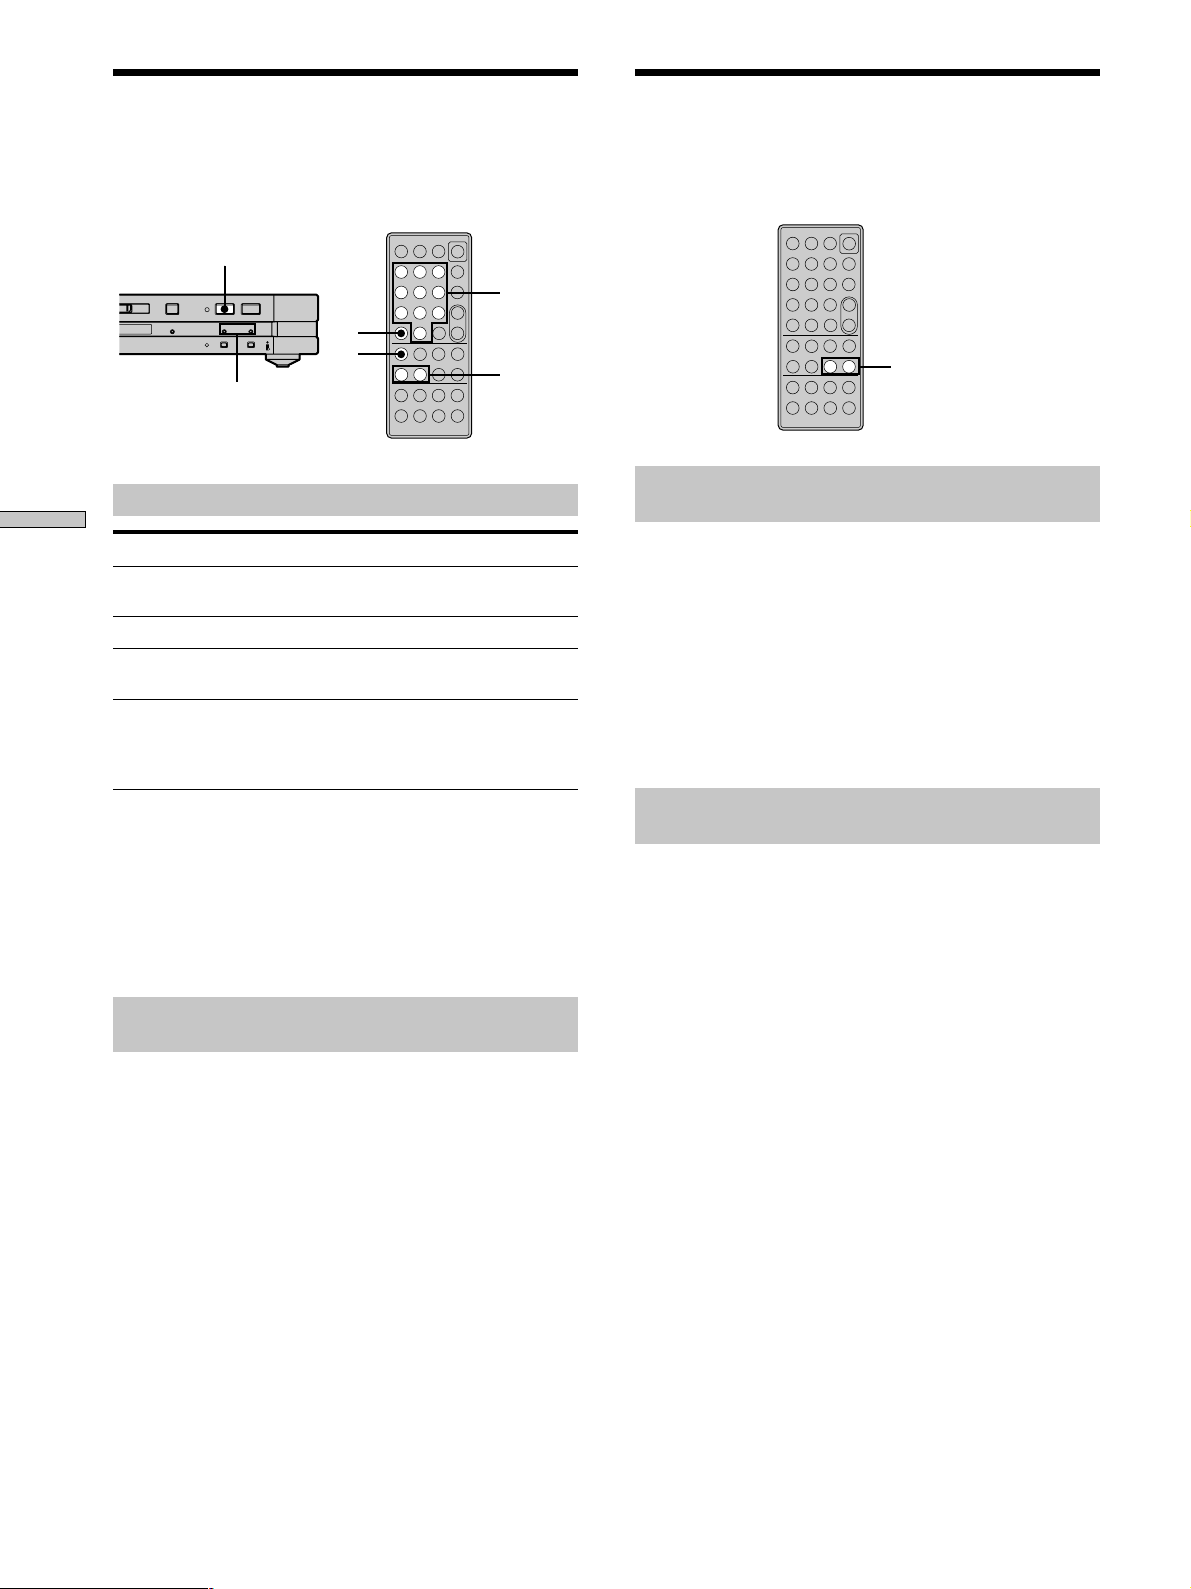
9 HX button (12, 19, 21, 22)
• Press when the deck is stopped to start play.
• Press during playback to pause play.
• Press during recording to pause recording.
• Press during playback pause or recording pause to
resume play or recording.
q; x button (12, 20, 21)
Press to stop play or recording, or cancel the selected
operation.
qa ./> buttons (12, 15, 16, 19, 21, 22)
Press to locate tracks or select a menu item and a
setting value.
qs REC z button (12, 17)
Press to record on the MD or mark track numbers.
qd CD SYNCHRO button (19)
Press to start CD Synchro-recording.
GB
5
Page 6

Remote Parts Descriptions
Location and Function of Parts
PLAY MODE
wa ws 1
REPEAT
CLEAR
w;
,
ABC
–/, DEF DISPLAY
123
JKLGHI MNO
456
ql
TUVPQRS WXYZ
789
10
NX x z
YES
CLEAR
qdqf qs qa
qk
qj
qh
qg
>10
.> m M
MENU/NO
NAME EDIT/
SELECT
y
B
A
INPUT LEVEL
/0
FADER
M.SYNC
MD
?/1
SCROLL
+
–
REC MODE
T.REC
2
3
4
5
6
7
8
9
0
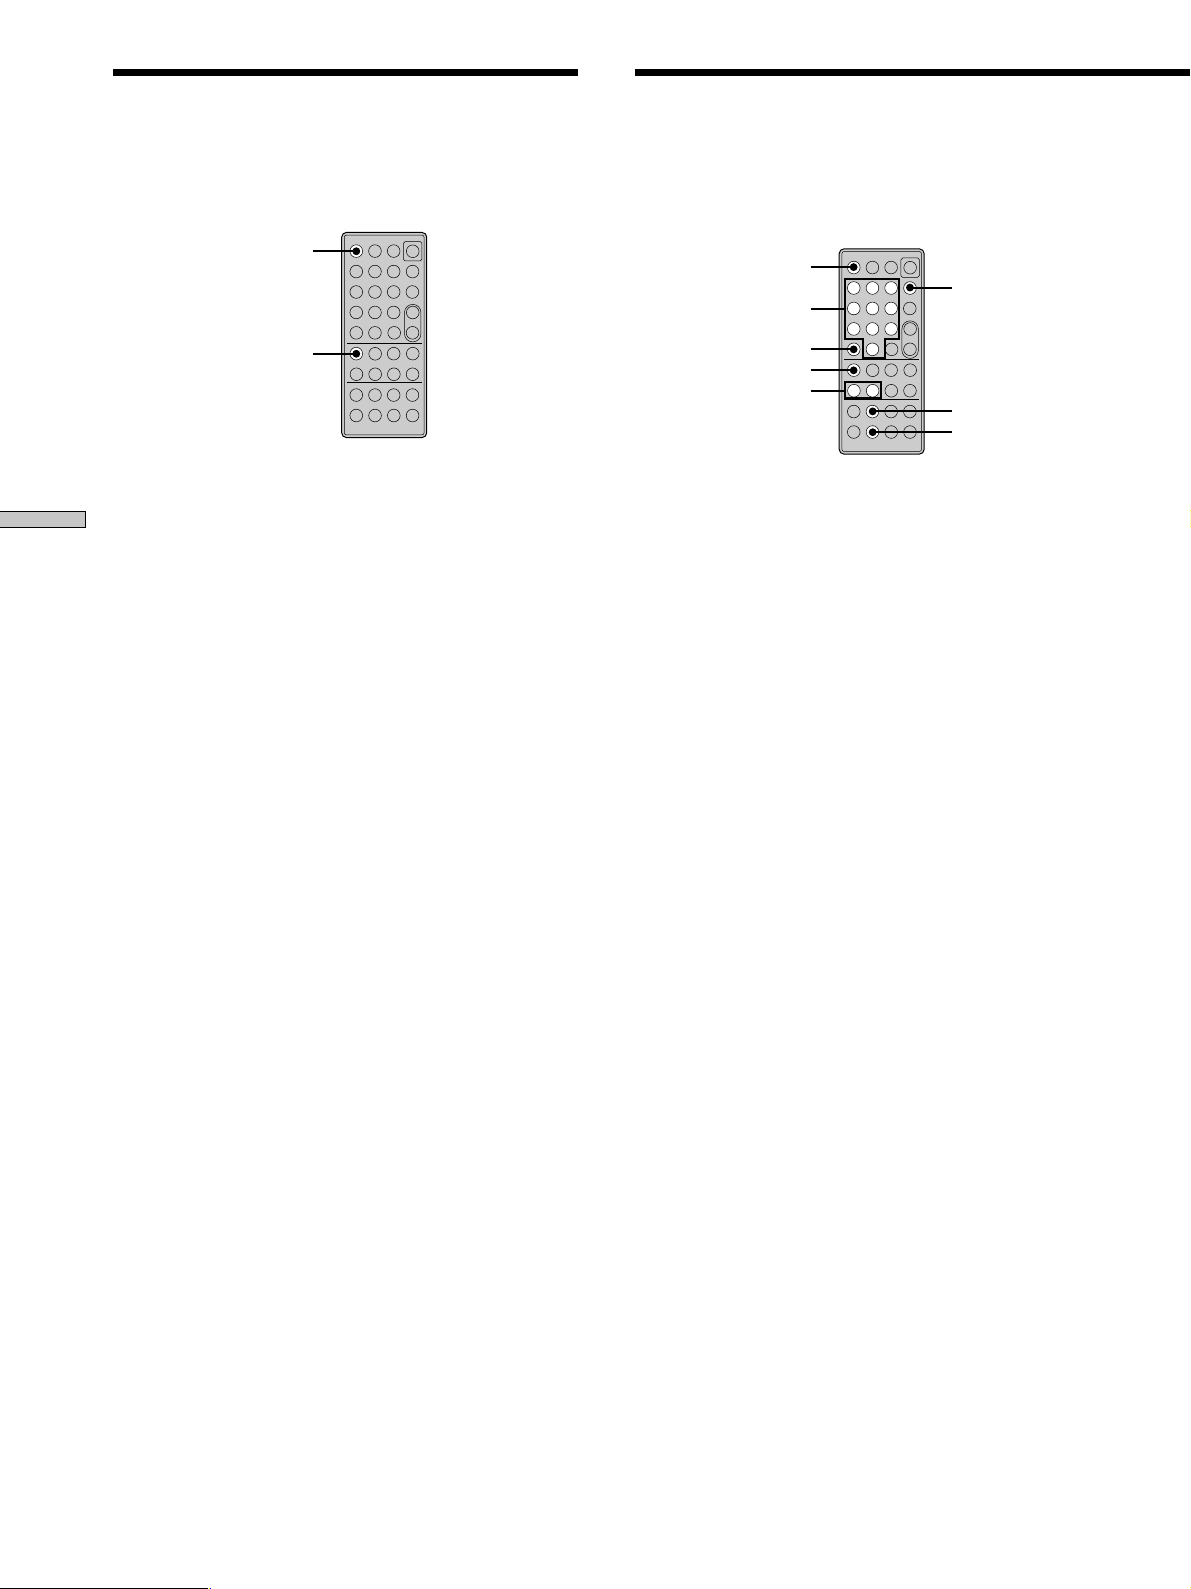
1 ~/1 (power) switch (12, 21)
Press to turn on the deck. When you turn on the deck,
the STANDBY indicator on the deck turns off. When
you press the switch again, the deck turns off and the
indicator lights up.
2 DISPLAY button (9, 13, 16, 20, 21, 24)
Press to select the information to be displayed in the
window.
3 SCROLL button (21)
Press to scroll the name of a track or MD.
4 LEVEL +/– buttons (16)
Press to adjust the recording level.
5 INPUT button (12)
Use to select the programme source to be recorded.
6 z button (12, 17, 19)
Press to record on the MD or mark track numbers.
7 x button (12, 20, 21)
Press to stop play or recording, or cancel the selected
operation.
8 m/M buttons (22, 23, 29, 30, 32)
Press to locate a portion within a track, change the
contents of a programme, or shift the cursor to the
right.
9 REC MODE button (15)
Press to select one kf the following four recording
modes: MONO mode (monaural recording), stereo
mode (stereo recording), LP2 mode (2 times long
recording), and LP4 mode (4 times long recording).
q; FADER button (36)
Press to perform Fade-in Recording or Fade-out
Recording.
qa T.REC button (18)
Press to start T ime Machine Recording.
qs MUSIC SYNC button (19)
Press to start Music Synchro-recording.
qd CLEAR button (24, 33)
Press to erase a track in the programme or erase a
character.
qf NAME EDIT/SELECT button (32, 33)
Press to add the name or change the name of a track or
an MD, or to select the type of characters to be input.
GB
6
Page 7

qg MENU/NO button (15-19, 25, 26, 28-38)
Press to display “Edit Menu” or “Setup Menu.”
YES button (15-17, 19, 24-26, 28-38)
Press to carry out the selected operation.
qh ./> buttons (12, 15-19, 21, 22, 24-26, 28-38)
Press to locate tracks, select a menu item and a setting
value, or select the character to be input.
qj X button (12, 20, 21)
Press to pause play or recording. Press again to
resume play or recording.
qk N button (12, 19, 21, 22, 24)
Press to start play.
ql Letter/number buttons (22, 24, 32)
Press to input letters or numbers.
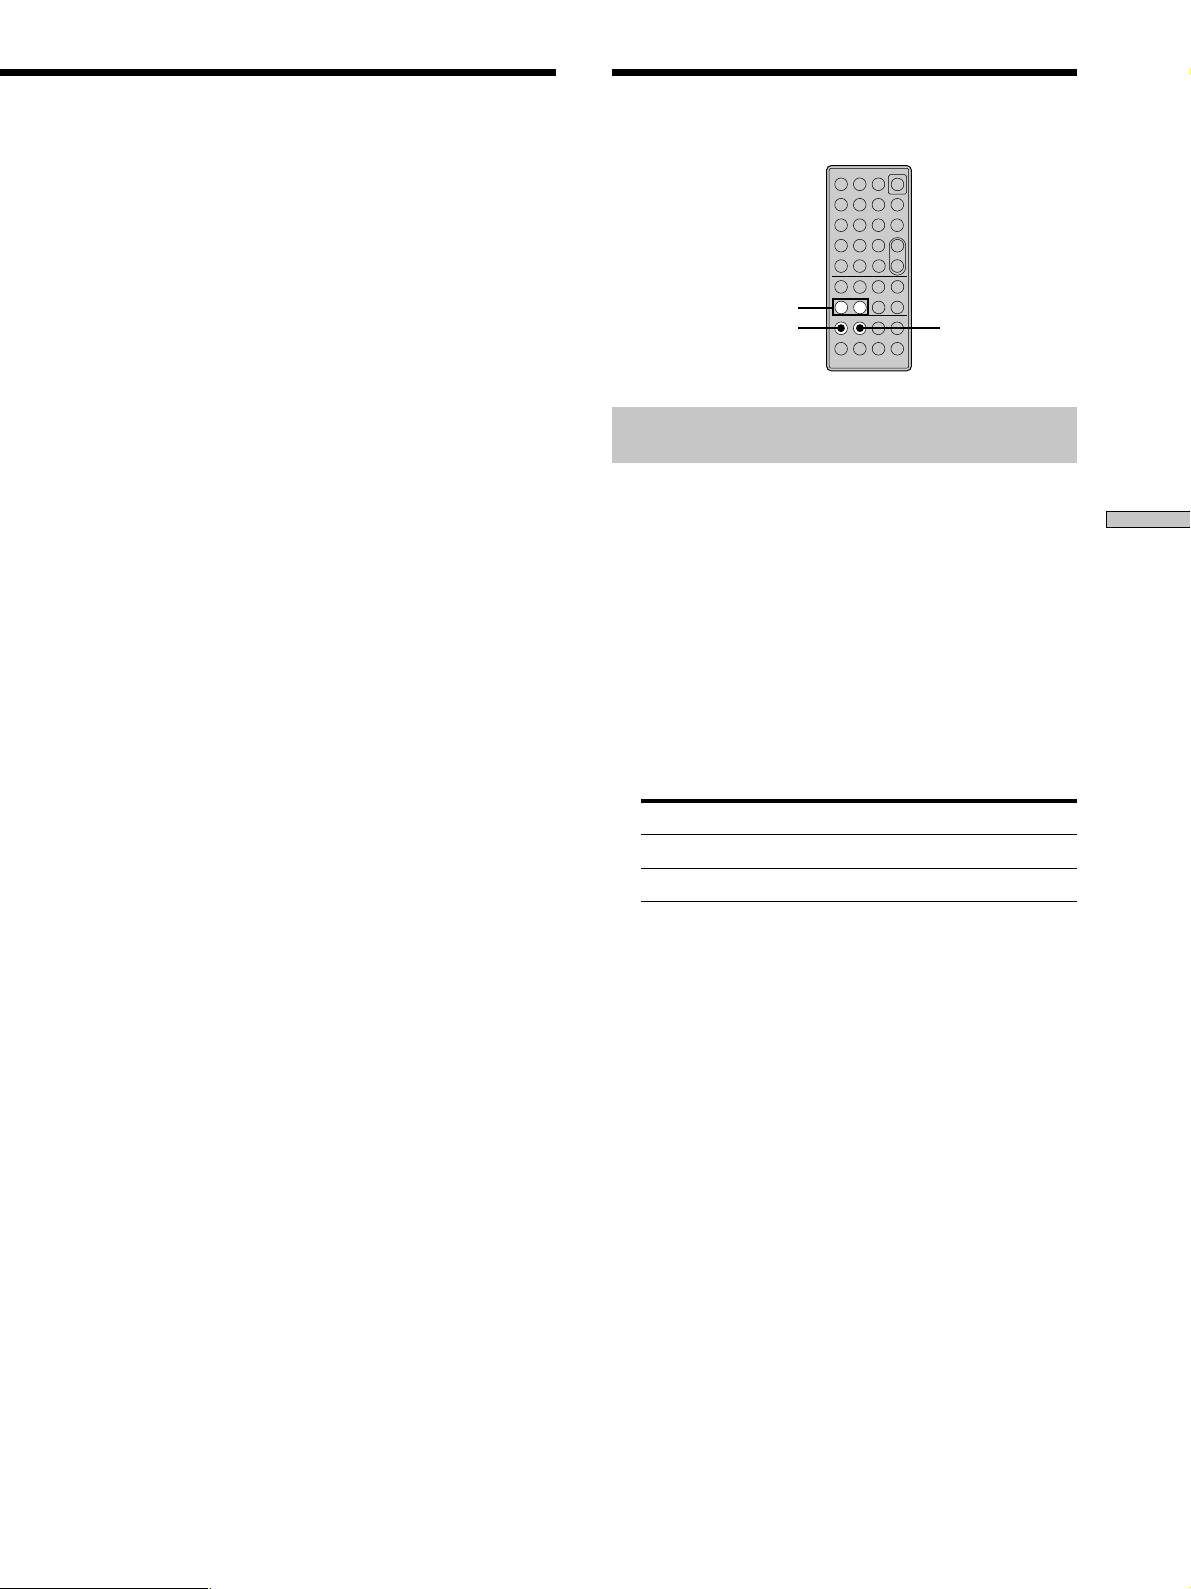
w; PLAY MODE button (24)
Press to select Shuffle Play or Programme Play.
wa REPEAT CLEAR button (23)
• Press to play tracks repeatedly.
• When Repeat All Play or Repeat 1 Play is selected,
press to resume normal play.
ws AyB button (23)
Press to select Repeat A-B Play.
Location and Function of Parts
GB
7
Page 8
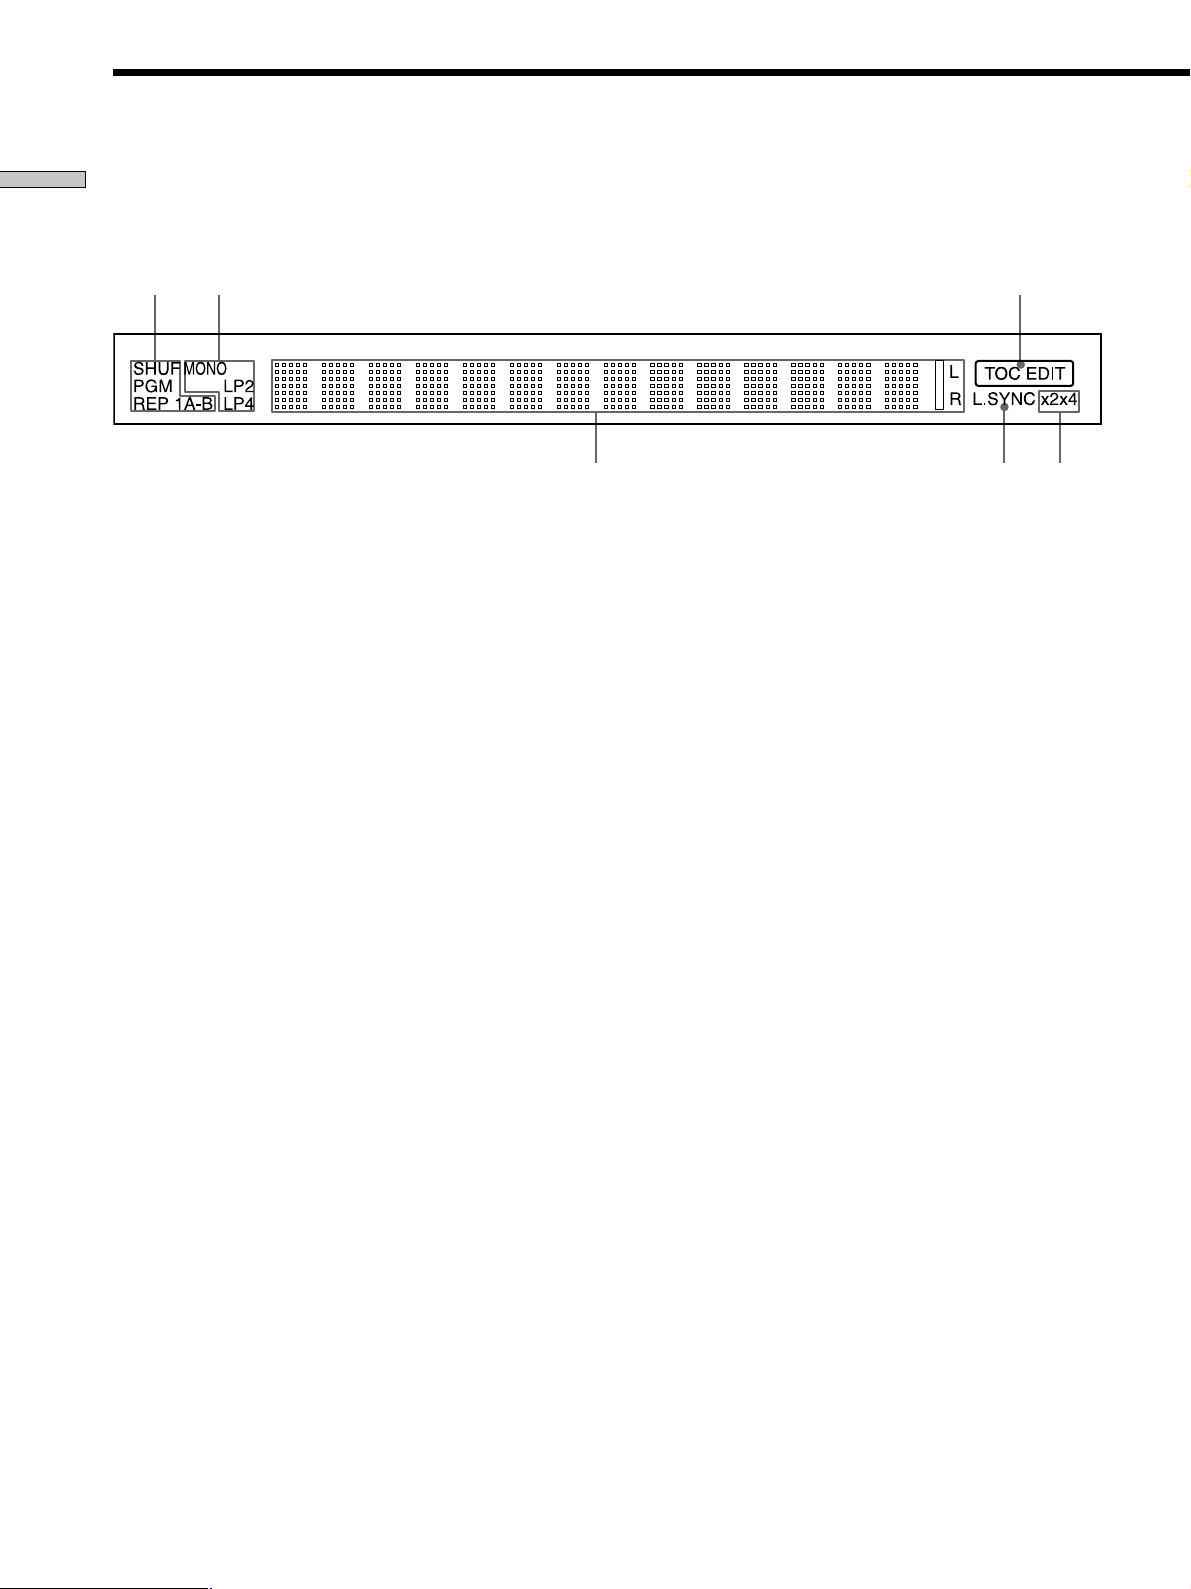
Display Window Descriptions
Location and Function of Parts
12 3
654
1 Play mode indicators
SHUF indicator (24)
Lights up when Shuffle Play is selected.
PGM indicator (24)
Lights up when Programme Play is selected.
REP indicators (23)
• “REP” lights up when Repeat All Play is selected.
• “REP 1” lights up when Repeat 1 Play is selected.
• “REP A-B” lights up when Repeat A-B Play is
selected.
2 Recording mode indicators (15)
• No indicator lights up when stereo recording is
selected.
• “MONO” lights up when monaural recording is
selected.
• “LP2” lights up when 2 times long recording is
selected.
• “LP4” lights up when 4 times long recording is
selected.
Whenever a track is played back, the corresponding
recording mode indicator lights up in the display.
3 TOC EDIT indicator (14, 28, 38)
• “TOC” lights up to indicate the presence of TOC
data that has not been written to the disc. “TOC”
flashes when the data is being written to the disc.
• “TOC EDIT” lights up during an editing operation.
5 L.SYNC indicator (18)
Lights up during recording when the deck is in
automatic track marking mode.
6 Information and menu display area (8, 9, 16, 32, 35)
• Displays parameters during editing or menu
operations.
• Displays the input level during recording or
recording pause.
• Displays MD or track data (name and playing time,
etc.), depending on the deck status (play, recording,
etc.).
Notes
• The display format that you’ve selected in each of the deck
statuses will appear whenever the deck enters that status
and you press DISPLAY until you change the format to
another (see below for details). If you disconnect the mains
lead, however, all the displays will revert to their default
(i.e., the factory set display) the next time you turn on the
deck.
• Time information to be displayed may vary according to
the recording mode.
When you insert an MD
The following information appears automatically.
Disc name
r
Total number of tracks and total recorded time
4 High-Speed CD Synchro-Recording indicators (20)
•“×2” lights up when 2× High-speed CD Synchro-
recording (recording is done in LP2 or LP4 mode) is
selected.
•“×4” lights up when 4× High-speed CD Synchro-
recording (recording is done in stereo or MONO
mode) is selected.
GB
8
Page 9

Location and Function of Parts
While the deck is stopped
Press DISPLAY repeatedly to change the display.
Each press of the button changes the display as
follows:
Total number of tracks and total recorded time
(default display)
r
Remaining recordable time on the MD
(recordable MDs only)*
r
Disc name**
Not shown for the premastered discs.
*
Disc name does not appear when the MD has not been named.
**
While the deck is recording
Press DISPLAY repeatedly to change the display.
Each press of the button changes the display as
follows:
Track number and recorded time of the current
track (default display)
r
Remaining recordable time on the MD
While the deck is playing
Press DISPLAY repeatedly to change the display.
Each press of the button changes the display as
follows:
Track number and elapsed time of the current
track (default display)
r
Track number and remaining playing time of
the current track
r
Remaining playing time on the MD
r
Track name*
Track name does not appear when the track has not been named.
*
r
Level of the input signal
r
Track name*
Track name does not appear when the track has not been named.
*
GB
9
Page 10

Getting
Before You Start the Hookup
Started
This chapter provides information on
the supplied accessories, things you
should keep in mind while hooking
up the system, and how to connect
i.LINK components to the MD deck.
Be sure to read this chapter
thoroughly before you actually
connect anything to the deck.
Checking the supplied accessories
This MD deck comes with the following items:
• i.LINK connecting cable (1)
• Remote commander (remote) (1)
Before using the supplied remote
The supplied remote already contains a battery. Before
using the remote, pull out the insulating sheet to allow the
power to flow from the battery.
To avoid battery leakage
If you don’t use the remote for an extended period of time,
remove the battery to avoid possible damage from battery
leakage and corrosion.
z
When to replace the battery
Under normal conditions, the battery should last for about six
months. When the remote no longer operates the deck, replace
the battery with new kne.
Notes on lithium battery
• Keep the lithium battery out of the reach of the children.
Should the battery be swallowed, immediately consult a doctor.
• Wipe the battery with a dry cloth to assure a good contact.
• Be sure to observe the correct polarity when inserting the
battery.
• Do not hold the battery with metallic tweezers, otherwise a
short-circuit may occur.
10
WARNING
Battery may explode if mistreated.
Do not recharge, disassemble, or dispose of in fire.
GB
Page 11
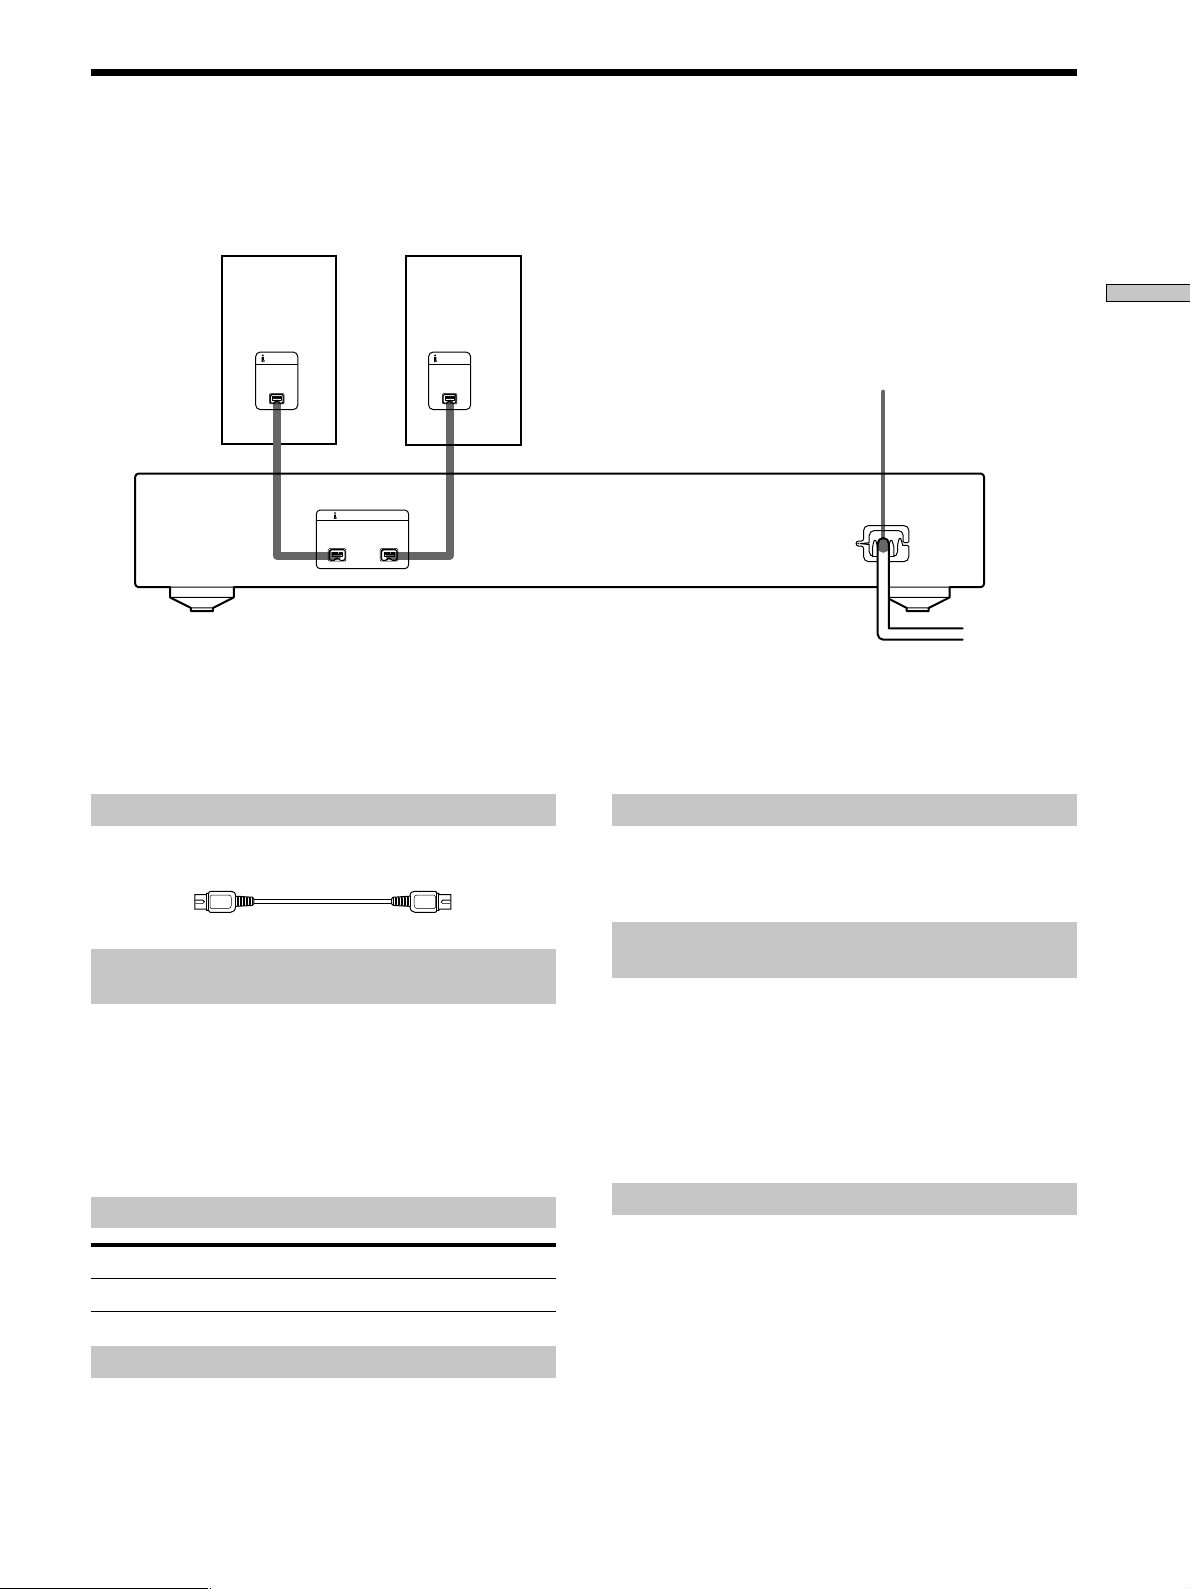
Hooking Up the i.LINK Components
Receiver,
*
etc.
i.LINK i.LINK
i.LINK S200
v v
You can connect the i.LINK components to either i.LINK S200 connector.
*
CD
player,
etc.*
Required cords
i.LINK connecting cables (2) (only one supplied)
Getting Started
Mains lead
About optional i.LINK connecting cables
Be sure to use the Sony i.LINK S200 connecting cables
(4 pins-4 pins).
Things you should keep in mind while
hooking up the system
• Turn off the power to all components before making
any connections.
• Do not connect any mains lead until all the connections
are completed.
• Be sure the connections are firm to prevent hum and
noise.
Jacks for connecting i.LINK components
Connect an To the
Receiver or CD player, etc. i.LINK S200 connector
Note on i.LINK component hookups
If a metal object should fall into the i.LINK S200
connector, short-circuiting may occur and damage the
components.
About i.LINK components to be used in
combination with the MD deck
The following i.LINK components can be used with the
MD deck:
• STR-LSA1 receiver
• CDP-LSA1 CD Player
z
For general information about i.LINK
See “About i.LINK” on page 38.
Connecting the mains lead
Connect the mains lead of the deck to a wall outlet.
Note
If you use a timer, connect the mains lead to the outlet of the
timer.
11
GB
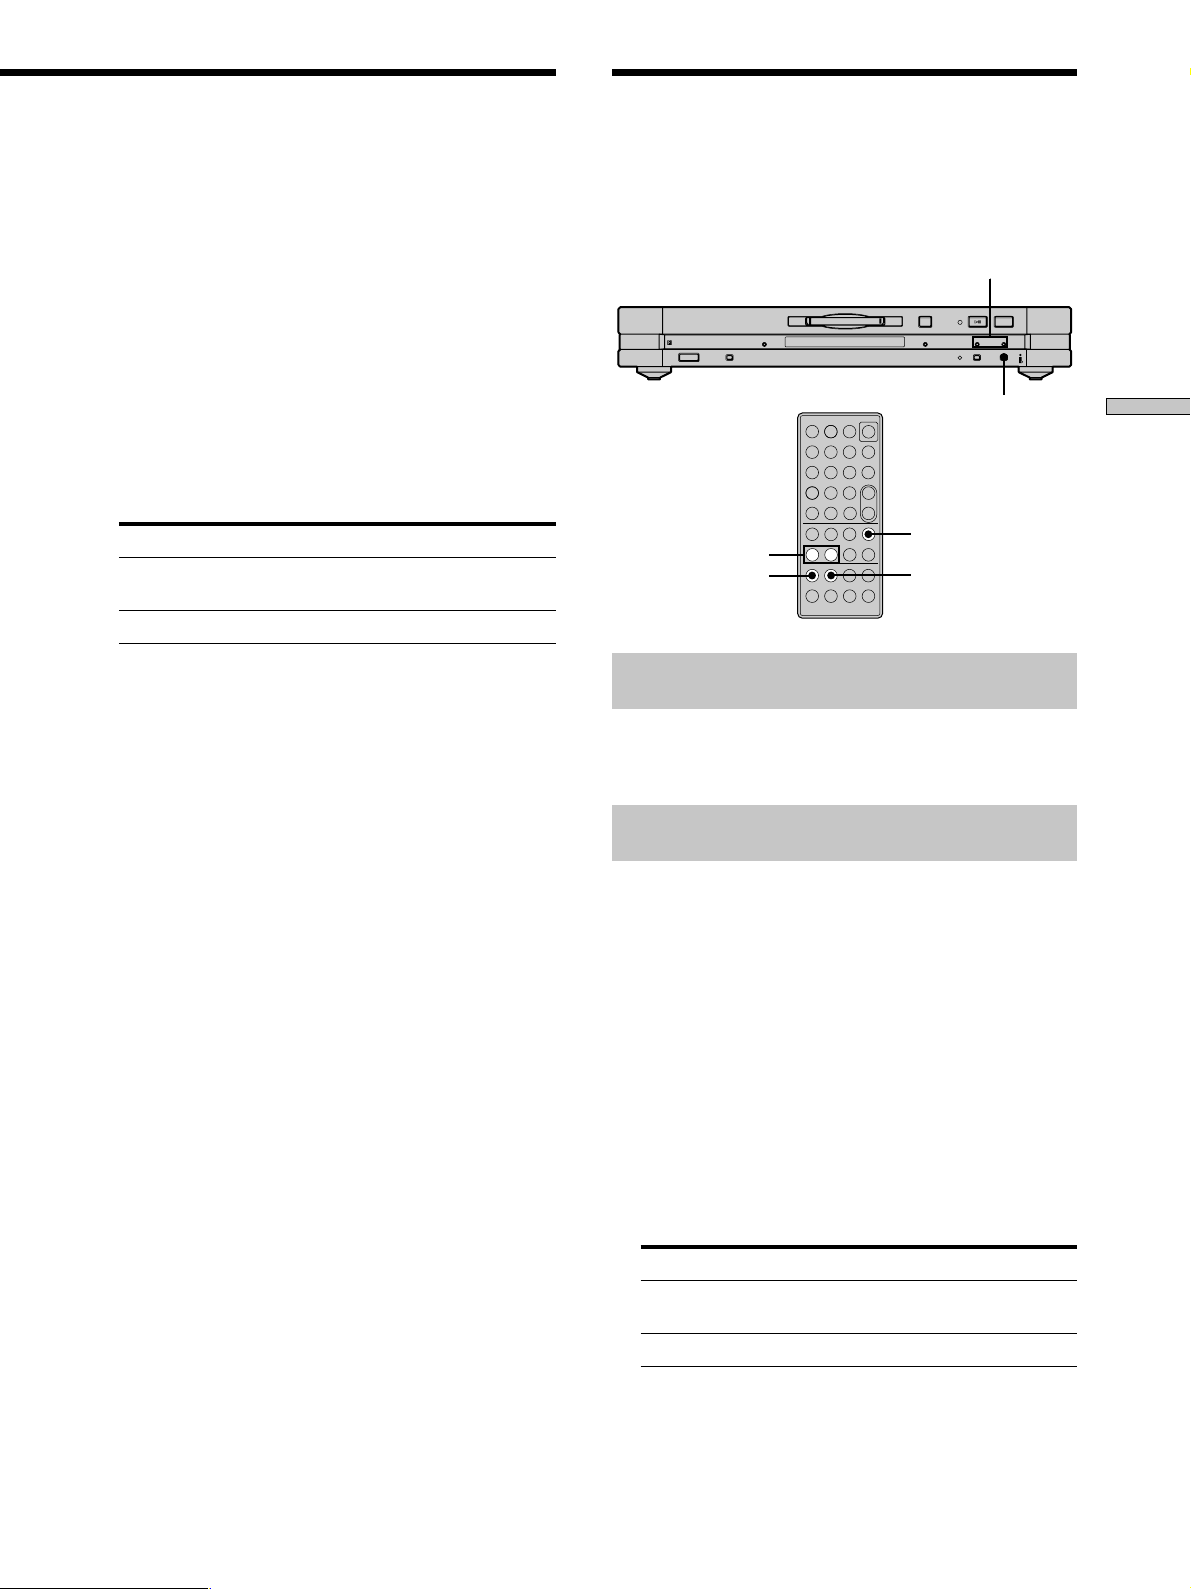
Page 12

Recording on
?/1
INPUT
REC z
?/1
xA
AHX
. >
./>
z
x
Recording on an MD
MDs
This chapter explains the various
ways to record on an MD, as well as
how to mark track numbers and
perform synchro-recording with other
components. See also “System
Limitations” on page 41 before
recording.
The operations for normal recording are explained below.
If the MD has recorded material on it, the deck will
automatically start recording from the end of the recorded
portion.
1 Press ~/1 to turn on the deck.
The STANDBY indicator turns off.
2 If the receiver is not turned off, turn it on and turn
on the programme source, and then select the
source kn the receiver.
3 Insert a recordable MD.
4 Press INPUT repeatedly until the name of the
programme source that you want to record from
appears.
If the programme source you want does not appear,
see page 13.
5 If necessary, select the recording mode.
For details, see “Recording for Long Times” on page
15.
6 If necessary, locate the point on the MD to start
recording from.
If you want to record on a new MD or start recording
from the end of the recorded portion, go to step 7.
To record over from the beginning of an existing MD
track
Press ./> repeatedly until the number of the
track to be recorded over appears.
To record over from the middle of an MD track
Press ./> repeatedly until the number of the
track to be recorded over appears, then press HX (or
N) to start playback. Press HX again (or press X)
at the point you want to start recording from.
7 Press REC z.
The deck changes to recording pause.
8 If necessary, adjust the recording level.
For details, see “Adjusting the Recording Level” on
page 16.
9 Press HX (or press N or X).
Recording starts.
12
GB
10Start playing the programme source.
Page 13
Operations you may want to do during recording
To Press
Stop recording x
Pause recording HX (or X)
Resume recording after pausing HX (or press N or X)
Change the display information DISPLAY (page 9)
Eject the MD A after stopping recording
When you pause recording
The track number increases by one. For example, if you
paused recording while recording track 4, the track
number will be 5 when you resume recording.
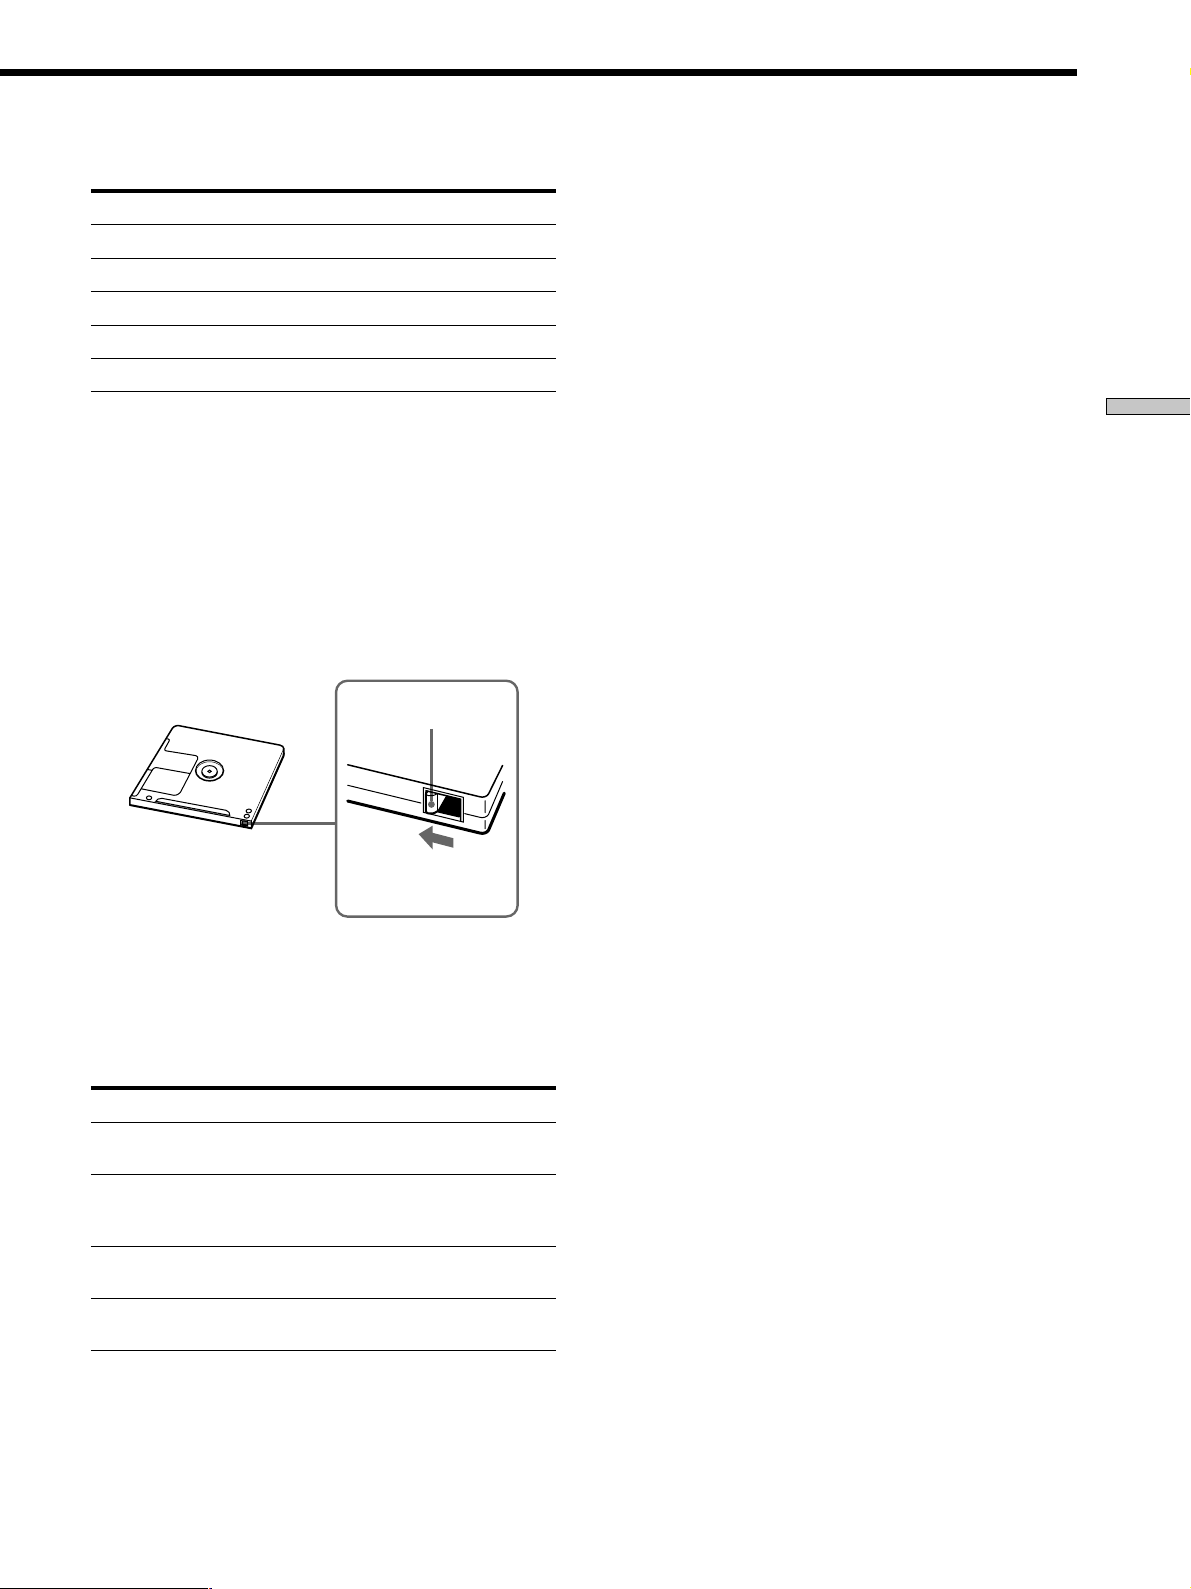
To prevent accidental erasure of the recorded
material
To make it impossible to record on an MD, slide the
record-protect tab in the direction of the arrow (see
illustration below) to open the slot. To enable recording,
close the slot.
z
To play the tracks you just recorded
Press HX (or N) immediately after stopping recording.
The deck starts to play from the first track of the material just
recorded.
z
To play from the first track of the MD after recording
1 Press x again after stopping recording.
2 Press HX (or N).
The deck starts to play from the first track of the MD.
Note
While recording, do not disconnect any mains leads or i.LINK
connecting cables within the i.LINK configuration. If you do so,
recording may not be done properly.
Recording on MDs
Bottom side of the MD
Record-protect tab
Slide in the
direction of arrow
If the programme source does not appear in step 4
An error may have occurred while the MD deck was
reading information about the programme source. Or, the
MD deck may be incapable of receiving information from
certain components. The indications in the following
table may appear at this time:
Indication Meaning
“Disc”, “Tuner”, etc. The MD deck has read in only general
“Unknown” The MD deck cannot receive any
“No Device” No component is connected to the MD
“CANNOT LINC” You cannot record from the selecetd
information about the component.
information about the component. The
connection, however, remains operative.
deck.
component.
13
GB
Page 14

Notes on Recording
About indications which appear while
recording
When “Protected” and “C11” alternate in the
display
The record-protect slot is open and the MD is recordprotected. To record on the MD, slide the tab to close the
slot. For details, see “To prevent accidental erasure of the
recorded material” on page 13.
Recording on MDs
When “Cannot Select” and programme source
name alternate in the display
The selected programme source is not an audio
component. Select the audio component.
When “Cannot Copy” and “C12” alternate in the
display
The MD deck uses the Serial Copy Management System.
MDs recorded through the digital input connector can’t be
copied on other MDs or DAT tapes through the digital
output connector. For details, see “Guide to the Serial
Copy Management System” on this page.
When “Impossible” appears in the display
You tried to record over existing track(s) (see “Recording
on an MD” on page 12) while Shuffle Play (page 24) or
Programme Play (page 24) is selected. You can record
over existing material only when the normal play (page
21) or Repeat Play (page 23) is selected.
When “NO SIGNAL” appears in the display
No signal is input to the MD deck and recording cannot
be done.
Guide to the Serial Copy Management
System
Digital audio programme, such as CDs, MDs, and DATs
make it easy to produce high-quality copies of music by
processing music as a digital signal.
To protect copyrighted music sources, this deck uses the
Serial Copy Management System which allows you to
make only a single copy of a digitally recorded source
through digital-to-digital connections.
You can make only a first-generation copy
through a digital-to-digital connection.
Examples are given as follows:
• You can make a copy of a commercially available digital
sound programme (for example, a CD or MD), but you
can’t make a second copy from the first-generation
copy.
• You can make a copy of a digital signal from a digitally
recorded analog sound programme (for example, an
analog record or a music cassette tape) or from a digital
satellite broadcast programme, but you can’t make a
second copy from the first-generation copy.
A first-generation copy means the first recording of a digital audio
*
source through the deck’s digital input connector. For example, if you
record from a CD player connected to the i.LINK S200 connector,
that copy is a first-generation copy.
Note
The restrictions of the Serial Copy Management System don’t
apply when you make a recording through the analog-to-analog
connections.
*
When “Tr” flashes in the display
The MD deck is recording over existing track(s). The
indication stops flashing when the deck reaches the end of
the recorded portion.
About indications which appear after
recording
When “TOC” lights up in the display
Recording has finished but the TOC (Table of Contents)
on the MD has not been updated to reflect the recording
results. The recording will be lost if you disconnect the
mains lead while the indication is on. The TOC will be
updated only when you eject the MD or turn off the MD
deck.
When “TOC Writing” flashes in the display
The deck is updating the TOC. Do not disconnect the
mains lead or move the deck while the indication flashes.
GB
14
Page 15
Recording for Long Times
In addition to normal stereo recording, this deck has two
recording modes: LP2 and LP4. When recording in LP2
mode, you can record 2 times the normal recordable time,
and in LP4 mode, you can record 4 times the normal
recordable time. In addition, the recordable time for
monaural recording is approximately double the stereo
recording time.
Note
MDs recorded in LP2 or LP4 mode can be played back only on
decks that support the MD LP format. Conventional MD decks
cannot play MDs recorded in LP2 or LP4 mode.
REC MODE
A
1 Do steps 1 to 4 of “Recording on an MD” on page
12.
2 Press REC MODE repeatedly to select the recording
mode.
To record in Select to light up
Monaural MONO
Stereo (factory setting) no indicator
LP2 stereo LP2
LP4 stereo LP4
z
LP Stamp function works during recording in LP2 or LP4
mode Z
A track recorded in LP2 or LP4 mode is given an identification
code which is displayed only when you attempt to play that track
on an MD deck which does not support LP modes. “LP:”
appears in the display at this time. To turn off this function, do
the procedure below.
1 While the deck is stopped or playing, press MENU/NO twice.
“Setup Menu” appears in the display.
2 Press ./> repeatedly until “LP Stamp On” appears, then
press YES.
3 Press ./> repeatedly to select “LP Stamp Off,” then press
YES.
4 Press MENU/NO.
To turn on the LP Stamp function again, select “LP Stamp On” in
step 3 above.
Notes
• “LP:” does not appear when the track is played back on the
MD deck that supports the MD LP format.
• When the LP Stamp function is on, the maximum number of
characters which can be input in the MD decreases.
• When you divide the track recorded with the LP Stamp
function activated, “LP:” code is copied to the newly created
track.
Recording on MDs
3 Do steps 6 to 10 of “Recording on an MD” on page
12.
z
When you record on an MD in LP2 or LP4 mode
The LP indicator on the front panel lights up.
Notes
• Even if you press REC MODE during recording or recording
pause, you cannot change the recording mode.
• You cannot perform S.F Edit for the tracks recorded in LP2 or
LP4 mode.
15
GB
Page 16

Adjusting the Recording
?/1
x
A
. >
./>
z
YES
DISPLAY
./>
MENU/NO
–
+
?/1
.>m M
Xxz
789
10
/0
1
23
456
N
>10
DISPLAY
Level
Do the procedure below to adjust the recording level.
Recording Tips
1 Do steps 1 to 7 of “Recording on an MD” on page
12.
Recording on MDs
2 Play the portion of the programme source with the
strongest output.
3 Press DISPLAY repeatedly until the level of the
input signal appears.
4 While monitoring the sound, press ./>
repeatedly (or press LEVEL +/– repeatedly) to raise
the recording level to its highest level without
turning kn the rightmost indicator on the peak
level meters.
5 Stop playing the programme source.
6 To start recording, continue from step 9 of
“Recording on an MD” on page 12.
z
The Peak Hold function freezes the peak level meters at the
highest level reached by the input signal Z
1 Press MENU/NO twice.
“Setup Menu” appears in the display.
2 Press ./> repeatedly until “P.Hold Off” (factory setting)
appears, then press YES.
3 Press ./> repeatedly to select “P.Hold On,” then press
YES.
4 Press MENU/NO.
To turn off the Peak Hold Function, select “P.Hold Off” in step 3
above.
Note
The volume can only be increased up to +18.0 dB. Therefore, if
the output level of the connected component is low, it may not be
possible to set the recording level to maximum.
DISPLAY
?/1
./>
xA
. >
z
Checking the remaining recordable time
on the MD
Press DISPLAY repeatedly.
While the deck is The following information appears
Stopped Total recorded time y Remaining
Avoid turning on this indicator
Recording Recorded time kf the current track y
recordable time on the MD
Remaining recordable time on the MD
For details, see page 9.
Note
Time information to be displayed may vary depending on the
recording mode.
Erasing blank portions automatically
(Smart Space/Auto Cut) Z
The deck can be set to automatically erase any blanks that
are produced when the signal is interrupted during
recording. The function which activates (Smart Space or
Auto Cut) depends on the length of the interruption, as
described below.
Smart Space
If the signal is interrupted for less than 30 seconds, Smart
Space replaces the blank portion with a blank space of
about three seconds, then continues the recording. “Smart
Space” appears in the display during this time.
16
GB
Page 17
Marking Track Numbers While Recording (Track Marking)
Auto Cut
If the signal is interrupted for about 30 seconds , Auto Cut
replaces the blank portion with a blank space of about
three seconds, then pauses the recording. “Auto Cut”
appears in the display during this time.
Do the procedure below to turn Smart Space and Auto
Cut on or off.
1 While the deck is stopped, press MENU/NO twice.
“Setup Menu” appears in the display.
2 Press ./> repeatedly until “S.Space On”
appears, then press YES.
3 Press ./> repeatedly to select the setting,
then press YES.
To Select
Turn on Smart Space and Auto Cut S.Space On (factory
setting)
Turn off Smart Space and Auto Cut S.Space Off
4 Press MENU/NO.
Notes
• If you start recording with no signal input, Smart Space and
Auto Cut will not operate regardless of the setting.
• Smart Space does not affect the order of the track numbers
being recorded, even if the blank space occurs in the middle of
a track.
• Auto Cut is automatically turned on or off in tandem with
Smart Space.
• If you turn off the deck or disconnect the mains lead, the deck
will store the last setting (“S.Space On” or “S.Space Off”) and
recall it the next time you turn on the deck.
• If the deck continues recording pause for about ten minutes
after the Auto Cut activated, recording stops automatically.
You can mark track numbers either manually or
automatically while recording. By marking track
numbers at specific points, you can quickly locate the
points later or edit the MD easily.
./>
A
?/1
x
. >
z
REC z
?/1
23
1
456
+
789
–
>10
10
/0
Xxz
./>
MENU/NO
N
.>m M
z
YES
Marking track numbers manually
(Manual Track Marking)
Press REC z at the point where you want to add a
track number while recording.
Marking track numbers automatically
(Automatic Track Marking) Z
When recording from a CD player or MD deck connected
to the i.LINK S200 connector, the deck marks track
numbers in the same sequence as the source. When
recording from other sources connected to the i.LINK
S200 connector, do the procedure below to mark track
numbers automatically. However, Automatic Track
Marking may not function properly if the recording
source contains much noise.
Recording on MDs
1 While the deck is stopped, press MENU/NO twice.
“Setup Menu” appears in the display.
2 Press ./> repeatedly until “T.Mark Lsync”
appears, then press YES.
3 Press ./> repeatedly to select the setting,
then press YES.
To Select
Turn on Automatic Track Marking T.Mark Lsync (factory
setting)
Turn off Automatic Track Marking T.Mark Off
17
GB
Page 18
Marking Track Numbers While Recording
(Track Marking)
Starting Recording With 6
Seconds of Prestored Audio
4 Press MENU/NO.
When you have turned on Automatic Track Marking
in step 3 above, “L.SYNC” lights up in the display.
The deck marks a track number whenever the input
signal level drops to –50 dB (the trigger level for
Automatic Track Marking) or below for at least 1.5
seconds and rises above –50 dB again.
To change the trigger level for Automatic Track
Marking Z
Recording on MDs
Do the procedure below to change the signal level that
triggers Automatic Track Marking.
1 While the deck is stopped, press MENU/NO twice.
“Setup Menu” appears in the display.
2 Press ./> repeatedly until “LS(T)” appears,
then press YES.
3 Press ./> repeatedly to select the level, then
press YES.
You can set the level at any value between –72 dB and
0 dB, in 2 dB steps.
4 Press MENU/NO.
z
Additional information on Automatic Track Marking
• When recording from a CD player or MD deck connected to the
i.LINK S200 connector, the entire material may be recorded as a
single track in the following cases:
— When you consecutively record the same track two or more
— When you consecutively record two or more tracks with the
— When you record tracks from certain CD or multi-disc
Also, if the source is an MD, a track number may not be
marked for tracks less than four seconds (in stereo mode,
monaural mode, or LP2 mode) or eight second (in LP4 mode)
long.
• When recording from a DAT deck or DBS tuner connected to
the i.LINK S200 connector, the entire material may be recorded
as a single track.
• When recording from a DAT deck or DBS tuner connected to
the i.LINK S200 connector, the deck will mark a track number
whenever the sampling frequency of the input signal changes,
regardless of the track marking parameter setting (“T.Mark
Lsync” or “T.Mark Off”).
times using single-track repeat play.
same track number but from different CDs or MDs.
players.
Data (Time Machine Recording) Z
Whenever the deck is in recording pause, the deck’s
buffer memory continuously stores the latest 6 seconds
worth of audio data. When you press T.REC, the
recording then starts with the data in the buffer memory.
Time Machine Recording thus allows you to avoid
missing the beginning of material recorded live from an
FM or satellite broadcast.
?/1
23
1
56
4
+
789
–
>10
10
/0
NX x z
.>m M
T.REC
1 Do steps 1 to 8 of “Recording on an MD” on page
12.
The deck changes to recording pause.
2 Start playing the programme source.
3 Press T.REC at the point where you want to start
recording.
Recording starts with the 6 seconds of prestored data
in the buffer memory, then continues recording via the
buffer memory thereafter.
To stop Time Machine Recording
Press x.
Note
The storage of data in the buffer memory starts from the moment
the deck changes to recording pause. Thus, if you start recording
less than 6 seconds after changing to recording pause, less than 6
seconds worth of data will be recorded from the buffer memory.
The same is true if the programme source had been playing for
less than 6 seconds at the time you start recording.
z
You can mark track numbers even after recording has
finished
See “Dividing Tracks” on page 30.
Note
If you turn off the deck or disconnect the mains lead, the deck
will store the last settings (“T.Mark Lsync” or “T.Mark Off” and
the trigger level) and recall them the next time you turn on the
deck.
GB
18
Page 19
Synchro-recording With the
Synchro-recording With a
Audio Component of Your
Choice (Music Synchro-recording)
Z
The Music Synchro-recording allows you to automatically
synchronize recording kn the MD deck with the playing
of the selected programme source. The Track Marking
function, however, will differ according to the programme
source. For details, see “Marking Track Numbers While
Recording” on page 17.
?/1
23
1
56
4
+
789
>10
1 Do steps 1 to 6 of “Recording on an MD” on page
12.
2 Press M.SYNC.
The deck changes to recording pause.
3 Start playing the programme source.
Recording starts automatically.
–
10
/0
NX x z
.>m M
M.SYNC
Sony CD Player (Normal/
High-Speed CD Synchro-recording)
By connecting the MD deck to a Sony CD player, you can
copy the contents of CDs to MDs through simple
operations. You can select normal speed or high speed.
When you select high speed, the deck automatically
specifies 2× normal speed or 4× normal speed according
to the current recording mode (monaural, stereo, LP2
stereo, or LP4 stereo). If you use the remote during this
procedure, make sure the MD deck and the CD player are
as close to each other as possible since the remote operates
both the MD deck and the CD player.
CD SYNCHRO
A
?/1
?/1
23
1
456
+
789
–
>10
10
/0
N
N
./>
MENU/NO
Xxz
.>m M
z
YES
Z
./>HX
x
. >
z
Recording on MDs
To stop Music Synchro-recording
Press x.
Note
During Music Synchro-recording, Smart Space and Auto Cut will
operate regardless of their setting (“S.Space On” or “S.Space
Off”).
1 While the deck is stopped, press MENU/NO twice.
“Setup Menu” appears in the display.
2 Press ./> repeatedly until “Synchro High”
appears, then press YES.
3 Press ./> repeatedly to select the setting,
then press YES.
To record at Select
Normal speed Synchro Normal
High speed Synchro High*
(factory setting)
* When monaural or stereo recording mode is selected, CD
Synchro-recording is done in ×4 normal speed; when LP2 or LP4
is selected, recording is done in ×2 normal speed.
4 Press MENU/NO.
5 Turn on the receiver and the CD player, and select
CD on the receiver.
6 Do steps 3 to 6 of “Recording on an MD” on page
12.
7 Insert a CD into the CD player and select the
playback mode (normal play or Programme Play
only) on the CD player.
19
GB
Page 20

Synchro-recording With a Sony CD Player
(Normal/High-Speed CD Synchro-recording)
8 Press CD SYNCHRO.
The CD player changes to play standby and the MD
deck changes to recording standby. The HIGH SPEED
indicator on the MD deck and the ×2 or ×4 indicator in
the MD deck display light up according to the
recording speed.
When “Select CD” appears in the display
The CD player is not selected as the programme
source. Press INPUT on the MD deck to select the CD
player.
Recording on MDs
When “Connect CD” appears in the display
The CD player is not connected in an i.LINK
configuration. Connect the CD player.
9 After “New Track” starts to flash in the display,
press HX (or press N or X).
The deck starts recording and the CD player starts to
play.
The track number and elapsed recording time of the
track appear in the display.
Recording stops automatically when the CD player
finishes playback.
Operations you may want to do during CD
Synchro-recording
To Press
Stop recording x
Check the remaining recordable
time on the MD
When “Cannot Synchro” appears in the display
A reading error has occurred. Record the track again.
Reading errors may be caused by the following CD and
recording conditions:
• With the following kinds of CDs, you may experience a
reading failure or noise when recorded to an MD:
— CDs with adhesive labels attached to them
— Irregularly shaped CDs (for example, heart- or star-
— CDs with printed text concentrated on one side only
— Old CDs
— Scratched CDs
— Dirty CDs
— Warped CDs
• If the following occurs during CD playback or
recording, a reading error may occur or noise may be
produced in the recording results:
— The CD tray or other part of the deck is bumped.
— The deck is placed on an uneven or soft surface.
— The deck is located near a speaker, door, or other
shaped CDs)
source of vibration.
DISPLAY (page 16)
z
You can use the remote of the CD player to stop CD Synchro-
recording
Press x. The deck stops recording and the CD player stops
playing.
z
During CD Synchro-recording, track numbers are marked in
the following way:
When the CD player is connected to the i.LINK S200 connector,
track numbers are automatically marked as they appear on the
CD.
z
CD text information (CD text and disc memos) can be copied
to the MD during CD Synchro-recording (Disc Memo Copy
function)
If the MD deck is recording a CD track with CD text information,
press NAME EDIT/SELECT to display the contents of the
information in the MD deck’s display window. To record the
information to the MD as a track name, press YES.
Notes
• You cannot record over existing material during High-Speed
CD Synchro-recording. The deck automatically starts recording
from the end of the existing material.
• When the CD player is in Shuffle Play or Repeat Play mode, it
automatically changes to normal play at the point you press
CD SYNCHRO in step 8.
• The following items are either inoperable or cannot be used
during High-Speed CD Synchro-Recording:
— The Auto Cut function
— The recording level specified by the Setup Menu. (In this
case, recording is done at 0.0 dB.)
• Text information may not be copied for some CDs.
• When no operation has been done for about one minute after
you pressed CD SYNCHRO in step 8, CD Synchro-recording is
automatically cancelled.
• Do not disconnect any mains leads or i.LINK connecting cables
within the i.LINK configuration. If you do so, recording may
fail.
• Make sure that the remaining recordable time on the MD is
longer than the playing time of the CD, especially if you want
to record all the tracks on the CD.
• If the MD becomes full in the middle of recording of a track, the
track will not be recorded to the MD.
20
GB
Page 21
Playing MDs
Playing an MD
This chapter explains the various
ways to play MDs.
The operations for normal play are explained below.
?/1
?/1
A
A
xHX
x
. >
z
./>
1 Press ~/1 to turn on the deck.
The STANDBY indicator turns off.
2 If the receiver is turned off, turn it on and select
this deck on the receiver.
3 Insert an MD.
4 If necessary, press > repeatedly to locate the
track you want to start playing from.
If you want to play from the first track, go to step 5.
5 Press HX (or N).
The deck starts to play.
6 Adjust the volume on the receiver.
Operations you may want to do during play
To Press
Stop play x
Pause play HX (or X)
Resume play after pausing HX (or, N or X)
Locate a succeeding track > repeatedly
Locate the beginning of the
current track or a preceding
track
Change the display information DISPLAY (page 9)
Eject the MD A after stopping play
. repeatedly
Playing MDs
z
When i.LINK Control function is activated on the receiver
Pressing HX (or N) on the MD deck turns on the receiver and
the MD deck and playback starts automatically.
z
When you play an MD recorded in LP2 or LP4 mode
The LP indicator in the deck lights up.
z
You can check the track name at any time while playing Z
Press SCROLL.
The track name appears and scrolls. While the track name is
scrolling, press the button again to stop scrolling, and again to
continue scrolling.
21
GB
Page 22
Playing a Specific Track
Locating a Particular Point in a Track Z
While the deck is playing or stopped, use the procedure
below to quickly play any track.
Locating a track with AMS*
Playing MDs
To go to Press
The next or a succeeding track
during play
A preceding track during play . repeatedly.
The beginning of the current
track during play
A specific track while the deck
is stopped
Automatic Music Sensor
*
z
To locate the last track of the MD quickly
While the deck is stopped, press . once.
z
If you locate a track while the deck is stopped or paused
The deck will still be stopped or paused at the beginning of the
located track.
Playing a track by entering the track
number Z
HX
xA
. >
z
./>
?/1
23
>10
N
1
56
4
789
>10
10
/0
N
Xxz
.>m M
+
–
Number
buttons
./>
> repeatedly.
. once.
./> repeatedly until the
track number you want to go to
flashes in the display, then press
HX (or N).
You can locate a particular point in a track during play or
play pause.
?/1
23
1
56
4
+
789
–
>10
10
/0
NX x z
.>m M
m/M
Locating a point while monitoring the
sound
Press down m/M during play.
You will hear intermittent playback as the disc goes
forward or in reverse. When you reach the point, release
the button.
Notes
• If the disc reaches the end while you’re pressing M, the deck
stops.
• Tracks that are only a few seconds long may be too short for
monitoring. For such tracks, play the MD at normal speed.
Locating a point by observing the time
indication
Press down m/M during play pause.
The elapsed playing time of the track appears in the
display. When you reach the point, release the button.
No sound is output during this time.
z
When “- Over -” appears in the display
The disc has reached the end while you’re pressing down M.
Press m to go back.
Press the number button(s) to enter the track number
of the track you want to play.
To enter a track number over 10
1 Press >10.
2 Enter the corresponding digits.
To enter 0, press 10 instead.
Examples:
• To play track number 30, press >10, then 3 and 10.
• To play track number 108, press >10 twice, then 1, 10, and
8.
z
If you enter a track number while the deck is stopped or
paused
The deck will still be stopped or paused at the beginning of the
track.
GB
22
Page 23
Playing Tracks Repeatedly
Z
You can play an entire MD repeatedly. This function can
be used with Shuffle Play to repeat all the tracks in
random order (page 24), or with Programme Play to
repeat all the tracks in the programme (page 24). You can
also repeat a specific track or portion within a track.
REPEAT
CLEAR
?/1
23
1
56
4
+
789
–
>10
10
/0
NX x z
.>m M
AyB
M
Note
If you turn off the deck or disconnect the mains lead, the deck
will store the last setting of the repeat play (“Repeat All” or
“Repeat 1”) and recall it the next time you turn on the deck.
However, settings of Repeat A-B Play are erased when you turn
off the deck or disconnect the mains lead.
Repeating all the tracks on the MD
(Repeat All Play)
Press REPEAT CLEAR repeatedly until “REP” lights up in
the display.
When you play an MD, the deck repeats the tracks as
follows:
When the play mode is The deck repeats
Normal play (page 21) All the tracks in sequence
Shuffle Play (page 24) All the tracks in random order
Programme Play (page 24) All the tracks in the programme in
sequence
Repeating a specific portion within a
track (Repeat A-B Play)
You can specify one portion within a track to be played
repeatedly. Note that the portion that you specify must be
within the boundaries of a single track.
1 While the deck is playing, press AyB at the
starting point (point A) of the portion to be played
repeatedly.
“REP A-” lights up and “B” flashes in the display.
2 Continue playing the track or press M to locate
the ending point (point B), then press AyB.
“REP A-B” lights up and Repeat A-B Play starts.
To stop Repeat A-B Play and resume normal play
Press REPEAT CLEAR.
z
You can set a new starting point and ending point during
Repeat A-B Play
You can change the current ending point to a new starting point,
then specify a new ending point to repeat a portion right after the
current portion.
1 During Repeat A-B Play, press AyB.
The current ending point changes to the new starting point
(point A).
“REP A-” lights up and “B” flashes in the display.
2 Locate the new ending point (point B) and press AyB.
“REP A-B” lights up and the deck starts to repeat the newly
specified portion.
Playing MDs
To stop Repeat All Play
Press x.
To resume normal play
Press REPEAT CLEAR repeatedly until “REP” turns off.
Repeating the current track
(Repeat 1 Play)
While the track you want to repeat is being played,
press REPEAT CLEAR repeatedly until “REP 1” lights up
in the display.
Repeat 1 Play starts.
To stop Repeat 1 Play
Press x.
To resume normal play
Press REPEAT CLEAR repeatedly until “REP 1” turns off.
23
GB
Page 24
Playing Tracks in Random
Creating Your Own
Order (Shuffle Play) Z
When you select Shuffle Play, the deck plays all the tracks
on the MD in random order.
1 While the deck is stopped, press PLAY MODE
repeatedly until “SHUF” lights up in the display.
Playing MDs
2 Press N.
Shuffle Play starts.
; appears while the deck is “shuffling” the tracks.
To resume normal play
While the deck is stopped, press PLAY MODE repeatedly
until “SHUF” turns off.
z
You can locate tracks during Shuffle Play
Press ./> repeatedly.
• To locate the next track or a later track to be played, press >
repeatedly.
• To locate the beginning of the current track, press .. Note
that you can’t locate and play the tracks that have already been
played once.
PLAY
MODE
?/1
23
1
56
4
789
>10
10
/0
NNXxz
.>m M
Programme (Programme Play) Z
You can pick out the tracks that you like and specify the
playback order in a programme containing up to 25
tracks.
PLAY MODE
+
–
Number
buttons
>10
N
./>
1 While the deck is stopped, press PLAY MODE
repeatedly until “PGM” lights up in the display.
2 Use the number button(s) to enter the track
directly. Or, press ./> repeatedly until the
track number you want to add to the programme
appears, then press YES or PLAY MODE.
“Step X (X: number of the entered tracks)” appears,
followed by total playing time of the programme.
To clear the last entered track
Press CLEAR to erase the track number.
To enter a track number over 10
Use >10. For details, see page 22.
3 Repeat step 2 to enter other tracks.
4 Press N.
Programme Play starts.
?/1
23
1
56
4
789
>10
10
/0
N
Xxz
.>m M
DISPLAY
+
–
YES
CLEAR
To check the number of the track currently being
played in the programme
Press DISPLAY.
To check the contents of the programme during
Programme Play
Press ./> repeatedly.
To add a track to the end of the programme
Do steps 2 above while the deck is stopped.
To erase all tracks in the programme
Press CLEAR repeatedly until all the track numbers
disappear.
To stop Programme Play
Press x.
To resume normal play
Press PLAY MODE repeatedly until “PGM” turns off.
24
GB
Page 25
Tips for Recording From
z
The programme remains even after Programme Play ends or
is stopped
Press N to play the programme again.
Notes
• If you eject the MD, the programme will be lost.
• The display shows “- - - m - - s” when the total playing time of
the programme exceeds 1,000 minutes.
• “Step Full” appears when you try to programme the 26th track.
MDs to Tape
./>
MENU/NO
Z
1
4
789
>10
N
.>m M
?/1
23
56
10
/0
Xxz
+
–
YES
Inserting blanks between tracks during
play (Auto Space)
The MD deck can be set to automatically insert a threesecond blank between tracks during play. This function is
useful when you’re recording from an MD to an analog
tape since the three-second blank enables you to use the
Multi-AMS function later to locate the beginning of tracks
on the tape.
1 While the deck is stopped, press MENU/NO twice.
“Setup Menu” appears in the display.
2 Press ./> repeatedly until “Auto Off”
appears, then press YES.
Playing MDs
3 Press ./> repeatedly to select the setting,
then press YES.
To Select
Turn on Auto Space Auto Space
Turn off Auto Space Auto Off (factory setting)
4 Press MENU/NO.
Notes
• If you select “Auto Space” and record a selection containing
multiple track numbers (for example, a medley or symphony),
blank spaces will be created on the tape in between the various
sections.
• If you turn off the deck or disconnect the mains lead, the deck
will store the last setting (“Auto Space” or “Auto Off”) and
recall it the next time you turn on the deck.
25
GB
Page 26

Tips for Recording From MDs to Tape
Pausing after each track (Auto Pause)
You can set the MD deck so that it pauses after each track
to give you time to locate the next track to be recorded.
1 While the deck is stopped, press MENU/NO twice.
“Setup Menu” appears in the display.
2 Press ./> repeatedly until “Auto Off”
appears, then press YES.
3 Press ./> repeatedly to select the setting,
then press YES.
To Select
Turn on Auto Pause Auto Pause
Playing MDs
Turn off Auto Pause Auto Off (factory setting)
4 Press MENU/NO.
To resume play after pausing
Press N.
Note
If you turn off the deck or disconnect the mains lead, the deck
will store the last setting (“Auto Pause” or “Auto Off”) and recall
it the next time you turn on the deck.
26
GB
Page 27

Editing
Before You Start Editing
Recorded MDs
This chapter explains how to edit the
tracks that have been recorded on an
MD.
Brief descriptions of buttons used to edit
MDs
?/1
23
1
56
4
+
789
–
>10
10
/0
Xxz
N
./>
MENU/NO
.>m M
The buttons described below are used to erase, divide,
move, or combine tracks on the MD.
Note
The operations of these buttons are different when naming a
track or MD. For details, see “Naming Tracks or MDs” on page
32.
No editing is possible when the Shuffle or Programme Play is
selected. Be sure to select normal play before editing the MD.
MENU/NO button: While the deck is stopped, playing,
or paused, press to edit tracks. While editing, press to
cancel editing.
Note
No editing is possible when the Shuffle or Programme Play is
selected. Be sure to select normal play before editing the MD.
m/M
YES
Editing Recorded MDs
./> buttons: Press to select an editing operation or
track number. You can also use the buttons to specify
points in a track for erasure or track division.
YES button: Press this button to enter a selection.
m/M buttons: Press to specify the unit (minute,
second, or frame) by which the MD is advanced when the
./> buttons are pressed. You can also use these
buttons to locate the end point of the portion to be erased.
For further details on the function of each button, see the
sections on editing operations.
27
GB
Page 28

AAA BBB CCC DDD
1 2 3 4
AAA CCC DDD
1 2 3
Before You Start Editing
Erasing Tracks Z
Editing Recorded MDs
About indication which appears while
editing
When “Protected” appears in the display
The record-protect slot is open. To edit the MD, slide the
tab to close the slot. For details, see “To prevent
accidental erasure of the recorded material” on page 13.
About indications which appear after
editing
When “TOC” lights up in the display
Editing has finished but the TOC (Table of Contents) on
the MD has not been updated to reflect the editing results.
The editing will be lost if you disconnect the mains lead
while the indication is on. The TOC will be updated only
when you eject the MD or turn off the MD deck.
When “TOC Writing” flashes in the display
The deck is updating the TOC. Do not disconnect the
mains lead or move the deck while the indication flashes.
You can erase a track or part of a track simply by
specifying the number of the track or the portion within a
track to be erased. You can also erase all the tracks on an
MD at one time.
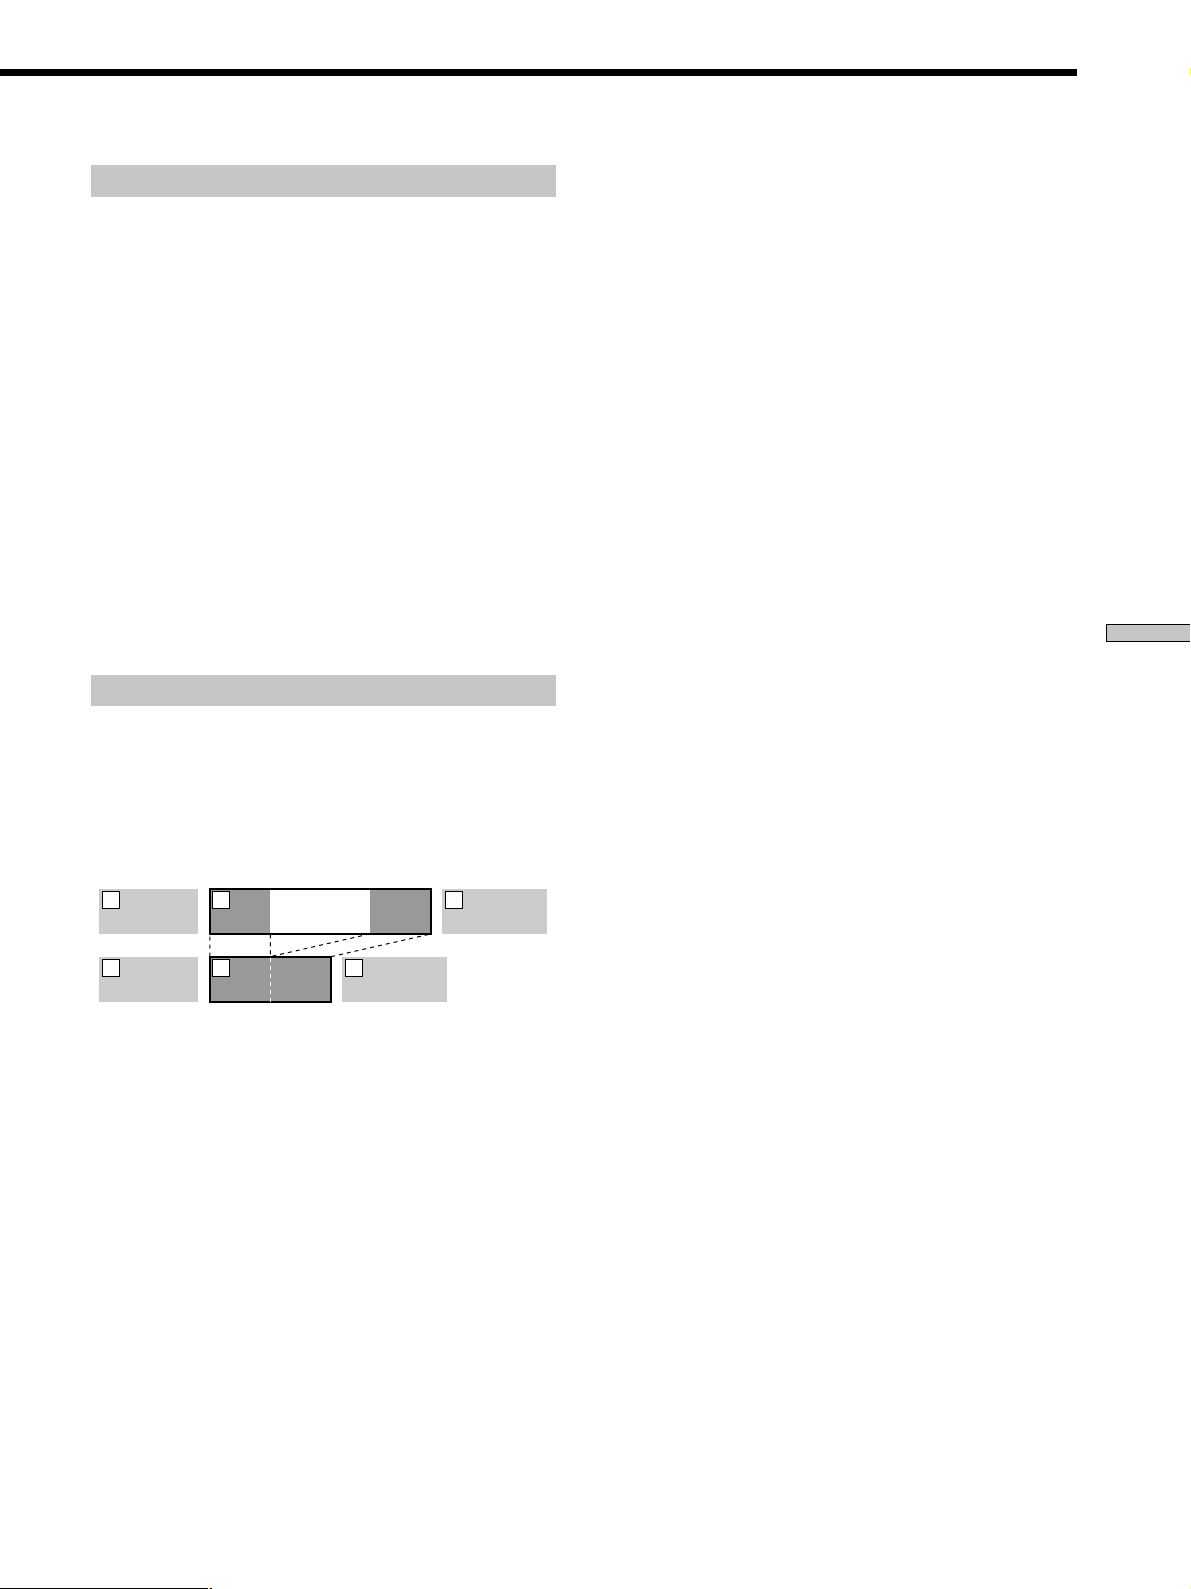
Erasing a track
Specify the number of the track you want to erase.
Example: Erasing the second track (track name:
BBB)
When you erase a track, all the tracks after the kne erased
are automatically renumbered. For example, if you erase
track number 2, the previous track number 3 becomes
track number 2 and the previous track number 4 becomes
track number 3, and so on.
1 While the deck is stopped, playing, or paused,
press MENU/NO.
“Edit Menu” appears in the display.
2 Press ./> repeatedly until “Tr Erase ?”
appears, then press YES.
The deck starts to play the track indicated by the
number in the display.
3 Press ./> repeatedly until the track number
you want to erase appears.
4 Press YES.
“Complete!!” appears for a few seconds and the track
is erased. The track following the erased track starts
to play. If the erased track is the last one on the MD,
the track preceding the erased track starts to play.
To cancel the operation
Press MENU/NO or x.
z
If “Erase ???” appears in step 4 above
The track has been record-protected on another MD deck. If you
still want to erase the track, press YES again while the indication
appears.
z
To avoid confusion when erasing more than one track
Start erasing from the highest numbered track. This way you’ll
avoid renumbering the tracks that you plan to erase.
z
You can undo the erasure
For details, see “Undoing the Last Edit” on page 34.
GB
28
Page 29
Erasing all the tracks on an MD
Do the procedure below to erase all the tracks, track
names, and disc name at once.
1 While the deck is stopped, playing, or paused,
press MENU/NO.
“Edit Menu” appears in the display.
2 Press ./> repeatedly until “All Erase ?”
appears, then press YES.
“All Erase ??” appears in the display.
3 Press YES.
“Complete!!” appears for a few seconds and all the
tracks, track names, and disc name are erased.
To cancel the operation
Press MENU/NO or x.
z
You can undo the erasure
For details, see “Undoing the Last Edit” on page 34.
Erasing a portion of a track
You can easily erase a portion of a track by specifying the
starting and ending points of the erasure.
This is useful for erasing the unnecessary portions of a
track recorded from a satellite or FM broadcast.
Example: Erasing portion “B2” of the second
track
AAA BBB
1 2 3
B1 B3B2
AAA
1 2 3
BBB
B1 B3
CCC
CCC
4 While monitoring the sound, press ./>
repeatedly to locate the starting point of the
portion to be erased (point A).
You can shift the starting point by 1-frame* intervals
(stereo mode) (frame = 1/86 second). The time
indication (“m (minute),” “s (second),” and “f (rame)”)
of the current point is displayed and several seconds
of the track from that point play back repeatedly.
When recording in monaural or LP2 mode, you can shift the
*
starting point by 2-frame intervals. When recording in LP4
mode, you can shift the point by 4-frame intervals.
To find a point quickly
Specify a unit (minute, second, or frame) by which the
MD is advanced when you press ./>
repeatedly.
To do this, press m/M in step 4 repeatedly to select
“m,” s,” or “f.” The selected unit flashes in the
display.
5 Repeat step 4 until you’ve located point A.
6 Press YES to enter point A.
“Point B set” appears and several seconds of the track
from point A play back repeatedly.
7 Continue playing the track or press M to locate
the ending point of the portion to be erased (point
B), then press YES.
“A-B Ers” and “Point B ok?” alternate in the display
and a few seconds of the track before point A and after
point B play back repeatedly.
8 Repeat step 4 until you’ve located point B.
9 Press YES to enter point B.
“Complete!!” appears for a few seconds and the
portion between point A and B is erased.
Editing Recorded MDs
1 While the deck is stopped, playing, or paused,
press MENU/NO.
“Edit Menu” appears in the display.
2 Press ./> repeatedly until “A-B Erase ?”
appears, then press YES.
3 Press ./> repeatedly until the number of the
track containing the portion to be erased appears,
then press YES.
“-Rehearsal-” and “Point A ok?” alternate in the
display and several seconds of the track from the point
where you pressed YES play back repeatedly.
To cancel the operation
Press MENU/NO or x.
z
You can undo the erasure
For details, see “Undoing the Last Edit” on page 34.
Note
In the following cases, “Impossible” appears and you can’t erase
a portion of a track:
• The point B you entered comes before point A.
• After repeated editing kf a track, it may become impossible to
erase a portion of the track any further. This is a technical
limitation of the MD system and is not a mechanical error.
29
GB
Page 30

Dividing Tracks Z
Editing Recorded MDs
You can divide a recorded track at any point simply by
adding a track mark at that point. This is especially useful
when you want to divide recorded material which
contains multiple tracks but only one track number (see
page 17), or when you want to locate a certain point in the
track.
Example: Dividing the second track
AAA
1 2 3
AAA
1 2 3 4
When you divide a track, the total number of tracks
increases by one and all tracks following the divided track
are automatically renumbered.
BBB
B1 B2
BBB
B1 B2
CCC
CCC
1 While the deck is stopped, playing, or paused,
press MENU/NO.
“Edit Menu” appears in the display.
2 Press ./> repeatedly until “Divide ?” appears,
then press YES.
3 Press ./> repeatedly until the number of the
track you want to divide appears, then press YES.
“-Rehearsal-” appears and several seconds of the track
from the point where you pressed YES play back
repeatedly.
6 Press YES.
“Complete!!” appears for a few seconds and the track
is divided. The deck starts to play the newly created
track. Note that new track has no name.
To cancel the operation
Press MENU/NO or x.
z
You can undo the track division
For details, see “Undoing the Last Edit” on page 34.
z
You can divide tracks while recording
For details, see “Marking Track Numbers While Recording” on
page 17.
4 While monitoring the sound, press ./>
repeatedly to locate the dividing point.
You can shift the starting point by 1-frame* intervals
(stereo mode) (frame = 1/86 second). The time
indication (“m,” “s ,” and “f ”) of the current point is
displayed and several seconds of the track from that
point play back repeatedly.
* When recording in monaural or LP2 mode, you can shift the
starting point by 2-frame intervals. When recording in LP4
mode, you can shift the point by 4-frame intervals.
To find a point quickly
Specify a unit (minute, second, or frame) by which the
MD is advanced when you press ./>
repeatedly.
To do this, press m/M in step 4 repeatedly to select
“m,” “s ,” or “f .” The selected unit flashes in the
display.
5 Repeat step 4 until you’ve located the dividing
point.
30
GB
Page 31

Combining Tracks Z
Moving Tracks Z
This function allows you to combine any two tracks into a
single track. The two tracks need not to be consecutive
nor chronological. You can combine several tracks into a
single medley, or several independently recorded portions
into a single track. When you combine two tracks, the
total number of tracks decreases by one and all tracks
following the combined track are renumbered.
Example: Combining the second track and the
fourth track
AAA BBB DDDCCC
1 2 43
AAA BBB
1 2 3
BBB
If both of the combined tracks have a track name, the
name of the second track is erased.
DDD
CCC
1 While the deck is stopped, playing, or paused,
press MENU/NO.
“Edit Menu” appears in the display.
2 Press ./> repeatedly until “Combine ?”
appears, then press YES.
3 Press ./> repeatedly until the number of the
first track of the two to be combined appears, then
press YES.
The display for selecting a second track appears and
the deck plays the portion where joining will occur
(the end of the first track and the beginning of the
track following it) repeatedly.
This function lets you change the order of any track.
Example: Moving the second track after the
third track
AAA BBB CCC DDD
1 2 3 4
AAA BBBCCC DDD
1 32 4
After you move a track, the tracks are renumbered
automatically.
1 While the deck is stopped, playing, or paused,
press MENU/NO.
“Edit Menu” appears in the display.
2 Press ./> repeatedly until “Move ?” appears,
then press YES.
3 Press ./> repeatedly until the number of the
track to be moved appears, then press YES.
4 Press ./> repeatedly until the new track
position appears, then press YES.
“Complete!!” appears for a few seconds and the track
is moved. The deck starts to play the moved track.
To cancel the operation
Press MENU/NO or x.
z
You can undo the track move
For details, see “Undoing the Last Edit” on page 34.
Editing Recorded MDs
4 Press ./> repeatedly until the number of the
second track of the two to be combined appears,
then press YES.
“Complete!!” appears for a few seconds and the tracks
are combined. The deck starts to play the combined
track.
To cancel the operation
Press MENU/NO or x.
z
You can undo the combination
For details, see “Undoing the Last Edit” on page 34.
Notes
• Tracks recorded in different recording modes (stereo, monaural,
LP2, or LP4) can’t be combined.
• If “Impossible” appears in the display, the tracks can’t be
combined because repeated editing has been done to the
track(s). This is a technical limitation of the MD system and is
not a mechanical error.
31
GB
Page 32

Naming Tracks or MDs Z
Editing Recorded MDs
You can enter a name for a recorded MD as well as for
individual tracks. Names can consist of uppercase and
lowercase letters, numbers, and symbols. A total number
of 1,700 characters can be stored for all the names on the
MD.
?/1
23
1
56
Letter/
number
buttons
./>
MENU/NO
NAME EDIT/
SELECT
4
+
789
–
>10
10
/0
N
Xxz
.>m M
m/M
YES
CLEAR
Note
If you name a track while it is being recorded, be sure to finish
the naming operation before the track ends. If the track ends
before you finish, the entered character data will be discarded
and the track will remain unnamed. Also, you can‘t name tracks
while the deck is recording over existing material.
Naming a track or MD
1 Press NAME EDIT/SELECT while the deck is in one
of the operating statuses listed below, depending
on what you want to name:
To name Press while the deck is
A track Playing, paused, recording, or stopped with
The MD Stopped with no track number displayed
A flashing cursor appears in the display.
the track number displayed
3 Enter a character.
If you’ve selected uppercase or lowercase letters
1 Press the corresponding letter/number button
repeatedly until the character to be entered flashes.
Or , press the button once and press ./>
repeatedly.
To select symbols, press . repeatedly while “A”
is flashing.
2 Press M.
The flashing character is entered and lights
continuously and the cursor shifts to the right.
If you’ve selected numbers
Press the corresponding number button.
The number is entered and the cursor shifts to the
right.
D
4 Repeat steps 2 and 3 to enter the rest of the name.
To enter a space
Press M while the cursor is flashing. Note that you
can’t enter a space for the first character of the name.
To change a character
Press m/M repeatedly until the character to be
changed flashes, press CLEAR to erase the character,
then repeat steps 2 and 3.
5 Press YES.
The whole name appears, followed by “Complete!!,”
and the name is entered.
To cancel the operation
Press MENU/NO or x.
2 Press NAME EDIT/SELECT repeatedly to select the
character type.
To select Press repeatedly until
Uppercase letters and symbls* “Selected ABC” appears in
Lowercase letters and symbls* “Selected abc” appears in the
Numbers “Selected 123” appears in the
* The following symbols can be selected: ‘ _ / , . ( ) : ! ?
A
GB
32
the display
display
display
z
You can undo the naming of a track or MD
For details, see “Undoing the Last Edit” on page 34.
z
You can name tracks or MDs using Edit Menu Z
1 Press MENU/NO while the deck is in one of the operating
statuses listed below, depending on what you want to name:
To name Press while the deck is
A track or an MD Stopped, playing, or paused
The track being recorded Recording the track
2 Press ./> repeatedly until “Name ?” appears, then press
YES.
3 Press ./> repeatedly until “Nm In?” appears, then pr ess
YES.
4 Press ./> repeatedly until the track number (when
naming a track) or “Disc” (when naming the MD) flashes, then
press YES.
5 Do steps 2 to 5 on “
Naming a track or MD” above.
Page 33

Copying a track or disc name
You can copy an existing track or disc name and use it to
name another track on the same disc or the disc itself.
4 Press YES.
The whole name appears, followed by “Complete!!,”
and the name is changed.
1 While the deck is stopped, playing, or paused,
press MENU/NO.
“Edit Menu” appears in the display.
2 Press ./> repeatedly until “Name ?” appears,
then press YES.
3 Press ./> repeatedly until “Nm Copy ?”
appears, then press YES.
4 Press ./> repeatedly until the number of the
track (when copying the track name) or “Disc”
(when copying the disc name) flashes, then press
YES to copy the selected name.
When “No Name” appears in the display
The selected track or disc has no name.
5 Press ./> repeatedly until the number of the
track (when naming a track) or “Disc” (when
naming a disc) flashes, then press YES to enter the
copied name.
“Complete!!” appears for a few seconds and the name
is copied.
To cancel the operation
Press MENU/NO or x.
Erasing a track or disc name
Use this function to erase the name of a track or disc.
1 While the deck is stopped, playing, recording, or
paused, press MENU/NO.
“Edit Menu” appears in the display.
2 Press ./> repeatedly until “Name ?” appears,
then press YES.
3 Press ./> repeatedly until “Nm Erase ?”
appears, then press YES.
4 Press ./> repeatedly until the number of the
track (when erasing the track name) or “Disc”
(when erasing the disc name) flashes, then press
YES.
“Complete!!” appears for a few seconds and the name
is erased.
To cancel the operation
Press MENU/NO or x.
z
You can undo the erasing of a track or disc name
For details, see “Undoing the Last Edit” on page 34.
Editing Recorded MDs
z
When “Overwrite ?” appears in step 5 above
The track or the disc selected in step 5 already has a name. If you
wish to replace the name, press YES again while the indication
appears in the display.
If the track has been recorded in MD LP mode with the “LP
Stamp On” setting (page 15), “Overwrite ?” also appears even if a
track name is not assigned. In this case if you copy the track
name, the “LP:” indication disappears from the track name.
z
You can undo the copying of a track or disc name
For details, see “Undoing the Last Edit” on page 34.
Renaming a track or MD
1 Press NAME EDIT/SELECT while the deck is in one
of the operating statuses listed below, depending
on what you want to rename:
To rename Press while the deck is
A track Playing, paused, recording, or stopped
The MD Stopped with no track number displayed
A track or disc name appears in the display.
with the track number displayed
2 Press down CLEAR until the selected name is
erased completely.
Erasing all the names on the MD
You can erase all the track names and the disc name on an
MD in a single operation.
1 While the deck is stopped, playing, or paused,
press MENU/NO.
“Edit Menu” appears in the display.
2 Press ./> repeatedly until “Name ?” appears,
then press YES.
3 Press ./> repeatedly until “Nm All Ers?”
appears, then press YES.
“Nm All Ers??” appears in the display.
4 Press YES.
“Complete!!” appears for a few seconds and all the
names on the MD are erased.
To cancel the operation
Press MENU/NO or x.
z
You can undo the erasing of all the names on the MD
For details, see “Undoing the Last Edit” on page 34.
z
You can erase all the recorded tracks and names on the MD
For details, see “Erasing all the tracks on an MD” on page 29.
3 Do steps 2 to 4 of “Naming a track or MD” on page
32.
33
GB
Page 34

Undoing the Last Edit Z
Editing Recorded MDs
You can undo the last edit operation and restore the
contents of the MD to the condition that existed before the
operation. Note, however, that you can’t undo an edit
operation if you perform any of the following operations
after the edit:
• Press REC z or CD SYNCHRO on the deck.
• Press z or M.SYNC on the remote.
• Turn kff the deck or eject the MD.
• Change a track level using the S.F Edit function.
• Disconnect the mains lead.
?/1
23
1
56
4
+
789
–
>10
10
/0
Xxz
N
./>
MENU/NO
.>m M
YES
1 While the deck is stopped and no track number
appears in the display, press MENU/NO.
“Edit Menu” appears in the display.
2 Press ./> repeatedly until “Undo ?” appears.
“Undo ?” doesn’t appear if no editing has been done.
4 Press YES.
“Complete!!” appears for a few seconds and the MD is
restored to the condition that existed before the edit
operation.
To cancel the operation
Press MENU/NO or x.
3 Press YES.
One kf the following messages appears depending on
the last edit operation.
Last edit operation Message
Erasing a track
Erasing all the tracks on an MD Erase Undo?
Erasing a portion of a track
Dividing a track Divide Undo?
Combining tracks CombineUndo?
Moving a track Move Undo?
Naming a track or MD
Copying a track or disc name
Renaming a track or MD Name Undo?
Erasing a track or disc name
Erasing all the names on the MD
34
GB
Page 35

Changing the Track Level After Recording (S.F Edit)
Z
You can change the volume of recorded tracks using S.F
(Scale Factor) Edit. The original track is recorded over at
the new recording level. When changing the recording
level, you can change the overall level, gradually increase
the signal level at the start of the track, or gradually
decrease the level at the end of the track.
?/1
23
1
56
4
+
789
–
>10
10
/0
z
Xx
N
./>
MENU/NO
.>m M
YES
Changing the overall level of a track
1 While the deck is stopped, playing, or paused,
press MENU/NO.
“Edit Menu” appears in the display.
2 Press ./> repeatedly until “S.F Edit ?”
appears, then press YES.
3 Press ./> repeatedly until “Tr Level ?”
appears, then press YES.
4 Press ./> repeatedly until the track number
whose level you want to change appears, then
press YES.
5 While monitoring the sound, press ./>
repeatedly to change the track level without
turning on the rightmost indicator on the peak
level meters.
You can set the level at any value between –12 dB to
+12 dB, in 2-dB steps.
Changing the level gradually at the
beginning or the end of the track
1 While the deck is stopped, playing, or paused,
press MENU/NO.
“Edit Menu” appears in the display.
2 Press ./> repeatedly until “S.F Edit ?”
appears, then press YES.
3 Press ./> repeatedly until “Fade In ?” (when
increasing the level gradually at the beginning of
the track) or “Fade Out ?” (when decreasing the
level gradually at the end of the track) appears,
then press YES.
4 Press ./> repeatedly until the track number
whose level you want to change appears, then
press YES.
“Time 5.0s” appears in the display.
5 While monitoring the sound, press ./>
repeatedly to change duration of the increase or
decrease of the level.
The deck plays the portion that will be recorded over.
You can set the duration at any value between 1
second and 15 seconds, in 0.1-second steps.
6 Press YES.
“S.F Edit ok?” appears in the display.
7 Press YES.
The deck starts recording over the specified portion of
the original track. “S.F Edit: XX%” appears to show
the recording progress while the portion is being
recorded over. When the process finishes,
“Complete!!” appears in the display for a few seconds.
To cancel the operation
Press MENU/NO or x in steps 1 to 6 above. After you
press YES in step 7, you can’t cancel the operation.
Editing Recorded MDs
Avoid turning on this indicator
6 Press YES.
“S.F Edit ok?” appears in the display.
7 Press YES.
The deck starts recording over the kriginal track in the
specified level. “S.F Edit: XX%” appears to show the
recording progress while the track is being recorded
over. The process takes approximately equal to or
longer than the playback time of the track. When the
process finishes, “Complete!!” appears in the display
for a few seconds.
Notes
• Do not disconnect the mains lead or move the deck while the
recording is in progress. This may damage the recording data
preventing recording from being performed properly.
• You can’t change the level of tracks recorded in LP2 or LP4
mode.
• Do not use an MD that is damaged or dirty. This may prevent
the track from being recorded properly.
• Repeated changes of the track level using the S.F Edit function
results in poor sound quality.
• Once the track level has been changed, the track level will not
return to the exact original level, even if you attempt to return
it by performing the S.F Edit function again. Note also that you
cannot undo the S.F Edit function. Note also that you cannot
undo the S.F Edit function.
35
GB
Page 36

Other
FADER
–
+
?/1
.>m M
NX x z
789
>10
10
/0
1
23
4
56
Fade In and Fade Out Z
Functions
This chapter explains other useful
functions that are available on the MD
deck.
Fade-in Recording gradually increases the signal level at
the start of recording. Fade-out Recording gradually
decreases the signal level at the end of recording.
Fade-in Recording
During recording pause, press FADER.
b flashes in the display and the deck performs Fade-in
Recording for five seconds (factory setting) until the
counter reaches “0.0s.”
Fade-out Recording
During recording, press FADER.
B flashes in the display and the deck performs Fade-out
Recording for five seconds (factory setting) until the
counter reaches “0.0s, ” then pauses.
36
GB
z
You can change the duration of Fade-in and Fade-out
Recording
1 While the deck is stopped, press MENU/NO twice.
“Setup Menu” appears in the display.
2 Press ./> repeatedly to select the setting, then press YES.
To change the duration of Select
Fade-in Recording F.in
Fade-out Recording F.out
3 Press ./> repeatedly to select the duration, then press
YES.
Both the Fade-in and Fade-out durations can be set in 0.1second steps.
To set the duration in 1-second steps, use m/M instead.
4 Press MENU/NO.
Page 37

Adjusting the Brightness of
Other Settings Using the
the Display Z
You can select one of four brightness levels for the display
window. The A, HX, or x buttons on the deck turn off
when a low brightness level is selected.
?/1
23
1
56
4
+
789
–
>10
10
/0
Xxz
N
./>
MENU/NO
1 While the deck is stopped, press MENU/NO twice.
“Setup Menu” appears in the display.
2 Press ./> repeatedly until “Dimmer 1”
appears, then press YES.
3 Press ./> repeatedly to select the setting,
then press YES.
When you select The display window becomes
Dimmer 1 (factory setting) Fully lit and the A, HX, or x
Dimmer 2 Dimmer and the A, HX, or x
Dimmer 3 Dimmer and the A, HX, or x
Dimmer 4 Turned off and the A, HX, or x
4 Press MENU/NO.
z
If any change occurs in the display information while the
display window is turned off
The display turns back on (dimly) for several seconds to show
the new information, and then turns off again.
.>m M
YES
buttons are on.
buttons are on.
buttons are off.
buttons are off.
Setup Menu Z
?/1
23
1
56
4
+
789
–
>10
10
/0
N
Xxz
./>
MENU/NO
Verifying the current programme source
to be recorded (Ping function)
You can verify which of the components is currently
selected as a programme source to be recorded from by
pressing the INPUT button. When this function is turned
on, “N N n n” will appear momentarily on the
display window of the selected programme source each
time the INPUT button is pressed. Note that this function
works on the STR-LSA1 Receiver and CDP-LSA1 CD
Player only.
1 While the deck is stopped, press MENU/NO twice.
“Setup Menu” appears in the display.
2 Press ./> repeatedly until “Ping On” appears,
then press YES.
3 Press ./> repeatedly to select the setting,
then press YES.
To Select
Turn on the Ping function Ping On (factory setting)
Turn off the Ping function Ping Off
4 Press MENU/NO.
.>m M
YES
Other Functions
z
The brightness level of the display window on the MD deck
can be linked to that of the receiver’s display window
When the i.LINK Control function is activated on the receiver, the
brightness level of the display window on the MD deck is
forcibly linked to that of the receiver’s display window
regardless of the setting on the MD deck.
37
GB
Page 38

Other Settings Using the Setup Menu
About i.LINK
Turning off the MD deck automatically
(Power Save function)
You can set so that the MD deck turns off when no
operation has been done for five minutes.
1 While the deck is stopped, press MENU/NO twice.
“Setup Menu” appears in the display.
2 Press ./> repeatedly until “Powersave On”
appears, then press YES.
3 Press ./> repeatedly to select the setting,
then press YES.
To Select
Turn on the Power Save function Powersave On
Turn off the Power Save function Powersave Off
4 Press MENU/NO.
Other Functions
(factory setting)
This section explains the general specifications and major
features of i.LINK. Read this section before doing any
i.LINK-related operation.
Note that i.LINK connections and operations may vary,
depending on the component. For details regarding the
connection of i.LINK components to this unit, see
“Hooking Up the i.LINK Components” on page 11.
i.LINK functions
i.LINK is a serial digital interface that supports the
bidirectional transmission of audio and video signals,
commands, and even component status information. All
that is needed to hook up i.LINK components are i.LINK
connecting cables. Audio and video components
connected within an i.LINK configuration can be used to
perform a wide range of operations and data exchanges
that is sure to expand as the number and variety of i.LINK
components grows.
Since i.LINK allows data to be transmitted from one
component to other components to which it is not directly
connected, there is no need to pay attention to connection
order. However, due to differences in characteristics or
specifications, operation of or data exchange with certain
i.LINK components may not be possible, even when they
are connected.
z
What is i.LINK?
i.LINK is a trademark proposed by Sony Corporation and
accepted by companies throughout the world as an easy-toremember name for the IEEE 1394 world standard of the Institute
of Electrical and Electronics Engineers.
38
GB
Page 39

i.LINK connections
The use of i.LINK cables to connect i.LINK components as
shown below is called a “daisy chain” configuration.
i.LINK connecting cable
i.LINK
component
Branch connections
• Any i.LINK component with three or more i.LINK
connectors can serve as a branch point.
• Up to 63 i.LINK components can be connected in a
single configuration. However, the maximum number
of components that can be daisy-chained in a single
route is 17 (i.e., a maximum of 16 i.LINK connecting
cables in a row). Each i.LINK cable used in a single
route is called a “hop.” For example, there are 6 hops in
the route between A and C in the illustration below, and
3 hops in the route between A and D.
Each route between A and B; A and C; A and D; B and C; B
and D; and C and D in the illustration above can have 16
hops (i.e., 17 components).
Loop-connection
A signal output from one component is transmitted to all
other components. A loop connection should thus be
avoided to prevent the return of a signal to its source.
i.LINK
component
Data can be transmitted between any two
components even if they are indirectly connected.
i.LINK
component
i.LINK
component
i.LINK
component
BA
DC
Correct Incorrect (looped)
Notes
• Some i.LINK components (such as personal computers) do not
transfer signals when they are turned off. Refer to the
operation manual of each component to be connected before
you hook them up.
• The maximum transmission rate of an i.LINK component is
printed near its i.LINK connector. The indications S100, S200,
and S400 refer to maximum transmission rates of 100, 200, or
400 Mbps*, respectively. The actual transmission rate may be
faster or slower , depending on the differences in transmission
rates and specifications among the connected components.
z
What is Mbps?
“Mbps” is an abbreviation for megabits per second. It indicates
the amount of data transmitted per second. For example, a rate
of 200 Mbps means 200 megabits of data are transmitted in one
second.
LINC (Logical INterface Connection)
Before an audio signal can be transmitted between i.LINK
components, a “LINC” must first be established between
the receiving component (of the audio signal) and the
sending component. Establishing a “LINC” means
establishing a logical path for the transmission of digital
audio signals between the two components. Each logical
path has an ID number. Since the component that sends
an audio signal must output the signal to a path, and the
component that receives the signal must input it from the
same path, the path must be mutually known by both
components. During the establishment of a LINC, the
following communication occurs between the two i.LINK
components.
Example
A component establishing a LINC with a CD player in
order to receive an audio signal from the CD player
1 The component that will receive an audio signal
from the CD player sends a request and path
information to the CD player to establish a
transmission path for the audio signal.
Other Functions
The component
that receives
the audio signal
1
,
2
CD player
(sending
component)
<
2 The CD player responds to the component,
agreeing to the establishment of a LINC.
The digital audio signal transmission becomes possible
only after the communication described above has
occurred and a LINC has been established.
39
GB
Page 40

Additional
Precautions
Information
This chapter provides additional
information that will help you
understand and maintain your MD
deck system.
On safety
Should any solid object or liquid fall into the cabinet,
unplug the deck and have it checked by qualified
personnel before operating it any further.
On power sources
• Before kperating the deck, check that the operating
voltage of the deck is identical with your local power
supply. The operating voltage is indicated on the
nameplate at the bottom of the deck.
• The unit is not disconnected from the AC power source
(mains) as long as it is connected to the wall outlet, even
if the unit itself has been turned off.
• If you are not going to use the deck for a long time, be
sure to disconnect the deck from the wall outlet. To
disconnect the AC power cord (mains lead), grasp the
plug itself; never pull the cord.
• AC power cord (mains lead) must be changed only at
the qualified service shop.
On condensation in the deck
If the deck is brought directly from a cold to a warm
location, or is placed in a very damp room, moisture may
condense on the lenses inside the deck. Should this occur,
the deck may not operate properly. In this case, remove
the MD and leave the deck turned on for several hours
until the moisture evaporates.
On the MiniDisc cartridge
• Do not open the shutter to expose the MD.
• Do not place the cartridge where it will be subject to
extremes of sunlight, temperature, moisture or dust.
On cleaning
Clean the cabinet, panel and controls with a soft cloth
slightly moistened with a mild detergent solution. Do not
use any type of abrasive pad, scouring powder or solvent
such as alcohol or benzine.
Replacing the battery in the remote
Slide out and remove the battery case, and insert a new
lithium battery CR2025 with the + side facing up. And
then, slide the battery case back in.
A lithium battery CR2025
1
2
1 Keep pushing.
2 Pull out.
40
GB
Page 41

CAUTION
Danger of explosion if battery is incorrectly replaced. Replace the
battery only with the same or equivalent type recommended by
the manufacturer. Discard used batteries according to the
manufacturer’s instructions.
If you have any questions or problems concerning your
deck, please consult your nearest Sony dealer.
Handling MDs
The MD is enclosed in a cartridge to protect the disc from
debris or fingerprints and to make it easy to handle.
However, the presence of debris or a warped cartridge
may inhibit the disc from operating properly. To assure
that you can always listen to the highest quality music,
follow the precautions below:
• Do not touch the internal disc directly. Forcing the
shutter open may damage the internal disc.
• Be sure to stick the labels supplied with the MD to the
appropriate positions. The shape of the labels may vary
depending kn the MD brand.
Proper
location of
the labels
Where to keep the MDs
Do not place the cartridge where it may be exposed to
direct sunlight or extremely high heat and humidity.
Regular maintenance
Wipe dust and debris from the surface of the cartridge
with a dry cloth.
Note on High-Speed CD Synchro-Recording
Certain CD conditions may cause sound dropout or noise
in the recording results, or even create unwanted tracks
on the MD. If this happens, clean the CD and record
material to the MD using normal-speed CD SynchroRecording only.
Shutter
System Limitations
The recording system in your deck is radically different
from those used in cassette and DAT decks and is
characterized by the limitations described below. Note,
however, that these limitations are due to the inherent
nature of the MD recording system itself and not to
mechanical causes.
“Disc Full” appears in the display even before
the MD has reached the maximum recording time
When 255 tracks have been recorded on the MD,
“Disc Full” appears regardless of the total recorded time.
More than 255 tracks can’t be recorded on the MD. To
continue recording, erase unnecessary tracks or use
another recordable MD.
“Disc Full” appears before the maximum number
of tracks is reached
Fluctuations in emphasis within tracks are sometimes
interpreted as track intervals, incrementing the track
count and causing “Disc Full” to appear.
The remaining recording time does not increase
even after erasing numerous short tracks
Tracks under 12 seconds (when stereo mode is selected),
24 seconds (when monaural mode or LP2 mode is
selected), or 48 seconds (when LP4 mode is selected) in
length are not counted and so erasing them may not lead
to an increase in the recording time.
The total recorded time and the remaining
recordable time on the MD may not total the
maximum recording time
Recording is done in minimum units of 2 seconds (when
stereo mode is selected), 4 seconds (when monaural mode
or LP2 mode is selected), or 8 seconds (when LP4 mode is
selected) each no matter how short the material. The
contents recorded may thus be shorter than the maximum
recording capacity. Disc space may also be further
reduced by scratches.
Limitations when recording over an existing
track
• The correct remaining recordable time may not be
displayed.
• You may find it impossible to record over a track if that
track has been recorded over several times already. If
this happens, erase the track (see page 28).
• The remaining recordable time may be shortened out of
proportion to the total recorded time.
• Recording over a track to eliminate noise is not
recommended since this may shorten the duration of
the track.
• You may find it impossible to name a track while
recording over an existing track.
Tracks created through editing may exhibit
sound dropout as you’re searching for a point
while monitoring the sound.
Some tracks can’t be combined with others
Tracks may not be combined if they have been edited.
Additional Information
41
GB
Page 42

Track numbers are not marked correctly
Incorrect assignment or marking of track numbers may
result when CD tracks are divided into several smaller
tracks during digital recording. Also, when the
Automatic Track Marking is activated during recording,
track numbers may not be marked as in the original,
depending on the programme source.
“TOC Reading” appears for a long time
If the inserted recordable MD is brand new, “TOC
Reading” appears in the display longer than for MDs that
have already been used.
The correct recorded/playing time may not be
displayed during playback of MDs recorded in
monaural mode.
Troubleshooting
If you experience any of the following difficulties while
using the deck, use this troubleshooting guide to help you
remedy the problem. Should any problem persist, consult
your nearest Sony dealer.
The deck does not operate or operates poorly.
, The MD may be dirty or damaged. Replace the
MD.
, The MD deck is being controlled by an external
device such as a personal computer. “REMOTE”
appears in the display and all the buttons on the
deck and the remote become inoperable.
Additional Information
The deck does not play.
, Moisture has formed inside the deck. Take the MD
out and leave the deck in a warm place for several
hours until the moisture evaporates.
, The deck is not on. Press ~/1 to turn on the deck.
, The deck may not be connected to the receiver
correctly. Check the connection.
, The MD is inserted in the wrong direction. Slide
the MD into the disc slot with the labelled side up
and the arrow pointing towards the slot.
, The MD may not be recorded. Replace the disc
with one that has been recorded.
The sound has a lot of static.
, Strong magnetism from a television or a similar
device is interfering with operations. Move the
deck away from the source of strong magnetism.
The deck does not record.
, The MD is record-protected. Slide the record-
protect tab and close the slot.
, The deck is not connected properly to the
programme source. Check the connection.
, Select the correct programme source using INPUT.
, The recording level is not adjusted properly.
Adjust the recording level.
, A premastered MD is inserted. Replace it with a
recordable MD.
, There is not enough time left on the MD. Replace
it with another recordable MD with fewer recorded
tracks, or erase unnecessary tracks.
, There has been a power failure or the mains lead
has been disconnected during recording. Data
recorded to that point may be lost. Repeat the
recording procedure.
A message and a three- or five-digit
alphanumeric code alternate in the display.
, The Self-Diagnosis Function is on. See the table on
page 46.
Note
If the deck does not operate properly even after you’ve attempted
the prescribed remedies, turn off the deck, then re-insert the plug
into the power outlet.
Specifications
System MiniDisc digital audio system
Disc MiniDisc
Laser Semiconductor laser (λ = 780 nm)
Emission duration: continuous
Laser output Less than 44.6 µW
∗ This output is the value measured
at a distance of 200 mm from the
objective lens surface on the Optical
Pick-up Block with 7 mm aperture.
Laser diode Material: GaAlAs
Revolutions (CLV) 400 rpm to 900 rpm
Error correction ACIRC (Advanced Cross Interleave
Reed Solomon Code)
Sampling frequency 44.1 kHz
Coding ATRAC (Adaptive TRansform
Acoustic Coding)/ATRAC3
Modulation system EFM (Eight-to-Fourteen Modulation)
Number of channels 2 stereo channels
Frequency response 5 to 20,000 Hz ±0.3 dB
Signal-to-noise ratio Over 100 dB during playback
Wow and flutter Below measurable limit
*
42
GB
Page 43

Inputs/outputs
i.LINK S200 Jack type: 4-pins to 4-pins
General
Power requirements 230 V AC, 50/60 Hz
Power consumption 18 W
Dimensions (approx.) 430 × 70 × 315 mm (w/h/d) incl.
projecting parts and controls
Mass (approx.) 4.4 kg
Supplied accessories
See page 10.
US and foreign patents licensed from Dolby Laboratories
Licensing Corporation.
Design and specifications are subject to change without notice.
Display Messages
The following table explains the various messages that
appear in the display. Messages are also displayed by the
deck’s Self-Diagnosis function (see page 46).
Message Meaning
Auto Cut The Auto Cut function is on (page 16).
Blank Disc A new (blank) or erased MD has been
inserted.
CANNOT LINC You cannot record from the selected
component. Select another component.
This indication also appears when
communiation erro has occurred between
the deck and the selected component
while recording. In this case, press x on
the deck to cancel recording, and then
start recording over again.
Cannot Copy An attempt was made to make a second
copy from a digitally dubbed MD (page
14).
Cannot Edit An attempt was made to edit a
premastered MD, to edit the MD while
Programme or Shuffle Play is selected, or
to change the recording level of an MD
recorded in LP2 or LP4 mode.
Cannot Synchro Communication between the MD deck
and the CD player failed during CD
Synchro-recording.
Disc Full The MD is full (page 41).
Impossible The deck cannot do the specified
operation (pages 14 and 31).
Incomplete!! S.F Edit (changing the recording level
after recording, Fade-in, or Fade-out)
operation failed because the deck was
moved while the recording was in
progress or the MD is damaged or dirty.
Message Meaning
Initialize (flashing) The Setup Menu settings have been lost.
Name Full The naming capacity of the MD has
NEW CONNECT A new component is connected within
No Change You performed S.F. Edit without
No Disc There is no MD in the deck.
No Name The track or disc has no name.
No Program!! You tried to start Programme Play when
Premastered An attempt was made to record on a
ProgramFull The programme contains the maximum
REMOTE The MD deck is being controlled by an
S.F Edit! You tried to do another operation while
S.F Edit NOW You pressed +/1 while in S.F Edit
Smart Space The Smart Space function is on (page 16).
TOC Reading The deck is checking the TOC (Table Of
If “REMOTE” appears under other circumstances, turn kff the deck,
*
then turn it on again.
Or the contents recorded by timer have
disappeared over time and are not be
available for saving to disc, or
Programme Play could not be activated
since the programme has disappeared
over time.
(The message flashes for about four
seconds when you turn on the deck by
pressing +/1.)
reached its limit (about 1,700 characters).
the i.LINK configuration. This indication
also appears when a mains lead or an
i.LINK connecting cable of the
component within the configuration is
connected or disconnected.
specifying the recording level, resulting
in no change of recording level.
no programme exists.
premastered MD.
number of tracks. You cannot add any
more tracks.
external device connected to the deck.*
While this indication appears, all the
buttons on the deck and the remote
become inoperable.
the S.F Edit is in progess. You cannot
perform any other operations at this
time.
(changing the recording level after
recording, Fade-in, or Fade-out) mode. If
you turn off the deck while in S.F Edit
mode, any changes that you have made
will not saved properly. Finish the
editing and exit S.F Edit mode before
turning off the deck. If you wish to turn
off the deck at this time, press +/1 again
while this indication appears in the
display.
Contents) on the MD.
Additional Information
43
GB
Page 44

Edit Menu Table
The following table provides a quick guide to the various editing functions that you can perform using the Edit Menu.
To access the Edit Menu
Press MENU/NO to display “Edit Menu.”
Note
The available menu items may vary according to the current status of the deck.
Menu item Sub-item Function Reference page(s)
Name ? Nm In ? Names a track or an MD. 32
Nm Copy ? Copies a name to a track or an MD. 33
Nm Erase ? Erases a name. 33
Nm All Ers? Erases all the names on an MD. 33
Tr Erase ? — Erases a track. 28
Move ? — Moves a track. 31
Combine ? — Combines tracks. 31
Divide ? — Divides a track. 30
A-B Erase ? — Erases a portion of a track. 29
All Erase ? — Erases all the tracks on an MD. 29
Undo ? — Undoes the last edit operation. 34
Setup ? — Enters Setup Menu (page 45) directly. —
S.F Edit ? Tr Level ? Changes the overall track level after recording. 35
Fade In ? Changes the level at the beginning of a track after recording. 35
Fade Out ? Changes the level at the end of a track after recording. 35
Additional Information
44
GB
Page 45

Setup Menu Table
The following table provides an overview of the various Setup Menu items, including their parameters, factory settings,
and reference page(s) in the manual.
To access the Setup Menu
While the deck is stopped, press MENU/NO twice to display “Setup Menu.”
Menu item Sub-item Function Parameters Factory setting Reference page(s)
T.Mark — Turns Automatic Track Marking on or off. Lsync/Off Lsync 17
LS(T) — Changes the trigger level for Automatic Track Marking. –72 to 0dB* –50dB 18
Auto — Turns Auto Space and Auto Pause on or off. Off/Space/Pause Off 25, 26
S.Space — Turns Smart Space and Auto Cut on or off. On/Off On 17
P.Hold — Turns Peak Hold on or off. On/Off Off 16
F.in — Sets the duration of Fade-in Recording. 1.0 to 15.0s 5.0s 36
F.out — Sets the duration of Fade-out Recording. 1.0 to 15.0s 5.0s 36
Synchro — Selects the recording speed for CD-synchro recording. Normal/High High 19
Dimmer — Sets the brightness of the display. Dimmer 1/2/3/4 Dimmer 1 37
Ping — Turns Ping function on or off. On/Off On 37
Powersave — Turns Power Save function on or off. On/Off On 38
LP Stamp — Turns LP Stamp function on or off. On/Off On 15
Adjustable in 2 dB steps.
*
To recall a factory setting
Press CLEAR while selecting the parameter.
Additional Information
45
GB
Page 46

Self-Diagnosis Function
The deck’s self-diagnosis function automatically checks the condition of the MD deck when an error occurs, then issues a
code and an error message on the display. If the code and message alternate, find them in the following table and perform
Code/Message Cause/Remedy
C11/Protected The inserted MD is record-protected.
C12/Cannot Copy An attempt was made to play a disc that is not compatible with this deck (MD data disc, etc.).
C13/REC Error The recording was not made properly.
C13/Read Error The deck could not read the TOC on the MD properly.
C14/Toc Error The deck could not read the TOC on the MD properly.
C41/Cannot Copy The digitally dubbed material cannot be recorded digitally (page 14).
C71/Din Unlock The sporadic appearance of this message is caused by the digital signal being recorded. This will not affect
C78:03/LOOP CONNECT The i.LINK connection is looped.
C78:04/NO SIGNAL The selected component is turned on, but no signal is not output from the component.
C78:11/C78:12/CANNOT LINC
Additional Information
C78:15/BUS FULL The signal bus within the i.LINK configuration is full and no more signals can be output from the deck.
C78:21/NO SIGNAL The deck and the selected component are connected correctly, but no signal from the component is input to
C78:22/NO SIGNAL The format of the input signal is not supported.
C78:23/NO SIGNAL The selected component is not turned on.
C78:31/NO SIGNAL The communication between the deck and the selected component is unstable. Or, the format of the input
C78:32/NEW CONNECT While recording, a new component is connected within the i.LINK configuration, or a mains lead or an
E0001/MEMORY NG There is an error in the internal data that the deck needs in order to operate.
E0101/LASER NG There is a problem with the optical pickup.
the indicated countermeasure. Should the problem persist, consult your nearest Sony dealer.
, Take out the MD and close the record-protect slot (page 13).
, Replace the disc.
, Set the deck in a stable surface, and repeat the recording procedure.
The inserted MD is dirty (with smudges, fingerprints, etc.), scratched, or substandard in quality.
, Replace the disc and repeat the recording procedure.
, Take out the MD and insert it again.
, Insert another disc.
, If possible, erase all the tracks on the MD (page 29).
the recording.
While recording from a digital component connected through the i.LINK S200 connector, the digital
connecting cable was unplugged or the digital component turned off.
, Connect the cable or turn the digital component back on.
, Check the connection (see page 39).
, Check the selected component.
The deck cannot establish a LINC with a component because of an existing LINC between the deck and
another component.
, Cancel the LINC between the deck and the other component.
the deck.
, Check the selected component.
, Verify that the component is on.
signal is not supported.
, Check the condition and the signal format of the selected component.
i.LINK connecting cable of the component within the configuration is connected or disconnected.
, Do not connect or disconnect any mains leads or i.LINK connecting cables during recording. If you do,
recording may not be done correctly.
, Consult you nearest Sony dealer.
, Consult you nearest Sony dealer.
46
GB
Page 47

Index
A
AMS 22
Auto Cut 17
Auto Pause 26
Auto Space 25
Automatic Track Marking
additional information 18
how to 17
trigger level 18
B
Battery 10
Blank
erasing during recording. See
Smart Space and Auto Cut
inserting during play. See Auto
Space
C
CD Synchro-recording
high-speed 19
normal-speed 19
Combining 31
D
Display brightness 37
Displaying
disc name 8
remaining recordable time 9, 16
total number of tracks 8, 9
total recorded time 9
track name 9
Dividing 30
E
Erasing
a name 33
a portion of a track 29
a track 28
all names 33
all tracks 29
F, G
Fade-in Recording 36
Fade-out Recording 36
H
H.A.T.S. function 4
I, J, K
i.LINK
component 11
connecting cable 10, 11
connections 11, 39
LINC 39
L
Locating
particular point 22
tracks 22
LP Stamp function 15
M
Manual Track Marking 17
MD (MiniDisc)
ejecting 13, 21
premastered 9
recordable 9, 12
record-protect tab 13
Moving 31
Music Synchro-recording 19
N, O
Naming
copying 33
how to 32
renaming 33
P, Q
Pausing
after each track. See Auto Pause
play 21
recording 13
Peak Hold function 16
Peak level meters 16
Playing
entering the number 22
from the first track 21
specific track. See Locating
Power Save function 38
Programme Play
checking the contents 24
programming 24
R
Recording
how to 12
level 16
long times 15
mode 15
over existing tracks 12
Remote 10
Repeat A-B Play 23
Repeat All Play 23
Repeat 1 Play 23
Repeating
a portion. See Repeat A-B Play
all tracks. See Repeat All Play
current track. See Repeat 1 Play
S
SCMS. See Serial Copy Management
System
Scrolling the name 21
Serial Copy Management System 14
S.F Edit
changing overall track level 35
changing track level at the
beginning 35
changing track level at the end 35
Shuffle Play 24
Smart Space 16
Supplied accessories 10
T
Table of contents. See TOC
Time Machine Recording 18
TOC 14, 28
U, V, W, X, Y, Z
Undoing 34
Additional Information
47
GB
Page 48

AVERTISSEMENT
Pour éviter tout risque
d’incendie ou d’électrocution, n’exposez pas cet
appareil à la pluie ou à
l’humidité.
Cet appareil est un produit laser de classe
1.
L’indication CLASS 1 LASER PRODUCT
se trouve à l’arrière de l’appareil.
L’étiquette suivante se trouve à l’intérieur
de la platine.
Bienvenue !
Nous vous remercions d’avoir porté
votre choix sur cette platine MiniDisc
Sony. Veuillez lire attentivement ce
mode d’emploi avant de l’utiliser et
rangez-le en lieu sûr pour toute
référence future.
Notes sur le mode
d’emploi
Conventions
• Les commandes indiquées dans les
procédures sont celles du panneau
avant de la platine. Vous pouvez
utiliser à leur place les touches de la
télécommande fournie portant le
même nom ou celles qui sont
indiquées entre parenthèses dans
les instructions.
Exemple: Appuyez sur HX (ou
sur X).
• Les icônes suivantes sont utilisées
dans ce manuel:
ZSignale une procédure pour
laquelle vous devez utiliser la
télécommande.
z Signale des conseils ou
suggestions destinés à faciliter
une opération.
LE REVENDEUR NE PEUT EN AUCUN
CAS ÊTRE TENU RESPONSABLE DE
DOMMAGES DIRECTS, INDIRECTS OU
ACCESSOIRES, QUELLE QU’EN SOIT
LA NATURE, NI DE PERTES OU FRAIS
RÉSULTANT D’UN PRODUIT
DÉFECTUEUX OU DE L’UTILISATION
D’UN PRODUIT.
Ne jetez pas les piles aux
ordures. Portez-les à un dépôt
pour déchets dangereux.
FR
2
Page 49

TABLE DES MATIÈRES
Emplacement et fonction des
éléments 4
Description des éléments du panneau avant 4
Description des touches de la télécommande 6
Description de l’afficheur 8
Mise en service 10
Avant d’effectuer les raccordements 10
Raccordement d’appareils i.LINK 11
Enregistrement sur un MD 12
Enregistrement sur un MD 12
Remarques sur l’enregistrement 14
Enregistrement de longue durée 15
Réglage du niveau d’enregistrement 16
Conseils pour l’enregistrement 16
Inscription de numéros de plage pendant
l’enregistrement (marquage des plages) 17
Commencement de l’enregistrement par 6 secondes
de son mémorisé (enregistrement rétroactif) 18
Enregistrement synchronisé avec l’appareil audio de
votre choix (enregistrement Synchr o) 19
Enregistrement synchronisé avec un lecteur CD
Sony (enregistrement de CD normal/synchro
rapide) 19
Lecture de MD 21
Lecture d’un MD 21
Lecture d’une plage donnée 22
Localisation d’un point précis d’une plage 22
Lecture répétée de plages 23
Lecture des plages dans un ordre aléatoire (lecture
aléatoire) 24
Création d’un programme (lecture d’un
programme) 24
Conseils pour l’enregistrement d’un MD sur une
cassette 25
Edition de MD enregistrés 27
Informations préliminaires 27
Effacement de plages 28
Division d’une plage 30
Combinaison de plages 31
Déplacement d’une plage 31
Titrage de plages ou de MD 32
Annulation de la dernière opération d’édition 34
Changement du niveau de la plage après
l’enregistrement (S.F Edit) 35
Autres fonctions 36
Entrée et sortie en fondu 36
Réglage de la luminosité de l’afficheur 37
Autres réglages effectués avec Setup Menu 37
A propos du système i.LINK 38
Informations complémentaires 40
Précautions 40
Manipulation des MD 41
Limites du système 41
Guide de dépannage 42
Spécifications 42
Messages affichés 43
Tableau Edit Menu (menu d’édition) 44
Tableau Setup Menu (menu de réglage) 45
Fonction d’autodiagnostic 46
Index 47
FR
FR
3
Page 50

Emplacement et fonction des éléments
Ce chapitre indique l’emplacement
des touches et commandes du
panneau avant et de la télécommande
fournie et décrit leurs fonctions.
Des informations plus détaillées sont
fournies aux pages indiquées entre
parenthèses.
Vous trouverez aussi dans ce chapitre
une description des informations
apparaissant sur l’afficheur.
Description des éléments du panneau avant
1 Interrupteur ~/1 (alimentation) (12, 21)
Appuyez sur cet interrupteur pour allumer la platine.
Lorsque vous allumez la platine, le témoin STANDBY
s’éteint. Lorsque vous appuyez à nouveau sur cet
interrupteur, la platine s’éteint et le témoin s’allume.
2 Capteur de télécommande
Dirigez la télécommande vers ce capteur (
commande à distance de la platine.
3 Témoin LP (15)
Il s’allume lorsque le mode LP2 ou LP4 est sélectionné,
ou lorsqu’une plage enregistrée dans le mode LP2 ou
LP4 est lue.
4 Témoin H.A.T.S.
Il s’allume lorsque la fonction H.A.T.S. est activée sur
l’ampli-tuner.
z
Qu’est-ce que la fonction H.A.T.S. ?
La fonction H.A.T.S. (Système de transmission
audionumérique de haute qualité) de l’ampli-tuner a pour
but de réduire les instabilités du son se présentant parfois
pendant la transmission de signaux audionumériques en
mémorisant les signaux audionumérique transmis par la
platine MD ou la source d’enregistrement (lecteur CD, etc.)
dans une mémoire tampon avant de les restituer.
) pour la
FR
4
Page 51

1
23456 7
Emplacement et fonction des éléments
890qa
STANDBY LP H.A.T.S
?/1
INPUT
DISPLAY REC MODE
qh qg qf qd qs
5 Touche d’affichage (DISPLAY) (9, 13, 16, 20, 21)
• Appuyez sur cette touche quand la platine est
arrêtée pour afficher les informations concernant le
disque.
• Appuyez sur cette touche pendant l’enregistrement
pour afficher les informations concernant la plage en
cours d’enregistrement ou le temps
d’enregistrement disponible sur le MD.
• Appuyez sur cette touche pendant la lecture pour
afficher les informations concernant la plage
actuelle.
• Pendant la lecture de programme appuyez sur cette
touche pour afficher le numéro de la plage en cours
de lecture.
• Appuyez sur cette touche pendant l’enregistrement
ou une pause d’enregistrement pour régler le niveau
d’enregistrement.
6 Afficheur (8, 16, 32, 35)
Affiche diverses informations. Pour plus
d’informations, voir “Description de l’afficheur” à la
page 8.
7 Fente d’insertion du MD (12, 21)
Insérez le MD comme indiqué sur la figure ci-dessous.
Étiquette vers le
haut
x
A
>
.
z
Flèche vers la
platine
8 Touche d’éjection (A) (12, 21)
Appuyez sur cette touche pour éjecter le MD.
9 Touche HX (12, 19, 21, 22)
• Sert à activer la lecture lorsque la platine est à
l’arrêt.
• Sert à mettre en pause momentanément la lecture.
• Sert à mettre en pause momentanément
l’enregistrement.
A
HIGH SPEED CD SYNCHRO REC
x
. >
z
• Sert à redémarrer la lecture ou l’enregistrement
pendant la pause de lecture ou d’enregistrement.
q; Touche x (12, 20, 21)
Appuyez sur cette touche pour arrêter la lecture ou
l’enregistrement ou pour annuler l’opération
sélectionnée.
qa Touches ./> (12, 15, 16, 19, 21, 22)
Appuyez sur ces touches pour localiser des plages ou
un paramètre du menu et pour désigner une valeur.
qs Touche d’enregistrement (REC z) (12, 17)
Appuyez sur cette touche pour enregistrer sur un MD
ou inscrire des numéros de plage.
qd Touche d’enregistrement synchronisé de CD (CD
SYNCHRO) (19)
Appuyez sur cette touche pour activer
l’enregistrement synchronisé.
qf Témoin HIGH SPEED (20)
Il s’allume lorsque la platine est en mode
d’enregistrement synchronisé rapide de CD.
qg Touche de mode d’enregistrement (REC MODE) (15)
Appuyez sur cette touche pour sélectionner un des
quatre modes d’enregistrement: mode MONO
(enregistrement en monophonie), mode stéréo
(enregistrement en stéréophonie), mode LP2
(enregistrement 2 fois plus long) et mode LP4
(enregistrement 4 fois plus long).
qh Touche d’entrée (INPUT) (12)
Appuyez une fois sur cette touche pour afficher la
source de programme sélectionnée.
Si la source de programme est le STR-LSA1 ou le CDPLSA1, “N N n n” apparaîtra momentanément
sur l’afficheur de cet appareil. Appuyez une nouvelle
fois sur la touche pour changer de source de
programme.
5
FR
Page 52

Description des touches de la télécommande
Emplacement et fonction des éléments
PLAY MODE
wa ws 1
REPEAT
CLEAR
y
B
A
w;
,
ABC
–/, DEF DISPLAY
123
JKLGHI MNO
456
ql
TUVPQRS WXYZ
789
INPUT LEVEL
10
/0
NX x z
YES
FADER
CLEAR
M.SYNC
qk
qj
qh
qg
>10
.> m M
MENU/NO
NAME EDIT/
SELECT
MD
?/1
SCROLL
+
–
REC MODE
T.REC
2
3
4
5
6
7
8
9
0
1 Interrupteur ~/1 (alimentation) (12, 21)
Appuyez sur cet interrupteur pour allumer la platine.
Lorsque vous allumez la platine, le témoin STANDBY
s’éteint sur la platine. Lorsque vous appuyez à
nouveau sur cet interrupteur, la platine s’éteint et le
témoin s’allume.
2 Touche d’affichage (DISPLAY) (9, 13, 16, 20, 21, 24)
Appuyez sur cette touche pour sélectionner les
informations à afficher.
3 Touche de défilement (SCROLL) (21)
Appuyez sur cette touche pour faire défiler le nom
d’une plage ou d’un MD.
4 Touches +/– de réglage de niveau (LEVEL +/–) (16)
Appuyez sur ces touches pour régler le niveau
d’enregistrement.
5 Touche de saisie (INPUT) (12)
Appuyez sur cette touche pour sélectionner la source
de programme à enregistrer.
6 Touche z (12, 17, 19)
Appuyez sur cette touche pour enregistrer sur un MD
ou inscrire des numéros de plage.
7 Touche x (12, 20, 21)
Appuyez sur cette touche pour arrêter la lecture ou
l’enregistrement ou pour annuler l’opération
sélectionnée.
qdqf qs qa
8 Touches m/M (22, 23, 29, 30, 32)
Appuyez sur ces touches pour localiser un passage
d’une plage, changer le contenu d’un programme ou
déplacer le curseur vers la droite.
9 Touche de mode d’enregistrement (REC MODE) (15)
Appuyez sur cette touche pour sélectionner un des
quatre modes d’enregistrement: mode MONO
(enregistrement en monophonie), mode stéréo
(enregistrement en stéréophonie), mode LP2
(enregistrement 2 fois plus long) et mode LP4
(enregistrement 4 fois plus long).
q; Touche de fondu (FADER) (36)
Appuyez sur cette touche pour augmenter
graduellement le son au début de l’enregistrement ou
le diminuer graduellement à la fin de l’enregistrement.
qa Touche d’enregistrement rétroactif (T.REC) (18)
Appuyez sur cette touche pour commencer un
enregistrement rétroactif.
qs Touche d’enregistrement synchronisé (MUSIC
SYNC) (19)
Appuyez sur cette touche pour commencer
l’enregistrement synchronisé.
FR
6
Page 53

qd Touche d’annulation (CLEAR) (24, 33)
Appuyez sur cette touche pour supprimer une plage
du programme ou effacer un caractère.
qf Touche d’édition/sélection de nom (NAME EDIT/
SELECT) (32, 33)
Appuyez sur cette touche pour ajouter un nom ou
changer le nom d’une plage ou d’un MD, ou pour
sélectionner le type de caractères à saisir.
qg Touche de menu/non (MENU/NO) (15-19, 25, 26, 28-
38)
Appuyez sur cette touche pour afficher “Edit Menu”
(menu de montage) ou “Setup Menu” (menu de
réglage).
Touche oui (YES) (15-17, 19, 24-26, 28-38)
Appuyez sur cette touche pour exécuter l’opération
sélectionnée.
qh Touches ./> (12, 15-19, 21, 22, 24-26, 28-38)
Appuyez sur ces touches pour localiser les plages,
sélectionner une option de menu et une valeur de
réglage ou pour sélectionner le caractère à saisir.
qj Touche X (12, 20, 21)
Appuyez sur cette touche pour passer en mode de
pause de lecture ou d’enregistrement. Appuyez à
nouveau sur cette touche pour reprendre la lecture ou
l’enregistrement.
Emplacement et fonction des éléments
qk Touche N (12, 19, 21, 22, 24)
Appuyez sur cette touche pour commencer la lecture.
ql Touches numériques/alphabétiques (22, 24, 32)
Appuyez sur ces touches pour saisir des chiffres ou
des lettres.
w; Touche de mode de lecture (PLAY MODE) (24)
Appuyez sur cette touche pour sélectionner la lecture
aléatoire ou la lecture de programme.
wa Touche de répétition (REPEAT CLEAR) (23)
• Appuyez cette touche pour répéter des plages.
• Appuyez sur cette touche pour revenir à la lecture
normale lorsque la lecture répétée de toutes les
plages ou d’une seule plage est sélectionnée.
ws Touche AyB (23)
Appuyez sur cette touche pour sélectionner la lecture
répétée d’un passage A-B.
FR
7
Page 54

Description de l’afficheur
Emplacement et fonction des éléments
12 3
654
1 Indicateurs de mode de lecture
Indicateur SHUF (24)
Il s’allume lorsque la lecture aléatoire est sélectionnée.
Indicateur PGM (24)
Il s’allume lorsque la lecture de programme est
sélectionnée.
Indicateurs REP (23)
• “REP” s’allume lorsque la lecture répétée de toutes
les plages est sélectionnée.
• “REP 1” s’allume lorsque la lecture répétée d’une
plage est sélectionnée.
• “REP A-B” s’allume lorsque la lecture répétée d’un
passage A-B est sélectionnée.
2 Indicateurs de mode d’enregistrement (15)
• Aucun indicateur ne s’allume lorsque
l’enregistrement stéréo est sélectionné.
• “MONO” s’allume lorsque l’enregistrement en
monophonie est sélectionné.
• “LP2” s’allume lorsque l’enregistrement deux fois
plus long est sélectionné.
• “LP4” s’allume lorsque l’enregistrement quatre fois
plus long est sélectionné.
Lorsqu’une plage est reproduite, l’indicateur de mode
d’enregistrement correspondant s’allume sur
l’afficheur.
3 Indicateur TOC EDIT (14, 28, 38)
• “TOC” s’allume pour signaler la présence de
données TOC qui n’ont pas encore été inscrites sur
le disque. “TOC” clignote lorsque ces données sont
inscrites sur le disque.
• “TOC EDIT” s’allume pendant l’édition d’un
disque.
4 Indicateurs d’enregistrement synchronisé rapide de
CD (20)
•“×2” s’allume lorsque l’enregistrement synchronisé
rapide de CD 2× (enregistrement en mode LP2 ou
LP4) est sélectionné.
•“×4” s’allume lorsque l’enregistrement synchronisé
rapide de CD 4× (enregistrement en mode stéréo ou
mono) est sélectionné.
5 Indicateur L.SYNC (18)
Il s’allume pendant l’enregistrement lorsque la platine
est en mode de marquage automatique des plages.
6 Zone d’affichage des informations et du menu (8,
9, 16, 32, 35)
• Affichage de paramètres pour l’édition ou la
sélection d’options sur le menu.
• Affichage du niveau d’entrée pendant
l’enregistrement ou la pause d’enregistrement.
• Affichage des données de MD ou de plages (titre et
temps de lecture, etc.) selon le mode de la platine
(lecture, enregistrement, etc.).
Remarques
• Le format d’affichage sélectionné pour chaque mode de la
platine apparaît lorsque la platine entre dans un mode et
lorsque vous appuyez sur DISPLAY tant qu’il n’est pas
changé (voir ci-dessous pour les détails). Toutefois, si vous
débranchez le cordon d’alimentation, tous les affichages
par défaut seront rétablis (c’est-à-dire les affichages
sélectionnés en usine) à la prochaine mise sous tension de
la platine.
• Les temps indiqués peuvent être différents selon le mode
d’enregistrement.
FR
8
Page 55

Emplacement et fonction des éléments
Lorsqu’un MD est inséré
Les informations suivantes apparaissent
automatiquement.
Titre du disque
r
Nombre total de plages et temps total de
l’enregistrement
Pendant l’arrêt de la platine
Appuyez plusieurs fois sur DISPLAY pour changer
l’affichage.
A chaque pression de cette touche, l’affichage change
de la façon suivante:
Nombre total de plages et temps total
d’enregistrement écoulé (affichage par défaut)
r
Temps d’enregistrement restant sur le MD (MD
enregistrables seulement)*
r
Titre du disque**
N’apparaît pas pour les disques préenregistrés.
*
Le titre du disque n’apparaît pas si le MD n’a pas été titré.
**
Pendant l’enregistrement
Appuyez plusieurs fois sur DISPLAY pour changer
l’affichage.
A chaque pression de cette touche, l’affichage change
de la façon suivante:
Numéro de plage et temps d’enregistrement
écoulé de la plage actuelle (affichage par
défaut)
r
Temps d’enregistrement restant sur le MD
r
Niveau du signal d’entrée
r
Titre de la plage*
Le titre de la plage n’apparaît pas si la plage n’a pas été titrée.
*
Pendant la lecture
Appuyez plusieurs fois sur DISPLAY pour changer
l’affichage.
A chaque pression de cette touche, l’affichage change
de la façon suivante:
Numéro de plage et temps de lecture écoulé de
la plage actuelle (affichage par défaut)
r
Numéro de plage et temps de lecture restant
sur la plage actuelle
r
Temps de lecture restant sur le MD
r
Titre de la plage*
Le titre de la plage n’apparaît pas si la plage n’a pas été titrée.
*
FR
9
Page 56

Mise en
Avant d’effectuer les raccordements
service
Ce chapitre donne des informations
sur les accessoires fournis, indique les
points à observer lors des raccordements et explique la manière de
raccorder des appareils i.LINK à la
platine MD. Veuillez le lire
entièrement avant de raccorder les
divers appareils à la platine.
Vérification des accessoires fournis
Les accessoires suivants sont livrés avec la platine MD:
• Câbles de liaison i.LINK (1)
• Télécommande infrarouge (1)
Avant d’utiliser la télécommande fournie
La télécommande fournie contient déjà une pile. Avant de
l’utiliser, détachez la feuille isolante pour que le courant
puisse circuler vers la télécommande.
Pour éviter une fuite de la pile.
Si vous n’utilisez pas la télécommande pendant un certain temps,
retirez la pile pour qu’elle ne fuie pas et n’endommage pas la
télécommande.
z
Quand faut-il remplacer les piles ?
En cas d’utilisation normale, la pile dure environ six mois. Quand
la platine ne répond plus à la télécommande, remplacez la pile
par une neuve.
Remarques sur la pile au lithium
• Gardez la pile au lithium hors de portée des enfants.
En cas d’ingestion, contactez immédiatement un médecin.
• Essuyez la pile avec un chiffon sec pour assurer un bon contact.
• Respectez la polarité lorsque vous insérez la pile.
• Ne tenez pas la pile avec une pince métallique, sinon un courtcircuit peut se produire.
10
AVERTISSEMENT
La pile peut exploser si elle est mal utilisée.
Ne pas la recharger, démonter ni jeter au feu.
FR
Page 57

Raccordement d’appareils i.LINK
Ampli-tuner
*
etc.
i.LINK i.LINK
i.LINK S200
v v
Vous pouvez relier les appareils i.LINK sur l’un ou l’autre des connecteurs i.LINK S200.
*
Câbles nécessaires
Câbles de liaison i.LINK (2) (un fourni seulement)
Lecteur
CD, etc.*
A propos des câbles de liaison i.LINK
Veuillez utiliser des câbles de liaison i.LINK S200 de
marque Sony (4 broches - 4 broches).
Mise en service
Cordon d’alimentation
Points à observer lors des raccordements
• Avant d’effectuer les liaisons, éteignez tous les
appareils.
• Ne branchez aucun cordon d’alimentation avant d’avoir
effectué toutes les liaisons.
• Pour éviter un ronflement ou des parasites, assurezvous que les fiches sont bien enfoncées dans les prises
ou connecteurs.
Prises pour le raccordement d’appareils
i.LINK
Raccordez un Aux
Ampli-tuner, lecteur CD, etc. connecteurs i.LINK S200
Remarque sur le raccordement d’appar eils
i.LINK
Si un objet métallique tombe dans le connecteur i.LINK
S200, un court-circuit peut se produire et endommager les
composants.
A propos des appareils i.LINK pouvant
être utilisés avec la platine MD
Les composants i.LINK suivants peuvent être utilisés avec
la platine MD:
• Ampli-tuner STR-LSA1
• Lecteur CD CDP-LSA1
z
Pour des informations d’ordre général sur le système i.LINK
Voir “A propos du système i.LINK” à la page 38.
Branchement du cordon d’alimentation
Branchez le cordon d’alimentation de la platine sur une
prise de courant.
Remarque
Si vous utilisez une minuterie, branchez le cordon d’alimentation
de la platine sur la prise de la minuterie.
11
FR
Page 58

Enregistrement
?/1
INPUT
REC z
?/1
xA
AHX
. >
./>
z
x
Enregistrement sur un MD
sur un MD
Ce chapitre décrit les diverses
méthodes d’enregistrement sur un
MD. Il explique également comment
inscrire les numéros de plage et
effectuer un enregistrement
synchronisé avec d’autres appareils.
Reportez-vous aussi à “Limites du
système” à la page 41 avant
d’effectuer un enregistr ement.
Cette section explique les opérations pour l’enregistrement normal. Si le MD est déjà partiellement enregistré,
l’enregistrement commencera automatiquement à la fin de
la dernière plage enregistrée.
1 Appuyez sur ~/1 pour allumer la platine.
Le témoin STANDBY s’éteint.
2 Mettez l’ampli-tuner en service s’il ne l’est pas et
ainsi que la source de programme sélectionnez la
source de programme sur l’ampli-tuner.
3 Insérez un MD enregistrable.
4 Appuyez plusieurs fois sur INPUT jusqu’à ce que le
nom de la source de programme que vous voulez
enregistrer apparaisse.
Si la source de programme souhaitée n’est pas
indiquée, voir page 13.
5 Au besoin, sélectionnez le mode d’enregistrement.
Pour les détails, voir “Enregistrement de longue
durée” à la page 15.
6 Si nécessaire, localisez le point du MD où
l’enregistrement doit commencer.
Si vous enregistrez sur un MD neuf ou si vous voulez
enregistrer à la suite des enregistrements existants,
passez à l’étape 7.
Pour enregistrer depuis le début d’une plage
existante d’un MD
Appuyez plusieurs fois sur ./> jusqu’à ce que le
numéro de la plage sur laquelle vous voulez
enregistrer s’affiche.
Pour enregistrer depuis le milieu d’une plage
existante d’un MD
Appuyez plusieurs fois sur ./> jusqu’à ce que le
numéro de la plage sur laquelle vous voulez
enregistrer s’affiche, puis appuyez sur HX (ou N)
pour commencer la lecture. Appuyez à nouveau sur
HX (ou sur X) à l’endroit où l’enregistrement doit
commencer.
7 Appuyez sur REC z.
La platine se met en pause d’enregistrement.
12
8 Si nécessaire, réglez le niveau d’enregistrement.
Pour plus d’informations, reportez-vous à “Réglage
du niveau d’enregistrement” à la page 16.
FR
9 Appuyez sur HX (ou N ou X).
L’enregistrement commence.
10Commencez la lecture de la source.
Page 59

Opérations pouvant être effectuées pendant
l’enregistrement
Pour Appuyez sur
Arrêter l’enregistrement x
Interrompre l’enregistrement HX (ou X)
Reprendre l’enregistrement après
une pause
Changer les informations
affichées
Ejecter le MD A après avoir arrêté
HX (ou N ou X)
DISPLAY (page 9)
l’enregistrement
Lors de la pause d’enregistrement
Le numéro de plage augmente d’une unité. Ainsi, si vous
interrompez l’enregistrement de la plage 4, le numéro de
plage sera 5 lorsque vous reprendrez l’enregistrement.
Pour empêcher un effacement accidentel d’un
enregistrement
Pour empêcher l’enregistrement sur un MD, poussez le
taquet de protection contre l’enregistrement dans le sens
de la flèche (voir l’illustration ci-dessous) pour ouvrir le
hublot. Pour pouvoir enregistrer, fermez le hublot.
z
Pour écouter les plages que vous venez d’enregistrer
Appuyez sur HX (ou N) juste après avoir arrêté
l’enregistrement.
La lecture commence par la première plage que vous venez
d’enregistrer.
z
Pour commencer la lecture par la première plage du MD
après l’enregistrement
1 Appuyez à nouveau sur x après avoir arrêté l’enregistrement.
2 Appuyez sur HX (ou N).
La lecture commence par la première plage du MD.
Remarque
Pendant l'enregistrement, ne débranchez pas de cordons
d’alimentation ni de câbles de liaison i.LINK faisant partie de la
configuration i.LINK, sinon l'enregistrement ne s’effectuera pas
correctement.
Enregistrement sur un MD
Face inférieure du MD
Taquet de
protection contre
l’enregistrement
Poussez-le dans le
sens de la flèche.
Si la source de programme n’est pas indiquée à
l’étape 4
Une erreur s’est peut-être produite pendant que la
cassette était en train de lire les informations concernant la
source de programme. Ou bien, la platine MD est peutêtre incapable de recevoir des informations de certains
appareils. Les indications suivantes peuvent apparaître:
Indication Signification
“Disc”, “Tuner”, etc. La platine MD n’a lu que les
“Unknown” La platine MD ne peut pas recevoir
“No Device” Aucun appareil n’est raccordé à la
“CANNOT LINC” Il n’est pas possible d’enregistrer
informations générales relatives à
l’appareil.
d’informations au sujet de l’appareil.
La connexion reste cependant active.
platine MD.
depuis l’appareil sélectionné.
13
FR
Page 60

Remarques sur l’enregistrement
Indications s’affichant pendant
l’enregistrement
Si “Protected” et “C11” apparaissent
alternativement sur l‘afficheur
Le hublot de protection contre l’enregistrement est ouvert
et le MD est protégé contre l’enregistrement. Pour
enregistrer sur le MD, déplacez le taquet pour fermer le
hublot. Pour plus d’informations, reportez-vous à “Pour
empêcher un effacement accidentel d’un enregistrement”
Enregistrement sur un MD
à la page 13.
Si “Cannot Select” et le nom de la source de
programme apparaissent alternativement sur
l’afficheur
La source de programme sélectionnée n’est pas un
appareil audio. Sélectionnez un appareil audio.
Si “Cannot Copy” et “C12” apparaissent
alternativement sur l‘afficheur
La platine MD utilise le système SCMS, un système de
protection contre la copie abusive. Un MD enregistré par
le connecteur d’entrée numérique ne peut pas être copié
sur un autre MD ou sur une cassette DAT par le
connecteur de sortie numérique. Pour plus
d’informations, reportez-vous à “Protection contre la
copie abusive: le système SCMS” sur cette page.
Si “Impossible” apparaît sur l’afficheur
Vous essayez d’enregistrer sur une plage existante (voir
“Enregistrement sur un MD” à la page 12) alors que la
lecture aléatoire (page 24) ou la lecture de programme
(page 24) est sélectionnée. Vous ne pouvez enregistrer sur
une plage que lorsque la lecture normale (page 21) ou la
lecture répétée (page 23) est sélectionnée.
Si “NO SIGNAL” apparaît sur l’afficheur
Aucun signal n’est transmis à la platine MD et
l'enregistrement ne peut pas être effectué.
Quand “Tr” clignote sur l’afficheur
La platine MD enregistre sur une plage existante.
L’indication cesse de clignoter lorsque la fin de la partie
enregistrée est atteinte.
Indications s’affichant après
l’enregistrement
Quand “TOC” s’allume sur l’afficheur
L’enregistrement est terminé mais le TOC (sommaire) du
MD n’a pas encore été mis à jour. Vous perdrez
l’enregistrement que vous venez d’effectuer si vous
débranchez le cordon d’alimentation pendant que cette
indication est affichée. Le TOC n’est mis à jour que
lorsque vous éjectez le MD ou éteignez la platine MD.
Quand “TOC Writing” clignote sur l’afficheur
La platine met à jour le TOC. Ne débranchez pas le
cordon d’alimentation et ne déplacez pas la platine
pendant que l’indication clignote.
Protection contre la copie abusive: le
système SCMS
Les appareils audionumériques tels que les lecteurs CD,
platines MD et platines DAT permettent de faire
facilement des copies de haute qualité car ils traitent la
musique comme un signal numérique.
Pour la protection de la propriété artistique, cette platine
utilise le système SCMS (Serial Copy Management
System). Ce système ne permet de faire qu’une seule copie
d’un enregistrement numérique par une liaison
numérique-numérique.
Vous ne pouvez faire qu’une copie de première
génération
numérique.
Autrement dit:
• Vous pouvez faire une copie d’une source numérique
(CD ou MD, par exemple) vendue dans le commerce,
mais vous ne pouvez pas dupliquer cette première
copie (c’est-à-dire la copie de première génération).
• Vous pouvez faire une copie du signal numérique d’une
source analogique (disque vinyle analogique ou cassette
audio, par exemple) enregistrée en numérique ou d’une
émission numérique par satellite, mais vous ne pouvez
pas dupliquer cette première copie.
Par copie de première génération, on entend le premier
*
enregistrement d’une source audionumérique effectué par le
connecteur d’entrée numérique de la platine. Si, par exemple, vous
enregistrez depuis un lecteur CD raccordé au connecteur i.LINK
S200, vous effectuez une copie de première génération.
Remarque
Les restrictions du système SCMS ne s’appliquent pas à un
enregistrement effectué par une liaison analogique-analogique.
* par une liaison numérique-
14
FR
Page 61

Enregistrement de longue durée
La platine présente non seulement des modes
d’enregistrement en stéréophonie et en monophonie mais
aussi deux autres modes: LP2 et LP4. Lors de
l’enregistrement en mode LP2, vous pouvez enregistrer 2
fois plus longtemps et dans le mode LP4 4 fois plus
longtemps que pendant un enregistrement normal. En
outre, le temps d’enregistrement en monophonie est
environ deux fois supérieur au temps d’enregistrement en
stéréophonie.
Remarque
Les MD enregistrés dans le mode LP2 ou LP4 ne pourront être lus
que sur les platines dotées de ce format. Les platines MD
classiques ne peuvent pas lire ce type de MD.
REC MODE
A
1 Effectuez les étapes 1 à 4 de “Enregistrement sur
un MD” à la page 12.
2 Appuyez plusieurs fois sur REC MODE pour
sélectionner le mode d’enregistrement.
Pour enregistrer en Sélectionnez
Monophonie MONO
Stéréophonie (réglage par défaut) Aucun indicateur
Stéréophonie LP2 LP2
Stéréophonie LP4 LP4
z
La fonction LP Stamp peut être utilisée pendant
l’enregistrement en mode LP2 ou LP4 Z
Une plage enregistrée en mode LP2 ou LP4 est identifiée par un
code qui n’apparaît que lorsque vous écoutez cette plage sur une
platine MD ne reconnaissant pas les modes LP. “LP:” apparaît à
ce moment sur l’afficheur.
Pour désactiver cette fonction, procédez de la façon suivante.
1 Pendant l’arrêt de la platine ou pendant la lecture, appuyez
deux fois sur MENU/NO.
“Setup Menu” s’affiche.
2 Appuyez plusieurs fois sur ./> jusqu’à ce que “LP
Stamp On” s’affiche, puis appuyez sur YES.
3 Appuyez plusieurs fois sur ./> pour sélectionner “LP
Stamp Off”, puis appuyez sur YES.
4 Appuyez sur MENU/NO.
Pour activer à nouveau la fonction LP Stamp, sélectionnez “LP
Stamp On” à l’étape 3 ci-dessus.
Remarques
• “LP:” ne s’affiche pas si la plage est lue sur une platine MD ne
reconnaissant pas le format LP des MD.
• Lorsque la fonction LP Stamp est activée, le nombre maximal
de caractères pouvant être saisis sur un MD diminue.
• Si vous divisez la plage enregistrée quand la fonction LP Stamp
est activée, le code “LP:” est copié sur la nouvelle plage créée.
Enregistrement sur un MD
3 Effectuez les étapes 6 à 10 de “Enregistrement sur
un MD” à la page 12.
z
Lorsque vous enregistrez sur un MD dans le mode LP2 ou LP4
Le témoin LP s’allume sur le panneau avant.
Remarques
• Le mode d’enregistrement ne peut pas être changé pendant
l’enregistrement ou la pause d’enregistrement même en
appuyant sur REC MODE.
• La fonction S.F Edit ne peut pas être utilisée pour les plages
enregistrées dans le mode LP2 ou LP4.
15
FR
Page 62

Réglage du niveau
?/1
x
A
. >
./>
z
YES
DISPLAY
./>
MENU/NO
–
+
?/1
.>m M
Xxz
789
10
/0
1
23
456
N
>10
DISPLAY
Conseils pour
d’enregistrement
Procédez de la façon suivante pour ajuster le niveau
d’enregistrement.
?/1
1 Effectuez les opérations 1 à 7 de “Enregistrement
sur un MD” à la page 12.
Enregistrement sur un MD
2 Reproduisez la partie de la source ayant le niveau
de sortie le plus élevé.
3 Appuyez plusieurs fois sur DISPLAY jusqu’à ce que
le niveau du signal d’entrée s’affiche.
4 Tout en écoutant le son, appuyez plusieurs fois sur
./> (ou sur LEVEL +/–) pour augmenter le
niveau d’enregistrement au maximum sans que les
deux indicateurs les plus à droite ne s’allument sur
l’indicateur de niveau de crête.
5 Arrêtez la lecture de la source.
DISPLAY
./>
. >
Ces indicateurs ne doivent pas s’allumer
l’enregistrement
xA
z
Vérification du temps d’enregistrement
restant sur le MD
Appuyez plusieurs fois sur DISPLAY.
Quand la platine L’indication suivante apparaît:
Est arrêtée Temps total d’enregistrement y Temps
d’enregistrement restant sur le MD
Enregistre Temps d’enregistrement de la plage
actuelle y Temps d’enregistrement
restant sur le MD
6 Pour commencer l’enregistrement, continuez par
l’étape 9 de “Enregistrement sur un MD” à la page
12.
z
La fonction Peak Hold sert à immobiliser les indicateurs de
niveau lorsque le niveau de crête du signal d’entrée est atteint
Z
1 Appuyez deux fois sur MENU/NO.
“Setup Menu” s’affiche.
2 Appuyez plusieurs fois sur ./> jusqu’à ce que “P.Hold
Off” (réglage par défaut) s’affiche, puis appuyez sur YES.
3 Appuyez plusieurs fois sur ./> pour sélectionner
“P.Hold On”, puis appuyez sur YES.
4 Appuyez sur MENU/NO.
Pour désactiver la fonction Peak Hold, sélectionnez “P.Hold Off”
à l’étape 3 ci-dessus.
Remarque
Il n’est possible d’augmenter le volume que jusqu’à +18,0 dB.
Aussi, si le niveau de sortie de l’appareil raccordé est faible, il
peut être impossible d’augmenter le volume au niveau maximal.
Pour plus d’informations, reportez-vous à la page 9.
Remarque
Les temps indiqués peuvent être différents selon le mode
d’enregistrement.
Suppression automatique des silences
(Smart Space/Auto Cut) Z
Vous pouvez programmer la platine pour qu’elle
supprime automatiquement les silences qui se produisent
en cas d’interruption du signal pendant l’enregistrement.
La fonction activée (Smart Space ou Auto Cut) dépend de
la durée de l’interruption, comme indiqué ci-dessous.
Smart Space
Si le signal est interrompu pendant moins de 30 secondes,
l’espace silencieux est remplacé par un silence d’environ
trois secondes, puis l’enregistrement se poursuit. “Smart
Space” s’affiche à ce moment.
16
FR
Page 63

Inscription de numéros de
plage pendant l’enregistrement
Auto Cut
Si le signal est interrompu pendant 30 secondes environ,
l’espace silencieux est remplacé par un silence d’environ
trois secondes, puis la platine se met en pause
d’enregistrement. “Auto Cut” s’affiche à ce moment.
Pour activer ou désactiver les fonctions Smart Space et
Auto Cut, procédez comme suit.
1 Quand la platine est arrêtée, appuyez deux fois sur
MENU/NO.
“Setup Menu” s’affiche.
2 Appuyez plusieurs fois sur ./> jusqu’à ce que
“S.Space On” s’affiche, puis appuyez sur YES.
3 Appuyez plusieurs fois sur ./> pour
sélectionner une option, puis appuyez sur YES.
Pour Sélectionnez
Activer Smart Space et Auto Cut S.Space On (réglage
d’usine)
Désactiver Smart Space et Auto Cut S.Space Off
4 Appuyez sur MENU/NO.
Remarques
• Si vous commencez à enregistrer sans qu’il n’y ait d’entrée de
signal, les fonctions Smart Space et Auto Cut ne fonctionneront
pas quelle que soit l’option choisie.
• La fonction Smart Space n’affecte pas l’ordre des numéros de
plage enregistrés, même si le silence se produit au milieu d’une
plage.
• La fonction Auto Cut s’active et désactive automatiquement en
même temps que la fonction Smart Space.
• Lorsque vous éteignez la platine ou débranchez le cordon
d’alimentation, la platine mémorise le dernier réglage (“S.Space
On” ou “S.Space Off”) et le rappelle lorsque vous la rallumez.
• Si la pause d’enregistrement se prolonge pendant une dizaine
de minutes après la mise en service d’Auto Cut, l’enregistrement s’arrêtera automatiquement.
(marquage des plages)
Les numéros de plage peuvent être inscrits manuellement
ou automatiquement lors de l’enregistrement.
L’inscription d’un numéro de plage à un point précis du
disque permet de revenir plus tard sur ce point et facilite
les opérations de montage.
./>
A
?/1
?/1
23
1
456
+
789
–
>10
10
/0
Xxz
./>
MENU/NO
N
.>m M
z
YES
Inscription manuelle des numéros de
plage (marquage manuel des plages)
Pendant l’enregistrement, appuyez sur REC z au point
où vous voulez ajouter un numéro de plage.
Inscription automatique des numéros de
plage (marquage automatique des plages)
Lorsque vous enregistrez depuis un lecteur CD ou une
platine MD raccordés au connecteur i.LINK S200, la
platine inscrit les numéros de plage tels qu’ils sont sur la
source. Lorsque vous enregistrez d’autres sources
raccordées au connecteur i.LINK S200, procédez comme
suit pour que les numéros de plage s’inscrivent
automatiquement. Le marquage automatique de plages
peut mal fonctionner si la source d’enregistrement est très
parasitée.
x
. >
z
REC z
Z
Enregistrement sur un MD
1 Quand la platine est arrêtée, appuyez deux fois sur
MENU/NO.
“Setup Menu” s’affiche.
2 Appuyez plusieurs fois sur ./> jusqu’à ce que
“T.Mark Lsync” s’affiche, puis appuyez sur YES.
3 Appuyez plusieurs fois sur ./> pour
sélectionner une option, puis appuyez sur YES.
Pour Sélectionnez
Activer le marquage automatique
des plages
Désactiver le marquage
automatique des plages
T.Mark Lsync
(réglage d’usine)
T.Mark Off
17
FR
Page 64

Inscription de numéros de plage pendant
l’enregistrement (marquage des plages)
Commencement de
l’enregistrement par 6
4 Appuyez sur MENU/NO.
Lorsque vous activez le marquage automatique des
plages à l’étape 3 ci-dessus, “L.SYNC” s’allume sur
l’afficheur.
La platine inscrit un numéro de plage chaque fois que
le niveau du signal d’entrée descend à –50 dB (seuil de
déclenchement du marquage automatique des plages)
ou au-dessous pendant 1,5 seconde au moins et
remonte ensiute au-dessus de -50 dB.
Pour changer le seuil de déclenchement du
Enregistrement sur un MD
marquage automatique des plages Z
Procédez comme suit pour changer le niveau du signal
qui déclenche le marquage automatique des plages.
1 Quand la platine est arrêtée, appuyez deux fois sur
MENU/NO.
“Setup Menu” s’affiche.
2 Appuyez plusieurs fois sur ./> jusqu’à ce que
“LS(T)” s’affiche, puis appuyez sur YES.
3 Appuyez plusieurs fois sur ./> pour
sélectionner le niveau, puis appuyez sur YES.
Vous pouvez régler le niveau sur une valeur comprise
entre –72 dB et 0 dB, par incréments de 2 dB.
4 Appuyez sur MENU/NO.
z
Informations complémentaires sur le marquage automatique
des plages
• Lors d’un enregistrement depuis un lecteur CD ou une platine
MD raccordés au connecteur i.LINK S200, vous n’obtiendrez
qu’une seule plage dans les cas suivants:
— vous avez enregistré plusieurs fois de suite la même plage
en utilisant la lecture répétée d’une seule plage;
— vous avez enregistré à la suite plusieurs plages ayant le
même numéro de plage, mais appartenant à des CD ou MD
différents;
— vous avez enregistré des plages d’un autre lecteur CD ou
d’un lecteur multidisques.
En outre, si la source est un MD, les numéros de plages ne
seront pas inscrits pour les plages de moins de quatre secondes
(en mode stéréo, mono ou LP2) ou huit secondes (en mode
LP4).
• Lors d’un enregistrement depuis une platine DAT ou un tuner
satellite (DBS) raccordés au connecteur i.LINK S200, il se peut
que la source soit entièrement enregistrée sur une seule plage.
• Lors d’un enregistrement depuis une platine DAT ou un tuner
satellite (DBS) raccordés au connecteur i.LINK S200, la platine
inscrit un numéro de plage chaque fois que la fréquence
d’échantillonnage du signal d’entrée change, quelle que soit
l’option (“T.Mark Lsync” ou “T.Mark Off”) choisie pour le
marquage des plages.
z
Les numéros de plage peuvent être inscrits après
l’enregistrement
Reportez-vous à “Division d’une plage” à la page 30.
Remarque
Lorsque vous éteignez la platine ou débranchez le cordon
d’alimentation, la platine mémorise les derniers réglages
(“T.Mark Lsync” ou “T.Mark Off” et le seuil de déclenchement) et
les rappelle lorsque vous la rallumez.
FR
18
secondes de son mémorisé
(enregistrement rétroactif) Z
Chaque fois que la platine est en pause d’enregistrement,
elle mémorise les 6 dernières secondes des données audio.
Quand vous appuyez sur T.REC pour enregistrer, ces 6
secondes sont ajoutées au début de l’enregistrement.
Ainsi, vous ne risquez pas de manquer le début d’une
émission FM ou satellite que vous enregistrez en direct.
?/1
23
1
56
4
+
789
–
>10
10
/0
NX x z
.>m M
T.REC
1 Effectuez les opérations 1 à 8 de “Enregistrement
sur un MD” à la page 12.
La platine se met en pause d’enregistrement.
2 Commencez la lecture de la source.
3 Appuyez sur T.REC au point où l’enregistrement
doit commencer.
L’enregistrement commence par les 6 secondes de son
mémorisé, puis se poursuit via la mémoire tampon.
Pour arrêter l’enregistrement rétroactif
Appuyez sur x.
Remarque
La platine commence à mémoriser le son au moment où vous la
mettez en pause d’enregistrement. Si vous commencez
l’enregistrement moins de 6 secondes après avoir mis la platine
en pause d’enregistrement, moins de 6 secondes de son seront
ajoutées au début de l’enregistrement. Il en est de même si
l’émission commence moins de 6 secondes avant le début de
l’enregistrement.
Page 65

Enregistrement synchronisé
Enregistrement synchronisé
avec l’appareil audio de
votre choix
(enregistrement Synchro) Z
L’enregistrement Synchro permet de synchroniser le
début de l’enregistrement sur la platine MD et le début de
la lecture de la source sélectionnée. Le marquage des
plages sera différent selon les sources. Pour plus
d’informations, reportez-vous à “Inscription de numéros
de plage pendant l’enregistrement” à la page 17.
?/1
23
1
56
4
+
789
>10
1 Effectuez les opérations 1 à 6 de “Enregistrement
sur un MD” à la page 12.
2 Appuyez sur M.SYNC.
La platine se met en pause d’enregistrement.
3 Commencez la lecture de la source.
L’enregistrement commence automatiquement.
–
10
/0
NX x z
.>m M
M.SYNC
avec un lecteur CD Sony
(enregistrement de CD normal/synchro
rapide)
En raccordant la platine MD à un lecteur CD, vous
pouvez aisément copier le contenu de CD sur des MD.
Selon le mode d’enregistrement sélectionné vous pouvez
specifier la vitesse normale, la vitesse normale ×2 ou la
vitesse normale ×4. Si vous utilisez la télécommande pour
l’enregistrement, veillez à rapprocher le plus possible la
platine MD et le lecteur CD pour que la télécommande
puisse faire fonctionner ces deux appareils.
Z
?/1
./>
MENU/NO
N
CD SYNCHRO
?/1
23
1
456
+
789
>10
10
/0
N
Xxz
.>m M
./>HX
A
–
x
. >
z
z
YES
Enregistrement sur un MD
Pour arrêter l’enregistrement Synchro
Appuyez sur x.
Remarque
Pendant l’enregistrement Synchro, les fonctions Smart Space et
Auto Cut sont activées quelle que soit l’option (“S.Space On” ou
“S.Space Off”) choisie.
1 Pendant que la platine est à l’arrêt, appuyez deux
fois sur MENU/NO.
“Setup Menu” s’affiche.
2 Appuyez plusieurs fois sur ./> jusqu’à ce que
“Synchro High” s’affiche, puis appuyez sur YES.
3 Appuyez plusieurs fois sur ./> pour
sélectionner le réglage, puis appuyez sur YES.
Pour enregistrer à Sélectionnez
La vitesse normale Synchro Normal
La vitesse rapide Synchro High*
(réglage d‘usine)
* Lorsque l’enregistrement en stéréophonie ou monophonie est
sélectionné, l’enregistrement synchronisé de CD s’effectue à la
vitesse normale ×4; lorsque LP2 ou LP4 est sélectionné,
l’enregistrement s’effectue à la vitesse normale ×2.
4 Appuyez sur MENU/NO.
5 Mettez l’ampli-tuner et le lecteur CD en service et
sélectionnez le lecteur CD sur l’ampli-tuner.
6 Effectuez les étapes 3 à 6 de “Enregistrement sur
un MD” à la page 12.
7 Insérez un CD dans le lecteur CD et sélectionnez le
mode de lecture (lecture normale ou lecture de
programme seulement) sur le lecteur CD.
19
FR
Page 66

Enregistrement synchronisé avec un lecteur
CD Sony (enregistrement de CD normal/
synchro rapide)
8 Appuyez sur CD SYNCHRO.
Le lecteur CD se met en attente de lecture et la platine
MD en attente d’enregistrement. Le témoin HIGH
SPEED sur la platine MD et l’indicateur ×2 ou ×4 sur
l’afficheur de la platine MD s’allument selon la vitesse
sélectionnée.
Lorsque “Select CD” apparaît sur l’afficheur
Le lecteur CD n’est pas sélectionné comme source de
programme. Appuyez sur INPUT de la platine MD
pour sélectionner le lecteur CD.
Enregistrement sur un MD
Lorsque “Connect CD” apparaît sur l’afficheur
Le lecteur CD n’est pas raccordé par une liaison
i.LINK. Raccordez le lecteur CD.
9 Lorsque “New Track” se met à clignoter sur
l’afficheur, appuyez sur HX (ou N ou X).
L’enregistrement commence sur la platine MD et la
lecture sur le lecteur CD.
Le numéro de plage et le temps d’enregistrement
écoulé de la plage apparaissent sur l’afficheur.
L’enregistrement s’arrête automatiquement lorsque la
lecture s’arrête sur le lecteur CD.
Opérations pouvant être effectuées pendant
l’enregistrement synchronisé de CD
Pour Appuyez sur
Arrêter l’enregistrement x
Vérifier le temps
d’enregistrement restant
Lorsque “Cannot Synchro” apparaît sur l’afficheur
Une erreur de lecture s’est produite. Enregistrez une
nouvelle fois sur la plage:
Les erreurs de lecture peuvent se produire dans les
situations et avec les CD mentionnés ci-dessous.
• Avec les CD suivants, des erreurs de lecture ou des
parasites peuvent apparaître lorsqu’ils sont enregistrés
sur un MD:
— CD sur lesquels des étiquettes ont été collées
— CD aux formes irrégulières (par exemple, CD en
forme de cœur ou d’étoile)
— CD avec du texte imprimé sur un seul côté
— Vieux CD
— CD rayés
— CD sales
— CD voilés
• Si le cas suivant se présente pendant la lecture ou
l’enregistrement d’un CD, une erreur se produira ou
des parasites apparaîtront sur l’enregistrement:
— Le plateau de CD ou une partie de la platine a été
frappé.
— La platine est installée sur une surface non plate ou
molle.
— La platine se trouve près d’une enceinte, d’une porte
ou d’une autre source de vibration.
DISPLAY (page 16)
z
Vous pouvez utiliser la télécommande du lecteur CD pour
arrêter l’enregistrement synchronisé de CD
Appuyez sur x. L'enregistrement et la lecture s’arrêtent.
z
Pendant l’enregistrement synchronisé de CD, les numéros de
plages sont marqués de la façon suivante:
Losque le lecteur CD est raccordé au connecteur i.Link S200, les
muméros de plage sont automatiquement marqués comme sur
les CD.
z
Les informations des disques CD TEXT (texte et mémos de
disque) peuvent être copiées sur le MD pendant l’enregistrement
synchronisé de CD (Copie de mémos de disque)
Si la platine MD enregistre une plage d’un CD contenant des
informations alphanumériques, appuyez sur NAME EDIT/
SELECT pour afficher le contenu de ces informations sur la
platine MD. Pour enregistrer le nom de la plage sur le MD,
appuyez sur YES.
Remarques
• Il n’est pas possible d’enregistrer sur un matériau existant lors
de l’enregistrement synchronisé rapide de CD.
L’enregistrement commence automatiquement à la fin du
dernier matériau.
• Lorsque le lecteur CD est en mode de lecture aléatoire ou de
lecture répétée, il revient automatiquement au mode de lecture
normale au moment où vous appuyez sur CD SYNCHRO à
l’étape 8.
• Les fonctions suivantes n’agissent pas non plus lors de
l’enregistrement synchronisé rapide de CD:
— Fonction Auto Cut
— Enregistrement au niveau spécifié dans le menu de réglage.
(Dans ce cas, l’enregistrement s’effectue à 0.0 dB.)
• Les informations alphanumériques de certains CD peuvent être
impossibles à copier.
• Si aucune opération n’a été effectuée dans la minute qui suit la
pression de CD SYNCHRO à l’étape 8, l'enregistrement
synchronisé de CD sera automatiquement annulé.
• Ne débranchez pas de cordons d’alimentation ni de câbles de
liaison i.LINK faisant partie de la configuration i.LINK, sinon
l'enregistrement ne s’effectuera pas corr ectement.
• Assurez-vous que le temps d’enregistrement restant sur le MD
est plus long que le temps de lecture du CD, surtout si vous
voulez enregistrer toutes les plages du CD.
• Si le MD devient plein au milieu de l'enregistrement d’une
plage, la plage ne sera pas enregistrée sur le MD.
20
FR
Page 67

Lecture de MD
Lecture d’un MD
Ce chapitre décrit les divers modes de
lecture de MD.
Les opérations pour la lecture normale sont expliquées cidessous.
?/1
?/1
A
A
xHX
x
. >
z
./>
1 Appuyez sur ~/1 pour allumer la platine.
Le témoin STANDBY s’éteint.
2 Si l’ampli-tuner n’est pas en service, mettez-le en
service et sélectionnez cette platine sur l’amplituner.
3 Insérez un MD.
4 Si nécessaire, appuyez plusieurs fois sur > pour
localiser la plage à partir de laquelle la lecture doit
commencer.
Si vous voulez commencer la lecture par la première
plage, passez à l’étape 5.
5 Appuyez sur HX (ou N).
La lecture commence.
6 Réglez le volume sur l’amplificateur.
Lecture de MD
Opérations pouvant être effectuées pendant la lecture
Pour Appuyez sur:
Arrêter la lecture x
Interrompre la lecture HX (ou X)
Reprendre la lecture après une pause HX (ou N ou X)
Localiser une plage suivante > à plusieurs reprises
Localiser le début de la plage
actuelle ou une plage précédente
Changer les informations affichées DISPLAY (page 9)
Ejecter le MD A après avoir arrêté la
z
Lorsque la fonction de commande i.LINK est activée sur
l’ampli-tuner
L’ampli-tuner et la platine MD se mettent en marche et la lecture
commence automatiquement lorsque vous appuyez sur HX (ou
N).
z
Lorsque vous écoutez un MD enregistré dans le mode LP2 ou
LP4
Le témoin LP sur la platine s’allume.
z
Vous pouvez vérifier le titre de la plage quand vous voulez
pendant la lecture Z
Appuyez sur SCROLL.
Le titre de la plage apparaît et défile. Lorsque le titre de la plage
défile, appuyez à plusieurs reprises sur la touche pour l’arrêter et
le faire à nouveau défiler.
. à plusieurs reprises
lecture
21
FR
Page 68

Lecture d’une plage donnée
Localisation d’un point précis d’une plage Z
Lecture de MD
Quand la platine est en mode de lecture ou d’arrêt,
procédez comme suit pour écouter une plage.
HX
xA
. >
z
./>
>10
N
?/1
23
1
56
4
+
789
–
>10
10
/0
N
Xxz
.>m M
Touches
numériques
./>
Localisation d’une plage avec AMS*
Pour localiser Appuyez sur:
Une plage suivante pendant
la lecture
Une plage précédente pendant
la lecture
Le début de la plage actuelle
pendant la lecture
Une plage donnée quand la
platine est arrêtée
Automatic Music Sensor (Recherche automatique de plages)
*
z
Pour localiser rapidement la dernière plage du MD
Quand la platine est arrêtée, appuyez une fois sur ..
z
Si vous recherchez une plage quand la platine est à l’arrêt ou
> à plusieurs reprises
. à plusieurs reprises
. une fois
./> à plusieurs reprises
jusqu’à ce que le numéro de
plage souhaité clignote sur
l’afficheur, puis appuyez sur
HX (ou N).
en pause
Le platine s’arrêtera ou se mettra en pause au début de la plage
localisée.
Lecture d’une plage en saisissant le
numéro de plage Z
Vous pouvez localiser un point précis d’une plage
pendant la lecture ou la pause de lecture.
?/1
23
1
56
4
+
789
10
/0
NX x z
.>m M
–
m/M
>10
Localisation d’un point précis d’une plage
en écoutant le son
Appuyez en continu sur m/M pendant la lecture.
Vous entendez le son par intermittence pendant la
recherche avant ou arrière. Lorsque vous atteignez le
point souhaité, relâchez la touche.
Remarques
• Si vous parvenez à la fin du disque alors que vous appuyez sur
M, la platine s’arrêtera.
• Les plages qui ne durent que quelques secondes sont parfois
trop courtes pour que vous entendiez le son. Dans ce cas, il est
préférable d’écouter le MD à vitesse normale.
Localisation d’une plage en observant
l’indication de temps
Appuyez en continu sur m/M pendant la pause de
lecture.
Le temps de lecture écoulé de la plage est indiqué.
Lorsque vous atteignez le point souhaité, relâchez la
touche. Le son n’est pas audible pendant la recherche.
z
Si “- Over -” s’affiche
Vous êtes parvenu à la fin du disque alors que vous appuyiez sur
M. Appuyez sur m pour revenir en arrière.
Appuyez sur les touches numériques pour saisir le
numéro de plage que vous voulez écouter.
Pour saisir un numéro de plage supérieur à 10
1 Appuyez sur >10.
2 Saisissez les chiffres correspondants.
Pour saisir 0, appuyez sur 10.
Exemples:
• Pour saisir le numéro de plage 30, appuyez sur >10, puis
sur 3 et 10.
• Pour saisir le numéro de plage 108, appuyez deux fois sur
>10, puis sur 1, 10 et 8.
z
Si vous saisissez un numéro de plage quand la platine est à
l’arrêt ou en pause
La platine restera à l’arrêt ou en pause au début de la plage.
FR
22
Page 69

Lecture répétée de plages
Z
Vous pouvez écouter plusieurs fois de suite tout un MD.
Cette fonction peut être utilisée en mode de lecture
aléatoire pour répéter toutes les plages dans un ordre
toujours différent (page 24) ou en mode de lecture de
programme pour répéter toutes les plages d’un
programme (page 24). Vous pouvez aussi répéter une
plage donnée ou un passage d’une plage.
REPEAT
CLEAR
?/1
23
1
56
4
+
789
–
>10
10
/0
NX x z
.>m M
AyB
M
Remarque
Quand vous éteignez la platine ou débranchez le cordon
d’alimentation, la platine mémorise le dernier mode de lecture
répétée (“Repeat All” ou “Repeat 1”) et le rappelle quand vous la
rallumez.
Cependant les réglages effectués pour la lecture d’un passage A-B
seront effacés lorsque vous éteignez la platine ou débranchez le
cordon d’alimentation.
Répétition de toutes les plages d’un MD
(Repeat All)
Appuyez plusieurs fois sur REPEAT CLEAR jusqu’à ce
que “REP” s’allume.
Lors de la lecture d’un MD, les plages sont lues comme
suit:
Lors de la lecture La platine répète
Normale (page 21) toutes les plages dans l’ordre
Aléatoire (page 24) toutes les plages dans un ordre
De programme (page 24) toutes les plages du programme dans
aléatoire
l’ordre
Pour arrêter la fonction Repeat 1
Appuyez sur x.
Pour reprendre la lecture normale
Appuyez plusieurs fois sur REPEAT CLEAR jusqu’à ce
que “REP 1” s’éteigne.
Répétition d’un passage précis d’une
plage (Repeat A-B)
Vous pouvez spécifier un passage d’une plage pour
l’écouter plusieurs fois de suite. Notez que le passage
spécifié doit se trouver à l’intérieur d’une plage.
1 Pendant la lecture, appuyez sur AyB au début du
passage (point A) à répéter.
“REP A-” s’allume et “B” clignote sur l’afficheur.
2 Continuez à écouter la plage ou appuyez sur M
pour localiser la fin du passage (point B), puis
appuyez sur AyB.
“REP A-B” s’allume et la lecture du passage A-B
commence.
Pour arrêter la fonction Repeat A-B et reprendre
la lecture normale
Appuyez sur REPEAT CLEAR.
z
Vous pouvez sélectionner un nouveau point de départ et un
nouveau point final pendant la lecture du passage A-B
Vous pouvez utiliser la fin actuelle comme nouveau point de
départ, puis spécifier une nouvelle fin pour répéter un passage
suivant le passage actuel.
1 Pendant la lecture du passage A-B, appuyez sur AyB.
La fin actuelle devient le nouveau début (point A).
“REP A-” s’allume et “B” clignote sur l’afficheur.
2 Localisez la nouvelle fin (point B) et appuyez sur AyB.
“REP A-B” s’allume et la lecture répétée du nouveau passage
commence.
Lecture de MD
Pour arrêter la fonction Repeat All
Appuyez sur x.
Pour reprendre la lecture normale
Appuyez plusieurs fois sur REPEAT CLEAR jusqu’à ce
que “REP” s’éteigne.
Répétition de la plage actuelle (Repeat 1)
Pour répéter la plage en cours de lecture, appuyez
plusieurs fois sur REPEAT CLEAR jusqu’à ce que “REP 1”
s’allume.
La lecture répétée de la plage commence.
23
FR
Page 70

Lecture des plages dans un
Création d’un programme
Lecture de MD
ordre aléatoire (lecture
aléatoire)
Lorsque vous sélectionnez le mode de lecture aléatoire,
toutes les plages du MD sont lues dans un ordre aléatoire.
1 Pendant que la platine est à l’arrêt, appuyez
plusieurs fois sur PLAY MODE jusqu’à ce que
“SHUF” s’allume sur l’afficheur.
2 Appuyez sur N.
La lecture aléatoire commence.
; s’affiche pendant que la platine“mélange” les
plages.
Pour reprendre la lecture normale
Pendant l’arrêt de la lecture, appuyez plusieurs fois sur
PLAY MODE jusqu’à ce que “SHUF” s’éteigne.
z
Vous pouvez localiser des plages pendant la lecture aléatoire
Appuyez plusieurs fois sur ./>.
• Pour localiser une plage suivante appuyez plusieurs fois sur
> .
• Pour localiser le début de la plage actuelle, appuyez sur ..
Notez que vous ne pouvez pas localiser et écouter des plages
qui ont déjà été lues une fois.
Z
PLAY
MODE
?/1
23
1
56
4
+
789
>10
10
/0
NNXxz
.>m M
–
(lecture d’un programme) Z
Vous pouvez créer un programme de 25 plages au
maximum en spécifiant l’ordre dans lequel vous voulez
les écouter.
PLAY MODE
Touches
numériques
>10
N
./>
?/1
23
1
56
4
789
>10
10
/0
N
Xxz
.>m M
DISPLAY
+
–
YES
CLEAR
1 Pendant que la platine est à l’arrêt, appuyez
plusieurs fois sur PLAY MODE jusqu’à ce que
“PGM” s’allume sur l’afficheur.
2 Utilisez les touches numériques pour indiquer
directement le numéro de plage. Ou bien, appuyez
plusieurs fois de suite sur ./> jusqu’à ce que
le numéro de la plage que vous voulez ajouter au
programme apparaisse, puis appuyez sur YES ou
PLAY MODE.
“Step X (X: nombre de plages saisies)” apparaît
d’abord puis le temps total de lecture du programme.
Pour supprimer la dernière plage saisie
Appuyez sur CLEAR pour supprimer le numéro de
plage.
Pour saisir un numéro de plage supérieur à 10
Utilisez >10. Pour les détails, voir page 22.
3 Répétez l’étape 2 pour programmer d’autres
plages.
24
4 Appuyez sur N.
La lecture de programme commence.
Pour vérifier le numéro de la plage en cours de
lecture
Appuyez sur DISPLAY.
Pour vérifier le contenu du programme pendant
la lecture de programme
Appuyez plusieurs fois sur ./>.
Pour ajouter une plage à la fin du programme
Effectuez l’étape 2 ci-dessus pendant que la platine est à
l’arrêt.
Pour supprimer toutes les plages du programme
Appuyez plusieurs fois sur CLEAR jusqu’à ce que tous les
numéros de plages disparaissent.
FR
Page 71

Conseils pour l’enregistrement d’un MD sur une
Pour arrêter la lecture du programme
Appuyez sur x.
Pour reprendre la lecture normale
Appuyez plusieurs fois sur PLAY MODE jusqu’à ce que
“PGM” s’éteigne.
z
Le programme reste mémorisé même après la lecture du
programme
Appuyez sur N pour écouter à nouveau le programme.
Remarques
• Si vous éjectez le MD, le programme sera effacé.
• L’afficheur indique “- - - m - - s” si le temps total de lecture du
programme dépasse 1.000 minutes.
• “Step Full” s’affiche si vous essayez de programmer une 26
plage.
cassette
Z
./>
MENU/NO
?/1
23
1
56
4
789
>10
10
/0
Xxz
N
.>m M
+
–
YES
Insertion d’espaces entre les plages
pendant la lecture (Auto Space)
La platine peut être réglée pour insérer automatiquement
un espace de trois secondes entre les plages pendant la
lecture. Cette fonction est utile lorsque vous enregistrez
un MD sur une cassette analogique. L’espace de trois
secondes ainsi créé permet d’utiliser ultérieurement la
fonction Multi-AMS pour localiser le début des plages de
la cassette.
1 Quand la platine est à l’arrêt, appuyez deux fois
sur MENU/NO.
“Setup Menu” s’affiche.
Lecture de MD
2 Appuyez plusieurs fois sur ./> jusqu’à ce que
“Auto Off” s’affiche, puis appuyez sur YES.
3 Appuyez plusieurs fois sur ./> pour
sélectionner une option, puis appuyez sur YES.
Pour Sélectionnez
Activer Auto Space Auto Space
Désactiver Auto Space Auto Off (réglage d’usine)
4 Appuyez sur MENU/NO.
Remarques
• Lorsque vous sélectionnez “Auto Space” et enregistrez un
morceau composé de plusieurs numéros de plages (tel qu’un
pot-pourri ou une symphonie), des espaces sont insérés sur la
bande à chaque changement de numéro de plage.
• Lorsque vous éteignez la platine ou débranchez le cordon
d’alimentation, la platine mémorise le dernier réglage (“Auto
Space” ou “Auto Off”) et le rappelle lorsque vous la rallumez.
25
FR
Page 72

Lecture de MD
Conseils pour l’enregistrement d’un MD sur
une cassette
Pause après chaque plage (Auto Pause)
Vous pouvez régler la platine MD pour qu’elle se mette en
pause après chaque plage pour vous permettre de
localiser la plage suivante à enregistrer.
1 Quand la platine est à l’arrêt, appuyez deux fois
sur MENU/NO.
“Setup Menu” s’affiche.
2 Appuyez plusieurs fois sur ./> jusqu’à ce que
“Auto Off” s’affiche, puis appuyez sur YES.
3 Appuyez plusieurs fois sur ./> pour
sélectionner une option, puis appuyez sur YES.
Pour Sélectionnez
Activer Auto Pause Auto Pause
Désactiver Auto Pause Auto Off (réglage d’usine)
4 Appuyez sur MENU/NO.
Pour reprendre la lecture après une pause
Appuyez sur N.
Remarque
Lorsque vous éteignez la platine ou débranchez le cordon
d’alimentation, la platine mémorise le dernier réglage (“Auto
Pause” ou “Auto Off”) et le rappelle lorsque vous la rallumez.
26
FR
Page 73

Edition de MD
Informations préliminaires
enregistrés
Ce chapitre explique comment éditer
les plages enregistrées sur un MD.
Présentation des touches utilisées pour
l’édition de MD
?/1
23
1
56
4
+
789
–
>10
10
/0
Xxz
N
./>
MENU/NO
.>m M
Les touches suivantes sont utilisées pour effacer, diviser,
déplacer ou combiner les plages du MD.
Remarque
L’utilisation de ces touches est différente pour le titrage d’une
plage ou d’un MD. Pour plus d’informations, reportez-vous à
“Titrage de plages ou de MD” à la page 32.
Aucune opération d’édition n’est possible lorsque la lecture
aléatoire ou la lecture de programme est sélectionnée. Veillez à
sélectionner la lecture normale avant d’éditer un MD.
Touche MENU/NO: Quand la platine est en mode d’arrêt,
de lecture ou de pause, appuyez sur cette touche pour
éditer des plages. Pendant l’édition, vous pouvez annuler
une opération en appuyant sur cette touche.
Remarque
Aucune opération d’édition n’est possible lorsque la lecture
aléatoire ou la lecture de programme est sélectionnée. Veillez à
sélectionner la lecture normale avant d’éditer un MD.
m/M
YES
Edition de MD enregistrés
Touches ./>: Appuyez sur ces touches pour
sélectionner une opération ou un numéro de plage. Vous
pouvez également utiliser ces touches pour sélectionner
des points d’une plage lors de l’effacement ou de la
division de plages.
Touche YES: Appuyez sur cette touche pour valider un
choix.
Touches m/M: Appuyez sur ces touches pour
spécifier l’unité (minute, seconde ou trame) de recherche à
l’aide des touches ./>. Vous pouvez également
utiliser ces touches pour localiser la fin d’un passage à
effacer.
Pour plus d’informations sur la fonction des touches,
reportez-vous aux paragraphes traitant des opérations
d’édition.
27
FR
Page 74

AAA BBB CCC DDD
1 2 3 4
AAA CCC DDD
1 2 3
Informations préliminaires
Effacement de plages Z
Edition de MD enregistrés
Indications affichées pendant le montage
Si “Protected” s’affiche
Le hublot de protection contre l’enregistrement est ouvert.
Pour éditer le MD, poussez le taquet pour fermer le
hublot. Pour plus d’informations, reportez-vous à “Pour
empêcher un effacement accidentel d’un enregistrement”
à la page 13.
Indications affichées après le montage
Quand “TOC” s’allume sur l’afficheur
Le montage est terminé mais le TOC (sommaire) du MD
n’a pas encore été mis à jour. Les opérations d’édition
effectuées seront perdues si vous débranchez le cordon
d’alimentation à ce moment. Le TOC n’est mis à jour que
lorsque vous éjectez le MD ou éteignez la platine MD.
Quand “TOC Writing” clignote sur l’afficheur
La platine met à jour le TOC. Ne débranchez pas le
cordon d’alimentation et ne déplacez pas la platine
pendant que l’indication clignote.
Vous pouvez effacer une plage ou un passage d’une plage
en spécifiant simplement le numéro de plage ou en
sélectionnant le passage de la plage qui doit être effacé.
Vous pouvez aussi effacer toutes les plages d’un MD en
une seule fois.
Effacement d’une plage
Spécifiez le numéro de la plage à effacer.
Exemple: Effacement de la seconde plage (Nom
de plage: BBB)
Lorsque vous effacez une plage, toutes les plages qui la
suivent sont automatiquement renumérotées. Par
exemple, si vous effacez le numéro de plage 2, le numéro
3 devient le numéro 2, le numéro 4 devient le numéro 3 et
ainsi de suite.
1 Quand la platine est en mode d’arrêt, de lecture ou
de pause, appuyez sur MENU/NO.
“Edit Menu” s’affiche.
2 Appuyez plusieurs fois sur ./> jusqu’à ce que
“Tr Erase ?” s’affiche, puis appuyez sur YES.
La lecture de la plage dont le numéro est indiqué sur
l’afficheur commence.
3 Appuyez plusieurs fois sur ./> jusqu’à ce que
le numéro de plage à effacer s’affiche.
4 Appuyez sur YES.
“Complete!!” reste affiché pendant quelques secondes
et la plage est effacée. Ensuite la plage juste après la
plage effacée est lue. Si la plage effacée est la dernière
du MD, la plage précédente sera lue.
Pour annuler l’opération
Appuyez sur MENU/NO ou x.
z
Si “Erase ???” s’affiche à l’étape 4 ci-dessus
La plage a été protégée sur une autre platine MD. Pour l’effacer,
appuyez à nouveau sur YES pendant que cette indication est
affichée.
z
Pour ne pas confondre les plages lorsque vous en effacez
plusieurs
Effacez les plages en commençant par le numéro le plus élevé.
Ainsi les plages que vous comptez effacer ne seront pas
renumérotées.
FR
28
z
Vous pouvez annuler un effacement
Pour plus d’informations, reportez-vous à “Annulation de la
dernière opération d’édition” à la page 34.
Page 75

Effacement de toutes les pages d’un MD
Procédez comme indiqué ci-dessous pour effacer toutes
les plages, les noms de plage et le nom de disque.
1 Quand la platine est en mode d’arrêt, de lecture ou
de pause, appuyez sur MENU/NO.
“Edit Menu” s’affiche.
2 Appuyez plusieurs fois sur ./> jusqu’à ce que
“All Erase ?” s’affiche, puis appuyez sur YES.
“All Erase ??” s’affiche.
3 Appuyez sur YES.
“Complete!!” apparaît pendant quelques secondes et
les plages, les noms de plage et le nom de disque sont
effacés.
Pour annuler l’opération
Appuyez sur MENU/NO ou x.
z
Vous pouvez annuler l’effacement
Pour plus d’informations, reportez-vous à “Annulation de la
dernière opération d’édition” à la page 34.
Effacement d’un passage d’une plage
Vous pouvez facilement effacer un passage d’une plage en
sélectionnant le début et la fin de celui-ci.
Cette fonction est utile lorsque l’on veut effacer des
parties inutiles d’une plage d’une émission satellite ou FM
enregistrée.
Exemple: Effacement du passage “B2” de la
seconde plage
AAA BBB
1 2 3
B1 B3B2
AAA
1 2 3
BBB
B1 B3
CCC
CCC
4 Tout en écoutant le son, appuyez plusieurs fois sur
./> pour localiser le début du passage à
effacer (point A).
Vous pouvez décaler le début du passage d’une trame*
à la fois en mode stéréo (1 trame =
temps (“m (minute)”, “s (seconde)” et “f (trame =
de seconde)”) du point actuel est indiqué et les
quelques secondes de la plage à partir de ce point sont
répétées.
Lors de l’enregistrement en mode monophonique ou LP2, vous
*
pouvez décaler le début du passage de 2 trames à la fois. Lors de
l’enregistrement en mode LP4, vous pouvez le décaler de 4
trames à la fois.
Pour localiser rapidement un point
Spécifiez l’unité (minute, seconde ou trame) d‘arance
sur le MD à chaque pression de ./>.
Pour ce faire, appuyez plusieurs fois sur m/M à
l’étape 4 pour sélectionner “m”, “s” ou “f”. L’unité
sélectionnée clignote sur l’afficheur.
1
/86e seconde). Le
1
/86
5 Répétez l’opération 4 jusqu’à ce que vous ayez
localisé le point A.
6 Appuyez sur YES pour valider le point A.
“Point B set” s’affiche et les quelques secondes de la
plage à partir du point A sont répétées.
7 Continuez la lecture de la plage ou appuyez sur
M pour localiser la fin du passage à effacer (point
B), puis appuyez sur YES.
“A-B Ers” et “Point B ok?” s’affichent alternativement
et les quelques secondes de la plage avant le point A et
après le point B sont répétées.
8 Répétez l’opération 4 jusqu’à ce que vous ayez
localisé le point B.
9 Appuyez sur YES pour valider le point B.
“Complete!!” s’affiche pendant quelques secondes et le
passage entre les points A et B est effacé.
e
Edition de MD enregistrés
1 Quand la platine est en mode d’arrêt, de lecture ou
de pause, appuyez sur MENU/NO.
“Edit Menu” s’affiche.
2 Appuyez plusieurs fois sur ./> jusqu’à ce que
“A-B Erase ?” s’affiche, puis appuyez sur YES.
3 Appuyez plusieurs fois sur ./> jusqu’à ce que
le numéro de la plage contenant le passage à
effacer s’affiche, puis appuyez sur YES.
“-Rehearsal-” et “Point A ok?” s’affichent
alternativement et les premières secondes de la plage
sont lues de façon répétée à partir de l’endroit où vous
avez appuyé sur YES.
Pour annuler l’opération
Appuyez sur MENU/NO ou x.
z
Vous pouvez annuler l’effacement
Pour plus d’informations, reportez-vous à “Annulation de la
dernière opération d’édition” à la page 34.
Remarque
Dans les cas suivants, “Impossible” s’affiche et vous ne pouvez
pas effacer un passage d’une plage:
• Le point B spécifié se trouve devant le point A.
• Après plusieurs opérations d’édition d’une plage, il peut être
impossible d’effacer un passage de la plage. Ceci est dû à une
limite technique du système MD et ne provient pas d’une
erreur mécanique.
29
FR
Page 76

Division d’une plage Z
Vous pouvez diviser une plage enregistrée à n’importe
quel point en insérant un repère à cet endroit. Cette
fonction est utile lorsqu’on veut diviser un enregistrement
comportant plusieurs plages mais un seul numéro de
plage (voir page 17) ou lorsqu’on veut localiser un point
précis d’une plage.
Exemple: Division de la seconde plage
AAA
1 2 3
AAA
1 2 3 4
Lorsque vous divisez une plage, le nombre total de plages
augmente d’une unité et toutes les plages après la plage
divisée sont automatiquement renumérotées.
BBB
B1 B2
BBB
B1 B2
CCC
CCC
Pour annuler l’opération
Appuyez sur MENU/NO ou x.
z
Vous pouvez annuler la division de plage
Pour plus d’informations, reportez-vous à “Annulation de la
dernière opération d’édition” à la page 34.
z
Vous pouvez diviser des plages pendant l’enregistrement
Pour plus d’informations, reportez-vous à “Inscription de
numéros de plage pendant l’enregistrement” à la page 17.
1 Quand la platine est en mode d’arrêt, de lecture ou
de pause, appuyez sur MENU/NO.
“Edit Menu” s’affiche.
Edition de MD enregistrés
2 Appuyez plusieurs fois sur ./> jusqu’à ce que
“Divide ?” s’affiche, puis appuyez sur YES.
3 Appuyez plusieurs fois sur ./> jusqu’à ce que
le numéro de la plage à diviser s’affiche, puis
appuyez sur YES.
“-Rehearsal-” s’affiche et les quelques secondes de la
plage qui suivent le point où vous avez appuyé sur
YES sont répétées.
1
/86
e
4 Tout en écoutant le son, appuyez plusieurs fois sur
./> pour localiser le point de division.
Vous pouvez décaler le début du passage d’une trame*
à la fois en mode stéréo (1 trame =
Le temps (“m”, “s” et “f”) du point actuel est indiqué
et les quelques secondes de la plage à partir de ce
point sont répétées.
1
/86e seconde).
* Lors de l’enregistrement en mode monophonique ou LP2, vous
pouvez décaler le début du passage de 2 trames à la fois. Lors de
l’enregistrement en mode LP4, vous pouvez le décaler de 4
trames à la fois.
Pour localiser rapidement un point
Spécifiez l’unité (minute, seconde ou trame) d‘avance
sur le MD à chaque pression de ./>.
Pour ce faire, appuyez plusieurs fois sur m/M à
l’étape 4 pour sélectionner “m”, “s” ou “f”. L’unité
sélectionnée clignote sur l’afficheur.
5 Répétez l’opération 4 jusqu’à ce que le point de
division ait été localisé.
6 Appuyez sur YES.
“Complete!!” s’affiche pendant quelques secondes et
la plage est divisée. La lecture de la plage
nouvellement créée commence. Notez que la nouvelle
plage n’a pas de nom.
30
FR
Page 77

Combinaison de plages Z
Déplacement d’une plage
Z
Cette fonction permet de combiner deux plages en une
seule. Il n’est pas nécessaire que les deux plages soient
consécutives ou dans l’ordre chronologique. Vous pouvez
ainsi créer un pot-pourri à partir de plusieurs plages ou
joindre plusieurs passages en une seule plage. Lorsque
vous combinez deux plages, le nombre total de plages
diminue d’une unité et toutes les plages après la plage
combinée sont renumérotées.
Exemple: Combinaison de la seconde plage et de
la quatrième plage
AAA BBB DDDCCC
1 2 43
AAA BBB
1 2 3
BBB
Si les plages combinées ont toutes deux un nom, le nom
de la seconde est effacé.
DDD
CCC
1 Quand la platine est en mode d’arrêt, de lecture ou
de pause, appuyez sur MENU/NO.
“Edit Menu” s’affiche.
2 Appuyez plusieurs fois sur ./> jusqu’à ce que
“Combine ?” s’affiche, puis appuyez sur YES.
3 Appuyez plusieurs fois sur ./> jusqu’à ce que
le numéro de la première des deux plages à
combiner s’affiche, puis appuyez sur YES.
L’affichage pour la sélection de la seconde plage
apparaît et la partie où s’effectuera la jonction est
répétée (fin de la première plage et début de la plage
qui suit).
4 Appuyez plusieurs fois sur ./> jusqu’à ce que
le numéro de la seconde des deux plages à
combiner s’affiche, puis appuyez sur YES.
“Complete!!” s’affiche pendant quelques secondes et
les plages sont combinées. La lecture de la plage
combinée commence.
Cette fonction permet de changer la position d’une plage.
Exemple: Déplacement de la seconde plage après
la troisième
AAA BBB CCC DDD
1 2 3 4
AAA BBBCCC DDD
1 32 4
Après le déplacement d’une plage, les plages sont
automatiquement renumérotées.
1 Quand la platine est en mode d’arrêt, de lecture ou
de pause, appuyez sur MENU/NO.
“Edit Menu” s’affiche.
2 Appuyez plusieurs fois sur ./> jusqu’à ce que
“Move ?” s’affiche, puis appuyez sur YES.
3 Appuyez plusieurs fois sur ./> jusqu’à ce que
le numéro de la plage à déplacer s’affiche, puis
appuyez sur YES.
4 Appuyez plusieurs fois sur ./> jusqu’à ce que
la position de la nouvelle plage soit indiquée, puis
appuyez sur YES.
“Complete!!” s’affiche pendant quelques secondes et
la plage est déplacée. La lecture de la plage déplacée
commence.
Pour annuler l’opération
Appuyez sur MENU/NO ou x.
z
Vous pouvez annuler un déplacement de plage
Pour plus d’informations, reportez-vous à “Annulation de la
dernière opération d‘édition” à la page 34.
Edition de MD enregistrés
Pour annuler l’opération
Appuyez sur MENU/NO ou x.
z
Vous pouvez annuler une combinaison
Pour plus d’informations, reportez-vous à “Annulation de la
dernière opération d‘édition” à la page 34.
Remarques
• Les plages enregistrées dans divers modes (stéréo, mono, LP2
ou LP4) ne peuvent pas être combinées.
• Si “Impossible” s’affiche, les plages ne pourront pas être
combinées car elles ont déjà fait l’objet de plusieurs éditions.
Ceci est dû à une limite technique du système MD et ne
provient pas pas d’une erreur mécanique.
31
FR
Page 78

Titrage de plages ou de MD
Z
Vous pouvez titrer les MD et les plages que vous avez
enregistrés. Les titres (noms) peuvent comprendre des
majuscules, des minuscules, des chiffres et des symboles.
Pour chaque MD 1.700 caractères peuvent être enregistrés.
?/1
23
Touches
numériques/
alphabétiques
./>
MENU/NO
NAME EDIT/
SELECT
1
56
4
+
789
–
>10
10
/0
N
Xxz
.>m M
m/M
YES
CLEAR
Ou bien, appuyez une fois sur la touche, puis
plusieurs fois sur ./>.
Pour sélectionner un symbole, appuyez plusieurs
fois sur . quand “A” clignote.
2 Appuyez sur M.
Le caractère clignotant est validé et reste allumé. Le
curseur se déplace vers la droite.
Si vous avez sélectionné des chiffres
Appuyez sur la touche numérique correspondante.
Le chiffre est validé et le curseur se déplace vers la
droite.
D
Remarque
Si vous titrez une plage pendant l’enregistrement, terminez le
titre avant la fin de la plage. Sinon, aucun caractère ne sera
enregistré et la plage restera sans titre. Vous ne pouvez pas titrer
une plage lorsque vous enregistrez sur une plage existante.
4 Répétez les opérations 2 et 3 pour saisir le reste du
nom.
Pour insérer un espace
Edition de MD enregistrés
Titrage d’une plage ou d’un MD
1 Appuyez sur NAME EDIT/SELECT quand la platine
est dans l’un des modes suivants selon ce que vous
voulez titrer:
Pour titrer Appuyez sur la touche quand la platine est
Une plage en mode de lecture, de pause,
Le MD arrêtée sans numéro de plage affiché
d’enregistrement ou d’arrêt avec le numéro
de plage affiché
Appuyez sur M pendant que le curseur clignote. Il
n’est pas possible d’introduire un espace au début du
titre.
Pour changer un caractère
Appuyez plusieurs fois sur m/M jusqu’à ce que le
caractère à changer clignote, appuyez sur CLEAR
pour effacer le caractère, puis répétez les opérations 2
et 3.
5 Appuyez sur YES.
Le nom complet s’affiche suivi de “Complete!!”, puis
le nom est enregistré.
Un curseur clignotant s’affiche.
Pour annuler l’opération
Appuyez sur MENU/NO ou x.
2 Appuyez plusieurs fois sur NAME EDIT/SELECT pour
sélectionner le type de caractère.
Pour sélectionner Appuyez plusieurs fois sur
la touche jusqu’à ce que
Des majuscules et des “Selected ABC” s’affiche
symboles*
Des minuscules et des “Selected abc” s’affiche
symboles*
Des chiffres “Selected 123” s’affiche
* Les symboles suivants peuvent être sélectionnés:
‘ _ / , . ( ) : ! ?
A
3 Saisissez un caractère.
Si vous avez sélectionné des majuscules ou des
minuscules
1 Appuyez plusieurs fois sur la touche numérique/
alphabétique correspondante jusqu’à ce que le
caractère à saisir clignote.
FR
32
z
Vous pouvez annuler le titrage d’une plage ou d’un MD
Pour plus d’informations, reportez-vous à “Annulation de la
dernière opération d’édition” à la page 34.
z
Vous pouvez titrer des plages ou des MD en utilisant le menu
d’édition Z
1 Appuyez sur MENU/NO pendant que la platine est dans un
des modes suivants, selon ce que vous voulez titrer:
Pour titrer Appuyez sur la touche pendant que
la platine est
Une plage ou un MD à l’arrêt, en cours de lecture ou en
La plage en cours en cours d’enregistrement
2 Appuyez plusieurs fois sur ./> jusqu’à ce que “Name ?”
s’affiche, puis appuyez sur YES.
3 Appuyez plusieurs fois sur ./> jusqu’à ce que “Nm In?”
s’affiche, puis appuyez sur YES.
4 Appuyez plusieurs fois sur ./> jusqu’à ce que le numéro
de plage (lors du titrage d’une plage) ou “Disc” (lors du titrage
d’un MD) clignote, puis appuyez sur YES.
5 Effectuez les étapes 2 à 5 de “Titrage d’une plage ou d’un MD”
ci-dessus.
pause
Page 79

Copie d’un nom de plage ou de disque
Vous pouvez copier un nom de plage ou de disque
existant et l’utiliser pour titrer une autre plage du même
disque ou le disque lui-même.
1 Quand la platine est en mode d’arrêt, de lecture ou
de pause, appuyez sur MENU/NO.
“Edit Menu” s’affiche.
2 Appuyez plusieurs fois sur ./> jusqu’à ce que
“Name ?” s’affiche, puis appuyez sur YES.
3 Appuyez plusieurs fois sur ./> jusqu’à ce que
“Nm Copy ?” s’affiche, puis appuyez sur YES.
4 Appuyez plusieurs fois sur ./> jusqu’à ce que
le numéro de la plage (lorsque vous copiez le nom
d’une plage) ou “Disc” (lorsque vous copiez le nom
du disque) clignote, puis appuyez sur YES pour
copier le nom sélectionné.
Si “No Name” s’affiche
La plage ou le disque sélectionné n’a pas de nom.
5 Appuyez plusieurs fois sur ./> jusqu’à ce que
le numéro de la plage (lors du titrage d’une plage)
ou “Disc” (lors du titrage d’un disque) clignote,
puis appuyez sur YES pour valider le nom copié.
“Complete!!” s’affiche pendant quelques secondes et le
nom est copié.
Pour annuler l’opération
Appuyez sur MENU/NO ou x.
z
Si “Overwrite ?” s’affiche à l’étape 5 ci-dessus
La plage ou le disque sélectionné à l’étape 5 a déjà un nom. Pour
remplacer le nom, appuyez à nouveau sur YES quand l’indication
est affichée.
Si la plagge a ete enregistree en mode MD LP avec l'option “LP
Stamp On” selectionnee (page 15), “Overwrite ?” s'affiche
egalement meme si un nom n'a pas ete attribue a cette plage. Si
vous copiez alors le nom de plage, l'indication “LP:” disparait du
nom de la plage.
z
Vous pouvez annuler la copie d’un nom de plage ou de
disque
Pour plus d’informations, reportez-vous à “Annulation de la
dernière opération d’édition” à la page 34.
Re-titrage d’une plage ou d’un MD
1 Appuyez sur NAME EDIT/SELECT quand la platine
est dans l’un des modes suivants selon ce que vous
voulez re-titrer:
Pour re-titrer Appuyez sur la touche quand la platine est
Une plage en mode de lecture, de pause,
Le MD arrêtée sans numéro de plage affiché
Un nom de plage ou de disque s’affiche.
d’enregistrement ou d’arrêt avec le numéro
de plage affiché
2 Appuyez sur CLEAR jusqu’à ce que le nom
sélectionné soit complètement effacé.
3 Effectuez les opérations 2 à 4 de “Titrage d’une
plage ou d’un MD” à la page 32.
4 Appuyez sur YES.
Le nom complet apparaît suivi de “Complete!!”, puis
le nom est changé.
Effacement d’un nom de plage ou de disque
Utilisez cette fonction pour effacer le nom d’une plage ou
d’un disque.
1 Quand la platine est en mode d’arrêt, de lecture,
d’enregistrement ou de pause, appuyez sur MENU/
NO.
“Edit Menu” s’affiche.
2 Appuyez plusieurs fois sur ./> jusqu’à ce que
“Name ?” s’affiche, puis appuyez sur YES.
3 Appuyez plusieurs fois sur ./> jusqu’à ce que
“Nm Erase ?” s’affiche, puis appuyez sur YES.
4 Appuyez plusieurs fois sur ./> jusqu’à ce que
le numéro de la plage (pour effacer un nom de
plage) ou “Disc” (pour effacer le nom du disque)
clignote, puis appuyez sur YES.
“Complete!!” s’affiche pendant quelques secondes et le
nom est effacé.
Pour annuler l’opération
Appuyez sur MENU/NO ou x.
z
Vous pouvez annuler l’effacement du nom de plage ou de
disque
Pour plus d’informations, reportez-vous à “Annulation de la
dernière opération d’édition” à la page 34.
Effacement de tous les noms du MD
Vous pouvez effacer tous les noms de plage et le nom de
disque d’un MD en une seule fois.
1 Quand la platine est en mode d’arrêt, de lecture ou
de pause, appuyez sur MENU/NO.
“Edit Menu” s’affiche.
2 Appuyez plusieurs fois sur ./> jusqu’à ce que
“Name ?” s’affiche, puis appuyez sur YES.
3 Appuyez plusieurs fois sur ./> jusqu’à ce que
“Nm All Ers?” s’affiche, puis appuyez sur YES.
“Nm All Ers??” s’affiche.
4 Appuyez sur YES.
“Complete!!” s’affiche pendant quelques secondes et
tous les noms du MD sont effacés.
Pour annuler l’opération
Appuyez sur MENU/NO ou x.
z
Vous pouvez annuler l’effacement de tous les noms du MD
Pour plus d’informations, reportez-vous à “Annulation de la
dernière opération d’édition” à la page 34.
z
Vous pouvez effacer toutes les plages et noms enregistrés
sur un MD
Pour plus d’informations, reportez-vous à “Effacement de toutes
les pages d’un MD” à la page 29.
33
Edition de MD enregistrés
FR
Page 80

Annulation de la dernière
opération d’édition Z
Vous pouvez annuler la dernière opération d’édition
effectuée et rétablir le contenu du MD, tel qu’il était avant
cette opération. Notez, toutefois, que vous ne pouvez pas
4 Appuyez sur YES.
“Complete!!” s’affiche pendant quelques secondes et
l’état du MD avant l’opération d’édition est rétabli.
annuler une opération d’édition si, après l’édition, vous
avez effectué l’une des opérations suivantes:
• appuyé sur REC z ou CD SYNCHRO de la platine;
Pour annuler l’opération
Appuyez sur MENU/NO ou x.
• appuyé sur z ou M.SYNC de la télécommande;
• éteint la platine ou éjecté le MD;
• changé le niveau de la plage en utilisant la fonction S.F
Edit;
• débranché le cordon d’alimentation.
?/1
23
1
56
4
+
789
–
>10
10
/0
Xxz
N
./>
MENU/NO
.>m M
YES
Edition de MD enregistrés
1 Quand la platine est à l’arrêt et qu’aucun numéro
de plage n’est affiché, appuyez sur MENU/NO.
“Edit Menu” s’affiche.
2 Appuyez plusieurs fois sur ./> jusqu’à ce que
“Undo ?” s’affiche.
“Undo ?” ne s’affiche pas si aucune opération
d’édition n’a été effectuée.
3 Appuyez sur YES.
L’un des messages suivants s’affiche selon la dernière
opération effectuée.
Dernière opération d’édition Message
Effacement d’une plage
Effacement de toutes les plages d’un MD Erase Undo?
Effacement d’un passage d’une plage
Division d’une plage Divide Undo?
Combinaison de plages CombineUndo?
Déplacement d’une plage Move Undo?
Titrage d’une plage ou d’un MD
Copie d’un nom de plage ou de disque
Re-titrage d’une plage ou d’un MD Name Undo?
Effacement d’un nom de plage ou de disque
Effacement de tous les noms sur le MD
34
FR
Page 81

Changement du niveau de la plage après l’enregistrement (S.F Edit)
Z
Vous pouvez changer le volume des plages enregistrées
en utilisant la fonction S.F (Scale Factor) Edit. La plage
originale est réenregistrée au nouveau niveau
d’enregistrement. Lorsque vous changez le niveau
d’enregistrement, vous pouvez changer tout le niveau, ou
bien l’augmenter lentement au début de la plage et le
diminuer lentement à la fin de la plage.
?/1
23
1
56
4
+
789
–
>10
10
/0
z
Xx
N
./>
MENU/NO
.>m M
YES
Changement du niveau général d’une
plage
1 Pendant que la platine est en mode d’arrêt, de
lecture ou de pause, appuyez sur MENU/NO.
“Edit Menu” s’affiche.
2 Appuyez plusieurs fois sur ./> jusqu’à ce que
“S.F Edit ?” s’affiche, puis appuyez sur YES.
3 Appuyez plusieurs fois sur ./> jusqu’à ce que
“Tr Level ?” s’affiche, puis appuyez sur YES.
4 Appuyez plusieurs fois sur ./> jusqu’à ce que
le numéro de la plage dont vous voulez changer le
niveau apparaisse, puis appuyez sur YES.
5 Tout en écoutant le son, appuyez plusieurs fois sur
./> pour changer le niveau de la plage sans
que les indicateurs à l’extrême droite ne s’allument
sur les indicateurs de niveau de crête.
Vous pouvez régler le niveau sur une valeur comprise
entre –12 dB et +12 dB, par incréments de 2 dB.
Changement graduel de niveau au début
et à la fin de la plage
1 Pendant que la platine est en mode d’arrêt, de
lecture ou de pause, appuyez sur MENU/NO.
“Edit Menu” s’affiche.
2 Appuyez plusieurs fois sur ./> jusqu’à ce que
“S.F Edit ?” s’affiche, puis appuyez sur YES.
3 Appuyez plusieurs fois sur ./> jusqu’à ce que
“Fade In ?” (pour accroître lentement le niveau au
début de la plage) ou “Fade Out ?” (pour réduire
lentement le niveau à la fin de la plage) s’affiche,
puis appuyez sur YES.
4 Appuyez plusieurs fois sur ./> jusqu’à ce que
le numéro de la plage dont vous voulez changer le
niveau apparaisse, puis appuyez sur YES.
“Time 5.0s” s’affiche.
5 Tout en écoutant le son, appuyez plusieurs fois sur
./> pour changer la durée d’augmentation
ou de réduction du niveau.
Le passage qui sera enregistré est reproduit.
Vous pouvez régler la durée sur une valeur comprise
entre 1 et 15 secondes, par incréments de 0,1 seconde.
6 Appuyez sur YES.
“S.F Edit ok?” s’affiche.
7 Appuyez sur YES.
L’enregistrement commence sur la partie spécifiée de
la plage originale. “S.F Edit: XX%” apparaît pour
indiquer la progression de l’enregistr ement.
Lorsque l’enregistrement est terminé, “Complete!!”
s’affiche pendant quelques secondes.
Pour annuler l’opération
Appuyez sur MENU/NO ou sur x aux étapes 1 à 6 cidessus. Après avoir appuyé sur YES à l’étape 7, il n’est
plus possible d’annuler l’opération.
Edition de MD enregistrés
Ces indicateurs ne doivent pas s’allumer
6 Appuyez sur YES.
“S.F Edit ok?” s’affiche.
7 Appuyez sur YES.
La plage est réenregistrée au niveau spécifiée. “S.F
Edit: XX%” apparaît pour indiquer la progression de
l’enregistrement. Cette opération peut durer aussi
longtemps ou plus longtemps que la lecture de la
plage. Lorsqu’elle est terminée, “Complete!!” s’affiche
pendant quelques secondes.
Remarques
• Ne débranchez pas le cordon d’alimentation secteur et ne
déplacez pas la platine pendant l’enregistrement, sinon les
données risquent de ne pas être enregistrées correctement.
• Vous ne pouvez pas changer le niveau des plages enregistrées
dans le mode LP2 ou LP4.
• N’utilisez pas de MD endommagé ou sale. Les plages ne seront
pas enregistrées correctement.
• Les changements répétés du niveau d’une plage à l’aide de la
fonction S.F Edit produisent des enregistrements de moindre
qualité.
• Lorsque le niveau de la plage est changé, le niveau antérieur ne
peut pas être rétabli, même si vous essayez d’utiliser une
nouvelle fois la fonction S.F Edit. Vous ne pouvez pas annuler
la fonction S.F Edit.
35
FR
Page 82

Autres
FADER
–
+
?/1
.>m M
NX x z
789
>10
10
/0
1
23
4
56
Entrée et sortie en fondu
Z
fonctions
Ce chapitre décrit d’autres fonctions
utiles qui sont disponibles sur la
platine MD.
Lorsque vous effectuez une entrée d’enregistrement en
fondu, le niveau du signal augmente lentement au début
de l’enregistrement et lorsque vous effectuez une sortie
d’enregistrement, le niveau du signal diminue lentement
à la fin de l’enregistrement.
Entrée en fondu de l’enregistrement
En mode de pause d’enregistrement, appuyez sur
FADER.
b clignote sur l’afficheur et l’enregistrement commence
par un fondu de cinq secondes (réglage d’usine) jusqu’à
ce que le compteur indique “0.0s”.
Sortie en fondu de l’enregistrement
Durant l’enregistrement, appuyez sur FADER.
B clignote sur l’afficheur et l’enregistrement se termine
par un fondu de cinq secondes (réglage d’usine) jusqu’à
ce que le compteur indique “0.0s”, puis se met en pause.
z
Vous pouvez changer la durée du fondu
1 Quand la platine est arrêtée, appuyez deux fois sur MENU/
NO.
“Setup Menu” s’affiche.
2 Appuyez plusieurs fois sur ./> pour sélectionner une
option, puis appuyez sur YES.
Pour changer la durée Sélectionnez
De l’entrée d’enregistrement en fondu F.in
De la sortie d’enregistrement en fondu F.out
3 Appuyez plusieurs fois sur ./> pour sélectionner la
durée, puis appuyez sur YES.
Les durées du fondu peuvent être réglées par incréments de 0,1
seconde.
Pour régler la durée par incréments d’une seconde, appuyez
sur m/M.
4 Appuyez sur MENU/NO.
36
FR
Page 83

Réglage de la luminosité de
Autres réglages effectués
l’afficheur Z
Vous avez le choix entre quatre niveaux de luminosité de
l’afficheur. Les touches A, HX ou x de la platine
s’éteignent lorsqu’un niveau de luminosité faible est
sélectionné.
?/1
23
1
56
4
+
789
–
>10
10
/0
Xxz
N
./>
MENU/NO
1 Pendant que la platine est à l’arrêt, appuyez deux
fois sur MENU/NO.
“Setup Menu” s’affiche.
2 Appuyez plusieurs fois sur ./> jusqu’à ce que
“Dimmer 1” s’affiche, puis appuyez sur YES.
3 Appuyez plusieurs fois sur ./> pour
sélectionner le réglage, puis appuyez sur YES.
Lorsque vous sélectionnez L’afficheur est
Dimmer 1 (réglage d‘usine) normalement éclairé et les
Dimmer 2 faiblement éclairé et les
Dimmer 3 faiblement éclairé et les
Dimmer 4 éteint ainsi que les touches A,
.>m M
YES
touches A, HX ou x sont
allumées.
touches A, HX ou x sont
allumées.
touches A, HX ou x sont
éteintes.
HX ou x.
avec Setup Menu Z
?/1
23
1
56
4
+
789
–
>10
10
/0
N
Xxz
./>
MENU/NO
Vérification de la source à enregistrer
(Fonction Ping)
Lorsque cette fonction est activée, vous pouvez vérifier
l’appareil sélectionné pour l’enregistrement en appuyant
sur la touche INPUT. “N N n n” apparaît un
moment sur l’afficheur de la source sélectionnée chaque
fois que vous appuyez sur la touche INPUT. Cette
fonction ne peut être utilisée qu’avec le STR-LSA1 et le
CDP-LSA1.
1 Pendant que la platine est à l’arrêt, appuyez deux
fois sur MENU/NO.
“Setup Menu” s’affiche.
2 Appuyez plusieurs fois sur ./> jusqu’à ce que
“Ping On” apparaisse, puis appuyez sur YES.
3 Appuyez plusieurs fois sur ./> pour
sélectionner le réglage, puis appuyez sur YES.
Pour Sélectionner
Activer la fonction Ping Pind On (réglage d‘usine)
Désactiver la fonction Ping Ping Off
4 Appuyez sur MENU/NO.
.>m M
YES
Autres fonctions
4 Appuyez sur MENU/NO.
z
Si un changement d’affichage intervient lorsque l’afficheur
est éteint
L’afficheur se rallumera (faible éclairage) pendant quelques
secondes pour que vous puissiez voir ces informations et
s’éteindra à nouveau.
z
Le niveau de luminosité de l’afficheur de la platine MD peut
être synchronisé sur celui de l’ampli-tuner
Lorsque la commande i.LINK est activée sur l’ampli-tuner, le
niveau de luminosité de l’afficheur de la platine MD est
automatiquement synchronisé sur celui de l’ampli-tuner quel que
soit le réglage sur la platine MD.
37
FR
Page 84

Autres réglages effectués avec Setup Menu
A propos du système i.LINK
Mise hors tension automatique de la
platine MD (Economiseur d’énergie)
Vous pouvez régler la platine pour qu’elle s’éteigne
automatiquement si aucune opération n’est effectuée
pendant cinq minutes environ.
1 Pendant que la platine est à l’arrêt, appuyez deux
2 Appuyez plusieurs fois sur ./> jusqu’à ce que
3 Appuyez plusieurs fois sur ./> pour
4 Appuyez sur MENU/NO.
Autres fonctions
fois sur MENU/NO.
“Setup Menu” s’affiche.
“Powersave On” apparaisse, puis appuyez sur YES.
sélectionner le réglage, puis appuyez sur YES.
Pour Sélectionner
Activer l’économiseur d’énergie Powersave On
(réglage d‘usine)
Désactiver l’économiseur d’énergie Powersave Off
Ce paragraphe explique les caractéristiques générales et
techniques du système i.LINK. Veuillez le lire
attentivement avant d‘effectuer une opération i.LINK.
Les connexions et le fonctionnement du système i.LINK
peuvent varier selon l’appareil. Pour plus d’informations
sur le raccordement d’appareils i.LINK à cet appareil,
reportez-vous à “Raccordement d’appareils i.LINK” à la
page 11.
Fonctionnement du système i.LINK
Le système i.LINK est une interface série numérique
permettant la transmission bidirectionnelle de données
audio et vidéo numériques ainsi que certaines
informations sur les appareils. Il suffit d’utiliser des câbles
i.LINK pour raccorder plusieurs appareils i.LINK. Les
appareils audio et vidéo reliés par un câble i.LINK
peuvent être utilisés pour un grand nombre de fonctions
et pour l’échange de données, qui dans l’avenir seront de
plus en plus fréquents vu l’accroissement constant du
nombre d’appareils i.LINK.
Comme le système i.LINK permet de transférer des
données d’un appareil à un autre même s’ils ne sont pas
directement raccordés, l’ordre de connexion n’est pas
important. Toutefois, en raison des différences de
caractéristiques générales ou techniques, il se peut
qu’avec certains appareils i.LINK l’échange de données
ou la commande des appareils soit impossible, bien qu‘ils
soient reliés entre eux.
z
Que signifie “i.LINK” ?
i.LINK est une marque de fabrique qui a été proposée par Sony
Corporation, et acceptée dans le monde entier. Ce nom est plus
simple à retenir que la norme internationale IEEE 1394, établie
par l’Institut des Ingénieurs en Electricité et Electronique.
38
FR
Page 85

Liaisons i.LINK
La liaison d’appareils i.LINK avec des câbles i.LINK, telle
qu’illustrée ci-dessous, est appelée configuration en
“cascade”.
Câble de liaison i.LINK
Appareil
i.LINK
Liaisons arborescentes
• Tout appareil i.LINK muni de trois connecteurs i.LINK
ou plus peut servir de point de branchement.
• En tout 63 appareils i.LINK peuvent être reliés entre
eux. Cependant, le nombre maximal d’appareils
pouvant être raccordés en cascade sur une seule ligne
est limité à 17 (16 câbles de liaison i.LINK au
maximum). Chaque câble i.LINK utilisé par ligne est
appelé “maillon”. Par exemple, il y a 6 maillons sur la
ligne de A à C ci-dessus et 3 maillons sur la ligne de A à
D.
Chaque ligne de A à B, A à C, A à D, B à C, B à D et C à D
ci-dessus peut avoir 16 maillons (17 appareils).
Appareil
i.LINK
Les données peuvent être transmises d’un appareil à
l’autre même s’ils ne sont pas directement reliés.
Appareil
i.LINK
Appareil
i.LINK
Appareil
i.LINK
BA
DC
Remarques
• Certains appareils i.LINK (par ex, les ordinateurs) ne
transmettent pas les signaux lorsqu’ils sont éteints. Consultez
le manuel de chaque appareil avant d’effectuer les liaisons.
• La vitesse de transfert maximale d’un appareil i.LINK est
indiquée près du connecteur i.LINK. Les indications S100, S200
et S400 désignent les vitesses de transmission maximales 100,
200 ou 400 Mbps*. La vitesse réelle peut être plus rapide ou
plus lente en raison des différences de vitesses et des
caractéristiques techniques des appareils reliés.
z
Que signifie “Mbps” ?
Mbps signifie mégabits par seconde. Il s’agit de la quantité de
données pouvant être transmises en une seconde. Par exemple,
une vitesse de transfert de 200 Mbps signifie que 200 mégabits de
données peuvent être envoyés en une seconde.
LINC (Logical INterface Connection)
Avant qu’un signal audio puisse circuler entre des
appareils i.LINK, une liaison “LINC” doit être établie
entre l’appareil recevant le signal audio et l’appareil
envoyant le signal audio. L’établissement d’une liaison
“LINC” signifie qu’un chemin logique est établi entre
deux appareils pour la transmission des signaux
audionumériques. Chaque chemin logique a un numéro
d’identification. Comme l’appareil qui envoie un signal
audio et celui qui le reçoit utilisent le même chemin, ce
chemin doit être connu des deux appareils. Pendant
l’établissement d’une liaison LINC, la communication
s’effectue de la façon suivante entre les deux appareils.
Exemple
Un appareil établit une liaison LINC avec un lecteur CD
pour recevoir un signal audio de ce dernier.
Autres fonctions
Liaison en boucle
Dans ce cas, le signal d’un appareil est transmis à tous les
autres appareils. Lors d’une liaison en boucle, il faut éviter
de faire revenir le signal à sa source.
Bon Mauvais (bouclé)
1 L’appareil qui reçoit un signal audio du lecteur CD
envoie une demande et des informations
concernant le chemin conduisant au lecteur CD
pour ouvrir une voie au signal audio.
Appareil recevant
le signal audio
1
,
2
Lecteur CD
(appareil envoyant
le signal)
<
2 Le lecteur CD répond à l’appareil et accepte
l’établissement d’une liaison LINC.
La transmission d’un signal audionumérique est possible
seulement après l’établissement de la communication
mentionnée ci-dessus et d’une liaison LINC.
39
FR
Page 86

Informations
Précautions
complémentaires
Ce chapitre fournit des informations
complémentaires qui vous aideront à
mieux comprendre le système MD et
entretenir votre platine MD.
Sécurité
Si un objet ou un liquide pénètre dans le coffret de la
platine, débranchez la platine et faites-la vérifier par un
technicien qualifié avant de la remettre sous tension.
Sources d’alimentation
• Avant d’utiliser la platine, vérifiez que sa tension de
fonctionnement correspond à celle du secteur local. La
tension de fonctionnement est indiquée sur la plaque
signalétique sous la platine.
• La platine n’est pas isolée du secteur tant qu’elle reste
branchée à la prise murale, même si elle est éteinte.
• Débranchez la platine de la prise murale si vous ne
comptez pas l’utiliser pendant longtemps. Pour
débrancher le cordon d’alimentation, tenez-le par la
fiche; ne tirez jamais directement sur le cordon
proprement dit.
• Si le cordon d’alimentation a besoin d’être changé,
adressez-vous à un professionnel.
Condensation dans la platine
Si la platine est déplacée d’un endroit froid à un endroit
chaud ou placée dans une pièce très humide, de la
condensation peut se former sur les lentilles à l’intérieur
et elle risque de mal fonctionner. Dans ce cas, retirez le
MD et laissez la platine allumée pendant quelques heures
pour que l’humidité s’évapore.
Cartouche du MD
• N’ouvrez pas l’obturateur qui protège le disque.
• Ne placez pas la cartouche dans un endroit où elle peut
être exposée aux rayons directs du soleil, à des
températures extrêmes, à l’humidité ou à la poussière.
Nettoyage
Nettoyez le coffret, le panneau et les commandes avec un
chiffon doux légèrement imbibé d’une solution détergente
douce. N’utilisez pas de tampons abrasifs, des poudres à
récurer ou des solvants tels qu’alcool ou benzène.
Remplacement de la pile de la télécommande
Tirez et sortez le porte-pile et insérez une pile au lithium
CR2025 neuve avec la face + dirigée vers la haut.
Réinsérez ensuite le porte-pile.
Pile au lithium CR2025
1
2
1 Appuyez.
2 Tirez.
40
FR
Page 87

ATTENTION
Danger d’explosion en cas de mauvais remplacement de la pile.
Remplacer la pile seulement par une pile identique ou du type
recommandé par le fabricant. Mettre les piles inutilisées au rebut
selon les instructions du fabricant.
Pour toute question ou difficulte concernant la platine,
adressez-vous à votre revendeur Sony.
Manipulation des MD
La cartouche du MD protège le disque contre les
substances étrangères ou traces de doigts et facilite les
manipulations.
La présence de substances étrangères ou une cartouche
déformée peut empêcher le disque de fonctionner
correctement. Pour toujours obtenir un son de grand
qualité, observez les précautions suivantes:
• Ne touchez pas le disque à l’intérieur de la cartouche.
En ouvrant l’obturateur, vous risquez de l’endommager.
• Collez les étiquettes fournies avec le MD aux endroits
indiqués. La forme des étiquettes peut différer selon les
marques de MD.
“Disc Full” s’affiche avant la fin du temps
d’enregistrement maximum du MD
Lorsque 255 plages ont été enregistrées sur un MD,
“Disc Full” s’affiche même s’il reste encore de la place sur
ce disque. Il n’est pas possible d’enregistrer plus de 255
plages sur les MD. Pour continuer à enregistrer, effacez les
plages inutiles ou utilisez un autre MD enregistrable.
“Disc Full” s’affiche avant que le nombre
maximum de plages pouvant être enregistrées
ne soit atteint
Des fluctuations d’accentuation à l’intérieur d’une plage
sont quelquefois interprétées par la platine comme des
espaces interplages. Ceci augmente le nombre de plages et
“Disc Full” s’affiche.
Le temps d’enregistrement restant sur le disque
n’augmente pas après l’effacement d’un grand
nombre de plages de courte durée
Les plages de moins de 12 secondes (lorsque le mode
stéréo est sélectionné), 24 secondes (lorsque le mode
mono ou LP2 est sélectionné), ou 48 secondes (lorsque le
mode LP4 est sélectionné) ne sont pas comptées. Le temps
d’enregistrement n’augmente donc pas lorsque vous les
effacez.
Emplacement
correct des
étiquettes
Où ranger les MD
Ne rangez pas les MD à un endroit où ils pourraient être
exposés aux rayons directs du soleil ou à une très forte
chaleur ou humidité.
Nettoyage régulier
Essuyez la poussière et les substances étrangères de la
surface de la cartouche avec un chiffon sec.
Remarque sur l’enregistrement synchronisé de
CD rapide
Dans certains cas, des coupures du son ou des parasites
peuvent apparaître sur les enregistrements, ou des plages
non souhaitées peuvent être créées sur le MD. Si le cas se
présente, nettoyez le CD et enregistrez-le sur le MD en
utilisant l’enregistrement synchronisé de CD à vitesse
normale.
Obturateur
Limites du système
Le système d’enregistrement de cette platine MD est très
différent de celui des platines-cassette ou platines DAT et
présente les limites ci-dessous. Ces limites sont liées au
système d’enregistrement MD et n’ont pas une origine
mécanique.
Le total du temps enregistré et du temps restant
sur le MD peut ne pas correspondre au temps
d’enregistrement maximal
L’enregistrement s’effectue par unités minimales de
2 secondes (lorsque le mode stéréo est sélectionné), 4
secondes (lorsque le mode mono ou LP2 est sélectionné),
ou 8 secondes (lorsque le mode LP4 est sélectionné) même
s‘ilest plus court. Il se peut donc que le contenu enregistré
soit plus court que la capacité maximale. Des rayures
peuvent également réduire l’espace sur le disque.
Limites lors de l’enregistrement sur une plage
existante
• Le temps d’enregistrement restant peut ne pas être
correctement affiché.
• Il peut être impossible d’enregistrer sur une plage qui a
déjà été enregistrée plusieurs fois. Dans ce cas, effacez la
plage (voir page 28).
• Le temps d’enregistrement restant peut être raccourci
de manière disproportionnée par rapport ou temps total
enregistré.
• Il est déconseillé d’enregistrer par-dessus une plage
pour éliminer des bruits car ceci peut raccourcir la
durée de la plage.
• Il peut être impossible de titrer une plage lors d’un
enregistrement par-dessus une plage existante.
Les plages résultant d’une opération d’édition
peuvent présenter des pertes de son lors de la
recherche d’un point en écoutant le son.
Certaines plages ne peuvent pas être combinées
avec d’autres
Il se peut que les plages ne puissent pas être combinées si
elles ont déjà fait l’objet d’édition.
41
Informations complémentaires
FR
Page 88

Les numéros de plage ne s’inscrivent pas
correctement
L’attribution ou l’inscription de numéros de plage peut
être incorrecte lorsque les plages du CD sont divisées en
plusieurs petites plages pendant l’enregistrement
numérique. Lorsque le marquage automatique des plages
est activé pendant l’enregistrement, il se peut aussi que
pour certaines sources, les numéros de plage ne soient pas
marqués comme sur l’original.
“TOC Reading” reste longtemps affiché
Si le MD enregistrable utilisé est neuf, “TOC Reading”
reste plus longtemps affiché que s’il a déjà été utilisé.
Il se peut que le temps d’enregistrement/temps
de lecture ne soit pas correctement affiché lors
de la lecture d’un MD enregistré en mode mono.
La platine n’enregistre pas.
, Le MD est protégé contre l’enregistrement. Tirez le
taquet de protection contre l’enregistrement pour
fermer le hublot.
, La platine n’est pas correctement raccordée à la
source. Vérifiez le raccordement.
, Sélectionnez la source correcte à l’aide de INPUT.
, Le niveau d’enregistrement n’est pas correctement
réglé. Réglez le niveau d’enregistrement.
, Le MD est préenregistré. Remplacez-le par un MD
enregistrable.
, Il n’y a pas assez de place sur le MD. Remplacez-le
par un autre MD enregistrable avec moins de
plages enregistrées ou effacez les plages inutiles.
, Il y a eu une panne de courant ou le cordon
d’alimentation a été débranché pendant
l’enregistrement. Il se peut que le son enregistré
jusqu’ici soit perdu. Recommencez
l’enregistrement.
Informations complémentaires
Guide de dépannage
Si vous rencontrez l’un des problèmes suivants lors de
l’utilisation de la platine, utilisez ce guide pour le
résoudre. Si vous n’y parvenez pas, consultez votre
revendeur Sony.
La platine ne marche pas ou fonctionne mal.
, Le MD est peut-être sale ou endommagé.
Remplacez-le.
, La platine MD est contrôlée par un appareil
externe, par exemple un ordinateur. “REMOTE”
apparaît sur l’afficheur et aucune touche de la
platine et de la télécommande ne peut être utilisée.
La lecture est impossible.
, De l’humidité s’est formée dans la platine. Retirez
le MD et laissez la platine dans un endroit chaud
pendant plusieurs heures pour permettre à
l’humidité de s’évaporer.
, La platine n’est pas allumée. Appuyez sur ~/1
pour l’allumer.
, La platine n’est peut-être pas raccordée
correctement à l’ampli-tuner. Vérifiez le
raccordement.
, Le MD est à l’envers. Insérez le MD avec son
étiquette vers le haut et la flèche tournée vers la
platine.
, Le MD n’est peut-être pas enregistré. Utilisez un
disque enregistré.
Le son est très parasité.
, Le magnétisme puissant d’un téléviseur ou d’un
appareil similaire perturbe le bon fonctionnement
de la platine. Eloignez la platine de la source de
magnétisme.
FR
42
Un message et un code à trois ou cinq caractères
s’affichent alternativement.
, La fonction d’autodiagnostic est activée. Reportez-
vous au tableau de la page 46.
Remarque
Si la platine ne fonctionne toujours pas correctement après les
vérifications précédentes, éteignez-la, puis rebranchez-la sur la
prise de courant.
Spécifications
Système Système audionumérique MiniDisc
Disque MiniDisc
Laser Laser à semiconducteur (λ = 780 nm)
Durée d’émission: continue
Sortie laser Inférieure à 44,6 µW
∗ Cette sortie est la valeur mesurée à
une distance de 200 mm de la
surface de l’objectif sur le capteur
optique avec une ouverture de
7 mm.
Diode laser Matière: GaAlAs
Vitesse de rotation (CLV) 400 à 900 tr/mn
Correction d’erreur Code ACIRC (Advanced Cross
Interleave Reed Solomon Code)
Fréquence d’échantillonnage
44,1 kHz
Codage Codage ATRAC (Adaptive
TRansform Acoustic Coding)/
ATRAC3
Système de modulation EFM (Modulation huit à quatorze)
Nombre de canaux 2 canaux stéréo
Réponse en fréquence 5 à 20.000 Hz ±0,3 dB
Rapport signal/bruit Supérieur à 100 dB pendant la lecture
Pleurage et scintillement Non mesurable
∗
Page 89

Entrées/Sorties
i.LINK S200 Type de prise: 4 broches à 4 broches
Généralités
Alimentation 230 V CA, 50/60 Hz
Consommation 18 W
Dimensions (approx.) 430 × 70 × 315 mm (l/h/p) y compris
les pièces et commandes saillantes
Poids (approx.) 4,4 kg
Accessoires fournis
Voir page 10.
Dolby Laboratories Licensing Corporation autorise une license
d’exploitation de ses brevets d’invention américains et étrangers.
La conception et les spécifications peuvent être modifiées sans
préavis.
Messages affichés
Le tableau suivant explique les messages qui apparaissent
sur l’afficheur. Des messages d’autodiagnostic
apparaissent également (voir page 46).
Message Signification
Auto Cut La fonction Auto Cut est activée (page
16).
Blank Disc Un MD neuf (vierge) ou effacé a été
inséré.
CANNOT LINC Il n’est pas possible d’enregistrer depuis
l’appareil sélectionné. Sélectionnez un
autre appareil. Cette indication apparaît
lorsqu’une erreur de communication de
données se produit entre la platine et
l’appareil sélectionné pendant
l’enregistrement. Dans ce cas, appuyez
sur x de la platine pour annuler
l’enregistrement et recommencez
l’enregistrement.
Cannot Copy Vous essayez de faire une seconde copie
d’un MD copié numériquement (page
14).
Cannot Edit Vous essayez d’éditer un MD
préenregistré, d’éditer un MD alors que
la lecture de programme ou la lecture
aléatoire est se‘lectionnée, ou de changer
le niveau d’enregistrement d’un MD
enregistré dans le mode LP2 ou LP4.
Cannot Synchro La communication avec la platine MD et
le lecteur CD a échoué lors de
l’enregistrement synchronisé de CD.
Disc Full Le MD est plein (page 41).
Impossible La platine ne peut pas effectuer
l’opération spécifiée (pages 14 et 31).
Incomplete!! L’opération S.F Edit effectuée
(changement du niveau
d’enregistrement, entrée, sortie en fondu)
a échoué parce que la platine a été
déplacée pendant l’enregistrement ou le
MD est endommagé ou sale.
Message Signification
Initialize (clignotement)Les réglages Setup Menu ont été effacés
Name Full La capacité de titrage du MD a atteint sa
NEW CONNECT Un nouvel appareil est raccordé par une
No Change Vous avez effectué une opération S.F Edit
No Disc Il n’y a pas de MD dans la platine.
No Name La plage ou le disque n’a pas de nom.
No Program!! Vous avez essayé de commencer la
Premastered Vous avez essayé d’enregistrer sur un
ProgramFull Le programme contient le nombre
REMOTE La platine MD est commandé par un
S.F Edit! Vous avez essayé d’effectuer une autre
S.F Edit NOW Vous avez appuyé sur ~/1 dans le mode
Smart Space La fonction Smart Space est activée
TOC Reading La platine vérifie le sommaire (TOC =
Si “REMOTE” s’affiche dans d’autres circonstances, éteignez la
*
platine, puis rallumez-la.
ou le contenu de l’enregistrement
programmé a disparu et ne peut pas être
inscrit sur le disque; ou encore la lecture
d’un programme ne peut pas être activée
car le programme a disparu.
(Ce message clignote pendant quatre
secondes environ lorsque vous allumez
la platine avec +/1.)
limite (1.700 caractères environ).
liaison i.LINK. Cette indication apparaît
aussi lorsqu’un cordon d’alimentation ou
un câble de liaison i.LINK de la
configuration est branché ou débranché.
sans spécifier le niveau d’enregistrement,
et le niveau d’enregistrement n’a pas été
changé.
lecture d’un programme alors qu’il n’y
avait pas de programme.
MD préenregistré.
maximum de plages. Vous ne pouvez pas
ajouter d’autres plages.
dispositif extérieur raccordé à la platine.*
Pendant que cette indication apparaît,
aucune touche de la platine et de la
télécommande ne peut être utilisée.
opération pendant une opération S.F
Edit. Vous ne pouvez pas effectuer
d’autres opérations à ce moment.
S.F Edit (changement du niveau
d’enregistrement après l’enregistrement,
entrée, sortie en fondu). Si vous éteignez
la platine dans le mode S.F Edit, les
changements effectués ne seront pas
sauvegardés correctement. Terminez
l’édition et sortez du mode S.F Edit avant
d’éteindre la platine. Si vous voulez
éteindre la platine à ce moment, appuyez
une nouvelle fois sur ~/1 pendant que
l’indication est allumée.
(page 16).
Table Of Contents) du MD.
43
Informations complémentaires
FR
Page 90

Tableau Edit Menu (menu d’édition)
Le tableau suivant donne un aperçu des diverses fonctions d’édition que vous pouvez utiliser avec Edit Menu.
Pour accéder à Edit Menu
Appuyez sur MENU/NO pour afficher “Edit Menu”.
Remarque
Les options de menu disponibles diffèrent selon l’état actuel de la platine.
Option de menu Sous-option Fonction Pages de référence
Name ? Nm In ? Titre une plage ou un MD. 32
Nm Copy ? Copie un nom sur une plage ou un MD. 33
Nm Erase ? Efface un nom. 33
Nm All Ers? Efface tous les noms d’un MD. 33
Tr Erase ? — Efface une plage. 28
Move ? — Déplace une plage. 31
Combine ? — Combine des plages. 31
Divide ? — Divise une plage. 30
A-B Erase ? — Efface un passage d’une plage. 29
All Erase ? — Efface toutes les plages d’un MD. 29
Undo ? — Annule la dernière opération d’édition. 34
Setup ? — Affiche directement Setup Menu (page 45). —
S.F Edit ? Tr Level ? Change le niveau d’ensemble de la plage après l’enregistrement. 35
Fade in ? Change le niveau au début de la plage après l’enregistrement. 35
Fade out ? Change le niveau à la fin de la plage après l’enregistrement. 35
Informations complémentaires
44
FR
Page 91

Tableau Setup Menu (menu de réglage)
Le tableau suivant donne un aperçu des options de Setup Menu avec l’indication des paramètres, réglages d’usine et pages
de référence.
Pour accéder à Setup Menu
Quand la platine est arrêtée, appuyez deux fois sur MENU/NO pour afficher “Setup Menu”.
Option de
menu
T.Mark — Active ou désactive le marquage automatique des plages. Lsync/Off Lsync 17
LS(T) — Change le seuil de déclenchement pour le marquage automatique des plages. –72 à 0dB* –50dB 18
Auto — Active ou désactive les fonctions Auto Space et Auto Pause. Off/Space/Pause Off 25, 26
S.Space — Active ou désactive les fonctions Smart Space et Auto Cut. On/Off On 17
P.Hold — Active ou désactive la fonction Peak Hold. On/Off Off 16
F.in — Spécifie la durée de l’entrée d’enregistrement en fondu. 1.0 à 15.0s 5.0s 36
F.out — Spécifie la durée de la sortie d’enregistrement en fondu. 1.0 à 15.0s 5.0s 36
Synchro — Sélectionne la vitesse d’enregistrement lors de l’enregistrement synchro de CD. Normal/High Normal 19
Dimmer — Règle la luminosité de l’afficheur. Dimmer 1/2/3/4 Dimmer 1 37
Ping — Active ou désactive la fonction Ping. On/Off On 37
Powersave — Active ou désactive l’économiseur d’énergie. On/Off On 38
LP Stamp — Active ou désactive la fonction LP Stamp. On/Off On 15
Réglable par incréments de 2 dB
*
Sousoption
Fonction
Paramètres Réglage
d’usine
Pages de
référence
Pour rappeler un réglage d’usine
Appuyez sur CLEAR tout en sélectionnant le paramètre.
Informations complémentaires
45
FR
Page 92

Informations complémentaires
Fonction d’autodiagnostic
La fonction d’autodiagnostic vérifie automatiquement l’état de la platine MD en cas d’erreur, puis affiche un code et un
message d’erreur. Si un code et un message s’affichent alternativement, cherchez leur signification dans le tableau suivant et
prenez les mesures nécessaires. Si vous ne parvenez pas à résoudre le problème, consultez votre revendeur Sony.
Code/Message Cause/Solution
C11/Protected Le MD dans la platine est protégé contre l’enregistrement.
, Retirez le MD et fermez le taquet de protection contre l’enregistrement (page 13).
C12/Cannot Copy Vous avez essayé de copier une disque qui n’est pas compatible avec cette platine (disque de
données MD, etc.)
, Remplacez le disque.
C13/REC Error L’enregistrement ne s’est pas effectué correctement.
, Placez la platine sur une surface stable et recommencez l’enregistrement.
Le MD dans la platine est sale (taches, traces de doigts, etc.), rayé ou de mauvaise qualité.
, Remplacez le disque et recommencez l’enregistrement.
C13/Read Error La platine n’a pas pu lire correctement le sommaire (TOC) du MD.
, Retirez le MD, puis réinsérez-le.
C14/Toc Error La platine n’a pas pu lire correctement le sommaire (TOC) du MD.
, Insérez un autre disque.
, Effacez si possible toutes les plages du MD (page 29).
C41/Cannot Copy Un matériau copié numériquement ne peut pas être dupliqué numériquement (page 14).
C71/Din Unlock L’affichage occasionnel de ce message est dû au signal numérique en cours d’enregistrement. Ceci
n’affecte pas l’enregistrement.
Lors d’un enregistrement depuis un appareil numérique raccordé au connecteur i.LINK S200, le
câble de liaison numérique a été débranché ou l’appareil numérique a été éteint.
, Rebranchez le câble ou rallumez l’appareil numérique.
C78:03/LOOP CONNECT La liaison i.LINK est bouclée.
, Vérifiez la liaison (voir page 39).
C78:04/NO SIGNAL L’appareil sélectionné est allumé mais aucun signal n’est fourni par l’appareil.
, Vérifiez l’appareil sélectionné.
C78:11/ C78:12/CANNOT LINC La platine ne peut pas établir de liaison LINC avec un appareil parce qu’une autre liaison existe
entre la platine et un autre appareil.
, Annulez la liaison LINC entre la platine et l’autre appareil.
C78:15/BUS FULL Le bus de signal dans la configuration i.LINK est plein et aucun autre signal ne peut être transmis à
la platine.
C78:21/NO SIGNAL La platine et l’appareil sélectionné sont raccordés correctement, mais aucun signal de l’appareil
n’est transmis à la platine.
, Vérifiez l’appareil sélectionné.
C78:22/NO SIGNAL Le format du signal d’entrée n’est pas supporté.
C78:23/NO SIGNAL L’appareil sélectionné n’est pas allumé.
, Assurez-vous que l’appareil est allumé.
C78:31/NO SIGNAL La communication entre la platine et l’appareil sélectionné est instable. Ou bien, le format du signal
reçu n’est pas approprié.
, Vérifiez l’état et le format du signal de l’appareil sélectionné.
C78:32/NEW CONNECT Pendant l’enregistrement, un nouvel appareil est raccordé à la configuration i.LINK, ou bien un
cordon d’alimentation ou un câble de liaison i.LINK de l’appareil est branché ou débranché.
, Ne branchez ou débranchez pas de cordon d’alimentation ni de câbles de liaison i.LINK
pendant l’enregistrement, sinon l’enregistrement ne s’effectuera pas correctement.
E0001/MEMORY NG Présence d’une erreur dans les données internes dont a besoin la platine pour fonctionner.
, Consultez votre revendeur Sony.
E0101/LASER NG Il y a un problème au niveau du capteur optique.
, Consultez votre revendeur Sony.
46
FR
Page 93

Index
A, B
Accessoires fournis 10
Affichage
du nombre total de plages 8, 9
du temps d’enregistrement restant
9, 16
du temps d’enregistrement total 9
du titre de la plage 9
du titre du disque 8
AMS 22
Annulation d’une opération 34
C, D
Combinaison 31
Coupure automatique 17
Défilement du nom 21
Déplacement 31
Division 30
E, F, G, H, I, J, K
Economiseur d’énergie 38
Effacement
de tous les noms 33
de toutes les plages 29
d’un passage d’une plage 29
d’un titre 33
d’une plage 28
Enregistrement
comment enregistrer 12
longue durée 15
niveau 16
mode 15
sur des plages existantes 12
Enregistrement rétroactif 18
Enregistrement synchro 19
Enregistrement synchronisé de CD
normal 19
rapide 19
Entrée d’enregistrement en fondu 36
Espacement automatique 25
Espacement optimal 16
Fonction de maintien de crête 16
Fonction H.A.T.S. 4
Fonction LP Stamp 15
i.LINK
appareil 11
câble de liaison 10, 11
liaisons 11, 39
LINC 39
Indicateurs de niveau de crête 16
L, M, N, O
Lecture
d’une plage particulière. Voir
Localisation
depuis la première plage 21
saisie du numéro 22
Lecture aléatoire 24
Lecture de programme
programmation 24
vérification du contenu 24
Lecture répétée d’un passage A-B 23
Lecture répétée d’une seule plage 23
Lecture répétée de toutes les plages
23
Localisation
d’un point précis 22
de plages 22
Luminosité de l’afficheur 37
Marquage automatique des plages
comment marquer des plages 17
informations complémentaires 18
seuil de déclenchement 18
Marquage manuel des plages 17
MD (minidisque)
éjection 13, 21
enregistrable 9, 12
préenregistré 9
taquet de protection de
l’enregistrement 13
P, Q, R
Passage silencieux
effacement pendant
l’enregistrement. Voir
Espacement automatique et
Coupure automatique
insertion pendant la lecture. Voir
Espacement automatique
Pause automatique 26
Pause
après chaque plage. Voir Pause
automatique
enregistrement 13
lecture 21
Pile 10
Répétition
d’un passage. Voir Lecture répétée du
passage A-B
de toutes les plages. Voir Lecture
répétée de toutes les plages
de la plage actuelle. Voir Lecture
répétée d’une plage
S, T, U, V, W, X, Y, Z
SCMS. Voir Système de protection
contre la copie abusive
S.F Edit
changement de niveau à la fin de la
plage 35
changement de niveau au début de
la plage 35
changement du niveau général
d’une plage 35
Sommaire. Voir TOC
Sortie d’enregistrement en fondu 36
Système de protection contre la copie
abusive 14
Télécommande 10
Titrage
comment titrer 32
copie 33
re-titrage 33
TOC 14, 28
Informations complémentaires
47
FR
Page 94

Informations complémentaires
48
FR
Page 95

Informations complémentaires
49
FR
Page 96

Sony Corporation Printed in Japan
 Loading...