

Page 1
MiniDisc Deck
3-864-669-11(1)
Operating Instructions
Mode d’emploi
EN
EN
F
MDS-JE320
1998 by Sony Corporation
Page 2

WARNING
To prevent fire or shock
hazard, do not expose the unit
to rain or moisture.
To avoid electrical shock, do
not open the cabinet. Refer
servicing to qualified
personnel only.
The laser component in this product
is capable of emitting radiation
exceeding the limit for Class 1.
For the customers in the
United States
This symbol is intended to alert the user
to the presence of uninsulated
“dangerous voltage” within the
product’s enclosure that may be of
sufficient magnitude to constitute a risk
of electric shock to persons.
turning the equipment off and on, the
user is encouraged to try to correct the
interference by one or more of the
following measures:
– Reorient or relocate the receiving
antenna.
– Increase the separation between the
equipment and receiver.
– Connect the equipment into an outlet
on a circuit different from that to
which the receiver is connected.
– Consult the dealer or an experienced
radio/TV technician for help.
CAUTION
You are cautioned that any changes or
modifications not expressly approved in
this manual could void your authority
to operate this equipment.
For the customers in Canada
This appliance is classified as a CLASS 1
LASER product. The CLASS 1 LASER
PRODUCT MARKING is located on the
rear exterior.
The following caution label is located
inside of the unit.
IN NO EVENT SHALL SELLER BE
LIABLE FOR ANY DIRECT,
INCIDENTAL OR
CONSEQUENTIAL DAMAGES OF
ANY NATURE, OR LOSSES OR
EXPENSES RESULTING FROM
ANY DEFECTIVE PRODUCT OR
THE USE OF ANY PRODUCT.
This symbol is intended to alert the user
to the presence of important operating
and maintenance (servicing)
instructions in the literature
accompanying the appliance.
CAUTION
The use of optical instruments with this
product will increase eye hazard.
Owner’s Record
The model and serial numbers are
located on the rear of the unit.
Record these numbers in the spaces
provided below. Refer to them
whenever you call upon your Sony
dealer regarding this product.
Model No. MDS-JE320
Serial No.
INFORMATION
This equipment has been tested and
found to comply with the limits for a
Class B digital device, pursuant to Part
15 of the FCC Rules.
These limits are designed to provide
reasonable protection against harmful
interference in a residential installation.
This equipment generates, uses, and can
radiate radio frequency energy and, if
not installed and used in accordance
with the instructions, may cause
harmful interference to radio
communications. However, there is no
guarantee that interference will not
occur in a particular installation. If this
equipment does cause harmful
interference to radio or television
reception, which can be determined by
CAUTION
TO PREVENT ELECTRIC SHOCK, DO
NOT USE THIS POLARIZED AC PLUG
WITH AN EXTENSION CORD,
RECEPTACLE OR OTHER OUTLET
UNLESS THE BLADES CAN BE FULLY
INSERTED TO PREVENT BLADE
EXPOSURE.
Precautions
On safety
Should any solid object or liquid fall
into the cabinet, unplug the deck and
have it checked by qualified personnel
before operating it any further.
On power sources
• Before operating the deck, check that
the operating voltage of the deck is
identical with your local power
supply. The operating voltage is
indicated on the nameplate at the rear
of the deck.
• The unit is not disconnected from the
AC power source (mains) as long as it
is connected to the wall outlet, even if
the unit itself has been turned off.
• If you are not going to use the deck
for a long time, be sure to disconnect
the deck from the wall outlet. To
disconnect the AC power cord, grasp
the plug itself; never pull the cord.
• AC power cord must be changed only
at the qualified service shop.
EN
2
Page 3

On operation
If the deck is brought directly from a
cold to a warm location, or is placed in a
very damp room, moisture may
condense on the lenses inside the deck.
Should this occur, the deck may not
operate properly. In this case, remove
the MD and leave the deck turned on
for about an hour until the moisture
evaporates.
On the MiniDisc cartridge
• Do not open the shutter to expose the
MD.
• Do not place the cartridge where it
will be subject to extremes of
sunlight, temperature, moisture or
dust.
TABLE OF CONTENTS
Getting Started
Unpacking .............................................................................................................................4
Hooking Up the System...................................................................................................... 4
Recording on an MD.................................................................................................. 6
Playing an MD................................................................................................................ 8
Recording on MDs
Notes on Recording ............................................................................................................. 9
Useful Tips for Recording ............................................................................................... 10
Recording Over Existing Tracks..................................................................................... 11
Adjusting the Recording Level....................................................................................... 11
Marking Track Numbers While Recording (Track Marking) ................................... 12
Starting Recording With 6 Seconds of Prestored Audio Data
(Time Machine Recording).......................................................................................... 13
On cleaning
Clean the cabinet, panel and controls
with a soft cloth slightly moistened with
a mild detergent solution. Do not use
any type of abrasive pad, scouring
powder or solvent such as alcohol or
benzine.
If you have any questions or problems
concerning your deck, please consult
your nearest Sony dealer.
Welcome!
Thank you for purchasing the Sony
MiniDisc Deck. Before operating the
deck, please read this manual
thoroughly and retain it for future
reference.
About This Manual
Playing MDs
Using the Display.............................................................................................................. 14
Locating a Specific Track ................................................................................................. 15
Locating a Particular Point in a Track ........................................................................... 16
Editing Recorded MDs
Notes on Editing ............................................................................................................... 17
Erasing Recordings (Erase Function) ............................................................................ 17
Erasing a Part of a Track (A-B Erase Function) ........................................................... 18
Dividing Recorded Tracks (Divide Function) ............................................................. 19
Combining Recorded Tracks (Combine Function) ..................................................... 20
Moving Recorded Tracks (Move Function) ................................................................. 21
Labeling Recordings (Title Function) ............................................................................ 22
Undoing the Last Edit (Undo Function) ....................................................................... 23
Additional Information
Display Messages.............................................................................................................. 24
System Limitations ........................................................................................................... 24
Troubleshooting ................................................................................................................ 25
Specifications ..................................................................................................................... 26
Guide to the Serial Copy Management System........................................................... 27
Index .................................................................................................................................... 28
EN
Convention
The following icon is used in this
manual:
Indicates tips for making the
z
task easier and hints.
EN
3
Page 4
Getting Started
Getting Started
Unpacking
Check that you received the following items:
• Audio connecting cords (2)
• Optical cable (1)
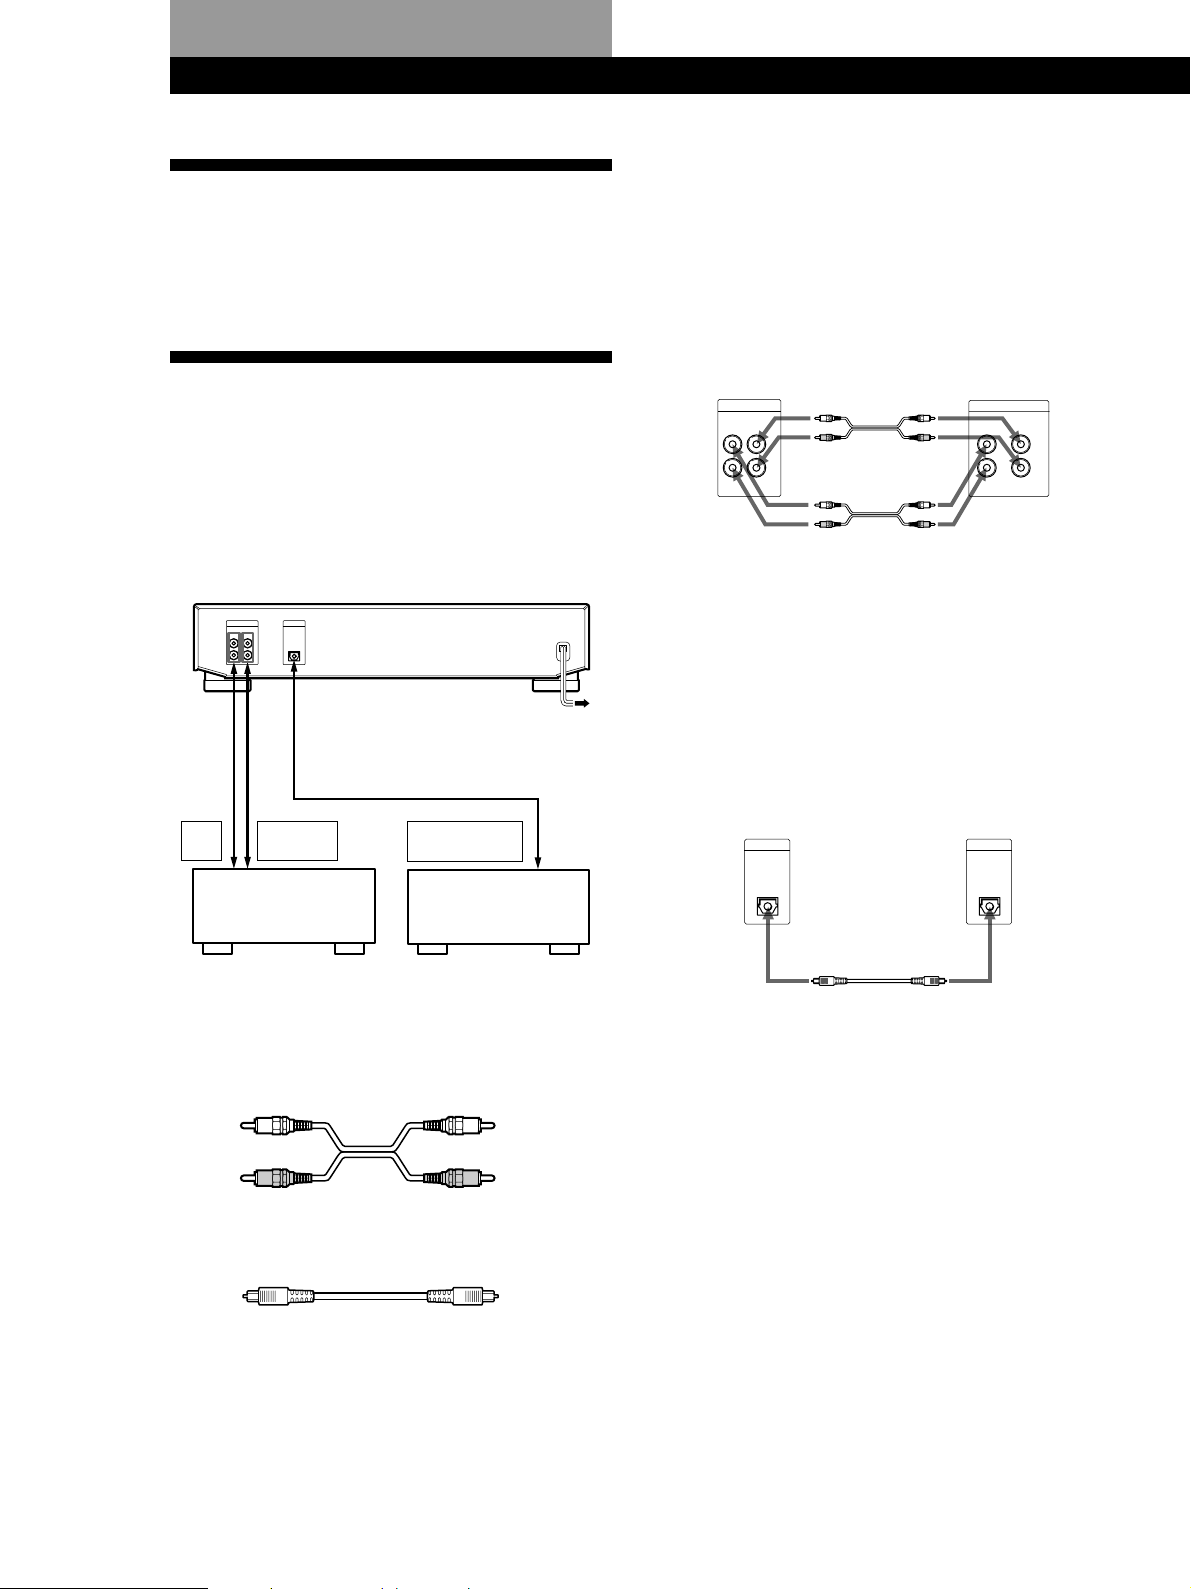
Hookups
Connecting the deck to an amplifier
Connect the amplifier to the LINE (ANALOG) IN/
OUT jacks using the audio connecting cords (supplied),
making sure to match the color-coded cords to the
appropriate jacks on the components: red (right) to red
and white (left) to white. Be sure to make connections
firmly to prevent hum and noise.
Hooking Up the System
Overview
This section describes how to hook up the MD deck to
an amplifier or other components such as a CD player
or DAT deck. Be sure to turn off the power of each
component before connection.
DIGITAL
LINE
(ANALOG)
OPTICAL
OUTIN
IN
L
R
to a wall outlet
(or to a timer during timer
recording or playback)
DIGITAL
OPTICAL OUT
CD player,
DAT deck or
MD deck, etc.
REC
OUT
ç
ç
TAPE/MD
Amplifier
ç
IN
MD deck Amplifier
LINE
(ANALOG)
OUTIN
ç
L
R
TAPE / MD
INOUT
L
R
Ç
çç
ç: Signal flow
çç
Connecting the deck to a digital component such as
a CD player, DAT deck, digital amplifier, or another
MD deck
Connect the component through the DIGITAL
OPTICAL IN connector with an optical cable
(supplied).
Take the caps off the connectors and then insert the
plugs parallelly until they click into place.
Be sure not to bend or tie the optical cable.
MD deck Digital component
DIGITAL
OPTICAL
IN
DIGITAL
OPTICAL
OUT
çç
ç : Signal flow
çç
çç
ç: Signal flow
çç
What cords will I need?
Ç
• Audio connecting cords (supplied) (2)
White
(L)
Red
(R)
White
(L)
Red
(R)
• Optical cable (supplied) (1)
EN
4
z Automatic conversion of digital sampling rates
during recording
A built-in sampling rate converter automatically
converts the sampling frequency of various digital
sources to the 44.1 kHz sampling rate of your MD deck.
This allows you to record sources such as 32- and 48kHz DAT or satellite broadcasts, as well as compact
discs and other MDs.
Page 5

Notes
• If “Din Unlock” or “Cannot Copy” appears in the display,
recording through the digital connector is not possible.
In this case, record the program source through the LINE
(ANALOG) IN jacks with INPUT set to ANALOG.
• When recording through the DIGITAL OPTICAL IN
connector, you cannot adjust the recording level.
Connecting the AC power cord
Connect the AC power cord to a wall outlet or to the
outlet of a timer.
Getting Started
EN
5
Page 6

Basic Operations
Basic Operations
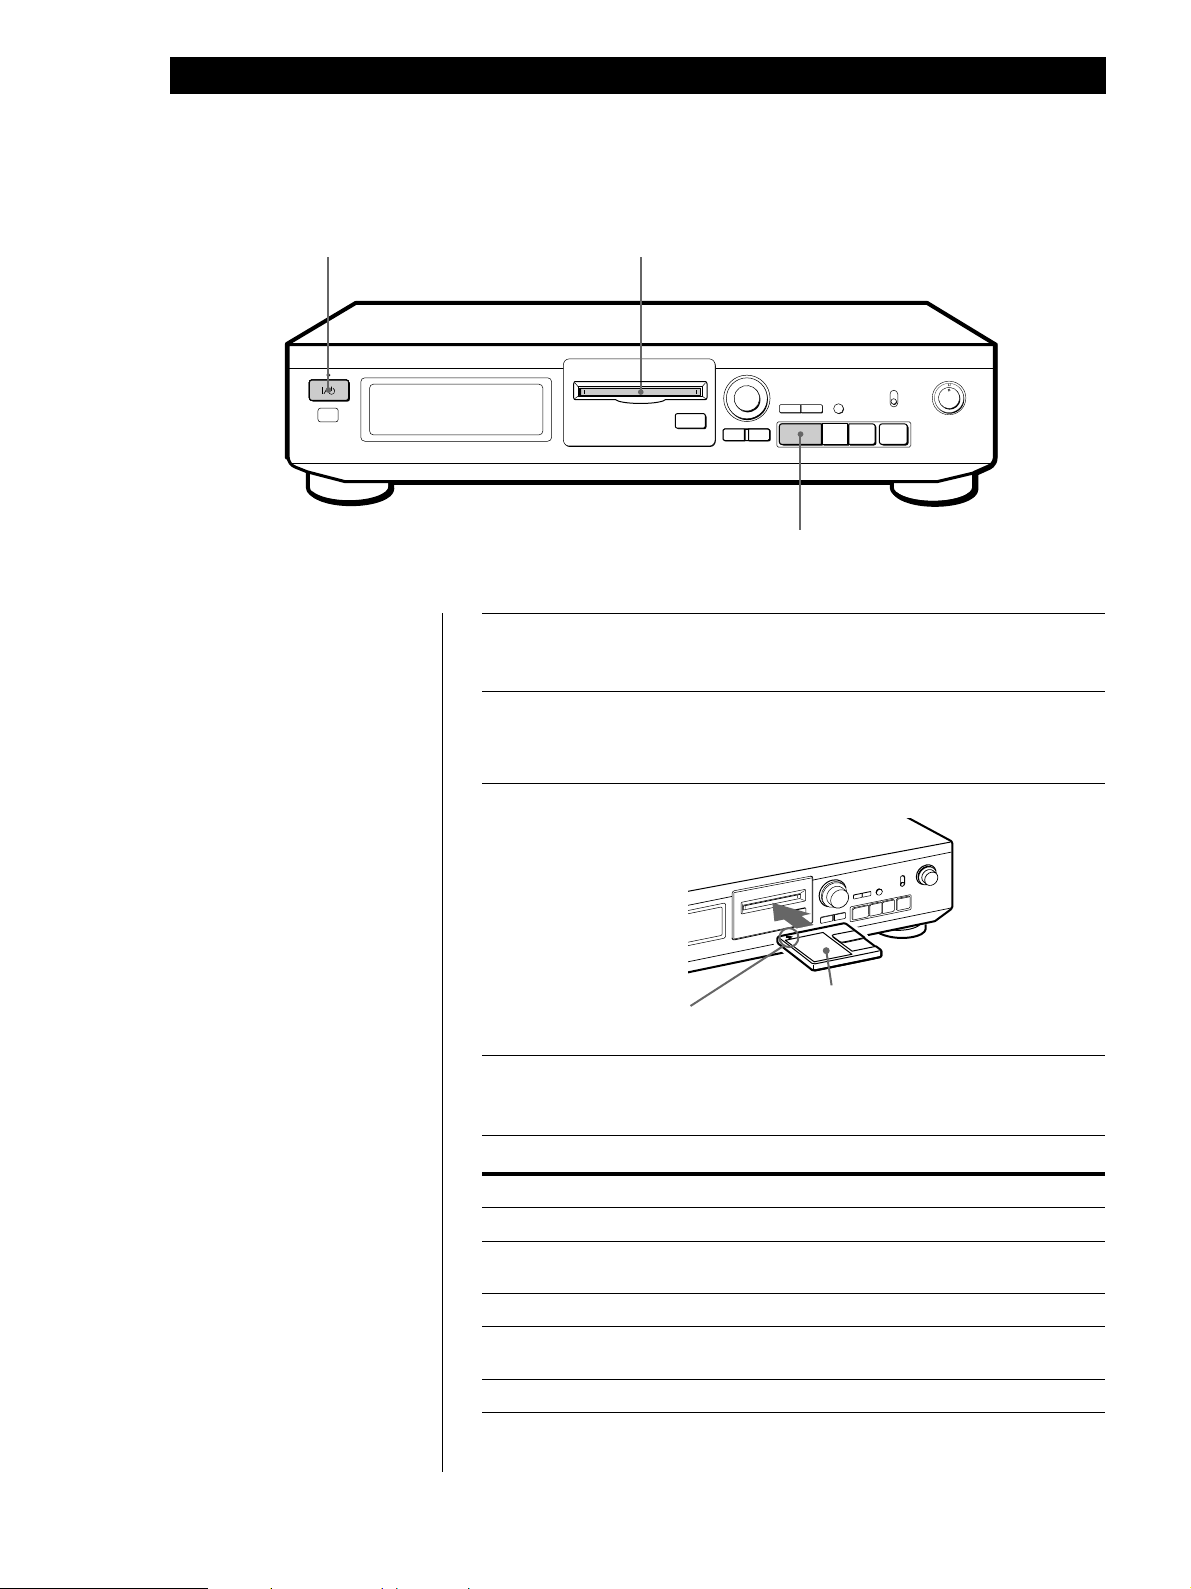
Recording on an MD
23
AMS (PUSH ENTER)
≠ ±
EJECT
§
0)
YESNO
EDIT
·
4
INPUT
DIGITAL
DISPLAY/CHAR
ANALOG
pp
r
P
REC
REC
7 5
Turn on the amplifier and play the program source you want to
1
record.
Press 1/u.
2
The 1/u indicator changes from red to green.
Insert a recordable MD.
3
REC LEVEL
•
•
•
•
0
6
•
•
•
•
•
•
10
With the arrow
pointing this way
With the label side up
If the MD has a recorded material on it, the deck will
automatically start recording from the end of the last recorded
track.
Set INPUT to the corresponding input connector.
4
To record through Set INPUT to
DIGITAL OPTICAL IN DIGITAL
LINE (ANALOG) IN ANALOG
EN
6
Page 7
Basic Operations
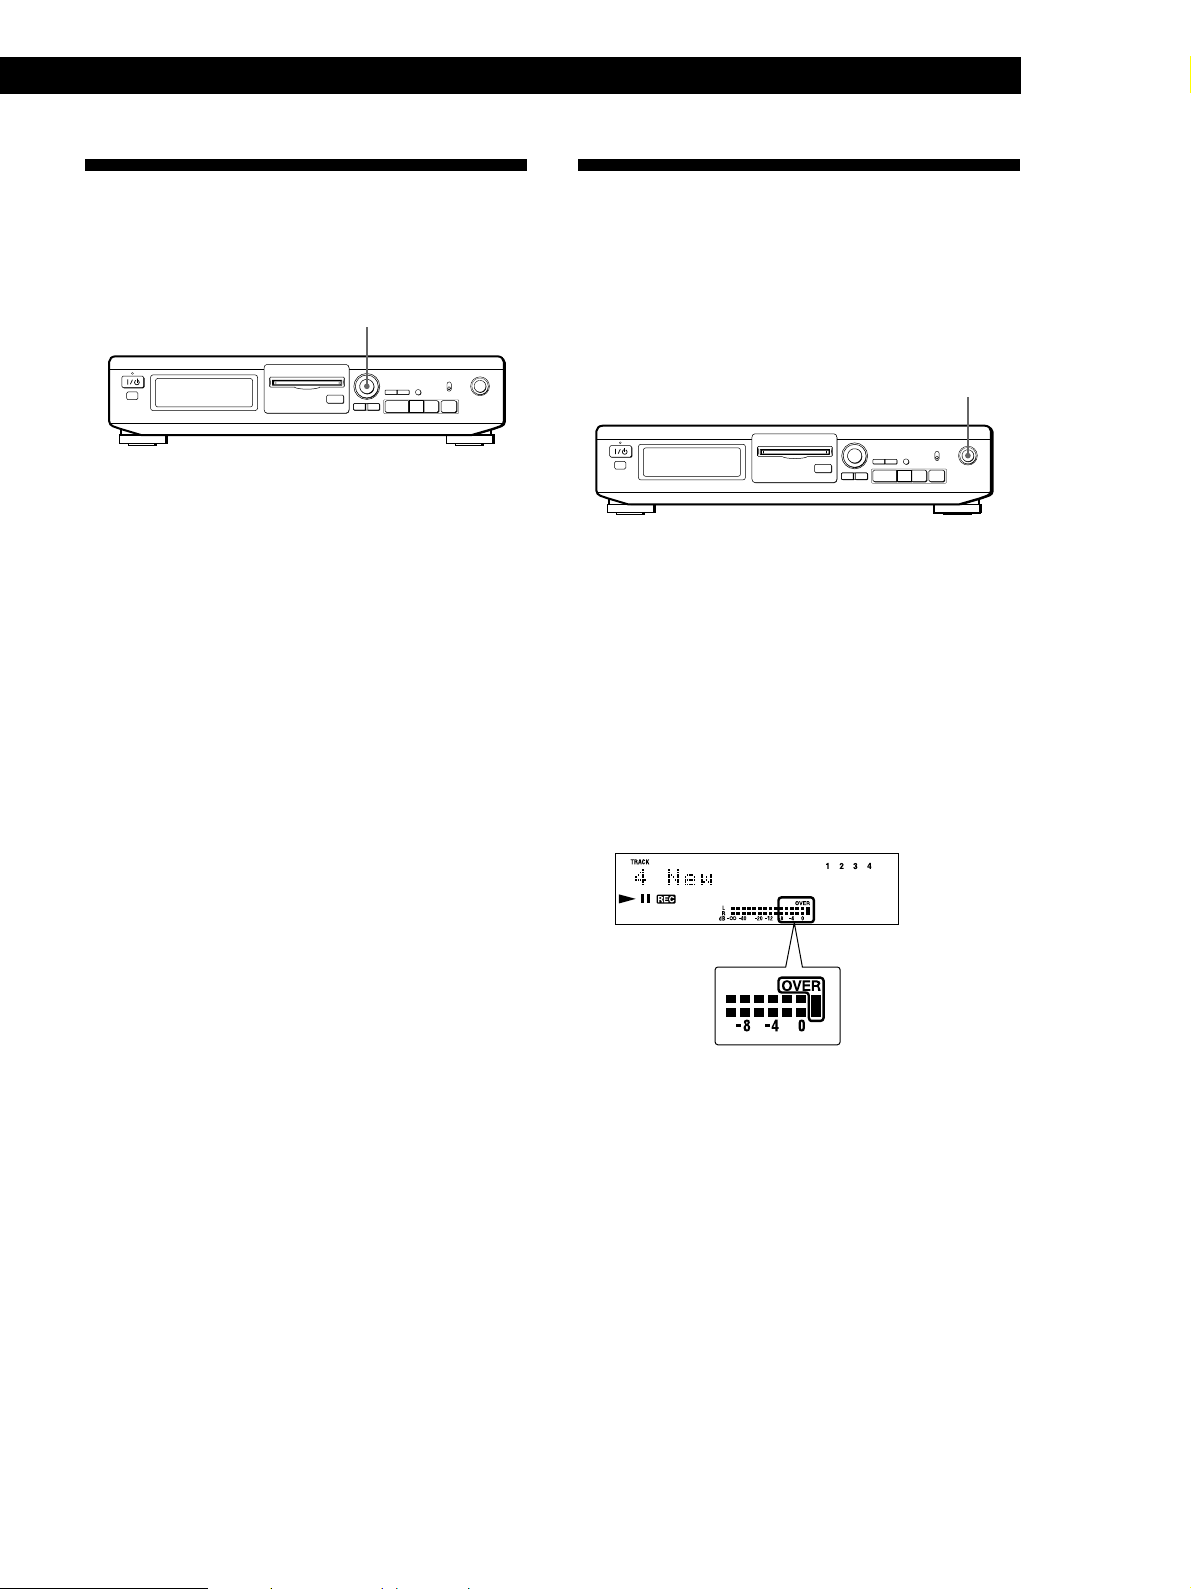
Press r REC.
5
The deck becomes ready to record.
When recording the analog input signal, adjust the recording
6
level with REC LEVEL.
The fourth dot is satisfactory for most purposes. For details,
refer to “Adjusting the Recording Level” on page 11.
Press · or P.
7
Recording starts.
Start playing the program source.
8
When ”TOC“ flashes in the display
The deck is currently updating the
Table Of Contents (TOC).Do not
move the deck or pull out the AC
power cord. Changes to an MD
made through recording are saved
only when you update the TOC by
ejecting the MD or changing the
deck to standby by pressing the
1 /u switch.
Do not disconnect the deck from the power source immediately after
recording
If you pull out the AC power cord during recording or while “TOC” flashes in
the display, “STANDBY” flashes in the display when you turn on the deck
next and the recorded material may not be saved correctly to the MD. To save
the material, after recording, press § EJECT to take out the MD or change the
deck to standby by pressing 1 /u. “TOC” will flash in the display at this time.
After “TOC” stops flashing and goes out, you can pull out the AC power
cord.
To Press
Stop recording p
Pause recording* P. Press the button again or press · to resume
recording.
Take out the MD § EJECT after stopping.
* Whenever you pause recording, the track number increases by one. For example, if
you paused recording while recording on track 4, the track number increases by
one and recording continues on the new track when restarted.
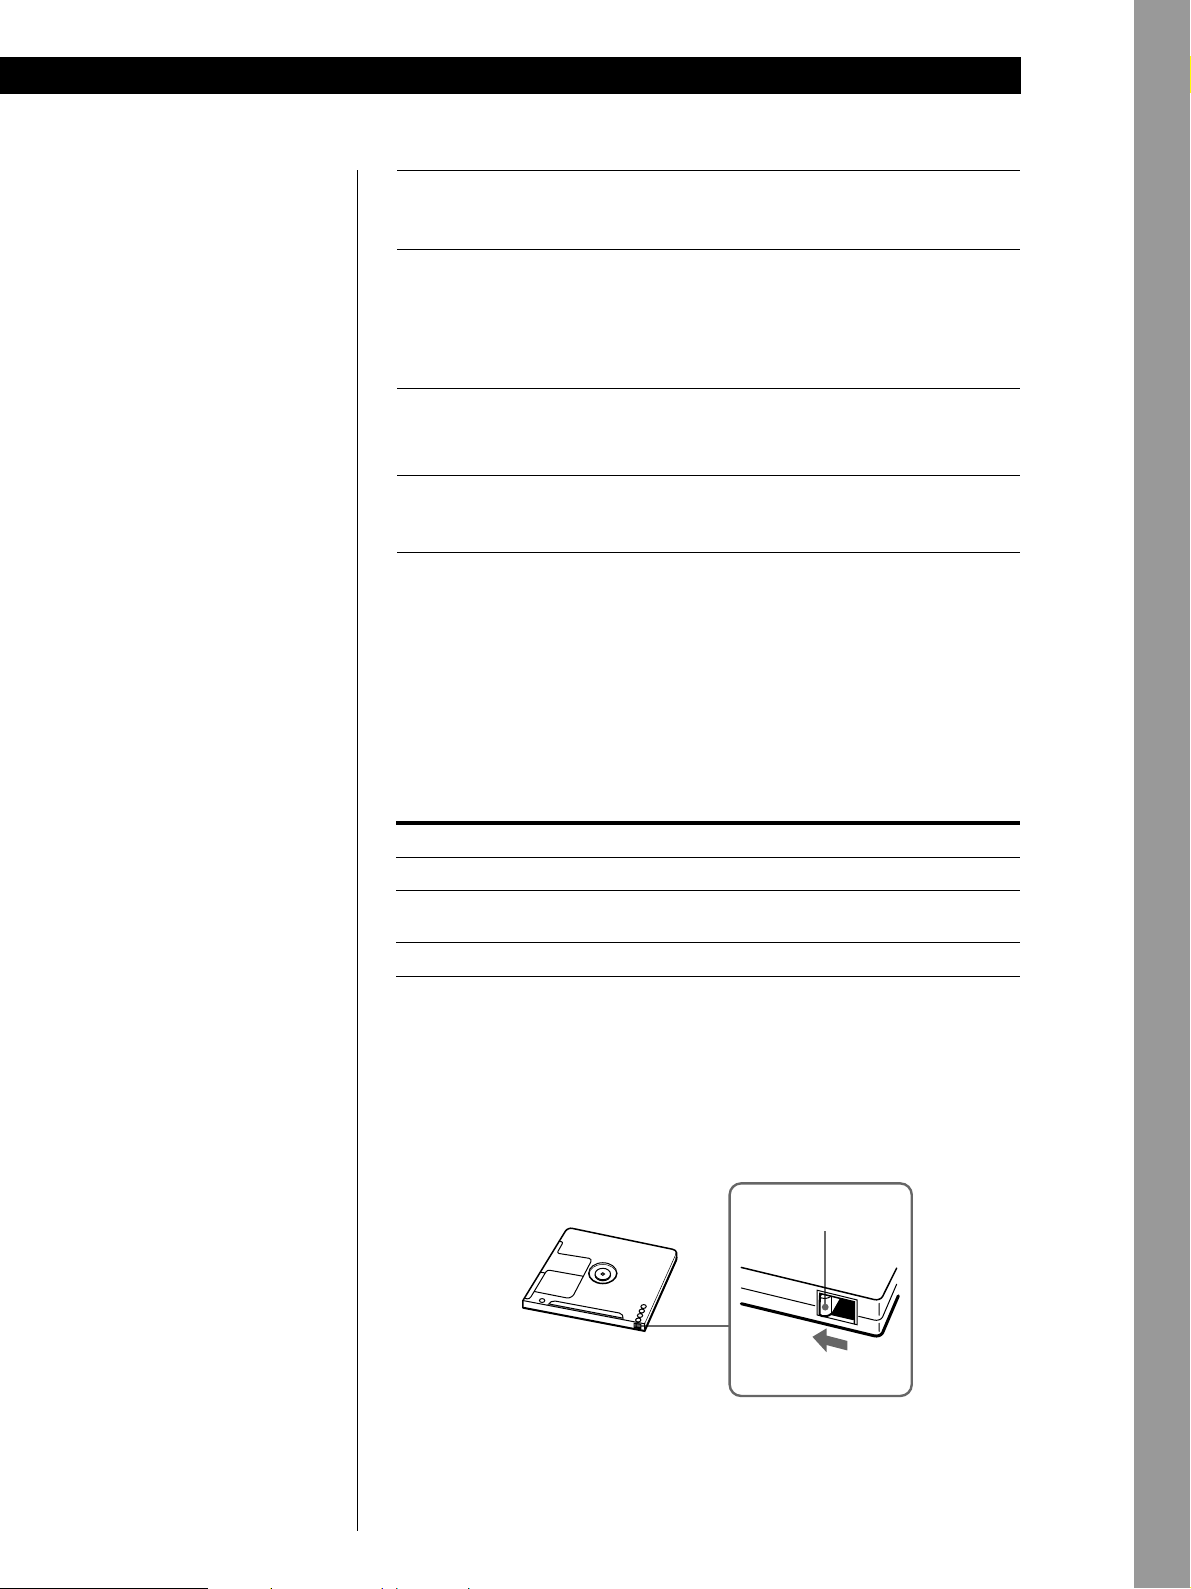
To protect an MD against accidental erasure
To make it impossible to record on an MD, slide the tab in the direction of
arrow, opening the slot. To allow recording, close the slot.
Basic Operations
Rear of the disc
Record-protect tab
Slide the tab in the
direction of arrow
EN
7
Page 8
Basic Operations
Playing an MD
2
3
AMS (PUSH ENTER)
≠ ±
DISPLAY/CHAR
EJECT
§
0)
YESNO
EDIT
·
·
Pp
INPUT
DIGITAL
ANALOG
r
REC
REC LEVEL
•
•
•
•
0
•
•
•
•
•
•
10
4
Turn on the amplifier and set the source selector to the position
1
for MD deck.
Press 1/u.
2
The 1/u indicator changes from red to green.
Insert an MD.
3
With the label side up
z You can locate and play back
a track while the deck is
stopped
1 Turn AMS until the number
of the track you want to play
appears.
2 Press AMS or ·.
With the arrow
pointing this way
Press ·.
4
The deck starts playing. Adjust the volume on the amplifier.
To Do the following:
Stop playing Press p.
Pause playing Press P. Press the button again or press
· to
resume playing.
Go to the next track Turn AMS clockwise.
Go to the current track Turn AMS counterclockwise.
or the preceding track
Take out the MD Press § EJECT after stopping playing.
EN
8
Page 9

Recording on MDs
Notes on Recording
If “Protected” appears in the display
The MD is record-protected. Close the slot to record
on the disc (see “To protect an MD against accidental
erasure” on page 7).
If “Din Unlock” flashes in the display
• The digital program source is not connected
properly.
To continue, connect the program source properly.
• The program source is not on.
Turn on the program source.
Depending on source being recorded, track numbers
are marked in following ways:
• When recording from a CD or MD with INPUT set to
DIGITAL and the source connected through the
DIGITAL OPTICAL IN connector:
The deck automatically marks track numbers in the
same sequence as the original. If, however, a track is
repeated two or more times (e.g. by single-track
repeat play) or two or more tracks with the same
track number (e.g. from different MDs or CDs) are
played, the track or tracks are recorded as part of a
single, continuous track with a single track number.
If the source is an MD, track numbers may not be
marked for tracks of less than 4 seconds.
• When recording from source connected through
LINE (ANALOG) IN with INPUT at ANALOG, and
“LEVEL- SYNC” does not light up (see “Marking
Track Numbers While Recording” on page 12) or
when recording from a DAT or satellite broadcast
connected through the DIGITAL OPTICAL IN
connector with INPUT set to DIGITAL:
The source will be recorded as a single track.
If “LEVEL-SYNC” appears in the display, the deck
automatically marks track numbers when recording
analog source or digital recording of DAT or a
satellite broadcast (see “Marking track numbers
automatically” on page 12).
• When recording from DAT or satellite broadcasts
with INPUT set to DIGITAL, the deck automatically
marks a track number whenever the sampling
frequency of the input signal changes.
Recording on MDs
z You can mark track numbers during or after
recording
For details, see “Marking Track Numbers While
Recording” (page 12) and “Dividing Recorded Tracks”
(page 19).
When “TOC” flashes in the display
The deck is currently updating the Table Of Contents
(TOC). Do not move the deck or pull out the AC power
cord. Changes to an MD made through recording are
saved only when you update the TOC by ejecting the
MD or changing the deck to standby by pressing the
1/u switch.
The MD deck uses the SCMS (Serial Copy
Management System on page 27)
MDs recorded through the digital input connector
cannot be copied onto other MDs or DAT tapes
through the digital output connector.
EN
9
Page 10

Recording on MDs
Useful Tips for Recording
DISPLAY/CHAR
≠ ±
§
EDIT/NO
Checking the remaining recordable time on
the MD
• When you press DISPLAY/CHAR while recording,
the remaining recordable time on the MD appears.
• When you press DISPLAY/CHAR repeatedly while
the deck is stopped, the display changes as follows:
total recorded time, remaining recordable time on
the MD, disc name (see page 14).
YES
Pp0)r
·
·p
To turn off the Smart Space Function and Auto Cut
Function
1 During recording pause, press EDIT/NO repeatedly
until “S. Space ?” appears in the display.
2 Press YES.
3 Press EDIT/NO to display “S. Space OFF.”
To turn on the Smart Space Function and Auto Cut
Function again
1 During recording pause, press EDIT/NO repeatedly
until “S. Space ?” appears in the display.
2 Press YES twice to display “S. Space ON”.
Notes
• When you turn off the Smart Space Function, the Auto Cut
Function is also turned off automatically.
• The Smart Space Function and Auto Cut Function are
factory set to on.
• If you turn off the deck or disconnect the AC power cord,
the deck will recall the last setting (ON or OFF) of the
Smart Space and Auto Cut Functions the next time you
turn on the deck.
If “Auto Cut” appears in the display
(Auto Cut)
There has been no sound input for about 30 seconds
during recording. The 30 seconds of silence are
replaced by a blank of about 3 seconds and the deck
changes to recording pause.
If the deck continues pausing for about 10 minutes
after the Auto Cut Function activated, recording stops
automatically.
Note that this function does not activate even if there
has been no sound input for about 30 seconds when
the deck started recording from the blank portion.
z You can turn off the Auto Cut Function
For details, see “To turn off the Smart Space Function
and Auto Cut Function” on this page. Note that when
you turn off the Auto Cut Function, the Smart Space
Function is turned off automatically.
If “Smart Space” appears in the display
(Smart Space)
There has been an extended silence of 4 to 30 seconds
in length during recording. The silence is replaced
with a blank of about 3 seconds and the deck continues
recording. Note that new track numbers may not be
marked for portions recorded while this function is
activated. Also, the Smart Space Function does not
activate even if there has been an extended silence of
4 to 30 seconds in length when the deck started
recording from the blank portion.
Playing back tracks just recorded
Do this procedure to immediately play back tracks that
have just been recorded.
Press · immediately after stopping recording.
Playback starts from the first track of the material just
recorded.
To play from the first track of the MD after
recording
1 Press p again after stopping recording.
2 Press ·.
Playback starts from the first track of the MD.
10
EN
Page 11
Recording on MDs
Recording Over Existing Tracks
Follow the procedure below to record over existing
material just as you would on an analog cassette tape.
≠ AMS ±
≠ ±
§
1 Do Steps 1 to 4 in “Recording on an MD” on page
6.
2 Turn AMS until the number of the track to be
recorded over appears.
3 To record from the start of the track, continue
from Step 5 in “Recording on an MD” on page 7.
z While “TRACK” flashes in the display
The deck is recording over an existing track, and stops
flashing when it reaches the end of the recorded
portion.
·
Pp0)r
Adjusting the Recording Level
When recording with INPUT at ANALOG and the
signal input through LINE (ANALOG) IN jacks, use
REC LEVEL to adjust the recording level before
starting recording.
You cannot adjust the recording level during digital
recording.
REC LEVEL
≠ ±
§
1 Do Steps 1 to 5 in “Recording on an MD” on
pages 6 and 7.
2 Play the portion of the program source with the
strongest signal level.
3 While monitoring the sound, turn REC LEVEL to
adjust the recording level so that the peak level
meters reach their highest point without turning
on the OVER indication. Occasional lighting of
“OVER” is acceptable.
·
Pp0)r
z To record from the middle of the track
1 After Step 2 above, press · to start playback.
2 Press P where you want to start recording.
3 Continue from Step 5 in “Recording on an MD” on
page 7.
4 Stop playing the program source.
5 To start recording, do the procedure starting from
Step 7 in “Recording on an MD” on page 7.
11
EN
Page 12

Recording on MDs
Marking T rack Numbers While Recording (Track Marking)
You can mark track numbers either manually or
automatically. By marking track numbers at specific
points, you can quickly locate the points later using the
AMS Function, or use various Editing Functions.
≠ ±
§
EDIT/NO
YES
·
Pp0)r
r REC
To cancel Automatic Track Marking
1 Press EDIT/NO during recording or recording
pause.
“LevelSync ?” appears in the display.
2 Press YES.
3 Press EDIT/NO.
“LevelSyncOFF” appears in the display.
* The signal level must remain low for 2 or more
seconds before a new track number is marked.
z When you want to mark track numbers after you’ve
finished recording
Use the Divide Function (see “Dividing Recorded
Tracks” on page 19).
Marking track numbers manually
(Manual Track Marking)
You can mark track numbers at any time while
recording on an MD.
Press r REC at the place you want to add a track mark
while recording.
Marking track numbers automatically
(Automatic Track Marking)
The deck adds track marks differently in the following
cases:
• When recording from CDs or MDs with INPUT at
DIGITAL and the source connected through the
DIGITAL OPTICAL IN connector:
The deck marks track numbers automatically.
However, the Automatic Track Marking Function
may not activate when recording from some CD
players and multi disc players.
• When recording with INPUT at ANALOG and the
source connected through LINE (ANALOG) IN, or
when recording from DAT or satellite broadcasts
with INPUT at DIGITAL and the DAT or satellite
broadcasts connected through the DIGITAL
OPTICAL IN connector:
The deck marks a new track number whenever the
signal level drops and rises to a certain point*
(Automatic Track Marking). If “LEVEL-SYNC” does
not light up, set the LevelSync to ON as follows:
Note
If you turn off the deck or disconnect the AC power cord, the
deck will recall the last settings of the Automatic Track
Marking Function (“ON” or “OFF”) the next time you turn
on the deck.
12
1 Press EDIT/NO to display “LevelSync ?”during
recording or recording pause.
2 Press YES twice to display “LevelSync ON.”
“LEVEL-SYNC” appears in the display.
EN
Page 13
Starting Recording With
Recording on MDs
To stop Time Machine Recording
Press p.
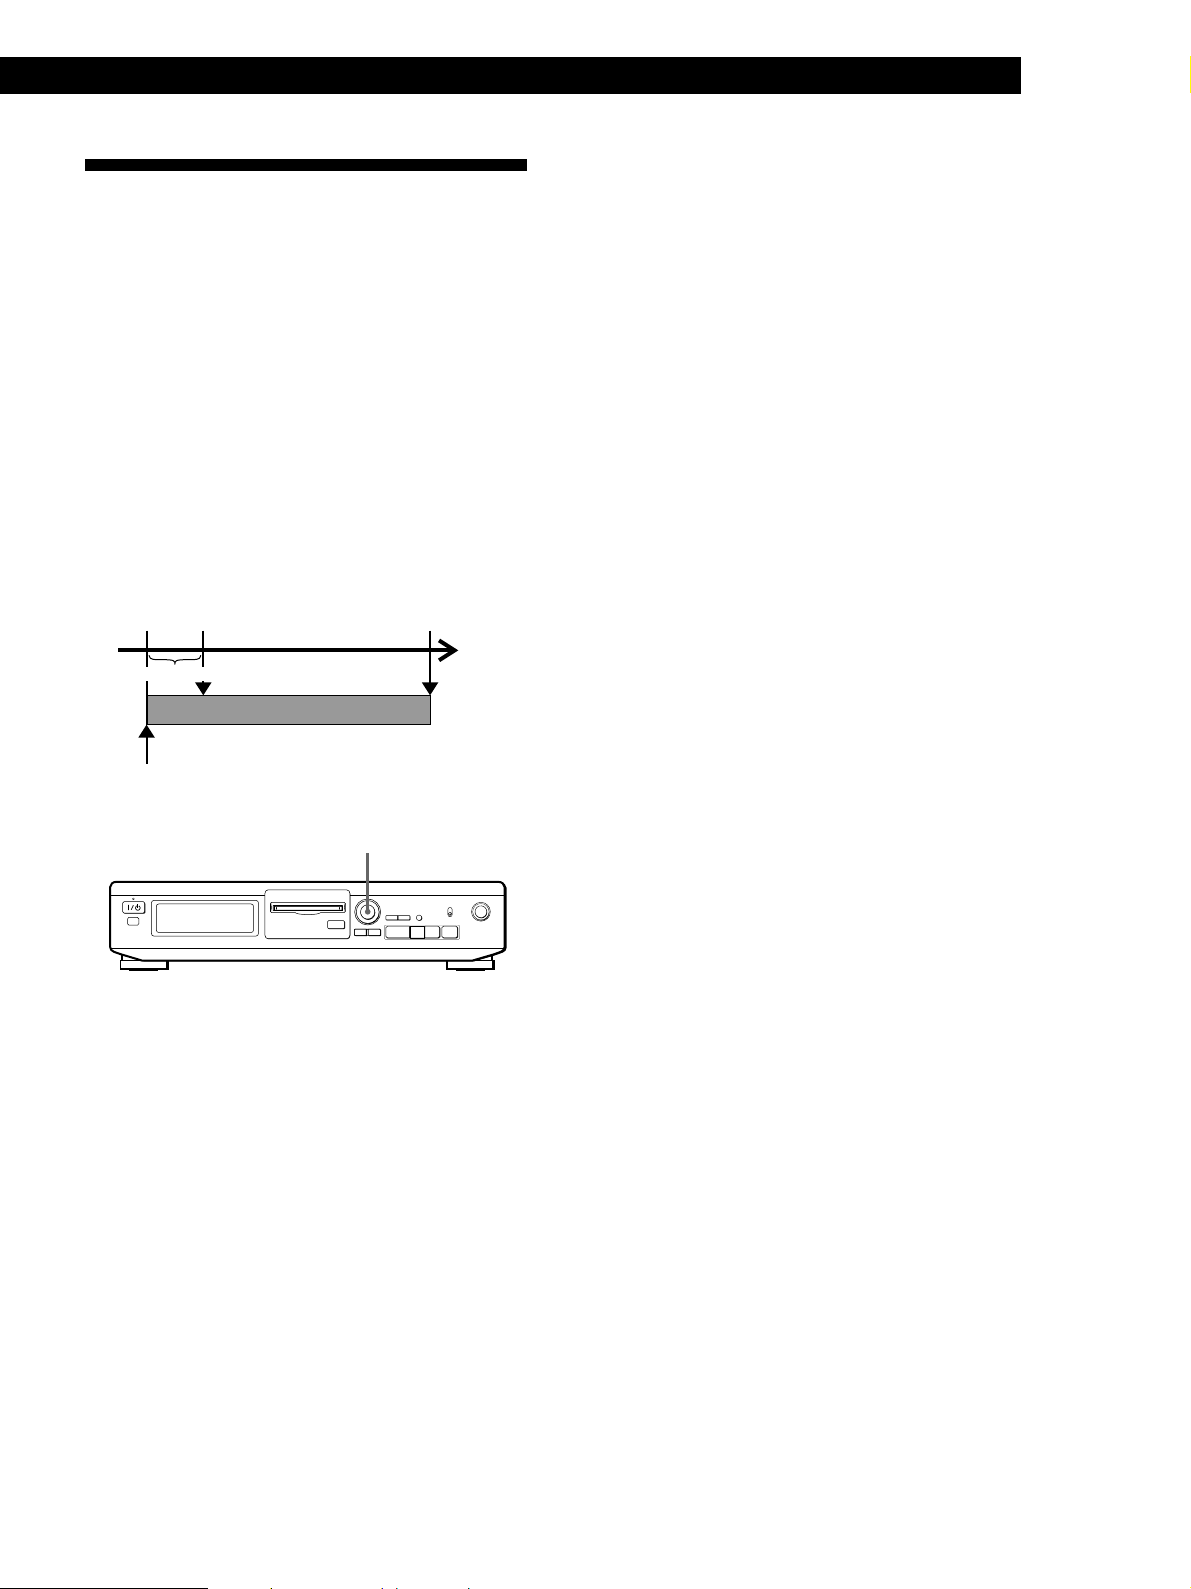
6 Seconds of Prestored Audio
Data (Time Machine Recording)
When recording from an FM or satellite broadcast, the
first few seconds of material are often lost due to the
time it takes you to ascertain the contents and press the
record button. To prevent the loss of this material, the
Time Machine Recording Function constantly stores
6 seconds of the most recent audio data in a buffer
memory so that when you begin recording the
program source using this function, the recording
actually begins with the 6 seconds of audio data stored
in the buffer memory in advance as shown in the
illustration below.
When you press
AMS in Step 3
Audio data in 6-second buffer memory
Beginning of the program
source to be recorded
End of the program
source to be recorded
Time
Recorded
portion
Note
The deck starts storing audio data when the deck is in
recording pause and you start playing the program source.
With less than 6 seconds of playing of the program source
and audio data stored in the buffer memory, Time Machine
Recording starts with less than 6 seconds of audio data.
≠ AMS ±
≠ ±
§
·
Pp0)r
1 Do Steps 1 to 5 in “Recording on an MD” on
pages 6 and 7.
The deck changes to recording pause.
2 Start playing the program source you want to
record.
The most recent 6 seconds of audio data is stored
in the buffer memory.
3 Press AMS to start Time Machine Recording.
Recording of the program source starts with the 6
seconds of audio data stored in the buffer
memory.
13
EN
Page 14

Playing MDs
Playing MDs
Using the Display
You can use the display to check disc and track
information such as the total track number, total
playing time of the tracks, remaining recordable time
of the disc and disc name.
DISPLAY/CHAR
≠ ±
§
·
Pp0)r
When you insert an MD, the disc name, total number
of tracks, total disc playing time, and the music
calender appear in the display as follows:
Disc name
Music calendar
√
Total number of tracks
Total disc playing time
Checking the total track number, total disc
playing time, remaining recordable time of
the disc and the title of the disc
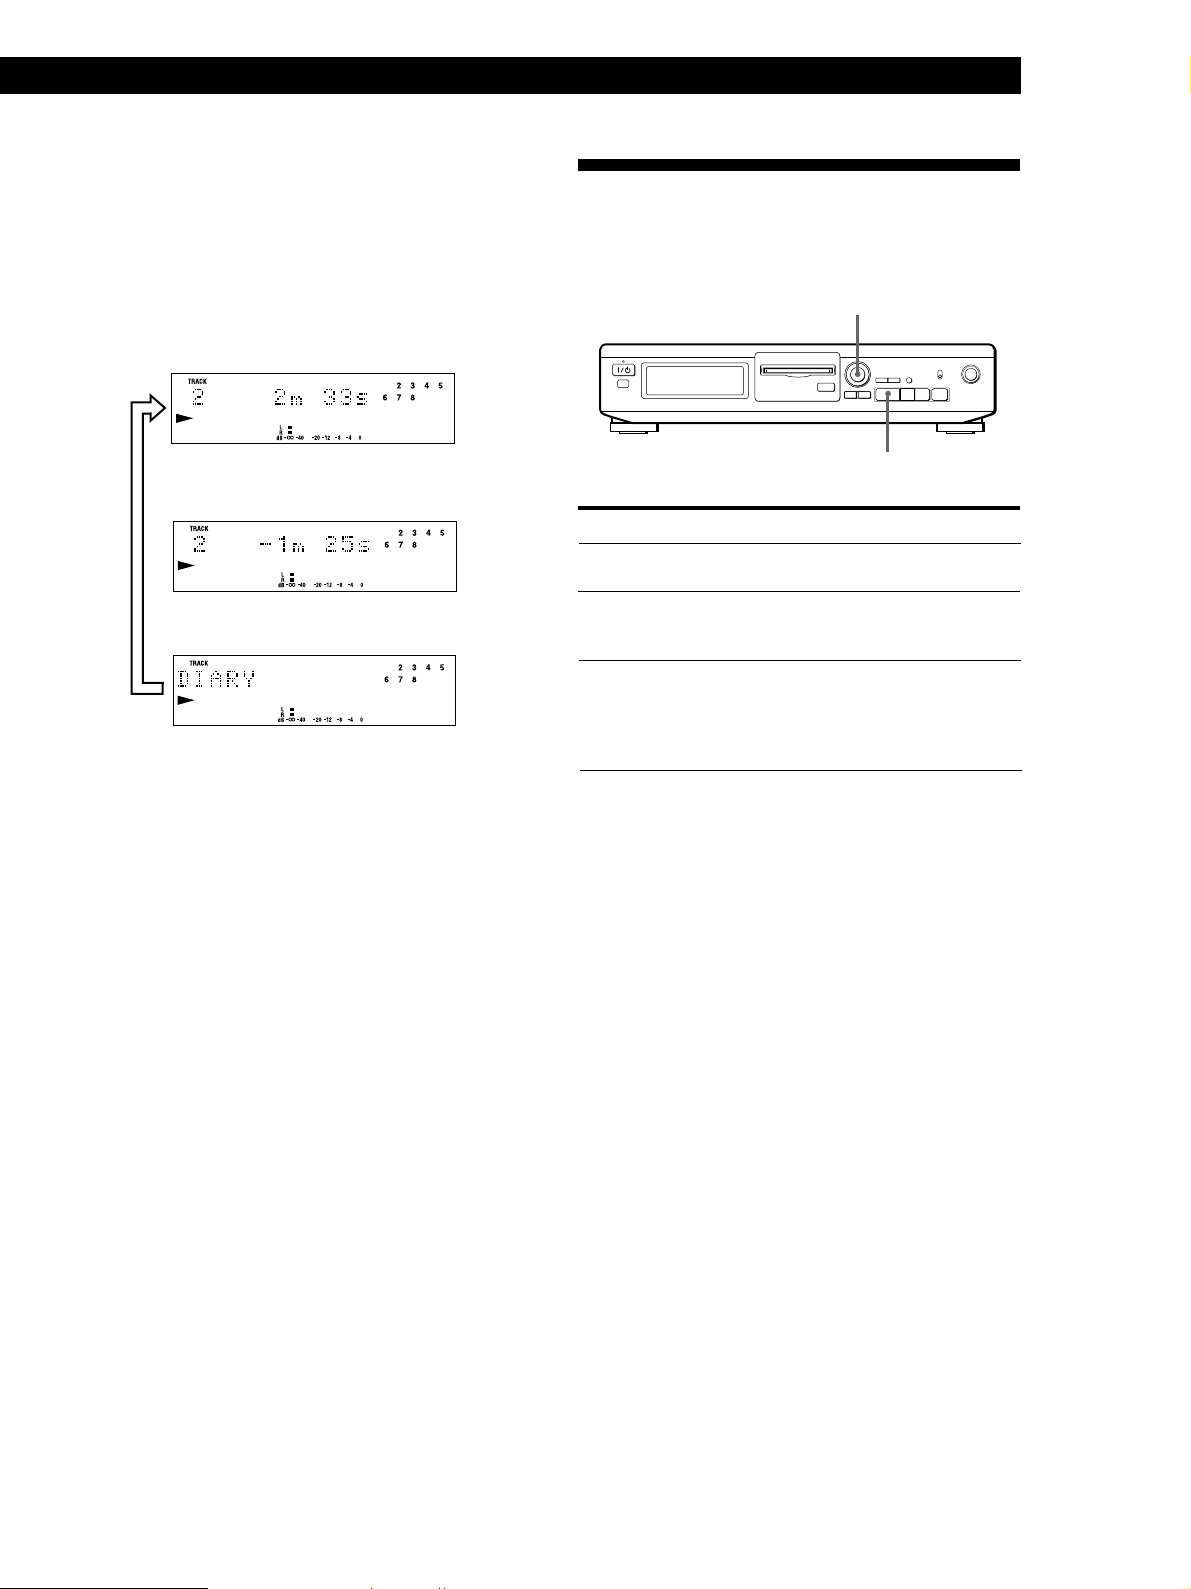
Each time you press DISPLAY/CHAR while the deck
is stopped, you can change the display as follows:
Total track number and total playing
time of all recorded tracks
Press
Remaining recordable time of the
disc (Recorded MDs only)
The remaining recordable time of the disc is
not shown for premastered MDs.
Disc name
√
√
Press
The disc name appears, followed by the total number
of tracks (Tr) and total disc playing time.
A music calendar showing all the track numbers
appears within a grid if the MD is a premastered disc,
or without a grid if the MD is a recordable disc.
If the total track number exceeds 25, z appears to the
right of number 25 in the music calendar.
To label a recordable disc and its tracks, see “Labeling
Recordings” on page 22.
14
Press
EN
Page 15
Checking remaining time and the title of a
≠ ±
Pp0)r
·
≠ AMS ±
§
·
track
Each time you press DISPLAY/CHAR while playing
an MD, you can change the display as shown below.
The track numbers in the music calendar disappear
after they are played.
Track number and playing time of the
current track
Press
Track number and remaining time of
the current track
Track name
Press
If no title is recorded, “No Name” appears,
followed by the elapsed playing time.
√
√
Press
Playing MDs
Locating a Specific Track
You can quickly locate any track while playing a disc
by using AMS (Automatic Music Sensor).
To locate
The next or
succeeding tracks
The current or
preceding tracks
A specific track by
using AMS
Do the following:
During playback, turn AMS clockwise
until you find the track.
During playback, turn AMS
counterclockwise until you find the
track.
1 Turn AMS until the track number
you want to locate appears while
the deck is stopped. (The track
number is flashing.)
2 Press AMS or ·.
To pause playing at the beginning of a track
z
Turn AMS after pausing playback.
z To go quickly to the beginning of the last track
Turn AMS counterclockwise while the display shows
the total track number and total disc playing time,
remaining recordable time of the disc, or disc name (see
page 14).
15
EN
Page 16

Playing MDs
Locating a Particular Point in a Track
You can also use 0 and ) to locate a particular
point in a track during playback or playback pause.
0/)
≠ ±
§
To locate a point Press
·
Pp0)r
While monitoring the
sound
Quickly by observing
the display during
playback pause
) (forward) or 0 (backward)
and keep pressing until you find
the point.
) or 0 and keep pressing
until you find the point. There is
no sound output during this
operation.
z If “OVER” appears while you are pressing )
during playback pause
The disc has reached to its end. Press 0 or turn AMS
counterclockwise to go back.
Notes
• If the disc reaches the end while you are pressing )
during sound monitoring, the deck stops.
• Tracks that are only a few seconds long may be too short
to scan using the search function. For such tracks, it is
better to play the MD at normal speed.
16
EN
Page 17
Editing Recorded MDs
Notes on Editing
You can edit the recorded tracks after recording, using
the following functions:
• Erase Function allows you to erase recorded tracks
simply by specifying the corresponding track
number.
• A-B Erase Function allows you to specify a portion
within a track to erase it.
• Divide Function allows you to divide tracks at
specified points so that you can quickly locate those
points afterwards, using the AMS function.
• Combine Function allows you to combine two
consecutive tracks into one.
• Move Function allows you to change the order of
tracks by moving a specific track to a track position
you want.
• Title Function allows you to create titles for your
recorded MDs and tracks.
• Undo Function allows you to cancel the last edit.
If “Protected” appears in the display
The deck could not edit because the record-protect slot
on the MD is open. Edit after closing the slot.
Editing Recorded MDs
Erasing a single track
You can erase a track simply by specifying the
respective track number. When you erase a track, the
total number of tracks on the MD decreases by one and
all tracks following the erased one are renumbered.
Since erasing merely updates the TOC, there is no need
to record over material.
z To avoid confusion when erasing multiple tracks,
you should proceed in order of high to low track
number to prevent the renumbering of tracks that
have not been erased yet.
Example: Erasing B
Track
number
Erasing
1
AB C D
1
AC D
23 4
B is erased
2
3
1 Turn AMS until the track number you want to
erase appears in the display.
When “TOC” flashes in the display
Do not move the deck or pull out the AC power cord.
After editing, “TOC” lights continuously until you
eject the MD or turn off the deck. “TOC” flashes while
the deck is updating the TOC. When the deck finishes
updating the TOC, “TOC” goes off.
Erasing Recordings (Erase Function)
Do the procedures below to erase following:
• A single track
• All tracks
≠ AMS ±
≠ ±
§
EDIT/NO YES
·
Pp0)r
2 Press EDIT/NO repeatedly until “Erase ?”
appears in the display.
The track number you selected starts flashing in
the music calendar.
3 Press YES.
When the track selected in Step 1 has been
erased, “Complete” appears for a few seconds
and the total number of tracks in the music
calendar decreases by one.
If you erase a track during playback, the track
following the deleted track begins playing
afterwards.
4 Repeat Steps 1 to 3 to erase more tracks.
To cancel the Erase Function
Press EDIT/NO, p, or turn AMS to change the track
number.
Note
If “Erase!! ?” appears in the display, the track was recorded
or edited on another MD deck and is record-protected. If
this indication appears, press YES to erase the track.
(Continued)
17
EN
Page 18

Editing Recorded MDs
Erasing all tracks on an MD
Erasing a recordable MD deletes the disc name, all
recorded tracks, and titles.
Erasing a Part of a T r ack (A-B Erase Function)
1 While the deck is stopped, press EDIT/NO
repeatedly until “All Erase ?” appears in the
display.
2 Press YES.
All tracks in the music calendar start flashing.
3 Press YES again.
When the disc name, all recorded tracks, and titles
on the MD have been erased, “Complete” appears
for a few seconds and the music calendar
disappears.
To cancel the Erase Function
Press EDIT/NO or p.
z You can undo the Erase Function
Use the Undo Function immediately after you erased
the track (see page 23).
You can specify a portion within a track and erase the
portion with ease. It is convenient when erasing
unnecessary sections after recording satellite broadcast
or FM broadcast.
Example: Erasing a part of track A
Track
number
Erasing
Point A Point B
A
#1A#2A#3
1
A (#1+#3)
EDIT/NO
2
B
2
B
≠ AMS ±
≠ ±
§
·
YES P
31
C
3
C
)
Pp0)r
1 While playing a disc, press P at the starting point
(point A) of the portion to be erased.
2 Press EDIT/NO repeatedly until “A-B Erase ?”
appears in the display.
3 Press YES.
“Rehearsal” alternates with “Point A ok?” in the
display and the starting point A of the portion to
be erased plays back repeatedly.
4 If point A is incorrect, press EDIT/NO. (If it is
correct, go to Step 7.)
5 While monitoring the sound, turn AMS to find
point A.
“Rehearsal” alternates with “Point A ok?” in the
display and point A is played back repeatedly.
Point A can be moved within a maximum range
of –128 to +127 steps of about 0.06 second each
within a track.
6 If point A is still incorrect, repeat Step 5 until it is
correct.
18
EN
Page 19

7 Press YES or AMS when point A is correct.
After “Point B Set” appears for a few seconds,
“ ( ” and “A-B” start flashing, and playback
begins so that you can set point B.
Editing Recorded MDs
Dividing Recorded Tracks (Divide Function)
8 Continue playing the track or press ) until you
reach the ending point (point B) of the portion to
be erased, then press YES.
“Rehearsal” alternates with “Point B ok?” in the
display, and the “spliced” portion of the track
(after the portion from point A to B has been
erased) plays back repeatedly, starting a few
seconds before point A and ending a few seconds
after point B.
9 If point B is incorrect, press EDIT/NO. (If it is
correct, go to Step 12.)
10
While monitoring the sound, turn AMS to find
point B.
“Rehearsal” alternates with “Point B ok?” in the
display, and the “spliced” portion of the track
(after the portion from point A to B has been
erased) plays back repeatedly.
Point B can be moved within a maximum range of
–128 to +127 steps of about 0.06 second each
within a track.
11
If point B is still incorrect, repeat Step 10 until it is
correct.
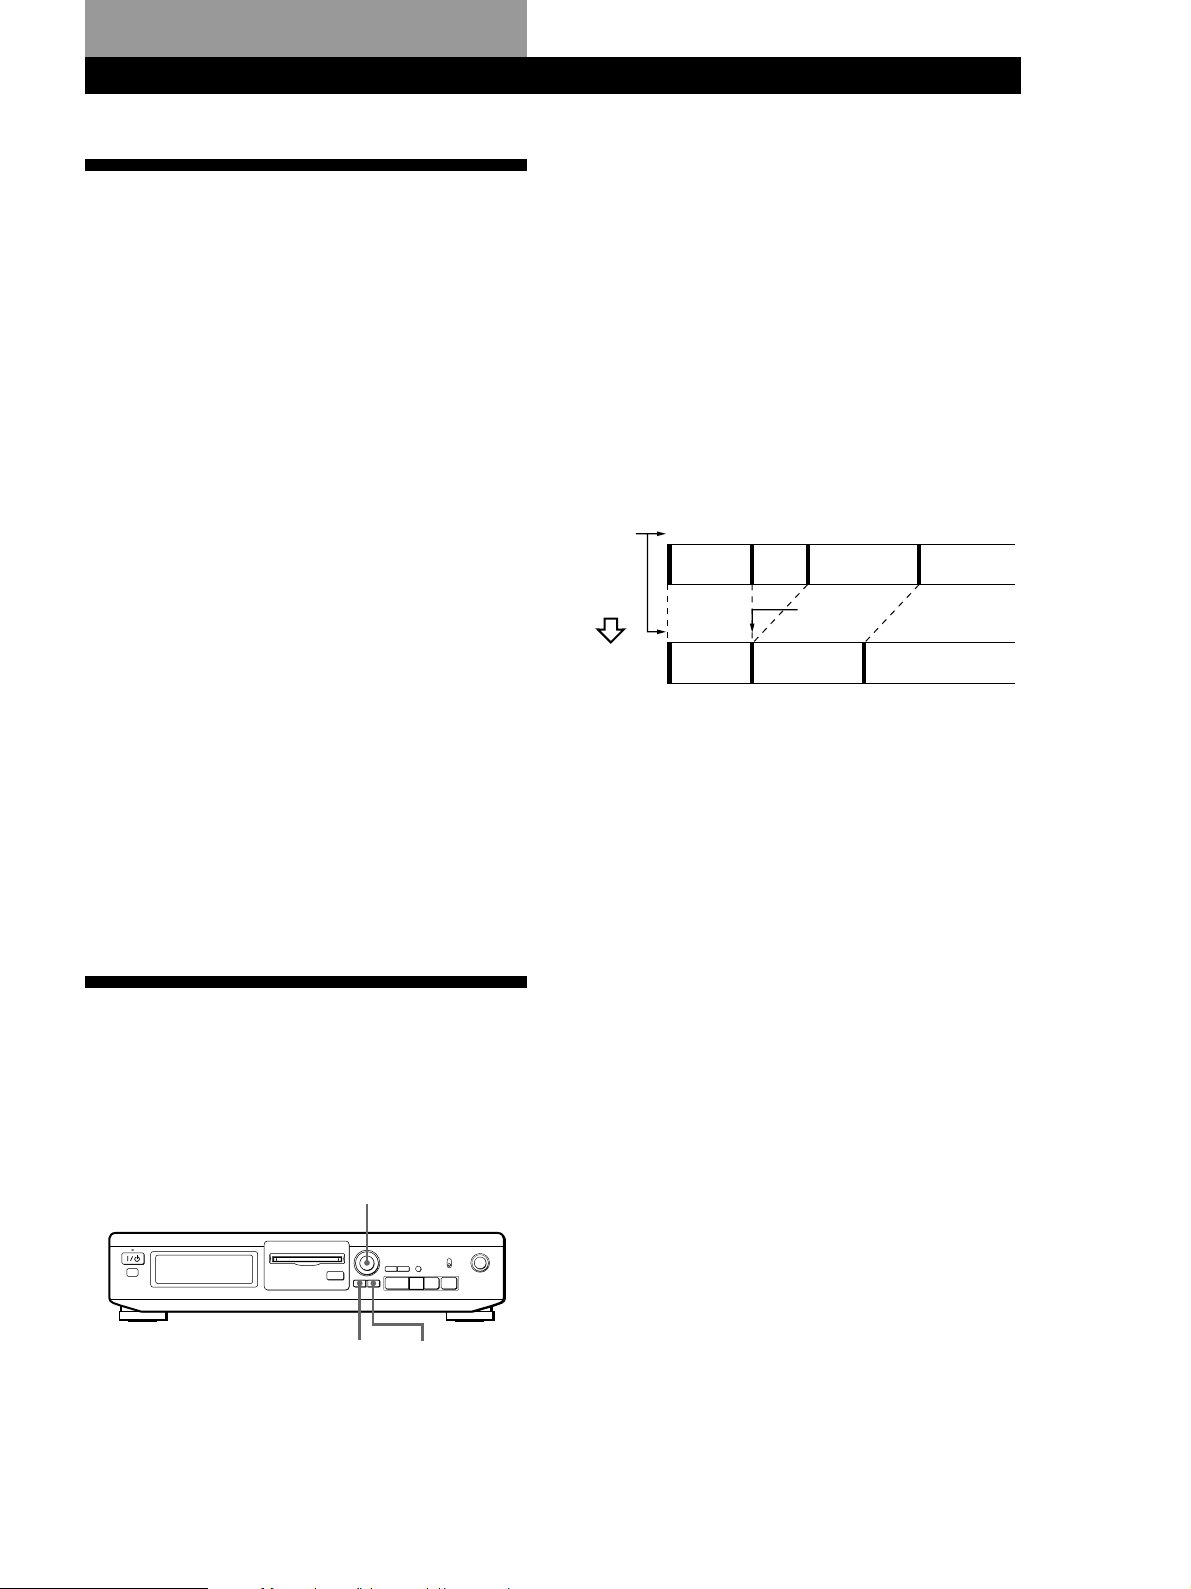
With the Divide Function you can mark a track
number at places that you want to randomly access
afterwards. Use this function to add tracks to MDs
recorded from an analog source (and therefore contain
no track numbers), or to divide an existing track into
multiple portions for locating positions in the middle
of a track. When you divide a track, the total number
of tracks on the MD increases by one and all tracks
following the divided track are renumbered.
Example: Dividing track 2 to create a new track for C
Track
number
Dividing
1
23
A
BC D
Track 2 is divided and a
2
A
new track is created for C
31
B
≠ AMS ±
§
4
≠ ±
·
DC
Pp0)r
12
Press YES or AMS when point B is correct.
When the portion from point A to B has been
erased, “Complete” appears for a few seconds.
To cancel the A-B Erase Function
Press p.
Notes
• If “Impossible” appears in the display, point B was
specified before point A. Specify point B so that it comes
after point A.
• If “Sorry” appears in the display, a portion of the track
cannot be erased. This sometimes happens when you’ve
edited the same track many times, and is due to a
technical limitation of the MD system, not a mechanical
error.
EDIT/NO
YES P
1 While playing the MD, press P at the point where
you want to create a new track.
The deck pauses playing.
2 Press EDIT/NO repeatedly until “Divide ?”
appears in the display.
3 Press YES to divide the track.
“Rehearsal” alternates with “Position ok?“ in the
display, the track to be divided starts flashing in
the music calendar, and the starting portion of the
new track begins playing repeatedly.
4 If the starting position is incorrect, press EDIT/
NO. (If it is correct, go to Step 7.)
(Continued)
19
EN
Page 20

Editing Recorded MDs
5 While monitoring the sound, turn AMS to find the
starting position of the new track.
The starting portion of the new track is played
back repeatedly.
“Rehearsal“ alternates with “Position ok?“ in the
display.
The starting position can be moved within a
maximum range of –128 to +127 steps of about
0.06 second each within a track.
6 If the starting position is still incorrect, repeat
Step 5 until it is correct.
Combining Recorded Tracks (Combine Function)
Use the Combine Function while the deck is stopped,
playing or in pause to combine consecutive tracks on a
recorded MD. This function is useful for combining
several songs into a single medley, or several
independently recorded portions into a single track.
When you combine two tracks, the total number of
tracks decreases by one and all tracks following the
combined tracks are renumbered.
7 Press YES or AMS when the position is correct.
When the track has been divided, “Complete”
appears for a few seconds and the newly created
track begins playing. The new track will have no
track title even if the original track was labeled.
To cancel the Divide Function
Press p.
z You can undo the Divide Function
Use the Undo Function immediately after you divided
the track (see page 23).
z You can divide a track while recording
Use the Track Marking Function (see page 12).
Example: Combining B and C
Track
number
Combining
123
AB C
12
AB C D
≠ AMS ±
§
EDIT/NO YES
4
D
B and C are combined
into one track
3
≠ ±
Pp0)r
·
p
1 Turn AMS until the second track of the two to be
combined appears.
For example, when combining tracks 3 and 4, turn
AMS until 4 appears.
2 Press EDIT/NO repeatedly until “Combine ?”
appears in the display.
20
3 Press YES.
“Rehearsal“ alternates with “Track ok?“ in the
display. The place where the two tracks will join
(i.e., the end of the first track and the beginning of
the second track) repeatedly plays back and the
respective track number flashes in the music
calendar.
4 If the track is the wrong one, press EDIT/NO or
p, then start from Step 1 again.
EN
Page 21

5 If the place is correct, press YES.
When the tracks have been combined,
“Complete” appears for a few seconds and the
total number of tracks in the music calendar
decreases by one.
If both of the combined tracks have track titles,
the title of the second track is erased.
To cancel the Combine Function
Press EDIT/NO or p.
Editing Recorded MDs
Moving Recorded Tracks (Move Function)
Use the Move Function to change the order of any
track. After you move a track, the track numbers
between the new and old track positions are
automatically renumbered.
Example: Moving track C to track position 2
z You can undo the Combine Function
Use the Undo Function immediately after you combined
the tracks (see page 23).
Note
If “Sorry” appears in the display, the tracks cannot be
combined. This sometimes happens when you’ve edited the
same track many times, and is due to a technical limitation
of the MD system, not a mechanical error.
Track
number
Moving
123 4
AB C D
Track C moves to
14
2
ACBD
track position 2
3
≠ AMS ±
≠ ±
§
EDIT/NO
·
Pp0)r
YES
1 Turn AMS until the track number you want to
move appears in the display.
2 Press EDIT/NO repeatedly until “Move ?”
appears in the display.
3 Press YES.
The track number to be moved and the new track
position appears.
Track number
to be moved
New track
position
4 Turn AMS until the new track position appears.
5 Press YES or AMS.
After you have moved the track, “Complete”
appears for a few seconds and the moved track
begins playing back if the deck is in playback
mode.
To cancel the Move Function
Press EDIT/NO or p.
21
EN
Page 22

Editing Recorded MDs
Labeling Recordings (Title Function)
You can create titles for your recorded MDs and tracks.
Titles — which may consist of uppercase and
lowercase letters, numbers and symbols for a
maximum of about 1,700 characters per disc — appear
in the display during MD operation.
4 Turn AMS to select the character.
The selected character flashes.
Letters, numbers, and symbols appear in
sequential order as you turn AMS.
You can use the following symbols in titles:
! ” # $ % & ’ ( ) * + , – . / : ; < = > ? @ _ `
≠ AMS ±
EDIT/NO
≠ ±
§
YES
DISPLAY/CHAR
Pp0)r
·
0/)
Use the following procedure to label a track or an MD.
You can label a track while it is playing, pausing or
recording. If the track is playing or recording, be
sure to finish labeling before the track ends. If the
track ends before you’ve completed the labeling
procedure, the characters already entered are not
recorded and the track will remain unlabeled.
1 Press EDIT/NO repeatedly until “Name in ?”
appears in the display, then do the following:
To label Make sure that the deck is
A track Playing, pausing, recording the track
An MD Stopped with no track number
to be labeled, or stopped after
locating the track to be labeled
appearing in the display
2 Press YES.
A flashing cursor appears in the display.
You can press DISPLAY/CHAR to change the
character type at any time during Step 4 (see
Step 3).
5 Press AMS to enter the selected character.
The cursor shifts rightward and waits for the
input of the next character.
6 Repeat Steps 3 to 5 until you have entered the
entire title.
If you entered the wrong character
Press 0 or ) until the character to be corrected
starts flashing, and repeat Steps 3 to 5 to enter the
correct character.
To erase a character
Press 0 or ) until the character to be erased
starts flashing, then press EDIT/NO.
To enter a space
Press AMS or ) while the cursor is flashing.
7 Press YES.
This completes the labeling procedure and the
title appears on the left side of the display.
22
EN
3 Press DISPLAY/CHAR to select the character
type as follows:
To select Press DISPLAY/CHAR repeatedly
until
Uppercase letters “A” appears in the display
Lowercase letters
Numbers “0” appears in the display
“a” appears in the display
To cancel labelling
Press p.
Note
You cannot label a track or an MD while you are recording
over an existing track.
Page 23

Erasing all titles on a disc (Name Erase)
Use this function to erase all titles on an MD
simultaneously.
Editing Recorded MDs
Undoing the Last Edit (Undo Function)
1 While the deck is stopped, press EDIT/NO
repeatedly until “All Erase ?” appears in the
display.
2 Press EDIT/NO again.
“Name Erase ?” appears in the display.
3 Press YES.
All titles are erased.
To cancel the Name Erase Function
Press p.
z You can undo the Name Erase Function
See “Undoing the Last Edit” on this page.
z You can erase all recorded tracks and titles
See “Erasing all tracks on an MD” on page 18.
You can use the Undo Function to cancel the last edit
and restore the contents of the MD to the condition that
existed before editing was done. Note, however, that
you cannot undo an edit if you do any of the following
after the edit:
• Press the r REC button on the deck.
• Update the TOC by turning off the deck or ejecting
the MD.
• Disconnect the AC power cord.
≠ ±
§
EDIT/NO YES
·
Pp0)r
1 With the deck stopped and no track number
appearing in the display, press EDIT/NO
repeatedly until “Undo ?” appears in the display.
“Undo ?” does not appear if no editing has been
done.
2 Press YES.
One of the following messages appears in the
display, depending on the type of editing to be
undone:
Editing done: Message:
Erasing a single track
Erasing all tracks on an MD “Erase Undo ?”
Erasing a part of a track
Dividing a track “Divide Undo ?”
Combining tracks “Combine Undo ?”
Moving a track “Move Undo ?”
Labeling a track or an MD
Erasing all titles on an MD
“Name Undo ?”
3 Press YES again.
“Complete” appears for a few seconds and the
contents of the MD are restored to the condition
that existed before the edit.
To cancel the Undo Function
Press EDIT/NO or p.
23
EN
Page 24

Additional Information
Additional Information
Display Messages
The following table explains the various messages that
appear in the display.
Message
Blank Disc
Cannot Copy
Disc Error
Disc Full
Impossible
Name Full
NO DISC
No Track
Protected
Retry
Retry Error
Sorry
Meaning
A new (blank) or erased MD has been
inserted.
An attempt was made to make a second
copy from a digitally dubbed MD (see
page 27).
The MD is scratched or missing a TOC.
Erase all tracks on a new recordable MD
before use (see “Erasing all tracks on an
MD” on page 18).
The MD is full (see “System Limitations”
on this page).
An attempt was made to combine tracks
while playing back the first track.
An attempt was made to specify point B
before point A for the “A-B Erase”. Point
B can only be specified so that it comes
after point A.
The titling capacity of the MD has reached
its limit (about 1,700 characters).
There is no MD in the deck.
The inserted MD has a disc title but no
tracks.
The inserted MD is record-protected.
The first recording attempt failed due to a
disturbance or scratch on the MD, and a
second attempt is being made.
Due to vibrations to the deck or scratches
on the MD, several recording attempts
were made but with no success.
An attempt was made to combine tracks
that cannot be combined.
An attempt was made to erase a portion of
a track that cannot be erased.
System Limitations
The recording system in your MiniDisc deck is
radically different from those used in cassette and DAT
decks and is characterized by the limitations described
below. Note, however, that these limitations are due to
the inherent nature of the MD recording system itself
and not to mechanical causes.
“Disc Full” lights up even before the MD has reached the
maximum recording time (60 or 74 minutes)
When 255 tracks have been recorded on the MD, “Disc Full”
lights up regardless of the total recorded time. More than
255 tracks cannot be recorded on the MD. To continue
recording, erase unnecessary tracks or use another
recordable MD.
“Disc Full” lights up before the maximum number of
tracks is reached
Fluctuations in emphasis within tracks are sometimes
interpreted as track intervals, incrementing the track count
and causing “Disc Full” to light up.
The remaining recording time does not increase even
after erasing numerous short tracks
Tracks under 12 seconds in length are not counted and so
erasing them may not lead to an increase in the recording
time.
Some tracks cannot be combined with others
Track combination may become impossible when tracks are
edited.
The total recorded time and the remaining time on the
MD may not total the maximum recording time (60 or
74 minutes)
Recording is done in minimum units of 2 seconds each, no
matter how short the material. The contents recorded may
thus be shorter than the maximum recording capacity. Disc
space may also be further reduced by scratches.
24
Tracks created through editing may exhibit sound
dropout during search operations.
Track numbers are not recorded correctly
Incorrect assignment or recording of track numbers may
result (1) when CD tracks are divided into several smaller
tracks during digital recording, or (2) while recording certain
CDs with the “LEVEL-SYNC” indication on (i.e., the
automatic track marking function on).
EN
Page 25

Additional Information
“TOC Reading” appears for a long time
If the inserted recordable MD is brand new, “TOC Reading”
appears in the display longer than for MDs that have been
used.
Limitations when recording over an existing track
• The correct remaining recording time may not be
displayed.
• You may find it impossible to record over a track if that
track has been recorded over several times already. If this
happens, erase the track using the Erase Function (see
page 17).
• The remaining recording time may be shortened out of
proportion to the total recorded time.
• Recording over a track to eliminate noise is not
recommended since this may shorten the duration of the
track.
• You may find it impossible to label a track while
recording over it.
The correct recorded/playing time may not be displayed
during playback of monaural-format MDs.
Troubleshooting
If you experience any of the following difficulties while
using the deck, use this troubleshooting guide to help you
remedy the problem. Should any problem persist, consult
your nearest Sony dealer.
The deck does not record.
/ The MD is record-protected (“Protected” appears).
Close the record-protect slot (see page 7).
/ The deck is not connected properly to the program
source. Make connections properly to the program
source.
/ The recording level is not adjusted properly (in case of
input through LINE (ANALOG) IN). Turn REC
LEVEL to adjust the recording level properly (see
page 11).
/ A premastered MD is inserted. Replace it with a
recordable MD.
/ There is not enough time left on the MD. Replace it
with another recordable MD with fewer recorded
tracks, or erase unnecessary tracks.
/ There has been a power failure or the AC power cord
has been disconnected during recording. Data
recorded to that point may be lost. Repeat the
recording procedure.
The sound has a lot of static.
/ Strong magnetism from a television or a similar device
is interfering with operations. Move the deck away
from the source of strong magnetism.
Note
If the deck does not operate properly even after you’ve
attempted the prescribed remedies, turn off the deck, then
reinsert the plug into the power outlet.
The deck does not operate or operates poorly.
/The MD may be damaged (“Disc Error” appears).
Take the MD out and insert it again. If “Disc Error”
remains, replace the MD.
The deck does not play back.
/Moisture has formed inside the deck. Take the MD out
and leave the deck in a warm place for several hours
until the moisture evaporates.
/The deck is not on. Press 1/u to turn the deck on.
/The MD is inserted in the wrong direction. Slide the
MD into the disc slot with the label side up and the
arrow pointing towards the opening.
/The MD may not be recorded (the music calendar does
not appear). Replace the disc with one that has been
recorded.
25
EN
Page 26

Additional Information
Specifications
System MiniDisc digital audio system
Disc MiniDisc
Laser Semiconductor laser (λ = 780 nm)
Emission duration: continuous
Laser output Less than 44.6 µW*
* This output is the value measured at a
distance of 200 mm from the objective
lens surface on the Optical Pick-up
Block with 7 mm aperture.
Laser diode properties Material: GaAIAs
Revolutions (CLV) 400 rpm to 900 rpm
Error correction Advanced Cross Interleave Reed
Solomon Code (ACIRC)
Sampling frequency 44.1 kHz
Coding Adaptive Transform Acoustic Coding
(ATRAC)
Modulation system EFM (Eight-to-Fourteen Modulation)
Number of channels 2 stereo channels
Frequency response 5 to 20,000 Hz ±0.3 dB
Signal-to-noise ratio Over 96 dB during playback
Wow and flutter Below measurable limit
General
Power requirements
Where purchased
Continental Europe 220 – 230 V AC, 50/60 Hz
U.S.A and Canada 120 V AC, 60 Hz
Power consumption
Continental Europe: 20 W
U.S.A and Canada: 19 W
Dimensions (approx.) (w/h/d) incl. projecting parts
Mass (approx.) 3.5 kg (7 lbs 11 oz)
Power requirements
430 × 93 × 280.5 mm
3
(17 × 3
/
× 111/8 in.)
4
Supplied accessories
See page 4.
Optional accessories
Recordable MDs MDW-60 (60 min), MDW-74 (74 min)
US and foreign patents licensed from Dolby Laboratories
Licensing Corporation.
Inputs
LINE
(ANALOG) IN
DIGITAL
OPTICAL IN
Outputs
LINE
(ANALOG)
OUT
Jack type
Phono
jacks
Square
optical
connector
jack
Phono
jacks
Input
impedance
47 kilohms
Optical
wave
length:
660 nm
2 Vrms
(at 50 kilohms)
Rated
input
500 mVrms
—
Load impedanceJack type Rated output
Over 10 kilohms
Minimum
input
125 mVrms
—
Design and specifications are subject to change without
notice.
26
EN
Page 27

Guide to the Serial Copy Management System
This MD deck uses the Serial Copy Management
System, which allows only first-generation digital
copies to be made of premastered software via the
deck’s digital input jack. An outline of this system
appears below:
1 You can record from digital program sources (CDs, DATs
or premastered MDs) onto a DAT tape or recordable MD
via digital input jack on the DAT or MD deck.
You cannot, however, record from this recorded DAT tape
or MD onto another DAT tape or recordable MD via the
digital input jack on the DAT or MD deck.
CD player
Additional Information
2 You can record the digital input signal of a digital satellite
broadcast onto a DAT tape or recordable MD via the
digital input jack on the DAT or MD deck which is capable
of handling a sampling frequency of 32 kHz or 48 kHz.
You can then record the contents of this recorded DAT
tape or MD (first-generation) onto another DAT tape or
recordable MD via digital input jack on the DAT or MD
deck to create a second-generation digital copy.
Subsequent recording from the second-generation copy
onto another recordable DAT tape or MD is possible only
through the analog input jack on the DAT or MD deck.
Note, however, that on some BS/CS tuners, secondgeneration digital copying may not be possible.
Playing
Optical cable or
coaxial digital
connecting cable
BS/CS tuner
Digital output jack
Digital input jack
MD deckDAT deck
Playing
Optical cable or
coaxial digital
connecting cable
Recording
DAT or MD
Playback
Digital output jack Line (analog) output jacks
Optical cable or
coaxial digital
connecting cable
Digital input jack Line (analog) input jacks
DAT deck or
MD deck
DAT deck or
MD deck
Digital output jack
Digital input jack
First-generation
DAT tape or MD
recorded via
digital-to-digital
connection
Audio connecting
cord
Recording
DAT or MD
Playback
Optical cable or
coaxial digital
connecting cable
Recording
DAT or MD
Playback
DAT deck or
MD deck
First-generation
DAT tape or MD
recorded via
digital-to-digital
connection
DAT deck or
MD deck
Digital output jack
Digital input jack
DAT deck or
MD deck
Secondgeneration DAT
tape or MD
recorded via
digital-to-digital
connection
DAT deck or
MD deck
Recording
DAT deck or
MD deck
Digital output jack
Optical cable or
coaxial digital
connecting cable
Digital input jack Line (analog) input jacks
Recording
DAT deck or
Line (analog) output jacks
Audio connecting
cord
MD deck
(Continued)
27
EN
Page 28

Additional Information
3 You can record a DAT tape or MD recorded via the DAT
or MD deck’s analog input jack onto another DAT tape or
MD via the DAT or MD deck’s digital output jack. You
cannot, however, make a second-generation DAT tape or
MD copy via the DAT or MD deck’s digital output jack.
Turntable
CD playerTuner
Cassette deck DAT deck
Microphone
amplifier
Playing
Audio connecting cord
Recording
DAT or MD
Playback
Optical cable or
coaxial digital
connecting cable
Recording
DAT deck or
DAT deck or
DAT deck or
MD deck
MD deck
MD deck
MD deck
Line (analog)
output jacks
Line (analog)
input jacks
DAT tape or MD
recorded via
analog-to-digital
connection
Digital output jack
Digital input jack
Index
A, B
A-B erase 18
AMS (Automatic Music Sensor) 15
Audio connecting cord 4, 27, 28
Auto cut 10
C
Cable
optical cable 4, 27, 28
Checking
remaining recordable time on the MD 10, 14
Cleaning 2
Combining 20
D
Display messages 24
Dividing 19
E, F, G
Erasing
all titles 23
all tracks 18
a part of a track 18
a single track 17
H, I, J, K
Hooking up
a digital component 4
an analog component 4
L
Labeling
an MD 22
a track 22
LEVEL-SYNC 9, 12
Locating
a particular point in a track 16
a specific track 15
28
EN
DAT or MD
Playback
Digital output jack
Optical cable or
coaxial digital
connecting cable
Digital input jack
Recording
DAT deck or
MD deck
Line (analog) output jacks
Line (analog) input jacks
DAT deck or
MD deck
First-generation
DAT tape or MD
recorded via
digital-to-digital
connection
Audio connecting
cord
M, N
MD
inserting 6, 8
premastered 14
recordable 6, 14
taking out 7, 8
Moving 21
Page 29

Additional Information
O
Optional accessories 26
P, Q
Pausing
playback 8
recording 7
Playing
normal play 8
Precautions 2
R
Recording
normal recording 6, 7
over existing tracks 11
time machine recording 13
Recording level 11
Record-protect tab 7
S
Sampling frequency 4, 27
Sampling rate converter 4
SCMS (Serial Copy
Management System) 9, 27
Smart space 10
Specifications 26
Supplied accessories 4
System limitations 24
T
Track marking
automatic track marking 12
manual track marking 12
Troubleshooting 25
U, V, W, X, Y, Z
Undoing the last edit 23
Names of controls
Buttons
DISPLAY/CHAR 10, 14, 22
EDIT/NO/YES 10, 12, 17 to 23
§ EJECT 7, 8
r REC (recording) 7, 12, 23
· (play) 7, 8, 10, 15
P (pause) 7, 8, 18, 19
p (stop) 7, 8, 10, 20
0/) (manual search)
16, 18, 22
Switches
INPUT 6, 9
1/u 6 to 8
Connectors
DIGITAL OPTICAL IN 4, 6, 9,
12
Controls
≠ AMS ± 8, 11, 13, 15,
17 to 22
REC LEVEL 7, 11
Indicator
1/u 6, 8
Jacks
LINE (ANALOG) IN/OUT
4, 6, 9, 12
Others
Display 14
Music calendar 14
TOC (Table Of Contents)
7, 9, 17
29
EN
Page 30

A VERTISSEMENT
Pour éviter tout risque
d’incendie ou d’électrocution,
ne pas exposer cet appareil à
la pluie ou à l’humidité.
Pour éviter tout choc
électrique, ne pas ouvrir le
coffret. Ne confier l’entretien
qu’à un technicien qualifié.
Le composant à laser de cet appareil
est susceptible d’émettre des
radiations dépassant la limite des
appareils de Classe 1.
AVERTISSEMENT POUR LES
UTILISATEURS AU CANADA
ATTENTION
POUR PREVENIR LES CHOCS
ELECTRIQUES, NE PAS UTILISER
CETTE FICHE POLARISEE AVEC UN
PROLONGATEUR, UNE PRISE DE
COURANT OU UNE AUTRE SORITIE
DE COURANT, SAUF SI LES LAMES
PEUVENT ETRE INSEREES A FOND
SANS EN LAISSER AUCUNE PARTIE
A DECOUVERT.
Précautions
Sécurité
Si un solide ou un liquide tombait dans
le coffret, débranchez la platine et faitesla vérifier par un professionnel avant de
la remettre sous tension.
Cartouche du minidisque
• Ne pas ouvrir le volet et exposer le
minidisque.
• Ne pas poser la cartouche dans un
endroit exposé directement au soleil,
à des températures extrêmes, à
l’humidité ou à la poussière.
Nettoyage
Nettoyez le coffret, le panneau et les
commandes avec un chiffon doux
légèrement mouillé d’une solution
savonneuse douce. Ne pas utiliser de
tampon abrasif, de poudre à récurer ni
de solvant, comme l’alcool ou l’essence,
qui pourrait abîmer la finition.
Pour toute question ou problème
concernant votre platine, adressez-vous
au revendeur Sony le plus proche.
Cet appareil fait partie des produits
laser de la CLASSE 1. L’étiquette
CLASS 1 LASER PRODUCT est collée à
l’arrière de l’appareil.
L’étiquette suivante est collée à
l’intérieur de la platine.
LE REVENDEUR NE PEUT EN
AUCUN CAS ÊTRE TENU
RESPONSABLE DE DOMMAGES
DIRECTS, INDIRECTS OU
ACCIDENTELS, QUELLE QU’EN
SOIT LA NATURE, OU DE PERTES
OU DEPENSES RESULTANT D’UN
PRODUIT DEFECTUEUX OU DE
L’UTILISATION D’UN PRODUIT.
Sources d’alimentation
• Avant de mettre la platine sous
tension, vérifiez si sa tension de
fonctionnement correspond à celle du
secteur local. La tension de
fonctionnement est indiquée sur la
plaque signalétique à l’arrière de la
platine.
• La chaîne n’est pas isolée du secteur
tant qu’elle reste branchée à la prise
secteur, même lorsqu’elle est éteinte.
• Débranchez la platine si vous n’avez
pas l’intention de l’utiliser pendant
longtemps. Pour déconnecter le
cordon d’alimentation secteur, tirez
sur la fiche proprement dite. Ne
jamais tirer sur le cordon.
• Si le cordon d’alimentation (secteur) a
besoin d’être changé, faites-le changer
dans un centre de réparation qualifié
uniquement.
Fonctionnement
Si la platine est portée directement d’un
endroit froid dans une pièce chaude, ou
si elle est placée dans une pièce très
humide, de l’humidité risque de se
condenser sur les lentilles à l’intérieur
de la platine. Dans ce cas la platine ne
fonctionne pas correctement. Sortez le
minidisque et laissez la platine pendant
environ une heure allumée pour que
l’humidité s’évapore.
Bienvenue!
Merci d’avoir porté votre choix sur cette
platine MiniDisc Sony. Avant de la
mettre en service, veuillez lire le mode
d’emploi avec attention et le conserver
pour toute référence future.
Au sujet de ce mode
d’emploi
Convention
Le symbole suivant est utilisé dans ce
mode d’emploi.
Indique des suggestions et
z
conseils qui simplifient une
opération.
F
2
Page 31

TABLE DES MATIÈRES
Préparatifs
Déballage ............................................................................................................................. 4
Raccordement du système................................................................................................ 4
Enregistrement d’un MD................................................................................................. 6
Lecture d’un MD................................................................................................................... 8
Enregistrement sur MD
Remarques sur l’enregistrement ..................................................................................... 9
Conseils utiles pour l’enregistrement .......................................................................... 10
Enregistrement sur des plages préexistantes .............................................................. 11
Réglage du niveau d’enregistrement ........................................................................... 11
Inscription des numéros de plage pendant l’enregistrement
(Marquage de plage) ....................................................................................................... 12
Début d’enregistrement avec mémorisation préalable de
6 secondes de données audio (Enregistrement avec préstockage).......................... 13
Lecture de MD
Utilisation de l’affichage ................................................................................................. 14
Localisation d’une plage donnée .................................................................................. 15
Localisation d’un point donné sur une plage ............................................................. 16
F
Montage de MD enregistrés
Remarques sur le montage ............................................................................................. 17
Effacement d’un enregistrement (Fonction ERASE).................................................. 17
Effacement d’un passage d’une plage (Fonction A-B Erase) ...................................18
Division d’une plage enregistrée (Fonction DIVIDE) ............................................... 19
Combinaison de plusieurs plages enregistrées (Fonction COMBINE) .................. 20
Déplacement d’une plage enregistrée (Fonction MOVE) ......................................... 21
Titrage d’un enregistrement (Fonction TITLE)........................................................... 22
Annulation de la dernier montage (Fonction UNDO) .............................................. 23
Informations supplémentaires
Messages affichés ............................................................................................................. 24
Limites du système .......................................................................................................... 24
Guide de dépannage ....................................................................................................... 25
Spécifications .................................................................................................................... 26
Système de protection contre la copie abusive ........................................................... 27
Index................................................................................................................................... 28
F
3
Page 32

Préparatifs
Préparatifs
Déballage
Vérifiez si les articles suivants se trouvent dans
l’emballage :
• Cordons de liaison audio (2)
• Câble optique (1)
Raccordements
Raccordement de la platine à un amplificateur
Raccordez l’amplificateur aux prises LINE (ANALOG)
IN/OUT à l’aide des cordons de liaison audio (fournis)
en tenant compte de la couleur des cordons et de celle
des prises : Les fiches rouges correspondent aux prises
rouges (canal droit) et les fiches blanches aux prises
blanches (canal gauche). Enfoncez les fiches à fond
dans les prises pour éliminer tout ronflement ou bruit.
Raccordement du système
Aperçu
Cette section explique comment raccorder la platine
MD à un amplificateur ou à d’autres appareils, comme
un lecteur CD ou une platine DAT. Avant de le
raccorder, n’oubliez pas d’éteindre tous les appareils.
DIGITAL
LINE
(ANALOG)
OPTICAL
OUTIN
IN
L
R
REC
OUT
ç
ç
ç
TAPE/MD
IN
Amplificateur
vers une prise murale
(ou une minuterie pour la
lecture ou l’enregistrement
programmé)
DIGITAL
OPTICAL OUT
Lecteur CD,
platine DAT ou
platine MD, etc.
Platine MD Amplificateur
LINE
(ANALOG)
OUTIN
ç
L
R
TAPE / MD
INOUT
L
R
Ç
çç
ç : Sens du signal
çç
Raccordement de la platine à un appareil numérique
tel qu’un lecteur CD, une platine DAT, un
amplificateur numérique ou une autre platine MD
Raccordez le composant par la prise DIGITAL
OPTICAL IN à l’aide d'un câble optique (fourni).
Retirez les capuchons des prises, puis insérez les fiches
parallèlement jusqu’à ce qu’elles se verrouillent avec
un déclic.
Ne pliez pas le câble optique et ne l'attachez pas.
Platine MD Composant numérique
DIGITAL
OPTICAL
IN
DIGITAL
OPTICAL
OUT
çç
ç : Sens du signal
çç
Ç
Quels cordons utiliser?
çç
ç : Sens du signal
• Cordons de liaison audio (fournis) (2)
çç
z Conversion automatique des cadences
Blanc (L)
(gauche)
Rouge (R)
(droit)
• Câble optique (fourni) (1)
F
4
Blanc (L)
(gauche)
Rouge (R)
(droit)
d’échantillonnage numériques pendant
l’enregistrement
Le convertisseur de cadence d’échantillonnage
incorporé convertit automatiquement la fréquence
d’échantillonnage de diverses sources numériques à la
cadence d’échantillonnage de 44,1 kHz de votre platine
MD. Ceci vous permet d’enregistrer des sources telles
que DAT ou émissions par satellite de 32 et 48 kHz ainsi
que des disques compacts et d’autres MD.
Page 33

Remarques
• Si “Din Unlock” ou “Cannot Copy” apparaît dans
l’afficheur, l’enregistrement par la prise numérique est
impossible.
Dans ce cas, enregistrez la source de programme par les
prises LINE (ANALOG) IN avec INPUT réglé sur
ANALOG.
• Lors d’un enregistrement via les prises DIGITAL
OPTICAL IN, vous ne pouvez pas régler le niveau
d’enregistrement.
Raccordement du cordon secteur
Branchez le cordon d’alimentation secteur sur une
prise murale ou sur la prise d’une minuterie.
Préparatifs
Préparatifs
F
5
Page 34

Opérations de base
Opérations de base
Enregistrement d’un MD
23
AMS (PUSH ENTER)
≠ ±
EJECT
§
0)
YESNO
EDIT
·
4
INPUT
DIGITAL
DISPLAY/CHAR
ANALOG
pp
r
P
REC
REC
7 5
Allumez l’amplificateur et reproduisez la source de
1
programme que vous voulez enregistrer.
Appuyez sur 1/u.
2
L’indicateur 1/u qui était rouge devient vert.
Insérez un minidisque enregistrable.
3
REC LEVEL
•
•
•
•
0
6
•
•
•
•
•
•
10
Dirigez la flèche
dans ce sens
Tournez la face
imprimée vers le haut
Si le minidisque a déjà été partiellement enregistré,
l’enregistrement commence à la fin de la dernière plage
enregistrée.
Réglez INPUT sur l’entrée correspondante.
4
Pour enregistrer par Réglez INPUT sur
DIGITAL OPTICAL IN DIGITAL
LINE (ANALOG) IN ANALOG
F
6
Page 35

Opérations de base
Appuyez sur r REC.
5
La platine est prête pour l’enregistrement.
Pendant l’enregistrement du signal d’entrée analogique, réglez
6
le niveau d’enregistrement avec REC LEVEL.
La quatrième position (point) est en général suffisante pour la
plupart des enregistrements. Pour les détails, voir “Réglage du
niveau d’enregistrement” page 11.
Appuyez sur · ou P.
7
L’enregistrement commence.
Commencez la lecture de la source de programme.
8
Quand “TOC” clignote dans
l’afficheur
La platine est en train de mettre à
jour le sommaire (TOC). Ne
déplacez pas la platine et ne
débranchez pas le cordon
d’alimentation secteur. Les
changements dus à
l’enregistrement ne sont
sauvegardés que lorsque le
sommaire a été mis à jour, soit par
l’éjection du minidisque ou la mise
en veille de la platine avec
l’interrupteur 1/u.
Ne débranchez pas la platine de la source d‘alimentation immédiatement
après un enregistrement.
Si vous débranchez le cordon d’alimentation pendant l’enregistrement ou
alors que “TOC” clignote sur l’afficheur, “STANDBY” clignotera sur
l’afficheur lorsque vous rallumerez la platine et l’enregistrement risque de ne
pas être sauvegardé normalement sur le MD. Pour sauvegarder
l’enregistrement qui vient d’être effectué, appuyez sur § EJECT pour sortir le
MD ou mettez la platine en veille en appuyant sur 1/u. “TOC” se met alors à
clignoter dans l’afficheur.
Quand “TOC” cesse de clignoter et s’éteint, vous pouvez débrancher la
platine.
Pour Appuyez sur
arrêter l’enregistrement p
arrêter momentanément P. Appuyez une nouvelle fois sur la touche ou
l’enregistrement* appuyez sur · pour poursuivre
l’enregistrement.
sortir le MD § EJECT après avoir arrêté l’enregistrement.
* Quand vous faites une pause d’enregistrement, le numéro de plage augmente
d’une unité. Si, par exemple, vous faites une pause pendant l’enregistrement de la
plage 4, le numéro de plage augmente d’une unité et l’enregistrement se poursuit
sur une nouvelle plage.
Opérations de base
Pour protéger un minidisque contre un effacement accidentel
Pour rendre tout enregistrement impossible sur un minidisque, poussez le
taquet de protection dans le sens de la flèche afin d’ouvrir la fente. Pour
permettre l’enregistrement, fermez la fente.
Taquet de protection
d’enregistrement
Arrière du minidisque
Poussez le taquet dans
le sens de la flèche.
F
7
Page 36

Opérations de base
Lecture d’un MD
2
3
AMS (PUSH ENTER)
≠ ±
DISPLAY/CHAR
EJECT
§
0)
YESNO
EDIT
·
·
Pp
INPUT
DIGITAL
ANALOG
r
REC
REC LEVEL
•
•
•
•
0
•
•
•
•
10
4
Allumez l’amplificateur et réglez le sélecteur de source sur la
1
position réservée à la platine MD.
Appuyez sur 1/u.
2
L’indicateur 1/u qui était rouge devient vert.
Insérez un minidisque.
3
•
•
z Vous pouvez localiser et
reproduire une plage quand
l’enregistreur est à l’arrêt
1 Tournez AMS jusqu’à ce
que le numéro de la plage
souhaitée apparaisse.
2 Appuyez sur AMS ou ·.
Tournez la face imprimée
Dirigez la flèche
dans ce sens
vers le haut
Appuyez sur ·.
4
La lecture commence. Réglez le volume sur l’amplificateur.
Pour Vous devez :
arrêter la lecture appuyer sur p.
arrêter momenanément appuyer sur P. Appuyez une nouvelle fois sur la
la lecture touche ou appuyez sur · pour poursuivre la
aller à la plage suivante tourner AMS dans le sens des aiguilles d’une
Revenir à la plage actuelle tourner AMS dans le sens inverse des aiguilles
ou à la plage précédente d’une montre.
sortir le MD appuyer sur § EJECT après avoir arrêter la
lecture.
montre.
lecture.
F
8
Page 37

Enregistrement sur MD
Remarques sur l’enregistrement
Si “Protected” apparaît sur l’afficheur
Le minidisque est protégé. Fermez la fente pour
enregistrer sur le disque (voir “Pour protéger un
minidisque contre un effacement accidentel” page 7).
Si “Din Unlock” clignote dans l’afficheur
• La source de programme n’est pas raccordée de la
correctement.
Pour continuer, raccordez correctement la source de
programme.
• La source de programme ne fonctionne pas.
Faites fonctionner la source de programme.
Les numéros des plages sont enregistrés de façon
différente selon la source de programme en cours
d’enregistrement :
• Lors de l’enregistrement d’un CD ou d’un MD avec
INPUT réglé sur DIGITAL et la source reliée à la
prise DIGITAL OPTICAL IN :
La platine inscrit automatiquement les numéros de
plages dans le même ordre que la source. Toutefois,
si une plage est répétée deux fois ou plus (par ex. lors
de la lecture répétée d’une seule plage) ou si deux
plages ou plus ayant le même numéro de plage (par
ex. les plages de différents minidisques ou CD) sont
reproduites, cette plage ou ces plages sont
enregistrées comme plage unique, continue avec un
seul numéro de plage.
Si la source est un MD, les numéros des plages qui
durent moins de 4 secondes risquent de ne pas être
inscrits.
• Si vous réglez INPUT sur ANALOG, que la source
est reliée à la prise LINE (ANALOG) IN et que
“LEVEL-SYNC” ne s’allume pas (voir “Inscription
des numéros de plage pendant l’enregistrement” à la
page 12), ou si vous enregistrez une source DAT ou
la radio satellite avec INPUT réglé sur DIGITAL et
que la source est reliée par un câble DIGITAL
OPTICAL IN :
La source sera enregistrée en une seule plage. Si
“LEVEL-SYNC” apparaît dans l’afficheur, la platine
inscrit automatiquement les numéros de plage
pendant l’enregistrement d’une source analogique
ou l’enregistrement numérique d’une cassette DAT
ou d’une émission radio satellite (voir “Marquage
automatique des numéros de plage” page 12).
• Pendant l’enregistrement d’une cassette DAT ou
d’une émission radio satellite avec INPUT réglé sur
DIGITAL, la platine inscrit automatiquement un
numéro de plage quand la fréquence
d’échantillonnage du signal d’entrée change.
Enregistrement sur MD
EnregistrementEnregistrement
z Les numéros de plage peuvent être inscrits pendant
ou après l’enregistrement
Pour les détails, voir “Inscription des numéros de plage
pendant l’enregistrement” (page 12) et “Division d’une
plage enregistrée” (page 19).
Quand “TOC” clignote dans l’afficheur
La platine est en train de mettre à jour le sommaire
(TOC). Ne déplacez pas la platine et ne débranchez pas
le cordon d’alimentation secteur. Les changements dus
à l’enregistrement ne sont sauvegardés que lorsque le
sommaire a été mis à jour, soit par l’éjection du
minidisque ou la mise en veille de la platine avec
l’interrupteur 1/u.
La platine MD utilise le système de protection
contre la copie abusive (SCMS : Serial Copy
Management System) décrit à la page 27
Les minidisques enregistrés par la prise d’entrée
numérique ne peuvent pas être copiés sur d’autres
minidisques ou cassettes DAT via la prise de sortie
numérique.
F
9
Page 38

Enregistrement sur MD
Conseils utiles pour l’enregistrement
DISPLAY/CHAR
≠ ±
§
EDIT/NO
Vérification du temps enregistrable restant
sur le MD
• Quand vous appuyez sur DISPLAY/CHAR en cours
d’enregistrement, le temps enregistrable restant sur
le minidisque apparaît.
• Quand vous appuyez à plusieurs reprises sur
DISPLAY/CHAR quand la platine est arrêtée,
l’affichage change comme suit : temps total
enregistré, temps enregistrable restant sur le MD,
titre du minidisque (voir page 14).
Si “Auto Cut” apparaît dans l’afficheur
Aucun son n’a été fourni pendant 30 secondes environ
lors de l’enregistrement. Le passage silencieux de
30 secondes est remplacé par un espace blanc de
3 secondes environ et la platine se met en pause
d’enregistrement.Si la pause se prolonge pendant
10 minutes après la mise en service de la fonction Auto
Cut, l’enregistrement s’arrête automatiquement.
Notez que lorsque l’enregistrement commence sur un
espace vierge de la bande, cette fonction ne se met pas
en service si aucun son n’a été fourni pendant
30 secondes environ.
YES
Pp0)r
·
·p
Pour mettre les fonctions Smart Space et Auto Cut
hors service
1 Pendant la pause d’enregistrement, appuyez de
façon répétée sur EDIT/NO jusqu’à ce que
“S. Space ?” apparaisse dans l’afficheur.
2 Appuyez sur YES.
3 Appuyez sur EDIT/NO pour afficher “S. Space
OFF.”
Pour remettre les fonctions Smart Space et Auto Cut
en service
1 Pendant la pause d’enregistrement, appuyez de
façon répétée sur EDIT/NO jusqu’à ce que
“S. Space ?” apparaisse dans l’afficheur.
2 Appuyez deux fois sur YES pour afficher
“S. Space ON.”
Remarques
• Quand vous arrêtez la fonction Smart Space, la fonction
Auto Cut est automatiquement désactivée.
• Les fonctions Smart Space et Auto Cut ont été mises en
service en usine.
• Si vous éteignez la platine ou débranchez le cordon
d’alimentation secteur, la platine rappellera le dernier
réglage (ON ou OFF) des fonctions Smart Space et Auto
Cut à la prochaine mise sous tension.
Lecture des plages venant d’être
enregistrées
Procédez comme suit pour écouter les plages qui
viennent d’être enregistrées.
Appuyez sur · immédiatement après avoir arrêté
l’enregistrement.
La lecture commence à partir de la première plage qui
vient d’être enregistrée.
10
z Vous pouvez mettre la fonction Auto Cut hors
service
Pour les détails, voir “Pour mettre les fonctions Smart
Space et Auto Cut hors service” sur cette page. Quand
vous arrêtez la fonction Auto Cut, la fonction Smart
Space est aussi automatiquement arrêtée.
Si “Smart Space” apparaît dans l’afficheur
Il y a eu un silence prolongé de 4 à 30 secondes lors de
l’enregistrement. Ce silence est remplacé par un
passage blanc de 3 secondes et la platine continue
l’enregistrement. Notez que les nouveaux numéros de
plage risquent de ne pas être inscrits quand cette
fonction est en service. Lorsque l’enregistrement
commence sur un espace vierge de la bande, la
fonction Smart Space ne se met pas en service même si
le silence s’est prolongé pendant 4 à 30 secondes quand
la platine a commencé à enregistrer à partir du passage
blanc.
F
Lecture à partir du début du minidisque après un
enregistrement
1 Appuyez encore une fois sur p après avoir arrêté
l’enregistrement.
2 Appuyez sur ·.
La lecture commence à partir de la première plage
du minidisque.
Page 39

Enregistrement sur MD
≠ ±
Pp0)r
·
REC LEVEL
§
EnregistrementEnregistrement
Enregistrement sur des plages préexistantes
Procédez comme suit pour enregistrer sur des plages
préexistantes exactement comme vous le faites avec
des cassettes analogiques.
≠ AMS ±
≠ ±
§
1 Effectuez les étapes de 1 à 4 de “Enregistrement
d’un MD” page 6.
2 Tournez AMS jusqu’à ce que le numéro de la
plage à enregistrer apparaisse.
3 Pour enregistrer du début de la plage, continuer
avec l’étape 5 de “Enregistrement d’un MD”
page 7.
z Quand “TRACK” clignote dans l’afficheur
C’est que la platine est en train d’enregistrer sur une
plage existante. Le clignotement cesse quand la fin du
passage enregistré est atteinte.
z Pour enregistrer à partir du milieu d’une plage
1 Après l’étape 2 ci-dessus, appuyez sur · pour
démarrer la lecture.
2 Appuyez sur P où vous voulez commencer
l’enregistrement.
3 Continuez avec l’étape 5 de “Enregistrement d’un
MD” page 7.
·
Pp0)r
Réglage du niveau d’enregistrement
Quand vous enregistrez une source sonore, alors que
INPUT est réglé sur ANALOG et que le signal passe
par la prise LINE (ANALOG) IN, réglez le niveau
d’enregistrement avec REC LEVEL avant de
commencer l’enregistrement.
Vous ne pouvez pas régler le niveau d’enregistrement
lors d’un enregistrement numérique.
1 Suivez les étapes 1 à 5 dans “Enregistrement d’un
MD” aux pages 6 et 7.
2 Reproduisez le passage de la source au niveau le
plus élevé.
3 Tout en écoutant le son, tournez REC LEVEL pour
ajuster le niveau d’enregistrement de manière que
les décibelmètres atteignent le point le plus élevé
mais en évitant que l’indication OVER s’allume.
“OVER” peut toutefois s’allumer de temps en
temps.
4 Arrêtez la lecture de la source de programme.
5 Pour commencer l’enregistrement, suivez les
explications de “Enregistrement d’un MD”
page 7, à partir de l’étape 7.
11
F
Page 40

Enregistrement sur MD
I
nscription des numéros de
plage pendant l’enregistrement
(Marquage de plage)
L’inscription des numéros de plage peut se faire
manuellement ou automatiquement. En inscrivant des
numéros à des points particuliers, vous pourrez
repérer rapidement ces points par la suite à l’aide de la
fonction AMS, ou utiliser les différentes fonctions de
montage.
≠ ±
§
·
Pp0)r
1 Appuyez sur EDIT/NO pour afficher
“LevelSync ?” pendant l’enregistrement ou la
pause d’enregistrement.
2 Appuyez deux fois sur YES pour afficher
“LevelSync ON”.
“LEVEL-SYNC” apparaît dans l’afficheur.
Pour annuler le marquage de plage
automatiquement
1 Appuyez sur EDIT/NO pendant l’enregistrement
ou la pause d’enregistrement.
“LevelSync ?” apparaît dans l’afficheur.
2 Appuyez sur YES.
3 Appuyez sur EDIT/NO.
“LevelSyncOFF” apparaît dans l’afficheur.
EDIT/NO
YES
r REC
Inscription manuelle des numéros de plage
(Marquage de plage manuellement)
Vous pouvez inscrire un numéro de plage sur un
minidisque quand vous le souhaitez en cours
d’enregistrement.
Appuyez sur r REC en cours d’enregistrement à
l’endroit où vous voulez ajouter un repère.
Inscription automatique des numéros de
plage (Marquage de plage automatiquement)
Le marquage de numéros s’effectue de manière
différente dans les cas suivants :
• Quand vous enregistrez un CD ou un MD, alors que
INPUT est réglé sur DIGITAL et que la source est
raccordée à la prise DIGITAL OPTICAL IN :
La platine inscrit les numéros de plage
automatiquement.
Toutefois, la fonction d’inscription automatique des
numéros de plage ne se met pas en service lorsque
vous enregistrez depuis certains lecteurs CD et
lecteurs multi-disque.
•
Quand vous enregistrez avec INPUT réglé sur
ANALOG et la source raccordée à la prise LINE
(ANALOG) IN, ou bien quand vous enregistrez une
source DAT ou la radio satellite avec INPUT réglé sur
DIGITAL et la source DAT ou la radio satellite
raccordée à la prise DIGITAL OPTICAL IN :
La platine inscrit un nouveau numéro chaque fois que
le niveau du signal tombe au-dessous et monte audessus d’un certain point* (marquage automatique de
plage). Si “LEVEL-SYNC” ne s’allume pas, réglez
LevelSync sur ON en procédant comme suit :
* Le niveau du signal doit rester faible pendant au moins
2 secondes avant qu’un nouveau numéro de plage soit
inscrit.
z Si vous voulez inscrire les numéros des plages après
l’enregistrement
Utilisez la fonction de division (voir “Division d’une
plage enregistrée” à la page 19).
Remarque
Si vous arrêtez la platine ou débranchez le cordon
d’alimentation secteur, les derniers réglages de la fonction
marquage de plage automatiquement (“ON” ou “OFF”)
seront rappelés à la prochaine mise sous tension de la
platine.
12
F
Page 41

Début d’enregistrement avec
Enregistrement sur MD
Pour arrêter cette fonction
Appuyez sur p.
EnregistrementEnregistrement
mémorisation préalable de
6 secondes de données audio
(Enregistrement avec
préstockage)
Quand vous enregistrez une émission FM ou satellite,
les premières secondes de l’émission que vous voulez
enregistrer sont souvent perdues à cause du temps
qu’il faut pour s’assurer du contenu de l’émission et
pour appuyer sur la touche d’enregistrement. Pour
éviter cet inconvénient, la fonction d’enregistrement
avec préstockage permet de mémoriser continuellement
les 6 dernières secondes de données audio dans la
mémoire tampon. Ainsi quand vous démarrez
l’enregistrement en utilisant cette fonction,
l’enregistrement commence en fait par ces 6 secondes
déjà stockées dans la mémoire tampon, ce qui peut être
illustré de la façon suivante :
Quand vous appuyez
sur AMS à l’étape 3
6 secondes de données audio dans la mémoire tampon
Fin de la source de
programme à enregistrer
Temps
Passage
enregistré
Remarque
La platine commence à mémoriser des données quand elle
est en mode de pause d’enregistrement et que vous
démarrez la lecture de la source de programme. Si la lecture
de la source dure moins de 6 secondes, les données
mémorisées seront inférieures à 6 secondes et
l’enregistrement avec préstockage sera lui aussi inférieur à
6 secondes.
Début de la source à
enregistrer
≠ AMS ±
≠ ±
§
·
Pp0)r
1 Effectuez les étapes 1 à 5 de “Enregistrement d’un
MD” pages 6 et 7.
La platine se met en pause d’enregistrement.
2 Démarrez la source de programme que vous
voulez enregistrer.
Les dernières 6 secondes de données audio sont
stockées dans la mémoire tampon.
3 Appuyez sur AMS pour démarrer
l’enregistrement avec préstockage de données.
L’enregistrement de la source de programme
commence par les 6 secondes de données audio
mémorisées.
13
F
Page 42

Lecture de MD
Lecture de MD
Utilisation de l’affichage
Vous pouvez vérifier les informations concernant un
minidisque ou une plage, telles que le nombre total de
plages, le temps de lecture total des plages, le temps
enregistrable restant sur le minidisque et le titre du
disque.
DISPLAY/CHAR
≠ ±
§
·
Pp0)r
Quand vous insérez un minidisque dans la platine, le
titre de ce disque, le nombre de plages total, le temps
de lecture total et le répertoire musical apparaissent
comme suit :
Nom du disque Répertoire
√
Nombre total
de plages
Temps total
de lecture
Contrôle du nombre de plages total, du
temps total de lecture, du temps
enregistrable restant sur le minidisque et
du titre du disque
Chaque fois que vous appuyez sur DISPLAY/CHAR
quand la platine est à l’arrêt, l’affichage change et
indique les informations suivantes :
Nombre total de plages et temps de lecture
total de toutes les plages enregistrées
Appuyez
Temps enregistrable restant sur le disque
(minidisques enregistrés uniquement)
Le temps enregistrable restant n’est pas
affiché pour les minidisques préenregistrés.
Titre du disque
√
√
Appuyez
Le nom du disque apparaît, puis le nombre total de
plages (Tr) et le temps total de lecture du disque.
Le répertoire indique tous les numéros de plages dans
une grille si le minidisque est un disque préenregistré
ou sans grille si le minidisque est enregistrable.
Si le nombre total de plages est supérieur à 25,
z apparaît à la droite du numéro 25 dans le répertoire.
Pour titrer un minidisque enregistrable et ses plages,
voir “Titrage d’un enregistrement” page 22.
14
Appuyez
F
Page 43

Contrôle du temps restant et du titre d’une
≠ ±
Pp0)r
·
≠ AMS ±
§
·
plage
Lecture de MD
Localisation d’une plage
Lecture
Chaque fois que vous appuyez sur DISPLAY/CHAR
pendant la lecture d’un minidisque, l’affichage change
comme suit. Les numéros dans le répertoire
disparaissent au fur et à mesure que les plages sont
lues.
Numéro de plage et temps de
lecture de la plage en cours
Appuyez
Numéro de plage et temps restant sur la
plage en cours
Titre de la plage
Appuyez
Si aucun titre n’est enregistré, “No
Name” apparaît, suivi du temps de
lecture écoulé.
√
√
Appuyez
donnée
Vous pouvez localiser rapidement une plage pendant
la lecture d’un minidisque avec la molette AMS
(recherche automatique de plage).
Pour localiser
la ou les plages
suivantes
la plage courante
ou les plages
précédentes
une plage donnée
en utilisant
la fonction AMS
Vous devez
pendant la lecture tourner AMS dans
le sens des aiguilles d’une montre
jusqu’à ce que vous trouviez la plage.
pendant la lecture tourner AMS dans
le sens contraire des aiguilles d’une
montre jusqu’à ce que vous trouviez
la plage.
1 tourner AMS jusqu’à ce que le
numéro de plage désiré apparaisse
avec la platine arrêtée (le numéro de
plage clignote).
2 appuyer sur AMS ou ·.
z Pour faire une pause au début d’une plage
Tournez AMS après avoir mis la lecture en pause.
z Pour aller rapidement au début de la dernière plage
Tournez AMS dans le sens contraire des aiguilles d’une
montre quand l’affichage indique le nombre total de
plages et le temps total de lecture sur le minidisque, le
temps enregistrable restant ou le nom du disque
(page 14).
15
F
Page 44

Lecture de MD
Localisation d’un point donné sur une plage
Vous pouvez aussi utiliser 0 et ) pour localiser un
point donné d’une plage pendant la lecture ou la pause
de lecture.
0/)
≠ ±
§
·
Pp0)r
Pour localiser un point
tout en écoutant le son
rapidement en
observant l’affichage
pendant la pause de
lecture
Appuyez sur
) (avant) ou 0 (arrière) en
continu jusqu’à ce que vous
trouviez le point souhaité.
) ou 0 en continu jusqu’à ce
que vous trouviez le point
souhaité. Dans ce cas, vous
n’entendez pas le son.
z Si “OVER” apparaît dans l’afficheur quand vous
appuyez sur ) pendant la pause de lecture
Vous avez atteint la fin du minidisque. Appuyez sur
0, ou tournez AMS vers la gauche pour revenir en
arrière.
Remarques
• Si vous atteignez la fin du disque en appuyant sur )
tout en contrôlant le son, la platine s’arrête.
• Les plages qui ne durent que quelques secondes peuvent
être trop courtes pour être localisées lors du balayage des
plages. Dans ce cas, il vaut mieux écouter le minidisque à
vitesse normale.
16
F
Page 45

Montage de MD enregistrés
Remarques sur le montage
Vous pouvez éditer les plages enregistrées en utilisant
les fonctions suivantes :
• La fonction d’effacement (fonction ERASE) vous
permet d’effacer les plages après l’enregistrement en
spécifiant simplement le numéro de plage
correspondant.
• La fonction A-B Erase permet de désigner un
passage d’une plage pour l’effacer.
• La fonction de division d’une plage enregistrée
(fonction DIVIDE) vous permet de diviser une plage
en des points donnés afin de pouvoir les localiser
rapidement par la suite à l’aide de la fonction AMS.
• La fonction de combinaison de plusieurs plages
enregistrées (fonction COMBINE) vous permet de
combiner deux plages consécutives en une seule.
• La fonction de déplacement d’une plage enregistrée
(fonction MOVE) vous permet de changer l’ordre de
plages en déplaçant une plage donnée sur la position
désirée.
• La fonction de titrage d’un enregistrement (fonction
TITLE) vous permet de créer des titres pour les MD
et plages que vous enregistrez.
• La fonction Undo permet d’annuler le dernier
montage.
Si “Protected” apparaît dans l’afficheur
La platine n’a pu effectuer le montage des plages
enregistrées car la fente de protection contre
l’enregistrement du MD est ouverte. Effectuez le
montage après avoir fermé la fente.
Si “TOC” clignotent dans l’afficheur
Ne bougez pas la platine et ne débranchez pas le
cordon d’alimentation. Après le montage, “TOC” reste
allumé jusqu’à ce que vous éjectiez le minidisque ou
éteigniez la platine. Pendant que la platine met le
sommaire à jour, “TOC” clignote. “TOC” s’éteint
quand toutes les données ont été enregistrées.
Effacement d’un enregistrement (Fonction ERASE)
Montage de MD enregistrés
Effacement d’une seule plage
Vous pouvez effacer une plage en spécifiant
simplement le numéro de la plage. Quand vous effacez
une plage, le nombre total de plages sur le minidisque
diminue d’une unité et toutes les plages qui suivent la
plage effacée sont renumérotées. Le sommaire (TOC)
étant remis à jour quand des plages sont effacées,
l’enregistrement sur un ancien enregistrement est
inutile.
z Pour éviter toute confusion lors de l’effacement de
plusieurs plages, vous devez effacer les plages en
partant des numéros de plage les plus grands et
allant aux plus petits, afin d’éviter une
renumérotation inutile des plages qui n’ont pas
encore été effacées.
Exemple : Effacement B
Numéro
de plage
Effacement
123
A
1
AC D
B
B est effacée
2
CD
4
3
1 Tournez AMS jusqu’à ce que le numéro de la
plage que vous voulez effacer apparaisse dans
l’afficheur.
2 Appuyez de façon répétée sur EDIT/NO jusqu’à
ce que “Erase ?” apparaisse dans l’afficheur.
Le numéro de la plage sélectionnée se met à
clignoter dans le répertoire.
3 Appuyez sur YES.
Quand la plage sélectionnée à l’étape 1 est effacée,
“Complete” apparaît pendant quelques secondes
et le nombre total de plages dans le repertoire
diminue d’une unité.
Si vous effacez une plage pendant la lecture, la
plage suivant celle qui a été effacée est
immédiatement reproduite.
4 Répétez les étapes 1 à 3 pour effacer d’autres
plages.
Procédez comme suit pour effacer :
• une seule plage
• toutes les plages
≠ AMS ±
§
EDIT/NO YES
≠ ±
·
Pp0)r
Pour annuler la fonction Erase
Appuyez sur EDIT/NO, p, ou tournez AMS pour
changer de numéro de plage.
Remarque
Si “Erase!! ?” apparaît dans l’afficheur, la plage a été
enregistrée ou montée sur une autre platine MD et elle est
protégée. Si cette indication apparaît, appuyez sur YES pour
effacer la plage.
(Voir page suivante)
17
F
Page 46

Montage de MD enregistrés
Effacement de toutes les plages d’un MD
Quand vous effacez un MD enregistrable, toutes les
plages, les titres et le titre du minidisque enregistrés
sont effacés.
1 Quand la platine est à l’arrêt, appuyez de façon
répétée sur EDIT/NO jusqu’à ce que “All Erase ?”
apparaisse dans l’afficheur.
Effacement d’un passage d’une plage (Fonction A-B Erase)
Vous pouvez désigner un passage particulier d’une
plage et l’effacer facilement. Cette fonction est pratique
si vous voulez supprimer des passages inutiles après
l’enregistrement d’une émission satellite ou FM.
2 Appuyez sur YES.
Toutes les plages dans le répertoire clignotent.
3 Appuyez encore une fois sur YES.
Une fois que le titre du minidisque, toutes les
plages et les titres enregistrés sur le minidisque
sont effacés, “Complete” apparaît pendant
quelques secondes, puis le répertoire disparaît.
Pour annuler la fonction Erase
Appuyez sur EDIT/NO ou p.
z Vous pouvez annuler la fonction Erase
Utilisez la fonction Undo juste après avoir effacé la
plage (voir page 23).
Exemple : Effacement d’un passage de la plage A
Numéro
de plage
Effacement
Point A Point B
1
A#2A
A
#1
1
A (#1+#3)
EDIT/NO
2
#3
2
≠ AMS ±
§
B
B
≠ ±
·
YES P
3
C
3
C
)
Pp0)r
1 Pendant la lecture du disque, appuyez sur P au
début (point A) de la partie à effacer.
2 Appuyez de façon répétée sur EDIT/NO jusqu’à
ce que “A-B Erase ?” apparaisse sur l’afficheur.
18
3 Appuyez sur YES.
“Rehearsal” et “Point A ok?” apparaissent
alternativement sur l’afficheur, et le point A de la
partie à effacer est lu de façon répétée.
4 Si le point A est incorrect, appuyez sur EDIT/NO.
(S’il est correct, passez à l’étape 7.)
5 En écoutant le son, tournez AMS pour trouver le
point A.
“Rehearsal” et “Point A ok?” apparaissent
alternativement sur l’afficheur et le point A est lu
de façon répétée.
Vous pouvez déplacer le point A de –128 à +127
incréments d’environ 0,06 seconde chacun dans
une plage.
6 Si le point A est encore incorrect, répétez l’étape 5
jusqu’à ce qu’il soit correct.
F
Page 47

7 Si le point A est correct, appuyez sur YES ou
AMS.
Lorsque “Point B Set” apparaît pendant quelques
secondes, “(” et “A-B” clignotent et la lecture
commence pour vous permettre de spécifier le
point B.
8 Continuez la lecture de la plage ou appuyez sur
) jusqu’à la fin (point B) de la partie à effacer,
puis appuyez sur YES.
“Rehearsal” et “Point B ok?” apparaissent
alternativement sur l’afficheur et la partie “collée”
de la plage (après effacement de la partie A à B)
est lue de façon répétée depuis quelques secondes
avant le point A jusqu’à quelques secondes après
le point B.
9 Si le point B est incorrect, appuyez sur EDIT/NO.
(S’il est correct, passez à l’étape 12.)
10
En écoutant le son, tournez AMS pour trouver le
point B.
“Rehearsal” et “Point B ok?” apparaissent
alternativement sur l’afficheur et la partie “collée”
de la plage (après effacement de la partie A à B)
est lue de façon répétée.
Vous pouvez déplacer le point B de –128 à +127
incréments d’environ 0,06 seconde chacun dans
une plage.
11
Si le point B est encore incorrect, répétez
l’étape 10 jusqu’à ce qu’il soit correct.
Montage de MD enregistrés
Division d’une plage enregistrée (Fonction DIVIDE)
Avec la fonction Divide vous pouvez numéroter des
positions précises, ce qui vous permettra de les
localiser facilement par la suite. Utilisez aussi cette
fonction pour ajouter des numéros de plage aux
minidisques enregistrés à partir d’une source
analogique (car ils ne contiennent pas de numéros de
plage), ou pour diviser une plage en plusieurs parties
pour pouvoir localiser des points de cette plage par la
suite. Quand vous divisez une plage, le nombre de
plages total sur le minidisque augmente d’une unité et
toutes les plages qui suivent sont renumérotées.
Exemple : Division de la plage 2 pour créer une nouvelle
plage C
Numéro
de plage
Division
1
1
23
A
A
B
2
BC D
C
La plage 2 est divisée et une
nouvelle plage est créée pour C.
3
≠ AMS ±
§
≠ ±
4
Pp0)r
·
D
12
Si le point B est correct, appuyez sur YES ou AMS.
Quand la partie A à B a été effacée, “Complete”
apparaît pendant quelques secondes.
Pour annuler la fonction A-B Erase
Appuyez sur p.
Remarques
• Si “Impossible” apparaît sur l’afficheur, le point B a été
spécifié avant le point A. Spécifiez le point B après le point
A.
• Si “Sorry” apparaît sur l’afficheur, une partie de la plage
ne peut être effacée. Ceci se produit parfois lorsque vous
avez édité la même plage de nombreuses fois et provient
des limites techniques du système MD et non d’une erreur
mécanique.
EDIT/NO
YES P
1 Pendant la lecture du minidisque, appuyez sur P
à la position où vous voulez créer une nouvelle
plage.
La platine se met en pause de lecture.
2 Appuyez de façon répétée sur EDIT/NO jusqu’à
ce que “Divide ?” apparaisse sur l’afficheur.
3 Appuyez sur YES pour diviser la plage.
“Rehearsal” et “Position ok?” apparaissent
alternativement sur l’afficheur, la plage qui doit
être divisée se met à clignoter dans le répertoire et
la position de départ de la nouvelle plage est
répétée.
4 Si la position de départ de la plage est incorrecte,
appuyez sur EDIT/NO. (Si elle est correcte,
passez à l’étape 7.)
(Voir page suivante)
19
F
Page 48

Montage de MD enregistrés
5 Tout en écoutant le son, tournez AMS pour
trouver la position de départ de la nouvelle plage.
Le début de la nouvelle plage est reproduit de
façon répétée.
“Rehearsal” et “Position ok?” apparaissent
alternativement sur l’afficheur.
Vous pouvez déplacer la position de départ
de –128 à +127 incréments d’environ 0,06 seconde
chacun dans une plage.
6 Si la position de départ n’est toujours pas correcte,
répétez l’étape 5 jusqu’à ce que vous trouviez la
position correcte.
7 Appuyez sur YES ou sur AMS quand vous avez
trouvé la position correcte.
Quand la plage a été divisée, “Complete” apparaît
pendant quelques secondes et la nouvelle plage
est reproduite. Cette plage n’a pas de titre, même
si la plage originale en a un.
Pour annuler la fonction Divide
Appuyez sur p.
z Vous pouvez annuler la fonction Divide
Utilisez la fonction Undo immédiatement après avoir
divisé la plage (voir page 23).
z Vous pouvez diviser une plage pendant
l’enregistrement
Dans ce cas, utilisez le marquage de plage (voir
page 12).
Combinaison de plusieurs plages enregistrées (Fonction COMBINE)
Utilisez la fonction de combinaison pendant l’arrêt, la
lecture ou la pause pour combiner des plages
consécutives d’un MD enregistré. Cette fonction est
pratique lorsque vous voulez combiner plusieurs
chansons pour faire un pot-pourri, ou différents
passages enregistrés séparément pour obtenir une
seule plage. Quand vous combinez deux plages, le
nombre total de plages diminue d’une unité et toutes
les plages qui suivent les plages combinées sont
renumérotées.
Exemple : Combinaison de B et C
Numéro
de plage
Combinaison
123 4
AB
12
AB
C
B et C sont réunies
en une plage
≠ AMS ±
≠ ±
§
3
CD
Pp0)r
·
D
20
EDIT/NO YES
p
1 Tournez AMS jusqu’à ce que la deuxième des
deux plages à combiner apparaisse.
Par exemple, pour combiner les plages 3 et 4,
tournez AMS jusqu’à ce que 4 apparaisse.
2 Appuyez de façon répétée sur EDIT/NO jusqu’à
ce que “Combine ?” apparaisse sur l’afficheur.
3 Appuyez sur YES.
“Rehearsal” et “Track ok?” apparaissent
alternativement sur l’afficheur. La position où les
deux plages seront réunies (c’est-à-dire la fin de la
première et le début de la seconde plage) est
répétée et le numéro de chaque plage clignote sur
l’afficheur.
4 Si ce n’est pas la bonne plage, appuyez sur
EDIT/NO ou p, et recommencez à l’étape 1.
F
Page 49

5 Si la position est correcte, appuyez sur YES.
Quand les plages ont été combinées, “Complete”
apparaît sur l’afficheur pendant quelques secondes
et le nombre total de plages dans le répertoire
diminue d’une unité.
Si les deux plages combinées ont des titres, le titre
de la deuxième est effacé.
Pour annuler la fonction Combine
Appuyez sur EDIT/NO ou p.
z Vous pouvez annuler une combinaison de plages
Utilisez la fonction Undo immédiatement après avoir
combiné les plages (voir page 23).
Remarque
Si “Sorry” apparaît sur l’afficheur, les plages ne peuvent pas
être combinées. Ceci se produit parfois lorsque vous avez
édité la même plage de nombreuses fois et provient des
limites techniques du système MD et non d’une erreur
mécanique.
Montage de MD enregistrés
Déplacement d’une plage enregistrée (Fonction MOVE)
Utilisez la fonction de déplacement pour changer
l’ordre des plages. Quand une plage est déplacée, les
plages entre la nouvelle et l’ancienne position sont
automatiquement renumérotées.
Exemple : Déplacement de la plage C à la position 2
Numéro
de plage
Déplacement
1
14
2
3
AC
ACBD
B
La plage C prend
la position 2
2
≠ AMS ±
≠ ±
§
4
D
3
Pp0)r
·
EDIT/NO
YES
1 Tournez AMS jusqu’à ce que le numéro de la
plage que vous voulez déplacer apparaisse dans
l’afficheur.
2 Appuyez de façon répétée sur EDIT/NO jusqu’à
ce que “Move ?” apparaisse.
3 Appuyez sur YES.
Le numéro de la plage à déplacer et la nouvelle
position apparaissent.
Numéro de plage
à déplacer
Nouvelle position
de la plage
4 Tournez AMS jusqu’à ce que la nouvelle position
apparaisse.
5 Appuyez sur YES ou AMS.
Quand vous avez déplacé la plage, “Complete”
apparaît dans l’afficheur pendant quelques
secondes et la plage déplacée est reproduite si la
platine est en mode de lecture.
Pour annuler la fonction MOVE
Appuyez sur EDIT/NO ou p.
21
F
Page 50

Montage de MD enregistrés
Titrage d’un enregistrement
3 Appuyez sur DISPLAY/CHAR pour sélectionner
le type de caractère comme suit :
(Fonction TITLE)
Vous pouvez créer des titres pour les minidisques et
les plages que vous avez enregistrés. Les titres qui
peuvent comprendre des lettres majuscules ou
minuscules, des chiffres ou des symboles, et un
maximum de 1 700 caractères par minidisque,
apparaissent dans l’afficheur quand vous utilisez la
platine MD.
≠ AMS ±
EDIT/NO
Procédez comme suit pour titrer une plage ou un
minidisque.
Vous pouvez donner un titre à une plage quand
elle est en cours de lecture ou d’enregistrement ou
en pause. Si elle est en cours de lecture ou
d’enregistrement, le titre doit être créé avant la fin
de la plage. Si la plage que vous voulez titrer en
cours de lecture ou d’enregistrement se termine
avant que vous ayez le temps d’inscrire tout le titre,
les caractères entrés ne sont pas enregistrés et la
plage reste sans titre.
1 Appuyez de façon répétée sur EDIT/NO jusqu’à
ce que “Name in ?” apparaisse dans l’afficheur, et
effectuez les démarches suivantes :
≠ ±
§
YES
DISPLAY/CHAR
Pp0)r
·
0/)
Pour sélectionner
Appuyez de façon répétée sur
DISPLAY/CHAR jusqu’à ce que
les majuscules
les minuscules
les chiffres
“A” apparaisse dans l’afficheur
“a” apparaisse dans l’afficheur
“0” apparaisse dans l’afficheur
4 Tournez AMS pour choisir un caractère.
Le caractère sélectionné clignote.
Des lettres, des chiffres et des symboles
apparaissent dans l'ordre quand vous tournez
AMS.
Vous pouvez utiliser les symboles suivants dans
les titres :
! ” # $ % & ’ ( ) * + , – . / : ; < = > ? @ _ `
Vous pouvez changer le type de caractère à l'étape
4 en appuyant sur DISPLAY/CHAR (voir
l'étape 3).
5 Appuyez sur AMS pour valider le caractère choisi.
Le curseur va à droite et attend que vous entriez
un nouveau caractère.
22
Pour titrer
une plage
un MD
2 Appuyez sur YES.
Un curseur clignotant apparaît dans l’afficheur.
F
Assurez-vous que la platine est
en cours de lecture, de pause ou
d’enregistrement de la plage à titrer,
ou à l’arrêt après la localisation de la
plage à titrer.
à l’arrêt et sans numéro de plage
affiché.
6 Répétez les étapes 3 à 5 jusqu’à ce que vous ayez
entré tout le titre.
En cas d’erreur
Appuyez sur 0 ou ) jusqu’à ce que le
caractère que vous voulez changer se mette à
clignoter, puis répétez les étapes 3 à 5 pour entrer
le bon caractère.
Pour effacer un caractère
Appuyez sur 0 ou ) jusqu’à ce que le
caractère que vous voulez effacer se mette à
clignoter, puis appuyez sur EDIT/NO.
Pour entrer un espace
Appuyez sur AMS ou ) quand le curseur
clignote.
Page 51

Montage de MD enregistrés
7 Appuyez sur YES.
Le titrage est terminé et le titre apparaît sur la
gauche de l’afficheur.
Pour annuler la fonction de titrage
Appuyez sur p.
Remarque
Vous ne pouvez pas titrer une plage ou un minidisque
quand vous superposez un enregistrement à une plage
préexistante.
Effacement de tous les titres d’un
minidisque (Name Erase)
Cette fonction vous permet d’effacer simultanément
tous les titres d’un minidisque.
1 Appuyez de façon répétée sur EDIT/NO quand la
platine est à l’arrêt jusqu’à ce que
“All Erase ?” apparaisse dans l’afficheur.
2 Appuyez encore une fois sur EDIT/NO.
“Name Erase ?” apparaît dans l’afficheur.
3 Appuyez sur YES.
Tous les titres sont effacés.
Pour annuler la fonction Name Erase
Appuyez sur p.
z Vous pouvez annuler la fonction Name Erase
Voir “Annulation du dernier montage” sur cette page.
z Vous pouvez effacer toutes les plages et tous les
titres enregistrés
Voir “Effacement de toutes les plages d’un MD” à la
page 18.
• Appuyé sur la touche r REC de la platine.
• Mis à jour le sommaire (TOC) en éteignant l’appareil
ou éjectant le MD.
• Débranché le cordon d’alimentation secteur.
≠ ±
§
EDIT/NO YES
·
Pp0)r
1 Quand la platine est à l’arrêt et qu’aucun numéro
de plage n’est affiché, appuyez plusieurs fois sur
EDIT/NO jusqu’à ce que “Undo ?” apparaisse
dans l’afficheur. “Undo ?” n’apparaît pas si aucune
opération de montage n’a été effectuée.
2 Appuyez sur YES.
Un des messages suivants apparaît dans l’afficheur
en fonction de l’opération de montage à supprimer :
Opération de montage Message :
effectuée :
Effacement d’une seule
plage
Effacement de toutes les
plages d’un MD
Effacement d’un passage
d’une plage
Division d’une plage “Divide Undo ?”
Combinaison de plages “Combine Undo ?”
Déplacement d’une plage “Move Undo ?”
Titrage d’une plage ou d’un
MD
Effacement de tous les titres
des plages d’un MD
“Erase Undo ?”
“Name Undo ?”
Annulation de la dernier montage (Fonction UNDO)
La fonction d’annulation permet d’annuler la dernier
montage et de rétablir le contenu du MD aux
conditions préalables à l’opération de montage.
Cependant, vous ne pouvez pas utiliser cette fonction
si vous avez effectué une des opérations suivantes
après le montage :
3 Appuyez de nouveau sur YES.
“Complete” apparaît pendant quelques secondes
et le contenu du MD est rétabli aux conditions
préalables à l'opération de montage.
Pour annuler la fonction Undo
Appuyez sur EDIT/NO ou p.
23
F
Page 52

Informations supplémentaires
Informations supplémentaires
Messages affichés
Le tableau ci-dessous explique les divers messages qui
apparaissent dans l’afficheur.
Messages Signification
Blank Disc Un minidisque neuf (vierge) ou effacé a
été inséré.
Cannot Copy Vous essayez de faire une seconde copie
d’un minidisque copié numériquement
(voir page 27).
Disc Error Le minidisque est rayé ou n’a pas de
sommaire.
Avant l’utilisation, effacez toutes les
plages du nouvel MD enregistrable (voir
“Effacement de toutes les plages d’un
MD” à la page 18).
Disc Full Le minidisque est plein (voir “Limites du
système” sur cette page).
Impossible Vous essayez de combiner des plages
pendant la lecture de la première plage.
Vous essayez de spécifier le point B avant
le point A pour la fonction A-B Erase. Le
point B ne peut être spécifié qu’après le
point A.
Name Full La capacité de titrage du minidisque a
atteint sa limite (environ 1 700 caractères).
NO DISC Il n’y a pas de minidisque dans la platine.
No Track Le minidisque inséré comporte un titre
mais pas de plages.
Protected Le minidisque inséré est protégé.
Retry Le premier essai d’enregistrement a
échoué à cause de perturbations ou de
rayures sur le minidisque et un second
essai est en cours.
Retry Error Plusieurs essais d’enregistrement ont
échoué à cause de vibrations ou de
rayures sur le minidisque.
Sorry Vous essayez de combiner des plages qui
ne peuvent pas l’être.
Vous essayez d’effacer une partie d’une
plage qui ne peut être effacée.
Limites du système
Le système d’enregistrement de la platine MiniDisc est
complètement différent de ceux des magnétocassettes
et des platines DAT. Il est caractérisé par les limites
décrites ci-dessous. Ces limites sont liées au système
d’enregistrement MiniDisc et ne sont pas dues à des
défaillances mécaniques.
“Disc Full” s’allume avant que le temps d’enregistrement
maximum du minidisque (60 ou 74 minutes) ne soit atteint
Si vous avez enregistré 255 plages sur le minidisque, “Disc
Full” s’allume, quel que soit le temps total d’enregistrement.
Vous ne pouvez pas enregistrer plus de 255 plages sur le
minidisque. Pour continuer l’enregistrement, effacez des
plages inutiles ou utilisez un autre minidisque enregistrable.
“Disc Full” s’allume avant que le nombre maximum de
plages ne soit atteint
Des fluctuations d’intensité entre les plages peuvent parfois
être interprétées comme des espaces interplages. Le nombre
total de plages augmente alors et “Disc Full” s’allume.
Le temps d’enregistrement restant n’augmente pas après
l’effacement de plusieurs plages courtes
Les plages de moins de 12 secondes ne sont pas comptées et le
temps n’augmente pas quand vous les effacez.
Certaines plages ne peuvent pas être recombinées
La combinaison peut être impossible si les plages ont subi
plusieurs opérations de montage.
Le total du temps d’enregistrement et du temps restant
sur le minidisque ne correspond pas au temps
d’enregistrement maximum (60 ou 74 minutes)
L’enregistrement est effectué par unités de 2 secondes au
minimum, quelle que soit la longueur des plages ; c’est
pourquoi le temps d’enregistrement peut être inférieur à la
capacité maximum. L’espace sur le minidisque peut
également être réduit par des rayures.
Les plages créées par montage peuvent présenter des
pertes de son pendant les opérations de recherche.
24
Les numéros des plages ne sont pas enregistrés
correctement
Une numérotation incorrecte des plages peut avoir lieu quand
(1) des plages d’un CD sont divisées en plusieurs plages plus
petites pendant l’enregistrement numérique, ou (2) certains
CD sont enregistrés avec “LEVEL-SYNC” allumée (par ex.
quand la fonction de marquage automatique des plages est en
service).
F
Page 53

Informations supplémentaires
Informations supplémentaires
“TOC Reading” reste affiché pendant longtemps
Si le minidisque enregistrable inséré est neuf, “TOC Reading”
reste affiché plus longtemps que pour un minidisque qui a
déjà été utilisé.
Limites lors de l’enregistrement sur une plage
préexistante
• Le temps correct d’enregistrement restant peut ne pas être
affiché.
• Vous ne parviendrez éventuellement pas à enregistrer sur
une ancienne plage, si cette plage a été réenregistrée
plusieurs fois. Dans ce cas, effacez la plage avec la
fonction Erase (voir page 17).
• Le temps d’enregistrement restant peut être trop court,
sans proportion avec le temps total d’enregistrement.
• L’enregistrement sur une plage pour éliminer du bruit
n’est pas conseillé car la durée de la plage pourrait être
réduite.
• Il est parfois impossible de titrer une plage enregistrée sur
une autre.
Le temps d’enregistrement/lecture affiché peut être
inexact pendant la lecture d’un minidisque mono.
Guide de dépannage
Si vous rencontrez un des problèmes suivants en cours
d’utilisation, reportez-vous à ce guide pour le résoudre. Si
vous n’y parvenez pas, consultez votre revendeur Sony.
L’enregistrement est impossible.
/ Le minidisque est protégé (“Protected” apparaît).
Fermez la fente de protection (voir page 7).
/ La platine n’est pas raccordée correctement à la source
sonore. Raccordez correctement la source sonore.
/ Le niveau d’enregistrement n’est pas réglé
correctement (en cas d’entrée par LINE (ANALOG)
IN). Tournez REC LEVEL pour régler correctement le
niveau d’enregistrement (voir page 11).
/ Un minidisque préenregistré a été inséré. Remplacez-le
par un minidisque enregistrable.
/ Il ne reste pas assez d’espace sur le minidisque.
Remplacez le minidisque par un autre sur lequel moins
de plages ont été enregistrées ou effacez des plages.
/ Il y a eu une panne d’électricité ou le cordon
d’alimentation secteur a été débranché pendant
l’enregistrement. Les données enregistrées à ce moment
ont peut-être été perdues. Refaites l’enregistrement.
Le son est très parasité.
/ Le magnétisme puissant d’un téléviseur ou d’un
appareil similaire gêne le fonctionnement. Eloignez la
platine de la source de magnétisme.
Remarque
Si la platine ne fonctionne toujours pas normalement malgré
les vérifications précédentes, mettez-la hors tension et
réinsérez la fiche dans la prise murale.
La platine ne fonctionne pas bien ou pas du tout.
/Le minidisque est peut-être endommagé (“Disc Error”
apparaît). Sortez le minidisque et insérez-le à
nouveau. Si “Disc Error” reste affiché, remplacez le
minidisque.
La lecture est impossible.
/De la condensation s’est formée dans la platine.
Sortez le minidisque et laissez la platine dans une
pièce chaude pendant quelques heures pour que
l’humidité s’évapore.
/La platine est éteinte. Appuyez sur 1/u pour
l’allumer.
/Le minidisque est inséré dans le mauvais sens.
Insérez le minidisque dans la fente avec la face
étiquetée tournée vers le haut et la flèche dirigée vers
l’ouverture.
/Le minidisque n’est peut-être pas enregistré (le
répertoire n’apparaît pas). Remplacez-le par un
minidisque enregistré.
25
F
Page 54

Informations supplémentaires
Spécifications
Système Système audio numérique MiniDisc
Disque Minidisque
Laser
Sortie du laser Inférieure à 44,6 µW*
Propriétés de la diode laser Matériau : GaAIAs
Vitesse de rotation (CLV) 400 à 900 tr/mn
Correction d’erreur Code Reed Solomon
Fréquence d’échantillonnage 44,1 kHz
Codage Codage acoustique par
Système de modulation Modulation huit à quatorze
Nombre de canaux 2 canaux stéréo
Réponse en fréquence 5 à 20 000 Hz ±0,3 dB
Rapport signal/bruit Supérieur à 96 dB pendant la lecture
Pleurage et scintillement Non mesurable
Laser à semi-conducteur (λ = 780 nm)
Durée d’émission : continue
* Cette sortie est la valeur mesurée à
une distance de 200 mm de la
surface de l’objectif sur le capteur
optique avec une ouverture de
7 mm.
d’entrelacement croisé avancé
(ACIRC : Advanced Cross
Interleave Reed Solomon Code)
transformation adaptive
(ATRAC : Adaptive Transform
Acoustic Coding)
(EFM : Eight-to-Fourteen
Modulation)
Généralités
Alimentation
Lieu d’achat Alimentation
Europe continentale Secteur 220 – 230 V, 50/60 Hz
Étas-Unis et Canada Secteur 120 V, 60 Hz
Consommation électrique
Europe continentale 20 W
Étas-Unis et Canada 19 W
Dimensions hors tout (approx.) (l/h/p)
Poids (approx.) 3,5 kg (7 li 11 on.)
Accessoires fournis
Voir page 4.
Accessoires en option
Minidisques enregistrables
Dolby Laboratories Licensing Corporation autorise une
license d’exploitation de ses brevets d’invention américains et
étrangers.
La conception et les spécifications peuvent être modifiées sans
préavis.
430 × 93 × 280.5 mm
3
/4 × 11 1/8 po.)
(17 × 3
MDW-60 (60 min.), MDW-74 (74 min.)
Entrées
LINE
(ANALOG) IN
DIGITAL
OPTICAL IN
Sorties
LINE
(ANALOG)
OUT
Type de
prise
cinch
Prise
optique
carrée
Type de
prise
Prises
cinch
Impédance
d’entrée
Longueur
d’onde
optique :
660 nm
Sortie
nominale
2 Vrms
(à 50 kilohms)
Entrée
nominale
500 mVrms47 kilohmsPrises
Entrée
minimale
125 mVrms
—
Impédance de charge
Supérieure à
10 kilohms
—
26
F
Page 55

Système de protection contre la copie abusive
Cette platine MiniDisc fonctionne d’après le système
de protection contre la copie abusive (SCMS), qui
autorise l’enregistrement d’une première génération de
copie numérique par la prise d’entrée numérique de la
platine. Voici un aperçu de ce système :
1 Vous pouvez enregistrer des sources numériques (CD, DAT
ou MD préenregistrés) sur une cassette DAT ou un
minidisque enregistrable par la prise d’entrée numérique
de la platine DAT ou MD.
Vous ne pouvez cependant pas recopier la cassette DAT ou
le minidisque enregistré sur une cassette DAT ou un autre
minidisque enregistrable par la prise d’entrée numérique
de la platine DAT ou MD.
Lecteur CD
Informations supplémentaires
Informations supplémentaires
2 Vous pouvez enregistrer le signal d’entrée numérique d’une
émission radiosatellite sur une cassette DAT ou un MD
enregistrable par la prise d’entrée numérique d’une platine
DAT ou MD, capable de traiter les fréquences
d’échantillonnage de 32 kHz ou 48 kHz. Vous pouvez
ensuite enregistrer le contenu de la cassette DAT ou du MD
(première génération de copie) sur une autre cassette DAT
ou un autre minidisque enregistrable par le prise d’entrée
numérique de la platine DAT ou MD pour créer une
seconde génération de copie.
Les enregistrements suivant la seconde génération de copie
sur une cassette DAT ou un MD ne sont possibles que par
les prises d’entrée analogique de la platine DAT ou MD.
Notez, cependant, qu’une seconde génération de copie
numérique peut être impossible avec certains tuners BS/CS.
Lecture
Câble optique ou
câble coaxial de
liaison numérique
Tuner BS/CS
Prise de sortie
numérique
Prise d’entrée
numérique
Platine MDPlatine DAT
Lecture
Câble optique ou
câble coaxial de
liaison numérique
Enregistrement
DAT ou MD
Lecture
Prise de sortie numérique Prises de sortie de ligne
Câble optique ou
câble coaxial de
liaison numérique
Prise d’entrée numérique
Enregistrement
Platine DAT ou
Platine DAT ou
Platine DAT ou
Prise de sortie
numérique
Prise d’entrée
numérique
MD
Première
génération de
cassette DAT ou
MD enregistré via
la liaison
numérique à
numérique
MD
(analogique)
Cordon de liaison
audio
Prises d’entrée de ligne
(analogique)
MD
Enregistrement Platine DAT ou MD
DAT ou MD
Lecture
Câble optique ou
câble coaxial de
liaison numérique
Enregistrement
DAT ou MD
Lecture Platine DAT ou MD
Prise de sortie numérique
Câble optique ou
câble coaxial de
liaison numérique
Platine DAT ou MD
Platine DAT ou MD
Prises de sortie de ligne
(analogique)
Première
génération de
cassette DAT ou
MD enregistré via
la liaison
numérique à
numérique
Prise de sortie
numérique
Prise d’entrée
numérique
Seconde
génération de
cassette DAT ou
MD enregistré
via la liaison
numérique à
numérique
Cordon de liaison
audio
Prise d’entrée numérique
Enregistrement
Platine DAT ou MD
Prises d’entrée de ligne
(analogique)
(voir page suivante)
27
F
Page 56

Informations supplémentaires
3 Vous pouvez enregistrer une cassette DAT ou un MD par
les prises d’entrée analogiques de la platine sur une autre
cassette DAT ou un MD par la prise de sortie numérique de
la platine DAT ou MD. Vous ne pouvez cependant pas faire
une seconde génération de copie de cassette DAT ou MD
par la prise de sortie numérique de la platine DAT ou MD.
Tourne-disque
Index
A, B
Accessoires en option 26
Accessoires fournis 4
AMS (Automatic Music Sensor/recherche
automatique de plage) 15
Annulation de la dernière opération de montage
23
28
Platine à cassette Platine DAT
Amplificateur de
microphone
Lecture
Cordon de liaison audio
Enregistrement
Platine DAT ou
MD
Lecteur CDTuner
Platine MD
Prises de sortie de
ligne (analogique)
Prises d’entrée de
ligne (analogique)
C
Câble optique 4, 27, 28
Combinaison 20
Convertisseur de cadence d’échantillonnage 4
Cordon de liaison audio 4, 27, 28
D
Déplacement 21
Division 19
E
Effacement
A-B (d’un partie d‘une plage) 18
de tous les titres 23
de toutes les plages 18
d’une plage 17
Enregistrement
enregistrement avec préstockage de données
13
enregistrement normal 6, 7
enregistrement sur des plages préexistantes 11
DAT ou MD
Cassette DAT ou
MD enregistré
via la liaison
analogique à
numérique
F
Lecture
Câble optique ou
câble coaxial de
liaison numérique
Enregistrement
DAT ou MD
Lecture
Prise de sortie numérique
Câble optique ou
câble coaxial de
liaison
numérique
Cordon d’entrée
Enregistrement
F
Platine DAT ou
Platine DAT ou
Platine DAT ou
numérique
Platine DAT ou
MD
Prise de sortie
numérique
Prise d’entrée numérique
MD
Première
génération de
cassette DAT ou
MD enregistré
via la liaison
numérique à
numérique
MD
Prises de sortie de ligne
(analogique)
Cordon de liaison
audio
Prises d’entrée de ligne
(analogique)
MD
Fonction “Auto Cut” 10
Fonction “Smart Space” 10
Fréquence d’échantillonnage 4, 27
G, H, I, J, K
Guide de dépannage 25
L
Lecture
lecture normale 8
LEVEL-SYNC 9, 12
Limites du système 24
Localisation
d’une plage donnée 15
d’un point donné sur une plage 16
M
Marquage de plages
Marquage automatique 12
Marquage manuel 12
MD
éjection 7, 8
enregistrable 6, 14
mise en place 6, 8
préenregistré 14
Messages affichés 24
Page 57

Informations supplémentaires
Informations supplémentaires
N, O
Nettoyage 2
Niveau d’enregistrement 11
P, Q
Pause
de lecture 8
d’enregistrement 7
Précautions 2
R
Raccordement
à un appareil analogique 4
à un appareil numérique 4
S
SCMS (Système de protection
contre la copie abusive) 9, 27
Spécifications 26
T, U
Taquet de protection de
l’enregistrement 7
Titrage
d’une plage 22
d’un minidisque 22
Nomenclature
Touches
DISPLAY/CHAR 10, 14, 22
EDIT/NO/YES 10, 12, 17 à 23
§ EJECT (éjection) 7, 8
r REC (enregistrement) 7, 12,
23
· (lecture) 7, 8, 10, 15
P (pause) 7, 8, 18, 19
p (arrêt) 7, 8, 10, 20
0/) (recherche manuelle)
16, 18, 22
Interrupteurs
INPUT 6, 9
1/u 6 à 8
Connecteurs
DIGITAL OPTICAL IN 4, 6, 9,
12
Commandes
≠ AMS ± 8, 11, 13, 15,
17 à 22
REC LEVEL 7, 11
V, W, X, Y, Z
Vérification
du temps enregistrable
restant sur le MD 10, 14
Indicateur
1/u 6, 8
Prises
LINE (ANALOG) IN/OUT
4, 6, 9, 12
Divers
Afficheur 14
Répertoire 14
TOC (sommaire) 7, 9, 17
29
F
Page 58

Page 59

Page 60

Sony Corporation Printed in Malaysia
 Loading...