

Sony HVR-A1P User Manual

2-639-668-13 (1)
Digital HD Video
Camera Recorder
Operating Guide
Before operating the unit, please read this manual thoroughly,
and retain it for future reference.
HVR-A1E/A1P
© 2005 Sony Corporation
Read this first
Before operating the unit, please read this
manual thoroughly, and retain it for future
reference.
WARNING
To prevent fire or shock hazard,
do not expose the unit to rain or
moisture.
FOR CUSTOMERS IN THE
UNITED KINGDOM
HVR-A1E only
NOTICE ON THE SUPPLIED AC
ADAPTOR
A moulded plug complying with BS1363 is
fitted to this equipment for your safety and
convenience.
Should the fuse in the plug supplied need to be
replaced, a fuse of the same rating as the supplied
one and approved by ASTA or BSI to BS1362
(i.e., marked with or mark) must be used.
If the plug supplied with this equipment has a
detachable fuse cover, be sure to attach the fuse
cover after you change the fuse. Never use the
plug without the fuse cover. If you should lose
the fuse cover, please contact your nearest Sony
service station.
FOR CUSTOMERS IN EUROPE
HVR-A1E only
This product with the CE marking complies
with both the EMC Directive and Low Voltage
Directive (73/23/EEC) issued by the Commission
of the European Community.
Compliance with these directives implies
conformity to the following European standards:
• EN60065:Product Safety (supplied AC Adaptor
only)
• EN55103-1:Electromagnetic Interference
(Emission)
• EN55103-2:Electromagnetic Susceptibility
(Immunity)
This product is intended for use in the following
Electromagnetic Environment(s):E1 (residential),
E2 (commercial and light industrial), E3 (urban
outdoors) and E4 (controlled EMC environment
ex. TV studio).
ATTENTION
The electromagnetic fields at the specific
frequencies may influence the picture and sound
of this camcorder.
“Memory Stick”
N50
Disposal of Waste
Electrical and Electronic
Equipment for business
use (Applicable in the
European Union and
other European countries
with separate collection
systems)
This symbol on the product or on its packaging
indicates that this product shall not be treated
as household waste. Instead it shall be handed
over to the applicable take-back scheme for
the recycling of electrical and electronic
equipment. By ensuring this product is disposed
of correctly, you will help prevent potential
negative consequences for the environment and
human health, which could otherwise be caused
by inappropriate waste handling of this product.
The recycling of materials will help to conserve
natural resources. For more detailed information
about recycling of this product, please contact
your local Sony office or visit Sony Europe’s web
site for business customers:
http://www.sonybiz.net/environment
For the customers in the Nederland
Voor de klanten in Nederland
Dit apparaat bevat een vast ingebouwde
batterij die niet vervangen hoeft te worden
tijdens de levensduur van het apparaat.
Raadpleeg uw leverancier indien de batterij
toch vervangen moet worden.
2

De batterij mag alleen vervangen worden
door vakbekwaam servicepersoneel.
Gooi de batterij niet weg maar lever deze in
als klein chemisch afval (KCA).
“Memory Stick Duo” (Size used with this
unit)
Lever het apparaat aan het einde van de
levensduur in voor recycling, de batterij zal
dan op correcte wijze verwerkt worden.
Notes on use
On the types of cassette you can use
in your camcorder
Your camcorder is capable of recording in
HDV, DVCAM, and DV formats.
When recording in HDV/DV format, it is
recommended to use mini DV cassettes.
When recording in DVCAM format, it
is recommended to use mini DVCAM
cassettes.
Your camcorder is not compatible with the
Cassette Memory function.
The HDV standards
• Digital high-definition (HD) video signals
are recorded and played back on a DV
format cassette.
• HDV signals are compressed in MPEG2
format, which is adopted in BS (broadcast
satellite) digital and terrestrial digital
HDTV broadcastings and in Blu-ray disc
recorders (p.102).
“Memory Stick”
(You cannot use it in your camcorder.)
• You cannot use any type of memory card
except “Memory Stick Duo.”
• “Memory Stick PRO” and “Memory
Stick PRO Duo” can be used only
with “Memory Stick PRO” compatible
equipment.
When using a “Memory Stick Duo”
with “Memory Stick” compatible
equipment
Be sure to insert the “Memory Stick Duo”
into the supplied Memory Stick Duo
Adaptor.
Memory Stick Duo Adaptor
On the types of “Memory Stick” you
can use in your camcorder
You can use “Memory Stick Duo”
marked with or
(p. 106).
Continued
3
4
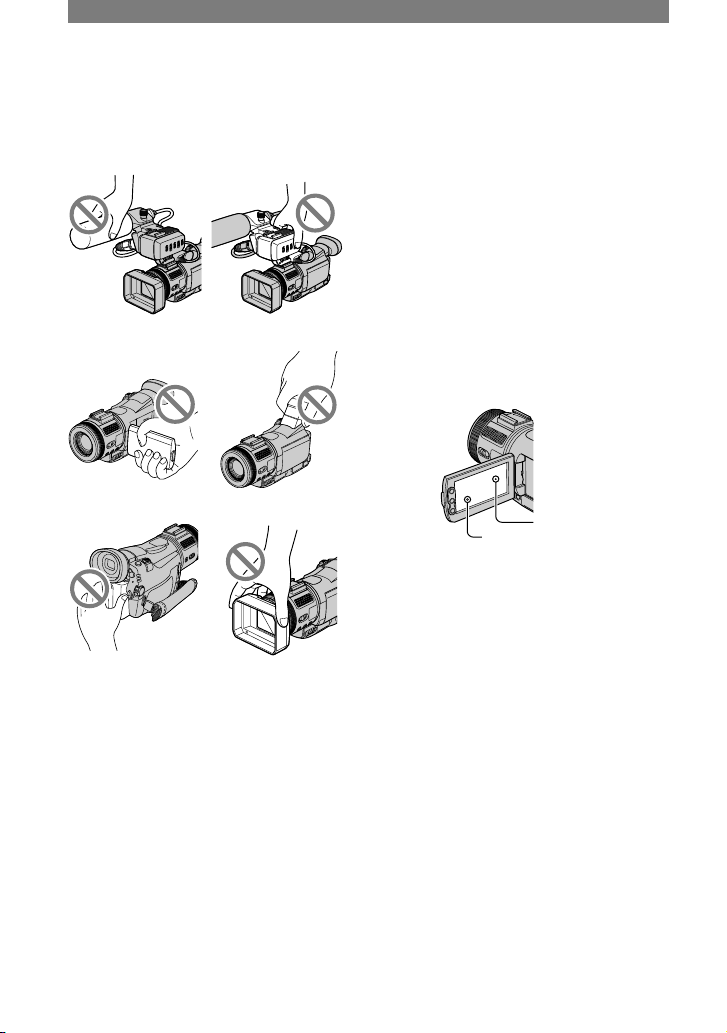
On using the camcorder
• Do not hold the camcorder by the
following parts.
Microphone XLR Adaptor
LCD panel Viewfinder
Battery pack Lens hood with lens
cover
• The camcorder is not dustproofed,
dripproofed or waterproofed.
See “Maintenance and precautions” (p.
110).
• Before connecting your camcorder to
another device with a component video
cable, USB or i.LINK cable, be sure to
insert the connector plug in the proper
direction. If you insert the connector
plug forcibly in the wrong direction, the
terminal may be damaged, or this may
cause a malfunction of your camcorder.
On the menu items, LCD panel,
viewfinder, and lens
• A menu item that is grayed out is not
available under the current recording or
playback conditions.
• The LCD screen and the viewfinder are
manufactured using extremely highprecision technology, so over 99.99% of
the pixels are operational for effective
use. However, there may be some tiny
black points and/or bright points (white,
red, blue, or green in color) that appear
constantly on the LCD screen and the
viewfinder. These points are normal
results of the manufacturing process and
do not affect the recording in any way.
White, red, blue or
green point
Black point
• Exposing the LCD screen, the viewfinder,
or the lens to direct sunlight for long
periods of time may cause malfunctions.
• Do not aim at the sun. Doing so might
cause your camcorder to malfunction.
Take pictures of the sun only in low light
conditions, such as at dusk.
On recording
• Before starting to record, test the
recording function to make sure the
picture and sound are recorded without
any problems.
• Compensation for the contents of
recordings cannot be provided, even if
recording or playback is not possible
due to a malfunction of the camcorder,
storage media, etc.
• TV color systems differ depending on
the countries/regions. To view your
recordings on a TV, you need a PAL
system-based TV.
Read this first (Continued)

• Television programs, films, video tapes,
and other materials may be copyrighted.
Unauthorized recording of such materials
may be contrary to the copyright laws.
Playing back HDV tapes on other
devices
A tape recorded in the HDV format cannot
be played back on a device that is not
compatible with the HDV format. The
screen appears blue.
Check the contents of tapes by playing
them back on this camcorder prior to
playing them back on other devices.
On this manual
• The images of the LCD screen and
the viewfinder used in this manual for
illustration purposes are captured using
a digital still camera, and therefore may
appear different.
• The on-screen displays in each local
language are used for illustrating the
operating procedures. Change the screen
language before using your camcorder if
necessary (p.66).
• Design and specifications of recording
media and other accessories are subject to
change without notice.
About the Carl Zeiss lens
Your camcorder is equipped with a Carl
Zeiss lens, which was developed jointly
by Carl Zeiss, in Germany, and Sony
Corporation, and produces superior images.
It adopts the MTF measurement system for
video cameras and offers a quality typical
of a Carl Zeiss lens. Also, the lens for
your camcorder is T*-coated to suppress
unwanted reflections and faithfully
reproduce colors.
MTF= Modulation Transfer Function. The
number value indicates the amount of light
from a subject coming into the lens.
5

6
Table of Contents
Read this first ............................................................................................2
Getting Started
Step 1: Checking supplied items ...............................................................9
Step 2: Charging the battery pack ...........................................................10
Step 3: Turning the power on and holding your camcorder firmly ...........13
Step 4: Adjusting the LCD panel and viewfinder .....................................14
Step 5: Using the touch panel .................................................................15
Step 6: Setting the date and time ............................................................16
Step 7: Inserting a tape or a “Memory Stick Duo” ....................................17
Step 8: Installing the supplied microphone and hood with lens cover .....19
Recording/Playback
Recording ................................................................................................22
Playback ..................................................................................................23
Functions used for recording/playback, etc. ............................................24
Recording
To use zoom
To fix the brightness or the exposure of the picture manually
(EXPOSURE/AE SHIFT)
To record in dark places (NightShot)
To make the subject stand out clearer (TELE MACRO)
To use the AUTO LOCK switch
To adjust the focus manually
To enlarge and focus on the image (Expanded focus)
To adjust the exposure for backlit subjects
To record in mirror mode
To use a tripod
Playback
To use PB zoom
To adjust the movie volume
Recording/playback
To check the remaining battery (Battery Info)
You can assign functions to the ASSIGN button
To turn off the operation confirmation beep
Note on the icons used in this manual
: Features available for the HDV
format only.
: Features available for the DVCAM
format only.
: Features available for the DV SP
format only.

7
Continued
To initialize the settings
Other part names and functions
Indicators displayed during recording/playback .......................................28
Searching for the starting point ...............................................................31
Searching for the last scene of the most recent recording (END SEARCH)
.............................................................................................................31
Reviewing the most recently recorded scenes (Rec review) .........................31
Remote Commander ...............................................................................32
Searching for a scene by date of recording (Date search) ...........................32
Connecting to a TV for viewing ................................................................33
Using the Menu
Using the menu items ............................................................38
Menu items ..............................................................................................40
CAMERA SET menu ..........................................................................43
Settings to adjust your camcorder to the recording conditions
(SPOT METER/WHITE BAL./STEADYSHOT, etc.)
MEMORY SET menu .........................................................................49
Settings for the “Memory Stick Duo”
(BURST/QUALITY/IMAGE SIZE/ALL ERASE/NEW FOLDER, etc.)
PICT.APPLI. menu ............................................................................52
Special effects on pictures or additional functions on recording/playback
(SLIDE SHOW/PICT. EFFECT, etc.)
EDIT/PLAY menu .............................................................................56
Settings for editing or playing back in various modes
(VAR.SPD PB/END SEARCH, etc.)
STANDARD SET menu ....................................................................57
Settings while recording on a tape or other basic settings
(REC MODE/MULTI-SOUND/LCD/VF SET/DISP OUTPUT, etc.)
TIME/LANGU. menu .........................................................................66
(CLOCK SET/WORLD TIME/LANGUAGE)
Customizing Personal Menu ....................................................................66
Dubbing/Editing
Dubbing to another device such as a VCR, DVD recorder, etc. ...............68
Recording pictures from a VCR ...............................................................71
Dubbing pictures from a tape to a “Memory Stick Duo” ...........................72
Deleting recorded pictures from the “Memory Stick Duo” ........................73
Marking images on the “Memory Stick Duo” with specific information
(Image protection/Print mark) ........................................................73
Printing recorded images (PictBridge compliant printer) .........................74

8
Jacks to connect external devices ...........................................................76
Using a computer
Connecting to a computer .......................................................................77
Copying still images to a computer .........................................................77
Copying movies on a tape to the computer ............................................80
Troubleshooting
Troubleshooting .......................................................................................82
Warning indicators and messages ..........................................................97
Additional Information
Using your camcorder abroad ...............................................................101
HDV format and recording/playback ......................................................102
Compatibility of the DVCAM/DV formats ...............................................104
About the “Memory Stick” ......................................................................106
About the “InfoLITHIUM” battery pack ...................................................108
About i.LINK ..........................................................................................109
Maintenance and precautions ...............................................................110
Specifications ........................................................................................113
Quick Reference
Identifying parts and controls ................................................................116
Index .....................................................................................................119
9
Getting Started
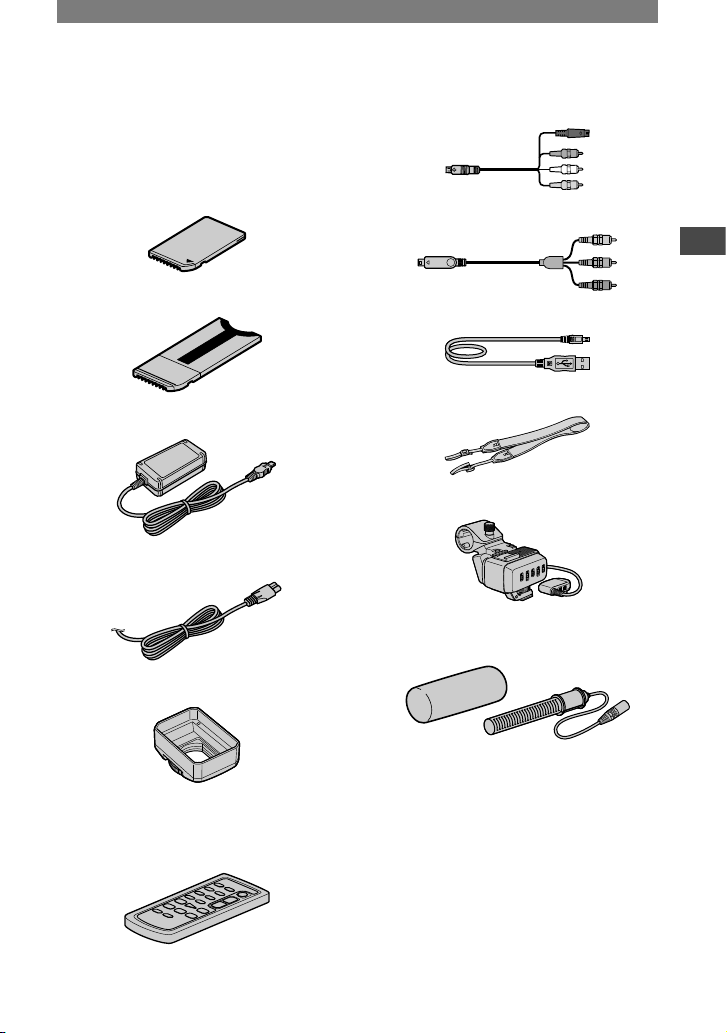
Step 1: Checking supplied items
Make sure that you have following items
supplied with your camcorder.
The number in the parentheses indicates the
number of that item supplied.
“Memory Stick Duo” (1) (p. 17, 106)
Memory Stick Duo Adaptor (1) (p. 107)
AC Adaptor (1) (p. 10)
Mains lead (1) (p. 10)
Lens hood with lens cover (1) (p. 20, 117)
Use the lens hood to record under strong light,
such as under the sun.
Wireless Remote Commander (1)
(p. 32)
A button-type lithium battery is already installed.
A/V connecting cable (1) (p. 33, 68)
Component video cable (1) (p. 33, 34)
USB cable (1) (p. 77)
Shoulder Strap (1) (p. 117)
XLR adaptor (1) (p. 19)
Wind Screen (1),
Microphone (1) (p. 19)
Rechargeable battery pack NP-FM50 (1)
(p. 10, 108)
Operating Guide (This manual) (1)
10
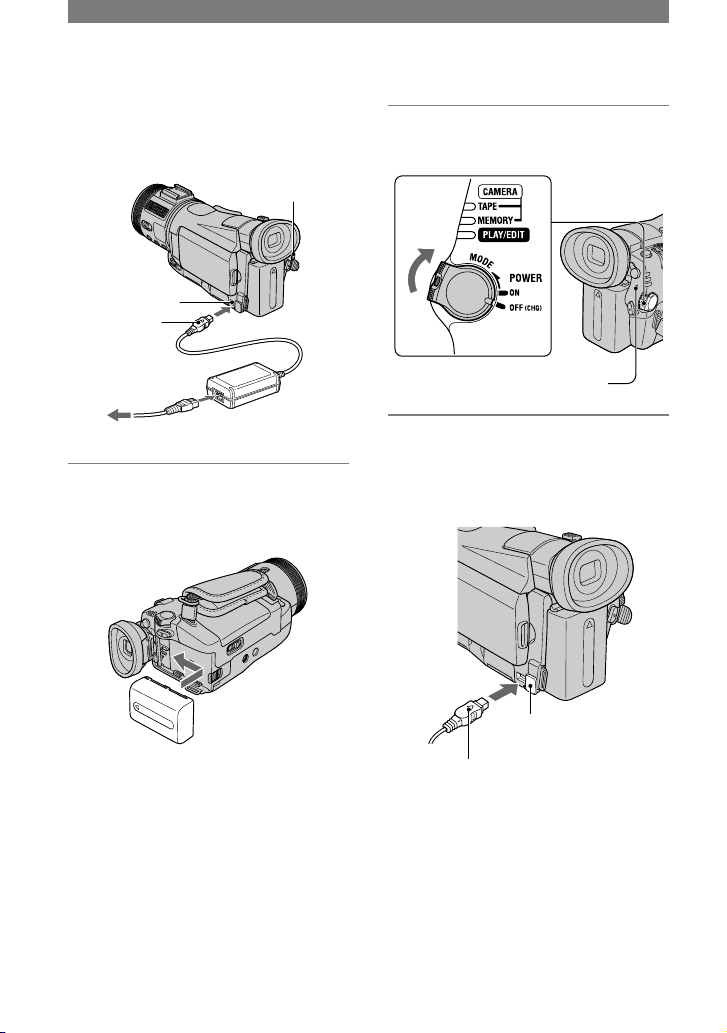
Step 2: Charging the battery pack
You can charge the “InfoLITHIUM”
battery pack (M series) (p. 108) after
attaching it to your camcorder.
POWER
switch
DC IN jack
DC plug
AC Adaptor
To the wall socket
Mains lead
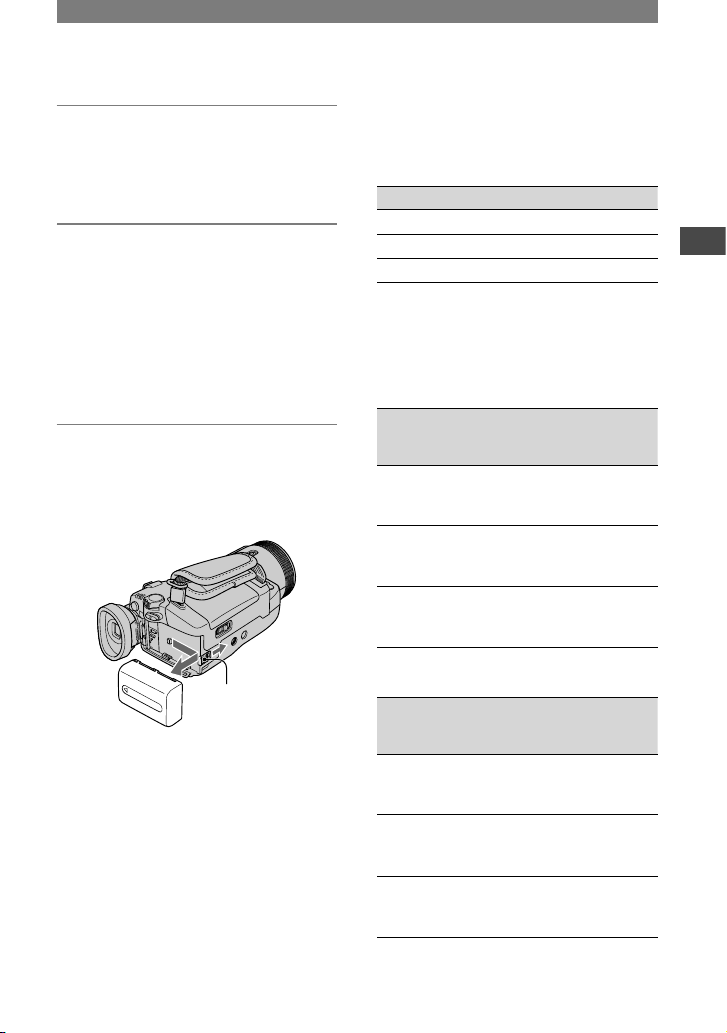
1 Attach the battery pack by sliding
it in the direction of the arrow
until it clicks.
2 Slide the POWER switch up to
OFF (CHG) . (The default setting.)
CHG (charge) lamp
3 Connect the AC Adaptor to the
DC IN jack of your camcorder. Be
sure that the mark on the DC
plug is facing up.
The mark faces up.
Open the
DC IN jack cover.
11
Getting Started
4 Connect the mains lead to the AC
Adaptor and the wall socket.
The CHG (charge) lamp lights up and
charging starts.
5 The CHG (charge) lamp turns off
when the battery is fully charged.
Disconnect the AC Adaptor from
the DC IN jack on your camcorder
and the DC plug.
Disconnect the AC Adaptor from the
DC IN jack holding both the camcorder
and the DC plug.
To remove the battery pack
Slide the POWER switch up to OFF
(CHG). Slide the BATT (battery release)
lever and remove the battery pack.
BATT (battery
release) lever
When storing the battery pack
Fully discharge the battery before storing it
for an extended period (p. 108).
To use an outside power source
You can operate your camcorder using the
power from the wall socket by making the
same connections as you do when charging
the battery pack. The battery pack will not
lose its charge in this case.
Charging time
Approximate time (min.) required when
you fully charge a fully discharged battery
pack.
Battery pack Charging time
NP-FM50 (supplied)
150
NP-QM71D 260
NP-QM91D 360
Recording time
Approximate time (min.) available when
you use a fully charged battery pack.
Recording in the HDV format
(With the XLR adaptor attached)
Battery pack
Continuous
recording
time*
Typical
recording
time*
NP-FM50
(supplied)
75
80
75
40
40
40
NP-QM71D 190
205
190
105
110
105
NP-QM91D 285
315
290
155
175
160
Recording in the DVCAM (DV) format
(With the XLR adaptor attached)
Battery pack
Continuous
recording
time*
Typical
recording
time*
NP-FM50
(supplied)
85
95
85
45
50
45
NP-QM71D 210
230
215
115
125
120
NP-QM91D 320
350
325
175
195
180
* Top: When the LCD backlight turns on.
Middle: When the LCD backlight turns off.
Continued

Step 2: Charging the battery pack (Continued)
Bottom: Recording time when recording with
the viewfinder while the LCD panel is closed.
• Typical recording time shows the time when
you repeat recording start/stop, turning the
power on/off and zooming.
Playing time
Approximate time (min.) available when
you use a fully charged battery pack.
HDV format pictures
Battery pack
NP-FM50
(supplied)
LCD panel
opened*
105 115
NP-QM71D 255 285
NP-QM91D 390 430
DVCAM (DV) format pictures
Battery pack
NP-FM50
(supplied)
LCD panel
opened*
125 145
NP-QM71D 305 355
NP-QM91D 465 535
* When the LCD backlight turns on.
On the battery pack
• Before changing the battery pack, slide the
POWER switch up to OFF (CHG).
• The CHG (charge) lamp flashes during
charging, or the battery information (p. 27) will
not be correctly displayed under the following
conditions.
– The battery pack is not attached correctly.
– The battery pack is damaged.
– The battery pack is fully discharged. (For
Battery Info only.)
• The power will not be supplied from the battery
as long as the AC Adaptor is connected to the
DC IN jack of your camcorder, even when
the mains lead is disconnected from the wall
socket.
• Use the supplied or optional Sony
“InfoLITHIUM” battery pack (M series). You
cannot use the battery pack NP-FM30 with your
camcorder.
12
LCD panel
closed
LCD panel
closed
• When attaching an optional video light, it is
recommended that you use a NP-QM71D or
NP-QM91D battery pack.
On the charging/recording/playback time
• Times measured with the camcorder at
25 °C (77 °F) . (10 to 30 °C (50 °F to 86 °F) is
recommended.)
• The recording and playback time will be
shorter when you use your camcorder in low
temperatures.
• The recording and playback time will be shorter
depending on the conditions under which you
use your camcorder.
On the AC Adaptor
• Use the nearby wall socket when using the AC
Adaptor. Disconnect the AC Adaptor from the
wall socket immediately if any malfunction
occurs while using your camcorder.
• Do not use the AC Adaptor placed in a narrow
space, such as between a wall and furniture.
• Do not short-circuit the DC plug of the AC
Adaptor or battery terminal with any metallic
objects. This may cause a malfunction.
• Even if your camcorder is turned off, AC power
(mains) is still supplied to it while connected to
the wall socket via the AC Adaptor.
13
Getting Started
Step 3: Turning the power on and holding your
camcorder firmly
To record or play back, slide the POWER
switch repeatedly to turn on the respective
lamp.
When using it for the first time, the
[CLOCK SET] screen appears (p. 16).
POWER
switch
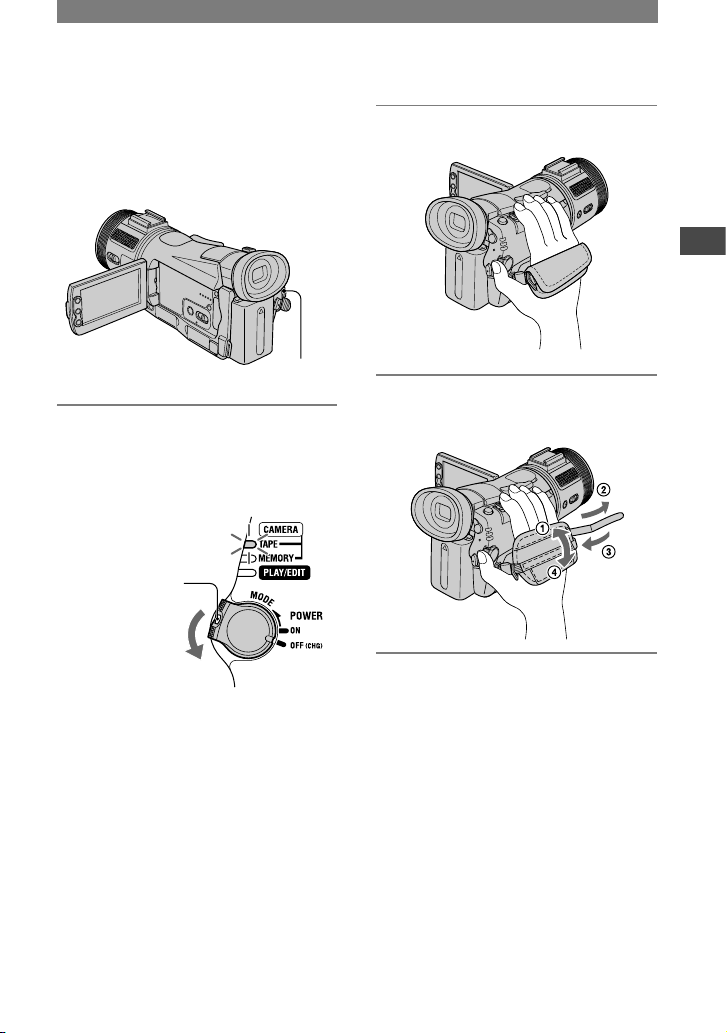
1 Slide the POWER switch
repeatedly in the direction of the
arrow to turn on the respective
lamp.
If the POWER
switch is set to
OFF (CHG), slide
it down while
pressing the green
button.
Lamps that light up
CAMERA-TAPE: To record on a tape.
CAMERA-MEMORY: To record on a
“Memory Stick Duo.”
PLAY/EDIT: To play or edit pictures.
• When you slide the POWER switch
from OFF (CHG) to CAMERA-TAPE or
CAMERA-MEMORY, the current date and
time will be displayed on the LCD screen
for about 5 seconds.
2 Hold the camcorder correctly.
3 Ensure a good grip, then fasten
the grip belt.
To turn off the power
Slide the POWER switch up to OFF
(CHG).
14
Step 4: Adjusting the LCD panel and viewfinder
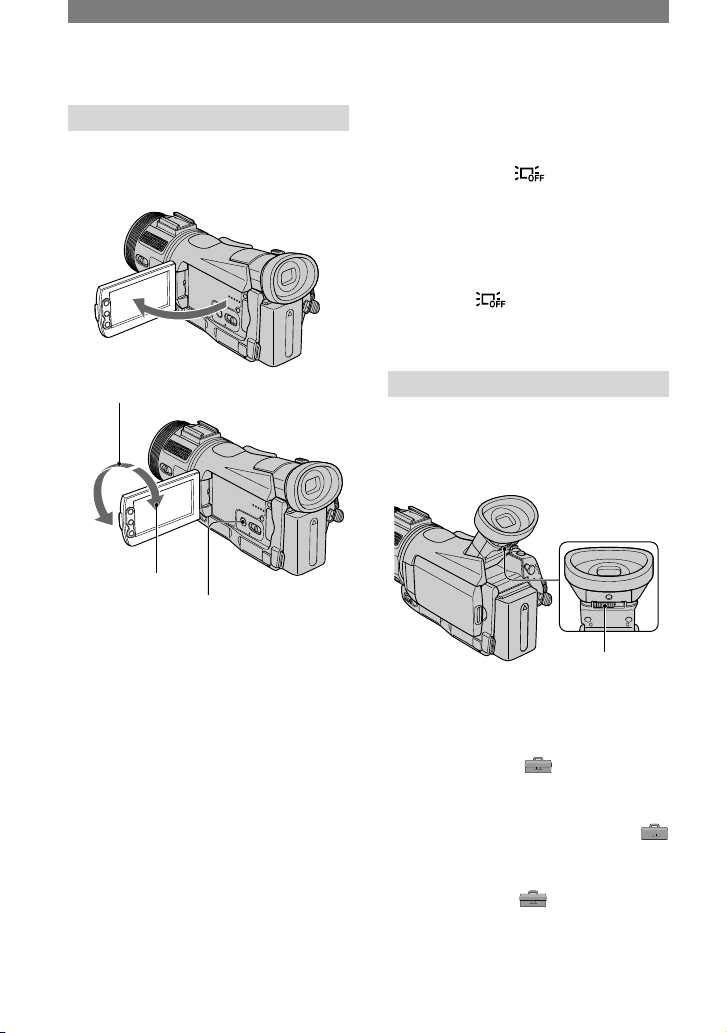
The LCD panel
Open the LCD panel 90 degrees to the
camcorder (), then rotate it to the best
angle to record or play ().
90 degrees to
the camcorder
180 degrees
(max.)
90 degrees
(max.)
DISPLAY/BATT INFO
• Do not press the buttons beside the LCD frame
accidentally when you open or adjust the LCD
panel.
• If you rotate the LCD panel 180 degrees to the
lens side from the status , you can close the
LCD panel with the LCD screen facing out.
This is convenient during playback operations.
• When closing the LCD panel, rotate the LCD
panel as illustrated in , and then close the
LCD panel facing inward.
To turn off the LCD backlight to make
the battery last longer
Press and hold DISPLAY/BATT INFO for
a few seconds until appears.
This setting is practical when you use
your camcorder in bright conditions or
where you want to save battery power. The
recorded picture will not be affected by the
setting. To turn on the LCD backlight, press
and hold DISPLAY/BATT INFO for a few
seconds until disappears.
• See [LCD BRIGHT] (p. 60) to adjust the
brightness of the LCD screen.
The viewfinder
You can view images using the viewfinder
with the LCD panel closed. The battery
will last longer than when using the LCD
panel.
Lift up the
viewfinder.
Viewfinder lens
adjustment lever
Move it until the
picture is clear.
• You can adjust the brightness of the viewfinder
backlight by selecting (STANDARD
SET)[LCD/VF SET][VF B.LIGHT] (p.
60).
• To display the picture on both the LCD panel
and the viewfinder during recording, touch
(STANDARD SET)[LCD/VF SET][VF
POWER] [ON] (p. 60).
• To display the picture in black and white on
the viewfinder, touch (STANDARD
SET)[LCD/VF SET][VF COLOR]
[OFF] (p.60).
15
Getting Started
Step 5: Using the touch panel
You can play back recorded pictures (p.
23), or change the settings (p. 38) using the
touch panel.
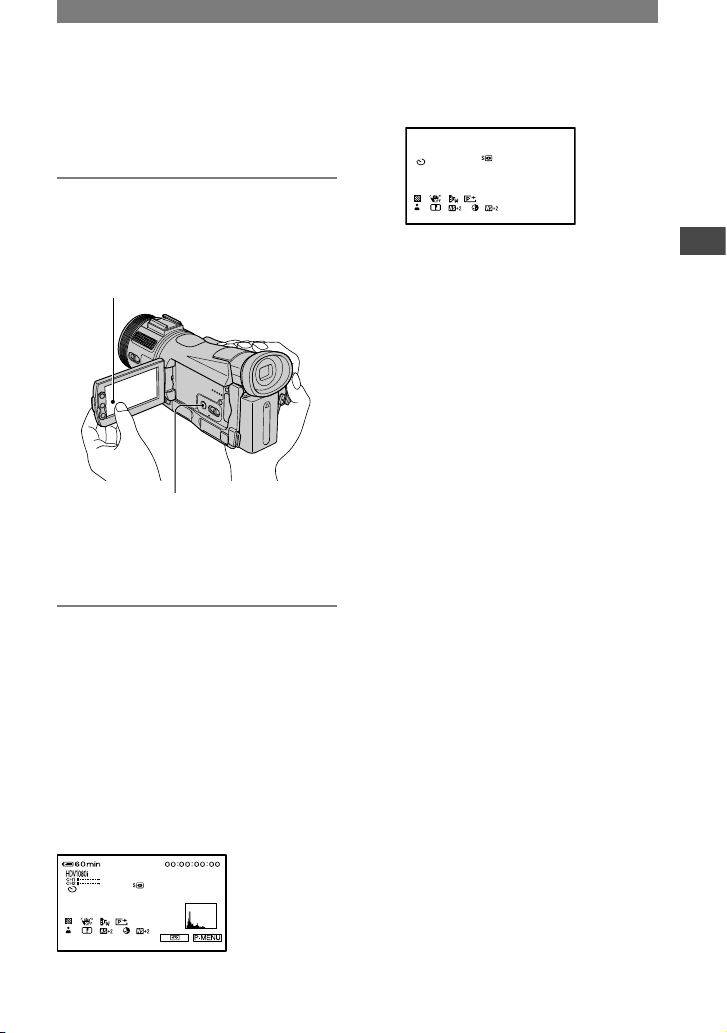
Place your hand on the rear side of
the LCD panel to support it. Then,
touch the buttons displayed on the
screen.
Touch the button on the LCD screen.
DISPLAY/BATT INFO
• Perform the same actions as explained above
when you press the buttons on the LCD frame.
• Be careful not to press buttons on the LCD
frame accidentally while using the touch panel.
To hide the screen indicators
Press DISPLAY/BATT INFO to toggle the
screen data (such as time code, etc).
When the POWER switch is set to
CAMERA-TAPE or
CAMERA-MEMORY, the indicator
changes from detailed display simple
display no display.
When the POWER switch is set to PLAY/
EDIT, the display turns on and off.
Detailed display
Simple display
16
Step 6: Setting the date and time
Set the date and time when using this
camcorder for the first time. If you do not
set the date and time, the [CLOCK SET]
screen appears every time you turn on your
camcorder or change the POWER switch
position.
• If you do not use your camcorder for about
3 months, the built-in rechargeable battery
gets discharged and the date and time settings
may be cleared from the memory. In that case,
charge the rechargeable battery and then set the
date and time again (p. 112).
POWER switch
Skip to step 4 when you set the clock for
the first time.
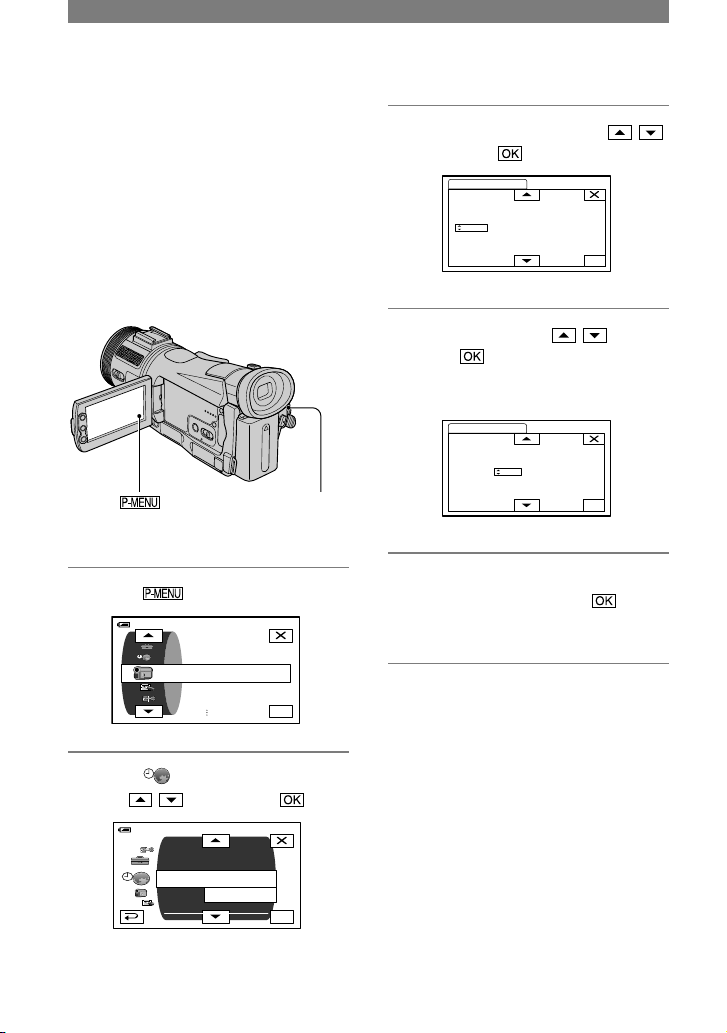
1 Touch
[MENU].
OK
60min
PROGRAM AE
CAMERA SET
SPOT METER
EXPOSURE
–– :– –:– –: ––
2 Select (TIME/LANGU.) menu
with / , then touch .
OK
60min
CLOCK SET
ASSIGN BTN
WORLD
QUICK REC
LANGUAGE
DATEREC
PROGRAMAE
––: ––:– –
–– :– –:: –– :– –
3 Select [CLOCK SET] with / ,
then touch .
OK
CLOCK SET
DATE
2005Y1M1D0: 00
4 Set [Y] (year) with / , then
touch .
You can set any year up to the year
2079.
OK
CLOCK SET
DATE
2005Y1M1D0: 0 0
5 Set [M] (month), [D] (day), hour
and minute, then touch .
The clock starts.

17
Getting Started
Step 7: Inserting a tape or a “Memory Stick Duo”
Cassette tape
See 102 for details of usable cassettes and
prevention of accidental erasure.
• The recordable time varies depending on
[ REC MODE] (p. 57).
1 Slide and hold the OPEN/EJECT
lever in the direction of the
arrow and open the lid.
OPEN/EJECT lever
Lid
The cassette compartment automatically
comes out and opens up.
2 Insert a cassette with its window
facing outwards, then press .
Push the center
of the back of the
cassette lightly.
Window
The cassette compartment automatically
slides back in. Do not force the cassette
into the compartment. This may cause a
malfunction.
3 Close the lid.
To eject the cassette
Open the lid following the same procedure
as described in step 1 and remove the
cassette.
“Memory Stick Duo”
You can use only a “Memory Stick
Duo” marked with or
(p. 106).
• The number of recordable pictures varies
depending on the image quality or the image
size. For details, see page 50.
Insert the “Memory Stick Duo” into
the “Memory Stick Duo” slot in the
right direction until it clicks.
Access lamp
• If you force the “Memory Stick Duo” into the
slot in the wrong direction, the “Memory Stick
Duo,” the “Memory Stick Duo” slot, or image
data may be damaged.
Continued

18
To eject a “Memory Stick Duo”
Lightly push the “Memory Stick Duo” in
once.
• When the access lamp is lit or flashing, your
camcorder is reading/writing data. Do not shake
or knock your camcorder, turn the power off,
eject the “Memory Stick Duo,” or remove the
battery pack. Otherwise, image data may be
damaged.
• Make sure that the “Memory Stick Duo” does
not pop up and drop off when inserting and
removing it from your camcorder.
Step 7: Inserting a tape or a “Memory Stick Duo” (Continued)

19
Getting Started
Step 8: Installing the supplied microphone and hood with lens cover
Installing the supplied
microphone
Install the supplied XLR adaptor and
microphone. You can receive the desired
audio quality.
1 Attach the XLR adaptor
to the
accessory shoe on the camcorder
and tighten the screw of the XLR
adaptor.
2 Connect the plug of the XLR
adaptor to the Active Interface
Shoe of the camcorder.
3 Attach the wind screen
to the
microphone .
4 Loosen the microphone holder
screw and open the cover.
5 Place the microphone into the
holder with the model name
(ECM-NV1) facing upward, close
the cover, and tighten the screw.
6 Connect the plug of the
microphone to the INPUT1
connector .
7 Set the INPUT LEVEL selector to
MIC or MIC ATT.
When the selector is set to MIC ATT,
you can reduce the volume by about
20dB.
Set the +48V switch to ON.
Continued

20
8 Select the channel with the REC
CH SELECT switch.
Used channels according to the position
of the REC CH SELECT switch are as
follows:
The
position
of the
REC CH
SELECT
switch
Audio
input
through
The audio
is recorded
on
CH1, CH2 INPUT1 Channel 1
Channel 2
INPUT2
CH1 INPUT1 Channel 1
INPUT2 Channel 2
• We recommend that you set [MIC NR] to
[OFF] in the menu setting in the following
cases.
– When you use the external microphone
at a distance from the camcorder.
– When the REC CH SELECT switch is
set to CH1 and you will not input from
the INPUT2 connector.
– When you set the INPUT LEVEL
selector to LINE.
• If you use equipment other than a 48-V
microphone with the +48V switch set to
ON, a malfunction of the equipment may
occur. When you connect equipment other
than a 48-V microphone, set it to OFF.
• When the wind is blowing hard and the
audio is input via the INPUT1 connector,
set INPUT1 of the LOW CUT switch to
ON. Set INPUT2 to ON when the audio is
input via the INPUT2 connector. The sound
of wind is reduced.
• When you connect equipment other than a
microphone, set the +48V switch to OFF
and the INPUT LEVEL selector to LINE.
• When using an external microphone, use
a simple full-screen or underscan monitor
and make sure that the wind screen does not
appear on the screen.
When detaching the XLR adaptor
Unplug the connector plug of the XLR
adaptor from the Active Interface Shoe
beforehand. Detach the XLR adaptor after
having loosened the screw of the XLR
adaptor.
• When you unplug the microphone plug,
unplug it while holding the PUSH button
down.
Attaching the supplied lens
hood with lens cover
Insert hooks on the lens hood
with lens cover to the holes on the
camcorder. Turn the hood fixing
screw in the direction of the arrow.
To remove the lens hood
Loosen the lens hood fixing screw by
turning it in the opposite direction of the
arrow in the illustration above.
• You cannot attach a filter (optional) with
the lens hood with lens cover on.
Step 8: Installing the supplied microphone and hood with lens cover
(Continued)

21
Getting Started
To open and close the lens cover
Move the lens cover lever up and down to
open or close the lens cover.
Move the lens cover lever to OPEN
to open the lens cover, and move
the lever to CLOSE to close the lens
cover.
22
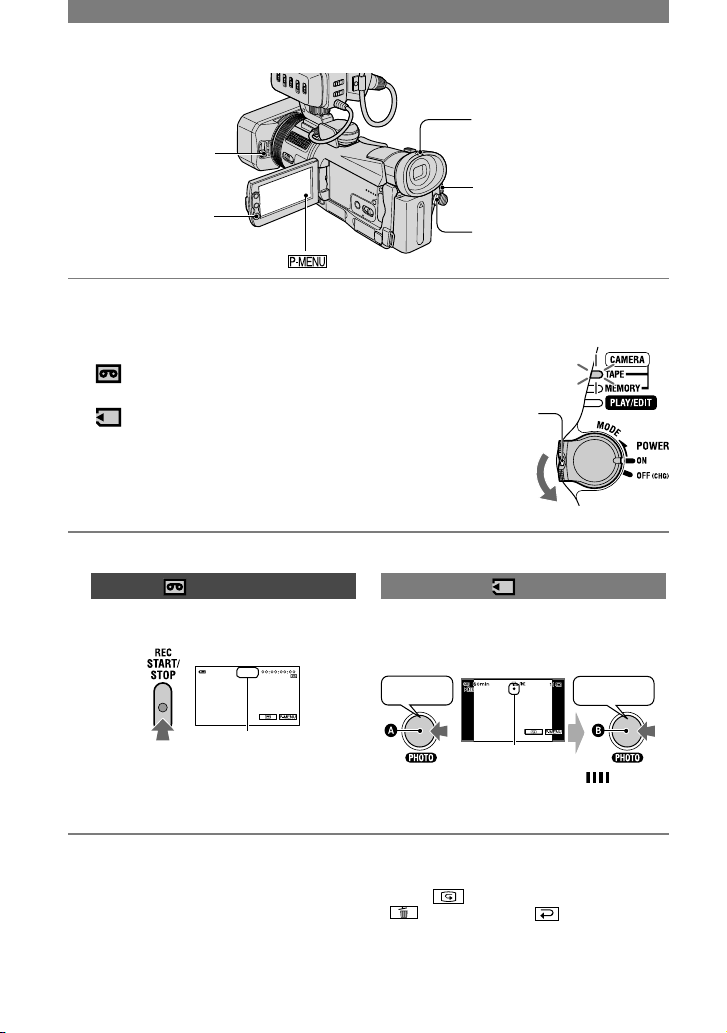
To check the latest recording on a
“Memory Stick Duo”
Touch . To delete the picture, touch
[YES]. Touch to return to the
standby mode.
• See page 50 for the image size.
• You can record a still image on a “Memory
Stick Duo,” while recording movies on a tape
or in standby mode by pressing PHOTO deeply.
Still images will be fixed to image size [1440
× 810] in the HDV format, [1080 × 810] (4:3)
or [1440 × 810] (16:9) in the DVCAM (DV)
format.
Recording
1 Slide the POWER switch in the direction of the arrow repeatedly to turn on
the respective lamp to select a recording medium.
If the POWER
switch is set to
OFF (CHG), slide
it down while
pressing the green
button.
Movies on tape: The CAMERA-TAPE
lamp lights up.
Still images on “Memory Stick Duo”:
The CAMERA-MEMORY lamp lights up.*
* The image size ratio is set by default to 4:3.
2 Start recording.
Movies
Press REC START/STOP (or
).
60min
60min
REC
[STBY][REC]
To stop the movie recording, press REC
START/STOP again.
• The pictures are recorded in the HDV format
in the default setting (p. 57).
Still images
Press and hold PHOTO lightly to
adjust the focus (), then press it
fully ().
Beep
Shutter click
FlashingLights up
A shutter sound is heard. When
disappears, the image has been recorded
PHOTO
POWER switch
REC START/STOP
REC START/
STOP
Open the
lens cover.
23
Recording/Playback
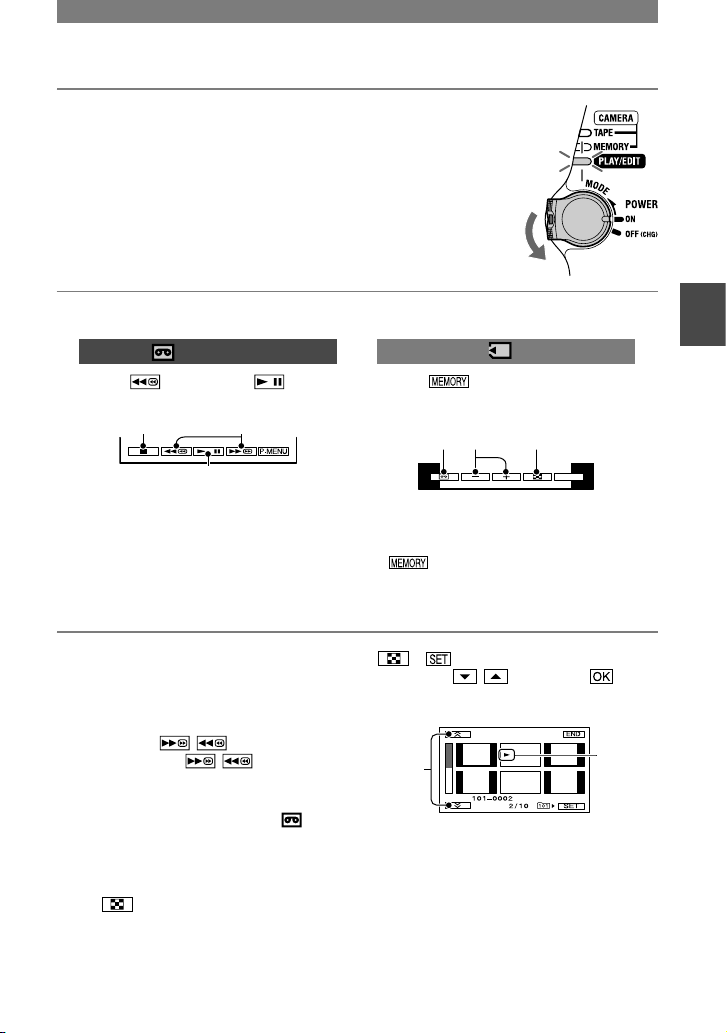
Playback
1 Slide the POWER switch in the direction of the arrow
repeatedly to turn on the PLAY/EDIT lamp.
To adjust the volume
Move the EXPOSURE/VOL lever up and
down to adjust the volume (p. 27).
To search for a scene during playback
Touch and hold / during playback
(Picture Search), or / while fast
forwarding or rewinding the tape (Skip
Scan).
• You can play back in various modes ([ VAR.
SPD PB], p. 56).
To display pictures on a “Memory
Stick Duo” on the Index screen
Touch . Touch the picture you want to
display in the single display mode.
To view pictures in other folders, touch
[PB FOLDER], select a
folder with / , then touch
(p. 52).
Index display screen
A
B
Previous/Next 6 pictures
The picture displayed before switching to
the index screen.
2 Start playing back.
Movies
Touch , then touch to
start playback.
A
B
C
Stop
Play/Pause toggles as you touch it.*
Rewind/Fast forward
* Playback automatically stops if pause is
engaged for more than 3 minutes.
Still images
Touch .
The most recently recorded image is
displayed.
P-MENU
A B C
Tape playback
Previous/Next
Index screen display
• is not displayed when a “Memory
Stick Duo” is not inserted or no image files
exist in it.
24
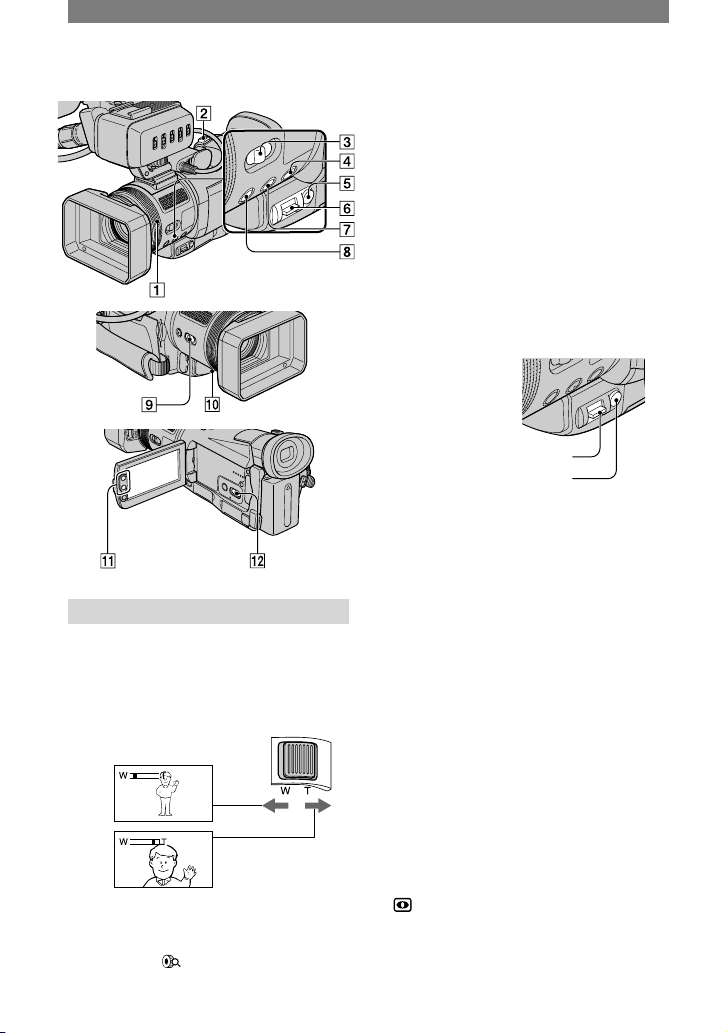
Functions used for recording/playback, etc.
Recording
To use zoom ................
Move the power zoom lever slightly for
a slower zoom. Move it further for a faster
zoom.
Wider range of view:
(Wide angle)
Close view:
(Telephoto)
• When using the zoom ring , set the FOCUS/
ZOOM switch to ZOOM and rotate it at the
desired speed ( appears).
• You cannot change the zoom speed with the
zoom buttons on the LCD frame.
• The minimum distance required between your
camcorder and the subject to get a sharp focus
is about 1 cm (about 1/2 in.) for wide angle and
about 80 cm (about 2 5/8 ft.) for telephoto.
• You can set [DIGITAL ZOOM] if you want to
zoom to a level greater than 10 × (p. 48).
• Zooming may not be able to catch up the
rotating speed of the ring if it is rotated too fast.
To fix the brightness or the exposure
of the picture manually (EXPOSURE/
AE SHIFT) ..........................
EXPOSURE/VOL lever
EXPOSURE button
You can adjust the brightness or
exposure of a picture manually with the
EXPOSURE/VOL lever . Set the AUTO
LOCK switch to OFF beforehand (p. 25).
Select the setting for the EXPOSURE/
VOL lever with [EXPOSURE LEVER]
(p. 49).
You can assign [EXPOSURE] (p. 44) or
[AE SHIFT] (p. 45).
Press EXPOSURE button .
The assigned setting becomes manual.
Move the EXPOSURE/VOL lever up or
down to adjust the setting.
You can set the same menu items as
with the menu screen.
• To return to the automatic mode, press the
EXPOSURE button again.
To record in dark places (NightShot)
...........................................
Set the NIGHTSHOT switch to ON.
( and [”NIGHTSHOT”] appear.)
• To record an image brighter, use Super
NightShot function (p. 47).To record an image
more faithful to the original colors, use Color
Slow Shutter function (p. 47).
25
Recording/Playback
• The NightShot and Super NightShot function
use infrared light. Therefore, do not cover the
infrared port with your fingers or other
objects and remove the supplied lens hood with
lens cover or the conversions lens (optional).
• Adjust the focus manually (p. 25) when it is
hard to focus automatically.
• Do not use these functions in bright places. This
may cause a malfunction.
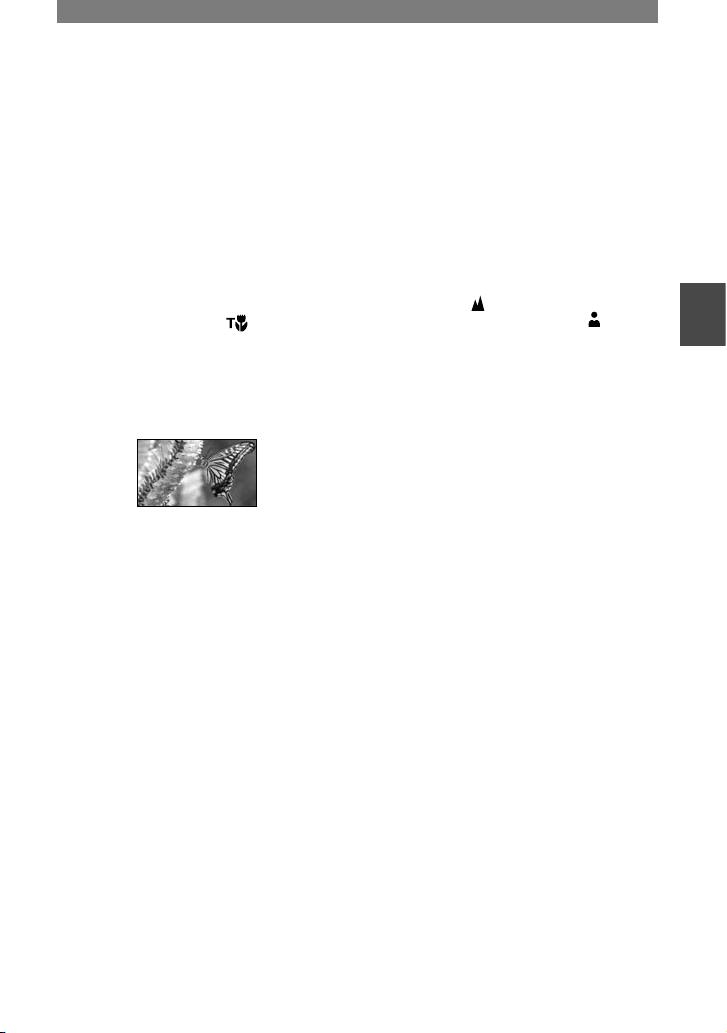
To make the subject stand out clearer
(TELE MACRO) ........................
Press TELE MACRO . appears
and the zoom moves to the top of the T
(Telephoto) side automatically and allows
for recording subjects at a close distance,
down to about 48 cm (19 in.). This is useful
to shoot small subjects, such as flowers or
insects.
To cancel, press TELE MACRO again, or
zoom to wide-angle (W side).
• When recording a distant subject, it may be
difficult to focus on and take time for focusing.
• Adjust the focus manually (p. 25) when it is
hard to focus automatically.
To use the AUTO LOCK switch ......
You can set up the following settings
manually with the AUTO LOCK switch
to OFF. The settings return to the automatic
mode with the switch ON.
– [SPOT METER]
– [EXPOSURE]
– [PROGRAM AE]
– [WHITE BAL.]
– [SHUTTR SPEED]
• Settings adjusted while the AUTO LOCK
switch is OFF are retained when it is set to ON,
and will be restored when set to OFF again.
• Set the AUTO LOCK switch to ON when using
the external flash (optional).
To adjust the focus manually.. ..
Set the FOCUS/ZOOM switch to
MANUAL ( appears).
Rotate the focus ring to adjust the
focus.
To adjust the focus automatically, set the
FOCUS/ZOOM switch to AUTO.
• You can also use this function when changing
the subject to be focused intentionally.
• changes to when the focus cannot be
adjusted any farther. changes to when the
focus cannot be adjusted any closer.
• It is easier to focus on the subject by moving
the power zoom lever towards T (telephoto)
to adjust the focus, then towards W (wide
angle) to adjust the zoom for recording. When
you want to record a subject at close range,
move the power zoom lever to W (wide angle),
then adjust the focus.
To enlarge and focus on the image
(Expanded focus) .. ...............
Set the FOCUS/ZOOM switch to
MANUAL in standby mode.
Press EXPANDED FOCUS to
double the size of the picture. When
you finish focusing, the screen
automatically returns to the normal
picture display.
To cancel the expanded focus, press
EXPANDED FOCUS again.
To adjust the exposure for backlit
subjects ................................
To adjust the exposure for backlit subjects,
press BACK LIGHT to display . To
cancel the back light function, press BACK
LIGHT again.
Continued
26
To record in mirror mode ............
Open the LCD panel 90 degrees to the
camcorder (), then rotate it 180 degrees
to the lens side ().
• A mirror-image of the subject appears on the
LCD screen, but the picture will be normal
when recorded.
To use a tripod ........................
Attach the tripod (optional: the length of
the screw must be less than 5.5 mm (7/32
in.) to the tripod receptacle using a
tripod screw.
• Remove the tripod when taking out the cassette.
Playback
To use PB zoom ..................
You can magnify still pictures on the
“Memory Stick Duo” from about 1.5 to 5
times the original size.
Magnification can be adjusted with the
power zoom lever or the zoom buttons
on the LCD frame.
Play back the picture you want to
magnify.
Magnify the picture with T (Telephoto).
Touch the screen at the point you want
to display in the center of the displayed
frame.
Adjust the magnification with W (Wide
angle)/T (Telephoto).
To cancel, touch [END].
Functions used for recording/playback, etc. (Continued)
To adjust the movie volume .........
Move the EXPOSURE/VOL lever up
or down to adjust the volume. Move the
lever up to increase the volume and move it
down to decrease the volume.
• You can also adjust the volume by touching
(STANDARD SET)[VOLUME] (p.58).
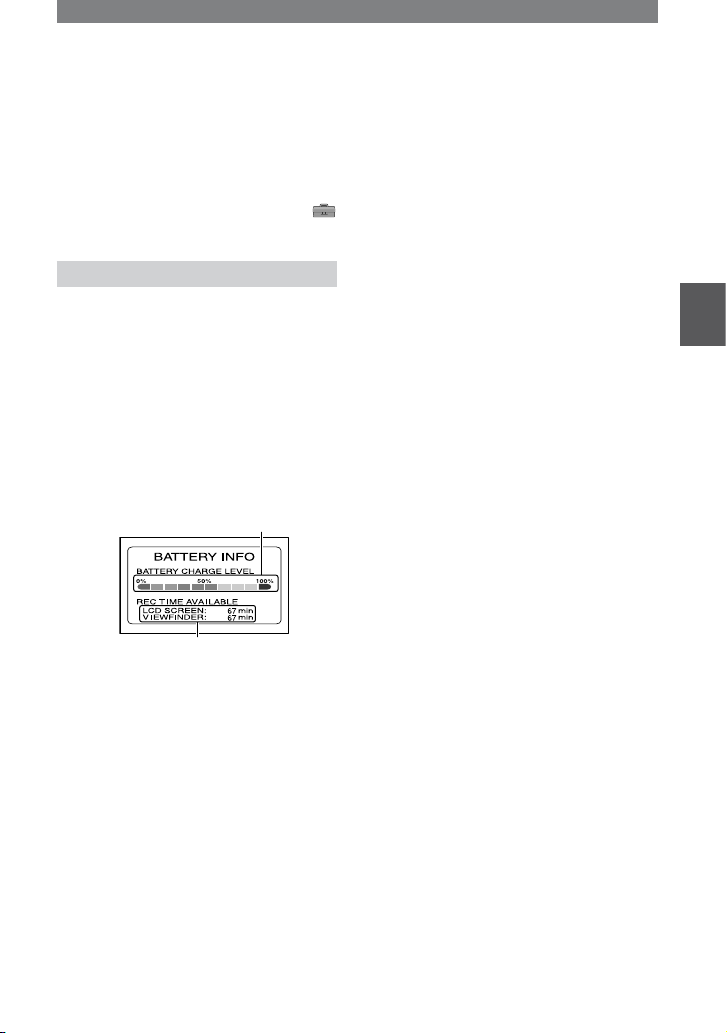
Recording/playback
To check the remaining battery
(Battery Info) ..........................
Set the POWER switch up to OFF (CHG),
then press DISPLAY/BATT INFO . The
approximate recordable time in the selected
format and battery information appear for
about 7 seconds. By pressing DISPLAY/
BATT INFO, you can view the battery
information for up to 20 seconds while it is
displayed.
Remaining battery (approx.)
Recording capacity (approx.)
You can assign functions to the
ASSIGN button .........................
Use [ASSIGN BTN] (p. 65) to assign
functions.
To initialize the settings .............
Press RESET to initialize all the
settings, including the setting of the date
and time.
(Menu items customized on Personal Menu
are not initialized.)
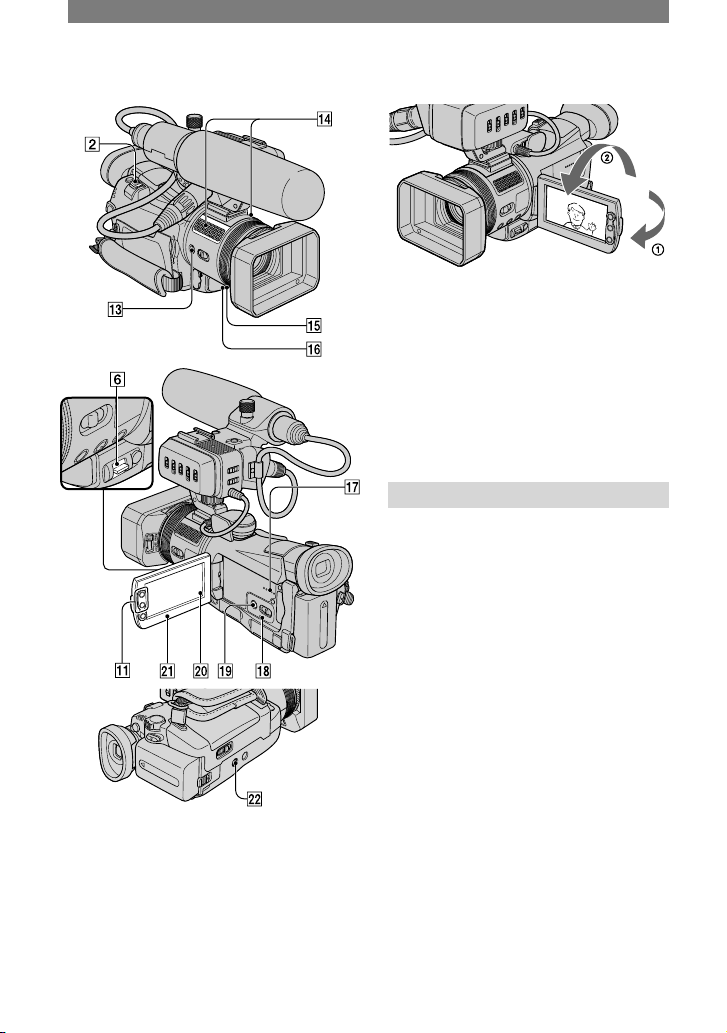
Other part names and functions
Internal stereo microphone
When an external microphone is
connected, the audio input from the
external microphone takes precedence
over others.
REC lamp
The REC lamp lights up in red during
recording (p. 65).
The REC lamp flashes when the
remaining recording time or battery
power is low.
Remote sensor
Point the Remote Commander (p. 32)
towards the remote sensor to operate
your camcorder.
Speaker
Sounds come out from the speaker.
•
For how to adjust the volume, see page 23.
Recording/Playback
To turn off the operation confirmation
beep.....................................
See [BEEP] (p. 65) to set the operation
beep.
27
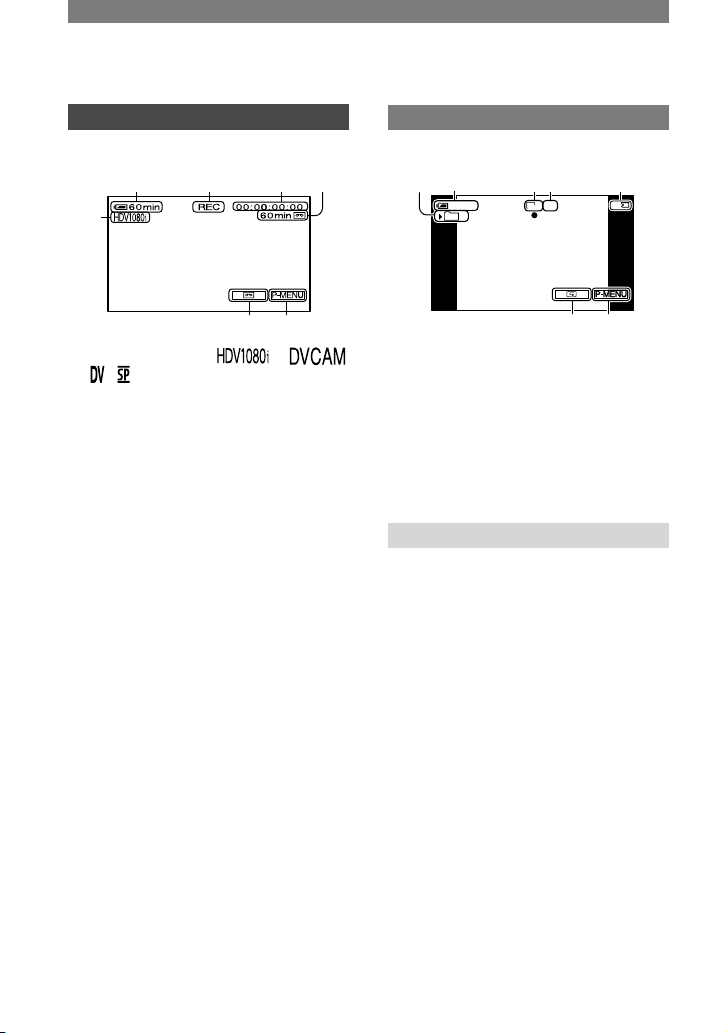
28
Indicators displayed during recording/playback
Recording movies
In the CAMERA-TAPE mode
2
1
3 4 5
76
Recording format (
or
) (57)
Remaining battery (approx.)
Recording status ([STBY] (standby) or
[REC] (recording))
Time code or user bits
Recording capacity of the tape
(approx.) (64)
END SEARCH/Rec review display
switch button (31)
Personal Menu button (38)
Recording still images
8
2
90 qa
7qs
11
60min1160min
FINE
1920
101
Recording folder (52)
Image size (50)
Quality ([FINE] or [STD]) (49)
“Memory Stick Duo” indicator and the
number of images that can be recorded
(approx.)
Review button (22)
Data code during playback
The date/time during recording and the
camera setting data will be recorded
automatically. They do not appear on the
screen during recording, but you can check
them as [DATA CODE] during playback
(p. 64).
29
Recording/Playback
( ) is a reference page.
The indicators during recording will not be recorded.
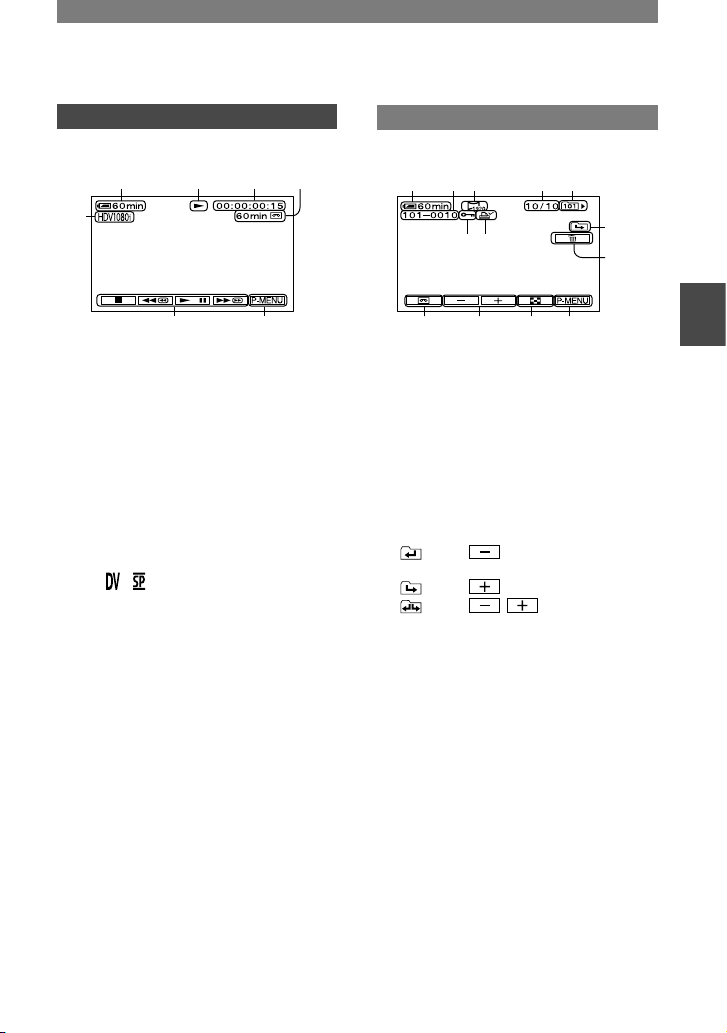
Viewing movies
2 qd 4 5
7qf
1
Tape transport indicator
Video operation buttons (23)
• When playing back a tape recorded in the
HDV and DVCAM (DV) formats, and the
signal switches between HDV and DVCAM
(DV) formats, the picture and sound disappear
temporarily.
• You cannot play back the tape recorded in the
HDV format on video cameras of the DVCAM
(DV) format or mini-DVCAM (DV) players.
• DV format tapes are played back on your
camcorder only if they are recorded in the SP
mode ( appears on the screen). Tapes
recorded in the LP mode are not played back.
• Time code and user bits are not displayed
correctly unless time code and user bits are
recorded on the tape, or the recorded time code
is compatible with your camcorder.
Viewing still images
MEMORY PLAY
2 qg 9 qh qj
qk
ql
7ws
wdwf
waw;
Data file name
Picture number/Total number of
recorded pictures in the current
playback folder
Playback folder (52)
Previous/Next folder icon
The following indicators appear when the
first or last picture of the current folder is
displayed and when there are multiple folders
on the same “Memory Stick Duo.”
: Touch to move to the previous
folder.
: Touch to move to the next folder.
: Touch / to move to either
the previous or the next folder.
Image delete button (73)
Tape playback select button (23)
Previous/Next image button (23)
Index screen display button (23)
Image protection mark (73)
Print mark (74)
Continued
CH1
CH2
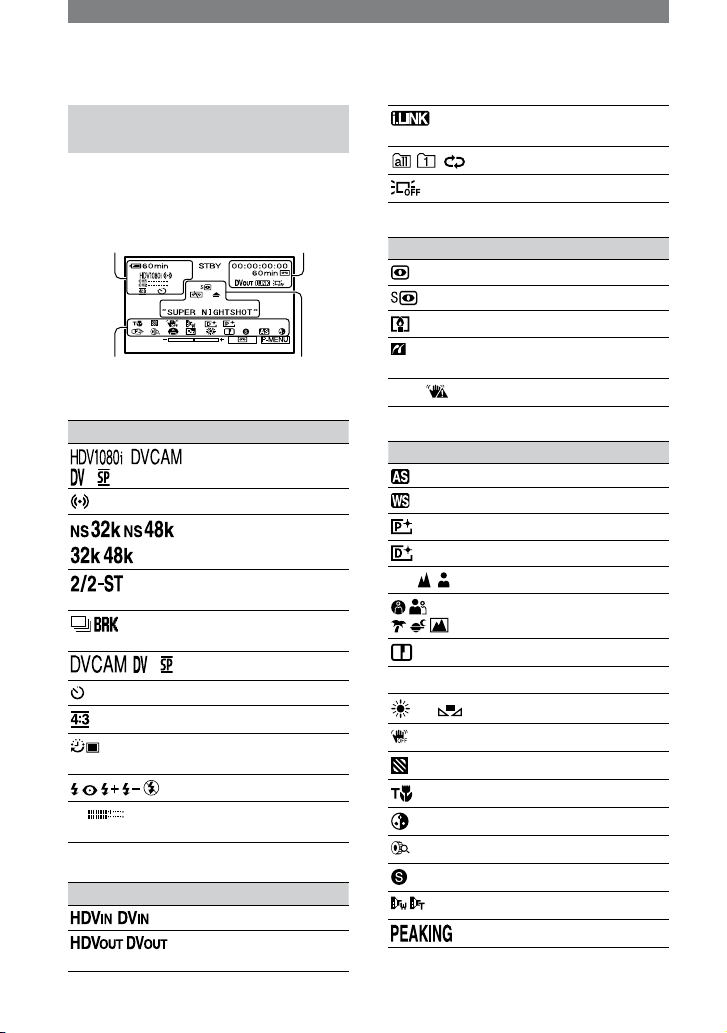
Indicators displayed during recording/playback (Continued)
Indicators when you made
changes
You can check the [DISP GUIDE] (p. 62)
to check the function of each indicator that
appears on the LCD screen.
Upper left Upper right
Bottom Center
Upper left
Indicator Meaning
Recording format (57)
EXT SUR MIC (59)
AUDIO MODE (58)*
4-channel microphone
recording standard (90)
Continuous photo
recording (49)
Recording mode (57)*
Self-timer recording (48)
WIDE SELECT (58)*
Interval photo recording
(54)
Flash light (46)
Recording level meter
(59)
Upper right
Indicator Meaning
HDV input/DV input (71)
HDV output/DV output
(33, 70)
30
Center
Indicator Meaning
Bottom
Indicator Meaning
* The settings can be made only for the pictures
in the DVCAM (DV) format.
i.LINK connection (33,
70, 71)
Slide show (53)
LCD backlight off (14)
NightShot (24)
Super NightShot (47)
Color Slow Shutter (47)
PictBridge connecting
(74)
Warning (97)
AE SHIFT (45)
WB SHIFT (46)
Picture effect (53)
Digital effect (53)
Manual focus (25)
PROGRAM AE (43)
Sharpness (45)
Backlight (25)
White balance (44)
SteadyShot off (48)
Zebra (47)
TELE MACRO (25)
CAMERA COLOR (45)
Zoom ring (24)
Shutter speed (45)
CONV. LENS (48)
PEAKING (46)
 Loading...