

Sony HDR-TG1E User Manual
Digital HD Video Camera Recorder
Operating Guide
HDR-TG1E/TG3E
3-288-523-13(1)
For details on the advanced operations, please refer to
“Handycam Handbook” (PDF).
© 2008 Sony Corporation
Read this first
Before operating the unit, please read this
manual thoroughly, and retain it for future
reference.
WARNING
To reduce fire or shock hazard, do
not expose the unit to rain or
moisture.
Do not expose the batteries to
excessive heat such as sunshine,
fire or the like.
CAUTION
Replace the battery with the
specified type only. Otherwise, fire
or injury may result.
Notice for customers in the
United Kingdom
A moulded plug complying with BS 1363 is
fitted to this equipment for your safety and
convenience.
Should the fuse in the plug supplied need to
be replaced, a fuse of the same rating as the
supplied one and approved by ASTA or
BSI to BS 1362 (i.e., marked with an or
mark) must be used.
If the plug supplied with this equipment has
a detachable fuse cover, be sure to attach
the fuse cover after you change the fuse.
Never use the plug without the fuse cover.
If you should lose the fuse cover, please
contact your nearest Sony service station.
FOR CUSTOMERS IN EUROPE
ATTENTION
The electromagnetic fields at the specific
frequencies may influence the picture and sound
of this unit.
This product has been tested and found compliant
with the limits set out in the EMC Directive for
using connection cables shorter than 3 meters (9.8
feet).
2
Notice
If static electricity or electromagnetism causes
data transfer to discontinue midway (fail), restart
the application or disconnect and connect the
communication cable (USB, etc.) again.
Disposal of Old Electrical &
Electronic Equipment
(Applicable in the European
Union and other European
countries with separate
collection systems)
This symbol on the product or on its
packaging indicates that this product shall
not be treated as household waste. Instead it
shall be handed over to the applicable
collection point for the recycling of
electrical and electronic equipment.
By ensuring this product is disposed of
correctly, you will help prevent potential
negative consequences for the environment
and human health, which could otherwise
be caused by inappropriate waste handling
of this product. The recycling of materials
will help to conserve natural resources.
For more detailed information about
recycling of this product, please contact
your local Civic Office, your household
waste disposal service or the shop where
you purchased the product.
Applicable Accessories: “Memory Stick
PRO Duo,” Dedicated USB Terminal
Adaptor
Disposal of waste batteries
(applicable in the European
Union and other European
countries with separate
collection systems)
This symbol on the battery or on the
packaging indicates that the battery
provided with this product shall not be
treated as household waste.
By ensuring these batteries are disposed of
correctly, you will help prevent potentially
negative consequences for the environment

and human health which could otherwise be
caused by inappropriate waste handling of
the battery. The recycling of the materials
will help to conserve natural resources.
In case of products that for safety,
performance or data integrity reasons
require a permanent connection with an
incorporated battery, this battery should be
replaced by qualified service staff only.
To ensure that the battery will be treated
properly, hand over the product at end-oflife to the applicable collection point for the
recycling of electrical and electronic
equipment.
For all other batteries, please view the
section on how to remove the battery from
the product safely. Hand the battery over to
the applicable collection point for the
recycling of waste batteries.
For more detailed information about
recycling of this product or battery, please
contact your local Civic Office, your
household waste disposal service or the
shop where you purchased the product.
For customers in the U.S.A.
If you have any questions about this
product, you may call:
Sony Customer Information Center 1-800222-SONY (7669).
The number below is for the FCC related
matters only.
Regulatory Information
Declaration of Conformity
Trade Name: SONY
Model No.: HDR-TG1E
Responsible Party: Sony Electronics Inc.
Address: 16530 Via Esprillo, San Diego, CA
92127 U.S.A.
Telephone number: 858-942-2230
This device complies with Part 15 of the FCC
Rules. Operation is subject to the following two
conditions: (1) This device may not cause
harmful interference, and (2) this device must
accept any interference received, including
interference that may cause undesired operation.
Notice for the customers in the
countries applying EU Directives
The manufacturer of this product is Sony
Corporation, 1-7-1 Konan Minato-ku
Tokyo, 108-0075 Japan. The Authorized
Representative for EMC and product safety
is Sony Deutschland GmbH, Hedelfinger
Strasse 61, 70327 Stuttgart, Germany. For
any service or guarantee matters please
refer to the addresses given in separate
service or guarantee documents.
“Memory Stick”
N50
Notes
HDR-TG1E is to be used with the
Handycam Station Model DCRA-C230 and
AC Adaptor Model AC-L200/L200B.
CAUTION
You are cautioned that any changes or
modifications not expressly approved in this
manual could void your authority to operate this
equipment.
Note
This equipment has been tested and found to
comply with the limits for a Class B digital
device, pursuant to Part 15 of the FCC Rules.
These limits are designed to provide reasonable
protection against harmful interference in a
residential installation. This equipment generates,
uses, and can radiate radio frequency energy and,
if not installed and used in accordance with the
instructions, may cause harmful interference to
radio communications.
3
However, there is no guarantee that interference
will not occur in a particular installation. If this
equipment does cause harmful interference to
radio or television reception, which can be
determined by turning the equipment off and on,
the user is encouraged to try to correct the
interference by one or more of the following
measures:
– Reorient or relocate the receiving antenna.
– Increase the separation between the equipment
and receiver.
– Connect the equipment into an outlet on a
circuit different from that to which the receiver
is connected.
– Consult the dealer or an experienced radio/TV
technician for help.
The supplied interface cable must be used w ith the
equipment in order to comply with the limits for a
digital device pursuant to Subpart B of Part 15 of
FCC Rules.
Battery pack and “Memory Stick PRO
Duo”
This device complies with Part 15 of the FCC
Rules. Operation is subject to the following two
conditions:
(1) This device may not cause harmful
interference, and (2) this device must accept any
interference received, including interference that
may cause undesired operation.
This Class B digital apparatus complies with
Canadian ICES-003.
Notes on use
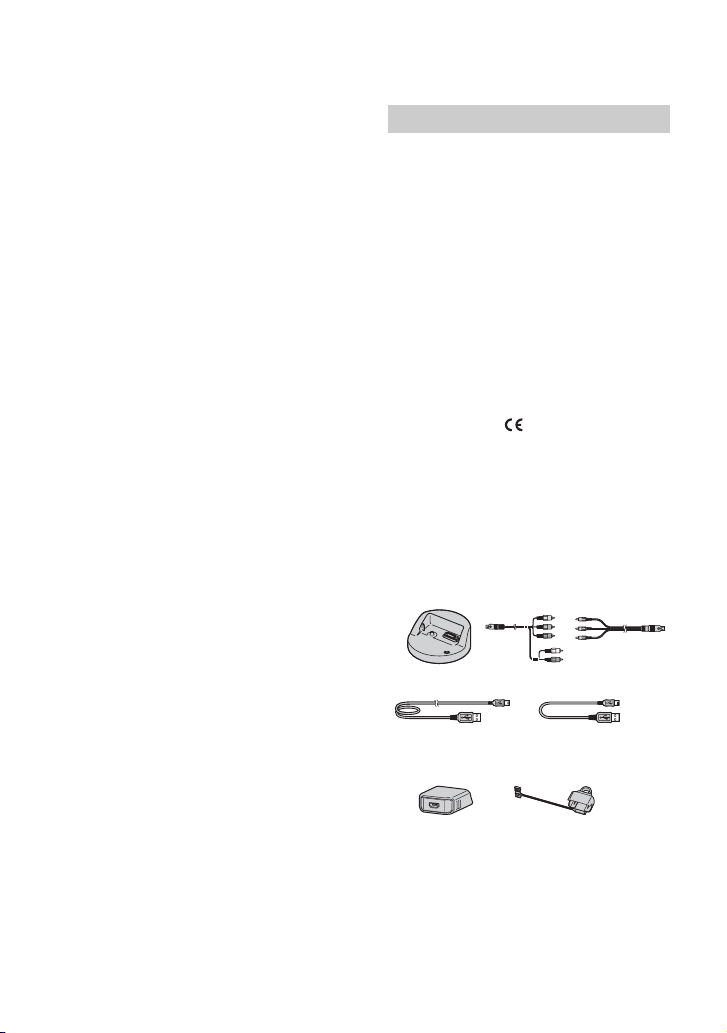
Supplied items
The numbers in ( ) are the supplied
quantity.
• “Memory Stick PRO Duo” 4 GB (1)
• AC Adaptor (1)
• Power cord (Mains lead) (1)
• Handycam Station (1) A
• Component A/V cable (1) B
• A/V connecting cable (1) C
• USB cable (long) (1) D
• USB cable (short) (1) E
• Dedicated USB Terminal Adaptor (1) F
• USB adaptor cap (1) G
• 21-pin adaptor (1)
For the models with the mark printed on their
bottom surfaces only.
• Rechargeable battery pack NP-FH50 (1)
• Wrist strap (1)
• CD-ROM “Handycam Application Software”
(1) (p. 26)
– Picture Motion Browser (Software)
–PMB Guide
– Handycam Handbook (PDF)
• “Operating Guide” (This manual) (1)
ABC
DE
FG
* The Dedicated USB Terminal Adaptor F and
the USB adaptor cap G are attached to the USB
cable (short) E beforehand.
4

Types of “Memory Stick” you can use
with your camcorder
• For recording movies, it is recommended that
you use a “Memory Stick PRO Duo” of 1 GB or
larger marked with:
– (“Memory Stick
PRO Duo”)*
– (“Memory Stick
PRO-HG Duo”)
* Marked with Mark2 or not, either can be used.
• A “Memory Stick PRO Duo” of up to 16 GB
has been confirmed to operate correctly with
this camcorder.
• See page 14 for the recordable time of a
“Memory Stick PRO Duo.”
• “Memory Stick PRO Duo” and “Memory Stick
PRO-HG Duo” are both called as “Memory
Stick PRO Duo” in this manual.
Using the camcorder
• The camcorder is not dustproofed, dripproofed
or waterproofed. See “Precautions” (p. 32).
• Do not do any of the following when the
(Movie)/ (Still) mode lamps (p. 10), the
access lamp (p. 12) or the QUICK ON lamp
(p. 7) is lit or flashing.
Otherwise, the “Memory Stick PRO Duo” may
be damaged, recorded images may be lost or
other malfunctions could occur.
– Eject the “Memory Stick PRO Duo”
– Remove the battery pack or AC Adaptor from
the camcorder.
– Apply mechanical shock or vibration to the
camcorder.
• If you close the LCD panel when your
camcorder is connected to other devices with
the USB cable, the recorded images may be lost.
• When inserting or ejecting the “Memory Stick
PRO Duo,” be careful so that the “Memory
Stick PRO Duo” does not pop out and drop
(p. 12).
• When connecting your camcorder to another
device with a cable, be sure to insert the
connector plug in the correct way. Pushing the
plug forcibly into the terminal will damage the
terminal and may result in a malfunction of your
camcorder.
• If you repeat recording/deleting images for a
long time, fragmentation of data occurs on the
media. Images cannot be saved or recorded. In
such a case, save your images on some type of
external media first, and then perform [MEDIA
FORMAT] (p. 24).
• The LCD screen is manufactured using
extremely high-precision technology, so over
99.99% of the pixels are operational for
effective use. However, there may be some tiny
black points and/or bright points (white, red,
blue, or green in color) that appear constantly on
the LCD screen. These points are normal results
of the manufacturing process and do not affect
the recording in any way.
On recording
• Before starting to record, test the recording
function to make sure the image and sound are
recorded without any problems.
• Compensation for the contents of recordings
cannot be provided, even if recording or
playback is not possible due to a malfunction of
the camcorder, recording media, etc.
• TV color systems differ depending on the
country/region. To view your recordings on a
TV, you need a PAL system-based TV.
• Television programs, films, video tapes, and
other materials may be copyrighted.
Unauthorized recording of such materials may
be contrary to the copyright laws.
On playing back recorded images on
other devices
• Your camcorder is compatible with MPEG-4
AVC/H.264 High Profile for HD (high
definition) image quality recording. Therefore,
you cannot play back images recorded with HD
(high definition) image quality on your
camcorder with the following devices;
– Other AVCHD format compatible devices
which are not compatible with High Profile
– Devices which are not compatible with the
AVCHD format
Save all your recorded image data
• To prevent your image data from being lost,
save all your recorded images on other media. It
is recommended that you save the image data on
a disc such as DVD-R using your computer, etc.
Also, you can save your image data using a
VCR, or a DVD/HDD recorder (p. 23).
• It is recommended that you save your image
data periodically, after recording.
5

Table of Contents
When the camcorder is connected to a
computer
• Do not try to format the “Memory Stick PRO
Duo” in the camcorder using a computer. If you
do so, your camcorder may not operate
correctly.
About language setting
• The on-screen displays in each local language are
used for illustrating the operating procedures.
Change the screen language before using your
camcorder if necessary (p. 11).
About this manual
• The images of the LCD screen used in this
manual for illustration purposes are captured
using a digital still camera, and therefore may
appear different from the actual images of the
LCD screen.
• Design and specifications of your camcorder
and accessories are subject to change without
notice.
• The screenshots are from Windows Vista. The
scenes may vary depending on the operating
system of the computer.
• Refer also to “Handycam Handb ook” (PDF) and
“PMB Guide.”
Read this first ..................................2
Getting Started
Step 1: Charging the battery pack... 7
Step 2: Turning the power on, and
setting the date and time.............10
Changing the language setting
................................................... 11
Step 3: Inserting a “Memory Stick
PRO Duo”....................................12
Recording/Playback
Recording......................................13
Playback........................................ 15
Playing the image on a TV ........... 16
Name and functions of each part .. 17
Indicators displayed during
recording/playback ...................... 19
Performing various functions
- “ HOME” and “ OPTION”
.....................................................21
Saving images............................... 23
Deleting images.............................24
Enjoying with a computer
Performing with a computer ..........26
Installing and viewing “Handycam
Handbook” (PDF)....................... 26
Installing “Picture Motion Browser”
................................................... 26
Troubleshooting
Troubleshooting.............................30
Additional Information
Precautions ...................................32
Specifications ................................33
6
Getting Started
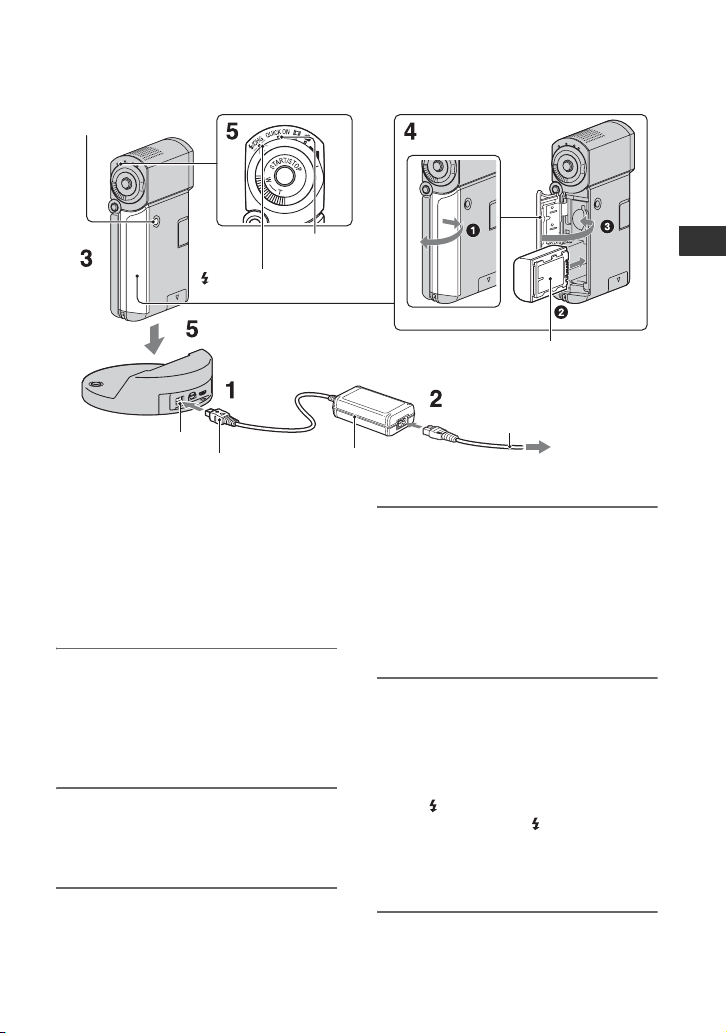
Step 1: Charging the battery pack
POWER button
QUICK ON
/CHG lamp
DC IN jack
DC plug
You can charge the “InfoLITHIUM”
battery pack NP-FH50 after attaching
it to your camcorder.
b Notes
• You cannot attach any “InfoLITHIUM” battery
pack other than NP-FH50 to your camcorder.
lamp
AC Adaptor
1 Connect the AC Adaptor to the
DC IN jack on the Handycam
Station.
Be sure that the v mark on the DC plug
is facing up.
2 Connect the power cord (mains
lead) to the AC Adaptor and the
wall outlet (wall socket).
Getting Started
Battery pack
Power cord
(Mains lead)
To the wall outlet
(wall socket)
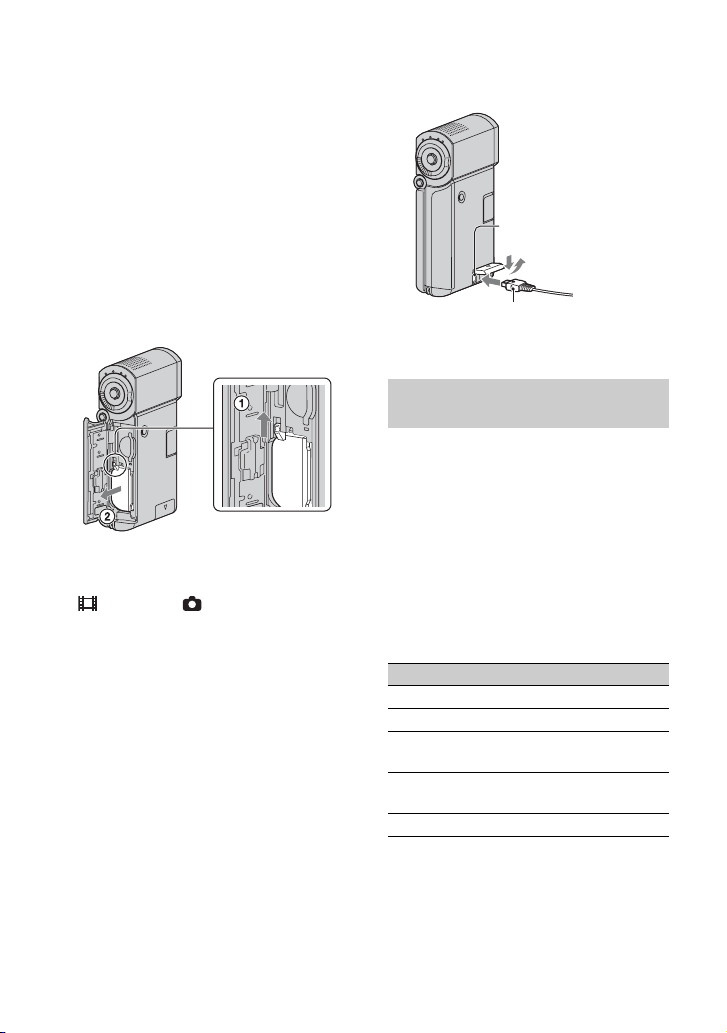
4 Insert the battery.
1 Open the battery/Memory Stick Duo
cover.
2 Insert the battery pack all the way in
until it clicks.
3 Close the battery/Memory Stick Duo
cover.
5 Place the camcorder on the
Handycam Station as shown
above, and insert it into the
Handycam Station securely, all
the way to the bottom.
The /CHG (charge) lamp lights up and
charging starts. The /CHG (charge)
lamp turns off when the battery pack is
fully charged. Remove the camcorder
from the Handycam Station.
3 Make sure that the LCD panel is
closed.
7
b Notes
• You cannot charge the battery pack while the
QUICK ON lamp is flashing. When the QUICK
ON lamp is flashing, press POWER to turn off
your camcorder. Make sure the QUICK ON
lamp is not flashing before charging the battery
pack.
To remove the battery pack
Turn off your camcorder and open the
battery/Memory Stick Duo cover.
Slide the battery eject lever.
Be sure not to drop the battery pack.
Battery eject lever
b Notes
• When you remove the battery pack or
disconnect the AC Adaptor, make sure that the
(Movie) lamp/ (Still) lamp (p. 10)/
access lamp (p. 12)/QUICK ON lamp are turned
off.
To charge the battery pack using only
the AC Adaptor
Close the LCD panel with your camcorder
turns off, then connect the AC Adaptor to
the DC IN jack on your camcorder.
DC IN jack
Open the jack cover.
DC plug
With the v mark
on the bottom
Available running time for the
supplied battery pack
Charging time:
Approximate time (min.) required when
you fully charge a completely exhausted
battery pack.
Recording/Playback time:
Approximate time (min.) available when
you use a fully charged battery pack.
“HD” stands for high definition image
quality, and “SD” stands for standard image
quality.
(Unit:min.)
HD SD
Charging time 135
Recording time*
Continuous recording
time
Typical recording
time*
Playback time*
*1[REC MODE]: SP
2
*
When the LCD backlight is on.
3
Typical recording time shows the time when
*
you repeat recording start/stop, turning the
power on/off and zooming.
1*2
100 120
3
2
50 60
135 145
8

On the battery pack
• When you remove the battery pack, turn off
your camcorder, and turn off the (Movie)
lamp/ (Still) lamp (p. 10)/access lamp
(p. 12)/QUICK ON lamp.
• The power will not be supplied from the battery
as long as the AC Adaptor is connected to the
DC IN jack of your camcorder or the Handycam
Station, even when the power cord (mains lead)
is disconnected from the wall outlet (wall
socket).
On the charging/recording/playback time
• Times measured when using the camcorder at
25°C (77°F) (10°C to 30°C (50°F to 86°F) is
recommended).
• The available recording and playback time will
be shorter when you use your camcorder in low
temperatures.
• The available recording and playback time will
be shorter depending on the conditions under
which you use your camcorder.
On the AC Adaptor
• Use the nearby wall outlet (wall socket) w hen
using the AC Adaptor. Disconnect the AC
Adaptor from the wall outlet (wall socket)
immediately if any malfunction occurs while
using your camcorder.
• Do not use the AC Adaptor placed in a narrow
space, such as between a wall and furniture.
• Do not short-circuit the DC plug of the AC
Adaptor or battery terminal with any metallic
objects. This may cause a malfunction.
• Even if your camcorder is turned off, AC power
source (mains) is still supplied to it while
connected to the wall outlet (wall socket) via the
AC Adaptor.
Getting Started
On using abroad
• You can use your camcorder in any countries/
regions using the AC Adaptor supplied with
your camcorder. Also, you can charge the
battery pack.
Use a commercially available AC plug adaptor,
if necessary, depending on the design of the wall
outlet (wall socket).
See “Handycam Handbook” (PDF) for details.
9
Step 2: Turning the power on, and setting the date and time
When using the camcorder for
the first time, the [CLOCK
SET] screen appears on the
LCD screen.
POWER button
(HOME)
Touch the button on the LCD screen. (Movie) / (Still)
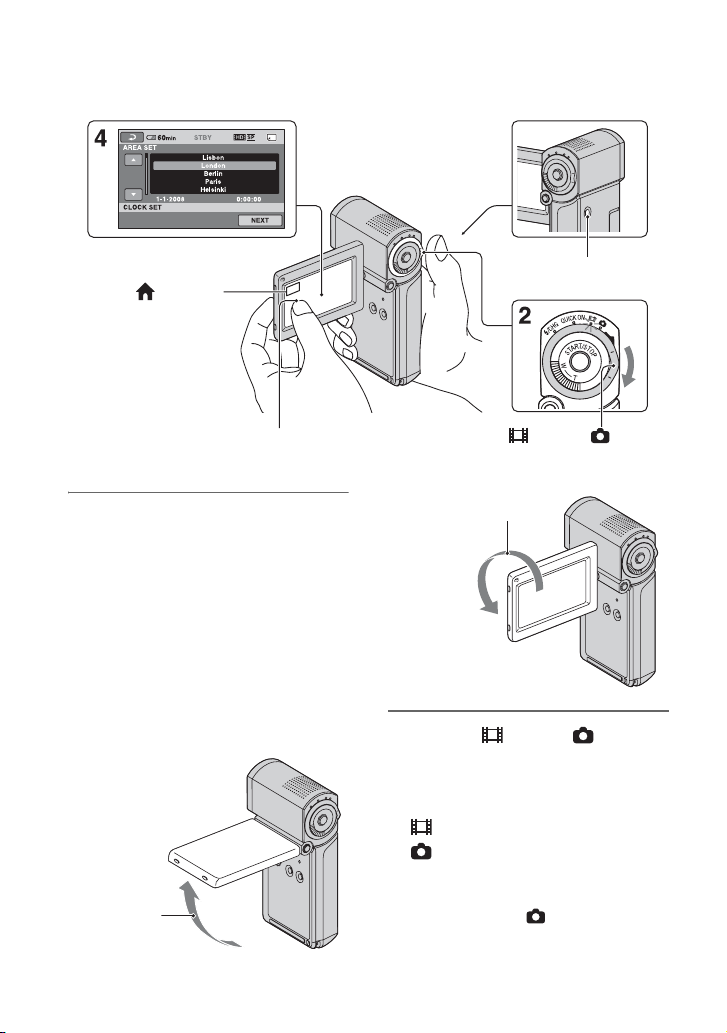
1 Open the LCD panel.
Your camcorder turns on.
To turn on your camcorder when the
LCD panel is opened, close it and open
it again, or press POWER with the LCD
panel opened.
To adjust the LCD panel, open the LCD
panel 90 degrees to the camcorder (1),
then rotate it to the best angle to record
or play (2). You can rotate the LCD
panel 270 degrees to the lens side (2)
to record in mirror mode.
190 degrees
to the
camcorder
10
select switch
2270 degrees (max.)
2 Slide the (Movie)/ (Still)
select switch repeatedly in the
direction of the arrow until the
respective lamp lights up.
(Movie): To record movies
(Still): To record still images
Go to step 4 when you turn on your
camcorder for the first time.
• When you turn on (Still) lamp, the
screen aspect ratio is changed to 4:3
automatically (the default setting).
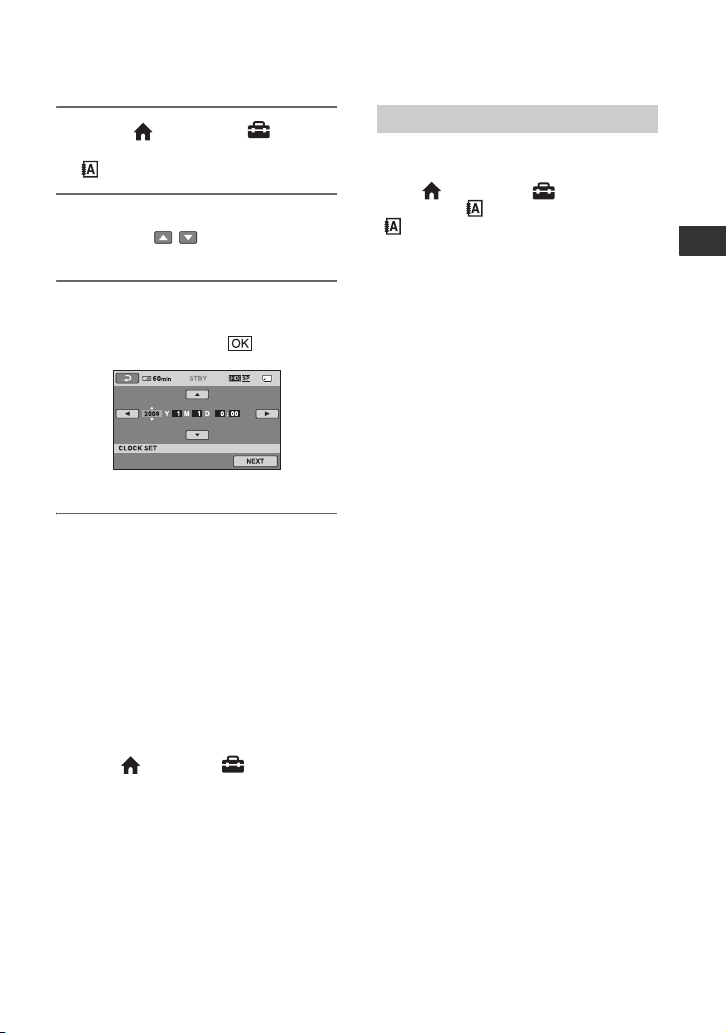
3 Touch (HOME) t
(SETTINGS) t [CLOCK/
LANG] t [CLOCK SET].
4 Select the desired geographical
area with / , then touch
[NEXT].
5 Set [SUMMERTIME], [Y] (year),
[M] (month), [D] (day), hour and
minute, then touch .
The clock starts.
To turn off the power
When recording standby/recording mode,
close the LCD panel, then press POWER.
Otherwise, close the LCD panel or press
POWER.
z Tips
• The date and time do not appear during
recording, but they are automatically recorded
on the “Memory Stick PRO Duo,” and can be
displayed during playback.
• You can turn off the operation beeps by
touching (HOME) t (SETTINGS)
t [SOUND/DISP SET] t [BEEP] t [OFF].
• When you close the LCD panel during standby/
recording, the QUICK ON lamp starts flashing
and your camcorder goes to sleep mode. If
[QUICK ON STBY] is set to [OFF] on the
HOME MENU (p. 22), closing the LCD panel
makes your camcorder turn off.
Changing the language setting
You can change the on-screen displays to
show messages in a specified language.
Touch (HOME) t (SETTINGS)
t [CLOCK/ LANG] t
[ LANGUAGE SET], then select the
desired language.
Getting Started
11
 Loading...