

Sony DHC-AZ7DM, DHC-AZ3DM, DHC-AZ5D, DHC-AZ2D, DHC-ZA7DM Operating Instructions Manual
2-629-502-11(1)
Display Side
Hi-Fi Component
System
Operating Instructions
DHC-AZ7DM
DHC-AZ3DM
©2005 Sony Corporation
WARNING
To prevent fire or shock hazard, do not
expose the unit to rain or moisture.
To prevent fire, do not cover the ventilation of the
apparatus with news papers, table-cloths, curtains, etc.
And don’t place lighted candles on the apparatus.
To prevent fire or shock hazard, do not place objects
filled with liquids, such as vases, on the apparatus.
Do not install the appliance in a confined space,
such as a bookcase or built-in cabinet.
This appliance is
classified as a CLASS 1
LASER product. This
marking is located on the
rear exterior.
Don’t throw away the battery with
general house waste, dispose of it
correctly as chemical waste.
Australian mode
l only
ENERGY STAR® is a U.S.
registered mark. As an E
®
TAR
partner, Sony Corporation
S
has determined that this product
meets the E
NERGY STAR
NERGY
®
guidelines for energy efficiency.
1)
This system incorporates Dolby
Logic (II) adaptive matrix surround decoder, and
2)
DTS
Digital Surround System.
1)
Manufactured under license from Dolby
Digital, Dolby Pro
Laboratories.
“Dolby”, “Pro Logic”, and the double-D symbol are
trademarks of Dolby Laboratories.
2)
Manufactured under license from Digital Theater
Systems, Inc. “DTS” and “DTS Digital Surround”
are registered trademarks of Digital Theater
Systems, Inc.
®
is a video file compression technology,
DivX
developed by DivXNetworks, Inc.
DivX, DivX Certified, and associated logos are
trademarks of DivXNetworks, Inc. and are used under
license.
TM
and ® marks are omitted in this manual.
GB
2

Table of Contents
How to use this manual...........................5
Playable USB storage media...................5
Playable discs..........................................6
Getting Started
Hooking up the system............................8
Positioning the speakers........................12
Setting the clock....................................13
Performing the Quick Setup..................14
USB storage media – Play
Inserting USB storage media ................17
Playing USB storage media ..................17
— Normal Play/Shuffle Play
Playing repeatedly.................................20
— Repeat Play
DVD/VIDEO CD/CD/MP3/JPEG/
®
DivX
video – Play
Loading a disc.......................................21
Playing a disc........................................21
Creating your own program ..................24
— Program Play
Playing in random order........................25
— Shuffle Play
Playing repeatedly.................................26
— Repeat Play
Playing DVDs using the menu..............27
Selecting “ORIGINAL” or “PLAY LIST”
on a DVD-RW ................................28
Playing VIDEO CDs with PBC functions
(Ver. 2.0).........................................28
— PBC Play
About MP3 audio tracks and JPEG image
files .................................................29
Playing DATA CDs with MP3 audio track
and JPEG image files......................30
Playing audio tracks and images as a slide
show with sound.............................33
Playing DivX
Using the on-screen display to search... 36
Searching by scene................................38
— Picture Navigation
®
video files ....................35
DVD/VIDEO CD/CD/MP3/JPEG/
®
DivX
video – Various
functions
Changing the sound.............................. 39
Adjusting the delay between the picture
and sound........................................ 41
— A/V SYNC
Using the Setup Display ....................... 41
Setting the display or sound track
language ......................................... 42
— LANGUAGE SETUP
Settings for the display ......................... 43
— SCREEN SETUP
Custom settings..................................... 45
— CUSTOM SETUP
Speaker settings.................................... 46
— SPEAKER SETUP
(DHC-AZ7DM only)
Restricting disc playback...................... 49
— CUSTOM PARENTAL
CONTROL/PARENTAL
CONTROL
Changing the angles.............................. 53
Displaying the subtitles ........................ 53
Tuner
Presetting radio stations........................ 54
Listening to the radio............................ 55
— Preset Tuning
— Manual Tuning
Tape – Play
Loading a tape ...................................... 57
Playing a tape........................................ 57
Tape – Recording
Recording your favorite CD tracks on a
tape ................................................. 58
— CD-TAPE Synchro Recording
Recording on a tape manually .............. 59
— Manual Recording
continued
GB
3

Sound Adjustment
Adjusting the sound ..............................60
Selecting the sound effect .....................60
Selecting the surround effect ................61
Adjusting the graphic equalizer and
storing .............................................62
Singing along: Karaoke......................... 62
Timer
Falling asleep to music..........................66
— Sleep Timer
Waking up to music..............................66
— Play Timer
Timer recording radio programs ........... 67
— Rec Timer
Display
Turning off the display..........................68
— Power Saving Mode
Adjusting the brightness of the
display............................................. 68
Viewing information about the USB
storage media in the display ...........69
Viewing information about the disc in the
display............................................. 69
Viewing information about the disc in the
on-screen display............................71
Checking the date information.............. 72
Viewing the tuner information in the
display............................................. 72
Optional Personal Computer
Connecting a personal computer to the
system .............................................73
Installing the driver...............................74
Listening to audio files on a personal
computer.........................................77
Optional Components
Controlling the TV with the remote ..... 77
Using the THEATRE SYNC
function........................................... 78
Hooking up optional components......... 79
Listening to audio from a connected
component...................................... 80
Enjoying the 5.1 channel sound with the
optional amplifier........................... 81
(DHC-AZ3DM only)
Recording audio from a connected
component...................................... 81
Recording on a connected
component...................................... 81
Troubleshooting
Problems and remedies......................... 82
Messages............................................... 88
Self-diagnosis Function ........................ 89
(When letters/numbers appear in
the display)
Additional Information
Precautions ........................................... 90
Specifications ....................................... 92
Language code list................................ 95
List of items that can be displayed and
selected by disc type....................... 96
System setup item list........................... 98
Glossary................................................ 99
List of button locations and reference
pages............................................. 103
GB
4
How to use this manual
Playable USB storage
• This manual mainly explains operations using
the remote, but the same operations can also
be performed using the buttons on the unit
having the same or similar names.
• The OSD (on-screen display) may vary
depending on the country model.
• The English OSD screen (on-screen display)
is used for illustration purposes only.
• The Control Menu items may be different
depending on the disc type (page 96).
• The selectable items in the Setup Display may
be different depending on the area (page 41).
• “DVD” may be used as a general term for
DVD VIDEOs, DVD+RWs/DVD+Rs and
DVD-RWs/DVD-Rs.
• MP3 (MPEG1 Audio Layer 3) is a standard
format defined by ISO/MPEG which
compresses audio data.
• The following symbols are used in this
manual.
Symbol Meaning
Functions available for DVD
VIDEOs, DVD-Rs/DVD-RWs in
video mode, and DVD+Rs/
DVD+RWs
Functions available for DVD-RWs
in VR (Video Recording) mode
Functions available for VIDEO
CDs (including Super VCDs or CDRs/CD-RWs in video CD format or
Super VCD format)
Functions available for music CDs
or CD-Rs/CD-RWs in music CD
format
Functions available for DATA CDs
(CD-ROMs/CD-Rs/CD-RWs
containing MP3 audio tracks, JPEG
image files and DivX
Functions available for DATA
DVDs (DVD-Rs/DVD-RWs/
DVD+Rs/DVD+RWs) containing
DivX video files
video files)
media
You can play back the following Sony USB
storage media on this system.
Other USB storage media cannot be played back
on this system.
Verified Sony USB storage
media (as of July 2005)
Product name Model name/Capacity
MICROVAULT* USM32A/64A/128A/256A
USM32U2/64U2/128U2/256U2/
512U2
USM64D/128D/256D
USM128E/256E/512E
* MICROVAULT is a trademark of Sony Corporation.
Notes
• Do not connect USB devices other than USB storage
media. This may damage the system.
• Operation may not always be ensured even when
using these USB storage media.
• Some of these USB storage media may not be
available for purchase in certain areas.
Notes on USB storage media
• Always turn off the system before removing
USB storage media. Removing media while
the system is on may corrupt the data on it or
damage the media itself.
• Depending on the encoding/writing software,
recording device, or the recording media used
at the time an MP3 audio track is recorded,
you may encounter such problems as disabled
playback, sound interruptions, and noise.
• The system may be unable to play MP3
format files that do not have the “.MP3”
extension.
• Attempting to play non-MP3 format files that
have the “.MP3” extension may result in noise
or malfunction.
• The following USB storage media may take a
longer time to start playback.
– USB storage media recorded with
complicated tree structure.
continued
GB
5
– High-capacity USB storage media.
– USB storage media that is fragmented.
• Do not leave the USB storage media within
the reach of small children. They might
accidentally swallow it.
• Music you record is limited to private use
only. Any other use requires the permission of
the copyright holders.
• Sony is not liable for incomplete data transfer
or damaged data due to problems of this
product or your computer.
• USB storage media formatted with file
systems other than FAT12, FAT16, or FAT32
are unsupported.
• This system supports FAT12, FAT16 and
FAT32, but some USB storage media may not
support all of these FAT. For details, see the
operation manual of each USB storage media
or contact the manufacturer.
• If you use partitioned USB storage media, only
MP3 files on the first partition can be played.
Playable discs
You can play back the following discs on this
system. Other discs cannot be played back.
List of playable discs
Format of discs Disc logo
DVD VIDEO
DVD-RW
VIDEO CD
Audio CD
Format of discs Disc logo
CD-R/CD-RW
The “DVD VIDEO” logo and “DVD-RW” logo are
trademarks.
Region code of DVDs you can
play on this system
Your system has a region code printed on the
back of the unit and will only play DVDs labeled
with identical region code.
DVDs labeled will also be played on this
ALL
system. If you try to play any other DVD, the
message “Playback prohibited by area
limitations.” will appear on the TV screen.
Depending on the DVD, no region code
indication may be labeled even though playing
the DVD is prohibited by area restrictions.
X
Region code
MODEL NO. HCD-AZXX
DVD DECK RECEIVER
AC: 00V 00Hz 00W
SERIAL NO:
Discs that this system cannot
play
• CD-ROMs/CD-Rs/CD-RWs other than those
recorded in the following formats:
– music CD format
– video CD format
– MP3 (MPEG1 Audi o Layer-3)/JPEG/DivX
format that conforms to ISO9660* Level 1/
Level 2 or Joliet
• CD-ROMs recorded in PHOTO CD format
• Data part of CD-Extras
• Super Audio CDs
• DVD-ROMs/DVD-Rs/DVD-RWs/DVD+Rs/
DVD+RWs other than those recorded in
DivX format conforming to Universal Disk
Format (UDF).
• DVD-ROMs/DVD-Rs/DVD-RWs/DVD+Rs/
DVD+RWs recorded in Multi Session
• DVD-RAMs
• DVD Audio discs
GB
6

• A DVD with a different region code.
• An 8 cm disc with an adapter
• Discs with non-standard shapes (e.g., heart,
square, star) cannot be played on this unit.
Attempting to do so may damage the unit. Do
not use such discs.
• A disc with paper or stickers on it.
• A disc that has the adhesive, cellophane tape,
or a sticker still left on it.
* A logical format of files and folders on a CD-ROMs,
defined by ISO (International Organization for
standardization).
Notes about CD-R/CD-RW/DVDR/DVD-RW/DVD+R/DVD+RW
• In some cases, CD-Rs, CD-RWs, DVD-Rs,
DVD-RWs, DVD+R or DVD+RW cannot be
played on this system depending upon the
recording quality or physical condition of the
disc, or the characteristics of the recording
device. Furthermore, the disc will not play if
it has not been correctly finalized. For more
information, see the operating instructions for
the recording device.
• A disc recorded in packet write format cannot
be played.
Note on playback operations
of DVDs and VIDEO CDs
Some playback operations of DVDs and VIDEO
CDs may be intentionally set by software
producers. Since this system plays DVDs and
VIDEO CDs according to the disc contents the
software producers designed, some playback
features may not be available. Also, refer to the
instructions supplied with the DVDs or VIDEO
CDs.
Music discs encoded with
copyright protection
technologies
This product is designed to playback discs that
conform to the Compact Disc (CD) standard.
Recently, various music discs encoded with
copyright protection technologies are marketed
by some record companies. Please be aware that
among those discs, there are some that do not
conform to the CD standard and may not be
playable by this product.
Note on DualDiscs
A DualDisc is a two sided disc product which
mates DVD recorded material on one side with
digital audio material on the other side.
However, since the audio material side does not
conform to the Compact Disc (CD) standard,
playback on this product is not guaranteed.
Cautions when playing a disc
that is recorded in Multi
Session
• This system can play Multi Session CDs
when an MP3 audio track is contained in the
first session. Any subsequent MP3 audio
tracks recorded in later sessions can also be
played back.
• This system can play Multi Session CDs
when a JPEG image file is contained in the
first session. Any subsequent JPEG image
files recorded in later sessions can also be
played back.
• If audio tracks and images in music CD
format or video CD format are recorded in the
first session, only the first session will be
played back.
• CD-R and CD-RW discs recorded in multisession that have not ended by “closing the
session” are not supported.
• With CD-ROMs/CD-Rs/CD-RWs that
contain DivX video files in addition to MP3
audio tracks or JPEG image files, the system
plays only the DivX video files.
Copyrights
This product incorporates copyright protection
technology that is protected by U.S. patents and
other intellectual property rights. Use of this
copyright protection technology must be
authorized by Macrovision, and is intended for
home and other limited viewing uses only unless
otherwise authorized by Macrovision. Reverse
engineering or disassembly is prohibited.
GB
7

Getting Started
Hooking up the system
Perform the following procedures 1 to 6 to hook up your system using the supplied cords and
accessories. The type of speakers supplied varies according to the model you purchased (see
“Specifications” on page 92). DHC-AZ7DM is used for illustration purposes.
AM loop antenna
FM antenna
Surround speaker
(Right)*
Front speaker (Right)
Center speaker*
Surround speaker
(Left)*
Front speaker (Left)
Subwoofer*
* DHC-AZ7DM only
GB
8

1 Connect the speakers and subwoofer.
Be sure to match the appropriate speaker
cords from the speaker terminals to the
corresponding SPEAKER terminals on the
unit.
Main unit
Front speakers/Center speaker*/
Surround speakers*
Insert only the stripped portion
Black (#)
Black (#)
Color tube
* DHC-AZ7DM only
Notes
• For the subwoofer (DHC-AZ7DM only), the speaker
cords are attached to the subwoofer. Connect the
speaker cords to the main unit only.
• The connector and the color tube of the speaker cords
are the same color as the speaker terminal to be
connected.
• Be sure to match the speaker cord to the appropriate
terminal on the components: 3 to 3, and # to #. If
the cords are reversed, the sound will be di storted and
will lack bass.
2 Connect the FM and AM antennas.
Set up the AM loop antenna, then connect
it.
Extend the FM lead
antenna horizontally
AM loop antenna
* Strip off an end-portion of wire covering.
Note
Keep the antennas away from the speaker cords.
Insert only the
stripped portion*
FM
75
COAXIAL
AM
3 Connect the video input jack of your TV
to the VIDEO OUT jack with the
supplied video cable.
When using a TV
Turn on the TV and select the video input so that you
can view the pictures from this system.
Getting Started
continued
GB
9
When connecting a video deck
Connect the TV and the video deck using video and
audio cords (not supplied) as shown below.
TV
Video deck System
When you connect the components as shown above, you
may experience video leakage or hear noise. In this case,
disconnect one of the components.
Note
Do not place the TV on this system.
Tip
For even higher quality video images:
– Use an optional component video cord to connect the
COMPONENT VIDEO input jacks on your TV to
the COMPONENT VIDEO OUT jacks of this
system. If your TV is compatible with progressive
format file signals, use this connection and set
“PROGRESSIVE AUTO” or “PROGRESSIVE
VIDEO” depending on your TV. For details, see “To
change the type of signal output from the system”
(page 44).
– You can use an optional S video cord to connect the
S VIDEO input jack on your TV to the S VIDEO
OUT jack.
4 For models with a voltage selector, set
VOLTAGE SELECTOR to the local
power line voltage.
Depending on the model, the VOLTAGE
SELECTOR may differ.
VOLTAGE SELECTOR
220–240V
120V
5 Connect the power cord to a wall
outlet.
The demonstration appears in the display.
When you press
?/1, the system turns on
and the demonstration automatically ends.
If the supplied adapter on the plug does not
fit your wall outlet, detach it from the plug
(only for models equipped with an adapter).
Note
Install this system so that the power cord can be
unplugged from the wall socket immediately in the
event of trouble.
6 Set the color system to PAL or NTSC
depending on the color system of your
TV.
The color system is factory set to NTSC for
region code 3 models, and PAL for other
region code models. Each time you perform
the procedure below, the color system
changes as follows:
NTSC y PAL
1 Press ?/1 to turn off the system.
2 Press ?/1 on the unit while touching X
on the unit.
The system turns on and the color
system is changed.
Notes
• Do not place the surround speakers on top of a TV.*
This may cause distortion of the colors in the TV
screen.
• Be sure to connect both left and right surround
speakers.* Otherwise, the sound will not be heard.
• You cannot set the color system in Power Saving
Mode (page 68).
• When you play back a VIDEO CD recorded in a
different color system from the one you set to the
unit, the picture image may be distorted.
* DHC-AZ7DM only
To connect optional components
See page 79.
10
GB
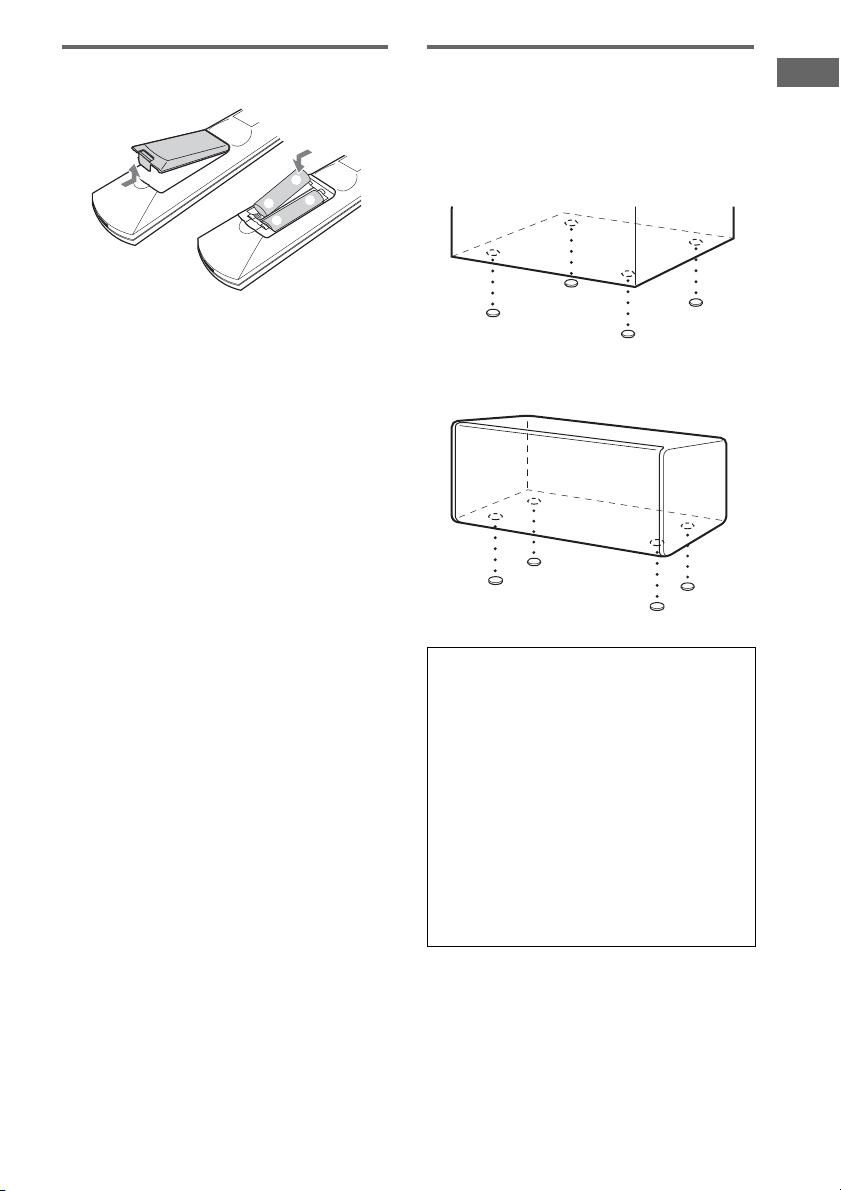
Inserting two R6 (size AA)
batteries into the remote
Attaching the speaker pads
Attach the supplied speaker pads to the bottom
of the speakers to stabilize the speakers and
prevent them from slipping.
Getting Started
e
E
E
e
Note
If you do not use the remote for a long period of time,
remove the batteries to avoid possible damage from
battery leakage and corrosion.
Tip
With normal use, the batteries should last for about six
months. When the remote no longer operates the
system, replace both batteries with new ones.
Front speaker (Left (4)/Right (4))
Center speaker (4)*/
Surround speaker (Left (4)/Right (4))*
* DHC-AZ7DM only
When carrying this system
Perform the following procedure to protect
the DVD mechanism.
Use buttons on the unit for the operation.
1 Press ?/1 to turn on the system, then
touch DVD.
2 Make sure that no disc is loaded in the
system and check that “No Disc”
appears.
3 Press ?/1 to turn off the system and
check that “STANDBY” disappears.
4 Unplug the power cord.
11
GB

Positioning the speakers
1 Place the front speakers at an angle of
45 degrees from your listening
position.
Front
speaker
(L)
Surround speaker
(L)*
* DHC-AZ7DM only
Center speaker*
Subwoofer*
45˚
Front
speaker
(R)
Surround speaker
(R)*
2 Place the center speaker at about the
same height as the front speakers.
Align the center speaker with the front
speakers or place it slightly behind the front
speakers.
3 Place the surround speakers.
4 Place the subwoofer.
To obtain a better bass reproduction, we
recommend you to place the subwoofer on
a solid floor where resonance is unlikely to
occur.
Notes
• Do not place the surround speakers on top of a TV.*
This may cause distortion of the colors in the TV
screen.
• Always place the subwoofer vertically, keeping it a
few centimeters away from the wall.*
• If the subwoofer is placed in the center of a room, the
bass could be extremely weakened.* This is due to
the influence of the sta nding wave of the room. If this
happens, move the subwoofer away from the center
of the room or eliminate the cause of the standing
wave, by placing a bookshelf against the wall, etc.
* DHC-AZ7DM only
To install the surround speakers
on the wall (DHC-AZ7DM only)
1 Prepare screws (not supplied) that are
suitable for the hole on the back of each
speaker. See the illustrations below.
4 mm
5.3 mm
12
more than 25 mm
9 mm
Hole on the back of
the speaker
2 Fasten the screws to the wall.
The screws should protrude 5.5 to 7 mm.
20˚
Position the surround speakers within the
respective gray ranges.
Positioning both surround speakers the
same distance from the listening position is
effective.
GB
5.5 to 7 mm
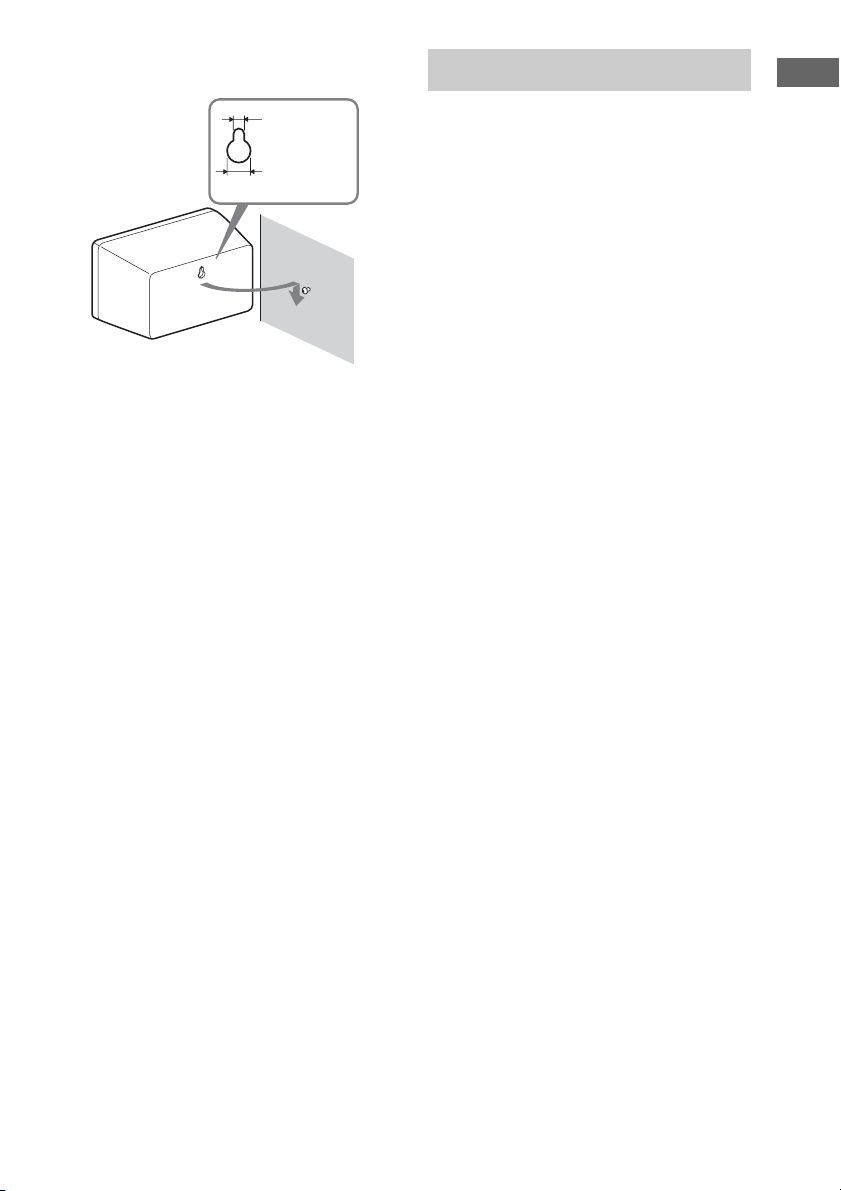
3 Hang the speakers on the screws.
Hole on the back of the speaker
5.3 mm
9 mm
Notes
• Use screws that are suitable for the wall material and
strength. As a plaster board wall is especially fragile,
attach the screws securely to a beam and fasten them
to the wall. Install the satellite speakers on a vertical
and flat wall where reinforcement is applied.
• Contact a screw shop or installer regarding the wall
material or screws to be used.
• Sony is not responsible for accident or damage
caused by improper installation, insufficient wall
strength or improper screw installation, natural
calamity, etc.
Speaker settings (DHC-AZ7DM
only)
To enjoy DVDs and other discs with multichannel sound and Dolby surround effects, the
speakers need to be adjusted. Set the distance
from the listening position to the speakers, and
the balance and level. Then use the test tone to
adjust the volume of each speaker to the same
level.
For details, see “Speaker settings” on page 46.
Setting the clock
Getting Started
Use buttons on the remote for the operation.
1 Press ?/1 to turn on the system.
2 Press TIMER MENU.
3 Press M or m repeatedly to set the hour.
4 Press ENTER.
5 Press M or m repeatedly to set the
minute.
6 Press ENTER.
The clock starts working.
To adjust the clock
1 Press TIMER MENU.
2 Press M or m to select “CLOCK SET?”, then
press ENTER.
3 Do the same procedures as step 3 to 6
above.
Notes
• The clock settings are canceled when you disconnect
the power cord or if a power failure occurs.
• You cannot set the clock in Power Saving Mode
(page 68).
13
GB
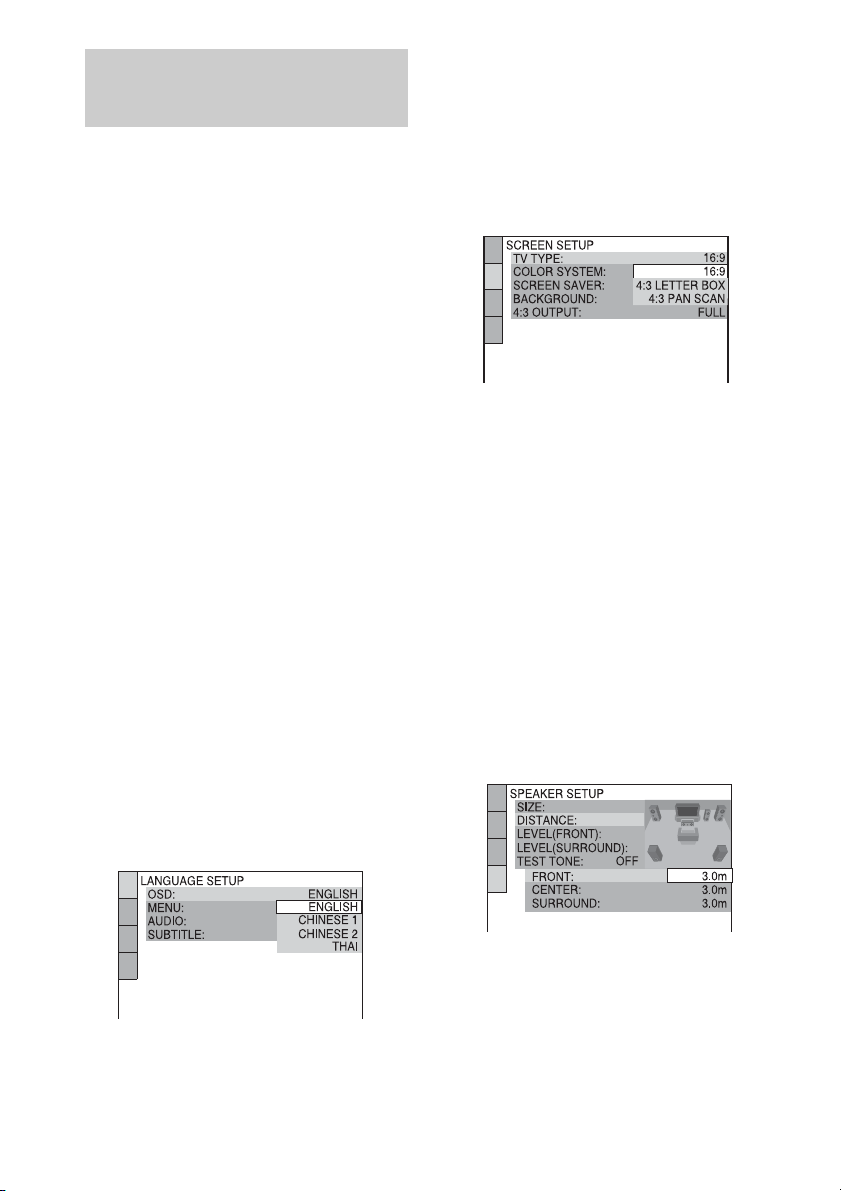
Performing the Quick Setup
You can set the initial settings of “OSD”, “TV
TYPE” and “DISTANCE” (DHC-AZ7DM
only) step by step.
After performing the Quick Setup, the system is
ready for playing back of movies, music CDs,
etc. To perform further speakers settings, see
“Speaker settings” on page 46.
Asian model is used for illustration purposes
only.
For DHC-AZ7DM
1 Turn on the TV and select the video
input.
2 Press ?/1 to turn on the system.
3 Press FUNCTION + or – repeatedly (or
touch DVD on the unit) to switch the
function to DVD.
The guide message appears on the TV
screen.
Notes
• When a disc is in the system, the guide message
does not appear on the TV screen. Press Z on
the unit to remove the disc.
• When you press CLEAR, the guide message
disappears. When you need to perform the
Quick Setup, see “To recall the Quick Setup
display” (page 16).
• Disconnect the headphones and microphones
when you perform the Quick Setup. You cannot
operate steps after 9 with the headphones and
microphones connected.
4 Press ENTER.
“LANGUAGE SETUP” appears.
5 Press M or m repeatedly to select a
language used in the on-screen
display.
The selectable language is different
depending on the area.
6 Press ENTER.
The setting is selected and “SCREEN
SETUP” appears.
7 Press M or m repeatedly to select the
setting that matches your TV type.
x When you connect a 4:3 standard TV
“4:3 LETTER BOX” or “4:3 PAN SCAN”
(page 43)
x When you connect a wide-screen TV
or a 4:3 standard TV with a wide-screen
mode
“16:9” (page 43)
8 Press ENTER.
The setting is selected and “SPEAKER
SETUP” appears.
9 Press M or m repeatedly to select the
front speaker distance from the
listening position, then press ENTER.
You can set from 1.0 to 7.0 m.
14
The language you select in “LANGUAGE
SETUP” is for “OSD”, “MENU” and
“SUBTITLE” (page 42).
GB
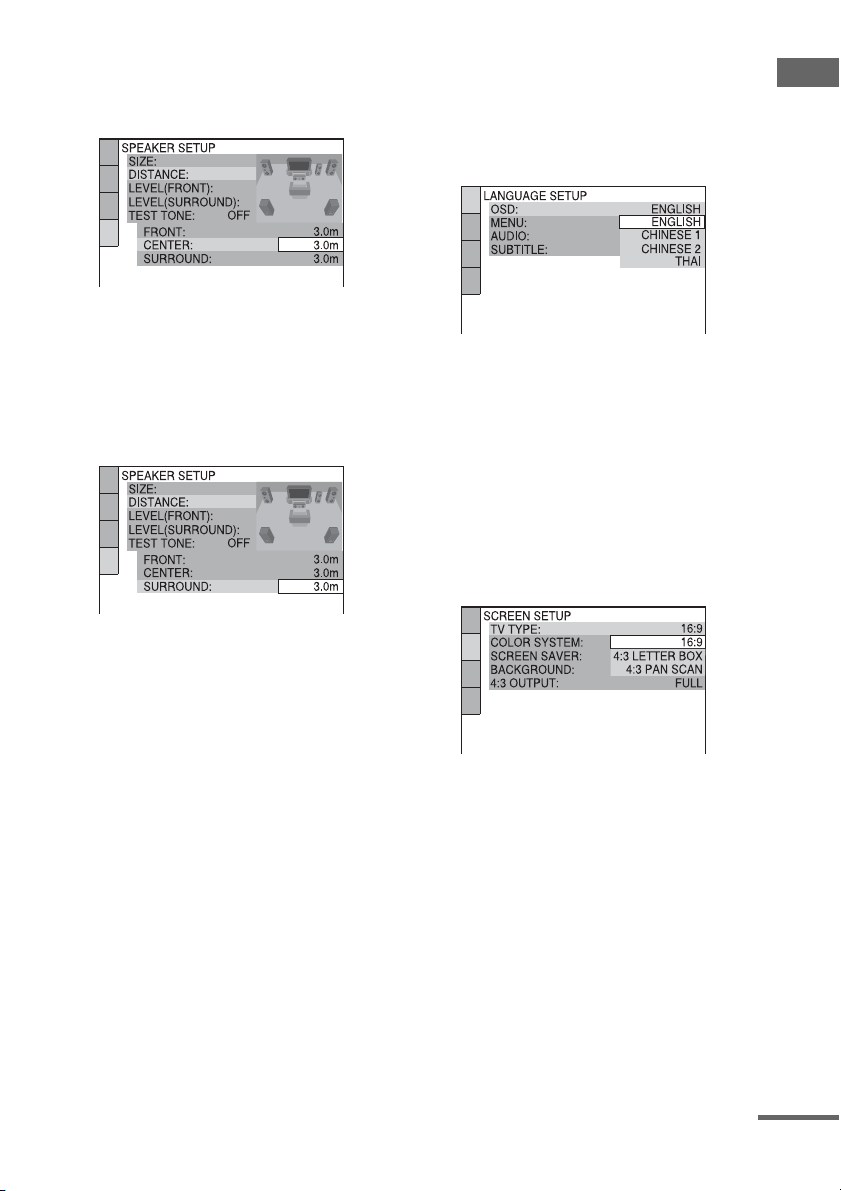
10 Press M or m repeatedly to select the
center speaker distance from the
listening position, then press ENTER.
You can set from 0.0 to 7.0 m.
Note
The setting range changes depending on the front
speaker setting.
11 Press M or m repeatedly to select the
surround speaker distance from the
listening position.
You can set from 0.0 to 7.0 m.
• When you press CLEAR, the guide message
disappears. When you need to perform the
Quick Setup, see “To recall the Quick Setup
display” (page 16).
4 Press ENTER.
“LANGUAGE SETUP” appears.
The language you select in “LANGUAGE
SETUP” is for “OSD”, “MENU” and
“SUBTITLE” (page 42).
5 Press M or m repeatedly to select a
language used in the on-screen
display.
The selectable language is different
depending on the area.
6 Press ENTER.
The setting is selected and “SCREEN
SETUP” appears.
Getting Started
Note
The setting range changes depending on the front
speaker setting.
12 Press ENTER.
The Quick Setup is complete.
For DHC-AZ3DM
1 Turn on the TV and select the video
input.
2 Press ?/1 to turn on the system.
3 Press FUNCTION + or – repeatedly (or
touch DVD on the unit) to switch the
function to DVD.
The guide message appears on the TV
screen.
Notes
• When a disc is in the system, the guide message
does not appear on the TV screen. Press Z on
the unit to remove the disc.
7 Press M or m repeatedly to select the
setting that matches your TV type.
x When you connect a 4:3 standard TV
“4:3 LETTER BOX” or “4:3 PAN SCAN”
(page 43)
x When you connect a wide-screen TV
or a 4:3 standard TV with a wide-screen
mode
“16:9” (page 43)
8 Press ENTER.
The Quick Setup is complete.
If you make a mistake
Press ., then select the item again.
continued
15
GB

To quit the Quick Setup
Press DISPLAY.
To recall the Quick Setup display
1 Press DISPLAY in stop mode.
The Control Menu appears.
2 Press M or m repeatedly to select “SETUP”,
then press ENTER.
The options for “SETUP” appear.
3 Press M or m repeatedly to select “QUICK”,
then press ENTER.
The Quick Setup display appears.
Note
If you want to change each setting, see “Using the
Setup Display” (page 41).
16
GB
USB storage media – Play
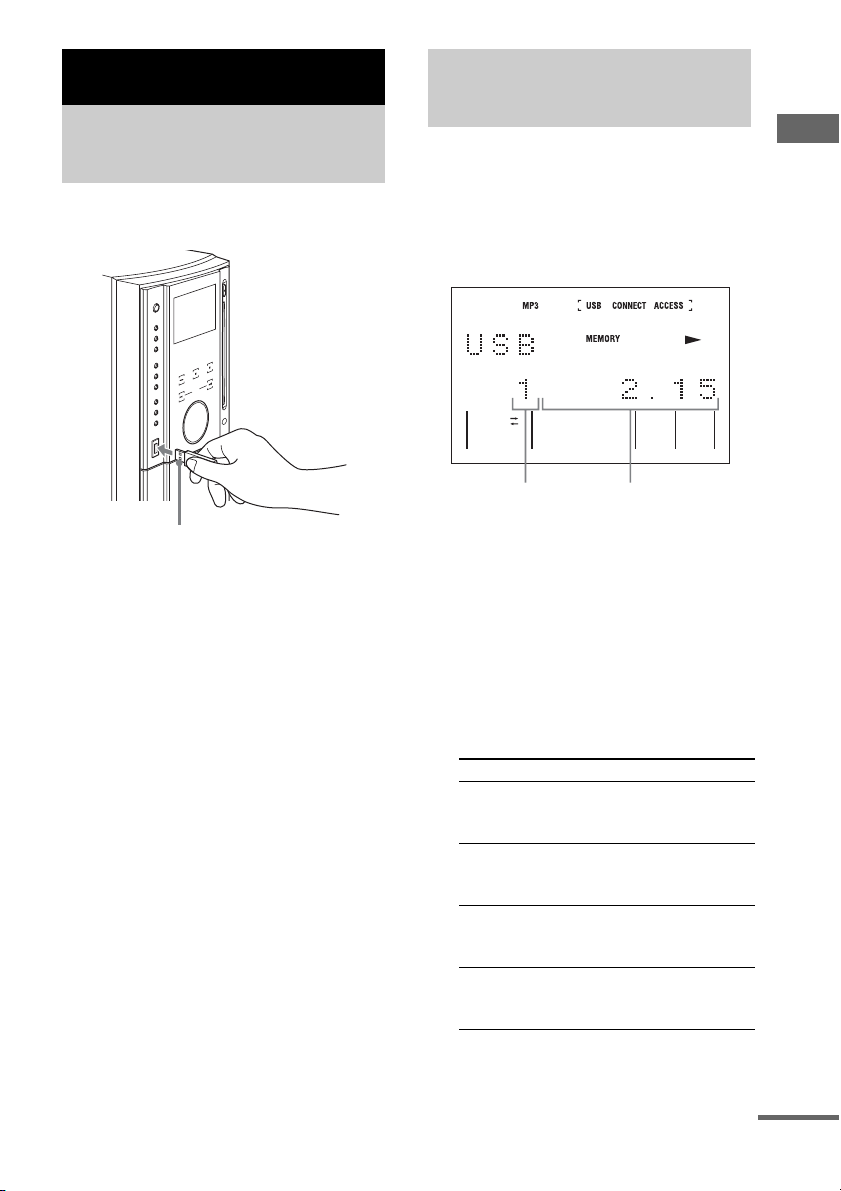
Inserting USB storage media
Insert USB storage media to USB MEMORY
port as shown below.
Playing USB storage media
— Normal Play/Shuffle Play
This system lets you play MP3 audio tracks on
USB storage media.
Example: When USB storage media is
loaded
USB storage media – Play
When inserting USB storage media, make sure of
the direction and insert it all the way to the USB
MEMORY port.
Notes
• When you insert USB storage media, “USB
CONNECT” and “ACCESS” light up. Always
turn off the system before removing USB
storage media. Removing media while the
system is on may corrupt the data on it or
damage the media itself.
• Do not forcibly insert the USB storage media, as this
may cause the media to be damaged.
• Do not insert other media or objects besides USB
storage media.
Track number
Playing time
1 Press FUNCTION + or – (or touch USB
MEMORY/PC on the unit) repeatedly to
switch the function to USB MEMORY.
2 Press MENU in stop mode.
3 Press . or > repeatedly until
“Play Mode?” appears, then press
ENTER.
4 Press . or > repeatedly until the
mode you want appears in the display,
then press ENTER.
Select To play
Continue
(Normal Play)
Album Cont
(Normal Play)
Shuffle
(Shuffle Play)
Album Shuf
(Shuffle Play)
The MP3 audio tracks on the
USB storage media in
original order.
The MP3 audio tracks in the
album you have selected in
original order.
The MP3 audio tracks on the
USB storage media in
random order.
The MP3 audio tracks in the
album you have selected in
random order.
5 Press H (or touch nN on the unit).
Playback starts.
continued
17
GB

Other operations
To Do this
Stop play Press x.
Pause Press X. Press again to resume
Select an MP3
track
Select an album Press ALBUM + or – repeatedly.
Find a point in a
track
Remove the
USB storage
media
play.
Press . or > repeatedly.
Keep pressing m or M during
playback and release it at the
desired point.
1 Press x to stop playback.
2 Check that “ACCESS” is not
displayed.
3 Turn off the system, then
remove the media.
Playback order of MP3 audio
tracks on USB storage media
The playback order of MP3 audio tracks
recorded on USB storage media is shown below.
Note that only MP3 files are playable. Any other
data on the USB storage media cannot be played
on this system.
x Structure of USB storage media contents
Tree 1 Tree 2 Tree 3 Tree 4 Tree 5
ROOT
18
Album
Track (MP3 audio)
When you insert USB storage media and press
H (or touch nN on the unit), the numbered
tracks are played sequentially, from 1 through
7. Any sub-albums/tracks contained within a
currently selected album take priority over the
next album in the same tree. (Example: C
contains D so 4 is played before 5.)
GB

Notes
• The system may take longer time to playback, when
progressing to the following album or jump to other
album.
• You cannot change the play mode during playback.
• Some time may be needed to start playback when:
– the USB storage media is recorded in complex
configurations such as many layers.
– the memory capacity is excessive.
• When the USB storage media is inserted, the player
reads all the tracks on that media. If there are many
albums or non-MP3 audio tracks on the USB storage
media, it may take a long time for play to begin or for
the next MP3 audio track to start play.
• Do not save unnecessary albums or tracks other than
MP3 ones in the USB storage media to be used for
MP3 listening. We recommend that you do not save
other types of tracks or unnecessary albums on USB
storage media that has MP3 audio tracks.
• An album that does not include an MP3 audio track
is skipped.
• Maximum album number: 999 (including root
folder)
• The maximum number of MP3 audio tracks and
albums that can be contained on a sin gle USB storage
media is 999.
• Playback is possible up to 8 levels.
• MP3 audio tracks on the same album are sorted by
file name for playback. In some cases, the playback
order may be different depending on how albums and
tracks are named.
• Depending on the encoding/writing software,
recording device, or the recording media used at the
time an MP3 audio track is recorded, you may
encounter such problems as disabled playback,
sound interruptions, and noise.
Tip
If you add numbers (01, 02, 03, etc.) to the front of the
track names when you store the tracks in USB storage
media, the tracks will be played in that order.
Resuming playback from the
point you stopped the USB
storage media
— Resume Play
This system memorizes the point where you
stopped the USB storage media so you can
resume from that point. Resume Play is not
canceled when you turn off the system.
1 While playing the USB storage media,
press x to stop playback.
“Resume” appears in the display.
If “Resume” does not appear, Resume Play
is not available.
2 Press H (or touch nN on the unit).
The player starts playback from the point
you stopped the disc in step 1.
Notes
• You cannot perform Resume Play during Shuffle
Play.
• Depending on where you stopped the USB storage
media, the system may resume playback from a
different point.
• Resume play is canceled when:
– you press x in stop mode.
– you remove the USB storage media.
– you change the play mode.
USB storage media – Play
19
GB

Playing repeatedly
— Repeat Play
You can play all the MP3 audio tracks or a single
MP3 audio track on USB storage media
repeatedly.
1 Press FUNCTION + or – (or touch USB
MEMORY/PC on the unit) repeatedly to
switch the function to USB MEMORY.
2 Press MENU in stop mode.
3 Press . or > repeatedly until
“Repeat?” appears, then press ENTER.
4 Press . or > repeatedly until the
mode you want appears in the display,
then press ENTER.
Select To repeat
Repeat All All the MP3 audio tracks on
Repeat 1 A single MP3 audio track
the media or selected album.
“REP” lights up when you
select this mode.
only. “REP1” lights up when
you select this mode.
5 Press H (or touch nN on the unit).
Repeat Play starts.
To cancel Repeat Play
In step 4, press . or > repeatedly until
“Repeat Off” appears, then press ENTER. You
can also cancel Repeat Play mode by pressing
REPEAT repeatedly until both “REP” and
“REP1” disappear.
Note
After the last track is played during Album Shuffle
Play in Repeat All mode, Album Shuffle Play will
continue, using tracks from the selected album.
Tips
• You can also select Repeat Play mode by pressing
REPEAT repeatedly.
• The OSD does not appear on the TV screen except
for DVD function.
20
GB
DVD/VIDEO CD/CD/MP3/JPEG/DivX®
video – Play
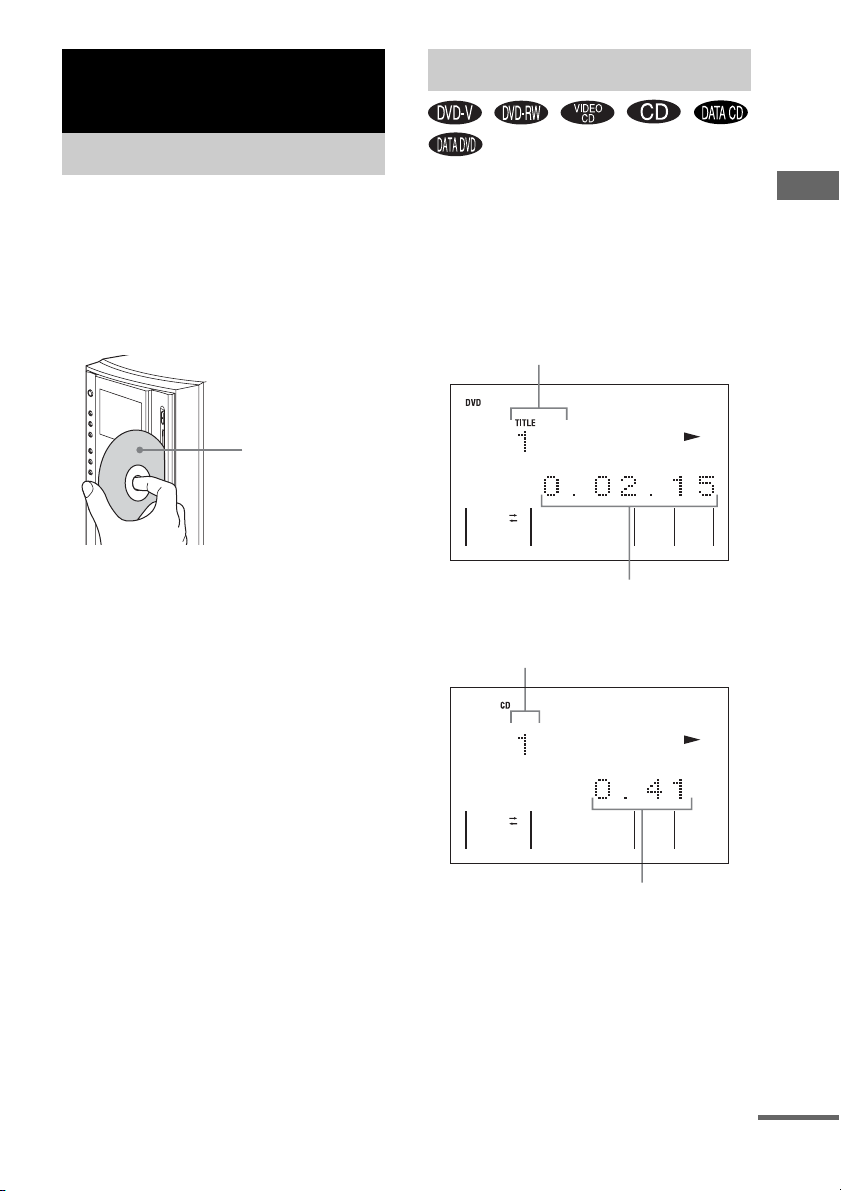
Loading a disc
Use buttons on the unit for the operation.
1 Press ?/1 to turn on the system.
If a disc is loaded, press Z to remove the
disc from the disc slot. “No Disc” appears.
2 Insert a disc in the disc slot with the
label side facing right.
When you play a disc,
insert it with the label
side facing right.
Playing a disc
Before playing a DVD, VIDEO CD, JPEG
image or DivX video turn on your TV and select
the video input. Depending on the DVD or
VIDEO CD, some operations may be different
or restricted. Refer to the operating instructions
supplied with the disc.
Example: When a DVD disc is loaded
Title or chapter number
DVD/VIDEO CD/CD/MP3/JPEG/DivX
video – Play
®
Notes
• When you turn on the system, the disc is not
pulled into the disc slot until “No Disc”
appears in the display. Do not attempt to
push in the disc until “No Disc” appears.
• When pressing Z and then reinserting the disc that
appears in the disc slot, do not simply push in the
disc. Remove the disc from the disc slot and then
reinsert it.
• Do not turn off the system with a disc halfway
inserted in the disc slot. Doing so may cause the disc
to fall.
• Do not use a disc with tape, seals or paste on it as this
may cause malfunction.
• When you eject a disc, handle the disc by its edge. Do
not touch the surface.
• Do not push a disc into the disc slot when the system
is off. Doing so may cause the system to malfunction.
• Do not load an 8 cm disc with an adaptor. Doing so
may cause the system to malfunction.
Playing time
Example: When a CD disc is loaded
Track number
Playing time
1 Press FUNCTION + or – repeatedly (or
touch DVD on the unit) to switch the
function to DVD.
2 Press H (or touch nN on the unit).
continued
21
GB

Other operations
To Do this
Stop Press x.
Pause Press X.
Press X again or press H (or
touch nN on the unit) to
resume play.
Select a chapter,
scene or track
(Except for JPEG)
Select an album of
MP3/JPEG/DivX
video
Locate a point
quickly in fast
forward or fast
reverse (Scan)
(Except for JPEG)
Watch frame by
frame
(Slow-motion Play)
(DVD VIDEO/DVDRW/VIDEO CD/
DivX video only)
Play one frame at a
time (Freeze frame)
(DVD VIDEO/
DVD-RW/VIDEO
CD only)
Replay the previous
scene
(Instant Replay)
(DVD VIDEO/
DVD-RW only)
Press . or > repeatedly
during play or pause.
Or, press the number buttons
in stop mode, then press
ENTER
Press ALBUM + or –
repeatedly during play or
pause.
Press m or M during play.
Each time you press the
button, searching speed
changes cyclically as follows:
3)
Playback direction
t × 2B5) t 1M t 2M
t 3M
Opposite direction
t × 2b7) t 1m t 2m
t 3m
To return to Normal Play,
press H (or touch nN on
the unit).
Press X during play, then
press SLOW or SLOW
y. Each time you press the
button, the playback speed
changes as follows:
3)
Playback direction
2 y y 1 y
Opposite direction
VIDEO/DVD-RW only)
2 y 1
To return to Normal Play,
press H (or touch nN on
the unit).
Press X during play, then
press STEP C to go to the
next frame or press c STEP
to go to the previous frame
(DVD VIDEO/DVD-RW
only).
Press REPLAY during
play.
To Do this
Briefly fast forward
the current scene
1)
(Instant Advance)
(DVD VIDEO/
Press ADVANCE during
play.
DVD-RW only)
Switch to DVD
function from
Touch DVD on the unit
(Automatic Source selection).
another source
Remove a disc Press Z on the unit.
1)
2)
.
There may be some disturbance in the video image.
2)
Except for MP3/JPEG
3)
No sound is output depending on the audio source.
4)
The × 2B/× 2b playback speed is about twice the
normal speed. The 3M/3m playback speed is
faster than the 2M/2m and the 2M/2m
playback speed is faster than the 1M/1m.
5)
DVD VIDEO/CD only
6)
DVD VIDEO/DVD-RW/VIDEO CD/DivX video
4)
6)
4)
6)
only
7)
DVD VIDEO only
8)
The 2 y/2 playback speed is slower than
1 y/1 .
Notes
• You cannot perform Instant Replay and Instant
Advance in Repeat Play mode (page 26).
• You cannot search for a still picture on a DVD-RW
in VR mode.
• Depending on the DVD or VIDEO CD, some
operations may be restricted.
• 2 channel sound is heard when using headphones.
• The following discs take a longer time to start
8)
8)
(DVD
playback.
– a disc recorded with complicated tree structure.
– a disc recorded in Multi Session.
– a disc to which data can be added (non-finalized
disc).
• Some DVD-Rs/DVD-RWs/DVD+Rs/DVD+RWs or
CD-Rs/CD-RWs cannot be played on this system
depending on file format.
Tips
• The Instant Replay function is useful when you want
to review a scene or dialogue that you missed.
• The Instant Advance function is useful when you
want to pass over a scene that you do not want to
watch.
• You may not be able to use the Instant Replay or
Instant Advance function with some scenes.
22
GB

Resuming playback from the
point you stopped the disc
— Resume Play
This system memorizes the point where you
stopped the disc so you can resume from that
point. Resume Play is not canceled when you
turn off the system (except for MP3/JPEG/DivX
video).
1 While playing a disc, press x to stop
playback.
“Resume” appears in the display.
If “Resume” does not appear, Resume Play
is not available.
2 Press H (or touch nN on the unit).
The player starts playback from the point
you stopped the disc in step 1.
Notes
• You cannot perform Resume Play during Shuffle
Play or Program Play.
• Depending on where you stopped the disc, the
system may resume playback from a different point.
• Resume play is canceled when:
– you press x in stop mode.
– you disconnect the power cord.
– you eject the disc (except for DVD VIDEO/
VIDEO CD when “MULTI-DISC RESUME” in
“CUSTOM SETUP” is set to “ON”).
– you change the play mode.
– you change the settings on the Setup Display.
– you turn off the system (MP3/JPEG/DivX video
only).
– you change the functions (except for DVD
VIDEO/VIDEO CD when “MULTI-DISC
RESUME” in “CUSTOM SETUP” is set to
“ON”).
To enjoy a disc that is played
before by resume playback
— Multi-disc Resume (DVD VIDEO/VIDEO
CD only)
This system memorizes the point where you
stopped the disc for up to 40 discs and resumes
playback the next time you insert the same disc.
If you store a resume playback point for the 41st
disc, the resume playback point for the first disc
is deleted.
To activate this function, set “MULTI-DISC
RESUME” in “CUSTOM SETUP” to “ON”
(page 46).
Notes
• If “MULTI-DISC RESUME” in “CUSTOM
SETUP” is set to “OFF” (page 46), the resume point
is cleared when you change the function.
• If “MULTI-DISC RESUME” in “CUSTOM
SETUP” is set to “ON” (page 46) and you playback
a recorded disc such as DVD-RW, the system may
playback other recorded discs from the same resume
point. To play from the beginning, press x twice,
then press H (or touch nN on the unit).
DVD/VIDEO CD/CD/MP3/JPEG/DivX
video – Play
®
23
GB
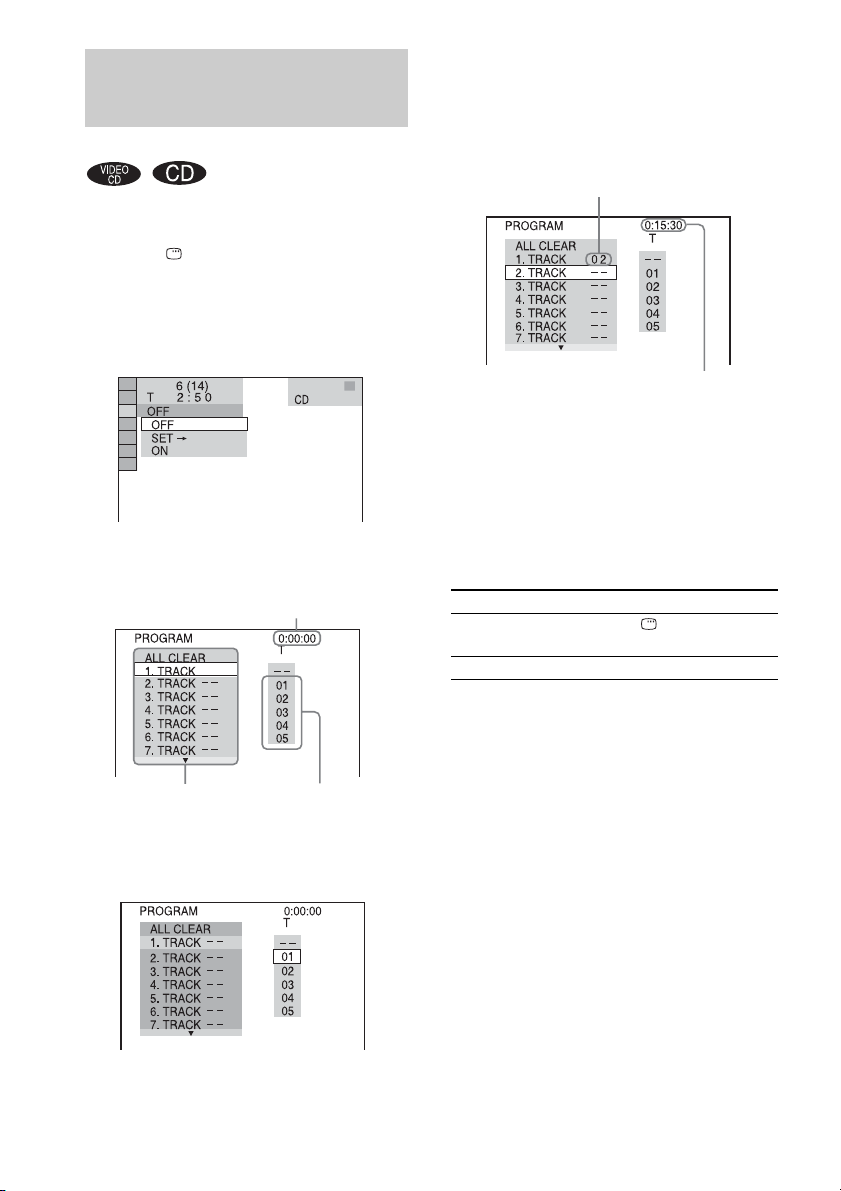
Creating your own program
— Program Play
You can make a program of up to 99 steps.
1 Press DISPLAY in stop mode.
The Control Menu appears.
2 Press M or m repeatedly to select
“PROGRAM”, then press ENTER.
The options for “PROGRAM” appear.
3 Press M or m repeatedly to select “SET
t
”, then press ENTER.
Total playing time of the programmed tracks
5 Press M or m repeatedly to select the
track you want to program, then press
ENTER.
The selected track is programmed and the
cursor moves to the program list.
For example, select track “02”.
Selected track
Total playing time of the programmed tracks
6 Repeat step 4 and 5 to program other
tracks.
The programmed tracks are displayed in the
selected order.
7 Press H (or touch nN on the unit).
Program Play starts.
Other operations
To Do this
Turn off the Program
Display
Check the program Perform steps 1 to 3.
Press DISPLAY.
24
GB
Program list Track list on the disc
4 Press ,.
The cursor moves to the track list (in this
case, “01”).
To cancel Program Play
Press CLEAR, or select “OFF” after step 2.
To play the same program again, select “ON” in
step 3, then press ENTER.
To change a programmed track
1 After step 3, press M or m repeatedly to
select the programmed track you want to
change in the program list, then press ,.
2 Press M or m repeatedly to select the track
you want to program, then press ENTER.
The selected track in the program list is
replaced by the newly selected track.
To clear a programmed track
1 After step 3, press M or m repeatedly to
select the programmed track you want to
clear in the program list.
2 Press CLEAR.
Or, press ,, then press M repeatedly to
select “– –” in the track list, and then press
ENTER.
To clear all the programmed
tracks
In step 4, press M repeatedly to select “ALL
CLEAR” in the program list, then press ENTER.
To turn off the Control Menu
Press DISPLAY repeatedly until the Control
Menu disappears.
Note
You cannot perform Program Play during PBC
playback of VIDEO CDs and Super VCDs (page 28).
Tip
You can perform Repeat Play or Shuffle Play of
programmed tracks. During Program Play, follow the
steps of Repeat Play (page 26) or Shuffle Play
(page 25).
Playing in random order
— Shuffle Play
You can play tracks on a disc in random order by
using the on-screen display.
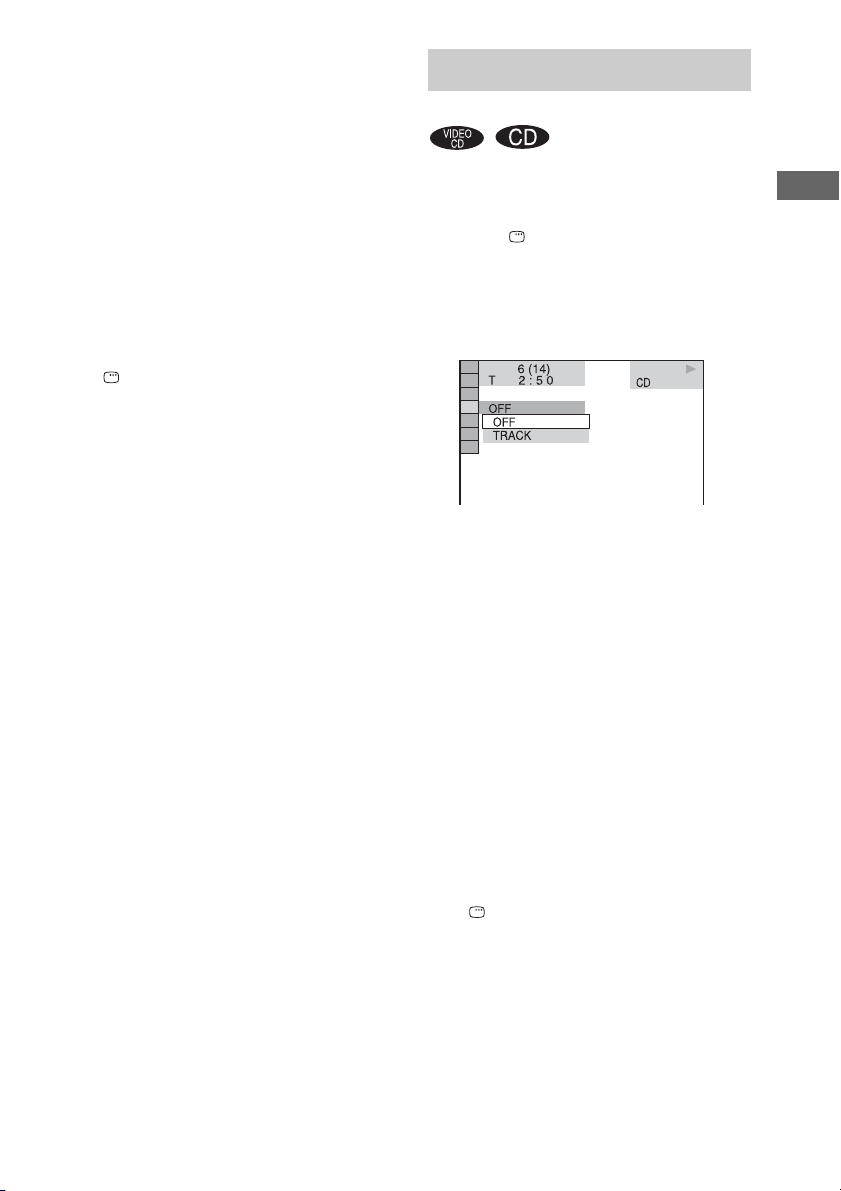
1 Press DISPLAY during play.
The Control Menu appears.
2 Press M or m repeatedly to select
“SHUFFLE”, then press ENTER.
The options for “SHUFFLE” appear.
3 Press M or m repeatedly to select the
item to be shuffled.
x When the disc is in Normal Play
mode
TRACK: plays tracks on the current disc in
random order.
x When the disc is in Program Play
mode
ON: plays programmed tracks on the
current disc in random order.
4 Press ENTER.
Shuffle Play starts.
To cancel Shuffle Play
Press CLEAR, or select “OFF” in step 3.
To turn off the Control Menu
Press DISPLAY repeatedly until the Control
Menu disappears.
Note
You cannot perform Shuffle P lay during PBC playback
of VIDEO CDs and Super VCDs (page 28).
Tip
You can set Shuffle Play while the system is stopped.
After selecting the “SHUFFLE” option, press H (or
touch nN on the unit) to start Shuffle Play.
DVD/VIDEO CD/CD/MP3/JPEG/DivX
video – Play
®
25
GB
Playing repeatedly
Using the on-screen display
— Repeat Play
You can play a whole disc or selected album
repeatedly or you can also play a single title/
chapter/track/DivX video file repeatedly.
You can use a combination of Shuffle or
Program Play modes.
Using the front panel display
Press REPEAT repeatedly during play until
“REP” or “REP1” appears.
REP: Repeats a whole disc or selected album1).
REP1: Repeats a single title
DivX video file only.
1)
For JPEG, during slide show only
2)
For DVD, you can check whether a title or chapter is
being repeatedly played on the TV screen.
To cancel Repeat Play
Press REPEAT repeatedly until both “REP” and
“REP1” disappear, or press CLEAR.
Notes
• Depending on the DVD, you cannot perform Repeat
Play.
• You cannot perform Repeat Play during PBC
playback of VIDEO CDs and Super VCDs (page 28).
• You cannot select “REP1” during Program Play and
Shuffle Play.
• When you select “REP1”, that title/chapter/track/
DivX video file is repeated endlessly until “REP1” is
canceled.
2)
/chapter2)/track/
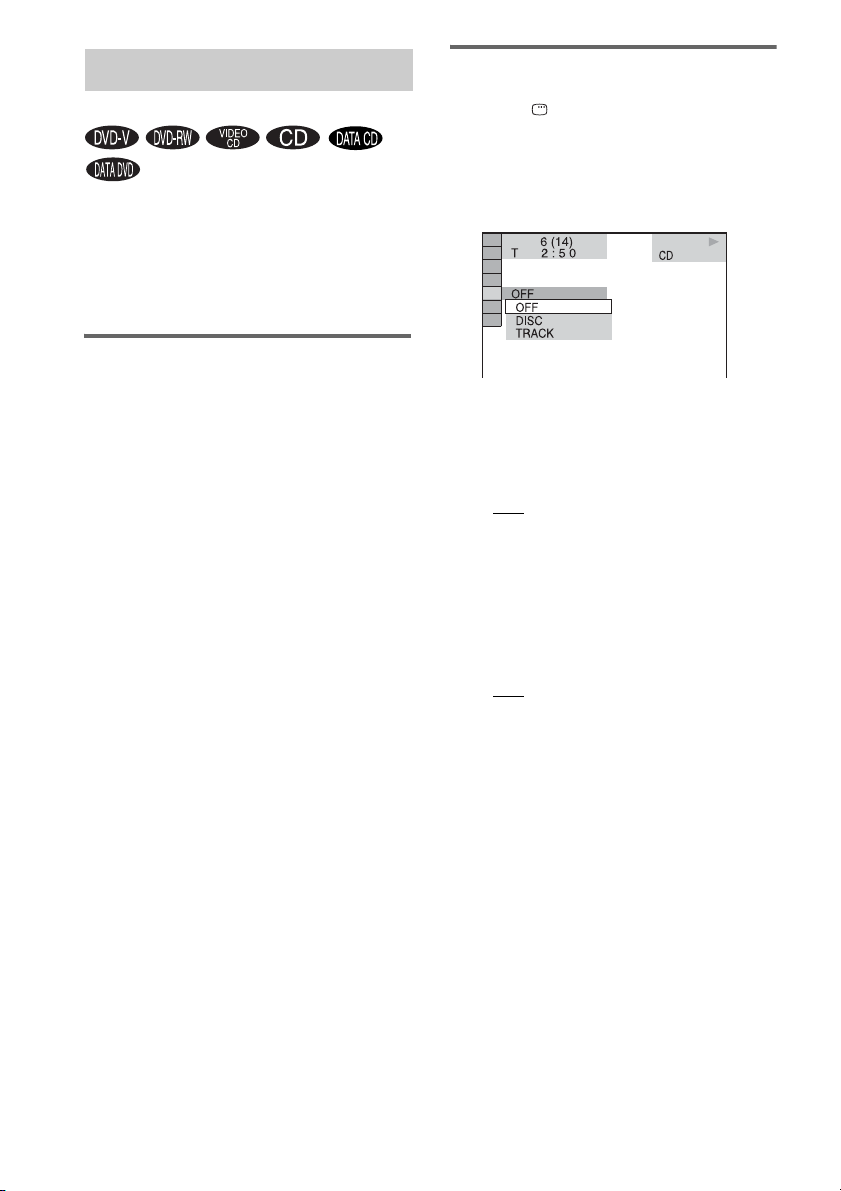
1 Press DISPLAY during play.
The Control Menu appears.
2 Press M or m repeatedly to select
“REPEAT”, then press ENTER.
The options for “REPEAT” appear.
3 Press M or m repeatedly to select the
item to be repeated.
The default setting is underlined.
x When playing a DVD VIDEO/DVD-RW
•OFF: does not play repeatedly.
• DISC*: repeats all the titles on the disc.
• TITLE: repeats the current title.
• CHAPTER: repeats the current chapter.
* When playing a DVD-RW in VR mode,
“DISC” repeats all the titles of the selected type
(page 28).
x When playing a CD/VIDEO CD
•OFF: does not play repeatedly.
• DISC: repeats all the tracks on the disc.
• TRACK: repeats the current track.
26
GB

x When playing a DATA CD/DATA DVD
•OFF: does not play repeatedly.
• DISC: repeats all the albums on the disc.
• ALBUM: repeats the current album.
•TRACK
•FILE
1)
MP3 audio tracks only
2)
DivX video files only
x When a CD/VIDEO CD is in Shuffle
Play or Program Play mode
•OFF: does not play repeatedly.
• ON: repeats Shuffle Play or Program
1)
: repeats the current track.
2)
: repeats the current file.
Play.
4 Press ENTER.
Repeat Play starts.
To cancel Repeat Play
Press CLEAR, or select “OFF” in step 3.
To turn off the Control Menu
Press DISPLAY repeatedly until the Control
Menu disappears.
Notes
• You cannot perform Repeat Play during PBC
playback of VIDEO CDs and Super VCDs (page 28).
• When “MODE (MP3, JPEG)” is set to “IMAGE
(JPEG)” (page 33), you cannot select “TRACK”.
Tips
• You can set Repeat Play in stop mode. After
selecting the “REPEAT” option, press H (or touch
nN on the unit) to start Repeat Play.
• You can quickly display the “REPEAT” status by
pressing REPEAT. Each time you press REPEAT,
the “REPEAT” option changes.
Playing DVDs using the menu
Some DVDs have menus to help you enjoy the
DVDs. You can play DVDs using these menus
on the TV screen.
• Using the DVD top menu
A DVD is divided into long sections of a picture
or a music feature called “titles”. When you play
a DVD which contains several titles, you can
select the title you want using the DVD top
menu.
• Using the DVD menu
Some DVDs allow you to select the disc
contents using a menu. When you play these
DVDs, you can select items such as the langua ge
for the subtitles and the language for the sound
using the DVD menu.
1 Press TOP MENU or MENU.
The menu appears on the TV screen. The
contents of the menu vary from disc to disc.
2 Press M/m/</, or the number
buttons to select the title or item you
want to play.
3 Press ENTER.
DVD/VIDEO CD/CD/MP3/JPEG/DivX
video – Play
®
27
GB
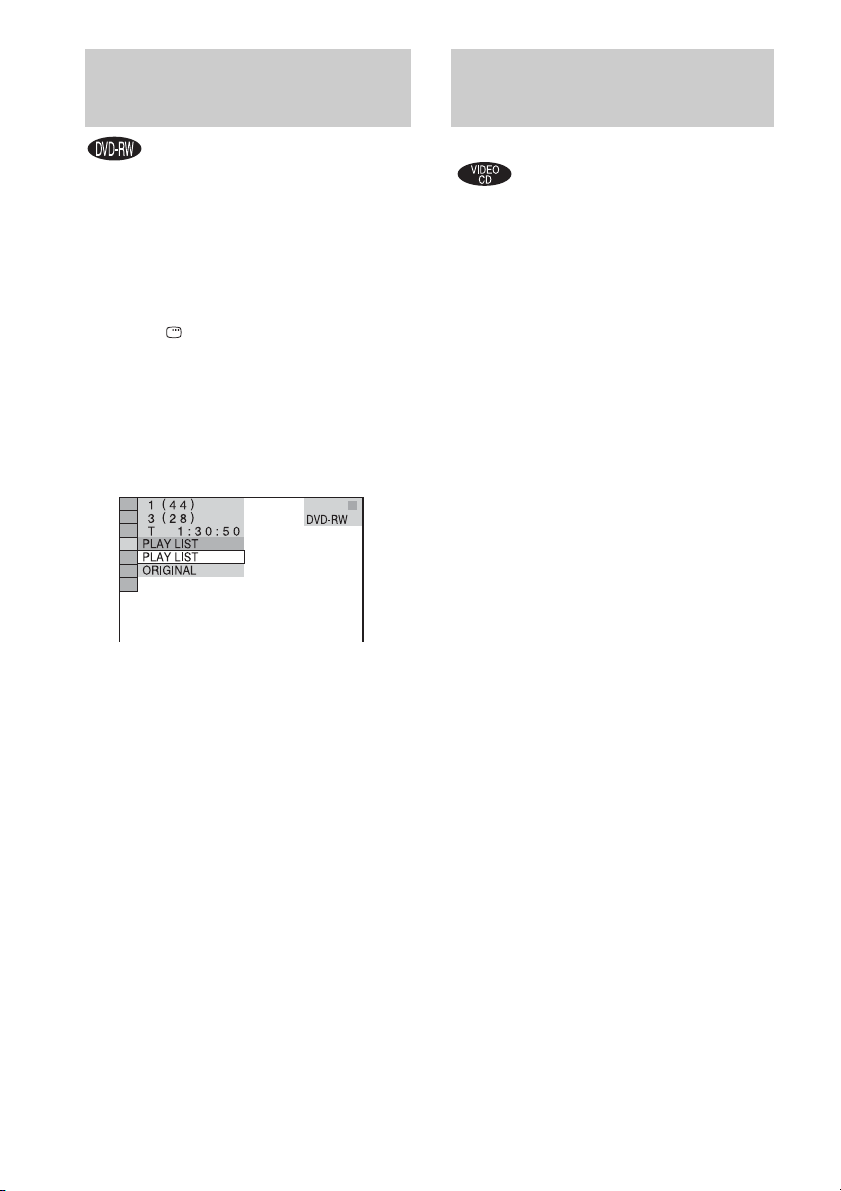
Selecting “ORIGINAL” or
Playing VIDEO CDs with
“PLAY LIST” on a DVD-RW
Some DVD-RWs in VR (Video Recording)
mode have two types of titles for playback:
originally recorded titles (“ORIGINAL”) and
titles that can be created on recordable DVD
players for editing (“PLAY LIST”). You can
select the type of title to be played.
1 Press DISPLAY in stop mode.
The Control Menu appears.
2 Press M or m repeatedly to select
“ORIGINAL/PLAY LIST”, then press
ENTER.
The options for “ORIGINAL/PLAY LIST”
appear.
3 Press M or m repeatedly to select the
setting you want, then press ENTER.
• PLAY LIST: plays the titles created from
“ORIGINAL” for editing.
• ORIGINAL: plays the titles originally
recorded.
PBC functions (Ver. 2.0)
— PBC Play
You can use PBC* menus on your TV screen to
enjoy the disc’s interactive software. The menu
format and structure may differ depending on
each disc.
* PBC: Playback Control
1 Press H (or touch nN on the unit)
to start playing a VIDEO CD with PBC
functions (Ver. 2.0).
The PBC menu appears on the TV screen.
2 Press the number buttons to select the
item number you want.
3 Press ENTER.
4 Continue playback according to the
instructions on the menus to enjoy
interactive playback.
Refer to the operating instructions supplied
with the disc, as the operating procedure
may differ according to the VIDEO CD.
To go back to a previous menu
Press O RETURN.
Notes
• Depending on the VIDEO CD, the menu does not
appear in step 1.
• Depending on the VIDEO CD, “Press ENTER” in
step 3 may appear as “Press SELECT” in the
operating instructions supplied with the disc. In this
case, press
Tip
You can cancel playback with PBC functions.
1 In stop mode, press . or > repeatedly, or the
number buttons to select a track.
2 Press H (or touch nN on the unit).
“Play without PBC” appears on the TV screen and
playback starts from the selected track. Still images,
such as the menu screens, will not be shown.
To return to PBC playback, press x twice, then press
H (or touch nN on the unit).
H (or touch nN on the unit).
28
GB

About MP3 audio tracks and JPEG image files
What is MP3/JPEG?
MP3 is audio compression technology that
satisfies the ISO/MPEG regulations. JPEG is
image compression technology.
* “Design rule for Camera File system”: Image
standards for digital cameras regulated by Japan
Electronics and Information Technology Industries
Association (JEITA).
Notes
• The system will play any data with the extension
“.MP3”, “.JPG” or “.JPEG” even if they are not in
MP3 or JPEG format. Playing this data may generate
a loud noise which could damage your speaker
system.
• The system does not conform to audio in MP3PRO
format.
DVD/VIDEO CD/CD/MP3/JPEG/DivX
Discs that the system can
play
You can play back DATA CDs (CD-ROMs/CDRs/CD-RWs) recorded in MP3 (MPEG1 Audio
Layer 3) and JPEG format. However, the discs
must be recorded according to ISO9660 Level 1,
Level 2 or Joliet format for the system to
recognize the tracks (or files). You can also play
discs recorded in Multi Session.
See the instructions supplied with the CD-R/
CD-RW drives and the recording software (not
supplied) for details on the recording format.
About the multi-session disc
If MP3 audio tracks or JPEG image files are
recorded in the first session, the system will also
play MP3 audio tracks or JPEG image files in
other sessions. If audio tracks and images in
audio CD format or video CD format are
recorded in the first session, only the first
session will be played back.
Note
The system may not be able to play some DATA CDs
created in the Packet Write format. In this case, you
cannot view the JPEG images recorded.
Playback order of MP3 audio
tracks or JPEG image files
The playback order of MP3 audio tracks or
JPEG image files recorded on a DATA CD is as
follows:
x Structure of disc contents
Tree 1 Tree 2 Tree 3 Tree 4 Tree 5
ROOT
video – Play
®
MP3 audio track or JPEG
image file that the system can
play
The system can play the MP3 audio tracks or
JPEG image files:
• which have the extension “.MP3” (MP3 audio
track) or “.JPG”/“.JPEG” (JPEG image file)
• which conform to the DCF* image file format
Album
Track (MP3 audio) or
File (JPEG image)
continued
29
GB

When you insert a DATA CD and press H (or
touch nN on the unit), the numbered tracks
(or files) are played sequentially, from 1
through 7. Any sub-albums/tracks (or files)
contained within a currently selected album take
priority over the next album in the same tree.
(Example: C contains D so 4 is played before
5.)
Playing DATA CDs with MP3 audio track and JPEG image files
When you press MENU and the list of album
names appears (page 31), the album names are
arranged in the following order:
A t B t C t D t F t G. Albums
that do not contain tracks (or files) (such as
album E) do not appear in the list.
Notes
• Depending on the software you use to create the
DATA CD, the playback order may differ from the
illustration.
• The playback order above may not be applicable if
there are more than 200 albums and 300 files in each
album.
• The system can recognize up to 200 albums (the
system will count just albums, including albums that
do not contain MP3 audio tracks and JPEG image
files). The system will not play any albums beyond
the 200th album.
• The system may take longer time to playback, when
progressing to the following album or jump to other
album.
• Some type of JPEG files cannot be played.
Tips
• If you add nu mbers (01, 02, 03, etc.) to the front of the
track/file names when y ou store the tracks (or files) in
a disc, the tracks and files will be played in that order.
• Since a disc with many trees takes longer to start
playback, it is recommended that you create albums
with no more than two trees.
MP3 audio tracks and JPEG image files
recorded on DATA CDs (CD-ROMs/CD-Rs/
CD-RWs) can be played on this system.
Notes
• When “MODE (MP3, JPEG)” is set to “AUTO”, the
system can recognize up to 300 MP3 tracks and 300
JPEG files in a single album. When “MODE (MP3,
JPEG)” is set to “AUDIO (MP3)” or “IMAGE
(JPEG)”, the system can recognize up to 600 MP3
and 600 JPEG files in a single album. A maximum of
200 albums can be recognized regardless of the
selected mode.
• Playback is possible up to 8 levels.
• An album that does not include an MP3 audio track
or JPEG image file is skipped.
• If you put the extension “.MP3” to data not in MP3
format, the system cannot recognize the data
properly and will generate a loud noise which could
damage your speaker system.
Tips
• You can view the disc information while playing
MP3 audio tracks a nd JPEG image files (pages 69 and
72).
• You can select Repeat Play while playing MP3 audio
tracks and JPEG image files (page 26) and “AUDIO”
setting while playing an MP3 audio track (page 39).
30
GB
 Loading...