

Sony STR-DG710, DAV-HDX501W, DAV-HDX500/I, DAV-HDX267W, DAV-HDX501W/C Hdmi Control Manual
...
3-196-613-12(1)
Multi Channel AV
Receiver/
Home Theatre
System
HDMI CONTROL Guide
Guide de la fonction HDMI CONTROL
GBGBGB
FR
©2007 Sony Corporation

Using the HDMI CONTROL function for ‘BRAVIA’ Theatre Sync
To use ‘BRAVIA’ Theatre Sync, set the
HDMI CONTROL function as explained
below.
By connecting Sony components that are
compatible with the HDMI CONTROL
function with a HDMI cable (not supplied),
operation is simplified as below:
• One-Touch Play: When you play back a
component such as a DVD/Blu-ray Disc
Player, the receiver and the TV are turned on
automatically and switch to the appropriate
HDMI input.
• System Audio Control: While watching TV,
you can select to output the sound from the
TV speaker or the speakers connected to the
receiver.
• System Power Off: When you turn off the
TV, the receiver and connected components
are also turned off simultaneously.
Note
Depending on the connected component, the HDMI
CONTROL function may not work. See the
operating instructions of the component.
HDMI CONTROL is a mutual control
function standard used by HDMI CEC
(Consumer Electronics Control) for HDMI
(High-Definition Multimedia Interface).
The HDMI CONTROL function
does not work in the following
cases:
• When you connect the receiver to a
component which is not correspond with
Sony’s HDMI CONTROL function.
• When you connect the receiver and
components using other than HDMI
connection.
We recommend that you connect the receiver
to products featuring ‘BRAVIA’ Theatre
Sync.
GB
2
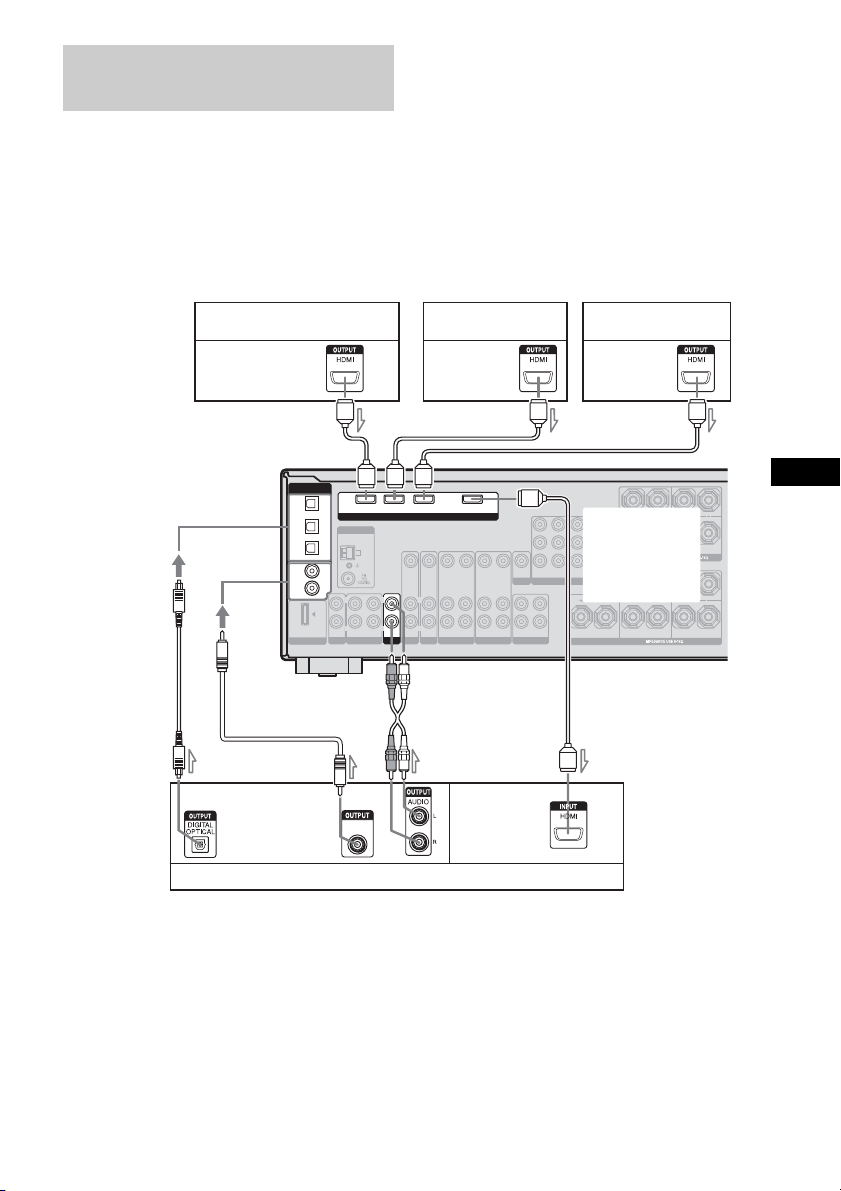
Connecting a TV and other components
Connect audio and video cords according to
the jacks of your receiver and components.
The illustration below is used as reference for
connection purposes only.
To enjoy TV multi channel
surround sound broadcasting
You can listen to TV multi channel surround
sound broadcasting from the speakers
connected to the receiver.
Connect the digital audio output jack of the TV
to any of the DIGITAL IN jacks of the
receiver. Then, reassign the connected jack to
TV input. For details, refer to the DIGITAL
ASSIGN function on the separate operating
instructions supplied with the receiver.
To one of the
OPTICAL IN
jacks
Satellite tuner/Set-top box
Audio/video
signals
A
DIGITAL
(ASSIGNABLE)
SAT
IN
VIDEO 2/
BD IN
VIDEO 1
IN
OPTICAL
SA-CD/
CD/CD-R
IN
DVD
IN
COAXIAL
DMPORT
SAT IN DVD IN VIDEO 2/BD IN
ANTENNA
L
R
IN INOUT AUDIO OUTAUDIO IN AUDIO IN
SA-CD/CD/CD-R
AUX
HDMI
AM
VIDEO IN
L
R
AUDIO INTVIN
SAT
To one of the
COAXIAL IN jacks
BAD
C
DIGITAL
Audio
COAXIAL
signals
TV, etc.
DVD player Blu-ray disc player
Audio/video
signals
Audio/video
signals
AA
OUT
VIDEO OUT
VIDEO IN
LRLRL
DVD VIDEO 2/BD VIDEO 1 SUB WOOFER
VIDEO OUT
VIDEO IN
AUDIO OUT AUDIO OUTAUDIO IN
Audio/video
signals
VIDEO IN
VIDEO OUT
MONITOR
R
SAT IN DVD IN
VIDEO 1 IN
COMPONENT VIDEO
MONITOR OUT
Y
For rear panel
illustration, refer
B/CB
P
to the operating
PR/C
R
instructions of
your receiver.
SPEAKERS
L
L
R
R
FRONT B
FRONT A
SPEAKERS
L
L
R
R
SURROUND
SURROUND BACKCENTER
GBGBGB
A HDMI cable (not supplied)
We recommend that you use a Sony HDMI cable.
B Optical digital cord (not supplied)
C Coaxial digital cord
D Audio cord (not supplied)
a)
Connect to at least one of the audio cords (B, C
or D).
b)
Refer to the “Supplied accessories” in the
operating instructions of your receiver for details.
a)b)
a)
a)
Note
The shape, location, label and number of jacks will
vary according to models and areas.
GB
3

Preparing for HDMI CONTROL function
Before you use the HDMI CONTROL
function, be sure you have performed the
following procedures. For details on setting
the TV and connected components, see the
operating instructions of the respective
components.
1 Make sure that the receiver is connected to
the TV and components (compatible with
HDMI CONTROL function) via HDMI
connection.
2 Turn on the receiver, TV and connected
components.
3 Set the respective HDMI CONTROL
function for the receiver and TV to on.
See “To set HDMI CONTROL” below.
4 Select the HDMI input of the receiver and
TV to match the HDMI input of the
connected component, so that the image
from the connected component is displayed.
5 Set the HDMI CONTROL function for the
connected component to on.
6 Repeat step 5 for other components that you
want to use the HDMI CONTROL function.
3 Press or b to enter the
menu.
4 Press V/v repeatedly to select
“CONTROL”.
“HDMI” flashes on the display.
5 Press or b to enter the
parameter.
6 Press V/v repeatedly to select
“CTRL ON”.
HDMI CONTROL function is activated.
To set HDMI CONTROL
1 (For remote RM-AAP016/
RM-AAP017 only)
Press RECEIVER, then press
MENU.
The RECEIVER indicator lights up and
receiver operation is activated.
“1-LEVEL” appears on the display.
(For remote RM-AAU014/
RM-AAU015/RM-AAU017 only)
Press AMP MENU.
“1-LEVEL” appears on the display.
2 Press V/v repeatedly to select
“6-VIDEO”.
GB
4

Watching a DVD
Enjoying the TV sound
(One-Touch Play)
Play back a connected component.
The receiver and the TV are turned on
automatically and switch to the appropriate
HDMI input.
Note
Depending on the TV, the start of the content may
not be output.
Watching a DVD by simple
operation
You can also select a connected component,
such as a DVD/Blu-ray Disc Player using the
TV menu. In this case, the receiver and the TV
switch to the appropriate HDMI input.
from the speakers
connected to the receiver
(System Audio Control)
You can enjoy the TV sound from the speakers
connected to the receiver by a simple
operation.
If you turn on the receiver while the TV is
turned on, the System Audio Control function
will automatically be set to on and the TV
sound will output from the speakers connected
to the receiver. However, if you turn off the
receiver, the sound will output from the TV
speakers.
You can also operate this function using the
TV menu. For details, see the operating
instructions of the TV.
Notes
• When “CONTROL” is set to “CTRL ON”, the
“AUDIO” settings in the VIDEO menu will set
automatically depending on the System Audio
Control settings.
• When you connect a TV that does not have System
Audio Control function, the System Audio Control
function does not work.
• If the TV is turned on before turning on the
receiver, the TV sound will not be output for a
moment.
Notes for models other than
STR-DG910
• When you switch to an input other than HDMI or
TV, the System Audio Control function will
automatically be set to off.
• If you switch from other input to HDMI or TV
input, the System Audio Control function will
automatically be set to on.
GB
5
 Loading...