

Page 1
Quick Setup Guide
DIGITAL OUT
COAXIAL
OPTICAL
TV
AUDIO OUT
L
R
TV/VIDEO
P
B
/C
B
P
R
/C
R
Y
COMPONENT VIDEO IN
HDMI IN
VIDEO IN
COMPONENT VIDEO OUT
VIDEO OUT
P
B
Y
P
R
OUT
ARC
TV
OPTICAL
DIGITAL
IN
TV
AUDIO IN
R
L
COAXIAL
DIGITAL OUT
DIGITAL OUT
COAXIAL
OPTICAL
TV
AUDIO OUT
L
R
TV/VIDEO
L
R
AUDIO OUT
OPTICAL
DIGITAL OUT
SPEAKERS
SUR R
SUR L
TV
OPTICAL
DIGITAL
IN
SPEAKERS
SUBWOOFER
CENTER
FRONT R
FRONT L
TV
R
DAV-DZ340K/DZ640K/DZ840K/DZ940K
(1)
4-286-727-11(1)
For details, refer to the Operating Instructions.
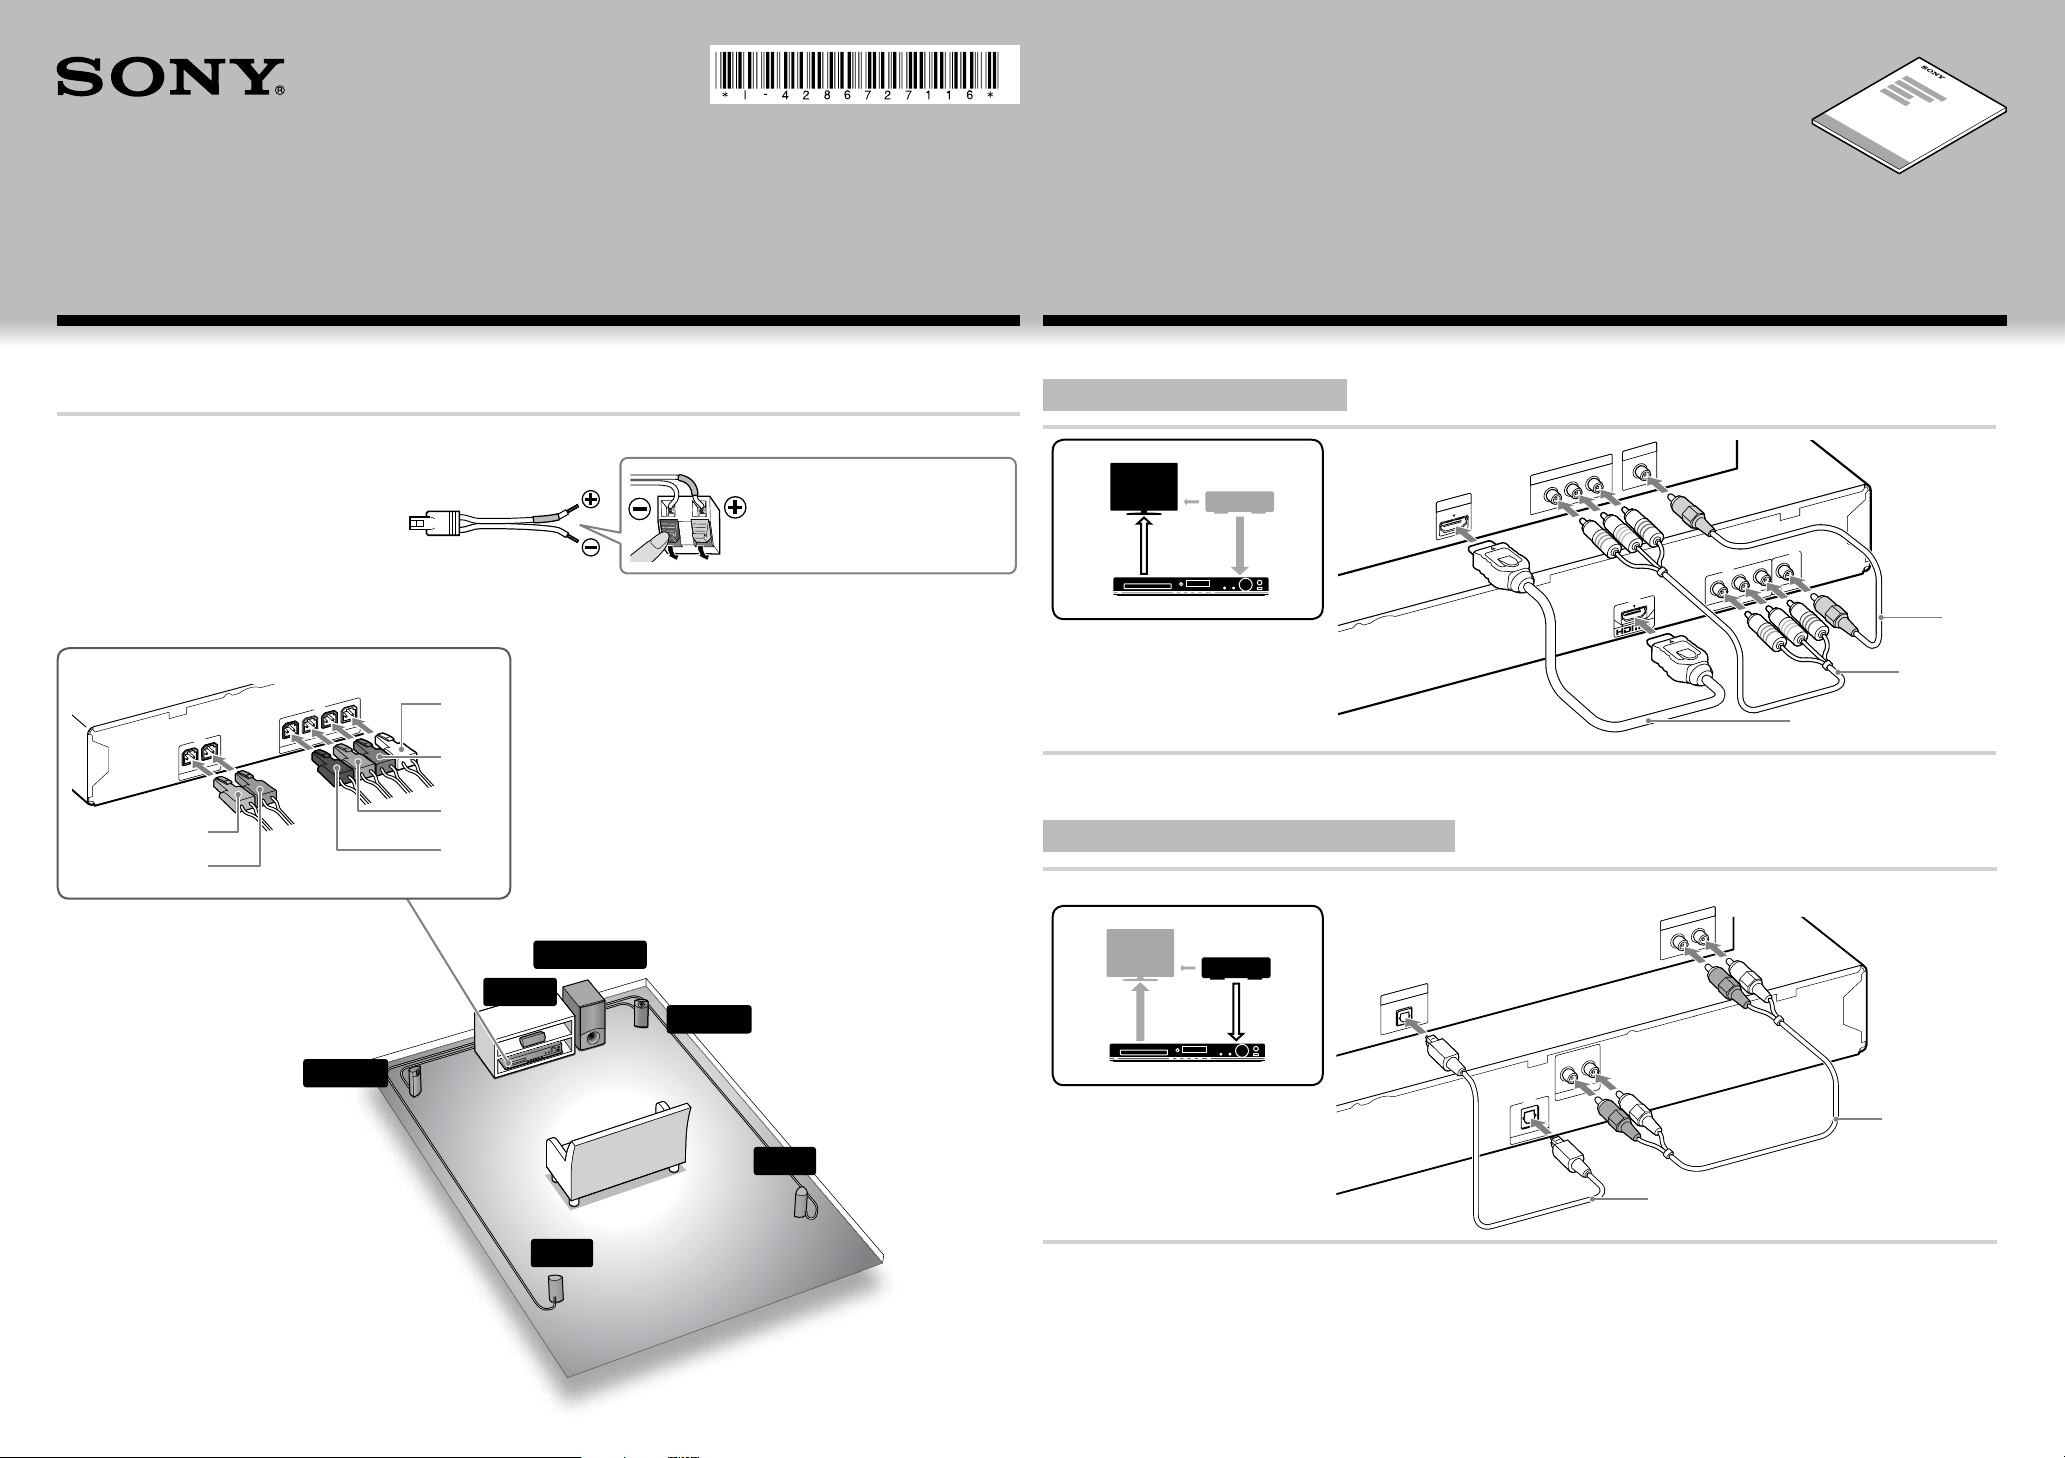
Connecting the speakers
1
For DAV-DZ640K/DZ840K/DZ940K, speaker assembly is necessary. Refer to the supplied “Speaker
Installation Guide.”
To connect speaker cords to the speaker
Connect the cord so that the cord’s color tube
matches the color of the label on the rear of the
speaker.
Rear of the front, surround and center
speakers
For all models, connect the speaker cords to match the color of the SPEAKERS jacks of the unit.
Rear panel of the main unit
White
Red
Green
Gray
Blue
Purple
Connecting your TV/set-top box
2
Depending on the jacks on your TV or set-top box, select the video and audio connection method.
Connecting the video to your TV
VIDEO
Method 2
*1 The HDMI cable is supplied with certain models/in certain areas only.
*2 Not supplied. The COMPONENT VIDEO OUT jacks are available on DAV-DZ640K/DZ840K/DZ940K only.
Connecting the audio from your set-top box
If you do not use a set-top box, refer to “Connecting your TV/set-top box” in the Operating Instructions.
Method 1
*2
Method 3
*1
FRONT L
DAV-DZ340K is the model used for illustration purposes.
©2011 Sony Corporation Printed in China
CENTER
Main unit
SUBWOOFER
SUR L
FRONT R
SUR R
AUDIO
*2
Method 2
*1 Not supplied.
*2 Not supplied. The TV (DIGITAL IN OPTICAL) jack is available on DAV-DZ840K/DZ940K only.
Method 1
*1
Page 2
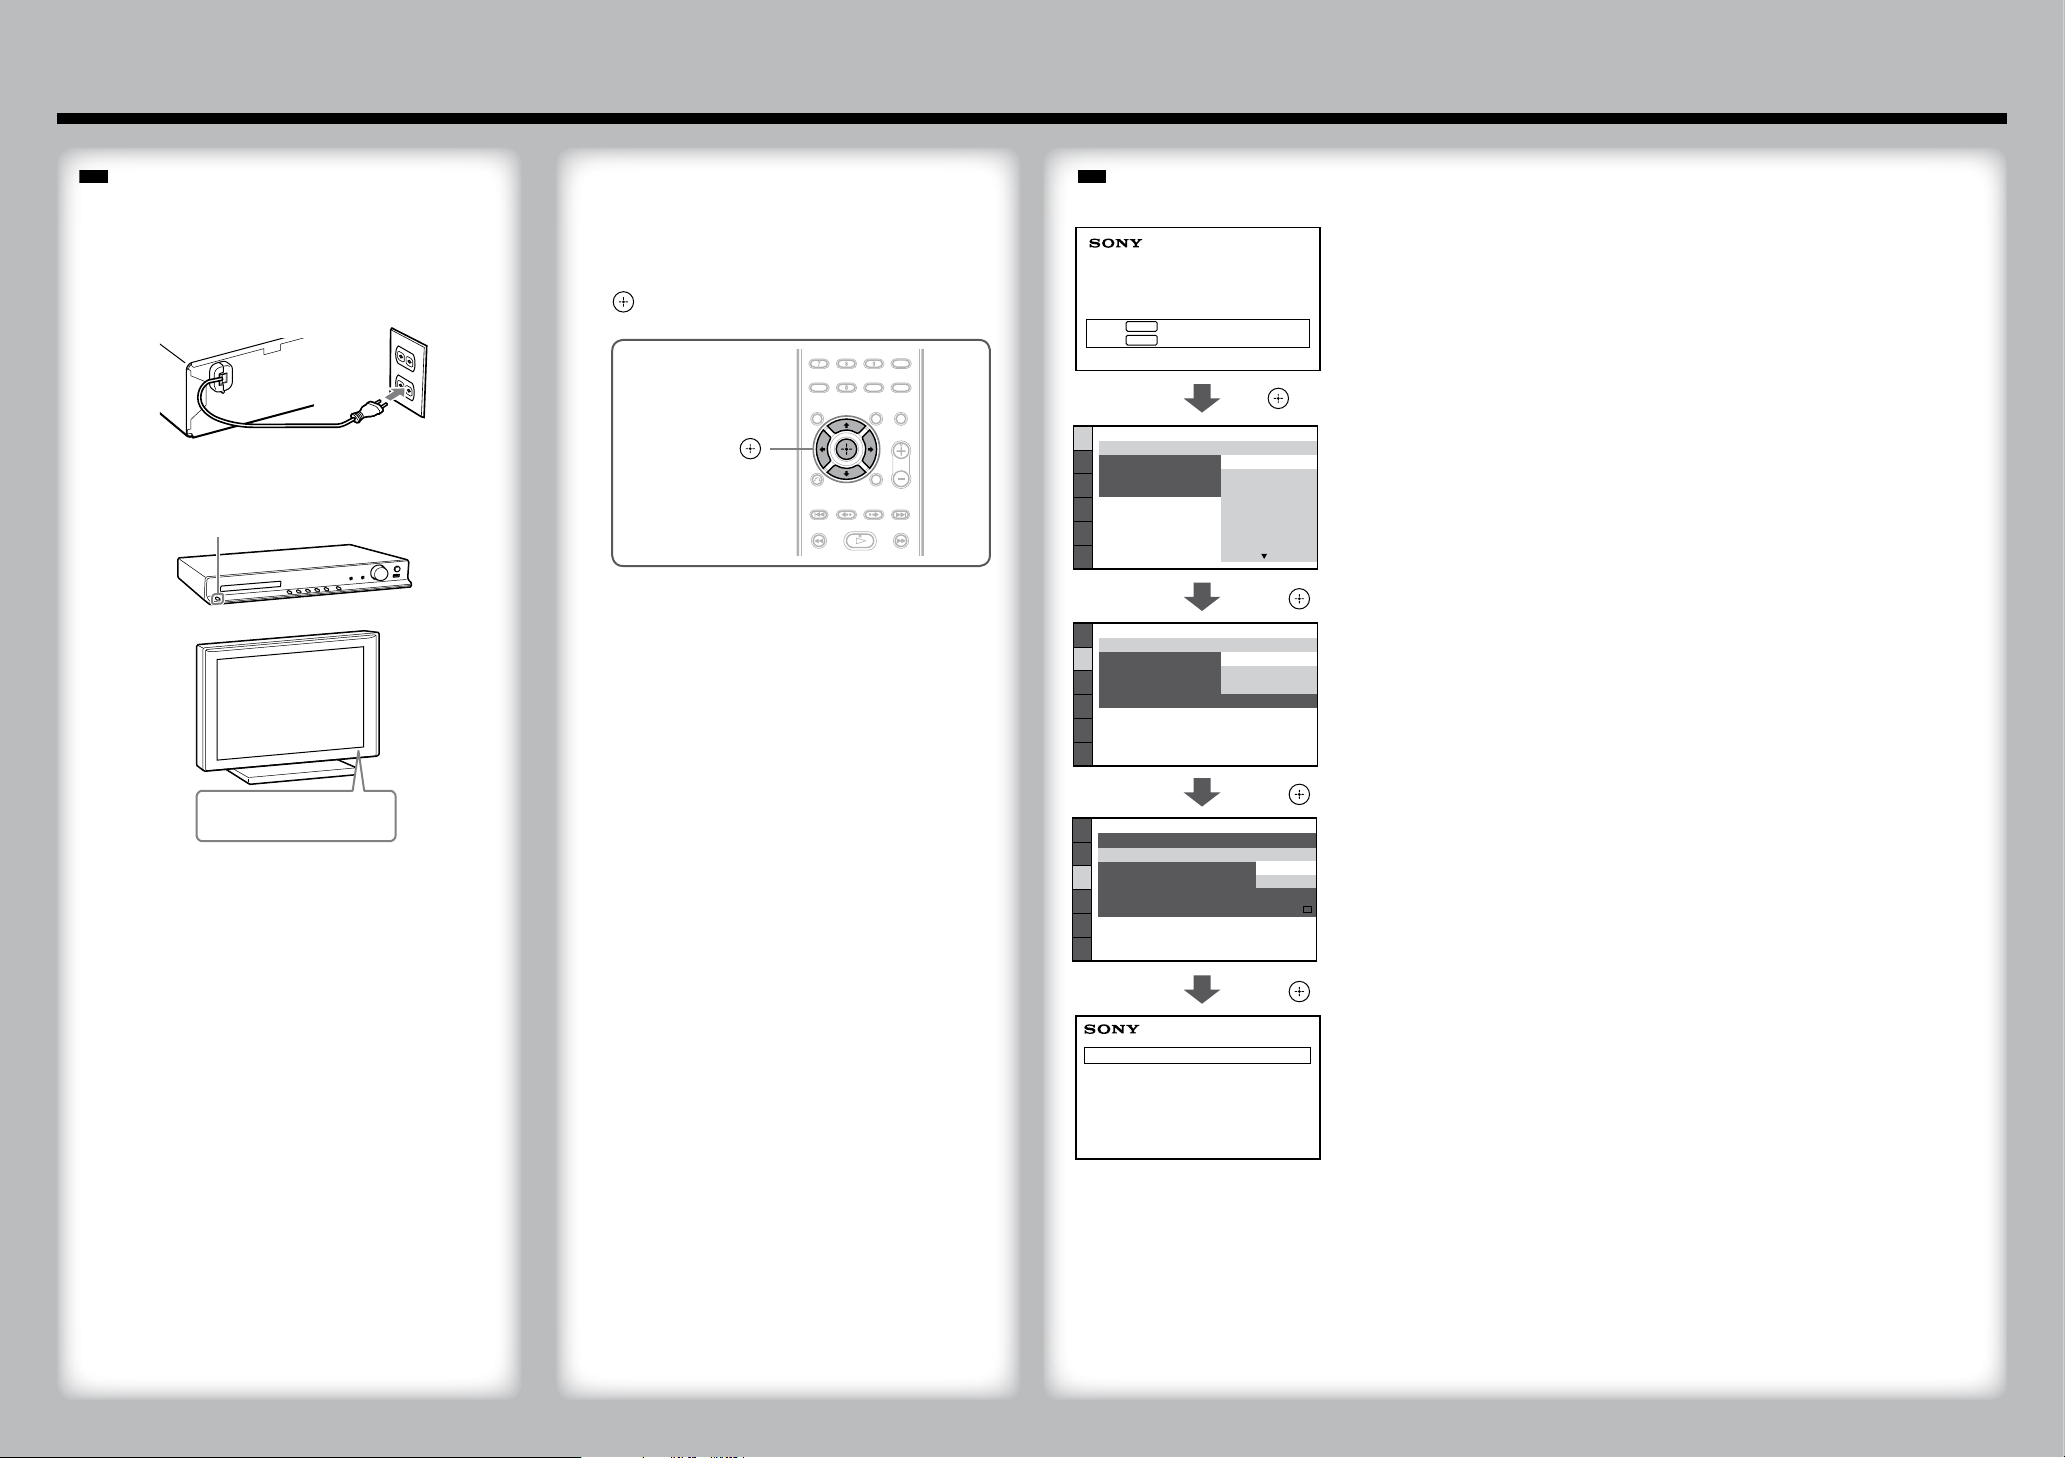
Note
Performing the Quick Setup
Note
Home Theatre System
Press to run QUICK SETUP.
Press to erase this message.
ENTER
CLEAR
LANGUAGE SETUP
MENU:
OSD:
AUDIO:
SUBTITLE:
ENGLISH
ENGLISH
FRANÇAIS
DEUTSCH
ITALIANO
ESPAÑOL
NEDERLANDS
DANSK
VIDEO SETUP
PROGRESSIVE
(COMPONENT OUT)
:
TV TYPE:
4:3 OUTPUT:
COLOR SYSTEM
(VIDEO CD)
:
16:9
AUTO
PAUSE MODE:
16:9
4:3 LETTER BOX
4:3 PAN SCAN
HDMI SETUP
HDMI RESOLUTION:
AUDIO RETURN CHANNEL:
AUTO
(1920x1080p)
OFF
SD
YCBCR/RGB(HDMI):
YCBCR
JPEG RESOLUTION:
AUDIO(HDMI):
CONTROL FOR HDMI:
ON
ON
OFF
QUICK SETUP is complete.
Home Theatre System
3
Do not insert a disc before performing the Quick Setup.
Connect the AC power cord.
1
The shape of the wall outlet differs depending on the
area.
Turn on the power of the main unit and TV.
2
/
Switch the input selector on your TV to
3
display “SONY Home Theatre System.”
Set each following item, using /// and
4
.
///,
(ENTER)
Displayed items vary depending on the area.
Select an on-screen language.
/,
Select the aspect ratio of the connected TV.
/
(power)
/,
Select [ON] when you connect the main unit and the TV with an HDMI cable.
/,
Basic setup is complete. Refer to the supplied Operating Instructions for details on how to enjoy
disc playback and many other features.
 Loading...