

Page 1

SONY.
Video Camera Recorder E
CCD-TR7
Operating Instructions
Before operating the unit, please read this manual thoroughly
and retain it for future reference.
3-751-908-22 (2)
Video 8 Handycam
Page 2

The model number and serial numbers are
located on (he boUom. Record (he serial
number in the space provided below. Refer to
these numbers whenever you call upon your
Sony dealer regarding this product.
Model No. CCD TR7 Serial No.
To prevent fire or shock hazard, do
not expose the unit to rain or
moisture.
CAUTION TO
UON
.E.FPSr.v.C
______________
CAUTION I
OfPUCf THf fi,5K Of ELECTRIC SHCJC K
OT «EMOvE (.Over lOR BAf:ki
INC.. TO QUAU'itu SERVICE
This symbol is intended to
alert the user to the
presence of uninsulated
‘dangerous voltage ” within
the product s enclosure that
may be of sufficient
magnitude to constitute a
risk of electric shock to
persons.
This symbol is intended to
alert the user to the
presence of important
operating and maintenance
(servicing) instructions in the
literature accompanying the
appliance.
,4\
PERSONNEL
p-.‘r
INFORMATION for the customers In the U.S.A.
This equipment generates and uses radio
frequency energy and if not installed and used
properly, that is, in strict accordance with the
manufacturer's instructions, may cause
interference to radio and television reception. It
has been type tested and four>d to comply
with the limits for a Class B computing device
in accordance with the specifications in
Subpart J of Part 15 of FCC Rules, which are
designed to provide reasonable protection
against such interference in a residential
installation. However, there Is no guarantee
that interference will not occur in a particular
installation. If this equipment does cause
interference to radio or television reception,
which can be determined by turning the
equipment off and on, the user is encouraged
to try to correct the interference by one or
more of the following measures:
Reorient the receiving antenna
Relocate the equipment with respect to the
Move the equipment away from the receiver
Plug the equipment into a different outlet so
that equipment and receiver are on different
branch circuits.
If necessary, the user should consult the
dealer or an experienced radlo/television
technician for additional suggestions. The user
may find the following booklet prepared by the
Federal Communications Commission helpful:
"How to Identify and Resolve Radio TV
Interference Problems".
This booklet is available from the U.S.
Government Printing Office, Washington, DC
20402, Slock No. 004-000-00346-4,
For the customers in Canada
This apparatus complies with the Class B
limits for radio noise emissions set out in
Radio Interference Regulations.
I QaWng Storied
Introduction
..............................................................
Identifying the parts
_____
.................................................
\
4
T
I Preparing Your Camcorder |
(Connecting the power sources
Getting the most from the battery pack
Setting the date ar>d time......................................20
Inserting a (ape......................................................22
Adjusting the viewfinder lens............................24
.............................
..................
13
18
¡OpeffBng Ihe Cwwra 8>cMon
Recording a picture using automatic
adjustments............................................
To record date and time..............................
Playing back the picture instantly
...............
fMwMnQ i pictura Mint mènMl
Selecting the aulomatic/manual adjustrirenl.. 33
Manual focusing.....................................................34
Adjusting the white balance
Setting the shutter speed
Shooting with Backlighting.....................................40
Zooming.................................................................41
Close-up (Macro)
Fade-in and fade-out..............................................43
Recording a title.....................................................44
...................................
.......................................
...................................................
36
38
42
I Opw««ng (hs VCB Sectton |
Connection for playback.........................................48
Playing back a tape................................................52
Using the tape counter...........................................55
Editing onto another VCR
Recording from another VCR or a TV
Insert recording..................................................... 58
......................................
...................
56
57
I OtMi ~
Hints, for belter shooting
Notes and precautions
Using your camcorder abroad............................
Specifications.....................................................
Trouble check
Indications inside the viewfinder and the
display window...............................................
....................................
.......................................
.....................................................
Page 3

Overview ol the CCO-TR7
The CCD-TR7 Video 8 Handycam is a compact
color video camera/recorder (camcorder),
You can use it to shoot the pictures you want
arrd play them back on your television set. It is
equipped with a Hi-Fi stereo recording system
which offers high quality sound.
The camcorder uses 8mm video-formal
cassettes.
This manual is for you. You can use this
manual to find exactly the information you
need, whether you are familiar with video
equipment or not.
The first section of the manual explains Ihe
preliminary steps necessary to prepare for
shooting and playing back.
Other sections include shooting procedures
that show you how to use the various features
and functions of your camcorder. If you are
beginner, start with “Recording with aufomafic
adjustments." If you are very familiar with
camcorders, try to shoot your picture with
manual adjustments as well as automatic
adjustments.
If you want to record right away, see p.26
through 26.
The manual also includes Information on how
to play back a picture on a TV and how to edit
your original 8mm tape onto another video
tape.
If you have any problems during operation, see
the "Trouble Check" section.
How This Manual Wor^s
Use the information below to help you follow
the instructions in this manual.
• Controls and settings on the camcorder are
shown in capital letters:
ex. Set POWER to CAMERA.
• The letter In an illustration corresponds to
the letter in the text:
ex. (A-1) or W
• The step numbers in all illustrations
correspond to Ihe step numbers in the text.
• Notes and caution messages are set off with
lines.
Note on battery life
Battery will not last as long in cold
places
Supplied Acoesoftee
The caimcofder is packed together with the
following units. Check to see that everything
is contair>ed in the package.
(«Attached to the camcorder)
• Battery pack NP-55 (1)
• AC power adaptor AC-V30 (1)
• Lithium battery CR2025 (1)
• RFU adaptor RFU-90UC (1)
• Step-up-ring 037mm --*■ 046mm (1)
• Shoulder strap (1)
• Jack cover (l)*
• Lens cap (1)*
• AV cable (1)
• Handy Manual (1)
Page 4
Frequency allocation of the hi-fi system
w
1.5MHZ I 7MHZ
Л2МНг 5 4MH2 MHZ
Hi-Fi Stereo System
On the 8mm video standard track the sound is
recorded/played back in hi-fi monaural. On this
camcorder, an additional hi-fi stereo sound can
be recorded on the standard track.
The hi-fi stereo sound is recorded as L-r-R on
the 1.5 MHz carrier and L-R on the 1,7 MHz
carrier in FM as illustrated. (A-1) This method
was adopted to maintain compatibility with the
conventional hi-fi monaural sound.
When playing back the tape recorded in this
hi-fi stereo system, a matrix circuit is used to
produce the L and R stereo sounds separately.
When a conventional hl-fl monaural model is
used to play back a tape recorded by this
camcorder in hi-fi stereo, the playback sound
will be in a L-i-R monaural sound. This is
because the monaural models will play back
only the sound recorded in the 1.5 MHz carrier.
The hi-fi stereo system of this camcorder
enables you to enjoy a live stereo sound
atmosphere.
Compatfbiitty with the conventional 8 mm video format
When you playback a tape recorded in stereo
hi-fi on a conventional 8 mm video equipment,
the sound will be in monaural.
(B-3)
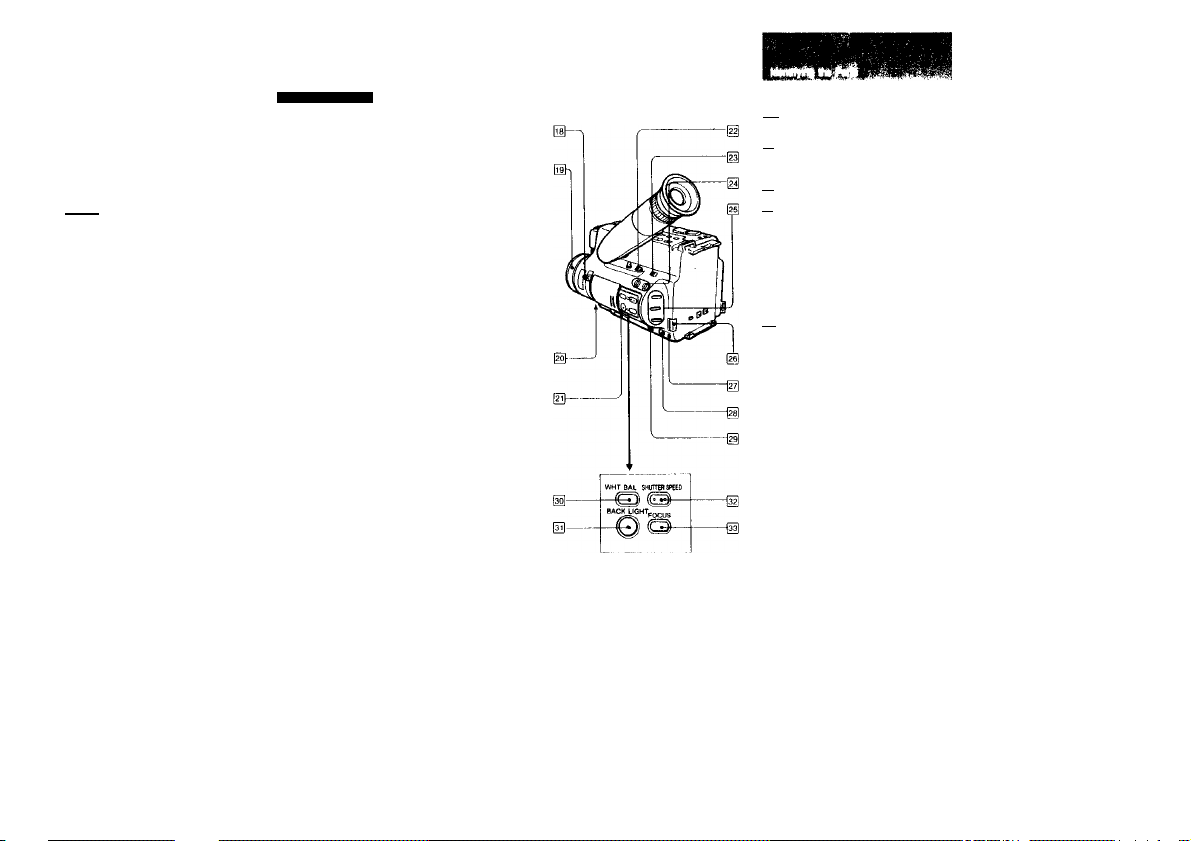
fisj Zoom lever ф, ф
Macro set button ф
|l9| Focus ring ф
FADER button ф
fzi} Lithium battery compartment ф
Щ REC startfstop button Ф
Use when recording in the low position.
H EDTT switch Ф
Normally set to the left position. When
editing tapes, set to EDIT.
|2^ DATE and TIME buttons
Press to display or turn off the date or
time.
|25] Superimpose buttons ф
MEMORY button
COLOR/MODE button
SUPERIMPOSE button
ВАТТ (Battery efect) knob ф
PHONES (Headphones) jack (stereo mini-jack)
[2^ C REMOTE control jack (stereo mini-
mini-jack)
Connect a wired remote control unit, an
editing controller, or other equipment here.
(H Hl-R SOUND swHch ф
Set to the appropriate position when
playing back the tape.
WHT BAL (whtte balance) button ф
BACK LIGHT button ф
(32| SHUTTER SPEED button ф
Used to select the shutter speed.
FOCUS button
Used for manual focusing.
About C (LANC)
C stands for Local Application Control Bus
System. The C connector is used (or controlling the
tape transport ol video equipment ar^d the
peripherals connected to it. This connector has the
same function as the connectors indicated as
CONTROL L or REMOTE.
9
Page 5
(B-5)
(B-4)
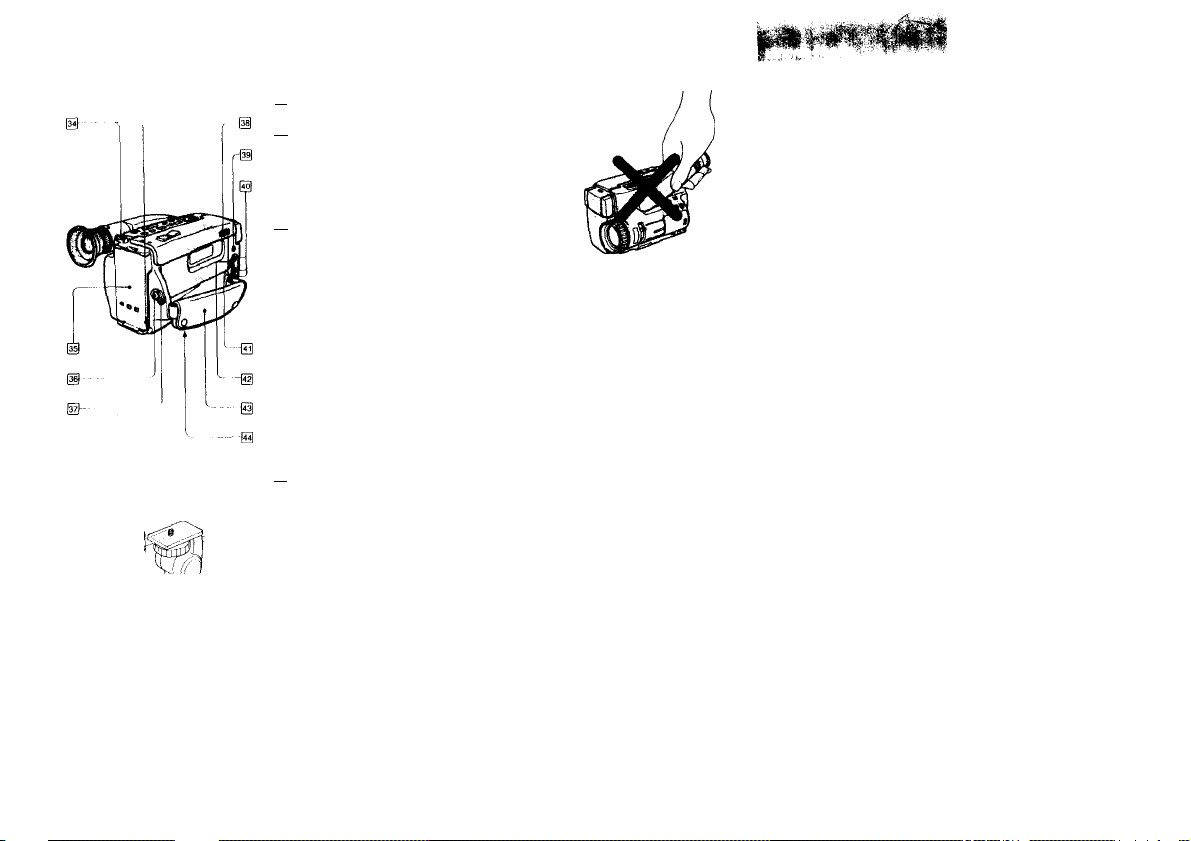
[3^ Hooks (Of stwulder strap
AHach \he shoulder sUap.
[35! Battery mounting surface
START/STOP buHon
Press to start and stop camera recording.
STANDBY switch
Slide up to set the camcorder to the
star>dby mode.
[38| LkJ lock
Slide to the left to oper> the cover.
|39| MIC Jack (PLUG IN POWER)
(stereo minijack)
Connect an external stereo microphone.
@ VIDEO/AUDIO Jacks (phono jacks)
DC OUT (RFU adaptor DC output) jack (special minijack)
Attach the supplied RFU adaptor here if
necessary. This lack also supplies power to
an ex1err>al microphone.
@ VIDEO/AUDIO INPUT/OUTPUT selector
switch
For input: Slide to INPUT
For output: Slide to OUTPUT
Grip strap
Adjust the let^gth so that your thumb can
easily manipulate the START/STOP button.
¡aH Tripod receptacle
Note that when you are attachirrg a tripod
not manufactured by Sony, the lerrgth of
the camera mounting screw must be less
than 6,5mm. Otherwise the screw may
damage the inner parts of the camera.
(B-5>
(B-6)
Caution (B-6)
Do not pick up the unit as shown in the
illustration.
10
Page 6

To remove dust from inside tfte viewfinder
(B-7)
1 Puli out until the mark appears.
2 Turn counterclockwise until It stops and
pull out.
3 Clean the surface of the cover with a
|||■|| '■ II I—
Power
Place
Outdoors
Indoors
ca,'“
Note on power source
. Disconnecting the power source or removing the
battery pack during recording or playback may
damage the inserted tape. II disconnected
accidently supply the pov^er again immediately.
Accessory to be used
source
Battery pack NP-55 (supplied),
Battery
NP-66H, NP-77, NP-77H
pack
Alkaline
Battery case EBP-55
batteries
AC power adaptor AC V30
(supplied),
current
ACV55
DC pack DCP 77,
12V or
DCP-55 (DCC-16B car
24V car
battery cord supplied)
battery
12
13
Page 7
Using the Battery Pack
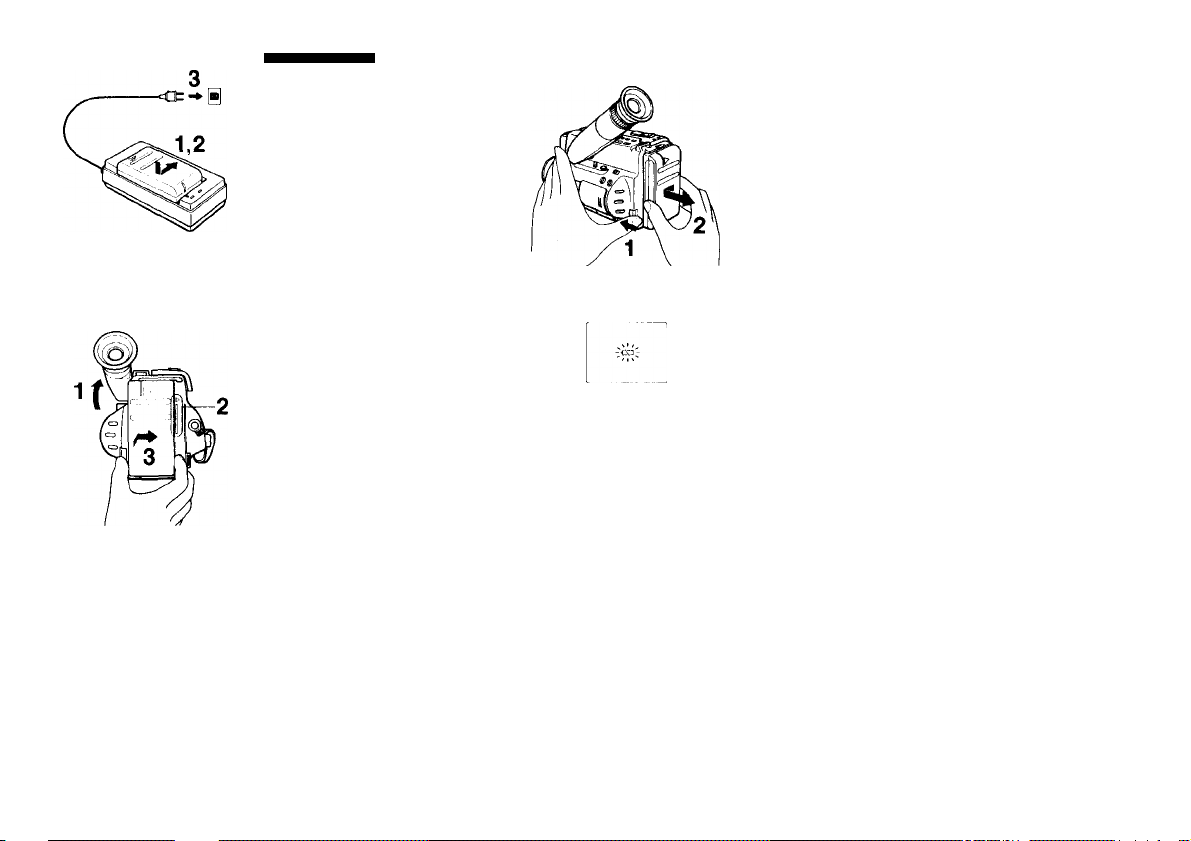
Charge the battery pack. (C-1)
1 Align the right side of the battery pack with
the llrw on the AC power adaptor.
2 Slide in the battery pack to the tight.
3 Conrwct the AC power adaptor to a wall
outlet.
Approximate required charging lime (minutes)
when using AC-V30
* Supplied
See the instruction manual of the AC power
adaptor for details
Mount the battery pack on the camcorder.
(C-2)
*
1 LIH up the viewfinder.
2 Align the right side of the battery pack with
the line on the camcorder.
3 Slide the battery pack to the right.
Make sure the battery fits completely on the
mounting surface of the camcorder. Imperfect fit
may damage the projections on the camcorder.
To remove the battery pack
(C-3)
While pressing the ВАТТ knob in the direction
of arrow, slide to the left ar>d pull out the
battery pack as Illustrated.
Battery life
A fully charged battery pack lasts for:
(Approx, minutes, continuous recording when
used indoors)
• Supplied
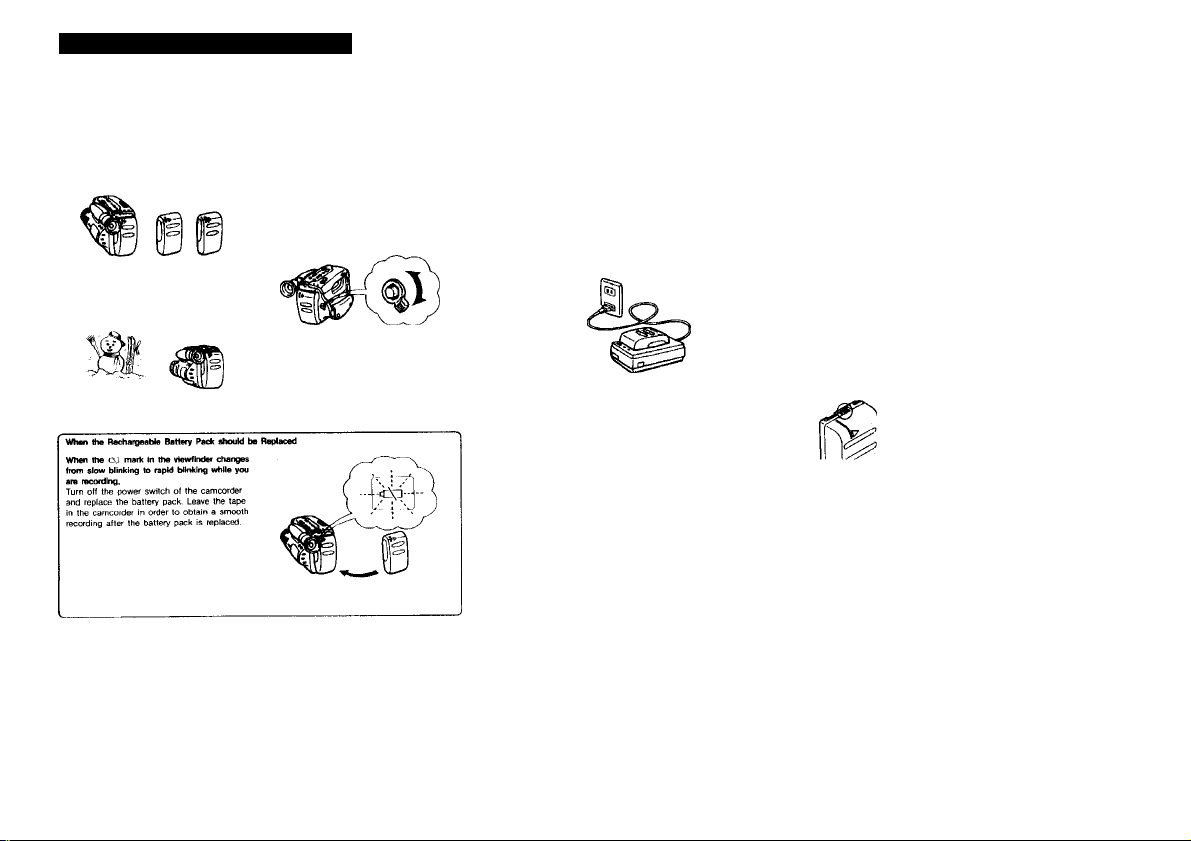
When the battery becomes weak
(C-4)
The cX> Indication and red lamp blink slowly in
the viewfinder. Replace the battery pack with a
fully charged or>e when they blink rapidly.
Other options for charging
• AC-V55 AC power adaptor: You can charge
two battery packs one after another.
• BC-55, BC-77 portable battery charger; You
can charge a battery pack on 100-240 V AC.
• DC-V30 car battery charger: You can charge
a battery by connecting the car battery
charger to the cigarette lighter socket. This
battery charger can also supply power for
Sony 8 mm equipment that oj^erates on a
battery pack.
• NP-40CX) rechargeable battery pack: You can
use it for long outdoor recording.
15
Page 8
(С-5)
Using Alkaline Batteries
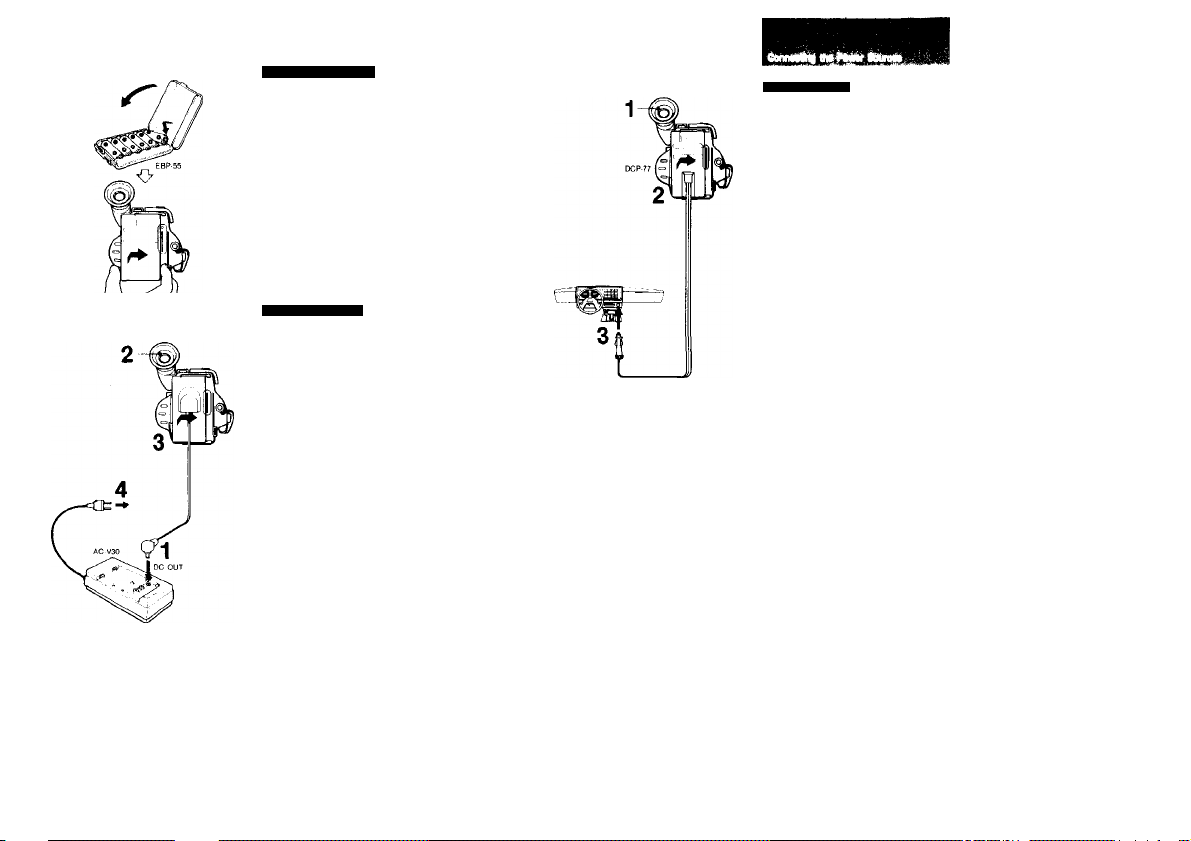
1
(C-5)
The EBP-55 baUery case is required (not
supplied.)
1 Insert 6 AA size alkalkw batteries Into the
battery case.
2 Attach the case in the same way as the
battery pack.
Battery life
Approx. 60 minutes using Sony alkaline
batteries (continuous recording when operated
indoors)
Notes on battery Hie
• Batteries will not last as long in cold places.
• No Indication appears in the viewfinder when the
Using House Current
Use the supplied AC-V30 AC power adaptor.
1 Iftsert the conr>ectir>g cord supplied with
the AC-V30 AC power adaptor into the DC
OUT jack on the AC power adaptor.
Using Car Battery
The DCP-77 СЮ pack is reguired (not supplied).
1 Lift up the viewfinder. 2 Align the right side of the DC pack with
the line on the camcorder, and slide It in to
the right.
3 Connect the cord to the cigarette lighter
socket of a car (12V or 24V).
To remove the DC peck
While pressing the ВАТТ knob on the
camcorder, slide the DC pack to the left and
pull out.
Other options
• The AC-V55 AC power adaptor and the
IXC-IBAW car battery cord can also be
used to operate this camcorder on a 12V or
24V car battery.
» OCP-55 DC pack can also be used to
operate this camcorder on a 12V or 24V car
battery.
2 Lift up the viewfinder.
3 Align the right side of the connecting plate
with the line on the camcorder, and slide it
in to the right.
4 Connect the AC power adaptor to a wall
outlet.
We recommend the use of the AC power
adaptor while viewing the playback picture on
the TV, editing tapes or recording a TV
program, as you do not need to worry about
running out of power.
See the instruction manual of the AC power
adaptor for details.
Other optiorrs
The AC-V55 AC power adaptor can also be
used.
16
17
Page 9
Getting the Most from the Battery Pack
How to Prepare the Rechargeable Battery Pack
Have sufficient battery pack power to do 2 or
3 times as much necordirtg than you have
pfanited.
“Battery life" as indicated in the instruction
manual or catalogue of the camcorder is
measured by the continuous recording time of
the camcorder, placed at a room temperature
using a full-charged battery.
Battery life is shorter in a cold climate
Battery efficiency is decreased and the battery
will be used up more quickly.
Leaving the unit In the starrdby mode will
consume power and shorten the available
battery life. To consenre power, turn the
STANDBY switch off between recordings. A
srTKwth transition between scenes cart be
made even if recording Is stopped and started
again.
While positioning the subject or selecting an
angle, by viewing through the viewfinder, and
in using autofocus, the battery is being
expertded. The battery is also being expended
when a tape is Inserted or removed.
Notes on Charging
Before using the battery pack, charge it
sufficientlly. A brand-new battery pack is
not charged-
Recharge the battery pack only when It is exhausted.
• If recording is completed before the mark
CXI appears In the viewfinder, it Is
recommecded that you remove the tape,
set POWER to CAMERA, slide up the
STANDBY, and leave the camcorder until
the cXi mark blinks rapidly.
• Repeated charging while some capacity
remains causes a lowering of battery
capacity. However, the original battery
capacity can be recovered if you fully
charge and discharge the battery again.
Recharge the battery pack before using.
If the battery pack is charged fully but not
used for a long time (about 1 yeaq. it
becomes discharged. Charge it again but in
this case the battery life will be shortened
than normal. After several charging and
discharging cycles, the battery life will
recover its original capacity
Keep the Tenninals Clean
If the terminals (metaf parts on the back)
are not cfaan, the battery duration will be
shortened.
When the terminals are not clean or when
the battery pack has not been used for a
long time, install and remove the battery
pack from lime to time. This will improve
the contact condition. Also, wipe the + and
- terminals with a soft cloth or paper,
Notes on the Rechargeable Battery Pack
Why the battery pack heats up
During charging or recording, the battery
pack heats up. This means energy has been
gerwrated and chemical change has
occurred Inside the battery pack and this Is
not dangerous.
How to care tor the battery peck
• Remove the battery pack from the
camcorder after using it, and keep it in a
cool place. When the battery pack is
attached to the camcorder, a smalt
amount of current flows to the camcorder
even If the POWER switch Is turned off.
It causes overdischarging arnl shortens
battery life.
• The battery pack is always discharging
even when It is not In use after charging.
Thus it is recommernfed you charge the
battery before using.
How to use the switch on the battery pack
This switch is provided so that you can
remember the charging condition. Set the
switch to the "no mark" position when
charging Is completed. Set the switch to the
"red mark" position when the battery is used
up.
How many times can the battery pack be recharged
It can be fully charged and discharged about
500 times under normal temperatures. If the
cX! mark blinks rapidly just after turnlr>g on
the camcorder with a fully charged battery
pack, .the battery pack should be replaced
with a new fully charged one.
Temperatures during charging
Lower temperatures require a longer charging
time. Charging under temperatures ranging
from 10®C to 30°C is recommefKled.
18
19
Page 10
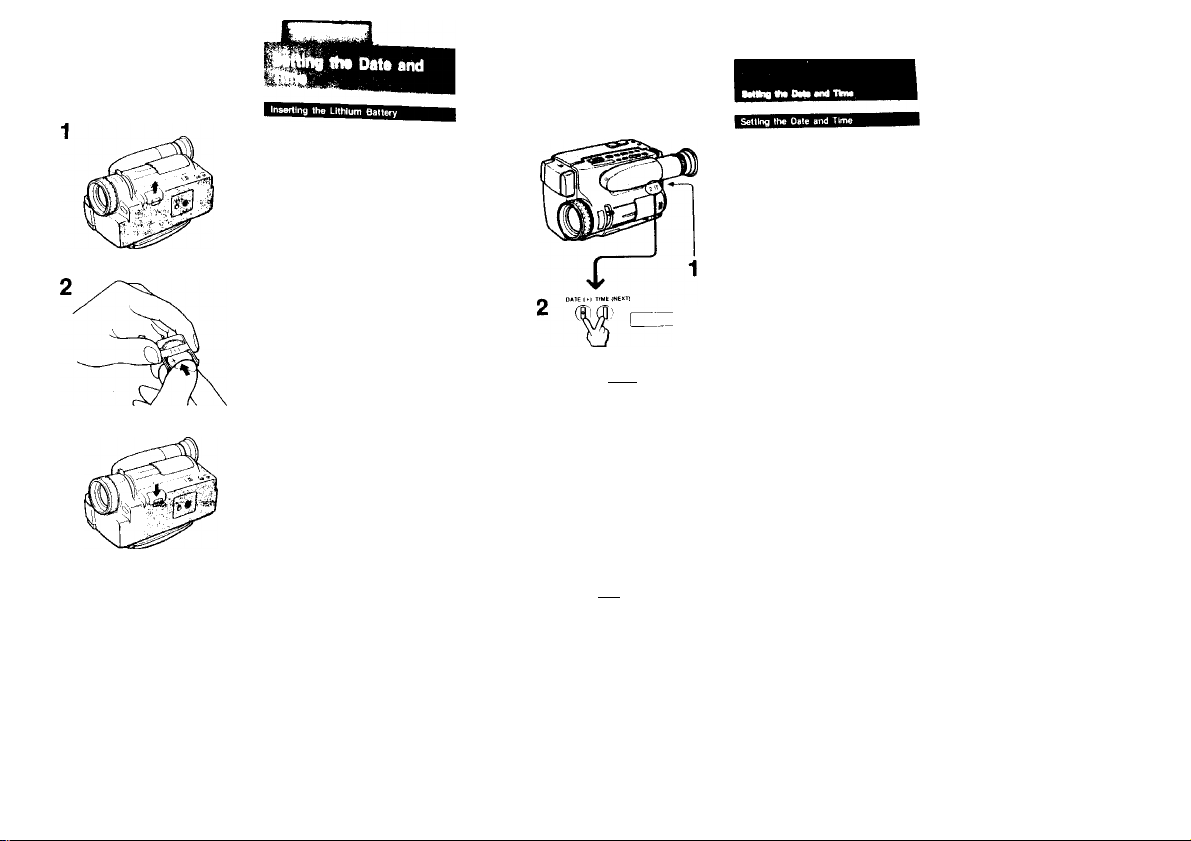
(D-1)
This camcorder uses a fithium batlery to
activate the clock and to keeo titles in
memory. Before operating it for the first time,
install the supplied lithium battery.
1 Pull out the lithium battery hoMer Irom the
bottom of the camcorder.
2 Install the supplied CR202S lithium battery
with the * side facing the < 4) on the
batlery holder.
3 Put the lithium battery holder back into the
camcorder.
To chartge the lithium battery
Remove the lithium battery holder from the
camcorder, and pull out the lithium battery and
insert a new one.
Note on baitery life
The battery lasts for approximately 1 year under
normal operation. When the lithium battery
becomes weai<, the time indication keeps blinking
in the display window and blinks In the viewfinder
for about 5 seconds when the POWER switch
to CAMERA When this happens, replace the
battery with a Sony CR2025 or Duracell DL 2025
lithium battery. Use of another battery may present
a risk of fire or explosion. While replacing the
lithium battery, keep the battery pack or other
power source attached. M the battery pack or other
power source was not attached while replacing,
readjustment of the date and lime is necessary.
Cautions
• Keep the lithium battery out of the reach of
children.
Should the battery be swallowed, consult a
doctor immediately.
• Wipe the battery with a dry cloth to assure
good contact.
• Be sure to install the battery with the
correct polarity
• Do not hold the battery with metallic
tweezers, as a short-circuit may occur.
WARNING
Battery may explode If misireated. Do rrot
recharge, disassemble, or dispose of in a lli
1 Маке SUI* «bat а potMf аоиге* 1а
eonnacted. аа« POWER «о CAMERA, and
sIWa STANOev up.
2 Prase DATE and TIME ahmiNanaoiialy tor
mora than Э seconds untH the data
Indicstion sppaars In the display window.
DATE now functfons as + (to advance
numbers) and TIME functions as NEXT (to
execute).
3 Set the year, month, day. hour and minute.
In this Older.
First adjust the blinking digits with 4 and
then press NEXT.
4 Press NE)(T to set the second.
The clock starts operating.
To correct the date and time setting
3®Ж
г г »it-»
set
Repeat steps 2 to 4.
To advance the digits faster
Keep 4 pressed.
ъ
To check the preset date and time
Press DATE or TIME. When you press the
same button again, the indication goes off.
I
о
Ф с::
(Ш
ф г -
Ф
20
21
Page 11
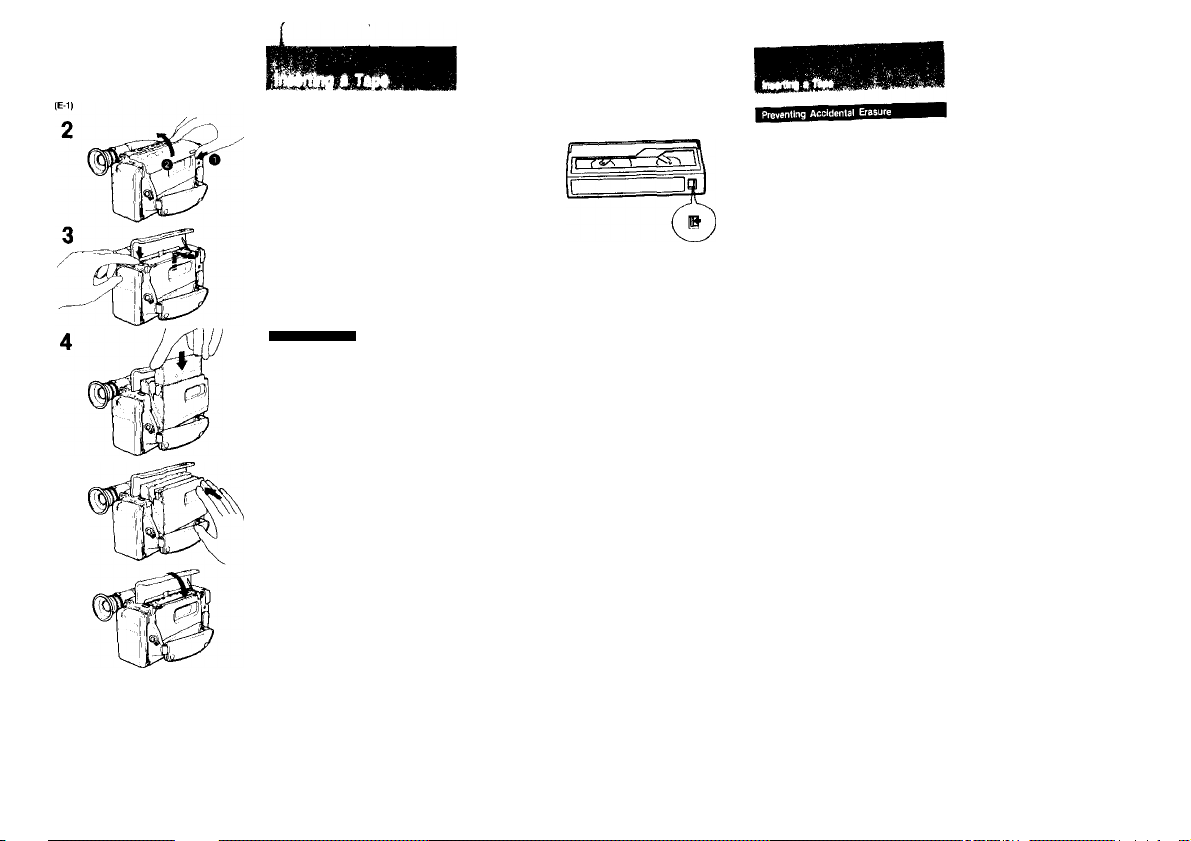
(E-1)
1 Make sure a power source Is connected.
2 IMhlte stkltng the lid lock In the direction ol
the arrow lit! up the lid until it dicks.
3 Press EJECT-
The lip of the cassette compartment will
automatically lift up and open.
4 Insert the cassette with the window lacing
5 Press the PUSH mark on the cassette
compartment cover to dose It.
6 Close the lid.
Ejecting the Tape
1 Make sure that a power source Is
connected.
2 While sliding the lid lock In the direction of
the arrow, lift the lid up until it clicks.
3 Press the EJECT.
The l/p of the casseKe comparlmenf will lifl
up and automatically open.
4 Take out the cassette and press the PUSH
mark on the comparment to close It.
5 Close the lid.
(E-2)
№•2)
Slide out the red tab on the cassette to protect
the recording.
To re-record on this tape, slide the tab back in.
Notes on hendllnp tapes
• Insert anything in the small holes orr trie
rear ol the cassette. These holes are used to
sense the type ol tape, thickness of tape, or if
the tab is out or in, etc.
» Store tapes in their cases and keep them in an
upright position to prevent intrusion of dust and
uneven winding.
_____
_____
22
23
Page 12

The position of the viewfinder lens for optimum
vision varies depending on the person. Adjust
when using the first time, or when using after
someone else.
(F-1)
1 Make sure a power source is connected.
2 Pull the viewfinder out until it clicks.
3 While pressing the green button, set
POWER to CAMERA.
4 Insert a cassette.
5 Slide STANDBY up.
6 Turn the viewfinder lens adjustment ring so
that the “STBY" display in the viewflr>der
screen comes into sharp focus.
Нёсокйпца Ptoturs ilskig Auiomrtic
Before recording "once-onty" events, we
strongly recommend making a trial recording
and checking that everything is working
properly
(F-2)
1 Hold the camcorder as illustrated.
Put your hand through the grip strap and
check that your thumb can easily touch
START/STOP.
2 Make sure that the vtevriinder Is pulled out.
3 Remove the tens cap and clip It on the grip
strap.
4 While pressing the green button, set the
POWER to CAMERA.
5 Close the AUTO LOCK cover and turn the
zoom lever downwards.
6 Slide STANDBY up.
"STBY" and the auto-focus frame appear in
the viewfinder. The camcorder is now in the
standby mode, and focus is adjusted
automatically irtside the frame (auto-focus
adjusting range). Do not turn or stop the
focus ring forcibly.
7 Press START/STOP.
"REC" appears and the red lamp lights up
in the viewfinder. The camcorder is now
recording.
To pause (to stop momentarily)
Press START/STOP again.
"STBY" appears in the viewfinder. The
camcorder is in the standby mode again.
To stop
Slide STANDBY down and set POWER to OFF.
24
25
Page 13

Ho<N to (it the gtip strap (F-3)
In step 1 on the previous page, hold the
camcorder against your body and pull the grip
strap upward.
For low-position recording
The viewfinder can be turned 90 degrees up.
It can be used in either the pushed-down or
pulled-out position.
1 Slide STANDBY up.
2 Press REC START/STOP with your left
DATE (♦) TIME (NEXT)
OATEj-fjTIME fNEXTl
(3
To Record Date and Time
(F-5)
During camera recording or when in the
recording pause mode, press DATE for date
indication or TIME for time indication.
The dale or time displayed in the viewfinder if
recorded with the picture.
To stop recording dale and lime
Press DATE or TIME again.
The picture recording continues.
Notes on rscordlng
« To record (rom the beginning ot the tape, run the
tape lor about 15 seconds before recording. This
will avoid missing the starting point when the
tape IS played back.
• И POWER is moved during recording, the tape
will stop.
• When moving from indoors to outdoors, or vice
versa, slide STANDBY up and point the
camcorder at a white object tor about 15
seconds so that the white balance ts properly
adjusted.
Note ort the standby mode
If you leave the camcorder in the standby mode for
5 minutes or more, the camcorder will be turned off
automatically. To resume the standby mode, slide
STANDBY down once and slide it up again. To
start recording, press STARTfSTOP directly.
Recording mode
This camcorder records in the SP mode
(approximately 1.43cm/second) and can play
back in the SP and the LP modes
(approximately 0.72cm)second). The quaWy of
the playback picture in the LP mode, however,
will not be as good as that in the SP mode.
Note on PCM recording and playback
PCM recording or playback is not possible with this
camcorder. The PCM sound recorded or after-
recorded with another video recorder cannot be
played back with this camcorder.
26
(F-6)
(F-6)
Set BUILT-IN MIC to "WIND."
The noise from the wind (bass noise) will be
reduced.
After recording, set it to the green position
(green mark).
if you forget to do this, sound may be
recorded unnaturally because of this function.
27
Page 14

To Check the Last Portion of the
Previous Recording
(F-7)
1 Set the camcorder in the recording pause
mode by pressing START/STOP.
2 Press—side of EDITSEARCH ( c§) )
momentarily.
The Iasi few seconds of the recorded
portion are rewound and then (he tecorded
picture appears in the viewfinder. After a
few seconds of playback, thie camcorder
goes back to the recording pause mode.
if the picteire has not been recorded
The video heads may be contaminated. Clean
the heads using the Sony V6-25CLH video head
cleaning cassette or equivalent.
2,3
1
+ EDITSEARCH — '-
if
4
To Re record a Previously Recorded
Portion
1 Slide STANDBY up to set the camcorder to
the standby mode.
2 Look in the viewfinder and lind the point
Irom where you went to begin the recording
by ;
Keeping the + side of EDITSEARCH
pressed to advance the picture at the
normal playback speed, or the - side to
reverse the picture playback.
3 At the desked point, release EWTSEARCH. 4 Press START/STOP to start lecordlnB.
The picture is connected smoothly after the
prerecorded portion even it STANDBY is slid
down and up, or even if the power is turned off
and on again, provided that the tape Is not
removed.
To stop
Slide STANDBY down.
28
29
Page 15

AtcoRlInQ a notura I
Ac^itttmantt
To cancel ZERO MEM
Press ZERO MEM.
■Rie picture may be distorted at the ertd of the
inserted portion when it is played back.
30
31
Page 16

(F-10)
) • №lun IMno Mmfna№
m
You can check the lecoided picture in thi
viewfinder, Sound is not heard
1 While pressing the green button, set
POWER to CAMER^.
2 Slide STANDBY
Keep pressing the + or - side o<
3
EDITSEARCH to play bar* the picture.
+ side; to view the playback picture
- side; to view the playback picture in
To stop playback
Release EDITSEARCH,
To monitor the sound while viewing the
playback picture in the viewfinder
Connect headphones to the PHONES jack.
1 White pressing the green button, set
POWER to VTR.
2 Press -44 to rewind the tape and press I
3 Press [> to start ptayback.
up.
where you want to stop.
Selecting the
Automatic/Manuai
Adjustment
When you close the AUTO LOCK cover, the
focus arvj white balatrce are adjusted
automatically, and the shutter speed is set to
V60.
The automatic function offers you worry-free
operation under most shooting conditions. But
under certain circumsiarrces. manual
adjustment Is better for effective recording. For
manual adjustment, open the AUTO LOCK
cover and select an appropriate setting.
What Each Button Does
(G-1>
WHT BAL;
Press to lock the white balat^ce in the
%•: (outdoors), -A- (indoors), or HOLD mode. The
tone of colors is fixed regardless of the
lighting cortoition. (See page 36.)
SHUTTER SPEED;
Press to increase the shutter speed to record a
fast-moving subject, such as a golf or tennis
swing, clearly. (See page 38.)
BACK LIGHT;
Press when a subject appears dark against a
bright background. (See page 40.)
FOCUS;
Press to set the camcorder in the manual
focusing mode.
Once the focus Is adjusted manually, the
setting is locked. (See page 34.)
Even If you open the AUTO LOCK cover
The setting of each button is the same as the
automatic.adjustment unit! you change it.
• Even when you set POWER to OFF, the previous
settings are retained. They are cancelled if the
power source is disconnected.
• If you close the AUTO LOCK cover after you have
made manual adjustment and then open it again,
the settings for manual adjustment will be recalled.
32
33
Page 17

Manual Focusing
When you close the AUTO LOCK covei, Ihe
autofocusing (unctions and you can easily pet
a focused picture under most shooting
conditions. But manual focusing is
recommended in the following cases.
|a] to II] correspond to the illustrations. (H-1)
[a] Insufficient light
(bj Too much brightness behind the subject
|c] Subject with little contrast—wall, sky, etc.
Id] One subject is close; the other Is in the
center, but at a distance
[a] Subjects beyond nets, etc., or another
subject passes in front of the camcorder
m HorvzOTtal stripes
Jg] Subject through frosted glass
|h) Bright subject or subject reflecting light
[i] High contrast behirtd the subject (the
background may be focused)
[j| Under the following circumstances
• When using conversion lenses of effect
filters
• When shooting a stationary subject using
a tripod
• To save battery wear
Autofocusing does not function momenlarlfy when:
• The setting of the shutter speed Is changed.
• Back light is adjusted manually.
• Lighting conditions change quickly.
• Zooming is dor>e from wide-range to
telephoto.
This camcorder keeps in focus by referring to
the picture contrast, which is weak in the
above situations.
Focusing Manually
(H-2)
1 Slide open the AUTO LOCK cover.
2 Press FOCUS.
Make sure that the autofocus frame goes
off in the viewfinder.
3 Turn the manual zoom lever fully to the
telephoto position.
4 Turn the focus ring to achieve sheip locus.
5 Set the desired shot length using the
manual zoom lever.
Some helpful hints
• When shooting in relatively dark places such
as indoors, the depth of field in proper focus
is very shallow. For best results, shoot at
wide angles after focusing in telephoto.
• When shooting a scene with lots of
movement in bright light, set the zoom lever
to the wide-angle position and the focus ring
to 2m.
34
35
Page 18

When ,0h close the AUTO LOCK ewer, the
(Ml
auto ie balance tunetion ol this
adjusts the picture to natural colors un*r
most shooting conditions, Howe«r, in the
conditions listed below, adlust the white
isalance manually
|a] 10 [e] correspond to the illustrations (1-1)
Condtttons
Ughting condii'
quick ty
Too Bright, such as
photograph studios
Monochromatic suBject
|cl
bacKground
I Under sodium larnf^
¡Under mercury lamp
lender a color matching
tiuorescenl lamp_______
^co’romg. • a sunseUsutrrise
* . after sunset
change
___
____
the viewfinder
In
«■a
iperalure (K)
Tow ~
am
1 Slide open the AUTO LOCK cover.
2 Select the desired white balance modi
pressing WHT BAL
fcach time you press the buttori, the
indication changes as follows.
No indication (auto) -* HOLD -»
What is the HOLD mode?
The HOLD mode allows you to tiUn in natuiai
color by keeping light sources at a certain
color
temperature, initially the camcorder is in
auto mode and is set to the appropriate white
balance. When you set the camcorder to the
HOLD mode, it will hold thal temperature even
if you record subjects with different light
sources. You can record subject with natural
colors without being affected by surroundings.
To set the HOLD mode
1 Close the AUTO LOCK cover.
The white balance will be set to the
aulomaflc mode.
2 Point at a white, (tat object such as a
while wall or paper for about IS seconds.
3 Press WHT BAL to display the HOLD mark
in the vtewtWxler.
When you change the battery pack or when
the light source is changed, follow this
procedure again.
Color Temperature and White Balance
(1-3)
The color temperature indicates a property of
light ar>d is measured in K (Kelvin). It increases
as the light source gets bluer ar»d decreases
as the light source gets redder 11 has no direct
relationship with brightness.
The camcorder automatically adjusts the white
balance within the range shown below,
36
37
Page 19

When a (ast-moving subject is recorded at
normal shutter speed, it may not be seen
clearly when played back In the pause mode
(still picture). This can be improved by
increasing the shutter speed. Six shutter
speeds can be selected:t/60
(normal speed). 1/100, 1/250, 1/1000, 1/2000 or
1/4(XX) of a second- (J-1)
When recording at a high speed shutter setting, record In a brighter place than usual.
Also, the depth of field in proper focus
becomes shallow at a higher shutter speed.
This is effective to record the main subject in
sharp focus and the surroundings out of locus.
Recommeixtod setting for your situation
Choose an appropriate shutter speed according
to the situation, referring to the chart for
examples.
Example use
On clear days, recording a (
or tennis swing (To view the hit 1/4IXX)
ball clearly in the still picture
mode, set to 1/4000) 1/2000
■ Recording skiers
On overcast days, recording
moving merry-go-round or roller 1/1000
coaster
■ Recording outdoors from inside 1/250
a vehicle (lor stable shooting)
' Instead of the ND2 filter (To
reduce the exposure level lo
about a half)
' Recording indoor sports (for
stable shooting)
When piaying back the picture recorded at certain speeds
Use 8mm video equipment with the clean still
function lo obtain a noiseless stilt picture.
Selecting the Shutter Speed
(J-2)
1 Slide open the AITTO LOCK cover. 2 Press SHUTTER SPEED repeatedly untH the
desired shutter speed indication appears.
Each lime you press the button, the
indication changes as follows.
No indication (1/60) -«■ 100(1/100) -* * 250(1/250)
t i
4000(1/4000) - 2000(1/2000) 1000(1/1000)
Notes
« When you select a shutter speed 1/250 or faster,
record under sunlight or use a video light.
• When you record a TV screen with certain
shutter speeds, the brightness of the recorded
picture may vary.
• When you shoot a very bright subject at a faster
shutter speed, a vertical light, belt-lIKe line
(smear) may appear on the screen.
• When you record at certain shutter speeds under
a light discharges tube, such as a fluorescent
lamp, sodium lamp, or mercury lamp, the
brightness of the recorded picture may vary
(causing the picture to flicker).
38
39
Page 20

In this camcorder, the ejsposure is
au\omaVicatty cor^Uotted. However. i1 the hght
source is behind the subject, use BACK LIGHT
(K-1)
1 Slide open llte AUTO LOCK cover. 2 Press BACK LIGHT.
The EJ indication appears in the viewlmder,
Aher shooting
Be sure to release this adjustrrpent settit^g by
pressing BACK LIGHT again.
(The 13 indication goes out.)
Otherwise, the lecorded picture will be loo
bright.
Zooming
(L-t)
The size of the subject in the screen can be
changed. Use “zoom-in" for dramatic close-ups.
Use “zcx5m-our for panoramic long shots. Also
use zooming to focus manually or to decide
the shooting angle. (L-1)
— for smooth and constant zooming (L<2)
Press the T side of the power zoom button for
telephoto (subject appears closer) and the W
side lor wide-angle (subject appears farther
away).
Zooming Manually
— for creating a dramatic effect (L-3)
Turn the manual zoom lever upward for
telephoto and downward for wide-angle.
Focal length of thfs camcorder
The focal length is 8.5 mm to 68 mm (1/3 to 2
3/4 irrches). This means apprcwimaleiy 46 mm
to 368 mm (1 13/16 to 14 1/2 inches) when
converted info the focal length of a 35-mm
camera.
For more zooming effect
Use an optional conversion lens 'VCL-0637 or
VCL-1437.
If you use a 46 mm conversion lens, attach it
using the supplied stH)-up-ring. Auto focus,
however will not functloh in that case For
details, consult your Sony dealer.
When shooting with airto focusing
When you set the zoom lever to the wide angle
position, the focus ring will be fixed arour>d the
2 m position and may not exactly match the
actual object-to-camera distance.
40
41
Page 21

Cl0M>Up (Macro)
Even tiny subjects, such as flowers, insects,
and photographs, can literally fill the screen.
(M-1)
1 Turn the zoom lever to the MACRO
position, pressing the green macro set
button.
2 Bring the camcorder as close as necessary
to obtain the desired size ol Image.
The subject can be as close as a minimum
of 10 mm (7/16 in.) from the lens surface.
3 Turn the zoom lever within the MACRO
rartge to focus sharply.
In the MACHO range, auto-focusing does not
function.
holes
• When shooting in macro, the depth of field is
very shallow. So pay attention to focusing. To
keep the subject in focus, use a tripod,
• II the subject Is closer than 10 mm (7/16 In.), It
cannot be brought Into focus.
(N-1)
I FADE IN I
Fade-In and Fade-out
When fading-in, the picture will gradually
appear from a black screen. The sound will
also gradually increase.
When fading-out, the picture will gradually
disappear to a black screen. The sound will
also gradually decrease.
This function will give your recording a
professional appearance. (N-1)
1 Slide STANDBY up to set the camcorder In
the standby mode.
2 Press FADER.
The "FADER" indication appears In the
viewfinder.
3 Press STARTfSTOP.
Fade-in is performed and then recording
will start.
1 While recording, press FADER.
The "FADER" indication appears in the
viewfinder.
2 Press START/STOP to stop the recording.
Fade-out is performed and then recording
stops.
To cancel the tade-ln/fade-out function before
ft Is perfonned
Press FADER again before pressing
START/STOP.
If you want to use the fade ln/lade-out function
repeatedly
Start from step 1 each lime.
42
43
Page 22

’l'’ fi. .1^
YOU can sut)enmpose your own hand-lettered
message or illuslrahon over the picture during
recording. (0-1)
• One title can be stored
• The color of the title can be selected from 8
colors.
To make a desired title card, use a plain, white
card and write a title using a dark color arvd
thick lines.
Before recording, store the title or illustration.
(0-2)
.VÍ
Make sure that the lithium battery is installed.
'
1 White pressing the green button, set
POWER to CAMERA.
2 Slide STANOev up to set the camcorder In
the standby mode.
3 Point the camcorder to the ffite card and
adjust the focus.
To focus the subject, use the close-up
function if necessary.
4 Press MEMORY to store the title.
5 Press COLOR/MODE aivl setoct the tHte
cofor.
Each time you press the button the
indication changes as follows.
WHT (while) -» BLUE - CRN (green) -* CYAN
t ;
BLK (black) — YEL (yellow) — VIO (viole)) •- REO
(0-3)
1 During recording, press SUPERIMPOSE at
the point from which you want to insert the
title.
The title is displayed. During recording, the
title is recorded,
2 Weft for a white and at the point you went
to him oft the title, press SUPERIMPOSE
again
The title goes out.
When recording the fffte at the begknlng
We recommend the following method:
1 Set the camcorder In the standby mode.
2 Press SUPERIMPOSE.
3 start recording wi
viewfinder.
4 We« tor a white and at tfw point you want
to turn oti the tRte, press SUPERIMPO^
About the color indication
• The color indication in the viewfinder is not
recorded.
• You can change the title color by pressing
COLOR/MODE even after displaying the title.
) title displayed in the
6 Press SUPERIMPOSE to turn ofl the title.
To check the title
Press SUPERIMPOSE in the standby mode.
To turn off the title, press the button again.
About memory back up
The camcorder uses a lithium battery (located
on the bolfom of the unit) to keep the fifte in
memory. On lithium battery Ofe. see page 20.
44
45
Page 23

SlJi-i.
Various Display Modes of the Title
Display mode
Scrollirtg up the title (0-4)
The litle scrolls up.
Reversing the title with Ihe picture
(0-5)
SereUing up the reversed title (0-6)
Normal display mode
Selecting the display mode
Before displaying the title, press COLOR/MODE
until the indication of the mode you want
appears. (0*7)
After selecting the mode
Follow the procedure on page 45 to
superimpose the title on the picture in that
mode.
Indication In
the viewfinder
BY
No indication
Function of the COLOftfMOOE button
This button has a double function: one is to
select the title color and Ihe other is to select
the title display mode. Its function depends on
t
D
whether Ihe title is displayed or not. (0*8)
To select the color
1 Press SUPERIMPOSE to display the title. 2 Press COLOR/MODE
Each time you press the button, the color
indication changes as follows.
WHT (while) — BLUE - CRN (green) — CYAN
BLK (Black) — YEL (yellow) •- VIO (violet) — RED
1 If the tftte Is displayed, press
SUPERIMPOSE so that the title disappears.
2 Press COLOR/MODE
Each time you press the button, the mode
indication changs as follows.
No indication (no title mode) t -• B-» Dt
t: Title scroll up mode
B: Title reverse mode
Bt: Title reverse and scroll up mode
t
COLOR/MODE
f
I
Ъ
46
47
Page 24

To view the playback pictufe on the TV screen,
the camcorder and the TV and /or VCR must
be connected properly. Check the following
connecting examples and go to the appropriate
section to make the connections required.
We recommend use of the AC power adaptor
as a power source.
48
Page 25

: Signal flow
CbtMlttttBn tor MaybMk
Type 2: Connecting to a TV without
Video/Audio Input Jacks
Connecting the camcorder, the RFU adaptor
(RFU-90 UC, supplied), and the TV.
1 Connect the RFU adaptor to the camcorder.
2 Connect the VHF/UHF antenna to the RFU
3 Connect the RFU adaptor to the TV.
4 Set the INPUT/OUTPUT selector on the
camcorder to OUTPUT.
Selection of the TV channel to monitor the
camcorder playback.
1 Set the RF unit selector on the RFU
adaptor to either channel 3 or 4, whichever
is not actWe in your area.
2 Select the same channel on the TV.
Whenever playing back a tape, be sure to set
the TV to the channel that you have selected
in step 2.
Note
With this connection, the sound wilt be in
monaural.
Type 3: Connection to a TV via a VCR
with an Input Selector
(P-4)
1 Connect the camcorder to the VCR using
the supplied AV conneclirtg cable.
• If your VCR is a monaural type, connect
only the white plug for audio both on the
camcorder and the TV. Do not use the
red plugs.
• You will have stereo sound if your TV
and VTR are stereo, however If one Is
monaural the sound will be monaural.
2 Set the INPirr/OUTPUT selector on the
camcorder to OUTPUT.
3 Set the input selector on the VCR to LINE
eitd set the TVrVTR selector on the TV to
VTR.
50
51
Page 26

Playing Back a Tape
Turn on the TV, and select the channel for
viewing a playback picture (set the TV/VTR
selector to VTR).
(0-1)
While pressing the green button, set the
1
POWER switch to VTR.
2 Insert a tape. 3 Press l> .
Playback starts.
To view a still picture
Press ;; during playback.
To resume playback, press II
To stop playback
Press L).
To rewind the tape
Press -44
To advance the tape rapidly
Press
Note
Streaks will appear a
still picture mode.
Ptayfeig iMk • Tapt
Monitoring a High-Speed Picture
Durirtg playback—Picture search
1 In
The picture will be nronliored at high speed
as long as -44 or Is kept pressed.
2 Reteasa ^ or »» at the desired point.
Normal playback will resume
During fast-forwaid or rewind - Skip scan
1 In the fast-lorwent or rewind mode, preea
or .
The picture Is monitored as long as ^4 or
Is kept pressed.
2 Release 44 or lo resume the rwymal
fasl-lorward or rewind mode.
Notes
• II you move the position of POWER during
piayOactr. the tape will slop When you move
POWER to CAMERA In the playback pause
mode, however, the camcorder will enter
recording pause mode
• When the pause mode !?sls lor 5 minutes or
more, the camcorder will aulomaiica"v enter the
52
53
Page 27

Page 28

You can creale your own video program by
editing with any other 0 8 mm, FD Betamax
or VMS VHS VCR.
You can record a tape from another VCR or a
TV program from the TV equipped with
audio/video outputs. (T-1)
♦ Make conr>ections using the supplied
audio/video connecting cable. (S-1)
• Set the input selector of the VCR to LINE, If
available.
1 Insert a tape to be recorded on Into the
recording VCR.
2 Move EDIT on the camcorder In the
direction of the amm. (EDIT ON)
3 Set INPUTfOUTPUT to OUTPUT.
4 Set POWER of the camcorder to VTR aiKf
insert your recorded tape.
5 Playback the tape on the camcorder and
locate the point where you want to start
editing and set the camcorder to the
playback pause mode.
6 On the recording VCR, locate the recording
start point and set the VCR to the recording
pause mode.
7 Press on b
start edith>g.
To stop editing momentarffy
Press 'I on the recording VCR.
To edit more scenes
Repeat steps 5 to 7.
To stop editing
Press n on both units.
Use ot the EDIT switch
When you set EDIT to the direction of the
arrow (EDIT ON), picture deterioration resulting
from editing can be kept to the minimum.
Notes
• Avoid using the edileo (ape (or muKipfe
generations of editing.
♦ Ader edi(ing, move EDIT in the opposite direction
of the arrow (EDIT OFF).
5 simultaneously to
* •
56
• Disconnect the RFU adaptor from the
camcorder it it is connected.
• Make connections using the supplied
audio/video connecting cable.
• Read the instruction manual of the other
equipment to be connected.
If your VCR Of TV is a monaural type, connect
only the white plug tor audio both on the
camcorder and the VCR or TV. Do not use the
red plugs.
1 Turn on the TV or VCR.
2 Select the TV program or play beck the
tape to be recorded.
3 Set 1NPUT/OUTPUT to INPUT.
4 While pres^ng the green button, set the
POWER on the camcorder to VTR.
5 Irrsert a tape and slide # REC.
Recording starts.
You can monitor the picture being recorded
in the viewfinder screen.
57
Page 29

Insari Recording
You can insert a new scene from a VCR or the
TV onto your originally recorded tape. (U-1)
Before You Begin
• Connection is the same as in "Recording
from a TV or Another VCR."
• Set the VCR in the playback pause mode at
the beginning of the desired scene.
1 Set POWER of the camcorder to VTR artd
display the counter in the display window.
2 Locate the point where the Imert shouid
end by pressirtg ^4 or during playback.
The viewfinder screen shows a high-speed
playback piclura.
3 At the end point, press RESET.
The counter is reset to "0:0000."
4 Locate the point where the insert should
start
5 At the start point, set the camcorder into
recording pause mode.
6 Press ZERO MEM.
The end point of the insert is stored in
memory.
7 Press :: on both units to start insert
recording.
You can monitor the picture to be inserted
in the viewfinder screen.
The insert recording will slop automatically near
the zero point on the counter.
To change the end point
Press ZERO MEM so that the ZERO MEMO
indicator disappears, and repeat from step 2.
Hints for Better Shooting
Shooting Stable Pictures
Assume a good posture for shooting (V-1)
For hand held shots, it vs important to hotd the
camcorder properly.
• Hold the camcorder firmly and secure it with
the grip strap so that you can easily
manipulate the camcorder with your thumb.
• Place your right elbow against your side.
• Place your left hand under the camcorder to
support it. When adjusting the focus
manually, make sure the camcorder does not
rrove.
• Place your eye firmly against the viewfinder
eyecup.
Use a trtpod
If you have a tripod lor still camera, it can also
be used with the camcorder. If a tripod is not
available, try placing the camcorder on a fable
top or any other flal surface of suitable height.
Keep the horizontal plane level (V-2)
The horizontal plane can be easily determined
by using the viewfinder frame as a reference.
Planning Beforehand
If you are going to edit the tape after recording
Shoot the scene a little longer to make the
editing easier.
If you are not going to edit the tape after
recording
First record a title and then use the
START/STOP button to make a smooth
recording.
58
59
Page 30

Notes and Precautions
(W-1)
Shoot with the sun behind you
When the light source is behind the subject, or
in the following situations, the subject will looK
dark and the background will look light in the
recording.
• The subject is indoors and there is a window
behind the subject.
• Bright source such as fluorescent or
incandescent lamps are Included In the scene.
• You are shooting a person wearing white or
shiny clothes in front ot a white background.
In this case, the face will look dark in the
recording.
Use video Ughl tn the dark
To get the best colors, a sufficient light level
must be maintained. Photography lamps oi
halogen lamps are recommended. For best
result, use ot Sony video lights are
recommended because of their weight and low
heal output levels. When using a video light,
attach it to this camcorder with a video light
attachment (not supplied )
High heat from light can warp the casing. Do
not let light shine on the camcorder. Be
especially careful when you are using a video
light attachment.
Do not place your lace or hair loo dose to the
light during low-position shooting (page 26). For
detailed instructions on proper use of light,
read its instruction manual.
Using the following chart as a reference, take a
few minutes to familiarize yourself with
brightness levels to improve your recording
technique.
Snow-covered mountains
rteWs
Sandy beacii. cleai day in
Clear day, nrld day (lOO.OOOlui.
Clear day, mid-afternoon (35,000)
Overca&t day. mid-day (32,00ф
Overcast day, one trour atte*
sunrise (2,CW
onice III by fluorescent ismpe.
neat window (1.000)
Clear day, one hour before
Sunset (1.000)
Oepartment siore counw
(500-700)
Siatioi' wicket (650)
Office lit by Muorescent lamps
(400 500)
Room m by two SOW Muorescent
lamps (300)
Subway station platlonn (300)
Arcsde al mow OSO-200)
60
Moisture Condensation
It the camcorder is brought directly from a cold
place to a warm place, moisture may condense
inside the camcorder, on the surface of the
tape, or on the lens In this condition, the tape
may stick to the head drum and be damaged
or the camccifder may not operate correctly. To
prevent possible damage under these
circumstances, the camcorder Is furnished with
moisture sensor. However, take the following
precautions.
If molstuie condenses inside the unit (W-1)
Moisture is present inside the camcorder when
the IS indication in the viewfinder blinks, it
indica1i(3fi also blinks when the cassette is
inserted. In this case, no function except for
tape ejection will work.
Eject the tape, turn off the camcorder, and
leave it with the cassette holder open for about
1 hour.
The camcorder can be used again if the IS
indication does not appear when the power is
turned on again.
If moisture condenses on the surface ot the tape (W-2)
If moisture is present on the surface of the
tape when the tape is inserted and a tape
transport button (L>. etc.) is pressed, the
— irKfication blinks inside the viewfinder. In
such case, no function except for tape ejection
will work.
Eject the tape and let it sit for about 1 hour.
The tape can be used again if the ± indication
does not appear when the tape is inserted and
a tape transport button is pressed.
If moisture condenses on the lens
No Indications will appear, but the picture
becomes dim. Turn off the power and leave the
camrxjrcier unused for about 1 hour.
61
Page 31

To ensure clear picture, clean the video heads
periodically.
When playback pictures are no'sy or hardly
visible the video heads may be contaminated.
(W-3)’
(a] Slight contamination
(b] Critical contamination
In such cases,
1 Clean the video heads with the Sony
V8-25CLH cleaning cassette (not supplied),
reterrtng to Hs Inslnicttons.
2 After cteanteg. check W the pWwe Is clear
by recording or playing bock with an
ordinary tape.
3 If the picture I» Ml" r»>i«y. tW"'
(Do not repeat cleaning more than 5 times.)
Caution
Do not use a commercially available wet-type
cleaning cassette. W may damage the video
If the V8-25CI.H clearing cassette ts not available li
yoiii area, consult youi Sony service (acikty.
On operation
• Operate the camcorder an 6.0 V (battery
pack). 7.5 V (AC power adaptor), 9.0 V
(alkaline batteries).
For DC Of AC operation, use the accessories
recommerided in this manual.
• Should ar>y solid object or liquid fall into the
casing, unplug the camcorder arxJ leave if
checked by qualified personnel before
Operating it any further,
• Do not hold the camcorder by the viewfinder.
• Avoid rough handling or mechanical shock
Be partlcutariy careful of the lens,
• Keep the lens cap on fhe lens when not
using the camera.
• Do not wrap (he carTwiwder and operate it
because heal may built up internally.
• Keep the camcorder away from strong
magnetic field or mechanical vibration.
• Do not put the camcorder on the sand.
On cam
• When the unit will not be used for a tong
time, disconnect the power source and
remove the tape. Periodically turn on the
power, operate fhe camera section and
player section, and play back a tape for
about 3 minutes.
• Clean the lens with a soft brush to remove
dust. If there are fingerprints on if, wipe
them off with a soft doth.
Clean the camcorder body with a dry. soft
cloth, or a soft clofh lightly mcisfened with a
mild detergent solution. Do not use any type of
solvent which may damage fhe finish.
Telawfaipn pfogrww, Wma, vidae tap«», «tá putar
«toy t» copyrtghtoii iMmithortoto
of wtch materlaiB may ba cofttnvy’lo
fhe proitetort of tha eopyrlQM lawt.
62
63
Page 32

Page 33

Trouble Check
If any difficulty should arise during operation, go through the following table. Should the difficulty
persist, unplug the unit and contact your Sony dealer or local authorized facility.
Power
Operation
Picture
Symptont
The power will not turn on.
The power turns off • While being operated in the
The battery pack is quickly
discharged.
START/STOP does not
operate.
The cassette cannot be
removed from the
compartment.
No function except tor
cassette ejection works.
The tape does not move
when a tape transport
button is pressed
The auto focusing tunction
does not work
The image on the
viewfinder screen is not
A vertical band appears
when a subject such as
lights or candle flame is
shot against a dark
background.
The color of the playback Shooting cor>dilions were not
The playback picture is
not clear.
CwtM Wee*»—
• The battery is not attached.
• The battery is exhausted.
• The AC power adaptor is not
connected to a wall outlet.
CAMERA mode, the recorder
has been in the pause mode
for more than 5 minutes.
• The battery is exhausted.
• The ambient temperature is
too low.
• The battery pack has not been
charged fully.
• The tape is affixed to the
• The tape is at its end.
• POWER is set to VTR.
• The tab on the cassette is out
(red).
The battery is exhausted. Use the charged battery or the
Moisture condensation has
occurred. (See page 61.)
• POWER is set to CAMERA or
OFF.
• The tape is at its end.
Shooting condition were not
suitable for auto focusing
operation. (See page 34.)
The AUTO LOCK cover is not
closed perfectly.
The viewfinder lens is not
adjusted.
The contrast between the
subject and background Is too
high; the camcorder is not
malfunctioning.
suitable for white balance
operat’on when It was recorded.
(See page 36.)
• EDIT Is set in the direction of
the arrow.
• The channel for the VCR is
not adjusted on the TV.
The video heads may be
contaminated.
• Attach the battery.
• Use a charged battery.
• Connect the adaptor to a wall
• Turn STANDBY to LOCK once
and turn it to STANDBY again.
• Use a charged battery.
• Charge the battery pack again
• Remove the cassette with the
cassette eject button.
• Rewind the tape or use a new
• Set it to CAMERA.
• Use a new cassette or slide
the tab.
AC power adaptor.
Remove the cassette and do not
use the unit for about an hour.
• Set it to VTR.
• Rewind the tape or use a new
Open the AUTO LOCK cover and
press FOCUS to adjust the focus
manually.
Adjust the viewfinder lens.
~
When recording, set the white
balance adjustment (auto or
manual) according to the light
condition. (See page 36.)
• Set EDIT in the reverse
direction of the arrow.
• Adjust the TV.
Clean the heads using the Sony
V8-25CLH video head cleaning
cassette. (See page 62.) If the
V8-25CLH cleaning cassette is
not available in your area, have
the heads cleaned at the nearest
Sony service facility.
66
Sound
Ottion
tmnrtinr I I rrotmam
No sound or only a low
sound is heard when
playing back a tape.
Excessive high-pitched
sound is heard.
• Recording on another
tape is Impossible.
• Recording a TV program
or recording from
another tape is
There is dust inside the
viewfinder.
--------------------------------------------
The stereo tape is played back |
with the camcorder set to "HI FI
SOUND Q or [3l
The picture has been recorded
with BUILT-IN MIC set to
. The INPUT/OUTPUT selecfor
switch Is set to INPUT.
• The INPUTfOUTPUT selector
switch Is set to OUTPUT.
-
Set the switch to (jreen
position."
When there is no wind, set the
switch to the green position.
. Set to OUTPUT.
. Set to INPUT.
Pull out the viewfinder and clean
the viewfinder screen cover or
viewfinder lens. (See page 12.)
1
67
Page 34

J fast blint'lng P ] slow blinking
Display In tha viawllndar seraan
and caution lamp
tSJ and Battery lamp
cn and Battery lamp
ffla and Battery lamp
DO, — and battery lamp
PH
№ and —
SI. ± and DEW lamp
i and DEW lamp
Q and Caution lamp
A and Caution lamp
AM 12 00 00 blinks (O'
6 seconds alipr selling
POWER to CAMERA
7he currenl lime blinks
lor 5 seconds alter
selling POWER to
CAMERA
Cause Correcllve action
The battery Is weak. Prepare a charged one
The battery Is used up. Use a charged battery
The tape is near its end. Prepare a new one.
The tape ts at its end. Use a new tape.
No tape Is Inserted.
The tab on the tape is out (red). Slide the tab back or use a new
Moisture condensation has
occurred.
Moisture condensed on the tape.
The gap ot the head is clogged.
Other trouble may occur.
The lithium battery is
installed
The lithium battery is
exhausted
Remove the (ape and do rro(
operate the camcorder for about 1
Remove the tape and do not
operate the camcorder lor about 1
Clean the head using the Sony
V8 25CLH cleaning (ape.
Turn off the camcorder and
remove the battery. Then attach
the battery again II the lamp still
blinks, consutl your nearest Sony
dealer.
Correcllve action
Inside the VietMfinder
(X-1)
Q BACK LIGHT is pressed.
fT) White balance mode (ifc I -■* - /HOLD)
[Tl Title mode
[4] Shutter speed
[U FADER is pressed.
[§] “Replace battery.”
[~7] Moisture condensation.
fsl Auto focus adjusting range
Goes out during manual focusktg
Showrs up durtng recording.
When bllnicing: “Replace battery.”
In the MACRO range
fTT| Tape transport and camera recording mode
Tape counter
[13} ZERO MEM is pressed.
“Exchattge tape."
[1^ “Clean video heads." or other caution (Q, —)
[iel Date or time
68
69
Page 35

wewri
(X-2)
¡T] Tape counter
[2] ZERO MEM Is pressed.
(D Date or time/tape counter
AM QQ*
mi'pM OOn
Bi
70
 Loading...