

Sony BDV-N990W,BDV-N890W,BDV-N790W Quick Setup Manual
Quick Setup Guide/
ﻊﯾﴎ یزاﺪﻧا هار یﻨﻫار
ﺪﯿﻨﮐ ﻞﺼﺘﻣ ار ﺎﻫﻮﮔﺪﻨﻠﺑ
.ﺪﯿﻨﮐ ﻞﺼﺘﻣ هﺎﮕﺘﺳد SPEAKERS یﺎﻫ ﺶﯿﻓ ﮓﻧر ﺎﺑ ﺐﺳﺎﻨﺘﻣ ار ﻮﮔﺪﻨﻠﺑ یﺎﻫ ﻢﯿﺳ
ﯽﻠﺻا هﺎﮕﺘﺳد ﯽﺘﺸﭘ ﻪﺤﻔﺻ
SPEAKERS
ﺰﻣﺮﻗ
ﺪﯿﻔﺳ
ﺰﺒﺳ
ﺶﻔﻨﺑ
ﺮﯿﮔاﺮﻓ هﺪﻨﻨﮐ ﺖﯾﻮﻘﺗ ﯽﺘﺸﭘ ﻪﺤﻔﺻ
ﯽﺑآ
یﱰﺴﮐﺎﺧ
ﺪﯿﻨﮐ ﻞﺼﺘﻣ ار دﻮﺧ نﻮﯾﺰﯾﻮﻠﺗ
.ﺪﯿﻨﮐ ﻪﻌﺟاﺮﻣ ﯽﺗﺎﯿﻠﻤﻋ یﺎﻫ ﻞﻤﻌﻟا رﻮﺘﺳد ﻪﺑ ﺎﻫ لﺎﺼﺗا ﺮﯾﺎﺳ یاﺮﺑ .ﺪﯿﻨﮐ ﻞﺼﺘﻣ
1
*HDMI ﻞﺑﺎﮐ زا هدﺎﻔﺘﺳا ﺎﺑ ار نﻮﯾﺰﯾﻮﻠﺗ و ﻢﺘﺴﯿﺳ ﻪﮐ ﻢﯿﻨﮐ ﯽﻣ ﻪﯿﺻﻮﺗ
نﻮﯾﺰﯾﻮﻠﺗ
1
*HDMI ﻞﺑﺎﮐ
2
*
لﺎﺘﯿﺠﯾد یرﻮﻧ ﻢﯿﺳ
Audio Return Channel (ARC)
دﺮﮑﻠﻤﻋ ﺎﺑ نﻮﯾﺰﯾﻮﻠﺗ
HDMI
ﺶﯿﻓ ﺮﮔا
ﻦﯾا ﻖﯾﺮﻃ زا نﻮﯾﺰﯾﻮﻠﺗ یاﺪﺻ زا و ﺪﯿﻨﮐ راﺮﻗﺮﺑ ار لﺎﺼﺗا ﻦﯾا ،ﺖﺴﯿﻧ رﺎﮔزﺎﺳ
.ﺪﯾﱪﺑ تﺬﻟ ﻢﺘﺴﯿﺳ
ﯽﻠﺻا هﺎﮕﺘﺳد ﯽﺘﺸﭘ ﺖﻤﺴﻗ
و ﺪﻨﻠﯾﺎﺗ ،رﻮﭘﺎﮕﻨﺳ ،ﻪﻧﺎﯿﻣ روﺎﺧ ،ﺪﻨﻫ یﺎﻫ لﺪﻣ یاﺮﺑ ﻂﻘﻓ ﺖﻋﴎ ﺮﭘ HDMI ﻞﺑﺎﮐ 1*
.ﺖﺳا هﺪﺷ ﻪﺋارا ناﻮﯾﺎﺗ
.ﺖﺴﯿﻧ ﻪﻤﯿﻤﺿ 2*
Note
"TV" ﺎﺗ ﺪﯿﻫد رﺎﺸﻓ ًارﺮﮑﻣ ار FUNCTION ،نﻮﯾﺰﯾﻮﻠﺗ یاﺪﺻ زا ندﺮﺑ تﺬﻟ یاﺮﺑ ˎ
.دﻮﺷ بﺎﺨﺘﻧا
.ﺪﯿﻨﮐ ﻪﻌﺟاﺮﻣ ﯽﺗﺎﯿﻠﻤﻋ یﺎﻫ ﻞﻤﻌﻟا رﻮﺘﺳد ﻪﺑ ،تﺎﯿﺋﺰﺟ زا عﻼﻃا یاﺮﺑ
دراد ﻪﻣادا
.ﺖﺳا هﺪﺷ هدﺎﻔﺘﺳا نآ زا ﺮﯾوﺎﺼﺗ ﺶﯾﺎ یاﺮﺑ ﻂﻘﻓ ﻪﮐ ﺖﺳا ﯽﻟﺪﻣ BDV-N990W
ﯽﻠﺻا هﺎﮕﺘﺳد
ﺮﯿﮔاﺮﻓ هﺪﻨﻨﮐ ﺖﯾﻮﻘﺗ
BDV-N990W/N890W/N790W
©2012 Sony Corporation Printed in Malaysia
(1)
4-418-162-51(1)
For details, refer to the Operating Instructions.
1
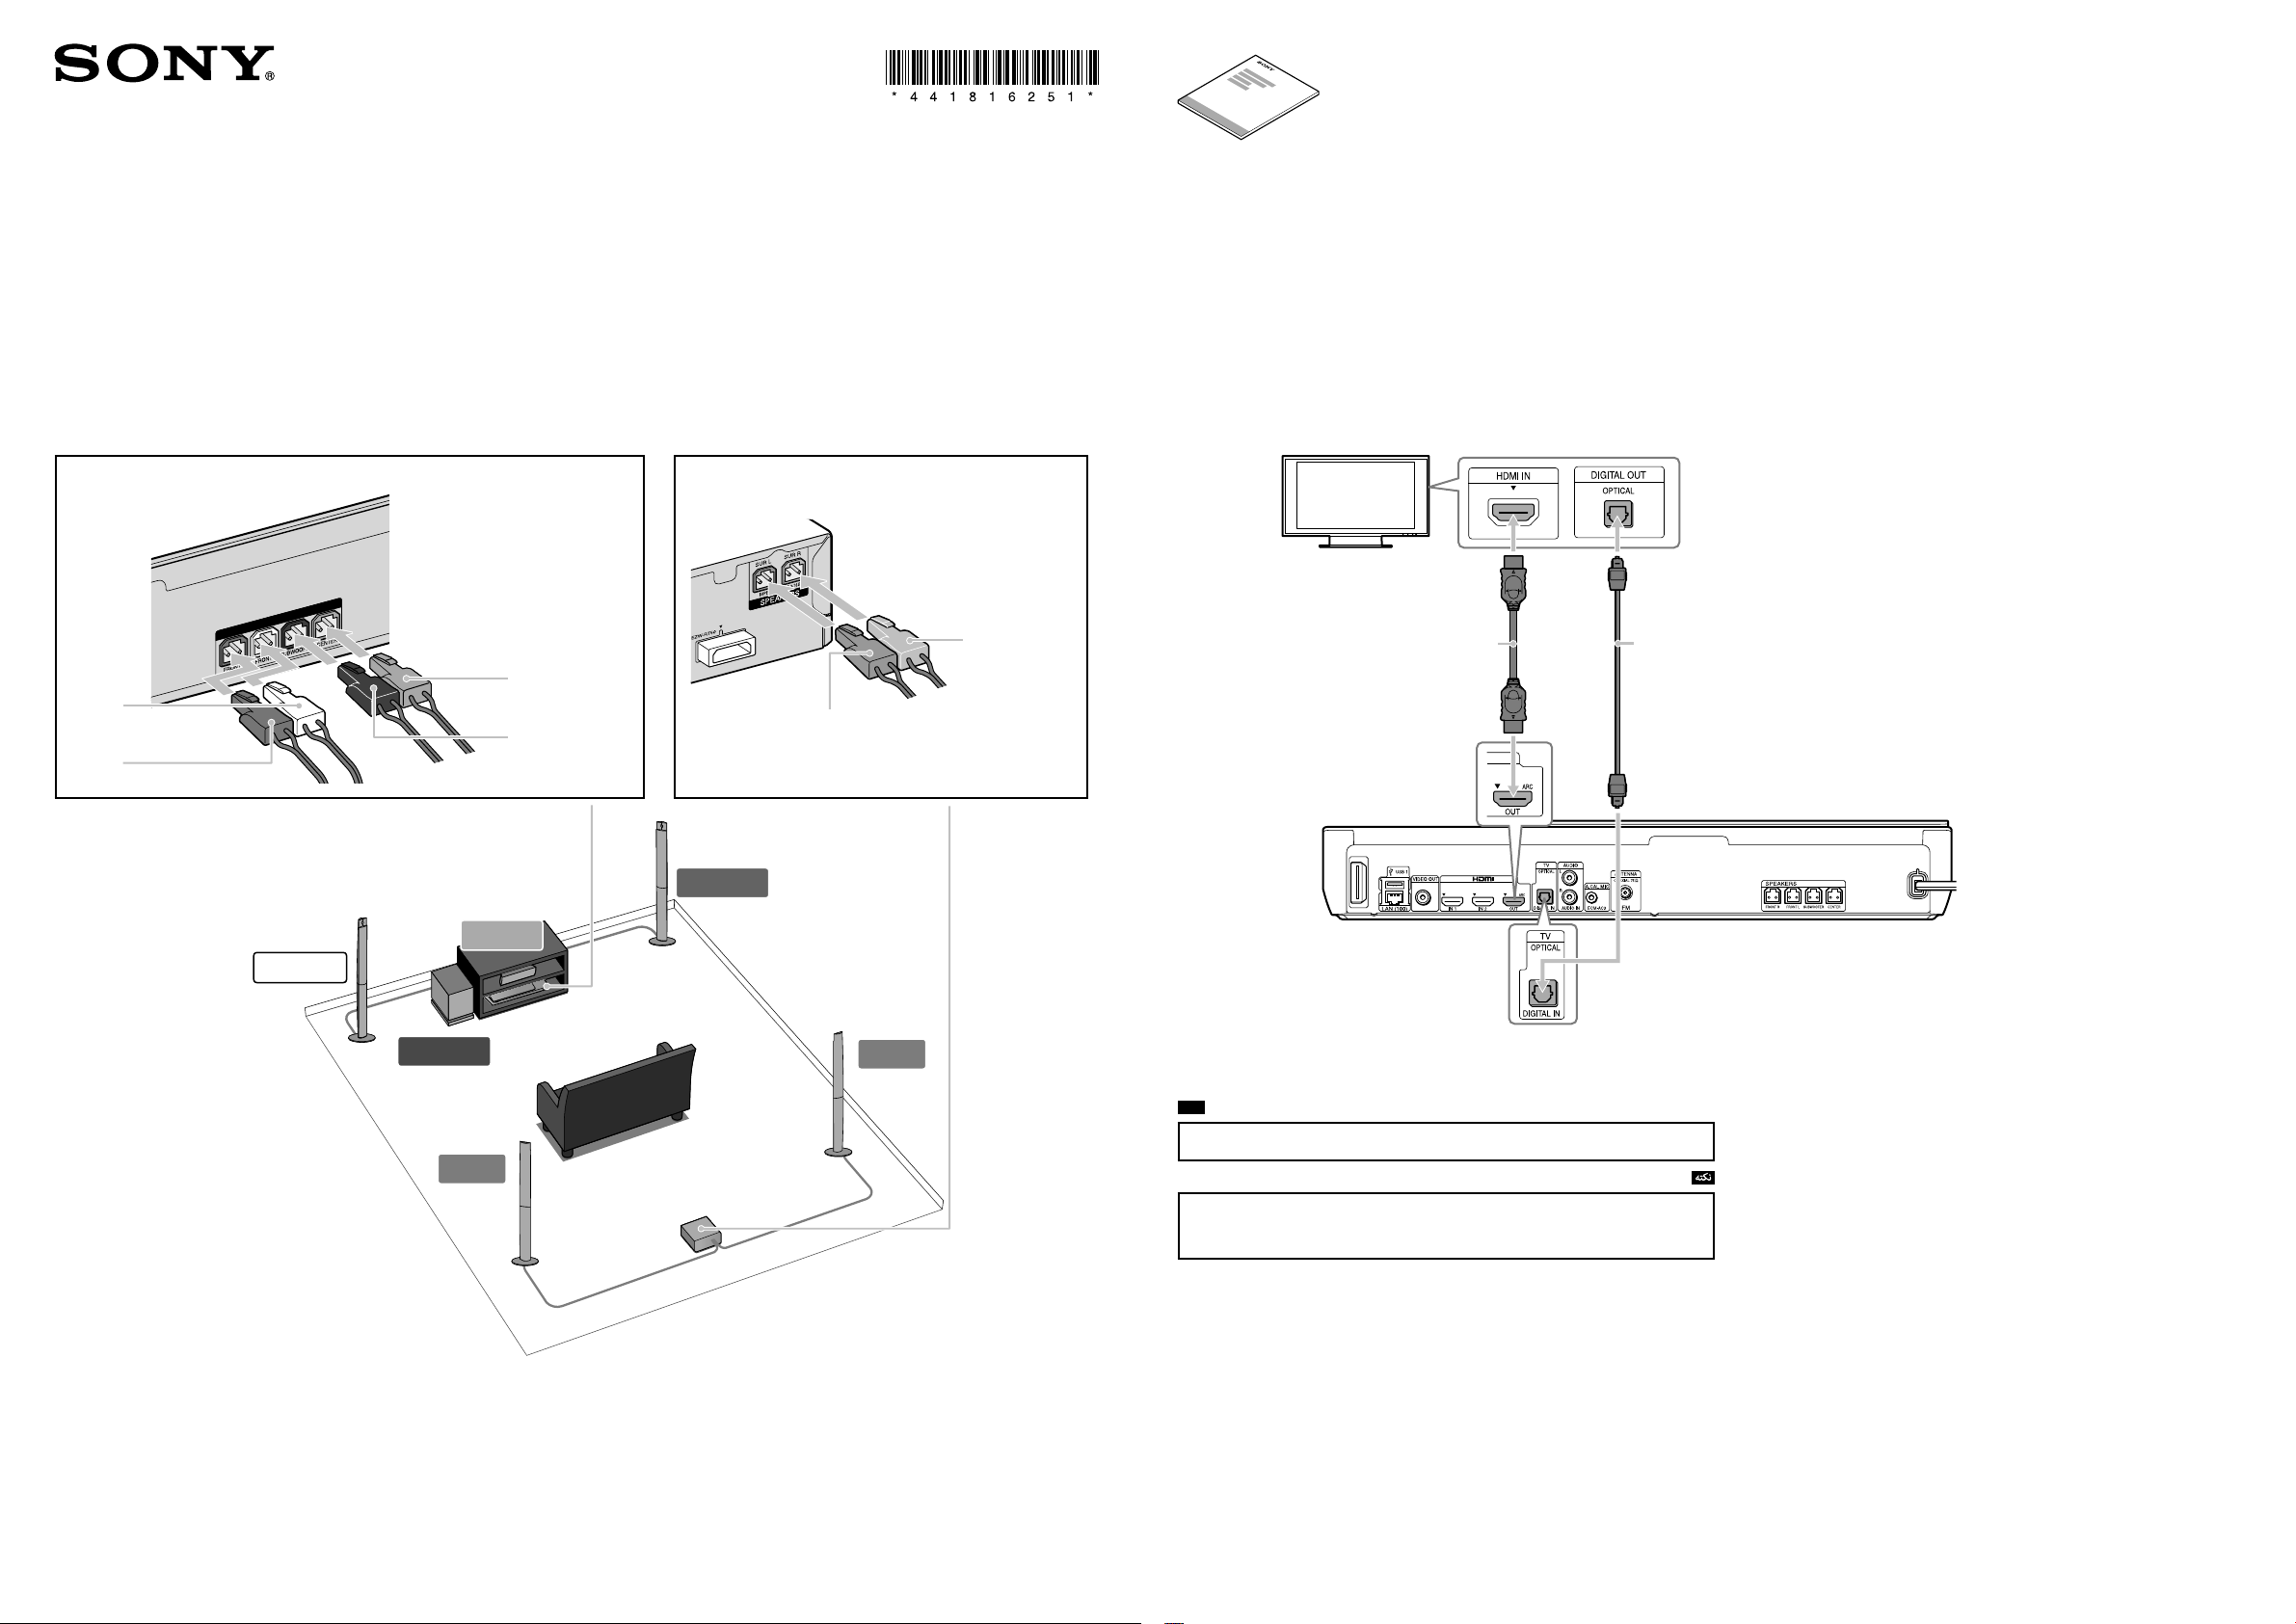
Connect the speaker cords to match the color of the SPEAKERS jacks of the unit.
Connect the speakers/
Rear panel of the main unit/
Green
White
Purple
Red
Rear panel of the surround amplifier
Blue
Gray
2
We recommend that you connect the system and TV with an HDMI cable*1. For other connections, refer to the Operating Instructions.
Rear of the main unit
Connect your TV/
TV
HDMI cable*
Digital optical cord*
If the TV’s HDMI jack is not compatible with the Audio
1
Return Channel (ARC) function, make this connection to
enjoy TV sound via the system.
2
FRONT L
SUBWOOFER
BDV-N990W is the model used for illustration purposes.
CENTER
SUR L
Main unit
FRONT R
Surround amplifier
SUR R
To enjoy TV sound, press FUNCTION repeatedly to select “TV.”
*1 A High Speed HDMI cable is supplied with India, Middle
East, Singapore, Thailand, and Taiwan models only.
*2 Not supplied.
Continued/
ﺪﯿﻨﮐ اﺮﺟا ار Easy Setup
.ﺪﯾراﺬﮕﻧ هﺎﮕﺘﺳد نورد ار ﯽﮑﺴﯾد ،Easy Setup یاﺮﺟا زا ﻞﺒﻗ
.ﺪﯿﻫد راﺮﻗ رود هار زا لﱰﻨﮐ نورد ار ﺎﻫ یﺮﺗﺎﺑ
ﯽﻠﺻا هﺎﮕﺘﺳد نورد ار ﻢﯿﺳ ﯽﺑ هﺪﻨﺘﺳﺮﻓ یﺎﻫ هﺪﻧﺮﯿﮔ
.ﺪﯾراﺬﮕﺑ ﺮﯿﮔاﺮﻓ هﺪﻨﻨﮐ ﺖﯾﻮﻘﺗ و
نﺎﺸﻧ ﺮﯾز ﺮﯾﻮﺼﺗ رد ﻪﮐ رﻮﻄﻧﻫ ار ﻢﯿﺳ ﯽﺑ هﺪﻨﺘﺳﺮﻓ یﺎﻫ هﺪﻧﺮﯿﮔ
.ﺪﯿﻨﮐ دراو فﺎﮑﺷ نورد ﻞﻣﺎﮐ رﻮﻄﺑ و ﻢﮑﺤﻣ ،ﺖﺳا هﺪﺷ هداد
EZW-RT50
ﯽﻠﺻا هﺎﮕﺘﺳد
ﺮﯿﮔاﺮﻓ هﺪﻨﻨﮐ ﺖﯾﻮﻘﺗ
هﺪﻨﻨﮐ ﺖﯾﻮﻘﺗ ،ﯽﻠﺻا هﺎﮕﺘﺳد بوﺎﻨﺘﻣ قﺮﺑ یﺎﻫ ﻢﯿﺳ
بوﺎﻨﺘﻣ قﺮﺑ ﯽﺟوﺮﺧ ﻪﺑ ار نﻮﯾﺰﯾﻮﻠﺗ و ﺮﯿﮔاﺮﻓ یاﺪﺻ
ار دﻮﺧ نﻮﯾﺰﯾﻮﻠﺗ و ﯽﻠﺻا هﺎﮕﺘﺳد ﺲﭙﺳ و هدﺮﮐ ﻞﺼﺘﻣ
.ﺪﯿﻨﮐ ﻦﺷور
ﺪﯿﻨﮐ ﻞﺼﺘﻣ ار لﺎﻨﮕﯿﺳ هﺪﻧﺮﯿﮔ هﺎﮕﺘﺳد
.ﺪﯾﺮﯿﮕﺑ هﺪﯾدﺎﻧ ار ﻪﻠﺣﺮﻣ ﻦﯾا ،ﺪﯿﻨﮐ ﯽ هدﺎﻔﺘﺳا لﺎﻨﮕﯿﺳ هﺪﻧﺮﯿﮔ هﺎﮕﺘﺳد زا ﺮﮔا
IN 2IN 1
نﻮﯾﺰﯾﻮﻠﺗ
2 ﻪﻠﺣﺮﻣ رد لﺎﺼﺗا ﻦﯾا
.دﻮﺷ ﯽﻣ ﻞﯿﻤﮑﺗ
ﯽﻠﺻا هﺎﮕﺘﺳد ﯽﺘﺸﭘ ﺖﻤﺴﻗ
لﺎﻨﮕﯿﺳ هﺪﻧﺮﯿﮔ هﺎﮕﺘﺳد
.ﺖﺴﯿﻧ ﻪﻤﯿﻤﺿ*
*HDMI ﻞﺑﺎﮐ
Note
"HDMI2" ﺎﯾ "HDMI1" ﺎﺗ ﺪﯿﻫد رﺎﺸﻓ ًارﺮﮑﻣ ار FUNCTION ،لﺎﻨﮕﯿﺳ هﺪﻧﺮﯿﮔ هﺎﮕﺘﺳد یاﺪﺻ زا ندﺮﺑ تﺬﻟ یاﺮﺑ ˎ
.دﻮﺷ بﺎﺨﺘﻧا
ﺪﯾﻮﺷ ﻞﺼﺘﻣ ﻪﮑﺒﺷ ﻪﺑ
.ﺪﯾﺮﯿﮕﺑ هﺪﯾدﺎﻧ ار ﻪﻠﺣﺮﻣ ﻦﯾا ،Wi-Fi زا هدﺎﻔﺘﺳا یاﺮﺑ .ﺖﺳا دﻮﺟﻮﻣ Wi-Fi لﺎﺼﺗا
.ﺖﺴﯿﻧ ﻪﻤﯿﻤﺿ*
ﺖﻧﱰﻨﯾا
ﯽﻠﺑﺎﮐ مدﻮﻣ/ADSL مدﻮﻣ
ﻦﻬﭘ ﺪﻧﺎﺑ بﺎﯾﺮﯿﺴﻣ
ﯽﻠﺻا هﺎﮕﺘﺳد ﯽﺘﺸﭘ ﺖﻤﺴﻗ
*LAN ﻞﺑﺎﮐ
ﺮﯿﯿﻐﺗ نﻮﯾﺰﯾﻮﻠﺗ یور زا ار یدورو هﺪﻨﻨﮐ بﺎﺨﺘﻧا
دراﻮﻣ ﺪﻨﻧﺎﻣ ﻢﺘﺴﯿﺳ یﺎﻫ ﻪﺤﻔﺻ ﻪﮐ یا ﻪﻧﻮﮔ ﻪﺑ ،ﺪﯿﻫد
.ﺪﻧﻮﺷ هداد ﺶﯾﺎ نﻮﯾﺰﯾﻮﻠﺗ ﻪﺤﻔﺻ یور ﺮﺑ ﺮﯾز
"Easy Initial Settings" ﻪﺤﻔﺻ
رﺎﮐ ﻪﺑ عوﴍ
رد ﻪﮐ ﻪﺤﻔﺻ یور یﺎﻫ ﻞﻤﻌﻟارﻮﺘﺳد ندﺮﮐ لﺎﺒﻧد ﺎﺑ
ﺎﺑ و ﺖﺳا هﺪﺷ هدروآ
"Easy Initial Settings"
ار ﻢﺘﺴﯿﺳ تﯿﻈﻨﺗ ، و
V/j//p
زا هدﺎﻔﺘﺳا
.ﺪﯿﻫد
م
ﺎﺠﻧا
رد ﻪﮐ ﻪﺤﻔﺻ یور یﺎﻫ ﻞﻤﻌﻟارﻮﺘﺳد ندﺮﮐ لﺎﺒﻧد ﺎﺑ
ﺖﺳا هﺪﺷ هدروآ
"Easy Network Settings"
ار ﻪﮑﺒﺷ تﯿﻈﻨﺗ ، و
V/j//p
زا هدﺎﻔﺘﺳا ﺎﺑ و
.ﺪﯿﻫد
م
ﺎﺠﻧا
Easy] ،"Easy Network Settings" نﺪﺷ ﻞﻣﺎﮐ ﺎﺑ
.دﻮﺷ ﯽﻣ هداد ﺶﯾﺎ
[Network Settings are complete.
رد تﺎﯿﺋﺰﺟ زا عﻼﻃا یاﺮﺑ .ﺪﺷ ﻞﯿﻤﮑﺗ ﯽﻠﺻا ﻢﯿﻈﻨﺗ
ﯽﮔﮋﯾو ﺮﮕﯾد زا یرﺎﯿﺴﺑ و ﮏﺴﯾد ﺶﺨﭘ هﻮﺤﻧ ﺎﺑ ﻪﻄﺑار
هاﺮﻤﻬﺑ هﺪﺷ ﻪﺋارا ﯽﺗﺎﯿﻠﻤﻋ یﺎﻫ ﻞﻤﻌﻟا رﻮﺘﺳد ﻪﺑ ،ﺎﻫ
.ﺪﯿﻨﮐ ﻪﻌﺟاﺮﻣ هﺎﮕﺘﺳد
:ﺪﯿﻨﮐ ﯽﺳرﺮﺑ ار لواﺪﺘﻣ یﺎﻫ لاﺆﺳ و هدﺮﮐ نﺪﯾد ﺮﯾز ﺖﯾﺎﺳ زا ،ﻪﮑﺒﺷ تﯿﻈﻨﺗ ﻪﻨﯿﻣز رد ﱰﺸﯿﺑ تﺎﯿﺋﺰﺟ یاﺮﺑ
3
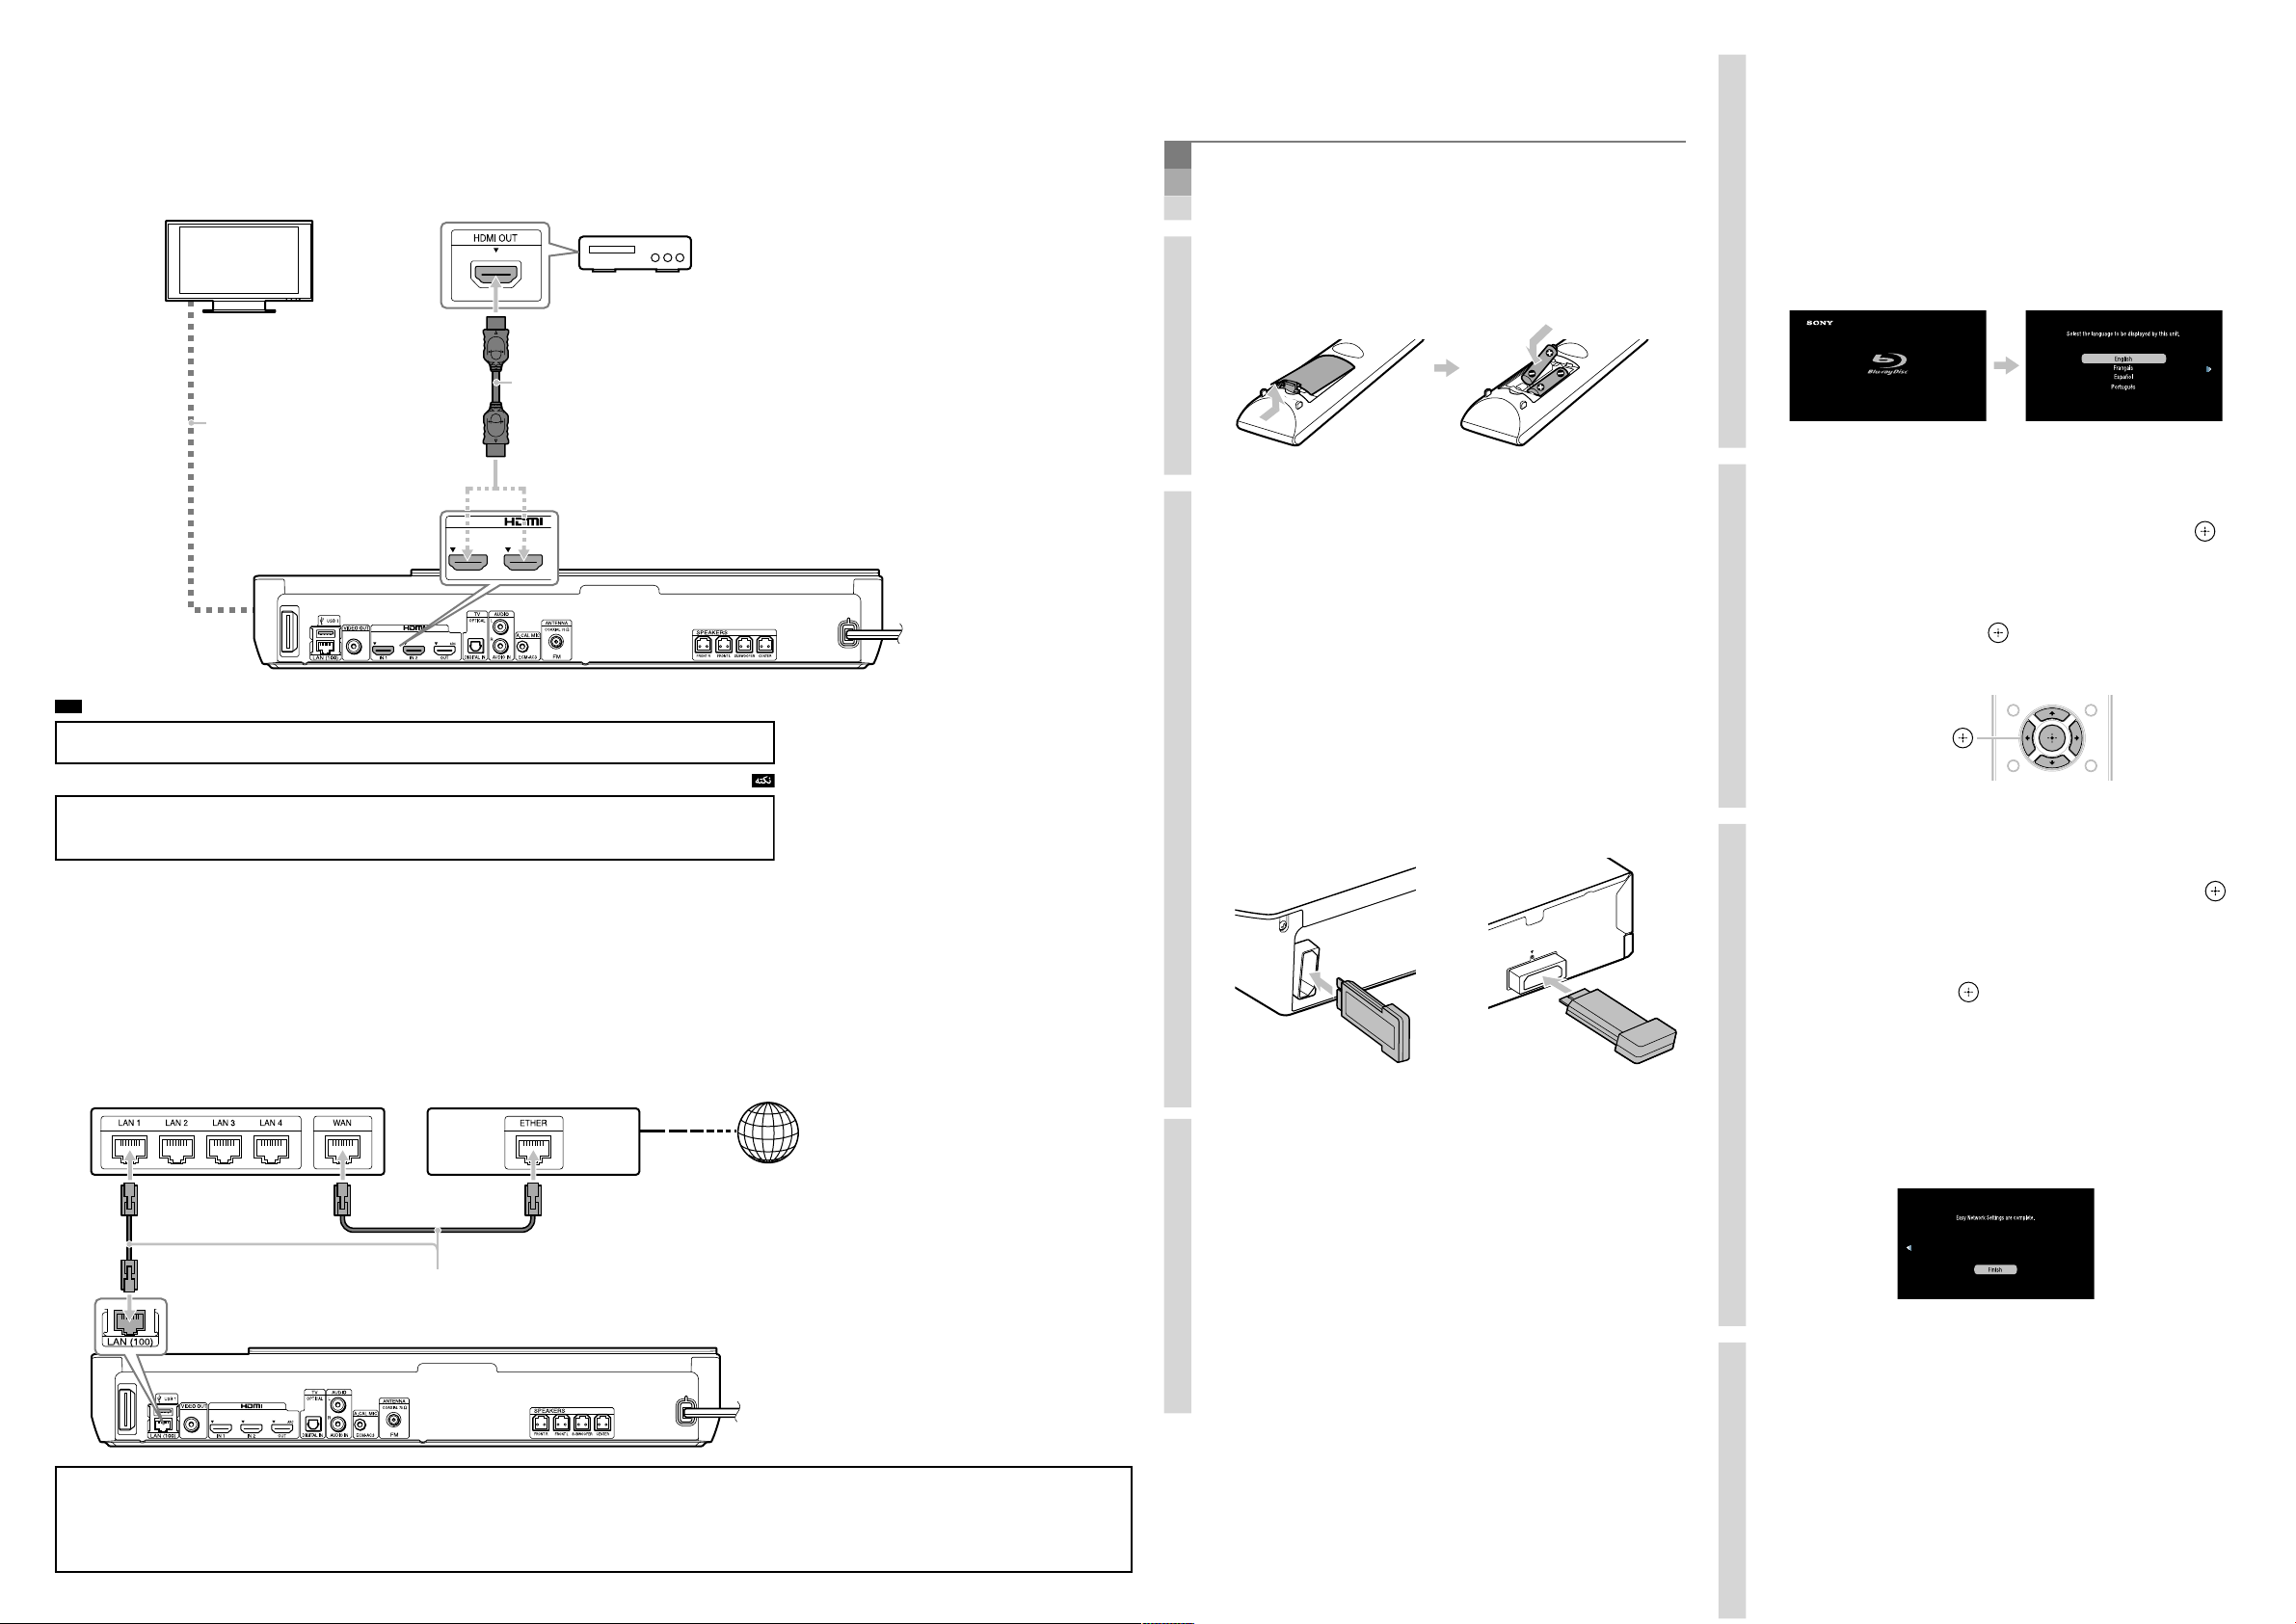
If you do not use a set-top box, skip this Step.
Connect your set-top box/
Perform Easy Setup
5
Do not insert a disc before performing the Easy Setup.
4. Switch the input selector on your TV
so that system screens like the ones
below appear on the TV screen.
TV
This connection is
completed in Step 2.
To enjoy set-top box sound, press FUNCTION repeatedly to select “HDMI1” or “HDMI2.”
HDMI cable*
Rear of the main unit
Set-top box
*Not supplied.
1. Insert batteries into the remote.
2. Insert the wireless transceivers into
both the main unit and surround
amplifier.
Firmly insert the wireless transceiver all the way
into the slot, as in the figure below.
Starting up
5. Perform system settings by following
the on-screen instructions in “Easy
Initial Settings” using
///
,
“Easy Initial Settings” screen
///
and
.
4
Wi-Fi connection is available. To use Wi-Fi, skip this Step.
Connect to the network/
Broadband router
LAN cable*
ADSL modem/cable modem
Rear of the main unit
Internet
*Not supplied.
Main unit
3. Connect the AC power cords of the
main unit, surround amplifier, and
your TV to the AC power outlet, and
then turn on the power of the main
unit and your TV.
Surround amplifier
6.
Perform network settings by following
the on-screen instructions in “Easy
Network Settings” using
[Easy Network Settings are complete.] appears
when “Easy Network Settings” is complete.
Basic setup is complete. Refer to the
supplied Operating Instructions for
details on how to enjoy disc playback
and many other features.
///
and
.
For further details on network settings, visit the following website and check the FAQ:
http://www.sony-asia.com/section/support
 Loading...