

Page 1

СТАРАЕТСЯ ДЛЯ МЕНЯ
Каталог фотоаппаратов
Page 2
4-690-670-41(1)
“Help Guide” (Web manual)
Refer to “Help Guide” for
in-depth instructions on the
many functions of the camera.
« Manuel d’aide » (Manuel en ligne)
Consultez le « Manuel d’aide » pour
obtenir des instructions détaillées
au sujet des nombreuses fonctions
E-mount
http://rd1.sony.net/help/ilc/1640/h_zz/
Interchangeable Lens Digital Camera/Instruction Manual GB
Appareil photo à objectif interchangeable/Mode d’emploi FR
Digitalkamera mit Wechselobjektiv/Gebrauchsanleitung DE
de l’appareil.
©2016 Sony Corporation Printed in Thailand
Cámara Digital de Lentes Intercambiables/Manual de instrucciones
Fotocamera digitale con obiettivo intercambiabile/Istruzioni per l’uso
Câmara Digital de Objetivas intercambiáveis/Manual de instruções
Digitale camera met verwisselbare lens/Gebruiksaanwijzing NL
Aparat cyfrowy z wymiennymi obiektywami/Instrukcja obsługi PL
Цифровой фотоаппарат со сменным объективом/Инструкция по эксплуатации
Цифровий фотоапарат зі змінним об’єктивом/Посібник з експлуатації
Digitalkamera med utbytbart objektiv/Handledning SE
Digitaalinen kamera vaihdettavalla objektiivilla/Käyttöopas FI
Digitalkamera med utskiftbart objektiv/Bruksanvisning NO
Digitalkamera med udskifteligt objektiv/Betjeningsvejledning DK
ILCE-6500
ES
IT
PT
RU
UA
Page 3

English
Check out the
Help Guide!
The “Help Guide” is an on-line manual that you can read on your
computer or smartphone. Refer to it for details on menu items,
advanced usage, and the latest information on the camera.
Scan
here
http://rd1.sony.net/help/ilc/1640/h_zz/
ILCE-6500 Help Guide
Instruction Manual
(this book)
This manual introduces some
basic functions.
For the quick start guide, see
“Startup guide” (page21). The
“Startup guide” introduces the
initial procedures from when you
open the package until you release
the shutter for the first shot.
GB
2
In-Camera Guide
The [In-Camera Guide] shows
explanations of the menu
items on the monitor of the
camera.
You can quickly pull up
information during shooting.
To use the [In-Camera Guide]
function, some settings must be
made beforehand. For details,
search “In-Camera Guide” in the
Help Guide.
Page 4

Owner’s Record
Record the model and serial number
(which are located on the product)
in the space provided below. Refer
to these numbers whenever you
call your Sony dealer regarding this
product.
Model No. ILCESerial No.
WARNING
To reduce fire or shock hazard,
do not expose the unit to rain or
moisture.
IMPORTANT SAFETY
INSTRUCTIONS
-SAVE THESE
INSTRUCTIONS
DANGER
TO REDUCE THE
RISK OF FIRE OR
ELECTRIC SHOCK,
CAREFULLY
FOLLOW THESE
INSTRUCTIONS
If the shape of the plug does not fit
the power outlet, use an attachment
plug adaptor of the proper
configuration for the power outlet.
CAUTION
Battery pack
If the battery pack is mishandled, the
battery pack can burst, cause a fire
or even chemical burns. Observe the
following cautions.
• Do not disassemble.
• Do not crush and do not expose the
battery pack to any shock or force
such as hammering, dropping or
stepping on it.
• Do not short circuit and do not allow
metal objects to come into contact
with the battery terminals.
• Do not expose to high temperature
above 60°C (140°F) such as in direct
sunlight or in a car parked in the sun.
• Do not incinerate or dispose of in fire.
• Do not handle damaged or leaking
lithium ion batteries.
• Be sure to charge the battery pack
using a genuine Sony battery charger
or a device that can charge the
battery pack.
• Keep the battery pack out of the
reach of small children.
• Keep the battery pack dry.
• Replace only with the same or
equivalent type recommended by
Sony.
• Dispose of used battery packs
promptly as described in the
instructions.
• Do not expose to extremely low
temperatures of -20°C (-4°F) or lower
or extremely low pressures of 11.6 kPa
or lower.
GB
GB
3
Page 5

Use a nearby wall outlet (wall socket)
when using the AC Adaptor/battery
charger. If any malfunction occurs,
disconnect the plug from the wall
outlet (wall socket) immediately to
disconnect from the power source.
If you use the product with a charge
lamp, note that the product is not
disconnected from the power source
even when the lamp turns off.
The power cord (mains lead), if
supplied, is designed specifically
for use with this equipment only,
and should not be used with other
electrical equipment.
Power Cord
For the customers in the UK, Ireland,
Malta, Cyprus and Saudi Arabia
Use the power cord (A). For safety
reasons, the power cord (B) is not
intended for above countries/regions
and shall therefore not be used there.
For the customers in other EU
countries/regions
Use the power cord (B).
(A) (B)
Notice
If static electricity or
electromagnetism causes data
transfer to discontinue midway (fail),
restart the application or disconnect
and connect the communication
cable (USB, etc.) again.
This product has been tested and
found compliant with the limits set
out in the EMC regulation for using
connection cables shorter than
3meters (9.8feet).
The electromagnetic fields at the
specific frequencies may influence
the picture and sound of this unit.
For Customers in the U.S.A. and
Canada
RECYCLING LITHIUM-ION BATTERIES
Lithium-Ion batteries
are recyclable.
You can help preserve
our environment by
returning your used
rechargeable batteries
to the collection and recycling
location nearest you.
For more information regarding
recycling of rechargeable batteries,
call toll free 1-800-822-8837, or visit
http://www.call2recycle.org/
Caution: Do not handle damaged or
leaking Lithium-Ion batteries.
GB
4
Page 6

This equipment complies with FCC
radiation exposure limits set forth
for an uncontrolled environment and
meets the FCC radio frequency (RF)
Exposure Guidelines. This equipment
has very low levels of RF energy that
is deemed to comply without testing
of specific absorption rate(SAR).
The available scientific evidence does
not show that any health problems
are associated with using low power
wireless devices. There is no proof,
however, that these low power
wireless devices are absolutely safe.
Low power Wireless devices emit low
levels of radio frequency energy (RF)
in the microwave range while being
used. Whereas high levels of RF can
produce health effects (by heating
tissue), exposure of low-level RF that
does not produce heating effects
causes no known adverse health
effects. Many studies of low-level
RF exposures have not found any
biological effects. Some studies
have suggested that some biological
effects might occur, but such
findings have not been confirmed by
additional research. This equipment
has been tested and found to
comply with IC radiation exposure
limits set forth for an uncontrolled
environment and meets RSS-102 of
the IC radio frequency (RF) Exposure
rules.
For Customers in the U.S.A.
If you have any questions about this
product, you may call:
Sony Customer Information Center
1-800-222-SONY (7669).
The number below is for the FCC
related matters only.
Regulatory Information
Declaration of Conformity
Trade Name: SONY
Model No.: WW213019
Responsible Party: Sony Electronics
Inc.
Address: 16535 Via Esprillo, San
Diego, CA 92127 U.S.A.
Telephone No.: 858-942-2230
This device complies with Part15 of
the FCC Rules. Operation is subject
to the following two conditions: (1)
This device may not cause harmful
interference, and (2) this device
must accept any interference
received, including interference
that may cause undesired
operation.
This device complies with Part 15 of
the FCC Rules. Operation is subject to
the following two conditions:
(1) This device may not cause harmful
interference, and (2) this device must
accept any interference received,
including interference that may cause
undesired operation.
This equipment must not be colocated or operated in conjunction
with any other antenna or
transmitter.
GB
GB
5
Page 7

CAUTION
You are cautioned that any changes
or modifications not expressly
approved in this manual could
void your authority to operate this
equipment.
Note:
This equipment has been tested and
found to comply with the limits for
a Class B digital device, pursuant to
Part 15 of the FCC Rules.
These limits are designed to provide
reasonable protection against
harmful interference in a residential
installation. This equipment
generates, uses, and can radiate
radio frequency energy and, if not
installed and used in accordance
with the instructions, may cause
harmful interference to radio
communications. However, there is
no guarantee that interference will
not occur in a particular installation.
If this equipment does cause harmful
interference to radio or television
reception, which can be determined
by turning the equipment off and
on, the user is encouraged to try to
correct the interference by one or
more of the following measures:
–Reorient or relocate the receiving
antenna.
–Increase the separation between
the equipment and receiver.
–Connect the equipment into an
outlet on a circuit different from
that to which the receiver is
connected.
–Consult the dealer or an
experienced radio/TV technician
for help.
GB
6
The supplied interface cable must be
used with the equipment in order to
comply with the limits for a digital
device pursuant to Subpart B of Part
15 of FCC Rules.
For Customers in Canada
This device complies with Industry
Canada’s licence-exempt RSSs.
Operation is subject to the following
two conditions:
(1) This device may not cause
interference; and
(2) This device must accept any
interference, including interference
that may cause undesired operation
of the device.
CAN ICES-3 B/NMB-3 B
For Customers in Europe
Manufacturer: Sony Corporation, 1-7-1
Konan Minato-ku Tokyo, 108-0075
Japan
For EU product compliance: Sony
Belgium, bijkantoor van Sony Europe
Limited, Da Vincilaan 7-D1, 1935
Zaventem, Belgium
Hereby, Sony Corporation, declares
that this equipment is in compliance
with the essential requirements and
other relevant provisions of Directive
1999/5/EC. For details, please access
the following URL:
http://www.compliance.sony.de/
Page 8
Disposal of waste batteries and
electrical and electronic equipment
(applicable in the European Union and
other European countries with separate
collection systems)
This symbol on the
product, the battery
or on the packaging
indicates that the
product and the
battery shall not
be treated as household waste. On
certain batteries this symbol might be
used in combination with a chemical
symbol. The chemical symbols for
mercury (Hg) or lead (Pb) are added
if the battery contains more than
0.0005% mercury or 0.004% lead.
By ensuring these products and
batteries are disposed of correctly,
you will help prevent potentially
negative consequences for the
environment and human health
which could otherwise be caused by
inappropriate waste handling. The
recycling of the materials will help to
conserve natural resources. In case of
products that for safety, performance
or data integrity reasons require
a permanent connection with an
incorporated battery, this battery
should be replaced by qualified
service staff only. To ensure that
the battery and the electrical and
electronic equipment will be treated
properly, hand over these products
at end-of-life to the applicable
collection point for the recycling of
electrical and electronic equipment.
For all other batteries, please view
the section on how to remove the
battery from the product safely. Hand
the battery over to the applicable
collection point for the recycling of
waste batteries.
For more detailed information about
recycling of this product or battery,
please contact your local Civic Office,
your household waste disposal
service or the shop where you
purchased the product or battery.
For Customers in Singapore
GB
For Customers in U.A.E.
For Customers in Malaysia
For Customers in India
Battery Pack
GB
7
Page 9

Notes on using your camera
Along with this section, also see
“Precautions” in the Help Guide
(page2).
Screen language
You can select the language
displayed on the screen using the
menu (page 41).
Notes on recording/playback
•Once you format the memory
card, all the data recorded on
the memory card will be deleted
and cannot be restored. Before
formatting, copy the data to a
computer or other device.
•Before you start recording, make
a trial recording to make sure that
the camera is working correctly.
Notes on handling the product
•This camera is designed to be dust
and moisture-resistant, but is not
waterproof or splash-proof.
•Do not leave the camera, the
supplied accessories, or memory
cards within the reach of infants.
They may be accidentally
swallowed. If this occurs, consult a
doctor immediately.
No compensation for damaged
content or recording failure
Sony can provide no guarantees
in the event of failure to record or
loss or damage of recorded images
or audio data due to a malfunction
of the camera or recording media,
etc. We recommend backing up
important data.
Notes on the monitor, electronic
viewfinder, lens, and image sensor
•The monitor and electronic
viewfinder are manufactured
using extremely high-precision
technology, and over 99.99% of the
pixels are operational for effective
use. However, there may be some
small black dots and/or bright
dots (white, red, blue or green in
color) that constantly appear on the
monitor and electronic viewfinder.
These dots are normal due to the
manufacturing process and do not
affect the images in any way.
•Do not hold the camera by the
monitor.
•When using the power zoom lens,
be careful not to get your fingers
or any other objects caught in the
lens.
GB
8
Page 10

•Do not leave the lens or the
viewfinder exposed to a strong
light source such as sunlight.
Because of the lens’s condensing
function, doing so may cause
smoke, fire, or a malfunction inside
the camera body or the lens. If you
have to leave the camera exposed
to a light source such as sunlight,
attach the lens cap to the lens.
•When you shoot with backlighting,
keep the sun sufficiently far away
from the angle of view. Otherwise,
the sunlight may enter the focus
inside the camera and cause smoke
or fire. Even if the sun is slightly
away from the angle of view, it may
still cause smoke or fire.
•Do not directly expose the lens to
beams such as laser beams. That
may damage the image sensor and
cause the camera to malfunction.
•Do not look at sunlight or a strong
light source through the lens when
it is detached. This may result in
unrecoverable damage to the eyes
or cause a malfunction.
•Do not use the camera in areas
where strong radio waves or
radiation are being emitted.
Recording and playback may not
function correctly.
•Images may trail across on the
screen in a cold location. This is not
a malfunction.
•The recorded image may be
different from the image you
monitored before recording.
Notes on using lenses and
accessories
It is recommended that you use Sony
lenses/accessories designed to suit
the characteristics of this camera.
Using this camera with products from
other manufacturers may affect its
performance, leading to accidents
or malfunction. Sony bears no
responsibility for such accidents or
malfunction.
Notes on the Multi Interface Shoe
•When attaching or detaching
accessories such as an external
flash to the Multi Interface Shoe,
first turn the power to OFF. When
attaching the accessory, confirm
that it is firmly fastened to the
camera.
•Do not use the Multi Interface Shoe
with a commercially available flash
that applies voltages of 250 V or
more or has the opposite polarity
of the camera. It may cause a
malfunction.
Notes on shooting with the
viewfinder
•The image may be slightly distorted
near the corners of the viewfinder.
This is not a malfunction. When you
want to see the full composition
with all its details, you can also use
the monitor.
GB
GB
9
Page 11

•If you pan the camera while looking
into the viewfinder or move your
eyes around, the image in the
viewfinder may be distorted or the
color of the image may change.
This is a characteristic of the
lens or display device and is not
a malfunction. When you shoot
an image, we recommend that
you look at the center area of the
viewfinder.
•When shooting with the viewfinder,
you may experience symptoms
such as eyestrain, fatigue,
travel sickness, or nausea. We
recommend that you take a break
at regular intervals when you are
shooting with the viewfinder.
In case you may feel
uncomfortable, refrain from using
the viewfinder until your condition
recovers, and consult your doctor
as necessary.
Notes on continuous shooting
During continuous shooting, the
monitor or viewfinder may flash
between the shooting screen and a
black screen. If you keep watching
the screen in this situation, you may
experience uncomfortable symptoms
such as feeling of unwellness. If
you experience uncomfortable
symptoms, stop using the camera,
and consult your doctor as necessary.
Notes on recording for long
periods of time or recording 4K
movies
•Depending on the camera and
battery temperature, you may be
unable to record movies or the
power may turn off automatically
to protect the camera. A message
will be displayed on the screen
before the power turns off or you
can no longer record movies. In
this case, leave the power off and
wait until the camera and battery
temperature goes down. If you turn
on the power without letting the
camera and battery cool enough,
the power may turn off again
or you may be unable to record
movies.
•Under high ambient temperatures,
the temperature of the camera
rises quickly.
•When the temperature of the
camera rises, the image quality
may deteriorate. It is recommended
that you wait until the temperature
of the camera drops before
continuing to shoot.
•The surface of the camera may get
warm. This is not a malfunction.
•If the same part of your skin
touches the camera for a long
period of time while using the
camera, even if the camera does
not feel hot to you, it may cause
symptoms of a low-temperature
burn such as redness or blistering.
10
GB
Page 12

Pay special attention in the following
situations and use a tripod, etc.
–When using the camera in a high-
temperature environment
–When someone with poor
circulation or impaired skin
sensation uses the camera
–When using the camera with the
[Auto Pwr OFF Temp.] set to [High]
•Especially during 4K movie
shooting, the recording time may
be shorter under low temperature
conditions. Warm up the battery
pack or replace it with a new
battery.
Notes on playing back movies on
other devices
Movies recorded with this camera
may not be played back correctly on
other devices. Also, movies recorded
with other devices may not be played
back correctly on this camera.
Warning on copyright
Television programs, films,
videotapes, and other materials
may be copyrighted. Unauthorized
recording of such materials may
be contrary to the provisions of the
copyright laws.
On the data specifications
described in this manual
The data on performance and
specifications are defined under
the following conditions, except
as described in this manual: at an
ordinary ambient temperature of
25ºC (77°F), and using a battery pack
that has been fully charged until the
charge lamp has turned off.
How to turn off wireless network
functions (Wi-Fi, NFC and Bluetooth
function, etc.) temporarily
When you board an airplane, etc.,
you can turn off all wireless network
functions temporarily.
Select MENU button
[Airplane Mode] [On].
If you set [Airplane Mode] to [On], an
(airplane) mark will be displayed
on the screen.
(Wireless)
Notes on wireless LAN
If your camera is lost or stolen, Sony
bears no responsibility for the loss or
damage caused by illegal access or
use of the registered access point on
the camera.
Notes on security when using
wireless LAN products
•Always make sure that you are
using a secure wireless LAN to avoid
hacking, access by malicious third
parties, or other vulnerabilities.
•It is important that you set the
security settings when using a
wireless LAN.
•If a security problem arises
because no security precautions
are in place or due to any
inevitable circumstances when
using a wireless LAN, Sony bears
no responsibility for the loss or
damage.
GB
GB
11
Page 13
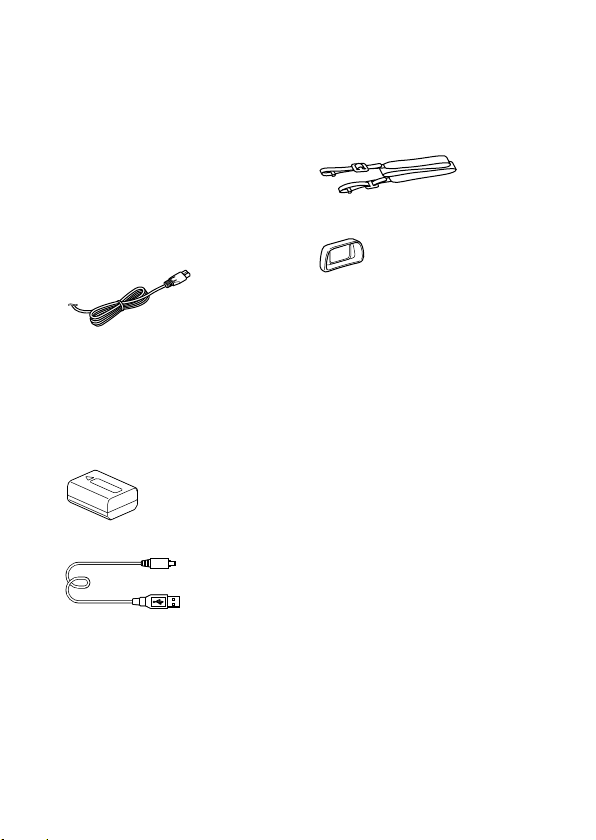
Checking the camera and the supplied
items
The number in parentheses
indicates the number of pieces.
• Camera (1)
• Power cord (mains lead) (1)*
(supplied in some countries/
regions)
* Multiple power cords may be
supplied with your camera.
Use the appropriate one that
matches your country/region.
See page 4.
• Rechargeable battery pack
NP-FW50 (1)
• Micro USB cable (1)
• AC Adaptor (1)
• Shoulder strap (1)
• Eyepiece cup (1)
• Body cap (1) (attached to the
camera)
• Shoe cap (1) (attached to the
camera)
• Instruction Manual (this
manual) (1)
• Wi-Fi Connection/One-touch
(NFC) Guide (1)
12
GB
Page 14
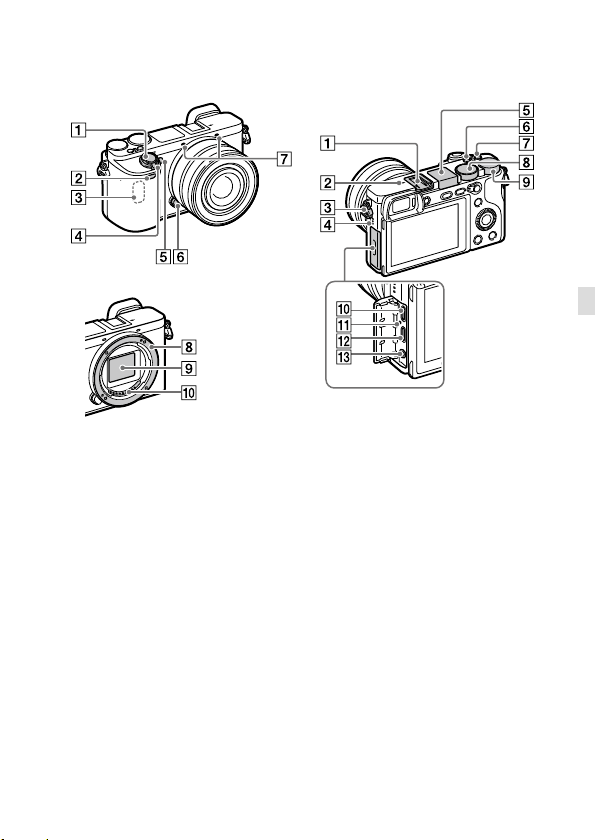
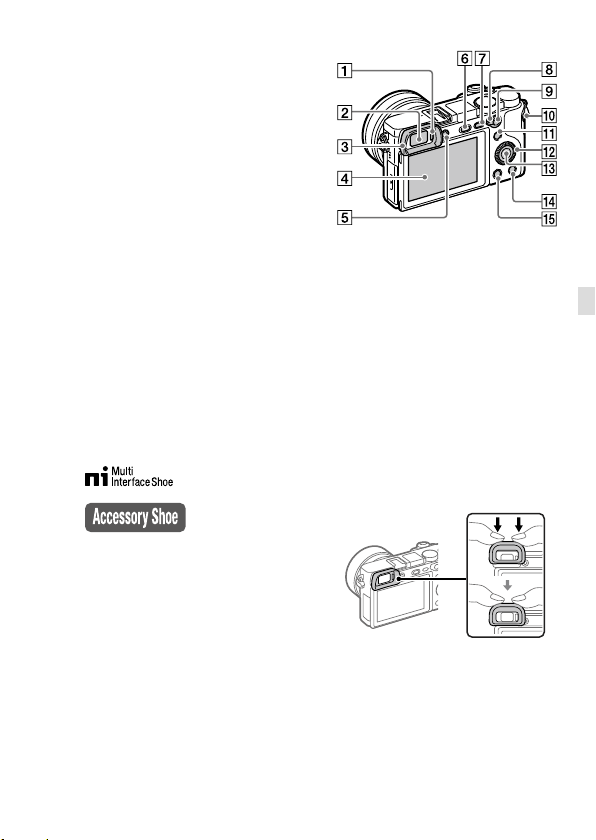
Identifying parts
When the lens is removed
Shutter button
Remote sensor
Wi-Fi antenna (built-in)
ON/OFF (Power) switch
Self-timer lamp/AF illuminator
Lens release button
Microphone*
Mount
Image sensor**
Lens contacts**
* Do not cover this part during
movie recording. Doing so may
cause noise or lower the volume.
** Do not touch this part directly.
Multi Interface Shoe*
Some accessories may not go
in all the way and protrude
backward from the Multi
interface shoe. However,
when the accessory reaches
the front end of the shoe, the
connection is completed.
GB
GB
13
Page 15
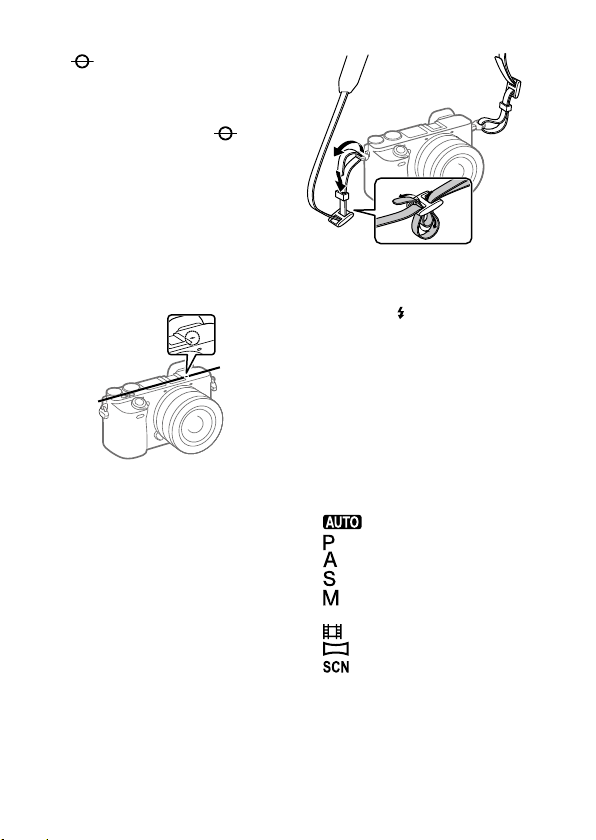
Image sensor position
mark
The image sensor is the
sensor that converts light into
an electric signal. The
mark shows the location of
the image sensor. When you
measure the exact distance
between the camera and the
subject, refer to the position
of the horizontal line. The
distance from the lens contact
surface to the image sensor is
about 18 mm (23/32 in.).
If the subject is closer than the
minimum shooting distance of
the lens, the focus cannot be
confirmed. Make sure you put
enough distance between the
subject and the camera.
Hook for shoulder strap
Attach both ends of the strap
onto the camera.
Speaker
Flash
• Press the
button to use the flash.
The flash does not pop up
automatically.
• When not using the flash,
press it back into the camera
body.
C2 button (Custom button 2)
C1 button (Custom button 1)
Mode dial
(Program Auto)/
(Aperture Priority)/
(Shutter Priority)/
(Manual Exposure)/
1/2
(Movie/S&Q Motion)/
Control dial
You can quickly adjust the
settings for each shooting
mode.
(Flash pop-up)
(Auto Mode)/
(Memory recall)/
(Sweep Panorama)/
(Scene Selection)
14
GB
Page 16
Multi/Micro USB Terminal*
This terminal supports Micro
USB-compatible devices.
Charge lamp
HDMI micro jack
(Microphone) jack
When an external microphone
is connected, the internal
microphone turns off
automatically. When the
external microphone is a
plugin-power type, the power
of the microphone is supplied
by the camera.
* For details on compatible
accessories for the multi
interface shoe and the
Multi/Micro USB Terminal, visit
the Sony web site, or consult your
Sony dealer or local authorized
Sony service facility.
Eye sensor
Viewfinder
Eyepiece cup
Not attached to the camera at
the factory. It is recommended
that you attach the eyepiece
cup when you intend to use
the viewfinder.
Attaching/removing the
eyepiece cup
Match the eyepiece cup to the
groove on the viewfinder and
slide it into place.
GB
To remove the eyepiece cup,
grasp it on the left and right
sides and lift it up.
• Remove the eyepiece
cup when you attach an
accessory (sold separately) to
the Multi Interface Shoe.
GB
15
Page 17
Monitor (For touch operation:
Touch panel/Touch pad)
You can adjust the monitor to
an easily viewable angle and
shoot from any position.
You may not be able to adjust
the monitor angle depending
on the type of a tripod you
use. In such a case, release the
tripod screw once to adjust the
monitor angle.
Diopter-adjustment dial
Adjust the diopter-adjustment
dial according to your eyesight
until the display appears
clearly in the viewfinder. If it is
hard to operate the diopteradjustment dial, remove the
eyepiece cup before operating
the dial.
For shooting: AF/MF
button/AEL button
For viewing:
(Enlarge)
button
MOVIE (Movie) button
For shooting: Fn (Function)
button
For viewing:
(Send to Smartphone)
button
You can display the screen
for [Send to Smartphone] by
pressing this button.
Control wheel
Center button
For shooting: C3 button
(Custom button 3)
For viewing:
(Playback) button
(Delete) button
(Flash pop-up) button
MENU button
AF/MF/AEL switch lever
GB
16
(N mark)
This mark indicates the touch
point for connecting the
camera and an NFC-enabled
Smartphone.
Page 18
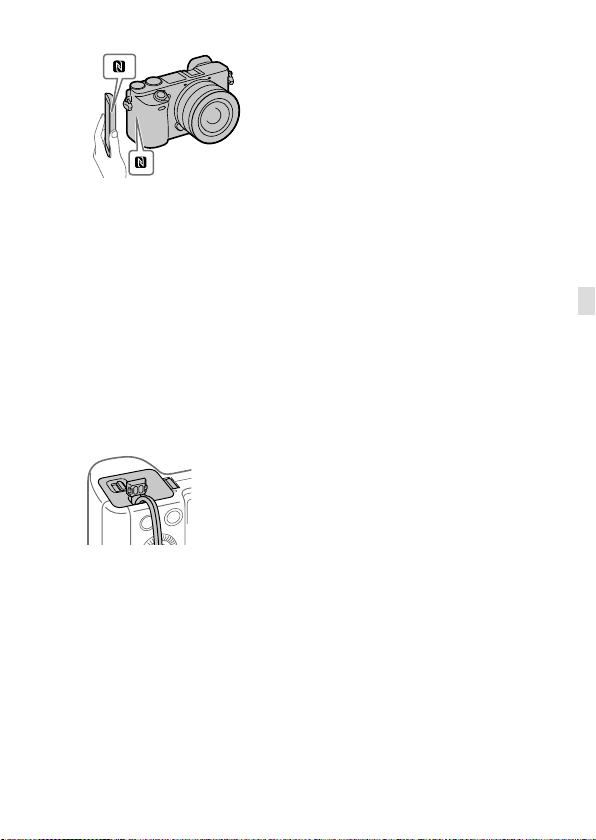
• NFC (Near Field
Communication) is an
international standard of
the short-range wireless
communication technology.
Connection plate cover
Use this when using an
AC-PW20 AC Adaptor
(sold separately). Insert the
connection plate into the
battery compartment, and
then pass the cord through
the connection plate cover as
shown below.
Make sure that the cord is not
pinched when you close the
cover.
Tripod socket hole
Use a tripod with a screw less
than 5.5 mm (7/32 inches)
long. Otherwise, you cannot
firmly secure the camera, and
damage to the camera may
occur.
Access lamp
Battery/memory card cover
Memory card slot
Battery lock lever
Battery insertion slot
GB
GB
17
Page 19
Basic operations
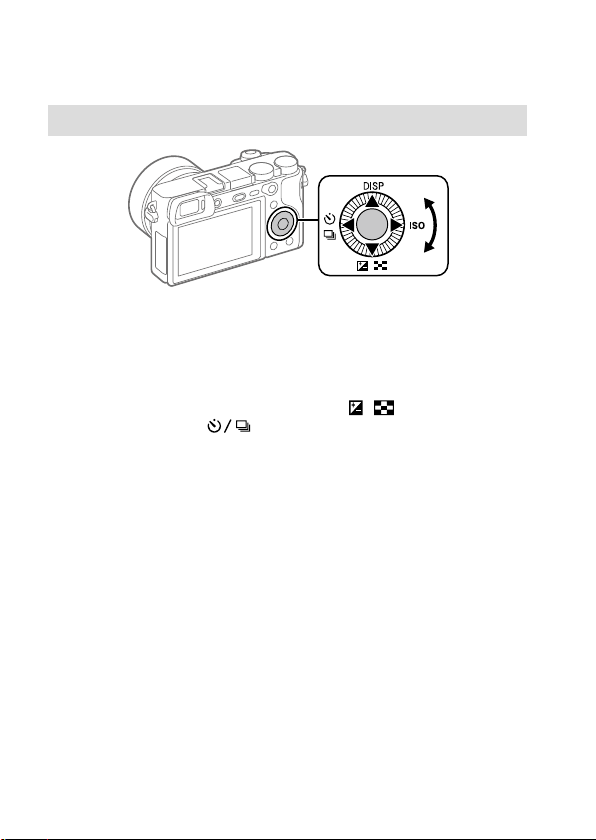
Using the control wheel
• You can select setting items by turning or pressing the top/bottom/
left/right side of the control wheel. Your selection is determined when
you press the center of the control wheel.
• The default settings for the top/bottom/left/right side and the center
of the control wheel are as follows.
Top side: DISP (Display Setting)
Bottom side: Exposure Comp./Image Index (
Left side: Drive Mode (
Right side: ISO
Center: Eye AF
You can also assign the desired functions to the bottom/left/right side
or the center of the control wheel.
• During playback, you can display the next/previous image by pressing
the right/left side of the control wheel or by turning the control wheel.
)
/ )
18
GB
Page 20
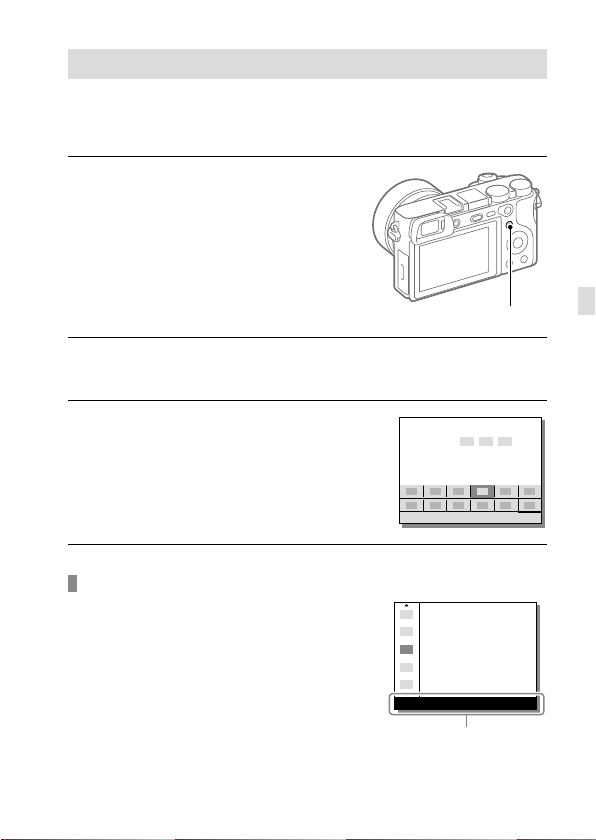
Using the Fn (Function) button
You can register frequently used functions to the Fn (Function) button
and recall them while shooting. Up to 12 frequently used functions can be
registered to the Fn (Function) button.
1
Press the DISP button
repeatedly to display a
screen mode other than
[For viewfinder], and then
press the Fn (Function) button.
Fn
2
Select the desired function by pressing the top/bottom/left/
right side of the control wheel.
3
Select the desired setting by
turning the control wheel, and
press the center of the control
wheel.
• Some functions can be finetuned using the control dial.
To adjust settings from the dedicated setting screens
Select the desired function in step 2,
then press the center of the control
wheel. The dedicated setting screen
for the function will appear. Follow the
operating guide to adjust settings.
GB
Operation guide
GB
19
Page 21

Using the AF/MF/AEL switch lever
You can switch the function of the
AF/MF/AEL button to AF/MF or AEL by
changing the position of the AF/MF/AEL
switch lever.
When you move the AF/MF/AEL
switch lever to the AF/MF position and
press the button, the focusing mode
temporarily switches between auto
and manual (AF/MF control). When you
move the AF/MF/AEL switch lever to the
AEL position and press the button, the
exposure is locked (AE lock).
AF/MF button/
AEL button
AF/MF/AEL switch lever
20
GB
Page 22
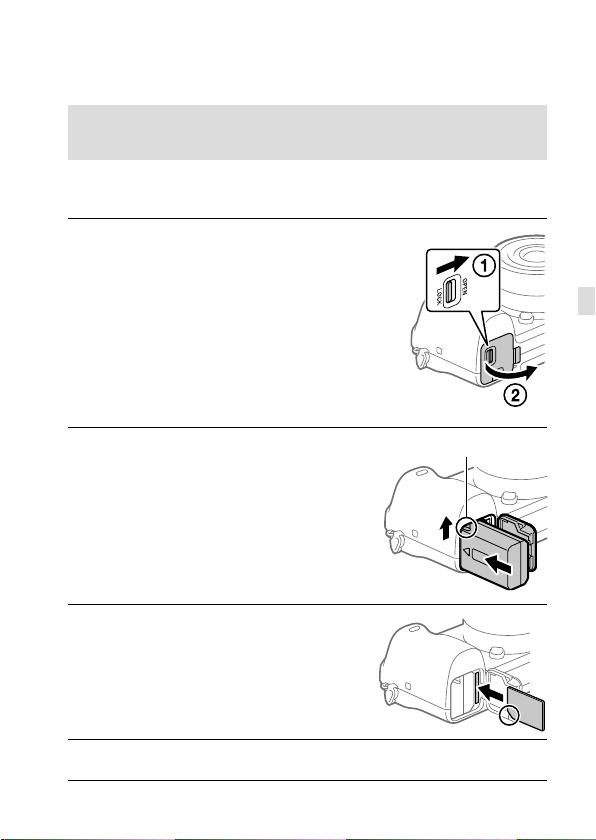
Startup guide
Step 1: Inserting the battery pack/memory card into the
camera
For details on memory cards that can be used with this camera, refer to
page 44.
1
Open the battery/memory
card cover.
GB
2
Insert the battery pack while
pressing the lock lever with
the tip of the battery until the
battery locks into place.
3
Insert the memory card.
• With the notched corner facing
in the direction illustrated, insert
the memory card until it clicks
into place. Otherwise, it may
cause a malfunction.
4
Close the cover.
Lock lever
GB
21
Page 23
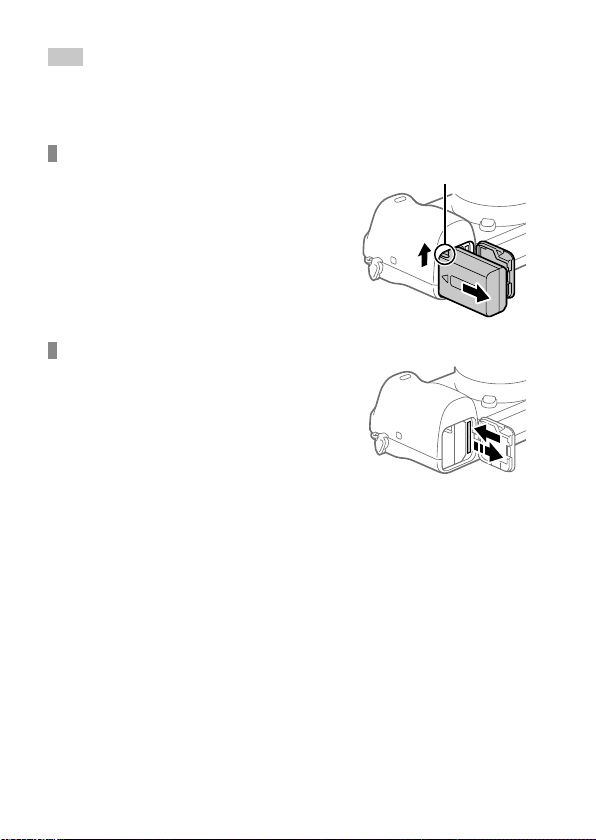
Hint
• When you use a memory card with the camera for the first time, it is
recommended that you format the card on the camera for more stable
performance of the memory card (page 42).
To remove the battery pack
Make sure that the access lamp
(page 17) is not lit, and turn off
the camera. Then, slide the lock
lever and remove the battery pack.
Be careful not to drop the battery
pack.
Lock lever
To remove the memory card
Make sure that the access lamp
(page 17) is not lit, and then
push in the memory card once to
remove it.
22
GB
Page 24
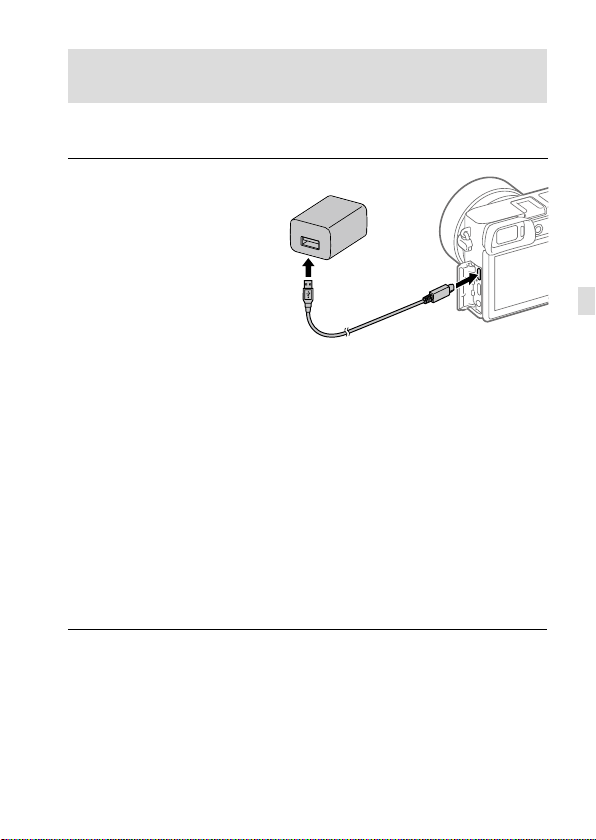
Step 2: Charging the battery pack while it is inserted in
the camera
1
Turn the power off.
2
Connect the camera
with the battery pack
inserted to the AC Adaptor
(supplied) using the micro
USB cable (supplied), and
connect the AC Adaptor
to the wall outlet (wall
socket).
Charge lamp on the camera (orange)
Lit: Charging
Off: Charging finished
Flashing: Charging error or charging paused temporarily because the
camera is not within the proper temperature range
• Charging time (full charge): approximately 150 min (when charging a
fully depleted battery pack at a temperature of 25°C (77°F))
• When you use a completely new battery pack or a battery pack that
has not been used for a long time, the charge lamp may flash quickly
when the battery is charged. If this happens, remove the battery pack
or disconnect the USB cable from the camera and then re-insert it to
recharge.
• Be sure to use only genuine Sony brand battery packs, micro USB
cables (supplied) and AC Adaptors (supplied).
GB
GB
23
Page 25
Step 3: Attaching a lens
1
Remove the body cap from the
camera and the rear lens cap
from the rear of the lens.
• When changing the lens,
work quickly in a dust-free
environment to keep dust or
debris from getting inside the
camera.
2
Mount the lens by aligning
the two white index marks
(mounting indexes) on the
lens and camera.
• Hold the camera with the lens
facing down to prevent dust
or debris from entering the
camera.
3
While pushing the lens lightly
toward the camera, turn the
lens slowly in the direction of
the arrow until it clicks into
the locked position.
Body cap
Rear lens cap
24
GB
Page 26

Note
• Be sure to hold the lens straight and do not use force when attaching a lens.
• Do not press the lens release button when attaching a lens.
• The Mount Adaptor (sold separately) is required to use an A-mount lens
(sold separately). For details, refer to the operating manual supplied with the
Mount Adaptor.
• When carrying the camera with a lens attached, hold both the camera and
the lens firmly.
• Do not hold the part of the lens that is extended for zoom or focus
adjustment.
To remove the lens
Keep pressing the lens release
button and turn the lens in the
direction of the arrow until it stops.
Lens release button
GB
GB
25
Page 27
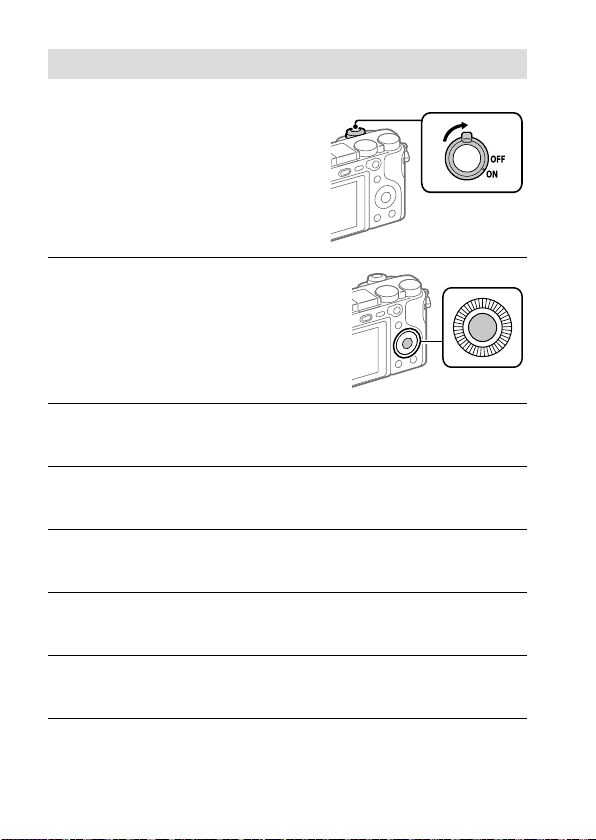
Step 4: Setting the language and the clock
1
Set the ON/OFF (Power) switch
to “ON” to turn on the camera.
ON/OFF (Power)
switch
2
Select the desired language
and then press the center of
the control wheel.
3
Make sure that [Enter] is selected on the screen and then press
the center.
4
Select the desired geographic location and then press the
center.
5
Select a setting item using the top/bottom of the control wheel
or by turning the control wheel, and then press the center.
6
Select the desired item by pressing the top/bottom/left/right
side of the control wheel, and then press the center.
7
Repeat steps 5 and 6 to set other items, then select [Enter] and
press the center.
GB
26
Page 28
Hint
• If you want to set the date and time later, you can cancel the date and time
setting procedure by pressing the MENU button. In this case, the setting
screen for the date and time will reappear the next time you turn on the
camera.
• To reset the date and time setting, use MENU (page 42).
Note
• This camera does not have a function for inserting the date into images.
You can insert the date into images and then save and print them using
PlayMemories Home (for Windows only).
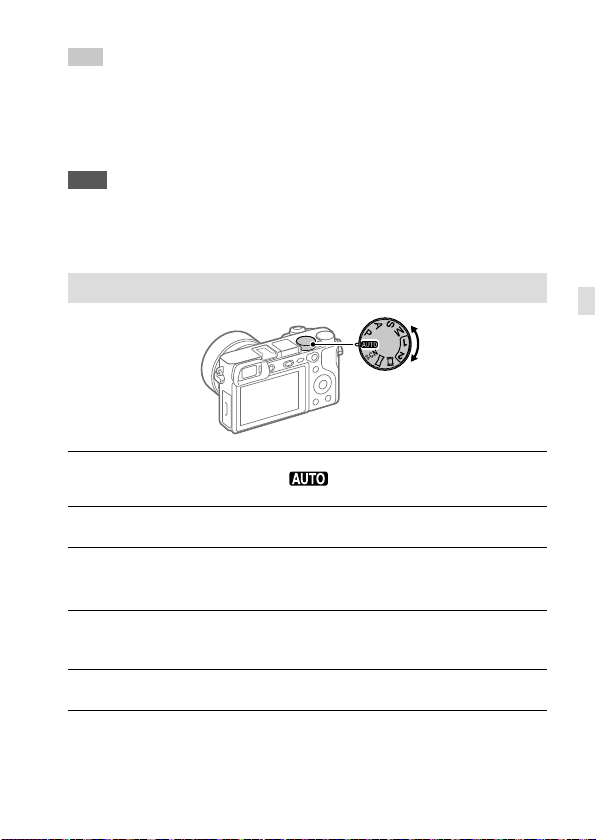
Step 5: Shooting images in auto mode
1
Turn the mode dial to set to .
2
Look through the viewfinder and hold the camera.
3
Set the size of the subject by rotating the zoom ring of the lens
when a zoom lens is attached.
4
Press the shutter button halfway down to focus.
• When the image is in focus, an indicator (such as ) will light up.
5
Press the shutter button all the way down.
GB
GB
27
Page 29

To shoot movies
Press the MOVIE button to start/stop recording.
To play back images
Press the (Playback) button to play back images. You can select the
desired image using the control wheel.
To delete displayed image
Press the (Delete) button while an image is displayed to delete it.
Select [Delete] using the control wheel on the confirmation screen, and
then press the center of the control wheel to delete the image.
To shoot images in various shooting modes
Set the mode dial to the desired mode depending on the subject or the
functions you want to use.
28
GB
Page 30

Using the Wi-Fi / One-touch (NFC) /
Bluetooth functions
You can perform the following operations using the camera's Wi-Fi, NFC
One-touch, and Bluetooth functions.
• Saving images to a computer
• Transferring images from the camera to a smartphone
• Using a smartphone as a remote control for the camera
• Viewing still images on a TV
• Recording location information from a smartphone to images
For details, refer to the “Help Guide” (page 2) or to the attached
document “Wi-Fi Connection/One-touch (NFC) Guide.”
PlayMemories Mobile
PlayMemories Mobile is required to connect the camera and a
smartphone. If PlayMemories Mobile is already installed on your
smartphone, be sure to update it to the latest version.
For details on PlayMemories Mobile, refer to the support page
(http://www.sony.net/pmm/).
Recording location information to captured images
By using PlayMemories Mobile, you can obtain location information from
a connected smartphone (via Bluetooth communication) and record it to
captured images.
GB
GB
29
Page 31

Introduction to computer software /
PlayMemories Camera Apps
We offer the following computer software and
PlayMemories Camera Apps to enhance your enjoyment of photos/
movies.
To take advantage of the computer software, access one of the following
URLs using your Internet browser and then download the software by
following the onscreen instructions. If one of these programs is already
installed on your computer, update it to the latest version before use.
Windows:
http://www.sony.co.jp/imsoft/Win/
Mac:
http://www.sony.co.jp/imsoft/Mac/
You can check the recommended operating environment for the software from
the following URL:
http://www.sony.net/pcenv/
PlayMemories Home
PlayMemories Home allows you to import still images and movies to your
computer and view or use them.
You need to install PlayMemories Home to import XAVC S movies or
AVCHD movies to your computer.
You can access the download website directly from the following URL:
http://www.sony.net/pm/
• When you connect the camera to your computer, new functions may
be added to PlayMemories Home. Connecting the camera to your
computer is therefore recommended even if PlayMemories Home has
already been installed on the computer.
30
GB
Page 32

Image Data Converter
You can develop and edit RAW images using various adjustment
functions like tone curve and sharpness.
Remote Camera Control
With Remote Camera Control, you can change the camera settings or
release the shutter from a computer connected via a USB cable.
To use Remote Camera Control, first select MENU
[USB Connection] [PC Remote], then connect the camera to a
computer via a USB cable.
(Setup)
PlayMemories Camera Apps
You can add the functions of your choice to your camera by connecting
to the application download website
using your computer or the Wi-Fi function of the camera.
http://www.sony.net/pmca/
• After installing an application, you can call up the application by
touching an NFC-enabled Android smartphone to the
camera, using the [One-touch(NFC)] function.
(PlayMemories Camera Apps)
mark on the
GB
GB
31
Page 33

List of MENU items
For details on each MENU items, refer to the Help Guide.
(Camera Settings1)
Quality/Image Size
Quality
Image Size
Aspect Ratio
Panorama: Size
Panorama: Direction
Long Exposure NR
High ISO NR
Color Space
Lens Comp.
Shoot Mode/Drive
Auto Mode
Scene Selection
S. Auto Img. Extract.
Drive Mode
Red tab
Sets the image quality for still images.
([RAW]/ [Fine], etc.)
Selects the size of still images.
(L/ M/ S)
Selects the aspect ratio for still images.
Selects the size of panoramic images.
Sets the shooting direction for panoramic images.
Sets noise reduction processing for shots with a
shutter speed of 1 second or longer.
Sets noise reduction processing for high-sensitivity
shooting.
Changes the color space (range of reproducible
colors).
Selects the type of lens compensation.
You can shoot selecting either Intelligent Auto or
Superior Auto.
Selects pre-set settings to match various scene
conditions.
([Portrait]/ [Sports Action], etc.)
When the shooting mode is set to [Superior Auto]
and the camera recognizes the scene to be shot
with multiple images, this sets whether to extract an
image automatically and save it.
Sets the drive mode, such as for continuous
shooting.
([Self-timer]/ [Cont. Bracket], etc.)
32
GB
Page 34

Bracket Settings
/ Recall
/ Memory
AF
Focus Mode
Priority Set in AF-S
Priority Set in AF-C
Focus Area
AF Illuminator
Center Lock-on AF
AF System
AF w/ shutter
Pre-AF
Eye-Start AF
AF Area Auto Clear
Disp. cont. AF area
Sets self-timer shooting in bracket mode, shooting
order for exposure bracketing, and white balance
bracketing.
Calls up settings pre-registered to
/ Memory].
[
Registers the desired modes and camera settings.
Selects the focus mode.
([Single-shot AF]/ [Continuous AF], etc.)
Sets the timing of the shutter release when
[Focus Mode] is set to [Single-shot AF], [DMF] or
[Automatic AF] with a still subject.
Sets the timing of the shutter release when
[Focus Mode] is set to [Continuous AF] or
[Automatic AF] with a moving subject.
Selects the area of focus.
([Wide]/ [Flexible Spot], etc.)
Sets the AF illuminator, which provides light to aid
focusing in dark scenes.
Sets the function to track a subject and continue
focusing when pressing the center of control wheel
in the shooting screen.
Sets the auto focus method when an LA-EA1/LA-EA3
Mount Adaptor (sold separately) is attached.
Sets whether to perform auto focusing when the
shutter button is pressed halfway down. This is
useful when you want to adjust the focus and
exposure separately.
Sets whether or not to perform auto focus before
the shutter button is half pressed.
Sets whether to use auto focus when you look
through the viewfinder if an LA-EA2/LA-EA4 Mount
Adaptor (sold separately) is attached.
Sets whether the focus area is displayed all the time
or disappears automatically shortly after focusing.
Sets whether or not to display the focus area in
[Continuous AF] mode.
GB
GB
33
Page 35
AF Micro Adj.
Exposure
Exposure Comp.
ISO
ISO AUTO Min. SS
Metering Mode
Spot Metering Point
Exposure step
AEL w/ shutter
Exposure Std. Adjust
Flash
Flash Mode
Flash Comp.
Exp.comp.set
Red Eye Reduction
Color/WB/Img. Processing
White Balance
Priority Set in AWB
Finely adjusts the autofocused position, when
using the LA-EA2 or LA-EA4 Mount Adaptor
(sold separately).
Compensates for the brightness of the entire image.
Sets the ISO sensitivity.
([ISO AUTO], etc.)
Sets the slowest shutter speed at which ISO
sensitivity will start to change in [ISO AUTO] mode.
Selects the method for measuring brightness.
([Multi]/ [Spot], etc.)
Sets whether to coordinate the spot metering point
with the focus area when [Focus Area] is set to
[Flexible Spot] or [Expand Flexible Spot].
Selects the size of the increment step for shutter
speed, aperture, and exposure compensation.
Sets whether to lock the exposure when the shutter
button is pressed halfway down. This is useful
when you want to adjust the focus and exposure
separately.
Adjusts the standard for the correct exposure value
for each metering modes.
Sets the flash settings.
Adjusts the intensity of flash output.
Sets whether to reflect exposure compensation
value to flash compensation.
Reduces the red-eye phenomenon when using
flash.
Corrects the tone effect of the ambient light to shoot
whitish objects in a white tone.
([Auto]/ [Daylight], etc.)
Selects which tone to prioritize when shooting under
lighting conditions such as incandescent light with
[White Balance] set to [Auto].
34
GB
Page 36

DRO/Auto HDR
Creative Style
Picture Effect
Picture Profile
Soft Skin Effect
Focus Assist
Focus Magnifier
Focus Magnif. Time
AF in Focus Mag.
MF Assist
Peaking Level
Peaking Color
Face Detection/Shoot Assist
Smile/Face Detect.
Face Registration
Analyzes the contrast of light and shadow between
the subject and the background by dividing the
image into small areas, and creates an image with
the optimal brightness and gradation.
Selects the desired image processing.
You can also adjust contrast, saturation, and
sharpness.
([Vivid]/ [Portrait], etc.)
Shoots images with a texture unique to the selected
effect.
([Toy Camera]/ [Rich-tone Mono.], etc.)
Changes settings such as color and tone when
recording images.
* This function is for skilled movie creators.
Sets the Soft Skin Effect and the effect level.
Enlarges the image before shooting so that you can
check the focus.
Sets the length of time the image will be shown in
an enlarged form.
Sets whether or not to autofocus when an enlarged
image is being displayed. While the enlarged image
is being displayed, you can focus within a smaller
area than the flexible spot.
Displays an enlarged image when focusing
manually.
Enhances the outline of in-focus areas with a
specific color when focusing manually.
Sets the color used for the peaking function.
Selects to detect faces and adjust various settings
automatically. Sets to automatically release the
shutter when a smile is detected.
([Off]/ [On (Regist. Faces)]/ [On]/ [Smile Shutter])
Registers or changes the person to be given priority
when focusing.
GB
GB
35
Page 37

Auto Obj. Framing
Analyzes the scene when capturing faces, close-ups,
or subjects tracked by the Lock-on AF function, and
automatically trims and saves another copy of the
image with a more impressive composition.
(Camera Settings2)
Movie
Movie/S&Q Motion
File Format
Record Setting
S&Q Settings
Dual Video REC
AF drive speed
AF Track Sens
Auto Slow Shut.
Audio Recording
Audio Rec Level
Audio Level Display
Wind Noise Reduct.
Marker Display
Purple tab
Sets the exposure mode when shooting movies
or slow-motion/quick-motion movies.
Selects the movie file format.
([XAVC S 4K]/ [AVCHD], etc.)
Selects the bit rate and frame rate for the
movie size.
Changes the settings for slow-motion and
quick-motion movie shooting.
Sets whether to simultaneously record an
XAVC S movie and MP4 movie or an AVCHD
movie and MP4 movie.
Switches focusing speed when using autofocus
in movie mode.
Sets the AF tracking sensitivity for the movie
mode.
Sets the function that automatically adjusts the
shutter speed following the brightness of the
environment in movie mode.
Sets whether to record audio when shooting
a movie.
Adjusts the audio recording level during movie
recording.
Sets whether to display the audio level.
Reduces wind noise during movie recording.
Sets whether to display markers on the monitor
when recording movies.
36
GB
Page 38

Marker Settings
Shutter/SteadyShot
Silent Shooting
e-Front Curtain Shut.
Release w/o Lens
Release w/o Card
SteadyShot
SteadyShot Settings
Zoom
Zoom
Zoom Setting
Zoom Ring Rotate
Display/Auto Review
DISP Button
FINDER/MONITOR
Finder Frame Rate
Zebra
Grid Line
Exposure Set. Guide
Sets which markers to displayed on the monitor
when recording movies.
Shoots images without a shutter sound.
Sets whether to use the electronic front curtain
shutter function.
Sets whether to release the shutter when the
lens is not attached.
Sets whether to release the shutter when a
memory card is not inserted.
Sets whether to activate SteadyShot for
shooting.
Sets SteadyShot settings.
Sets the zoom scale for zoom functions other
than the optical zoom.
Sets whether to use the Clear Image Zoom and
Digital Zoom when zooming.
Assigns the zoom in/out to the rotational
direction of the zoom lens. This function is
only available with a power zoom lens that is
compatible with this function.
Sets the type of information to be displayed on
the monitor or in the viewfinder when the DISP
button is pressed.
Sets the method for switching the display
between the electronic viewfinder and the
monitor.
Sets the frame rate for the viewfinder when
shooting still images.
Displays stripes to adjust brightness.
Displays grid lines for adjusting the image
composition.
Sets the guide displayed when exposure
settings are changed in the shooting screen.
GB
GB
37
Page 39
Live View Display
Auto Review
Custom Operation
Custom Key(Shoot.)
Custom Key(PB)
Function Menu Set.
Dial/Wheel Setup
Dial/Wheel Ev Comp
MOVIE Button
Dial/Wheel Lock
Audio signals
Sets whether to reflect settings such as
exposure compensation in screen display.
Sets auto review to display the captured image
after shooting.
Assigns functions to the various keys so that
you can perform operations more quickly by
pressing the keys when shooting images.
Assigns functions to the keys so that you can
perform operations more quickly by pressing
the keys when playing back images.
Customizes the functions displayed when the
Fn (Function) button is pressed.
Sets the function of the control dial and the
control wheel when the exposure mode is
set to M. You can adjust the shutter speed or
aperture with this setting.
Adjusts the exposure compensation with the
control dial or the control wheel.
Enables or disables for the MOVIE button.
Sets whether to disable the control dial and
the control wheel temporarily by using the Fn
button when shooting. You can disable/enable
the control dial and the control wheel by
pressing and holding down the Fn button.
Selects whether to sound a beep during auto
focus or self-timer operations.
(Wireless)
Send to Smartphone
Send to Computer
View on TV
GB
38
Green tab
Transfers images to display on a smartphone.
Backs up images by transferring them to a
computer connected to a network.
Allows you to view images on a network-
enabled TV.
Page 40

One-touch(NFC)
Airplane Mode
Wi-Fi Settings
Bluetooth Settings
Loc. Info. Link Set.
Edit Device Name
Reset Network Set.
Assigns an application to One-touch (NFC). You
can call up the application when shooting by
touching an NFC-enabled smartphone to the
camera.
Disables wireless communications from the
device such as Wi-Fi, NFC, and Bluetooth
function.
Allows you to register your access point
and check or change the Wi-Fi connection
information.
Controls the settings for connecting the camera
with a smartphone via a Bluetooth connection.
Obtains location information from the paired
smartphone and records it to captured images.
Changes the device name under Wi-Fi Direct,
etc.
Resets all the network settings.
GB
(Application)
Application List
Introduction
(Playback)
Delete
View Mode
Image Index
Display Rotation
Slide Show
Light Green tab
Displays the application list. You can select the
application you want to use.
Displays instructions on using the application.
Blue tab
Deletes an image.
Plays back images from a specified date or
specified folder of still images and movies.
Displays multiple images at the same time.
Sets the playback orientation for images shot
vertically.
Plays a slide show.
GB
39
Page 41
Rotate
Enlarge Image
Protect
Specify Printing
Photo Capture
Rotates the image.
Enlarges the playback images.
Protects recorded images against accidental
erasure.
Specifies in advance on the memory card which
still images to print out later.
Captures a chosen scene in a movie to save as
a still image.
(Setup)
Monitor Brightness
Viewfinder Bright.
Finder Color Temp.
Gamma Disp. Assist
Volume Settings
Upload Settings
Tile Menu
Mode Dial Guide
Delete confirm.
Display Quality
Pwr Save Start Time
Auto Pwr OFF Temp.
GB
40
Yellow tab
Adjusts the brightness of the screen.
Sets the brightness of the electronic viewfinder.
Sets the color temperature of the viewfinder.
Converts an S-Log image into an image with
contrast equivalent to a normal gamma setting
when it is displayed to assist monitoring.
Sets the volume for movie playback.
Sets the upload function of the camera when
using a commercially available Eye-Fi card.
Sets whether to display the tile menu every
time you press the MENU button.
Turns the mode dial guide (the explanation of
each shooting mode) on or off.
Sets whether [Delete] or [Cancel] is preselected
in the delete confirmation screen.
Sets the display quality.
Sets the time intervals to automatically switch
to power save mode.
Sets the camera temperature at which the
camera turns off automatically during shooting.
When shooting in hand-held mode, set to
[Standard].
Page 42

NTSC/PAL Selector
Cleaning Mode
Touch Operation
Touch Pad (vertical)
Touch Pad Area Set.
Demo Mode
TC/UB Settings
Remote Ctrl
HDMI Settings
4K Output Sel.
USB Connection
USB LUN Setting
USB Power Supply
PC Remote Settings
Language
*1
Changes the TV format of the device so that
you can shoot in a different movie format.
Starts the cleaning mode to clean the image
sensor.
Sets whether or not to activate the touch
operation of the monitor.
Sets whether to operate the camera using the
touch pad when you use the viewfinder in the
vertical position.
Sets the area to be used in the touch
pad operation at the time of shooting by
viewfinder.
Sets demonstration playback of movies to on
or off.
Sets the time code (TC) and user bit (UB).
* This function is for skilled movie creators.
Sets whether to use the infrared remote
control.
Sets the HDMI settings.
Sets how to record and output 4K movies via
HDMI when the camera is connected to an
external recorder/player that supports 4K.
Sets the USB connection method.
Enhances compatibility by limiting the
functions of USB connection. Set to [Multi]
in normal conditions and to [Single] only
when the connection between the camera
and a computer or AV component cannot be
established.
Sets whether to supply power via USB
connection when the camera is connected to
a computer or USB device using a micro USB
cable. If you use the supplied AC Adaptor,
power will be supplied regardless of whether
this setting is on or off.
Controls the PC remote shooting settings.
Selects the language.
GB
GB
41
Page 43

Date/Time Setup
Area Setting
Copyright Info
Format
File Number
Set File Name
Sets the date, time, and daylight savings.
Sets the location of use.
Sets copyright information for still images.
Formats the memory card.
Sets the method used to assign file numbers.
Changes the first 3 characters of the file names
for still images.
Select REC Folder
Changes the folder selected for storing still
images and movies (MP4).
New Folder
Creates a new folder for storing still images
and movies (MP4).
Folder Name
Recover Image DB
Sets the folder format for still images.
Recovers the image database file and enables
recording and playback.
Display Media Info.
Displays the remaining recording time of
movies and the recordable number of still
images on the memory card.
Version
Certification Logo
*2
Displays the camera software version.
Displays certification information for the
camera (only some of the certification logos are
displayed).
Setting Reset
Restores settings to their defaults. Select
[Initialize] to restore all settings to their default
values.
1
If you change this item, you will need to format the memory card for
*
compatibility with the PAL or NTSC system. Also, note that it may not be
possible to play back movies recorded for the NTSC system on PAL system
TVs.
2
Overseas models only.
*
42
GB
Page 44
Specifications
Battery life and number of recordable images
Battery life Number of images
Shooting
(still images)
Actual shooting
(movies)
Continuous shooting
(movies)
• The above estimates for battery life and number of recordable images
apply when the battery pack has been fully charged. The battery life
and number of images may decrease depending on the conditions of
use.
• The battery life and number of recordable images are estimates based
on shooting under the following conditions:
– Using the battery pack at an ambient temperature of 25°C (77°F).
– Using an E PZ 16 - 50mm F3.5 - 5.6 OSS lens (sold separately)
– Using a Sony SDXC memory card of UHS Speed Class 3 (
(sold separately)
– [Viewfinder Bright.]: [Manual] [±0]
– [Monitor Brightness]: [Manual] [±0]
– [Display Quality]: [Standard]
• The numbers for “Shooting (still images)” are based on the CIPA
standard and shooting under the following conditions:
(CIPA: Camera & Imaging Products Association)
– DISP: [Display All Info.]
– [Focus Mode]: [Automatic AF]
– One picture is taken every 30 seconds.
– The flash strobes once for every two pictures.
– The power is turned on and off once every ten times.
Screen mode
Viewfinder mode
Screen mode
Viewfinder mode
Screen mode
Viewfinder mode
― Approx. 350
― Approx. 310
Approx. 70 min. ―
Approx. 65 min. ―
Approx. 105 min. ―
Approx. 105 min. ―
)
GB
GB
43
Page 45

• The number of minutes for movie shooting is based on the CIPA
standard and shooting under the following conditions:
– The image quality is set to XAVC S HD 60p 50M
/50p 50M .
– Actual shooting (movies): Battery life based on repeatedly shooting,
zooming, shooting stand-by, turning on/off, etc.
– Continuous shooting (movies): Battery life based on non-stop
shooting until the limit (29 minutes) has been reached, and then
continued by pressing the MOVIE (Movie) button again. Other
functions, such as zooming, are not operated.
Memory cards that can be used
You can use the following types of memory cards with this camera. The
mark indicates that these memory cards can be used for shooting still
images or movies.
When using Memory Stick Micro media or microSD memory cards with
this camera, make sure to use with the appropriate adaptor.
Memory card
Memory Stick PRO Duo
Memory Stick PRO-HG Duo
Memory Stick Micro (M2)
SD memory card
SDHC memory card
SDXC memory card
microSD memory card
microSDHC memory card
microSDXC memory card
*1 Movies cannot be recorded in 100 Mbps or more.
2
SD Speed Class 4 ( ) or faster, or UHS Speed Class 1 ( ) or faster
*
3
SD Speed Class 10 ( ), or UHS Speed Class 1 ( ) or faster
*
For still
images
MP4 AVCHD XAVC S
(Mark2 only)(Mark2 only)
(Mark2 only)(Mark2 only)
For movies
2
*
2
*
2
*
2
*
2
*
2
*
2
*
2
*
2
*
2
*
2
*
2
*
When recording in 100 Mbps or more, UHS Speed Class 3 (
GB
44
—
*
—
—
*
*
—
*
*
) is required.
1
3
3
3
3
Page 46

Note
• When an SDHC memory card is used to record an XAVC S movie over
extended periods of time, the recorded movies will be divided into files 4GB
in size. The divided files can be handled as a single file by importing them to
a computer using PlayMemories Home.
Number of recordable images
When you insert a memory card into the camera and set the ON/OFF
(Power) switch to “ON,” the number of images that can be recorded
(should you continue to shoot using the current settings) is displayed on
the screen.
Note
• When “0” (the number of recordable images) flashes in orange, the memory
card is full. Replace the memory card with another one, or delete images from
the current memory card.
• When “NO CARD” flashes in orange, it means no memory card has been
inserted. Insert a memory card.
GB
GB
45
Page 47

The number of images that can be recorded on a memory
card
The table below shows the approximate number of images that can be
recorded on a memory card formatted with this camera. The values are
defined using Sony standard memory cards for testing. The values may
vary depending on the shooting conditions and the type of memory card
used.
Image Size]: [L: 24M]
[
Aspect Ratio]: [3:2]*
[
Standard
Fine
Extra fine
RAW & JPEG
RAW
* When [
than the numbers shown in the table above (except when [RAW] is selected).
Quality 8 GB 16 GB 32 GB 64 GB
1300 2700 5400 10500
820 1650 3300 6600
405 810 1600 3250
215 435 880 1750
295 600 1200 2400
Aspect Ratio] is set to other than [3:2], you can record more images
Note
• Even if the number of recordable images is higher than 9999 images, “9999”
will appear.
• When an image shot with another product is played back on this camera, the
image may not appear in its actual size.
• The numbers shown are when using a Sony memory card.
(Units: Images)
46
GB
Page 48

Recordable movie times
The table below shows the approximate total recording times using
a memory card formatted with this camera. The values may vary
depending on the shooting conditions and the type of memory card
used. The recording times for when [
[XAVC S HD], and [AVCHD] are recording times when shooting with
[Dual Video REC] set to [Off].
File Format Record Setting 8 GB 16 GB 32 GB 64 GB
XAVC S 4K
XAVC S HD
AVCHD
30p 100M/
25p 100M
30p 60M/
25p 60M
24p 100M
24p 60M
120p 100M/
100p 100M
120p 60M/
100p 60M
60p 50M
50p 50M
30p 50M
25p 50M
24p 50M
60i 24M (FX)
50i 24M (FX)
60i 17M (FH)
50i 17M (FH)
60p 28M (PS)
50p 28M (PS)
24p 24M (FX)
25p 24M (FX)
24p 17M (FH)
25p 17M (FH)
*/ –
*/ –
/
/
*/ –
/
/
/
/
/
File Format] is set to [XAVC S 4K],
(h (hour), m (minute))
9m 15m 35m 1h 15m
15m 30m 1h 2h 5m
9m 15m 35m 1h 15m
15m 30m 1h 2h 5m
9m 15m 35m 1h 15m
15m 30m 1h 2h 5m
15m 35m 1h 15m 2h 35m
15m 35m 1h 15m 2h 35m
15m 35m 1h 15m 2h 35m
40m 1h 25m 3h 6h
55m 2h 4h 5m 8h 15m
35m 1h 15m 2h 30m 5h 5m
40m 1h 25m 3h 6h
55m 2h 4h 5m 8h 15m
GB
GB
47
Page 49

File Format Record Setting 8 GB 16 GB 32 GB 64 GB
MP4
* Only when [NTSC/PAL Selector] is set to NTSC
1920×1080
60p 28M
50p 28M
1920×1080
30p 16M
25p 16M
1280×720
30p 6M
25p 6M
/
/
/
35m 1h 15m 2h 35m 5h 20m
1h 2h 4h 10m 8h 25m
2h 35m 5h 20m 10h 55m 22h
• Continuous shooting is possible for approximately 29 minutes (a
product specification limit). The continuous recordable time may differ
in the following situations:
– When the file format is set to MP4 (28M): Approximately 20 minutes
(limited by file size of 4 GB).
– When shooting slow-motion/quick-motion movies: Recording will
automatically stop when the recorded file reaches approximately
29minutes (the played back movie reaches approximately 29
minutes).
(Recording will automatically stop when the recorded file reaches
approximately 15 minutes if [
Frame Rate] is set to [30fps/25fps].)
and [
Record Setting] is set to [60p/50p]
• The times for slow-motion/quick-motion movies are playback times,
not recording times.
Note
• The recordable time of movies varies because the camera is equipped with
VBR (Variable Bit-Rate), which automatically adjusts image quality depending
on the shooting scene. When you record a fast-moving subject, the image is
clearer but the recordable time is shorter because more memory is required
for recording. The recordable time also varies depending on the shooting
conditions, the subject or the image quality/size settings.
• The times shown are recordable times using a Sony memory card.
48
GB
Page 50

Notes on continuous movie recording
• It requires a lot of power to perform high quality movie recording
or continuous shooting. Therefore, if you continue to shoot, the
temperature inside the camera will rise, especially that of the image
sensor. In such cases, the camera will turn off automatically because
the surface of the camera is heated to a high temperature that can
affect the quality of the images or the internal mechanism of the
camera.
• The following values are the continuous times from when the camera
starts recording until the camera stops recording.
Ambient
temperature
20°C (68°F)
30°C (86°F)
40°C (104°F)
[Auto Pwr OFF Temp.]: [Standard]
HD: XAVC S HD (60p 50M/50p 50M, not connected via Wi-Fi)
4K: XAVC S 4K (24p 60M, not connected via Wi-Fi)
• The duration of time available for movie recording varies with the
temperature, file format/record setting for movies, Wi-Fi network
environment, or condition of the camera before you start recording. If
you frequently recompose or shoot images after the power is turned
on, the temperature inside the camera will rise and the recording time
available will be shorter.
• When the
• If the camera stops recording due to the temperature, leave it for some
time with the power turned off. Start recording after the temperature
inside the camera drops fully.
• If you observe the following points, the recording time will be longer.
– Keep the camera out of direct sunlight.
– Turn the camera off when it is not being used.
• When [
File Format] is set to [AVCHD], the file size of movies is
limited to approx. 2GB. If the movie file size reaches approx. 2GB
during recording, a new movie file will be created automatically.
• When [
File Format] is set to [MP4], the file size of movies is limited
to approx. 4GB. If the movie file size reaches approx. 4GB during
recording, recording will stop automatically.
Continuous recording time for
movies (HD)
Approx. 29min. Approx. 20min.
Approx. 29min. Approx. 20min.
Approx. 29min. Approx. 20min.
Continuous recording time for
movies (4K)
icon appears, the temperature of the camera is too high.
GB
GB
49
Page 51

Specifications
Camera
[System]
Camera type
Interchangeable Lens Digital Camera
Lens
Sony E-mount lens
[Image sensor]
Image sensor
APS-C format (23.5mm × 15.6mm)
CMOS image sensor
Effective pixel number of camera
Approx. 24200000pixels
Total pixel number of image sensor
Approx. 25000000pixels
[SteadyShot]
System
In-camera sensor shift image
stabilization system
[Anti-Dust]
System
Charge protection coating on
optical filter and image sensor shift
mechanism
[Auto focus system]
System
Phase detection system/Contrast
detection system
Sensitivity range
EV–1 to EV20 (at ISO100 equivalent,
with F2.0 lens)
[Exposure control]
Metering method
1200-segment metering by the
image sensor
GB
50
Metering range
EV–2 to EV20 (at ISO100 equivalent,
with F2.0 lens)
ISO sensitivity (Recommended
exposure index)
Still images: AUTO, ISO100 –
ISO25600 (Extended ISO: Maximum
ISO51200)
Movies: AUTO, ISO100 – ISO25600
equivalent
Exposure compensation
±5.0EV (switchable between 1/3 and
1/2EV steps)
[Shutter]
Type
Electronically-controlled, verticaltraverse, focal-plane type
Speed range
Still images: 1/4000second to
30seconds, BULB
Movies: 1/4000second to
1/4second (1/3 EV step)
– 1080 60i-compatible device:
up to 1/60second in AUTO mode
(up to 1/30second in Auto slow
shutter mode)
– 1080 50i-compatible device:
up to 1/50second in AUTO mode
(up to 1/25second in Auto slow
shutter mode)
Flash sync speed
1/160second
[Recording media]
Memory Stick PRO Duo media, SD
card
[Monitor]
LCD monitor
Wide, 7.5cm (3.0type) TFT drive,
touch panel
Page 52

Total number of dots
921600dots
[Electronic viewfinder]
Type
Electronic viewfinder
Total number of dots
2359296dots
Frame coverage
100%
Magnification
Approx. 1.07×
Approx. 0.70× (35mm-format
equivalent) with 50mm lens at
infinity, –1m
Eye point (CIPA compliant)
Approx. 23mm from the eyepiece,
approx. 21.4mm from the eyepiece
frame at –1m
Diopter Adjustment
–4.0m
–1
–1
to +3.0m
(diopter)
–1
–1
[Input/output terminals]
Multi/Micro USB Terminal*
Hi-Speed USB (USB 2.0)
* Supports Micro USB compatible
device.
HDMI
HDMI type D micro jack
(Microphone) Terminal
3.5mm Stereo mini jack
[Power]
Battery type
Rechargeable battery pack NP-FW50
Power consumption (while shooting)
When using an
E PZ 16 – 50 mm F3.5 – 5.6 OSS lens
Approx. 2.8W (during shooting with
the viewfinder)
Approx. 2.5W (during shooting with
the monitor)
[Others]
Exif Print
Compatible
PRINT Image Matching III
Compatible
DPOF
Compatible
Dimensions (CIPA compliant)
(Approx.)
120.0mm × 66.9mm × 53.3mm
(43/4inches × 23/4inches ×
21/8inches) (W/H/D)
Mass (CIPA compliant) (Approx.)
453g (1lb)
(including battery and SD card)
410g (14.5oz) (camera only)
Operating temperature
0°C to 40°C (32°F to 104°F)
Storage temperature
–20°C to +60°C (–4°F to +140°F)
[File format]
Still image
JPEG compliant (DCF Ver. 2.0, Exif Ver.
2.31, MPF Baseline), RAW (Sony ARW
2.3 Format)
Movies (XAVC S format)
MPEG-4 AVC/H.264 XAVC S ver.1.0
format compliant
Video: MPEG-4 AVC/H.264
Audio: LPCM2ch (48kHz 16bit)
Movie (AVCHD format)
AVCHD format Ver. 2.0 compatible
Video: MPEG-4 AVC/H.264
Audio: Dolby Digital 2ch
Dolby Digital Stereo Creator
• Manufactured under license from
Dolby Laboratories.
Movie (MP4 format)
Video: MPEG-4 AVC/H.264
Audio: MPEG-4 AAC-LC 2ch
USB communication
Hi-Speed USB (USB 2.0)
GB
GB
51
Page 53

[Flash]
Flash guide number
6 (in meters at ISO100)
Recycling time
Approx. 4seconds
Flash coverage
Covering 16mm lens (focal length
that the lens indicates)
Flash compensation
±3.0EV (switchable between 1/3 and
1/2 EV steps)
[Wireless LAN]
Supported format
IEEE802.11b/g/n
Frequency band
2.4GHz
Supported security protocols
WEP/WPA-PSK/WPA2-PSK
Configuration method
Wi-Fi Protected Setup™ (WPS)/
Manual
Access method
Infrastructure mode
[NFC]
Tag type
NFC Forum Type 3 Tag compliant
[Bluetooth communications]
Bluetooth standard Ver. 4.1
Frequency band
2.4GHz
Model No. WW213019
AC Adaptor AC-UUD12/UUE12
Power requirements
AC 100V to 240V, 50Hz/60Hz, 0.2A
Output voltage
DC 5V, 1.5A
Rechargeable battery pack
NP-FW50
Nominal voltage
DC 7.2V
Design and specifications are subject
to change without notice.
52
GB
Page 54

On focal length
The picture angle of this camera is
narrower than that of a 35 mmformat camera. You can find the
approximate equivalent of the focal
length of a 35 mm-format camera,
and shoot with the same picture
angle, by increasing the focal length
of your lens by half.
For example, by using a 50 mm
lens, you can get the approximate
equivalent of a 75 mm lens of a
35mm-format camera.
Trademarks
• Memory Stick and are
trademarks or registered
trademarks of Sony Corporation.
• XAVC S and
trademarks of Sony Corporation.
• “AVCHD Progressive” and
the “AVCHD Progressive”
logotype are trademarks of
Panasonic Corporation and
Sony Corporation.
• Mac is a registered trademark of
Apple Inc. in the United States and
other countries.
• IOS is a registered trademark or
trademark of Cisco Systems, Inc.
• iPhone and iPad are registered
trademarks of Apple Inc. in the
United States and other countries.
• Blu-ray Disc™ and Blu-ray™
are trademarks of the
Blu-ray Disc Association.
• DLNA and DLNA CERTIFIED
are trademarks of
Digital Living Network Alliance.
• Dolby and the double-D symbol are
trademarks of Dolby Laboratories.
• Eye-Fi is a trademark of Eye-Fi, Inc.
• The terms HDMI and HDMI HighDefinition Multimedia Interface,
and the HDMI Logo are trademarks
or registered trademarks of HDMI
Licensing LLC in the United States
and other countries.
• Microsoft and Windows
are registered trademarks
or trademarks of
Microsoft Corporation in the United
States and/or other countries.
• SDXC logo is a trademark of
SD-3C, LLC.
are registered
GB
GB
53
Page 55

• Facebook and the “f” logo
are trademarks or registered
trademarks of Facebook, Inc.
• Android and Google Play
are trademarks or registered
trademarks of Google Inc.
• YouTube and the YouTube logo
are trademarks or registered
trademarks of Google Inc.
• Wi-Fi, the Wi-Fi logo and
Wi-Fi Protected Setup are
registered trademarks or
trademarks of the Wi-Fi Alliance.
• The N Mark is a trademark
or registered trademark of
NFC Forum, Inc. in the United States
and in other countries.
• The Bluetooth® word mark and
logos are registered trademarks
owned by the Bluetooth SIG, Inc.
and any use of such marks by
Sony Corporation is under license.
• In addition, system and product
names used in this manual are, in
general, trademarks or registered
trademarks of their respective
developers or manufacturers.
However, the
not be used in all cases in this
manual.
or marks may
On GNU GPL/LGPL applied
software
The software that is eligible for the
following GNU General Public License
(hereinafter referred to as “GPL”) or
GNU Lesser General Public License
(hereinafter referred to as “LGPL”) are
included in the product.
This informs you that you have a
right to have access to, modify,
and redistribute source code for
these software programs under the
conditions of the supplied GPL/LGPL.
Source code is provided on the web.
Use the following URL to download it.
http://oss.sony.net/Products/Linux/
We would prefer you do not contact
us about the contents of source code.
Licenses (in English) are recorded in
the internal memory of your product.
Establish a Mass Storage connection
between the product and a computer
to read licenses in the “PMHOME” “LICENSE” folder.
Additional information on this
product and answers to frequently
asked questions can be found at our
Customer Support Website.
54
GB
Page 56

GB
55
GB
Page 57

Français
Consultez le
Manuel d’aide!
Le «Manuel d’aide» est un mode d’emploi en ligne que vous
pouvez lire sur votre ordinateur ou smartphone. Consultezle pour en savoir plus sur les éléments du menu, l’utilisation
avancée et les plus récentes informations sur l’appareil.
Scannez
ici
http://rd1.sony.net/help/ilc/1640/h_zz/
ILCE-6500 Manuel d’aide
Mode d’emploi
(ce livret)
Ce mode d’emploi présente
certaines fonctions de base.
Voir «Guide de démarrage»
(page22) pour le guide de
démarrage rapide. Le «Guide
de démarrage» présente les
procédures initiales depuis le
moment où vous déballez le
produit jusqu’au moment où vous
déclenchez l’obturateur pour la
première prise de vue.
FR
2
Guide intégr. à
l'app.
Le [Guide intégr. à l'app.]
donne des explications des
éléments du menu sur l’écran
de l’appareil.
Vous pouvez facilement obtenir
des informations pendant la prise
de vue.
Pour utiliser la fonction
[Guide intégr. à l'app.],
certains réglages doivent être
effectués au préalable. Pour
en savoir plus, recherchez
«Guide intégr. à l'app.» dans le
Manuel d’aide.
Page 58

AVERTISSEMENT
Afin de réduire les risques
d’incendie ou de décharge
électrique, n’exposez pas cet
appareil à la pluie ou à l’humidité.
IMPORTANTES
INSTRUCTIONS DE
SÉCURITÉ
- CONSERVEZ CES
INSTRUCTIONS
DANGER
AFIN DE RÉDUIRE LE
RISQUE D’INCENDIE
OU DE DÉCHARGE
ÉLECTRIQUE, SUIVEZ
EXACTEMENT CES
INSTRUCTIONS
Si la forme de la fiche ne correspond
pas à la prise secteur, utilisez un
adaptateur de fiche accessoire de
configuration correcte pour la prise
secteur.
ATTENTION
Batterie
Toute erreur de manipulation de
la batterie peut provoquer son
explosion, entraîner un incendie,
voire même des brûlures de
substances chimiques. Respectez les
précautions suivantes :
• Ne démontez pas la batterie.
• N’écrasez et n’exposez pas la batterie
à des chocs ou à une force extérieure.
Vous ne devez pas la frapper avec un
marteau, la laisser tomber ou marcher
dessus.
• Ne court-circuitez pas les bornes de
la batterie et maintenez-les à l’écart
de tout contact avec des objets
métalliques.
• N’exposez pas la batterie à des
températures supérieures à 60 °C
(140°F), notamment les rayons directs
du soleil ou l’habitacle d’un véhicule
garé au soleil.
• N’incinérez pas la batterie et ne la
jetez pas au feu.
• Ne manipulez jamais des batteries
lithium ion qui sont endommagées
ou présentent une fuite.
• Veillez à recharger la batterie à l’aide
d’un chargeur Sony authentique ou
d’un appareil capable de la recharger.
• Tenez la batterie hors de la portée
des petits enfants.
• Gardez la batterie au sec.
• Remplacez-la uniquement par une
batterie de même type ou d’un type
équivalent recommandé par Sony.
• Mettez les batteries au rebut sans
attendre, de la manière décrite dans
les instructions.
• N’exposez pas l’appareil à des
températures et des pressions très
basses, respectivement inférieures ou
égales à -20 °C (-4 °F) et à 11,6kPa.
FR
FR
3
Page 59

Lorsque vous utilisez l’adaptateur
secteur/le chargeur de batterie,
branchez-le sur une prise murale
se trouvant à proximité. En cas de
dysfonctionnement, débranchez
immédiatement la fiche de la prise
murale pour couper l’alimentation.
Si vous utilisez un produit équipé
d'un témoin de charge, notez que
l'alimentation du produit n'est pas
coupée même lorsque le témoin est
éteint.
Le cordon d’alimentation, s’il est
fourni, est conçu spécifiquement
pour une utilisation exclusive avec ce
produit et ne doit pas être utilisé avec
un autre appareil électrique.
Cordon d’alimentation
Pour les clients au Royaume-Uni,
en Irlande, à Malte, à Chypre et en
Arabie saoudite
Utilisez le cordon d’alimentation
(A). Pour des raisons de sécurité, le
cordon d’alimentation (B) ne doit pas
être utilisé dans les pays/régions,
pour lesquels il n’est pas conçu.
Pour les clients dans les autres pays/
régions de l’UE
Utilisez le cordon d’alimentation (B).
(A) (B)
Avis
Si l’électricité statique ou les
champs électrostatiques entraînent
une interruption lors du transfert
des données (échec), redémarrez
l’application ou débranchez, puis
rebranchez le câble de connexion
(USB, etc.).
Cet appareil a été testé et jugé
conforme aux limites établies
par la réglementation EMC visant
l’utilisation de câbles de connexion
de moins de 3 mètres (9,8 pi.).
Le champ électromagnétique à des
fréquences particulières peut avoir
une incidence sur l’image et le son de
cet appareil.
Pour les clients aux États-Unis et
au Canada
RECYCLAGE DES ACCUMULATEURS AUX
IONS DE LITHIUM
Les accumulateurs aux
ions de lithium sont
recyclables.
Vous pouvez
contribuer à préserver
l’environnement en
rapportant les piles usagées dans un
point de collecte et de recyclage le
plus proche.
Pour plus d’informations sur le
recyclage des accumulateurs,
téléphonez au numéro gratuit
1-800-822-8837 (États-Unis et Canada
uniquement), ou visitez
http : //www.call2recycle.org/
FR
4
Page 60

Avertissement : Ne pas utiliser des
accumulateurs aux ions de lithium
qui sont endommagés ou qui fuient.
Cet équipement est conforme
aux limites d’exposition aux
rayonnements énoncées pour
un environnement non contrôlé
et respecte les règles les
radioélectriques (RF) de la FCC
lignes directrices d’exposition. Cet
équipement émet une énergie RF
très faible qui est considérée comme
conforme sans évaluation du débit
d’absorption spécifique (DAS).
Les connaissances scientifiques
dont nous disposons n’ont mis en
évidence aucun problème de santé
associé à l’usage des appareils
sans fil à faible puissance. Nous ne
sommes cependant pas en mesure
de prouver que ces appareils sans fil
à faible puissance sont entièrement
sans danger. Les appareils sans fil
à faible puissance émettent une
énergie fréquence radioélectrique
(RF) très faible dans le spectre des
micro-ondes lorsqu’ils sont utilisés.
Alors qu’une dose élevée de RF
peut avoir des effets sur la santé (en
chauffant les tissus), l’exposition à
de faibles RF qui ne produisent pas
de chaleur n’a pas de mauvais effets
connus sur la santé. De nombreuses
études ont été menées sur les
expositions aux RF faibles et n’ont
découvert aucun effet biologique.
Certaines études ont suggéré
qu’il pouvait y avoir certains effets
biologiques, mais ces résultats n’ont
pas été confirmés par des recherches
supplémentaires.
Cet équipement a été testé et jugé
conforme aux limites d’exposition
aux rayonnements IC énoncées pour
un environnement non contrôlé et
respecte les règles d’exposition aux
fréquences radioélectriques (RF)
CNR-102 de l’IC.
Pour les utilisateurs au Canada
Le présent appareil est conforme aux
CNR d’Industrie Canada applicables
aux appareils radio exempts de
licence. L’exploitation est autorisée
aux deux conditions suivantes :
1) l’appareil ne doit pas produire de
brouillage;
2) l’utilisateur de l’appareil
doit accepter tout brouillage
radioélectrique subi, même si le
brouillage est susceptible d’en
compromettre le fonctionnement.
CAN ICES-3 B/NMB-3 B
POUR LES CLIENTS RÉSIDANT EN
EUROPE
Fabricant : Sony Corporation, 1-7-1
Konan Minato-ku Tokyo, 108-0075
Japon
Pour toute question relative à la
conformité des produits dans l’UE :
Sony Belgium, bijkantoor van Sony
Europe Limited, Da Vincilaan 7-D1,
1935 Zaventem, Belgique
FR
FR
5
Page 61

Par la présente, Sony Corporation
déclare que cet appareil est
conforme aux exigences essentielles
et aux autres dispositions pertinentes
de la directive 1999/5/CE. Pour toute
information complémentaire, veuillez
consulter l’URL suivante :
http : //www.compliance.sony.de/
Élimination des piles et accumulateurs
et des Équipements Électriques et
Électroniques usagés (Applicable dans
les pays de l’Union Européenne et aux
autres pays européens disposant de
systèmes de collecte sélective)
Ce symbole apposé
sur le produit, la pile
ou l’accumulateur
ou sur l’emballage,
indique que le
produit et les piles
et accumulateurs fournis avec
ce produit ne doivent pas être
traités comme de simples déchets
ménagers.
Sur certains types de piles, ce
symbole apparaît parfois combiné
avec un symbole chimique. Les
symboles pour le mercure (Hg) ou le
plomb (Pb) sont rajoutés lorsque ces
piles contiennent plus de 0,0005% de
mercure ou 0,004% de plomb.
En vous assurant que les produits,
piles et accumulateurs sont mis au
rebut de façon appropriée, vous
participez activement à la prévention
des conséquences négatives que
leur mauvais traitement pourrait
provoquer sur l’environnement et
sur la santé humaine. Le recyclage
des matériaux contribue par ailleurs
à la préservation des ressources
naturelles.
FR
6
Pour les produits qui pour des raisons
de sécurité, de performance ou
d’intégrité de données nécessitent
une connexion permanente à
une pile ou à un accumulateur, il
conviendra de vous rapprocher d’un
Service Technique qualifié pour
effectuer son remplacement.
En rapportant votre appareil
électrique, les piles et accumulateurs
en fin de vie à un point de collecte
approprié vous vous assurez que le
produit, la pile ou l’accumulateur
incorporé sera traité correctement.
Pour tous les autres cas de figure
et afin d’enlever les piles ou
accumulateurs en toute sécurité
de votre appareil, reportez-vous au
manuel d’utilisation.
Rapportez les piles et accumulateurs,
et les équipements électriques et
électroniques usagés au point de
collecte approprié pour le recyclage.
Pour toute information
complémentaire au sujet du
recyclage de ce produit ou des piles
et accumulateurs, vous pouvez
contacter votre municipalité, votre
déchetterie locale ou le point de
vente où vous avez acheté ce
produit.
Page 62

Remarques sur l’utilisation de votre
appareil
Voir également «Précautions» dans
le Manuel d’aide (page2) en plus
de cette section.
Langue à l’écran
Vous pouvez sélectionner la
langue affichée à l’écran à l’aide
du menu (page44).
Remarques sur l’enregistrement/
la lecture
• Le formatage de la carte mémoire
supprime définitivement toutes les
données enregistrées sur la carte
mémoire, il est impossible de les
restaurer. Copiez vos données sur
un ordinateur ou un autre support
de stockage avant de réaliser le
formatage.
• Avant de commencer à enregistrer,
effectuez un essai afin de vous
assurer que l’appareil fonctionne
correctement.
Remarques sur la manipulation du
produit
• Cet appareil est conçu pour résister
à la poussière et à l’humidité, mais
il n’est pas étanche à l’eau ni aux
éclaboussures.
• Ne laissez pas l’appareil, les
accessoires fournis ou les cartes
mémoire à la portée des jeunes
enfants. Ils pourraient être avalés
accidentellement. Le cas échéant,
consultez immédiatement un
médecin.
Pas d’indemnisation en cas
de contenu endommagé ou
d’enregistrement manqué
Sony ne saurait accorder de
garanties dans le cas d’un échec de
l’enregistrement ou de la perte ou
de la détérioration d’images ou de
données audio enregistrées dus à
un dysfonctionnement de l’appareil
ou du support d’enregistrement,
etc. Nous vous recommandons
d’effectuer une sauvegarde de vos
données importantes.
Remarques relatives à l’écran, au
viseur électronique, à l’objectif et
au capteur d’image
• La fabrication de l’écran et du
viseur électronique fait appel à une
technologie de très haute précision,
et plus de 99,99% des pixels sont
opérationnels pour une utilisation
effective. Quelques petits points
noirs et/ou lumineux (de couleur
blanche, rouge, bleue ou verte)
peuvent toutefois être visibles
en permanence sur l’écran et le
viseur électronique. Ces points sont
inhérents au procédé de fabrication
et n’affectent aucunement les
images.
• Ne saisissez pas l’appareil par
l’écran.
• Lorsque vous utilisez l’objectif
zoom motorisé, faites attention à
ce que rien ne se fasse coincer dans
l’objectif, y compris vos doigts.
FR
FR
7
Page 63

• Ne laissez pas l’objectif ou le viseur
exposés à une source de lumière
intense, comme les rayons du
soleil. En raison de la fonction de
condensation de l’objectif, cela
pourrait provoquer un dégagement
de fumée, un incendie ou un
dysfonctionnement à l’intérieur du
boîtier de l’appareil ou de l’objectif.
Si vous devez laisser l’appareil
exposé à une source de lumière
comme les rayons du soleil, fixez le
capuchon d’objectif sur l’objectif.
• Lorsque vous photographiez en
contre-éclairage, maintenez le
soleil suffisamment loin de l’angle
de champ. Autrement, les rayons
du soleil peuvent pénétrer le
foyer à l’intérieur de l’appareil et
provoquer un dégagement de
fumée ou un incendie. Même si le
soleil est légèrement éloigné de
l’angle de champ, il peut toujours
provoquer un dégagement de
fumée ou un incendie.
• N’exposez pas directement
l’objectif à des rayons tels que
les faisceaux laser. Vous risquez
d’endommager le capteur
d’image et de provoquer un
dysfonctionnement de l’appareil.
• Ne regardez pas le soleil ou
une source de lumière intense
à travers l’objectif après l’avoir
retiré de l’appareil. Vous
risquez des blessures oculaires
irréversibles et de provoquer un
dysfonctionnement.
• N’utilisez pas l’appareil à proximité
d’une forte source d’ondes
radioélectriques ou de radiations.
L’enregistrement et la lecture
pourraient en être affectés.
FR
8
• Il se peut que les images laissent
une traînée sur l’écran dans un
endroit froid. Il ne s’agit pas d’une
anomalie.
• L’image enregistrée peut être
différente de l’image contrôlée
avant l’enregistrement.
Remarques sur l’utilisation des
objectifs et des accessoires
Nous vous recommandons
d’utiliser des objectifs/accessoires
Sony conçus pour répondre aux
caractéristiques de cet appareil
photo. L’utilisation de cet appareil
avec des accessoires fournis
par d’autres fabricants peut
affecter ses performances, et
entraîner des accidents ou des
dysfonctionnements. Sony ne
saurait être tenu responsable de tels
accidents ou dysfonctionnements.
Remarques sur la
Griffe multi-interface
• Lorsque vous installez des
accessoires, par exemple un flash
externe, sur la Griffe multi-interface
et lorsque vous les retirez, mettez
d’abord l’appareil hors tension
(OFF). Lorsque vous installez
l’accessoire, confirmez qu’il est
solidement fixé à l’appareil.
• N’utilisez pas la
Griffe multi-interface avec un
flash en vente dans le commerce
appliquant des tensions
supérieures ou égales à 250V ou
ayant une polarité opposée à celle
de l’appareil photo. Cela pourrait
provoquer un dysfonctionnement.
Page 64

Remarques sur la prise de vue
avec le viseur
• L’image peut être légèrement
déformée près des coins du viseur.
Il ne s’agit pas d’une anomalie.
Vous pouvez aussi utiliser l’écran
pour observer en détail la totalité
de la composition.
• Si vous faites un panorama avec
l’appareil tout en regardant dans
le viseur ou bougez vos yeux tout
autour, l’image dans le viseur peut
être déformée ou les couleurs de
l’image peuvent changer. Il s’agit
d’une caractéristique de l’objectif
ou du dispositif d’affichage et pas
d’une anomalie. Lorsque vous
photographiez une image, nous
vous recommandons de regarder
au centre du viseur.
• Lorsque vous effectuez des prises
de vue en utilisant le viseur, il
se peut que vous présentiez les
symptômes suivants : fatigue
visuelle, fatigue, mal des
transports ou nausée. Nous vous
recommandons de faire des pauses
régulières lorsque vous effectuez
des prises de vue en utilisant le
viseur.
Si vous ressentez une gêne, évitez
d’utiliser le viseur jusqu’à ce que
vous alliez mieux, et consultez
votre médecin si nécessaire.
Remarques sur la prise de vue en
continu
Pendant la prise de vue en continu,
l’écran ou le viseur peuvent clignoter
entre l’écran de prise de vue et
un écran noir. Si vous continuez
à regarder l’écran dans cette
situation, vous pourriez ressentir des
symptômes désagréables comme
un malaise. Si vous ressentez des
symptômes désagréables, arrêtez
d’utiliser l’appareil photo et consultez
un médecin si nécessaire.
Remarques sur l’enregistrement
prolongé et sur l’enregistrement
de films 4K
• Selon la température de l’appareil
et de la batterie, il se peut que
vous n’arriviez pas à enregistrer
des films ou que l’alimentation se
coupe automatiquement afin de
protéger l’appareil. Un message
s’affiche sur l’écran avant que
l’appareil se mette hors tension
ou que vous ne puissiez plus
enregistrer de film. Dans ce cas,
laissez l’appareil hors tension et
attendez que la température de
l’appareil et de la batterie diminue.
Si vous mettez l’appareil sous
tension sans laisser l’appareil et la
batterie refroidir suffisamment, il se
peut que l’alimentation se coupe à
nouveau ou que vous ne puissiez
pas enregistrer de films.
• À une température ambiante
élevée, la température de l’appareil
augmente rapidement.
FR
FR
9
Page 65

• Lorsque la température de
l’appareil augmente, la qualité de
l’image peut se détériorer. Nous
vous recommandons de patienter
jusqu’à ce que la température
de l’appareil diminue avant de
poursuivre la prise de vue.
• La surface de l’appareil peut
chauffer. Il ne s’agit pas d’une
anomalie.
• Si une partie de votre peau est en
contact prolongé avec l’appareil
pendant que vous l’utilisez,
et même si l’appareil ne vous
semble pas chaud, vous risquez
de présenter des symptômes de
brûlures superficielles à basse
température (rougeurs, cloques).
Faites particulièrement attention
dans les situations suivantes, et
utilisez un trépied ou un autre
dispositif adéquat:
– Lorsque vous utilisez l’appareil à
température ambiante élevée;
– Lorsqu’une personne souffrant
de troubles circulatoires ou d’une
perte de sensibilité cutanée utilise
l’appareil;
– Lorsque vous utilisez l’appareil
avec [Tmp HORS tens. aut.] réglé
sur [Élevé].
• La durée d’enregistrement peut
être réduite à basse température,
en particulier pour les films
4K. Réchauffez la batterie ou
remplacez-la par une batterie
neuve.
Remarques sur la lecture de films
sur d’autres périphériques
Les films enregistrés avec cet
appareil risquent de ne pas être
lus correctement sur d’autres
périphériques. Réciproquement,
les films enregistrés avec d’autres
périphériques risquent de ne pas être
lus correctement sur cet appareil.
Avertissement sur les droits
d’auteur
Les émissions de télévision, films,
cassettes vidéo et autres œuvres
peuvent être protégés par des
droits d’auteur. L’enregistrement
non autorisé de telles œuvres peut
constituer une infraction à la loi sur
les droits d’auteur.
À propos des spécifications
techniques décrites dans ce
manuel
Les données indiquées pour les
performances et les spécifications
sont définies dans les conditions
suivantes, sauf mention contraire
dans ce manuel : à une température
ambiante de 25 ºC (77 °F) et en
utilisant une batterie complètement
chargée (charge poursuivie jusqu’à
extinction du témoin de charge).
10
FR
Page 66

Comment désactiver
provisoirement les fonctions
réseau sans fil (fonction Wi-Fi, NFC
et Bluetooth, etc.)
Lorsque vous montez à bord
d’un avion ou autre, vous pouvez
désactiver provisoirement toutes les
fonctions réseau sans fil.
Sélectionnez le bouton MENU
(Sans fil) [Mode avion] [ON].
Si vous réglez [Mode avion] sur [ON],
une marque
l’écran.
(avion) s’affiche sur
À propos des réseaux locaux sans
fil
Si votre appareil est perdu ou volé,
Sony n’assume aucune responsabilité
quant à la perte ou au préjudice
causés par l’accès ou l’utilisation
illicites du point d’accès enregistré
sur l’appareil.
Remarques relatives à la sécurité
lors de l’utilisation d’un réseau
local sans fil
• Assurez-vous toujours que vous
utilisez un réseau local sans fil
sécurisé afin de vous protéger
contre tout piratage, accès par
des tiers malveillants ou autres
vulnérabilités.
• Il est important de régler les
paramètres de sécurité lorsque vous
utilisez un réseau local sans fil.
• Sony ne saurait être tenu
responsable des pertes ou
dommages causés par un
problème de sécurité en l’absence
de précautions de sécurité ou en
cas de circonstances inévitables
lorsque vous utilisez un réseau
local sans fil.
FR
FR
11
Page 67

Vérification de l’appareil et des éléments
fournis
Le nombre indiqué entre
parenthèses correspond au
nombre d’éléments fournis.
• Appareil photo (1)
• Cordon d’alimentation (1)*
(fourni dans certains pays/
régions)
* Plusieurs cordons d’alimentation
peuvent être fournis avec
l’appareil photo. Utilisez le
cordon approprié qui correspond
à votre pays ou région. Voir
page4.
• Batterie rechargeable NP-FW50
(1)
• Câble micro-USB (1)
• Adaptateur secteur (1)
• Bandoulière (1)
• Oculaire de visée (1)
• Capuchon de boîtier (1) (fixé à
l’appareil photo)
• Capuchon de la griffe (1) (fixé à
l’appareil photo)
• Mode d’emploi (Ce manuel) (1)
• Wi-Fi Connection/One-touch
(NFC) Guide (1)
12
FR
Page 68

Identification des pièces
* Ne couvrez pas cette pièce
** Ne touchez pas directement cette
Lorsque l’objectif est retiré
Déclencheur
Capteur à distance
Antenne Wi-Fi (intégrée)
Interrupteur ON/OFF
(alimentation)
Témoin de retardateur/
Illuminateur AF
Bouton de déverrouillage de
l’objectif
Microphone*
Monture
Capteur d’image**
Contacts de l’objectif**
pendant l’enregistrement de films.
Sinon, cela risque de se traduire
par du bruit ou par une baisse du
volume sonore.
pièce.
FR
Griffe multi-interface*
Certains accessoires peuvent
ne pas s’enclencher à fond
et dépasser à l’arrière de
la griffe multi-interface.
Toutefois, lorsque l’accessoire
touche l’avant de la griffe, la
connexion est correcte.
FR
13
Page 69

Indicateur de position du
capteur d’image
Le capteur d’image est le
capteur qui convertit la
lumière en signal électrique.
L’indicateur
l’emplacement du capteur
d’image. Lorsque vous
mesurez la distance exacte
entre l’appareil photo et le
sujet, référez-vous à la position
de la ligne horizontale. La
distance entre la surface de
contact de l’objectif et le
capteur d’image est d’environ
18 mm (23/32 po.).
Si la distance au sujet est
inférieure à la distance de prise
de vue minimale de l’objectif,
la mise au point ne sera pas
vérifiée. Veillez à laisser assez
de distance entre le sujet et
l’appareil.
Crochets pour bandoulière
Fixez les deux extrémités de la
bandoulière à l’appareil.
indique
Haut-parleur
Flash
• Appuyez sur le bouton
(Déploiement du flash) pour
utiliser le flash. Le flash ne
sort pas automatiquement.
• Lorsque vous n'utilisez pas le
flash, faites-le rentrer dans le
corps de l'appareil.
Bouton C2 (Bouton Perso2)
Bouton C1 (Bouton Perso1)
Sélecteur de mode
(Mode auto)/
(Programme Auto)/
(Priorité ouvert.)/
(Priorité vitesse)/
(Exposition manuelle)/
(Rappel de mémoire)/
1/2
(Film/ralenti+accél.)/
(Panor. par balayage)/
(Sélection scène)
14
FR
Page 70

Sélecteur de commande
Vous pouvez rapidement
ajuster les réglages pour
chaque mode de prise de vue.
Multi/micro connecteur USB*
Ce connecteur prend en charge
les appareils compatibles
micro-USB.
Témoin de charge
Micro prise HDMI
Prise (microphone)
Lorsqu’un microphone externe
est connecté, le microphone
interne est automatiquement
désactivé. Lorsque le
microphone externe est de
type Plugin-power, il est
alimenté via l’appareil photo.
* Pour en savoir plus sur les
accessoires compatibles avec
la griffe multi-interface et le
Multi/micro connecteur USB,
visitez le site Internet Sony. Vous
pouvez aussi consulter votre
revendeur Sony ou un centre de
service après-vente Sony agréé.
Capteur de visée
Viseur
Oculaire de visée
Non installé sur l’appareil
en usine. Nous vous
recommandons d’installer
l’oculaire de visée lorsque vous
souhaitez utiliser le viseur.
Installation et retrait de
l’oculaire de visée
Faites coïncider l’oculaire de
visée avec la rainure sur le
viseur et faites-le glisser en
place.
FR
FR
15
Page 71

Pour enlever l'oculaire de visée,
saisissez-le par ses côtés et
soulevez-le.
• Pensez à retirer l’oculaire
de visée lorsque vous
installez un accessoire
(vendu séparément) sur la
Griffe multi-interface.
Écran (fonctionnement tactile:
écran tactile/pavé tactile)
L’écran peut être ajusté pour
offrir un angle de vue adapté
et vous permettre d’effectuer
des prises de vue, quelle que
soit votre position.
Selon le type de trépied
utilisé, il se peut que vous
ne parveniez pas à régler
l’angle de l’écran. Dans ce cas,
dégagez la vis du trépied pour
régler l’angle de l’écran.
Molette de réglage dioptrique
Pour ajuster le viseur à votre
vue, faites tourner la molette
de réglage dioptrique jusqu’à
ce que l’affichage devienne
net. Si vous avez du mal à
commander la molette de
réglage dioptrique, retirez
l’oculaire de visée avant
d’utiliser la molette.
Bouton (Déploiement du
flash)
Bouton MENU
Sélecteur AF/MF/AEL
Pour la prise de vue:
bouton AF/MF/ bouton AEL
Pour la visualisation:
bouton
Bouton MOVIE (Film)
Pour la prise de vue:
(Agrandir)
bouton Fn (Fonction)
Pour la visualisation: bouton
(Env. vers smartphon.)
Vous pouvez afficher l’écran
[Env. vers smartphon.] en
appuyant sur ce bouton.
16
FR
Page 72

Molette de commande
Bouton central
Pour la prise de vue:
bouton C3 (Bouton Perso3)
Pour la visualisation:
bouton
Bouton (Lecture)
(Supprimer)
(symbole N)
Ce symbole indique le point
de contact permettant de
connecter l’appareil et un
smartphone équipé de la
technologie NFC.
• NFC (Near Field
Communication) est une
norme internationale
de technologie de
communication sans fil à
courte portée.
FR
FR
17
Page 73

Couvercle de plaque de
connexion
Utilisez-le lorsque vous
utilisez un adaptateur secteur
AC-PW20 (vendu séparément).
Insérez la plaque de connexion
dans le compartiment de la
batterie, puis faites passer le
cordon à travers le couvercle
de la plaque de connexion
comme illustré ci-dessous.
Veillez à ce que le cordon ne
soit pas pincé lorsque vous
refermez le couvercle.
Écrou de pied
Utilisez un trépied avec une
vis de fixation de longueur
inférieure à 5,5mm (7/32po).
Sinon, vous ne pourrez pas
fixer l’appareil fermement, et
vous risquez de l’endommager.
Témoin d’accès
Couvercle du compartiment
batterie/carte mémoire
Fente de carte mémoire
Levier de verrouillage de la
batterie
Fente d’insertion de la batterie
18
FR
Page 74
Fonctions de base
Utilisation de la molette de commande
• Vous pouvez sélectionner les éléments de réglage en tournant la
molette de commande, ou en appuyant sur son côté supérieur/
inférieur/gauche/droit. Validez votre sélection en appuyant au centre
de la molette de commande.
• Les fonctions attribuées par défaut au centre et au côté supérieur/
inférieur/gauche/droit de la molette de commande sont les suivantes:
Côté supérieur: DISP (Réglage de l’affichage)
Côté inférieur: Correct. exposition/Index d'images (
Côté gauche: Entraînement (
Côté droit: ISO
Centre: AF sur les yeux
Vous pouvez aussi attribuer les fonctions de votre choix au centre ou au
côté inférieur/gauche/droit de la molette de commande.
• Pendant la lecture, vous pouvez afficher l’image suivante/précédente
en appuyant sur le côté droit/gauche de la molette de commande, ou
en la faisant tourner.
)
/ )
FR
FR
19
Page 75

Utilisation du bouton Fn (Fonction)
Vous pouvez affecter des fonctions fréquemment utilisées au bouton Fn
(Fonction) et les rappeler pendant la prise de vue. Il est possible d’affecter
jusqu’à 12fonctions fréquemment utilisées au bouton Fn (Fonction).
1
Appuyez à plusieurs reprises
sur le bouton DISP pour
afficher un mode d’écran
autre que [Pour le viseur],
puis appuyez sur le bouton Fn
(Fonction).
Fn
2
Sélectionnez la fonction souhaitée en appuyant sur le côté
supérieur/inférieur/gauche/droit de la molette de commande.
3
Sélectionnez le réglage
souhaité en tournant la
molette de commande, puis
appuyez au centre de la
molette de commande.
• Il est possible de régler certaines
fonctions avec précision à l'aide
du sélecteur de commande.
20
FR
Page 76

Pour ajuster les réglages depuis les écrans de réglage
dédiés
Sélectionnez la fonction souhaitée à
l’étape2, puis appuyez au centre de
la molette de commande. L’écran de
réglage dédié à la fonction apparaîtra.
Suivez le guide d’opérations pour
ajuster les réglages.
Guide d’opérations
Utilisation du sélecteur AF/MF/AEL
Vous pouvez faire basculer la fonction
du bouton AF/MF/AEL entre AF/MF
et AEL en modifiant la position du
sélecteur AF/MF/AEL.
Lorsque vous mettez le sélecteur
AF/MF/AEL en position AF/MF et que
vous appuyez sur le bouton, le mode de
mise au point bascule temporairement
entre auto et manuel (contrôle AF/MF).
Lorsque vous mettez le sélecteur
AF/MF/AEL en position AEL et que vous
appuyez sur le bouton, l'exposition est
verrouillée (verrouillage AE).
FR
Bouton AF/MF/
bouton AEL
Sélecteur AF/MF/AEL
FR
21
Page 77
Guide de démarrage
Étape1: Insérer la batterie et la carte mémoire dans
l’appareil
Pour en savoir plus sur les cartes mémoire utilisables avec cet appareil,
reportez-vous à la page 47.
1
Ouvrez le couvercle du
compartiment de la batterie/
carte mémoire.
2
Insérez la batterie tout en
appuyant sur le taquet de
verrouillage avec l’extrémité
de la batterie jusqu’à ce
qu’elle s’enclenche et se
verrouille en place.
3
Insérez la carte mémoire.
• En positionnant le coin biseauté
comme illustré, insérez la
carte mémoire jusqu’au clic
d’enclenchement. Sinon,
vous risquez de provoquer un
dysfonctionnement.
4
Fermez le couvercle.
FR
22
Taquet de verrouillage
Page 78

Astuce
• Lorsque vous utilisez une carte mémoire pour la première fois avec cet
appareil, nous vous recommandons de la formater avec l’appareil, afin de
garantir une performance stable de la carte mémoire (page44).
Pour retirer la batterie
Assurez-vous que le témoin
d’accès (page18) est éteint,
puis mettez l’appareil hors tension.
Ensuite, faites glisser le taquet de
verrouillage et retirez la batterie.
Faites attention à ne pas faire
tomber la batterie.
Taquet de verrouillage
Pour retirer la carte mémoire
Assurez-vous que le témoin d’accès
(page18) est éteint, puis poussez
sur la carte mémoire une fois pour
la retirer.
FR
FR
23
Page 79

Étape2: Charger la batterie une fois celle-ci insérée dans
l’appareil
1
Mettez-le hors tension.
2
La batterie étant insérée
dans l’appareil, raccordez
celui-ci à l’adaptateur
secteur (fourni) à l’aide du
câble micro-USB (fourni)
et branchez l’adaptateur
secteur sur la prise
murale.
Témoin de charge de l’appareil (orange)
Allumé: charge en cours
Éteint: charge terminée
Clignotant: erreur de charge ou interruption momentanée de la charge
parce que la température de l’appareil est en dehors de la plage
recommandée
• Temps de charge (charge complète): environ 150 min (pour une
batterie complètement déchargée, à une température ambiante de
25 °C (77°F))
• Lorsque vous chargez une batterie neuve (première charge) ou une
batterie qui n’a pas été utilisée depuis longtemps, le témoin de
charge peut clignoter rapidement lorsque la batterie est chargée.
Dans ce cas, retirez la batterie ou débranchez le câble USB de
l’appareil photo, puis réinsérez la batterie ou rebranchez le câble
pour recharger.
• Utilisez exclusivement des batteries, des câbles micro-USB (fourni) et
des adaptateurs secteur (fourni) de la marque Sony.
24
FR
Page 80

Étape3: Fixer un objectif
1
Retirez le capuchon de boîtier
de l’appareil et le capuchon
d’objectif arrière de l’arrière
de l’objectif.
• Procédez rapidement au
changement d’objectif à l’abri
de la poussière, pour éviter que
de la poussière ou des corps
étrangers ne pénètrent dans
l’appareil.
2
Installez l’objectif en alignant
le repère blanc de l’objectif
et celui de l’appareil photo
(repères de montage).
• Tenez l’appareil avec l’objectif
incliné vers le bas afin d’éviter
que de la poussière ou des
corps étrangers ne pénètrent
dans l’appareil.
3
Tout en poussant doucement
l’objectif vers l’appareil,
tournez lentement l’objectif
dans le sens de la flèche
jusqu’à ce qu’il s’enclenche en
position verrouillée.
Capuchon de
boîtier
Capuchon d’objectif arrière
FR
FR
25
Page 81

Note
• Veillez à tenir l’objectif droit et à ne pas forcer lorsque vous fixez l’objectif.
• N’appuyez pas sur le bouton de déverrouillage de l’objectif lorsque vous
installez un objectif.
• Pour utiliser un objectif à monture A (vendu séparément), un adaptateur
pour monture d’objectif (vendu séparément) est nécessaire. Pour en savoir
plus, consultez le guide d’utilisation fourni avec l’adaptateur pour monture
d’objectif.
• Lorsque vous transportez l’appareil avec l’objectif installé, tenez fermement
l’appareil et l’objectif.
• Veillez toutefois à ne pas tenir l’objectif par la partie qui se déploie pour
zoomer ou effectuer la mise au point.
Pour retirer l’objectif
Maintenez le bouton de
déverrouillage de l’objectif enfoncé
et tournez l’objectif dans le sens de
la flèche jusqu’à ce qu’il s’arrête.
Bouton de déverrouillage
de l’objectif
26
FR
Page 82

Étape4: Régler la langue et l’horloge
1
Placez l’interrupteur ON/OFF
(alimentation) sur « ON »
pour mettre l’appareil sous
tension.
Interrupteur
ON/OFF
(alimentation)
2
Sélectionnez la langue
souhaitée et appuyez au
centre de la molette de
commande.
3
Vérifiez que [Entrer] est sélectionné sur l’écran, puis appuyez
au centre.
4
Sélectionnez l’emplacement géographique souhaité, puis
appuyez au centre.
5
Sélectionnez l’élément de réglage en appuyant sur le côté
supérieur/inférieur de la molette de commande ou en la
faisant tourner, puis appuyez au centre.
6
Sélectionnez l’élément désiré en appuyant sur le côté
supérieur/inférieur/gauche/droit de la molette de commande,
puis appuyez au centre.
FR
7
Répétez les étapes 5 et 6 pour régler d’autres éléments, puis
sélectionnez [Entrer] et appuyez au centre.
FR
27
Page 83

Astuce
• Si vous souhaitez régler la date et l’heure ultérieurement, vous pouvez
annuler la procédure de réglage de la date et de l’heure en appuyant sur
le bouton MENU. Dans ce cas, l’écran de réglage pour la date et l’heure
réapparaîtra à la prochaine mise sous tension de l’appareil.
• Pour réinitialiser le réglage de la date et de l’heure, utilisez MENU
(page44).
Note
• Cet appareil ne dispose pas de fonction d’insertion de la date sur les images.
Vous pouvez insérer la date dans les images, les sauvegarder puis les
imprimer à l’aide de PlayMemories Home (pour Windows uniquement).
Étape5: Effectuer des prises de vue en mode auto
1
Placez le sélecteur de mode sur .
2
Regardez dans le viseur et tenez l’appareil.
3
Réglez la taille du sujet en tournant la bague de zoom de
l’objectif si un objectif zoom est fixé.
4
Enfoncez le déclencheur à mi-course pour effectuer la mise au
point.
• Lorsque l’image est nette, un indicateur (comme ) s’allume.
5
Enfoncez complètement le déclencheur.
FR
28
Page 84

Pour enregistrer des films
Appuyez sur le bouton MOVIE pour lancer/arrêter l’enregistrement.
Pour lire des images
Appuyez sur le bouton (Lecture) pour lire les images. Vous pouvez
sélectionner l’image souhaitée à l’aide de la molette de commande.
Pour supprimer l’image affichée
Appuyez sur le bouton (Supprimer) pendant qu’une image est affichée
pour la supprimer. Sélectionnez [Supprimer] sur l’écran de confirmation à
l’aide de la molette de commande puis appuyez au centre de la molette
de commande pour supprimer l’image.
Pour prendre des images dans différents modes de prise
de vue
Placez le sélecteur de mode sur le mode souhaité selon le sujet ou les
fonctions que vous souhaitez utiliser.
FR
FR
29
Page 85

Utilisation des fonctions Wi-Fi/par simple
contact (NFC)/Bluetooth
Vous pouvez exécuter les opérations suivantes au moyen des fonctions
Wi-Fi, Bluetooth et par simple contact NFC de l’appareil.
• Sauvegarde d’images vers un ordinateur
• Transfert d’images depuis l’appareil vers un smartphone
• Utilisation d’un smartphone en tant que télécommande de l’appareil
• Visualisation d’images fixes sur un téléviseur
• Enregistrement des informations sur l’emplacement depuis un
smartphone vers les images
Pour en savoir plus, reportez-vous au «Manuel d’aide» (page2) ou
au document joint «Wi-Fi Connection/One-touch (NFC) Guide».
PlayMemories Mobile
PlayMemories Mobile est nécessaire pour connecter l’appareil et
un smartphone. Si PlayMemories Mobile est déjà installé sur votre
smartphone, veillez à le mettre à jour vers la plus récente version.
Pour plus d’informations sur PlayMemories Mobile, consultez la page
d’assistance (http://www.sony.net/pmm/).
Enregistrement des informations de position sur les
images capturées
Grâce à PlayMemories Mobile, vous pouvez obtenir des informations de
position à partir d’un smartphone connecté (communication Bluetooth) et
les enregistrer sur les images capturées.
30
FR
Page 86

Présentation des logiciels
(ordinateur)/PlayMemories Camera Apps
Nous offrons les PlayMemories Camera Apps et les logiciels suivants pour
améliorer votre expérience photo ou vidéo.
Pour profiter de ces logiciels, saisissez l’une des URL suivantes dans le
navigateur Internet de votre ordinateur pour accéder au site, puis suivez
les instructions à l’écran pour télécharger le logiciel souhaité. Si l’un de
ces programmes est déjà installé sur votre ordinateur, mettez-le à jour
avec la version la plus récente avant de l’utiliser.
Windows:
http://www.sony.co.jp/imsoft/Win/
Mac:
http://www.sony.co.jp/imsoft/Mac/
Vous pouvez vérifier l’environnement d’exploitation recommandé pour le
logiciel à l’adresse URL suivante:
http://www.sony.net/pcenv/
PlayMemories Home
Le logiciel PlayMemories Home vous permet d’importer des images fixes
et des films sur votre ordinateur pour les voir ou les utiliser.
Vous devez installer PlayMemories Home pour importer des films XAVC S
ou des films AVCHD sur votre ordinateur.
Vous pouvez accéder directement au site Web de téléchargement à partir
de l’URL suivante:
http://www.sony.net/pm/
• Lorsque vous connectez votre appareil à l’ordinateur, vous pouvez
ajouter de nouvelles fonctions à PlayMemories Home. Il est donc
recommandé de connecter l’appareil à votre ordinateur même si
PlayMemories Home a déjà été installé sur l’ordinateur.
FR
FR
31
Page 87

Image Data Converter
Vous pouvez créer et modifier des images RAW à l’aide de différentes
fonctions de réglage comme la courbe de tonalité et la netteté.
Remote Camera Control
Avec la Remote Camera Control, vous pouvez changer les réglages de
l’appareil ou déclencher l’obturateur depuis un ordinateur connecté via
un câble USB.
Pour utiliser la Remote Camera Control, sélectionnez d’abord MENU
(Réglage) [Connexion USB] [PC à distance], puis connectez
l’appareil à un ordinateur via un câble USB.
PlayMemories Camera Apps
Vous pouvez ajouter les fonctions de votre choix à l’appareil photo
en vous connectant au site de téléchargement des applications
(PlayMemories Camera Apps) avec votre ordinateur ou la fonction
Wi-Fi de votre appareil.
http://www.sony.net/pmca/
• Après avoir installé une application, vous pouvez appeler celleci en mettant en contact le symbole
smartphone Android équipé de la technologie NFC, grâce à la fonction
[Simple contact(NFC)].
de l’appareil avec un
32
FR
Page 88

Liste des éléments du MENU
Pour plus d’informations sur les éléments du MENU, reportez-vous au
Manuel d’aide.
(Réglages de prise de vue1)
Qualité/taille d'image
Qualité
Taille d'image
Ratio d'aspect
Panorama : taille
Panorama : orient.
RB Pose longue
RB ISO élevée
Espace colorim.
Comp. de l'objectif
Mode Pr. vue/entraînement
Mode auto
Sélection scène
Permet de définir la qualité des images fixes.
([RAW]/ [Fine], etc.)
Permet de définir la taille des images fixes.
(L/ M/ S)
Permet de définir le ratio d’aspect des images fixes.
Permet de définir la taille des images panoramiques.
Permet de définir le sens de la prise de vue pour les
images panoramiques.
Permet de définir le traitement de la réduction
de bruit pour les prises de vue dont la vitesse
d’obturation est égale ou supérieure à 1seconde.
Permet de définir le traitement à appliquer à la
réduction du bruit pour les prises de vue à sensibilité
ISO élevée.
Permet de modifier l’espace colorimétrique (spectre
des couleurs reproductibles).
Sélectionne le type de correction d’objectif.
Vous pouvez photographier en sélectionnant Auto
intelligent ou Automatique supérieur.
Permet de sélectionner les paramètres prédéfinis
pour répondre aux différentes conditions de prise
de vue.
([Portrait]/ [Activités sportives], etc.)
Onglet rouge
FR
FR
33
Page 89

Auto.sup. Extr. imag.
Entraînement
Réglages bracketing
/ Rappel
/ Mémoire
AF
Mode mise au point
Régl. prior. ds AF-S
Régl. prior. ds AF-C
Zone mise au point
Illuminateur AF
Verrouill. AF central
Active/désactive l’extraction et la sauvegarde
automatiques d’une image lorsque le mode de prise
de vue est réglé sur [Automat. supérieur] et que
l’appareil reconnaît une scène nécessitant plusieurs
prises de vue.
Permet de définir le mode d’entraînement (par
exemple, la prise de vue en continu).
([Retardateur]/ [Bracket continu], etc.)
Permet de définir la prise de vue avec retardateur
en mode bracketing, l’ordre de prise de vue pour
le bracketing d’exposition et le bracketing de la
balance des blancs.
Permet de rappeler les réglages préenregistrés dans
/ Mémoire].
[
Permet d’enregistrer les modes souhaités et les
réglages de l’appareil.
Permet de sélectionner le mode de mise au point.
([AF ponctuel]/ [AF continu], etc.)
Permet de définir le délai de déclenchement
de l’obturateur lorsque [Mode mise au point]
est réglé sur [AF ponctuel], [Direct MFocus] ou
[AF automatique] avec un sujet immobile.
Permet de définir le délai de déclenchement de
l’obturateur lorsque [Mode mise au point] est réglé
sur [AF continu] ou [AF automatique] avec un sujet en
mouvement.
Sélectionne la zone de mise au point.
([Large]/ [Spot flexible], etc.)
Permet de régler l’illuminateur AF, lequel apporte
de la lumière pour aider à la mise au point dans les
scènes sombres.
Permet de régler la fonction de suivi de mise au
point continue sur un sujet en appuyant au centre
de la molette de commande sur l’écran de prise de
vue.
34
FR
Page 90

Système AF
AF par déclenc.
Pré-AF
Eye-Start AF
Désact. Aut. Zone AF
Affich. zone AF cont.
Microréglage AF
Exposition
Correct. exposition
ISO
ISO AUTO vit.ob min
Mode de mesure
Point spotmètre
Permet de définir le mode de mise au point
automatique lorsqu’un adaptateur pour monture
d’objectif LA-EA1/LA-EA3 (vendu séparément) est
installé.
Permet de choisir d’exécuter la mise au point
automatique lorsque le déclencheur est enfoncé à
mi-course. Cette fonction s’avère utile lorsque vous
souhaitez régler séparément la mise au point et
l’exposition.
Active/désactive la mise au point automatique avant
que vous n’enfonciez le déclencheur à mi-course.
Active/désactive la mise au point automatique
lorsque vous utilisez le viseur avec un adaptateur
pour monture d’objectif LA-EA2/LA-EA4
(vendu séparément).
Permet de choisir entre affichage permanent de la
zone de mise au point et disparition automatique et
rapide de celle-ci après la mise au point.
Active/désactive l’affichage de la zone de mise au
point en mode [AF continu].
Effectue un réglage fin de la position de mise
au point automatique lors de l’utilisation d’un
adaptateur pour monture d’objectif LA-EA2 ou
LA-EA4 (vendu séparément).
Corrige la luminosité de la totalité de l’image.
Permet de spécifier la sensibilité ISO.
([ISO AUTO], etc.)
Permet de définir la vitesse d’obturation minimale à
partir de laquelle la sensibilité ISO change en mode
[ISO AUTO].
Sélectionne la méthode de mesure de la luminosité.
([Multi]/ [Spot], etc.)
Permet de choisir de coordonner le point de la
mesure spot avec la zone de mise au point lorsque
[Zone mise au point] est réglé sur [Spot flexible] ou
[Spot flexible élargi].
FR
FR
35
Page 91

Palier d'expo.
AEL avec obturat.
Régl. stdrd d'expo
Flash
Mode Flash
Correct.flash
Rég.corr.expo
Réd. yeux rouges
Couleur/WB/traitem. d'img
Bal. des blancs
Régl. prior. ds AWB
Opti Dyn/HDR aut
Modes créatifs
Sélectionne la taille de l’incrément pour la vitesse
d’obturation, l’ouverture et la correction de
l’exposition.
Permet de choisir de verrouiller l’exposition lorsque
le déclencheur est enfoncé à mi-course. Cette
fonction s’avère utile lorsque vous souhaitez régler
séparément la mise au point et l’exposition.
Règle le standard pour la valeur d’exposition
correcte pour chaque mode de mesure.
Permet de régler le flash.
Permet de régler l’intensité du flash.
Active/désactive la répercussion de la valeur de la
correction d’exposition sur la correction d’exposition
du flash.
Permet d’atténuer le phénomène des yeux rouges
lorsque vous utilisez le flash.
Corrige la teinte donnée par la lumière ambiante
pour photographier des objets blanchâtres dans des
tons blancs.
([Auto]/ [Lumière jour], etc.)
Permet de sélectionner la tonalité prioritaire lors
de la prise de vue dans des conditions d’éclairage
spécifique comme une lumière incandescente avec
[Bal. des blancs] réglé sur [Auto].
Analyse le contraste ombre-lumière entre le sujet et
l’arrière-plan en divisant l’image en petites zones, ce
qui permet d’obtenir une image à la luminosité et la
gradation optimales.
Permet de sélectionner le traitement d’image
souhaité.
Vous pouvez également ajuster le contraste, la
saturation et la netteté.
([Eclatant]/ [Portrait], etc.)
36
FR
Page 92

Effet de photo
Profil d'image
Effet peau douce
Assistant de mise au point
Loupe mise pt
Tmps gross. m. au p.
AF loupe mise pt
Aide MF
Niv. d'intensification
Couleur d'intensific.
Dét. visage/assist. pr. de vue
Sourire/Dét. visage
Enregistrem. visage
Cadrage automat.
Permet de prendre des images fixes en leur
appliquant des textures spécifiques en fonction de
l’effet sélectionné.
([Toy Camera]/ [Monochrome riche], etc.)
Permet de modifier des réglages comme la couleur
et la teinte pendant l’enregistrement d’images.
* Cette fonction est destinée aux créateurs de films
chevronnés.
Sélectionne l’effet peau douce et le niveau de l’effet.
Agrandit l’image avant la prise de vue pour vous
permettre de vérifier la mise au point.
Règle la durée de l’affichage de l’image sous forme
agrandie.
Active/désactive la mise au point automatique
lors de l'affichage d'une image agrandie. Pendant
l'affichage d'une image agrandie, vous pouvez
effectuer la mise au point sur une zone plus petite
que le spot flexible.
Affiche une image agrandie lors de la mise au point
manuelle.
Renforce le contour des zones nettes avec une
couleur spécifique lors de la mise au point manuelle.
Définit la couleur utilisée pour la fonction
d’intensification.
Sélectionne la détection de visage et effectue
automatiquement les différents réglages.
Sélectionne le déclenchement automatique
lorsqu’un sourire est détecté.
([OFF]/ [Activé (Visage enr.)]/ [ON]/
[Détec. de sourire])
Enregistre ou change la personne prioritaire lors de
la mise au point.
Analyse la scène lors de la capture de visage, de
gros plans ou du suivi de sujet avec la fonction
Verrouillage AF, améliore automatiquement la
composition et enregistre l’image recadrée.
FR
FR
37
Page 93

(Réglages de prise de vue2)
Film
Film/ralenti+accél.
Format fichier
Réglage d'enreg.
Régl. ralenti+acc.
ENREG vidéo double
Vitesse AF
Sensibil. Suivi AF
Obt. vit. lente aut.
Enregistrem. audio
Niveau d'enr. audio
Affich. niv. audio
Réduction bruit vent
Affich. marqueur
Régl. marqueurs
Règle le mode d’exposition lors de
l’enregistrement de films ou de films au ralenti
ou en accéléré.
Sélectionne le format de fichier film.
([XAVC S 4K]/ [AVCHD], etc.)
Permet de sélectionner le débit binaire et la
cadence de prise de vue pour la taille du film.
Change les réglages pour l’enregistrement de
films au ralenti et en accéléré.
Permet d’enregistrer simultanément un film
au format XAVC S et un film au format MP4, ou
un film au format AVCHD et un film au format
MP4.
Commute la vitesse de mise au point lors de
l’utilisation de la mise au point automatique en
mode Film.
Permet de régler la sensibilité de suivi AF pour
le mode Film.
Permet de régler la fonction qui ajuste
automatiquement la vitesse d’obturation en
fonction de la luminosité de l’environnement
en mode Film.
Active/désactive l’enregistrement audio en
mode Film.
Permet de régler le niveau de l’enregistrement
audio pendant l’enregistrement de films.
Active/désactive l’affichage du niveau audio.
Réduit le bruit du vent pendant
l’enregistrement de films.
Active/désactive l’affichage de marqueurs à
l’écran lors de l’enregistrement de films.
Permet de sélectionner les marqueurs affichés
à l’écran lors de l’enregistrement de films.
Onglet violet
38
FR
Page 94

Déclench/SteadyShot
Pr. de vue silenc.
e-Obt. à rideaux av.
Déc sans obj.
Déclen. sans c. mém.
SteadyShot
Réglag. SteadyShot
Zoom
Zoom
Réglage du zoom
Rotation bague zoom
Affichage/affich. instantané
Bouton DISP
FINDER/MONITOR
Vit. défil. viseur
Zebra
Quadrillage
Effectue des prises de vue sans bruit de
déclenchement.
Active/désactive la fonction Obturateur à
rideaux avant électronique.
Active/désactive le déclenchement de
l’obturateur lorsqu’aucun objectif n’est fixé.
Active/désactive le déclenchement de
l’obturateur lorsqu’aucune carte mémoire n’est
insérée.
Active/désactive SteadyShot pour la prise de
vue.
Permet de définir les réglages SteadyShot.
Permet de régler le facteur de zoom pour les
fonctions de zoom autres que le zoom optique.
Active/désactive les fonctions Zoom « Clear
Image » et Zoom numérique lorsque vous
utilisez le zoom.
Attribue le zoom avant/arrière à la direction de
rotation de l’objectif zoom. Cette fonction est
disponible uniquement avec un objectif zoom
motorisé compatible.
Permet de définir le type d’informations à
afficher à l’écran ou dans le viseur lorsque le
bouton DISP est enfoncé.
Règle la méthode pour faire basculer
l’affichage entre le viseur électronique et
l’écran.
Permet de régler la cadence de prise de vue
pour le viseur lors de la prise de vue d’images
fixes.
Affiche un motif zébré permettant d’ajuster la
luminosité.
Affiche un quadrillage pour régler la
composition de l’image.
FR
FR
39
Page 95

Guide param. expos.
Affichage Live View
Affichage instantané
Opération personnalisée
Touche perso(p.d.v.)
Touche perso(lire)
Réglages menu fnct.
Conf. sél./molette
Sél./mol. comp. Ev
Bouton MOVIE
Verr. sélecteur/mol.
Signal sonore
Permet de sélectionner le guide affiché lorsque
les réglages d’exposition sont modifiés sur
l’écran de prise de vue.
Active/désactive la répercussion sur l’affichage
à l’écran de réglages comme la correction
d’exposition.
Permet de régler l’affichage instantané pour
afficher l’image capturée après la prise de vue.
Attribue des fonctions aux différentes touches
pour vous permettre d’accélérer les opérations
en appuyant sur les touches lorsque vous
prenez des images.
Attribue des fonctions aux touches pour
vous permettre d’accélérer les opérations en
appuyant sur les touches lorsque vous lisez des
images.
Permet de personnaliser les fonctions qui
s’affichent lorsque vous appuyez sur le bouton
Fn (Fonction).
Permet de définir la fonction du sélecteur de
commande et de la molette de commande
lorsque le mode d’exposition est réglé sur M.
Vous pouvez ajuster la vitesse d’obturation ou
l’ouverture avec ce réglage.
Permet de régler la correction d’exposition au
moyen du sélecteur de commande ou de la
molette de commande.
Active/désactive le bouton MOVIE.
Active/désactive temporairement le sélecteur
de commande et la molette de commande en
utilisant le bouton Fn lors de la prise de vue.
Vous pouvez désactiver ou activer le sélecteur
de commande et la molette de commande en
maintenant enfoncé le bouton Fn.
Permet de choisir d’émettre un bip pendant la
mise au point automatique ou les opérations
du retardateur.
40
FR
Page 96

(Sans fil)
Onglet vert
Env. vers smartphon.
Env. vers ordinateur
Visionner sur TV
Simple contact(NFC)
Mode avion
Réglages Wi-Fi
Réglages Bluetooth
Régl. liais. inf. empl
Éditer Nom Disposit.
Réinit. régl. Réseau
(Application)
Transfère les images à afficher vers un
smartphone.
Sauvegarde les images en les transférant vers
un ordinateur connecté à un réseau.
Vous permet de visualiser les images sur un
téléviseur compatible réseau.
Permet d’attribuer une application à la
fonction par simple contact (NFC). Vous pouvez
appeler cette application lors de la prise de
vue en mettant l’appareil en contact avec un
smartphone équipé de la technologie NFC.
Désactive les communications sans fil depuis
l’appareil comme la fonction Wi-Fi, NFC et
Bluetooth.
Vous permet d’enregistrer votre point d’accès
et de vérifier ou modifier les informations de la
connexion Wi-Fi.
Contrôle les réglages pour connecter l’appareil
avec un smartphone via une connexion
Bluetooth.
Obtient les informations sur l’emplacement
depuis le smartphone synchronisé et les
enregistre sur les images capturées.
Modifie le nom de l’appareil sous Wi-Fi Direct,
etc.
Réinitialise tous les paramètres réseau.
Onglet vert clair
FR
Liste d'applications
Présentation
Permet d’afficher la liste des applications. Vous
pouvez sélectionner l’application que vous
voulez utiliser.
Affiche les instructions d’utilisation de
l’application.
FR
41
Page 97

(Lecture)
Onglet bleu
Supprimer
Mode Visualisation
Index d'images
Rotation d'affichage
Diaporama
Pivoter
Agrandir
Protéger
Spécifier impression
Capture photo
(Réglage)
Luminosité d'écran
Luminosité du viseur
Tempér. coul. viseur
Aide affich. Gamma
Réglages du volume
Supprime une image.
Permet de lire les images à partir d’une date
spécifiée ou d’un dossier spécifié d’images
fixes et de films.
Affiche plusieurs images en même temps.
Règle l’orientation de la lecture pour les
images prises verticalement.
Permet de lire un diaporama.
Fait tourner l’image.
Agrandit les images lues.
Protège les images enregistrées contre un
effacement accidentel.
Permet de spécifier à l’avance sur la carte
mémoire quelles images fixes seront
imprimées par la suite.
Capture une scène choisie d’un film pour la
sauvegarder comme image fixe.
Onglet jaune
Règle la luminosité de l’écran.
Règle la luminosité du viseur électronique.
Permet de régler la température des couleurs
du viseur.
Permet de convertir une image S-Log en
une image avec un contraste équivalent à
un réglage normal de gamma lorsqu’elle est
affichée pour aider à la vérification.
Permet de régler le volume lors de la lecture
de films.
42
FR
Page 98

Réglages téléchargt.
Menu mosaïque
Guide sél. de mode
Confirm.effac.
Qualité d'affichage
H. début écon. éner.
Tmp HORS tens. aut.
Sélect. NTSC/PAL
Mode nettoyage
Fonctionnem. tactile
Pavé tactile(vertical)
Régl. zone pavé tact.
Mode Démo
*1
Permet de régler la fonction de téléchargement
de l’appareil lors de l’utilisation d’une carte
Eye-Fi en vente dans le commerce.
Active/désactive l’affichage du menu
mosaïque chaque fois que vous appuyez sur le
bouton MENU.
Permet d’activer ou de désactiver le guide
associé au sélecteur de mode (celui-ci fournit
des explications pour chaque mode de prise
de vue).
Sélectionne [Supprimer] ou [Annuler] comme
réglage par défaut sur l’écran de confirmation
de suppression.
Permet de définir la qualité d’affichage.
Permet de définir des intervalles de temps
déclenchant automatiquement le basculement
en mode d’économie d’énergie.
Permet de définir la température de l’appareil
déclenchant la mise hors tension automatique
de l’appareil pendant la prise de vue. Lorsque
vous effectuez des prises de vue en tenant
l’appareil à la main, sélectionnez [Standard].
Permet de modifier le format télévisé de
l’appareil pour que vous puissiez filmer dans
un format vidéo différent.
Permet de démarrer le mode Nettoyage pour
procéder au nettoyage du capteur d’image.
Active/désactive le fonctionnement tactile de
l’écran.
Active/désactive l’utilisation de l’appareil à
l’aide du pavé tactile lorsque vous utilisez le
viseur en position verticale.
Permet de définir la zone à utiliser avec le pavé
tactile lorsque vous effectuez une prise de vue
en mode viseur.
Permet d’activer ou de désactiver la
démonstration de la lecture de films.
FR
FR
43
Page 99

Réglages TC/UB
Commande à dist.
Réglages HDMI
Sél. de sortie 4K
Connexion USB
Réglage USB LUN
Alimentation USB
Régl. PC à distance
Langue
Rég. date/heure
Réglage zone
Informat. copyright
Formater
Nº de fichier
Définir nom d. fichier
FR
44
Permet de régler le code temporel (TC) et le bit
utilisateur (UB).
* Cette fonction est destinée aux créateurs de
films chevronnés.
Active/désactive l’utilisation de la
télécommande infrarouge.
Permet de définir les réglages HDMI.
Permet de définir l’enregistrement et la
restitution de films 4K via une connexion
HDMI lorsque l’appareil est connecté à un
enregistreur/lecteur externe compatible 4K.
Permet de définir le mode de connexion USB.
Permet d’améliorer la compatibilité en limitant
les fonctions de la connexion USB. Sélectionnez
[Multiple] en conditions normales, et [Unique]
uniquement lorsque la connexion entre
l’appareil et un ordinateur ou un dispositif AV
ne peut pas être établie.
Active/désactive l’alimentation via une
connexion USB lorsque l’appareil est raccordé
à un ordinateur ou à un périphérique USB à
l’aide d’un câble micro-USB. Si vous utilisez
l'adaptateur secteur fourni, l'appareil est
alimenté que ce réglage soit ou non activé.
Contrôle les réglages de prise de vue à distance
de l’ordinateur.
Permet de sélectionner la langue.
Permet de régler la date, l’heure et l’heure
d’été.
Permet de régler la zone d’utilisation.
Permet de définir les informations sur les droits
d’auteur pour les images fixes.
Permet de formater la carte mémoire.
Permet de définir la méthode utilisée pour
attribuer des numéros de fichier.
Permet de modifier les 3 premières lettres des
noms de fichier pour les images fixes.
Page 100

Sélect. dossier REC
Permet de changer le dossier sélectionné pour
l’enregistrement des images fixes et des films
(MP4).
Créat. d'un dossier
Permet de créer un nouveau dossier pour
l’enregistrement des images fixes et des films
(MP4).
Nom du dossier
Permet de définir le format de dossier des
images fixes.
Récup. BD images
Permet l’enregistrement et la lecture, ainsi que
la récupération du fichier de base de données
d’image.
Affich. info support
Affiche le temps d’enregistrement restant
pour les films et le nombre d’images fixes
enregistrables sur la carte mémoire.
Version
Permet d’afficher la version logicielle de
l’appareil.
Logo de certification
*2
Affiche les informations de certification pour
l’appareil (seuls certains logos de certification
s’affichent).
Rétablir le réglage
Permet de restaurer les réglages par défaut.
Sélectionnez [Initialiser] pour ramener tous les
réglages à leur valeur par défaut.
1
La carte mémoire devra être formatée pour être compatible avec le système
*
PAL ou NTSC si vous modifiez cet élément. Notez également qu’il peut
s’avérer impossible de lire des films enregistrés pour le système NTSC sur
des téléviseurs PAL.
2
Modèles commercialisés à l’étranger uniquement.
*
FR
FR
45
 Loading...