

Page 1
5-009-876-41(1)
“Help Guide” (Web manual)
Refer to “Help Guide” for in-depth
instructions on the many
functions of the camera.
E-mount
Interchangeable Lens Digital Camera/Startup Guide GB
Appareil photo à objectif interchangeable/Guide de démarrage FR
Digitalkamera mit Wechselobjektiv/Einführungsanleitung DE
Cámara Digital de Lentes Intercambiables/Guía de inicio ES
Fotocamera digitale con obiettivo intercambiabile/Guida di avvio IT
Câmara Digital de Objetivas intercambiáveis/Guia de início PT
Digitale camera met verwisselbare lens/Beknopte gids NL
https://rd1.sony.net/help/ilc/1950/h_zz/
©2019 Sony Corporation Printed in China
Aparat cyfrowy z wymiennymi obiektywami/Przewodnik uruchamiania
Цифровой фотоаппарат со сменным объективом/Руководство по началу работы
Цифровий фотоапарат зі змінним об’єктивом/Посібник із початку роботи
Digitalkamera med utbytbart objektiv/Startguide SE
Digitaalinen kamera vaihdettavalla objektiivilla/Aloitusopas FI
Digitalkamera med utskiftbart objektiv/Startveiledning NO
Digitalkamera med udskifteligt objektiv/Startvejledning DK
ILCE-6100
PL
RU
UA
Page 2
English
About the manual for this camera
This guide describes the necessary preparations to start using the
product, basic operations, etc. For details, refer to the “Help Guide” (web
manual).
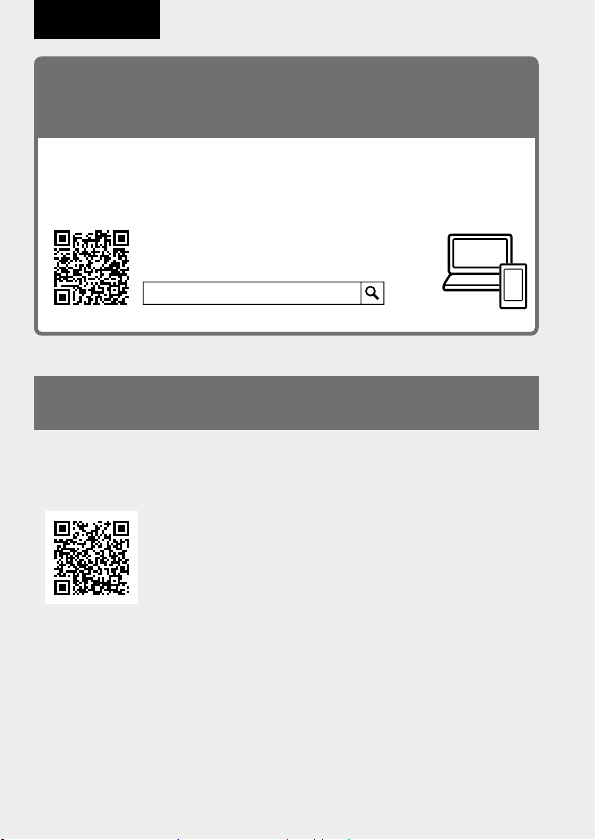
“Help Guide” (Web manual)
https://rd1.sony.net/help/ilc/1950/h_zz/
ILCE-6100 Help Guide
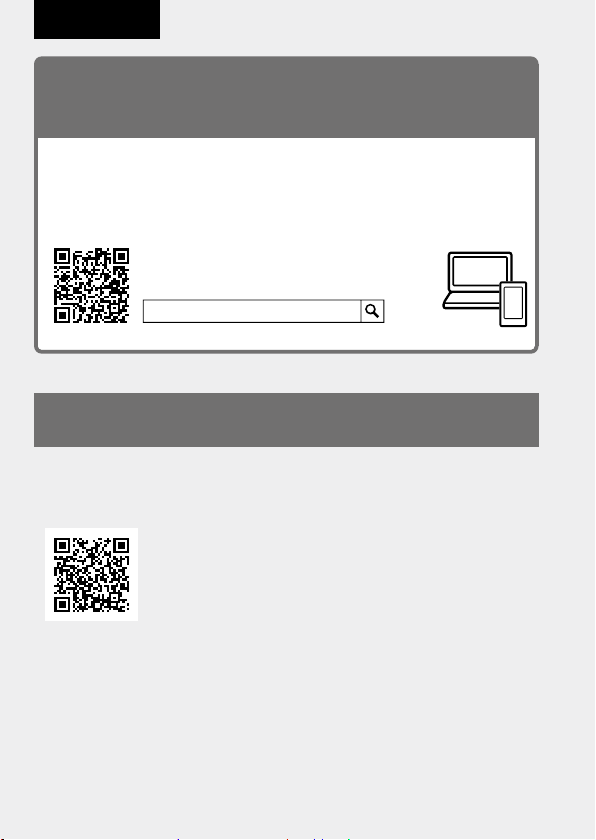
Looking for valuable information, such as essential points
on shooting
This website introduces convenient functions, ways of usage, and setting
examples.
Refer to the website when you set up your camera.
Tutorials
https://www.sony.net/tutorial/ilc/6100/
GB
2
Page 3
Preparations
Checking the supplied items
The number in parentheses indicates the number of pieces.
• Camera (1)
• Power cord (mains lead) (1)*
(supplied in some countries/
regions)
* Multiple power cords may be
supplied with this equipment. Use
the appropriate one that matches
your country/region. See page
11.
• Rechargeable battery pack
NP-FW50 (1)
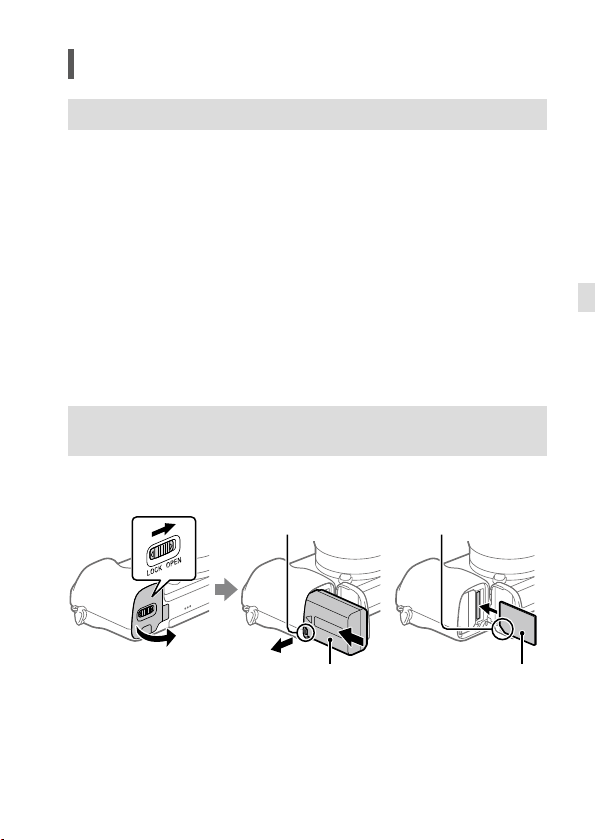
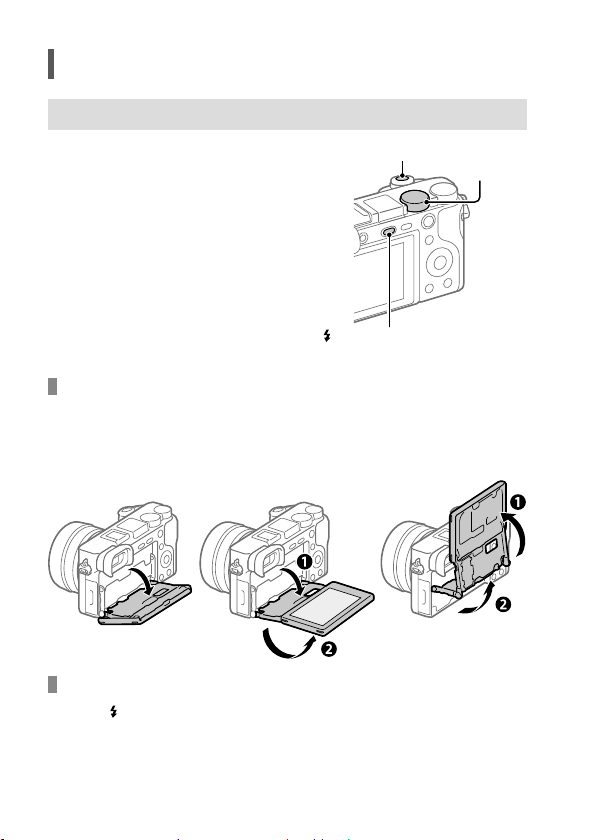
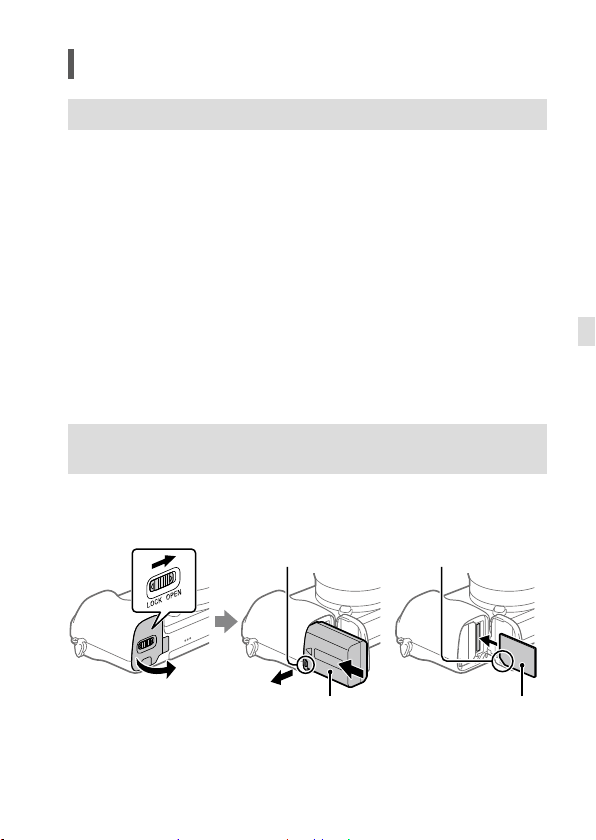
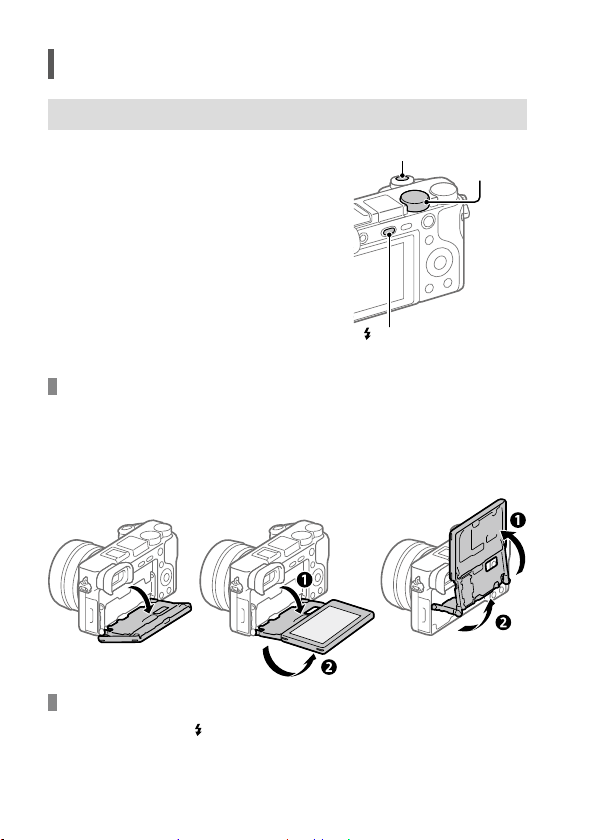
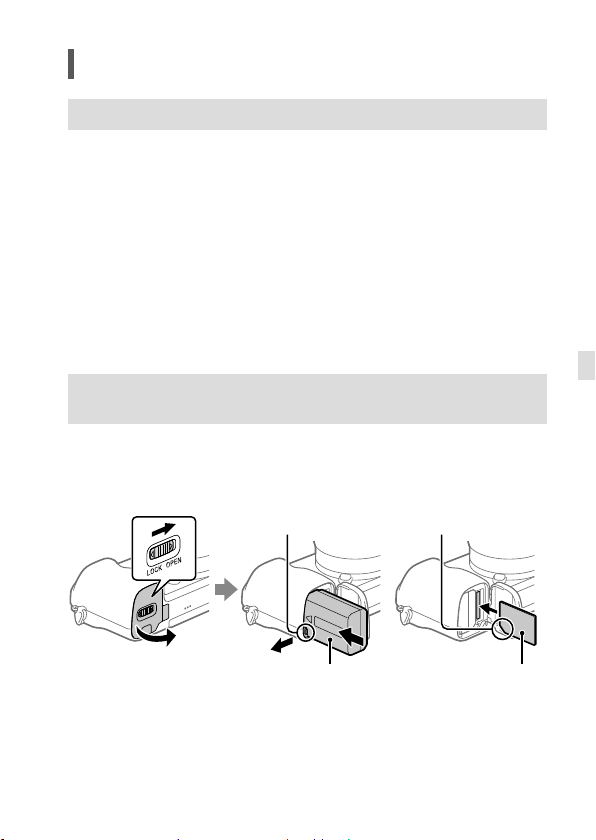
Inserting the battery pack (supplied)/memory card
(sold separately) into the camera
Open the battery/memory card cover, and insert the battery pack and a
memory card into the camera. Then, close the cover.
Lock lever
• Micro USB cable (1)
• AC Adaptor (1)
The type of the AC Adaptor may
differ depending on the country/
region.
• Shoulder strap (1)
• Eyepiece cup (1)
• Body cap (1)*
* Only for the ILCE-6100
• Startup Guide (this manual) (1)
• Reference Guide (1)
Ensure the notched corner
faces correctly.
GB
Memory card Battery pack
Battery pack
Make sure that the battery pack is facing in the correct direction, and insert
it while pressing the battery lock lever.
GB
3
Page 4
Memory card
Insert the memory card with the notched corner facing as illustrated.
This camera is compatible with SD memory cards or Memory Stick media.
For details on the compatible memory cards, refer to the “Help Guide.”
When you use a memory card with this camera for the first time, format the
card using the camera in order to stabilize the performance of the memory
card.
Note
• Formatting erases all data, including protected images and registered
settings (M1 to M4). Once erased, this data cannot be restored. Save
valuable data to a computer, etc. before formatting.
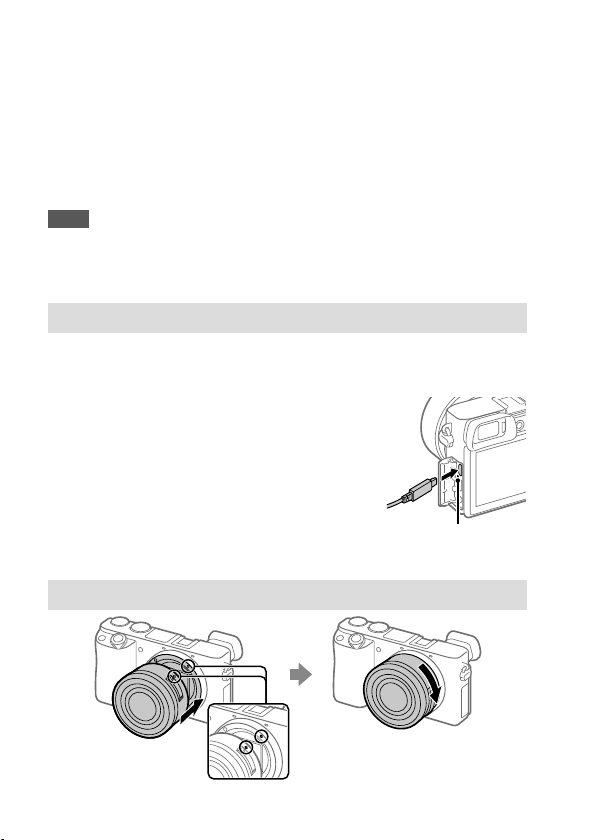
Charging the battery pack
1 Turn the power off.
If the camera is turned on, the battery pack will not be charged.
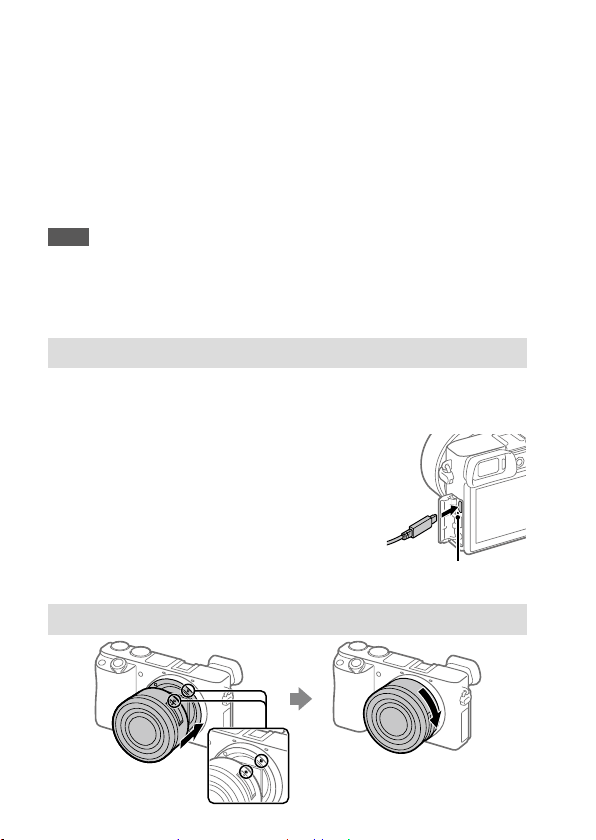
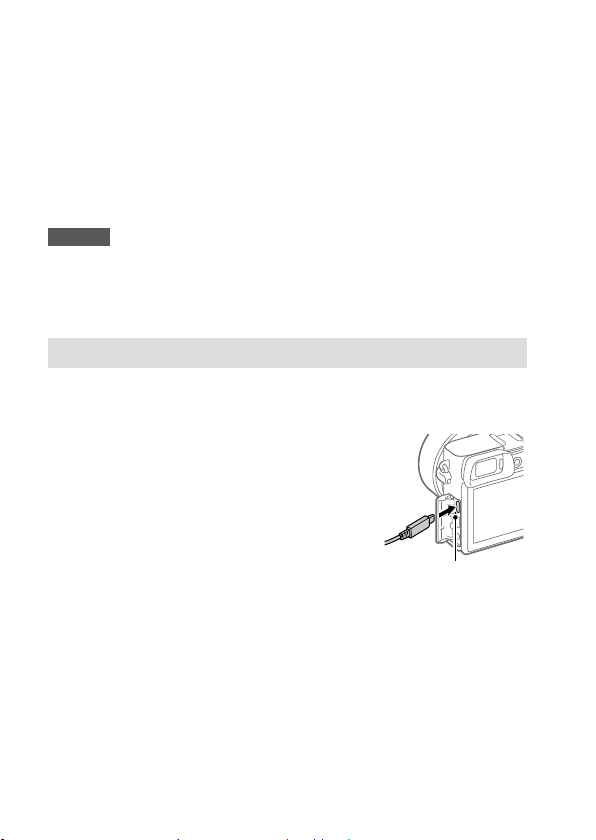
2 Connect the camera with the battery pack
inserted to the AC Adaptor (supplied) using
the micro USB cable (supplied), and connect
the AC Adaptor to the wall outlet (wall
socket).
The charge lamp will light up when charging
starts. When the charge lamp turns off,
charging is completed.
Attaching a lens
Charge lamp
GB
Mounting indexes
4
Page 5
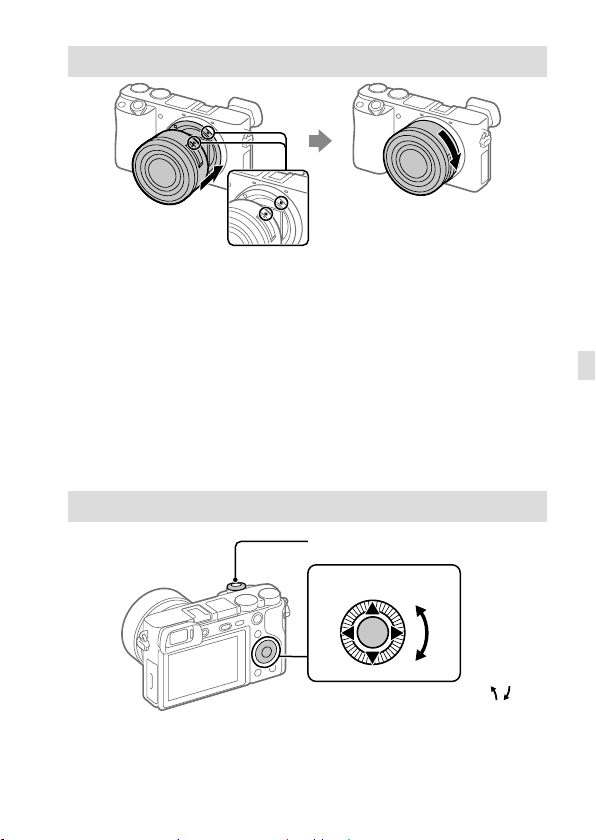
1 Remove the body cap from the camera and the rear lens cap from the
rear of the lens.
2 Mount the lens by aligning the two white index marks (mounting
indexes) on the lens and camera.
3 While pushing the lens lightly toward the camera, turn the lens slowly
in the direction of the arrow until it clicks into the locked position.
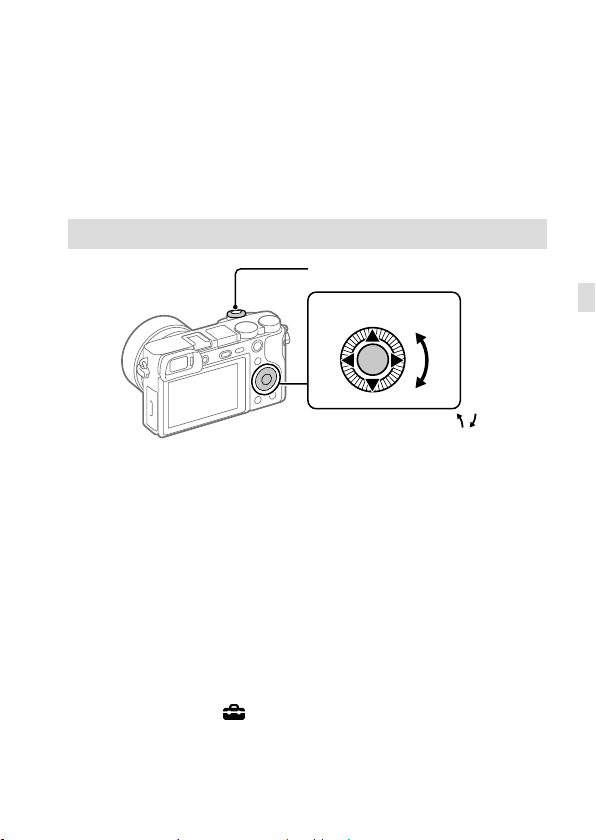
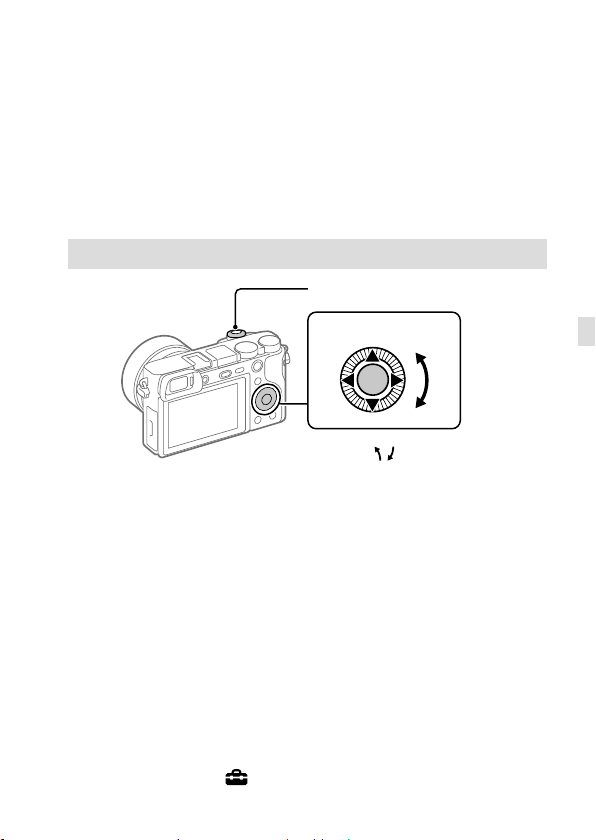
Setting the language and the clock
ON/OFF (Power) switch
Control wheel
GB
Select items : ////
Confirm : Center button
/
1 Set the ON/OFF (Power) switch to “ON” to turn on the camera.
2 Select the desired language and then press the center of the control
wheel.
3 Make sure that [Enter] is selected on the screen and then press the
center button.
4 Select the desired geographic location and then press the center button.
5 Set [Daylight Savings], [Date/Time], and [Date Format], and then select
[Enter] and press the center button.
If you want to reconfigure the date/time or the area setting at a later
point, select MENU
(Setup) [Date/Time Setup] or [Area Setting].
GB
5
Page 6
Shooting
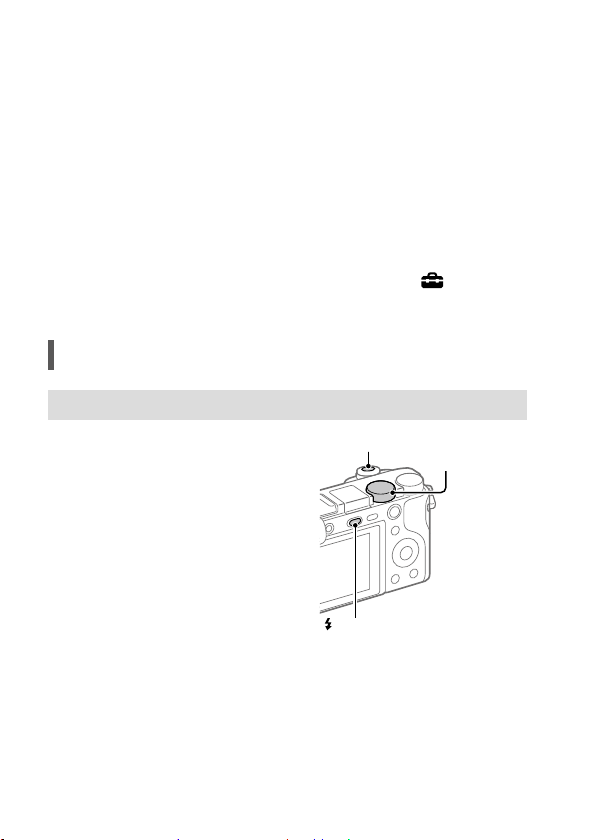
Shooting still images
1 Select the desired shooting mode
by turning the mode dial.
Shutter button
Mode dial
2 Press the shutter button halfway
down to focus.
3 Press the shutter button all the way
down.
(Flash pop-up) button
Changing the monitor angle
You can change the monitor angle to shoot from any position you like.
(A) High position (holding the camera high)
(B) Low position (holding the camera low)
(C) Selfie position (facing the monitor toward you to take a selfie)
(A)
(B)
Using the flash
Press the (Flash pop-up) button to pop up the flash.
(C)
GB
6
Page 7
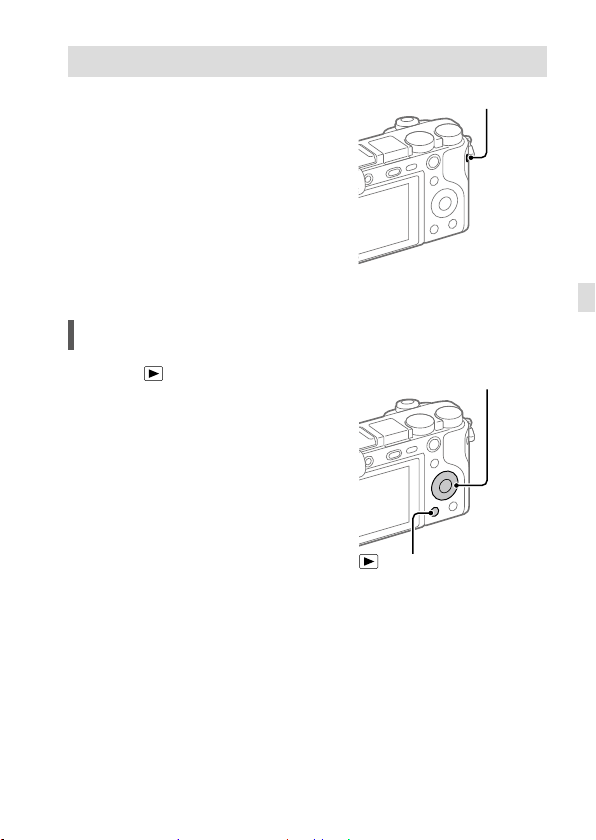
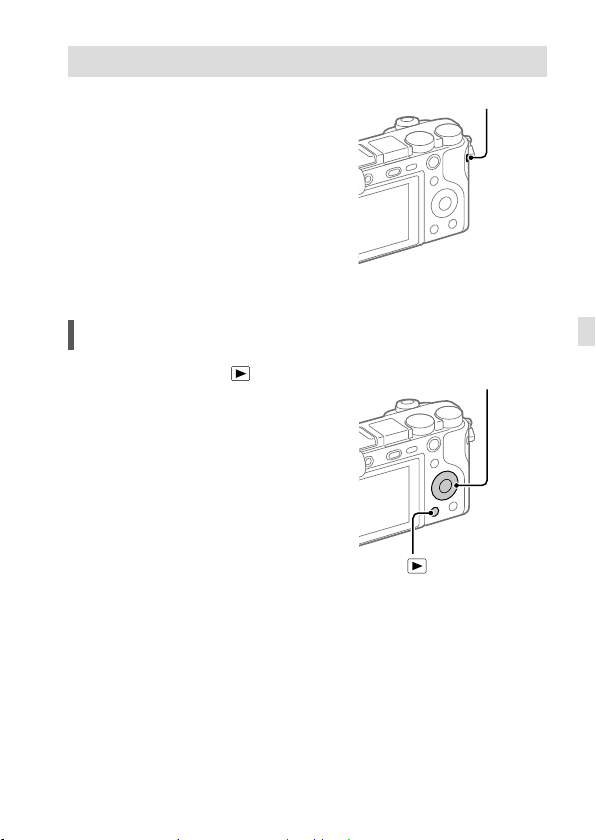
Shooting movies
1 Press the MOVIE (Movie) button to
start recording.
Movie recording can be started from
any shooting mode in the default
setting.
2 Press the MOVIE button again to
stop recording.
Viewing
1 Press the (Playback) button to
switch to the playback mode.
2 Select an image with the control
wheel.
You can move to the previous image/
next image by pressing the left/right
side of the control wheel.
To start playing back a movie, press
the center button on the control
wheel.
MOVIE (Movie) button
(Playback)
button
GB
Control wheel
GB
7
Page 8
Transferring images to a
smartphone
You can transfer images to a smartphone by connecting the camera and a
smartphone via Wi-Fi.
1 : Install Imaging Edge Mobile on your smartphone.
To connect the camera and your smartphone, Imaging Edge Mobile is
required.
Install Imaging Edge Mobile to your smartphone in advance.
If Imaging Edge Mobile is already installed on your smartphone, be sure
to update it to the latest version.
https://www.sony.net/iem/
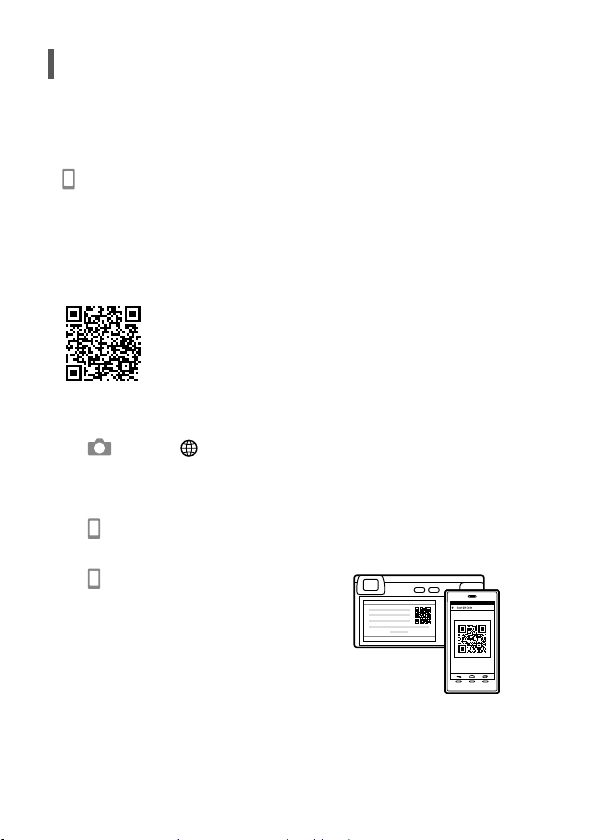
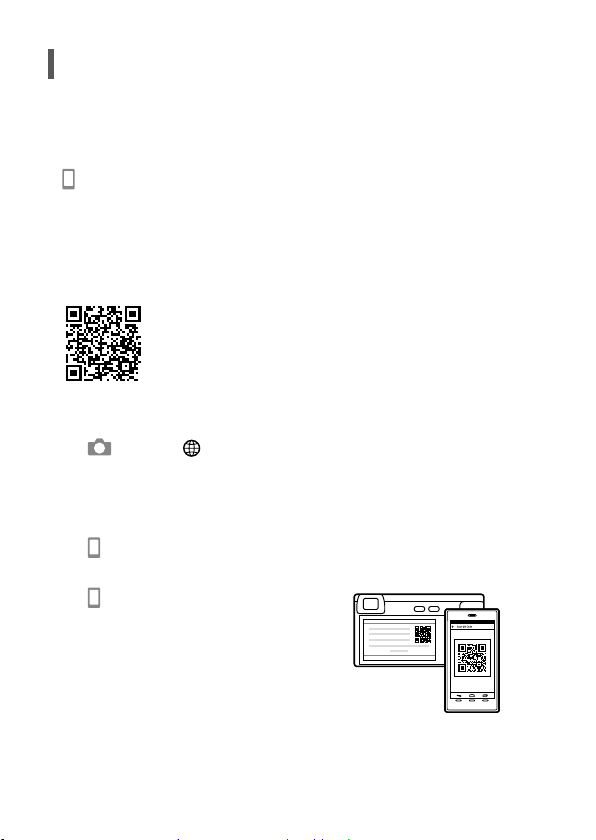
2 Connect the camera and your smartphone using the QR Code.
: MENU (Network) [Send to Smartphone Func.]
[Send to Smartphone] [Select on This Device] images to transfer.
If you want to select images on the smartphone, select
[Select on Smartphone].
: Launch Imaging Edge Mobile on your smartphone, and select
[Scan QR Code of the Camera].
: Scan the QR Code displayed on the
camera using your smartphone.
3 The selected images will be transferred.
If you are using Android, you can transfer images after the first time simply
by launching Imaging Edge Mobile with Step 2-
GB
above.
8
Page 9

If image transfer does not start, select the camera to connect on the screen
of your smartphone.
For details on how to connect to a smartphone, refer to the following
support sites:
https://www.sony.net/dics/iem02/
• For details on other connection methods or how to use the smartphone as
a remote commander to operate the camera, refer to the “Help Guide.”
• The Wi-Fi functions introduced in this manual are not guaranteed to
operate on all smartphones or tablets.
• The Wi-Fi functions of this camera are not available when connected to a
public wireless LAN.
Managing and editing images
on a computer
PlayMemories Home
PlayMemories Home allows you to import still images and movies to your
computer and view or use them. You need to install PlayMemories Home to
import XAVC S movies or AVCHD movies to your computer.
Imaging Edge
Imaging Edge is a software suite that includes functions such as remote
shooting from a computer, and adjusting or developing RAW images
recorded with the camera.
For details on the computer software, refer to the following URL.
https://www.sony.net/disoft/
Notes on use
Refer to “Precautions“ in the “Help Guide”
as well.
Notes on handling the product
• This camera is designed to be dustand moisture-resistant, but is not
waterproof or dust-proof.
• Remove any dirt from the surface of
the flash. Dirt on the surface of the
flash may emit smoke or burn due to
heat generated by the emission of
light. If there is dirt/dust, clean it off
with a soft cloth.
GB
GB
9
Page 10

• Do not leave the lens or the viewfinder
exposed to a strong light source such
as sunlight. Because of the lens’s
condensing function, doing so may
cause smoke, fire, or a malfunction
inside the camera body or the lens. If
you have to leave the camera exposed
to a light source such as sunlight,
attach the lens cap to the lens.
• When you shoot with backlighting,
keep the sun sufficiently far away
from the angle of view. Otherwise, the
sunlight may enter the focus inside the
camera and cause smoke or fire. Even if
the sun is slightly away from the angle
of view, it may still cause smoke or fire.
• Do not directly expose the lens to
beams such as laser beams. That may
damage the image sensor and cause
the camera to malfunction.
• Do not look at sunlight or a strong
light source through the lens when
it is detached. This may result in
unrecoverable damage to the eyes or
cause a malfunction.
• Do not leave the camera, the supplied
accessories, or memory cards within
the reach of infants. They may be
accidentally swallowed. If this occurs,
consult a doctor immediately.
Notes on the monitor and electronic
viewfinder
• The monitor and electronic viewfinder
are manufactured using extremely
high-precision technology, and over
99.99% of the pixels are operational
for effective use. However, there may
be some small black dots and/or
bright dots (white, red, blue or green
in color) that constantly appear on
the monitor and electronic viewfinder.
These are imperfections due to the
manufacturing process and do not
affect the recorded images in any way.
• When shooting with the viewfinder,
you may experience symptoms such as
eyestrain, fatigue, motion sickness, or
nausea. We recommend that you take a
break at regular intervals when you are
shooting with the viewfinder.
• If the monitor or electronic viewfinder
is damaged, stop using the camera
immediately. The damaged parts may
harm your hands, face, etc.
GB
10
Notes on continuous shooting
During continuous shooting, the monitor
or viewfinder may flash between the
shooting screen and a black screen.
If you keep watching the screen in
this situation, you may experience
uncomfortable symptoms such as
feeling of unwellness. If you experience
uncomfortable symptoms, stop using
the camera, and consult your doctor as
necessary.
Notes on recording for long periods of
time or recording 4K movies
• The camera body and battery may
become warm with use – this is normal.
• If the same part of your skin touches
the camera for a long period of time
while using the camera, even if the
camera does not feel hot to you, it may
cause symptoms of a low-temperature
burn such as redness or blistering.
Pay special attention in the following
situations and use a tripod, etc.
- When using the camera in a high
temperature environment
- When someone with poor circulation
or impaired skin sensation uses the
camera
- When using the camera with
[Auto Power OFF Temp.] set to [High]
Notes on using a tripod
Use a tripod with a screw less than
5.5mm (7/32 inches) long. Otherwise,
you cannot firmly secure the camera, and
damage to the camera may occur.
Sony lenses/accessories
Using this unit with products from
other manufacturers may affect its
performance, leading to accidents or
malfunction.
Warning on copyrights
Television programs, films, videotapes,
and other materials may be copyrighted.
Unauthorized recording of such materials
may be contrary to the provisions of the
copyright laws.
Page 11
Notes on location information
If you upload and share an image
tagged with a location, you may
accidentally reveal the information to a
third party. To prevent third parties from
obtaining your location information, set
[
Location Info. Link Set.] to [Off] before
shooting images.
Notes on discarding or transferring this
product to others
Before discarding or transferring this
product to others, be sure to perform the
following operation to protect private
information.
• Select [Setting Reset] [Initialize].
Notes on discarding or transferring a
memory card to others
Executing [Format] or [Delete] on
the camera or a computer may not
completely delete the data on the
memory card. Before transferring a
memory card to others, we recommend
that you delete the data completely using
data deletion software. When discarding
a memory card, we recommend that you
physically destroy it.
Note on network functions
When you use network functions,
unintended third parties on the network
may access the camera, depending on
the usage environment. For example,
unauthorized access to the camera may
occur in network environments to which
another network device is connected or
can connect without permission. Sony
bears no responsibility for any loss or
damage caused by connecting to such
network environments.
How to turn off wireless network
functions (Wi-Fi, etc.) temporarily
When you board an airplane, etc., you
can turn off all wireless network functions
temporarily using [Airplane Mode].
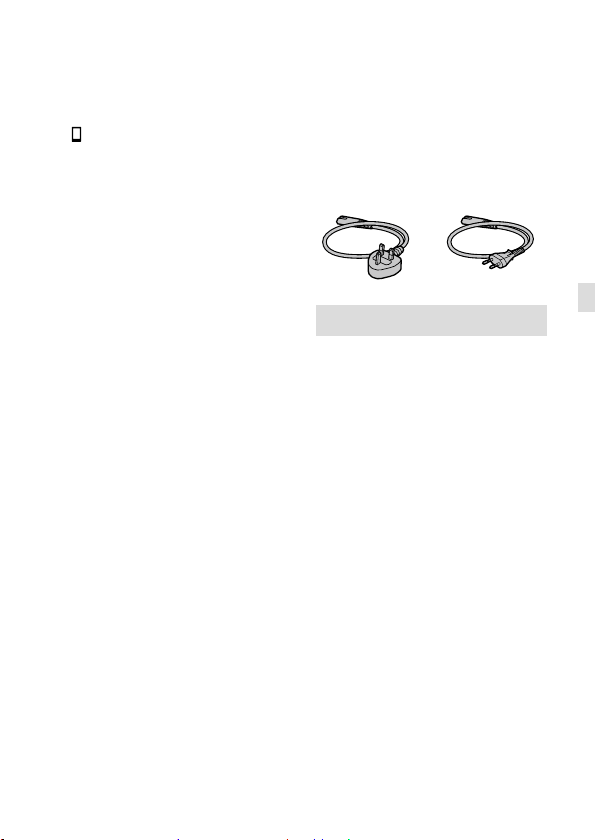
Power Cord
For the customers in the UK, Ireland,
Malta, Cyprus and Saudi Arabia
Use the power cord (A). For safety
reasons, the power cord (B) is not
intended for above countries/regions and
shall therefore not be used there.
For the customers in other EU countries/
regions
Use the power cord (B).
(A) (B)
For Customers in the U.S.A.
For question regarding your product or
for the Sony Service Center nearest you,
call 1-800-222-SONY (7669) .
Supplier’s Declaration of Conformity
Trade Name : SONY
Model : WW642826
Responsible Party : Sony Electronics Inc.
Address : 16535 Via Esprillo, San Diego,
CA 92127 U.S.A.
Telephone Number : 858-942-2230
This device complies with part 15 of the
FCC rules. Operation is subject to the
following two conditions: (1) This device
may not cause harmful interference,
and (2) this device must accept any
interference received, including
interference that may cause undesired
operation.
GB
GB
11
Page 12
Specifications
Camera
[System]
Camera Type:
Interchangeable Lens Digital Camera
Lens: Sony E-mount lens
[Image sensor]
Image format: APS-C size (23.5mm ×
15.6mm), CMOS image sensor
Effective pixel number of camera:
Approx. 24 200 000 pixels
Total pixel number of camera:
Approx. 25 000 000 pixels
[Electronic Viewfinder]
Type: 1.0 cm (0.39 type)
Electronic Viewfinder
[Monitor]
Wide, 7.5 cm (3.0 type) TFT drive,
touch panel
[General]
Rated input: 7.2V
Operating temperature:
0 to 40°C (32 to 104°F)
Storage temperature:
–20 to 55°C (–4 to 131°F)
Dimensions (W/H/D) (Approx.):
120 × 66.9 × 59.4mm
120 × 66.9 × 49.9mm
(from grip to monitor)
43/4 × 23/4 × 23/8in.
43/4 × 23/4 × 2in.
(from grip to monitor)
Mass (Approx.):
396g (14.0oz) (including battery
pack, SD memory card)
, 2.3W
AC Adaptor
AC-UUD12/AC-UUE12
Rated input:
100 - 240V
Rated output: 5V , 1.5A
GB
, 50/60Hz, 0.2A
12
Rechargeable battery pack
NP-FW50
Rated voltage: 7.2V
Design and specifications are subject
to change without notice.
Trademarks
• XAVC S and are registered
trademarks of Sony Corporation.
• AVCHD and AVCHD logotype are
trademarks of Panasonic Corporation
and Sony Corporation.
• Android and Google Play are
trademarks or registered trademarks of
Google LLC.
• Wi-Fi, the Wi-Fi logo and
Wi-Fi Protected Setup are registered
trademarks or trademarks of the
Wi-Fi Alliance.
• QR Code is a trademark of
Denso Wave Inc.
• In addition, system and product names
used in this manual are, in general,
trademarks or registered trademarks
of their respective developers or
manufacturers. However, the ™ or ®
marks may not be used in all cases in
this manual.
Additional information on this
product and answers to frequently
asked questions can be found at our
Customer Support Website.
Page 13

GB
13
GB
Page 14
Français
À propos du manuel pour cet
appareil
Ce guide décrit les préparatifs nécessaires pour commencer à utiliser le
produit, les fonctions de base, etc. Pour plus d’informations, consultez le
«Guide d’aide» (manuel en ligne).
« Guide d’aide » (Manuel en ligne)
https://rd1.sony.net/help/ilc/1950/h_zz/
ILCE-6100 Guide d’aide
Recherche d’informations précieuses, comme des points
essentiels sur la prise de vue
Ce site Web présente des fonctions pratiques, des types d’utilisation et des
exemples de réglage.
Consultez le site Web lorsque vous configurez l’appareil.
Tutoriels
https://www.sony.net/tutorial/ilc/6100/
FR
2
Page 15
Préparatifs
Vérification des éléments fournis
Le nombre indiqué entre parenthèses correspond au nombre d’éléments
fournis.
• Appareil photo (1)
• Cordon d’alimentation (1)* (fourni
dans certains pays/régions)
* Plusieurs cordons d’alimentation
peuvent être fournis avec cet
équipement. Utilisez le cordon
approprié qui correspond à votre
pays ou région. Voir page 11.
• Batterie rechargeable NP-FW50
(1)
• Câble micro-USB (1)
Insertion de la batterie (fourni)/carte mémoire
(vendu séparément) dans l’appareil
Ouvrez le couvercle du compartiment batterie/carte mémoire et insérez la
batterie et une carte mémoire dans l’appareil. Refermez ensuite le couvercle.
Levier de verrouillage
• Adaptateur secteur (1)
Le type d’adaptateur secteur peut
varier selon le pays/la région.
• Bandoulière (1)
• Oculaire de visée (1)
• Capuchon de boîtier (1)*
* Uniquement pour le ILCE-6100
• Guide de démarrage (ce manuel)
(1)
• Guide de référence (1)
Assurez-vous que le coin
entaillé est correctement
orienté.
FR
Carte mémoire Batterie
Batterie
Assurez-vous que la batterie est placée dans le bon sens et insérez-la tout
en appuyant sur le levier de verrouillage de la batterie.
FR
3
Page 16
Carte mémoire
Insérez la carte mémoire avec le coin biseauté tourné comme illustré.
Cet appareil est compatible avec les cartes mémoire SD ou Memory Stick.
Pour plus d’informations sur les cartes mémoire compatibles, reportez-vous
au «Guide d’aide».
Lorsque vous utilisez une carte mémoire pour la première fois avec cet
appareil, formatez-la en utilisant l’appareil, afin de stabiliser la performance
de la carte mémoire.
Note
• Le formatage efface toutes les données, y compris les images protégées
et les réglages enregistrés (M1 à M4). Une fois effacées, ces données ne
peuvent pas être récupérées. Sauvegardez vos données importantes sur
un ordinateur ou autre avant le formatage.
Charge de la batterie
1 Mettez-le hors tension.
Si l’appareil est sous tension, la batterie ne sera pas chargée.
2 La batterie étant insérée dans l’appareil,
raccordez celui-ci à l’adaptateur secteur (fourni)
à l’aide du câble micro-USB (fourni) et branchez
l’adaptateur secteur sur la prise murale.
Le témoin de charge s’allumera au
commencement de la charge. Lorsque le témoin
de charge s’éteint, la charge est terminée.
Fixation d’un objectif
Témoin de charge
FR
4
Repères de montage
Page 17
1 Retirez le capuchon de boîtier de l’appareil et le capuchon d’objectif
arrière de l’arrière de l’objectif.
2 Installez l’objectif en alignant le repère blanc de l’objectif et celui de
l’appareil photo (repères de montage).
3 Tout en poussant doucement l’objectif vers l’appareil, tournez
lentement l’objectif dans le sens de la flèche jusqu’à ce qu’il s’enclenche
en position verrouillée.
Réglage de la langue et de l’horloge
Interrupteur ON/OFF (Alimentation)
Molette de commande
Pour sélectionner des éléments:
////
Pour confirmer: Bouton central
/
1 Placez l’interrupteur ON/OFF (Alimentation) sur «ON» pour mettre
l’appareil sous tension.
2 Sélectionnez la langue souhaitée et appuyez au centre de la molette de
commande.
3 Vérifiez que [Entrer] est sélectionné sur l’écran, puis appuyez sur le
bouton central.
4 Sélectionnez l’emplacement géographique souhaité, puis appuyez sur
le bouton central.
5 Réglez [Heure d'été], [Date/heure] et [Format de date], puis sélectionnez
[Entrer] et appuyez sur le bouton central.
Pour reconfigurer la date/heure ou le réglage de la zone ultérieurement,
sélectionnez MENU
[Réglage zone].
(Réglage) [Rég. date/heure] ou
FR
FR
5
Page 18
Prise de vue
Prise d’images fixes
1 Sélectionnez le mode de prise de
vue souhaité en faisant tourner le
sélecteur de mode.
Déclencheur
Sélecteur
de mode
2 Enfoncez le déclencheur à mi-course
pour effectuer la mise au point.
3 Enfoncez complètement le
déclencheur.
Bouton (Déploiement du flash)
Modification de l’angle de l’écran
Vous pouvez modifier l’angle de l’écran pour photographier depuis
n’importe quelle position.
(A) Position élevée (en tenant l’appareil en hauteur)
(B) Position basse (en tenant l’appareil en bas)
(C) Position Selfie (en dirigeant l’écran vers vous pour prendre un selfie)
(A)
(B)
Utilisation du flash
Appuyez sur le bouton (Déploiement du flash) pour ouvrir le flash.
(C)
FR
6
Page 19
Enregistrement de films
1 Appuyez sur le bouton MOVIE (Film)
pour commencer l’enregistrement.
L’enregistrement de films peut être
lancé depuis n’importe quel mode de
prise de vue par défaut.
2 Appuyez à nouveau sur le bouton
MOVIE pour arrêter l’enregistrement.
Visualisation
1 Appuyez sur le bouton (Lecture)
pour basculer vers le mode lecture.
2 Sélectionnez une image avec la
molette de commande.
Vous pouvez accéder à l’image
précédente/suivante en appuyant sur
le côté gauche/droit de la molette de
commande.
Pour démarrer la lecture d’un film,
appuyez au centre de la molette de
commande.
Bouton MOVIE (Film)
FR
Molette de commande
Bouton (Lecture)
FR
7
Page 20
Transfert d’images vers un
smartphone
Vous pouvez transférer les images vers un smartphone en connectant
l’appareil et un smartphone via Wi-Fi.
1 : Installez Imaging Edge Mobile sur votre smartphone.
Pour connecter l’appareil et le smartphone, Imaging Edge Mobile est
nécessaire.
Installez au préalable Imaging Edge Mobile sur le smartphone.
Si Imaging Edge Mobile est déjà installé sur votre smartphone, veillez à le
mettre à jour vers la plus récente version.
https://www.sony.net/iem/
2 Connectez l’appareil et votre smartphone en utilisant le QR Code.
: MENU (Réseau) [Fnct Env. vers smart.]
[Env. vers smartphon.] [Sélect. sur ce dispositif] images à
transférer.
Si vous souhaitez sélectionner des images sur le smartphone,
sélectionnez [Sélect. sur smartphone].
: Lancez Imaging Edge Mobile sur le smartphone et sélectionnez
[Scanner le QR Code de la caméra].
: Scannez le QR Code affiché sur
l’appareil au moyen du smartphone.
FR
8
Page 21

3 Les images sélectionnées seront transférées.
Si vous utilisez Android, vous pouvez transférer des images après la
première fois, simplement en lançant Imaging Edge Mobile à l’étape 2ci-dessus.
Si le transfert d’images ne démarre pas, sélectionnez l’appareil à connecter
sur l’écran de votre smartphone.
Pour savoir comment connecter l’appareil à un smartphone, consultez les
sites d’assistance suivants:
https://www.sony.net/dics/iem02/
• Pour plus d’informations sur les méthodes de connexion ou pour savoir
comment utiliser le smartphone comme télécommande pour commander
l’appareil photo, consultez le «Guide d’aide».
• Le fonctionnement des fonctions Wi-Fi présentées dans ce manuel n’est
pas garanti avec tous les smartphones et toutes les tablettes.
• Les fonctions Wi-Fi de cet appareil ne peuvent pas être utilisées en cas de
connexion à un réseau local sans fil public.
Gestion et édition d’images sur
un ordinateur
PlayMemories Home
Le logiciel PlayMemories Home vous permet d’importer des images fixes
et des films sur votre ordinateur pour les voir ou les utiliser. Vous devez
installer PlayMemories Home pour importer des films XAVC S ou des films
AVCHD sur votre ordinateur.
Imaging Edge
Imaging Edge est une suite de logiciels comprenant des fonctions
comme la prise de vue à distance depuis un ordinateur et le réglage ou
développement des images RAW enregistrées avec l’appareil photo.
Pour plus d’informations sur les logiciels, consultez l’URL suivante.
https://www.sony.net/disoft/
FR
FR
9
Page 22

Remarques sur l’utilisation
Consultez également les «Précautions»
dans le «Guide d’aide».
Remarques sur la manipulation du
produit
• Cet appareil est conçu pour résister à la
poussière et à l’humidité, mais il n’est
étanche ni à l’eau ni à la poussière.
• Retirez toute saleté de la surface du
flash. La saleté présente sur la surface
du flash peut dégager de la fumée ou
brûler en raison de la chaleur produite
par l’émission de lumière. En présence
de saleté/poussière, essuyez l’appareil
avec un chiffon doux.
• Ne laissez pas l’objectif ou le viseur
exposés à une source de lumière
intense, comme les rayons du soleil. En
raison de la fonction de condensation
de l’objectif, cela pourrait provoquer
un dégagement de fumée, un incendie
ou un dysfonctionnement à l’intérieur
du boîtier de l’appareil ou de l’objectif.
Si vous devez laisser l’appareil exposé
à une source de lumière comme les
rayons du soleil, fixez le capuchon
d’objectif sur l’objectif.
• Lorsque vous photographiez en
contre-éclairage, maintenez le soleil
suffisamment loin de l’angle de champ.
Autrement, les rayons du soleil peuvent
pénétrer le foyer à l’intérieur de
l’appareil et provoquer un dégagement
de fumée ou un incendie. Même si le
soleil est légèrement éloigné de l’angle
de champ, il peut toujours provoquer
un dégagement de fumée ou un
incendie.
• N’exposez pas directement l’objectif
à des rayons tels que les faisceaux
laser. Vous risquez d’endommager le
capteur d’image et de provoquer un
dysfonctionnement de l’appareil.
• Ne regardez pas le soleil ou une source
de lumière intense à travers l’objectif
après l’avoir retiré de l’appareil.
Vous risquez des blessures oculaires
irréversibles et de provoquer un
dysfonctionnement.
FR
10
• Ne laissez pas l’appareil, les
accessoires fournis ou les cartes
mémoire à la portée des jeunes
enfants. Ils pourraient être avalés
accidentellement. Le cas échéant,
consultez immédiatement un médecin.
Remarques sur l’écran et le viseur
électronique
• La fabrication de l’écran et du
viseur électronique fait appel à une
technologie de très haute précision,
et plus de 99,99 % des pixels sont
opérationnels pour une utilisation
effective. Quelques petits points noirs
et/ou lumineux (de couleur blanche,
rouge, bleue ou verte) peuvent
toutefois être visibles en permanence
sur l’écran et le viseur électronique.
Ces imperfections sont inhérentes au
procédé de fabrication et n’affectent
aucunement les images enregistrées.
• Lorsque vous effectuez des prises de
vue en utilisant le viseur, il se peut
que vous présentiez les symptômes
suivants: fatigue visuelle, fatigue, mal
des transports ou nausée. Nous vous
recommandons de faire des pauses
régulières lorsque vous effectuez des
prises de vue en utilisant le viseur.
• Si l’écran ou le viseur électronique est
endommagé, cessez immédiatement
d’utiliser l’appareil photo. Les pièces
endommagées peuvent blesser vos
mains, votre visage, etc.
Remarques sur la prise de vue en continu
Pendant la prise de vue en continu,
l’écran ou le viseur peuvent clignoter
entre l’écran de prise de vue et un écran
noir. Si vous continuez à regarder l’écran
dans cette situation, vous pourriez
ressentir des symptômes désagréables
comme un malaise. Si vous ressentez
des symptômes désagréables, arrêtez
d’utiliser l’appareil photo et consultez un
médecin si nécessaire.
Remarques sur l’enregistrement prolongé
et sur l’enregistrement de films 4K
• Le boîtier de l’appareil photo et la
batterie peuvent chauffer en cours
d’utilisation. Cela est normal.
Page 23

• Si une partie de votre peau est en
contact prolongé avec l’appareil
pendant que vous l’utilisez, et même
si l’appareil ne vous semble pas
chaud, vous risquez de présenter des
symptômes de brûlures superficielles à
basse température (rougeurs, cloques).
Faites particulièrement attention dans
les situations suivantes, et utilisez un
trépied ou un autre dispositif adéquat:
- Si vous utilisez l’appareil dans un
environnement à température élevée
- Si vous souffrez de troubles
circulatoires ou d’une perte de
sensibilité cutanée
- Si vous utilisez l’appareil avec
[Tmp HORS tens. aut.] réglé sur [Élevé]
Remarques sur l’utilisation d’un trépied
Utilisez un trépied avec une vis de
fixation de longueur inférieure à 5,5mm
(7/32po). Sinon, vous ne pourrez pas fixer
l’appareil fermement, et vous risquez de
l’endommager.
Accessoires/Objectifs Sony
L’utilisation de cet appareil avec des
produits d’autres fabricants risque de
nuire à ses performances, entraînant des
accidents ou des dysfonctionnements.
Avertissement sur les droits d’auteur
Les émissions de télévision, films,
cassettes vidéo et autres œuvres peuvent
être protégés par des droits d’auteur.
L’enregistrement non autorisé de telles
œuvres peut constituer une infraction à la
loi sur les droits d’auteur.
Remarques sur les informations sur
l’emplacement
Si vous téléchargez et partagez une
image marquée avec un emplacement,
vous pourriez accidentellement révéler
les informations à un tiers. Pour
empêcher des tiers d’avoir accès à vos
informations de géolocalisation, réglez
[
Régl. liais. inf. empl] sur [OFF] avant
d’effectuer les prises de vue.
Remarques sur la mise au rebut ou le
transfert de ce produit à autrui
Avant de mettre ce produit au rebut ou
de le transférer à un tiers, veillez à réaliser
l’opération suivante afin de protéger vos
données personnelles.
• Sélectionnez [Rétablir le réglage]
[Initialiser].
Remarques sur la mise au rebut ou le
transfert d’une carte mémoire à autrui
L’exécution de la fonction [Formater]
ou [Supprimer] sur l’appareil ou un
ordinateur risque de ne pas supprimer
complètement les données de la carte
mémoire. Avant de transférer une carte
mémoire à une autre personne, nous
vous recommandons de supprimer
complètement les données à l’aide d’un
logiciel de suppression de données.
Lorsque vous mettez une carte mémoire
au rebut, nous vous recommandons de la
détruire physiquement.
Remarque sur les fonctions réseau
Lorsque vous utilisez les fonctions
réseau, des tierces parties indésirables
sur le réseau peuvent accéder à
l’appareil photo, selon l’environnement
d’utilisation. Par exemple, un accès
non autorisé à l’appareil photo peut se
produire dans un environnement réseau
auquel un autre périphérique réseau
est connecté ou peut se connecter sans
autorisation. Sony n’assume aucune
responsabilité pour toute perte ou tout
dommage liés à la connexion à un tel
environnement réseau.
Comment désactiver provisoirement les
fonctions réseau sans fil (Wi-Fi, etc.)
Lorsque vous montez à bord
d’un avion ou autre, vous pouvez
désactiver provisoirement toutes les
fonctions réseau sans fil au moyen de
[Mode avion].
Cordon d’alimentation
Pour les clients au Royaume-Uni, en
Irlande, à Malte, à Chypre et en Arabie
saoudite
Utilisez le cordon d’alimentation (A).
Pour des raisons de sécurité, le cordon
d’alimentation (B) ne doit pas être utilisé
dans les pays/régions, pour lesquels il
n’est pas conçu.
Pour les clients dans les autres pays/
régions de l’UE
Utilisez le cordon d’alimentation (B).
(A) (B)
FR
FR
11
Page 24
Spécifications
Appareil photo
[Système]
Type d’appareil photo :
Appareil photo à objectif
interchangeable
Objectif: Objectif à montureE Sony
[Capteur d’image]
Format d’image: Format APS-C
(23,5mm × 15,6mm), capteur d’image
CMOS
Nombre de pixels utiles de l’appareil:
Environ 24200000pixels
Nombre total de pixels de l’appareil:
Environ 25000000pixels
[Viseur électronique]
Type: 1,0 cm (type 0,39)
Viseur électronique
[Écran]
Grand écran tactile TFT à matrice
active de 7,5 cm (type3,0)
[Généralités]
Tension d’entrée nominale:
Température de fonctionnement:
Température de stockage:
Dimensions (L/H/P) (environ):
Poids (environ):
, 2,3W
7,2V
0 à 40 °C (32 à 104 °F)
–20 à 55°C (–4 à 131°F)
120 × 66,9 × 59,4mm
120 × 66,9 × 49,9mm
(de la poignée à l’écran)
43/4 × 23/4 × 23/8po
43/4 × 23/4 × 2po
(de la poignée à l’écran)
396g (14,0oz) (batterie et carte
mémoire SD incluses)
Adaptateur secteur
AC-UUD12/AC-UUE12
Tension d’entrée nominale:
100 à 240V
Tension de sortie nominale:
5V
, 50/60Hz, 0,2A
, 1,5A
Batterie rechargeable
NP-FW50
Tension nominale: 7,2 V
La conception et les spécifications
sont susceptibles d’être modifiées
sans préavis.
Marques commerciales
• XAVC S et sont des marques
déposées de Sony Corporation.
• AVCHD et le logo AVCHD sont
des marques commerciales
de Panasonic Corporation et
Sony Corporation.
• Android et Google Play sont des
marques commerciales ou des
marques déposées de Google LLC.
• Wi-Fi, le logo Wi-Fi et
Wi-Fi Protected Setup sont des
marques commerciales ou des
marques déposées de Wi-Fi Alliance.
• QR Code est une marque commerciale
de Denso Wave Inc.
• En outre, les noms de système et
de produit utilisés dans ce manuel
sont généralement des marques
commerciales ou des marques
déposées de leurs créateurs ou
fabricants respectifs. Cependant,
les symboles ™ ou ® ne sont pas
systématiquement utilisés dans ce
manuel.
Des informations complémentaires
sur ce produit et des réponses à
des questions fréquemment posées
sont disponibles sur notre site Web
d’assistance client.
12
FR
Page 25

FR
13
FR
Page 26
Deutsch
Info zur Anleitung für diese
Kamera
Diese Anleitung beschreibt die notwendigen Vorbereitungen, um
mit der Benutzung des Produkts zu beginnen und grundlegende
Bedienvorgänge usw. Einzelheiten entnehmen Sie bitte der „Hilfe“ (WebAnleitung).
„Hilfe“ (Web-Anleitung)
https://rd1.sony.net/help/ilc/1950/h_zz/
ILCE-6100 Hilfe
Suchen nach wertvollen Informationen, wie etwa
wesentliche Punkte zum Aufnehmen
Diese Website stellt praktische Funktionen, Benutzungsweisen und
Einstellbeispiele vor.
Nehmen Sie beim Einrichten Ihrer Kamera auf die Website Bezug.
Tutorials
https://www.sony.net/tutorial/ilc/6100/
DE
2
Page 27
Vorbereitungen
Überprüfen des mitgelieferten Zubehörs
Die Zahl in Klammern gibt die Stückzahl an.
• Kamera (1)
• Netzkabel (1)* (in manchen
Ländern/Regionen mitgeliefert)
* Eventuell sind mehrere Netzkabel
im Lieferumfang dieses Gerätes
enthalten. Verwenden Sie das für
Ihr Land bzw. Ihre Region passende
Netzkabel. Siehe Seite 12.
• Akku NP-FW50 (1)
• Micro-USB-Kabel (1)
Einsetzen des Akkus (mitgeliefert)/der Speicherkarte
(getrennt erhältlich) in die Kamera
Öffnen Sie die Akku-/Speicherkartenabdeckung, und setzen Sie den
Akku sowie eine Speicherkarte in die Kamera ein. Schließen Sie dann die
Abdeckung wieder.
Verriegelungshebel
• Netzteil (1)
Die Art des Netzteils kann je nach
Land/Region unterschiedlich sein.
• Schulterriemen (1)
• Okularmuschel (1)
• Gehäusekappe (1)*
* Nur für ILCE-6100
• Einführungsanleitung (diese
Anleitung) (1)
• Referenzanleitung (1)
Auf korrekte Ausrichtung
der abgeschnittenen
Ecke achten.
DE
Speicherkarte Akku
Akku
Vergewissern Sie sich, dass der Akku korrekt ausgerichtet ist, und setzen Sie
ihn ein, während Sie den Akku-Verriegelungshebel drücken.
DE
3
Page 28
Speicherkarte
Setzen Sie die Speicherkarte so ein, dass die eingekerbte Ecke so
ausgerichtet ist, wie abgebildet.
Diese Kamera ist mit SD-Speicherkarten oder Memory Stick kompatibel.
Einzelheiten über die kompatiblen Speicherkarten finden Sie in der „Hilfe“.
Wenn Sie eine Speicherkarte zum ersten Mal mit dieser Kamera verwenden,
formatieren Sie die Karte mit der Kamera, um die Leistung der Speicherkarte
zu stabilisieren.
Hinweis
• Durch Formatieren werden alle Daten, einschließlich geschützter Bilder
und registrierter Einstellungen (von M1 bis M4), gelöscht. Einmal gelöschte
Daten können nicht wiederhergestellt werden. Speichern Sie wertvolle
Daten vor dem Formatieren auf einem Computer usw.
Laden des Akkus
1 Schalten Sie die Stromversorgung aus.
Falls die Kamera eingeschaltet ist, wird der Akku nicht geladen.
2 Verbinden Sie die Kamera mit eingesetztem
Akku über das Micro-USB-Kabel (mitgeliefert)
mit dem Netzteil (mitgeliefert), und schließen
Sie das Netzteil an eine Netzsteckdose an.
Die Ladekontrollleuchte leuchtet auf,
wenn der Ladevorgang beginnt. Wenn
die Ladekontrollleuchte erlischt, ist der
Ladevorgang beendet.
Ladekontrollleuchte
DE
4
Page 29
Anbringen eines Objektivs
Ansetzindexe
1 Nehmen Sie die Gehäusekappe von der Kamera und den hinteren
Objektivdeckel von der Rückseite des Objektivs ab.
2 Montieren Sie das Objektiv, indem Sie die beiden weißen
Ausrichtmarkierungen (Ansetzindizes) an Objektiv und Kamera
aufeinander ausrichten.
3 Drehen Sie das Objektiv langsam in Pfeilrichtung, während Sie es
leicht gegen die Kamera drücken, bis es in der Verriegelungsposition
einrastet.
Einstellen der Sprache und der Uhr
Schalter ON/OFF (Ein-Aus)
Einstellrad
DE
Posten auswählen: ////
Bestätigen: Mitteltaste
/
1 Stellen Sie den Schalter ON/OFF (Ein-Aus) auf „ON“, um die Kamera
einzuschalten.
DE
5
Page 30
2 Wählen Sie die gewünschte Sprache aus, und drücken Sie dann die
Mitte des Einstellrads.
3 Vergewissern Sie sich, dass [Eingabe] auf dem Bildschirm ausgewählt
ist, und drücken Sie dann die Mitteltaste.
4 Wählen Sie die gewünschte geografische Position aus, und drücken Sie
dann die Mitteltaste.
5 Stellen Sie [Sommerzeit], [Datum/Zeit] und [Datumsformat] ein, wählen
Sie dann [Eingabe], und drücken Sie die Mitteltaste.
Wenn Sie Datum/Uhrzeit oder die Gebietseinstellung zu einem späteren
Zeitpunkt neu konfigurieren wollen, wählen Sie MENU
[Datum/Uhrzeit] oder [Gebietseinstellung].
(Einstellung)
Aufnahme
Standbildaufnahme
1 Wählen Sie den gewünschten
Aufnahmemodus durch Drehen des
Moduswahlknopfes.
2 Drücken Sie den Auslöser halb
nieder, um zu fokussieren.
3 Drücken Sie den Auslöser ganz
durch.
DE
6
Auslöser
Moduswahlknopf
Taste (Blitz ausklappen)
Page 31

Ändern des Monitorwinkels
Sie können den Monitorwinkel ändern, um von jeder gewünschten Position
aus aufzunehmen.
(A) Hohe Position (Kamera wird hoch gehalten)
(B) Tiefe Position (Kamera wird tief gehalten)
(C) Selfie-Position (Monitor wird nach vorn gerichtet, um ein Selfie
aufzunehmen)
(A)
(B)
(C)
Blitzbenutzung
Drücken Sie die Taste (Blitz ausklappen), um den Blitz auszuklappen.
Filmaufnahme
DE
1 Drücken Sie die Taste MOVIE (Film),
um die Aufnahme zu starten.
Bei der Standardeinstellung kann
die Filmaufnahme von jedem
Aufnahmemodus aus gestartet
werden.
2 Drücken Sie die Taste MOVIE erneut,
um die Aufnahme zu stoppen.
Taste MOVIE (Film)
DE
7
Page 32

Betrachten
1 Drücken Sie die Taste
(Wiedergabe), um auf den
Wiedergabemodus umzuschalten.
2 Wählen Sie ein Bild mit dem
Einstellrad aus.
Sie können das vorherige/nächste
Bild anzeigen, indem Sie die linke/
rechte Seite des Einstellrads drücken.
Um die Wiedergabe eines Films zu
starten, drücken Sie die Mitteltaste
am Einstellrad.
Taste (Wiedergabe)
Einstellrad
Übertragen von Bildern zu
einem Smartphone
Sie können Bilder zu einem Smartphone übertragen, indem Sie die Kamera
und ein Smartphone über WLAN verbinden.
1 : Installieren Sie Imaging Edge Mobile auf Ihrem Smartphone.
Um die Kamera und Ihr Smartphone zu verbinden, benötigen Sie
Imaging Edge Mobile.
Installieren Sie Imaging Edge Mobile zuvor auf Ihrem Smartphone.
Wenn Imaging Edge Mobile bereits auf Ihrem Smartphone installiert ist,
aktualisieren Sie die Applikation auf die neuste Version.
https://www.sony.net/iem/
DE
8
Page 33

2 Verbinden Sie die Kamera und Ihr Smartphone über den QR Code.
: MENU (Netzwerk) [An SmartpSend.-Fkt.]
[An Smartph. send.] [Auf Diesem Gerät ausw.] zu übertragende
Bilder.
Um Bilder auf dem Smartphone auszuwählen, wählen Sie
[Auf Smartphone ausw.].
: Starten Sie Imaging Edge Mobile auf Ihrem Smartphone, und wählen
Sie [QR Code der Kamera scannen].
: Scannen Sie den auf der Kamera
angezeigten QR Code mit Ihrem
Smartphone.
3 Die ausgewählten Bilder werden übertragen.
Wenn Sie Android benutzen, können Sie Bilder nach dem ersten Mal
durch einfaches Starten von Imaging Edge Mobile im obigen Schritt 2übertragen.
Falls die Bildübertragung nicht startet, wählen Sie die zu verbindende
Kamera auf dem Bildschirm Ihres Smartphones aus.
Einzelheiten über das Verbindungsverfahren mit einem Smartphone finden
Sie auf den folgenden Support-Sites:
https://www.sony.net/dics/iem02/
• Einzelheiten über andere Verbindungsmethoden oder die Benutzung des
Smartphones als Fernbedienung zum Bedienen der Kamera finden Sie in
der „Hilfe“.
• Es kann nicht garantiert werden, dass die in dieser Anleitung vorgestellten
Wi-Fi-Funktionen mit allen Smartphones oder Tablets funktionieren.
• Bei Verbindung mit einem öffentlichen Drahtlos-LAN sind die Wi-FiFunktionen dieser Kamera nicht verfügbar.
DE
DE
9
Page 34

Verwalten und Bearbeiten von
Bildern auf einem Computer
PlayMemories Home
Mit der Software PlayMemories Home können Sie Standbilder und Filme zu
Ihrem Computer importieren, um sie dort zu betrachten oder zu benutzen.
Sie müssen PlayMemories Home installieren, um XAVC S-Filme oder
AVCHD-Filme zu Ihrem Computer zu importieren.
Imaging Edge
Imaging Edge ist eine Software-Suite, die Funktionen, wie z.B. von einem
Computer aus ferngesteuerte Aufnahme und Einstellen oder Entwickeln von
mit der Kamera aufgenommenen RAW-Bildern enthält.
Einzelheiten über die Computersoftware finden Sie unter dem folgenden
URL.
https://www.sony.net/disoft/
Benutzungshinweise
Nehmen Sie auch auf
„Vorsichtsmaßnahmen“ in der „Hilfe“
Bezug.
Hinweise zur Handhabung des Produkts
• Diese Kamera ist von der Konstruktion
her staub- und feuchtigkeitsbeständig,
aber nicht wasserfest oder staubdicht.
• Entfernen Sie jeglichen Schmutz
von der Oberfläche des Blitzes.
Schmutz auf der Oberfläche des
Blitzes kann aufgrund der von der
Lichtemission erzeugten Wärme Rauch
oder Versengung verursachen. Falls
Schmutz/Staub vorhanden ist, wischen
Sie ihn mit einem weichen Tuch ab.
DE
10
• Lassen Sie das Objektiv oder den
Sucher nicht einer starken Lichtquelle,
wie z. B. Sonnenlicht, ausgesetzt.
Aufgrund der Kondensationsfunktion
des Objektivs kann dadurch Rauch,
ein Brand oder eine Funktionsstörung
im Kameragehäuse oder im Objektiv
verursacht werden. Wenn Sie die
Kamera einer Lichtquelle, wie z. B.
Sonnenlicht, ausgesetzt lassen müssen,
bringen Sie die Objektivkappe am
Objektiv an.
• Wenn Sie bei Gegenlicht aufnehmen,
halten Sie die Sonne in ausreichendem
Abstand vom Blickwinkel. Anderenfalls
kann das Sonnenlicht in den Fokus im
Inneren der Kamera eindringen und
Rauch oder einen Brand verursachen.
Selbst wenn die Sonne geringfügig
vom Blickwinkel abgewandt ist, kann
sie dennoch Rauch oder einen Brand
verursachen.
Page 35

• Setzen Sie das Objektiv nicht direkt
Strahlen, wie etwa Laserstrahlen,
aus. Dadurch kann der Bildsensor
beschädigt und eine Funktionsstörung
der Kamera verursacht werden.
• Blicken Sie nicht durch das
abgenommene Objektiv auf die Sonne
oder eine starke Lichtquelle. Dies kann
zu irreparabler Schädigung der Augen
führen oder eine Funktionsstörung
verursachen.
• Lassen Sie die Kamera, das
mitgelieferte Zubehör oder
Speicherkarten nicht in Reichweite
von Kleinkindern liegen. Solche Teile
können versehentlich verschluckt
werden. Falls dies eintritt, konsultieren
Sie sofort einen Arzt.
Hinweise zum Monitor und
elektronischen Sucher
• Der Monitor und der elektronische
Sucher werden mit extrem präziser
Technologie hergestellt. Über 99,99%
der Pixel sind für den effektiven Einsatz
betriebsbereit. Dennoch besteht die
Möglichkeit, dass winzige schwarze
und/oder helle Punkte (weiße, rote,
blaue oder grüne Punkte) ständig auf
dem Monitor und dem elektronischen
Sucher sichtbar sind. Diese sind auf den
Herstellungsprozess zurückzuführende
Unvollkommenheiten und
haben keinerlei Einfluss auf die
aufgezeichneten Bilder.
• Wenn Sie den Sucher zum
Aufnehmen benutzen, können sich
möglicherweise solche Symptome
wie Überanstrengung der Augen,
Ermüdung, Reisekrankheit oder
Übelkeit bemerkbar machen. Wir
empfehlen Ihnen, beim Aufnehmen mit
dem Sucher Pausen in regelmäßigen
Abständen einzulegen.
• Falls der Monitor oder der elektronische
Sucher beschädigt ist, brechen Sie
unverzüglich den Gebrauch der Kamera
ab. Die beschädigten Teile können Ihre
Hände, Ihr Gesicht usw. verletzen.
Hinweise zu Serienaufnahme
Während Serienaufnahme kann der
Monitor oder Sucher zwischen dem
Aufnahmebildschirm und einem
schwarzen Bildschirm blinken. Wenn
Sie den Bildschirm in dieser Situation
fortlaufend betrachten, können Sie
Missbehagen, wie z. B. Unwohlsein,
wahrnehmen. Wenn Sie Missbehagen
wahrnehmen, benutzen Sie die Kamera
nicht weiter, und konsultieren Sie bei
Bedarf Ihren Arzt.
Hinweise zum Aufnehmen über lange
Zeitspannen oder zum Aufnehmen von
4K-Filmen
• Kameragehäuse und Akku können im
Laufe der Benutzung warm werden –
dies ist normal.
• Wenn immer der gleiche Teil Ihrer
Haut während der Benutzung der
Kamera über einen langen Zeitraum
mit der Kamera in Berührung
kommt, können Symptome einer
Niedertemperaturverbrennung, wie
Rötung oder Blasenbildung, auftreten,
selbst wenn sich die Kamera nicht
heiß anfühlt. Verwenden Sie in den
folgenden Situationen besondere
Aufmerksamkeit, und benutzen Sie ein
Stativ usw.
- Wenn die Kamera in einer heißen
Umgebung benutzt wird
- Wenn eine Person mit
Kreislaufschwäche oder
beeinträchtigtem Hautgefühl die
Kamera benutzt
- Wenn die Kamera bei Einstellung
von [Autom. AUS Temp.] auf [Hoch]
benutzt wird
Hinweise zur Benutzung eines Stativs
Verwenden Sie ein Stativ, dessen
Schraube kürzer als 5,5 mm ist.
Anderenfalls wird die Kamera nicht richtig
befestigt und kann beschädigt werden.
Sony-Objektive/Zubehörteile
Verwendung dieses Geräts mit Produkten
anderer Hersteller kann seine Leistung
beeinträchtigen, was zu Unfällen oder
Fehlfunktionen führen kann.
DE
DE
11
Page 36

Warnung zu Urheberrechten
Fernsehprogramme, Filme,
Videobänder und andere Materialien
können urheberrechtlich geschützt
sein. Unerlaubtes Aufnehmen
solcher Materialien kann gegen die
Bestimmungen des Urheberrechts
verstoßen.
Hinweise zu Standortinformationen
Wenn Sie ein mit Standortinformationen
versehenes Bild hochladen und
teilen, können Sie die Informationen
versehentlich Dritten offenbaren.
Um zu verhindern, dass Dritte Ihre
Standortinformationen erhalten, stellen
Sie [
StO.infoVerknEinst] vor der
Aufnahme von Bildern auf [Aus] ein.
Hinweise zum Entsorgen oder Übertragen
dieses Produkts auf andere Besitzer
Bevor Sie dieses Produkt entsorgen
oder auf andere übertragen, führen Sie
unbedingt den folgenden Vorgang durch,
um private Daten zu schützen.
• Wählen Sie [Einstlg zurücksetzen]
[Initialisieren].
Hinweise zum Entsorgen oder Übertragen
einer Speicherkarte auf andere Besitzer
Durch Ausführen von [Formatieren]
oder [Löschen] auf der Kamera oder
einem Computer werden die Daten
auf der Speicherkarte möglicherweise
nicht vollständig gelöscht. Bevor Sie
eine Speicherkarte auf andere Besitzer
übertragen, empfehlen wir, die Daten
mithilfe von Datenlöschungs-Software
vollständig zu löschen. Wenn Sie eine
Speicherkarte entsorgen, empfehlen wir,
sie physisch zu zerstören.
Hinweis zur Netzwerkfunktionen
Wenn Sie Netzwerkfunktionen
verwenden, können unbeabsichtigte
Dritte im Netzwerk abhängig von der
Nutzungsumgebung auf die Kamera
zugreifen. Zum Beispiel kann ein
unbefugter Zugriff auf die Kamera
in Netzwerkumgebungen erfolgen,
an die ein anderes Netzwerkgerät
angeschlossen ist, oder es kann sich ohne
Erlaubnis verbinden. Sony übernimmt
keine Verantwortung für Verluste oder
Schäden, die durch die Verbindung
mit solchen Netzwerkumgebungen
verursacht werden.
DE
12
So schalten Sie DrahtlosNetzwerkfunktionen (Wi-Fi usw.)
vorübergehend aus
Wenn Sie in ein Flugzeug usw.
einsteigen, können Sie alle DrahtlosNetzwerkfunktionen mittels
[Flugzeug-Modus] vorübergehend
ausschalten.
Netzkabel
Für Kunden im Vereinigten Königreich,
Irland, Malta, Zypern und Saudi-Arabien
Verwenden Sie das Netzkabel (A). Aus
Sicherheitsgründen ist das Netzkabel (B)
nicht für die obigen Länder/Regionen
vorgesehen und darf daher dort nicht
verwendet werden.
Für Kunden in anderen EU-Ländern/
Regionen
Verwenden Sie das Netzkabel (B).
(A) (B)
Page 37

Technische Daten
Kamera
[System]
Kameratyp:
Digitalkamera mit Wechselobjektiv
Objektiv: Sony E-Bajonett-Objektiv
[Bildsensor]
Bildformat: APS-C-Format (23,5mm ×
15,6mm), CMOS-Bildsensor
Effektive Pixelzahl der Kamera:
Ca. 24 200 000 Pixel
Gesamtpixelzahl der Kamera:
Ca. 25 000 000 Pixel
[Elektronischer Sucher]
Typ: 1,0cm (0,39-Typ)
Elektronischer Sucher
[Monitor]
Breitbild, 7,5cm (3,0-Typ) TFTAnsteuerung, Touchpanel
[Allgemeines]
Nenneingangsleistung:
Betriebstemperatur:
Lagertemperatur:
Abmessungen (B/H/T) (ca.):
Gewicht (ca.):
, 2,3W
7,2V
0 bis 40°C
–20 bis 55°C
120 × 66,9 × 59,4mm
120 × 66,9 × 49,9mm
(vom Griff zum Monitor)
396g (inklusive Akku,
SD-Speicherkarte)
Netzteil
AC-UUD12/AC-UUE12
Nenneingangsleistung:
100 - 240V
Nennausgangsleistung: 5V , 1,5A
, 50/60Hz, 0,2A
Akku
NP-FW50
Nennspannung: 7,2 V
Änderungen von Design und
technischen Daten vorbehalten.
Markenzeichen
• XAVC S und sind
eingetragene Markenzeichen der
Sony Corporation.
• AVCHD und das AVCHD-Logo
sind Markenzeichen von
Panasonic Corporation und
Sony Corporation.
• Android und Google Play sind
Markenzeichen oder eingetragene
Markenzeichen der Google LLC.
• Wi-Fi, das Wi-Fi-Logo und
Wi-Fi Protected Setup sind
eingetragene Markenzeichen bzw.
Markenzeichen der Wi-Fi Alliance.
• QR Code ist ein Markenzeichen der
Denso Wave Inc.
• Außerdem sind die in dieser
Anleitung verwendeten System- und
Produktbezeichnungen im Allgemeinen
Markenzeichen oder eingetragene
Markenzeichen ihrer jeweiligen
Entwickler oder Hersteller. Die Zeichen
™ oder ® werden jedoch nicht in allen
Fällen in dieser Anleitung verwendet.
Zusätzliche Informationen zu diesem
Produkt und Antworten zu häufig
gestellten Fragen können Sie auf
unserer Kundendienst-Website finden.
DE
DE
13
Page 38

Español
Acerca del manual para esta
cámara
Esta guía describe los preparativos necesarios para comenzar a utilizar
el producto, las operaciones básicas, etc. Para ver detalles, consulte la
“Guía de ayuda” (manual en la web).
“Guía de ayuda” (Manual de web)
https://rd1.sony.net/help/ilc/1950/h_zz/
ILCE-6100 Guía de ayuda
Búsqueda de información valiosa, como puntos esenciales
sobre la toma de imagen
Este sitio web le da a conocer funciones útiles, formas de utilización, y ejemplos
de configuración.
Consulte el sitio web cuando configure su cámara.
Tutoriales
https://www.sony.net/tutorial/ilc/6100/
ES
2
Page 39

Preparativos
Comprobación de los elementos suministrados
El número entre paréntesis indica el número de piezas.
• Cámara (1)
• Cable de alimentación (1)*
(suministrado en algunos países/
regiones)
* Es posible que con este equipo
se suministren varios cables de
alimentación. Utilice el adecuado
para su país o región. Consulte la
página 12.
• Batería recargable NP-FW50 (1)
• Cable micro USB (1)
Inserción de la batería (suministrado)/tarjeta de memoria
(se vende por separado) en la cámara
Abra la cubierta de la batería/tarjeta de memoria, e inserte la batería y una
tarjeta de memoria en la cámara. Después, cierre la cubierta.
Palanca de bloqueo
• Adaptador de ca (FUENTE DE
ALIMENTACIÓN) (1)
El tipo de adaptador de ca (FUENTE
DE ALIMENTACIÓN) puede variar
dependiendo del país/región.
• Correa de bandolera (1)
• Caperuza de ocular (1)
• Tapa de caja (1)*
* Solamente para ILCE-6100
• Guía de inicio (este manual) (1)
• Guía de referencia (1)
Asegúrese de que la
esquina cortada está
orientada correctamente.
ES
Tarjeta de memoria Batería
Batería
Asegúrese de que la batería está orientada en la dirección correcta e
insértela mientras presiona la palanca de bloqueo de la batería.
ES
3
Page 40

Tarjeta de memoria
Inserte la tarjeta de memoria con la esquina cortada orientada como se
muestra en la ilustración.
Esta cámara es compatible con tarjetas de memoria SD o Memory Stick.
Para ver detalles sobre las tarjetas de memoria compatibles, consulte la
“Guía de ayuda”.
Cuando utilice una tarjeta de memoria con esta cámara por primera vez,
formatee la tarjeta utilizando la cámara para así estabilizar el rendimiento
de la tarjeta de memoria.
Nota
• El formateo borra todos los datos, incluyendo las imágenes protegidas
y los ajustes registrados (M1 a M4). Una vez borrados, los datos no se
pueden recuperar. Guarde los datos valiosos en un ordenador, etc., antes
de formatear.
Carga de la batería
1 Desconecte la alimentación.
Si la cámara está encendida, la batería no se cargará.
2 Conecte la cámara con la batería insertada
al adaptador de ca (suministrado) utilizando
el cable micro USB (suministrado), y conecte
el adaptador de ca a la toma de corriente de
la pared.
La luz de carga se iluminará cuando comience
la carga. Cuando la luz de carga se apague, la
carga se habrá completado.
Luz de carga
ES
4
Page 41

Colocación de un objetivo
Índices de montura
1 Retire la tapa de caja de la cámara y la tapa trasera de objetivo de la
parte trasera de objetivo.
2 Monte el objetivo alineando las dos marcas de índice blancas (índices
de montura) del objetivo y la cámara.
3 Mientras empuja el objetivo ligeramente hacia la cámara, gírelo
despacio en la dirección de la flecha hasta que produzca un chasquido
en posición bloqueada.
Ajuste del idioma y el reloj
Interruptor ON/OFF (Alimentación)
Rueda de control
Selección de elementos:
////
Confirmación: Botón del centro
/
1 Ajuste el interruptor ON/OFF (Alimentación) a “ON” para encender la
cámara.
2 Seleccione el idioma deseado y después pulse el centro de la rueda de
control.
ES
ES
5
Page 42

3 Asegúrese de que [Intro] está seleccionado en la pantalla y después
pulse el botón del centro.
4 Seleccione el lugar geográfico deseado y después pulse el botón del
centro.
5 Ajuste [Horario verano], [Fecha/Hora], y [Formato de fecha], y después
seleccione [Intro] y pulse el botón del centro.
Si quiere reconfigurar la fecha/hora o el ajuste de área posteriormente,
seleccione MENU
[Configuración área].
(Ajustes) [Ajuste fecha/hora] o
Toma de imágenes
Toma de imágenes fijas
1 Seleccione el modo de toma
deseado girando el dial de modo.
2 Pulse el botón disparador hasta la
mitad para enfocar.
3 Pulse el botón disparador a fondo.
ES
6
Botón disparador
Dial de modo
Botón (extracción de flash)
Page 43

Cambio del ángulo del monitor
Puede cambiar el ángulo del monitor para tomar imágenes desde cualquier
posición que le guste.
(A) Posición alta (sujetando la cámara en posición alta)
(B) Posición baja (sujetando la cámara en posición baja)
(C) Posición selfie (orientando el monitor hacia usted para tomar una selfie)
(A)
(B)
(C)
Utilización del flash
Pulse el botón (extracción de flash) para extraer el flash.
Toma de películas
ES
1 Pulse el botón MOVIE (Película) para
comenzar a grabar.
La grabación de películas se puede
iniciar desde cualquier modo de toma
en el ajuste predeterminado.
2 Pulse el botón MOVIE de nuevo para
detener la grabación.
Botón MOVIE (Película)
ES
7
Page 44

Visionado
1 Pulse el botón (Reproducción)
para cambiar al modo de
reproducción.
2 Seleccione una imagen con la rueda
de control.
Puede desplazarse a la imagen
anterior/siguiente pulsando el lado
izquierdo/derecho de la rueda de
control.
Para comenzar a reproducir una
película, pulse el botón del centro de
la rueda de control.
Botón (Reproducción)
Rueda de control
Transferencia de imágenes a un
smartphone
Puede transferir imágenes a un smartphone conectando la cámara y un
smartphone a través de Wi-Fi.
1 : Instale Imaging Edge Mobile en su smartphone.
Para conectar la cámara y su smartphone, se requiere
Imaging Edge Mobile.
Instale Imaging Edge Mobile en su smartphone de antemano.
Si Imaging Edge Mobile ya está instalada en su smartphone, asegúrese de
actualizarla con la versión más reciente.
https://www.sony.net/iem/
ES
8
Page 45

2 Conecte la cámara y su smartphone utilizando el QR Code.
: MENU (Red) [Func Enviar a smart.]
[Enviar a smartphone] [Sel. en este dispositivo] imágenes que se
van a transferir.
Si quiere seleccionar imágenes en el smartphone, seleccione
[Selecc. en smartphone].
: Inicie Imaging Edge Mobile en su smartphone, y seleccione
[Escanear el QR Code de la cámara].
: Escanee el QR Code visualizado en
la cámara utilizando su smartphone.
3 Las imágenes seleccionadas se transferirán.
Si está utilizando Android, puede transferir imágenes después de la primera
vez simplemente iniciando Imaging Edge Mobile con el Paso 2Si la transferencia de imagen no se inicia, seleccione la cámara que quiere
conectar en la pantalla de su smartphone.
Para ver detalles sobre cómo conectar a un smartphone, consulte los sitios
de soporte siguientes:
https://www.sony.net/dics/iem02/
• Para ver detalles sobre otros métodos de conexión o sobre cómo utilizar el
smartphone como controlador remoto para operar la cámara, consulte la
“Guía de ayuda”.
• No se garantiza que las funciones Wi-Fi presentadas en este manual
funcionen con todos los smartphones o tabletas.
• Las funciones Wi-Fi de esta cámara no están disponibles cuando la
conexión es a una LAN inalámbrica pública.
de arriba.
ES
ES
9
Page 46

Gestión y edición de imágenes
en un ordenador
PlayMemories Home
PlayMemories Home le permite importar imágenes fijas y películas a su
ordenador y verlas o utilizarlas. Necesita instalar PlayMemories Home para
importar películas XAVC S o películas AVCHD a su ordenador.
Imaging Edge
Imaging Edge es un paquete de software que incluye funciones como toma
remota desde un ordenador, y ajustar o revelar imágenes RAW grabadas
con la cámara.
Para ver detalles sobre el software de ordenador, consulte la URL siguiente.
https://www.sony.net/disoft/
Notas sobre la utilización
Nombre del producto: Cámara Digital
Modelo: ILCE-6100
Consulte “Precauciones“ en la
“Guía de ayuda” también.
Notas sobre el manejo del producto
• Esta cámara ha sido diseñada para ser
a prueba de polvo y humedad, pero
no es resistente al agua ni resistente
al polvo.
• Retire cualquier suciedad de la
superficie del flash. La suciedad sobre
la superficie del flash puede crear
humo o arder debido al calor generado
por la emisión de luz. Si hay suciedad/
polvo, limpie con un paño suave.
• No deje el objetivo o el visor expuesto
a una fuente de luz fuerte tal como
la luz solar. Debido a la función de
condensación del objetivo, si lo hace
podrá ocasionar humo, fuego, o un mal
funcionamiento dentro del cuerpo de la
cámara o el objetivo. Si tiene que dejar
la cámara expuesta a una fuente de luz
tal como la luz solar, coloque la tapa
del objetivo en el objetivo.
ES
10
• Cuando tome imágenes con
iluminación de fondo, mantenga el sol
suficientemente alejado del ángulo
de visión. De lo contrario, la luz solar
podrá entrar en el enfoque dentro de
la cámara y ocasionar humo o fuego.
Aunque el sol esté ligeramente alejado
del ángulo de visión, todavía puede
ocasionar humo o fuego.
• No exponga el objetivo directamente
a haces tales como haces de láser. Eso
podría dañar el sensor de imagen y
ocasionar un mal funcionamiento de
la cámara.
• No mire a la luz solar o a una fuente de
luz fuerte a través del objetivo cuando
este esté desmontado. Esto podría
resultar en daños irreparables a los ojos
u ocasionar un mal funcionamiento.
• No deje la cámara, los accesorios
suministrados, o las tarjetas de
memoria al alcance de niños pequeños.
Podrían ser tragados accidentalmente.
Si ocurre esto, consulte a un médico
inmediatamente.
Page 47

Notas sobre el monitor y el visor
electrónico
• El monitor y el visor electrónico están
fabricados utilizando tecnología de
muy alta precisión, y más del 99,99%
de los píxeles son operativos para
uso efectivo. Sin embargo, es posible
que haya algunos puntos pequeños
negros y/o brillantes (de color blanco,
rojo, azul o verde) que aparezcan
constantemente en el monitor y
en el visor electrónico. Estos son
imperfecciones debidas al proceso de
fabricación y no afectan de ninguna
forma a las imágenes grabadas.
• Cuando tome imágenes con el visor,
es posible que sienta síntomas como
cansancio de la vista, fatiga, mareo por
movimiento, o náusea. Se recomienda
descansar a intervalos regulares
cuando esté tomando imágenes con
el visor.
• Si el monitor o el visor electrónico
está dañado, deje de utilizar la cámara
inmediatamente. Las partes dañadas
pueden causarle daño en las manos,
la cara, etc.
Notas sobre la toma continua
Durante la toma continua, el monitor o el
visor podrá parpadear entre la pantalla
de toma y una pantalla negra. Si continúa
observando la pantalla en esta situación,
puede que note síntomas incómodos tal
como una sensación de no encontrarse
bien. Si nota síntomas incómodos, deje
de utilizar la cámara, y consulte a su
médico según sea necesario.
Notas sobre la grabación durante largos
periodos de tiempo o grabación de
películas 4K
• El cuerpo de la cámara y la batería se
podrán volver calientes durante el uso,
lo cual es normal.
• Si la misma parte de su piel toca la
cámara durante un largo periodo de
tiempo mientras está utilizando la
cámara, aunque usted no sienta que la
cámara está caliente, podrá ocasionar
síntomas de una quemadura de baja
temperatura tal como coloración roja o
ampollas. Preste atención especial en
las situaciones siguientes si utiliza un
trípode, etc.
- Cuando utilice la cámara en un
entorno de alta temperatura
- Cuando alguien con mala circulación
de sangre o sensación de deterioro
de la piel utilice la cámara
- Cuando utilice la cámara con
[Temp. APAGA auto] ajustado a [Alto]
Notas sobre la utilización del trípode
Utilice un trípode con un tornillo de
menos de 5,5 mm de largo. De lo
contrario, no podrá sujetar firmemente
la cámara, y es posible que la cámara
se dañe.
Objetivos/accesorios de Sony
El uso de esta unidad con productos
de otros fabricantes puede afectar a su
rendimiento, provocando accidentes o
mal funcionamiento.
Aviso sobre los derechos de autor
Los programas de televisión, películas,
cintas de vídeo y demás materiales
pueden estar protegidos por copyright.
La grabación no autorizada de tales
materiales puede ir en contra de los
artículos de las leyes de copyright.
Notas sobre la información de ubicación
Si sube a Internet una imagen que tiene
etiqueta de ubicación y la comparte,
es posible que revele la información a
terceros accidentalmente. Para evitar que
terceros obtengan su información de
ubicación, ajuste [
[Desactivar] antes de tomar imágenes.
Notas sobre cómo desechar o transferir
este producto a otras personas
Antes de desechar o transferir este
producto a otras personas, asegúrese
de realizar la operación siguiente para
proteger la información privada.
• Seleccione [Restablecer ajuste]
[Inicializar].
Ajust vínc info ubic] a
ES
ES
11
Page 48

Notas sobre cómo desechar o transferir
una tarjeta de memoria a otras personas
La ejecución de [Formatear] o [Borrar] en
la cámara o en un ordenador puede que
no borre completamente los datos de la
tarjeta de memoria. Antes de transferir
una tarjeta de memoria a otras personas,
le recomendamos que borre los datos
completamente utilizando un software de
borrado de datos. Cuando deseche una
tarjeta de memoria, le recomendamos
que la destruya físicamente.
Nota sobre las funciones de red
Cuando utilice las funciones de red,
cualquier persona en la red podría
acceder a la cámara, dependiendo del
entorno de uso. Por ejemplo, podría
producirse un acceso no autorizado a la
cámara en entornos de red en los que
haya otro dispositivo de red conectado
o se pueda conectar sin permiso. Sony
no admitirá responsabilidad por ninguna
pérdida o daño causados por la conexión
a tales entornos de red.
Cómo desactivar las funciones de red
inalámbrica (Wi-Fi, etc.) temporalmente
Cuando embarque en un avión, etc.,
puede desactivar todas las funciones
de red inalámbrica temporalmente
utilizando [Modo avión].
Cable de alimentación
Para clientes en Reino Unido, Irlanda,
Malta, Chipre y Arabia Saudita
Utilice el cable de alimentación (A).
Por razones de seguridad, el cable de
alimentación (B) no está pensado para
los países/regiones de arriba y, por lo
tanto, no debe ser utilizado allí.
Para clientes en otros países/regiones
de la UE
Utilice el cable de alimentación (B).
(A) (B)
ES
12
Especificaciones
Cámara
[Sistema]
Tipo de cámara:
Cámara Digital de Lentes
Intercambiables
Objetivo: Sony Objetivo de montura E
[Sensor de imagen]
Formato de imagen: Tamaño APS-C
(23,5mm × 15,6mm) sensor de
imagen CMOS
Número efectivo de píxeles de la
cámara:
Aprox. 24 200 000 píxeles
Número total de píxeles de la cámara:
Aprox. 25 000 000 píxeles
[Visor electrónico]
Tipo: 1,0 cm (tipo 0,39)
Visor electrónico
[Monitor]
Panorámico, unidad TFT de 7,5cm
(tipo 3,0), panel táctil
[General]
Entrada nominal: 7,2V
Temperatura de funcionamiento:
0 a 40 °C
Temperatura de almacenamiento:
–20 a 55 °C
Dimensiones (An/Al/Pr) (Aprox.):
120 × 66,9 × 59,4mm
120 × 66,9 × 49,9mm
(desde la empuñadura al monitor)
Peso (Aprox.):
396g (incluyendo la batería y
tarjeta de memoria SD)
2,3W
Adaptador de ca (FUENTE DE
ALIMENTACIÓN)
AC-UUD12/AC-UUE12
Entrada nominal:
100 - 240V
Salida nominal: 5V 1,5A
50/60Hz 0,2A
Page 49

Batería recargable
NP-FW50
Tensión nominal: 7,2V
El diseño y las especificaciones están
sujetos a cambios sin previo aviso.
Marcas comerciales
• XAVC S y son marcas
comerciales registradas de
Sony Corporation.
• AVCHD y el logotipo de AVCHD
son marcas comerciales de
Panasonic Corporation y
Sony Corporation.
• Android y Google Play son marcas
comerciales o marcas comerciales
registradas de Google LLC.
• Wi-Fi, el logotipo de Wi-Fi y
Wi-Fi Protected Setup son marcas
comerciales registradas o marcas
comerciales de Wi-Fi Alliance.
• QR Code es una marca comercial de
Denso Wave Inc.
• Además, los nombres de sistemas y
productos utilizados en este manual
son, en general, marcas comerciales
o marcas comerciales registradas de
sus respectivos desarrolladores o
fabricantes. Sin embargo, las marcas ™
o ® podrán no haber sido utilizadas en
todos los casos en este manual.
En nuestra página web de atención
al cliente se puede encontrar
información adicional sobre este
producto y obtener respuestas a las
preguntas más frecuentes.
ES
ES
13
Page 50

Italiano
Informazioni sul manuale della
fotocamera
Questa guida descrive le preparazioni necessarie per iniziare a usare il
prodotto, le operazioni di base ecc. Per i dettagli consultare la “Guida”
(manuale on-line).
“Guida” (manuale on-line)
https://rd1.sony.net/help/ilc/1950/h_zz/
ILCE-6100 Guida
Fornisce informazioni utili, tra cui i punti essenziali per la
ripresa
Questo sito web presenta funzioni pratiche, metodi di utilizzo ed esempi di
impostazione.
Per la configurazione della fotocamera fare riferimento al sito web.
Tutorial
https://www.sony.net/tutorial/ilc/6100/
IT
2
Page 51

Preparazioni
Verifica dei componenti in dotazione
Il numero fra parentesi indica il numero dei pezzi.
• Fotocamera (1)
• Cavo di alimentazione (1)* (in
dotazione in alcune nazioni/aree
geografiche)
* Con questa apparecchiatura
potrebbero venire forniti più cavi
di alimentazione. Utilizzare quello
appropriato che corrisponde alla
propria nazione/area geografica.
Vedere pagina 12.
• Pacco Batteria Ricaricabile
NP-FW50 (1)
• Cavo USB micro (1)
• Adattatore CA (1)
La forma dell’adattatore CA può
variare a seconda della nazione/
regione.
• Tracolla (1)
• Conchiglia oculare (1)
• Cappuccio per corpo macchina (1)*
* Solo per ILCE-6100
• Guida di avvio (il presente
manuale) (1)
• Guida di riferimento (1)
Inserimento del pacco batteria (in dotazione)/della scheda di
memoria (in vendita separatamente) nella fotocamera
Aprire il coperchio della batteria/scheda di memoria e inserire il pacco
batteria e una scheda di memoria nella fotocamera. Quindi chiudere il
coperchio.
Assicurarsi che l’angolo
Leva di blocco
Pacco batteria
Accertare che il pacco batteria sia rivolto nella direzione corretta e inserirlo
tenendo premuta la leva di blocco della batteria.
smussato sia orientato
correttamente.
Scheda di memoria Pacco batteria
IT
IT
3
Page 52

Scheda di memoria
Inserire la scheda di memoria con l’angolo tagliato rivolto nella direzione
indicata nella figura.
Questa fotocamera è compatibile con le schede di memoria SD o
Memory Stick. Per i dettagli sulle schede di memoria compatibili, consultare
la “Guida”.
Quando si utilizza per la prima volta una scheda di memoria con questa
fotocamera, formattare la stessa nella fotocamera per stabilizzarne le
prestazioni.
Nota
• La formattazione cancella tutti i dati, incluse le immagini protette e le
impostazioni registrate (da M1 a M4). Una volta cancellati, tali dati non
potranno essere ripristinati. Prima della formattazione, salvare i dati
importanti in un computer ecc.
Caricamento del pacco batteria
1 Spegnere il prodotto.
Se la fotocamera è accesa, il pacco batteria non viene caricato.
2 Collegare la fotocamera con il pacco batteria
inserito all’adattatore CA (in dotazione)
usando il cavo USB micro (in dotazione), e
collegare l’adattatore CA alla presa a muro.
L’indicatore luminoso di carica si illumina
quando ha inizio la carica. Quando la carica è
completata, l’indicatore si spegne.
Indicatore luminoso di carica
IT
4
Page 53

Montaggio di un obiettivo
Indici di montaggio
1 Rimuovere il cappuccio per corpo macchina e il copri-obiettivo
posteriore dalla parte posteriore dell’obiettivo.
2 Montare l’obiettivo allineando i due segni dell’indice di colore bianco
(indici di montaggio) sull’obiettivo e sulla fotocamera.
3 Spingendo leggermente l’obiettivo verso la fotocamera, ruotare
lentamente l’obiettivo nella direzione della freccia finché non scatta in
posizione bloccata.
Impostazione della lingua e dell’orologio
Interruttore ON/OFF (Accensione)
Rotellina di controllo
IT
Selezione di elementi: ////
Conferma: Tasto centrale
1 Portare l’interruttore ON/OFF (Accensione) su “ON” per accendere la
fotocamera.
/
IT
5
Page 54

2 Selezionare la lingua desiderata e premere al centro della rotellina di
controllo.
3 Accertare che sullo schermo sia selezionato [Immissione] e quindi
premere il tasto centrale.
4 Selezionare l’area geografica desiderata, quindi premere il tasto
centrale.
5 Impostare [Ora legale], [Data/Ora] e [Formato data], e quindi
selezionare [Immissione] e premere il tasto centrale.
Per riconfigurare l’impostazione di data/ora o dell’area in un secondo
momento, selezionare MENU
[Impostaz. fuso orario].
(Impostazione) [Imp.data/ora] o
Ripresa
Ripresa di fermi immagine
1 Selezionare il modo di ripresa
ruotando la manopola del modo.
2 Premere a metà il pulsante di scatto
per mettere a fuoco.
3 Premere a fondo il pulsante di
scatto.
IT
6
Pulsante di scatto
Tasto (Flash a scomparsa)
Manopola del
modo
Page 55

Cambiamento di angolazione del monitor
È possibile cambiare l’angolazione del monitor e riprendere da qualsiasi
posizione si desideri.
(A) Posizione alta (tenendo la fotocamera in alto)
(B) Posizione bassa (tenendo la fotocamera in basso)
(C) Posizione selfie (con il monitor rivolto verso sé stessi per scattare un
selfie)
(A)
(B)
(C)
Uso del flash
Premere il tasto (flash a scomparsa) per estrarre il flash.
Ripresa di filmati
IT
1 Premere il tasto MOVIE (Filmato) per
avviare la registrazione.
Nell’impostazione predefinita, la
registrazione di filmati può essere
avviata da qualsiasi modo di ripresa.
2 Premere di nuovo il tasto MOVIE per
arrestare la registrazione.
Tasto MOVIE (Filmato)
IT
7
Page 56

Visualizzazione
1 Premere il tasto (Riproduzione)
per passare al modo di riproduzione.
2 Selezionare un’immagine con la
rotellina di controllo.
È possibile passare all’immagine
precedente/successiva premendo il
lato sinistro/destro della rotellina di
controllo.
Per avviare la riproduzione di un
filmato, premere il tasto centrale della
rotellina di controllo.
Rotellina di controllo
Tasto (Riproduzione)
Trasferimento di immagini a uno
smartphone
È possibile trasferire immagini a uno smartphone collegando la fotocamera
allo smartphone tramite Wi-Fi.
1 : Installare Imaging Edge Mobile nello smartphone.
Per collegare la fotocamera allo smartphone, è richiesto
Imaging Edge Mobile.
Installare anticipatamente Imaging Edge Mobile nello smartphone.
Se Imaging Edge Mobile è già installato sullo Smartphone, assicurarsi di
aggiornarlo sull’ultima versione.
https://www.sony.net/iem/
IT
8
Page 57

2 Collegare la fotocamera allo smartphone usando il QR Code.
: MENU (Rete) [Funz Invia a Smrtphn]
[Invia a Smartphone] [Selez. su questo dispos.] immagini da
trasferire.
Per selezionare immagini nello smartphone, selezionare
[Selezion. su Smartphone].
: Avviare Imaging Edge Mobile nello smartphone, quindi selezionare
[Scandire QR Code della fotocamera].
: Scansionare il QR Code visualizzato
dalla fotocamera usando lo
smartphone.
3 Le immagini selezionate vengono trasferite.
Se si sta usando Android, è possibile trasferire le immagini dopo la prima
volta semplicemente avviando Imaging Edge Mobile con il passaggio 2sopra.
Se il trasferimento delle immagini non si avvia, selezionare la fotocamera da
connettere sullo schermo dello smartphone.
Per i dettagli su come stabilire la connessione a uno smartphone, consultare
i seguenti siti di supporto:
https://www.sony.net/dics/iem02/
• Per i dettagli sui metodi di connessione o su come usare lo smartphone
come telecomando per azionare la fotocamera, consultare la “Guida”.
• Non è garantito che le funzioni Wi-Fi introdotte in questo manuale operino
correttamente su tutti gli smartphone o tablet.
• Le funzioni Wi-Fi di questa fotocamera non sono disponibili quando si è
connessi a una LAN wireless pubblica.
IT
IT
9
Page 58

Gestione e modifica delle
immagini su computer
PlayMemories Home
PlayMemories Home consente di importare immagini statiche e
filmati sul computer e di visualizzarli o usarli. È necessario installare
PlayMemories Home per importare filmati XAVC S o filmati AVCHD nel
computer.
Imaging Edge
Imaging Edge è una suite di software che include funzioni quali la ripresa
remota da computer, nonché la regolazione o lo sviluppo di immagini RAW
registrate con la fotocamera.
Per i dettagli sui software per computer, fare riferimento al seguente URL.
https://www.sony.net/disoft/
Note sull’uso
Consultare anche le “Precauzioni“ nella
“Guida”.
Note sulla manipolazione del prodotto
• La fotocamera è progettata per essere
resistente alla polvere e all’umidità,
ma non è impermeabile né all’acqua
né alla polvere.
• Rimuovere lo sporco dalla superficie
del flash. La presenza di sporco sulla
superficie del flash può provocare
l’emissione di fumo o bruciature
a causa del calore generato
dall’emissione della luce. Se sono
presenti sporco o polvere, rimuoverli
con un panno morbido.
• Non esporre l’obiettivo o il mirino
a fonti di luce forti come la luce
solare. Per l’effetto di condensazione
dell’obiettivo, ciò potrebbe causare
fumo, fuoco o un malfunzionamento
all’interno del corpo della fotocamera
o dell’obiettivo stesso. Se si deve
lasciare la fotocamera esposta a una
fonte di luce, come la luce solare,
applicare il copriobiettivo sull’obiettivo.
IT
10
• Quando si riprende con
retroilluminazione, tenere il sole
sufficientemente lontano dall’angolo
di visione. In caso contrario, la luce
solare può colpire l’interno della
fotocamera e causare fumo o fuoco.
La luce solare può causare fumo o
fuoco anche se leggermente spostata
dall’angolo di visione.
• Non esporre direttamente l’obiettivo
a fasci di luce quali i raggi laser.
Ciò potrebbe danneggiare il
sensore dell’immagine e provocare
malfunzionamenti della fotocamera.
• Non guardare la luce solare o una
sorgente luminosa intensa attraverso
l’obiettivo smontato. Ciò può
provocare danni permanenti agli occhi
o causare malfunzionamenti.
• Non lasciare la fotocamera, gli
accessori in dotazione, o le schede
di memoria alla portata dei bambini.
Potrebbero ingerire accidentalmente
delle parti. Se si dovesse verificare,
consultare immediatamente un
medico.
Page 59

Note sul monitor e sul mirino elettronico
• Il monitor e il mirino elettronico sono
fabbricati usando una tecnologia ad
altissima precisione e perciò oltre il
99,99% dei pixel sono operativi per
l’uso effettivo. Tuttavia, potrebbero
esserci dei minuscoli punti neri e/o
luminosi (bianchi, rossi, blu o verdi) che
appaiono costantemente sul monitor
e sul mirino elettronico. Si tratta di
imperfezioni dovute al processo di
fabbricazione e non influiscono in alcun
modo sulle immagini registrate.
• Quando si riprende con il mirino, si
potrebbero verificare dei sintomi quali
affaticamento degli occhi, stanchezza,
chinetosi o nausea. Si consiglia di fare
una pausa ad intervalli regolari quando
si sta riprendendo con il mirino.
• Se il monitor o il mirino elettronico
è danneggiato, smettere
immediatamente di usare la
fotocamera. Le parti danneggiate
potrebbero causare lesioni alle mani,
al viso ecc.
Note sulla ripresa continua
Durante la ripresa continua, il monitor
o il mirino possono lampeggiare tra la
schermata di ripresa e lo schermo vuoto.
Se si continua a guardare lo schermo in
questa situazione, si potrebbero verificare
sintomi sgradevoli come sensazioni di
malessere. Se si verificano sintomi di
disagio, smettere di usare la fotocamera
e, se necessario, consultare un medico.
Note sulla registrazione per lunghi
periodi di tempo o di filmati 4K
• Il corpo della fotocamera e la batteria
si possono riscaldare con l’uso, ciò è
normale.
• Se la stessa porzione di pelle tocca
la fotocamera per un periodo di
tempo prolungato durante l’uso
della fotocamera, anche se questa
non sembra essere molto calda, può
causare i sintomi di un’ustione a bassa
temperatura, quali l’arrossamento o
la formazione di vesciche. Prestare
particolare attenzione nelle seguenti
situazioni e utilizzare un treppiede ecc.
- Quando si utilizza la fotocamera in un
ambiente con temperatura elevata
- Quando la fotocamera viene
utilizzata da persone con problemi
di circolazione o ridotta sensibilità
della pelle
- Quando si utilizza la fotocamera con
[Temp. ali. DIS. auto.] impostata su
[Alto]
Note sull’uso del treppiede
Usare un treppiede con una vite di
lunghezza inferiore a 5,5 mm. Altrimenti
non è possibile fissare saldamente la
fotocamera e potrebbero verificarsi dei
danni alla fotocamera.
Obiettivi/accessori Sony
L’utilizzo di questa unità con prodotti
di altre marche potrebbe alterarne
le prestazioni e causare incidenti o
malfunzionamenti.
Avvertenza sui diritti d’autore
I programmi televisivi, i film, le
videocassette e altri materiali possono
essere protetti dai diritti d’autore. La
registrazione non autorizzata di tali
materiali può essere contraria alle norme
delle leggi sui diritti d’autore.
Note sulle informazioni sulla posizione
Se si carica e si condivide un’immagine
taggata con una posizione, si può rivelare
accidentalmente questa informazione
a terzi. Per evitare che terzi ottengano
informazioni sulla posizione, impostare
[
Imp. coll. info. loc.] su [Disattiv.] prima
di riprendere le immagini.
Note sullo smaltimento o sul
trasferimento di questo prodotto ad altri
Quando si smaltisce o si trasferisce
questo prodotto ad altri, accertarsi di
eseguire la seguente operazione per
proteggere le informazioni private.
• Selezionare [Ripristino impostaz.]
[Inizializzazione].
IT
IT
11
Page 60

Note sullo smaltimento o sul trasferimento
di una scheda di memoria ad altri
L’esecuzione di [Formatta] o [Canc.] sulla
fotocamera o in un computer potrebbe
non eliminare completamente i dati
presenti sulla scheda di memoria. Prima
di trasferire una scheda di memoria
ad altri, è consigliabile eliminare
completamente i dati utilizzando un
software per l’eliminazione dei dati.
Qualora si smaltisca una scheda di
memoria, è consigliabile distruggerla
fisicamente.
Nota sulle funzioni di rete
Quando si usano le funzioni di rete, terze
parti indesiderate sulla rete potrebbero
accedere alla fotocamera, a seconda
dell’ambiente di utilizzo. Per esempio,
l’accesso non autorizzato alla fotocamera
potrebbe verificarsi in ambienti di rete
in cui un altro dispositivo di rete è
connesso alla rete o vi si può connettere
senza autorizzazione. Sony declina ogni
responsabilità per eventuali perdite o
danni causati dalla connessione a tali
ambienti di rete.
Come disattivare temporaneamente le
funzioni di rete wireless (Wi-Fi ecc.)
Quando ci si imbarca su un aereo ecc., è
possibile disattivare temporaneamente
tutte le funzioni di rete wireless con
[Modo Aeroplano].
Cavo di alimentazione
Per i clienti di Regno Unito, Irlanda, Malta,
Cipro e Arabia Saudita
Usare il cavo di alimentazione (A). Per
motivi di sicurezza, il cavo di
alimentazione (B) non è inteso per l’uso
nelle nazioni/regioni indicate sopra e
pertanto non deve venire usato in tali
nazioni/regioni.
Per i clienti di altre nazioni/regioni
dell’Unione Europea
Usare il cavo di alimentazione (B).
(A) (B)
Dati tecnici
Fotocamera
[Sistema]
Tipo di fotocamera:
Fotocamera digitale con obiettivo
intercambiabile
Obiettivo: Obiettivo con montaggio E
Sony
[Sensore dell’immagine]
Formato immagine: Formato APS-C
(23,5mm × 15,6mm), sensore
dell’immagine CMOS
Numero effettivo di pixel della
fotocamera:
Circa 24200000 pixel
Numero totale di pixel della
fotocamera:
Circa 25000000 pixel
[Mirino Elettronico]
Tipo: 1,0 cm (tipo 0,39)
Mirino Elettronico
[Monitor]
Wide, drive TFT da 7,5 cm (tipo 3,0),
touch panel
[Generali]
Potenza nominale di ingresso:
Temperatura di esercizio:
Temperatura di conservazione:
Dimensioni (L/A/P) (circa):
Peso (circa):
, 2,3W
7,2V
Da 0 a 40 °C
Da –20 a 55 °C
120 × 66,9 × 59,4mm
120 × 66,9 × 49,9mm
(dall’impugnatura al monitor)
396g (inclusi pacco batteria e
scheda di memoria SD)
12
IT
Page 61

Adattatore CA
AC-UUD12/AC-UUE12
Potenza nominale di ingresso:
100- 240V
Potenza nominale di uscita:
5V
, 50/60Hz, 0,2A
, 1,5A
Pacco Batteria Ricaricabile
NP-FW50
Tensione nominale: 7,2 V
Il formato e i dati tecnici sono soggetti
a modifiche senza preavviso.
Marchi di fabbrica
• XAVC S e sono marchi
registrati di Sony Corporation.
• AVCHD e il logo AVCHD sono
marchi di Panasonic Corporation e
Sony Corporation.
• Android e Google Play sono marchi di
fabbrica o marchi di fabbrica registrati
di Google LLC.
• Wi-Fi, il logo Wi-Fi e
Wi-Fi Protected Setup sono marchi
registrati o marchi di Wi-Fi Alliance.
• QR Code è un marchio di
Denso Wave Inc.
• Inoltre, i nomi dei sistemi e dei prodotti
usati in questo manuale sono, in
generale, marchi o marchi registrati
dei loro rispettivi sviluppatori o
produttori. Tuttavia, i contrassegni ™ o
® potrebbero non essere usati in tutti i
casi in questo manuale.
Sul sito web di Assistenza clienti
è possibile trovare informazioni
aggiuntive su questo prodotto e le
risposte alle domande frequenti.
IT
IT
13
Page 62

Português
Acerca do manual para esta
câmara
Este guia descreve os preparativos necessários para começar a utilizar
o produto, as operações básicas, etc. Para mais detalhes, consulte o
“Guia de ajuda” (manual da Web).
“Guia de ajuda” (manual da Web)
https://rd1.sony.net/help/ilc/1950/h_zz/
ILCE-6100 Guia de ajuda
Procurar informações valiosas, como por exemplo pontos
essenciais sobre fotografia
Este website apresenta funções convenientes, formas de utilização e exemplos
de definições.
Consulte o website quando configurar a sua câmara.
Tutoriais
https://www.sony.net/tutorial/ilc/6100/
PT
2
Page 63

Preparativos
Verificação dos itens fornecidos
O número entre parênteses indica o número de peças.
• Câmara (1)
• Cabo de alimentação (1)*
(fornecido em alguns países/
regiões)
* Vários cabos de alimentação
podem ser fornecidos com este
equipamento. Utilize o que for
adequado para o seu país/região.
Consulte a página 12.
• Bateria recarregável NP-FW50 (1)
• Cabo micro USB (1)
Inserir a bateria (fornecido)/cartão de memória
(vendido separadamente) na câmara
Abra a tampa do compartimento da bateria/cartão de memória e insira a
bateria e um cartão de memória na câmara. Em seguida, feche a tampa.
Alavanca de bloqueio
• Transformador de CA (1)
O tipo de transformador de CA
pode diferir consoante o país/
região.
• Correia do ombro (1)
• Ocular (1)
• Tampa do corpo da câmara (1)*
* Apenas para a ILCE-6100
• Guia de início (este manual) (1)
• Guia de referência (1)
Certifique-se de que o
canto com o entalhe está
virado corretamente.
PT
Cartão de memória Bateria
Bateria
Certifique-se de que o pack de baterias está virado na direção correta e
insira-o enquanto carrega na alavanca de bloqueio da bateria.
PT
3
Page 64

Cartão de memória
Insira o cartão de memória com o canto com o entalhe virado conforme a
ilustração.
Esta câmara é compatível com cartões de memória SD ou Memory Stick.
Para mais detalhes sobre cartões de memória compatíveis, consulte o
“Guia de ajuda”.
Quando usa um cartão de memória com esta câmara pela primeira vez,
formate o cartão usando a câmara para estabilizar o desempenho do cartão
de memória.
Nota
• A formatação apaga todos os dados, incluindo as imagens protegidas e
as definições registadas (M1 a M4). Uma vez apagados, estes dados não
podem ser restaurados. Guarde os dados valiosos num computador, etc.,
antes de formatar.
Carregar a bateria
1 Desligue a alimentação.
Se a câmara estiver ligada, a bateria não carregará.
2 Ligue a câmara ao transformador de CA
(fornecido) com a bateria inserida usando
o cabo micro USB (fornecido), e ligue o
transformador de CA à tomada de parede.
O indicador luminoso de carga acenderá
quando o carregamento iniciar. Quando o
indicador se apaga, o carregamento está
concluído.
Indicador luminoso de carga
PT
4
Page 65

Colocar uma objetiva
Índices de montagem
1 Retire a tampa do corpo da câmara e a tampa de trás da objetiva da
traseira da objetiva.
2 Monte a objetiva alinhando as duas marcas brancas do índice (índices
de montagem) na objetiva e na câmara.
3 Enquanto empurra a objetiva ligeiramente em direção da câmara, rode
a objetiva lentamente na direção da seta até fazer clique na posição
bloqueada.
Definir o idioma e o relógio
Interruptor ON/OFF (Alimentação)
Seletor de controlo
PT
Selecionar itens : ////
Confirmar : Botão central
/
1 Regule o interruptor ON/OFF (Alimentação) para “ON” para ligar a
câmara.
PT
5
Page 66

2 Selecione o idioma desejado e depois carregue no centro do seletor de
controlo.
3 Certifique-se de que [Confirmar] está selecionado no ecrã e depois
carregue no botão central.
4 Selecione a localização geográfica desejada e depois carregue no botão
central.
5 Defina [Hora de verão], [Data/Hora] e [Formato de Data] e depois
selecione [Confirmar] e carregue no botão central.
Se quiser reconfigurar a data/hora ou a definição de área num ponto
posterior, selecione MENU
[Definição de Área].
(Configuração) [Conf Data/Hora] ou
Fotografar
Fotografar imagens fixas
1 Selecione o modo de fotografia
desejado rodando o seletor de
modo.
2 Carregue até meio no botão do
obturador para focar.
3 Carregue completamente no botão
do obturador.
PT
6
Botão do obturador
Botão (abertura do flash)
Seletor de
modo
Page 67

Alterar o ângulo do monitor
Pode alterar o ângulo do monitor para fotografar a partir de qualquer
posição que quiser.
(A) Posição alta (segurar a câmara na posição alta)
(B) Posição baixa (segurar a câmara na posição baixa)
(C) Posição de selfie (virar o monitor para si para tirar uma selfie)
(A)
(B)
(C)
Utilizar o flash
Carregue no botão (abertura do flash) para abrir o flash.
Gravar filmes
1 Prima o botão MOVIE (Filme) para
iniciar a gravação.
A gravação de filmes pode ser
iniciada em qualquer modo de
filmagem na predefinição.
Botão MOVIE (Filme)
2 Prima novamente o botão MOVIE
para parar a gravação.
PT
PT
7
Page 68

Visualização
1 Carregue no botão (Reprodução)
para comutar para o modo de
reprodução.
2 Selecione uma imagem com o
seletor de controlo.
Pode deslocar-se para a imagem
anterior/imagem seguinte
carregando no lado esquerdo/direito
do seletor de controlo.
Para iniciar a reprodução de um filme,
carregue no botão central no seletor
de controlo.
Seletor de controlo
Botão (Reprodução)
Transferir imagens para um
smartphone
Pode transferir imagens para um smartphone ligando a câmara e um
smartphone através de Wi-Fi.
1 : Instale Imaging Edge Mobile no seu smartphone.
Para ligar a câmara e o seu smartphone, é necessário
Imaging Edge Mobile.
Instale previamente Imaging Edge Mobile no seu smartphone.
Se Imaging Edge Mobile já estiver instalada no seu smartphone,
certifique-se de que a atualiza para a versão mais recente.
https://www.sony.net/iem/
PT
8
Page 69

2 Ligue a câmara e o seu smartphone usando o QR Code.
: MENU (Rede) [Funç. Env. p/ smrtph]
[Env. p/ Smartphone] [Selec. Neste Dispositivo] imagens a
transferir.
Se quiser selecionar imagens no smartphone, selecione
[Selec. no Smartphone].
: Inicie Imaging Edge Mobile no seu smartphone e selecione
[Digitalize o QR Code da câmara].
: Digitalize o QR Code visualizado na
câmara usando o seu smartphone.
3 As imagens selecionadas serão transferidas.
Se estiver a utilizar Android, pode transferir imagens após a primeira vez
iniciando simplesmente Imaging Edge Mobile com o Passo 2Se a transferência de imagens não iniciar, selecione a câmara a ligar no ecrã
do seu smartphone.
Para mais detalhes sobre como ligar a um smartphone, consulte os
seguintes sites de apoio:
https://www.sony.net/dics/iem02/
• Para mais detalhes sobre outros métodos de ligação ou como utilizar o
smartphone como um telecomando para operar a câmara, consulte o
“Guia de ajuda”.
• As funções Wi-Fi introduzidas neste manual não têm garantia de
funcionarem em todos os smartphones ou tablets.
• As funções Wi-Fi desta câmara não estão disponíveis quando estiver
ligado a uma LAN pública sem fios.
acima.
PT
PT
9
Page 70

Gerir e editar imagens num
computador
PlayMemories Home
PlayMemories Home permite-lhe importar imagens fixas e filmes
para o seu computador e visualizá-los ou utilizá-los. Tem de instalar
PlayMemories Home para importar filmes XAVC S ou filmes AVCHD para o
seu computador.
Imaging Edge
Imaging Edge é um pacote de software que inclui funções como fotografia
remota a partir de um computador e ajustar ou desenvolver imagens RAW
gravadas com a câmara.
Para mais detalhes sobre o software informático, consulte o seguinte URL.
https://www.sony.net/disoft/
Notas sobre a utilização
Consulte também “Precauções“ no
“Guia de ajuda”.
Notas sobre o manuseamento do produto
• Esta câmara foi concebida para ser
resistente ao pó e à humidade, mas
não é à prova de água nem antipoeira.
• Retire qualquer sujidade da superfície
do flash. A sujidade na superfície do
flash pode emitir fumo ou queimar
devido ao calor gerado pela emissão
de luz. Se houver sujidade/pó, limpe
com um pano macio.
• Não deixe a objetiva ou o visor exposto
a uma fonte de luz forte como por
exemplo a luz solar. Por causa da
função de condensação da objetiva,
ao fazê-lo pode provocar fumo, fogo
ou um mau funcionamento no interior
do corpo da câmara ou da objetiva. Se
tiver de deixar a câmara exposta a uma
fonte de luz como a luz solar, coloque a
tampa da objetiva na objetiva.
PT
10
• Quando fotografa com retroiluminação,
mantenha o sol suficientemente
afastado do ângulo de visão. Caso
contrário, a luz solar pode entrar no
foco no interior da câmara e provocar
fumo ou fogo. Mesmo se o sol estiver
ligeiramente afastado do ângulo de
visão, ainda pode provocar fumo ou
fogo.
• Não exponha a objetiva diretamente a
feixes de luz, como por exemplo raios
laser. Isso pode danificar o sensor de
imagem e causar mau funcionamento
da câmara.
• Não olhe para a luz solar nem para uma
fonte de luz forte através da objetiva
quando estiver desmontada. Isso
pode resultar em danos irreparáveis
para os olhos ou causar um mau
funcionamento.
• Não deixe a câmara, os acessórios
fornecidos ou os cartões de memória
ao alcance das crianças. Podem ser
ingeridos acidentalmente. Se isso
ocorrer, consulte imediatamente um
médico.
Page 71

Notas sobre o monitor e o visor eletrónico
• O monitor e visor eletrónico são
fabricados usando tecnologia com
uma precisão extremamente alta, pelo
que mais de 99,99% dos píxeis estão
operacionais para utilização efetiva.
Contudo, pode haver alguns pequenos
pontos pretos e/ou pontos brilhantes
(brancos, vermelhos, azuis ou verdes)
que aparecem constantemente no
monitor e visor eletrónico. Estas
são imperfeições que se devem ao
processo de fabrico e não afetam em
nada as imagens gravadas.
• Quando fotografar com o visor, pode
experimentar sintomas como por
exemplo fadiga visual, fadiga, enjoo de
movimento ou náusea. Recomendamos
que faça uma pausa em intervalos
regulares quando estiver a fotografar
com o visor.
• Se o monitor ou o visor eletrónico
estiver danificado, deixe de utilizar
a câmara imediatamente. As peças
danificadas podem lesionar as suas
mãos, rosto, etc.
Notas sobre fotografia contínua
Durante fotografia contínua, o monitor
ou visor pode piscar entre o ecrã de
fotografia e um ecrã negro. Se continuar
a ver o ecrã nesta situação, pode sentir
sintomas de desconforto como uma
sensação de mal-estar. Se sentir sintomas
de desconforto, deixe de usar a câmara
e consulte o seu médico conforme
necessário.
Notas sobre gravação durante longos
períodos de tempo ou gravação de
filmes 4K
• O corpo da câmara e a bateria podem
ficar quentes com a utilização – isso
é normal.
• Se a mesma parte da sua pele toca
na câmara durante um longo período
de tempo durante a utilização da
câmara, mesmo se não sentir a câmara
quente, pode causar sintomas de uma
queimadura de baixa temperatura
como por exemplo vermelhidão ou
bolhas. Tome especial atenção nas
seguintes situações e use um tripé, etc.
- Quando usar a câmara num ambiente
de temperatura elevada
- Quando alguém com má circulação
ou problemas de sensibilidade
cutânea usa a câmara
- Quando usar a câmara com a
[Temp des. alim. auto] definida para
[Alto]
Notas sobre a utilização de um tripé
Utilize um tripé com um parafuso
inferior a 5,5 mm de comprimento. Caso
contrário, pode não fixar a câmara com
firmeza e danificar a câmara.
Objetivas/acessórios Sony
A utilização desta unidade com produtos
de outros fabricantes pode afetar o
respetivo desempenho, originando
acidentes ou avarias.
Aviso sobre direitos de autor
Programas de televisão, filmes, cassetes
de vídeo e outros materiais podem
estar protegidos por direitos de autor. A
gravação não autorizada destes materiais
poderá contrariar o disposto nas leis de
direitos de autor.
Notas sobre informação de localização
Se carregar e partilhar uma imagem
etiquetada com uma localização, pode
revelar acidentalmente a informação
a terceiros. Para evitar que terceiros
obtenham a sua informação de
localização, defina [
para [Desligado] antes de fotografar
imagens.
Def. lig. info. locali.]
PT
PT
11
Page 72

Notas sobre a eliminação ou transferência
deste produto para outros
Antes de eliminar ou transferir este
produto para outros, certifique-se de
que executa a seguinte operação para
proteger a informação privada.
• Selecione [Repor Definições]
[Inicializar].
Notas sobre a eliminação ou transferência
de cartão de memória para outros
Executar [Formatar] ou [Apagar] na
câmara ou num computador pode não
eliminar completamente os dados no
cartão de memória. Antes de transferir
um cartão de memória para outros,
recomendamos que elimine os dados
completamente usando o software de
eliminação de dados. Quando eliminar
um cartão de memória, recomendamos
que o destrua fisicamente.
Nota sobre as funções de rede
Quando utiliza as funções de rede,
outras pessoas não intencionais na rede
podem aceder à câmara, dependendo
do ambiente de utilização. Por exemplo,
pode ocorrer acesso não autorizado à
câmara em ambientes de rede em que
outro dispositivo de rede esteja ligado ou
possa ligar-se sem autorização. A Sony
não se responsabiliza por qualquer perda
ou danos causados pela ligação a esses
ambientes de rede.
Como desligar temporariamente funções
da rede sem fios (Wi-Fi, etc.)
Quando estiver a bordo de um avião, etc.,
pode desligar temporariamente todas
as funções da rede sem fios usando
[Modo avião].
Cabo de alimentação
Para os clientes no Reino Unido, Irlanda,
Malta, Chipre e Arábia Saudita
Use o cabo de alimentação (A). Por razões
de segurança, o cabo de alimentação (B)
não se destina aos países/regiões acima
e, por conseguinte, não deve ser usado.
Para os clientes noutros países/regiões
da UE
Use o cabo de alimentação (B).
(A) (B)
12
PT
Page 73

Especificações
Câmara
[Sistema]
Tipo de câmara:
Câmara Digital de Objetivas
intercambiáveis
Objetiva: Objetiva de montagem tipo
E Sony
[Sensor de imagem]
Formato de imagem: Tamanho APS-C
(23,5 mm × 15,6mm), sensor de
imagem CMOS
Número de píxeis efetivos da câmara:
Aprox. 24 200 000 píxeis
Número total de píxeis da câmara:
Aprox. 25 000 000 píxeis
[Visor eletrónico]
Tipo: Visor eletrónico de 1,0 cm
(tipo 0,39)
[Monitor]
Amplo, 7,5 cm (tipo 3,0) unidade TFT,
painel tátil
[Geral]
Potência nominal de entrada:
Temperatura operacional:
Temperatura de armazenamento:
Dimensões (L/A/P) (aprox.):
Peso (aprox.):
, 2,3W
7,2V
0 a 40°C
–20 a 55°C
120 × 66,9 × 59,4mm
120 × 66,9 × 49,9mm
(da pega ao monitor)
396 g (incluindo a bateria, cartão
de memória SD)
Transformador de CA
AC-UUD12/AC-UUE12
Potência nominal de entrada:
100- 240V
Potência nominal de saída:
5V
, 50/60Hz, 0,2A
, 1,5A
Bateria recarregável
NP-FW50
Tensão nominal: 7,2 V
O design e especificações estão
sujeitos a alteração sem aviso prévio.
Marcas comerciais
• XAVC S e são marcas
registadas da Sony Corporation.
• AVCHD e logótipo AVCHD são marcas
comerciais da Panasonic Corporation e
Sony Corporation.
• Android e Google Play são marcas
comerciais ou marcas registadas da
Google LLC.
• Wi-Fi, o logótipo Wi-Fi e
Wi-Fi Protected Setup são marcas
registadas ou marcas comerciais da
Wi-Fi Alliance.
• QR Code é uma marca comercial da
Denso Wave Inc.
• Para além disso, os nomes de sistemas
e produtos usados neste manual
são, em geral, marcas comerciais ou
marcas registadas dos seus respetivos
programadores ou fabricantes.
Contudo, as marcas ™ ou ® podem não
ser usadas em todos os casos neste
manual.
Informação adicional sobre este
produto e respostas a perguntas
frequentes podem ser encontradas no
Website do Apoio ao Cliente.
PT
PT
13
Page 74

Nederlands
Over de handleiding voor deze
camera
Deze gids beschrijft de noodzakelijke voorbereidingen om het product
te kunnen gebruiken, de basisbedieningen, enz. Voor meer informatie
raadpleegt u de "Helpgids" (handleiding op het internet).
"Helpgids" (handleiding op het internet)
https://rd1.sony.net/help/ilc/1950/h_zz/
ILCE-6100 Helpgids
Zoeken naar waardevolle informatie, zoals essentiële
punten over opnemen
Deze website introduceert handige functies, gebruiksmethoden en voorbeelden
van instellingen.
Raadpleeg de website wanneer u uw camera instelt.
Zelfstudiematerialen
https://www.sony.net/tutorial/ilc/6100/
NL
2
Page 75

Voorbereidingen
De bijgeleverde items controleren
De cijfer tussen haakjes geeft het aantal stuks aan.
• Camera (1)
• Netsnoer (1)* (bijgeleverd in
bepaalde landen/regio’s)
* Er zullen misschien meerdere
netsnoeren bij dit apparat
geleverd. Gebruik het snoer dat
geschikt is voor uw land/regio. Zie
pagina 12.
• Oplaadbare accu NP-FW50 (1)
• Micro-USB-kabel (1)
De accu (bijgeleverd)/geheugenkaart (los verkrijgbaar) in de
camera plaatsen
Open het deksel van geheugenkaartgleuf en accuvak en plaats de accu en
een geheugenkaart in de camera. Sluit daarna het deksel.
Vergrendelingshendel
Accu
Verzeker u ervan dat de accu in de juiste richting wordt gehouden en plaats
hem terwijl u de accuvergrendelingshendel ingedrukt houdt.
• Netstroomadapter (1)
Het type netstroomadapter kan
verschillen afhankelijk van het land/
gebied.
• Schouderriem (1)
• Oogkap voor oculair (1)
• Camerahuisdop (1)*
* Alleen voor de ILCE-6100
• Beknopte gids (dit boekje) (1)
• Referentiegids (1)
Let erop dat de
afgeschuinde hoek in de
juiste richting wijst.
Geheugenkaart Accu
NL
NL
3
Page 76

Geheugenkaart
Plaats de geheugenkaart met de afgeschuinde hoek in de positie zoals
afgebeeld.
Deze camera is compatibel met SD-geheugenkaarten en Memory Stick. Voor
informatie over compatibele geheugenkaarten, raadpleegt u de "Helpgids".
Wanneer u voor de eerste keer een geheugenkaart gebruikt in deze camera,
formatteert u de kaart met behulp van de camera om de prestaties van de
geheugenkaart stabieler te maken.
Opmerking
• Formatteren wist alle gegevens, inclusief beveiligde beelden en
geregistreerde instellingen (M1 t/m M4). Eenmaal gewist, kunnen deze
gegevens niet meer worden hersteld. Sla waardevolle gegevens op een
computer of soortgelijk apparaat op voordat u formatteert.
De accu opladen
1 Zet het apparaat uit.
Als de camera is ingeschakeld, wordt de accu niet opgeladen.
2 Sluit de camera met daarin de accu met
behulp van de micro-USB-kabel (bijgeleverd)
aan op de netstroomadapter (bijgeleverd),
en sluit de netstroomadapter aan op een
stopcontact.
Het oplaadlampje gaat branden wanneer het
opladen start. Wanneer het oplaadlampje
uitgaat is het opladen voltooid.
Oplaadlampje
NL
4
Page 77

Bevestig een lens
Vattingmarkeringen
1 Haal de camerahuisdop van de camera af en haal de achterste lensdop
van de lens af.
2 Bevestig de lens door de twee witte uitlijnmarkeringen
(vattingmarkeringen) op de lens en de camera met elkaar uit te lijnen.
3 Terwijl u de lens licht tegen de camera aan duwt, draait u de lens
langzaam in de richting van de pijl totdat deze vastklikt in de
vergrendelde positie.
De taal en de klok instellen
ON/OFF (Aan/Uit)-schakelaar
Besturingswiel
Selecteer items : ////
Bevestig : Middenknop
1 Zet de ON/OFF (Aan/Uit)-schakelaar op "ON" om de camera in te
schakelen.
NL
/
NL
5
Page 78

2 Selecteer de gewenste taal en druk daarna op het midden van het
besturingswiel.
3 Controleer of [Enter] is geselecteerd op het scherm en druk daarna op
de middenknop.
4 Selecteer de gewenste geografische locatie en druk daarna op de
middenknop.
5 Stel [Zomertijd], [Datum/Tijd] en [Datumindeling] in, selecteer
vervolgens [Enter] en druk daarna op de middenknop.
Als u de instellingen van de datum/tijd of het gebied later opnieuw
wilt configureren, selecteert u MENU
[Datum/tijd instellen] of [Tijdzone instellen].
(Instellingen)
Opname
Stilstaande beelden opnemen
1 Selecteer de gewenste
opnamefunctie door de
functiekeuzeknop te draaien.
2 Druk de ontspanknop tot
halverwege in om scherp te stellen.
3 Druk de ontspanknop helemaal in.
NL
6
Ontspanknop
Functiekeuzeknop
(flitser omhoog-)knop
Page 79

De hoek van de monitor veranderen
U kunt de hoek van de monitor veranderen zodat u kunt opnemen vanuit
elke gewenste positie.
(A) Hoge positie (houd de camera omhoog)
(B) Lage positie (houd de camera laag)
(C) Selfie-positie (richt de monitor naar u toe om een selfie te maken)
(A)
(B)
(C)
De flitser gebruiken
Druk op de (flitser omhoog-)knop om de flitser omhoog te laten springen.
Bewegende beelden opnemen
1 Druk op de MOVIE (bewegende
beelden)-knop om te beginnen met
opnemen.
Het opnemen van bewegende
beelden kan worden gestart
vanuit elke opnamefunctie in de
standaardinstelling.
2 Druk nogmaals op de MOVIE-knop
als u het opnemen wilt stoppen.
MOVIE (bewegende beelden)-knop
NL
NL
7
Page 80

Weergave
1 Druk op de (weergave-)knop
om over te schakelen naar de
weergavefunctie.
2 Selecteer een beeld met behulp van
het besturingswiel.
U kunt verspringen naar het vorige/
volgende beeld door op de linker-/
rechterkant van het besturingswiel te
drukken.
Om bewegende beelden weer te
geven, drukt u op de middenknop
van het besturingswiel.
(weergave-)knop
Besturingswiel
Beelden overbrengen naar een
smartphone
U kunt beelden overbrengen naar een smartphone door de camera via Wi-Fi
te verbinden met een smartphone.
1 : Installeer Imaging Edge Mobile op uw smartphone.
Om de camera met uw smartphone, te kunnen verbinden is
Imaging Edge Mobile vereist.
Installeer Imaging Edge Mobile van tevoren op uw smartphone.
Als Imaging Edge Mobile reeds is geïnstalleerd op uw smartphone, moet
u deze updaten naar de nieuwste versie.
https://www.sony.net/iem/
NL
8
Page 81

2 Verbind de camera en uw smartphone met behulp van de QR Code.
: MENU (Netwerk) [Fnct Naar smart. verz]
[Naar smartph verznd] [Op dit apparaat selecter.] beelden die
moeten worden overgedragen.
Als u beelden op de smartphone wilt selecteren, selecteert u
[Op smartphone selecter.].
: Open Imaging Edge Mobile op uw smartphone en selecteer
[QR Code van de camera scannen].
: Scan de QR Code die op de camera
wordt afgebeeld met behulp van uw
smartphone.
3 De geselecteerde beelden worden overgedragen.
Als u Android gebruikt, kunt u na de eerste keer beelden simpelweg
overdragen door Imaging Edge Mobile te openen met de bovenstaande
.
Stap 2Als het overbrengen van beelden niet begint, selecteert u de camera die
moet worden verbonden op het scherm van uw smartphone.
Voor meer informatie over het verbinden met een smartphone, raadpleegt u
de volgende websites voor klantenondersteuning:
https://www.sony.net/dics/iem02/
• Voor meer informatie over andere verbindingsprocedures of over het
gebruik van de smartphone als een afstandsbediening voor het bedienen
van de camera, raadpleegt u "Helpgids".
• Wij kunnen niet garanderen dat alle Wi-Fi-functies die in deze
gebruiksaanwijzing worden beschreven correct werken op alle
smartphones en tablets.
• De Wi-Fi-functies van deze camera zijn niet beschikbaar indien verbonden
met een openbaar draadloos LAN.
NL
NL
9
Page 82

Beelden op een computer
beheren en bewerken
PlayMemories Home
Met PlayMemories Home kunt u stilstaande en bewegende beelden
in u computer importeren en deze bekijken of gebruiken. U moet
PlayMemories Home installeren om bewegende beelden in het
XAVC S-formaat of AVCHD-formaat te kunnen importeren in uw computer.
Imaging Edge
Imaging Edge is een softwaresuite met functies zoals opnemen vanaf
een computer, en aanpassen of ontwikkelen van RAW-beelden die zijn
opgenomen met de camera.
Voor meer informatie over de computersoftware, raadpleegt u de volgende
URL:
https://www.sony.net/disoft/
Opmerkingen over het gebruik
Raadpleeg ook "Voorzorgsmaatregelen"
in de "Helpgids".
Opmerkingen over het hanteren van het
apparaat
• Deze camera is ontworpen bestand te
zijn tegen stof en vocht, maar is niet
waterdicht of stofdicht.
• Verwijder eventueel vuil vanaf het
oppervlak van de flitser. Het vuil op
het oppervlak van de flitser kan rook
veroorzaken of verbranden als gevolg
van de warmte die wordt gegenereerd
door de emissie van licht. Als er vuil/
stof op zit, veegt u dit eraf met een
zachte doek.
• Stel de lens of de zoeker niet langdurig
bloot aan een sterke lichtbron, zoals de
zon. Vanwege de condensatiefunctie
van de lens, kan als u dit doet
rook, brand of een storing worden
veroorzaakt binnenin de camerabody
of de lens. Als u de camera moet
blootstellen aan een lichtbron, zoals
de zon, dan bevestigt u de lensdop op
NL
de lens.
10
• Als u opneemt met tegenlicht, dan
houdt u de zon voldoende ver uit de
kijkhoek. Anders kan het zonlicht op
de scherpstelling binnenin de camera
vallen en rook of brand veroorzaken.
Zelfs als de zon iets buiten de kijkhoek
staat, kan nog steeds rook of brand
ontstaan.
• Stel de lens niet rechtstreeks bloot
aan lichtstralen, zoals laserstralen.
Hierdoor kan de beeldsensor worden
beschadigd en kan een storing
optreden in de camera.
• Kijk niet door een lens naar de zon
of een sterke lichtbron wanneer deze
niet op de camera is bevestigd. Dit kan
leiden tot onherstelbare schade aan de
ogen of een storing veroorzaken.
• Laat de camera, de bijgeleverde
accessoires of de geheugenkaarten
niet binnen bereik van kleine kinderen.
Ze kunnen per ongeluk worden
ingeslikt. Als dat gebeurt, raadpleegt u
onmiddellijk een arts.
Page 83

Opmerkingen over de monitor en
elektronische beeldzoeker
• De monitor en de elektronische
beeldzoeker zijn vervaardigd met
behulp van uiterste precisietechnologie
zodat meer dan 99,99% van de
beeldpunten effectief werkt. Het is
echter mogelijk dat enkele kleine
zwarte punten en/of oplichtende
punten (wit, rood, blauw of groen)
permanent op de monitor en de
elektronische beeldzoeker zichtbaar
zijn. Dit zijn onvolkomenheden als
gevolg van het productieproces en
heeft geen enkele invloed op de
beelden.
• Tijdens het opnemen met de zoeker
kunt u last krijgen van symptomen
zoals vermoeidheid van het oog,
lichamelijke vermoeidheid, reisziekte
of misselijkheid. Wij adviseren u
regelmatig een pauze te nemen
wanneer u opneemt met de zoeker.
• Als de monitor of de elektronische
beeldzoeker beschadigd is, stopt u
onmiddellijk met het gebruik van de
camera. De beschadigde onderdelen
kunnen uw handen, gezicht enz.
verwonden.
Opmerkingen over ononderbroken
opnemen
Tijdens ononderbroken opnemen kunnen
de monitor of zoeker snel omwisselen
tussen het opnamescherm en een zwart
scherm. Als u in deze situatie naar het
scherm blijft kijken, kunt u last krijgen van
oncomfortabele symptomen, zoals een
gevoel van onwel worden. Als u last krijgt
van oncomfortabele symptomen, stopt
u met het gebruik van de camera en
raadpleegt u zo nodig een arts.
Opmerkingen over langdurig opnemen of
4K-video opnemen
• De body van de camera en de accu
kunnen tijdens gebruik warm worden,
echter dit is normaal.
• Als hetzelfde deel van uw huid
langdurig de camera aanraakt tijdens
het gebruik van de camera, ook
wanneer de camera niet heet aanvoelt,
kunnen symptomen van verbranding
bij lage temperatuur worden
veroorzaakt, zoals roodheid of blaren.
Let met name goed op in de volgende
situaties en gebruik een statief, enz.
- Bij gebruik van de camera in een
omgeving met een hoge temperatuur
- Wanneer iemand met een slechte
bloedsomloop of een afwijkend
huidgevoel de camera bedient
- Bij gebruik van de camera met
[Temp. auto strm UIT] ingesteld op
[Hoog]
Opmerkingen over het gebruik van een
statief
Gebruik een statief met een schroef van
minder dan 5,5 mm lang. Als de schroef
te lang is, kunt u de camera niet stevig
bevestigen en kan de camera worden
beschadigd.
Sony lenzen/accessoires
Gebruik van dit toestel met producten
van andere fabrikanten kan invloed
hebben op de prestaties van het
toestel, en kan leiden tot ongelukken of
storingen.
Waarschuwing over auteursrechten
Televisieprogramma’s, films,
videobanden en ander materiaal kunnen
beschermd zijn door auteursrechten.
Het zonder toestemming opnemen van
dergelijk materiaal, kan in strijd zijn met
de wetten op de auteursrechten.
Opmerkingen over locatie-informatie
Als u een beeld uploadt of deelt dat
getagd is met een locatie, kunt u
onbedoeld de informatie mededelen
aan een ander. Om te voorkomen dat
anderen uw locatie-informatie te weten
komen, stelt u [
op [Uit] voordat u beelden opneemt.
Opmerkingen over het weggooien of aan
anderen overdragen van dit apparaat
Voordat u dit apparaat weggooit of aan
anderen overdraagt, vergeet u niet de
volgende bediening uit te voeren ter
bescherming van privégegevens.
• Selecteer [Instelling herstellen]
[Initialiseren].
Inst. loc.gegev.link] in
NL
NL
11
Page 84

Opmerkingen over het weggooien
of aan anderen overdragen van een
geheugenkaart
Als u [Formatteren] of [Wissen]
uitvoert op de camera of op een
computer, worden de gegevens op de
geheugenkaart mogelijk niet volledig
gewist. Voordat u een geheugenkaart
overdraagt aan een ander, adviseren
wij u de gegevens erop volledig te
wissen met behulp van gespecialiseerde
software voor het wissen van gegevens.
Wanneer u een geheugenkaart weggooit,
adviseren wij u deze fysiek te vernietigen.
Opmerking over de netwerkfuncties
Als u netwerkfuncties gebruikt, kunnen
onbedoelde derden op het netwerk
toegang krijgen tot de camera,
afhankelijk van de gebruiksomgeving.
Bijvoorbeeld, onbevoegde toegang
tot de camera kan voorkomen in een
netwerkomgeving waarmee een ander
netwerkapparaat is verbonden of zonder
toestemming mee kan verbinden. Sony
draagt geen verantwoordelijkheid voor
enig verlies of schade veroorzaakt
door verbindingen met dergelijke
netwerkomgevingen.
Draadloos-netwerkfuncties (Wi-Fi, enz.)
tijdelijk uitschakelen
Als u in een vliegtuig, enz., zit, kunt u
alle draadloos-netwerkfuncties tijdelijk
uitschakelen met [Vliegtuig-stand].
Netsnoer
Voor klanten in het Verenigd Koninkrijk,
Ierland, Malta, Cyprus en Saoedi-Arabië
Gebruik netsnoer (A). Om
veiligheidsredenen is netsnoer (B) niet
bedoeld voor de bovengenoemde
landen/gebieden en mag daarom daar
niet worden gebruikt.
Voor klanten in andere EU-landen/
gebieden
Gebruik netsnoer (B).
(A) (B)
Technische gegevens
Camera
[Systeem]
Cameratype:
Digitale camera met verwisselbare
lens
Lens: Sony-lens met E-vatting
[Beeldsensor]
Beeldsysteem: APS-C-formaat
(23,5mm × 15,6mm), CMOSbeeldsensor
Effectief aantal pixels van de camera:
Ong. 24 200 000 pixels
Totaalaantal pixels van de camera:
Ong. 25 000 000 pixels
[Elektronische beeldzoeker]
Type: 1,0 cm (type 0,39)
Elektronische beeldzoeker
[Monitor]
Breed, 7,5 cm (type 3,0) TFTaansturing, aanraakscherm
[Algemeen]
Nominale invoer: 7,2V
Bedrijfstemperatuur:
0 t/m 40 °C
Bewaartemperatuur:
–20 t/m 55 °C
Afmetingen (b/h/d) (ong.):
120 × 66,9 × 59,4mm
120 × 66,9 × 49,9mm
(van handgreep tot monitor)
Gewicht (ong.):
396 g (inclusief accu,
SD-geheugenkaart)
, 2,3W
Netstroomadapter
AC-UUD12/AC-UUE12
Nominale invoer:
100- 240V
Nominale uitvoer: 5V , 1,5A
, 50/60Hz, 0,2A
12
NL
Page 85

Oplaadbare accu
NP-FW50
Nominale spanning: 7,2 V
Het ontwerp en de technische
gegevens zijn onderhevig aan
wijzigingen zonder voorafgaande
kennisgeving.
Handelsmerken
• XAVC S en zijn gedeponeerde
handelsmerken van Sony Corporation.
• AVCHD en AVCHD-logotypen
zijn handelsmerken van
Panasonic Corporation en
Sony Corporation.
• Android en Google Play zijn
handelsmerken of gedeponeerde
handelsmerken van Google LLC.
• Wi-Fi, het Wi-Fi-logo en
Wi-Fi Protected Setup zijn
gedeponeerde handelsmerken of
handelsmerken van de Wi-Fi Alliance.
• QR Code is een handelsmerk van
Denso Wave Inc.
• Alle andere in deze gebruiksaanwijzing
vermelde systeem- en productnamen
zijn doorgaans handelsmerken of
gedeponeerde handelsmerken van
de betreffende ontwikkelaars of
fabrikanten. In deze gebruiksaanwijzing
worden de aanduidingen ™ en ®
mogelijk niet in alle gevallen gebruikt.
Extra informatie over dit apparaat en
antwoorden op veelgestelde vragen
vindt u op onze Customer Supportwebsite voor klantenondersteuning.
NL
NL
13
Page 86

Polski
Informacje na temat podręcznika
do opisywanego aparatu
W niniejszym przewodniku opisano niezbędne przygotowania
do rozpoczęcia użytkowania produktu, podstawowe operacje
itp. Szczegółowe informacje można znaleźć w pozycji
„Przewodnik pomocniczy”(podręcznik internetowy).
„Przewodnik pomocniczy” (podręcznik
internetowy)
https://rd1.sony.net/help/ilc/1950/h_zz/
ILCE-6100 Przewodnik pomocniczy
Szukasz cennych informacji, na przykład podstawowych
kwestii dotyczących rejestrowania obrazów
Niniejsza witryna zawiera wprowadzenie dotyczące wygodnych funkcji,
sposobów użytkowania oraz przykładowych ustawień.
Z tej witryny należy korzystać w przypadku konfiguracji aparatu.
Samouczki
https://www.sony.net/tutorial/ilc/6100/
PL
2
Page 87

Przygotowania
Sprawdzenie dostarczonych elementów
Liczba w nawiasach oznacza liczbę sztuk.
• Aparat (1)
• Przewód zasilający (1)* (w
zestawie wprzypadku niektórych
krajów/regionów)
* W zestawie z opisywanym
sprzętem może znajdować się
kilka przewodów zasilających.
Należy użyć właściwego dla
danego kraju/regionu. Informacje
na stronie 12.
• Akumulator NP-FW50 (1)
• Przewód microUSB (1)
Wkładanie akumulatora (w zestawie)/karty pamięci
(sprzedawany oddzielnie) do aparatu
Otwórz pokrywę wnęki akumulatora/karty pamięci i wsuń akumulator oraz
kartę pamięci do aparatu. Następnie zamknij pokrywę.
• Zasilacz (1)
Typ zasilacza zależy od kraju/
regionu.
• Pasek na ramię (1)
• Nakładka na okular (1)
• Futerał na korpus (1)*
* Tylko w przypadku ILCE-6100
• Przewodnik uruchamiania
(niniejsza instrukcja) (1)
• Przewodnik (1)
Dźwignia
blokady
Upewnij się, że ścięty
narożnik jest właściwie
skierowany.
PL
Karta pamięci Akumulator
Akumulator
Upewnij się, że akumulator jest skierowany we właściwą stronę, i wsuń go
naciskając dźwignię blokady akumulatora.
PL
3
Page 88

Karta pamięci
Wsunąć kartę pamięci w taki sposób, aby ścięty narożnik karty był zwrócony
jak na rysunku.
Opisywany aparat obsługuje karty pamięci SD lub Memory Stick.
Szczegółowe informacje na temat zgodnych kart pamięci zawiera
„Przewodnik pomocniczy”.
W przypadku pierwszego użycia karty pamięci w opisywanym aparacie
należy sformatować kartę z poziomu aparatu w celu zapewnienia jej
stabilnego działania.
Uwaga
• Formatowanie usuwa wszystkie dane, w tym także obrazy chronione
izapamiętane ustawienia (M1 do M4). Po usunięciu, wspomnianych
danych nie można przywrócić. Przed przystąpieniem do formatowania
cenne dane należy zapisać na komputerze itp.
Ładowanie akumulatora
1 Wyłącz zasilanie.
Jeśli aparat jest włączony, akumulator nie będzie ładowany.
2 Za pośrednictwem przewodu microUSB
(w zestawie) podłącz aparat do akumulatora
włożonego do zasilacza (w zestawie), a
zasilacz podłącz do gniazda elektrycznego.
W momencie rozpoczęcia ładowania zostanie
podświetlona lampka ładowania. Gdy lampka
ładowania zgaśnie, procedura ładowania
dobiegła końca.
Lampka ładowania
PL
4
Page 89

Zakładanie obiektywu
Wskaźniki mocowania
1 Zdejmij futerał na korpus z aparatu oraz tylną przykrywkę obiektywu z
tylnej części obiektywu.
2 Zamocuj obiektyw, po uprzednim wyrównaniu dwóch białych
znaczników indeksowych (wskaźników mocowania) na obiektywie i na
aparacie.
3 Docisnąwszy lekko obiektyw do aparatu, obróć go zgodnie z
kierunkiem strzałki, aż do pozycji blokady, co sygnalizowane jest
charakterystycznym kliknięciem.
Ustawianie języka izegara
Przełącznik ON/OFF (Zasilanie)
Pokrętło sterowania
PL
Wybór pozycji: ////
Zatwierdzenie: Przycisk środkowy
/
1 Ustaw przełącznik ON/OFF (Zasilanie) wpozycji „ON”, aby włączyć aparat.
2 Wybierz właściwy język, po czym naciśnij środkową sekcję pokrętła
sterowania.
PL
5
Page 90

3 Upewnij się, że na ekranie zaznaczone jest polecenie [Enter], po czym
naciśnij przycisk środkowy.
4 Wybierz właściwą lokalizację geograficzną, po czym naciśnij przycisk
środkowy.
5 Ustaw opcje [Czas letni/zimowy], [Date/Czas] i [Format daty], a
następnie wybierz [Enter] inaciśnij przycisk środkowy.
Jeśli chcesz później zmienić konfigurację daty/godziny lub ustawienie
obszaru, wybierz MENU
[Nastawia region].
(Ustawienia) [Ust.daty/czasu] lub
Wykonywanie zdjęć
Fotografowanie
1 Wybierz odpowiedni tryb
rejestrowania obrazu obracając
pokrętło trybu.
2 Naciśnij przycisk migawki do
połowy, aby ustawić ostrość.
3 Naciśnij do końca przycisk migawki.
PL
6
Przycisk migawki
Przycisk (Wysuwanie lampy
błyskowej)
Pokrętło trybu
Page 91

Zmiana kąta ustawienia monitora
Możliwość zmiany kąta ustawienia monitora pozwala rejestrować obrazy
zdowolnej pozycji odpowiadającej użytkownikowi.
(A) Pozycja górna (trzymanie aparatu wysoko)
(B) Pozycja dolna (trzymanie aparatu nisko)
(C) Pozycja do zdjęć autoportretowych (skierowanie monitora w stronę
użytkownika w celu zrobienia zdjęcia autoportretowego)
(A)
(B)
(C)
Korzystanie z lampy błyskowej
Naciśnij przycisk (Wysuwanie lampy błyskowej), aby wysunąć lampę
błyskową.
Nagrywanie filmów
1 Naciśnij przycisk MOVIE (Film), aby
rozpocząć nagrywanie.
Przy ustawieniu domyślnym
nagrywanie filmów można
uruchamiać zdowolnego trybu
fotografowania.
2 Ponowne naciśnięcie przycisku
MOVIE kończy operację nagrywania.
Przycisk MOVIE (Film)
PL
PL
7
Page 92

Oglądanie obrazów
1 Naciśnij przycisk (Odtwarzanie),
aby włączyć tryb odtwarzania.
2 Pokrętłem sterowania wybierz
obraz.
Do poprzedniego obrazu/następnego
obrazu można przejść naciśnięciem
lewej/prawej strony pokrętła
sterowania.
Aby rozpocząć odtwarzanie filmu,
wystarczy nacisnąć środkową sekcję
pokrętła sterowania.
Przycisk (Odtwarzanie)
Pokrętło sterowania
Przesyłanie obrazów do
smartfona
Obrazy można przesyłać do smartfona po uprzednim podłączeniu smartfona
do aparatu za pośrednictwem Wi-Fi.
1 : Zainstaluj na smartfonie aplikację Imaging Edge Mobile.
Do nawiązania podłączenia między aparatem a smartfonem wymagana
jest aplikacja Imaging Edge Mobile.
Zainstaluj wcześniej aplikację Imaging Edge Mobile na posiadanym
smartfonie.
Jeśli aplikacja Imaging Edge Mobile jest już zainstalowana na smartfonie,
należy ją zaktualizować do najnowszej wersji.
https://www.sony.net/iem/
PL
8
Page 93

2 Podłącz aparat i posiadanego smartfona za pomocą kodu QR Code.
: MENU (Sieć) [Fun. Wyśl. do smartf.]
[Wyślij do smartfona] [Wybierz na tym urządz.] obrazy do
przesłania.
Jeśli chcesz wybrać obrazy na smartfonie, wybierz
[Wybierz na smartfonie].
: Uruchom aplikację Imaging Edge Mobile na smartfonie i wybierz
[Zeskanuj QR Code urządz. fotograf.].
: Zeskanuj smartfonem kod QR Code
wyświetlany na aparacie.
3 Wybrane obrazy zostaną przesłane.
W przypadku korzystania z systemu Android, po pierwszym razie obrazy
można przesyłać, uruchamiając po prostu aplikację Imaging Edge Mobile w
punkcie 2Jeżeli przesyłanie obrazów nie rozpocznie się, na ekranie smartfona wybierz
aparat do podłączenia.
Szczegółowe informacje o sposobie nawiązywania połączenia ze
smartfonem można znaleźć w poniższych witrynach wsparcia:
https://www.sony.net/dics/iem02/
• Szczegółowe informacje na temat innych metod nawiązywania połączenia
• Nie można zagwarantować, że funkcje Wi-Fi wprowadzone w tym
• Funkcje Wi-Fi opisywanego aparatu nie będą dostępne po nawiązaniu
powyżej.
lub sposobu wykorzystania smartfona jako pilota zdalnego sterowania do
obsługi aparatu zawiera „Przewodnik pomocniczy”.
podręczniku będą działać na wszystkich smartfonach lub tabletach.
połączenia z publiczną siecią bezprzewodową LAN.
PL
PL
9
Page 94

Zarządzanie obrazami na
komputerze i ich edycja
PlayMemories Home
PlayMemories Home pozwala zaimportować do komputera zdjęcia i
filmy w celu ich wyświetlenia lub wykorzystania. Aby móc importować do
komputera filmy XAVC S lub filmy AVCHD, konieczne jest zainstalowanie
programu PlayMemories Home.
Imaging Edge
Imaging Edge to pakiet oprogramowania zawierający takie funkcje, jak
zdalne fotografowanie z poziomu komputera oraz korygowanie lub
wywoływanie obrazów RAW zarejestrowanych aparatem.
Szczegółowe informacje na temat oprogramowania komputerowego można
znaleźć pod poniższym adresem URL.
https://www.sony.net/disoft/
Uwagi dotyczące użytkowania
Informacje można również znaleźć w
rozdziale „Środki ostrożności“ w pozycji
„Przewodnik pomocniczy“.
Uwagi dotyczące obchodzenia się z
opisywanym produktem
• Opisywany aparat zaprojektowano
tak, aby był odporny na kurz i wilgoć,
ale nie jest on wodoszczelny ani
pyłoszczelny.
• Powierzchnię lampy błyskowej należy
oczyścić z kurzu. Zabrudzenia na
powierzchni lampy błyskowej mogą
emitować dym lub spalać się wskutek
ciepła generowanego podczas emisji
światła. Zabrudzenia/kurz należy
usunąć miękką szmatką.
PL
10
• Nie narażać obiektywu lub wizjera na
oddziaływanie źródeł mocnego światła,
na przykład na światło słoneczne.
W przeciwnym razie, z uwagi na
funkcję skupiającą obiektywu, może
pojawić się dym lub ogień, albo może
dojść do usterki wewnątrz korpusu
aparatu lub obiektywu. Jeżeli musimy
pozostawić aparat w miejscu, gdzie
będzie narażony na oddziaływanie
źródła światła, na przykład światła
słonecznego, należy na obiektyw
założyć osłonę obiektywu.
• W przypadku rejestrowania ujęć pod
światło, należy starać się, aby słońce
znajdowało się wystarczająco daleko
poza kątem widzenia obiektywu.
W przeciwnym razie wiązka światła
słonecznego może zostać skupiona
w jednym punkcie wewnątrz aparatu
doprowadzając do powstania dymu
lub ognia. Nawet jeśli słońce znajduje
się nieznacznie poza kątem widzenia
obiektywu, nadal może doprowadzić
do powstania dymu lub ognia.
Page 95

• Obiektyw należy chronić przed
bezpośrednim oddziaływaniem wiązek
światła, na przykład wiązek laserowych.
Grozi to uszkodzeniem przetwornika
obrazu i może spowodować
nieprawidłowe działanie aparatu.
• Nie wolno patrzeć przez odłączony
obiektyw na słońce ani inne źródło
mocnego światła. Może bowiem dojść
do nieodwracalnego uszkodzenia wzroku
lub nieprawidłowej pracy urządzenia.
• Nie pozostawiać aparatu, wyposażenia
z zestawu lub kart pamięci w zasięgu
małych dzieci. Mogą bowiem zostać
przypadkowo połknięte. W takim
przypadku należy niezwłocznie
zasięgnąć porady lekarza.
Uwagi dotyczące monitora i wizjera
elektronicznego
• Monitor iwizjer elektroniczny zostały
wykonane przy użyciu wyjątkowo
precyzyjnej technologii, dzięki której
efektywnie wykorzystywanych
może być ponad 99,99% pikseli. Na
monitorze i na wizjerze elektronicznym
mogą się jednak stale pojawiać małe
czarne i/lub jasne punkciki (białe,
czerwone, niebieskie lub zielone). Są to
niedoskonałości wynikającego z procesu
produkcyjnego. Nie mają one żadnego
wpływu na rejestrowane obrazy.
• Podczas rejestrowania obrazów z
wykorzystaniem wizjera użytkownik
może odczuwać objawy zmęczenia
oczu, ogólnego zmęczenia, choroby
lokomocyjnej lub nudności. W
przypadku rejestrowania obrazów z
wykorzystaniem wizjera wskazane są
regularne przerwy.
• W przypadku uszkodzenia monitora
lub wizjera elektronicznego, należy
natychmiast zaprzestać korzystania z
aparatu. Uszkodzone elementy mogą
poranić ręce, twarz itp.
Uwagi dotyczące zdjęć seryjnych
Podczas rejestrowania zdjęć seryjnych,
obraz na monitorze lub w wizjerze
może migać z uwagi na naprzemienne
wyświetlanie ekranu z rejestrowanym
obrazem i czarnego ekranu. Patrzenie na
ekran w takiej sytuacji może wywoływać
uciążliwe objawy i uczucie dyskomfortu.
W przypadku uciążliwości objawów,
należy zaprzestać używania aparatu
i w razie potrzeby zasięgnąć porady
lekarskiej.
Uwagi dotyczące rejestrowania przez
dłuższy czas lub nagrywania filmów 4K
• Korpus aparatu i akumulator mogą się
nagrzewać podczas eksploatacji. Jest to
normalne zjawisko.
• Jeżeli aparat, podczas jego
użytkowania, styka się z tym samym
fragmentem skóry przez długi okres
czasu, nawet jeśli aparat może nie
wydawać się w dotyku gorący, może
to powodować objawy poparzenia
niskotemperaturowego, na przykład w
postaci zaczerwienia lub pojawienia
się pęcherzy. Należy zwrócić specjalną
uwagę w poniższych sytuacjach i
korzystać ze statywu itp.
- W przypadku korzystania z aparatu w
warunkach wysokich temperatur
- Gdy osoba korzystająca z aparatu
ma problemy z krążeniem lub
nadwrażliwą skórę
- W przypadku korzystania z aparatu
przy ustawieniu [Wysoki] w pozycji
[Temp. auto. wyłącz.]
Uwagi dotyczące korzystania ze statywu
Należy używać statywu ze śrubą
odługości mniejszej niż 5,5 mm. W
przeciwnym razie nie można bezpiecznie
zamocować aparatu, co grozi jego
uszkodzeniem.
Obiektywy/akcesoria Sony
Korzystanie z tego urządzenia z
produktami innych marek może obniżyć
jego wydajność, spowodować wypadek
lub awarię.
Ostrzeżenie dotyczące praw autorskich
Programy telewizyjne, filmy, taśmy wideo
i inne materiały mogą być chronione
prawami autorskimi. Nieuprawniona
rejestracja takich materiałów może
stanowić naruszenie przepisów
dotyczących ochrony praw autorskich.
Uwagi dotyczące informacji o lokalizacji
Przekazując lub udostępniając obraz
z informacją o lokalizacji, można
przypadkowo ujawnić te informacje
stronie trzeciej. Aby uniemożliwić
stronom trzecim uzyskanie informacji
o lokalizacji, przed przystąpieniem do
rejestrowania obrazów należy w pozycji
[
Ust. łącza inf. o poł.] ustawić opcję
[WYŁ.].
PL
PL
11
Page 96

Uwagi dotyczące pozbywania
się opisywanego produktu lub
przekazywania go innym osobom
Przed przekazaniem opisywanego
produktu do utylizacji lub innej osobie
należy koniecznie wykonać poniższe
operacje, aby nie ujawnić informacji
osobistych.
• Wybierz [Reset ustawień] [Inicjuj].
Uwagi dotyczące pozbywania się karty
pamięci lub przekazywania jej innym
osobom
Wykonanie polecenia [Formatuj] lub
[Kasuj] z poziomu aparatu lub komputera
może nie usunąć całkowicie danych z
karty pamięci. Przed przekazaniem karty
pamięci innym osobom wskazane jest
całkowite usunięcie danych za pomocą
oprogramowania do usuwania danych. W
przypadku pozbywania się karty pamięci,
wskazane jest fizyczne jej zniszczenie.
Uwaga dotycząca funkcji sieciowych
W zależności od warunków użytkowania
aparatu podczas korzystania zfunkcji
sieciowych, osoby trzecie mogą bez
zezwolenia uzyskać dostęp do aparatu.
Na przykład do nieupoważnionego
dostępu do aparatu może dochodzić
wśrodowiskach sieciowych, do których
podłączone jest inne urządzenie
sieciowe lub z którymi inne urządzenie
sieciowe może nawiązywać połączenie
bez zezwolenia. Sony nie ponosi żadnej
odpowiedzialności za jakiekolwiek straty
lub szkody wynikłe z podłączenia do
takich środowisk sieciowych.
Tymczasowe wyłączanie funkcji sieci
bezprzewodowych (Wi-Fi itp.)
Po wejściu na pokład samolotu itp.
można tymczasowo wyłączyć wszystkie
funkcje sieci bezprzewodowych
poleceniem [Tryb samolotowy].
Przewód zasilający
W przypadku klientów w Wielkiej Brytanii,
Irlandii, na Malcie, na Cyprze i w Arabii
Saudyjskiej
Należy używać przewodu zasilającego
(A). Przewód zasilający (B) nie jest
przeznaczony dla powyższych krajów lub
regionów i ze względów bezpieczeństwa
nie należy go tam używać.
W przypadku klientów w innych krajach
lub regionach UE
Należy używać przewodu zasilającego (B).
(A) (B)
Dane techniczne
Aparat
[System]
Typ aparatu:
Aparat cyfrowy z wymiennymi
obiektywami
Obiektyw: Obiektyw Sony z
bagnetemE
[Przetwornik obrazu]
Format obrazu: Przetwornik obrazu
CMOS w formacie APS-C (23,5 mm ×
15,6 mm)
Efektywna liczba pikseli aparatu:
Ok. 24200000 pikseli
Całkowita liczba pikseli aparatu:
Ok. 25000000 pikseli
[Wizjer elektroniczny]
Typ: 1,0 cm (typ 0,39)
Wizjer elektroniczny
12
PL
Page 97

[Monitor]
Panoramiczny, z matrycą TFT 7,5cm
(typ 3,0), panel dotykowy
[Ogólne]
Znamionowe parametry wejściowe:
Temperatura robocza:
Temperatura przechowywania:
Wymiary (szer./wys./gł.) (ok.):
Masa (ok.):
, 2,3W
7,2V
Od 0 do 40°C
Od –20do 55°C
120 × 66,9 × 59,4mm
120 × 66,9 × 49,9mm
(od uchwytu do monitora)
396 g (z akumulatorem i kartą
pamięci SD)
Zasilacz
AC-UUD12/AC-UUE12
Znamionowe parametry wejściowe:
100- 240V
Znamionowe parametry wyjściowe:
5V
, 50/60Hz, 0,2A
, 1,5A
Akumulator
NP-FW50
Napięcie znamionowe: 7,2 V
Konstrukcja i dane techniczne mogą
ulec zmianie bez uprzedzenia.
Znaki towarowe
• XAVC S i są zastrzeżonymi
znakami towarowymi firmy
Sony Corporation.
• AVCHD i logotyp AVCHD są
znakami towarowymi firm
Panasonic Corporation oraz
Sony Corporation.
• Android i Google Play są znakami
towarowymi lub zastrzeżonymi
znakami towarowymi Google LLC.
• Wi-Fi, logo Wi-Fi i Wi-Fi Protected Setup
są zastrzeżonymi znakami towarowymi
lub znakami towarowymi Wi-Fi Alliance.
• QR Code jest znakiem towarowym
Denso Wave Inc.
• Poza tym używane w niniejszej
instrukcji nazwy systemów i produktów
są ogólnie znakami towarowymi lub
zastrzeżonymi znakami towarowymi
ich twórców lub producentów. Nie w
każdym jednak przypadku symbole
™ lub ® są stosowane wniniejszej
instrukcji.
Dodatkowe informacje na temat
urządzenia i odpowiedzi na najczęściej
zadawane pytania znajdują się w
naszej witrynie pomocy technicznej.
PL
PL
13
Page 98

Руcский
О руководстве для данной
камеры
В данном руководстве приведено описание необходимой подготовки
для начала использования изделия, основных операций и т.п. Для
получения подробных сведений см. “Справочное руководство” (вебруководство).
“Справочное руководство”
(Веб-руководство)
https://rd1.sony.net/help/ilc/1950/h_zz/
ILCE-6100 Справочное руководство
Поиск полезной информации, например, необходимых
рекомендаций по съемке
На данном веб-сайте представлены удобные функции, способы
использования и примеры настроек.
Обращайтесь к данному веб-сайту при настройке камеры.
Учебные материалы
https://www.sony.net/tutorial/ilc/6100/
RU
2
Page 99

Подготовка
Проверка комплектации
Число в скобках указывает количество штук.
• Камера (1)
• Сетевой шнур (1)* (прилагается
в некоторых странах/регионах)
* В комплект поставки данного
оборудования может
входить несколько сетевых
шнуров. Используйте шнур,
соответствующий стране/
региону пребывания. См.
стр.12.
• Аккумулятор NP-FW50 (1)
• Кабель Micro USB (1)
Вставка аккумулятора (прилагается)/карты памяти
(продается отдельно) в камеру
Откройте крышку отсека аккумулятора/карты памяти и вставьте
аккумулятор и карту памяти в камеру. Затем закройте крышку.
Рычаг блокировки
• Адаптер переменного тока (1)
Тип адаптера переменного тока
может отличаться в зависимости
от страны/региона.
• Плечевой ремень (1)
• Наглазник окуляра (1)
• Крышка корпуса (1)*
* Только для ILCE-6100
• Руководство по началу работы
(данное руководство) (1)
• Справочник (1)
Убедитесь, что срезанный
угол расположен
правильно.
RU
Карта памяти Аккумулятор
Аккумулятор
Убедитесь в том, что аккумулятор направлен правильно, и вставьте его,
нажимая рычаг блокировки аккумулятора.
RU
3
Page 100

Карта памяти
Вставьте карту памяти таким образом, чтобы зазубренный угол был
расположен, как показано на рисунке.
Данная камера совместима с картами памяти SD или Memory Stick.
Для получения подробных сведений о совместимых картах памяти
см.“Справочное руководство”.
При использовании карты памяти с данной камерой в первый раз
отформатируйте карту с помощью камеры для обеспечения стабильной
работы карты памяти.
Примечание
• Форматирование удаляет все данные, включая защищенные
изображения и зарегистрированные установки (от М1 до М4).
После удаления восстановить эти данные будет невозможно. Перед
форматированием сохраните ценные данные на компьютере и т.п.
Зарядка аккумулятора
1 Отключите питание.
Если камера включена, аккумулятор не будет заряжаться.
2 Подключите камеру с вставленным
аккумулятором к адаптеру переменного
тока (прилагается) с помощью кабеля
micro USB (прилагается) и подключите
адаптер переменного тока к сетевой
розетке.
Когда начнется зарядка, загорится
индикатор зарядки. Когда зарядка
завершится, индикатор зарядки погаснет.
Индикатор зарядки
RU
4
 Loading...