

Page 1
Nachrüstsatz
DE
EN
MC-PB
Montageanleitung
Hinweise zu diesem Dokument
Gültigkeitsbereich
Dieses Dokument gilt für den Nachrüstsatz MC-PB,
wenn er im SI 5048 oder im SBU 5000 eingesetzt ist.
Zielgruppe
Dieses Dokument ist für Fachkräfte. Die in diesem Do
kument beschriebenen Tätigkeiten dürfen nur mit fol
gender Qualifikation ausgeführt werden:
• Schulung zu Inselnetzsystemen oder Backup-Sys
temen von SMA Solar Technology AG
• Schulung im Umgang mit Gefahren und Risiken
bei der Installation und Bedienung von elektri
schen Geräten und Batterien
• Ausbildung für die Installation und Inbetriebnah
me von elektrischen Geräten
• Kenntnis und Beachtung der vor Ort gültigen Nor
men und Richtlinien
• Kenntnis und Beachtung dieser Dokumente mit al
len Sicherheitshinweisen
Bestimmungsgemäße Verwendung
Der Nachrüstsatz MC-PB ermöglicht den Aufbau einer
Multicluster-Kommunikation und einer RS485-Kommu
nikation. Die Multicluster-Kommunikation findet zwi
schen dem Master des Main Cluster und den Master
der Extension Cluster über CAN statt. Über RS485
kann der Sunny Island / Sunny Backup mit SMA Kom
munikationsprodukten und SMA Wechselrichtern
kommunizieren. Setzen Sie die Schnittstelle des
Nachrüstsatzes nach den Angaben der Dokumentati
on ein. Ein anderer Einsatz kann zu Sachschäden
führen. Aus Sicherheitsgründen ist es untersagt, das
Produkt zu verändern oder Bauteile einzubauen, die
nicht ausdrücklich von SMA Solar Technology AG für
dieses Produkt empfohlen oder vertrieben werden. Die
beigefügten Dokumentationen sind Bestandteil des
Produkts.
• Die Dokumentationen lesen und beachten.
• Die Dokumentationen jederzeit zugänglich
aufbewahren.
Lieferumfang
Prüfen Sie den Lieferumfang auf Vollständigkeit und
äußerlich sichtbare Beschädigungen. Setzen Sie sich
bei unvollständigem Lieferumfang oder
Beschädigungen mit Ihrem Fachhändler in Verbin
dung.
Anzahl Bezeichnung
1 485CANPB-G2
1 Gelbes RJ45-Datenkabel, 5m
1 Graues RJ45-Datenkabel, 5m
1 Weißes RJ45-Datenkabel mit 3 offenen
Adern
2 Abschlusswiderstand
1 Erdungskabel
1Montageanleitung
Produktbeschreibung
-
-
-
-
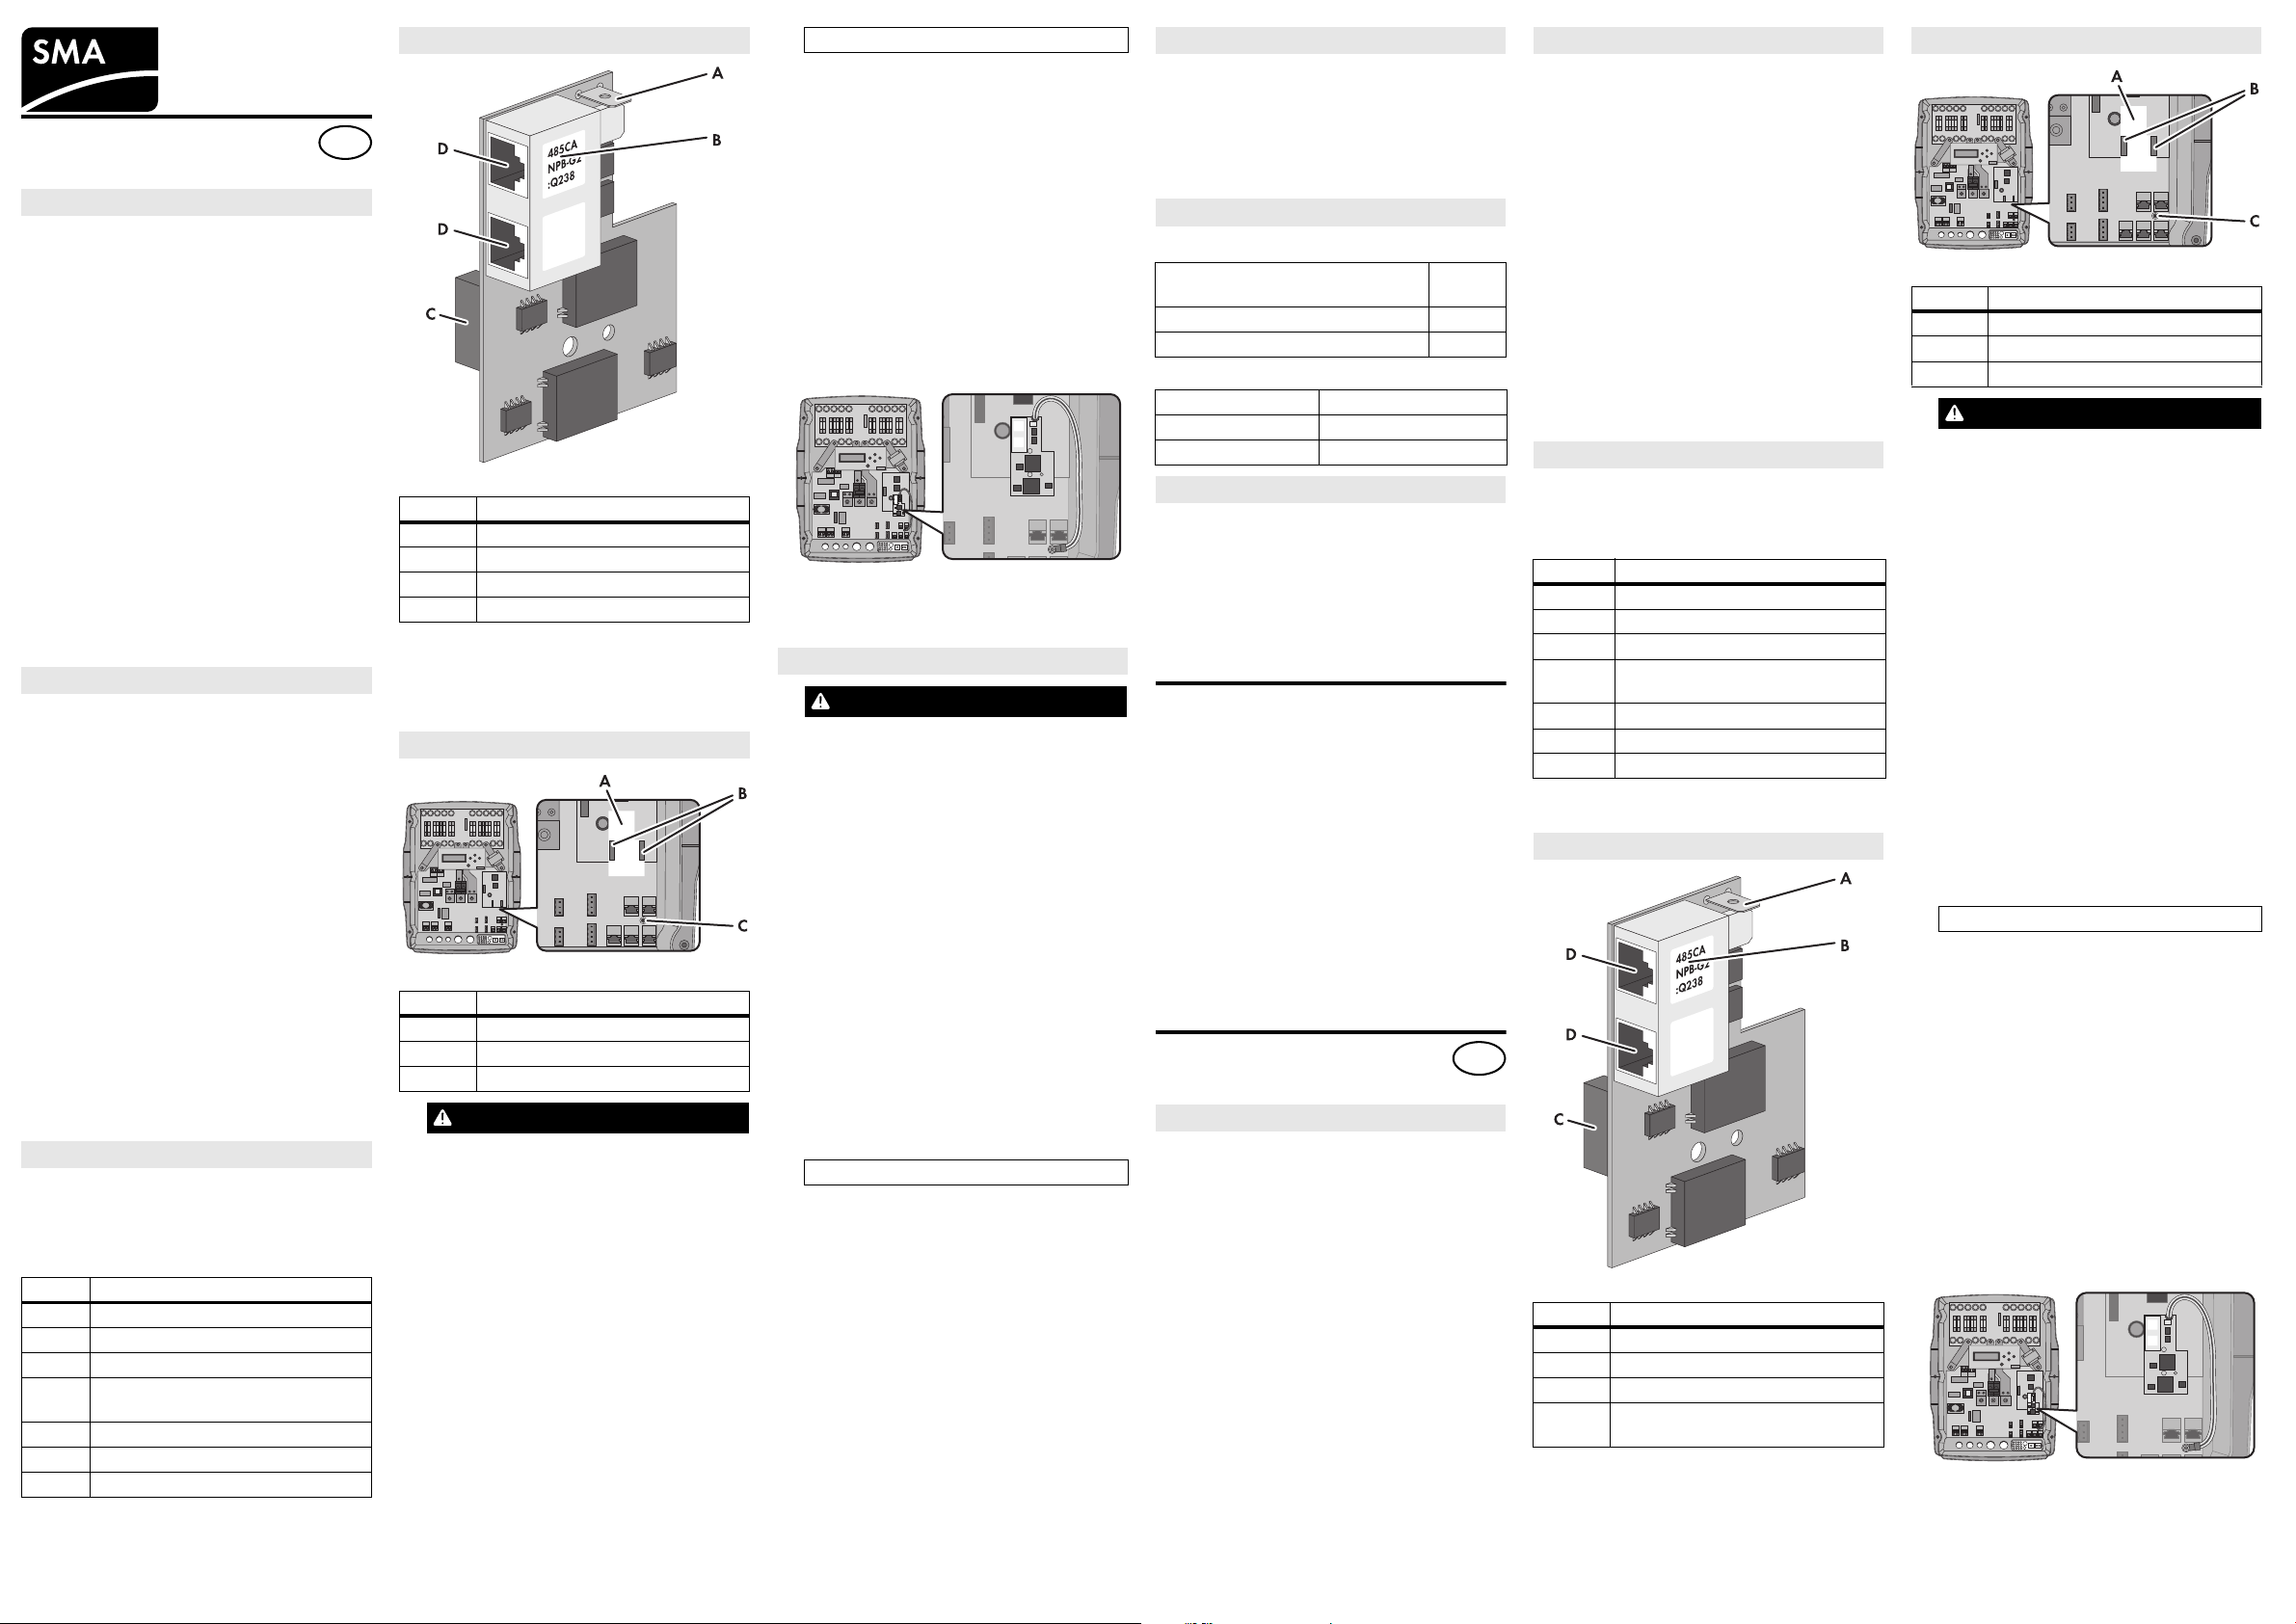
Abbildung1: Aufbau der Schnittstelle
-
Position Bezeichnung
-
A Flachstecker für Erdung
BTypenschild
-
C Anschluss-Stecker
D RJ45-Buchse Multicluster-Kommunikation
Die Angaben auf dem Typenschild unterstützen Sie
beim sicheren Gebrauch der Schnittstelle und bei Fra
gen an die SMA Service Line. Das Typenschild muss
dauerhaft an der Schnittstelle angebracht bleiben.
-
-
MC-PB einbauen
-
-
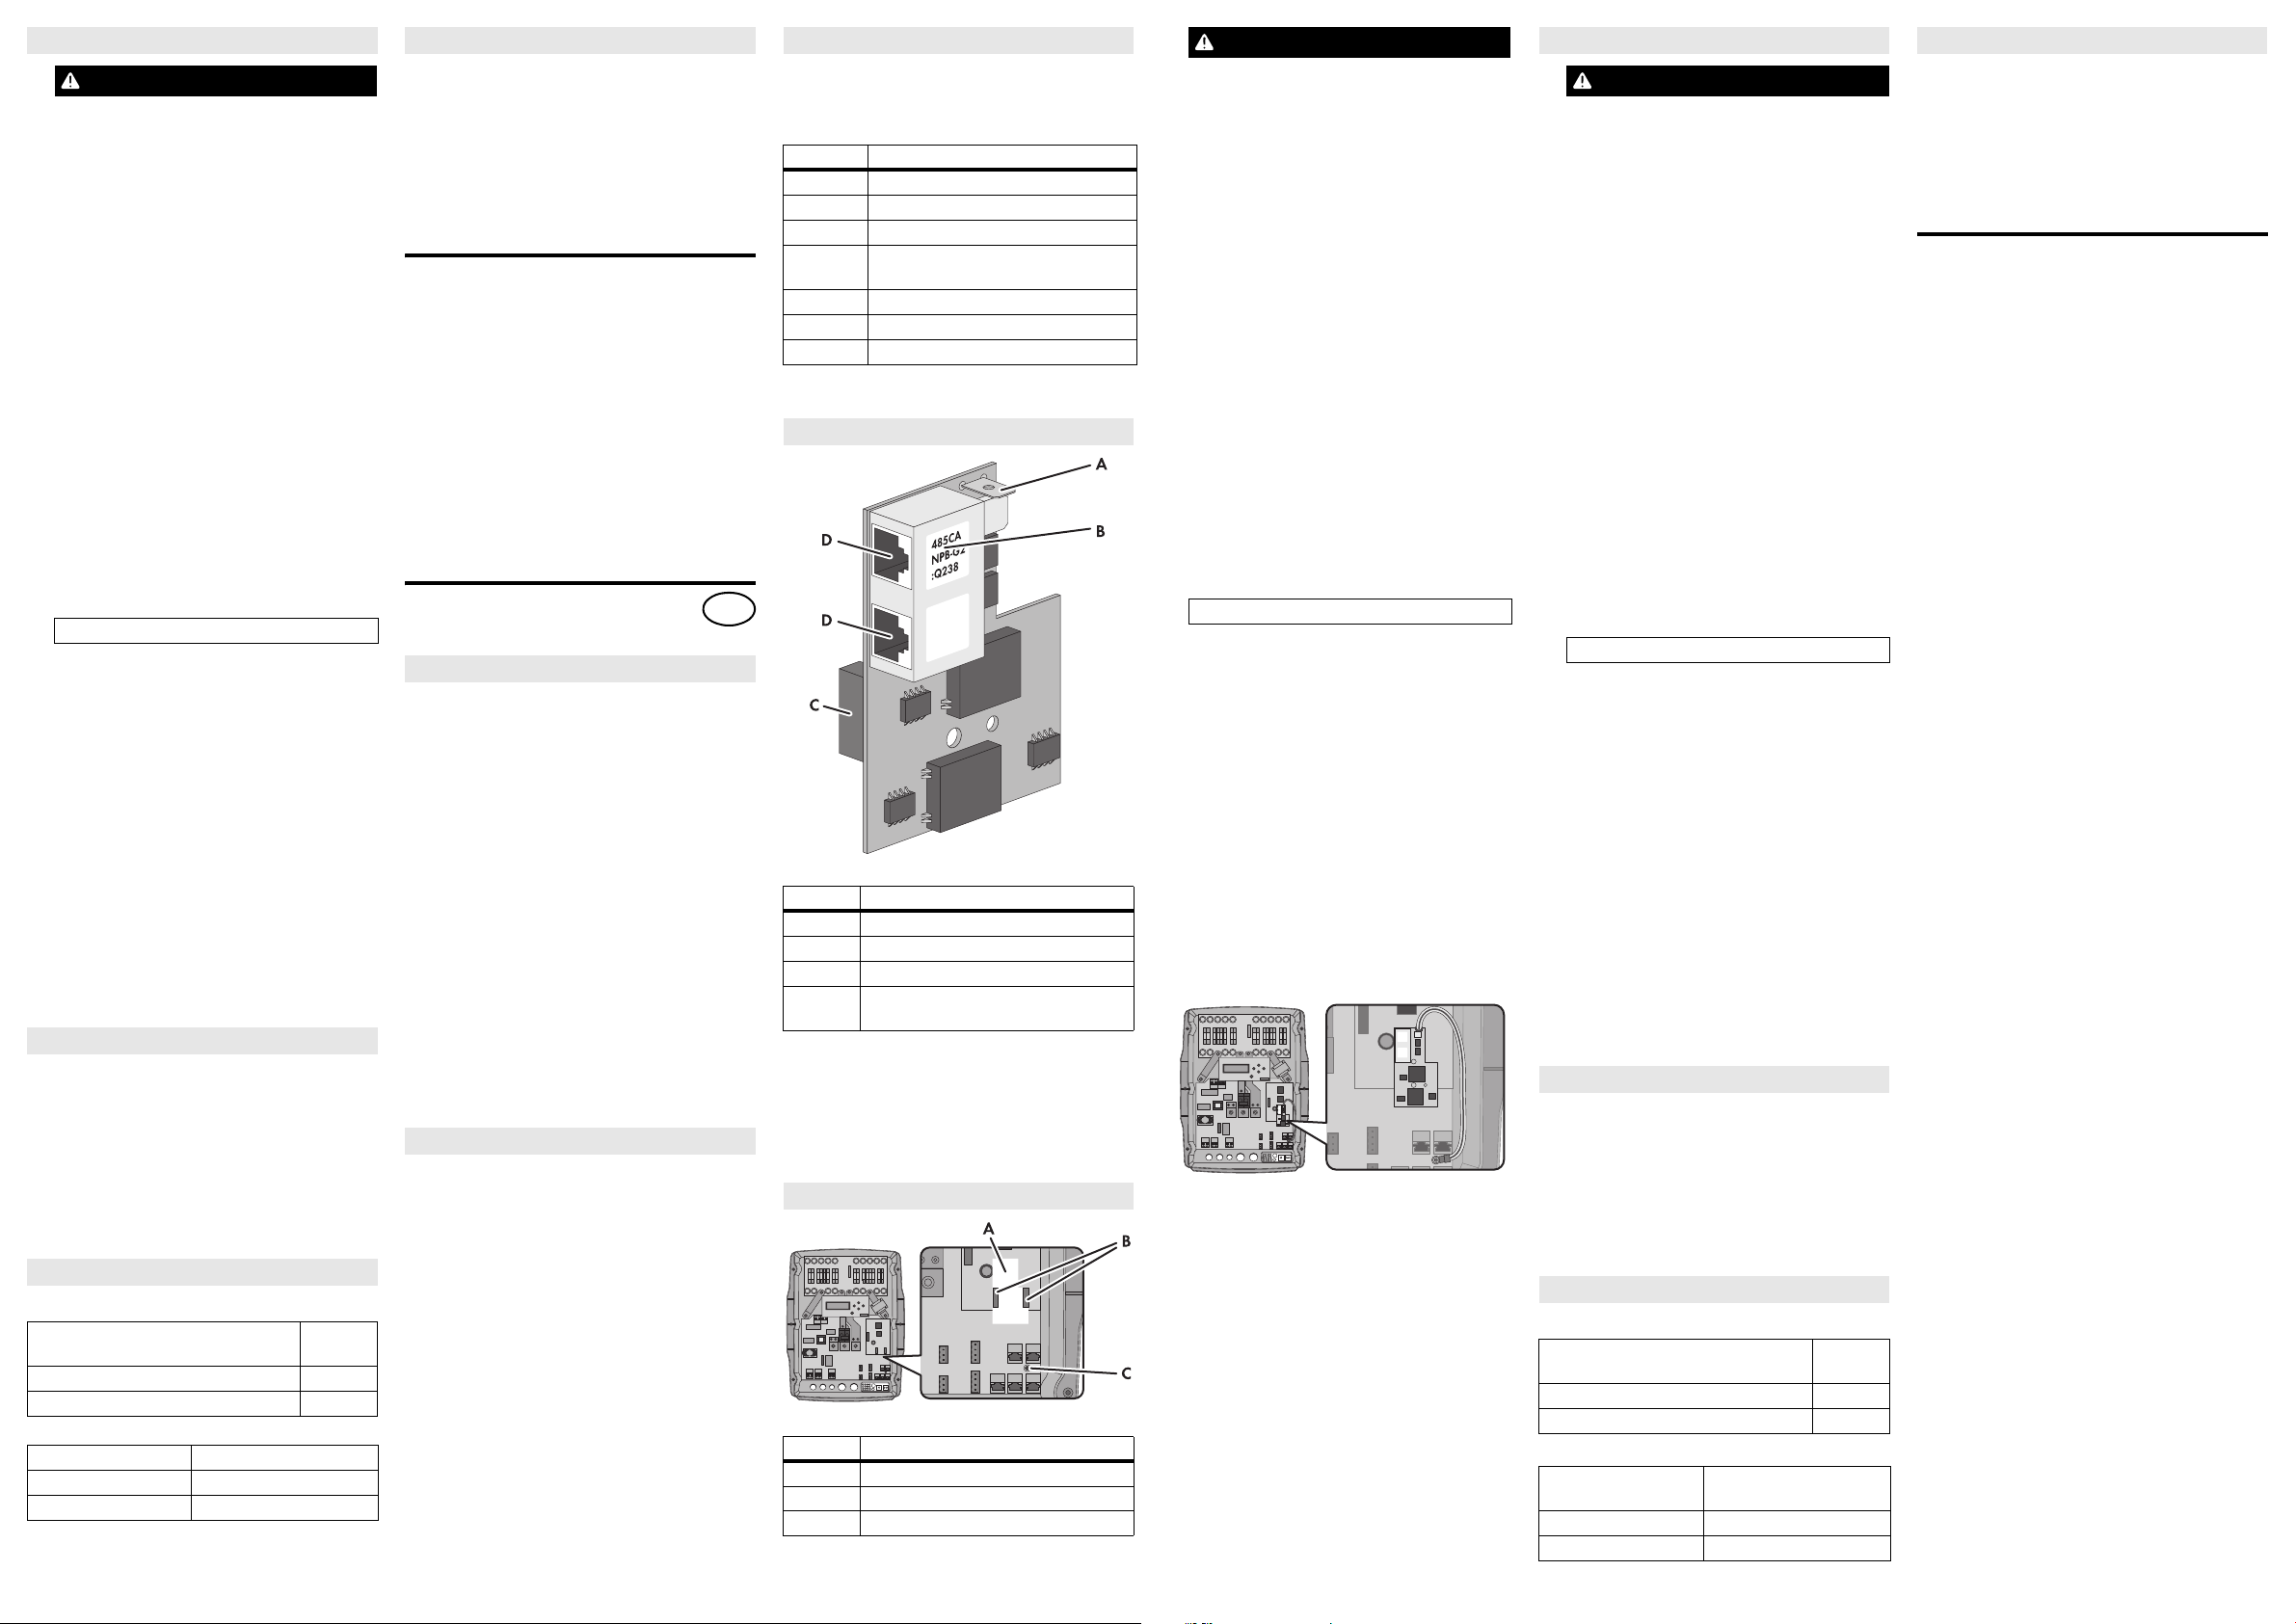
Abbildung2: Einbauort und Anschluss der Schnittstelle
Position Bezeichnung
A Schnittstellensteckplatz
B Anschlussbuchse
C Schraube für Erdung
1.
WARNUNG
Lebensgefahr durch hohe Spannungen
Im Inselnetzsystem/Backup-System und am
Sunny Island / Sunny Backup liegen hohe Span
nungen an. Der Sunny Island / Sunny Backup
kann aus dem Standby selbsttätig starten.
-
• Komponenten in der vorgegebenen Reihen
folge ausschalten oder freischalten:
–Sunny Island / Sunny Backup
– Alle Verbraucher, AC-Quellen, externe
Energiequellen und DC-Quellen
– In den Unterverteilungen Leitungsschutz
schalter für AC-Quellen und die externe
Energiequelle
•DC-Sicherungsautomat auf Off stellen.
• Gegen Wiedereinschalten sichern.
• Mindestens 15Minuten warten. Dadurch
können sich die Kondensatoren entladen.
• Gehäusedeckel des Sunny Island /
Sunny Backup öffnen und Spannungsfreiheit
feststellen.
• Die AC-Leiter erden und kurzschließen.
• Benachbarte, unter Spannung stehende Teile
abdecken oder abschranken.
2. ACHTUNG
Zerstörung der Anschlussbuchse durch
unsachgemäßen Einbau
• Bev or Sie ein B auteil berühre n, erden Sie s ich.
• Über dem Schnittstellensteckplatz die Schnitt
stelle senkrecht ausrichten. Dabei zeigen die
RJ45-Buchsen in das Innere des Gehäuses.
• Schnittstelle auf Anschlussbuchse aufsetzen
und mit leichtem Druck gleichmäßig
andrücken. Dadurch werden die Pins in der
Anschlussbuchse nicht beschädigt.
3. Schraube für Erdung lösen und Erdungskabel mit
Schraube für Erdung auf der Leiterplatte befesti
gen (Drehmoment: 2Nm).
4. Flachsteckhülse des Erdungskabels in den Flach
stecker für Erdung stecken.
☑ Die Schnittstelle ist geerdet.
5. Multicluster-Kommunikation und RS485-Kommu
nikation anschließen (siehe Technische Beschrei
bung des Sunny Island / Sunny Backup).
-
MC-PB ausbauen
1.
WARNUNG
Lebensgefahr durch hohe Spannungen
Im Inselnetzsystem/Backup-System und am Sunny
Island / Sunny Backup liegen hohe Spannungen
an. Der Sunny Island / Sunny Backup kann aus
dem Standby selbsttätig starten.
• Komponenten in der vorgegebenen Reihen
folge ausschalten oder freischalten:
– Sunny Island / Sunny Backup
– Alle Verbraucher, AC-Quellen, externe
Energiequellen und DC-Quellen
– In den Unterverteilungen Leitungs-schutz
schalter für AC-Quellen und die
externe Energiequelle
• DC-Sicherungsautomat auf Off stellen.
• Gegen Wiedereinschalten sichern.
• Mindestens 15Minuten warten. Dadurch
können sich die Kondensatoren entladen.
• Gehäusedeckel des Sunny Island / Sunny
Backup öffnen und Spannungsfreiheit feststel
len.
• Die AC-Leiter erden und kurzschließen.
• Benachbarte, unter Spannung stehende Teile
abdecken oder abschranken.
2. ACHTUNG
-
Zerstörung der Anschlussbuchse durch
unsachgemäßen Ausbau
-
• Bev or Sie ein B auteil berühre n, erden Sie s ich.
• Alle Kabel aus der Schnittstelle entfernen.
• Schraube für Erdung lösen und Erdungskabel
entfernen.
-
• Schraube für Erdung in die Leiterplatte schrau
ben (Drehmoment: 2Nm).
• Schnittstelle senkrecht aus der Anschlussbuch
se entfernen. Dabei die Schnittstelle nicht ver
kanten.
3. Den Sunny Island / Sunny Backup schließen. Da
bei sicherstellen, dass die nicht benötigten
Gehäuseöffnungen für die RJ45-Datenkabel mit
Kabeltüllen verschlossen werden (siehe Techni
sche Beschreibung des Sunny Island /
Sunny Backup).
MC-PB entsorgen
• Den MC-PB nach den vor Ort gültigen Entsor
gungsvorschriften für Elektronikschrott entsorgen.
oder
-
Den MC-PB auf eigene Kosten an SMA Solar
Technology AG zurücksenden. Dabei
Verpackung mit dem Hinweis "ZUR
ENTSORGUNG" kennzeichnen.
Technische Daten
Kommunikation
Kommunikationsschnittstellen CAN und
-
Kommunikationsreichweite CAN 50m
-
Kommunikationsreichweite RS485 1200m
Mechanische Größen
Breite x Höhe x Tiefe 68 mm x 42 mm x 27 mm
Gewicht 30g
Einbauort SI5048 / SBU 5000
Kontakt
SMA Solar Technology AG
Sonnenallee 1
34266 Niestetal
www.SMA.de
-
SMA Service Line
-
Tel. +49 561 9522 399
Fax: +49 561 9522 4697
E-Mail: SunnyIsland.Service@SMA.de
Rechtliche Bestimmungen
Die in diesen Unterlagen enthaltenen Informationen sind Eigentum der
SMA Solar Technology AG. Die Veröffentlichung, ganz oder in
Teilen, bedarf der schriftlichen Zustimmung der SMA Solar
Technology AG. Eine innerbetriebliche Vervielfältigung, die zur
Evaluierung des Produktes oder zum sachgemäßen Einsatz bestimmt
ist, ist erlaubt und nicht genehmigungspflichtig.
-
Warenzeichen
Alle Warenzeichen werden anerkannt, auch wenn diese nicht
gesondert gekennzeichnet sind. Fehlende Kennzeichnung bedeutet
nicht, eine Ware oder ein Zeichen seien frei.
Die Bluetooth
-
Warenzeichen der Bluetooth SIG, Inc. und jegliche Verwendung
dieser Marken durch die SMA Solar Technology AG erfolgt unter
Lizenz.
© 2004 bis 2012 SMA Solar Technology AG. Alle Rechte
vorbehalten.
Retrofit Kit
-
MC-PB
Mounting instructions
®
Wortmarke und Logos sind eingetragene
Information on this Document
Validity
This manual is valid for the MC-PB retrofit kit, if it is
used in the SI 5048 or in the SBU 5000.
Target Group
This document is for skilled persons. Only personnel
with the following skills are allowed to perform the
tasks set forth in this document.
• Training in off-grid systems or in backup systems
-
from SMA Solar Technology AG
• Training in how to deal with the dangers and risks
-
-
associated with installing and using electrical de
vices and batteries
• Training in the installation and commissioning of
-
electrical devices
• Knowledge and observance of the local stand
ards and guidelines
• Knowledge and observance of this document and
-
all safety precautions
RS485
Intended Use
-
The MC-PB retrofit kit enables the setup of the multi
cluster communication and of the RS485 communica
tion. The multicluster communication is established
between the master of the main cluster and the master
of the extension cluster via CAN. Via RS485 the
Sunny Island / Sunny Backup can communicate with
SMA communication products and SMA inverters.
Connect the interface of the retrofit kit according to the
instructions in the documentation. Any other applica
tion may cause property damage. For safety reasons,
it is not permitted to modify the product or install com
ponents that are not explicitly recommended or distrib
uted by SMA Solar Technology AG for this product.
The enclosed documentation is part of this product.
• Read and follow the documentation.
• Keep the documentation in a convenient place for
future reference.
Scope of Delivery
Check the scope of delivery for completeness and any
externally visible damage. Contact your specialist
dealer if the scope of delivery is incomplete or dam
aged.
Quantity Description
1 485CANPB-G2
1 Yellow RJ45 data cable, 5 m
1 Grey RJ45 data cable, 5 m
1 White RJ45 data cable with 3
conductors with stripped insulation
2Terminator
1Earthing cable
1 Mounting instructions
Product Description
Figure 1: Design of the interface
Item Description
A Flat male tab for earthing
-
BType label
CConnection plug
D RJ45 socket for multicluster
-
communication
The information on the type label is intended to help
you in the safe use of the interface and will be needed
if you contact the SMA Service Line. The type label
must be permanently attached to the interface.
Installing the MC-PB
-
-
-
-
Figure 2: Installation position and connection of the interface
-
Item Description
AInterface slot
B Connection socket
CScrew for earthing
1.
WARNING
Danger to life due to high voltages
High voltages are present in off-grid system /
backup system and in the Sunny Island /
Sunny Backup. The Sunny Island / Sunny Backup
-
can start on its own from standby.
• Turn off or disconnect the components in the
following order:
–Sunny Island / Sunny Backup
– All loads, AC sources, external energy
sources, and DC sources
– Miniature circuit-breaker for AC sources
and the external energy source in the
sub-distributions
• Switch the DC miniature circuit-breaker to the
Off position.
• Ensure that the device cannot be reconnect
ed.
• Wait at least 15 minutes. This allows the
capacitors to discharge.
• Open the enclosure lid of the Sunny Island /
Sunny Backup and ensure that no voltage is
present.
• Earth and short-circuit the AC conductors.
• Cover or shield any adjacent live compo
nents.
2. NOTICE
Destruction of the connection socket due to
improper installation
• Earth yourself before touching any compo
nents.
• Position the interface above the interface slot
and adjust it vertically to it. The RJ45 sockets
point towards the interior of the enclosure.
• Place the interface on the connection socket
and press slightly. This avoids damage of the
pins in the connection socket.
3. Undo the screw for earthing and attach it to the
earthing cable on the printed circuit board
(torque: 2 Nm).
4. Plug the push-on receptacle of the earthing cable
into the flat male tab for earthing.
☑ The interface is earthed.
5. Connect the multicluster communication and
RS485 communication (see technical description
of the Sunny Island / Sunny Backup).
-
-
-
MC-PB-MO-de_en_es-11 | IM01-MC-PB | Version / Versión 1.1 SMA Solar Technology AG
Page 2
Removing the MC-PB
ES
1.
WARNING
Danger to life due to high voltages
High voltages are present in the off-grid system /
backup system and in the Sunny Island /
Sunny Backup. The Sunny Island / Sunny Backup
can start on its own from standby.
• Turn off or disconnect the components in the
following order:
– Sunny Island / Sunny Backup
– All loads, AC sources, external energy
sources, and DC sources
– Miniature circuit-breaker for AC sources
and the external energy source in the
sub-distributions
• Switch the DC miniature circuit-breaker to the
Off position.
• Ensure that the device cannot be reconnect
ed.
• Wait at least 15 minutes. This allows the ca
pacitors to discharge.
• Open the enclosure lid of the Sunny Island /
Sunny Backup and ensure that no voltage is
present.
• Earth and short-circuit the AC conductors.
• Cover or shield any adjacent live compo
nents.
NOTICE
2.
Destruction of the connection socket due to
improper removal
• Earth yourself before touching any compo
nents.
• Remove all cables from the interface.
• Undo the screw for earthing and remove the
earthing cable.
• Insert the screw into the printed circuit board
for earthing (torque 2 Nm).
• Remove the interface vertically from the con
nection socket. Do not lock the interface.
3. Close the Sunny Island / Sunny Backup. Ensure
that enclosure openings which are not used for the
RJ45 data cable are closed with cable support
sleeves (see technical description of the
Sunny Island / Sunny Backup).
Disposing of the MC-PB
• Dispose of the MC-PB in accordance with the
locally applicable disposal regulations for
electronic waste.
or
Return the MC-PB to SMA Solar Technology AG
at your own expense. When doing so, label the
packaging "ZUR ENTSORGUNG"
("FOR DISPOSAL").
Technical Data
Communication
Communication interfaces CAN and
RS485
CAN communication range 50 m
RS485 radio range 1,200 m
Mechanical Data
Width x height x depth 68 mm x 42 mm x 27 mm
Weight 30 g
Installation location SI 5048 / SBU 5000
Contact
SMA Solar Technology AG
Sonnenallee 1
34266 Niestetal, Germany
www.SMA.de
SMA Service Line
Tel.: +49 561 9522 399
Fax: +49 561 9522 4697
E-mail: SunnyIsland.Service@SMA.de
Legal Provisions
The information contained in this document is the property of SMA
Solar Technology AG. Publishing its content, either partially or in full,
requires the written permission of SMA Solar Technology AG. Any
internal company copying of the document for the purposes of
evaluating the product or its correct implementation is allowed and
does not require permission.
-
Trademarks
All trademarks are recognized even if these are not marked
-
separately. Missing designations do not mean that a product or brand
is not a registered trademark.
The Bluetooth
owned by Bluetooth SIG, Inc. and any use of such marks by SMA
Solar Technology AG is under licence.
© 2004 to 2012 SMA Solar Technology AG. All rights reserved
®
word mark and logos are registered trademarks
-
Equipamiento adicional
MC-PB
Instrucciones de montaje
Indicaciones sobre este documento
-
Área de validez
Este documento se aplica al equipamiento adicional
MC-PB si éste se integra en el SI 5048 o en el
SBU 5000.
Grupo de destinatarios
Este documento está dirigido a especialistas. Las acti
vidades descritas en este documento solo podrán ser
-
llevadas a cabo por especialistas con esta
cualificación:
• Formación en sistemas aislados o sistemas de res
paldo de SMA Solar Technology AG
• Formación sobre la gestión de peligros y riesgos
relativos a la instalación y el manejo de equipos
eléctricos y baterías
• Formación profesional para la instalación y pues
ta en servicio de equipos eléctricos
• Conocimiento y cumplimiento de las normas y di
rectivas locales vigentes
• Conocimiento y observancia de estos documen
tos con todas las indicaciones de seguridad
Uso previsto
El equipamiento MC-PB sirve para establecer una
comunicación multiclúster y una comunicación
RS485. El maestro del clúster principal y el maestro
del clúster de extensión permiten establecer la
comunicación multiclúster a través de CAN. A través
de RS485, el Sunny Island / Sunny Backup puede
comunicarse con productos de comunicación e
inversores de SMA. Use la interfaz del equipamiento
adicional de acuerdo con las indicaciones de la
documentación. Otros usos del equipo pueden cau
sar daños materiales. Por razones de seguridad se
prohíben las modificaciones del producto, así como la
incorporación de componentes que no hayan sido re
comendados ni distribuidos específicamente por
SMA Solar Technology AG. La documentación
adjunta es parte integrante del producto.
• Lea y cumpla todas las indicaciones de la
documentación adjunta.
• Conserve esta documentación en un lugar de fácil
acceso en todo momento.
Contenido de la entrega
Compruebe que el contenido de la entrega esté com
pleto y que no presente daños externos visibles. En el
caso de que no esté completo opresente daños,
póngase en contacto con su distribuidor.
Cantidad Denominación
1 485CANPB-G2
1 Cable de datos RJ45 amarillo, 5 m
1 Cable de datos RJ45 gris, 5 m
1 Cable de datos RJ45 blanco con
3 conductores abiertos
2 Terminador
1 Cable de puesta a tierra
1 Instrucciones de montaje
Descripción del producto
-
Imagen 1: Estructura de la interfaz
-
Posición Denominación
A Enchufe plano para la toma a tierra
B Placa de características
CConector
-
D Hembrilla RJ45 para la comunicación
-
multiclúster
La información de la placa de características le
ayudará a utilizar la interfaz de forma segura y a res
-
ponder a las preguntas de la Asistencia Técnica
de SMA. La placa de características debe permane
cer en la interfaz en todo momento.
Montaje del MC-PB
-
-
Imagen 2: Lugar de montaje y conexión de la interfaz
Posición Denominación
A Ranura de inserción para la interfaz
BHembrilla
C Tornillo de toma a tierra
1.
-
ADVERTENCIA
Peligro de muerte por altas tensiones
Existen altas tensiones tanto en el sistema aislado
/ sistema de respaldo como en el Sunny Island /
Sunny Backup. El Sunny Island / Sunny Backup
puede ponerse en funcionamiento por sí solo.
• Desactive o desconecte los componentes en
el orden indicado a continuación:
– Sunny Island / Sunny Backup
– Todos los equipos consumidores, fuentes
de CA, fuentes de energía externas y
fuentes de CC
– En la distribución secundaria, los disyunto
res para las fuentes de CA y la fuente de
energía externa
• Ponga el disyuntor de CC en posición Off.
• Asegure el equipo contra la reconexión acci
dental.
• Espere al menos 15 minutos. De este modo
se podrán descargar los condensadores.
• Abra la tapa de la carcasa del Sunny Island /
Sunny Backup y compruebe que no haya
tensión.
• Ponga a tierra y en cortocircuito los conduc
tores de CA.
• Cubra o aísle las piezas próximas que estén
bajo tensión.
PRECAUCIÓN
2.
Destrucción de la hembrilla debido a un
montaje inadecuado
• Haga contacto a tierra antes de tocar cual
quier componente.
• Coloque la interfaz en posición vertical enci
ma de la ranura de inserción para la interfaz.
Las hembrillas RJ45 deben apuntar hacia el
interior de la carcasa.
• Ponga la interfaz sobre la hembrilla y aplique
una ligera presión uniforme encima.
Así evitará dañar las patillas de la hembrilla.
3. Afloje el tornillo de toma a tierra y fije el cable de
puesta a tierra con el tornillo en la placa de circui
to impreso (par de apriete: 2 Nm).
4. Introduzca el terminal hembra para el cable de
puesta a tierra en el enchufe plano para la toma
a tierra.
☑ La interfaz ya está conectada a tierra.
-
-
5. Conecte la comunicación multiclúster y la
comunicación RS485 (consulte la descripción
técnica del Sunny Island / Sunny Backup).
Desmontaje del MC-PB
1.
ADVERTENCIA
Peligro de muerte por altas tensiones
Existen altas tensiones tanto en el sistema aislado
/ sistema de respaldo como en el Sunny Island /
Sunny Backup. El Sunny Island / Sunny Backup
puede ponerse en funcionamiento por sí solo.
• Desactive o desconecte los componentes en
el orden indicado a continuación:
– Sunny Island / Sunny Backup
– Todos los equipos consumidores, fuentes
-
de CA, fuentes de energía externas y
fuentes de CC
– En la distribución secundaria, los disyunto
res para las fuentes de CA y la fuente de
-
energía externa
• Ponga el disyuntor de CC en posición Off.
• Asegure el equipo contra la reconexión acci
dental.
• Espere al menos 15 minutos. De este modo
se podrán descargar los condensadores.
• Abra la tapa de la carcasa del Sunny Island /
-
Sunny Backup y compruebe que no haya
tensión.
• Ponga a tierra y en cortocircuito los conduc
tores de CA.
• Cubra o aísle las piezas próximas que estén
bajo tensión.
2.
PRECAUCIÓN
-
Destrucción de la hembrilla debido a un
montaje inadecuado
-
• Haga contacto a tierra antes de tocar cual
quier componente.
• Retire todos los cables de la interfaz.
• Afloje el tornillo de toma a tierra y retire el ca
ble de puesta a tierra.
• Atornille el tornillo de toma a tierra en la pla
ca de circuito impreso (par de apriete:
2Nm).
-
• Extraiga la interfaz en posición vertical de la
hembrilla. Preste atención a no inclinar la in
terfaz.
3. Cierre el Sunny Island / Sunny Backup.
Asegúrese de cerrar con manguitos para cable
las aberturas en la carcasa para los cables de da
tos RJ45 que no sean necesarias (consulte la
descripción técnica del Sunny Island /
Sunny Backup).
Eliminación del MC-PB
• Deseche el MC-PB conforme a las disposiciones
vigentes sobre eliminación de residuos
electrónicos.
o
Envíe el MC-PB a portes pagados a
SMA Solar Technology AG. Marque el embalaje
con la indicación “ZUR ENTSORGUNG”
(para eliminar).
Datos técnicos
Comunicación
Interfaces de comunicación CAN y
Alcance de la comunicación CAN 50 m
Alcance de la comunicación RS485 1 200 m
Peso y dimensiones
Anchura x altura x
68 mm x 42 mm x 27 mm
profundidad
Peso 30 g
Lugar de montaje SI 5048 / SBU 5000
RS485
Contacto
SMA Ibérica Tecnología Solar, S.L.U.
Avda. de les Corts Catalanes, 9
Planta 3, Oficina 17–18
08173 Sant Cugat del Vallès (Barcelona)
Tel. +34 902 14 24 24
Fax +34 936 75 32 14
Service@SMA-Iberica.com
www.SMA-Iberica.com
Disposiciones legales
Las informaciones contenidas en esta documentación son propiedad
de SMA Solar Technology AG. La publicación, completa o parcial,
requiere el consentimiento por escrito de SMA Solar Technology AG.
-
La reproducción interna por parte de una empresa con vistas a
evaluar el producto o emplearlo correctamente está permitida y no
requiere autorización.
Marcas registradas
-
Se reconocen todas las marcas registradas, incluso si no están
señaladas por separado. La falta de señalización no implica que la
mercancía o las marcas sean libres.
La marca y los logotipos de Bluetooth
Bluetooth SIG, Inc. Todo uso que se haga de estas marcas a través
de SMA Solar Technology AG se realiza con licencia.
© 2004 - 2012 SMA Solar Technology AG. Reservados todos los
derechos.
-
®
son marcas registradas de
-
-
-
-
-
MC-PB-MO-de_en_es-11 SMA Solar Technology AG
 Loading...