


2118
Table of contents
 Loading...
2114/
SINGER

CONGRATULATIONS
— on the purchase of this new Singer* sewing machine. To achieve the most
enjoyment and satisfaction from this product, it is recommended that the instruction
manual be read through step by step while seated in front of the machine. This will
help the operator get to know all of its parts and capabilities.
INSTRUCTION BOOK
SINGER* MODELS 2114/2118
The manufacturer reserves the right to change the appearance, design, or
accessories of this sewing machine as considered necessary without any notification
or obligation.
^ A trademark of The Singer Company
Copyright 1987, Singer Sewing Machine Company
All rights reserved throughout the world

TABLE OF CONTENTS
1. GETTING TO KNOW YOUR MACHINE...........................................................................2
Principal Parts...............................................................................................................3
Accessories.................................................................................................................... 4
Important Safeguards.................................................................................................. 5
2. GETTING READY TO SEW.................................................................................................6
Connecting the Controller............................................................................................6
Running the Machine....................................................................................................6
Changing Snap-on Presser Feet
.................
.
................................................................
7
Changing Screw-on Presser Feet................................................................................ 7
Changing Needles..........................................................................................................8
Removing Needle Plate
.................................................................................................
8
Replacing Needle Plate................................................................................................. 8
Attaching Feed Cover.................................................................................................. 9
Attaching Blindstitch Guide.........................................................................................9
Winding the Bobbin.....................................................................................................10
Threading the Bobbin Case........................................................................................11
Threading the Machine...............................................................................................12
Raising the Bobbin Thread.........................................................................................13
Adjusting Needle Thread Tension..............................................................................14
Cloth Plate Removal and Replacement.....................................................................15
3. STITCH SELECTION...........................................................................................................16
Adjusting Stitch Width.............................................................................................. 16
Adjusting Stitch Length..............................................................................................16
Adjusting Stitch Balance............................................................................................ 17
Reverse Stitching...................................................................................................... 17
Pattern Selection..........................................................................................................17
Description of Stitches.................................................................................................18
4. SEWING TIPS AND APPLICATIONS...............................................................................19
Fabric, Thread, and Needle Ikble..............................................................................19
Sewing a Seam............................................................................................................ 20
Guiding Fabric............................................................................................................ 21
Basting..........................................................................................................................21
Blindstitching................................................................................................................22
Inserting a Zipper........................................................................................................23
Four-Step Buttonhole..................................................................................................24
TVvin Needle Sewing , ................................................................................................26
Personal Measurements..............................................................................................27
Performance Checklist................................................................................................28
5. CLEANING AND CARING FOR THE MACHINE..........................................................29
Removing Face Plate...................................................................................................29
Cleaning the Machine..................................................................................................29
Removing and Replacing Bobbin Case
..................
.
.................................................
30
Replacing Slide Plate...................................................................................................30
Removing and Replacing Light Bulb
........................................................................
31
1. GETTING TO KNOW YOUR MACHINE
---------------------------------
-
,
nn rtA
13-^ \
---------
)
i-9
'ipii ■
<U'
Laj
I”
nil li^il
E] C
E:
2114
( i ? 4 i hi 9 «I 10 M 1? 13 F4 ri
16
in lilil
:5i
\ìUÌ
2118
t J 3 4 i hr « » 10 M 3? ri W ri I* 17 »• r*
L iilllaiallllHU

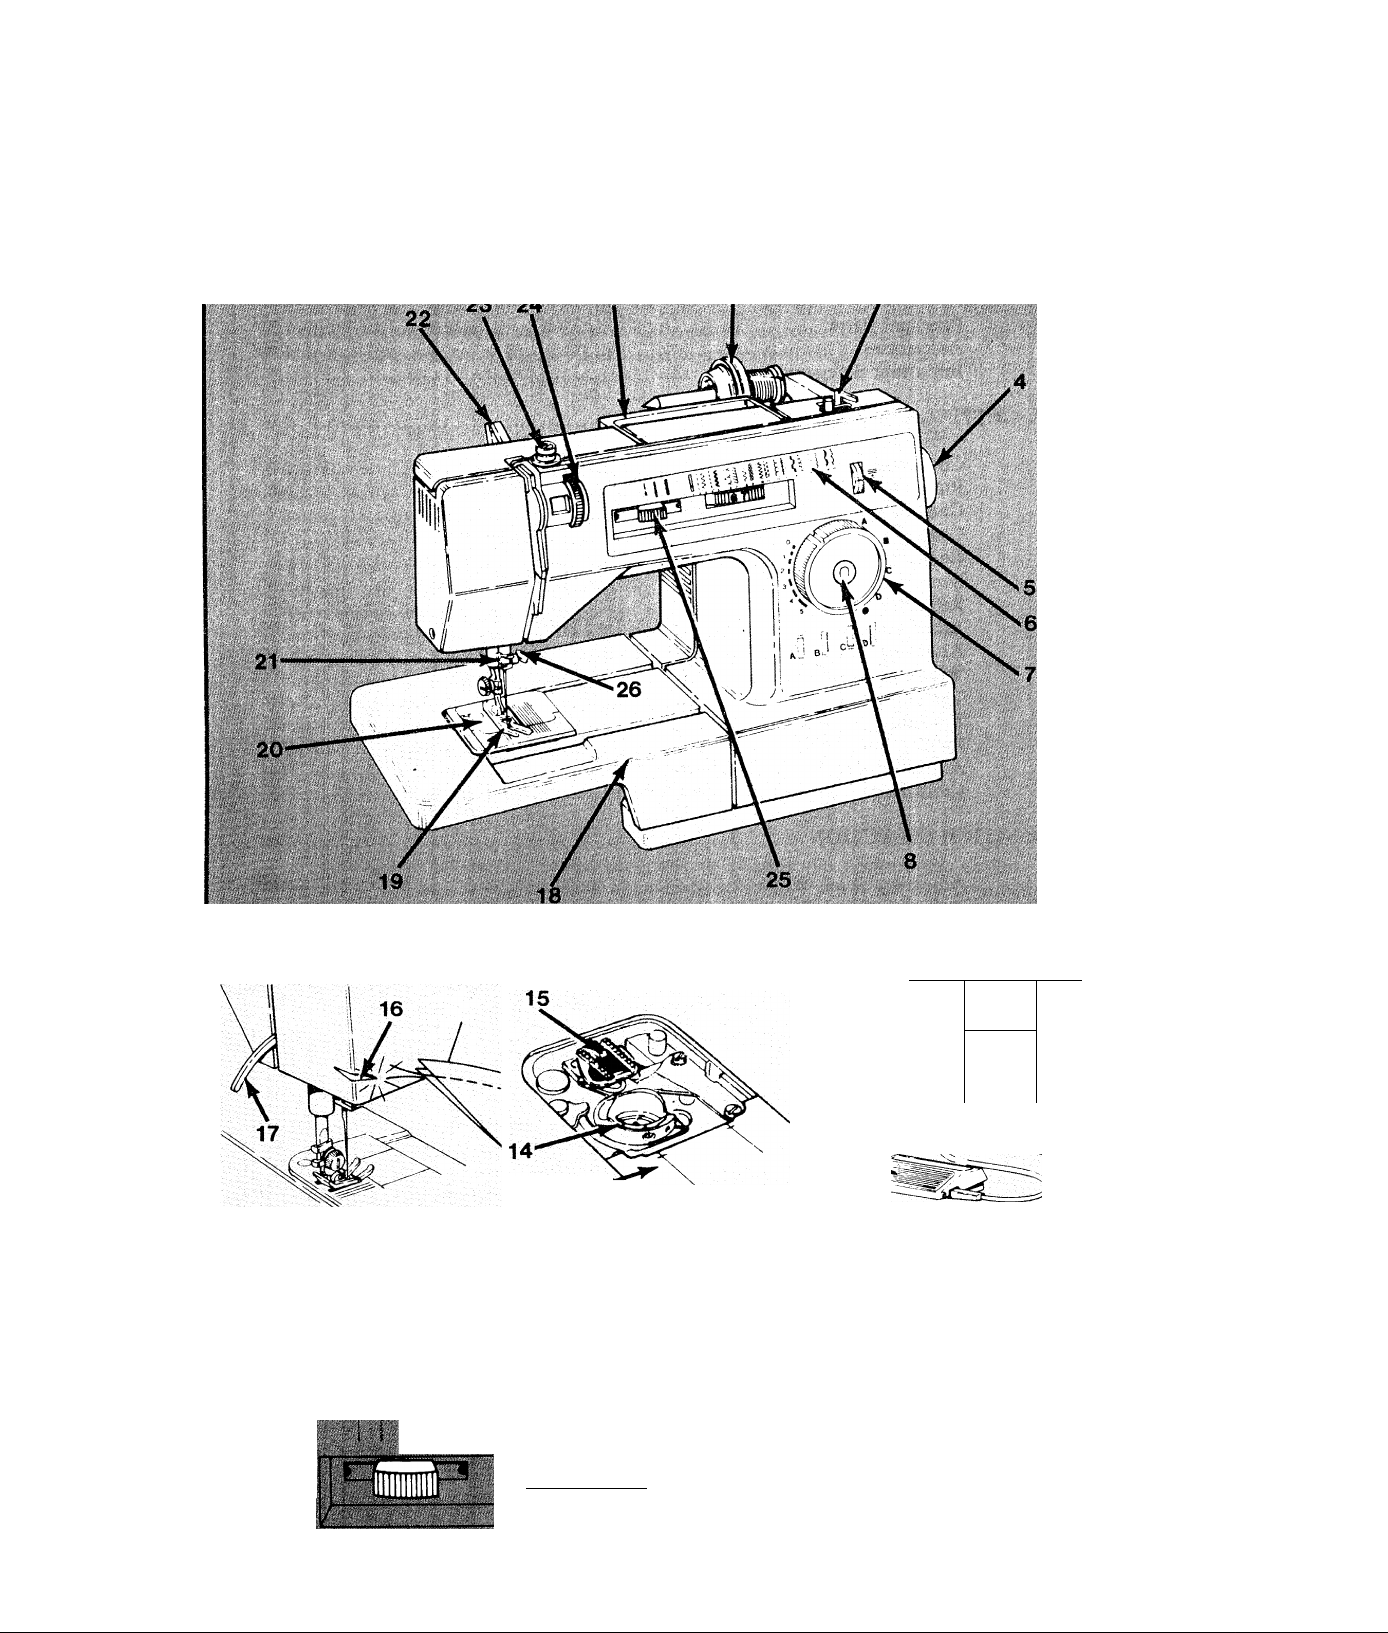
Principal Parts
1. Carrying Handle
2. Spool Holder
3. Bobbin Winder
4. Hand Wheel
■ 5. Stitch Balance Dial
6. Stitch Pattern Selector
7. Stitch Length Control
8. Reverse Stitching Button
9. Power and Light Switch
10. Electrical Connections
11. Electrical Rating Label
12. Speed Controller
13. Slide Plate
14. Bobbin Case
15. Fabric Feed (Feed Dog)
16. Thread Cutter
17. Presser Foot Lifter
18. Cloth Plate
19. Presser Foot
20. Needle Plate
21. Thread Guide
22. Snap-in Thread Guide
23. Bobbin Winder Tension
24. Top Thread Tension
25. Stitch Width Control
26. Needle Clamp
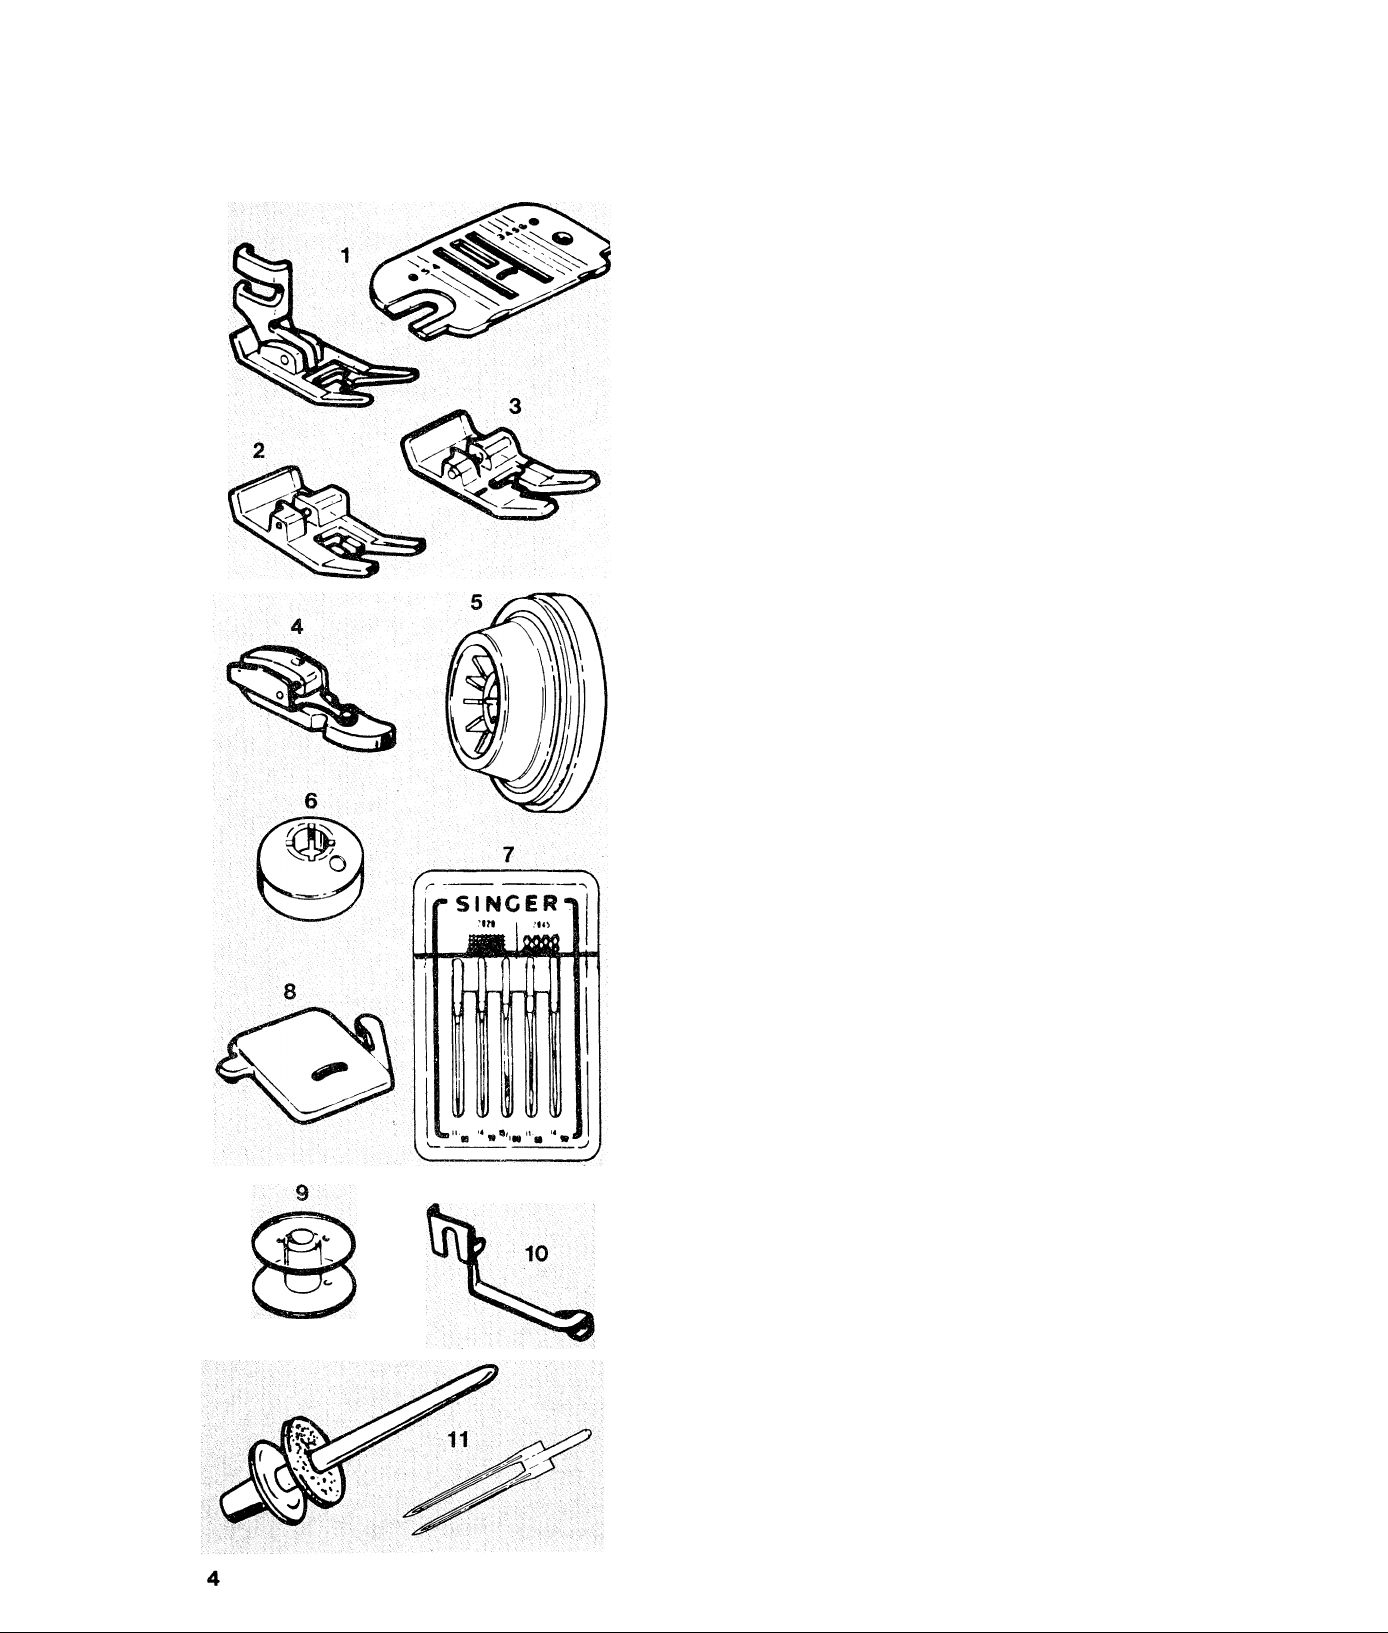
The following accessories are furnished with
this sewing machines:
1. General Purpose Presser Foot and Needle
Plate are on the machine when delivered.
Use together for most sewing projects.
2. Special Purpose Presser Foot for decorative
stitching.- -
3. Buttonhole Presser Foot
4. Zipper Foot
5. Spool Holder for medium and large thread
spools.
6. Small Spool Holder for small thread spools.
7. Needle Pack includes an assortment of types
and sizes.
8. Feed Cover for darning or embroidery.
9. Extra Bobbins
10. Bbnd Stitch Hem Guide
11. IWin Needle and Extra Spool Pin with Felt
Washer (optional) for decorative stitching.

Important Sa
1. Disconnect the powerline plug from the electrical outlet when changing needles,
feet, or needle plates, or when leaving machine unattended. This eliminates the possibili
ty of starting the machine by accidently pressing the speed controller.
2. Before removing the bobbin case, disconnect the powerline plug from the electrical
outlet.
3. Because of the up and down movement of the needle, work carefully and watch
the sewing area when operating the machine.
4. Do not pull the fabric while stitching as this may deflect the needle, causing it to
break.
5. Before cleaning the machine, disconnect the powerline plug from the electrical outlet.
6. Do not attempt to adjust the motor belt. Contact the nearest service center or an
authorized dealer should any adjustment be required.
7. Before changing the light bulb, make sure the powerline plug is disconnected from
the electrical outlet. Be sure to replace the face plate which covers the light bulb before
operating the machine.
8. This machine is designed to use a 15 watt maximum light bulb only.
9. This machine is double insulated. When servicing product, use only identical
replacement parts.
This product is suppressed for radio and television interference with the International
Electro-technical Commission requirements of the CISPR.
iî iaifînNe R
To really enjoy sewing, get to know the machine well. This chapter will be valuable in
doing just that.
Cohnectiitg the h/lachine
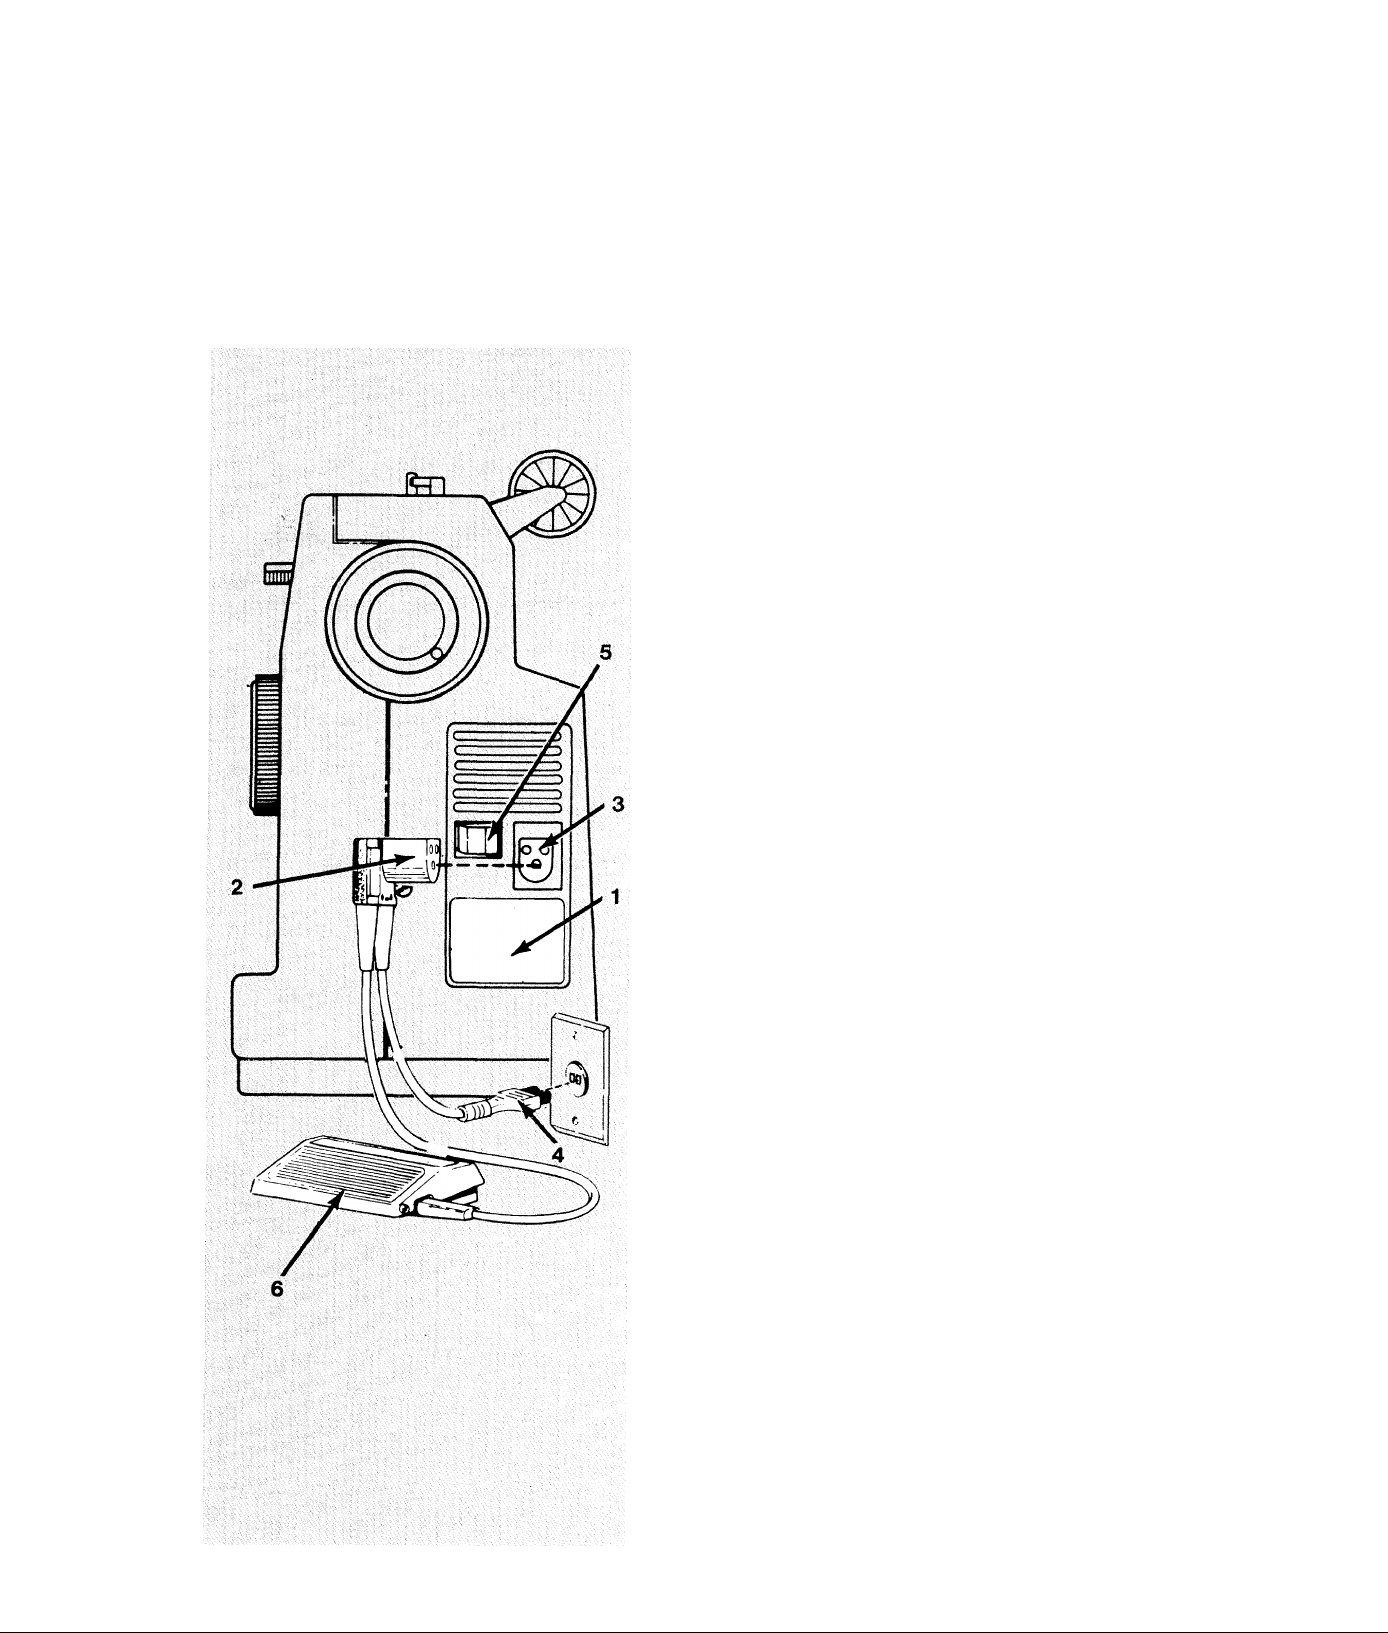
Connecting the ControUer
NOTE: Before plugging in the machine, be sure
the electrical information on the label (1) below
the handwheel agrees with the local electrical
supply.
Push plug (2) into the receptacle (3) at the right
end of the machine. Then, connect plug (4) to
an electrical outlet.
Running the Machine
To turn on machine and sewing light, press rear
portion of power switch (5). To turn off machine
and light, press front portion “0” of power
switch.
To run the machine and control speed, press the
speed controller (6) with foot. The harder it is
pressed, the faster the machine will sew. To stop
machine, remove foot from the controller.
NOTE: Do not operate machine without fabric
under the presser foot as this may
damage the feed and the presser foot.

Changing Snap-on Presser Feet
The accessory feet supplied with the machine fit
onto a common shank and are attached easily
as follows:
Hi Raise needle to highest point by turning the
handwheel towards the operator.
H« Raise presser foot using lever on rear of
machine.
H< Push up on toe of presser foot (1) until it
snaps off shank (2) and remove foot.
Hi Place new foot on needle plate with pin (3)
under center of shank.
Hi Using presser foot lifter, lower shank onto pin
(3) and push down firmly on presser foot screw
(4) until foot snaps into place onto shank.
Changing Screw-on Presser Feet
special feet which have built-in shanks are
replaced as follows:
Hi Raise needle and presser foot.
Hi Loosen presser foot screw (4) with a coin and
remove presser foot with shank (5) ’guiding it
towards the operator and to the right.
Hi To replace foot, hook it around presser bar
(6) and screw (4). Tighten screw with a coin.
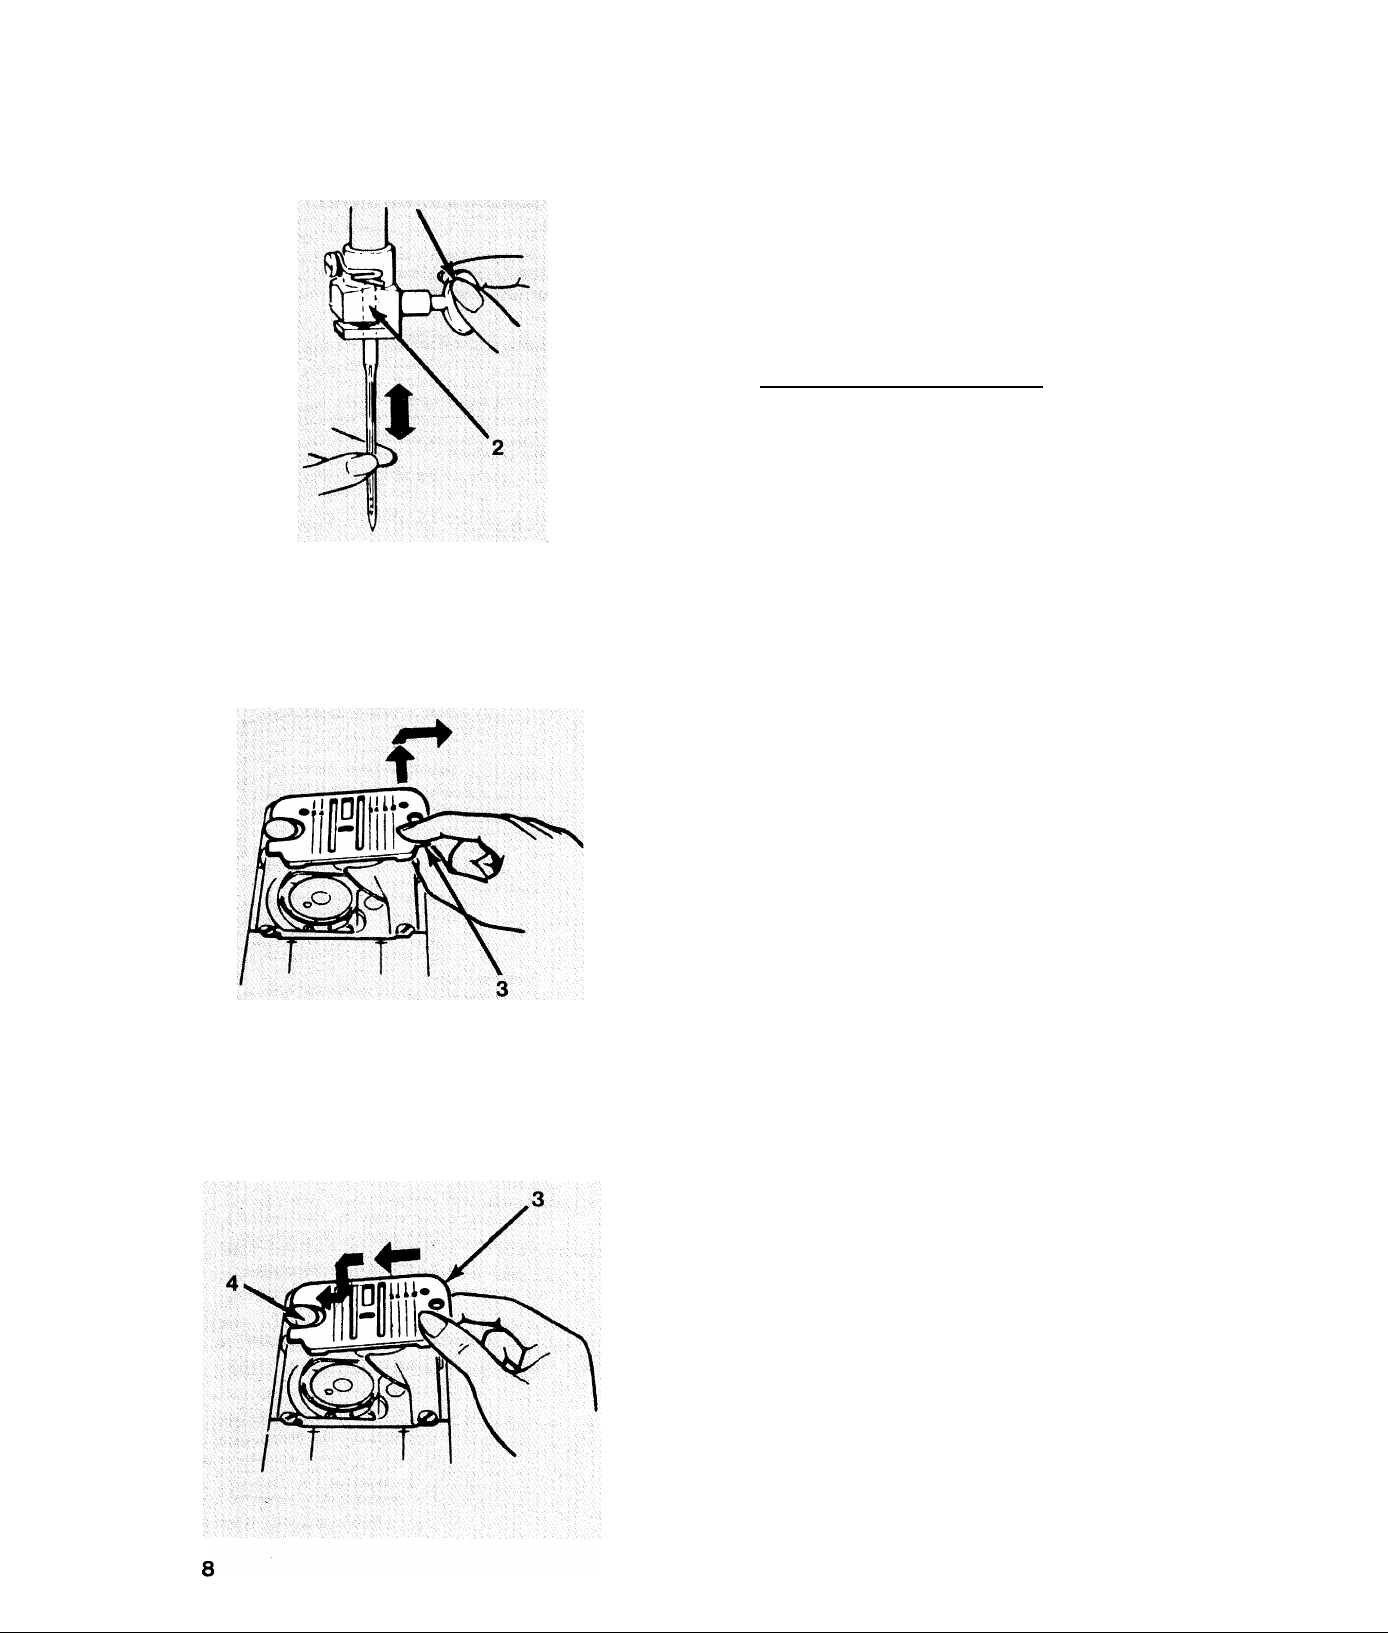
Changing Needles
Raise needle to highest position by turning
handwheel towards the operator.
Loosen needle damp screw (1) and remove
needle.
* With flat side of needle to the back, insert new
needle into clamp (2) as far as it will go.
^ Tighten needle clamp screw (1) securely.
Check the Fabric. Thread and Needle Chart in
this book for correct needle and fabric
combinations.
Re^pvihg Niediefil^te
For either cleaning or use of the straight
stitch plate, available from an approved
dealer, do the following:
Hi Raise needle and presser foot to their
highest positions.
Open slide plate and place thumb under right
side of needle plate (3).
H« Lift up and pull plate to the right to
remove it from the machine.
Replacing Necdieplate
Hi Holding needle plate as shown, slide it to the
left under the head of clamping pin (4).
Hi Press down on right side at (3) until it fits se
curely in place.
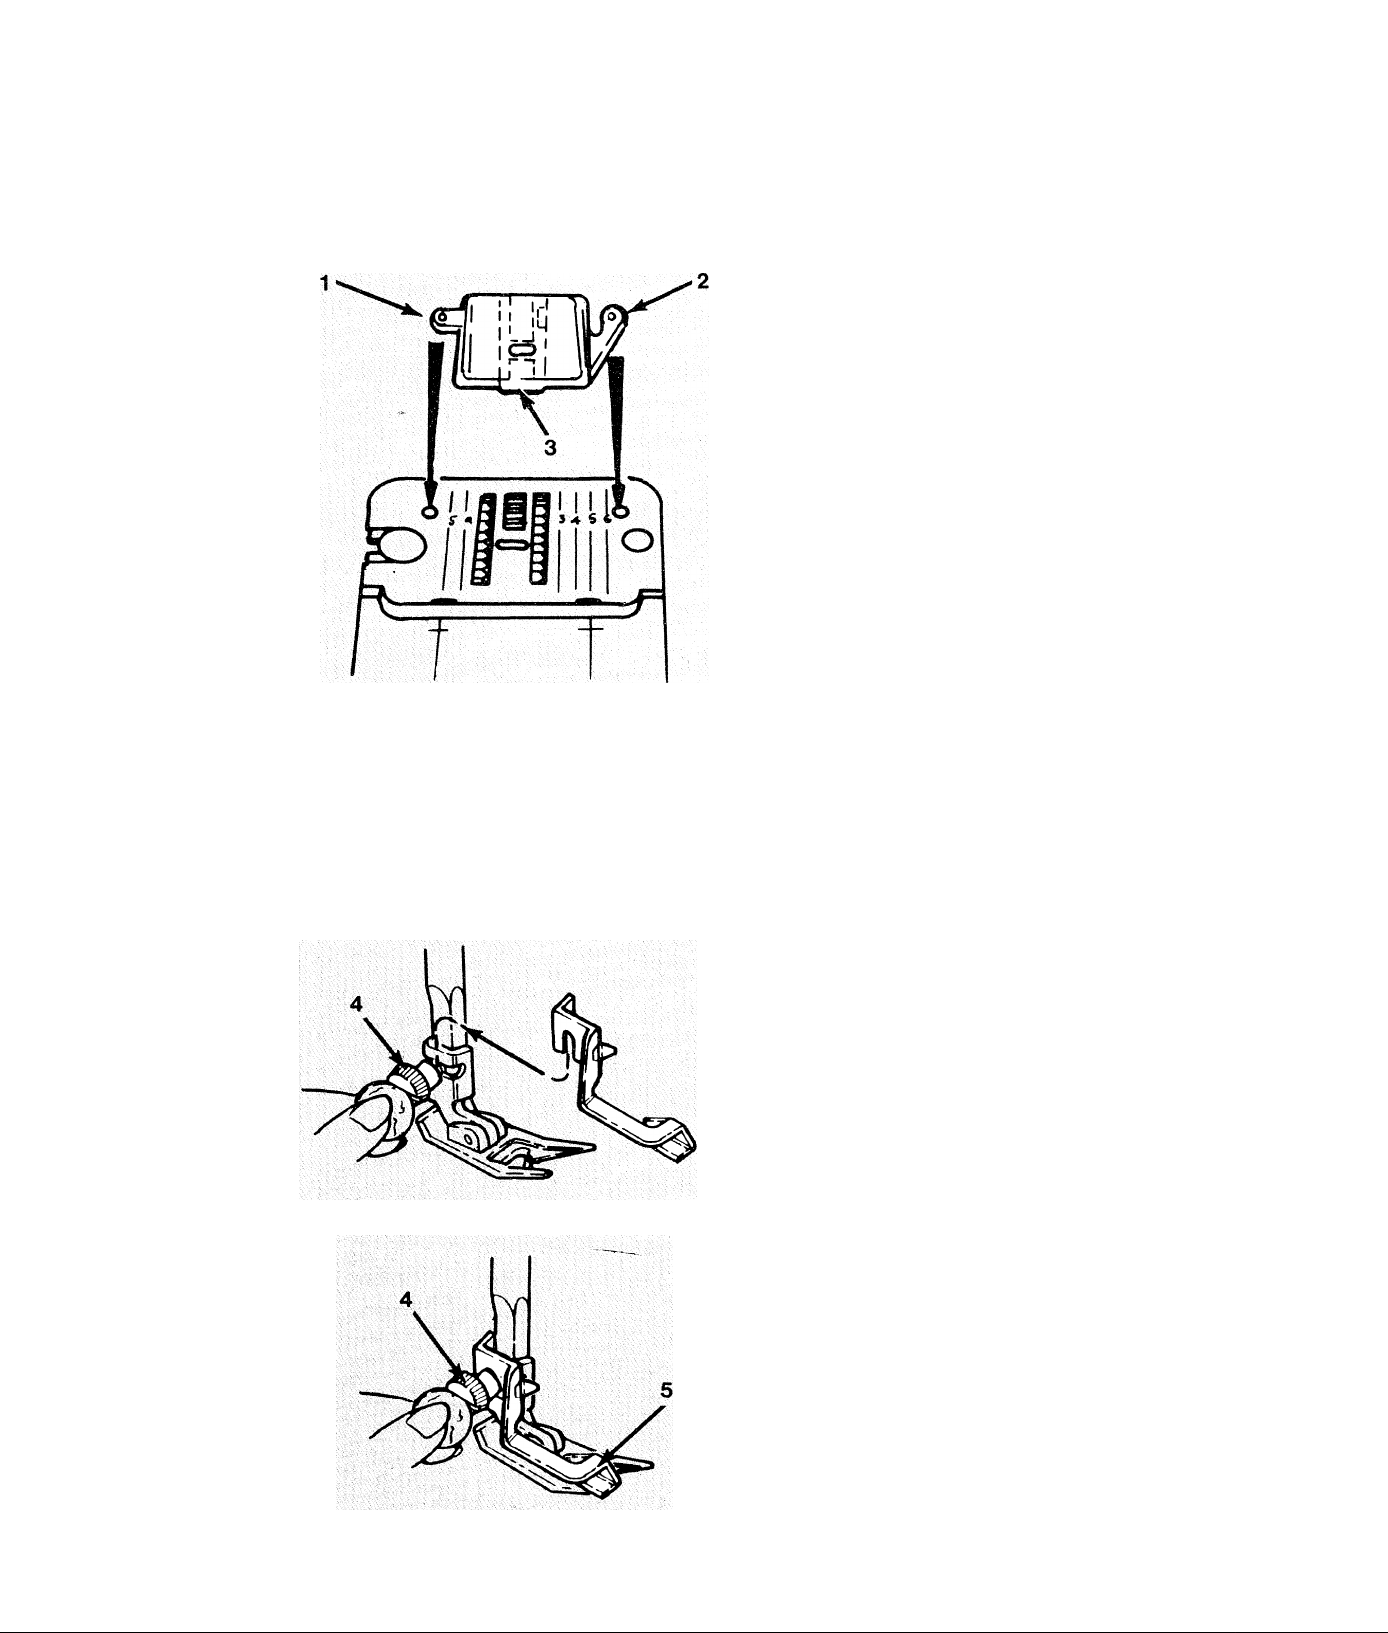
Attaching Feed Cover
For darning and free-motion embroidery, the
feed cover prevents the feed from moving the
material. Attach it as follows:
^ Raise needle and presser foot, and open slide
plate.
^ Slide feed cover on top of needle plate, press
ing tabs (1) and (2) into holes in needle plate.
Then, close slide plate.
* To remove, open slide plate. Lift front edge
of cover (3) and pull it away.
The optional darning and embroidery foot,
available from approved dealers, may be used.
If operator prefers to do these operations by
removing presser foot and shank entirely from
machine, be sure presser bar is lowered to main
tain proper thread tension.
Attaching Blindstitch Guide
5k Raise presser foot and loosen presser foot
screw with a coin.
>k Slip blindstitch hem guide between screw
and presser foot shank.
5k Be sure underside of the guide (5) clears the
slide plate and front of foot.
^ Tighten screw (4) with the coin.
Loading...