


216G
Table of contents
 Loading...

The use of a good
SPECIAL OIL
gives best results, in the use of
your sewing maschine; by using
such an oil, smooth running and
satisfactory work and a long life
for the machine are guaranteed.
For this reason, use
SINGER OIL
which is available in small glass
bottles at all SINGER Shops.

Form 2760/652 Ru.
DIN A 6
INSTRUCTIO
SEWING MACHINE
CLASS 216
FOR COMBINED ZIGZAG AND
STRAIGHT STITCHING
FOR HOUSEHOLD AND
MANUFACTURING
NOTICE
The unauthorized use of the name SINGER or any similar
protected trade marks of SINGER machines will be legally pro
secuted, as will also the alteration of the SINGER name or the
ornamentation, on used machines.
Trade Mark of
SINGER SEWING MACHINE COMPANY
Reprinting Forbidden

SINGER Sewing Machine
Class 216
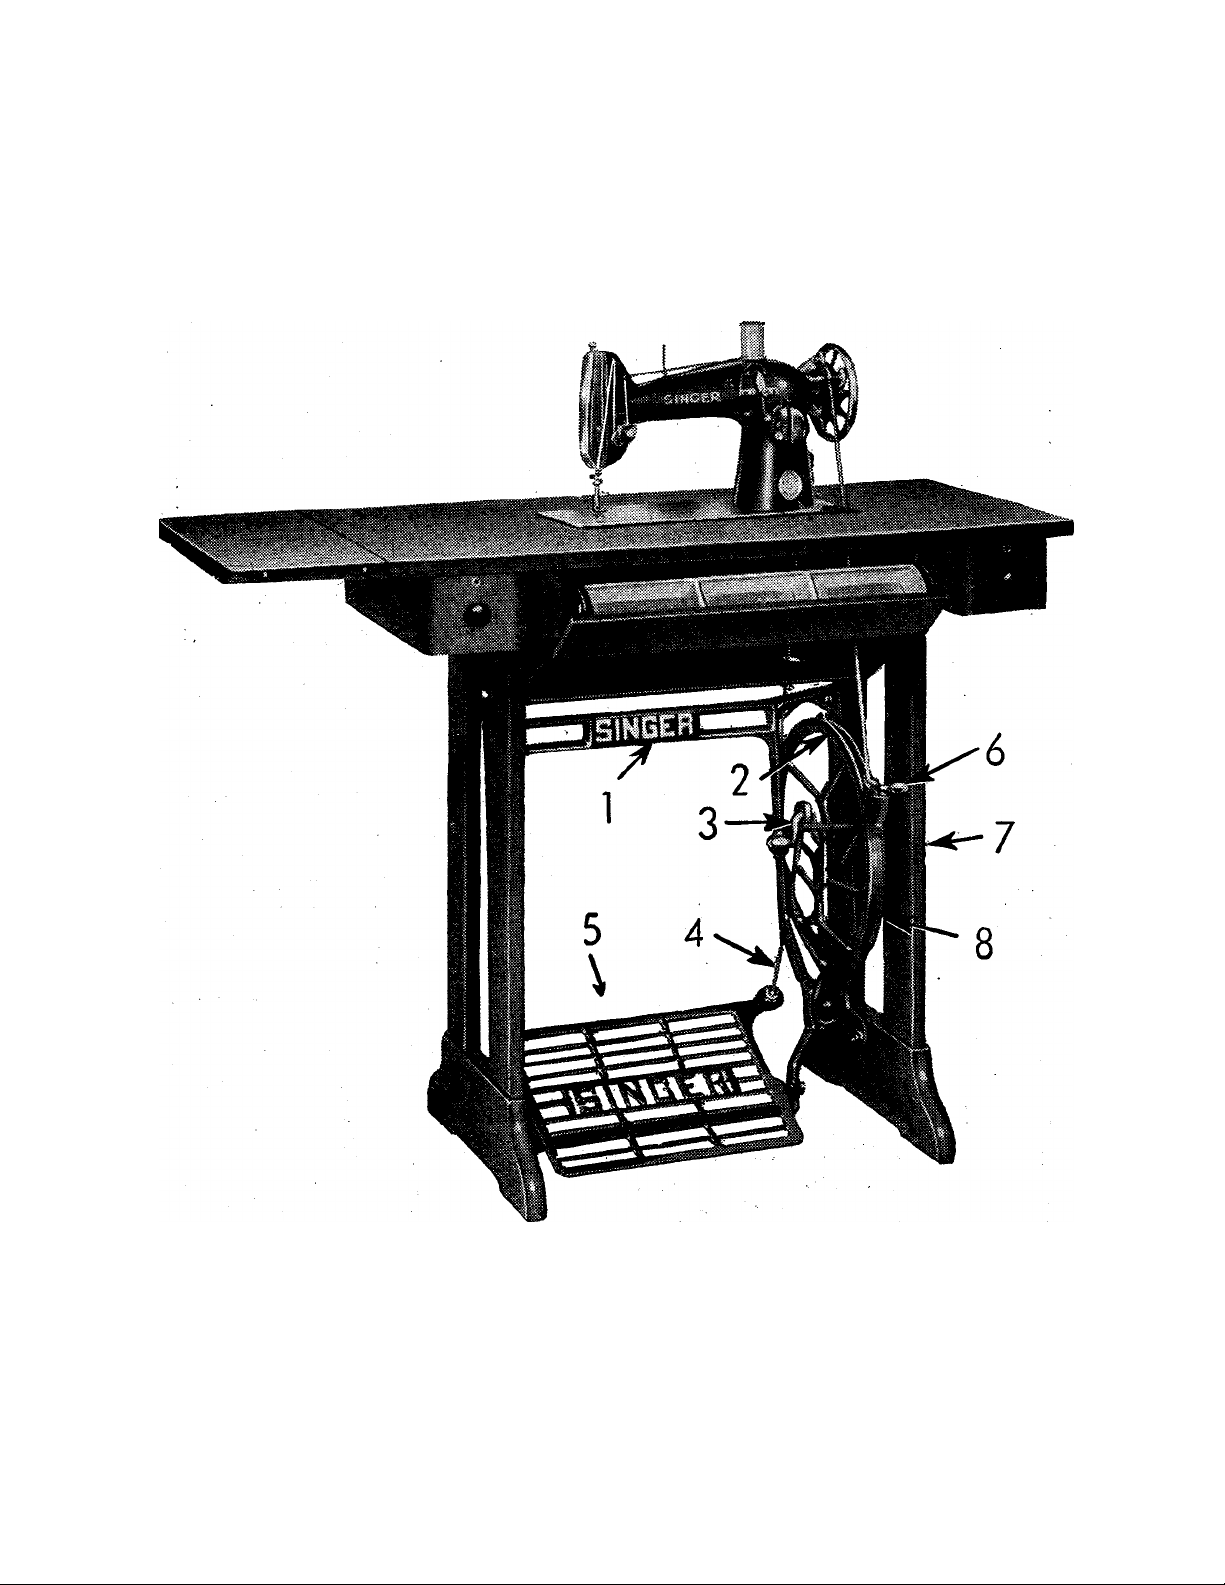
Fig. 1
Parts of the Machine Stand
1 Brace
2 Band Wheel
3 Band Wheel Crank
4 Pitman
5 Treadle
6 Bel Shifter
7 Leg
8 Dress Guard
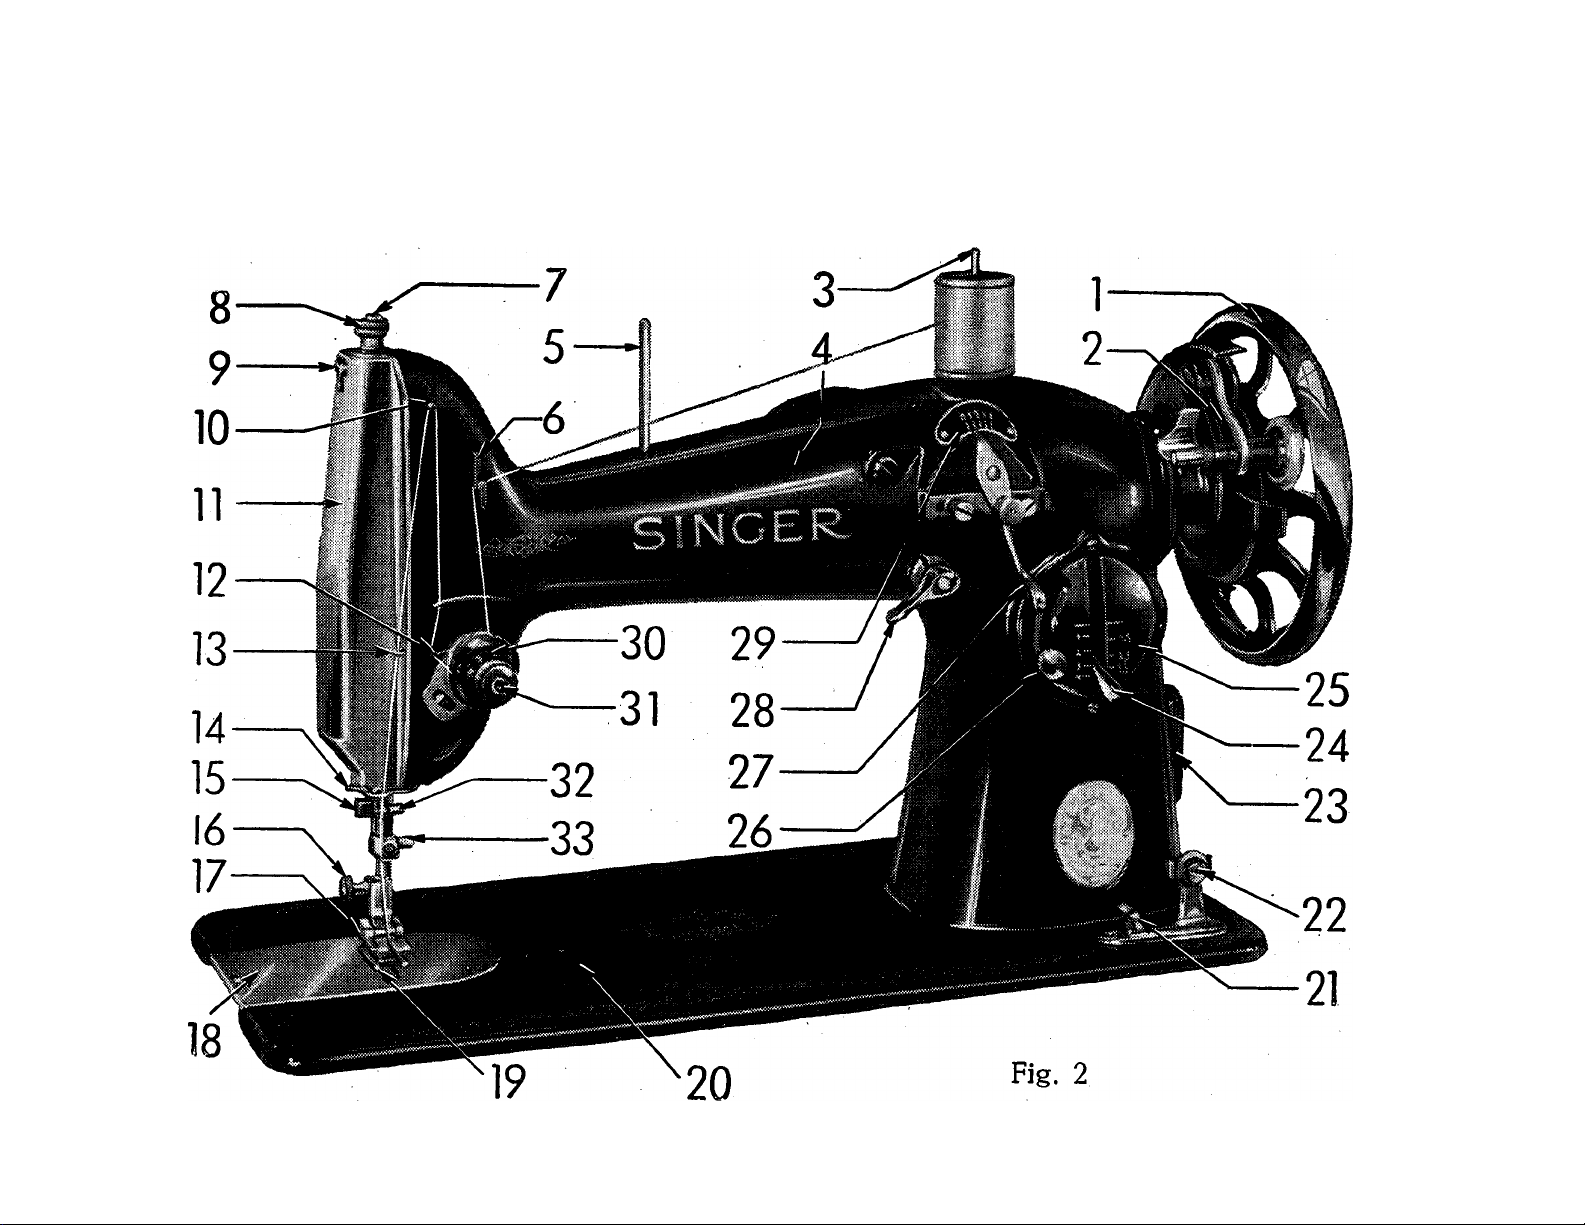
Parts of the Singer Class 216
with identifying references of those parts whidi are used in this instruction book

Description of Parts as shown
on Fig. 1 and 2
Balance Wheel
1.
Bobbin Winder 19.
2.
Right Spool Spindle 20.
3.
4. Arm
5. Left Spool Spindle 22.
6. Thread Guide
Presser Bar
7.
8. Pressure Regulating Thumb Screw
9.
Face Plate Set Screw
10.
11. Face Plate 28.
12. Thread Take-up Spring 29.
13.
Thread Take-up Lever
Face Plate Thread Guide
18.
21. Drop Feed Lever
23.
24. Stitch Length Regulator
25. Stitch Length Scale
26.
27. Bight Lever
30. Thread Tension with Scale
Throat Plate
Feed Dog
Bed Plate
Bobbin Winder Tension Discs
Motor Seat
Stitch Length Set Screw
Needle Position Lever
Bight Scale
cn
14.
15.
16.
17. Presser Foot
Thread Guide 31. Thread Tension Regulating
Thread Cutter
Presser Foot Thumb Screw
Thumb Nut
32. Needle Bar
33.
Needle Clamp

Accessory Set (Fig 3)
No.
Straight Stitching Foot
Button Sewing Foot
Buttonhole Foot ........................................................................... 3
Ornamental zigzag stitching Foot
Zigzag and straight stitch cording
and braiding Foot ..................................................................... 5
Shell Hemmer .............................................................................. 6
Felling Foot for straight stitching ................................................ 7
Buttonhole knife .......................................................................... 8
Buttonhole knife handle
Fibre Plate for cutting buttonholes
Adjustable cloth guide
................................................................
.....................................................................
......................................
...............................................................
............................................
..............................................................
10
11
1
2
4
9
Cloth guide screw ...................................................................... 12
Needle Threader ........................................................................ 13
Small Screw Driver
Large Screw Driver
Oil Can
......
.............................................................................. 16
....................................................................
...................................................................
14
15
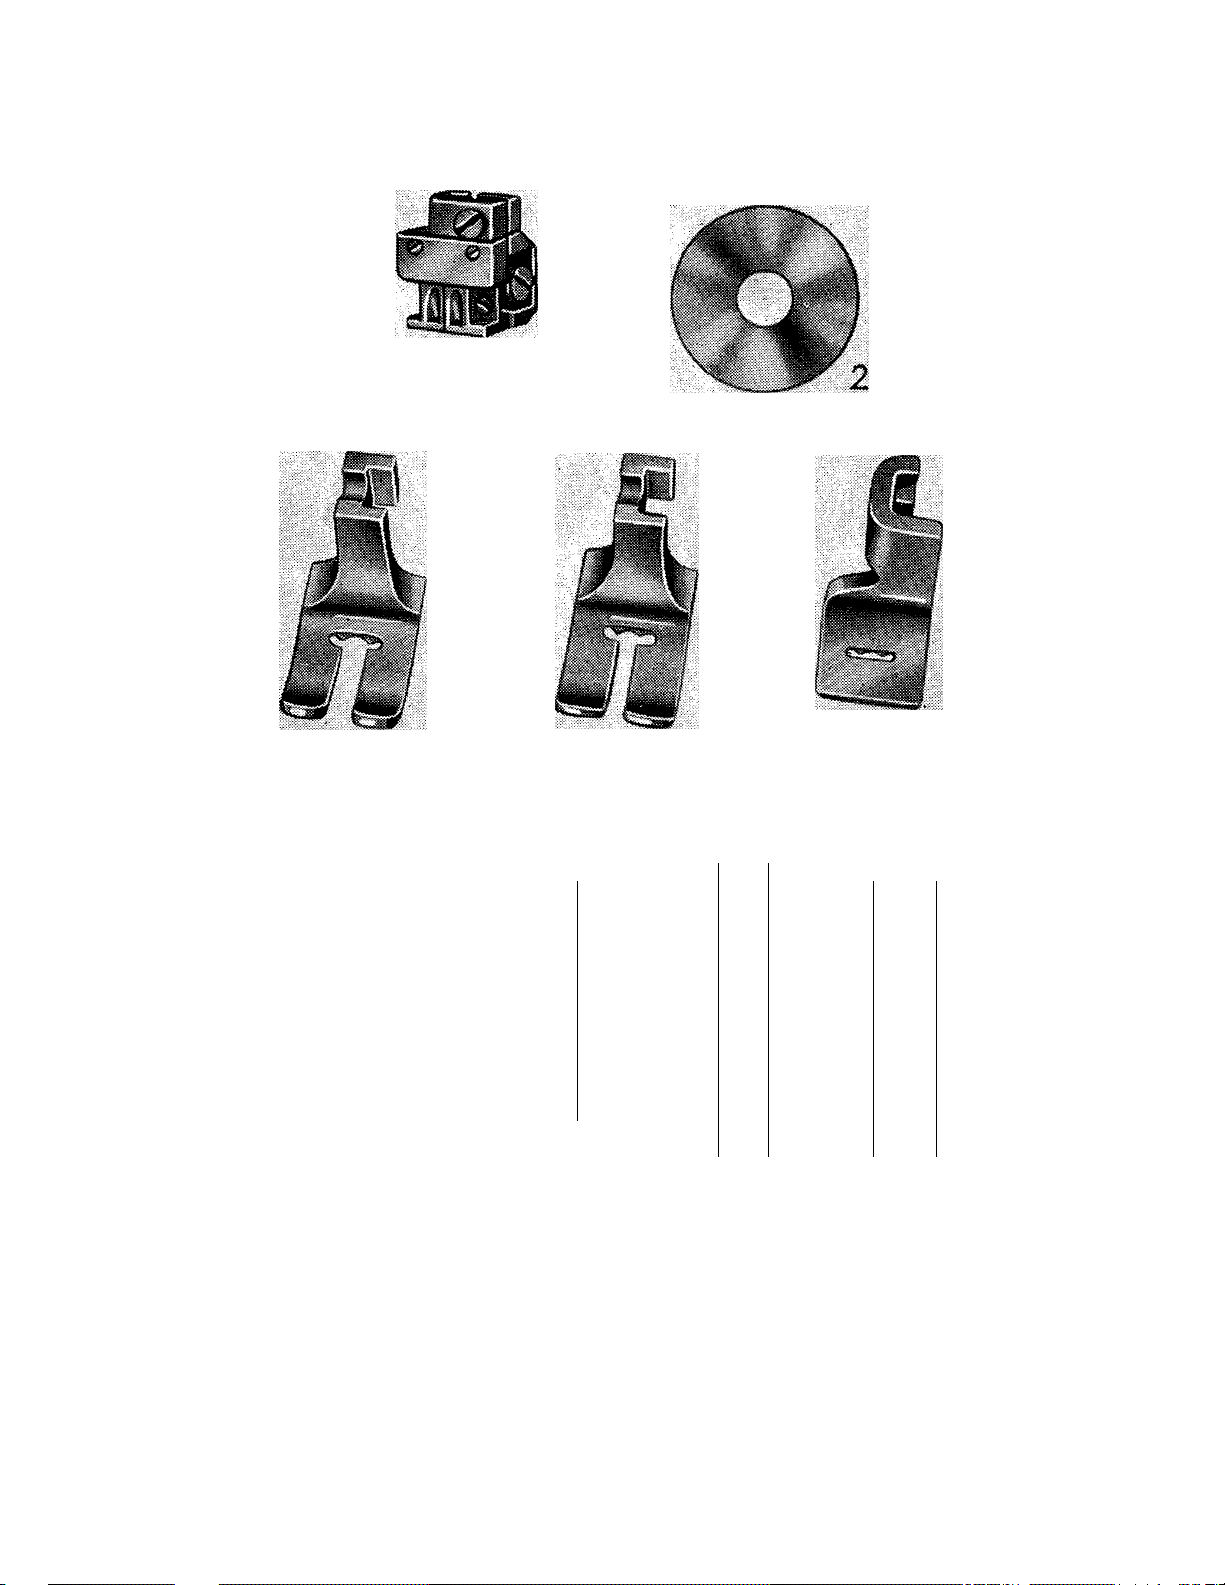
Supplied at Additional Cost (Fig. 4)
straight Stitch Plate
Curved cord covering Foot . .........................................
Roll Hemmer................................................................................ 3
.....................................................................
1
2
6
Fig. 3
1
Fig 4

Embroidery Set (Fig. 5)
(Supplied at Additional Cost)
No.
Throat Plate ................................................................................. 1
Double cord guide for cording, embroidery,
Madeira and Richelieu work
Spur Plate with 3V4 mm. spur ............................
Spur Plate with mm. spur
Punch for 3V4 mm. spur plate
Punch for 4V4 mm. spur plate
Mallet ........................................................................................... 7
...................................................... 4
.....................................................
.....................................................
...............
.........................
.........................
2
3
5
6
8
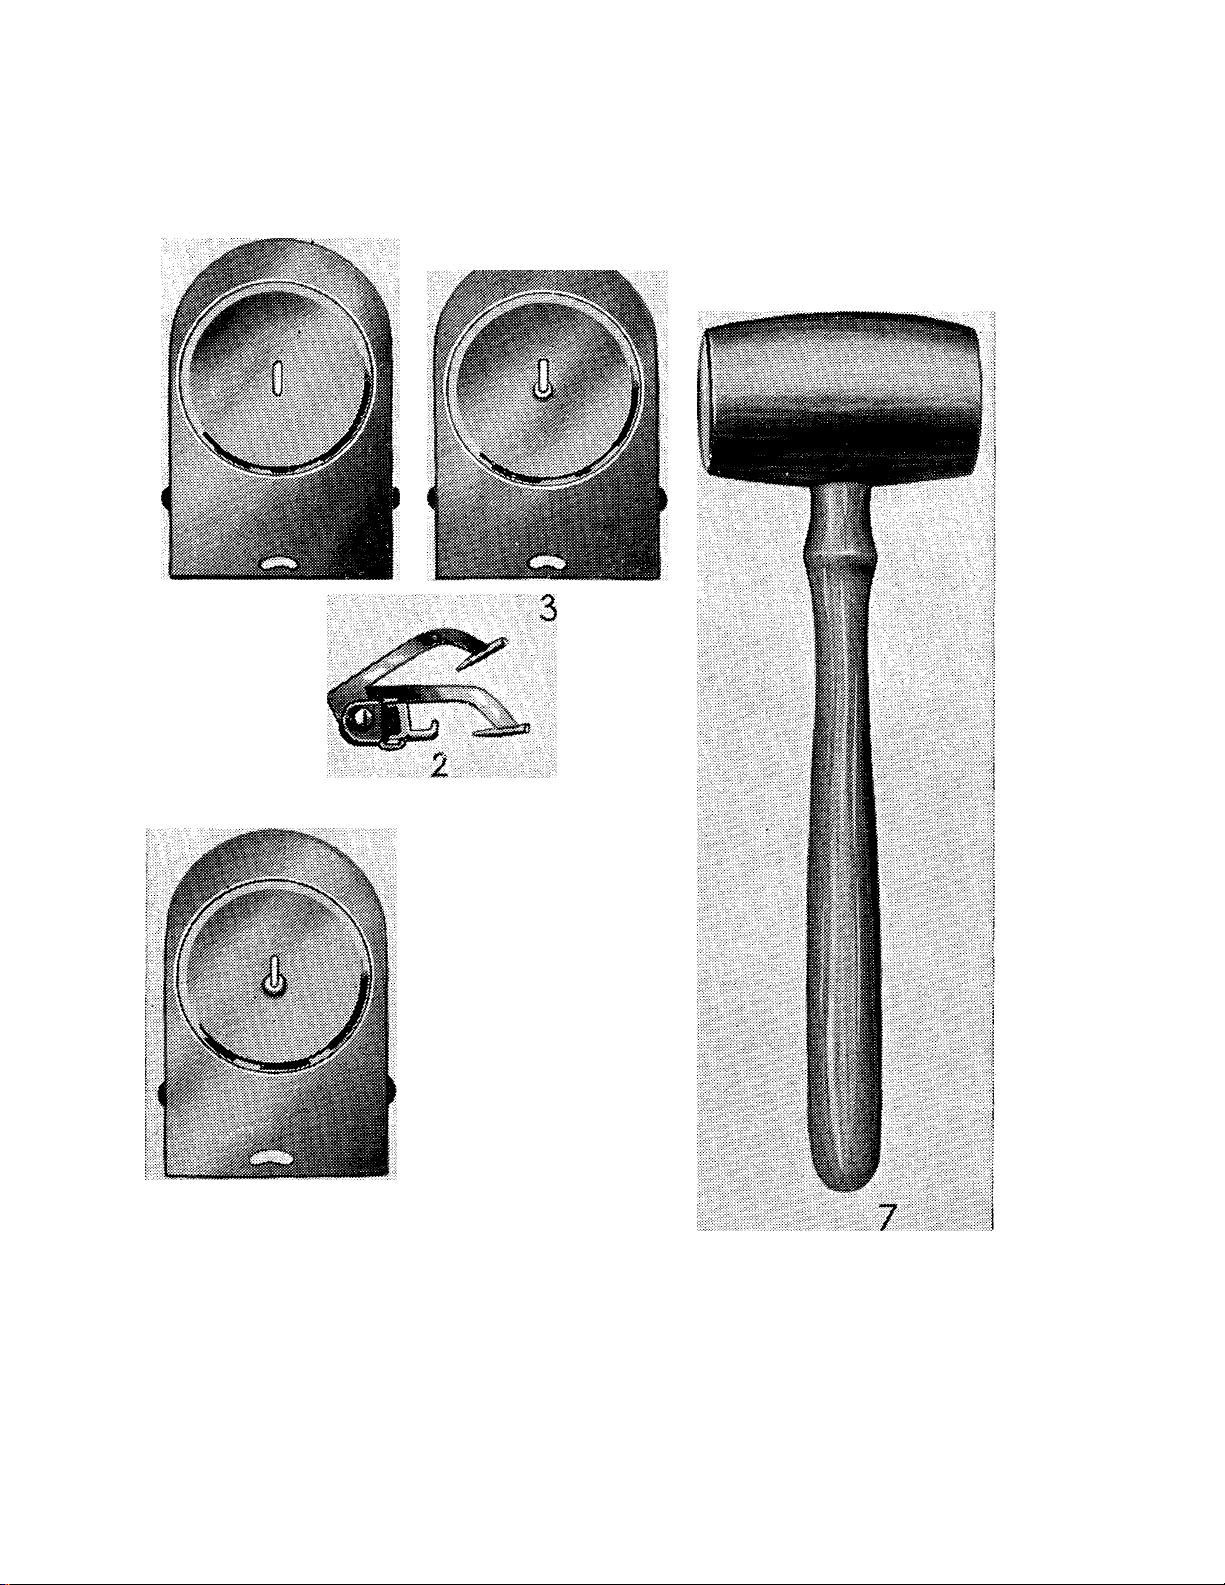
Fig. 5
6
9

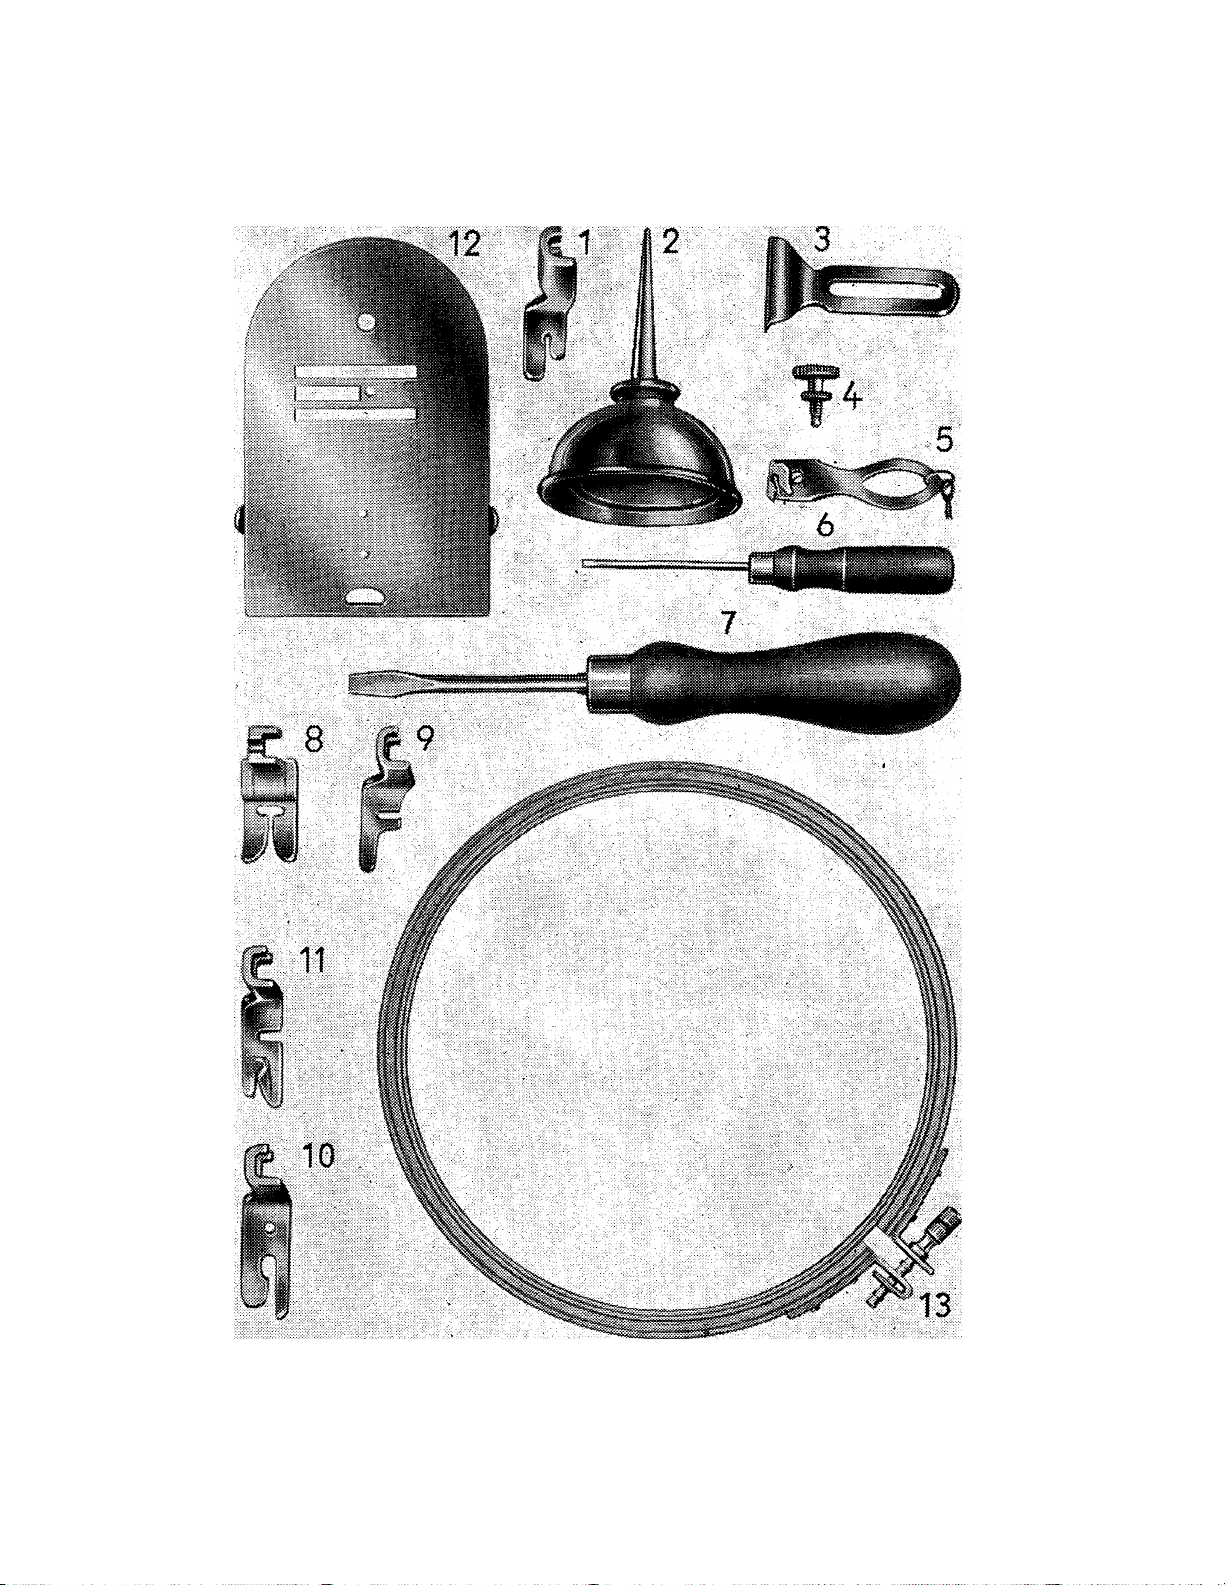
Fig. 5
9

Air Tucking Set (Fig. 6)
(Supplied at Additional Cost)
No.
Two-Needle Clamp .................................................................... 1
Middle Tension Needle Disc ...................................................... 2
Foot for wide air tucks
Foot for medium air tucks
Foot for narrow air tucks ..............................
Traverse for wide air tucks
Traverse for medium air tucks
Tubular Traverse for wide air tucks with cords .. 8
Traverse Clamp ............................................................................ 9
The needle used for the air tucking set is the round
shank needle of Class 16 x 1 No. 9 or Nr. 10 .... 11
...............
.......................................................... 4
................
..................
........................................ 6
...............
.............................
.............................
........................... 7
3
5
10
i i iiiiïiîS
И SlíiSfi;
И]
<■
/
6
^Я11
шШШМшШй
Fig. 6
iiiliili
11
Î
И

Table of contents
I. General Instructions for
Page
Using the Machine
II. Care of the Machine .
III. Hints ...................................................................... 35
IV. Hemming and Seaming with Straight
Stitches .................................................................. 36—37
V. General Zig Zag Work .......................................... 38—42
VI. Special Work with the Zig Zag Stitch . . 43—50
VII. Embroidery and Darning
VIII. Use of the Embroidery Set ................................... 52—55
IX. Work with Air Tucking
X. Sewing Very Narrow Air Tucks with the
Single Needle Clamp . .............
XI. Needles and Threads ............................................. 63—64
.......................................... 13—30
...........................................
......................................
........................................
.............................
31—34
51—52
56—61
62
12
I. GENERAL INSTRUCTIONS FOR
USING THE MACHINE
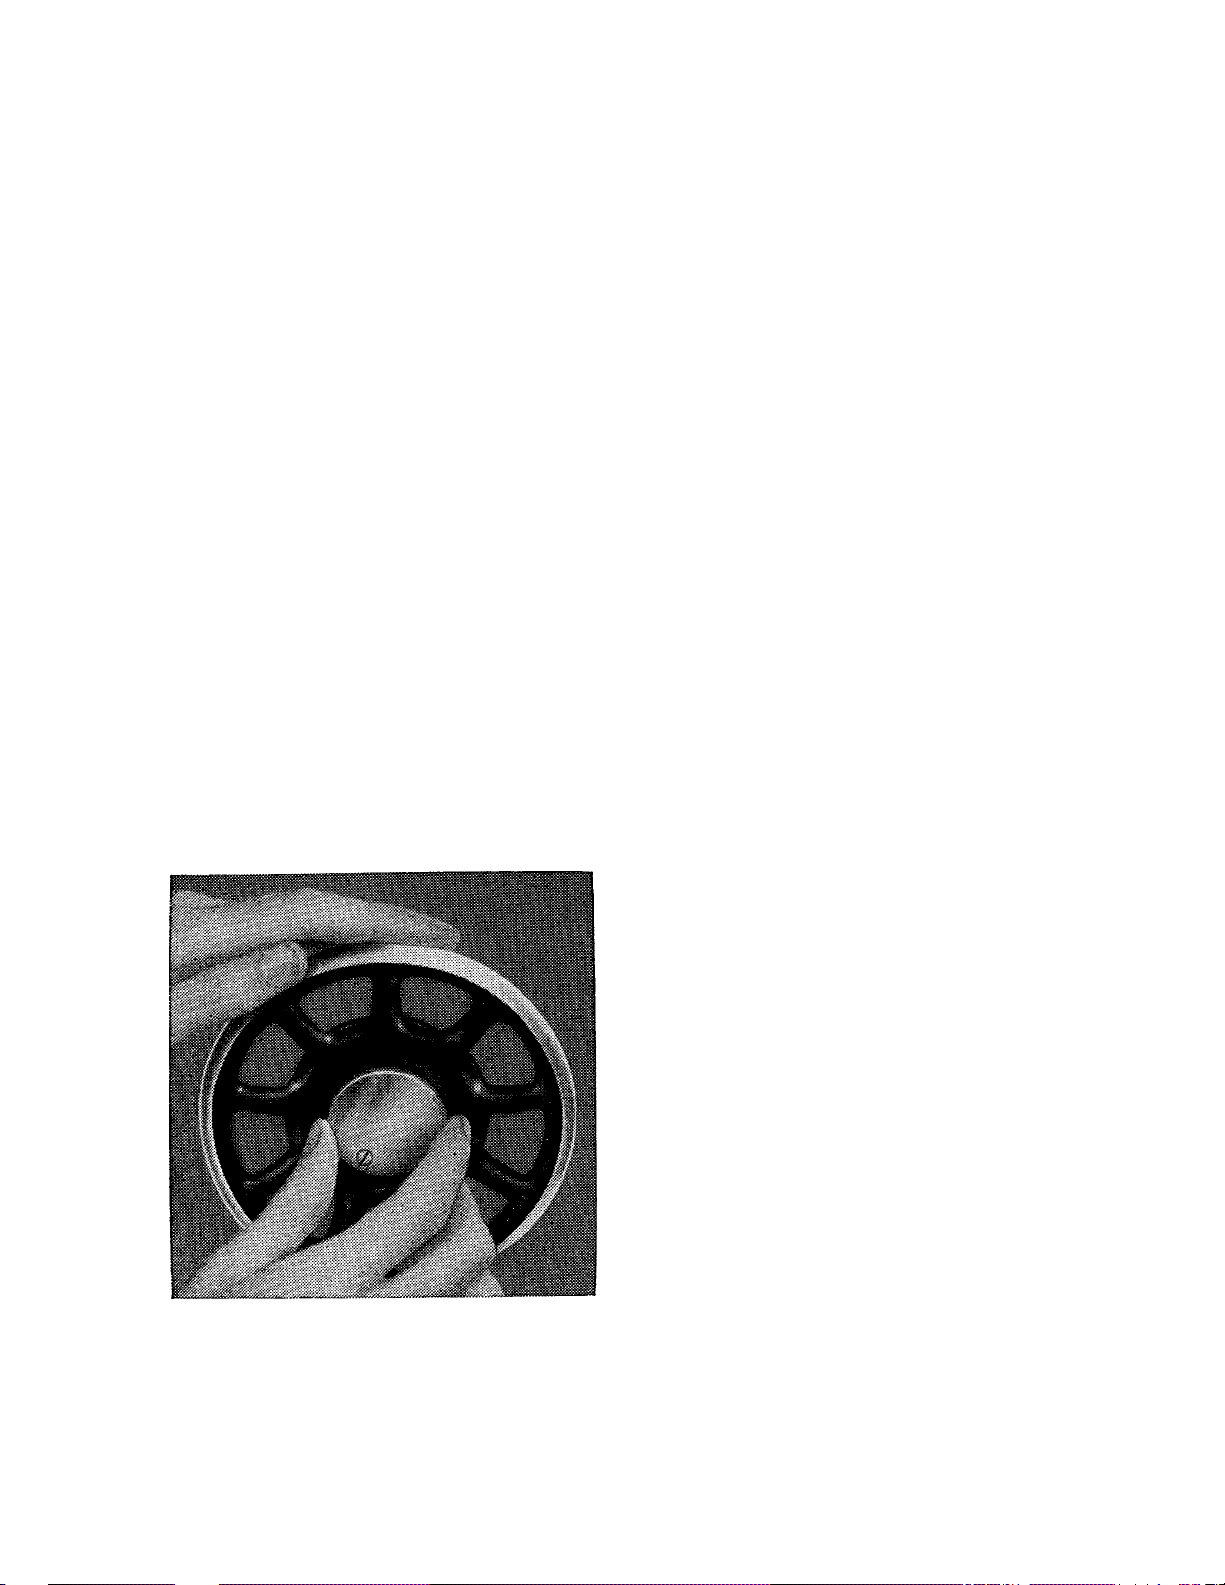
Releasing the Balance Wheel
Before setting the machine in operation, the presser
foot should be raised by means of the presser bar
lifter, to prevent injury to the presser foot and the
feed dog.
Next, one should become acquainted with the me
chanism for releasing the balance wheel. This me
chanism permits the beginner to practice using the
treadle without actually running the machine. Releas
ing the balance wheel also permits bobbin re-winding
without requiring the
Fig. 7
Releasing the Balance Wheel
sewing work to be re
moved or the thread to
be removed from the
machine. The balance
wheel is released as
shown in Fig. 7, by
holding the balance
wheel in place with the
left hand and, with the
right hand, turning stop
motion screw toward
the operator until no
ticeable resistance is
met.
13

The Treadle of the Machine
After releasing the balance wheel, place the foot
on the treadle of the machine, then turning the
balance wheel over toward you, with the right hand,
and by alternately pressing down with the heel and the
toes try to attain a uniform motion of the driving
wheel. As soon as the motion of the treadle has been
well learned, and the machine can again be set in
motion without turning the balance wheel in the
wrong direction, the releasing mechanism (Fig. 7) is
again tightened by turning the stop motion screw
toward the right (away from operator) and the ma
chine is again ready for sewing. Place a piece of
material under the presser foot, lower the presser
foot on the material and work in this manner with
the unthreaded machine until the operation of guid
ing the material through the machine has been
learned.
General Instructions
In order to obtain satisfactory work from the machine
it is necessary to observe the following:
The balance wheel must be turned only in the
direction of the operator.
When the machine is not being used the presser
foot should be raised.
As long as there is no material under the pres
ser foot the machine should not be run without
threading the needle.
In order to avoid the breaking of the needle,
do not pull on the goods while sewing. The
work will be moved by the feed without
assistance.
Kinds of Needles
The Glass 216 Machine uses SINGER needles of
14

Class 15X1 (flat shank). To choose the correct needle
size, see the charts on pages 63 and 64.
Quality of Needles (Fig. 8)
Since bad needles or needles of poor quality can
easily break the thread, skip stitches and make uneven
Fig. 8 SINGER Needles are stamped with the Company's Trade
Mark,, SIM ANCO*"
raw edges in your sewing work, be sure to purchase
you,T needles for this machine in a qualified SINGER
Shop, where the needles of the correct size, for the
type of work being done, can be purchased.
Fig. 9 To Set the Needle
To Set the Needle (Fig. 9)
Turn the balance wheel over toward you, until the
needle bar is at its highest position. Loosen screw
(A, Fig. 9) and insert the needle, as far up as it will
go, into the clamp (B, Fig. 9) with its flat side toward
the rear, and long groove of the needle towards you.
Then tighten screw (A).
Threading the Needle (Fig. 10)
Place the spool of thread on the right spool spindle.
15
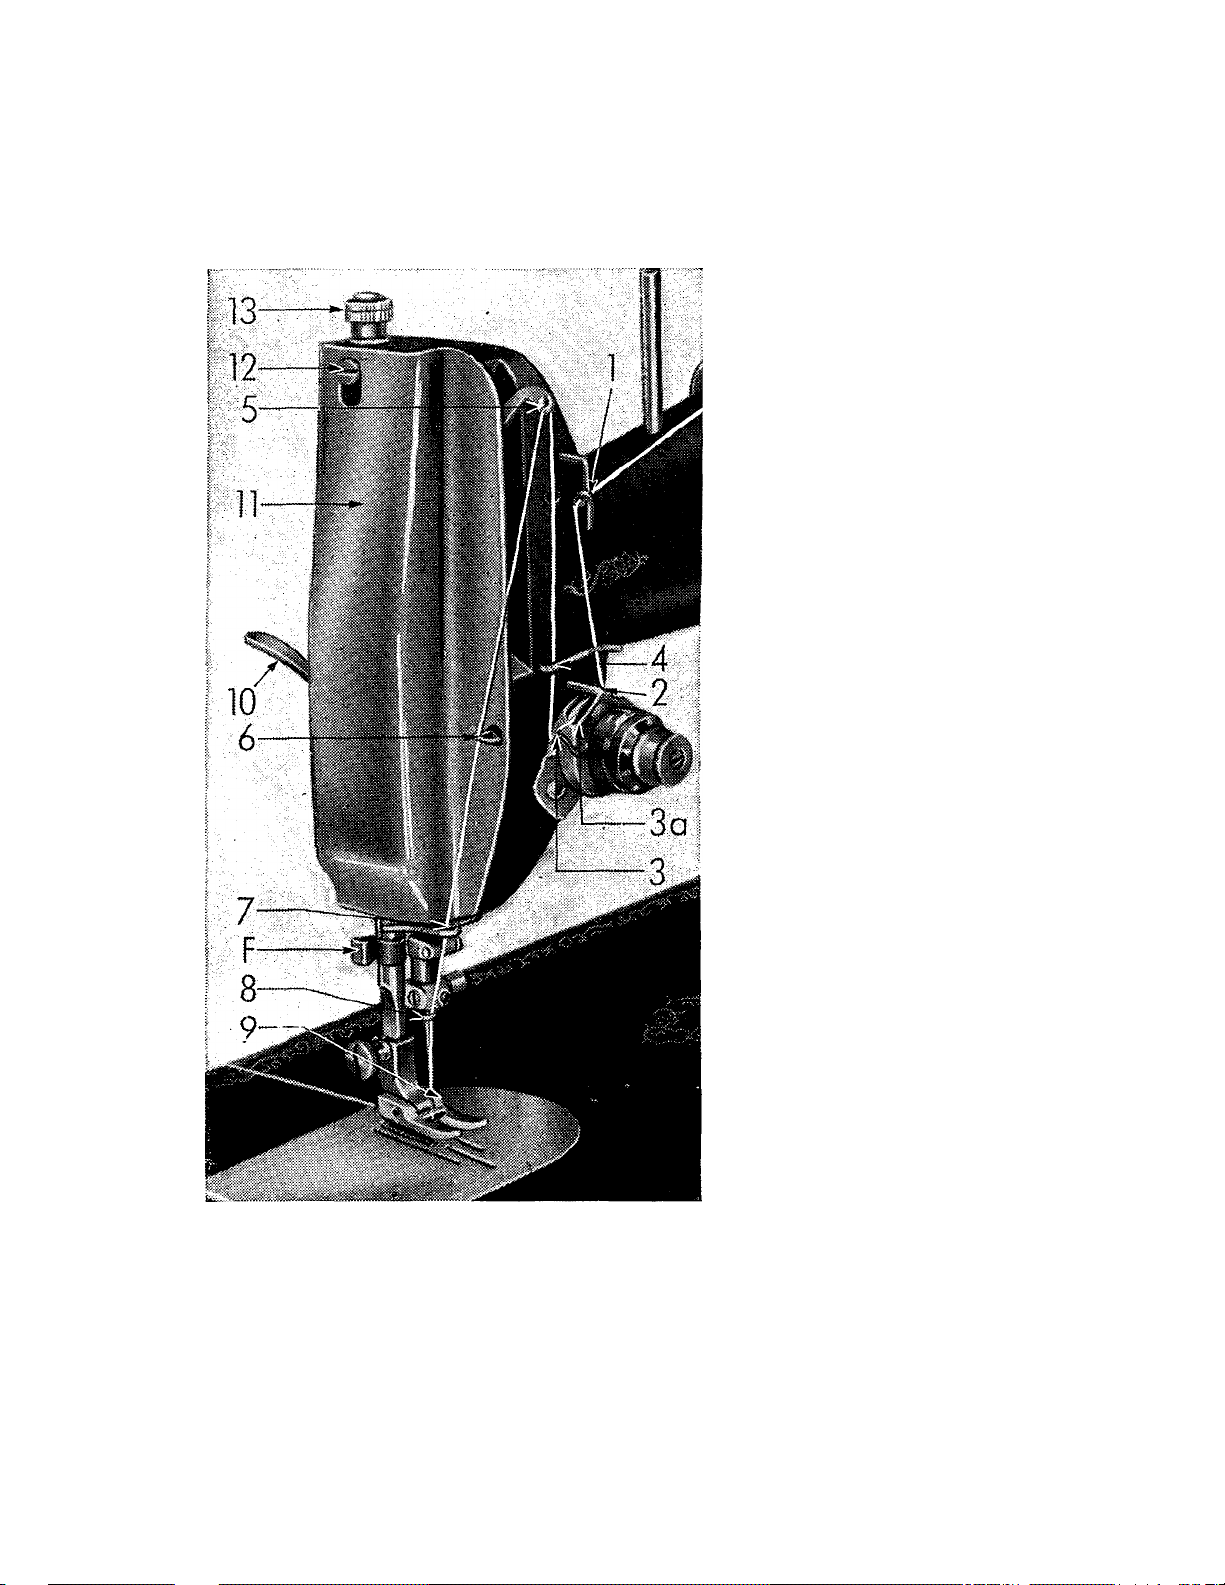
With the thread take-up lever (No. 5) and the presser
foot both in their highest positions, thread the needle
as follows: 1. From right to
left through the
thread guide 1.
2. Down and from
right to left be
tween the ten
sion discs 2.
3. From there lead
the thread down
and around and
upwards into the
loop of the takeup spring (3) and
Fig. 10 Upper Threading
7. Behind the guide 7.
pull the thread
taut until it slips
behind the small
retaining fork
(3 a), (see also
Fig. 22).
4. Upwards behind
the thread guide
No. 4.
5. From right to left
through the eye
of the take-up
lever No. 5.
6. Down through the
thread guide 6.
8. Through the thread guide 8, under the needle
clamp.
9. And from front to rear through the eye of the
needle 9.
16
Leave about 8 to 10 cm. (3 to 4 inches) of thread hang
out of the eye of the needle.
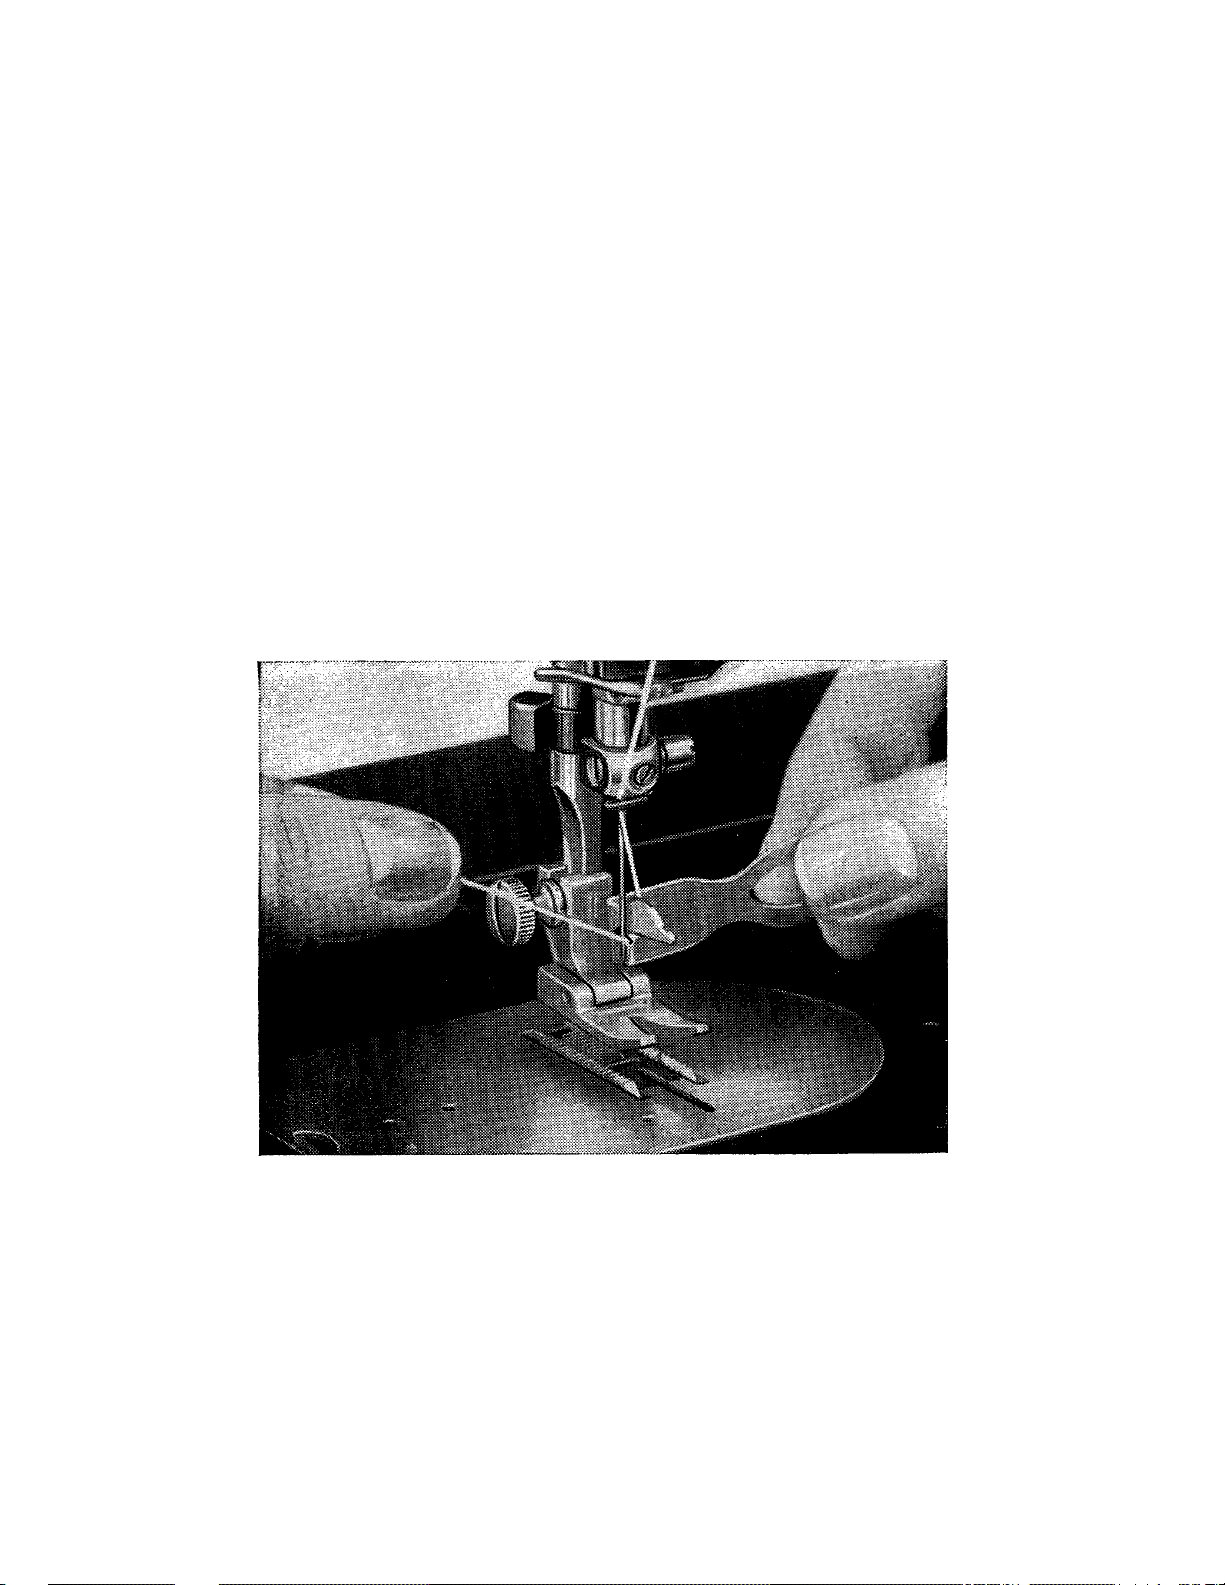
SINGER Threader (Fig. 11)
To thread the needle use the needle threader (No. 13,
Fig. 3). The presser foot is lowered and the needle bar
is raised to its highest point. Hold the needle threader
with the right hand so that it is behind the needle
and its hook is to the right of the needle and let the
hook of the threader slide down the short groove of
the needle until it slips into the eye of the needle.
Next, lead the hook as far as possible through the eye
of the needle, place the thread into the hook and hold
it as shown in Fig. 11.
Fig. 11 The Use of the SINGER Needle Threader
While holding the threader horizontally and lifting
slightly upward, draw the hook with the thread back
wards out of the needle eye until the end of the
thread is completely out of the hook. The needle is
now properly threaded.
17
Loading...