

Page 1
SHC 4342 SAÇ KESME MAK‹NASI
KULLANMA KILAVUZU
TR
EN
FR
NL
ES
RU
HR
HR
Page 2
G‹R‹fi
De¤erli Müflterimiz,
Ürün seçiminde S‹NBO'yu tercih etti¤iniz için teflekkür ederiz.
Uzun ve verimli bir kullan›m için cihaz› kullanmadan önce bu k›lavuzu
özellikle güvenlik talimatlar›na dikkat ederek okuman›z› ve devaml› suretle
saklaman›z› tavsiye ederiz.
Sayg›lar›m›zla,
Sinbo Küçük Ev Aletleri
- TEDAR‹KÇ‹ F‹RMA / EXPORTER United Favour Development Limited
Unit B, 10/F Lee May Building 788-790
Nathan Road, Mongkok, Kowloon, HK.
- UYGUNLUK BEYANI / CE Intertek Testing Services Hangzhou
16 No.1 Ave., Xiasha Economic Development
District,Hangzhou, China
Made in China
‹mal Y›l› : 2010
This appliance is not intended for use by persons (including children) with reduced physical, sensory
or mental capabilities, or lack of experience and knowledge, unless they have been given supervision
or instruction concerning use of the appliances by a person responsible for their safety. Children
should be supervised to ensure that they do not play with the appliance.
Bu ürün (çocuklar dahil ) fiziksel hassasiyeti az, zihinsel olarak yetersiz, deneyimsiz ve yeterli bilgiye
sahip olmadan yada kendilerinin güvenli¤inden sorumlu olan kifliler tarafından bu ürünü kullanmak
için gerekli talimatlar verilmemifl kiflilerin kullanımına uygun de¤ildir.
- 1 -
HZ10030050-001
EEE Yönetmeli¤ine uygundur.
Page 3
ÖNEML‹ GÜVENL‹K UYARILARI
• Bakım, Onarım ve Kullanımda Uyulması Gereken Kurallar
Elektrikli cihaz kullan›lmadan önce afla¤›da belirtilen temel güvenlik kurallar›na mutlaka
uyulmas› gerekmektedir:
UYARI! Ürünün üzerini kaplayan polietilen pofletler ya da ambalaj malzemeleri tehlikeli
olabilir. Bo¤ulma riskine neden olmamak için bunlar› bebeklerden ve çocuklardan uzak
tutunuz. Bu pofletler oyuncak de¤ildir.
• Cihaz› ›slanabilece¤i ya da içi su dolu lavabo ya da küvet gibi yerlere düflebilece¤i
konumlarda kullanmay›n›z ve saklamay›n›z.
• Bu cihaz yaln›zca kullan›m kitap盤›nda aç›klanan flekilde kullan›lmal›d›r. Bu k›lavuzu
baflvuru kayna¤› olarak saklay›n›z.
• Cihaz çal›fl›r durumdayken kesinlikle bafl›ndan ayr›lmay›n›z.
• Cihaz çal›fl›yorken kesinlikle bir zemin üzerine b›rakmay›n›z.
• Bu cihaz, cihaz hakk›nda deneyimi, bilgisi olmayan yetiflkinler ve çocuklar ya da engelli
kifliler taraf›ndan önceden bilgi verilmeksizin ve yeterli gözetim yap›lmaks›z›n
kullan›lmamal›d›r.
• Çocuklar›n cihazla oynamas›na engel olmak için yeterli gözetim yap›lmal›d›r.
• Cihaz› kulak ve göz gibi hassas noktalar›n yak›n›nda kullan›rken çok dikkatli olunmal›d›r.
• Cihaz temizlik ifllemine bafllanmadan önce ya da kullan›lmad›¤› zamanlarda mutlaka
kapal› duruma getirilip prizden ç›kar›lmal›d›r.
• Cihaz› kald›rmadan önce so¤umas›n› bekleyiniz.
• Cihaz› kulland›ktan sonra güç kablosunu cihaz›n etraf›na sarmay›n›z, aksi takdirde
kablo zarar görecektir. Bunun yerine kabloyu gevflek bir flekilde kendi üstünde sararak
cihaz›n yan›na b›rak›n›z.
• Bu cihaz, Elektromanyetik Uyumlulu¤a iliflkin 2004/108/EEC ve Ev Aletlerinin Elektriksel
Güvenli¤ine iliflkin 2006/95/CE say›l› Direktiflerin gerekliliklerine uygundur.
UYARI:
Cihaz› kullanmadan önce cihaz›n etiketinde yaz›l› olan voltaj›n evinizdeki tesisatla ayn›
de¤erlerde oldu¤undan emin olunuz.
Cihaz› k›sa bir süreli¤ine de olsa kullanmayacaksan›z kapal› duruma getiriniz.
Güç kablosunun ar›zalanmas› durumunda tehlikelerin önlenmesi için kablo üretici, servis
yetkilisi ya da benzer ehliyetli kifliler taraf›ndan de¤ifltirilmelidir.
Fifli tak›l› durumdaki cihaz› ›slak ellerle kullanmaya kalk›flmay›n›z (Elektrik floku tehlikesi!).
Bu saç kesme makinesi yaln›zca evde kullan›m için tasarlanm›flt›r!
TEKN‹K ÖZELL‹KLER
Güç Kayna¤›: AC230V, 50Hz
Güç: 10W
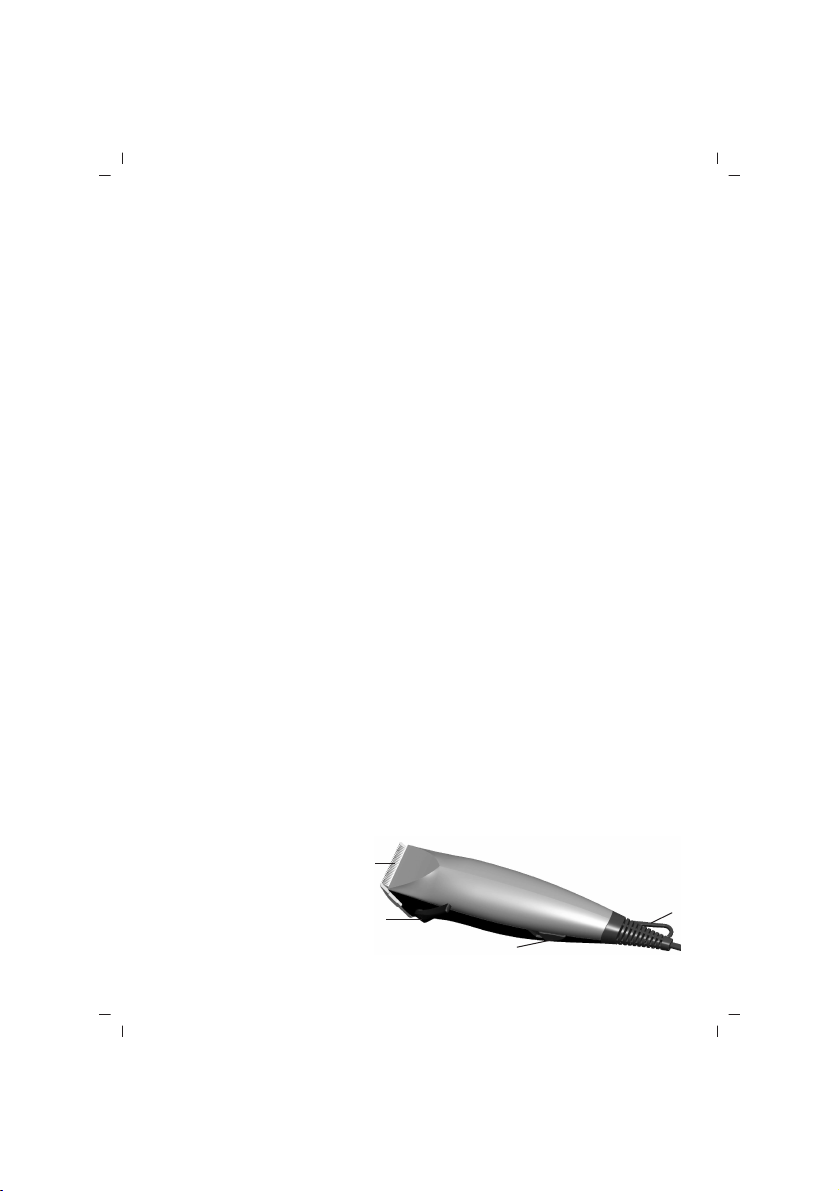
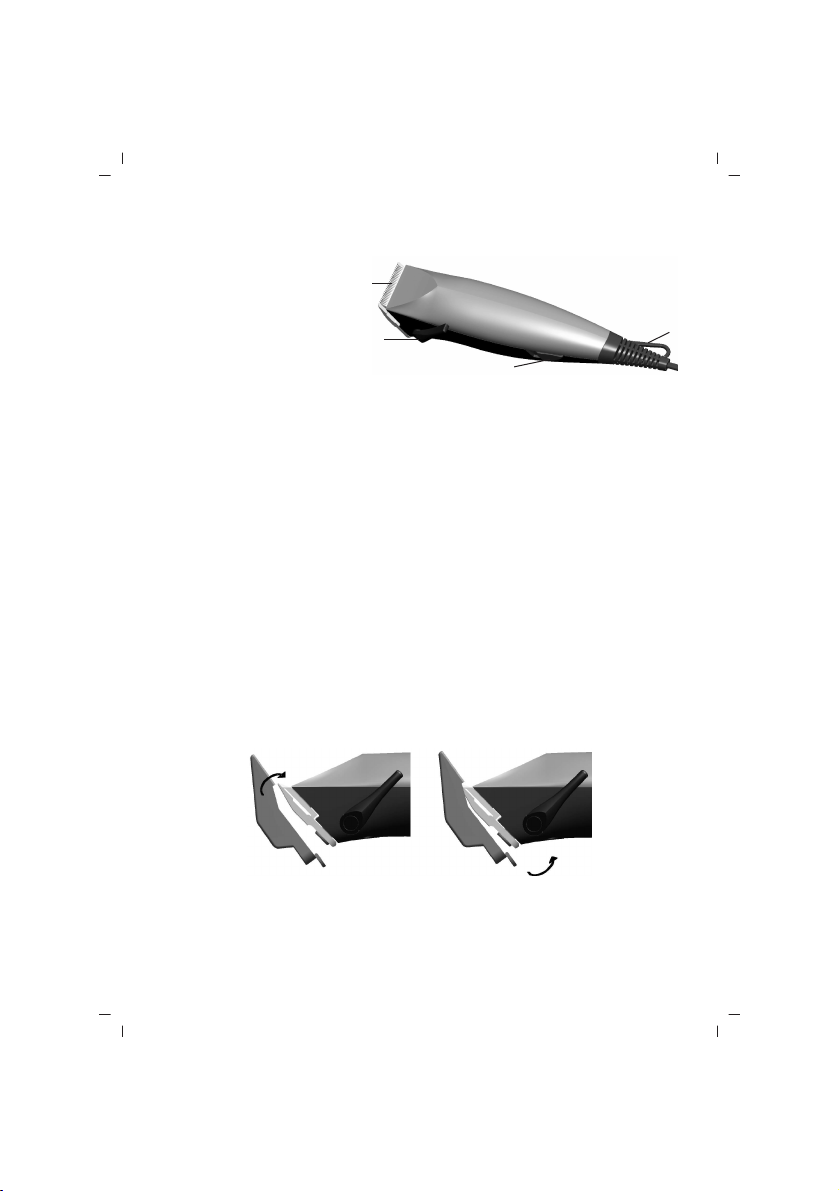
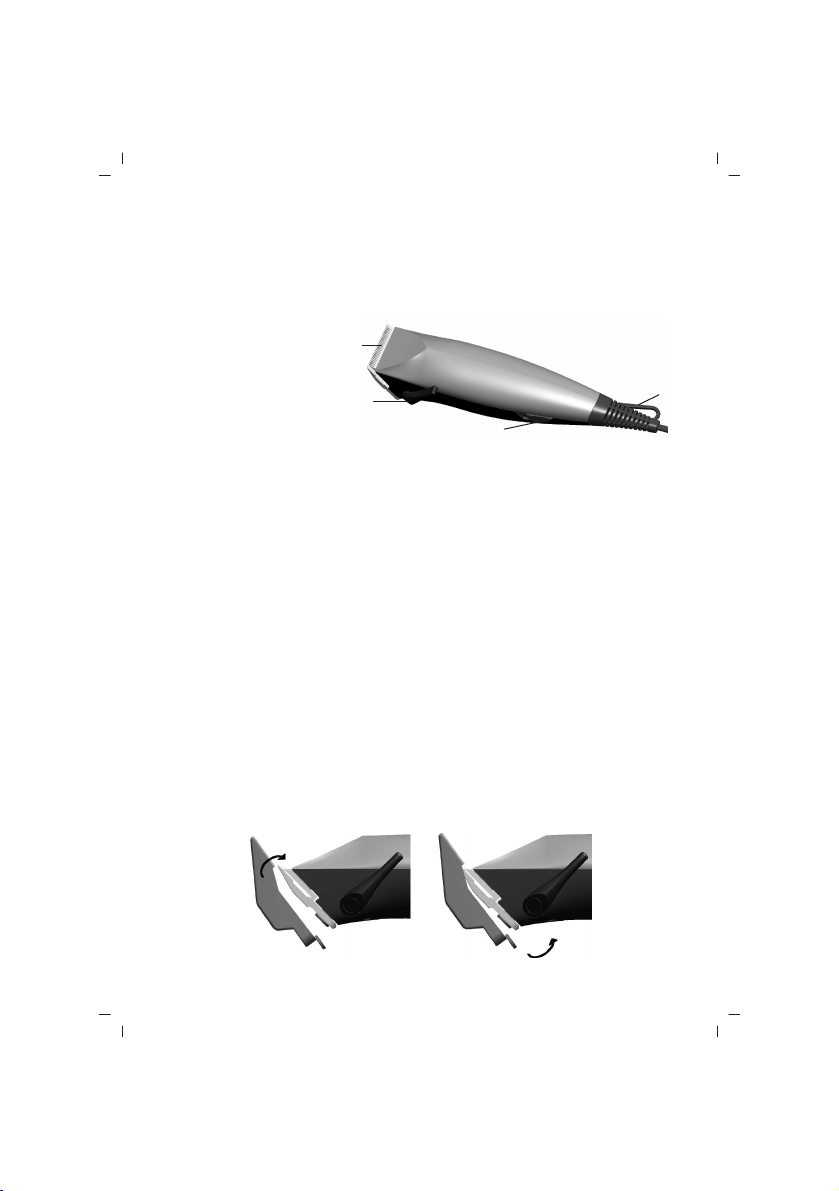
C‹HAZIN TANITIMI
1. Kesme Bafll›¤›
2. Ayar Kolu
3. AÇMA/KAPAMA Dü¤mesi
4. Ask› Kancas›
1
2
3
- 2 -
4
Page 4
C‹HAZIN KULLANIMI
• Ba¤lantı veya Montajın Nasıl Yapılaca¤ını Gösterir fiema ile Ba¤lantı veya Montajın
Kimin Tarafından Yapılaca¤ına (tüketici, yetkili servis) iliflkin bilgiler
Saç kesme makinesinin haz›rlanmas›:
Cihaz›n AÇMA/KAPAMA dü¤mesinin “KAPALI” konumda oldu¤undan emin olunuz. Kabloyu
aç›n›z ve uygun bir prize tak›n›z (230V~).
Saç kesme makinesinin kullan›lmas›:
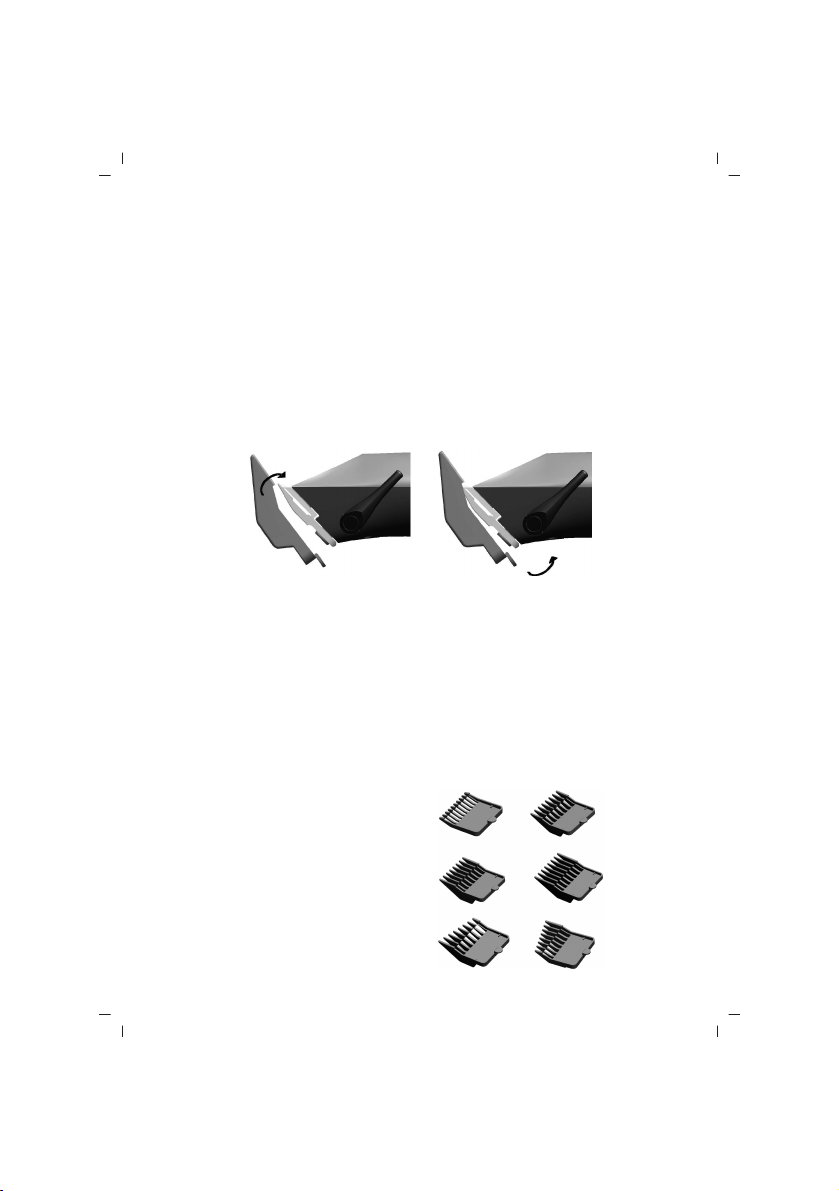
Kesilecek saçlar›n kuru ve temiz olmas› gerekir. Saçlar› f›rçalayarak aç›lmalar›n› sa¤lay›n›z.
Tarak aparat›n› kesme bafll›¤›na difller yukar›ya bakacak biçimde tak›n›z ve mandal›,
kesme bafll›¤›n›n alt metal ucuna bast›r›n›z (afla¤›daki çizimlere bak›n›z). Saç kesimine
bafllamadan önce aksesuar›n yerine oturdu¤undan emin olunuz.
Cihaz›, AÇMA/KAPAMA dü¤mesini yukar› do¤ru (“AÇIK” konum) iterek çal›flt›r›n›z. Tarak
aparatlar›na al›flmak için ilk önce küçük bir alan› kesmenizi tavsiye ederiz. ‹flleme uzun
tarakla bafllay›p daha sonra gerekti¤i takdirde k›sa tara¤a geçebilirsiniz. Alt› adet tarak
aparat› sayesinde 3 ila 13 mm uzunluklar›nda kesim yap›labilir. Cihaz› saçlar›n ç›k›fl
yönünün tersine do¤ru yavaflça hareket ettiriniz. Makineyi tarak aparat› mümkün oldu¤unca
düz olacak flekilde tutunuz.
Saçlar›, aparat› de¤ifltirmeden k›saltmak için ek esneklik sa¤lamas› amac›yla ayar kolunu
kullanabilirsiniz. Tarak aparat›n› ç›kararak makineyi ense gibi saçlar›n k›sa kesilmesi
gereken yerlerde taraks›z olarak kullanabilirsiniz. Cihaz› kulland›ktan sonra AÇMA/KAPAMA
dü¤mesini afla¤› do¤ru (“KAPALI” konum) iterek cihaz› durdurunuz.
Cihaz› kolay bir flekilde muhafaza etmek için asma kancas›n› kullanabilirsiniz.
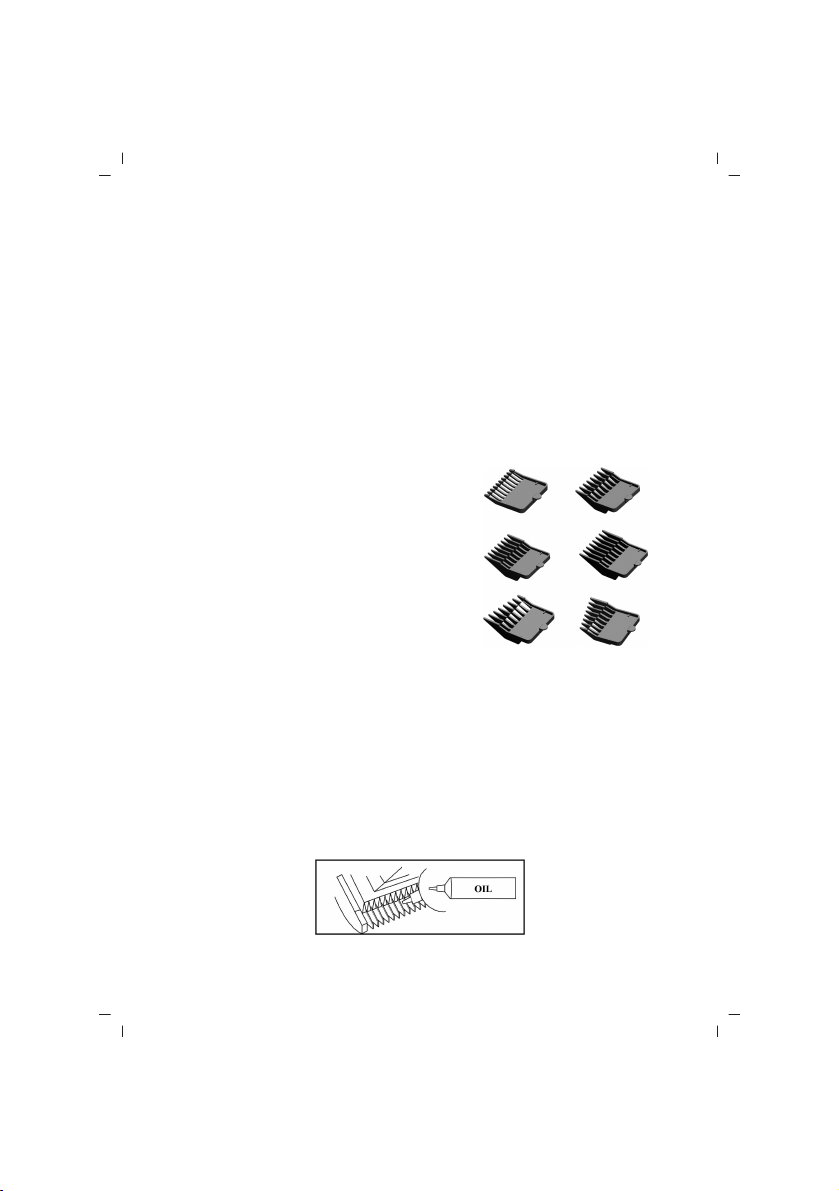
TARAK APARATLARI
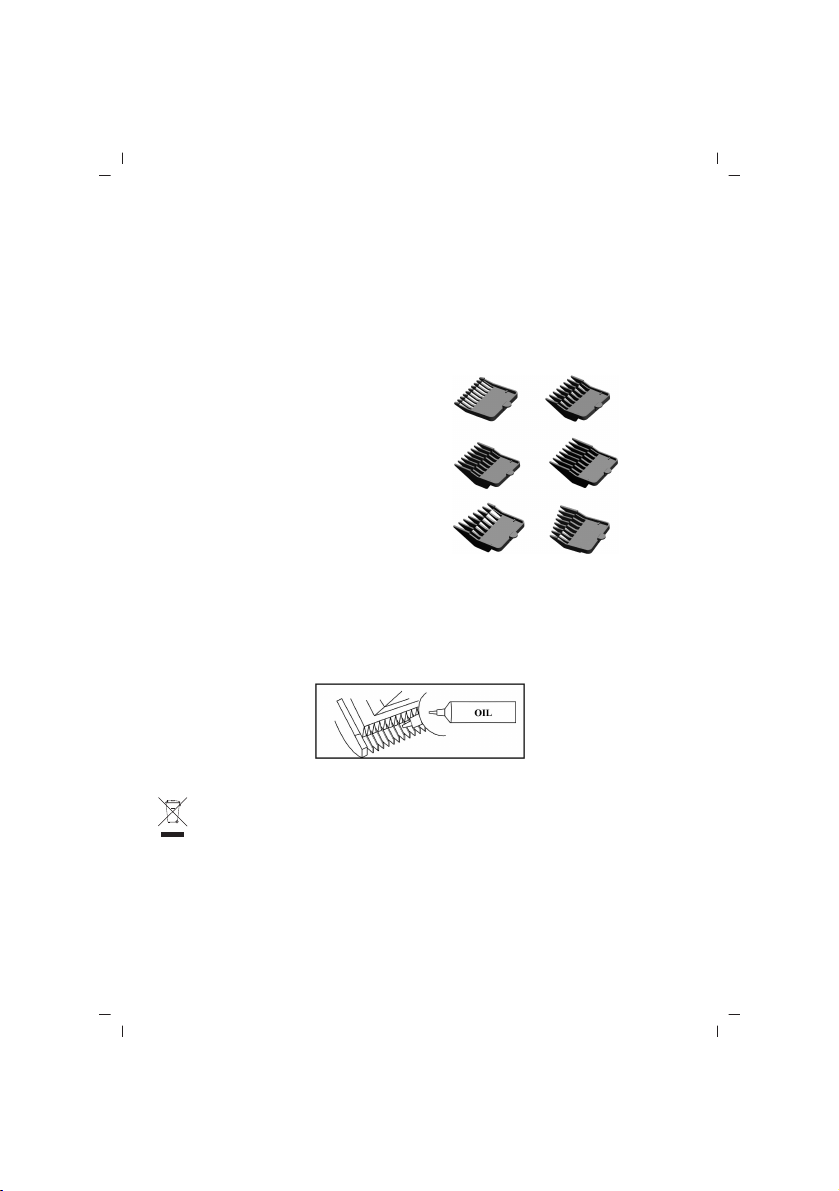
6 tarak aparat› seçene¤i bulunmaktad›r:
1 = 1/8”: 3,0mm kesme uzunlu¤u
2 = 1/4” 6,0mm kesme uzunlu¤u
3 = 3/8”: 9,0mm kesme uzunlu¤u
4 = 1/2”: 13,0mm kesme uzunlu¤u
5/6 = Yanal kademeli kesim tara¤›
1 2
3 4
5 6
- 3 -
Page 5
KULLANIM HATALARINA ‹L‹fiK‹N B‹LG‹LER
Cihazınızı, beyan edilen voltaj ile çal›flt›r›n›z.Bulundu¤unuz yerin voltaj›n›n uygun olup
olmad›¤›n› kontrol ediniz.
Güç kablosunun ar›zalanmas› durumunda tehlikelerin önlenmesi için kablo üretici, servis
merkezi ya da benzer bir ehliyetli kifli taraf›ndan de¤ifltirilmelidir. Ar›za durumunda cihaz›
kendiniz sökmeye kalk›flmay›n›z, bak›m merkezimiz ya da sat›fl sonras› hizmet merkezimiz
ile ba¤lant›ya geçiniz.
Cihaz› kendiniz onarmaya kalk›flmay›n›z. Meydana gelebilecek ar›zalardan firmam›z
kesinlikle sorumlu de¤ildir, ve cihaz›n›z garanti kapsam› d›fl›nda ifllem görecektir.
TAfiIMA VE NAKL‹YE ESNASINDA
• Ürünü düflürmeyiniz,
• Darbelere maruz kalmamas›n› sa¤lay›n›z,
• S›k›flmamas›n›, ezilmemesini sa¤lay›n›z,
• Ambalaj üzerindeki iflaretlemelere uyunuz.
• Orjinal ambalajıyla taflımaya özen gösteriniz.
ÇEVRE VE ‹NSAN SA⁄LI⁄I
Çevre korumas›na siz de katk›da bulunabilirsiniz!
Lütfen yerel düzenlemelere uymay› unutmay›n: Çal›flmayan
elektrikli cihazlar›, uygun elden ç›karma merkezlerine götürün.
Kullanım sırasında insan ve çevre sa¤lı¤ına tehlikeli veya zararlı olabilecek bir durum
söz konusu de¤ildir.
TEM‹ZL‹K VE BAKIM
• Tüketicinin Kendi Yapabilece¤i Bakım, Onarım veya Ürünün Temizli¤ine ‹liflkin Bilgiler
Cihaz› kapal› duruma getiriniz, fiflini çekiniz ve tak›l›ysa tarak aparat›n› ç›kar›n›z.
Kesme bafll›¤›n›n üstünde kalan saç kal›nt›lar›n› f›rçalayarak temizleyiniz.
Kesme bafll›¤›n› kesinlikle su ya da t›bbi alkol d›fl›ndaki bir s›v›yla temizlemeye
kalk›flmay›n›z.
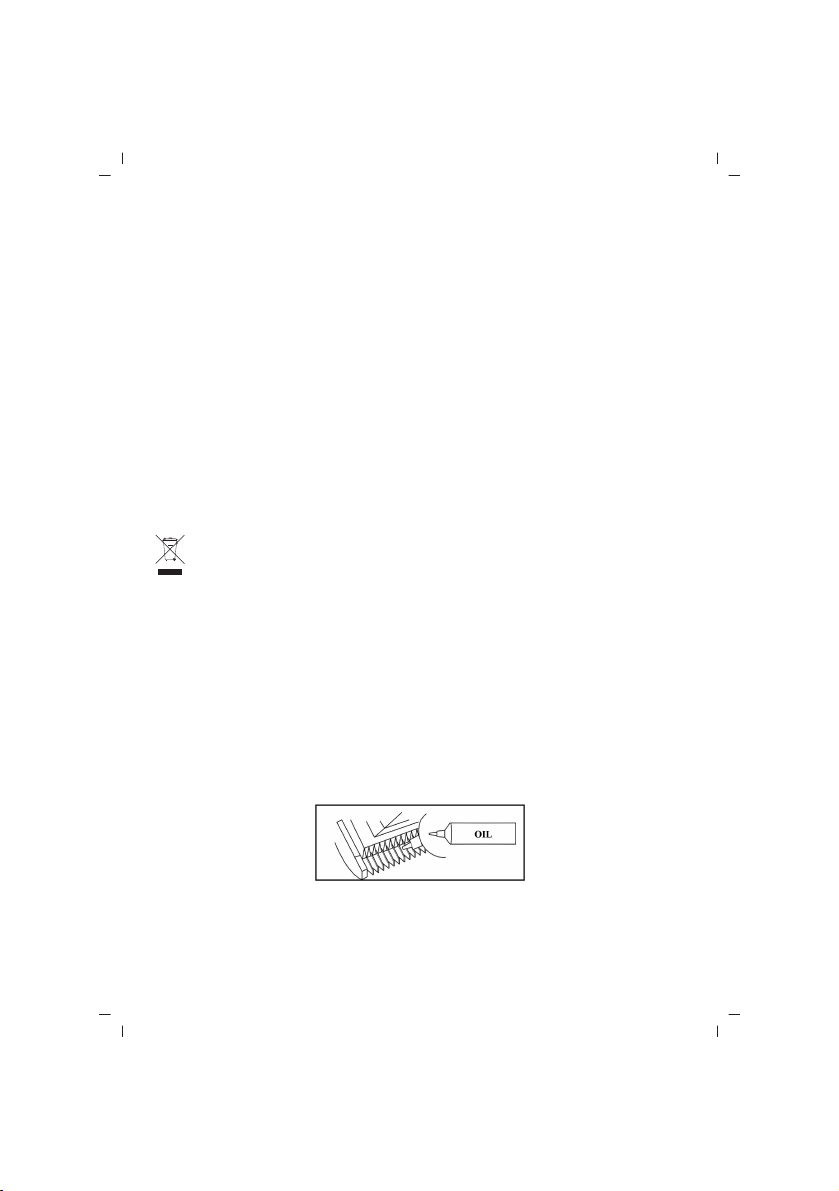
Kesme bafll›¤› düzenli olarak kullan›l›yorsa arada ya¤lanmal›d›r (afla¤›daki çizime bak›n›z).
Yaln›zca dikifl makinesi ya¤› gibi asit içermeyen bir ya¤ kullan›n›z. Fazla ya¤› bir bez
parças›yla silerek gideriniz.
• Periyodik Bakım Gerektirmesi Durumunda, Periyodik Bakımın Yapılaca¤ı Zaman
Aralıkları ile Kimin Tarafından Yapılması Gerekti¤ine ‹liflkin Bilgiler
Cihaz düzenli olarak her kullanımdan sonra mutlaka temizlenmelidir.
Kesme bafll›¤› düzenli olarak kullan›l›yorsa arada ya¤lanmal›d›r.
- 4 -
Page 6
ENGLISH
INSTRUCTION MANUAL
TECHNICAL DATA
Operated input: AC230V, 50Hz
Power: 10W
KNOW YOU PRODUCTION
1. Cutting Head
2. Adjustment Lever
3. ON/OFF Switch
4. Hanging Loop
NOTICE:
Do not switch on before checking that voltage on the specifications plates is the same
as that in your home;
Switch off when not in use, even if for a moment;
If the supply cord is damaged, it must be replaced by the manufacturer of its service
agent or a similarly qualified person in order to avoid a hazard.
you never use the appliance with damp hands when plugged in (Danger of electric shock!).
The hair clipper only used for household!
HOW TO USE
Preparing the hair clipper:
Ensure that the ON/OFF switch of the device is set to “OFF”. Unroll the cord and insert
the plug in a suitable socket (230V~).
Operating the hair clipper:
The fur to be cut must be dry and clean. Brush the fur carefully to remove any knots. Put
the comb attachment required on the cutting head with the tines pointing upwards and
press the lug into the lower metal edge of cutting head (see illustrations below).
1
2
3
4
Switch the appliance on by moving the ON/OFF switch upwards (“ON” position). We
recommend to trim a small area first to familiarize yourself with the individual comb
attachments. Start with a comb for long fur. Thereafter, use shorter combs if necessary.
The six comb attachments enable cutting lengths between 3 and 13 mm. Move the
appliance slowly and against growth direction through the fur. Hold the clipper in such
- 5 -
Page 7
HOW TO USE
a way that the comb attachment lies as flat as possible.
Use the adjustment lever for additional flexibility allowing you to shorten hair gradually
without changing the attachment. By removing the respective comb attachment, i.e. using
the cutting head without any comb you trim clear contours. Please switch off the appliance
immediately after use by moving the ON/OFF switch downwards (“OFF” position).
You can use the hanging loop at the cord for easy storage.
COMB ATTACHMENT
You can choose between 6 comb attachments:
1 = 1/8”: 3.0mm cutting length
2 = 1/4” 6.0mm cutting length
3 = 3/8”: 9.0mm cutting length
4 = 1/2”: 13.0mm cutting length
1 2
3 4
5/6 = Combs for lateral stair cut
CLEANING, CARE AND DISPOSAL
Cleaning the hair clipper:
Switch the appliance off, unplug it and remove the respective comb attachment if set on.
Use the cleaning brush included to remove any residual hair from the cutting head.
Do not clean the cutting head with water or any other fluid except medical alcohol.
Upon regular use, the cutting head should be occasionally oiled (see illustrations below).
Use only acid-free oil, e.g. sewing machine oil. Wipe off excess oil with a piece of cloth.
DISPOSAL:
Do not dispose the appliance via the normal household refuse. Contact your city
or local authority to find out about the proper, environmentally friendly disposal
of the appliance (“electric rubbish”).
SAFETY CAUTIONS
WARNING! Polythene bags over the product or packaging may be dangerous. To avoid
danger of suffocation, keep away from babies and children. These bags are not toys.
• Do not use or leave the appliance where it can become wet or where there is a danger
of it falling into basins or other vessels containing water.
• This appliance should only be used as described within this instruction book. Please
retain for reference.
5 6
- 6 -
Page 8

SAFETY CAUTIONS
• Do not leave the appliance unattended when switched on.
• Do not place the appliance on any surface whilst in operation.
• This appliance should not be used by adults or children whose lack of experience,
product knowledge or disability might cause a hazard, unless they have been correctly
instructed and are adequately supervised.
• Children should always be supervised to ensure that they do not play with this product.
• Special care is required when using the appliance close to the ears, eyes and face.
• Always switch off and unplug the appliance when cleaning or when not in use.
• Allow the appliance to cool before storing away.
• After use, do not coil the cord around the appliance as this may cause damage to the
cord. Instead, coil the cord loosely by the side of the appliance.
•This appliance complies with the requirements of Directives 04/108/EEC (Electromagnetic
Compatibility) and 06/95/CE (Electrical Safety of Domestic Appliances).
- 7 -
Page 9
FRANÇAIS
MODE D’EMPLOI
DONNÉES TECHNIQUES
Source d’alimentation: AC230V, 50Hz
Puissance: 10W
Prenez connaissance de
votre appareil
1. Tête de coupe
2. Manche d’ajustement
3. Bouton de Marche/Arrêt
4. Crochet de suspension
AVERTISSEMENT :
Avant de brancher l’appareil à la source d’alimentation, assurez-vous que le niveau de
voltage indiqué sur l’étiquette de l’appareil corresponde à celui de votre résidence.
Positionnez l’appareil sur « arrêt » lorsque vous n’allez pas l’utiliser, même si cela est
pour une courte durée. En cas de dysfonctionnement du cordon d’alimentation, afin
d’éviter les dangers ; le cordon doit être remplacé par le fabricant, l’autorisé de service
ou une personne similaire autorisée.
Ne tentez pas d’utiliser l’appareil avec les mains mouillées lorsque l’appareil est en état
branché. (Danger de choc électrique!).
Cette tondeuse à cheveux est destinée uniquement à l’usage domestique!
EMPLOI
Préparation de la tondeuse à cheveux:
Assurez-vous que le bouton de Marche/Arrêt de l’appareil est positionné sur « arrêt ».
Déroulez le cordon et branchez-la à une prise adéquate. (230V~).
Utilisation de la tondeuse à cheveux:
Les cheveux qui vont être coupés doivent être secs et propres. Brossez les cheveux pour
les démêler. Installez l’outil de peigne de façon à ce que les dents soient face vers le
haut et appuyez sur le bout en métal de la tête de coupe d’oreille (voir les illustrations
ci-dessous). Assurez-vous que l’accessoire est bien installé à sa place avant de commencer
à couper les cheveux.
1
2
3
4
Mettez l’appareil en marche en poussant le bouton de Marche/Arrêt vers le haut (position
- 8 -
Page 10
EMPLOI
de « Marche »). Pour vous habituer aux outils de peignes, nous vous conseillons de
couper d’abord une petite surface. Vous pouvez vous mettre à l’opération en commençant
avec le peigne long et passer au peigne court si nécessaire. Une coupe à des longueurs
de 3 à 13 mm peut s’effectuer grâce à six pièces d’outils. Mouvez doucement l’appareil
dans le sens opposé du sens vers le quel les cheveux poussent. Saisissez la machine de
façon à ce que l’outil de peigne soit le plus droit possible.
Pour raccourcir les cheveux sans changer l’outil vous pouvez vous servir de la manche
d’ajustement en vue d’obtenir une souplesse supplémentaire. Vous pouvez utiliser
l’appareil sans peigne en enlevant l’outil de peigne pour les endroits où les cheveux
doivent être coupés court comme la tête. Arrêtez l’appareil en poussant le bouton de
Marche/Arrêt vers le bas (position de « arrêt ») après avoir utilisé l’appareil.
Pour ranger l’appareil facilement vous pouvez utiliser le crochet de suspension.
OUTIL DE PEIGNE
Il se trouve 6 choix d’outils de peigne :
1 = 1/8”: 3,0mm de longueur de coupe
2 = 1/4” 6,0mm de longueur de coupe
3 = 3/8”: 9,0mm de longueur de coupe
4 = 1/2”: 13,0mm de longueur de coupe
5/6 = Peigne de coupe à échelon latéral
NETTOYAGE, ENTRETIEN ET REMISE AU REBUT
Nettoyage de la tondeuse à cheveux:
Positionnez l’appareil sur « arrêt », débranchez la fiche électrique et démontez l’outil
de peigne si monté.
Nettoyez les restes de cheveux sur la tête de coupe en la brossant.
Ne tentez jamais de nettoyer la tête de coupe avec un liquide autre que l’eau ou l’alcool
médical.
Si la tête de coupe est utilisée régulièrement, elle doit être lubrifiée de temps en temps.
(Voir l’illustration ci-dessous).
Utilisez uniquement un lubrifiant ne contenant pas d’acide comme par exemple celle
pour les machines à coudre. Éliminez l’huile qui est de trop en essuyant avec un morceau
de tissu.
1 2
3 4
5 6
- 9 -
Page 11

MISE AU REBUT
Ne vous défaites pas de cet appareil comme d’une ordure ménagère normale.
Mettez-vous en contact avec la mairie de la ville ou de l’arrondissement pour
éliminer les déchets d’appareils électriques de façon plus la plus correcte et
sans nuire à l’environnement.
CONSIGNES DE SÉCURITÉ
AVERTISSEMENT! Les pochettes qui enveloppent le dessus du produit et les matériels
d’emballage peuvent être dangereux. Pour éviter de causer des risques de suffocation,
tenez ceux-là hors de la portée des enfants. Ces pochettes ne sont pas des jouets.
• N’utilisez pas ou ne conservez pas l’appareil à des positions aux quelles l’appareil peut
se mouiller ou tomber dans des lavabos ou des baignoires remplis d’eau.
• Cet appareil doit être utilisé uniquement tel que décrit dans le mode d’emploi. Gardez
ce manuel pour une consultation future.
• Ne vous absentez jamais du lieu où l’appareil se trouve lorsqu’il est en marche.
• Ne posez jamais l’appareil sur une surface lorsque l’appareil est en marche.
• Cet appareil n’est pas prévu pour être utilisé par des personnes (y compris les enfants)
dont les capacités physiques, sensorielles ou mentales sont réduites, ou des personnes
dénuées d’expérience ou de connaissance, sauf si elles ont pu bénéficier, par l’intermédiaire
d’une personne responsable de leur sécurité, d’une surveillance ou d’instructions
préalables concernant l’utilisation de l’appareil.
• Il convient de bien surveiller les enfants pour s’assurer qu’ils ne jouent pas avec
l’appareil.
• Vous devez être très prudent pendant que vous utilisez l’appareil près des points
sensibles comme l’oreille, l’œil et le visage.
• Positionnez absolument l’appareil sur « arrêt » et débranchez-le avant de commencer
à l’opération de nettoyage ou pendant que vous ne faites pas usage de l’appareil.
• Attendez que l’appareil refroidisse avant de le ranger.
• N’enroulez pas le cordon d’alimentation autour de l’appareil après avoir utilisé l’appareil,
sinon le cordon s’endommagera. Au lieu de cela vous pouvez enrouler le cordon de façon
relâchée autour de lui-même et le poser à côté de l’appareil.
• Cet appareil est conforme aux nécessités des Directifs numéros 2004/108/EEC relatifs
à la Conformité Électromagnétique et numéros 2006/95/CE relatifs à la Sécurité Électrique
des Appareils Ménagers.
- 10 -
Page 12

NEDERLANDS
GEBRUIKSHANDLEIDING
TECHNISCHE SPECIFICATIES
Stroombron: AC230V, 50Hz
Vermogen: 10W
LEER UW APPARAAT KENNEN
1. Trimkop
2. Hendel voor het bijregelen
van de trimlengte
3. AAN/UIT schakelknop
4. Ophangoogje
OPGELET:
Controleer voordat u het apparaat in gebruik neemt, of de voltage op het typeplaatje
overeenkomt met de plaatselijke netspanning.
Schakel altijd het apparaat uit als u het niet gebruikt, al is het maar eventjes.
Ingeval het snoer beschadigd of defect is moet het om alle gevaar te vermijden, worden
vervangen door de kabelfabrikant, een bevoegde Service of geschoold vakman.
Raak het apparaat niet aan met natte handen als de stekker in het stopcontact zit (Gevaar
van elektrische schok!).
Dit apparaat voor het knippen van mensenhaar is uitsluitend bestemd voor persoonlijk
gebruik!
GEBRUIK
De haartrimmer voorbereiden voor gebruik
Vergewis u ervan de dat de schakelknop zich in “UIT” stand bevindt. Steek de stekker
in het stopcontact (230V~).
Gebruik van de haartrimmer:
Het haar dat u gaat knippen moet rein en droog zijn. Borstel het haar uit voordat u gaat
knippen. Bevestig de opzetkam met de tanden naar boven gericht door hem op het
metalen onderuiteinde van de oortrimkop te drukken (zie afbeeldingen onderaan).
Controleer of het accessoir degelijk is aangebracht vooraleer u het haar begint te knippen.
1
2
3
4
Druk de schakelknop naar boven in de “AAN” stand om het apparaat in werking te zetten.
Om aan de opzetkammen te wennen raden wij u aan te beginnen met het knippen van
- 11 -
Page 13

GEBRUIK
een kleine oppervlakte. U kunt beginnen knippen met de lange kam en zo nodig op de
kortere kam overschakelen. De zes meegeleverde opzetkammen zullen u toelaten het
haar egaal te knippen op de gewenste lengte tussen 3 en 13 mm. Beweeg het apparaat
voorzichtig over het hoofd in tegengestelde richting van de haargroei. Houd daarbij het
apparaat zo recht mogelijk voor zover de kam dit toelaat.
Tijdens het trimmen kunt u door de hendel te verstellen de kniplengte bijregelen zonder
de opzetkam te verwisselen. Verwijder de opzetkam en gebruik het apparaat zonder kam
op de plaatsen waar het haar heel kort moet worden geknipt, bv. boven op de hoofd. Druk
de schakelknop naar beneden toe in “UIT” stand om het apparaat uit te schakelen.
Het apparaat is voorzien van een handig ophangoog zodat u het eenvoudig aan een haakje
kunt opbergen.
OPZETKAMMEN
U hebt de keuze tussen 6 meegeleverde opzetkammen:
1 = 1/8”: 3,0 mm kniplengte
2 = 1/4”: 6,0 mm kniplengte
3 = 3/8”: 9,0 mm kniplengte
4 = 1/2”: 13,0 mm kniplengte
5/6 = Verstelbare zijkammen
REINIGING, ONDERHOUD EN AFVOER
Reiniging van de haartrimmer:
Schakel het apparaat uit, neem de stekker uit het stopcontact en verwijder de eventueel
aangebrachte opzetkam.
Borstel de achtergebleven haartjes van de trimkop.
Reinig de trimkop nooit met een ander product dan water of medische alcohol.
Als u het apparaat frequent gebruikt moet de trimkop regelmatig worden geolied (zie
afbeelding onderaan).
Gebruik hiervoor naaimachine olie of een gelijkaardige olie die geen zuren bevat. Verwijder
de overtollige olie en wrijf schoon met een doek.
1 2
3 4
5 6
Afvoer:
Dit apparaat mag niet met de gewone huisafval worden afgevoerd. Contacteer de
gemeentelijke autoriteiten om informatie in te winnen omtrent plaatselijke
voorschriften voor correcte, milieuvriendelijke afvoer van afgedankte elektrische
huishoudelijke apparaten.
- 12 -
Page 14

VEILIGHEIDSVOORSCHRIFTEN
OPGELET! Polyethyleen zakken en ander verpakkingsmateriaal van dit product kunnen
gevaar opleveren. Houd ze buiten het bereik van baby’s en kleine kinderen om
verstikkingsgevaar te voorkomen. Deze zakken zijn geen speelgoed.
• Gebruik of bewaar het product niet op plaatsen waar het nat kan worden of vanwaar
het in een met water gevulde lavabo, badkuip of dergelijke zou kunnen vallen.
• Dit apparaat mag alleen gebruikt worden voor het bestemde doel, op de wijze uiteengezet
in de gebruikshandleiding. Bewaar de handleiding zorgvuldig als naslagbron.
• Laat het apparaat nooit onbeheerd achter terwijl het in werking is.
• Leg het apparaat nooit ergens neer terwijl het in werking is.
• Dit apparaat mag niet gebruikt worden door kinderen en gehandicapten met gebrek
aan kennis en ervaring tenzij onder toezicht en leiding van een persoon die verantwoordelijk
is voor het veilig gebruik.
• Houd voldoende toezicht om te beletten dat kinderen met het apparaat gaan spelen.
• Wees voorzichtig als u het apparaat gebruikt nabij mond, oren, ogen of andere gevoelige
lichaamsdelen.
• Schakel het apparaat uit en neem de stekker uit het stopcontact als het apparaat niet
gebruikt wordt en voordat u het gaat reinigen.
• Wacht met opbergen tot het apparaat volledig is afgekoeld.
• Wikkel na gebruik het snoer niet om het apparaat want hierdoor kan het worden
beschadigd. Rol in de plaats daarvan het snoer losjes op en berg het op naast het
apparaat.
• Dit apparaat voldoet aan de vereisten van de Europese richtlijnen inzake
Elektromagnetische Velden 2004/108/EC en Beveiliging van Elektrische huishoudelijke
apparaten 2006/95/EC.
- 13 -
Page 15

ESPANOL
GUÍA DEL USO
DATOS TÉCNICOS:
FUENTE DE ENERGÍA: AC230V, 50Hz
ENERGÍA: 10W
INTRODUCIR SU MÁQUINA.
1. Cabeza de cortar
2. Brazo de configuración
3. Botón de Abrir/Apagar
4. Gancho
AVISO
Antes de utilizar la máquina tiene que estar seguro que los voltajes de su casa y la
máquina son los mismos.
Si no se va a utilizar la máquina por un tiempo lleva la máquina a la posición de apagada.
Si el cable de energía se avería para evitar los peligros el cable se debe cambiar por el
fabricante, competente del servicio o persona cualificada similar.
No intente utilizar la máquina enchufada por sus manos mojadas. (Peligro choque de
electricidad)
Esta máquina de cortar pelos se ha diseñado solo para el uso domestico.
USO
Preparación de la máquina de cortar los pelos:
Tiene que estar seguro que el botón de ABRIR/APAGAR está apagado. Abre el cable y
enchufe. (230V~)
Usar la máquina de cortar los pelos:
Los pelos se deben ser seco y limpios. Suministre abrir los pelos por cepillar. Fije el
aparato de peine como sus dientes miran arriba y empuje el extremo inferior del aparato
de cortar la oreja (mire las figuras siguientes). Antes de empezar a cortar los pelos de
tiene que estar seguro que el aparato está fijado.
1
2
3
4
Haga funcionar la máquina por empujar el botón de ABRIR/APAGAR hacia arriba (posición
“ABIERTO). Para acostumbrar los aparatos de peine primero recomendamos cortar una
pieza pequeña). Empieza al proceso por el peine largo y luego si se necesita se puede
- 14 -
Page 16

RECOMMENDATIONS
pasar al peine corto. Mediante seis aparatos de peine se puede hacer corte entre 3 y
13mm. Haga mover la máquina lentamente hacia contra la dirección de la salida de los
pelos. Coge la máquina como el aparato de peine será recto más posible.
Para cortar los pelos sin cambiar el aparato por el objeto de suministrar elasticidad
adicional puede utilizar el brazo de configuración. Puede utilizar la máquina sin peine
en los lugares que se necesitan cortar los pelos como de la cabeza por desmontar el
aparato de peine. Después de utilizar la máquina haga parar la máquina por empujar el
botón de ABRIR/APAGAR hacia abajo (posición de “APAGADO”).
Para guardar la máquina fácilmente puede utilizar el gancho.
APARATO DE PEINE
Hay 6 aparatos de peine:
1= 1/8”: 3,0mm longitud de cortar
2= 1/4" 6,00mm longitud de cortar
3= 3/8” 9,00mm longitud de cortar
4= 1/2” 13,00mm longitud de cortar
5/6= Peine de cortar con etapa lateral
LIMPIEZA, MANTENIMIENTO Y TIRAR LA MÁQUINA
Limpieza de la máquina de cortar el pelo:
Lleve la máquina a la posición de apagada, desenchufe y desmonte el aparato de peine.
Limpie los residuos de pelo que se quedan encima de la cabeza de cortar por cepillar.
No intente limpiar la cabeza de cortar con los líquidos excepto agua o alcohol médico.
Si se utiliza la cabeza de cortar regularmente se debe aceitar a veces. (Mire la figura
siguiente)
Solo utilice un aceite sin acide como aceite de máquina. Limpie el aceite excesivo por
un paño.
1 2
3 4
5 6
Tirar la máquina:
No tire esta máquina con los residuos domésticos. Para tirar las máquinas
residuales eléctricas correctamente y sin dañar al medioambiente conecta a su
ayuntamiento.
- 15 -
Page 17

AVIOS DE LA SEGURIDAD
AVISO: Los materiales de embalaje o bolsas de polietileno que cierre la parte superior
del producto pueden ser peligrosos. Para evitar el riesgo de estrangulación guarde ellos
fuera de los niños y bebes. Estas bolsas no son juguetes.
* No utilice y guarde la máquina en los lugares en que se puede caer al suelo como
lavabo o bañadero que se llena por agua.
* Esta máquina solo se debe utilizar en la forma que se explica en el guía del uso. Guarde
este guía para consultar en el futuro.
* No deje la máquina sola cuando está funcionándose.
* No deje la máquina encima de una superficie cuando está funcionándose.
* Esta máquina no se debe utilizar por las personas que no tienen información o
experiencia, los niños, minusválidos sin informar anteriormente o sin la vigilancia
suficiente.
* Hay que hacer la vigilancia suficiente para evitar que los niños juegan con la máquina.
* Tiene que tener mucho cuidado cuando está utilizando cerca de los puntos sensibles
como oreja, ojo y cara.
* Antes de empezar al proceso de limpieza o si no está utilizándose tiene que apagar y
desenchufar.
* Antes de guardar la máquina tiene que esperar que se enfríe.
* Después de guardar la máquina no enrolle el cable de energía en el entorno de la
máquina, si no el cable se avería. En el lugar de eso deje cerca de la máquina por enrollar
en su encima flojamente.
* Esta máquina se conforme con los Directivos de 2004/108/EC sobre la Conformidad
Electromagnético y 2006/95/CE sobre la Seguridad Eléctrica de las Máquinas Domésticos.
- 16 -
Page 18

1
2
3
4
- 17 -
Page 19

- 18 -
1 2
3 4
5 6
Page 20

- 19 -
Page 21

HRVATSKI
UPUTSTVO ZA UPORABU
TEHNIˇCKI PODACI
Napajanje: AC230V, 50Hz
Snaga: 10W
OPIS URED¯AJA
1. Rezna Glava
2. Poluga za podeˇsavanje
duˇzine rezanja
3. Gumb za UKLJUˇCITI/ISKLJˇCITI
4. Kukica za vjeˇsanje
UPOZORENJE:
Prije poˇcetka uporabe aparata provjerite da li vrijednost napona naznaˇcena na informacijskoj
naljepnici na aparatu odgovara vrijednostima napona u vaˇsem domu.
ˇ
Cak i u sluˇcaju da aparat na kratko ne´ce koristiti podesite ga u poziciju iskljuˇceno.
Za izbjegavanje svake vrste opasnosti oˇste´ceni kabel treba da zamjeni jedino proizvod¯aˇc
kabela, ovlaˇsteni servisni centar ili struˇcna osoba.
Aparat ukljuˇcen u izvor za napajanje nipoˇsto ne koristite mokrom rukom (Opasnost od
strujnog udara!).
Ovaj aparat za ˇsiˇsanje dizajniran je samo za ku´cansku uporabu!
RUKOVANJE
Priprema aparata za ˇsiˇsanje:
Uvjerite se da se gumb za UKLJUˇCITI/ISKLJUˇCITI nalazi u poziciji “ISKLJUˇCENO”. Izvucite
kabel i umetnite u odgovaraju´cu utiˇcnicu. (230V~).
Rukovanje aparatom za ˇsiˇsanje:
Kosa treba da budu suha i ˇcista. Kosu dobro oˇceˇsljajte. ˇCeˇsalj postavite tako da zubci
gledaju ka gore i uklopite na reznu glavu pritisnuvˇsi na donji metalni kraj (kao ˇsto je
prikazano na slikama). Prije poˇcetka ˇsiˇsanja kose uvjerite se da je nastavak pravilno
postavljen na aparat.
1
2
3
4
Gumb za UKLJUˇCITI/ISKLJUˇCITI gurnite ka gore (u poziiju “UKLJUˇCENO). Kako biste se
navikli na uporabu ˇceˇslja prvo uradite probno ˇsiˇsanje na manjoj povrˇsini. ˇSiˇsanje moˇzete
poˇceti s velikim ˇceˇsljem a po potrebi pre´ci na uporabu manjih ˇceˇsljeva. Zahvaljuju´ci
- 20 -
Page 22

RUKOVANJE
izboru 6 ˇceˇsljeva moˇzete vrˇsiti ˇsiˇsanje u duˇzini od 3 do 13 mm. Vrˇsite lagane pokrete
aparatom u pravcu suprotnom pravcu rasta kose. ˇCeˇsalj na aparatu drˇzite koliko je
mogu´ce ravno. Za postizanje dodatne fleksibilnosti ˇceˇslja moˇzete koristiti polugu za
podeˇsavanje. Aparat moˇzete koristiti i bez ˇceˇslja-vodilice na mjestima na kojima dlaˇcice
ˇzelite kratko oˇsiˇsati. Nakon uporabe aparata gumb za UKLJUˇCITI/ISKLJUˇCITI gurnite ka
dolje(u pozici “ISKLJUˇCENO”). Kukica za vjeˇsanje sluˇzi vam za jednostavno odlaganje
aparata.
ˇCEˇ
SALJ
Aparat ima 6 ˇceˇsljeva:
1 = 1/8”: duˇzina rezanja 3,0mm
2 = 1/4” duˇzina rezanja 6,0mm
3 = 3/8”: duˇzina rezanja 9,0mm
4 = 1/2”: duˇzina rezanja 13,0mm
5/6 = ˇceˇsalj za postupno boˇcno rezanje
ˇCIˇS´
CENJE, ODRˇZAVANJE I ZBRINJAVANJE
ˇ
Ciˇs´cenje aparata za ˇsiˇsanje:
Iskljuˇcite aparat, izvucite utikaˇc iz utiˇcnice i uklonite ˇceˇsalj.
Dlaˇcice koje su se zadrˇzale na reznoj glavi uklonite uz pomo´c ˇcetkice.
Reznu glavu nipoˇsto ne pokuˇsavajte oˇcistiti nekom drugom teku´cinom izuzev vode i
medicinskog alkohola.
Kod redovite uporabe aparata reznu glavu treba povremeno podmazati(Vidi donju sliku).
Za podmazivanje koristite ulje koje ne sadrˇzi kiselinu kao ˇsto je ulje za ˇsiva´ci stroj.Viˇsak
ulja uklonite uz pomo´c platnene krpice.
1 2
3 4
5 6
Zbrinjavanje:
Ovaj ured¯aj ne treba bacati skupa sa ostalim ku´canskim otpadom.Molimo vas da
stupite u kontakst s lokalnim vlastima u cilju informisanja po pitanju pravilnog
zbrinjavanja starih elektriˇcnih i elektronskih ured¯aja.
SIGURNOSNA UPOZORENJA
UPOZORENJE! Polietilenske vre´cice u kojima se nalazi proizvod ili ambalaˇzni materijal
mogu biti opasni. Za izbjegavanje opasnosti od guˇsenja uklonite ove vre´cice i drˇzite ih
van djeˇcijeg dohvata. Plastiˇcne vre´cice nisu igraˇcka.
- 21 -
Page 23

SIGURNOSNE UPOZORENJA
• Aparat ne koristite u blizini lavaboa ili kade i ne stavljajte na mjesta sa kojih lako mogu
upasti u lavabo ili kadu.
• Aparat treba koristiti samo na naˇcin opisan u ovom uputstvu za uporabu. Saˇcuvajte ovo
upustvo i za budu´ce potrebe.
• Nipoˇsto se ne odvajajte od ukljuˇcenog aparata.
• Aparat u stanju rada nipoˇsto ne spuˇstajte na neku povrˇsinu.
• Ovaj aparat ne treba da koriste osobe s posebnim potrebama i djeca, bez nadzora osobe
koja moˇze snositi odgovornost za sigurnu uporabu ured¯aja. Isto tako ured¯aj ne treba da
koriste neiskusne i osobe koje nisu dovoljno upu´cene u naˇcin njegove uporabe.
• Zabranite djeci da se igraju s aparatom. Uporaba aparata u blizini djece zahtjeva briˇzan
nadzor.
• Budite jako oprezni kod uporabe aparata u blizini oˇciju, uˇsiju, lica i sl. osjetljivih dijelova
tijela.
• Kada nije u uporabi i prije ˇciˇs´cenja, aparat podesite u poziciju iskljuˇceno i izvucite utikaˇc
iz utiˇcnice.
• Prije odlaganja aparata saˇcekajte da se ohladi.
• Nakon uporabe ne obmotavajte kabel za napajanje oko aparata, u suprotnom moˇze
do´ci do oˇste´cenja kabela. Umjesto toga kabel lagano obmotajte i odloˇzite aparat.
• Ovaj ured¯aj je proizveden u skladu s zahtjevima direktiva koje se odnose na
Elektromagnetsku kompatibilnost 2004/108/EEC i Elektriˇcnu Sigurnost Ku´canskih Aparata
2006/95/CE.
- 22 -
Page 24

1
2
3
4
- 23 -
Page 25

1 2
3 4
5 6
- 24 -
Page 26

- 25 -
Page 27

YETK‹L‹ SERV‹SLER L‹STES‹
ADANA-SEYHAN-DORUK SO⁄UTMA -REfiATBEY MAH. AV. MEHMET ERO⁄LU CAD. NO:8-TEL.:0322 458 55 14 ADANA-KOZAN-DURAN SO⁄UTMA-
CUMHUR‹YET MH. DEDEO⁄LU SK. S‹S. APT.- TEL.:0322 516 57 78 ADANA-SEYHAN-DÜZOVA ELEKTR‹K - KÜÇÜK SAAT MEYDANI HILAL HAN IS MRK NO
32 - TEL.:0322 363 67 87 ADANA-SEYHAN-ÖZER ELEKTRON‹K - OBALAR CAD. SAL‹H ZEK‹ BUGAY ‹fi HANI NO:11 - TEL.:0322 352 25 75 ADANA-SEYHAN-
SER‹N ELEKTRON‹K - MAHFESI⁄MAZ MH. KENAN EVREN BULV. 21.SK. KAROL S‹T. E BLOK NO:2/A - TEL.:0322 233 74 84 ADANA-CEYHAN-URANYUM
ELEKTRON‹K - ‹NÖNÜ BULVARI NO: 172 - TEL.:0322 611 29 95ADANA-CEYHAN-CEYHAN ELEKTRON‹K - BÜYÜKKIRIM MH. MEHMET fiER‹F Y‹⁄‹T CD.
4.SK. NO:3/B TEL. : 0322 613 45 96 ADIYAMAN-YILDIRIM SERV‹S - BAHÇEL‹EVLER MH. 177 SK. NO:2 - TEL.:0416 214 40 83 ADIYAMAN-KAHTA-ELK.
EV ALET. TAM‹RC‹S‹-FAT‹H MH. ZAFER CD. NO:20 - TEL.:0416 725 99 89 ADIYAMAN-ÜNAL ELEKTRON‹K-BAHÇEL‹EVLER MAH. ESK‹ KAHTA CAD.
NO:11/A-TEL.:0416 216 75 56 ADIYAMAN-BEYAZ EfiYA TAM‹R‹-ÇATI MH. BADEM SK. NO:11 BESN‹ TEL.: 0416 318 32 00 AFYON-EM‹N ELEKTRON‹K-
ENST‹TÜ CAD. NO:19-TEL.:0272 215 43 32 AFYON-D‹NAR-GÖKÇEO⁄LU ELEKTR‹K-EMN‹YET MH. YEN‹YOL CD. 146 BLOK NO:4-TEL.: 0272 353 53 44 A⁄RI-
PATNOS-ACELE PEfi‹N ELEKTRON‹K-BUHARA SOK. NO:12-TEL.:0472 616 46 08 A⁄RI-ÖZPAK ELEKTRONIK-ESKI VAN CAD NO: 341 Ömer Hamam Yan›TEL.:0472 216 53 14 AKSARAY-‹T‹NA ELEKTR‹K-TAfi PAZARI MH. fiEH‹T HAT‹P UÇKUN SK. ESK‹ TERM‹NAL ÇIKIfiI NO:9/A-TEL.:0382 212 63 99 AMASYA-
KUTUP TEKN‹K SO⁄UTMA-GÖKMEDRESE MAH. M.K.P. CAD. HAM‹TBATIR APT. NO:115/A-TEL.:0358 212 61 66 AMASYA-SULUOVA-ÇALIfiKAN ELEKTRON‹K-
ÖZEL ‹DARE ‹fi HANI NO:121-TEL.:0358 417 18 64 AMASYA-FLAfi ELEKTRON‹K-YÜZEVLER MAH.TORUMTAY SOK. NO:25 DEM‹RD‹fi APT. ALTI-TEL.:0358
212 33 71 ANKARA-YEN‹MAHALLE-ERDO⁄DU SO⁄UTMA-ÇARfiI MH. DAMLADOL SK. NO:74/C-TEL.:0312 315 60 25 ANKARA-KEÇ‹ÖREN-VEFA ELEKTRON‹K-
PINARBAfiI MH. AfiIK PAfiA CD. NO: 67/C-TEL.:0312 380 42 30 ANKARA-MAMAK-YÜCEL ELEKTRON‹K-ASIM GÜNDÜZ CD. 20/D-TEL.:0312 365 14 14
ANKARA-ÇANKAYA-GÖKSEL ELEKTRON‹K-21.CD. KARTAL KAYA APT. NO:29/A KIRKKONAKLAR-TEL.:0312 496 42 53 ANKARA-ÇANKAYA-ATC ‹LET‹fi‹M-
SELAN‹K CAD. NO: 31/3-TEL.: 0312 419 82 70 ANKARA-GÖLBAfiI-BEKS SERV‹S H‹ZMETLER‹-SE⁄MENLER MAH. CEMAL GÜRSEL CAD. NO:51/A-TEL.:0312
484 21 19 ANKARA-BEYPAZARI-DO⁄AN TEKN‹K-KAYHAN GÜVEN CD. NO:22/C-TEL.:0312 762 89 19 ANKARA-S‹NCAN-Y‹⁄‹T TEKN‹K ONARIM-M.Ç.M.
12. CADDE GÜLSUYU SK. NO:5/21-TEL.:0312 264 10 31ANKARA-KEÇ‹ÖREN-MERT TEKN‹K SERV‹S-ÖZYURT CD. NO:27/A AKTEPE-TEL.: 0312 380 00 22
ANKARA-ERYAMAN-ARSLANLAR ELEKTRON‹K-GÜZELKENT MAH.ÇARfiI ARYA 511 SK. NO:40-TEL.:0312 279 16 41 ANKARA-KIZILAY-ARTUKLU
ELEKTR‹KL‹ EV ALETLER‹-SAKARYA CD. ÖRNEK ‹fiHANI NO:8/70 TEL. : 0312 435 83 55 ANTALYA-KUMLUCA-AKGÜL TEKN‹K SERV‹S H‹ZMETLER‹-
ADNAN MENDERES BULV.KAVAKLI KUYU CAD. YED‹TEPELER KAR.SULAR APT.NO:9-TEL.:0242 887 53 80 ANTALYA-CANKALP ELEKTRON‹K-TUZCULAR
MAH. ‹MARET SOK. FARAÇLAR PASJ.NO:11-TEL.:0242 242 31 35 ANTALYA-MANAVGAT-ÖNAL ‹LET‹fi‹M-AfiA⁄I PAZARCI MH. ‹BRAH‹M SÖZEN CD. fiELALE
PSJ.NO: 18 1006 SK. TEL.:0242 742 35 36 ANTALYA-ALANYA-Ç‹NTAfi ELEKTRON‹K-SARAY MH. ATATÜRK CD. HACI HAMD‹ O⁄LU SK.NO: 20/A-TEL.:0242
513 88 85 ANTALYA-MERKEZ-BÜYÜKGEB‹Z ELEKTROMEKAN‹K GÜVENL‹K-MUSTAFA GÖKSU-KIZILSARAY MH. DOLAPLIDERE CD. 80 SK. ÇAKMAK ‹fi
HANI NO: 8/5-6 TEL. :0242 243 33 90 ARDAHAN-YILDIRIM ELEKTR‹K-ATATÜRK CAD.NO:69-TEL.:0478 211 28 58 ARTV‹N-ARTV‹N ELEKTR‹K-HALKEVI
CADDESI NO: 12-TEL.: 0466 212 10 82 AYDIN-YILMAZ ELEKTRON‹K-KURTULUS MH. GARAJ CD. NO:5/B-TEL.:0256 212 00 35 AYDIN-SÖKE-ÖZLEM
ELEKTRON‹K-YEN‹ CAM‹ MH. SEK‹LER CD. NO: 47-TEL.:0256 518 26 40 AYDIN-NAZ‹LL‹-BARIN ELEKTRON‹K-ALTINTAfi MH. HÜRR‹YET CD. NO:161 BTEL.: 0256 315 43 21 BALIKES‹R-BANDIRMA-ANIL SO⁄UTMA-GÜNAYDIN MAH. 2.OKUL CAD.NO:16/A-TEL.:0266 713 56 78 BALIKES‹R-EDREM‹T-ÖZER
TEKN‹K-CAM‹ VASAT MH. PARK CD. NO:12/A-TEL.:0266 373 12 44 BALIKES‹R-BURHAN‹YE-U⁄UR TEKN‹K SO⁄UTMA-MAHKEME MH. M‹THATPAfiA CD.
NO: 68-TEL.:0266 412 86 89 BALIKES‹R-KILIÇ ELEKTRON‹K-YEN‹ ÇARfiI BASIN SOK. NO: 4/B-TEL.:0266-241 87 54 BALIKES‹R-GÖNEN-GÜRSES
ELEKTRON‹K-MALKOÇ MAH.MÜFTÜ fiEVKET CAD. 76.SOK. NO:2/B-TEL.:0266 762 01 28 BALIKES‹R-BANDIRMA-D‹J‹TAL ELEKTRON‹K-17 EYLÜL
MAH.HAVUZLU BAHÇE SK.NO:8/A-TEL.:0266 715 16 46 BALIKES‹R-ERDEK-MERT TEKN‹K-YALI MH. HÜKÜMET CD. NO:55-TEL.:0266 845 61 10-97 BARTIN-
MARTI ELEKTRON‹K-HENDEKYANI CAD. ORTA MAH.101/B - BARTIN-TEL.:0378 228 34 22 BATMAN-fiAH‹NLER ELEKTRON‹K-CUMHUR‹YET CD. NO:20
2000 ‹fi MERKEZ‹ KARfiISI-TEL.:0488 213 17 02 B‹LEC‹K-EDEBAL‹ TEKN‹K-‹ST‹KLAL MH V.REF‹K A ÖZTÜRK CD NO: 1/A-TEL.:0228 212 46 80 B‹NGÖL-
KARLIOVA-MEHMET KARTAL - KARTAL ELEKTRON‹K-CUMHUR‹YET CD. NO:8-TEL.:0426 511 26 39 B‹NGÖL-S‹MGE ELEKTRON‹K- YEN‹fiEH‹R MH. YEfi‹M
SK. BO⁄ATEK‹N APT ALTI NO:14/C-TEL.:0426 213 77 56 B‹TL‹S-AHLAT-U⁄UR SO⁄UTMA-TOK‹ KONUTLARI YUKARI ÇARfiI-TEL.:0434 412 41 72 B‹TL‹S-
D‹ZAYN ELEKTR‹K-NUR CAD. EREM CENTER ‹fi MERKEZ‹KAT:2 NO:5-TEL.:0434 226 74 43 BOLU-BEST ELEKTRON‹K-TABAKLAR MAH.CUMHUR‹YET
CAD.NO:28/B-TEL.:0374 218 12 25 BURSA-OSMANGAZ‹-AKYÜZ ELEKTRON‹K-ÇIRPAN MH. UYSAL SK. NO:13/B-TEL.:0224 254 60 76 BURSA-GEML‹K-
AC‹L TV TAM‹R SERV‹S‹-DEM‹R SUBAfiI MH. FIRIN SK. NO:7-TEL.:0224 514 71 20 BURSA-MUDANYA-ER T‹CARET-ÖMERBEY MH. CAM‹ SK. SU APT.
NO:30-TEL.:0224 544 86 16 BURSA-MUSTAFAKEMALPAfi-AGUfi ELEKTR‹K-HAMZABEY MAHALLESI PAZARYERI SOKAK NO: 2/A-TEL.:0224 613 19 99
BURSA-‹NEGÖL-S.B.S ELEKTRON‹K-OSMAN‹YE MH.DERE SK. N:25/D-TEL.:0224 715 48 94 BURSA-KARACABEY-GÜRKAN T‹CARET-RUNGUÇPAfiA MH.
14. SK. NO:11-TEL.: 0224 676 66 80 BURSA-N‹LÜFER-ÖZME TEKN‹K-KARAMAN MH. BAYINDIR SK. NO:4/B CARREFOUR KARfiISI-TEL.: 0224 249 12 48
ÇANAKKALE-ÇAN-TÜRKER ELEKTRON‹K-CUMHUR‹YET MAH. ÇANAKKALE CAD.NO:41-TEL.:0286 416 13 89 ÇANAKKALE-GEL‹BOLU-GÜVEN ELEKTRON‹K-
YAZICIZADE MAH. M‹RALAY fiEF‹K AKER CAD. 2. SOK NO:4 / A TEL.:0286 566 90 70 ÇANAKKALE-MERKEZ-SAM ELEKTRON‹K-‹SMETPAfiA MH. ARSLANCA
SK.-TEL.:0286 212 35 59 ÇANKIRI-B‹LG‹ÇLER ELEKTRON‹K-BUGDAY PAZARI MH. A.TALAT ONAY BULVARI SAIM A⁄A S‹T. B/BLOK TEL.:0376 213 48 19
ÇORUM-H‹T‹T SO⁄UTMA-YEN‹YOL MH. MÜFTÜ AHMET GÖKEfiME SK. NO: 5 / I-TEL.:0364 225 70 58 ÇORUM-U⁄UR ELEKTRON‹K-ÜÇTUTLAR MAH. FAT‹H
CAD. 5.SOK.EYÜP SULTAN APT. NO:1/C-TEL.:0364 227 44 91 ÇORUM-ÖMÜR ELEKTRON‹K-CENG‹ZTOPEL CAD. NO:2/F-TEL.:0364 224 68 09 ÇORUM-
ALACA-EROL ELEKTRON‹K-AYHAN MH. ANKARA CD. NO:18-TEL.:0364 411 42 03 ÇORUM-GÜNDÜZ BEYAZ EfiYA SERV‹S‹-SUNGURLU-SUNGURO⁄LU
MH. ÇANKIRI CD. NO: 46-TEL.:0364 311 31 13 DEN‹ZL‹-KARDELEN SO⁄UTMA-EMEK CD. NO: 30-TEL.:0258 241 67 31 DEN‹ZL‹-ÖZ ELEKTRON‹K-ÇAYBAfiI
CD. ÜNAL APT. NO: 28-TEL.:0258 261 29 25 DEN‹ZL‹-MERKEZ-ÇA⁄LAYAN SO⁄UTMA-TOPRAKLIK MH. TURAN GÜNEfi CD.NO:34 TEL. : 0258 242 85 86
D‹YARBAKIR-B‹SM‹L-fiIK ELEKTR‹K-KURTULUfi MH. AHMET AR‹F BULVARI NO: 19/F-TEL.:0412 415 05 94 D‹YARBAKIR-‹LKADIM T‹CARET-BATIKENT
S‹T. A/5 BLOK ALTI NO:1 SA⁄LIK OCA⁄I YANIBA⁄LAR-TEL.:0412 235 70 89 D‹YARBAKIR-AZ‹Z ELEKTRON‹K-HATBOYU CD. 469. SK. GÜNEfi 2 APT. NO:3/BTEL.:0412 223 33 46 D‹YARBAKIR-S‹LVAN-DIGITAL ELEKTRONIC-KALE MH. SAM‹ SEÇK‹N CD. NO:9/B-TEL.:0412 711 44 14 D‹YARBAKIR-JAPON
RECEP-YENI MAH 19 MAYIS CAD NO74-TEL.:0412 511 24 10 D‹YARBAKIR-BA⁄LAR-AZ‹Z ELEKTRON‹K-HATBOYU CD. 469 SK. NO:3/B-TEL.: 0412 236 81
10 DÜZCE-ENSAR TEK SU S‹STEMLER‹-AZM‹N‹LL‹ MH. AYDINPINAR CD. SERHAT SK.NO:1/B-TEL.:0380 514 34 12 DÜZCE-BULUfi ELEKTRON‹K-CED‹D‹YE
MAH. M‹MAR S‹NAN CAD.-TEL.: 0380 514 66 81 ED‹RNE-UZUNKÖPRÜ-GÜVEN TEKN‹K-GAZ‹ CAD. YUSUF SOK. YURDACAN PASAJI NO:7-TEL.:0284 513
89 66 ED‹RNE-YILDIZ SO⁄UTMA-1.MURAT MH. GÜNGÖR MAZLUM CAD. SERHAT S‹TES‹ B/BLOK 35/A-TEL.:0284 235 37 63 ED‹RNE-KEfiAN-MUTLU
TEKN‹K-YUKARI ZAFER‹YE MH. ‹LYASBEY CD. NO:32/B-TEL.:0284 715 22 71ELAZI⁄-ÖZDEV TEKN‹K -‹ZZETPAfiA MAH.KAZIM BAYER CAD.NO:24/ATEL.:0424 238 51 67 ELAZI⁄-YILMAZ BOB‹NAJ-YEN‹ MAH. KEMAL fiEDELE CAD. NO: 12/E-TEL.:0424 212 08 96 ELAZI⁄-GÜNEfi ELEKTRON‹K-KÜLTÜR
MAH. VAL‹ FAHR‹BEY CAD.NO:113/D-TEL.:0424 233 10 18 ERZ‹NCAN-AYDINLAR ELEKTR‹K-‹NÖNÜ MAH. MERKEZ ÇARfiISI 15.SK NO:5 -TEL.:0446 223
59 76 ERZ‹NCAN-REFAH‹YE-B‹LG‹N ELEKTRON‹K-ERZ‹NCAN CAD. BELED‹YE ‹fi HANI-TEL.:0446 611 26 10 ERZURUM-OLTU-GÜVEN ELEKTRON‹K-
Z‹YABEY CAD. BELED‹YE PSJ. NO:6-TEL.:0442 816 42 23 ERZURUM-AT‹LAY ELEKTRON‹K-KONGRE CAD. HASIRHAN PASJ. NO:87-TEL.:0442 213 30 60
ERZURUM-‹SP‹R-YILMAZ ELEKTRON‹K-Z‹YAPAfiA CD. AfiA⁄I MH. NO:186-TEL.:0442 451 40 95 ESK‹fiEH‹R-ARZU ELEKTRON‹K-DEL‹KL‹TAfi MH. GÜRMAN
SOK. NO:37/B-TEL.:0222 234 87 15 ESK‹fiEH‹R-S‹VR‹H‹SAR-DERMAN ELEKTRON‹K-CAM‹KEB‹R MH. YUNUSEMRE CD. NO:7-TEL.:0222 711 22 60
GAZ‹ANTEP-ELEKTR‹KL‹ EV ALETLER‹ TAM‹RC‹S‹-MÜTERC‹M ASIM CAD. KÖRÜKÇÜ SOK. NO:8/A-TEL.:0342 231 00 73 GAZ‹ANTEP-ISLAH‹YE-YILMAZ
SO⁄UTMA-AYDINLIK MH. GÖZ CAD.ÜNLÜ S‹TES‹ NO: 2-TEL.:0342 862 12 20 GAZ‹ANTEP-‹K‹ZO⁄LU ELEKTRON‹K-BEY MAH. EBLEHAN ÇARfiISI NO:12/A-
- 26 -
Page 28

YETK‹L‹ SERV‹SLER L‹STES‹
TEL.:0342 230 71 00 GAZ‹ANTEP-N‹Z‹P-ÇAPAN TEKN‹K-CUMHUR‹YET MAH. MERMER SOK. NO:10-TEL.:0342 517 51 66 G‹RESUN-BULANCAK-YÜKSEL
SO⁄UTMA-‹HSAN‹YE MH. CEMAL GÜRSEL. CD. NO: 257-TEL.:0454 318 17 28 G‹RESUN-U⁄UR ELEKTRON‹K-HACI HÜSEY‹N MH. GAZ‹ CD. NO: 185 / 1-
TEL.:0454 212 00 90 GÜMÜfiHANE-GÜMÜfiHANE SERV‹S‹-HASANBEY MH. HASANBEY CD.NO:17/A-TEL.:0456 213 51 54 HATAY-SAMANDA⁄-GÜNEfi
ELEKTR‹K-ATATÜRK MAH. ‹SKELE CAD. HAYÜK PSJ NO:38-TEL.:0326 512 71 04 HATAY-KIRIKHAN-SEREN MAK‹NA-BARBAROS MAH. BOZTEPE CAD.
NO:23/B-TEL.:0326 344 32 49 HATAY-ANTAKYA-SER‹ SO⁄UTMA-KURTULUfi CD. NO:51/C-TEL.:0326 213 28 32 HATAY-ERZ‹N-YEL‹Z BOB‹NAJ-MUSTAFAL‹
MH. ‹STASYON CD. NO: 143-TEL.:0326 68148 32 HATAY-REYHANLI-BAfi TEKN‹K SO⁄UTMA-ATATÜRK CD. DÖ⁄ÜCÜLER ‹fiHANI NO:1 -TEL.:0326 413 44
04 HATAY-REYHANLI-ÖZ ‹fi SO⁄UTMA-CUMHUR‹YET MH. TAYFUR SÖKMEN CD. NO:26/B TEL. : 0326 413 21 22 HATAY-DÖRTYOL-FAT‹H ELEKTRON‹K-
SANAY‹ MH. EVREN CD. YEN‹ S‹NEMA KARfiISI NO:15 - TEL.:0326 712 86 46 HATAY-‹SKENDERUN-GÜL‹STAN ELEKTRON‹K-KURTULUfi MH. fi.O⁄UZ
YENER CD. NO:64/C-TEL.:0326 613 50 64 I⁄DIR-PARLAK TEKN‹K-TOPÇULAR CD. NO:34-TEL.:0476 227 47 51 ISPARTA-ÖZSOYLAR SO⁄UTMA-YAYLA
MAH. ‹SMETPAfiA CAD. NO: 60 fi‹FA TIP MERKEZ‹ ALTI-TEL.:0246 223 13 61 ‹ÇEL-ERDEML‹-ESEN ELEKTR‹K-MERKEZ MAH. ATATÜRK CAD. NO:11TEL.:0324 515 68 87 ‹ÇEL-MEZ‹TL‹-AKN‹SAN SO⁄UTMA&ELEKTRON‹K-GMK.BUL. FAT‹H MH. 18 SK.ÖZÜDO⁄RU S‹T. 3/A-TEL.:0324 359 64 34 ‹ÇEL-PINAR
ELEKTRON‹K-MAHMUD‹YE MH. 108. CD. NO:32/B-TEL.:0324 336 82 98 ‹ÇEL-TARSUS-MERT ELEKTRON‹K-GAZ‹LER MAH. ATATÜRK BULV. NO:119TEL.:0324 626 83 98 ‹ÇEL-TARSUS-TEKN‹K ‹fi ELEKTR‹K T‹C.-ATATÜRK CAD. U⁄UR ‹fi HANI NO:1-TEL.:0324 6242797 ‹ÇEL-ANAMUR-ÇEL‹K ELEKTRON‹K-
BAHÇE MH. ORMAN ‹fiLETMES‹ ALTI NO:61/B-TEL.:0324 814 85 90 ‹ÇEL-HAKAN ELEKTRON‹K-BAHÇEL‹EVLER MH. 1809 SK. D‹NL‹ APT.ALTI NO:3/BTEL.:0324 328 03 25 ‹ÇEL-S‹L‹FKE-SADIK ELEKTR‹K-GÖKSU MAH. O⁄UZKAAN CAD. DERYALAR APT.NO:22/B-TEL.:0324 714 05 54 ‹STANBUL-ATAfiEH‹R-
VURAL ELEKTRON‹K-KARAMAN Ç‹FTL‹K YOLU NO:12(ESK‹ PTT HAST. KARfiISI) ‹ÇERENKÖY TEL. : 0216 575 63 35 ‹STANBUL-fi‹fiL‹-YILKA T‹CARET-
SEYMEN SOK. NO:27/A KURTULUfi-TEL.:0212-233 80 53 ‹STANBUL-KÜÇÜKÇEKMECE-ÇA⁄DAfi SERV‹S-CENNET MAH.Y.KEMAL BEYATLI CAD.NO:14/DTEL.:0212 579 35 30 ‹STANBUL-ZEYT‹NBURNU-KARDEfiLER SO⁄UTMA-SEY‹T N‹ZAM MAH. fiEH‹T ERKAN ALYANAK SOK.NO:11-TEL.:0212 546 57 36
‹STANBUL-ESENLER-YILDIRIM ELEKTRON‹K-KAZIM KARABEK‹R MAH. 2.SOK. NO:10 -TEL.:0212 611 10 76 ‹STANBUL-EM‹NÖNÜ-IRMAK DIfi T‹CARET-
TAHTAKALE CD. TAHTAKALE T‹CARET MERKEZ‹ NO:34 2.BODRUM NO:204 -TEL.:0212 520 55 80 ‹STANBUL-ÜMRAN‹YE-GÜL-SER TEKN‹K SERV‹S-
NAMIK KEMAL MH. SÜTCÜ ‹MAM CD. SÜTÇÜ ÇIKMAZI NO:6/1- TEL.:0216 335 60 19 ‹STANBUL-ÜMRAN‹YE-GÖZDE ELEKTRON‹K-ATATÜRK MH. ALEMDA⁄
CD. YILDIZ SK. NO:12/A-TEL.: 0216 329 57 03 ‹STANBUL-MALTEPE-GÜR TEKN‹K SERV‹S-BA⁄DAT CD. BOLAYIR SK. NO:3/A-TEL.:0216 352 25 20 ‹STANBUL-
GAZ‹OSMANPAfiA-DEDEO⁄LU ELEKTR‹K-2124 SOK NO:4 SULTANÇ‹FTL‹⁄‹-TEL.:0212 594 50 91 ‹STANBUL-TUZLA-AKIN ISI TEKN‹K SERV‹S-YAYLA MH.
F.ÇAKMAK CD. ‹SMA‹L A⁄A SK. NO:11 TEL.:0216 395 66 62 ‹STANBUL-SARIYER-H‹SAR SERV‹S 1-NUR‹PAfiA CD NO\48A BA⁄LAR MEVK‹ YEN‹KÖYTEL.:0212 223 27 96 ‹STANBUL-BÜYÜKÇEKMECE-AYGÜL DEKORASYON-19 MAYIS MH. OSMAN GAZ‹ CD. NO: 7-TEL.:0212 881 33 18 ‹STANBUL-
GAZ‹OSMANPAfiA-ÇAM TEKN‹K-ISLAMBEY MAH NECIP FAZIL CAD 257 SK NO:25-TEL.:0212 597 86 62 ‹STANBUL-KÜÇÜKÇEKMECE-YILDIZ ELEKTR‹K
SO⁄UTMA-HALKALI CD. ANADOLU PSJ. NO: 185-TEL.:0212 580 76 02 ‹STANBUL-BAYRAMPAfiA-ÖZKAN ELEKTRON‹K-KARTALTEPE MH. B‹LGEHAN CD.
NO:36-TEL.:0212 564 33 46 ‹STANBUL-GAZ‹OSMANPAfiA-TOROS ELEKTRON‹K-MERKEZ MH. BA⁄LAR CD. NO:77-TEL.:0212 563 50 38 ‹STANBUL-fi‹fiL‹CHIP ELEKTRON‹K-BOZKURT CAD.NO: 235-TEL.:0212 231 65 43 ‹STANBUL-GÜNGÖREN-YÜKSEL ELEKTRON‹K-M.FEVZ‹ ÇAKMAK MAH.‹NÖNÜ CAD.NO:
138-TEL.:0212-504 61 42 ‹STANBUL-BEYO⁄LU-TOLGA ELEKTRON‹K-CAM‹ KEB‹R MH. DEREBOYU CAD. NO:28 KASIMPAfiA-TEL.:0212 235 65 34 ‹STANBULAVCILAR-NUR ELEKTRON‹K-DEN‹ZKÖfiKLER MAH.DERYA SOK. NO:36/1-TEL.:0212 694 12 82 ‹STANBUL-BA⁄CILAR-ÇA⁄LAYAN ELEKTRON‹K-‹STOÇ
25.ADA NO.:109-TEL.:0212 659 92 49 ‹STANBUL-KADIKÖY-UMUT ELEKTRON‹K-HAL‹TA⁄A CAD. CELAL MUHTAR SOK. NO:20/2-TEL.:0216 346 39 78
‹STANBUL-ZEYT‹NBURNU-UZMAN ELEKTRON‹K-YEN‹DO⁄AN MH. 42.SK NO:50-TEL.:0212 582 36 37 ‹STANBUL-KADIKÖY-MICROSYSTEM ELEKTRON‹K-
1. ORTA SK. NO:18/1 GÖZTEPE-TEL.:0216 411 91 50 ‹STANBUL-MALTEPE-BEYDA⁄I TEKN‹K ELEKTRON‹K-BA⁄LARBAfiI MAH. ‹NÖNÜ CAD.-TEL.:0216
457 63 34 ‹STANBUL-BA⁄CILAR-KUMRU ELEKTRON‹K-KEMALPAfiA MAH. NAMIK KEMAL CAD. NO: 126-TEL.:0212 429 34 19 ‹STANBUL-fi‹fiL‹-KASVA
ELEKTRON‹K-MEC‹D‹YE CAD. ‹MAM FEYZULLAH SOK. NO:2/B -TEL.:0212 211 33 11 ‹STANBUL-BAKIRKÖY-‹K‹ZLER ELEKTRON‹K-SAKIZA⁄A MH.
BERR‹NC‹N‹ SK. NO:16/A-TEL.:0212 543 85 83 ‹STANBUL-ÜSKÜDAR-KÖYLÜBAY ELEKTRON‹K-ALBAY HÜSAMETT‹N ERTÜRK SK. NO:7/A ÇENGELKÖY
TEL.:0216 318 35 13 ‹STANBUL-ÜSKÜDAR-AKÇEL‹K T‹CARET-M‹MAR S‹NAN MH. ‹SMA‹L DÜMBÜLLÜ SK. NO:9/A TEL.:0216 342 99 22 ‹STANBUL-
KADIKÖY-TELV‹D ELEKTRON‹K-MAZHAR OSMAN SOK FERAH APT NO:24/A FENERYOLU-TEL.:0216 414 66 00 ‹STANBUL-‹K‹TELL‹-BARIfi TEKN‹K-
ATATÜRK MH. ‹K‹TELL‹ CD. DURAK SK. NO:18 TEL. : 0212 471 04 76 ‹STANBUL-K.ÇEKMECE-ENG‹N ELEKTRON‹K-TEVF‹K BEY MH. MERKEZ CD. ORK‹DE
SOK. NO: 3 /1-TEL.:0212 598 44 76 ‹STANBUL-BAHÇEL‹EVLER-SEV-CAN DAYANIKLI TÜK.MALLARI.-YILDIRIM BEYAZIT CD .ZAFER MH. TÜRKBEY‹ SK.
NO:6/2-3-TEL.:0212 552 45 87 ‹STANBUL-fi‹fiL‹-IfiIK ELEKTRON‹K-AYAZA⁄A MASLAK ATATÜRK CD NO: 25-TEL.:0212 289 76 94 ‹STANBUL-PEND‹K-
GÖKHAK ELEKTRON‹K-BATI MH. SABR‹ TAfiKIN CD. SEB‹L SK. NO:4/1 TEL. : 0216 354 07 00 ‹STANBUL-G.O.PAfiA-ATILIM ELEKTRON‹K-CEBEC‹ MAH.
2472 SOK: NO:14/A SULTANÇ‹FTL‹⁄‹- TEL.:0212 475 85 62 ‹STANBUL-GÜNGÖREN-NUR ELEKTR‹K ELEKTRON‹K-MERKEZ MH. ASALET CD. NO: 22/DTEL.:0212 641 42 09 ‹STANBUL-BEYKOZ-ULUDO⁄AN ELEKTRON‹K-KAYABAfiI ÇIKMAZI NO: 4/B PAfiABAHÇE-TEL.:0216 322 85 85 ‹STANBUL-KARTAL-
ÖZO⁄LU ELEKTRON‹K-KIZILAY BULVARI CD. BAHADIR SK. 4/A-TEL.:0216 387 18 87 ‹STANBUL-FAT‹H-SOYLU TEKN‹K-HIRKA‹ fiER‹F CAM‹ ARKASI ESK‹
AL‹PAfiA CD. NO: 26-TEL.:0212 631 85 88 ‹STANBUL-FAT‹H-IRMAK DIfi T‹CARET-HACI KADIN CD. NO:15 K.M. PAfiA TEL.: 0212 589 75 27 ‹STANBUL-
S‹L‹VR‹-PDS ELEKTRON‹K-P.M. PAfiA MH. HACI PERVANE CD. NO:35/B -TEL.:0212 728 76 75 ‹STANBUL-GÜLTEPE-B‹L‹M ELEKTRON‹K-HARMANTEPE
MH. ABD‹ ‹PEKÇ‹ CD. NO:14/D -TEL.:0212 278 72 27 ‹ZM‹R-BERGAMA-GEZG‹N SERV‹S-K.KEMALBEY CAD. NO:82-84-TEL.:0232 633 35 15 ‹ZM‹R-KONAK-
TUNCA ELEKTR‹K-76 SK 10/A GÜZELYALI-TEL.:0232 246 40 62 ‹ZM‹R-ÇAMD‹B‹-KUDRET ELEKTRON‹K-BURAK RE‹S CAD. NO: 239/A-TEL.:0232 435 81
36 ‹ZM‹R-MENEMEN-AY ELEKTRON‹K-DR. SELAHATT‹N ÖZKURT CD. NO:22/B-TEL.:0232 832 02 31 ‹ZM‹R-KONAK-S‹STEM ELEKTRON‹K-2414 SK. NO:10
GÜLTEPE-TEL.:0232 469 72 69 ‹ZM‹R-KARfiIYAKA-LEVENT ELEKTR‹K LABORATUVARI-1710 SK. NO:70/B ESHOT SOKA⁄I-TEL.:0232 381 14 42 ‹ZM‹R-
KARfiIYAKA-ASMERKEZ T‹CARET-ESK‹ TRAMVAY CD. 1675. SK. NO:78/1B ALAYBEY-TEL.:0232 364 33 73 ‹ZM‹R-BORNOVA-ACEM ELEKTRON‹K-552/2
SK. NO: 4/A-TEL.:0232 339 73 31 ‹ZM‹R-KONAK-KILIÇ ELEKTRON‹K-BARBAROS HAYRETT‹N PAfiA CD. NO:62/1 LEVENT-TEL.:0232 433 15 19 ‹ZM‹R-
URLA-‹LTER ELEKTRON‹K-‹ZM‹R 75. YILl CADDES‹NO:81/C-D-TEL.:0232 754 44 44 ‹ZM‹R-BUCA-ÇA⁄LAR ELEKTRON‹K-670/1 SK. NO:57/B-TEL.:0232
276 27 77 ‹ZM‹R-YEfi‹LYURT-UMUT ELEKTR‹K & ELEKTRON‹K-YILDIZ CAD. NO: 152/A-TEL.:0232 244 65 77 ‹ZM‹R-ÖDEM‹fi-MURAT ELEKTRON‹K-
UMURBEY MH. SANAY‹ S‹T. 9.SK NO: 10 -TEL.:0232 544 41 98 KAHRAMANMARAfi-AKSUNGUR ELEKTR‹K-UZUNOLUK CAD. 20.SOKAK NO:20/A-TEL.:0344
212 77 50 KAHRAMANMARAfi-KALE ELEKTRON‹K-FEVZ‹PAfiA MH. UZUNLUK CD.-TEL.: 0344 225 07 94 KAHRAMANMARAfi-ELB‹STAN-DEM‹RO⁄LU
SO⁄UTMA-GÜNEfiL‹ MH. TERM‹NAL CD. NO:30-TEL.:0344 413 60 67 KARABÜK-SAFRANBOLU-MEHMET SA⁄LAM - GÖKAY TEKN‹K-‹NÖNÜ MH. ESK‹
BA⁄LAR SK. NO:13-TEL.:0370 712 24 97 KARABÜK-ACAR ELEKTRON‹K-VAKIF ‹fi HANI KAT:2 EMN‹YET MÜDÜRLÜ⁄Ü YANI-TEL.:0370 424 32 00 KARAMAN-
ÖZ AS SO⁄UTMA-ABBAS MH. MUT CD. NO: 82/A TEL. : 0338 214 56 74 KARS-AYDIN ELEKTRON‹K-KAZIM KARABEK‹R ‹fiHANI KAT:2 NO: 125 -TEL.:0474
212 87 82 KASTAMONU-TAfiKÖPRÜ-DE⁄‹fi‹M ELEKTR‹K-TABAKHANE MH. ATATÜRK CD. NO:55/A-TEL.:0366 417 42 04 KASTAMONU-TOSYA-DO⁄Ufi
ELEKTRON‹K-VAKIF SK. 15/A-TEL.:0366 313 42 59 KASTAMONU-HARUN TELEKOMÜN‹KASYON-‹NÖNÜ MAHALLES‹ AFfi‹NBEY SOKAK NO:8/B-TEL.:0366
212 33 66 KAYSER‹-MEL‹KGAZ‹-AKTÜRK BEYAZ EfiYA SERV‹S‹-AYDINLIKEVLER MH.FIRAT CD.KR‹STAL APT.A-B NO.17 TEL.:0352 332 08 25 KAYSER‹-
MEL‹KGAZ‹-AKIfi ELEKTRON‹K-ÇORAKÇILAR MH. CENG‹Z TOPEL CD.NO:20/B-TEL.:0352 320 14 00 KAYSER‹-DEVEL‹-U⁄UR SO⁄UTMA-HARMAN
MAHALLES‹ BELED‹YE PASAJ‹ ÜZER‹ NO: 15-TEL.:0352 621 56 31 KAYSER‹-SÖNMEZ ELEKTRON‹K-CAM‹ KEB‹R MAH. BASMANE SOK. NO:16/A-TEL.:0352
231 69 62 KAYSER‹-ZERO COMPUTER-SAHAB‹YE MH. METE CD. fiAH‹R SATO⁄LU SK. SATO⁄LU AP D: 1-TEL.:0352 232 15 34 KIRIKKALE-KARDEfiLER
- 27 -
Page 29

YETK‹L‹ SERV‹SLER L‹STES‹
ELEKTRON‹K-GÜZELTEPE MH. CELAL AT‹K CD. NO:4/B-TEL.:0318 224 47 42 KIRKLAREL‹-MERKEZ-BUSE ELEKTRON‹K-KARACA ‹BRAH‹M MH. KAPAN
CAM‹ SK. ACUN PSJ. NO:23-TEL.:0288 212 73 57 KIRKLAREL‹-LÜLEBURGAZ-BUSE ELEKTRON‹K-YILMAZ MH. ESK‹ KIRKLAREL‹ CD. EFSANE DÜ⁄ÜN
SALONU YANI NO:36/A TEL.: 0288 412 88 92 KIRfiEH‹R-GARANT‹ ELEKTRON‹K-ANKARA CD. C‹NGÖZ BEBE ARKASI YA⁄MUR ‹fiHANI NO:9/B-TEL.:0386
214 02 18 K‹L‹S-FLAfi ELEKTRON‹K-fiEH‹TLER PARKI KARfiISI NO:63/1-TEL.: 0348 814 55 28 KOCAEL‹-DORUK TEKN‹K H‹Z. -KARABAfi MH. CENG‹Z
TOPEL CD. MÜNECC‹M AR‹F SK. NO:6/A -TEL.:0262 331 11 66 KOCAEL‹-KARAMÜRSEL-KILINÇ ELEKTRON‹K-‹NÖNÜ CD. M.YASEF SK. NO:10/M-TEL.:0262
452 55 55 KOCAEL‹-D‹LOVASI-SAMET ELEKTRON‹K-BA⁄DAT CAD NO: 42/2-TEL.:0262 754 79 86 KOCAEL‹-DARICA-KARDEfiLER ELEKTRON‹K-KAZIM
KARABEK‹R MH. MEVALANA CAD. NO: 1/A-TEL.:0262 656 27 88 KOCAEL‹-GEBZE-YILDIRIM ELEKTRON‹K-H. HAL‹L MH. 1209 SK. NO:13/C-TEL.:0262 641
35 88KONYA-BEYfiEH‹R-SELV‹ SO⁄UTMA-HACI ARMA⁄AN MH. ANTALYA CD. NO:108/F-TEL.:0332 512 40 10 KONYA-SELÇUKLU-SAF‹R SO⁄UTMA-FER‹T
PAfiA MH. GÜNEY SK. NO:3/F KULE S‹TE C‹VARI-TEL.:0332 236 36 75 KONYA-ERKAM SO⁄UTMA-KARAKURT MH. FURKAN DEDE CD.ASBAfiKAN SK.
NO:13/B-TEL.:0332 350 00 32 KONYA-ÖZCAN SO⁄UTMA VE ISITMA LTD fiT‹-N‹fiANTAfiIMH. HULUS‹ BAYBAL CD. NO:36/A-TEL.:0332 236 33 37 KONYA-
SELÇUKLU-KONSEY SOGUTMA VE ISITMA-KÜÇÜK ‹HSAN‹YE MH. fiA‹R GUBAR‹ SK.B‹NSA S‹TES‹ ALTI NO : 15 TEL.:0332 321 21 22 KONYA-AKfiEH‹REROL ELEKTRON‹K-MEYDAN MAH. ÇOCUK PARKI KOD NO:38-TEL.:0332 812 61 12 KONYA-MERAM-GÜRKAN TEKN‹K-‹HT‹YARETT‹N MH.SIRÇALI
MEDRESE CAD.‹BN‹B‹B‹ SK. NO:1/B-TEL.:0332-351 02 03 KONYA-SEYD‹fiEH‹R-TUNCER ELEKTRON‹K-KIBRIS CD. NO:26-TEL.:0332 582 93 92 KONYADURMAZLAR ELEKTR‹K-ANKARA-KONYA CAD. NO:67-TEL.:0332 673 28 48 KONYA-ERE⁄L‹-ERDEM‹R TEKN‹K-ÜÇ GÖZ MH. KIBRIS CD.EL‹T APT. NO:3
TEL.: 0332 713 02 53 KÜTAHYA-EL‹FO⁄LU ELEKTR‹K-FAT‹H SULTAN MEHMET BULVARI DUAGÜR CAM‹‹ ALTI 43/B-TEL.:0274 226 32 80 MALATYAYUVAM ELEKTRON‹K-‹ST‹KLAL MH. FUZUL‹ CD.‹MAMO⁄LU SK. NO:1-TEL.:0422 322 52 88 MALATYA-HAL‹M ELEKTRON‹K-SARAY MH. DEVECEL SK.
NO:3-TEL.:0422 321 86 08MAN‹SA-SOMA-GÜRMAK TEKN‹K-KURTULUfi MH. ‹DMAN SK. NO:47/A-TEL.:0236 613 66 56 MAN‹SA-SAL‹HL‹-AYKAR SO⁄UTMA BEfiEYLÜL MH. BELED‹YE CD. NO:TEL.:243-0236 714 88 68 MAN‹SA-AY ELEKTRON‹K MAN‹SA fiB.-YARHASANLAR MAH. ESK‹ HASA⁄A 2306 SOK.NO:
18/A-TEL.:0236 237 30 62-63 MAN‹SA-BURCU ELEKTRON‹K-TUNCA MAH. KURTULUfi CAD. NO:54-TEL.:0236-234 57 42 MAN‹SA-TURGUTLU-EM‹N
ELEKTRON‹K-ALTAY MH. SEV‹NÇ SK. NO:25-TEL.:0236 313 28 35 MAN‹SA-AKH‹SAR-AKIN ELEKTRON‹K-PAfiA MAH. 7.SOK. NO:25BELED‹YE ARKASI-
TEL.:0236 413 50 53 MAN‹SA-SARUHANLI-fiEN SO⁄UTMA-ATATÜRK MH. 7 EYLÜL CD. NO: 21/B-TEL.:0236 357 12 00 MAN‹SA-KULA-ERDAL KARAHAN-
TERMO D‹NAM‹K-CAM‹‹ CED‹T MH. 62 SK. NO:67-TEL.:0236 816 70 99 MARD‹N-M‹DYAT-SA⁄LAM ELEKTRON‹K-ESNAF SANATKARLAR KRED‹ KOOP.
KARfiISI 2.CD.NO:56-TEL.:0482 462 33 90 MARD‹N-KIZILTEPE-‹BRAH‹MO⁄LU ISITMA-fiANLIURFA CAD. ECE PASAJI NO:7-TEL.:0482 312 55 99 MARD‹N-
DER‹K-UZAY ELEKTRON‹K-BELED‹YE MEYDANI NO:36-TEL.:0482 251 34 35 MARD‹N-YEN‹fiEH‹R-MERKEZ TEKN‹K-KARAYOLLARI ARKASI BARIfi CAD
GÜNAYDIN APT ALTI-TEL.:0482 212 83 06 MARD‹N-NUSAYB‹N-BÜDÜN ELEKTRON‹K-ZEYNEL AB‹D‹N MH. Ç‹LEK SK NO: 1/B-TEL.:0482 415 61 98 MU⁄LA-
FETH‹YE-ANADOLU TEKN‹K SERV‹S-ÖLÜDEN‹Z YOLU ÜZER‹ BAHA fiIKMAN CD.NO:157-TEL.:0252 611 39 12 MU⁄LA-M‹LAS-AFfi‹N YILDIRIM - TEKN‹K
SO⁄UTMA-HACI ‹LYAS MAH. PAZAR SOK.NO:14-TEL.:0252 512 14 45 MU⁄LA-YATA⁄AN-ASTEKN‹K ISITMA SO⁄UTMA SERV‹S‹-YEN‹ MH. 152. SK. NO:8-
TEL.:0252 572 56 31 MU⁄LA-DALAMAN-ÖZKAN TEKN‹K SO⁄UTMA-MERKEZ MAHALLES‹ ATATÜRK CD.NO:56-TEL.:0252 692 25 25 MU⁄LA-ELBO ELEKTR‹K
ELEKTRON‹K-ORHAN‹YE MH. HÜRR‹YET CAD. NO:1/6-TEL.:0252 214 18 84 MU⁄LA-DATÇA-MEL‹H ELEKTRON‹K-‹SKELE MH. AMBARCA CD. NO:17-
TEL.:0252 712 02 30 MU⁄LA-MARMAR‹S-‹LKSEL ELEKTRON‹K-YEN‹ YOL CD. N0:51/9-TEL.:0252 412 62 60 MU⁄LA-URLA-STAR ELEKTRON‹K-‹N‹fiD‹B‹
CAD NO 1/C AKYAKA BELDES‹-TEL.:0252 243 40 42 MUfi-HAfi‹MO⁄LU EK‹C‹ ELEKTRON‹K-HAfi‹MO⁄ULLARI EK‹C‹ ‹fi HANI BELED‹YE CD.NO:20/ATEL.:0436 212 38 80 N‹⁄DE-HUZUR ELEKTR‹K-ILHANLI MAH ÖZKUL MARKET KARSISI ÖZKILIÇ AP ALTI NO: 43-TEL.:0388 233 54 05 ORDU-TEK ISITMA
SO⁄UTMA-SAKARYA MAH YENI KUMRU CAD NO: 111-TEL.:0452 423 84 49 ORDU-HAZAR SO⁄UTMA-YEN‹ MAH. 26.SOK NO:17-TEL.:0452 214 04 49 ORDUÜNYE-STAR TEKN‹K-KALEDERE MH. 20TEMMUZ CD. NO:16-TEL.:0452 324 82 51 ORDU-MERKEZ-M‹KRO ELEKTRON‹K-YEN‹ MH. 319 SK. NO:18 -TEL.:
0452 223 13 49 OSMAN‹YE-MODERN ELEKTRON‹K-ORTAOKUL CD. K‹fi‹O⁄LU ÇARfiISI NO:15-TEL.:0328 812 82 84 OSMAN‹YE-DÜZ‹Ç‹-TERMO SO⁄UTMA-
UZUNBANI MAH. UZUNBANI CAD. NO: 31 / A-TEL.:0328 876 25 60 R‹ZE-ÇAYEL‹-ÖZER TEKN‹K- MAKSUT ÖZER-EMNIYET MÜD.KARfiISI fiA‹RLER YOLU
ÜZERI NO:3/2B-TEL.:0464 532 63 81 R‹ZE-CEVAH‹R ELEKTRON‹K-TOPHANE MAH. ATATÜRK CAD. ‹fi PASAJI-TEL.:0464 213 16 17 SAKARYA-ADAPAZARI-
ÇINAR ELEKTRON‹K-KÖMÜR PAZARI CAD. NO: 15 A-TEL.:0264 271 39 12 SAMSUN-ÇARfiAMBA-ÖZKAN SO⁄UTMA-ORTA MH. TUNCAY KOCABAfi SK.
NO:85-TEL.:0362 832 28 90 SAMSUN-BAFRA-KARATAfi T‹CARET-KIZILIRMAK MH. F.ÇAKMAK SK. NO:18/A-TEL.: 0362 543 04 91 SAMSUN-GÜLTEK‹N
SERV‹S-ATATÜRK BULVARI NO.285-TEL.:0362 437 33 82 SAMSUN-DEN‹Z ELEKTRON‹K-KADIKÖY MH. OSMAN‹YE CD. NO: 68-TEL.:0362 432 44 80 S‹‹RTERYILMAZ ELEKTRON‹K-CUMHUR‹YET CAD. NO:25 ULUCAM‹ KARfiISI-TEL.:0484 224 03 92 S‹NOP-ADA EV ALETLER‹-CAM‹ KEB‹R MH. TÜTÜNCÜ SK.
NO: 16-TEL.:0368 260 12 64 S‹NOP-AYANCIK-YILKAY SO⁄UTMA-YALI MH. DR.AZM‹ HAMZAO⁄LU CD. NO:46-TEL.:0368 613 52 12 S‹NOP-BOYABATÖZTÜRK BEYAZ EfiYA BAKIM SERV‹S-GÖKDERE MH.YUSUF KEMAL BEY CD.NO:24-TEL.:0368 315 61 21 S‹VAS-EKOL ELEKTRON‹K-H‹KMET IfiIK
CD.NALBANTLAR BAfiI KAVfiA⁄I NO:1/D-TEL.:0346 223 44 96 fiANLIURFA-SURUÇ-IfiIK SO⁄UTMA TEKN‹KERL‹⁄‹-D‹K‹L‹ MH. Z‹YARET CD. NO:10-TEL.:0414
612 17 25 fiANLIURFA-AKTAfi ELEKTRON‹K-ASFALT CD. N0.22/F-TEL.:0414 217 14 87 fiANLIURFA-B‹REC‹K-YARAfiIR SO⁄UTMA-MEYDAN MAH 10
TEMMUZ CAD KÖPRÜ ÇIKIfiI NO : 9-TEL.:0414 652 36 38 fiIRNAK-S‹LOP‹-ABAY ELEKTRON‹K-2. CADDE S‹EMENS BAY‹‹ KARfiISI-TEL.:0486 518 50 99
fiIRNAK-ULUDERE-ÜRÜN ELEKTRON‹K-CUMHUR‹YET CD. PTT YANI-TEL.:0486 351 28 22 TEK‹RDA⁄-HAYRABOLU-POYRAZ TEKN‹K-H‹SAR MAH. ADELET
SK. NO:24-TEL.:0282 315 55 48 TEK‹RDA⁄-SARAY-BATI TEKN‹K-YEN‹ MH. TAKS‹M CD. NO:9 TEL.:0282 768 69 34 TEK‹RDA⁄-MURATLI-AKAN ELEKTRON‹K-
MURAD‹YE MH. NAZIM SAV CD. NO:30/A-TEL.:0282 361 28 17 TEK‹RDA⁄-ÇORLU-FULL TEKN‹K-MUH‹TT‹N MH. F‹K‹R SK. NO:12/B-TEL.:0282 652 28 68
TEK‹RDA⁄-ARI ELEKTRON‹K-AYDO⁄DU MH. fiEH‹TLER CD. NO: 33/A-TEL.:0282 263 40 61 TEK‹RDA⁄-MALKARA-KER‹MO⁄ULLARI T‹CARET-YEN‹MAHALLE
GÜLDESTE SOK. NO: 4/B-TEL.:0282 427 16 61 TEK‹RDA⁄-ÇERKEZKÖY-ÇA⁄RI ELEKTRON‹K-G.O. PAfiA MH. SAYAR SK. KARDEfiLER APT. NO:5 -TEL.:0282
726 02 66 TOKAT-ERBAA-H‹DRO ELEKT‹R‹K-CUMHUR‹YET MH. GAZ‹ BULVARI NO:144-TEL.:0356 715 56 01 TOKAT-C‹HAN ELEKTRON‹K-G.O.PAfiA
BULVARI S‹VAS CAD. NO:290/A- TEL.:0356 214 00 74 TOKAT-TURHAL-GÜÇLÜ SO⁄UTMA-CELAL MH. TUNA SK. NO:11-TEL.: 0356 276 39 66 TOKAT-CEM
TEKN‹K SO⁄UTMA-SO⁄UKPINAR MH. GOP BULVARI 241/A GÖKÇE PASAJI NO:14-TEL.:0356 212 37 57 TRABZON-ÇIRAK TEKN‹K-FAT‹H MH. AYASOFYA
CD. NO: 57 MÜZE KARfiISI-TEL.:0462 229 66 44 TRABZON-AKÇAABAT-ATOM ELEKTR‹K-ORTA MH. ERENLER SK. NO:5 -TEL.:0462 228 12 58 TRABZON-
YET-SAN ELEKTRON‹K-FAT‹H MH. FAT‹H CD. COfiKUNER PASAJI NO:2/B-TEL.:0462 223 15 04 TRABZON-ARAKLI-fiENGÜL TEKN‹K-BA⁄KUR ÇARfiISI
NO: 10 / A-TEL.:0462 721 74 11 VAN-ERC‹fi-ÖZKANAT TAM‹RAT-EMN‹YET KARAKOL ARKASI NO:3-TEL.:0432 351 95 40 VAN-EB‹NÇ TEKN‹K-SIHKE CAD
ATEfi SOK. NO 10-TEL.:0432 214 31 37 VAN-BURHAN AYDIN - ÖZ USTA TAM‹RAT-KÜLTÜR MERKEZ‹ C‹VARI DEM‹RC‹LER 1. SK. NO:1/C-TEL.:0432 216
34 58 YALOVA-ALTINOVA-DO⁄AN TEKN‹K SO⁄UTMA-CUMHUR‹YET MH.MERKEZ DURAK KARfiISI NO:29A-TEL.:0226 461 26 21 YALOVA-TINAZTEPE
ELEKTR‹K-‹STANBUL CD. BORA SK. NO: 14-TEL.:0226 812 01 60 YOZGAT-AKDA⁄MADEN‹-AYDIN SO⁄UTMA-AHISHAVI MH. 2. HANLAR SK. NO :10TEL.:0354 314 64 12 YOZGAT-ÖNDER ELEKTRON‹K-UN PAZARI NO:14-TEL.:0354 212 79 67 YOZGAT-SORGUN-KARDEfiLER ELEKTRON‹K-CUMHUR‹YET
CD. NO:29 1/C-TEL.:0354 415 45 79 ZONGULDAK-KRD ERE⁄L‹-UZMAN ELEKTRON‹K-ERDEM‹R CAD NO:130-TEL.:0372 316 31 28 ZONGULDAK-MERKEZ-
EMEK ELEKTRON‹K-PAP‹LA ‹fi HANI ZEM‹N KAT NO:9 SO⁄UKSU-TEL.:0372 251 67 31
- 28 -
Page 30

MÜfiTER‹ H‹ZMETLER‹
De¤erli Müflterimiz,
En uygun fiyata en iyi ürünü vermenin yan› s›ra; en iyi hizmeti vermenin de
önemli oldu¤una inan›yoruz. Bu nedenle siz bilinçli tüketicilere daha yak›n
olabilmek için, internet adresimizdeki eriflim formlar›n›n yan› s›ra, tüketici
dan›flma hatlar›m›z› da hizmetinize açm›fl durumday›z.
TÜKET‹C‹
DANIfiMA HATTI
444 66 86
MERKEZ
TEKN‹K SERV‹S
(0212) 422 94 94
www.sinbo.com.tr
Dan›flma Hatlar›m›z›,
- Hafta içi her gün 08.30-18.00 saatleri aras›nda arayabilir; istek, öneri ve
flikayetlerinizi firmam›za iletebilirsiniz.
Tüketicinin Dikkatine:
Ürünlerimizle ilgili hizmetleri tam olarak alabilmek için afla¤›daki önerilere
uyman›z› rica ederiz:
1. Ürünü ald›¤›n›zda Garanti Belgesini mutlaka yetkili sat›c›n›za onaylatt›r›n›z.
2. Ürünü kullanma k›lavuzu esaslar›na göre kullan›n›z.
3. Ürününüzle ilgili hizmet talebiniz oldu¤unda yukar›daki telefon
numaralar›ndan, Tüketici ‹liflkileri Merkezi'ne baflvurunuz.
4. Ürünü promosyon arac›l›¤› ile edinmiflseniz, ürüne ait garanti belgesini en
yak›n yetkili servisimize giderek onaylatt›r›n›z.
5. Teknik servisteki ifliniz bitti¤inde "Hizmet Fifli" almay› unutmay›n›z.
Alaca¤›n›z bu fifl, ileride ürününüzde meydana gelebilecek herhangi bir
sorunda size yarar sa¤layacakt›r.
6. Cihaz›n›z ilk çal›flt›rmada çal›flm›yor veya ar›zal› ise, size en yak›n S‹NBO
Yetkili Servisine baflvurabilir veya S‹NBO Dan›flma Hatlar›ndan yard›m
alabilirsiniz.
- 29 -
Page 31

- GARANT‹ fiARTLARI -
1. Garanti süresi, mal›n teslim tarihinden itibaren bafllar ve 2 y›ld›r.
2. Mal›n bütün parçalar› dahil(kullan›m hatalar›ndan kaynaklanan k›r›lmalar hariç) olmak üzere tamam› firmam›z›n
garantisi kapsam›ndad›r.
3. Mal›n garanti süresi içerisinde ar›zalanmas› durumunda, tamirde geçen süre garanti süresine eklenir. Mal›n tamir
süresi en fazla 30 ifl günüdür. Bu süre, mala iliflkin ar›zan›n servis istasyonuna servis istasyonunun olmamas›
durumunda, mal›n sat›c›s›, bayii, acentas›,temsilcili¤i, ithalatç›s› veya imalatç›s›-üreticisinden birisine bildirim tarihinden
itibaren bafllar. Mal›n ar›zas›n›n 15 ifl günü içerisinde giderilmemesi halinde, imalatç›-üretici veya ithalatç›; mal›n
tamiri tamamlan›ncaya kadar, benzer özelliklere sahip baflka mal› tüketicinin kullan›m›na tahsis etmek zorundad›r.
4. Mal›n garanti süresi içerisinde, gerek malzeme ve iflçilik, gerekse montaj hatalar›ndan dolay› ar›zalanmas› halinde,
iflçilik masraf›, de¤ifltirilen parça bedeli ya da baflka herhangi bir ad alt›nda hiçbir ücret talep etmeksizin tamiri
yap›lacakt›r.
5. Tüketicinin onar›m hakk›n› kullanmas›na ra¤men mal›n;
-Tüketiciye teslim edildi¤i tarihten itibaren, belirlenen garanti süresi içinde kalmak kayd›yla,bir y›l içerisinde; ayn›
ar›zan›n ikiden fazla tekrarlanmas› veya farkl› ar›zalar›n dörtten fazla meydan gelmesi veya belirlenen garanti süresi
içerisinde farkl› ar›zalar›n toplam›n›n alt›ndan fazla olması unsurlar›n›n yan›s›ra, bu ar›zalar›n maldan yararlanamamay›
sürekli k›lmas›,
-Tamiri için gereken azami sürenin afl›lmas›,
-Firman›n servis istasyonunun, servis istasyonunun mevcut olmamas› halinde s›rayla sat›c›s›, bayii, acentesi temsilcili¤i,
ithalatç›s› veya imalatç› - üreticisinden birisine düzenleyece¤i raporla ar›zan›n tamirine mümkün bulunmad›¤›n›n
belirlenmesi,durumlar›nda, tüketici mal›n ücretsiz de¤ifltirilmesini, bedel iadesi veya ay›p oran›nda bedel indirimi
talep edebilir.
6. Mal›n kullanma k›lavuzunda yer alan hususlara ayk›r› kullan›lmas›ndan kaynaklanan ar›zalar garanti kapsam›
d›fl›ndad›r.
7. Garanti Belgesi ile ilgili olarak ç›kabilecek sorunlar için Sanayi ve Ticaret Bakanl›¤› Tüketicinin ve Rekabetin
Korunmas› Genel Müdürlü¤ü’ne baflvurulabilir.
‹THALATÇI F‹RMA
DE‹MA ELEKTROMEKAN‹K ÜRÜNLER ‹NfiAAT SPOR MALZEMELER‹ ‹MALAT SAN. VE T‹C. A.fi.
Cihangir Mh. Güvercin Cd. No:4 Haramidere Mevkii Avcılar - ‹stanbul - Türkiye
Tel : (0212) 422 94 94 & Fax : (0212) 422 03 49
www.sinbo.com.tr - info@sinbo.com.tr
- 30 -
Page 32

- SHC 4342 SAÇ KESME MAK‹NASI -
- GARANT‹ BELGES‹ -
Garanti Belge No : 79341
SSHY Belge No : 25551
‹THALATÇI F‹RMA
Ünvanı : DE‹MA ELEKTROMEKAN‹K ÜRÜNLER‹ ‹Nfi. SPOR MALZ.
‹MALAT SAN. ve T‹C. A.fi.
Adresi : Cihangir Mah. Güvercin Cad. No:4 Haramidere Mevkii
Avc›lar / ‹STANBUL
Tel. : 0212 422 94 94 & Fax: 0212 422 03 49
Yetkili Kifli :
Yönetim Kurulu Baflkan›
Ürünün Cinsi : SAÇ KESME MAK‹NASI
Markası : S‹NBO
Modeli : SHC 4342
Alt Modeli : Bandrol ve Seri No :
Teslim Tarihi ve Yeri :
Garanti Süresi : 2 Yıldır
Azami Tamir Süresi : 30 ‹fl Günü
Kullanım Ömrü : Bakanl›kça belirlenen ve ilan edilen kullan›m ömrü 7 y›ld›r.
(Ürünün fonksiyonlar›n› yerine getirebilmesi için gereken yedek parça temin süresi)
SATICI F‹RMA
Ünvanı :
Adresi :
Tel.Fax :
Fatura Tarihi ve No :
Teslim Tarihi ve Yeri :
‹mza ve Kafle :
Bu bölüm, ürünü sat›n ald›¤›n›z Yetkili Sat›c› taraf›ndan imzalanacak ve kaflelenecektir.
Bu belgenin kullan›lmas›na; 4077 say›l› Tüketicinin Korunması Hakkında Kanun ve bu Kanun’a dayan›larak yürürlü¤e konulan Garanti Belgesi
Uygulama Esaslar›na Dair Tebli¤ uyar›nca, TC Sanayi ve Ticaret Bakanl›¤› Tüketicinin ve Rekabetin Korunmas› Genel Müdürlü¤ü tarafından
izin verilmifltir.
Garanti Belge Onay Tarihi : 22/02/2010
SSHY Belge Onay Tarihi : 30/03/2010
- 31 -
 Loading...