

Page 1

SHB 3074 KIYMA MAK‹NES‹
KULLANMA KILAVUZU
TR
EN
FR
NL
DE
ES
HR
AR
Page 2

- 1 -
Page 3
1 2 3
4 5 6
7 8 9
10
11
12 13
- 2 -
Page 4

De¤erli Müflterimiz,
Ürün seçiminde S‹NBO'yu tercih etti¤iniz için teflekkür ederiz.
Uzun ve verimli bir kullan›m için cihaz› kullanmadan önce bu k›lavuzu özellikle güvenlik
talimatlar›na dikkat ederek okuman›z› ve devaml› suretle saklaman›z› tavsiye ederiz.
Sayg›lar›m›zla,
Sinbo Küçük Ev Aletleri
Cihazla oynamamalarını güvenceye almak için çocuklar gözetim altında tutulmalıdır.
Bu ürün (çocuklar dahil ) fiziksel hassasiyeti az, zihinsel olarak yetersiz, deneyimsiz ve yeterli bilgiye
sahip olmadan yada kendilerinin güvenli¤inden sorumlu olan kifliler tarafından bu ürünü kullanmak
için gerekli talimatlar verilmemifl kiflilerin kullanımına uygun de¤ildir.
Children being supervised not to play with the appliance.
This appliance is not intended for use by persons (including children) with reduced physical,sensory
or mental capabilities, or lack of experience and knowledge, unless they havebeen given supervision
or instruction concerning use of the appliances by a personresponsible for their safety. Children
should be supervised to ensure that they do not play with the appliance.
SINBO SHB 3074 KIYMA MAK‹NES‹
KULLANIM TAL‹MATI
Lütfen önemli güvenlik talimatlar›n› tam olarak okuyunuz ve bu talimatlar› saklay›n›z.
TANIM
1. Hazne plakas› 10. Kesim plakas› (ince)
2. Motor gövdesi 11. Kesim plakas› (orta)
3. Açma/ Kapama/ Geri Dü¤mesi 12. Kesim plakas› (kaba)
4. R/ON anahtar› 13. Sabitleme halkas›
5. Kilitleme dü¤mesi deli¤i 14. Kesim b›ça¤›
6. Kilitleme dü¤mesi 15. Sosis ba¤lant›s›
7. Yiyecek iticisi 16. Kibbe ba¤lant›s›
8. Bafll›k 17. Bafll›k girifli
9. Besleme vidas›
ÖNEML‹ GÜVENL‹K TEDB‹RLER‹
• Sadece ev içi kullan›m amaçl›d›r. Endüstriyel amaçl› kullanmay›n›z.
• Cihaz› takarken ve sökerken fiflini çekiniz.
• Çocuklar›n yan›nda herhangi bir cihaz kullan›rken yak›nda gözetim gereklidir.
• Cihaz› tafl›rken motor gövdesinden iki elle tuttu¤unuzdan emin olunuz. Cihaz› sadece
hazne plakas› veya bafll›¤›ndan tutarak tafl›may›n›z.
• Kibbe ba¤lant›s›n› kullan›rken kesim b›ça¤› ile kesim plakas›n› kar›flt›rmay›n›z.
- 3 -
Page 5

• Kesinlikle elle yiyecek beslemesi yapmay›n›z. Her zaman yiyecek iticisini kullan›n›z.
• Kemik, f›nd›k vb gibi sert maddeleri ö¤ütmeyiniz.
• Sert fiberli olan di¤er maddeleri ö¤ütmeyiniz.
• K›yma makinesinin sürekli çal›flt›r›lmas› 10 dakikay› geçmemelidir. Motorun so¤umas›
için 10 dakikal›k zaman aral›klar› verilmelidir.
• Cihaz çal›fl›rken ters fonksiyon yap›lmamal›d›r (örne¤in anahtar› ''AÇIK'' konumdan
''GER‹'' konuma ve bunun tersini yapma), ö¤ütücü tamamen durana kadar en az 1 dakika
bekleyiniz. Aksi takdirde anormal bir gürültüye, titreflime veya cihazda geçici bir elektrik
k›v›lc›m›na sebep olabilir. Cihaz›n zarar görmesine yol açabilir ve kullan›c›y› korkutabilir.
• Kullan›m sonras›nda ö¤ütücü bafll›¤›nda biraz yiyecek kalm›fl olacakt›r. Bu durum
normaldir. Uç tarafta yiyecek zeminine yap›flm›fl biraz siyah metal tozu olabilir. Lütfen
bunlar› toplay›p at›n›z, yemeyiniz.
• S›k›flmadan kaç›nmak için cihaz› afl›r› bas›nç ile çal›flt›rmaya zorlamay›n›z.
• Devre kesici aktif hale geldi¤inde, cihaz› açmay›n›z.
• Parçalar›n› kendiniz de¤ifltirmeye veya tamir etmeye kesinlikle kalk›flmay›n›z.
• Bu cihaz e¤er fiziksel, alg›sal ya da zihinsel yeterlilikleri güvenli olarak kullanmalar›na
engel oluyorsa çocuklar veya di¤er kifliler için yard›m veya gözetim olmadan kullan›m
amaçl› de¤ildir.
• Çocuklar›n cihazla oynamamalar›n› sa¤lamak için gözetilmeleri gerekir.
• E¤er güç kordonu veya fifli zarar görmüflse, cihaz›n›z› kullanmay›n›z. Tehlikeden
kaç›nmak için onayl› bir servis merkezi taraf›ndan de¤ifltirilmelidir.
‹LK DEFA KULLANIM
• De¤erlendirme etiketinde gösterilen voltaj›n evinizdeki ana hat voltaj›na karfl›l›k geldi¤ini
kontrol ediniz.
• Tüm parçalar› (gövde hariç) s›cak sabunlu suyla y›kay›n›z.
• Fifle takmadan önce “ON/OFF/ REV” anahtar›n›n "OFF" (KAPALI) konumda oldu¤undan
emin olunuz.
KULLANIM TAL‹MATI
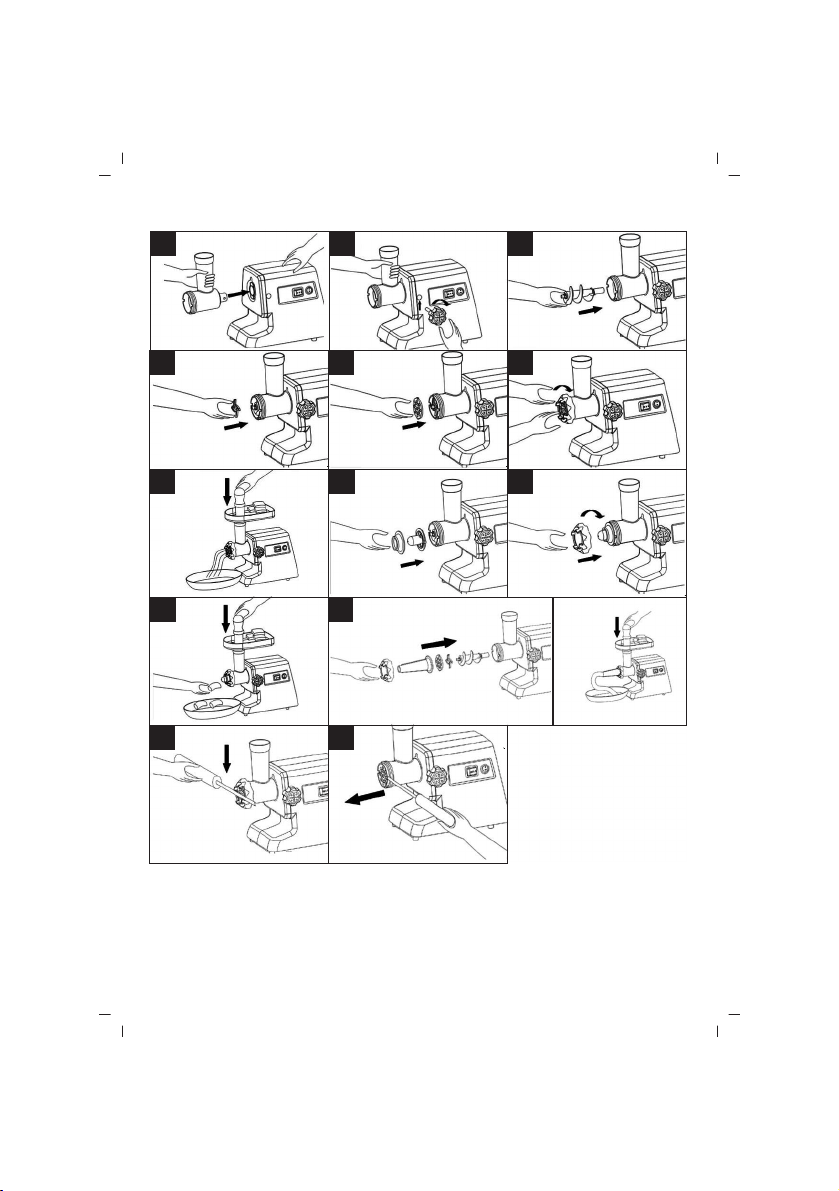
MONTAJ
• Bafll›¤› tutarak tek elle girifle sokunuz, motor gövdesinin yan taraf›ndaki kilitleme
dü¤mesini yerlefltiriniz, bafll›¤› s›k›flt›rmak için saat yönünde çeviriniz (fiekil.2)
• Besleme vidas›n› bafll›¤a yerlefltiriniz, ilk olarak uzun ucundan tutarak motor gövdesine
oturana kadar besleme vidas›n› hafifçe çevirerek yerlefltiriniz (fiekil.3).
• Kesim b›ça¤›n› besleme vidas› miline b›ça¤›n yönü ön tarafa gelecek flekilde resimdeki
gibi yerlefltiriniz (fiekil.4). E¤er tam olarak tak›lmazsa, et k›y›lmayacakt›r.
• ‹stenen kesim plakas›n› kesim b›ça¤› yan›na yuvalardaki ç›k›nt›lar› takarak yerlefltiriniz
(fiekil.5).
• Kesim plakas›n›n ortas›n› bir parmakla destekleyiniz veya bast›r›n›z ve sonra di¤er elle
s›k›flana kadar sabitleme halkas›n› vidalay›n›z (fiekil.6). Afl›r› s›k›flt›rmay›n›z.
• Hazne plakas›n› bafll›¤a yerlefltiriniz ve konuma sabitleyiniz.
- 4 -
Page 6

• Cihaz› sa¤lam bir yere yerlefltiriniz.
• Motor gövdesinin alt ve yan taraf›ndaki hava geçifli serbest b›rak›lmal› ve t›kanmamal›d›r.
ET KIYMA ‹fiLEM‹
• Tüm yiyecekleri parçalar haline getiriniz (zay›f, kemiksiz ve ya¤s›z et tavsiye edilir,
ortalama boy: 20 mm x 20 mm x 60 mm) böylece hazne girifline kolayca s›¤acaklard›r.
• Fifli prize tak›n ve “R/ON” dü¤mesini "ON" pozisyonuna getirin,ard›ndan “AÇMA/KAPAMA/
Geri” dü¤mesini "ON" pozisyonuna getirin.
• Hazne plakas›na yiyecek besleyiniz. Sadece yiyecek iticisini kullan›n›z (fiekil.7).
• Kullan›m sonras›nda cihaz› kapat›n›z ve fiflini güç kayna¤›ndan çekiniz.
TERS ÇALIfiTIRMA FONKS‹YONU
• Kar›flt›rma durumunda “R/ON” dü¤mesini “R” pozisyonuna ve “AÇMA/KAPAMA/Geri”
dü¤mesini “R” pozisyonuna getirmek suretiyle cihaz› kapat›n.
• Besleme vidas› z›t yönde dönüyor olacakt›r ve bafll›k boflalacakt›r.
• E¤er çal›flmazsa, cihaz› kapat›n›z ve temizleyiniz.
‹ÇL‹ KÖFTE YAPIMI
TAR‹FE MALZEMELER‹
Koyun eti 100g
Zeytinya¤› 1 1/çay kafl›¤›
So¤an (ince kesilmifl) 1 1/ çay kafl›¤›
Baharat zevkinize göre
Tuz zevkinize göre
Un 1 1/ çay kafl›¤›
• Koyun etini bir veya iki kere k›y›n›z.
• Kahverengi olana kadar so¤an› k›zart›n›z ve k›y›lm›fl koyun eti, baharat, tuz ve un
ekleyiniz.
ÇIKIfi KAPA⁄I
Ya¤s›z et 450g
Un 150-200g
Baharat zevkinize göre
Hindistan cevizi (ince kesilmifl) 1
K›rm›z› toz biber zevkinize göre
Biber zevkinize göre
• Eti üç kere k›y›n›z ve tüm içerik maddelerini bir kâse içinde kar›flt›r›n›z. Ç›k›fl kapa¤›
için daha çok et ve daha az un daha iyi k›vam ve lezzet sa¤layacakt›r.
• Kar›fl›m› üç kez ö¤ütünüz.
- 5 -
Page 7

• Ad›mlar 5-3'ü tersine uygulayarak kesim plakas›n› ve kesim b›ça¤›n› ç›kartmak için
cihaz› sökünüz.
• ‹çli köfte ba¤lant›lar›n› yuvalara ç›k›nt›lar› takarak besleme vidas› mili üzerine birlikte
yerlefltiriniz (fiekil.8).
• S›k›flana kadar sabitleme halkas›n› vidalay›n›z. Afl›r› s›k›flt›rmay›n›z (fiekil.9).
• Silindirik ç›k›fl kapa¤›n› ayarlay›n›z (fiekil.10).
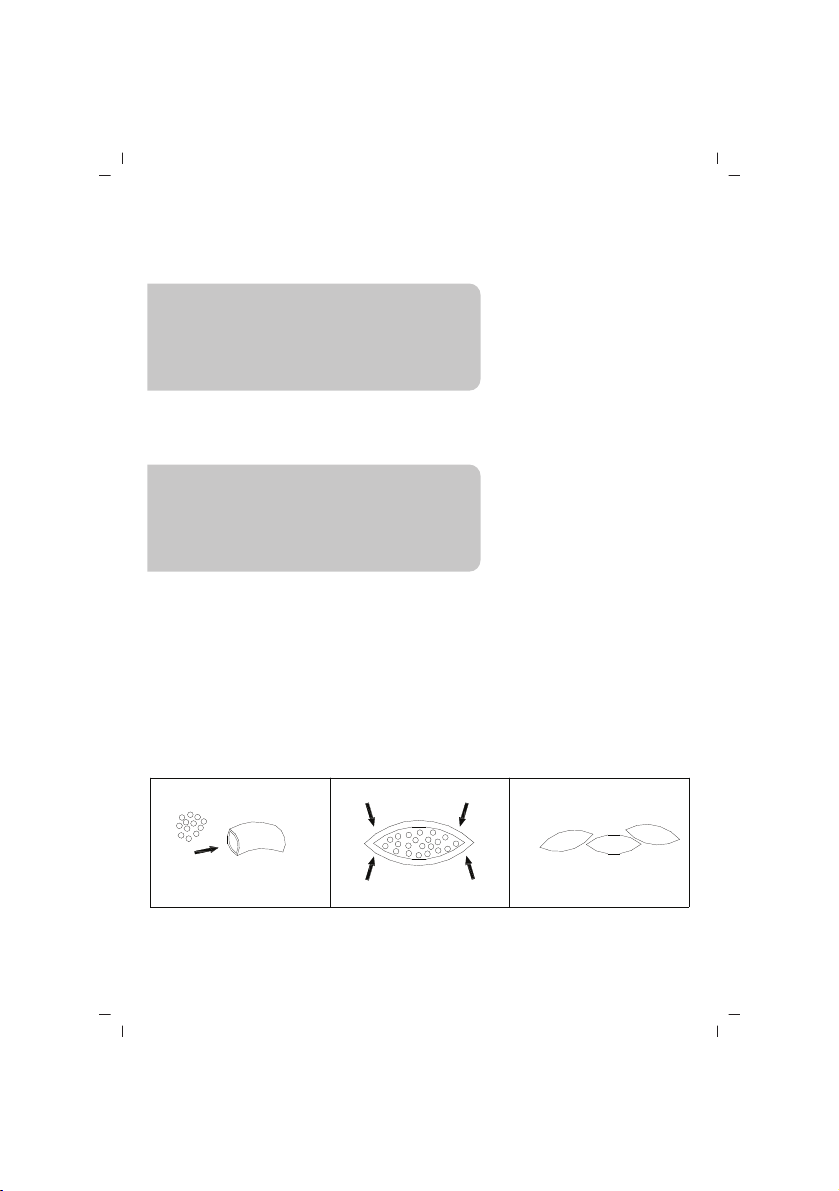
• ‹çli köfteyi flekildeki gibi oluflturup k›zart›n›z.
SOS‹S YAPIMI
Bafllamanda önce lütfen sosis ba¤lant›s›n› afla¤›daki gibi tak›n›z (fiekil.11)
TEM‹ZLEME VE BAKIM
SÖKME
• Motorun tamamen durdu¤undan emin olunuz.
• Fiflini güç ç›k›fl›ndan çekiniz.
• Resimler 6-1'deki ad›mlar› tersine uygulayarak sökünüz.
• Sabitleme halkas› ellerle kolayca ç›kart›lm›yorsa, lütfen araç kullan›n›z(fiekil.12).
• Kesim plakas›n› kolayca ç›kartmak için flekildeki gibi plaka ve bafll›k aras›na bir tornavida
yerlefltiriniz ve yukar› kald›r›n›z (fiekil.13).
TEM‹ZLEME
• Et vb ç›kart›n›z. Her bir parçay› s›cak sabunlu suda y›kay›n›z.
• Klor içeren bir beyazlat›c› solüsyon alüminyum yüzeylerin rengini bozacakt›r.
• Motor gövdesini suya bat›rmay›n›z ancak sadece nemli bir bezle temizleyiniz.
• Tinerler ve petrol cihaz›n rengini çatlatacak veya de¤ifltirecektir.
• Tüm kesim parçalar›n› bitkisel ya¤l›-›slak bezle temizleyiniz.
- 6 -
Page 8

ENGLISH
SINBO SHB 3074 MEAT GRINDER
INSTRUCTION MANUAL
Please read thoroughly for important safety and save these instructions
DESCRIPTION
1. Hopper plate 10. Cutting plate (fine)
2. Motor housing 11. Cutting plate (medium)
3. On/Off/Reverse switch 12. Cutting plate (coarse)
4. R/ON switch 13. Fixing ring
5. Locking knob hole 14. Cutting blade
6. Locking knob 15. Sausage attachment
7. Food pusher 16. Kibbe attachment
8. Head 17. Head inlet
9. Feed screw
IMPORTANT SAFEGUARDS
• Household use only. Do not use for industrial purpose.
• Unplug from outlet when assembling and disassembling the unit.
• Close supervision is necessary when any appliance is used near children.
• When carrying the unit be sure to hold the motor housing with both hands. Do not carry
the unit by holding only the hopper plate or head.
• Do not fix the cutting blade and cutting plate when using kibbe attachment.
• Never feed food by hand. Always use food pusher.
• Do not grind hard food such as bones, nuts, etc.
• Do not grind ginger and other materials with hard fiber.
• Continuous running of meat grinder should be not more than 10 minutes with the
following 10 minutes interval for motor cooling.
• Reverse function is prohibited while the appliance is operating (For example switch
“ON” knob to “REV” knob or on the contrary), wait at least one minute until grinder has
come to a complete stop,otherwise it may cause an abnormal noise, vibration or a
transitory electric spark in the appliance. It could result easily damage to appliance and
make a user frightened.
• After use, there would be a little food left in the grinder head. This is normal. There
might be a bit of black metal powder adhering to the food ground in the end. Please pick
them out and throw away, do not eat them.
• To avoid jamming, do not force to operate the unit with excessive pressure.
• When the circuit breaker activates, do not switch on.
• Never try to replace the parts and repair the unit by yourself.
• This appliance is not intended for use by persons (including children) with reduce
physical, sensory or mental capabilities, or lack of experience and knowledge, unless
they have been given supervision or instruction concerning use of the appliance by a
- 7 -
Page 9

person responsible for their safety.
• Children should be supervised to ensure that they do not play with the appliance.
• If the supply cord is damaged, it must be replaced by the manufacturer or its service
agent or a similarly qualified person in order to avoid a hazard.
FOR THE FIRST TIME
• Check that voltage indicated on the rating label correspond the mains voltage in your
home.
• Wash all parts (except body) in warm soapy water.
• Before plugging in, ensure the “ON/OFF/ REV” switch is turned to "OFF" position.
INSTRUCTION FOR USE
ASSEMBLING
• Holding the head and insert it in the inlet with one hand, place the locking knob into
the hole on the side of the motor housing?tighten it clockwise to secure the head .(fig.2)
• Place the feed screw into the head, long end first, by turning the feed screw slightly
until it is set into the motor housing (fig.3).
• Place the cutting blade onto the feed screw shaft with the blade facing the front as
illustrated (fig.4). If it is not fitted properly, meat will not be ground.
• Place the desired cutting plate next to the cutting blade, fitting protrusions in the slots
(fig.5).
• Support or press the centre of the cutting plate with one finger then screw the fixing
ring until tight with another hand (fig.6). Do not over tighten.
• Place the hopper plate on the head and fix into position.
• Locate the unit on a firm place.
• The air passage at the bottom and the side of the motor housing should be kept free
and not blocked.
MINCING MEAT
• Cut all foods into pieces (Sinewless, boneless and fatless meat is recommended,
approximate size :20 mm x 20 mm x 60 mm) so that they fit easily into the hopper opening.
• Plug in and turn the “R / ON” switch to "ON" position, then turn the “ON/OFF/ Reverse”
switch to "ON" position.
• Feed foods into the hopper plate. Use only the food pusher (fig.7).
• After use switch the unit off and unplug it from the power supply.
REVERSE FUNCTION
• In case of jamming switch the appliance off by turning the “R / ON” switch to
"R" position and “ON/OFF/ Reverse” switch to "R" position.
• Feed screw will be rotating in the opposite direction, and the head will get empty.
• If it doesn't work, switch the unit off and clean it.
- 8 -
Page 10
MAKING KIBBE
RECIPE
STUFFING
Mutton 100g
Olive oil 1 1/tablespoons
Onion (cut finely) 1 1/tablespoons
Spices to your taste
Salt to your taste
Flour 1 1/tablespoons
• Mince mutton once or twice.
• Fry onion until brown and add minced mutton, all spice, salt and flour.
OUTLET COVER
Lean meat 450g
Flour 150-200g
Spices to your taste
Nutmeg (cut finely) 1
Powdered red pepper to your taste
Pepper to your taste
• Mince meat three times and mix all ingredients together in a bowl. More meat and less
flour for outlet cover creates better consistency and taste.
• Grind the mixture three times.
• Disassemble by reversing the steps from 5-3 to remove the cutting plate and cutting
blade.
• Place kibbe attachments onto the feed screw shaft together, fitting protrusions in the
slots (fig.8).
• Screw fixing ring into place until tight. Do not over tighten (fig.9).
• Make the cylindrical outlet cover (fig.10).(
• Form kibbe as illustrated below and deep fry.
- 9 -
Page 11

MAKING SAUSAGE
Before starting please assemble sausage attachment as per following (fig.11)
CLEANING AND MAINTENANCE
DISASSEMBLING
• Make sure that the motor has stopped completely.
• Disconnect the plug from the power outlet.
• Disassemble by reversing the steps from 6-1 pictures.
• If the fixing ring is not easily removed by hands, please use tools(fig.12).
• To remove the cutting plate easily, place a screwdriver between the cutting plate and
the head as illustrated and lift it up (fig.13).
CLEANING
• Remove meat, etc. Wash each part in warm soapy water.
• A bleaching solution containing chlorine will discolor aluminum surfaces.
• Do not immerse the motor housing in water, but only wipe it with a damp cloth.
• Thinners and petrol will crack or change the color of the unit.
• Wipe all the cutting parts by vegetable oil-wet cloth.
- 10 -
Page 12

FRANÇAIS
SINBO SHB 3074 HACHOIR à VIANDE ELECTRIQUE
MODE D’EMPLOI
Lire attentivement ces instructions et le bien concerver pour y référer dans le futur.
DESCRIPTIONS
1. Plateau de remplissage 10. Disque à trou fine
2. Bloc Moteur 11. Disque à trou moyen
3. Bouton Marche/Arrêt/ Revers 12. Disque à trou gros
4. Fonction R/ON 13. Bague de serrage
5. Trou de bouton de verrouillage 14. Couteau en croix
6. Bouton de verrouillage 15. Entonnoir à saucisse
7. Poussoir 16. Accessoire de Kébbé
8. Boitier du hachoir 17. Sortie moteur
9. Vis sans fin
CONSIGNES IMPORTANTES DE SÉCURITÉ
• Cet appareil est destiné à un usage domestique.Ne pas l’utiliser à des fins industriels.
• Débrancher la fiche de la prise pendant l’installation et le démontage
• Une surveillance proche est nécessaire lorsqu’un appareil électrique est utilisé à
proximité des enfants.
• Porter l’appareil en saisissant le bloc moteur avec les deux mains et non par la coupe
de remplissage ou le boitier du hachoir.
• Ne pas utiliser le couteau ou les disques en utilisant l’accessoire kébbé
• Ne JAMAIS mettre les aliments dans le boitier du hachoir avec les mains.Utiliser
absolument le poussoir
• Ne pas tenter de hacher les aliments tels que des os ou des fruits secs.
• Ne pas tenter de hacher les aliments fibreux durs
• Ne pas faire fonctionner l’ hachoir en continu pendant plus de 10 minutes.Laisser
refroidir l’hachoir environ 10 minutes avant d’utiliser à nouveau
• Ne pas utiliser la fonction de reverse pendant le fonctionnement de l’appareil ( Tourner
le bouton de “MARCHE vers “ARRET” ou vice versa ), attendre au moins une minute pour
l’arrêt complet de l’appareil ,sinon les bruits anormaux, des vibrations ou d’allumage
électrique peuvent se produire de l’appareil. Par conséquent l’appareil peut facilement
endommager ou l’utilisateur peut avoir peur.
• Un quantité d’aliment pourrait rester dans le boitier du hachoir après l’utilisation.Ceci
est tout à fait normal. Le poudre de métal noir peut coller sur l’aliment restant au bout
de la machine. Jetez ce morceau à la poubelle et ne pas le manger certainement.
• Éviter de surcharger la machine afin de ne pas la bloquer.
• Ne pas allumer la machine à nouveau si le disjoncteur est activé.
• Ne jamais tenter de réparer ou changer les pièces vous – même.
• Cet appareil n'est pas prévu pour être utilisé par des personnes (y compris les enfants)
- 11 -
Page 13

dont les capacités physiques, sensorielles ou mentales sont réduites, ou des personnes
dénuées d'expérience ou de connaissance, sauf si elles ont pu bénéficier, par l'intermédiaire
d'une personne responsable de leur sécurité, d'une surveillance ou d'instructions
préalables concernant l'utilisation de l'appareil
• Une surveillance proche est nécessaire pour éviter les enfants jouer avec l’appareil.
• Si le cordon d'alimentation ou la fiche est endommagé, il doit être remplacé par votre
revendeur, son service après-vente ou une personne de qualification similaire afin d'éviter
tout danger.
PREMIERE UTILISATION
• Vérifier que le voltage indiqué sur la plaque signalétique de l’appareil correspond bien
à celui de votre installation électrique.
• Laver toutes les pièces dans de l’eau chaude savonneuse à l’exception du bloc moteur
• Vérifier l’interrupteur de Marche /Arrêt/Reverse qu’il soit à la position “Arrêt” avant
de brancher l’appareil à la prise de courant.
MODE D’EMPLOI
MONTAGE
• En tenant le boitier par la main, l’introduire dans la sortie du bloc moteur, appuyer sur
le bouton de verrouillage situé à côté du bloc moteur, tourner le boitier vers le sens des
aiguilles d’une montre afin de serrer(Figure 2)
• Introduire l’extrémité longue de la vis sans fin dans le boitier du hachoir et la tourner
légèrement jusqu’à ce quelle soit fixée dans le bloc moteur.(Figure 3 )
• Poser le couteau sur la vis sans fin : le couteau vers l’avant (figure 4). En cas d’erreur
de montage ,il n’est pas possible de hacher de la viande.
• Poser le disque souhaité devant le couteau. Vérifiez que la partie crantée du disque
est alignée avec les encoches prévues du couteau.(Figure 5 )
• En tenant le disque par la main ou appuyant sur le centre avec une doigt, visser
fermement la bague de serrage avec l’autre main.( Figure 6). Ne pas serrer excessivement
• Positionner le plateau de remplissage sur le boitier du hachoir et le fixer.
• Placer le hachoir sur une surface solide et plane
• Les fentes d’aération du bloc moteur ne doivent pas être obstruées.
HACHER LA VIANDE
• Couper tous les aliments en morceaux de dimension adaptée pour qu’ils puissent être
introduits dans la tubulure de remplissage (il est recommandé d’utiliser la viande maigre
et désossée de dimension 20 mm x 20 mm x 60 mm)
• Branchez la fiche à la prise de courant et tournez le bouton R/ON à la position ‘ON’
puis le bouton MARCHE/ARRET/REVERS à la position ‘ON’.
• Remplir les aliments dans la tubulure.Utiliser uniquement le poussoir. (Figure 7)
• Éteindre l’appareil et le débrancher après l’utilisation.
- 12 -
Page 14

FONCTION DE REVERSE
• En cas de mélange, tournez le bouton ‘R/ON’ à la position ‘R’ et le bouton
MARCHE/ARRET/REVERS à la position ‘R’ et éteignez l’appareil.
• Le vis sans fin va tourner vers le sens opposé et le boitier sera libéré.
• Si vous n’arrivez pas à resoudre le blocage, éteignez l’appareil, débranchez la fiche et
nettoyez –le.
Préparation de Kébbé ( cuisine traditionnelle du Moyen-Orient )
RECETTE
INGREDIENS POUR LA FARCE
Viande d’agneau 100g
Huile d’olive 1 cuillère à café
Oignon ( coupés en petits dés) 1 cuillère à café
Épices selon votre demande
Sel selon votre demande
Farine 1 cuillère à café
• Hacher la viande d’agneau une ou deux fois.
• Ajoutez la viande, les épices , du sel et la farine après avoir faire revenir l’oignons
hachés avec l’huile.
INGREDIENS POUR LA PÂTE
Viande Maigre 450g
Farine 150 -200g
Épices selon votre demande
Noix de coco (coupés en p etits dés) 1
Poivron rouge selon votre demande
Poivre selon votre demande
• Mélanger les ingrédiens dans un bol après avoir haché la viande 3 fois.Si vous ajoutez
plus de viande et moins de farine pour la pâte, le goût serait mieux.
• Hacher 3 fois le mélange.
• Retirer le couteau en croix et le disque en suivant les étapes de 5 à 3.
• Placer les accessoires kébbé de façon que les encoches soient bien placés dans les
fentes de vis sans fin.(Figure 8)
• Fixer la bague de serrage à sa place.Ne pas serrer excessivement (Figure 9 )
• Régler la pâte cylindirique(Figure 10)
• Créer le kébbé comme indiqué au figure et les frire.
- 13 -
Page 15

PRÉPARER DE SAUCISSES
Avant de commencer, placez l’entonnoir de saucisses comme suit (Figure 11 )
NETTOYAGE ET ENTRETIEN
DÉMONTAGE
• Assurez vous que le moteur soit complètement arrêté.
• Débrancher la fiche de la prise
• Démonter la machine en suivant les figures de 6.ème étape vers l’arrière.
• Si vous ne pouvez pas retirer la bague de serrage avec la main, utiliser l’outil.(Figure
12)
• Pour retirer facilement le disque à trou , placer un tournevis entre le disque et le boitier
et le relever comme indiqué au figure ( Figure 13 )
NETTOYAGE
• Retirez la viande restante dans la machine. Lavez toutes les pièces dans l’eau chaude
savaonneuse.
• Les décolorants contenant du chlore , provoquent des surfaces d’aliminium à s’estomper
• Ne pas plonger le bloc moteur dans l’eau, nettoyez –le au moyen d’un chiffon humide
et bien l’essuyer.
• Les substances tels que le diluant ou l’essence causent la décoloration ou la fissuration
sur la machine.
• Graisser toutes les pièces tranchantes au moyen d’huile comestible.
- 14 -
Page 16

NEDERLANDS
SINBO SHB 3074 GEHAKTMACHINE
GEBRUIKSAANWIJZING
Alstublieft de belangrijke veiligheidsrichtlijnen helemaal lezen en deze richtlijnen
bewaren.
BESCHRIJVING
1. Reservoirplaat 10. Snijplaat (dun)
2. Motorstructuur 11. Snijplaat (middelmatig)
3. Aan/Uit/Terugknop 12. Snijplaat (dik)
4. R/ON schakelaar 13. Vastmakingsketting
5. De gat van afsluitknop 14. Snijmes
6. Afsluitknop 15. Worstverbinding
7. Voedselduwer 16. Kibbe aansluiting
8. Hoofdstel 17. ‹ngang hoofdstel
9. Voedingsschroef
BELANGRIJKE VEILIGHEIDSMAATREGELEN
• Is alleen om thuis te gebruiken. Niet gebruiken voor industriele doelen.
• Tijdens het monteren en demonteren van het apparaat de stekker eruit trekken.
• Als u bij de kinderen de een of andere apparaat gebruikt is er van dichtbij toezicht
nodig.
• Tijdens het dragen van het apparaat met twee handen vasthouden van de structuur.
Het apparaat niet dragen door alleen vast te houden van de reservoirplaat of van het
hoofdstel.
• Tijdens het gebruiken van de kibbe aansluiting de snijmes en de snijplaat niet met
elkaar verwarren.
• Absoluut niet met de hand voeding geven. Altijd de voedselduwer gebruiken.
• De harde materialen als bot, hazelnoot niet vermalen.
• De andere materialen die van harde fiber zijn niet vermalen.
• De voortdurende werking van de gehaktmachine moet niet meer zijn dan 10 minuten.
Om de motor te laten verkoelen moet er een pause gegeven worden van 10 minuten.
• Tijdens de werking van het apparaat moet er geen tegenfunctie gedaan worden
(bijvoorbeeld de sleutel van “OPEN” naar “TERUG” positie en het tegengestelde van deze
niet doen), minimaal 1 minuten wachten totdat de vermaler helemaal stopt. Anders kan
het een abnormale geluid, vibratie of een tijdelijke elektrische vonk bij het apparaat
veroorzaken. Deze kan veroorzaken dat het apparaat wordt beschadigd en kan de
gebruiker bang maken.
• Na het gebruik zal een beetje voedsel gebleven zijn in het hoofdstel van de vermaler.
Dit is normaal. Aan het uiteinde kan er een beetje zwarte metalen stof zijn die is geplakt
aan de voedingsvloer. Alstublieft deze verzamelen en weggooien, niet eten.
• Om te vermijden van het vastzitten het apparaat niet forceren om te laten werken met
te veel druk.
- 15 -
Page 17

• Als de schakeling snijdend aktief wordt, niet het apparaat openen.
• De onderdelen absoluut niet zelf gaan vervangen of repareren.
• Dit apparaat kan niet gebruikt worden door de kinderen of andere personen zonder
hulp of toezicht als hun lichamelijke, perceptiele of geestelijke genoegzaamheden het
veilig gebruiken voorkomen.
• Er moet toezicht worden gegeven aan de kinderen om hun niet te laten spelen met het
apparaat.
• Als de krachtkabel of de stekker ervan beschadigd is, uw apparaat niet gebruiken. Om
te vermijden van het gevaar moet het vervangen worden door een goedgekeurde service
centrum.
VOOR HET EERSTE KEER GEBRUIK
• Controleert u of de voltage op het gewaardeerde etiket geschikt is aan de voltage van
de hoofdleiding in uw huis.
• Alle onderdelen (exclusief de structuur) met warme water met zeep wassen.
• U moet zeker zijn van of de “ON/OFF/REV” schakelaar op “OFF”(UIT) positie staat.
GEBRUIKSAANWIJZING
MONTAGE
• Door het hoofdstel vast te houden met één hand in de ingang zetten, de afsluitknop
plaatsen aan de zijkant van de motorstructuur, om het hoofdstel in te draaien draaien
richting de klok (Figuur 2).
• De voedingsschroef aan het hoofdstel plaatsen, door als eerst van de lange uiteinde
vast te houden de voedingsschroef plaatsen door een beetje te draaien tot het past aan
de motorstructuur (figuur 3).
• De snijmes aan de as van de voedingsschroef zoals op de foto plaatsen zodat de richting
van de mes aan de voorkant komt (figuur 4). Als het niet helemaal wordt vastgemaakt
zal er geen vlees stukgesneden worden.
• De gewenste snijplaat naast de snijmes plaatsen door de tanden in de gaten vast te
maken (figuur 5).
• Het midden van de snijplaat met een vinger ondersteunen of aandrukken en later met
de andere hand de vastmakingsketting vastschroeven totdat het vastloopt (figuur 6). Niet
te veel indraaien.
• De reservoirplaat aan het hoofdstel plaatsen en aan de positie vastmaken.
• Het apparaat op een veilige plaats plaatsen.
• De luchtovergang aan de onder- en zijkant van de motor structuur moet vrijgelaten
worden en het moet niet verstopt raken.
DE PROCEDURE VAN VLEES STUKSNIJDEN
• Alle voedingen in stukjes snijden (er wordt dunne vlees, vlees zonder bot en zonder vet
aangeraden, gemiddelde lengte: 20 mm x 20 mm x 60 mm) op deze manier zullen zij in
- 16 -
Page 18

de reservoiringang makkelijk passen.
• Doet u de stekker in het stopcontact brengt u de knop “R/ON” op positie "ON" daarna
brengt u de “AAN/UIT/ Terug” knop op de positie "ON".
• In de reservoirplaat voedsel geven. Alleen de voedselduwer gebruiken (figuur 7).
• Na het gebruik het apparaat uitdoen en de stekker uit het krachtbron trekken.
OMGEKEERD STARTFUNCTIE
Als het in de war is gebracht doet u het apparaat uit door de “R/ON” knop en de
“AAN/UIT/Terug” knop op de poistie “R” te brengen.
• De voedingsschroef zal aan de tegengestelde richting gedraaid worden en het hoofdstel
zal loskomen.
• Als het niet start/werkt, het apparaat uitdoen en schoonmaken.
HET MAKEN VAN EEN GEHAKTBALLETJE DIE GEVULD IS MET STUKJES TARWE
TARIEFMATERIALEN
Schapevlees 100g
Olijfolie 1 1/theelepel
Ui (dun gesneden) 1 1/ theelepel
Kruid volgens uw smaak
Zout volgens uw smaak
Meel 1 1/ theelepel
• Het schapevlees één of twee keer stuksnijden.
• De ui fruiten totdat het bruin is geworden en stukgesneden schapevlees, kruiden en
meel toevoegen.
UITGANG DEKSEL
Vlees zonder vet 450g
Meel 150-200g
Kruid volgens uw smaak
Kokosnoot (dun gesneden) 1
Rode peper volgens uw smaak
Peper volgens uw smaak
• De vlees drie keer stuksnijden en alle inhoudsmaterialen in een schaal mengen. Voor
de uitgangdeksel zal het meer vlees en minder meel betere dikte en smaak verzorgen.
• Het mengsel drie keer vermalen.
• Door de stappen 5-3 omgekeerd toe te passen het apparaat demonteren om de snijplaat
en snijmes eruit te halen.
• De aansluitingen van het gehaktballetje die gevuld is met stukjes tarwe in de holtes
door de tanden vast te maken op de as van de voedingsschroef samen plaatsen (figuur
8).
- 17 -
Page 19

• De vastmakingsketting vastschroeven totdat het vastloopt. Niet te veel vastmaken
(figuur 9).
• De cilinderige uitgangdeksel afstellen (figuur 10).
• Het gehaktballetje die gevuld is met stukjes tarwe samenstellen en braden zoals op
de figuur.
WORST MAKEN
Voordat u begint alstublieft de worstverbinding vastmaken zoals hieronder (figuur 11)
ONDERHOUD EN REINIGING
DEMONTEREN
• U moet zeker zijn van of de motor helemaal is gestopt.
• De stekker eruit trekken van de krachtuitgang.
• Demonteren door de stappen op de tekeningen 6-1 omgekeerd toe te passen.
• Als de vastmakingsketting niet makkelijk wordt uitgehaald met handen, alstublieft een
gereedschap gebruiken(figuur 12).
• Om de snijplaat makkelijk eruit te halen tussen de plaat en het hoofdstel een
schroevedraaier plaatsen zoals op het figuur en optillen (figuur 13).
REINIGING
• Vlees enz. eruithalen. Elk onderdeel wassen in warme water met zeep.
• Een bleeksolutie die chloor bevat zal de kleur van de aluminium oppervlakten slechter
maken.
• De structuur van de motor niet in water bedrukken maar alleen met een vochtige doekje
schoonmaken.
• De thinner en petroleum zal de kleur van het apparaat scheuren of veranderen.
• Alle snee onderdelen schoonmaken met een doekje met plantaardige olie-natte doekje.
- 18 -
Page 20

DEUTSCH
SINBO SHB 3074 GRINDER
GEBRAUCHSANWEISUNG
Bitte lesen Sie die wichtigen Sicherheitshinweise genau und bewahren Sie diese
Anweisungen.
BESCHREIBUNG
1. Auffangschale 10. Lochscheibe(Fein)
2. Motorgehäuse 11. Lochscheibe(Mittel)
3. Ein/Aus-, und Rücktaste 12. Lochscheibe(Grob)
4. R/ON Taste 13. Verschlussring
5. Die Verschluss-Taste-Loch 14. Kreuzmesser
6. Die Verschluss-Taste 15. Wurst-link
7. Lebensmittel-Schieber 16. Kibbe Verbindung
8. Kopf 17. Kopf-Eintrag
9. Förderschnecke
WICHTIGE SICHERHEITSMASSNAHMEN
• Nur für den Hausgebrauch. Verwenden Sie nicht für industrielle Zwecke.
• Während Sie das Gerät ein-, und ausbauen schalten Sie es aus und trennen Sie von
dem Netz ab
• Ausreichende Aufsicht ist erforderlich um die Kinder vom Spielen mit dem Gerät zu
vermeiden..
• Während Sie das Gerät tragen, stellen Sie sicher dass Sie den Motorkörper mit beiden
Händen fassen. Halten Sie das Gerät beim Tragen nicht von Auffangschale oder den Kopf.
• Während Verwendung der Kibbe-Verbindung,verwechseln Sie den Kreuzmessernicht
mit der Lochscheibe.
• Stopfen Sie die Nahrungsmittel auf keinen Fall mit der Hand. Verwenden Sie immer
den Stopfer.
• Mahlen Sie keine harte Materiale wie Knochen, Nüsse usw..
• Mahlen Sie keine andere Materiale mit hart Fasern.
• Der Fleischwolf sollte nicht mehr als 10 Minuten in Dauerbetrieb sein. Der Motor sollte
in 10-Minuten-Intervalle abgekühlt.
• Während das Gerät in Betrieb ist, sollte man keine widrige Funktion ausführen (z. B.
die Taste von „EIN“ zu „ZURÜCK“ und umgekehrt stellen).Warten Sie mindestens 1
Minutebis das Gerät vollständig anhält. Andernfalls könnte an dem Gerät möglicherweise
ungewöhnliche Geräusche, Vibrationen oder temporäre elektrische Funke entstehen.
Das kann das Gerät beschädigen oder den Benutzer erschrecken.
• Nach jedem Gebrauch wirdan dem Kopf ein wenig Nahrungsmittel stecken. Das ist
normal. An der Spitzenseite kann einekleine Menge von schwarzem Metallstaub an die
Nahrungsmittel gehaftet sein. Bitte sammeln und werfen ‹se diese weg, und nicht essen.
• Betreiben Sie das Gerät nicht mit extremem Druck um eine Verklemmung zu vermeiden.
- 19 -
Page 21

• Wenn der Schutzschalter aktivwird, schalten Sie das Gerät nicht ein.
• Versuchen Sie nie die Teile selbstzu reparierenoder auszutauschen,
• Dieses Gerät darf nicht ohne Überwachung oder Anleitung eines verantwortlichen
Person, bei den Benutzern (einschl. Kinder) mit eingeschränkten physischen, sensorischen
oder psychischen Fähigkeiten bzw. ohne jegliche Erfahrung oder Vorwissen verwendet
werden.
• Ausreichende Aufsicht ist erforderlich um die Kinder vom Spielen mit dem Gerät zu
vermeiden..
• Falls das Stromkabeloder der Stecker ist beschädigtist, verwenden Sie Ihr Gerätnicht.
Diese müssen durch ein autorisierte Service-Center ersetzt werden um die Gefahren zu
vermeiden.
VOR DEM ERSTEN GEBRAUCH
• Prüfen Sie ob die Netzspannung ist mit der auf dem Produktetikette angegebene
Spannung übereinstimmend ist.
• Alle Teile (ausschließlich der Körper), in warmen Seifenwasser waschen.
• Bevor Sie den Stecker einstecken, stellen Sie sicher das die "ON/OFF/REV" Taste ist
im "OFF" (aus) Zustand.
GEBRAUCHSANWEISUNG
MONTAGE
• Halten Sie den Kopfmit einer Hand und stecken Sie in den Zugang. Bringen Sie die
Verschluss-Tastean der Seite des Motorkörpers an; drehen Sie den Kopf im Uhrzeigersinn
Richtung um den Kopf festzustellen (Abbildung 2).
• Platzieren Sie die Förderschnecke auf dem Kopf; halten Sie zunächst das lange Ende
und drehen Sie bis sie sanft auf den Körper des Motors einrastet (Abbildung 3).
• Kreuzmesser so auf derAchse der Förderschnecke aufsetzen,dass die Schneidflächen
vorne sind, wie in derAbbildung (Abbildung 4).Falls nicht vollständig eingesetzt, wird das
Fleisch nicht gehakt.
• Setzen Sie die gewünschte Lochscheibe so auf den runden Zapfen der Förderschnecke
aufsetzen, dass die Kerbung der Lochscheibe in das Gegenstück am Fleischwolfgehäuse
einrastet.(Abbildung 5)
• Stützen Sie die Lochscheibe an der Mitte mit einem Finger oder drücken Sie sie und
dann mit der anderen Hand, schrauben Sie den Verschlussring bis er festsitzt (Abbildung
6). Verklemmen Sie nicht zu dicht.
• Legen Sie die Auffangschale auf dem Kopf und stellen Sie in diesem Zustand fest.
• Stellen Sie das Gerät an einem festen Platz.
• Die Luftdurchgänge an der Seite und unter des Motorkörperssollfrei und nicht
verstopftsein.
- 20 -
Page 22

FLEISCHHACKEN
• Bringen alle Lebensmittel in Teile(mageres fettarmes Fleisch ohne Knochen ist
vorgeschlagen;durchschnittliche Ma?e: 20 x 20 x 60 mm) so dass Sie leicht in die Schüssel
hineinpassen.
• SteckenSie den SteckereinundstellenSiedie “R/ON” Tasteauf “ON”.
DannstellenSiedie“Ein/Aus-, undRücktaste” auf “ON” ein.
• Füllen Sie Auffangschale mit Lebensmittel. Verwenden Sie nur den Stopfer (Abb. 7).
• Nach jedem Gebrauch,schalten Sie das Gerät aus und trennen Sie von der
Stromversorgung ab.
WIDRIG BETRIEB-FUNKTION
• InMischungzustand, stellenSiedie “R/ON” Tasteauf “R” undschaltenSieausindemSiedie
“Ein/Aus-, undRücktaste” auf “R”einstellen.
• Die Förderschnecke wird in der Gegenrichtung laufen und Kopf wird leeren.
• Falls es nicht funktioniert, schalten Sie das Gerät aus und reinigen Sie es.
VERTRAUT FLEISCHBÄLLCHEN
TARIF-MATERIALIEN
Schaf Fleisch 100 g
Olivenöl 1 1/Teelöffel
Zwiebel (fein geschnitten) 1 1/Teelöffel
Gewürze nach Geschmack
Salz nach Geschmack
Mehl 1 1/Teelöffel
• Hacken Sie das Fleisch ein oder zwei mal.
• BräunenSie die gehackte Zwiebel und fügen Sie Salz und Mehl, Fleisch, Gewürze hinzu.
AUSGABEDECKEL
Mageres Fleisch 450 g
Mehl 150-200 g
Gewürze nach Geschmack
Kokosnuss (Feinschnitt) 1
Roter Pfeffer nach Geschmack
Pfeffer nach Geschmack
• Hacken Sie das Fleisch dreimalund mischen Sie alle Zutaten in eine Schüssel. Für den
Ausgabedeckel wird mehr von Fleisch und weniger Mehl eine bessere Konsistenz oder
und Geschmack bieten.
• Mahlen Sie die Mischung dreimal.
• Bauen Sie das Gerät ab um die Lochscheibe und Kreuzmesser herauszuholen indem
- 21 -
Page 23

Sie die Schritte 5-3 in umgekehrter Richtung wiederholen.
• Setzen Sie die Verbindungen der vertrauteFleischbällchen in die Steckplätze auf der
Förderschnecke (Abbildung 8),
• Schrauben Sie den Verschlussring bis er einrastet. Verklemmen Sie nicht zu dicht
(Abbildung 9).
• Stellen Sie den zylindrischen Ausgabedeckel ein (Abbildung 10).
• Bilden und braten Sie die vertrauteFleischbällchen wie folgt:.
WURSTHERSTELLUNG
Bitte setzen Sie die Wurstverbindungwie folgt auf bevor Sie beginnen (Abbildung 11)
REINIGUNG UND WARTUNG
DEMONTAGE
• Stellen Sie sicher dass der Motor völlig gestoppt ist.
• Ziehen Sie den Stecker aus der Steckdose.
• Bauen Sie ab indem Sie die Schritte 6-1 im Gegenteil.
• Falls der Verschlussring mit der Hände nicht leicht herausgenommen kann, bitte
benutzen Sie ein Werkzeug (Abbildung 12).
• Um den Kreuzmesser leicht herauszunehmen setzen Sie einen Schraubenzieher
zwischen der Schale und Kopf und heben Sie nach oben (Abbildung 13).
REINIGUNG
• Entfernen Fleisch und so weiter. Waschen Sie jede Teil in warmen Seifenwasser.
• Eine Chlor haltige Bleichmittel-Lösung kann die Farbe der Aluminium Oberflächen
schädigen.
• Tauchen Sie den Motorkörper nicht ins Wasser,reinigen Sie nur mit einem feuchten
Tuch.
• Verdünner und Öl wird die Farbe des Geräts spalten oder ändern.
• Alle schneidendeTeile mit einem Pflanzenöl-angefeuchteteTuch.
- 22 -
Page 24

ESPANOL
SINBO SHB 3074 MÁQUINA DE PICAR CARNE
INSTRUCCIÓN DEL USO
Por favor leer las instrucciones de la seguridad completamente y conservar estas
instrucciones.
DESCRIPCIÓN
1. Placa del depósito. 10. Placa de la cortadura (fino).
2. Cuerpo del Motor. 11. Placa de la cortadura (mediano).
3. Botón de on/off/atrás (encender/apagar/atrás) 12. Placa de la cortadura (grueso).
4. Interruptor de R/ON. 13. Anillo para la fijación.
5. Agujero del botón para bloquear. 14. Cortador para pica.
6. Botón para bloquear. 15. Conección de salchichas.
7. Empujador para las comidas. 16. Conección de Kibbe.
8. Cabecera. 17. Entrada de la cabecera.
9. Tornillo de la Alimentación.
MEDIDAS IMPORTANTES DE LA SEGURIDAD
• Solamente es para uso domésrico. No usarlo por motivo industrial.
• Desenchufar el aparato mientrás montando y desmontando el aparato.
• Durante el uso de algún aparato cerca de los niños está necesaria vigilancia cerca.
• Estar seguro que usted ha cogido el cuerpo del motor con dos manos mientrás
transportando el aparato. No transportar el aparato solamente cogiendo de la placa del
depósito ú de la cabecera.
• No confundir la placa de picadura con el cortador durante el uso de la conección de
Kibbe.
• Definitivamente no alimentar las comidas con la mano. Siempre usar el empujador de
las comidas
• No moler las cosas duros como hueso, avellana y asimilados.
• No moler las otras cosas con fibras duros.
• Funcionamiento continvo de la máquina de picar carne no debe exceder a 10 minutos.
Debe ser descansado durante 10 minutos para secar el motor.
• No debe hacer funcionamiento al revés durante el funcionamiento del aparato. En caso
contrario debe causar un ruido anormal, una vibración o chispas eléctricas temporarias
en el aparato. Puede dañar al aparato y darmiedo al / a la usador / a.
• Después del uso, se reservará un poco comida sobre la cabecera del moledor. Éso es
normal. Puede en contrarse un poco polvo negro de metálico pegado en el suelo de la
comida en la sección del punto. Por favor cogerlas y tirarlas no las comen.
• No reforzar el aparato para funcionar eplicando una presión excesivo para evitar que
sea bloquedo.
• No abrir el aparato cuando es activado el interruptor del circuito.
• Usted no intenta a recambier o reparar las partes sí mismo definitivamente.
- 23 -
Page 25

• Este aparato no es para el uso de los niños o por otras personas sin ayuda o vigilancia
en caso de ser imperdido para que se usen seguramente sus competencias fisicas,
perceptivas o mentales.
• Los niños deben ser vigilados para que no jueguen con el aparato.
• En caso de ser dañado el cable de la energía o la ficha no usar el aparato. Debe ser
recambiado por un cento confirmado de servicio. Para evitar el peligro .
USO DEL APARATO POR PRIMERA VEZ
• Controlar si el voltaje de la línea principal en su casa sea idéntico al voltaje expresado
en la etiqueta de la evaluación.
• Lavar todas las partes (excepto el cuerpo) con agua caliente jabonosa.
• Antés de enchufar, estar seguro que el interruptor “ON / OFF / REV” está en la posición
“OFF” (APAGADO).
INSTRUCCIÓN DEL USO
MONTAJE
• Meter en la entrada cogiendo la cabecera con una mano, colocar el botón de bloquear
en la parte lateral del cuerpo del motor, girar hacia la dirección del reloj para apretar
la cabecera (Figura.2).
• Colocar el tornillo de la alimenteción en la cabecera, ante todo colocar girando un poco
el tornillo de la alimentación hasta que se fije en el cuerpo de motor cogiendo del punto
largo (Figura.3).
• Colocar el cortador de picadura como se muestra en el dibujo (Figura.4) en forma de
que la dirección del cortador estará en la parte adelante. En caso de no fijar completamente,
no se picará carne .
• Colocar la placa de picae deseada, fijando las salientes de las encajes al lado del
cortador de picadura (Figura.5).
• Soportar con un dedo la placa de cortador o presionar y después con otra mano tornillar
el anillo de la fijación hasta que se apreta (Figura.6). No apretar mucho.
• Colocar la placa del depósito en la cabecera y fijar en su posición.
• Colocar el aparato en un lugar duro.
• Las circuitos aéreos en la parte lateral e inferior del cuerpo del motor debe ser libre
y no debe ser bloqueado.
EL PROCESO DE LA PICADURA DE CARNE
• Hacer pedazos de tados las comidas (se recomienda carne delgada, sin hueso y sin
grasa), tamaño aproximadamente es: 20 mms x 20 mms x 60 mms), así se podrán entrar
fácilmente en la entrada del depósito.
• Enchufar y ajustar el botón “R/ON” al botón "ON"(ENCENDER), después ajustar el
botón pozisyonuna getirin,ard›ndan “AÇMA/KAPAMA/ “ON/OFF/ATRÁS”
(ENCENDER/APAGAR/ATRÁS) "ON" (ENCENDER).
• Colocar las comidas en la placa del depósito. Solamente usa el empujador para las
- 24 -
Page 26

comidas (Figura.7).
• - Después del uso apagar el aparato y desenchufar la cable de la energía.
FUNCIÓN DEL FUNCIONAMIENTO ALREVÉS
• En la posición de batir, apagar el aparato ajustando el botón “R/ON” a la posición “R”
y el botón / “ON/OFF/ATRÁS” (ENCENDER/APAGAR/ATRÁS) a la posición “R”.
• El tornillo de la alimentación estará girando en la dirección contraria y la cabecera se
soltará.
• En caso de no serfuncionado, apagar el aparato y limpiarlo.
PREPARACIÓN DE ALBóNDIGAS DE CARNE REBOZADAS CON BULGUR
INGREDIENTES DE LA RECETA
Carne de oveja 100grs.
Aceite de oliva 1 1/cuchara de té.
cebolla (picado fino) 1 1/ cuchara de té.
condimentos según su gusto
Sal según su gusto
Harina 1 1/ cuchara de té.
• Picar la carne de oveja una ve o dos veces.
• Freir la cebolla hasta que se convierta del color marrón y agregarla carne de oveja
picada, condimentos, sal y harina.
TAPA DE LA SALIDA
Carne sin grasa 450grs.
Harina 150-200grs.
condimentos según su gusto.
coco (cortado fino) 1
pimienta roja en polvo según su gusto.
pimienta según su gusto.
• Pica la carne tres veces y mezclar todos los ingredientes en un tazón. Tendrá mejor
concentración y gusto más carne y menos harina para la tapa de la salida.
• Moler tres veces la mezcla.
• Desmontar el aparato para quitar el cortador de la picadura y la placa de la picadura
aplicando los pasos 5 – 3 alrevés.
• Colocar las conecciónes para preparar albóndigas de carne rebozadas con bulgur
fijando las salientes en sus encajes sobre el eje de la alimentación juntos (Figura.8).
• Tornillar el anillo de la fijación hasta que se aprete. No apretar excesivo (Figura.9).
• Ajustar la tapa cilindrica de salida (Figura.10).
• Preparar albóndigas de carne rebozadas con bulgur como si fuera en la figura y freirlas.
- 25 -
Page 27

PREPARACIÓN DE SALCHICHAS
por favor fijar las conecciones de las salchichas como lo siguiente (Figura.11).
LIMPIEZA Y MANTENIMIENTO
DESMONTAJE
• Estar seguro que es parado completamente el motor.
• Desenchufar el cable de la energía.
• Desmontar aplicando al revés los pasos en las figuras 6 - 1.
• En caso de no desmontar el anillo de la fijación con manos fácilmente por favor usar
una herramienta para quitarlo (Figura.12).
• Para desmontar la placa de picadura fácilmente colocar un tornillador entre la placa
y la cabecera como si fuera en la figura y levantar hacia arriba (Figura.13).
LIMPIEZA
• Limpiar carne y asimilados. Lavar cada pieza con agua caliente jabonosa.
• Una solución aclarante que contiene cloro hará más claro el color de los superficies
de aluminio.
• No sumergir el cuerpo del motor en agua pero solamente limpiar con una tela mojada.
• El petroleo ú disolventes cambiarán o romperán el color del aparato.
• Limpiar todas las partes de picadura con una tela mojada sumergida en aceite vegetal.
- 26 -
Page 28

HRVATSKI
SINBO SHB 3074 STROJ ZA MLJEVENJE MESA
UPUTSTVO ZA UPORABU
Molimo vas da temeljno proˇcitate sve upute za uporabu i da ih saˇcuvate za budu´ce
potrebe.
OPIS
1. Pladanj spremnika 10. Ploˇca za rezanje (fino)
2. Ku´ciˇste motora 11. Ploˇca za rezanje(srednje)
3. Tipka Ukljuˇci / Iskljuˇci / Povratak Unatrag 12. Ploˇca za rezanje (grubo)
4. R/ON prekidaˇc 13. Prsten za stezanje
5. Rupa gumba za zakljuˇcavanje 14. Noˇz za rezanje
6. Gumb za zakljuˇcavanje 15. Aparat za kobasice
7. Potiskivaˇc za hranu 16. Aparat za kibbe
8. Glava 17. Ulaz glave
9. Puˇzasti/spiralni vijak
BITNA SIGURNOSNA UPOZORENJA
• Namjenjen samo za ku´cansku uporabu. Ne rabite u industrijske svrhe.
• Kada spajate ili odvajate dijelove iskljuˇcite ured¯aj iz napajanja.
• Uporaba bilo kog ured¯aja u blizini djece zahtjeva briˇzan nadzor.
• Kada ured¯aj prenosite ku´ciˇste motora uhvatite objema rukama. Ured¯aj nikada ne nosite
uhvativˇsi za pladanj spremnika ili glavu.
• Kada rabite aparat za kibbe pazite da ne zamjenite noˇz za rezanje sa ploˇcom za rezanje.
• Hranu nipoˇsto ne ubacujte rukama. Uvijek rabite potiskivaˇc za hranu.
• Stroj ne rabite za mljevenje kostiju, ljeˇsnjaka i sl. trvdih sastojaka.
• Ne rabite za mljevenje sastojaka sa tvrdim vlaknima.
• Stroj za mljevenje ne treba rabiti duˇze od 10 minuta u kontinuitetu. Treba omogu´citi
da se motor ohladi u intervalima od 10 minuta.
• Tijekom rada ured¯aja ne treba ukljuˇcivati funkciju rada natrag (na primjer kada se
prekidaˇc nalazi u poziciji ''UKLJUˇCENO'' ne treba ga podeˇsavati u poziciju ''NATRAG'' i
suprotno), saˇcekajte najmanje 1 minutu da se ured¯aj potpuno zaustavi. U suprotnom
moˇze do´ci do anomalne buke, vibracije ili do pojave privremene elektriˇcne iskre. To moˇze
uzrokovati oˇste´cenje ured¯aja i uplaˇsiti korisnika.
• Nakon uporabe u glavi za mljevenje moˇze se zadrˇzati mala koliˇcina hrane. To je normalno
stanje. Moˇze se desiti da se na samom kraju glave na hranu zalijepi malo crnog metalnog
praha.Molimo vas da taj komad mesa ne jedite ve´c ga bacite.
• Da ne bi doˇslo do zatiskanja hrane ne primjenjujte veliki pritisak na stroj za mljevenje
mesa.
• Kada se aktivira sigurnosna sklopka ne ukljuˇcujte ured¯aj.
• Nipoˇsto ne pokuˇsavajte sami zamjeniti ili popraviti dijelove stroja.
• Ovaj ured¯aj ne treba da rabe osobe s fiziˇckim, psihiˇckim i mentalnim invaliditetom
- 27 -
Page 29

(ukljuˇcuju´ci i djecu) bez nadzora osobe koja moˇze snositi odgovornost za sigurnu uporabu
ured¯aja.
• Zabranite djeci da se igraju s ured¯ajem i drˇzite ih pod stalnim nadzorom.
• Za izbjegavanje svake vrste opasnosti ne rabite ured¯aj s oˇste´cenim kabelom za napajanje
i utikaˇcem. Kontaktirajte ovlaˇsteni servisni centar.
KOD PRVE UPORABE
• Provjerite da li vrijednost napona naznaˇcena na informacijskoj ploˇcici proizvoda odgovara
naponu u vaˇsoj strujnoj mreˇzi.
• Sve dijelove (izuzev ku´ciˇsta) operite u toploj vodi sa deterdˇzentom.
• Prije umetanja utikaˇca u utiˇcnicu uvjerite se da se prekidaˇc “ON/OFF/ REV” nalazi u
poziciji "OFF" (ISKLJUˇCENO).
UPUTE ZA RUKOVANJE
MONTIRANJE
• Glavu uzmite jednom rukom, umetnite u otvor na ku´ciˇstu motora, umetnite gumb za
zakljuˇcavanje koji se nalazi s boˇcne strane motora i za fiksiranje okrenite u smjeru
kazaljke na satu. (slika 2)
• Umetnite puˇzasti ili spiralni vijak uhvativˇsi za duˇzi kraj i lagano okrenite sve dok se ne
uklopi u ku´ciˇste motora. (slika 3).
• Noˇz za rezanje stavite na osovinu puˇzastog vijka tako da smjer noˇza bude okrenut s
prednje strane kao ˇsto je prikazano na slici (slika 4).
Ako noˇz ne bude pravilno postavljen maˇsina ne´ce mo´ci da reˇze meso.
• Postavite ˇzeljenu ploˇcu za rezanje tako da se uklopi u izboˇcine na oblom djelu (slika
5).
• Srednji dio ploˇce za rezanje pritisnite prstom a drugom rukom postavite obruˇc za
stezanje i zavrnite. (slika 6). Ne steˇzite previˇse.
• Na glavu stroja postavite tanjur ili pladanj za spremnik i uˇcvrstite.
• Ured¯aj stavite na stabilnu povrˇsinu.
• Prostor za prolaz zraka sa donje i boˇcne strane ured¯aja treba da bude slobodan i ne
zatvarajte ga.
FUNKCIJA MLJEVENJA MESA
• Svu hranu izreˇzite na komade (preporuˇcujemo vam uporabu mekog i nemasnog mesa
bez kostiju, srednjih dimenzija: 20 mm x 20 mm x 60 mm) tako da lakˇse ulazi kroz otvor
za umetanje hrane u spremnik.
• Ukljuˇcite utikaˇc u utiˇcnici i tipku “R/ON” podjesite u poloˇzaju "ON", zatim tipku
“UKLJUˇCI/ISKLJUˇCI” / Povratak Unatrag” postavite u poloˇzaju "ON".
• Na tanjur za hranu stavite komade hrane. Hranu ubacujte u spremnik samo uz pomo´c
potiskivaˇca za hranu (slika 7).
• Nakon uporabe iskljuˇcite ured¯aj i izvucite utikaˇc iz utiˇcnice.
- 28 -
Page 30

FUNKCIJA RADA NATRAG
• U sluˇcaju mjeˇsanja tipku “R/ON” postavite u poloˇzaju “R”, zatim pritiskom na tipku
“UKLJUˇCI/ISKLJUˇCI / Povratak Unatrag” omoguˇcite iskljuˇcenje ured¯aja.
• Puˇzasti vijak ´ce poˇceti da se okre´ce u suprotnom smjeru isprazni´ce se glava.
• Ako ne radi, iskljuˇcite i oˇcistite ured¯aj.
PRIPREMA KUBBE
POTREBNI SASTOJCI
Ovˇcetina 100g
Maslinovo ulje 1 1/ˇcajnih ˇzlica
Luk (sitno sjeckani) 1 1/ ˇcajnih ˇzlica
Zaˇcini po ˇzelji
Sol po ˇzelji
Braˇsno 1 1/ ˇcajnih ˇzlica
• Ovˇcije meso sameljite jedanput ili dva puta.
• Luk proprˇzite dok ne porumeni i dodajte mljeveno meso, zaˇcine, sol i un.
VANJSKI DIO KUBBE
Nemasno meso 450g
Braˇsno 150-200g
Zaˇcini po ˇzelji
Kokosovo braˇsno(sitno) 1
Crveni papar po ˇzelji
Papar po ˇzelji
• Meso sameljite tri puta i sve sastojke izmjeˇsajte u jednoj posudi. Za vanjski dio kubbe
rabite viˇse mesa a manje braˇsna jer ´cete tako dobiti i smjesu boljeg okusa.
• Smjesu sameljite tri puta.
• Slijedite korake od 5-3 unatrag i rasklopite ured¯aj kako bi izvadili ploˇcu za rezanje i noˇz
za rezanje.
• Aparat za kubbe postavite na osovinu puˇzastog vijka tako da se izboˇceni dijelovi uklope
u utore na glavi. (slika 8).
• Zavrnite obruˇc za stezanje. Ne steˇzite previˇse. (slika 9).
• Vadite cilindriˇcne oblike za vanjski dio kubbe (slika 10).
• Oblikujte kubbe na naˇcin prikazan na slici i isprˇzite.
- 29 -
Page 31

PRIPREMA KOBASICA
Prije poˇcetka pripreme kobasica molimo vas da postavite aparat za kobasice kao ˇsto je
dolje prikazano. (slika 11)
ˇCIˇS´
CENJE I ODRˇZAVANJE
RASKLAPANJE
• Uvjerite se da se motor ured¯aja potpuno zaustavio.
• Izvucite utikaˇc iz utiˇcnice.
• Slijedite korake od 6-1 natrag i rasklopite ured¯aj.
• Ukoliko obruˇc za stezanje ne moˇzete lako da odvijete molimo vas da za njegovo odvijanje
koristite alatku (slika 12).
• Za jednostavno vad¯enje ploˇce za rezanje, izmed¯u ploˇce i glave smjestite odvijaˇc i podignite
ka gore, kao ˇsto je prikazano na slici (slika13).
ˇCIˇS´
CENJE
• Izvadite meso i sliˇcne sastojke. Svaki dio ured¯aja operite u toploj vodi i deterdˇzentu.
• Izbjeljivaˇc sa sadrˇzinom klora moˇze uniˇstiti boju aluminijskih povrˇsina.
• Ku´ciˇste motora ne uranjajte u vodu ve´c ga oˇcistite samo vlaˇznom krpom.
• Razrjed¯ivaˇci i benzin izmjeni´ce boju ured¯aja.
• Sve oˇstre reza´ce dijelove oˇcistite vlaˇznom krpom umoˇcenom u biljno ulje.
- 30 -
Page 32

SHB 3074
- 31 -
Page 33

- 32 -
Page 34

- 33 -
Page 35

MÜfiTER‹ H‹ZMETLER‹
De¤erli Müflterimiz,
En uygun fiyata en iyi ürünü vermenin yan› s›ra; en iyi hizmeti vermenin de
önemli oldu¤una inan›yoruz. Bu nedenle siz bilinçli tüketicilere daha yak›n
olabilmek için, internet adresimizdeki eriflim formlar›n›n yan› s›ra, tüketici
dan›flma hattımızı da hizmetinize açm›fl durumday›z.
TÜKET‹C‹
DANIfiMA HATTI
444 66 86
Tüketici Dan›flma Hattımızı,
- Hafta içi her gün 08.00-18.00 saatleri aras›nda arayabilir; istek, öneri ve
flikayetlerinizi firmam›za iletebilirsiniz.
Tüketicinin Dikkatine:
Ürünlerimizle ilgili hizmetleri tam olarak alabilmek için afla¤›daki önerilere
uyman›z› rica ederiz:
1. Ürünü ald›¤›n›zda Garanti Belgesini mutlaka yetkili sat›c›n›za onaylatt›r›n›z.
2. Ürünü kullanma k›lavuzunda belirtilen hususlara göre kullan›n›z.
3. Ürününüzle ilgili hizmet talebiniz oldu¤unda yukar›daki telefon
numaralar›ndan, Tüketici Danıflma Hattına baflvurunuz.
4. Ürünü promosyon arac›l›¤› ile edinmiflseniz, ürüne ait garanti belgesini en
yak›n yetkili servisimize giderek onaylatt›r›n›z.
5. Teknik servisteki ifliniz bitti¤inde "Yetkili Servis Hizmet Fifli" almay›
unutmay›n›z. Alaca¤›n›z bu Hizmet Fifli, ileride ürününüzde meydana
gelebilecek herhangi bir sorunda size yarar sa¤layacakt›r.
www.sinbo.com.tr
0800 211 50 21
KAPIDAN KAPIYA
ÜCRETS‹Z
SERV‹S
Kap›dan Kap›ya Ücretsiz Servis Kampanyam›z dâhilinde Yurtiçi Kargo Firmas› ile iflbirli¤i içerindeyiz. Tüketicimiz
taraf›ndan sat›n al›nan ürünün fiyat› ne olursa olsun, Tüketicimiz ürün ile ilgili garanti kapsam›na giren herhangi
bir problem yaflad›¤›nda, 444 66 86 numaral› Tüketici Danıflma Hattımızı aramas› ve kay›t b›rakmas› yeterlidir.
Bu süreçten sonra Tüketicimizin ürünü ücretsiz olarak Yurtiçi Kargo taraf›ndan Tüketicimizin bulundu¤u adresten
al›n›p, 7* ifl günü içerisinde ürün çal›fl›r bir vaziyette, yine Tüketicimize Yurtiçi Kargo arac›l›¤› ile adresine teslim
edilmektedir. 7 ifl günü içerisinde sorunu çözülemeyen ürünler ise, yenisi ve/veya bir üst modeli ile de¤ifltirilmektedir.
Tüm bu süreçte Tüketicilerimizden hiçbir ücret talep edilmemektedir.
(*Ürünün servis garanti süresi, Yurtiçi Kargo ürünü Sinbo Fabrikas›’na teslim ettikten sonra bafllar.)
- 34 -
7 GÜNDE
TESL‹MAT
GARANT‹S‹
(*)
Page 36

- GARANT‹ fiARTLARI -
1) Garanti süresi,mal›n teslim tarihinden itibaren bafllar ve 2 y›ld›r.
2) Mal›n bütün parçalar› dahil olmak üzere tamam› Firmam›z›n garanti kapsam›ndad›r.
3) Mal›n garanti süresi içerisinde ar›zalanmas› durumunda, tamirde geçen süre garanti
süresine eklenir. Mal›n tamir süresi, 20 iflgününü geçemez. Bu süre mala iliflkin ar›zan›n
servis istasyonuna, servis istasyonunun olmamas› durumunda, mal›n sat›c›s›, bayii,
acentesi, temsilcili¤i, ithalatç›s› veya imalatç›s›-üreticisinden birine bildirim tarihinden
itibaren bafllar. Tüketicinin ar›za bildirimini; telefon, faks, e-posta, iadeli taahhütlü mektup
veya benzeri bir yolla yapmas› mümkündür. Ancak, uyuflmazl›k halinde ispat yükümlülü¤ü
tüketiciye aittir. Mal›n ar›zas›n›n 10 ifl günü içerisinde giderilememesi halinde, imalatç›üretici veya ithalatç›; mal›n tamiri tamamlan›ncaya kadar, benzer özelliklere sahip baflka
bir mal› tüketicinin kullan›m›na tahsis etmek zorundad›r.
4) Mal›n garanti süresi içerisinde gerek malzeme ve iflçilik, gerekse montaj hatalar›ndan
dolay› ar›zalanmas› halinde, iflçilik masraf›, de¤ifltirilen parça bedeli ya da baflka herhangi
bir ad alt›nda hiçbir ücret talep etmeksizin tamiri yap›lacakt›r.
5) Tüketicinin onar›m hakk›n› kullanmas›na ra¤men mal›n;
- Tüketiciye teslim edildi¤i tarihten itibaren, garanti süresi içinde kalmak kayd›yla, bir
y›l içerisinde en az dört defa veya imalatç›-üretici ve/veya ithalatç› taraf›ndan belirlenen
garanti süresi içerisinde alt› defa ar›zalanmas›n›n yan› s›ra, bu ar›zalar›n maldan
yararlanamamay› sürekli k›lmas›,
- Tamiri için gereken azami süresinin afl›lmas› ,
- Firman›n servis istasyonunun, servis istasyonunun mevcut olmamas› halinde s›rayla
sat›c›s›, bayii, acentesi temsilcili¤i ithalatç›s› veya imalatç›-üreticisinden birisinin
düzenleyece¤i raporla ar›zan›n tamirini mümkün bulunmad›¤›n›n belirlenmesi,
durumlar›nda tüketici mal›n ücretsiz de¤ifltirilmesini, bedel iadesi veya ay›p oranda bedel
indirimi talep edebilir.
6) Mal›n kullanma k›lavuzunda yer alan hususlara ayk›r› kullan›lmas›ndan kaynaklanan
ar›zalar garanti kapsam› d›fl›ndad›r.
7) Garanti Belgesi ile ilgili olarak ç›kabilecek sorunlar için TC Gümrük ve Ticaret Bakanl›¤›
Tüketicinin Korunmas› ve Piyasa Gözetimi Genel Müdürlü¤ü’ne baflvurabilir.
‹THALATÇI F‹RMA
DE‹MA ELEKTROMEKAN‹K ÜRÜNLER ‹NfiAAT SPOR MALZEMELER‹ ‹MALAT SAN. VE T‹C. A.fi.
Cihangir Mh. Güvercin Cd. No:4 Haramidere Mevkii Avcılar - ‹stanbul - Türkiye
Ça¤rı Merkezi: 444 66 86
www.sinbo.com.tr - info@sinbo.com.tr
- 35 -
Page 37

- SHB 3074 ET KIYMA MAK‹NES‹ -
- GARANT‹ BELGES‹ -
Garanti Belge No : 112632
SSHY Belge No : 35274
‹THALATÇI F‹RMA
Ünvanı : DE‹MA ELEKTROMEKAN‹K ÜRÜNLER‹ ‹Nfi. SPOR MALZ.
‹MALAT SAN. ve T‹C. A.fi.
Adresi : Cihangir Mah. Güvercin Cad. No:4 Haramidere Mevkii
Avc›lar / ‹STANBUL
Tel. : Ça¤rı Merkezi: 444 66 86
Yetkili Kifli :
Yönetim Kurulu Baflkan›
Ürünün Cinsi : ET KIYMA MAK‹NES‹
Markası : S‹NBO
Modeli : SHB 3074
Alt Modeli : Bandrol ve Seri No :
Teslim Tarihi ve Yeri :
Garanti Süresi : 2 Yıldır
Azami Tamir Süresi : 20 ‹fl Günü
Kullanım Ömrü : Bakanl›kça belirlenen ve ilan edilen kullan›m ömrü 7 y›ld›r.
(Ürünün fonksiyonlar›n› yerine getirebilmesi için gereken yedek parça temin süresi)
SATICI F‹RMA
Ünvanı :
Adresi :
Tel.Fax :
Fatura Tarihi ve No :
Teslim Tarihi ve Yeri :
‹mza ve Kafle :
Bu bölüm, ürünü sat›n ald›¤›n›z Yetkili Sat›c› taraf›ndan imzalanacak ve kaflelenecektir.
Bu belgenin kullan›lmas›na; 4077 say›l› Tüketicinin Korunması Hakkında Kanun ve bu Kanun’a dayan›larak yürürlü¤e konulan Garanti Belgesi
Uygulama Esaslar›na Dair Yönetmelik uyar›nca, TC Gümrük ve Ticaret Bakanlı¤ı, Tüketicinin Korunması ve Piyasa Gözetimi Genel Müdürlü¤ü
tarafından izin verilmifltir.
Garanti Belge Onay Tarihi : 15/05/2012
SSHY Belge Onay Tarihi : 04/04/2012
- 36 -
Page 38

- TEDAR‹KÇ‹ F‹RMA / EXPORTER United Favour Development Limited
Unit B, 10/F Lee May Building 788-790
Nathan Road, Mongkok, Kowloon, HK.
- UYGUNLUK BEYANI / CE CONFORMITY -
Nemko Hong Kong Ltd.
Unit 1-5, 15/F. CCT Telecom Bldg,
11 Wo Shing St., Fotan, Shatin, Hong Kong
EEE Yönetmeli¤ine uygundur.
AEEE Yönetmeli¤ine uygundur.
Made in P.R.C.
‹mal Y›l› : 2013
 Loading...