

Page 1
timbre inalámbrico
Instrucciones de utilización y de seguridad
campanello senza Fili
Indicazioni per l’uso e per la sicurezza
campainha sem Fios
Instruções de utilização e de segurança
Wireless Doorbell
Operation and Safety Notes
Funktürklingel
Bedienungs- und Sicherheitshinweise
Z30914
5
29.06.11 18:00
Page 2
ES Instrucciones de utilización y de seguridad Página 7
IT / MT Indicazioni per l’uso e per la sicurezza Pagina 20
PT Instruções de utilização e de segurança Página 34
GB / MT Operation and Safety Notes Page 47
DE / AT / CH Bedienungs- und Sicherheitshinweise Seite 60
29.06.11 18:00
Page 3
29.06.11 18:00
Page 4
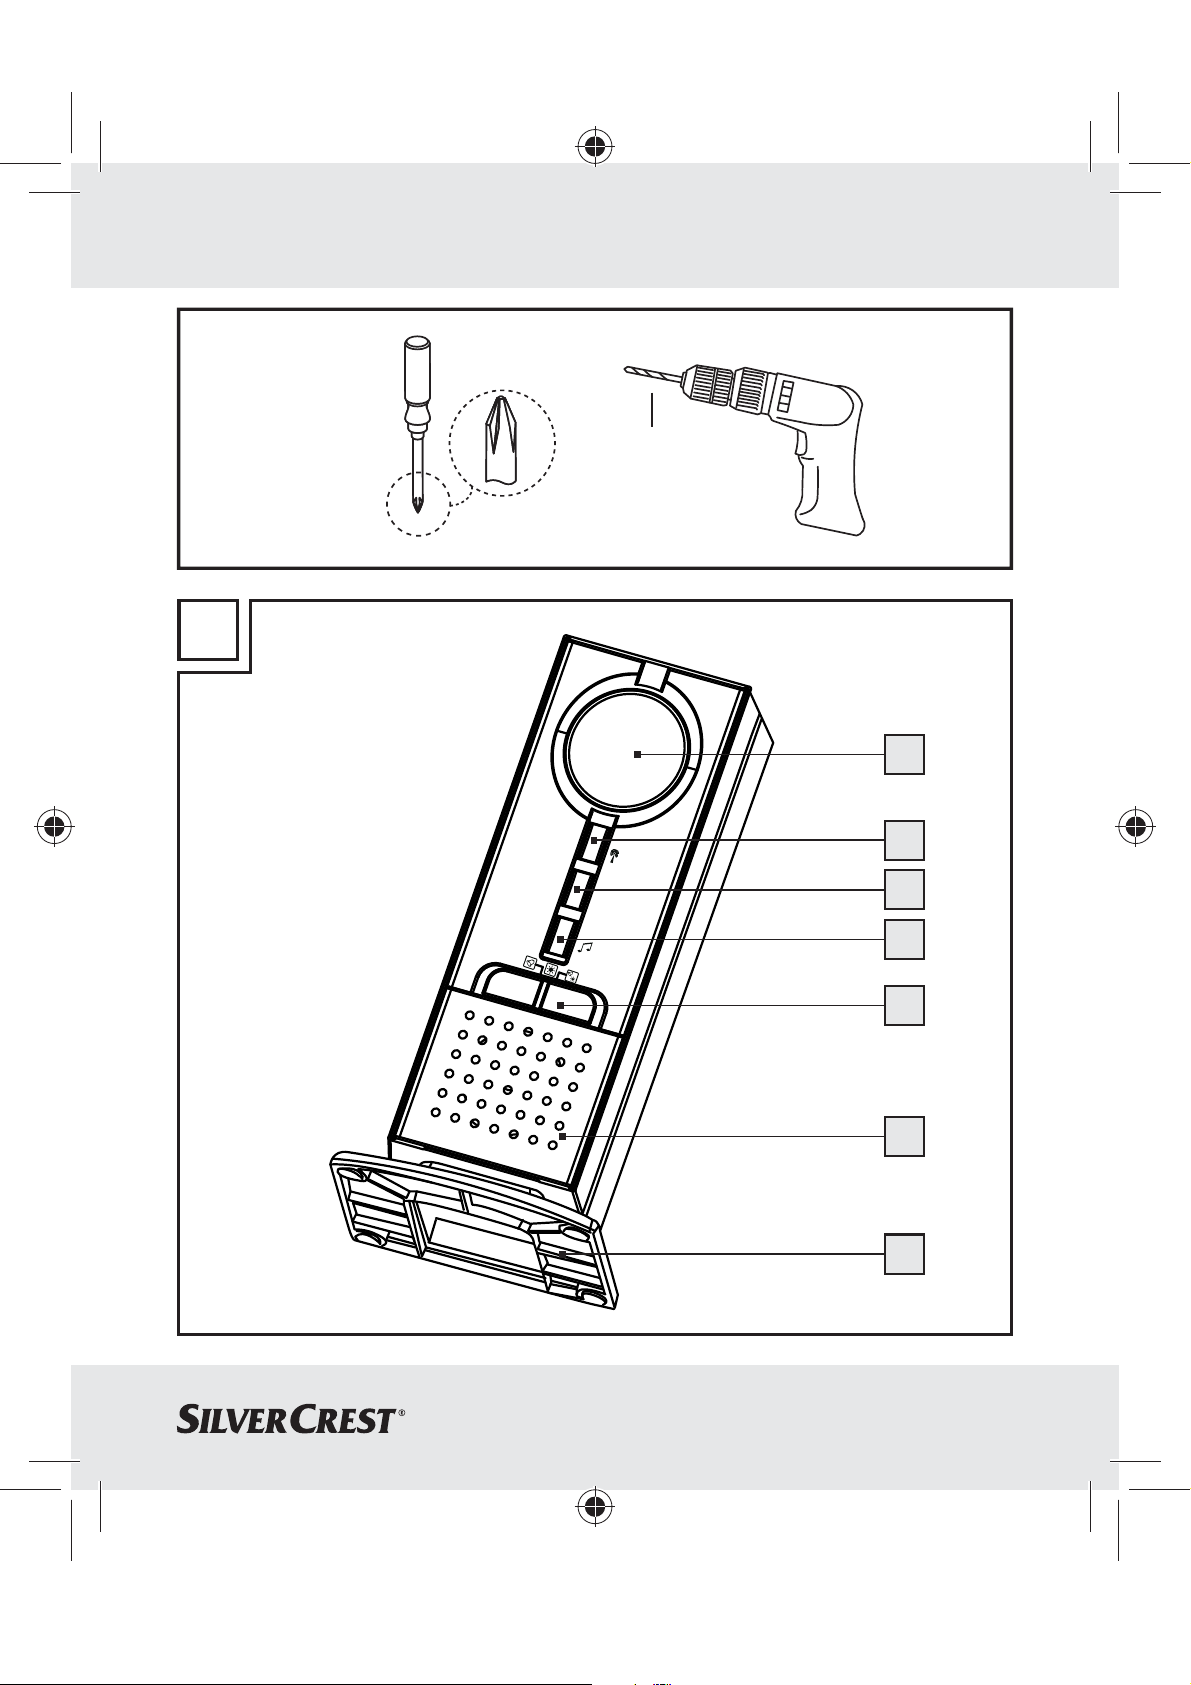
Necesita
Vi servono
Necessita de
You need
Sie benötigen:
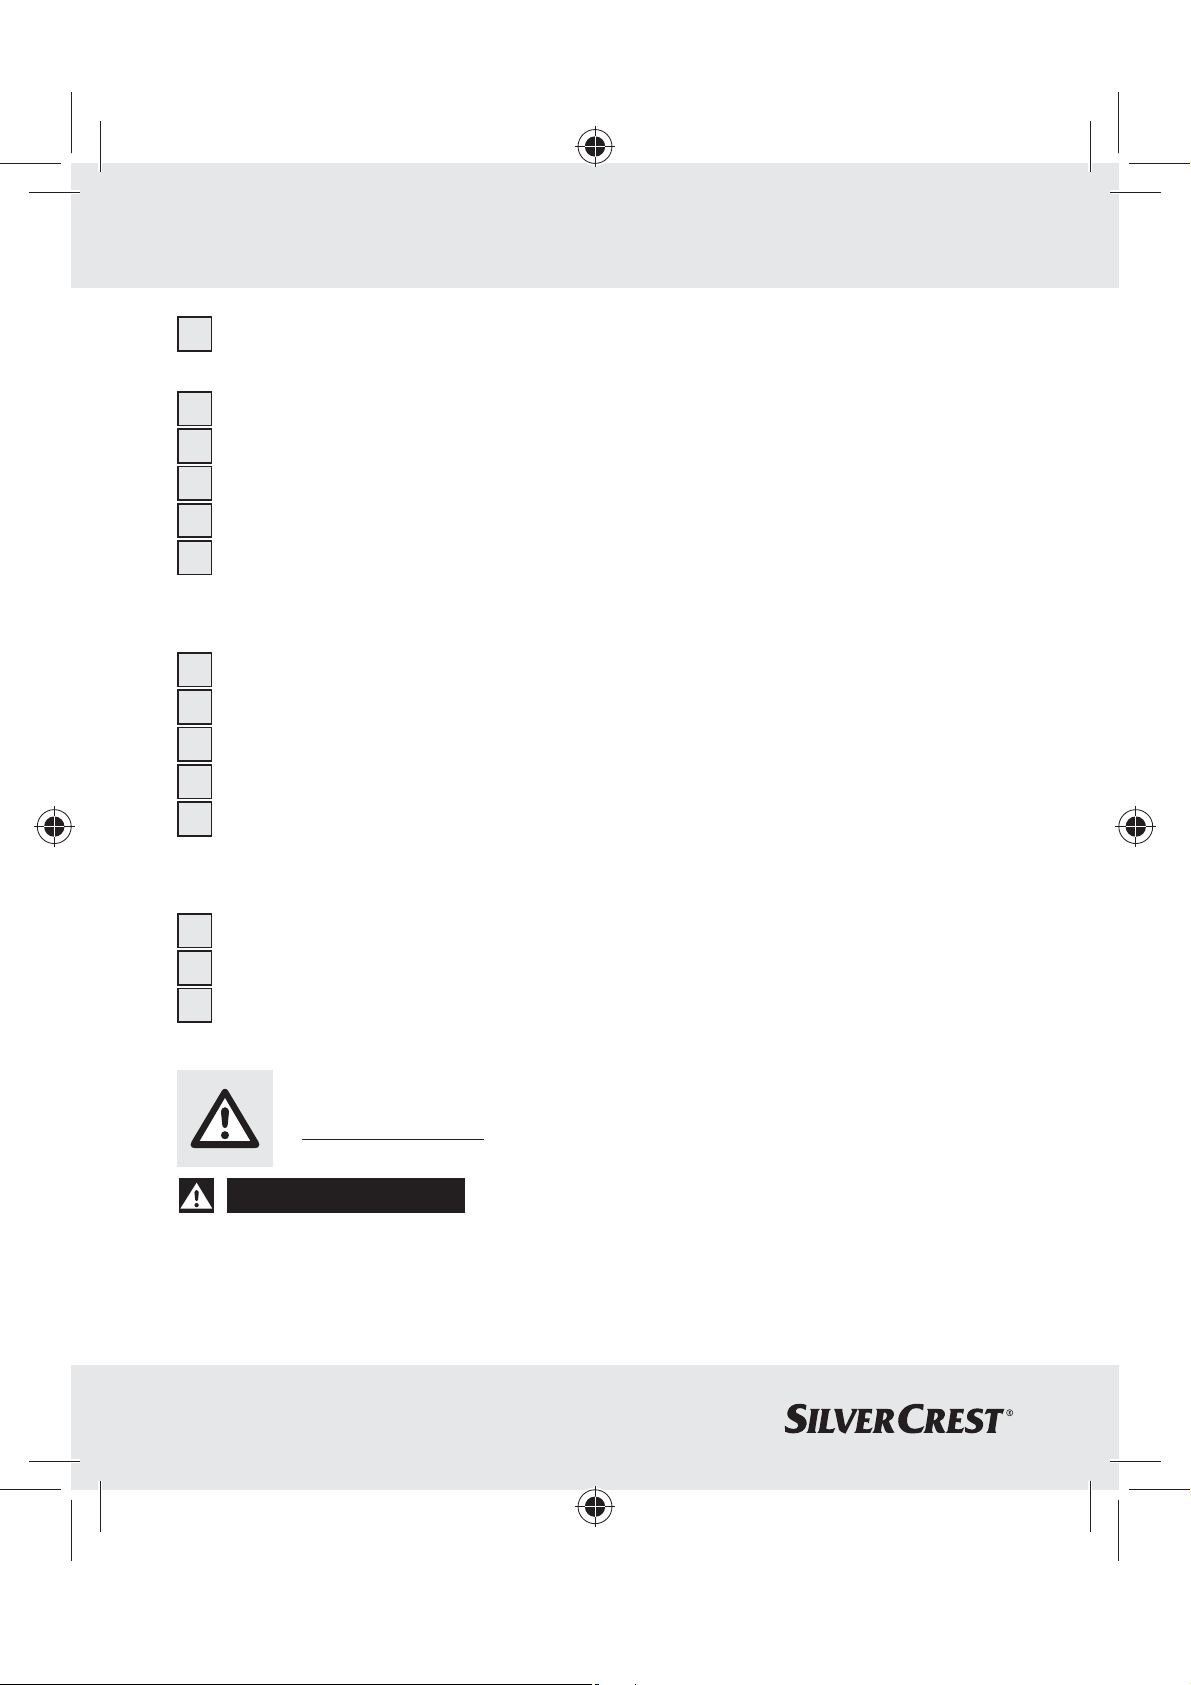
A
ø 6 mm
1
2
VOL
3
4
5
6
7
3
30.06.11 15:48
Page 5
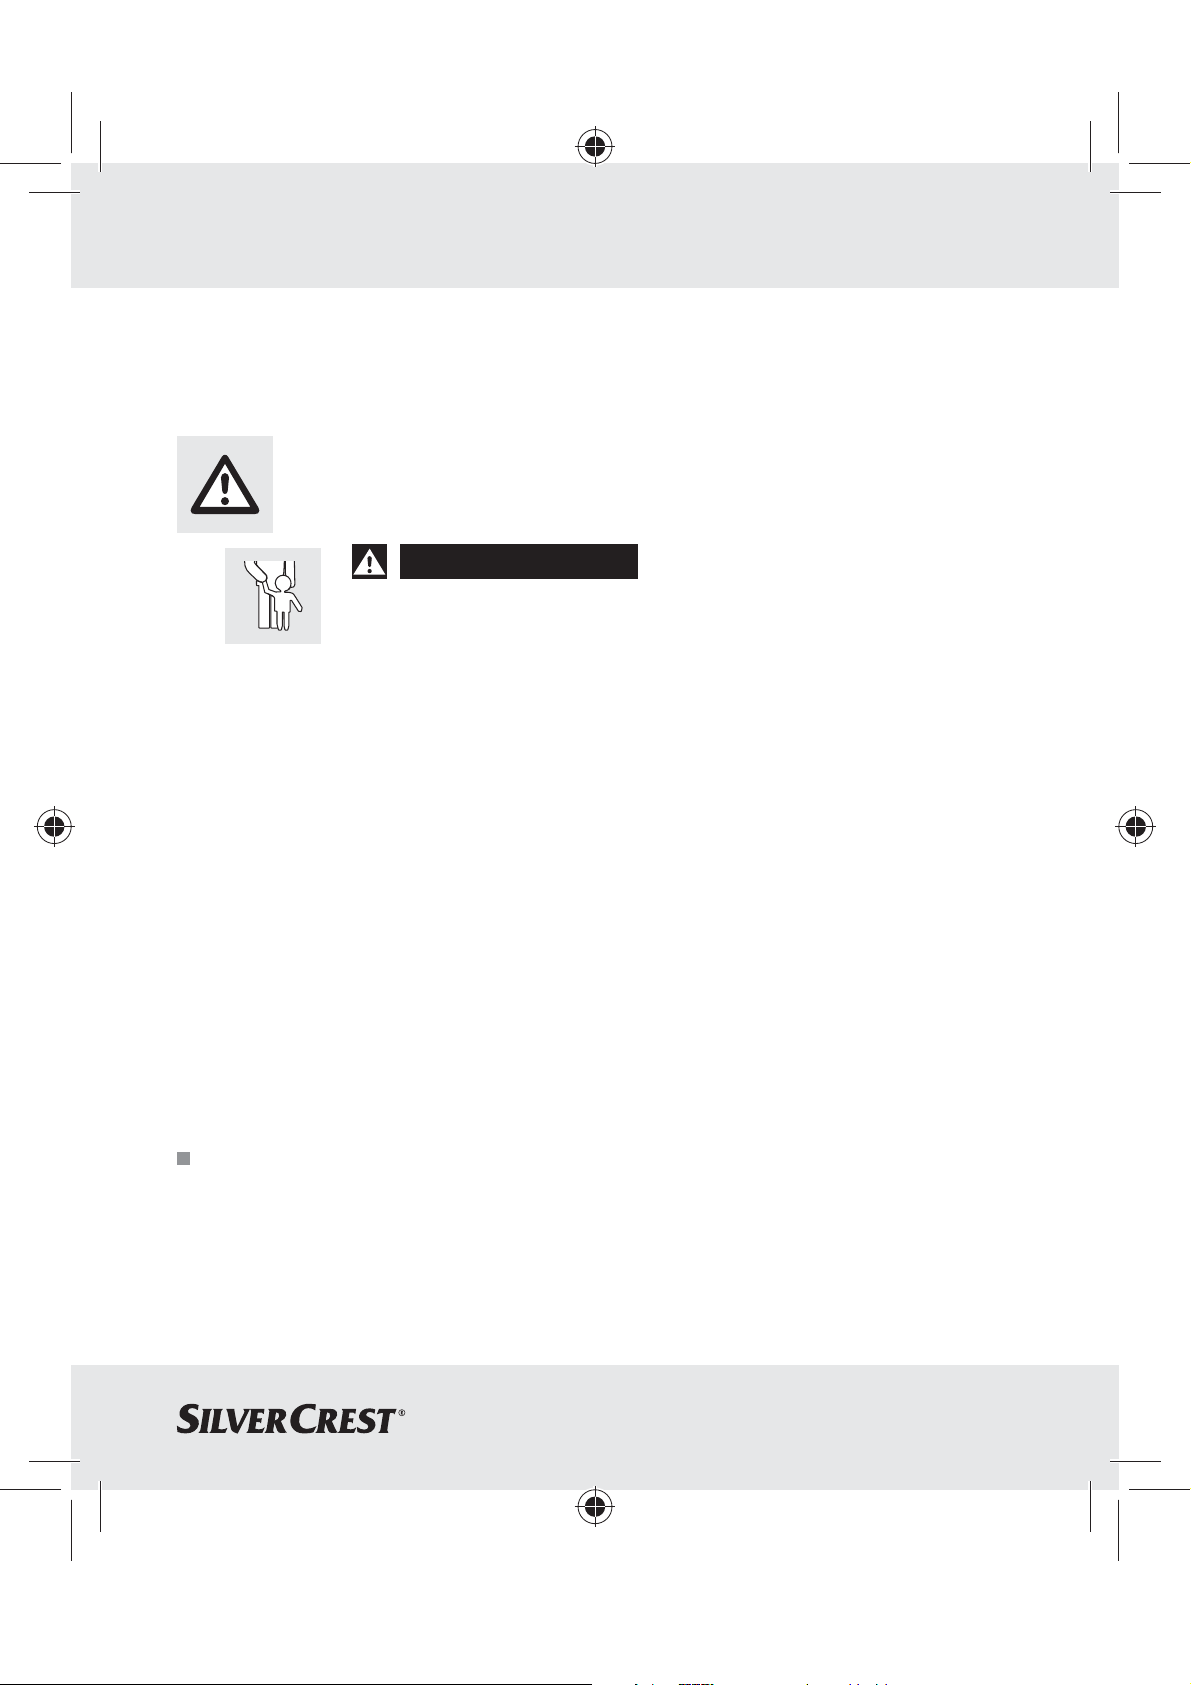
B
8
9 10
4
AA 1.5V
AA 1.5V
30.06.11 15:48
Page 6

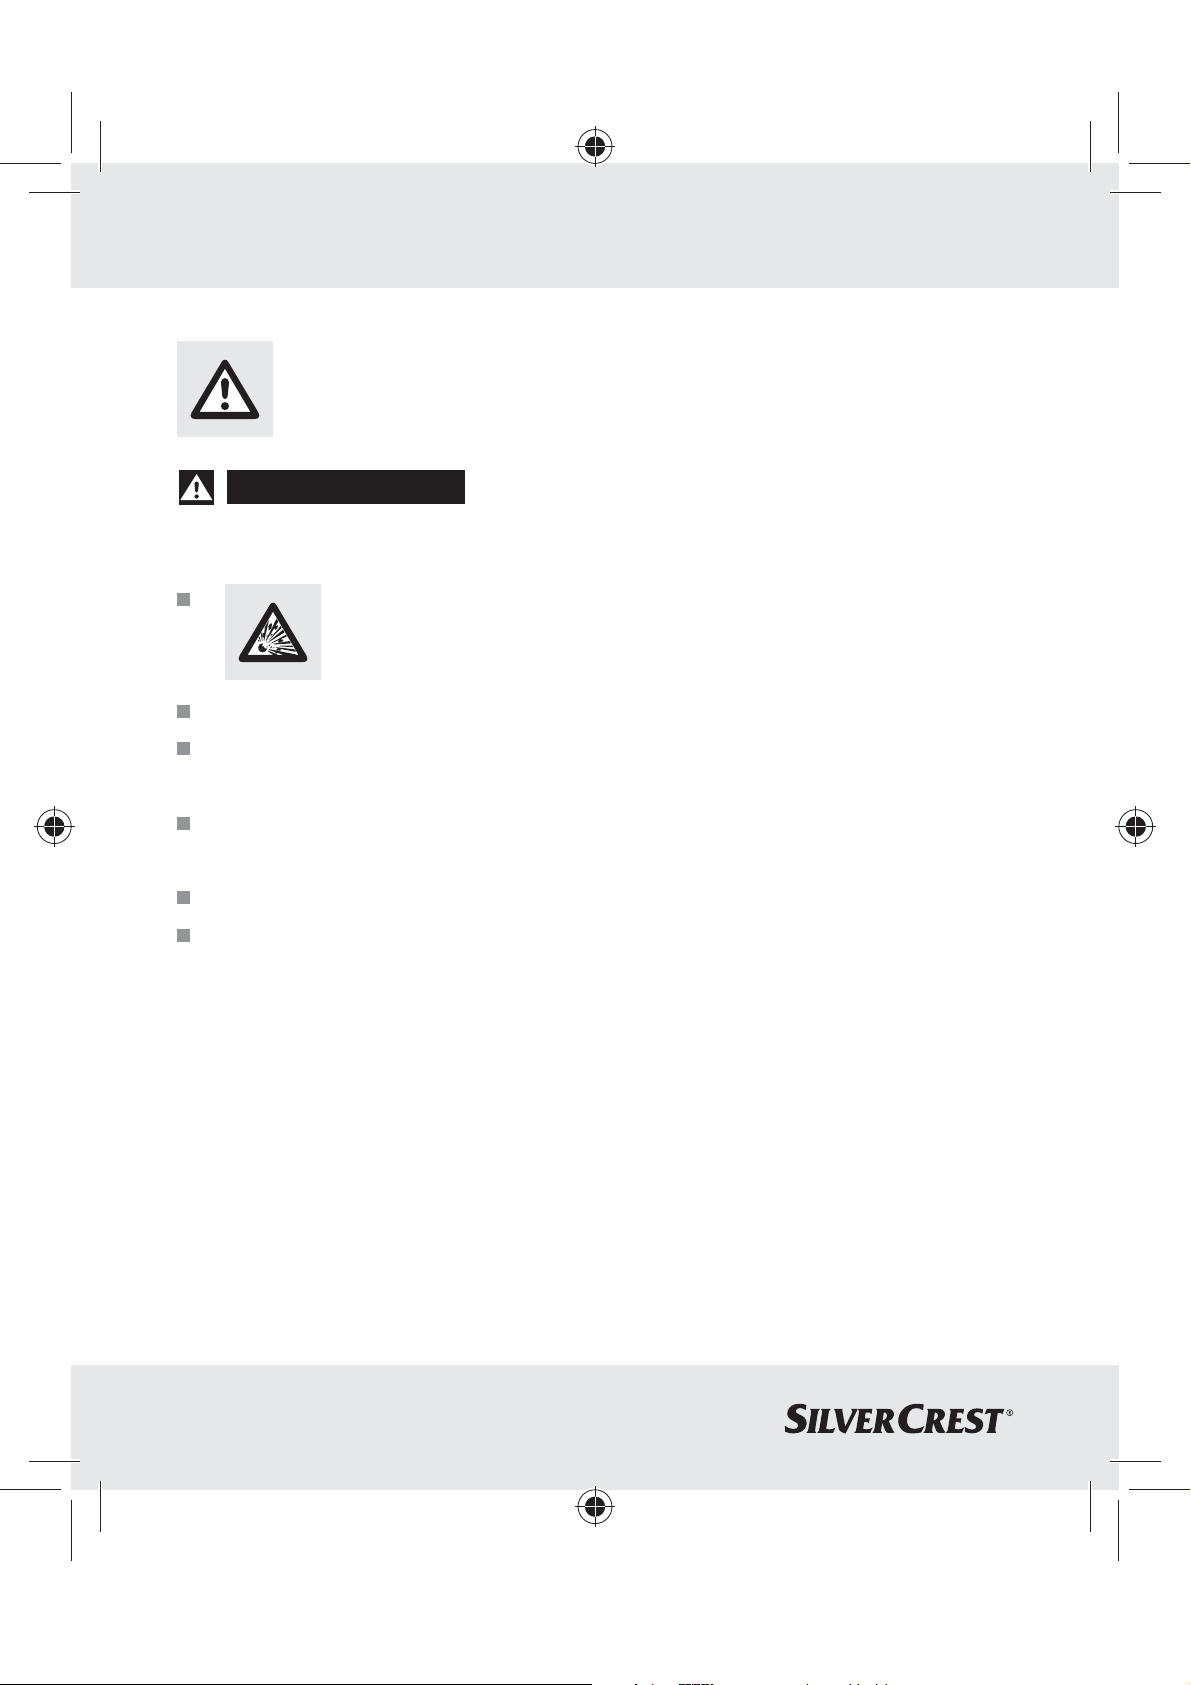
C
D
11
12
13
14 15
5
30.06.11 15:48
Page 7

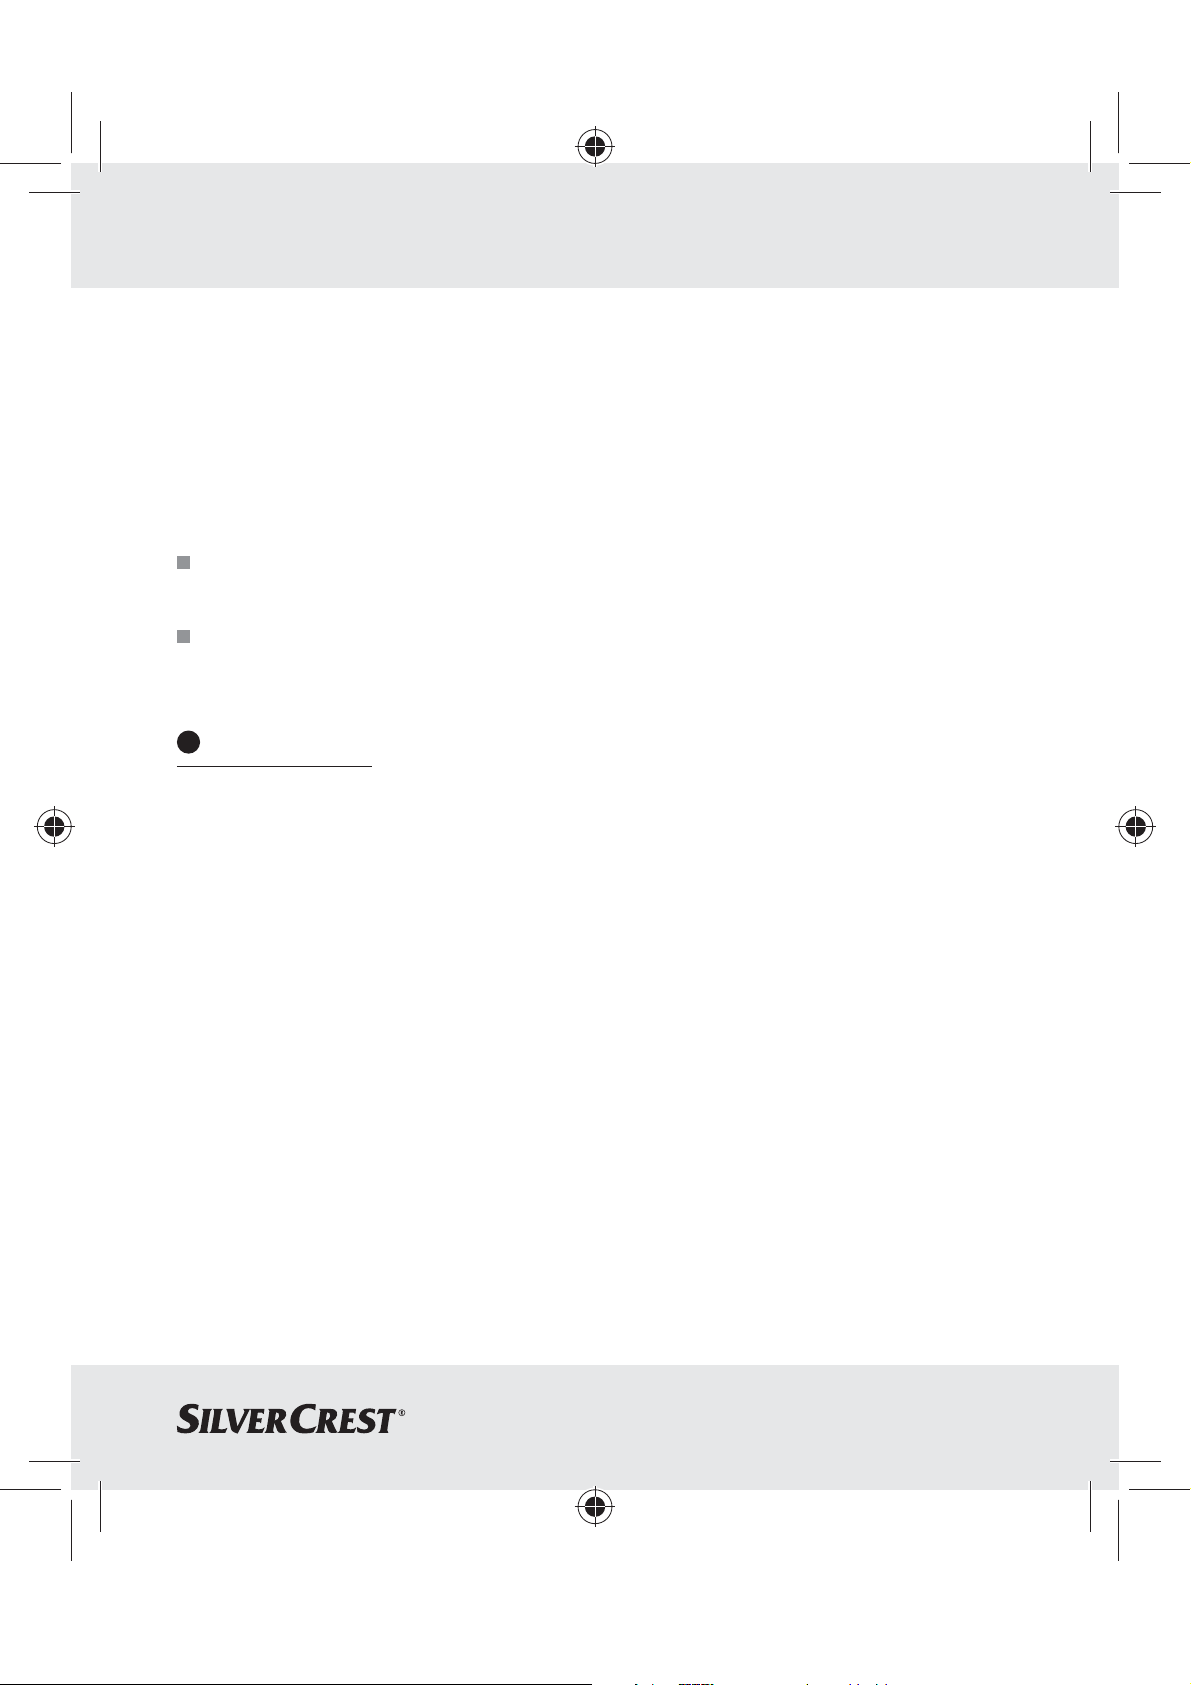
E
16
F
VOL
17
17
16
18
6
30.06.11 15:48
Page 8
Índice
Introducción
Uso conforme a su finalidad .............................................................Página 8
Datos técnicos .................................................................................... Página 8
Volumen de suministro .......................................................................Página 9
Descripción de piezas .......................................................................Página 9
Seguridad ...................................................................................... Página 10
Indicaciones generales de seguridad .............................................Página 11
Indicaciones de seguridad relativas a las pilas ..............................Página 12
Montaje ............................................................................................Página 13
Puesta en marcha
Colocación / cambio de las pilas .....................................................Página 14
Manejo
Sincronización transmisor / receptor................................................ Página 15
Ajustar el tipo de señal ...................................................................... Página 15
Ajustar el volumen.............................................................................. Página 16
Selección de tono de alarma ..........................................................Página 16
Eliminar errores ..................................................................................Página 16
Limpieza y mantenimiento ............................................ Página 17
Eliminación ....................................................................................Página 18
Informaciones
Declaración de conformidad ............................................................. Página 19
ES 7
30.06.11 15:48
Page 9
Introducción
Timbre inalámbrico
Introducción
Conserve adecuadamente estas instrucciones. Adjunte
igualmente toda la documentación en caso de entregar el
artefacto a un tercero.
Uso conforme a su finalidad
Este producto está destinado para la transmisión inalámbrica de la
señal del timbre de puerta. El producto no ha sido concebido para el
uso comercial.
Datos técnicos
Alcance: 100 m (espacios abiertos)
Frecuencia de transmisión: 433 MHz
Tipos de pila: Receptor: 2 x 1,5 V
Transmisor: 1 x 3 V
Receptor: Volumen de tono de alarma (con nivel
máximo de volumen): mín. 73 dB (a una
distancia del aparato de 1m)
ES8
(tipo AA / LR6),
(tipo CR2032)
30.06.11 15:48
Page 10
Transmisor: Tipo de protección: IPX4
Volumen de suministro
1 emisor
1 receptor
1 pie de apoyo (para el receptor)
Introducción
2 pilas 1,5 V
1 pila 3 V
tornillos (para el emisor y para el montaje en la pared del transmisor)
3
,tipo AA (receptor)
, tipo CR2032 (transmisor)
3 tacos
5 placas para nombre intercambiables (para el timbre de la puerta)
1 tapa para la placa para nombre
1 manual de instrucciones
Descripción de piezas
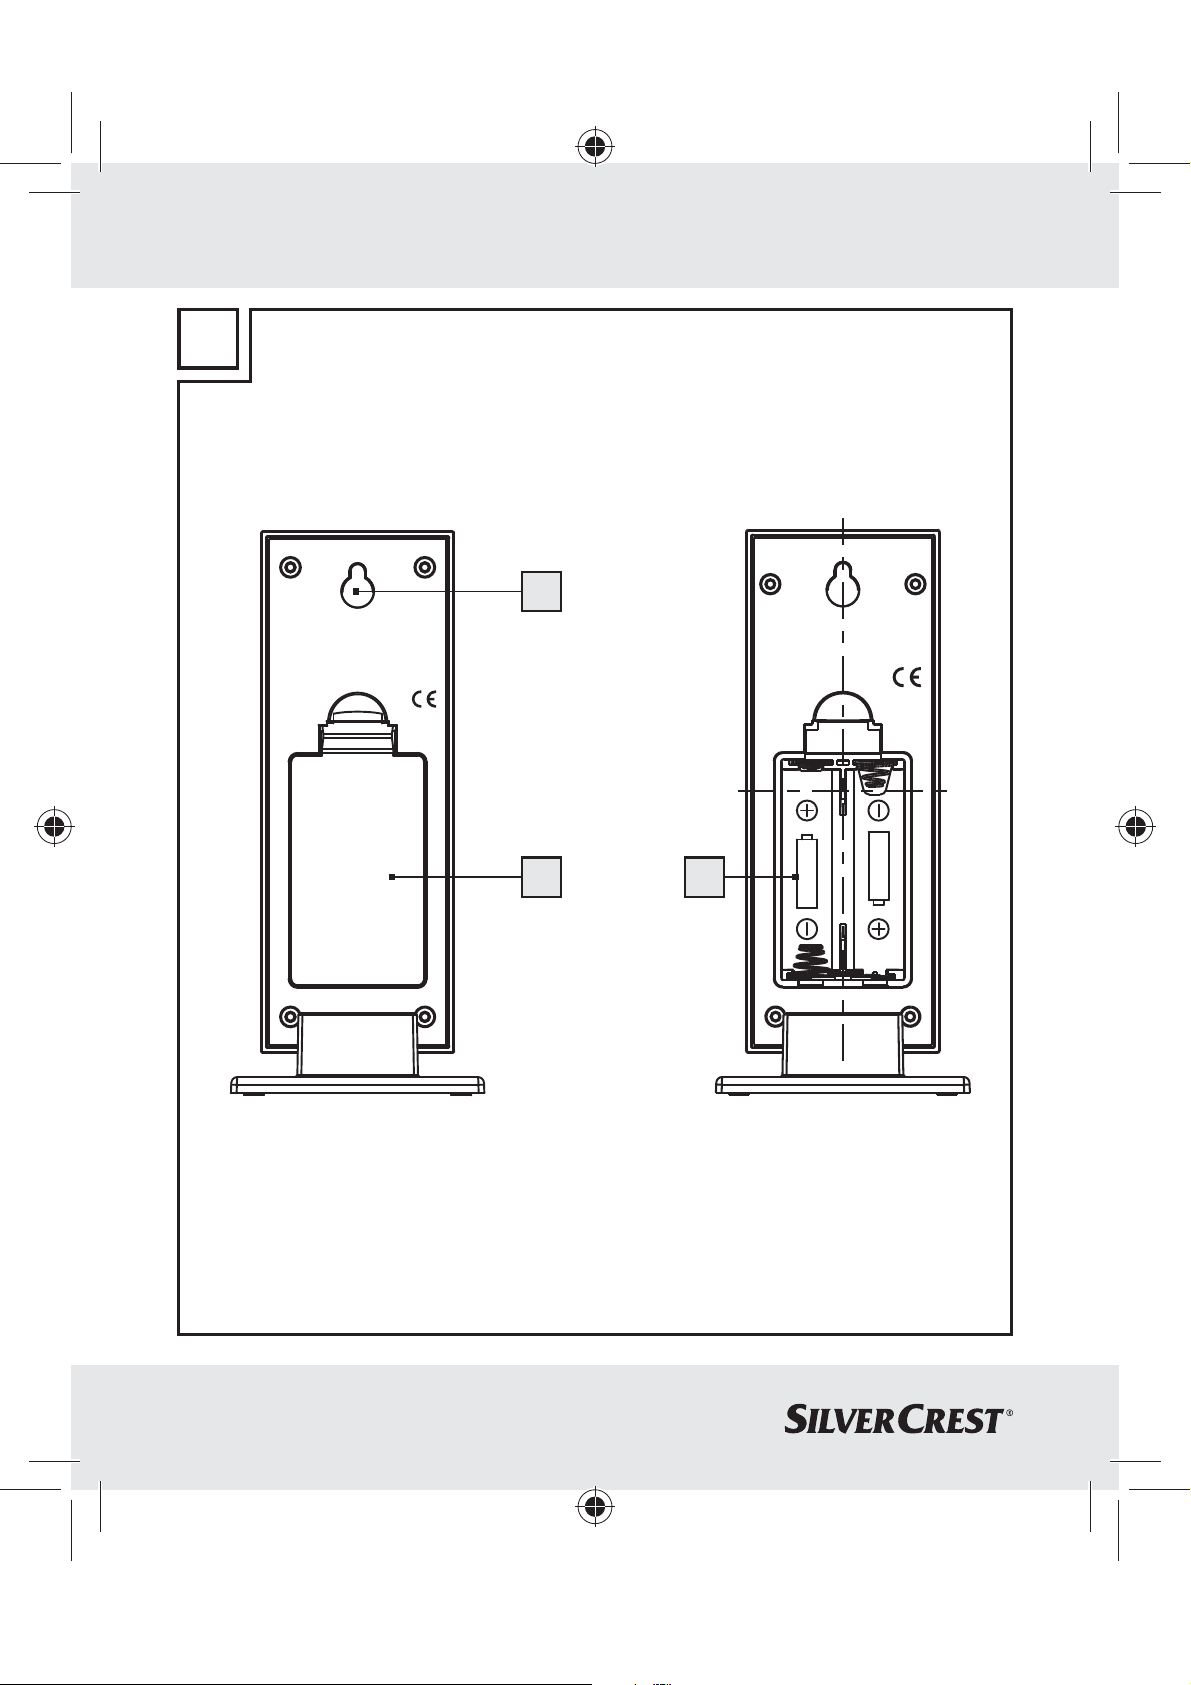
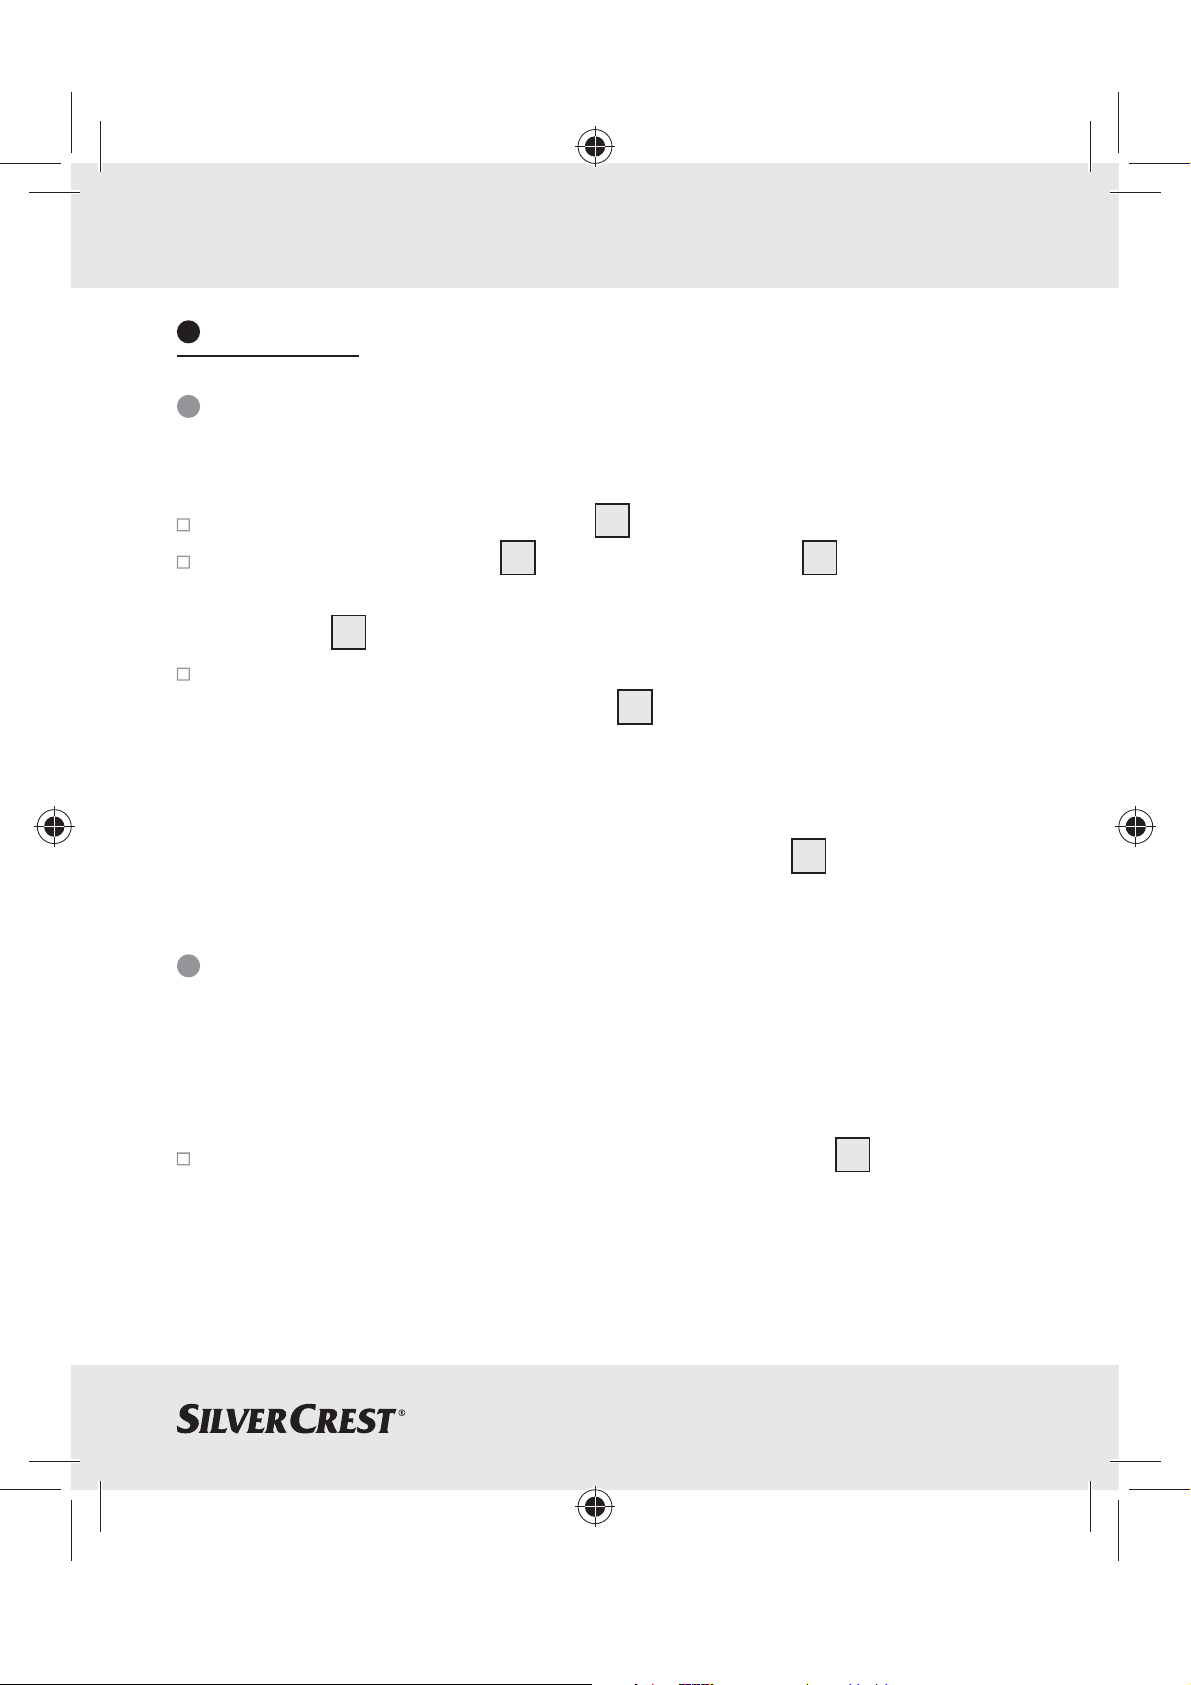
Receptor (fig. A / B):
1
Indicador de señal
2
Tecla de sincronización
3
Tecla de ajuste de volumen
4
Tecla de selección de tono de timbre
ES 9
30.06.11 15:48
Page 11
Introducción / Seguridad
5
Tecla de selección del tipo de señal (señal óptica, acústica,
óptica y acústica)
6
Altavoz
7
Soporte de pie
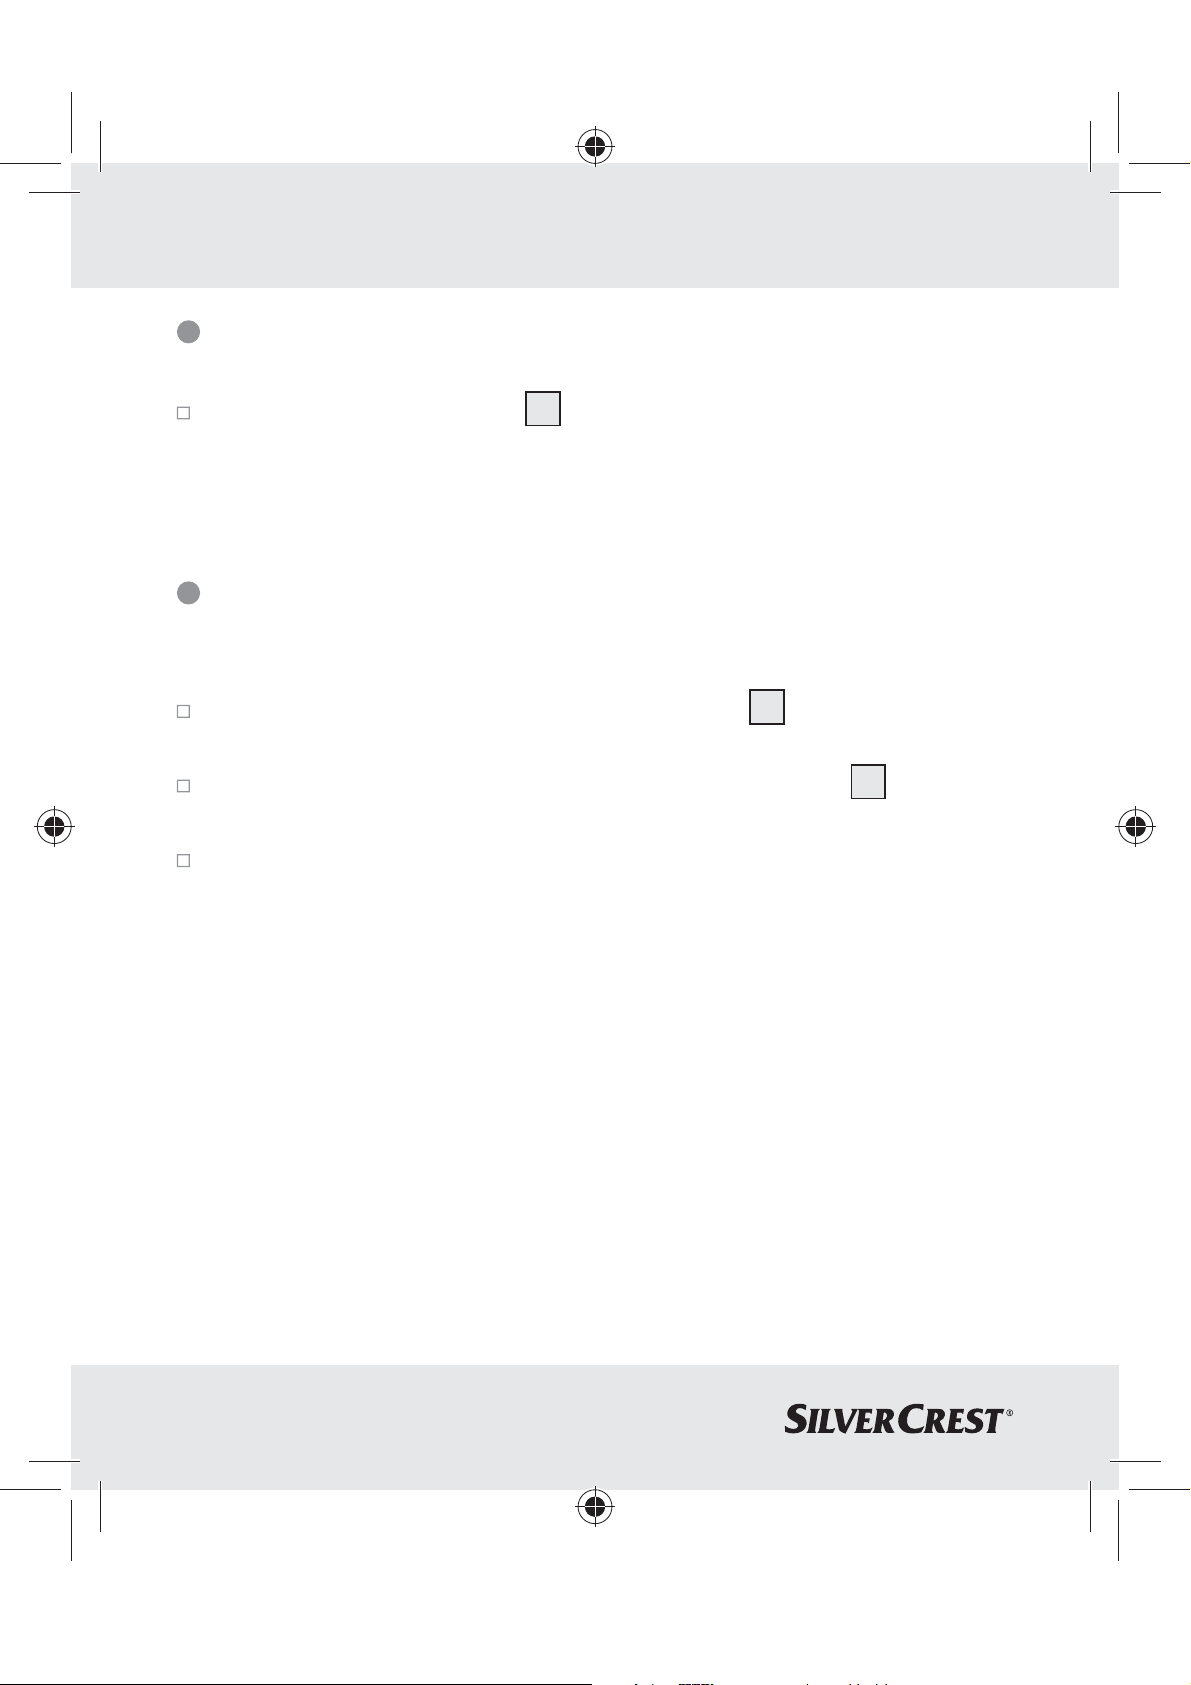
8
Colgador
9
Tapa del compartimento para pilas
10
Compartimento para pilas
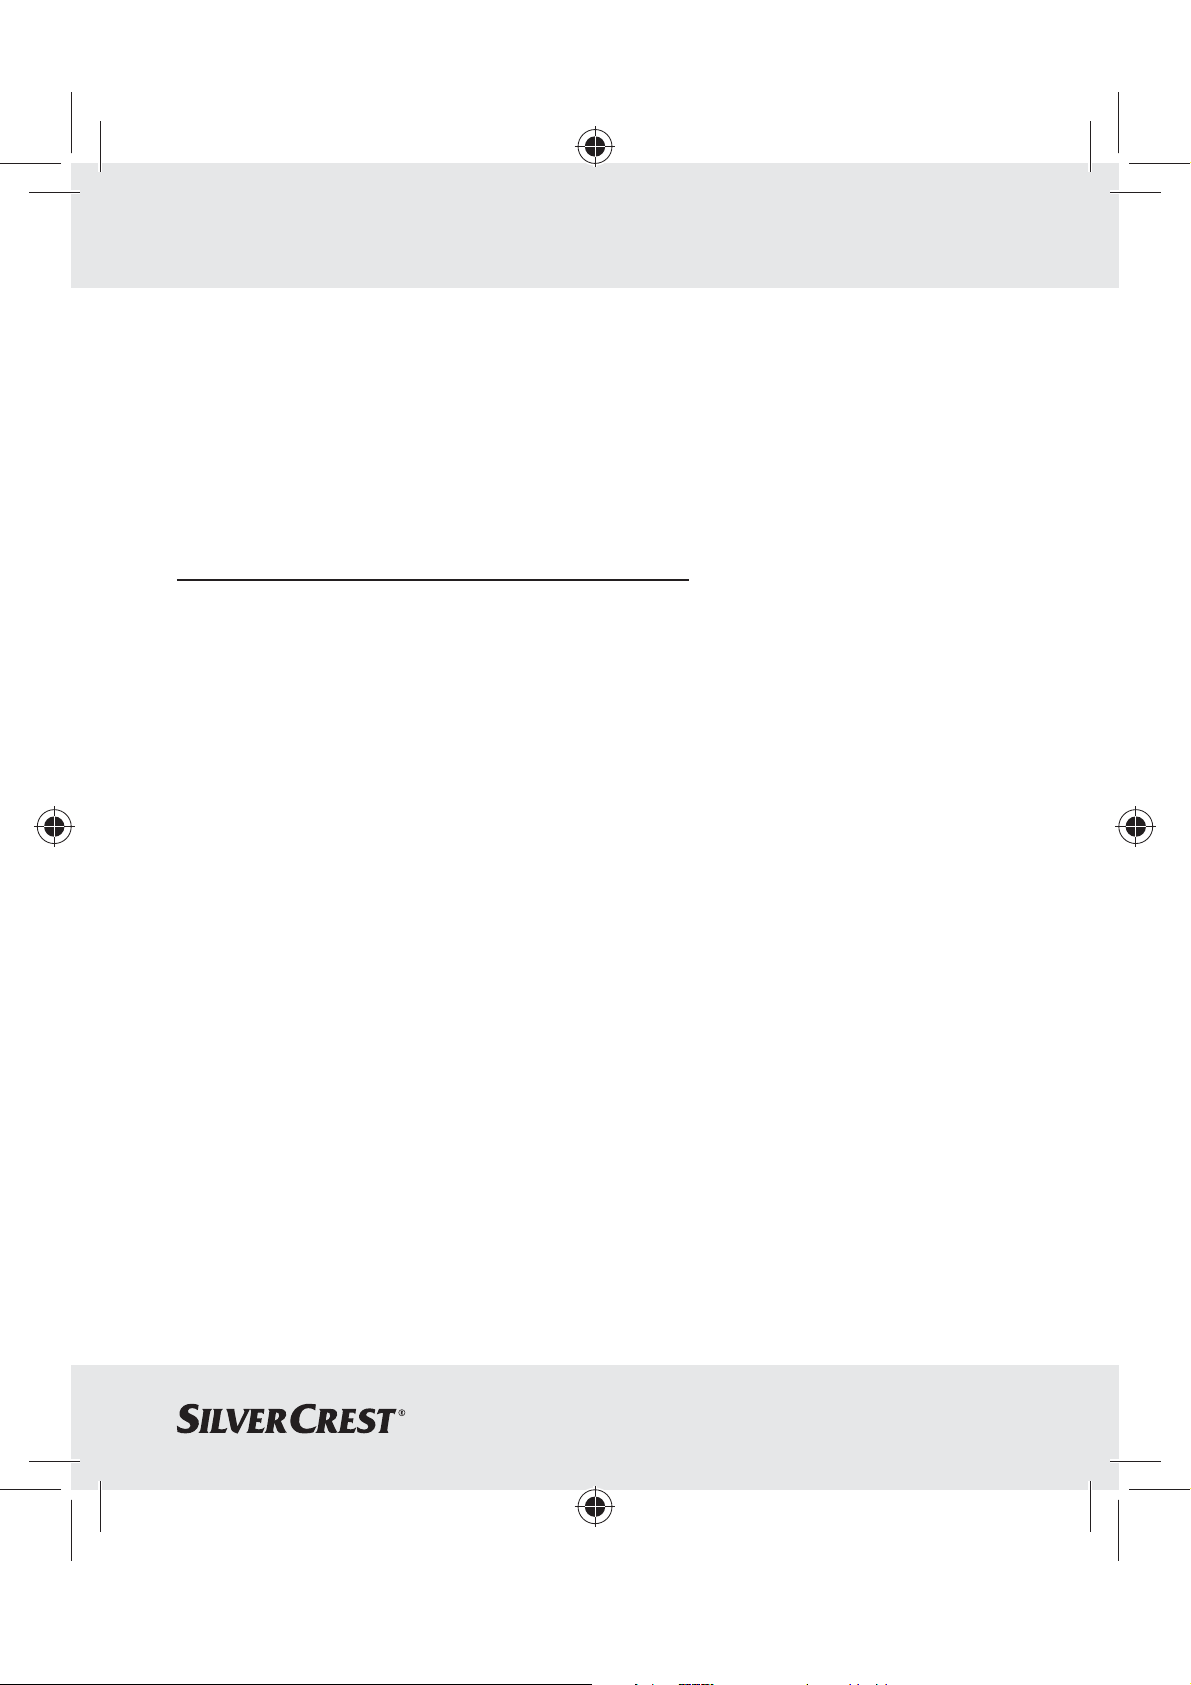
Transmisor (fig. C / D):
11
Indicador de señal
12
Placa para nombre
13
Tecla de timbre
14
Compartimento para pilas
15
Soporte (para montaje en la pared)
Montaje (fig. E / F ):
16
Tornillo
17
Taco
18
Tornillo (para el transmisor)
Seguridad
¡ADVERTENCIA!
instrucciones. El incumplimiento de las advertencias e indicaciones de
seguridad puede provocar descargas eléctricas, incendios y / o lesiones
graves.
ES10
Lea todas las indicaciones de seguridad y las
30.06.11 15:48
Page 12
Seguridad
¡CONSERVE TODAS LAS INDICACIONES DE SEGURIDAD Y ADVERTENCIAS POR SI NECESITA CONSULTARLAS MÁS ADELANTE!
Indicaciones generales de seguridad
embalaje. Existe peligro de asfixia por el material de embalaje. Los
niños suelen subestimar los peligros. Mantenga siempre a los niños
alejados del producto. No es un juguete.
¡ADVERTENCIA!
RIESGO
Nunca deje a los niños sin vigilancia con el material de
DE ACCIDENTE PARA BEBÉS Y NIÑOS!
¡PELIGRO DE MUERTE Y
Los niños o las personas que carezcan de los conocimientos o la
experiencia necesarios para manipular el aparato, o aquellas cuyas
capacidades físicas, sensoriales o psicológicas estén limitadas, no
deben utilizar el aparato sin la supervisión o la dirección de una
persona responsable por su seguridad. Debe mantenerse a los
niños vigilados para que no jueguen con el aparato.
Revise que todas las piezas estén íntegras. En caso del montaje de
piezas dañadas existe peligro de lesiones.
Revise que todas las piezas estén montadas adecuadamente. En
caso del montaje inadecuado existe peligro de lesiones.
Mantenga el aparato alejado del fuego y de las fuentes de calor
(p. ej., velas).
ES 11
30.06.11 15:48
Page 13
Seguridad
Indicaciones de seguridad
relativas a las pilas
¡ADVERTENCIA!
ingerirse, lo que puede suponer un peligro mortal. En caso de
ingestión de pilas, solicite ayuda médica de inmediato.
¡PELIGRO DE EXPLOSIÓN! No recargue nunca pilas
desechables, no las ponga en cortocircuito ni las abra.
Las pilas pueden sobrecalentarse, incendiarse o estallar.
No arroje las pilas ni al fuego ni al agua. Las pilas podrían explotar.
Retire en seguida las pilas agotadas del aparato. Existe un alto riesgo
de sulfatación.
Cambie siempre todas las pilas al mismo tiempo y utilice únicamente
pilas del mismo tipo.
No combine diferentes tipos de pilas ni pilas nuevas con usadas.
Las pilas no deben eliminarse junto con los residuos domésticos.
Elimine las pilas usadas de una forma respetuosa con el medio
ambiente.
¡PELIGRO DE MUERTE! Las pilas pueden
¡Todos los consumidores están obligados legalmente a desechar las
pilas debidamente!
Mantenga las pilas alejadas de los niños, no las eche al fuego, no
las ponga en cortocircuito ni las desarme.
El no cumplimiento de las indicaciones puede ocasionar que la pila
se descargue más allá de la tensión final. Esto ocasionará riesgo de
derrame. ¡Si la pila se hubiese derramado en su artefacto, retírela
inmediatamente a fin de evitar daños en el artefacto!
ES12
30.06.11 15:48
Page 14
Seguridad / Montaje
Evite el contacto con la piel, ojos y mucosas. ¡En caso de contacto
con el ácido de la pila, enjuague la zona afectada con abundante
agua y / o consulte a un médico!
No emplee pilas recargables.
Nunca ponga en cortocircuito a los polos de conexión.
Nunca use al mismo tiempo pilas usadas y nuevas.
Extraiga la pila del aparato cuando no lo haya utilizado durante un
período de tiempo prolongado.
Al introducir las pilas, tenga en cuenta la polaridad correcta.
Montaje
Nota: para montar el timbre, necesita un destornillador y una
taladradora.
Nota: para el montaje, utilice únicamente los tornillos y los tacos
suministrados.
Colocación del receptor (véase fig. E)
Colocación del transmisor (véase fig. F)
ES 13
30.06.11 15:48
Page 15

Puesta en marcha
Puesta en marcha
Colocación / cambio de las pilas
Antes de poner en marcha el aparato, introduzca las pilas para el
suministro de energía.
¡ATENCIÓN! Utilice exclusivamente el tipo de pila indicado.
En caso contrario, el producto podría dañarse.
Receptor:
Retire la tapa del compartimento para pilas 9 que se encuentra
en la parte trasera.
En caso necesario, retire las pilas gastadas.
Introduzca 2 pilas (1,5 V , tipo AA).
Nota: preste atención a la polaridad correcta. Ésta está indicada
en el compartimento
10
para pilas.
Cierre el compartimento para pilas 10.
Transmisor:
Reitre el soporte 15 situado en la parte posterior del transmisor.
Abra el compartimento para pilas 14 girando la tapa del mismo en
sentido contrario al de las agujas del reloj.
Introduzca una pila (3 V , tipo CR 2032). La parte marcada con
“+” debe mirar hacia arriba.
Coloque la tapa sobre el compartimento para pilas 14 y fíjela
girándola en el sentido de las agujas del reloj.
Vuelva a fijar el soporte del 15 transmisor en la parte trasera del
aparato.
ES14
30.06.11 15:48
Page 16
Manejo
Manejo
Sincronización transmisor / receptor
Para sincronizar el transmisor y el receptor, siga los siguientes pasos:
Pulse la tecla de sincronización 2.
Pulse la tecla de timbre 13, el indicador de señal 1 parpadea en
rojo. Entonces, suena el tono de alarma programado y el indicador
de señal
1
se apaga.
Si el aparato receptor no reacciona tal y como se ha descrito,
apriete la tecla de sincronización
2
de nuevo. La función de
sincronización se termina. Reanudar el proceso de sincronización.
La transmisión de la señal entre el emisor y el transmisor se muestra
mediante un breve parpadeo del indicador de señal
11
.
Ajustar el tipo de señal
El receptor puede mostrar una señal de puerta recibida bien ópticamente,
bien acústicamente o bien de las dos maneras.
Sirviéndose de la tecla de selección del tipo de señal 5, seleccione
si desea que la señal se muestre ópticamente, acústicamente o de
las dos maneras.
ES 15
30.06.11 15:48
Page 17
Manejo
Ajustar el volumen
Pulse la tecla de volumen 3 hasta alcanzar el volumen deseado.
En total hay 5 niveles de volumen posibles: muy alto, alto, intermedio,
bajo, muy bajo.
Selección de tono de alarma
Nota: el timbre dispone de más de 36 tonos de alarma diferentes.
Pulse la tecla de selección de tono de timbre 4. Suena el primer
tono de alarma.
Pulse otra vez la tecla de selección de tono de timbre 4 para
pasar al siguiente tono de alarma.
Repita el proceso hasta que alcance el tono de alarma deseado.
Automáticamente, se almacena el último tono de alarma seleccio-
nado.
Eliminar errores
Es muy probable que el artefacto no funcione correctamente luego de
estar expuesto
a condiciones climáticas extraordinarias (p. ej. un fuerte
campo electromagnético). En ese caso retire las pilas de ambos artefactos por aprox. 2 minutos. Proceda posteriormente como se describe en
“Sincronización transmisor / receptor”.
ES16
30.06.11 15:48
Page 18
Manejo / Limpieza y mantenimiento
Las descargas electrostáticas pueden ocasionar fallas en el funcionamiento. En caso de tales fallas retire la pila y colóquela nuevamente.
Proceda posteriormente como se describe en “Sincronización transmisor / receptor”.
Limpieza y mantenimiento
No utilice en ningún caso líquidos o productos de limpieza ya que
éstos dañarían el aparato.
Limpie el aparato sólo por fuera con un paño suave y seco.
ES 17
30.06.11 15:48
Page 19
Eliminación
Eliminación
El embalaje está compuesto por materiales no contaminantes
que pueden ser eliminados en el centro de reciclaje local.
Puede averiguar las posibilidades de eliminación del producto estropeado en la administración de su comunidad o ciudad.
No elimine el producto estropeado con los desechos domésticos, sino hágalo de manera correcta. Proteja así el medio
ambiente. Se puede informar en la oficina competente de su
administración sobre los puestos de recogida y sus horarios
de atención al público.
Las baterías defectuosas o agotadas deben reciclarse según la directiva
2006 / 66 / EC. Deseche la batería y / o el aparato a través de los puntos
de recogida disponibles.
¡Daño medioambiental debido a
Pb Hg
un reciclaje incorrecto de las pilas!
Las pilas no deben eliminarse junto a los residuos domésticos. Las pilas
pueden contener metales pesados tóxicos que debe tratarse conforme
a la normativa aplicable a los residuos especiales. Los símbolo químicos
de los metales pesados son: Cd = Cadmio, Hg = Mercurio, Pb = Plomo.
Las pilas deben reciclarse en el punto de recolección específico para
ello.
ES18
30.06.11 15:48
Page 20

Informaciones
Informaciones
Declaración de conformidad
Nosotros Milomex Ltd., c / o Milomex Services, Hilltop Cottage, Barton
Road, Pulloxhill, Bedfordshire, MK45 5HP, UK, declaramos bajo
responsabilidad propia, que el producto: Timbre inalámbrico, N.º de
modelo: Z30914, Versión: , referido en esta declaración,
cumple con las normas / documentos normativos de la directiva
1999 / 5 / EC.
Si es necesario puede descargar estos documentos de www.milomex.com.
EMC
ES 19
30.06.11 15:48
Page 21
Indice
Introduzione
Scopo d’impiego ...............................................................................Pagina 21
Dati tecnici ..........................................................................................Pagina 21
Dotazione ...........................................................................................Pagina 22
Quadro sinottico dei componenti ....................................................Pagina 22
Sicurezza ........................................................................................Pagina 23
Avvisi di sicurezza generali ..............................................................Pagina 24
Indicazioni di sicurezza relative alle batterie .................................Pagina 25
Montaggio ....................................................................................Pagina 26
Avvio
Inserimento / sostituzione delle batterie ..........................................Pagina 27
Funzionamento
Sincroniz zazione dell’emettitore / ricevitore ...................................Pagina 28
Impostazione del tipo di segnale .....................................................Pagina 28
Impostazione del volume ..................................................................Pagina 29
Scelta del segnale acustico ..............................................................Pagina 29
Eliminazione di errori ........................................................................Pagina 29
Pulizia e manutenzione ....................................................Pagina 30
Smaltimento ................................................................................Pagina 31
Informazioni
Dichiarazione di conformità .............................................................Pagina 32
IT/MT20
30.06.11 15:48
Page 22
Introduzione
Campanello senza fili
Introduzione
Conservate quest’istruzione per bene. Consegnate altresì tutti
i documenti quando date questo prodotto a terzi.
Scopo d’impiego
Questo prodotto è stato realizzato per il trasferimento senza fili del
segnale del campanello. Questo prodotto non è stato realizzato per l’uso
professionale.
Dati tecnici
Portata: 100 m (zona aperta)
Frequenza di
trasmissione: 433 MHz
Tipi di batteria: Ricevitore: 2 x 1,5 V
Emettitore: 1 x 3 V
Ricevitore: Volume del segnale acustico (in caso di regolazione
del volume al livello massimo): min. 73 dB (a una
distanza dall’apparecchio di 1 m)
(Tipo AA / LR6),
(Tipo CR2032),
IT/MT 21
30.06.11 15:48
Page 23
Introduzione
Emettitore: Tipo di protezione: IPX4
Dotazione
1 emettitore
1 ricevitore
1 base (per il ricevitore)
2 batterie 1,5 V
1 batteria 3 V
viti (per emettitore e per il montaggio a parete del ricevitore)
3
, Tipo AA (ricevitore)
Tipo CR2032 (emettitore)
3 tasselli
5 targhette sostituibili (per il campanello per porta)
1 copertura per targhetta di campanello
1 libretto di istruzioni d’uso
Quadro sinottico dei componenti
Ricevitore (vedi figg. A / B)
1
Indicatore del segnale
2
Tasto di sincronizzazione
3
Tasto del volume
4
Tasto di selezione della suoneria
IT/MT22
30.06.11 15:48
Page 24

Introduzione / Sicurezza
5
Tasto di selezione del tipo di segnale (segnale ottico, acustico,
ottico e acustico)
6
Altoparlante
7
Base
8
Dispositivo di sospensione
9
Coperchio del vano portabatterie
10
Vano portabatterie
Emettitore (vedi figg. C / D)
11
Indicatore del segnale
12
Targhetta
13
Tasto della suoneria
14
Vano portabatterie
15
Supporto (per montaggio a parete)
Montaggio (vedi figg. E / F):
16
Vite
17
Tassello
18
Vite (per l’emettitore)
Sicurezza
Leggere tutte le indicazioni di sicurezza e le istruzioni riportate. Il mancato rispetto delle indicazioni di sicurezza e delle
istruzioni d’uso può provocare incendi e / o gravi lesioni.
IT/MT 23
30.06.11 15:48
Page 25

Sicurezza
CONSERVI TUTTE LE ISTRUZIONI E GLI AVVISI DI SICUREZZA PER
CONSULTARLI IN FUTURO!
Avvisi di sicurezza generali
PERICOLO DI VITA E D’IN-
FORTUNI PER BAMBINI ED INFANTI! Non lasciate
mai i bambini inosservati con il materiale d’imballaggio,
poichè persiste pericolo di soffocamento. I bambini spesso sottovalutano i pericoli. Tenete sempre i bambini lontani dalla portata del
prodotto. Non è un giocattolo.
Senza la sorveglianza o la guida di una persona responsabile, questo
apparecchio non deve essere utilizzato da bambini né da persone
non in possesso della conoscenza e dell’esperienza necessarie per
maneggiarlo, o le cui capacità corporali, sensoriali o intellettuali
fossero limitate. I bambini devono essere sorvegliati affinché non
giochino con l’apparecchio.
Controllate che tutti i pezzi siano impeccabili. Il montaggio di pezzi
danneggiati può presentare un pericolo di lesioni.
Controllate che tutti i pezzi siano montati in modo giusto. Un mon-
taggio scorretto può presentare dei pericoli di lesione.
Tenere l’apparecchio lontano da fiamme libere e da fonti di calore
(ad esempio, da candele accese).
IT/MT24
30.06.11 15:48
Page 26

Sicurezza
Indicazioni di sicurezza relative alle
batterie
PERICOLO DI MORTE! Le batterie potrebbero
essere inghiottite, circostanza che può rappresentare un pericolo di
morte. In caso di ingerimento di una batteria chiedere subito l’intervento di un medico.
PERICOLO DI ESPLOSIONE! Non ricaricare mai bat-
terie non ricaricabili, non cortocircuitarle né aprirle. Ciò
potrebbe causarne il surriscaldamento, l’incendio o
l’esplosione.
Non gettare mai le batterie nel fuoco o in acqua. Le batterie potreb-
bero infatti esplodere.
Rimuovere subito dall’apparecchio le batterie esaurite. Sussiste un
notevole pericolo di perdita!
Sostituire sempre tutte le batterie contemporaneamente e inserire
solamente batterie nuove dello stesso tipo.
Non utilizzare tipi diversi di batteria oppure batterie usate e nuove
contemporaneamente.
Le batterie non devono essere gettate nella spazzatura domestica!
Smaltire batterie usate in modo non dannoso per l’ambiente.
Ogni consumatore è obbligato dalla legge di smaltire regolarmente
le pile!
Tenete le pile lontano dalla portata dei bambini, non gettatele nel
fuoco, non sottoponetelo sotto corto circuito e non smontatele.
IT/MT 25
30.06.11 15:48
Page 27

Sicurezza / Montaggio
In caso di inosservanza delle avvertenze le pile si possono scaricare
tramite la loro tensione finale. Persiste poi il pericolo d’uscita dell’acido dalle pile. In caso l’acido delle pile sia fuoruscito mentre le pile
si trovavano dentro l’apparecchio, toglietele subito per evitare danni
al prodotto!
Evitate il contatto con la pelle, gli occhi e mucosa. In caso di contatto
con l’acido delle pile, lavate subito la parte colpita con molta acqua
e / o consultate un medico!
Non utilizzate pile che si possano ricaricare.
Non sottoponete i poli d’attacco sotto corto circuito.
Non impiegate mai insieme pile vecchie con pile nuove.
Rimuovere le batterie dall’apparecchio qualora questo non venisse
utilizzato per lungo tempo.
Inserendo le batterie fare attenzione a che la polarità sia corretta.
Montaggio
Nota: Per il montaggio del campanello per porta, è necessario utiliz-
zare un cacciavite e un trapano.
Nota: Per il montaggio utilizzare solamente le viti e i tasselli in dotazione.
Montaggio del ricevitore (vedi fig. E)
Montaggio dell’emettitore (vedi fig. F)
IT/MT26
30.06.11 15:48
Page 28

Avvio
Avvio
Inserimento / sostituzione delle batterie
Prima di avviare l’apparecchio inserire le batterie per l’alimentazione
di energia.
ATTENZIONE! Utilizzare solamente il tipo di batteria indicato.
In caso contrario vi è il pericolo di danneggiamento del prodotto.
Ricevitore:
Rimuovere il coperchio del vano portabatterie 9 posto sul lato
posteriore.
Se necessario, rimuovere le batterie scariche.
Inserire due batterie (1,5 V , di tipo AA).
Nota: Facendo questo, tenere conto della polarità corretta.
Questa viene mostrata nel vano portabatterie
10
.
Chiudere il vano portabatterie 10.
Emettitore:
Rimuovere il supporto 15 posto sul retro dell’emettitore.
Aprire il vano portabatterie 14, ruotando il coperchio del vano por-
tabatterie in senso antiorario.
Inserire una batteria (3 V , di tipo CR 2032). Il punto contrasse-
gnato con “+” deve essere rivolto verso l’alto.
Porre il coperchio del vano portabatterie sul vano portabatterie 14
medesimo e stringerlo in senso orario.
Fissare nuovamente il supporto 15 dell’emettitore sul lato posteriore
dell’apparecchio.
IT/MT 27
30.06.11 15:48
Page 29

Funzionamento
Funzionamento
Sincronizzazione dell’emettitore / ricevitore
Sincronizzare l’emettitore e il ricevitore nel modo seguente:
Premere il tasto di sincronizzazione 2.
Premere il tasto del campanello 13, la visualizzazione del segnale
1
lampeggia di colore rosso. La tonalità di segnale programmata
risuona e l‘indicatore del segnale
1
si spegne.
Se il ricevitore non reagisce come descritto, premere nuovamente il
tasto di sincronizzazione
2
. La funzione di sincronizzazione viene
terminata. Ripetere la procedura di sincronizzazione.
L’emettitore visualizza la trasmissione del segnale al ricevitore con un
breve lampeggio dell’indicatore di segnale
11
.
Impostazione del tipo di segnale
Il ricevitore può visualizzare il segnale ricevuto dalla porta otticamente
o acusticamente, oppure sia otticamente sia acusticamente.
Operando sul tasto di selezione del tipo di segnale 5, scegliere se
il segnale debba essere visualizzato otticamente o acusticamente,
oppure sia otticamente che acusticamente.
IT/MT28
30.06.11 15:48
Page 30

Funzionamento
Impostazione del volume
Premere il tasto del volume 3, fino a quando il volume desiderato
è stato raggiunto. Vi sono complessivamente 5 possibilità di regolazione del volume: altissimo, alto, medio, basso, molto basso.
Scelta del segnale acustico
Nota: Questo campanello per porta dispone di 36 segnali acustici
diversi.
Premere il tasto di selezione della suoneria 4. Il primo segnale
acustico risuona.
Per accedere al segnale acustico successivo, premere nuovamente il
tasto di selezione dei segnale acustico
4
.
Ripetere la procedura fino a quando si è giunti al segnale acustico
scelto. L’ultimo segnale acustico scelto viene memorizzato automaticamente.
Eliminazione di errori
Con l’influenza di condizioni ambientali straordinarie (per es. un forte
campo elettromagnetico), il prodotto probabilmente non potrà più funzionare in modo impeccabile. Togliete in questo caso per ca. 2 minuti le
pile di tutti e due gli apparecchi. Procedete infine come descritto sotto
“Sincronizzazione dell’emettitore / ricevitore“.
IT/MT 29
30.06.11 15:48
Page 31

Funzionamento / Pulizia e manutenzione
Scariche elettrostatiche possono portare a disturbi nella funzione.
Togliete in caso di tali disturbi per breve tempo le pile e inseritele nuovamente. Procedete infine come descritto sotto “Sincronizzazione dell’emettitore / ricevitore”.
Pulizia e manutenzione
Non utilizzate per nessuna ragione liquidi o detergenti che danneg-
gerebbero l‘apparecchio.
Pulite esclusivamente l‘esterno dell‘apparecchio con un panno
morbido ed asciutto.
IT/MT30
30.06.11 15:48
Page 32

Smaltimento
Smaltimento
La confezione è prodotta in materiale riciclabile e biodegra-
dabile, smaltibile nei luoghi di raccolta differenziati.
Potete informarvi sulle possibilità di smaltimento del prodotto consumato
dall‘amministrazione comunale e cittadina.
Per la salvaguardia della tutela ambientale, quando il vostro
prodotto non funziona più, non gettatelo nei rifiuti domestici
bensì nei luoghi adatti di raccolta. Potete informarvi sui luoghi di raccolta e i loro orari di apertura dall‘amministrazione
competente.
Gli accumulatori difettosi o esausti devono essere riciclati in base alla
direttiva 2006 / 66 / EC. Riconsegnare gli accumulatori e / o i caricabatteria presso gli appositi centri di raccolta.
Vi possono essere conseguenze negative per
l’ambiente a seguito di uno smaltimento non
Pb Hg
corretto delle batterie!
Le batterie non devono essere smaltite nella spazzatura domestica. Esse
possono contenere metalli pesanti velenosi e devono essere trattate
quali rifiuti speciali. I simboli chimici dei metalli pesanti sono i seguenti:
Cd = cadmio, Hg = mercurio, Pb = piombo. Consegnare quindi le
batterie usate ad un punto di raccolta comunale.
IT/MT 31
30.06.11 15:48
Page 33

Informazioni
Informazioni
Dichiarazione di conformità
Noi, Milomex Ltd., c / o Milomex Services, Hilltop Cottage, Barton
Road, Pulloxhill, Bedfordshire, MK45 5HP, UK, dichiariamo sotto la
nostra esclusiva responsabilità che il prodotto: Campanello senza fili,
Modello n° Z30914, Versione: , alla quale si riferisce la
presente dichiarazione, è conforme alle norme / ai documenti normativi
di cui alla Direttiva 1999 / 5 / EC.
In caso di necessità, tale documentazione può essere scaricata dal sito
Internet www.milomex.com.
EMC
IT/MT32
30.06.11 15:48
Page 34

IT/MT 33
30.06.11 15:48
Page 35

Índice
Introdução
Utilização adequada ...................................................................... Página 35
Dados técnicos ................................................................................. Página 35
Material fornecido ........................................................................... Página 36
Vista geral das peças ...................................................................... Página 36
Segurança ................................................................................... Página 37
Indicações gerais de segurança .................................................... Página 38
Indicações de segurança relativas às pilhas ................................ Página 39
Montagem ................................................................................... Página 40
Colocação em funcionamento
Inserir / substituir pilhas ................................................................... Página 40
Utilização
Sincronizar emissor / receptor ........................................................ Página 42
Configurar tipo de sinal .................................................................. Página 42
Regular o volume ............................................................................. Página 43
Seleccionar sinal sonoro ................................................................. Página 43
Eliminação de falhas ....................................................................... Página 43
Limpeza e conservação .................................................. Página 44
Eliminação ................................................................................... Página 45
Informações
Declaração de conformidade ........................................................ Página 46
PT34
30.06.11 15:48
Page 36

Introdução
Campainha sem fios
Introdução
Conserve bem este manual de instruções. Se transmitir o
artigo a terceiros, entregue de igual modo os respectivos
documentos.
Utilização adequada
Este artigo serve para uma transmissão sem cabo do sinal da campainha
de porta. Este artigo não é adequado para uma utilização comercial.
Dados técnicos
Alcance: 100 m (área aberta)
Frequência de emissão: 433 MHz
Tipos de pilhas: Receptor: 2 x 1,5 V
Emissor: 1 x 3 V
Receptor: Volume do sinal sonoro (no caso de configu-
ração máx. do volume): mín. 73 dB (com 1 m
de distância do aparelho)
(Tipo AA / LR6),
(Tipo CR2032)
PT 35
30.06.11 15:48
Page 37

Introdução
Emissor: Tipo de protecção: IPX4
Material fornecido
1 Emissor
1 Receptor
1 Pé de suporte (para o receptor)
2 Pilhas 1,5 V
1 Pilha 3 V
Parafusos (para emissor e para a montagem na parede do receptor)
3
, tipo AA (receptor)
, tipo CR2032 (emissor)
3 Buchas
5 Placas de identificação para substituição (para a campainha)
1 Cobertura para placa da campainha
1 Manual de instruções
Vista geral das peças
Receptor (fig. A / B):
1
Indicação de sinal
2
Botão de sincronização
3
Botão do volume
4
Botão de selecção do toque da campainha
PT36
30.06.11 15:48
Page 38

Introdução / Segurança
5
Tipo de sinal-botão de selecção (óptico, acústico, sinal óptico e
acústico)
6
Altifalante
7
Pé de suporte
8
Dispositivo de suspensão
9
Tampa do compartimento das pilhas
10
Compartimento das pilhas
Emissor (fig. C / D):
11
Indicação de sinal
12
Placa de identificação
13
Botão da campainha
14
Compartimento das pilhas
15
Suporte (para montagem na parede)
Montagem (fig. E / F):
16
Parafuso
17
Bucha
18
Parafuso (para o emissor)
Segurança
Leia todas as indicações de segurança e instruções. A
negligência no cumprimento das indicações de segurança e instruções
pode provocar ferimentos graves e / ou incêndio.
PT 37
30.06.11 15:48
Page 39

Segurança
GUARDE TODAS AS INDICAÇÕES DE SEGURANÇA E INSTRUÇÕES PARACONSULTA FUTURA!
Indicações gerais de segurança
PERIGO DE VIDA E DE ACIDENTE
PARA BEBÉS E CRIANÇAS! Nunca deixe crianças
sozinhas com o material da embalagem. Existe o perigo
de asfixia através do material da embalagem. As crianças subestimam frequentemente os perigos. Mantenha sempre as crianças
afastadas do artigo. Ele não é nenhum brinquedo!
Crianças ou pessoas sem conhecimento ou experiência para manu-
sear o aparelho, ou que sofram de limitações das capacidades
físicas, sensoriais ou mentais, não podem utilizar o aparelho sem
vigilância ou orientação de quem seja responsável pela sua segurança. As crianças têm que ser vigiadas para evitar que brinquem
com o aparelho.
Verifique todas as peças em relação à sua integridade. Ao desmon-
tarem-se peças danificadas existe o perigo de ferimentos.
Verifique se todas as peças foram montadas correctamente. Se a
montagem não tiver sido bem efectuada, existe o perigo de ferimentos.
Mantenha o aparelho afastado de chamas vivas ou de fontes de
calor (por ex. velas acesas).
PT38
30.06.11 15:48
Page 40

Segurança
Indicações de segurança relativas
às pilhas
PERIGO DE MORTE! As pilhas podem ser ingeridas
e constituir perigo de morte. Contacte imediatamente um médico no
caso de ingestão de uma pilha.
PERIGO DE EXPLOSÃO! Nunca recarregue pilhas
não recarregáveis, não provoque curto-circuito nem as
abra. Isto poderia provocar sobreaquecimento, perigo
de incêndio ou explosão.
Nunca atire as pilhas para chamas ou água. Estas podem explodir.
Retire de imediato as pilhas gastas do aparelho. Caso contrário,
existe elevado risco de derrame!
Substitua sempre todas as pilhas ao mesmo tempo e coloque bate-
rias do mesmo tipo.
Não utilize tipos diferentes, nem misture pilhas novas e usadas.
As pilhas não devem ser depositadas no lixo doméstico! Elimine as
pilhas usadas de forma ecológica.
Cada consumidor vê-se legalmente na obrigação de eliminar pilhas
de uma forma adequada!
Mantenha as pilhas afastadas das crianças, não as jogue para o
fogo, não as curte-circuite e não as desmonte.
O não seguimento das indicações pode levar a que as pilhas fiquem
descarregadas através das suas extremidades. Depois existe o perigo
de derramamento de ácido. Se as pilhas derramarem ácido no seu
aparelho, remova-as imediatamente a fim de evitar danos no aparelho!
PT 39
30.06.11 15:48
Page 41

Segurança / Montagem / Colocação em funcionamento
Evite o contacto com a pele, os olhos e as mucosas. Se o ácido das
pilhas entrar em contacto com as zonas acima referidas, lavar
abundantemente com água e / ou procure um médico!
Não utilize pilhas recarregáveis.
Não curte-circuite os pólos de ligação.
Nunca utilize pilhas novas juntamente com pilhas usadas.
Retire do aparelho a pilha, caso não tenha sido utilizada há muito
tempo.
Tenha atenção à polaridade correcta!
Montagem
Nota: Para a montagem da campainha necessita de uma chave de
parafuso e um berbequim.
Nota: Utilize para a montagem apenas os parafusos e buchas fornecidos.
Aplicar receptor (ver fig. E)
Aplicar emissor (ver fig. F)
Colocação em funcionamento
Inserir / substituir pilhas
Antes da colocação em funcionamento do aparelho, insira as
pilhas para a alimentação de energia.
PT40
30.06.11 15:48
Page 42

Colocação em funcionamento
CUIDADO! Utilize apenas o tipo de pilha indicado. Caso contrário,
o produto pode sofrer danos.
Receptor:
Remova a tampa do compartimento das pilhas 9 na parte traseira.
Retire as pilhas usadas, se necessário.
Insira as 2 pilhas (1,5 V , tipo AA).
Nota: Tenha atenção à polaridade correcta. Esta é indicada no
compartimento das pilhas
10
.
Feche o compartimento das pilhas 10.
Emissor:
Remova o suporte 15 na parte traseira do emissor.
Abra o compartimento das pilhas 14, rodando a tampa do compar-
timento de pilhas no sentido contrário ao dos ponteiros do relógio.
Insira uma pilha (3 V , tipo CR 2032). O lado assinalado com
“+” terá que apontar para cima.
Coloque a tampa do compartimento das pilhas no compartimento
14
e rode-o no sentido dos ponteiros do relógio.
Fixe novamente o suporte 15 do emissor na parte traseira do
aparelho.
PT 41
30.06.11 15:48
Page 43

Utilização
Utilização
Sincronizar emissor / receptor
Sincronize o emissor e receptor como se segue:
Prima a botão de sincronização 2.
Pressione o botão de campainha 13, a indicação de sinal 1 pisca
a vermelho. É emitido o sinal sonoro programado e apaga-se a
indicação de sinal
1
.
Caso o receptor não reaja como descrito, prima novamente o
botão de sincronização
2
. A função de sincronização é terminada.
Repita o processo de sincronização.
O emissor indica a transmissão do sinal ao receptor com um breve sinal
intermitente na indicação do sinal
11
.
Configurar tipo de sinal
O receptor pode apresentar um sinal de porta recebido óptico ou acústico ou ainda óptico e acústico.
Seleccione com o botão de selecção do tipo de sinal 5 se o sinal
deve ser apresentado óptico ou acústico ou ainda óptico e acústico.
PT42
30.06.11 15:48
Page 44

Utilização
Regular o volume
Prima o botão do volume 3 até atingir o volume pretendido. Existe
no total 5 configurações possíveis de volume: muito alto, alto, médio,
baixo, muito baixo.
Seleccionar sinal sonoro
Nota: A campainha dispõe de 36 diferentes sinais sonoros.
Prima o botão de selecção do toque da campainha 4. Toca o
primeiro sinal sonoro.
Prima novamente o botão de selecção do toque da campainha 4
para conseguir o sinal sonoro seguinte.
Repita este procedimento até que tenha seleccionado o sinal sonoro
pretendido. O sinal sonoro seleccionado por último é memorizado
automaticamente.
Eliminação de falhas
Sob a influência de condições atmosféricas invulgares (por ex., um
campo electromagnético forte), o aparelho deixa de funcionar de forma correcta. Nesse caso, remova as pilhas dos dois aparelhos durante
aprox. 2 minutos. Proceda por fim da forma que é descrita no capítulo
“Sincronizar emissor / receptor“.
PT 43
30.06.11 15:48
Page 45

Utilização / Limpeza e conservação
As descargas de energia electrostática podem originar falhas no funcionamento. Se as referidas falhas de funcionamento se verificarem, remova
as pilhas por alguns instantes e volte a inseri-las. Proceda por fim da
forma que é descrita no capítulo “Sincronizar emissor / receptor“.
Limpeza e conservação
Nunca utilize líquidos ou detergentes, pois estes danificam o aparelho.
Limpe apenas o exterior do aparelho com um pano suave e seco.
PT44
30.06.11 15:48
Page 46

Eliminação
Eliminação
A embalagem é feita de materiais não poluentes que podem
ser eliminados nos contentores de reciclagem locais.
As possibilidades de reciclagem dos artigos utilizados poderão ser
averiguadas no seu Município ou Câmara Municipal.
No interesse da protecção do ambiente, não deite fora este
produto juntamente com o lixo doméstico; entregue-o num
ponto de recolha adequado. Pode informar-se no seu município sobre os locais de recolha adequados e o seu período
de funcionamento.
As baterias avariadas ou usadas têm de ser recicladas em conformidade
com a directiva 2006 / 66 / EC. Para tal, leia também as indicações de
segurança especiais para o aparelho de carregamento e para o conjunto de baterias.
Danos ambientais devido à
Pb Hg
eliminação incorrecta das pilhas!
As pilhas não podem ser eliminadas no lixo doméstico. Podem conter
metais pesados tóxicos e são consideradas resíduos perigosos. Os símbolos químicos dos metais pesados são os seguintes: Cd = cádmio,
Hg = mercúrio, Pb = chumbo. Como tal, deposite as pilhas utilizadas
num ponto de recolha adequado do seu município.
PT 45
30.06.11 15:48
Page 47

Informações
Informações
Declaração de conformidade
A empresa Milomex Ltd., c / o Milomex Services, Hilltop Cottage, Barton
Road, Pulloxhill, Bedford shire, MK45 5HP, UK declara, sob exclusiva
responsabilidade, que o produto: Campainha sem fios, Modelo n.º:
Z30914, Versão: , ao qual se refere a presente declaração,
se encontra em conformidade com as normas / documentos normativos
da Directiva 1999 / 5 / EC.
Se necessário, pode efectuar o download desta documentação em
www.milomex.com.
EMC
PT46
30.06.11 15:48
Page 48

Table of Contents
Introduction
Intended use ......................................................................................... Page 48
Technical data ...................................................................................... Page 48
Included items ...................................................................................... Page 49
Parts and features ................................................................................ Page 49
Safety .................................................................................................. Page 50
General safety information ................................................................. Page 51
Safety instructions for batteries .......................................................... Page 52
Assembly .......................................................................................... Page 53
Preparing for use
Inserting / replacing the batteries ....................................................... Page 53
Operation
Synchronising transmitter / receiver ................................................... Page 55
Setting the signal type ......................................................................... Page 55
Setting the volume ...............................................................................Page 56
Selecting the chime .............................................................................. Page 56
Troubles hootin g .................................................................................... Page 56
Cleaning and maintenance ............................................. Page 57
Disposal ............................................................................................. Page 58
Information
Declaration of conformity .................................................................. Page 59
GB/MT 47
30.06.11 15:48
Page 49

Introduction
Wireless Doorbell
Introduction
Keep these instructions in a safe place. If you pass the product
on to anyone else, please ensure that you also pass on all
the documentation.
Intended use
This product is intended for the wireless transmission of the doorbell
chime. The product is not intended for commercial use.
Technical data
Range: 100 m (unobstructed area)
Transmission frequency: 433 MHz
Battery types: Receiver: 2 x 1.5 V
Transmitter: 1 x 3 V
Receiver: Audible signal volume (at maximum volume
setting): min. 73 dB (at a distance of 1 m
from the device)
Transmitter: IP rating: IPX4
GB/MT48
(type AA / LR6),
(type CR2032)
30.06.11 15:48
Page 50

Included items
1 Transmitter
1 Receiver
1 Stand (for the receiver)
Introduction
2 Batteries 1.5 V
1 Batteries 3 V
Screws (for transmitter and for mounting the receiver on a wall)
3
, type AA (receiver)
, type CR2032 (transmitter)
3 Dowels
5 Exchangeable name plates (for the doorbell)
1 Doorbell cover
1 Operating instructions
Parts and features
Receiver (Figs. A / B):
1
Signal indicator
2
Synchronisation button
3
Volume button
4
Melody selection button
5
Signal type selector button (optical, acoustic, optical and acoustic
signal)
6
Speaker
7
Stand
8
Hanger
GB/MT 49
30.06.11 15:48
Page 51

Introduction / Safety
9
Battery compartment cover
10
Battery compartment
Transmitter (Figs. C / D):
11
Signal indicator
12
Name plate
13
Chime button
14
Battery compartment
15
Holder (for wall mounting)
Mounting (Figs. E / F):
16
Screw
17
Dowel
18
Screw (for transmitter)
Safety
Read all safety information and instructions. Failure
to comply with the safety information and instructions may cause fire
and / or serious injury.
YOU SHOULD STORE ALL SAFETY INFORMATION AND INSTRUCTIONS IN A SAFE PLACE IN CASE YOU NEED TO REFER TO THEM
AGAIN IN THE FUTURE!
GB/MT50
30.06.11 15:48
Page 52

General safety information
Safety
DANGEROUS TO LIFE AND RISK
OF ACCIDENTS FOR TODDLERS AND CHILDREN!
Never leave children alone and unsupervised with the
packaging material. There is a risk of suffocation from the packaging
material. Children often underestimate risks. Always keep children
away from the product. This is not a toy.
Children or persons who lack the knowledge or experience to use
the device or whose physical, sensory or intellectual capacities are
limited must never be allowed to use the device without supervision
or instruction by a person responsible for their safety. Children must
never be allowed to play with the device.
Check that all parts are in sound condition. If you use damaged
parts when assembling the device, you risk injury.
Check that all parts have been assembled correctly. There is a risk
of injury if the device is not properly assembled.
Keep the device away from open flames or sources of heat (e.g.
burning candles).
GB/MT 51
30.06.11 15:48
Page 53

Safety
Safety instructions for batteries
DANGER TO LIFE! Batteries can be swallowed,
which can prove fatal. Consult a doctor immediately if anyone
swallows a battery.
EXPLOSION HAZARD! Never recharge nonrecharge-
able batteries, short-circuit and / or open batteries. This can
cause them to overheat, burn or burst.
Never throw batteries into fire or water. The batteries may explode.
Immediately remove depleted batteries from the device; otherwise
there will be an increased risk of leakage!
Always replace all the batteries at the same time and insert batteries
of the same type.
Do not use different types of batteries or mix used and new batter-
ies together.
Batteries do not belong in household refuse. Dispose of used batteries
in an environmentally friendly manner.
Consumers are under a legal obligation to dispose of batteries in
the proper way.
Keep the battery out of the reach of children, do not dispose of the
battery in fire, do not short-circuit it, and do not take it apart.
Failure to observe these instructions may result in the battery discharging
beyond its end voltage, which poses a risk of leakage. If the battery
in your instrument has leaked, have it removed immediately to prevent
damage to the instrument.
GB/MT52
30.06.11 15:48
Page 54

Safety / Assembly / Preparing for use
Avoid contact with skin, eyes and mucous membrane. In the event of
contact with battery acid, rinse the affected area with plenty of water
and / or consult a doctor.
Never use rechargeable batteries.
The supply terminals are not to be short-circuited.
Do not mix old batteries with new ones.
Remove the batteries from the device if they have not been used for
a long period.
Make sure you insert the batteries the right way round (polarity).
Assembly
Note: You will need a screwdriver and a drill to assemble the doorbell.
Note: Only use the screws and dowels supplied for the assembly of
the device.
Mount the receiver (see Fig. E)
Mount the transmitter (see Fig. F)
Preparing for use
Inserting / replacing the batteries
Insert the batteries to provide power to the device before preparing
it for use.
GB/MT 53
30.06.11 15:48
Page 55

Preparing for use
CAUTION! Use the above-indicated battery types only. Failure to
observe this advice may result in damage to the product.
Receiver:
Remove the battery compartment cover 9 from the back of the
device.
Remove the used batteries, if present.
Insert 2 batteries (1.5 V , type AA).
Note: Ensure correct polarity. This is indicated in the battery
compartment
10
.
Close the battery compartment 10.
Transmitter:
Remove the holder 15 from the back of the transmitter.
Open the battery compartment 14 by turning the battery compartment
cover anticlockwise.
Insert a battery (3 V , type CR 2032). The side marked “+” must
face upwards.
Place the battery compartment cover on the battery compartment 14
and tighten it by turning it clockwise.
Fasten the holder 15 of the receiver back on to the back of the device.
GB/MT54
30.06.11 15:48
Page 56

Operation
Operation
Synchronising transmitter / receiver
Synchronise the transmitter and receiver as follows:
Press the synchronisation button 2.
Press the chime button 13; the signal indicator 1 flashes red. The
programmed audible signal sounds and the signal indicator
1
ceases to illuminate.
If the receiver does not react as described, press the synchronisation
button
2
again to switch off the synchronisation function and repeat
the synchronisation process.
The transmitter indicates the transmission of the signal to the receiver by
the signal indicator
11
flashing briefly.
Setting the signal type
The receiver can indicate the reception of a door signal either optically
or acoustically or both optically and acoustically.
Using the signal type selector button 5, select whether the signal
is to be indicated optically or acoustically or both optically and
acoustically.
GB/MT 55
30.06.11 15:48
Page 57

Operation
Setting the volume
Press the volume button 3 until the desired volume is reached. There
are a total of 5 possible volume settings: very loud, loud, medium,
soft, very soft.
Selecting the chime
Note: The doorbell has 36 different chimes.
Press the melody selection button 4. The first audible signal sounds.
Press the melody selection button 4 again to move on to the next
audible signal.
Repeat this process until you have selected your desired audible signal.
The last-selected audible signal is automatically stored.
Troubleshooting
After the influence of extraordinary environmental conditions (e.g. a strong
electromagnetical field) the function of the item may be affected. In this
case, please take off the batteries of both appliances for approximately
2 minutes. Then proceed again as described in the section “Synchronising
the transmitter / receiver”.
Electrostatic discharges may lead to malfunctions. If such malfunctions
do occur, remove the battery for a short time and then replace it again.
GB/MT56
30.06.11 15:48
Page 58

Operation / Cleaning and maintenance
Then proceed again as described in the section “Synchronising the
transmitter / receiver”.
Cleaning and maintenance
Under no circumstances should you use liquids or detergents, as
these will damage the device.
The device should only be cleaned on the outside with a soft dry cloth.
GB/MT 57
30.06.11 15:48
Page 59

Disposal
Disposal
The packaging is made entirely of recyclable materials,
which you may dispose of at local recycling facilities.
Contact your local refuse disposal authority for more details of how to
dispose of your worn-out product.
To help protect the environment, please dispose of the product
properly when it has reached the end of its useful life and not
in the household waste. Information on collection points and
their opening hours can be obtained from your local authority.
Faulty or used batteries must be recycled in accordance with Directive
2006 / 66 / EC. Please return the batteries and / or the device to the
available collection points.
Environmental damage through
Pb Hg
incorrect disposal of the batteries!
Batteries may not be disposed of with the usual domestic waste. They
may contain toxic heavy metals and are subject to hazardous waste
treatment rules and regulations. The chemical symbols for heavy metals
are as follows: Cd = cadmium, Hg = mercury, Pb = lead. That is why
you should dispose of used batteries at a local collection point.
GB/MT58
30.06.11 15:48
Page 60

Information
Information
Declaration of conformity
We, Milomex Ltd., c / o Milomex Services, Hilltop Cottage, Barton Road,
Pulloxhill, Bedfordshire, MK45 5HP, UK, hereby declare under our sole
responsibility that the product: Wireless Doorbell, Model No.: Z30914,
Version: , to which this declaration refers, complies with the
standards / normative documents of 1999 / 5 / EC.
The complete declaration of conformity can be viewed at:
www.milomex.com.
EMC
GB/MT 59
30.06.11 15:48
Page 61

Inhaltsverzeichnis
Einleitung
Bestimmungsgemäße Verwendung ....................................................Seite 61
Technische Daten .................................................................................Seite 61
Lief eru mfan g .........................................................................................Seite 62
Teileüb ersic ht ........................................................................................ Seite 62
Sicherheit..........................................................................................Seite 63
Allgemeine Sicherheitshinweise .........................................................Seite 64
Sicherheitshinweise zu Batterien ........................................................Seite 65
Montage ............................................................................................Seite 66
Inbetriebnahme
Batterien einlegen / wechseln .............................................................Seite 67
Bedienung
Sender / Empfänger synchronisieren .................................................Seite 68
Signalart einstellen ..............................................................................Seite 68
Lautstärke einstellen .............................................................................Seite 69
Signalton auswählen ...........................................................................Seite 69
Fehler beseitigen ..................................................................................Seite 69
Reinigung und Pflege ...........................................................Seite 70
Entsorgung ...................................................................................... Seite 71
Information
Konformitätserklärung ......................................................................... Seite 72
DE/AT/CH60
30.06.11 15:48
Page 62

Einleitung
Funktürklingel
Einleitung
Bewahren Sie diese Anleitung gut auf. Händigen Sie alle
Unterlagen bei Weitergabe des Produkts an Dritte ebenfalls
mit aus.
Bestimmungsgemäße Verwendung
Dieses Produkt ist zur drahtlosen Übertragung des Türklingelsignals
bestimmt. Dieses Produkt ist nicht für den gewerblichen Einsatz bestimmt.
Technische Daten
Reichweite: 100 m (offener Bereich)
Sendefrequenz: 433 MHz
Batterietypen: Empfänger: 2 x 1,5 V
Sender: 1 x 3 V
(Typ CR2032)
(Typ AA / LR6),
Empfänger: Signaltonlautstärke (bei max. Lautstärkeeinstellung):
min. 73 dB (bei Geräteabstand von 1 m)
Sender: Schutzart: IPX4
DE/AT/CH 61
30.06.11 15:48
Page 63

Einleitung
Lieferumfang
1 Sender
1 Empfänger
1 Standfuß (für den Empfänger)
2 Batterien 1,5 V
1 Batterie 3 V
Schrauben (für Sender und zur Wandmontage des Empfängers)
3
, Typ AA (Empfänger)
, Typ CR2032 (Sender)
3 Dübel
5 austauschbare Namensschilder (für die Türklingel)
1 Klingelschildabdeckung
1 Bedienungsanleitung
Teileübersicht
Empfänger (Abb. A / B):
1
Signalanzeige
2
Synchronisationstaste
3
Lautstärketaste
4
Klingelton-Auswahltaste
5
Signalart-Auswahltaste (optisches, akustisches, optisches und
akustisches Signal)
6
Lautsprecher
7
Standfuß
8
Aufhängevorrichtung
DE/AT/CH62
30.06.11 15:48
Page 64

9
Batteriefachdeckel
10
Batteriefach
Sender (Abb. C / D):
11
Signalanzeige
12
Namensschild
13
Klingeltaste
14
Batteriefach
15
Halterung (für Wandmontage)
Montage (Abb. E / F):
16
Schraube
17
Dübel
18
Schraube (für den Sender)
Einleitung / Sicherheit
Sicherheit
Lesen Sie alle Sicherheitshinweise und Anweisungen.
Versäumnisse bei der Einhaltung der Sicherheitshinweise und Anweisungen
können Brand und / oder schwere Verletzungen verursachen.
BEWAHREN SIE ALLE SICHERHEITSHINWEISE UND ANWEISUNGEN
FÜR DIE ZUKUNFT AUF!
DE/AT/CH 63
30.06.11 15:48
Page 65

Sicherheit
Allgemeine Sicherheitshinweise
LEBENS- UND UNFALLGEFAHR
FÜR KLEINKINDER UND KINDER! Lassen Sie Kinder
niemals unbeaufsichtigt mit dem Verpackungsmaterial. Es
besteht Erstickungsgefahr durch Verpackungsmaterial. Kinder unterschätzen häufig die Gefahren. Halten Sie Kinder stets vom Produkt
fern. Es ist kein Spielzeug.
Dieses Gerät ist nicht dafür bestimmt, durch Personen (einschließlich
Kinder) mit eingeschränkten physischen, sensorischen oder geistigen
Fähigkeiten oder mangels Erfahrung und / oder mangels Wissen
benutzt zu werden, es sei denn, sie werden durch eine für ihre Sicherheit zuständige Person beaufsichtigt oder erhielten von ihr Anweisungen,
wie das Gerät zu benutzen ist. Kinder sollten beaufsichtigt werden,
um sicherzustellen, dass sie nicht mit dem Gerät spielen.
Kontrollieren Sie alle Teile auf ihre Unversehrtheit. Bei der Montage
beschädigter Teile besteht Verletzungsgefahr.
Kontrollieren Sie, ob alle Teile sachgerecht montiert sind. Bei unsach-
gemäßer Montage besteht Verletzungsgefahr.
Halten Sie das Gerät von offenem Feuer bzw. Hitzequellen
(z.B. brennende Kerzen) fern.
DE/AT/CH64
30.06.11 15:48
Page 66

Sicherheit
Sicherheitshinweise zu Batterien
LEBENSGEFAHR! Batterien können verschluckt
werden, was lebensgefährlich sein kann. Nehmen Sie sofort ärztliche
Hilfe in Anspruch, wenn eine Batterie verschluckt wurde.
EXPLOSIONSGEFAHR! Laden Sie nicht aufladbare
Batterien niemals wieder auf, schließen Sie sie nicht kurz
und / oder öffnen Sie sie nicht. Überhitzung, Brandgefahr
oder Platzen können die Folge sein.
Werfen Sie Batterien niemals ins Feuer oder Wasser. Die Batterien
können explodieren.
Entfernen Sie erschöpfte Batterien umgehend aus dem Gerät. Es
besteht erhöhte Auslaufgefahr!
Tauschen Sie immer alle Batterien gleichzeitig aus und setzen Sie
nur Batterien des gleichen Typs ein.
Verwenden Sie keine unterschiedlichen Typen oder gebrauchte und
neue Batterien miteinander.
Batterien gehören nicht in den Hausmüll. Entsorgen Sie verbrauchte
Batterien umweltgerecht.
Jeder Verbraucher ist gesetzlich verpflichtet, Batterien ordnungsgemäß
zu entsorgen!
Halten Sie Batterien von Kindern fern, werfen Sie Batterien nicht
ins Feuer, schließen Sie Batterien nicht kurz und nehmen Sie sie nicht
auseinander.
Bei Nichtbeachtung der Hinweise können die Batterien über ihre
Endspannung hinaus entladen werden. Es besteht dann die Gefahr
DE/AT/CH 65
30.06.11 15:48
Page 67

Sicherheit / Montage
des Auslaufens. Falls die Batterien in Ihrem Gerät ausgelaufen sein
sollten, entnehmen Sie diese sofort, um Schäden am Gerät vorzubeugen!
Vermeiden Sie den Kontakt mit Haut, Augen und Schleimhäuten.
Bei Kontakt mit Batteriesäure spülen Sie die betroffene Stelle mit
reichlich Wasser ab und / oder suchen Sie einen Arzt auf!
Verwenden Sie keine aufladbaren Batterien.
Schließen Sie die Anschlusspole keinesfalls kurz.
Verwenden Sie niemals gebrauchte und neue Batterien zusammen.
Entfernen Sie die Batterie, wenn sie längere Zeit nicht verwendet
wurde, aus dem Gerät.
Achten Sie beim Einlegen auf die richtige Polarität!
Montage
Hinweis: Für die Montage der Türklingel benötigen Sie einen
Schraubendreher und eine Bohrmaschine.
Hinweis: Verwenden Sie für die Montage nur die mitgelieferten
Schrauben und Dübel.
Empfänger anbringen (siehe Abb. E)
Sender anbringen (siehe Abb. F)
DE/AT/CH66
30.06.11 15:48
Page 68

Inbetriebnahme
Inbetriebnahme
Batterien einlegen / wechseln
Legen Sie vor der Inbetriebnahme des Gerätes Batterien zur
Energieversorgung ein.
VORSICHT! Verwenden Sie ausschließlich den angegebenen
Batterietyp. Andernfalls drohen Beschädigungen des Produkts.
Empfänger:
Entfernen Sie den Batteriefachdeckel 9 auf der Rückseite.
Entfernen Sie ggf. verbrauchte Batterien.
Legen Sie 2 Batterien (1,5 V , Typ AA) ein.
Hinweis: Achten Sie dabei auf die richtige Polarität. Diese wird im
Batteriefach
Schließen Sie das Batteriefach 10.
10
angezeigt.
Sender:
Entfernen Sie die Halterung 15 auf der Rückseite des Senders.
Öffnen Sie das Batteriefach 14, indem Sie den Batteriefachdeckel
gegen den Uhrzeigersinn drehen.
Legen Sie eine Batterie (3 V , Typ CR 2032) ein. Die mit „+“
markierte Seite muss nach oben zeigen.
Legen Sie den Batteriefachdeckel auf das Batteriefach 14 und drehen ihn im Uhrzeigersinn fest.
Befestigen Sie die Halterung 15 des Senders wieder auf der Rückseite des Geräts.
DE/AT/CH 67
30.06.11 15:48
Page 69

Bedienung
Bedienung
Sender / Empfänger synchronisieren
Synchronisieren Sie Sender und Empfänger wie folgt:
Drücken Sie die Synchronisationstaste
Drücken Sie die Klingeltaste
13
, die Signalanzeige 1 blinkt rot.
Der programmierte Signalton ertönt und die Signalanzeige
2
.
1
erlischt.
Wenn der Empfänger nicht reagiert wie beschrieben, drücken Sie
die Synchronisationstaste
2
erneut, um die Synchronisationsfunktion
zu beenden und wiederholen Sie den Synchronisationsvorgang.
Der Sender zeigt die Übertragung des Signals an den Empfänger mit
einem kurzen Aufblinken der Signalanzeige
Signalart einstellen
11
an.
Der Empfänger kann ein empfangenes Türsignal entweder optisch oder
akustisch oder sowohl optisch als auch akustisch anzeigen.
Wählen Sie mithilfe der Signalart-Auswahltaste
5
aus, ob das
Signal optisch oder akustisch oder sowohl optisch als auch akustisch angezeigt werden soll.
DE/AT/CH68
30.06.11 15:48
Page 70

Bedienung
Lautstärke einstellen
Drücken Sie die Lautstärketaste 3, bis die gewünschte Lautstärke
erreicht ist. Es gibt insgesamt 5 mögliche Lautstärkeeinstellungen:
sehr laut, laut, mittel, leise, sehr leise.
Signalton auswählen
Hinweis: Die Türklingel verfügt über 36 unterschiedliche Signaltöne.
Drücken Sie die Klingelton-Auswahltaste 4. Der erste Signalton
erklingt.
Drücken Sie die Klingelton-Auswahltaste
4
erneut, um zum nächsten
Signalton zu gelangen.
Wiederholen Sie diesen Vorgang, bis Sie Ihren gewünschten Signalton
ausgewählt haben. Der zuletzt ausgewählte Signalton wird automatisch gespeichert.
Fehler beseitigen
Nach Einfluss von außergewöhnlichen Umweltbedingungen (z.B. einem
starken elektromagnetischen Feld) funktioniert das Produkt möglicherweise
nicht mehr einwandfrei. Entnehmen Sie in diesem Fall beiden Geräten
die Batterien für ca. 2 Minuten. Verfahren Sie anschließend wie unter
„Sender / Empfänger synchronisieren“ beschrieben.
DE/AT/CH 69
30.06.11 15:48
Page 71

Bedienung / Reinigung und Pflege
Elektrostatische Entladungen können zu Funktionsstörungen führen.
Entfernen Sie bei solchen Funktionsstörungen kurzzeitig die Batterie
und setzen Sie sie erneut ein. Verfahren Sie anschließend wie unter
„Sender / Empfänger synchronisieren“ beschrieben.
Reinigung und Pflege
Verwenden Sie in keinem Fall Flüssigkeiten und keine Reinigungsmittel,
da diese das Gerät beschädigen.
Reinigen Sie das Gerät nur äußerlich mit einem weichen, trockenen
Tuch.
DE/AT/CH70
30.06.11 15:48
Page 72

Entsorgung
Entsorgung
Die Verpackung besteht aus umweltfreundlichen Materialien,
die Sie über die örtlichen Recyclingstellen entsorgen können.
Möglichkeiten zur Entsorgung des ausgedienten Produkts erfahren Sie bei
Ihrer Gemeinde- oder Stadtverwaltung.
Werfen Sie Ihr Gerät, wenn es ausgedient hat, im Interesse
des Umweltschutzes nicht in den Hausmüll, sondern führen Sie
es einer fachgerechten Entsorgung zu. Über Sammelstellen und
deren Öffnungszeiten können Sie sich bei Ihrer zuständigen
Verwaltung informieren.
Defekte oder verbrauchte Batterien müssen gemäß Richtlinie 2006 / 66 / EC
recycelt werden. Geben Sie Batterien und / oder das Gerät über die
angebotenen Sammeleinrichtungen zurück.
Umweltschäden durch falsche
Pb Hg
Entsorgung der Batterien!
Batterien dürfen nicht über den Hausmüll entsorgt werden. Sie können
giftige Schwermetalle enthalten und unterliegen der Sondermüllbehandlung.
Die chemischen Symbole der Schwermetalle sind wie folgt: Cd = Cadmium,
Hg = Quecksilber, Pb = Blei. Geben Sie deshalb verbrauchte Batterien
bei einer kommunalen Sammelstelle ab.
DE/AT/CH 71
30.06.11 15:48
Page 73

Information
Information
Konformitätserklärung
Wir, Milomex Ltd., c / o Milomex Services, Hilltop Cottage, Barton
Road, Pulloxhill, Bedfordshire, MK45 5HP, UK, erklären in alleiniger
Verantwortung, dass das Produkt: Funktürklingel, Modell-Nr.: Z30914,
Version: , auf das sich diese Erklärung bezieht, mit den Normen /
normativen Dokumenten der 1999 / 5 / EC übereinstimmt.
Die komplette Konformitätserklärung finden Sie unter: www.milomex.com.
EMC
DE/AT/CH72
30.06.11 15:48
Page 74

5
29.06.11 18:00
 Loading...