

Page 1
BÁSCULA DE COCINA
Instrucciones de utilización y de seguridad
BILANCIA DA CUCINA
Indicazioni per l’uso e per la sicurezza
BALANÇA DE COZINHA
Instruções de utilização e de segurança
KITCHEN SCALE
Operation and Safety Notes
KÜCHENWAAGE
Bedienungs- und Sicherheitshinweise
5
Z29852A
Z29852B
79419 CB5 IM.indd 3 1/2/2013 3:32:49 PM
Page 2
ES Instrucciones de utilización y de seguridad Página 4
IT / MT Indicazioni per l’uso e per la sicurezza Pagina 12
PT Instruções de utilização e de segurança Página 20
GB / MT Operation and Safety Notes Page 28
DE / AT / CH Bedienungs- und Sicherheitshinweise Seite 35
79419 CB5 IM.indd 4 1/2/2013 3:32:49 PM
Page 3

1
6
2
3
26
25
24
23
22
5 4
Z29852A - White
Z29852B - Metallic red
7
13
1516
14 11 9
1012
8
17
18
19
20
21
3
79419 CB5 IM.indd 3 1/2/2013 3:32:52 PM
Page 4

Índice
Introducción
Uso correcto ..................................................................................................................................... Página 5
Descripción de las piezas ................................................................................................................ Página 5
Datos técnicos .................................................................................................................................. Página 5
Funciones .......................................................................................................................................... Página 6
Volumen de suministro .....................................................................................................................Página 6
Advertencias de seguridad
Indicaciones generales de seguridad .............................................................................................Página 6
Indicaciones de seguridad sobre baterías ..................................................................................... Página 7
Puesta en servicio
Cambio de pila ................................................................................................................................ Página 7
Botón de conversión ........................................................................................................................Página 8
Pesar ................................................................................................................................................. Página 8
Pesar y añadir ..................................................................................................................................Página 9
Retirar parte del alimento ................................................................................................................ Página 9
Desconexión automática o manual ................................................................................................ Página 9
Visualización de unidades de volumen .......................................................................................... Página 10
Subsanar errores ...................................................................................................................Página 10
Limpieza ........................................................................................................................................ Página 11
Eliminación .................................................................................................................................. Página 11
4 ES
79419 CB5 IM.indd 4 1/2/2013 3:32:53 PM
Page 5
Introducción
Báscula de cocina
Q
Introducción
Familiarícese con el artefacto antes de
la primera puesta en funcionamiento.
Lea detenidamente para esto el siguiente
manual de instrucciones y las indicaciones de seguridad. Utilice el artefacto únicamente como esta
descrito y para las aplicaciones indicadas. Conserve
adecuadamente estas instrucciones. Adjunte igualmente toda la documentación en caso de entregar
el artefacto a un tercero.
Q
Uso correcto
Este aparato es adecuado para pesar y determinar
el peso de cantidades de alimentos usuales en hogares. La balanza digital sirve para establecer el
peso de líquidos o sólidos no agresivos, no corrosivos y no raspantes. No está previsto para pesar
medicamentos o materiales no permitidos. No se
permiten usos distintos al descrito previamente ni
cambios en el producto; esto puede ocasionar
lesiones. Además podría provocarse peligro de
muerte y lesiones. El producto solo está dispuesto
para el uso propio, no para el uso médico o
comercial.
Alojamiento exterior de la pila
11
Cierre de color negro
12
Enganche de la tapa del compartimento de
13
la pila
2 ranuras en el lateral del compartimento de
14
la pila
Compartimento de la pila
15
Cinta de aislamiento de la pila
16
Pantalla LCD:
“g” = Visualización de unidad de peso (gramos)
17
“ml” = Visualización de unidad de volumen
18
(milímetros)
“fl’oz” = Visualización de unidad de volumen
19
(líquido: onzas)
“lb:oz”= Visualización de unidad de peso
20
(libras: onzas)
“–” = Signo encima de “agua” = Unidad de
21
medida para el modo de volumen
(ml / fl’oz de agua)
“–” = Signo encima de “leche” = Unidad de
22
medida para el modo de volumen
(ml / fl’oz de leche)
“–” = Signo encima de “peso” = Modo de
23
peso (gramos o libras: onzas)
Pictograma “0” = Peso cero
24
(esquina inferior izquierda de la pantalla LCD)
“–” = Valor negativo
25
(parte izquierda de la pantalla LCD)
“T” = Peso de tara
26
(esquina superior izquierda de la pantalla LCD)
Q
Descripción de las piezas
Recipiente
1
Balanza de cocina
2
Interruptor de modo Peso / Leche / Agua
3
(Weight Milk Water)
Pantalla LCD
4
Interruptor de encendido / apagado, ajuste a
5
cero (tara) (ON / OFF / ZERO)
Plataforma de la balanza
6
Pestaña de la tapa del compartimento de la pila
7
Tapa del compartimento de la pila
8
Botón de conversión de gramos / libras: onzas
9
Contacto metálico de la pila con resorte
10
79419 CB5 IM.indd 5 1/2/2013 3:32:54 PM
◂
Q
Datos técnicos
Carga máxima: 0.1 oz - 11 lb (libras) /
1 g - 5 kg (quilogramos)
División: 0.1 oz / 1 g
Pila: 1 x 3 V Batería de litio
(CR2032 pilas de botón de litio /
contenida en el volumen de
suministro)
5 ES
Page 6
Introducción / Advertencias de seguridad
Q
Funciones
j Visualización de unidades de volumen para
agua y leche.
j Dos sistemas diferentes para las unidades de
peso: gramos (g) o libras (lb:oz), convertible.
j Aviso en caso de “Batería baja” / “Sobrecarga”
mediante un pictograma LCD especial.
j Utilización de sensores-extensómetros de alta
precisión.
j Posición cero o función de tara opcional.
j Función de desconexión automática para ahorrar
energía si deja de utilizarse el aparato durante
más de dos minutos.
j Desconexión manual: presione el interruptor
ON / OFF / ZERO 5 y manténgalo pulsando
durante tres segundos.
Q
Volumen de suministro
Revise inmediatamente después del desembalaje
que el volumen de suministro esté completo, así
como el buen estado del producto.
1 x balanza digital de cocina
1 x platillo
1 x pila de litio (preinstalada)
1 x manual de instrucciones
Q
Advertencias de seguridad
Indicaciones generales
de seguridad
J
deje a los niños sin vigilancia con el material
de embalaje ni con el producto. De lo contrario,
existe peligro de asfixia. Mantenga siempre a
¡ADVERTENCIA!
¡PELIGRO
DE MUERTE Y ACCIDENTES
PARA BEBÉS Y NIÑOS! Nunca
los niños alejados del producto. ¡Este producto
no es un juguete!
J Personas o niños, que por su inexperiencia o
desconocimiento del uso del aparato o por sus
capacidades físicas, sensoriales o mentales
reducidas no están en condiciones de utilizar
el artefacto, no deben utilizar este artefacto a
menos que una persona, responsable de su
seguridad, supervise correspondientemente o
las instruya en el uso. Los niños deben ser supervisados para asegurarse de que no jueguen con
el aparato.
J
¡CUIDADO! ¡PELIGRO DE
LESIONES! No cargue la balanza
5 kg
con más de 5 kg. El producto podría
dañarse.
J No exponga el artefacto
– a temperaturas extremas,
– a fuertes vibraciones,
– a fuertes esfuerzos mecánicos,
– a la radiación solar directa,
– a un campo magnético,
– a la humedad.
De lo contrario hay peligro de daño del producto.
J Este aparato contiene componentes electrónicos
sensibles. Por ello, si hay equipos de radiotransmisión cerca, pueden producirse interferencias.
Aparatos de este tipo pueden ser, por ejemplo,
teléfonos móviles, transmisores-receptores portátiles, radiotransmisores CB, telemandos por
radio / otros mandos a distancia y aparatos de
microondas. Si en el display aparecen indicaciones erróneas, aleje dichos equipos del entorno del aparato.
J Las averías electromagnéticas / La emisión de
interferencias de alta frecuencia pueden causar
averías en el funcionamiento. En caso de tales
averías, retire unos instantes la pila e introdúzcala de nuevo. Proceda tal como se explica en
el capítulo “Cambio de pila”.
J Revise el producto por daños antes de la puesta
en marcha. De ninguna manera ponga en funcionamiento un aparato averiado.
¡ADVERTENCIA!
Bajo ninguna circunstancia
debe abrir la caja del producto. Se pueden pro-
ducir lesiones y / o daños en el producto. Deje
que un electricista lleve a cabo las reparaciones.
6 ES
79419 CB5 IM.indd 6 1/2/2013 3:32:55 PM
Page 7

Advertencias de seguridad / Puesta en servicio
J No permita que personas inexpertas utilicen el
producto. Asegúrese de haber comprendido totalmente las instrucciones de uso y que está en condiciones de operar el producto con seguridad.
J Coloque el producto sobre una superficie plana,
firme y horizontal.
J ¡APTO PARA ALIMENTOS! Este
producto no reduce las características
de sabor y olor. (Recipiente)
J ¡No apto para microondas!
J El producto no es adecuado para
lavavajillas.
Indicaciones de seguridad
sobre baterías
¡ADVERTENCIA!
Mantenga las baterías fuera del alcance de los
niños. No deje las baterías en cualquier lugar.
Hay peligro de que niños o animales domésticos
las ingieran. En caso de ingesta acuda inmediatamente a un médico.
J ¡PELIGRO DE EXPLOSIÓN! No
recargue nunca las baterías, no las
cortocircuite y / o abra. La conse-
cuencia puede ser el recalentamiento, peligro de
incendio o su explosión. Nunca eche las baterías
al fuego o al agua. Las baterías pueden explotar.
J Evite las condiciones y temperaturas extremas
que puedan influir en las baterías, p. ej. radiadores de calefacción. De lo contrario existe
elevado peligro de derrame.
J Compruebe periódicamente que la pila no
tenga fugas.
J ¡Las pilas gastadas o dañadas pue-¡Las pilas gastadas o dañadas pue-
den ocasionar quemaduras al entrar
en contacto con la piel, por este
motivo utilice en este caso guantes apropiados
de seguridad!
J Evite el contacto con la piel, ojos y mucosas,
en caso de que el líquido de la pila se haya
derramado. Si ha tenido contacto con el ácido
de la pila, enjuague inmediatamente la zona
¡PELIGRO DE MUERTE!
afectada con abundante agua clara y consulte
sin demora a un médico.
J En caso de ligera suciedad limpie los contactos
de la batería y el producto con un paño seco,
sin pelusas antes de colocar las pilas.
J Retire la pila del producto si no lo va a utilizar
durante un tiempo prolongado.
J Al colocar la pila, preste atención a que la po-
laridad sea la correcta. La polaridad correcta
aparece indicada en el compartimento para la
pila. Si no se hace de forma correcta, la pila
podría explotar.
J Coloque la pila con cuidado. De otro modo, el
producto podría resultar dañado.
J
No tire las baterías usadas a la basura doméstica,
sino elimínelas en los lugares previstos para ello.
Q
Puesta en servicio
1. Abra el compartimento de la pila 15 situado en
la base de la balanza desplazando la pestaña
de la tapa 8 en dirección al compartimento
7
de la pila y extrayéndola hacia arriba.
2. Retire la cinta de aislamiento 16, que se encuentra por debajo del contacto metálico para la pila.
3. Vuelva a colocar la tapa 8 sobre el compartimento de la pila 15. Asegúrese de que los dos
enganches 13 situados en la tapa 8 encajen
en las dos ranuras 14 situadas en el lateral del
compartimento de la pila. Presione firmemente la
tapa 8 sobre el compartimento de la pila 15
hasta que encaje haciendo clic.
12
16 11
Q
Cambio de pila
1. Apague la balanza. Pulse y mantenga pulsado
el interruptor on / off 5 durante tres segundos.
2. Abra el compartimento para la pila 15 según
se describe arriba.
7 ES
79419 CB5 IM.indd 7 1/2/2013 3:32:56 PM
Page 8

Puesta en servicio
3. Retire la pila gastada de su alojamiento 11
presionando la tapa negra 12. De esta forma,
la pila se libera automáticamente de su alojamiento 11. Asegúrese de no ejercer demasiada
fuerza sobre el contacto 10 porque podría
resultar dañado y deformarse al elevarse la
pila. Saque la pila del alojamiento exterior 11.
4. Coloque la pila nueva en el alojamiento exterior
. Respete la polaridad correcta. La parte “+”
11
debe indicar hacia arriba. El contacto metálico 10
presiona la pila para colocarla en su posición.
5. Cierre el compartimento de la pila 15 como se
ha indicado anteriormente.
Q
Botón de conversión
j En la base de la balanza se encuentra un
botón de conversión 9 de unidades de peso.
Presionando simplemente este botón, se cambia
la unidad de medida, del sistema métrico (g, ml)
al imperial (lb:oz, fl’oz).
Advertencia:
– Si el peso está establecido en unidades métri-
cas (g), la unidad de volumen también se mostrará automáticamente en ml.
– Si el peso está establecido en unidades impe-
riales (lb:oz), la unidad de volumen también se
mostrará automáticamente en fl’oz.
– La unidad estándar para peso es g (gramos).
Q
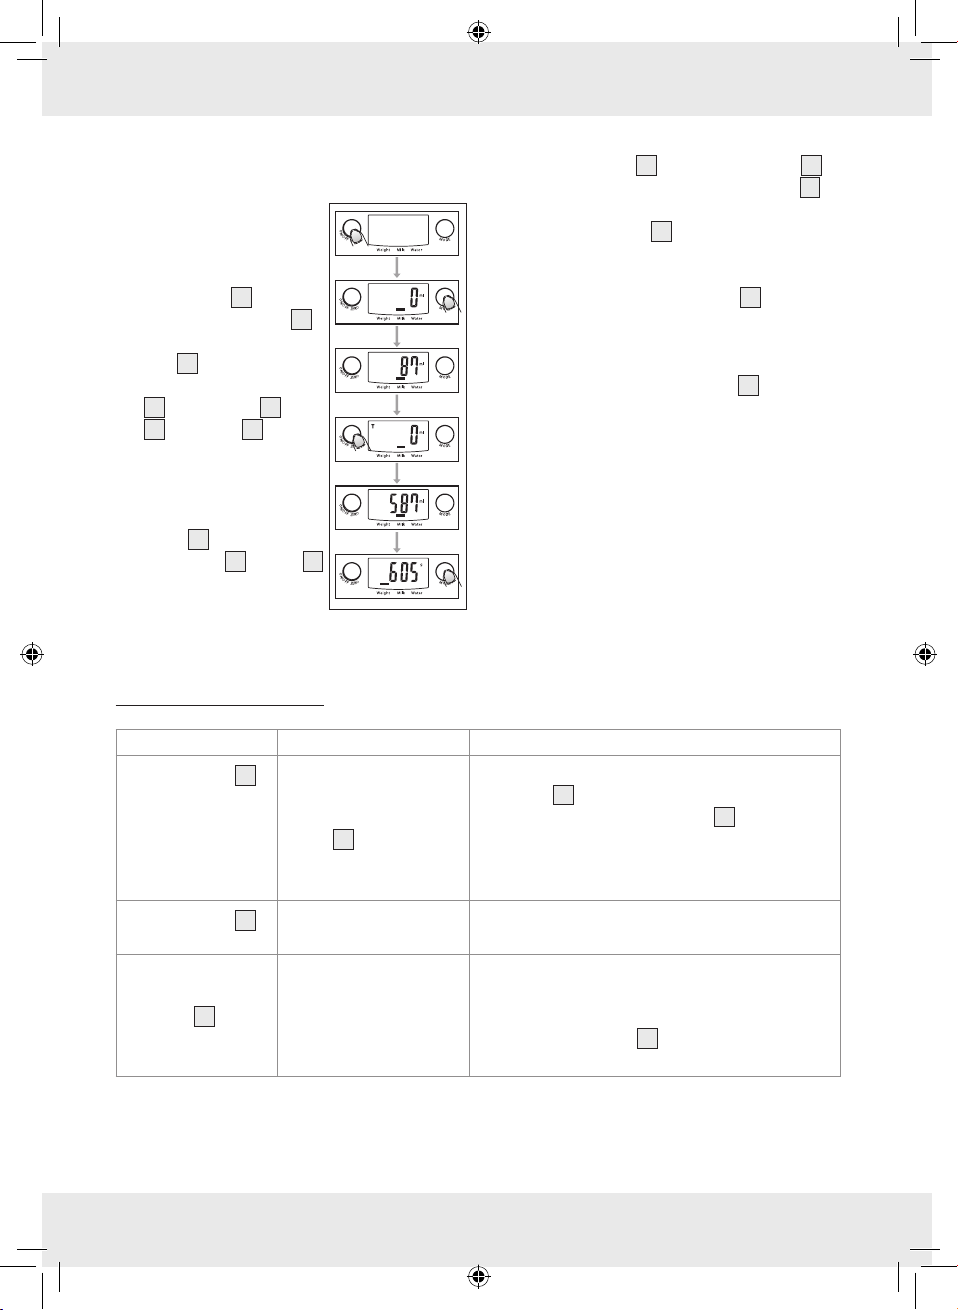
Pesar
Advertencia: La balanza de cocina 2 indica
siempre 0 g / 0:0.0 lb:oz 17 / 20 al presionar el
interruptor ON / OFF / ZERO 5. Si coloca el
recipiente de la balanza 1 sobre la balanza de
cocina 2 antes de encenderla, la balanza indicará
0 g / 0:0.0 lb:oz 17 / 20 una vez encendida.
Sin embargo, si coloca el recipiente 1 sobre la
balanza 2 una vez que ésta se haya encendido,
se mostrará el peso del recipiente 1. Presione
una vez el interruptor ON / OFF / ZERO 5 para
que aparezcan de nuevo en la pantalla los valores
0 g / 0:0.0 lb:oz 17 / 20.
j Coloque la balanza de cocina sobre una
superficie estable y plana.
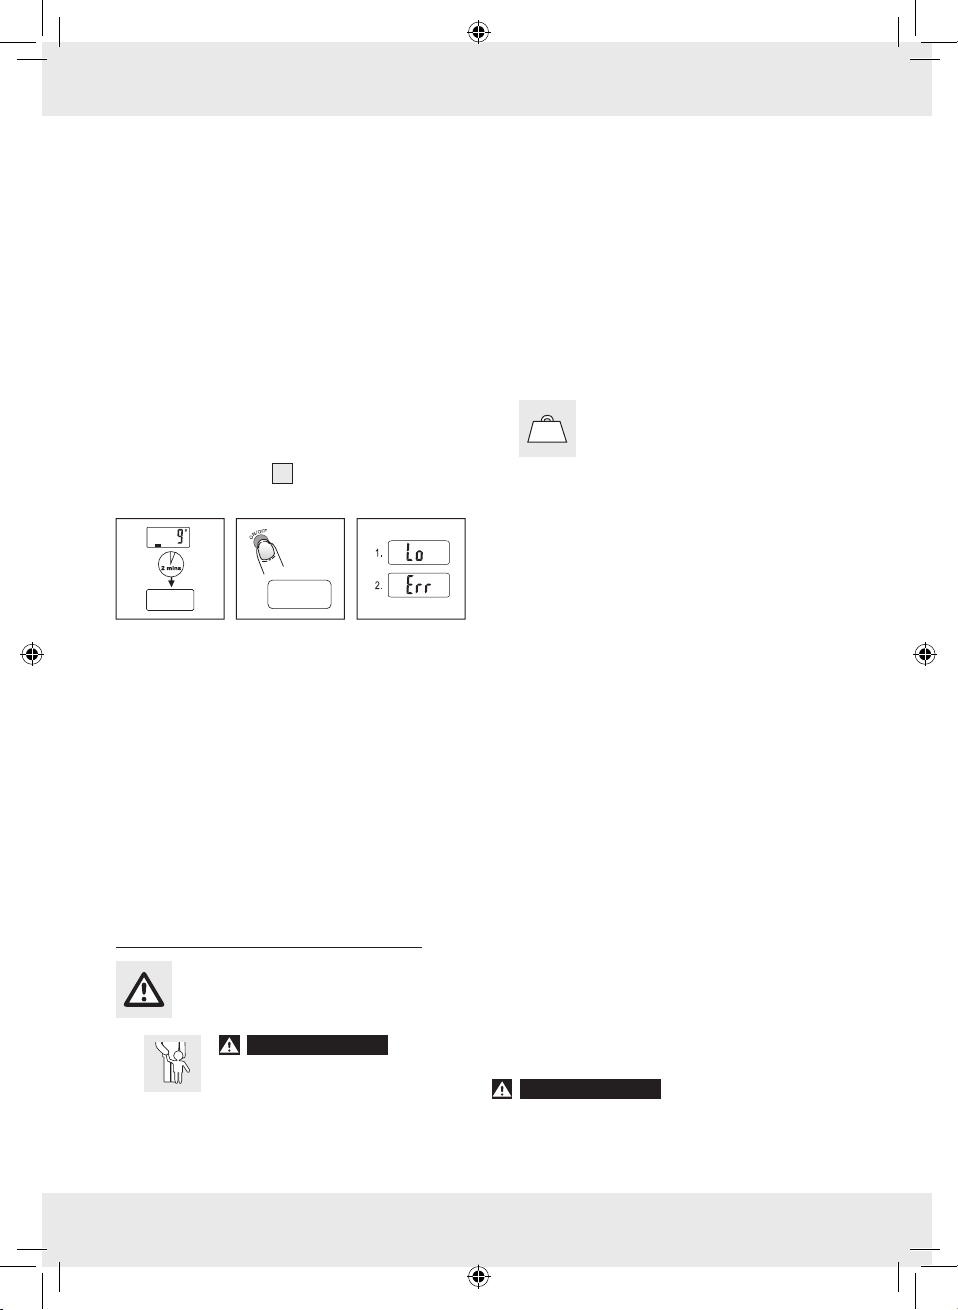
j Presione el interruptor ON / OFF / ZERO 5
para encender la balanza de cocina 2.
5
j Espere a que la pantalla LCD 4 se quede fija
y se equilibre mostrando
0 g 17, 0:0,0 onzas 20,
0 ml 18 ó 0,0 fl’oz 19,
dependiendo del modo en
que se encuentre la balanza
antes de apagarse.
j Presione el interruptor de
modo 3 para ajustar la
balanza en el modo de
peso estándar 23.
j En caso necesario, selec-
cione la unidad de peso
con anterioridad presionando el botón de conversión g / lb:oz 9
situado en la base de la balanza antes de
comenzar a pesar.
j Una vez haya seleccionado la unidad de
peso, pulse y mantenga pulsado el interruptor
on/ off/ cero 5 durante tres segundos para
apagar la balanza 2.
j Coloque la balanza de cocina 2 sobre una
superficie dura y plana. Coloque el recipiente 1
sobre la plataforma de la balanza 6.
j Presione el interruptor ON / OFF / ZERO 5
para encender la balanza con el modo de peso
estándar.
j Espere a que todas las secciones de la pantalla
LCD 4 estén encendidas y la balanza se
equilibre mostrando 0 g 17, 0:0,0 onzas 20.
j Coloque el alimento en el recipiente de la
balanza 1 para iniciar el proceso de pesaje.
La pantalla LCD 4 muestra el peso del alimento
en la unidad de peso seleccionada.
Advertencia: La balanza funciona sin recipiente 1
del mismo modo. Siga y repita los pasos anteriormente mencionados sin el recipiente de la balanza 1.
8 ES
79419 CB5 IM.indd 8 1/2/2013 3:32:58 PM
Page 9

Q
Pesar y añadir
La balanza de cocina 2 pesar de forma consecutiva sin tener que retirar el alimento del recipiente 1.
j Coloque el recipiente 1 sobre la plataforma
de la balanza 6.
j Presione el interruptor ON / OFF / ZERO 5
para encender la balanza 2.
j Espere a que la pantalla LCD 4 se detenga y
se equilibre mostrando 0 g 17, 0:0,0 onzas 20,
0 ml 18 o 0,0 fl’oz 19, dependiendo del modo
en que se encuentre la balanza antes de apagarse.
j Presione el interruptor de modo 3 para volver
a ajustar la balanza en el modo de peso 23
(preajuste en g o en lb:oz).
j Llene el recipiente de la balanza 1 para iniciar
el proceso de pesaje. En la pantalla LCD 4 se
muestra el peso del primer alimento colocado
en el recipiente.
j Presione el interruptor ON / OFF / ZERO 5
para volver a poner a cero el valor indicado
en la pantalla LCD 4.
j Podrá pesar otros alimentos de la misma forma
reiniciando el interruptor ON / OFF / ZERO 5
después de cada alimento.
Advertencia para el ajuste a cero o ajuste
de tara:
a) Si el peso total de todos los
productos colocados en la
balanza, incluyendo el recipiente, es menor de 200 gramos, la pantalla LCD 4
muestra un pictograma con
un cero 24 en su esquina inferior izquierda. Esto significa
que la balanza se ha vuelto
a poner a cero = la capacidad de peso restante de la
balanza seguirá siendo de
5000 - 5200 gramos.
b) Si el peso total de todos los
productos colocados en la
balanza, incluyendo el recipiente, es mayor de 200 gra-
Puesta en servicio
mos, la pantalla LCD 4 muestra un pictograma
con una T 26 en su esquina superior izquierda.
Esto significa que la balanza se encuentra en
modo de tara = la capacidad de peso restante
de la balanza corresponderá a 5000 gramos
menos el peso que ya se ha colocado sobre la
balanza.
Q
Retirar parte del alimento
j Coloque el recipiente 1 sobre la plataforma
de la balanza 6.
Indicación: La bandeja de pesaje no debe
superar los 200 g.
j Presione el interruptor ON / OFF / ZERO 5
para encender la balanza 2.
j Espere a que la pantalla LCD 4 se detenga y
se equilibre mostrando 0 g 17, 0:0,0 onzas 20,
0 ml 18 o 0,0 fl’oz 19, dependiendo del modo
en que se encuentre la balanza antes de apagarse.
j Presione el interruptor de modo 3 para ajustar
el modo de peso 23 (preajuste en g o en lb:oz).
j Llene el recipiente de la balanza 1 para iniciar
el proceso de pesaje. En la pantalla LCD 4 se
muestra el peso del primer alimento colocado
en el recipiente.
j Presione el interruptor ON / OFF / ZERO 5
para volver a poner a cero el valor indicado
en la pantalla LCD 4.
j A continuación, retire del recipiente de la ba-
lanza 1 la cantidad de producto deseada. La
pantalla LCD 4 mostrará el peso del alimento
retirado con un valor negativo.
Q
Desconexión
automática o manual
j La balanza se desconecta automáticamente
cuando deja de utilizarse durante más de
2 minutos.
j Presione el interruptor ON / OFF / ZERO 5
durante más de 3 segundos para apagar la
balanza.
9 ES
79419 CB5 IM.indd 9 1/2/2013 3:32:59 PM
Page 10
Puesta en servicio / Subsanar errores
Q
Visualización de
unidades de volumen
j Coloque la balanza de
cocina sobre una superficie
estable y plana.
j Presione el interruptor ON /
OFF / ZERO 5 para
encender la balanza 2.
j Espere a que la pantalla
LCD 4 se detenga y se
equilibre mostrando 0 g
, 0:0,0 onzas 20, 0 ml
17
o 0,0 fl’oz 19, depen-
18
diendo del modo en que
se encuentre la balanza
antes de apagarse.
j Presione el interruptor de
modo 3 hasta que aparezca leche 22 o agua 21
como modo de volumen
en ml o en fl’oz.
j Coloque un recipiente para líquidos o el recipien-
te de la balanza 1 sobre la plataforma 6.
j Presione el interruptor ON / OFF / ZERO 5
para volver a poner a cero el valor indicado
en la pantalla LCD 4 (en 0 ml o en 0,0 fl’oz).
Vierta leche o agua (tal como haya previsto)
en el recipiente.
j A continuación, la pantalla LCD 4 mostrará
automáticamente el volumen del líquido vertido
en el recipiente, que se indicará en ml o en fl’oz
dependiendo del preajuste.
j Presione el interruptor de modo 3 para volver
a poner la balanza en el modo de peso y poder
leer el peso del líquido.
Q
Subsanar errores
Error Causa Solución
La pantalla LCD 4
indica “Err” y se
mantiene así.
Se ha sobrepasado la
carga máxima de 5 kg /
11 lb de la balanza de
cocina 2.
j Retire el producto a pesar de la balanza de
cocina 2.
j Apague la balanza de cocina 2 y vuélvala a
encender a continuación.
j Reduzca la cantidad a pesar y pésela en varios
pasos.
La pantalla LCD 4
indica “Lo”.
No se puede
encender la balanza
de cocina 2.
La pila está agotada.
Puede que la pila esté
agotada.
j Cambie la pila según se describe en el Capítulo
“Cambio de pila”.
j Cambie la pila según se describe en el Capítulo
“Cambio de pila”.
j Si a pesar de ello no se puede encender la
balanza de cocina 2 póngase en contacto
con un especialista.
10 ES
79419 CB5 IM.indd 10 1/2/2013 3:33:00 PM
Page 11
Q
Limpieza
j Limpie el producto con un paño sin pelusa
ligeramente húmedo. En caso de suciedad más
fuerte también puede humedecer un paño con
agua jabonosa suave.
j Para la limpieza no utilice productos de limpieza
químicos, que rayan u objetos con filo. De lo
contrario se podría dañar el producto.
j No sumerja el producto nunca en agua u otros
líquidos. De lo contrario se podría dañar el
producto.
Q
Eliminación
El embalaje está compuesto por mate-
riales no contaminantes que pueden ser
eliminados en el centro de reciclaje local.
Puede averiguar las posibilidades de eliminación
del producto estropeado en la administración de
su comunidad o ciudad.
No elimine el producto estropeado con
los desechos domésticos, sino hágalo
de manera correcta. Proteja así el medio ambiente. Se puede informar en la
oficina competente de su administración
sobre los puestos de recogida y sus
horarios de atención al público.
Limpieza / Eliminación
pilas deben reciclarse en el punto de recolección
específico para ello.
EMC
Las pilas defectuosas o usadas deben ser recicladas
según lo indicado en la directiva 2006 / 66 / EC.
Para ello devuelva las pilas y / o el aparato en los
puntos de recogida indicados.
Daño medioambiental debido a
un reciclaje incorrecto de las pilas
Pb
Las pilas no deben eliminarse junto a los residuos
domésticos. Las pilas pueden contener metales
pesados tóxicos que debe tratarse conforme a la
normativa aplicable a los residuos especiales. Los
símbolo químicos de los metales pesados son:
Cd = Cadmio, Hg = Mercurio, Pb = Plomo. Las
11 ES
79419 CB5 IM.indd 11 1/2/2013 3:33:00 PM
Page 12
Indice
Introduzione
Uso previsto ...................................................................................................................................... Pagina 13
Descrizione dei componenti ............................................................................................................ Pagina 13
Dati tecnici ........................................................................................................................................ Pagina 13
Funzioni.............................................................................................................................................Pagina 14
Volume di consegna ........................................................................................................................Pagina 14
Misure di sicurezza
Indicazioni generali di sicurezza ...................................................................................................Pagina 14
Indicazioni di sicurezza relative alle batterie ................................................................................. Pagina 15
Messa in funzione
Sostituzione della batteria ............................................................................................................... Pagina 15
Interruttore di commutazione ......................................................................................................... Pagina 16
Pesatura ............................................................................................................................................Pagina 16
Pesatura ed aggiunta ....................................................................................................................... Pagina 17
Parziale rimozione della merce pesata ..........................................................................................Pagina 17
Disinserimento automatico o manuale ...........................................................................................Pagina 18
Visualizzazione di unità volumetriche .............................................................................................Pagina 18
Rimedio di errori ....................................................................................................................Pagina 18
Pulizia ..............................................................................................................................................Pagina 19
Smaltimento ............................................................................................................................... Pagina 19
12 IT/MT
79419 CB5 IM.indd 12 1/2/2013 3:33:00 PM
Page 13
Introduzione
Bilancia da cucina
Q
Introduzione
Familiarizzate con il prodotto prima
della messa in funzione. Leggete attenta-
mente quindi le seguenti istruzioni d‘uso
e le misure di sicurezza. Utilizzate l‘apparecchio
solo come descritto e per gli ambiti di funzione
indicati. Conservate per bene queste istruzioni.
Consegnate anche tutti i documenti di questo prodotto quando lo date a terzi.
Q
Uso previsto
Questo apparecchio è destinato a pesare e a
misurare quantità di alimenti normali per le abitudini
casalinghe. La bilancia digitale da cucina è adatta
per pesare liquidi e solidi non aggressivi, non
corrosivi e non affilatie non affilati. Non è è idonea
a pesare medicinali o materiali non autorizzati.
Qualsiasi altro impiego o modifica del prodotto è
ammesso, in quanto potrebbe causare danni allo
stesso. Inoltre potrebbe casuare pericoli e ferite
mortali. L‘utilizzo prodotto è previsto solo per uso
personale, e non è idoneo per uso medico o commerciale.
Q
Descrizione dei componenti
Piatto della bilancia
1
Bilancia da cucina
2
Interruttore di modalità di pesatura / latte /
3
acqua
(Weight Milk Water)
Display LC
4
Interruttore ON / OFF, Reset (Tara)
5
(ON / OFF / ZERO)
Piattaforma
6
Fermaglio al coperchio del vano portabatterie
7
Coperchio del vano portabatterie
8
Interruttore di commutazione grammi / libbre
9
Once
◂
Contatto di metallo della batteria – con effetto
10
molla
Contenitore esterno della batteria
11
Interruttore nero di chiusura per batteria
12
Prolungamento della copertura per il vano
13
portabatterie
2 scanalature sui lati del vano portabatterie
14
Vano portabatterie
15
Striscia isolante della batteria
16
Visualizzazione LCD:
“g” = Visualizzazione unità di pesatura
17
(grammi)
“ml” = Visualizzazione unità volumetrica
18
(millilitri)
“fl’oz” = Visualizzazione volumetrica
19
(liquido: Oncia)
“lb:oz” = Visualizzazione unità di pesatura
20
(libbra: Oncia)
“–” = Segno sopra la dicitura “acqua” = Unità
21
di misura per modalità di volume (ml / fl’oz di
acqua)
“–” = Segno sopra la dicitura “latte” = Unità
22
di misura per modalità di volume (ml / fl’oz di
latte)
“–” = Segno sopra la dicitura “peso” =
23
Modalità di pesatura (Grammi o Libbre: Oncia)
Pictogramma “0” = Peso Zero
24
(angolo inferiore sinistro del display LC)
“–” = Valore negativo
25
(lato sinistro del display LC)
“T” = Peso della tara
26
(angolo sinistro in alto del display LC)
Q
Dati tecnici
Portata: 0,1 oz - 11 lb (libbra) /
1 g - 5 kg (chilogrammi)
Suddivisione: 0,1 oz / 1 g
Batteria: 1 x 3 V Batteria al litio
(CR2032 pilette al litio /
fornite in dotazione)
13 IT/MT
79419 CB5 IM.indd 13 1/2/2013 3:33:01 PM
Page 14

Introduzione / Misure di sicurezza
Q
Funzioni
j Visualizzazione delle unità volumetriche per
acqua e latte.
j Due diversi sistemi per le unità di pesatura –
grammi (g) oppure libbre (lb:oz), commutabili.
j Avvertimento in caso di “batteria bassa” /
“sovraccarico” per mezzo di visualizzazioni speciali a pittogramma.
j Utilizzo di sensori estensimetri ad alta precisione.
j Possibile azzeramento o funzione tara.
j Funzione di disinserimento automatica allo scopo
di risparmiare energia, qualora l’apparecchio
non venga utilizzato per un tempo superiore ai
due minuti.
j Disinserimento manuale – Premere l’interruttore
ON / OFF / Zero 5 e mantenerlo premuto per
tre secondi.
Q
Volume di consegna
Controllare il prodotto subito dopo averlo scartato
e verificare che il volume della fornitura sia completo
e che la condizione del prodotto sia integro.
1 x Bilancia digitale da cucina
1 x Recipiente
1 x Batteria al litio (preinstallata)
1 x Istruzioni d‘uso
Q
Misure di sicurezza
Indicazioni generali
di sicurezza
J
ATTENZIONE!
DI VITA O INCIDENTI PER
INFANTI E BAMBINI! Non
lasciare mai i bambini incustoditi con il materiale
d‘imballaggio e il prodotto. Sussiste pericolo di
PERICOLO
soffocamento dovuto al materiale d‘imballaggio.
Tenere i bambini lontano dal prodotto. Questo
prodotto non è un giocattolo!
J Bambini o persone che non hanno dimestichezza
con le funzioni dell’apparecchio, o che soffrono
di disabilità fisica, sensoriale o mentale, non
devono usare l‘apparecchio senza la sorveglianza o la guida di una persona responsabile
per la loro sicurezza. I bambini devono essere
sorvegliati, in modo che non giochino con
l‘apparecchio.
J
ATTENZIONE! PERICOLO DI
LESIONE! Non caricate la bilancia
5 kg
con pesi superiori a 5 kg. Il prodotto
potrebbe danneggiarsi.
J Non esporre il prodotto
– a temperature estreme,
– a forti vibrazioni,
– a forti sollecitazioni meccaniche,
– ai raggi diretti del sole,
– a campo magnetico,
– all‘ umidità.
In caso contrario potrebbero subentrare danni
al prodotto.
J L’apparecchio contiene parti elettroniche deli-L’apparecchio contiene parti elettroniche deli-
cate. Pertanto l’apparecchio potebbe essere
disturbato da apparecchi a trasmissione radio
situati nelle immediate vicinanze, come p.es.
cellulari, walkie talkie, radiotrasmettitori CB,
controllo a distanza via radio/altri comandi a
distanza e forni a microonde. In presenza di
messaggi di errore sul display, allontanare
questi apparecchi dall’oggetto in questione.
J Disturbi elettromagnetici / emissioni di disturbo
ad alta frequenza possono provocare disturbi
di funzionamento. In presenza di tali disturbi di
funzionamento rimuovere per breve tempo la
batteria e inserirla nuovamente. A questo proposito procedere come indicato nel capitolo
“Sostituzione della batteria”.
J Prima dell‘uso, controllate se il prodotto è
danneggiato. Non mettete in nessun caso in
funzione un apparecchio danneggiato.
ATTENZIONE!
Non aprire mai l‘alloggia-
mento del prodotto. Ciò potrebbe portare a
pericolo di lesioni e / o danni. Lasciare eseguire
le riparazioni solo da personale specializzato.
14 IT/MT
79419 CB5 IM.indd 14 1/2/2013 3:33:01 PM
Page 15

Misure di sicurezza / Messa in funzione
J Non lasciare usare il prodotto a persone ine-Non lasciare usare il prodotto a persone ine-
sperti. Assicurarsi che chiunque usi il prodotto,
abbia letto le istruzioni d‘uso e sia in grado di
utilizzare il prodotto in modo sicuro.
J Posizionare il prodotto su un piano fi sso, oriz-Posizionare il prodotto su un piano fisso, oriz-
zontale e liscio.
J IDONEO PER ALIMENTI! Le ca-
ratteristiche del sapore e dell‘odore non
vengono pregiudicate dal prodotto.
(Piatto della bilancia)
J Non adatto al forno a microonde!
J Il prodotto non è adatto per essere
lavato in lavastoviglie.
Indicazioni di sicurezza
relative alle batterie
ATTENZIONE!
batterie non devono andare in mano ai bambini.
Non lasciare le batterie in giro. Persiste il pericolo
che queste vengano ingerite da bambini o animali
domestici. In caso di ingerimento consultate subito
un medico.
J PERICOLO D‘ESPLOSIONE!
aprirle. Ne possono derivare surriscaldamento,
pericolo d‘incendio o scoppi. Non buttare mai
le batterie nel fuoco o nell‘acqua. Le batterie
potrebbero esplodere.
J Evitare condizioni e temperature estreme che
potrebbero influire sulle batterie, per es. sui
termosifoni. Altrimenti potrebbero fuoriuscire
dei liquidi dalle batterie.
J Controllare la batteria con regolarità per
verificare eventuali vizi di tenuta.
J Batterie scariche o danneggiate
protezione adatti.
J In caso di fuoriuscita di liquidi dalle batterie,
evitare il contatto con la pelle, gli occhi e le
mucose. In caso di contatto con acido prove-
PERICOLO DI VITA! Le
Non caricare mai le batterie, non
mandarle in cortocircuito e / o non
possono essere corrosive a contatto
con la pelle, usare quindi guanti di
niente dalle batterie, sciacquare immediatamente e abbondantemente con acqua limpida
e consultare immediatamente un medico.
J In caso di sporco leggero, pulire i contatti delle
batterie e del prodotto, prima dell‘inserimento,
con un panno asciutto e privo di pelucchi.
J Rimuovere la batteria dal prodotto in caso di
mancato utilizzo dello stesso per lungo tempo.
J Inserendo la batteria fare attenzione a che ne
sia rispettata la polarità! Questa viene mostrata
nel vano portabatterie. In caso contrario la
batteria potrebbe esplodere.
J Inserire la batteria con attenzione. In caso con-Inserire la batteria con attenzione. In caso con-
trario il prodotto potrebbe esserne danneggiato.
J Non gettare le batterie scariche nei nella spaz-Non gettare le batterie scariche nei nella spaz-
zatura, ma smaltirle negli appositi contenitori.
Q
Messa in funzione
1. Aprire il vano portabatterie 15 posto sotto la
bilancia spostando il fermaglio 7 del vano
portabatterie 8 in direzione del vano portabatterie medesimo ed estrarlo verso l’altro.
2. Rimuovere la striscia isolante 16 fissata sotto il
contatto metallico per la batteria.
3. Inserire nuovamente il coperchio del vano portabatterie 8 sul vano portabatterie medesimo 15.
Assicurarsi che entrambe i prolungamenti 13
posti sul vano portabatterie 8 tocchino le due
scanalature 14 poste sui lati quando il vano
portabatterie viene chiuso. Fissare il coperchio
del vano portabatterie 8 sul vano portabatterie
medesimo 15 fino a quando questo si ingrana
in modo udibile.
12
16 11
Q
Sostituzione della batteria
1. Spegnere la bilancia. Premere l’interruttore ON /
OFF 5 e mantenerlo premuto per 3 secondi.
15 IT/MT
79419 CB5 IM.indd 15 1/2/2013 3:33:02 PM
Page 16

Messa in funzione
2. Aprire il vano portabatteria 15 come descritto
in precedenza.
3. Rimuovere la batteria consumata dal vano
portabatterie 11 premendo l’interruttore nero
del coperchio 12. La batteria viene rimossa
automaticamente dal vano portabatteria 11.
Assicurarsi di non esercitare una pressione
eccessiva sul contatto 10. In caso contrario
esso potrebbe essere danneggiato, giaché il
sollevamento della batteria provoca una
deformazione. Rimuovere la batteria dal vano
protbatteria 11 esterno.
4. Inserire la nuova batteria nel contenitore esterno 11. Fare attenzione a che il collegamento
delle polarità sia effettuato nel modo corretto.
Il lato “+” deve mostrare verso l’alto. Il contatto
di metallo 10 preme la batteria mantenendola
in posizione.
5. Chiudere il vano portabatterie 15 come descritto
in precedenza.
Q
Interruttore di commutazione
j Un interruttore di commutazione 9 per le unità
di pesatura si trova al di sotto della bilancia. Con
una semplice pressione di pulsante l’unità di
misura si commuta dalle dimensioni metriche
(g, ml) a quelle anglosassoni (lb:oz, fl’oz).
Nota:
– Quando l’unità di misura del peso viene fissata
secondo il sistema metrico decimale (g), anche
la misura volumetrica verrà visualizzata come ml.
– Quando l’unità di misura del peso viene fissata
secondo il sistema anglosassone (lb:oz), anche
la misura volumetrica verrà visualizzata come
fl’oz.
– L’unità di misurazione standard per pesare è il
grammo (g).
Q
Pesatura
Nota: La bilancia da cucina 2 si avvia sempre
visualizzando 0 g / 0:0.0 lb:oz 17 / 20, qualora
venga premuto l’interruttore ON / OFF / Reset 5.
Se il piatto 1 viene posto sulla bilancia da cucina
prima dell’avviamento, successivamente
2
all’avviamento verranno egualmente visualizzati
0 g / 0:0.0 lb:oz 17 / 20.
Se invece il piatto 1 viene posto sulla bilancia da
cucina 2, solo successivamente all’avviamento,
sulla bilancia verrà visualizzato il peso del piatto
1
Premere 1 volta l’interruttore ON / OFF / Reset 5
per resettare la visualizzazione facendola tornare
nuovamente a 0 g / 0:0.0 lb:oz 17 / 20.
j Porre la bilancia da cucina su una superficie
fissa e piana.
j Premere l’interruttore ON / OFF / Reset 5 per
avviare la bilancia da cucina 2.
5
j Attendere fino a quando il display LC 4 si fer-
ma e mostra in modo definitivo il valore 0 g 17,
0:0,0 once 20, oppure
0 ml 18 o 0,0 fl’oz 19 a
seconda della modalità in
cui si trovava la bilancia
prima di essere disinserita.
j Premere l’interruttore di
modalità 3 per commutare la bilancia sulla normale modalità di pesatura 23.
j Qualora fosse necessario,
scegliere preventivamente
l’unità di pesatura premendo il pulsante di
commutazione g / lb:oz 9 sul fondo della
bilancia prima di iniziare la pesatura.
j Se l’unità di peso è stata scelta, per spegnere
la bilancia da cucina 2 premere l’interruttore
ON / OFF /Null 5 e mantenerlo premuto per
3 secondi.
j Porre la bilancia da cucina 2 su una superficie
di tavolo dura e piana. Porre il piatto della bilancia 1 sulla piattaforma di pesatura 6.
j Premere l’interruttore di ON / OFF / Reset 5,
per avviare la bilancia ed azionarla in modo
di pesatura normale.
j Attendere fino a che non si accendano tutti i
segmenti del display LC 4 e la bilancia non
.
16 IT/MT
79419 CB5 IM.indd 16 1/2/2013 3:33:03 PM
Page 17

Messa in funzione
mostri in modo definitivo 0 g 17, 0:0,0 once 20.
j Per avviare la pesatura porre la merce da pesare
nel piatto 1. Il display LC 4 mostra il peso
della merce pesata nell’unità di pesatura scelta.
Nota: Senza il piatto 1 la bilancia funziona allo
stesso modo. Seguire e semplicemente ripetere i
passi descritti in precedenza, tuttavia senza piatto 1.
Q
Pesatura ed aggiunta
La bilancia da cucina 2 permette pesature successive dovere togliere la merce dal piatto 1.
j Porre il piatto della bilancia 1 sulla piattafor-
ma di pesatura 6.
j Premere l’interruttore ON / OFF / Reset 5 per
avviare la bilancia 2.
j Attendere fino a che il display LC 4 si ferma
e mostra in modo definitivo il valore 0 g 17,
0:0,0 once 20, oppure 0 ml 18 o 0,0 fl’oz 19
a seconda della modalità in cui si trovava la
bilancia prima di essere disinserita.
j Premere l’interruttore di modalità 3, per com-
mutare la bilancia in modalità di pesatura 23
(predisposizione con indicazione g oppure lb:oz).
j Porre la merce da pesare nel piatto 1 per av-
viare la pesatura. Il display LC 4 mostra il
peso della prima merce posta nella ciotola.
j Premere l’interruttore ON / OFF / Reset 5 per
resettare il display LC 4.
j E’ possibile pesare allo stesso modo dell’altra
merce resettando la bilancia con pressione
sull’interruttore ON / OFF / Reset 5 dopo ogni
nuova pesatura.
Nota relativa alla regolazione del reset o
della tara:
a) Qualora il peso complessivo
di tutti i prodotti già posti sulla bilancia, ivi incluso il piatto,
ammonta a meno di
200 grammi, il display LC 4
mostrerà un pittogramma indicante uno zero 24 nell’angolo sinistro inferiore. Ciò significa che la bi-
lancia è stata
resettata = la capacità di
pesatura rimanente della
bilancia è ancora tra i 5000
ed i 5200 grammi.
b) Qualora il peso complessivo
di tutti i prodotti già posti sulla bilancia, ivi incluso il piatto,
ammonta a meno di
200 grammi, il display LC 4
mostra un pittogramma con
una T 26 nell’angolo sinistro
superiore. Ciò significa che la bilancia si trova
in modalità tara = la capacità di pesatura rimanente della bilancia corrisponde a
5000 grammi meno il peso che è già stato
posto sulla bilancia.
Q
Parziale rimozione
della merce pesata
j Porre il piatto della bilancia 1 sulla piattafor-
ma di pesatura 6.
Nota: Il piatto della bilancia non può pesare
più di 200 g.
j Premere l’interruttore ON / OFF / Reset 5 per
avviare la bilancia 2.
j Attendere fino a che il display LC 4 si ferma
e mostra in modo definitivo il valore 0 g 17,
0:0,0 once 20, oppure 0 ml 18 o 0,0 fl’oz 19
a seconda della modalità in cui si trovava la
bilancia prima di essere disinserita.
j Premere l’interruttore di modalità 3, per portare
la bilancia in modalità di pesatura 23 (predisposizione con g oppure lb:oz).
j Porre la merce da pesare nel piatto 1 per
avviare la pesatura. Il display LC 4 mostra
il peso della prima merce posta nella ciotola.
j Premere l’interruttore ON / OFF / Reset 5 per
resettare il display LC 4.
j Rimuovere la quantità desiderata di merce
pesata dal piatto della bilancia 1. Il display
LC 4 mostra il peso di merce pesata sottratto
quale valore negativo.
17 IT/MT
79419 CB5 IM.indd 17 1/2/2013 3:33:03 PM
Page 18

Messa in funzione / Rimedio di errori
Q
Disinserimento
automatico o manuale
j La bilancia viene disinserita automaticamente
quando non viene utilizzata per un periodo
superiore ai 2 minuti.
j Premere l’interruttore ON / OFF / Reset 5 per
più di 3 secondi per disinserire la bilancia.
Q
Visualizzazione di
unità volumetriche
j Porre la bilancia da cucina su una superficie
fissa e piana.
j Premere l’interruttore ON / OFF / Reset 5 per
avviare la bilancia 2.
j Attendere fino a che il display LC 4 si ferma
e mostra in modo definitivo il valore 0 g 17,
0:0,0 once 20, oppure 0 ml 18 o 0,0 fl’oz 19
a seconda della modalità in cui si trovava la
bilancia prima di essere disinserita.
j Premere l’interruttore di
modalità 3, fino a che il
latte 22 oppure l’acqua
viene visualizzato
21
come modalità volumetrica
in ml oppure fl’oz.
j Porre un contenitore per
liquidi o il piatto della bilancia 1 sulla piattaforma
di pesatura 6.
j Premere l’interruttore di
ON / OFF / Reset 5, per
resettare il display LC 4
(o 0 ml oppure 0,0 fl’oz).
Versare latte o acqua
(scelta in precedenza) nel
contenitore.
j Il display LC 4 mostra
automaticamente il volume
del liquido presente nel contenitore in ml oppure
fl’oz a seconda della preimpostazione scelta.
j In seguito premere l’interruttore di modalità 3
per porre nuovamente la bilancia nella modalità
di pesatura e leggere il peso corrispondente del
liquido.
Q
Rimedio di errori
Errore Causa Soluzione
Il display LC 4
segnala “Err” e
rimane così bloccato.
La capacità massima di
5 kg / 11 lb della bilancia
da cucina
2
è superata.
j Rimuovere l'ingrediente dalla bilancia da cucina
2
.
j Spegnere la bilancia da cucina 2 e
riaccenderla successivamente.
j Diminuire l‘ingrediente e pesarlo in diverse volte.
Il display LC 4
segnala “Lo”.
La bilancia da cucina
2
non si accende.
La batteria è scarica
La batteria è forse scarica.
j Sostituire la batteria secondo quanto indicato
nel capitolo “Sostituzione della batteria”.
j Sostituire la batteria secondo quanto indicato
nel capitolo “Sostituzione della batteria”.
j Se la bilancia da cucina 2 non si accende ancora
accendere, bisogna rivolgersi a uno specialista.
18 IT/MT
79419 CB5 IM.indd 18 1/2/2013 3:33:03 PM
Page 19

Q
Pulizia
j Pulire il prodotto con un panno leggermente
inumidito e privo di pelucchi. In caso di sporco
resistente, il panno può essere inumidito
leggermente anche con acqua saponata.
j Non usare detergenti chimici, detersivi abrasivi
o oggetti taglienti. In caso contrario, il prodotto
potrebbe danneggiarsi.
j Non immergere mai il prodotto in acqua o in
altri liquidi. In caso contrario, il prodotto potrebbe
danneggiarsi.
Q
Smaltimento
La confezione è prodotta in materiale ri- La confezione è prodotta in materiale ri-La confezione è prodotta in materiale ri-
ciclabile e biodegradabile, smaltibile nei
luoghi di raccolta differenziati.
Potete informarvi sulle possibilità di smaltimento del
prodotto consumato dall‘amministrazione comunale
e cittadina.
Per la salvaguardia della tutela ambien-
tale, quando il vostro prodotto non
funziona più, non gettatelo nei rifiuti domestici bensì nei luoghi adatti di raccolta.
Potete informarvi sui luoghi di raccolta e
i loro orari di apertura dall‘amministrazione competente.
Pulizia / Smaltimento
piombo. Consegnare quindi le batterie usate ad un
punto di raccolta comunale.
EMC
Batterie difettose o usate devono essere riciclate ai
sensi della Direttiva 2006 / 66 / EC. Smaltire le
batterie e / o l’apparecchio presso i punti di raccolta
indicati.
Vi possono essere conseguenze
negative per l’ambiente a
Pb
seguito di uno smaltimento non
corretto delle batterie!
Le batterie non devono essere smaltite nella spazzatura domestica. Esse possono contenere metalli
pesanti velenosi e devono essere trattate quali rifiuti
speciali. I simboli chimici dei metalli pesanti sono i
seguenti: Cd = Cadmio, Hg = mercurio, Pb =
19 IT/MT
79419 CB5 IM.indd 19 1/2/2013 3:33:04 PM
Page 20

Índice
Introdução
Utilização adequada ......................................................................................................................Página 21
Descrição das peças ......................................................................................................................Página 21
Dados técnicos ................................................................................................................................Página 21
Funções ............................................................................................................................................Página 22
Material fornecido ..........................................................................................................................Página 22
Indicações de segurança
Indicações gerais de segurança ....................................................................................................Página 22
Indicações de segurança referentes ao uso das pilhas...................................................................Página 23
Colocação em funcionamento ...................................................................................Página 23
Substituir a pilha ..............................................................................................................................Página 24
Interruptor de conversão ................................................................................................................Página 24
Pesar ................................................................................................................................................Página 24
Pesar e adicionar ............................................................................................................................Página 25
Remover parcialmente o material a pesar ....................................................................................Página 25
Desactivação automática ou manual ............................................................................................Página 26
Indicação de unidades de volume ........................................................................................................Página 26
Eliminação de avarias ......................................................................................................Página 26
Limpeza ........................................................................................................................................Página 27
Eliminação ..................................................................................................................................Página 27
20 PT
79419 CB5 IM.indd 20 1/2/2013 3:33:04 PM
Page 21

Introdução
Balança de cozinha
Q
Introdução
Familiarize-se com o aparelho antes da
primeira colocação em funcionamento.
Para tal, leia atentamente o seguinte
manual de instruções e as indicações de segu
Utilize o aparelho apenas da
forma descrita e para a
finalidade indicada. Guarde cuidadosamente este
manual de instruções. Se entregar este aparelho a
terceiros, entregue também todos os respectivos
documentos.
Q
Utilização adequada
Este aparelho destina-se à pesagem e pesagem
adicional de alimentos para uso doméstico. A balança de cozinha serve para a indicação do peso
de líquidos ou de matérias sólidas não agressivas,
não corrosivas e não cortantes. Ela não foi concebida para pesar medicamentos ou materiais ilegais
e proíbidos. Não é permitida nenhuma alteração ou
outra qualquer utilização que não a anteriormente
descrita, podendo isso originar danos no artigo.
Adicionalmente, pode-se verificar perigo de vida e
ferimentos. Este artigo serve apenas para um uso
pessoal e não foi concebido para um uso medicinal
ou comercial.
rança.
Contacto metálico da pilha – com efeito de mola
10
Suporte externo da pilha
11
Interruptor de bloqueio preto para a pilha
12
Extensão da tampa do compartimento da pilha
13
2 encaixes em ambos os lados do compartimento
14
da pilha
Compartimento da pilha
15
Fita de isolamento da pilha
16
Visor LCD:
“g” = indicação da unidade de peso (gramas)
17
“ml” = indicação da unidade de volume
18
(mililitros)
“fl’oz” = indicação da unidade de volume
19
(líquido: onças)
“lb:oz”= indicação da unidade de peso
20
(libras: onças)
“–” = símbolo relativo à água = unidade de
21
medida para o modo de volume
(ml / fl’oz de água)
“–” = símbolo relativo ao leite = unidade de
22
medida para o modo de volume
(ml / fl’oz de leite)
“–” = símbolo relativo ao peso = modo de
23
pesagem (grama ou libra: onça)
Símbolo gráfico “0” = peso nulo (canto inferior
24
esquerdo do visor LCD)
“–” = valor negativo (lado esquerdo do visor LCD)
25
“T” = tara (canto superior esquerdo do visor LCD)
26
Q
Dados técnicos
Q
Descrição das peças
Intervalo de pesagem: 0,1 oz - 11 lb (libras) /
1 g - 5 kg (quilos)
Taça da balança
1
Balança de cozinha
2
Interruptor de modo Peso / leite / água
3
(Weight Milk Water)
Visor LCD
4
Interruptor para LIGAR / DESLIGAR / repor a
5
◂
Divisões da escala
de pesagem: 0,1 oz / 1 g
Pilhas: 1 x pilhas de lítio 3 V
(CR2032 em forma
de botão / incluídas no
material fornecido)
zero (tara) (ON / OFF / ZERO)
Plataforma de pesagem
6
Patilha da tampa do compartimento da pilha
7
Tampa do compartimento da pilha
8
Interruptor de conversão gramas / libras: onças
9
21 PT
79419 CB5 IM.indd 21 1/2/2013 3:33:04 PM
Page 22

Introdução / Indicações de segurança
Q
Funções
j Indicação das unidades de volume relativas à
água e ao leite.
j Dois sistemas diferentes para as unidades de
peso – gramas (g) ou libras (lb:oz), convertíveis.
j Aviso em caso de “pilha fraca” / “sobrecarga”
através de um símbolo gráfico especial no LCD.
j Utilização de extensómetros de elevada precisão.
j Possibilidade de reposição a zero ou função
de tara.
j Função de desactivação automática para econo-
mizar energia, caso o aparelho não seja utilizado
durante um período superior a 2 minutos.
j Desactivação manual – mantenha premido o
interruptor para LIGAR / DESLIGAR / repor a
zero 5 durante três segundos.
Q
Material fornecido
Ao desembalar o artigo, verifique imediatamente
se o material fornecido está completo e se todas
as peças se encontram em bom estado.
1 x Balança digital de cozinha
1 x Tigela de pesagem
1 x Pilha de lítio (pré-instalada)
1 x Manual de instruções
Q
Indicações de segurança
Indicações gerais
de segurança
J
AVISO!
E DE ACIDENTE PARA BEBÉS E
CRIANÇAS! Nunca deixe as crian-
ças sozinhas com o material da embalagem e
o artigo. Caso contrário, existe um perigo de
asfixia através do material da embalagem.
PERIGO DE VIDA
Mantenha sempre as crianças afastadas do
produto. Este produto não é um brinquedo!
J As crianças ou pessoas que não possuam
conhecimento ou experiência suficiente para
lidarem com o aparelho, ou cujas capacidades
físicas, sensoriais ou psíquicas estejam limitadas,
não podem utilizar a balança sem a vigilância
ou orientação de uma pessoa responsável, a
cargo da sua segurança. As crianças deverão
permanecer sob vigilância, de forma a não
brincarem com o aparelho.
J
CUIDADO! PERIGO DE FERI-
MENTOS! Não sobrecarregue a
5 kg
balança com mais de 5 kg. Caso
contrário ela poderá avariar-se.
J Nunca submeta o aparelho a
– temperaturas extremas,
– vibrações fortes,
– esforços mecânicos excessivos,
– acção directa dos raios do sol,
– zonas com campos magnéticos,
– humidade.
Caso contrário a balança poderá avariar-se.
J Este aparelho contém componentes electrónicos
sensíveis, Pelo que o seu funcionamento poderá
ser perturbado pela proximidade de dispositivos emissores de rádio. Entre estes dispositivos
incluem-se, por ex., telemóveis, intercomunicadores, equipamentos de comunicação via
rádio, controlos remotos via rádio e outros comandos à distância e fornos microondas. Caso
o visor apresente falhas, afaste esses dispositivos deste aparelho.
J Avarias electromagnéticas / emissões de inter-
ferências altamente frequentes podem causar
interferências no funcionamento. Em caso de tais
interferências retire a pilha e volte a colocá-la.
Para isso, proceda de acordo com o capítulo
“Substituir a pilha”.
J Antes de o colocar em funcionamento, verifique
o artigo em relação a danos ou avarias.
Nunca coloque uma balança danificada em
funcionamento.
AVISO!
Nunca abra a estrutura do artigo.
Em consequência disso, podem ocorrer ferimen-
tos e danos materiais. As reparações deverão
22 PT
79419 CB5 IM.indd 22 1/2/2013 3:33:04 PM
Page 23

Indicações de segurança / Colocação em funcionamento
ser efectuadas apenas por electricistas especia-
lizados.
J Não permite que pessoas inexperientes utilizem
a balança. Certifique-se de que as pessoas
que utilizarem a balança leram o manual de
instruções e estão capacitadas a utilizá-la de
forma segura.
J Coloque a balança sobre uma superfície firme,
plana e horizontal.
J ADEQUADA PARA PRODUTOS
ALIMENTARES! O sabor e o odor
natural dos alimentos não são afec-
tados por este artigo. (Taça da balança)
J Não é adequada para o microondas!
J O produto não é adequado para
máquinas de lavar loiça.
Indicações de segurança
referentes ao uso das pilhas
AVISO!
devem ficar ao alcance das crianças. Não deixe
as pilhas ao abandono. Existe o perigo de elas
serem engolidas pelas crianças ou animais
domésticos. Em caso de ingestão, procure imediatamente um médico.
J PERIGO DE EXPLOSÃO! Nunca
Em consequência disso, pode ocorrer sobrea-
quecimento, perigo de incêndio ou explosão
das pilhas. Nunca jogue as pilhas para o fogo
ou para a água. As pilhas podem explodir.
J Evite as condições e as temperaturas extremas,
como por exemplo, unidades de aquecimento,
as quais poderão ter um efeito sobre as pilhas.
Caso contrário, existe um perigo elevado de
derramamento de ácido.
J Verifique regularmente a pilha, para detectar
derrames.
J Pilhas derramadas ou danificadas
PERIGO DE VIDA! As pilhas não
recarregue as pilhas, não as coloque
em curto-circuito e / ou não as abra.
podem causar irritações na pele; por
essa razão e caso isso se verifique,
use sempre luvas de protecção adequadas!
J Evite o contacto com a pele, os olhos e mucosas,
no caso de as pilhas derramarem ácido para
fora. Em caso de contacto com o ácido da
pilha, lave as zonas afectadas e procure
imediatamente um médico.
J Antes de as colocar e se estes se encontrarem
ligeiramente sujos, limpe os contactos das pilhas
e da balança com um pano seco que não
liberte fios.
J Retire a pilha do produto, se não o utilizar
durante longos períodos de tempo.
J Ao colocar a pilha, verifique se a polaridade é
a correcta! A polaridade é indicada no compartimento das pilhas. Senão, a pilha podem
explodir.
J Coloque a pilha com cuidado. Senão, pode
danificar o produto.
J Não misture as pilhas gastas juntamente com
o lixo doméstico; deposite-as em vez disso nos
recipientes de reciclagem especiais nos respectivos centros de recolha.
Q
Colocação em funcionamento
1. Abra o compartimento da pilha 15 na parte de
baixo da balança, deslocando a patilha 7
da tampa 8 na direcção do compartimento e
retirando-a para cima.
2. Remova a fita de isolamento 16 que se encontra
fixa sob o contacto metálico da pilha.
3. Coloque a tampa 8 novamente no compartimento da pilha 15. Certifique-se de que ambas
as extensões 13 do compartimento da pilha
se encontram em contacto com ambos os
8
encaixes 14 laterais quando o compartimento
é fechado. Pressione a tampa 8 sobre o compartimento para as pilhas 15 até esta encaixar
de forma audível.
12
16 11
23 PT
79419 CB5 IM.indd 23 1/2/2013 3:33:04 PM
Page 24

Colocação em funcionamento
Q
Substituir a pilha
1. Desligue a balança. Prima e mantenha premido
o botão LIGAR / DESLIGAR / repor a zero 5
durante 3 segundos.
2. Abra o compartimento da pilha 15 conforme
descrito anteriormente.
3. Retire a bateria gasta do suporte 11, premindo
a presilha preta 12. A pilha sai automaticamente do suporte 11. Certifique-se de que não
exerce força excessiva no contacto 10. Senão
poderá danificá-lo, porque a elevação da pilha
pode provocar uma deformação. Retire a pilha
do suporte exterior 11.
4. Insira a nova pilha no suporte externo 11. Respeite a polaridade correcta. O lado “+” deve
estar voltado para cima. O contacto metálico 10
pressiona a pilha na posição.
5. Feche o compartimento da pilha 15 tal como
descrito anteriormente.
Q
Interruptor de conversão
j O interruptor de conversão 9 para as unidades
de peso encontra-se na parte inferior da balança.
Ao premir um simples botão, a unidade de
medida é alterada de medidas métricas (g, ml)
para medidas imperiais (lb:oz, fl’oz).
Nota:
– Se a unidade de peso estiver definida como
medida métrica (g), a medida volumétrica
também é indicada automaticamente como ml.
– Se a unidade de peso estiver definida como
medida imperial (lb:oz), a medida volumétrica
também é indicada automaticamente como fl’oz.
– A unidade de peso padrão é g (grama).
Q
Pesar
Nota: A balança de cozinha 2 activa-se sempre
com a indicação 0 g / 0:0.0 lb:oz 17 / 20 quando
o interruptor para LIGAR / DESLIGAR / repor a
zero 5 é premido. Se colocar a taça da balança 1
sobre a balança de cozinha 2 antes de ligar, surge
também a indicação 0 g / 0:0.0 lb:oz 17 / 20
depois de ligar a balança.
Porém, se colocar a taça da balança 1 sobre a
balança de cozinha 2 depois de a ligar, o peso da
taça da balança 1 é indicado. Prima uma vez o
interruptor para LIGAR / DESLIGAR / repor a zero 5,
para repor a indicação para 0 g / 0:0.0 lb:oz 17 / 20.
j Coloque a balança de cozinha sobre uma
superfície estável e plana.
j Pressione o interruptor para LIGAR / DESLIGAR /
repor a zero 5 para ligar a balança de
cozinha 2.
5
j Aguarde até que o visor LCD 4 estabilize em
0 g 17, 0:0,0 onças 20 ou
0 ml 18 ou 0,0 fl’oz 19,
consoante o modo ajustado
antes de a balança ter
sido desligada.
j Pressione o interruptor de
modo 3, a fim de ajustar
a balança para o modo
de pesagem normal 23.
j Se necessário, seleccione
previamente a unidade de
peso, premindo o interruptor
de conversão g / lb:oz 9
no fundo da balança, antes de iniciar a
pesagem.
j Depois de escolher a unidade de peso, prima
e mantenha premido o botão LIGAR /
DESLIGAR / repor a zero 5 durante 3 segundos para desligar a 2 balança de cozinha.
j Coloque a balança de cozinha 2 sobre uma
superfície rígida e plana. Coloque a taça da
balança 1 sobre a plataforma de pesagem 6.
j Prima o interruptor para LIGAR / DESLIGAR /
repor a zero 5 para ligar a balança e accionar
o modo de pesagem normal.
j Aguarde até que todos os segmentos do visor
LCD 4 acendam e que a balança estabilize
em 0 g 17, 0:0,0 onças 20.
24 PT
79419 CB5 IM.indd 24 1/2/2013 3:33:05 PM
Page 25

Colocação em funcionamento
j Insira o material a pesar na taça da balança 1
para iniciar a pesagem. O visor LCD 4
indica o peso do material na unidade de peso
seleccionada.
Nota: A balança funciona da mesma forma sem
a respectiva taça 1. Simplesmente siga e repita os
passos acima descritos sem a taça da balança 1.
Q
Pesar e adicionar
A balança de cozinha 2 permite efectuar uma
pesagem adicional, sem remover o material da
taça 1.
j Coloque a taça da balança 1 sobre a plata-
forma de pesagem 6.
j Prima o interruptor para LIGAR / DESLIGAR /
repor a zero 5 para ligar a balança 2.
j Aguarde até que o visor LCD 4 estabilize em
0 g 17, 0:0,0 onças 20 ou 0 ml 18 ou 0,0 fl’oz
, consoante o modo ajustado antes de a
19
balança ter sido desligada.
j Prima o interruptor de modo 3 para regressar
ao modo de pesagem 23 (predefinição: g ou
lb:oz).
j Insira o material na taça da balança 1 para
iniciar a pesagem. O visor LCD 4 indica o peso
do material colocado na taça em primeiro lugar.
j Prima o interruptor para LIGAR / DESLIGAR /
repor a zero 5 para repor o visor LCD 4 a
zero.
j Pode efectuar outra pesagem de material do
mesmo tipo, premindo o interruptor para LIGAR /
DESLIGAR / repor a zero 5 depois de colocar
o material a pesar.
Indicação relativa ao ajuste zero ou tara:
a) Se o peso total dos produtos
colocados na balança, incluindo a taça, for inferior a
200 gramas, o visor LCD 4
apresenta um símbolo gráfico
com um zero 24 no canto
inferior esquerdo. Isto significa
que a balança foi reposta a zero = a sua
capacidade de peso restante continua a corresponder a 5000 a 5200 gramas.
b) Se o peso total dos produtos
colocados na balança, incluindo a taça, for superior a
200 gramas, o visor LCD 4
indica um símbolo gráfico
com um T 26 no canto superior esquerdo. Isto significa
que a balança se encontra
no modo de tara = a sua
capacidade de peso restante
corresponde a 5000 gramas,
menos o peso já colocado
sobre a mesma.
Q
Remover parcialmente
o material a pesar
j Coloque a taça da balança 1 sobre a plata-
forma de pesagem 6.
Nota: a taça da balança não pode pesar
alimentos com um peso superior a 200 g.
j Prima o interruptor para LIGAR / DESLIGAR /
repor a zero 5 para ligar a balança 2.
j Aguarde até que o visor LCD 4 estabilize em
0 g 17, 0:0,0 onças 20 ou 0 ml 18 ou 0,0 fl’oz
, consoante o modo ajustado antes de a
19
balança ter sido desligada.
j Prima o interruptor de modo 3, a fim de ajustar o
modo de pesagem 23 (predefinição: g ou
lb:oz).
j Insira o material na taça da balança 1 para
iniciar a pesagem. O visor LCD 4 indica o peso
do material colocado na taça em primeiro lugar.
j Prima o interruptor para LIGAR / DESLIGAR /
repor a zero 5 para repor o visor LCD 4 a
zero.
j Retire a quantidade pretendida de material a
pesar da taça da balança 1. O visor LCD 4
indica o peso retirado como um valor negativo.
25 PT
79419 CB5 IM.indd 25 1/2/2013 3:33:05 PM
Page 26

Colocação em funcionamento / Eliminação de avarias
Q
Desactivação automática
ou manual
j A balança é desactivada automaticamente se
não for utilizada durante um período superior
a 2 minutos.
j Mantenha premido o interruptor LIGAR /
DESLIGAR / repor a zero 5 durante um período
superior a 3 segundos para desligar a balança.
Q
Indicação de unidades de volume
j Coloque a balança de cozinha sobre uma
superfície estável e plana.
j Prima o interruptor para LIGAR / DESLIGAR /
repor a zero 5 para ligar a balança 2.
j Aguarde até que o visor LCD 4 estabilize em
0 g 17, 0:0,0 onças 20 ou 0 ml 18 ou 0,0 fl’oz
, consoante o modo ajustado antes de a
19
balança ter sido desligada.
j Prima o interruptor de modo 3, até surgir a
indicação leite 22 ou água 21 como modo de
volume em ml ou fl’oz.
j Coloque um recipiente para líquidos ou a taça
da balança 1 sobre a
plataforma de pesagem
.
6
j Prima o interruptor para
LIGAR / DESLIGAR /
repor a zero 5 para repor o visor LCD 4 a zero
(0 ml ou 0,0 fl’oz). Encha
o recipiente com leite ou
água (o que tiver seleccionado anteriormente).
j O visor LCD 4 indica
agora automaticamente o
volume do líquido existente
no recipiente, em ml ou em
fl’oz, consoante o ajuste
efectuado.
j De seguida, prima o inter-
ruptor de modo
regressar ao modo de pesagem e determinar
o peso correspondente ao líquido.
3
para
Q
Eliminação de avarias
Avaria Causa Solução
O monitor LCD 4
apresenta a
mensagem “Err“ e
permanece imóvel.
A carga máxima
admissível de 5 kg / 11 lb
sobre a balança
2
ultrapassada.
j Retire os alimentos que se encontram sobre a
balança
foi
j Desligue a balança de cozinha
2
.
ligá-la.
2
e torne a
j Reduza a quantidade de alimentos pesados de
cada vez, aumentando para isso o número de
pesagens.
O monitor LCD 4
apresenta a
A pilha está gasta.
j Troque a pilha de acordo com o capítulo
“Substituir a pilha”.
mensagem “Lo“.
A balança de
cozinha 2 não se
consegue accionar.
A pilha está
eventualmente gasta.
j Troque a pilha de acordo com o capítulo
“Substituir a pilha”.
j Se ainda assim não conseguir accionar a
balança de cozinha
2
, contacte um técnico
especializado.
26 PT
79419 CB5 IM.indd 26 1/2/2013 3:33:06 PM
Page 27
Q
Limpeza
j Limpe a balança com um pano húmido e que
não liberte fios. Em caso de sujidade acentuada,
também pode humedecer o pano com um
sabão líquido suave.
j Ao efectuar a limpeza, nunca utilize produtos
de limpeza químicos, residuais ou corrosivos.
Caso contrário, o artigo poderá ficar danificado.
j Nunca mergulhe o artigo na água nem em
outros líquidos. Caso contrário, o artigo poderá
ficar danificado.
Q
Eliminação
A embalagem é feita de materiais não
poluentes que podem ser eliminados
nos contentores de reciclagem locais.
As possibilidades de reciclagem dos artigos utilizados poderão ser averiguadas no seu Município ou
Câmara Municipal.
No interesse da protecção do ambiente,
não deite fora este produto juntamente
com o lixo doméstico; entregue-o num
ponto de recolha adequado. Pode informar-se no seu município sobre os locais
de recolha adequados e o seu período
de funcionamento.
Limpeza / Eliminação
EMC
As pilhas avariadas ou gastas têm de ser recicladas
de acordo com a directiva 2006 / 66 / EC. Entregue
as pilhas e/ou o aparelho nos locais específicos
destinados à sua recolha.
Danos ambientais devido à
eliminação incorrecta das pilhas!
Pb
As pilhas não podem ser eliminadas no lixo
doméstico. Podem conter metais pesados tóxicos e
são consideradas resíduos perigosos. Os símbolos
químicos dos metais pesados são os seguintes:
Cd = cádmio, Hg = mercúrio, Pb = chumbo. Como
tal, deposite as pilhas utilizadas num ponto de
recolha adequado do seu município.
27 PT
79419 CB5 IM.indd 27 1/2/2013 3:33:06 PM
Page 28

Table of Contents
Introduction
Proper Use ...........................................................................................................................................Page 29
Description of Parts ............................................................................................................................. Page 29
Technical Data .....................................................................................................................................Page 29
Features ...............................................................................................................................................Page 29
Supply Scope ...................................................................................................................................... Page 30
Safety Instructions
General Safety Instructions..................................................................................................................Page 30
Battery Safety Instructions .................................................................................................................. Page 30
Getting started
Replacing the battery ..........................................................................................................................Page 31
Unit conversion button .......................................................................................................................Page 31
Weighing .............................................................................................................................................Page 32
Weigh and add ...................................................................................................................................Page 32
Removing part of the weight from the kitchen scale .........................................................................Page 33
Automatic or manual switch-off ......................................................................................................... Page 33
Volume units display mode .................................................................................................................Page 33
Troubleshooting ........................................................................................................................Page 34
Cleaning ...........................................................................................................................................Page 34
Disposal ............................................................................................................................................ Page 34
28 GB/MT
79419 CB5 IM.indd 28 1/2/2013 3:33:06 PM
Page 29

Introduction
Kitchen Scale
Q
Introduction
Before assembling and using the device
for the first time, take time to familiarise
yourself with the product first. Read the
following assembly instructions and safety instructions
carefully. Only use the product as described and for
the designated areas of application. Please keep
these instructions in a safe place. If you hand this
product on to a third party, you must also pass on all
documents relating to the product.
Q
Proper Use
This appliance is designed to weigh household
quantities of foods. The digital kitchen
the weight of non-aggressive, non-corrosive and
non-abrasive liquids or solids. It is not intended for
weighing medication or prohibited materials.
other than that described above or any modification
of the product is not permissible and will result in
damage. Misuse may also result in other life-threatening risks and injury. The product is for private use
only and is not intended for medical or commercial
use.
Q
Description of Parts
Weighing bowl
1
Kitchen scale
2
Mode setting button
3
(Weight Milk Water)
LC display
4
On / Off & Zero button (tare) (On / Off / Zero)
5
Weighing platform
6
Battery compartment cover clip
7
Battery compartment cover
8
Gram/lb:oz unit conversion button
9
Battery metal contact – spring action
10
Battery embedding case
11
Battery black locking tab
12
◂
scale measures
Any use
Battery compartment cover extension
13
2 notches on the edge of the battery compart-
14
ment opening
Battery compartment
15
Battery isolating strip
16
LC display:
“g” = weight unit indication (gram)
17
“ml” = volume unit indication (millilitre)
18
“fl’oz” = volume unit indication (fluid ounce)
19
“lb:oz”= weight unit indication (pound: ounce)
20
“–” = sign over “Water” = measuring water
21
volume mode (ml or fl’oz water)
“–” = sign over “Milk” = measuring milk volume
22
mode (ml or fl’oz milk)
“–” = sign over “Weight” = weighing mode
23
(gram or lb:oz)
“0” icon = zero weight
24
(bottom left corner of the LC display)
“–” icon = negative value
25
(left side of LC display)
“T” icon = tare weight
26
(top left corner of the LC display)
Q
Technical Data
Weighing range: 0.1 oz - 11 lb (pounds) /
1 g - 5 kg (kilograms)
Graduation: 0.1 oz / 1 g
Battery:
1 x 3 V Lithium battery
(CR2032 Lithium round cells /
included)
Q
Features
j Indicators for volume units for water and milk.
j Two different weight unit systems – grams (g)
or pounds (lb:oz), switchable.
j LC displays warning symbol to indicate “Low
battery power” / “Overload”.
j High precision strain gauge sensors.
j Zero reset or tare function.
j Auto-off function: switches the device off if not
used for two minutes to save power.
29 GB/MT
79419 CB5 IM.indd 29 1/2/2013 3:33:06 PM
Page 30

Introduction / Safety Instructions
j Manual switch off: press the On / Off / Zero
button 5 and keep it pressed for three seconds.
Q
Supply Scope
After unpacking the delivery, please check immediately
that it contains all parts and that the appliance is in
perfect condition.
1 x digital kitchen scale
1 x weighing bowl
1 x lithium battery (pre-installed inside the battery case)
1 x operating manual
Q
Safety Instructions
General Safety Instructions
J
Never leave children unattended with packaging
materials or the product. There is otherwise a
risk of fatal injury by suffocation. Always keep
children away from the product. This is not a toy.
J Children or other persons who do not have the
knowledge or experience required to use the
electrical appliance, or who have limited
physical, sensory or mental capabilities, must
not use the appliance without supervision or
instruction by a person who is responsible for
their safety. Children must be supervised at all
times to prevent them playing with the appliance.
J
5 kg
J Do not expose the product to
– extreme temperatures,
– strong vibrations,
WARNING!
DANGER TO
LIFE AND RISK OF ACCIDENTS
FOR INFANTS AND CHILDREN!
CAUTION! RISK OF INJURY!
Do not exceed the 5 kg capacity of the
scale. This could damage the product.
– heavy mechanical loads,
– direct sunlight,
– magnetic fields,
– moisture.
These can damage the product.
J This appliance has delicate electronic compo-
nents. This means that if it is placed near an
object that transmits radio signals, it could
cause interference. This could be, for example,
mobile telephones, walkie talkies, CB radios,
remote controls and microwaves. If the display
indicates a problem, move such objects away
from it.
J Electromagnetic interference / high-frequency
emissions can lead to the appliance failing. In
cases of the appliance failing to work remove
the battery for a short while and then replace
it. Do this as described in the “Replacing the
battery“ section.
J Check the product for damage before use.
Never use a damaged product.
WARNING!
Never open the housing of the
product. This can result in injury and damage
to the product. Repairs must be carried out by
an electrician only.
J Do not allow anyone inexperienced to use the
product. Make sure that anyone intending to
use the product has read the operating manual
and is capable of operating the product safely.
J Place the product on a solid, horizontal and
flat surface.
J FOOD-SAFE! This product has no
adverse effect on taste or smell.
(Weighing bowl)
J Not suitable for microwaves!
J The product is not suitable for
dishwasher.
Battery Safety Instructions
WARNING!
batteries out of the reach of children. Do not
leave batteries lying around. There is a risk of
DANGER TO LIFE! Keep
30 GB/MT
79419 CB5 IM.indd 30 1/2/2013 3:33:06 PM
Page 31

Safety Instructions / Getting started
children or animals swallowing them. Consult a
doctor immediately if a battery is swallowed.
J EXPLOSION HAZARD! Never
recharge, short-circuit and / or open
batteries. This can cause them to
overheat, burn or burst. Never throw batteries
into fire or water. The batteries may explode.
J Avoid extreme conditions and temperatures
which can affect batteries, e. g. heaters. Otherwise there is an increased risk of leakage.
J Check regularly that the battery is not leaking.
J Leaked or damaged batteries can
cause chemical burns if they come
into contact with the skin; in such
cases you must wear suitable protective gloves.
J Avoid contact with the skin, eyes and mucous
membranes if fluid has leaked from the battery.
In the event of contact with battery acid, rinse
the affected area with plenty of clean water
and consult a doctor immediately.
J Remove light dirt from the battery and product
contacts with a dry, non-fluffing cloth before
inserting the batteries.
J Remove the battery from the product if it is not
in use for any length of time.
J
Make sure that the polarity is correct when you
insert the
compartment. The
battery
. This is indicated in the battery
battery
can otherwise explode.
J Insert the battery with care. The product can
otherwise be damaged.
J Please do not dispose of used batteries in your
household waste but take them to a designated
collection depot for special waste.
edge of the battery compartment opening
when the cover is closed. Press the battery
compartment cover 8 firmly on to the battery
compartment 15 until you hear it engage.
12
16 11
Q
Replacing the battery
1. Switch off the scale. Press and hold down the
On / Off / Zero button 5 for 3 seconds.
2. Open the battery compartment 15 as described
above.
3. Remove the exhausted batteries from the battery
embedding case 11 by pressing the black battery locking tab 12. The battery is automatically
released from the battery embedding case 11.
Ensure that you do not exert too much force on
the contact 10, otherwise it could be damaged
by over-bending as the battery is lifted. Remove
the battery from the battery embedding case 11.
4. Insert a new battery into the battery embedding
case 11. Make sure you fit the battery the right
way round (polarity). The “+”- side must face
upwards. The metal contact 10 presses battery
into position.
5. Close the battery compartment 15 as described
above.
Q
Getting started
1. Open the battery compartment 15 under the
scale by pushing the clip 7 on the battery
compartment cover 8 towards the battery
compartment and lift up the cover.
2. Remove the battery isolating strip 16 from under
the battery metal contact to which it is attached.
3. Place the battery compartment cover 8 back
on the battery compartment 15. Ensure that the
two extensions 13 on the battery compartment
Q
Unit conversion button
j The unit conversion button 9 for the units of
weight can be found on the bottom of the kitchen
scale. By simply pressing the button the units of
measure change between metric (g, ml) and
imperial (lb:oz, fl’oz).
Note:
– If the units of weight are set to metric (g) then
the units of volume will be automatically shown
as ml.
cover 8 fit into the two notches 14 on the
31 GB/MT
79419 CB5 IM.indd 31 1/2/2013 3:33:07 PM
Page 32

Getting started
– If the units of weight are set to imperial (lb:oz)
then the units of volume will be automatically
shown as fl’oz.
– The standard unit of weight is g.
Q
Weighing
Note: The kitchen scale 2 always starts from 0 g /
0:0.0 lb:oz 17 / 20 if the On / Off / Zero button
is pressed. If you place the weighing bowl 1
5
on to the kitchen scale 2 before switching on, it
will also start from 0 g / 0:0.0 lb:oz 17 / 20.
If you place the weighing bowl 1 on the kitchen
scale 2 after it has been switched on, then the
display will show the weight of the weighing bowl
.
1
Press the On / Off / Zero button 5 once to reset
the display to 0 g / 0:0.0 lb:oz 17 / 20.
j Place the kitchen scale on a solid, flat surface.
j Press the On / Off / Zero button 5 to switch
on the kitchen scale 2.
5
j Wait until the LC display 4 stops and stabilizes
on 0 g 17, 0:0.0 lb:oz 20
or 0 ml 18 or 0.0 fl’oz 19,
which will be the mode the
kitchen scale was in when
it was last switched off.
j Press the mode setting
button 3 to set the kitchen scale to the normal
weighing mode 23.
j If necessary select the units
of weight in advance by
pressing the g / lb:oz unit
conversion button 9 on
the bottom of the kitchen scale before you start
weighing.
j When you have selected the units of weight press
and hold down the On / Off / Zero button 5
for 3 seconds to switch off the kitchen scale 2.
j Stand the kitchen scale 2 on a hard, flat table
surface. Place the weighing bowl 1 on the
weighing platform 6.
j Press the On / Off / Zero button 5 to switch on
the kitchen scale in the normal weighing mode.
j Wait until all the segments of the LC display 4
have illuminated and the kitchen scale has
stabilized at 0 g 17, 0:0.0 lb:oz 20.
j Place the substance to be weighed into the
weighing bowl 1 to start the weighing process.
The LC display 4 shows the weight of the substance in the weighing bowl in the selected unit
of weight.
Note: The kitchen scale works without the weighing
bowl 1 in the same way. Simply follow and repeat
the above steps without the weighing bowl 1.
Q
Weigh and add
The kitchen scale 2 allows you to carry out consecutive weighings without emptying the weighing
bowl 1 between weighings.
j Place the weighing bowl 1 on the weighing
platform 6.
j Press the On / Off / Zero button 5 to switch
on the kitchen scale 2.
j Wait until the LC display 4 stops and stabiliz-
es on 0 g 17, 0:0.0 lb:oz 20 or 0 ml 18 or
0.0 fl’oz 19, which will be the mode the kitchen
scale was in when it was last switched off.
j Press the mode button 3 to set the scale to
weighing mode 23 (preset to g or lb:oz).
j Place the substance to be weighed into the
weighing bowl 1 to start the weighing process.
The LC display 4 shows the weight of the first
substance placed in the weighing bowl.
j Press the On / Off / Zero button 5 to reset the
LC display 4 to zero.
j You can add further substances into the weighing
bowl in the same way and pressing the
On / Off / Zero button 5 between each new
substance.
32 GB/MT
79419 CB5 IM.indd 32 1/2/2013 3:33:07 PM
Page 33

Getting started
Note for zero or tare setting:
a) If the total weight of all the
substances already placed on
the kitchen scale including the
weighing bowl is less than
200 g, then the LC display
shows the “0” icon 24 in
4
the bottom left corner. This
means that the kitchen scale
has been reset to zero = the
remaining weight capacity of
the kitchen scale remains
between 5000 and 5200 g.
b) If the total weight of all the
substances already placed
on the kitchen scale including
the weighing bowl is more
than 200 g, then the LC display 4 will show the “T”
icon 26 instead in the top
left corner. This means that the kitchen scale is
in tare mode = the remaining weight capacity
of the kitchen scale is 5000 g minus the weight
of substances already placed on the kitchen
scale.
Q
Removing part of the weight
from the kitchen scale
j Place the weighing bowl 1 on the weighing
platform 6.
Note: The container bowl must not exceed
200 g.
j Press the On / Off / Zero button 5 to switch
on the kitchen scale 2.
j Wait until the LC display 4 stops and stabilizes
on 0 g 17, 0:0.0 lb:oz 20 or 0 ml 18 or
0.0 fl’oz 19, which will be the mode the kitchen
scale was in when it was last switched off.
j Press the mode button 3 to set the weighing
mode 23 (preset to g or lb:oz).
j Place the substance to be weighed into the
weighing bowl 1 to start the weighing process.
The LC display 4 shows the weight of the first
substance placed in the weighing bowl.
j Press the On / Off / Zero button 5 to reset the
LC display 4 to zero.
j Now remove the desired amount of substance
from weighing bowl 1. The LC display 4
shows the weight of the substance removed
from the weighing bowl as a negative value.
Q
Automatic or manual switchoff
j The kitchen scale switches itself off automatically
if it has not been used for 2 minutes.
j Press the On / Off / Zero button 5 for longer
than 3 seconds to switch off the kitchen scale.
Q
Volume units display mode
j Place the kitchen scale on
a solid, flat surface.
j Press the On / Off / Zero
button 5 to switch on the
kitchen scale 2.
j Wait until the LC display
stops and stabilizes on
4
0 g 17, 0:0.0 lb:oz 20 or
0 ml 18 or 0.0 fl’oz 19,
which will be the mode the
kitchen scale was in when
it was last switched off.
j Press the mode button 3
until milk 22 or water 21
appears as the volume
mode with the units as ml
or fl’oz.
j Place a container for liquid
or the weighing bowl 1
on the weighing platform 6.
j Press the On / Off / Zero button 5 to set the
LC display 4 to zero (0 ml or 0.0 fl’oz). Pour
milk or water (as selected previously) into the
container.
j The LC display 4 now automatically shows
the volume of liquid poured into the container,
either in ml or in fl’oz, depending on the setting.
j Then press the mode button 3 to set the kitchen
scale to weighing mode again and read off the
equivalent weight of the liquid.
33 GB/MT
79419 CB5 IM.indd 33 1/2/2013 3:33:08 PM
Page 34

Troubleshooting / Cleaning / Disposal
Q
Troubleshooting
Error Cause
The LCD readout 4
indicates “Err” and
does not change.
The LCD readout 4
indicates “Lo”.
It is not possible to
switch the kitchen
scale 2 on.
Q
Cleaning
j Clean the product with a slightly dampened,
non-fluffing cloth. To remove more stubborn
dirt, you can also dampen the cloth with a
weak soap solution.
j Do not use chemical cleaners, scouring agents
or sharp objects for cleaning. These can damage
the product.
j Never immerse the product in water or other
liquids. This can damage the product.
Q
Disposal
The packaging is made entirely of
recyclable materials, which you may
dispose of at local recycling facilities.
Contact your local refuse disposal authority for more
details of how to dispose of your worn-out product.
The maximum capacity of
the kitchen scale 2 of
5 kg / 11 lb has been
exceeded.
The battery is empty.
The battery may be
empty.
Solution
j Remove the food from the kitchen scale 2.
j Switch the kitchen scale 2 off and then back
on again.
j Reduce the amount of food and weigh it in
several steps.
j
Replace the battery as described in the
“Replacing the battery” chapter.
j Replace the battery as described in the
“Replacing the battery” chapter.
j If it is still not possible to switch the kitchen scale 2
on, please contact a specialist.
accordance with Directive 2006 / 66 / EC. Please
return the batteries and / or the device to the avail- / or the device to the avail-or the device to the available collection points.
Environmental damage through
incorrect disposal of the batter-
Pb
ies!
Batteries may not be disposed of with the usual domestic waste. They may contain toxic heavy metals
and are subject to hazardous waste treatment rules
and regulations. The chemical symbols for heavy
metals are as follows: Cd = cadmium, Hg= mercury, Pb = lead. That is why you should dispose of
used batteries at a local collection point.
EMC
To help protect the environment, please
dispose of the product properly when it
has reached the end of its useful life and
not in the household waste. Information
on collection points and their opening
hours can be obtained from your local
authority.
Faulty or used batteries must be recycled in
34 GB/MT
79419 CB5 IM.indd 34 1/2/2013 3:33:08 PM
Page 35

Inhaltsverzeichnis
Einleitung
Bestimmungsgemäßer Gebrauch .......................................................................................................Seite 36
Teilebeschreibung ...............................................................................................................................Seite 36
Technische Daten ................................................................................................................................Seite 36
Funktionen............................................................................................................................................Seite 36
Lieferumfang ........................................................................................................................................ Seite 37
Sicherheitshinweise
Allgemeine Sicherheitshinweise .........................................................................................................Seite 37
Sicherheitshinweise zu Batterien ........................................................................................................ Seite 38
Inbetriebnahme
Batterie austauschen ........................................................................................................................... Seite 38
Umrechnungsschalter .........................................................................................................................Seite 39
Wiegen ................................................................................................................................................ Seite 39
Wiegen und hinzufügen ..................................................................................................................... Seite 40
Wiegegut teilweise entfernen .............................................................................................................Seite 40
Automatisches oder manuelles Ausschalten .....................................................................................Seite 40
Anzeige von Volumeneinheiten .......................................................................................................... Seite 41
Fehler beheben .......................................................................................................................... Seite 41
Reinigung ........................................................................................................................................ Seite 42
Entsorgung ..................................................................................................................................... Seite 42
35 DE/AT/CH
79419 CB5 IM.indd 35 1/2/2013 3:33:08 PM
Page 36

Einleitung
Küchenwaage
Q
Einleitung
Machen Sie sich vor dem ersten Gebrauch
mit dem Produkt vertraut. Lesen Sie hierzu
aufmerksam die nachfolgende Bedienungsanleitung und die Sicherheitshinweise. Benutzen Sie
das Produkt nur wie beschrieben und für die angegebenen Einsatzbereiche. Bewahren Sie diese Anleitung gut auf. Händigen Sie alle Unterlagen bei
Weitergabe des Produkts an Dritte ebenfalls mit aus.
Q
Bestimmungsgemäßer
Gebrauch
Dieses Gerät ist zum Wiegen und Zuwiegen haushaltsüblicher Mengen von Lebensmitteln geeignet.
Die digitale Küchenwaage dient zur Ermittlung des
Gewichts von nicht aggressiven, nicht ätzenden und
nicht schleifenden Flüssigkeiten oder Feststoffen.
Sie ist nicht dafür vorgesehen, Medikamente oder
unerlaubte Materialien zu wiegen. Eine andere
Verwendung als zuvor beschrieben oder eine Veränderung des Produktes ist nicht zulässig und führt
zur Beschädigung. Darüber hinaus können weitere
lebensgefährliche Gefahren und Verletzungen die
Folge sein. Das Produkt ist nur zur Eigenanwendung,
nicht für den medizinischen oder kommerziellen
Gebrauch vorgesehen.
Q
Teilebeschreibung
Waagschale
1
Küchenwaage
2
Modus-S chalter Gewicht / Milch / Wasser
3
(Weight Milk Water)
LC-Display
4
EIN- / AUS-Sc halter, Nulleinstellung (Tara)
5
(ON / OFF / ZERO)
Wiegeplattform
6
Spange am Batteriefachdeckel
7
Batteriefachdeckel
8
◂
Umrechnungsschalter Gramm / Pfund: Unze
9
Metallkontakt der Batterie – mit Sprungfedereffekt
10
Äußere Einbettung Batterie
11
Schwarzer Verschluss-Schalter für Batterie
12
Verlängerung der Abdeckung für das Batteriefach
13
2 Aussparungen an den Seiten des Batteriefachs
14
Batteriefach
15
Isolierungsstreifen Batterie
16
LCD-Anzeige:
„g“ = Anzeige Gewichtseinheit (Gramm)
17
„ml“ = Anzeige Volumeneinheit (Milliliter)
18
“fl’oz” = Anzeige Volumeneinheit
19
(Flüssigkeit: Unze)
„lb:oz“= Anzeige Gewichtseinheit (Pfund: Unze)
20
„–“ = Zeichen über Wasser = Maßeinheit für
21
Volumenmodus (ml oder fl’oz Wasser)
„–“ = Zeichen über Milch = Maßeinheit für
22
Volumenmodus (ml oder fl’oz Milch)
„–“ = Zeichen über Gewicht = Wiegemodus
23
(Gramm oder Pfund: Unze)
„0“ Piktogramm = Null Gewicht
24
(linke untere Ecke des LC-Displays)
„–“ = Negativwert
25
(linke Seite des LC-Displays)
„T“ = Gewicht Tara
26
(linke obere Ecke der LC-Displays)
Q
Technische Daten
Wiegebereich: 0,1 oz - 11 lb (Pf und) /
1 g - 5 kg (Kilogramm)
Einteilung: 0,1 oz / 1 g
Batterie: 1 x 3 V Lithium Batterie
(CR2032 Lithium-Knopfzellen /
im Lieferumfang enthalten)
Q
Funktionen
j Anzeige Volumeneinheiten für Wasser und Milch.
j Zwei verschiedene Systeme für Gewichtseinheiten
– Gramm (g) oder Pfund (lb:oz), umwandelbar.
36 DE/AT/CH
79419 CB5 IM.indd 36 1/2/2013 3:33:08 PM
Page 37

Einleitung / Sicherheitshinweise
j Warnung bei „niedrigem Batteriestand“ / „Über-
belastung“ durch spezielle LCD-PiktogrammAnzeige.
j Verwendung von hochpräzisen Dehnungsmes-
ser-Sensoren.
j Nullstellung oder Tara-Funktion möglich.
j Automatische Ausschaltfunktion zur Einsparung
von Energie, wenn das Gerät für länger als zwei
Minuten nicht benutzt wird.
j Manuell ausschalten – Drücken Sie den EIN- /
AUS- / Null-Schalter 5 und halten Sie diesen
für drei Sekunden gedrückt.
Q
Lieferumfang
Überprüfen Sie unmittelbar nach dem Auspacken
immer den Lieferumfang auf Vollständigkeit sowie
den einwandfreien Zustand des Gerätes.
1 x Digitale Küchenwaage
1 x Waagschale
1 x Lithium Batterie (vorinstalliert)
1 x Bedienungsanleitung
Q
Sicherheitshinweise
Allgemeine
Sicherheitshinweise
J
WARNUNG!
UND UNFALLGEFAHREN FÜR
KLEINKINDER UND KINDER!
Lassen Sie Kinder niemals unbeaufsichtigt mit
Verpackungsmaterial und Produkt. Andernfalls
besteht Lebensgefahr durch Erstickung. Halten
Sie Kinder stets vom Produkt fern. Das Produkt
ist kein Spielzeug.
J Kinder oder Personen, denen es an Wissen oder
Erfahrung im Umgang mit dem Gerät mangelt,
oder die in ihren körperlichen, sensorischen oder
LEBENS-
geistigen Fähigkeiten eingeschränkt sind, dürfen
das Gerät nicht ohne Aufsicht oder Anleitung
durch eine für ihre Sicherheit verantwortliche
Person benutzen. Kinder müssen beaufsichtigt
werden, damit sie nicht mit dem Gerät spielen.
J
VORSICHT! VERLETZUNGSGE-
FAHR! Belasten Sie die Waage
5 kg
nicht über 5 kg. Das Produkt könnte
beschädigt werden.
J Setzen Sie das Produkt
– keinen extremen Temperaturen,
– keinen starken Vibrationen,
– keinen starken mechanischen Beanspru-
chungen,
– keiner direkten Sonneneinstrahlung,
– keiner magnetischen Umgebung,
– keiner Feuchtigkeit aus.
Andernfalls droht Beschädigung des Produktes.
J Das Gerät enthält empfindliche elektronische
Bauteile. Daher ist es möglich, dass es durch
Funkübertragungsgeräte in unmittelbarer Nähe
gestört wird. Dies können z.B. Mobiltelefone,
Funksprechgeräte, CB-Funkgeräte, Funkfernsteuerungen / andere Fernbedienungen und
Mikrowellengeräte sein. Treten Fehlanzeigen
im Display auf, entfernen Sie solche Geräte
aus der Umgebung des Gerätes.
J Elektromagnetische Störungen / hochfrequente
Störaussendungen können zu Funktionsstörungen
führen. Entfernen Sie bei solchen Funktionsstörungen kurzzeitig die Batterie und setzen Sie
sie erneut ein. Gehen Sie hierzu gemäß dem
Kapitel „Batterie austauschen” vor.
J Kontrollieren Sie das Produkt vor der Inbetrieb-
nahme auf Beschädigungen. Nehmen Sie ein
beschädigtes Produkt nicht in Betrieb.
WARNUNG!
Öffnen Sie niemals das
Gehäuse des Produktes. Verletzungen und
Beschädigungen am Produkt können die Folge
sein. Lassen Sie Reparaturen nur von einer Elektrofachkraft durchführen.
J Lassen Sie keine unerfahrenen Personen das
Produkt nutzen. Gehen Sie sicher, dass jeder,
der das Produkt nutzt, die Bedienungsanleitung
gelesen hat und in der Lage ist, das Produkt
sicher zu bedienen.
37 DE/AT/CH
79419 CB5 IM.indd 37 1/2/2013 3:33:08 PM
Page 38

Sicherheitshinweise / Inbetriebnahme
J Platzieren Sie das Produkt auf einer festen,
waagerechten und flachen Unterlage.
J LEBENSMITTELECHT! Geschmacks-
und Geruchseigenschaften werden
durch dieses Produkt nicht beein-
trächtigt. (Waagschale)
J Nicht mikrowellengeeignet!
J Das Produkt ist nicht spülmaschinen-
geeignet.
Sicherheitshinweise
zu Batterien
WARNUNG!
gehören nicht in Kinderhände. Lassen Sie Batte-
rien nicht herumliegen. Es besteht die Gefahr, dass
diese von Kindern oder Haustieren verschluckt
werden. Suchen Sie im Falle eines Verschluckens
sofort einen Arzt auf.
J EXPLOSIONSGEFAHR! Laden
oder öffnen Sie sie nicht. Überhitzung, Brand-
gefahr oder Platzen können die Folge sein.
Werfen Sie Batterien niemals ins Feuer oder
Wasser. Die Batterien können explodieren.
J Vermeiden Sie extreme Bedingungen und
Temperaturen, die auf Batterien einwirken
können, z.B. auf Heizkörpern. Andernfalls
besteht erhöhte Auslaufgefahr.
J Prüfen Sie die Batterie regelmäßig auf
Undichtigkeit.
J Ausgelaufene oder beschädigte Bat-
Sie deshalb in diesem Fall unbedingt geeignete
Schutzhandschuhe!
J Vermeiden Sie Kontakt mit Haut, Augen und
Schleimhäuten, falls Flüssigkeit aus der Batterie
ausgetreten ist. Spülen Sie bei Kontakt mit
Batteriesäure die betroffenen Stellen sofort mit
reichlich klarem Wasser und suchen Sie umgehend einen Arzt auf.
LEBENSGEFAHR! Batterien
Sie Batterien niemals wieder auf,
schließen Sie sie nicht kurz und /
terien können bei Berührung mit der
Haut Verätzungen verursachen; tragen
J Reinigen Sie bei leichten Verschmutzungen
Batterie- und Produktkontakte vor dem Einlegen
mit einem trockenen, fusselfreien Tuch.
J Entfernen Sie bei längerer Nichtverwendung
die Batterie aus dem Produkt.
J Achten Sie beim Einlegen auf die richtige
Polarität! Diese wird im Batteriefach angezeigt.
Andernfalls kann die Batterie explodieren.
J Legen Sie die Batterie vorsichtig ein. Andern-
falls kann das Produkt beschädigt werden.
J Bitte werfen Sie gebrauchte Batterien nicht in
den Hausmüll, sondern entsorgen Sie diese an
den für Sondermüll vorgesehenen Sammelstellen.
Q
Inbetriebnahme
1. Öffnen Sie das Batteriefach 15 unter der Waage,
indem Sie die Spange 7 des Batteriefachdeckels 8 in Richtung Batteriefach bewegen
und ihn nach oben abnehmen.
2. Entfernen Sie den Isolierungsstreifen 16, der unter
dem Metallkontakt für die Batterie befestigt ist.
3. Setzen Sie den Batteriefachdeckel 8 wieder
auf das Batteriefach 15. Stellen Sie sicher, dass
die beiden Verlängerungen 13 an dem Batteriefach 8 die beiden Aussparungen 14 an den
Seiten berühren, wenn dieses geschlossen wird.
Drücken Sie den Batteriefachdeckel 8 fest auf
das Batteriefach 15, bis dieser hörbar einras- bis dieser hörbar einrastet.
12
16 11
Q
Batterie austauschen
1. Schalten Sie die Waage aus. Drücken und
halten Sie den EIN- / AUS-Schalter 5 3 Sekunden lang.
2. Öffnen Sie das Batteriefach 15 wie zuvor
beschrieben.
38 DE/AT/CH
79419 CB5 IM.indd 38 1/2/2013 3:33:09 PM
Page 39

Inbetriebnahme
3. Entfernen Sie die verbrauchte Batterie aus der
Einbettung 11, indem Sie den schwarzen Verschluss-Schalter 12 drücken. Die Batterie löst
sich automatisch aus der Einbettung 11. Stellen
Sie sicher, dass Sie nicht zu großen Druck auf
den Kontakt 10 ausüben. Dieser kann sonst beschädigt werden, weil das Anheben der Batterie
zu einer Verformung führt. Entfernen Sie die
Batterie aus der äußeren Einbettung 11.
4. Legen Sie die neue Batterie in die äußere Einbettung 11. Achten Sie auf die richtige Polarität.
Die „+“-Seite muss dabei nach oben zeigen. Der
Metallkontakt 10 drückt die Batterie in die Position.
5. Schließen Sie das Batteriefach 15 wie oben
beschrieben.
Q
Umrechnungsschalter
j Ein Umrechnungsschalter 9 für die Gewichts-
einheiten befindet sich unten an der Waage.
Mit einem einfachen Knopfdruck wechselt die
Maßeinheit zwischen metrischen Maßen (g, ml)
zu imperialen Maßen (lb:oz, fl’oz).
Hinweis:
– Wenn die Gewichtseinheit als metrisches Maß
bestimmt ist (g), wird auch das Volumenmaß
automatisch als ml angezeigt.
– Wenn die Gewichtseinheit als imperiales Maß
bestimmt ist (lb:oz), wird auch das Volumenmaß
automatisch als fl’oz angezeigt.
– Die Standard-Einheit für Gewicht ist g (Gramm).
Q
Wiegen
Hinweis: Die Küchenwaage 2 startet immer auf
0 g / 0:0.0 lb:oz 17 / 20, wenn der EIN- / AUS- /
Null-Schalter 5 gedrückt wird. Platzieren Sie vor
dem Einschalten die Waagschale 1 auf der Küchenwaage 2, wird nach dem Einschalten ebenfalls
0 g / 0:0.0 lb:oz 17 / 20 angezeigt.
Platzieren Sie die Waagschale 1 aber erst nach dem
Einschalten auf der Küchenwaage 2, so zeigt sie
das Gewicht der Waagschale 1 an. Drücken Sie
1 x den EIN- / AUS- / Null- Schalter 5, um die Anzeige
wieder auf 0 g / 0:0.0 lb:oz 17 / 20, zurückzusetzen.
j Stellen Sie die Küchenwaage auf eine feste
und ebene Oberfläche.
j Drücken Sie den EIN- / AUS- / Null-Schalter
5
, um die Küchenwaage 2 einzuschalten.
5
j Warten Sie, bis das LC-Display 4 anhält und
sich auf 0 g 17, 0:0,0 Unzen 20 oder 0 ml 18 oder
0,0 fl’oz 19 einpendelt, je
nachdem in welchem Modus sich die Waage befand, bevor sie ausgeschaltet wurde.
j Drücken Sie den Modus-
Schalter 3, um die Waage
auf den normalen Wiegemodus umzustellen 23.
j Falls notwendig, wählen
Sie die Gewichtseinheit im
Voraus aus, indem Sie den g / lb:oz Umrechnungsschalter 9 am Boden der Waage drücken, bevor Sie mit dem Wiegen beginnen.
j Wenn Sie die Gewichtseinheit ausgewählt haben,
drücken und halten Sie den EIN- / AUS- / NullSchalter
3 Sekunden lang, um die Küchen-, um die Küchen-
5
waage 2 auszuschalten.
j Stellen Sie die Küchenwaage 2 auf eine harte,
flache Tischfläche. Stellen Sie die Waagschale
auf die Wiegeplattform 6.
1
j Drücken Sie den EIN- / AUS- / Null-Schalter
5
, um die Waage einzuschalten und im normalen Wiegemodus zu betätigen.
j Warten Sie, bis alle Segmente des LC-Displays
aufleuchten und die Waage sich auf 0 g 17,
4
0:0,0 Unzen 20 einpendelt.
j Füllen Sie das Wiegegut in die Waagschale 1
um den Wiegevorgang zu starten. Das LC-Display 4 zeigt das Gewicht des Wiegeguts in
der gewählten Gewichtseinheit an.
Hinweis: Die Waage funktioniert ohne die
Waagschale 1 auf die gleiche Weise. Folgen und
wiederholen Sie einfach die zuvor genannten Schritte
ohne die Waagschale 1.
39 DE/AT/CH
79419 CB5 IM.indd 39 1/2/2013 3:33:09 PM
Page 40

Inbetriebnahme
Q
Wiegen und hinzufügen
Die Küchenwaage 2 erlaubt ein aufeinander folgendes Abwiegen, ohne das Wiegegut aus der Waagschale 1 zu entfernen.
j Stellen Sie die Waagschale 1 auf die Wiege-
plattform 6.
j Drücken Sie den EIN- / AUS- / Null-Schalter
um die Waage 2 einzuschalten.
,
j Warten Sie, bis das LC-Display 4 anhält und
sich auf 0 g 17, 0:0,0 Unzen 20 oder 0 ml 18
oder 0,0 fl’oz 19 einpendelt, je nachdem in
welchem Modus sich die Waage befand, bevor
sie ausgeschaltet wurde.
j Drücken Sie den Modus-Schalter 3, um die
Waage in den Gewichts-Modus 23 zu versetzen
(Voreinstellung entweder g oder lb:oz).
j Befüllen Sie die Waagschale
um den Wiege-
1
,
vorgang zu starten. Das LC-Display 4 zeigt
das Gewicht des ersten, in der Schüssel platzierten Wiegeguts an.
j Drücken Sie den EIN- / AUS- / Null-Schalter
um das LC-Display 4 auf Null zurückzusetzen.
,
j Sie können weiteres Wiegegut auf die gleiche
Art und Weise abwiegen, indem Sie den EIN- /
AUS- / Null-Schalter 5 nach jedem neuen
Wiegegut zurücksetzen.
Hinweis zur Null- oder Tara-Einstellung:
a) Wenn das Gesamtgewicht
aller bereits auf die Waage
gestellten Produkte einschließlich der Waagschale weniger
als 200 Gramm beträgt, zeigt
das LC-Display 4 ein Piktogramm mit einer Null 24 in
der unteren linken Ecke an.
Dies bedeutet, dass die Waage auf Null zurückgesetzt wurde = die verbleibende Gewichtskapazität der Waage
entspricht weiterhin 5000 bis
5200 Gramm.
b) Wenn das Gesamtgewicht
aller bereits auf die Waage
gestellten Produkte einschließ-
5
5
lich der Schale mehr als 200 Gramm beträgt,
zeigt das LC-Display 4 stattdessen ein Piktogramm mit einem T 26 in der oberen linken
Ecke an. Dies bedeutet, dass sich die Waage
im Tara-Modus befindet = die verbleibende
Gewichtskapazität der Waage entspricht
5000 Gramm minus des Gewichts, das Sie
bereits auf die Waage gelegt haben.
Q
Wiegegut teilweise entfernen
j Stellen Sie die Waagschale 1 auf die Wiege-
plattform 6.
Hinweis: Die Waagschale darf nicht mehr
als 200 g wiegen.
j Drücken Sie den EIN- / AUS- / Null-Schalter
um die Waage 2 einzuschalten.
,
5
j Warten Sie, bis das LC-Display 4 anhält und
sich auf 0 g 17, 0:0,0 Unzen 20 oder 0 ml 18
oder 0,0 fl’oz 19 einpendelt, je nachdem in
welchem Modus sich die Waage befand, bevor
sie ausgeschaltet wurde.
j Drücken Sie den Modus-Schalter 3, um den
Gewichts-Modus 23 einzustellen (Voreinstellung
entweder g oder lb:oz).
j Befüllen Sie die Waagschale
um den Wiege-
1
,
vorgang zu starten. Das LC-Display 4 zeigt
das Gewicht des ersten, in der Schüssel platzierten Wiegeguts an.
j Drücken Sie den EIN- / AUS- / Null-Schalter
um das LC-Display 4 auf Null zurückzusetzen.
,
5
j Entnehmen Sie nun die gewünschte Menge an
Wiegegut aus der Waageschale 1. Das LCDisplay 4 zeigt das entnommene Gewicht
des Wiegeguts als Negativ-Wert an.
Q
Automatisches oder
manuelles Ausschalten
j Die Waage schaltet sich automatisch aus, wenn
sie länger als 2 Minuten nicht benutzt wird.
j Drücken Sie den EIN- / AUS- / Null-Schalter 5
länger als 3 Sekunden, um die Waage auszuschalten.
40 DE/AT/CH
79419 CB5 IM.indd 40 1/2/2013 3:33:10 PM
Page 41

Q
Anzeige von Volumeneinheiten
j Stellen Sie die Küchen-
waage auf eine feste und
ebene Oberfläche.
j Drücken Sie den EIN- /
AUS- / Null-Schalter
5
,
um die Waage 2 einzuschalten.
j Warten Sie, bis das LC-
Display 4 anhält und sich
auf 0 g 17, 0:0,0 Unzen
oder 0 ml 18 oder
20
0,0 fl’oz 19 einpendelt, je
nachdem in welchem
Modus sich die Waage
befand, bevor sie ausgeschaltet wurde.
j Drücken Sie den Modus-
Schalter 3, bis Milch 22
oder Wasser 21 als Volumenmodus in ml oder fl’oz angezeigt wird.
Q
Fehler beheben
Inbetriebnahme / Fehler beheben
j Stellen Sie einen Behälter für Flüssigkeiten oder
die Waagschale 1 auf die Wiegeplattform 6.
j Drücken Sie den EIN- / AUS- / Null-Schalter
, um das LC-Display 4 auf Null zu setzen
(entweder 0 ml oder 0,0 fl’oz). Füllen Sie Milch
oder Wasser (welches Sie vorher ausgewählt
haben) in den Behälter.
j Das LC-Display 4 zeigt nun automatisch das
Volumen der in den Behälter gefüllten Flüssigkeit
an, je nach Voreinstellung entweder in ml oder
fl’oz.
j Anschließend drücken Sie den Modus-Schalter
, um die Waage wieder in den Wiegemodus
3
zu setzen und das entsprechende Gewicht der
Flüssigkeit abzulesen.
5
Fehler Ursache Lösung
Das LC-Display 4
zeigt „Err“ an und
bleibt so stehen.
Die Maximalbelastung
von 5 kg / 11 lb der
Küchenwaage 2 ist
überschritten.
j Entfernen Sie das Wiegegut von der
Küchenwaage 2.
j Schalten Sie die Küchenwaage 2 aus und
anschließend wieder ein.
j Reduzieren Sie das Wiegegut und wiegen Sie
es in mehreren Schritten.
Das LC-Display 4
zeigt „Lo“ an.
Die Küchenwaage
lässt sich nicht
2
einschalten.
Die Batterie ist verbraucht.
Die Batterie ist ggf.
verbraucht.
j Tauschen Sie die Batterie gem. dem Kapitel
„Batterie austauschen“ aus.
j Tauschen Sie die Batterie gem. dem Kapitel
„Batterie austauschen“ aus.
j Lässt sich die Küchenwaage 2 noch immer
nicht einschalten, setzen Sie sich bitte mit einem
Fachmann in Verbindung.
41 DE/AT/CH
79419 CB5 IM.indd 41 1/2/2013 3:33:10 PM
Page 42

Reinigung / Entsorgung
Q
Reinigung
j Reinigen Sie das Produkt mit einem leicht
angefeuchteten, fusselfreien Tuch. Bei stärkerer
Verschmutzung können Sie das Tuch auch mit
einer leichten Seifenlauge befeuchten.
j Verwenden Sie zur Reinigung keine chemischen
Reiniger, Scheuermittel oder scharfe Gegenstände. Andernfalls kann das Produkt beschädigt
werden.
j Tauchen Sie das Produkt niemals in Wasser
oder in andere Flüssigkeiten. Andernfalls kann
das Produkt beschädigt werden.
Q
Entsorgung
Die Verpackung besteht aus umwelt-Die Verpackung besteht aus umwelt-
freundlichen Materialien, die Sie über
die örtlichen Recyclingstellen entsorgen
können.
Möglichkeiten zur Entsorgung des ausgedienten
Produkts erfahren Sie bei Ihrer Gemeinde oder
Stadtverwaltung.
Pb = Blei. Geben Sie deshalb verbrauchte Batterien
bei einer kommunalen Sammelstelle ab.
EMC
Werfen Sie Ihr Produkt, wenn es ausge-
dient hat, im Interesse des Umweltschutzes
nicht in den Hausmüll, sondern führen Sie
es einer fachgerechten Entsorgung zu.
Über Sammelstellen und deren Öffnungszeiten können Sie sich bei Ihrer zuständigen Verwaltung informieren.
Defekte oder verbrauchte Batterien müssen gemäß
Richtlinie 2006 / 66 / EC recycelt werden. Geben
Sie Batterien und / oder das Gerät über die angebotenen Sammeleinrichtungen zurück.
Umweltschäden durch falsche
Entsorgung der Batterien!
Pb
Batterien dürfen nicht über den Hausmüll entsorgt
werden. Sie können giftige Schwermetalle enthalten
und unterliegen der Sondermüllbehandlung. Die
chemischen Symbole der Schwermetalle sind wie
folgt: Cd = Cadmium, Hg= Quecksilber,
42 DE/AT/CH
79419 CB5 IM.indd 42 1/2/2013 3:33:10 PM
Page 43

IAN 79419
OWIM GmbH & Co. KG
Stiftsbergstraße 1
D-74167 Neckarsulm
Model No: Z29852A / Z29852B
Version: 02/2013
5
79419 CB5 IM.indd 43 1/2/2013 3:33:10 PM
 Loading...