

Page 1
&DQG\IORVV0DFKLQH6=:$
&DQG\IORVV0DFKLQH
2SHUDWLQJLQVWUXFWLRQV
53B=XFNHUZDWWHPDVFKLQHB&RYHUB/%LQGG
Page 2
RP66929 ZuckerWG LB6 Seite 2 Freitag, 10. Juni 2011 2:24 14
Be sure to note the fold-out page ........
SZW 400 A1_11_V1.2_GB
Page 3
RP66929 ZuckerWG LB6 Seite 1 Freitag, 10. Juni 2011 2:24 14
2
1
3
4
5
6
7
8
9
10
11
Page 4
RP66929 ZuckerWG LB6 Seite 2 Freitag, 10. Juni 2011 2:24 14
Page 5
4
5
6
7
8
9
10
1
2
3
11
RP66929 ZuckerWG LB6 Seite 3 Freitag, 10. Juni 2011 2:24 14
Contents
1. Part names (see foldout) . . . . . . . . . . . . . . . . . . . . . . . . . . . . . . . . . . . . . . . . . . . . . . . . 3
2. Device description . . . . . . . . . . . . . . . . . . . . . . . . . . . . . . . . . . . . . . . . . . . . . . . . . . . . . 3
3. Safety information. . . . . . . . . . . . . . . . . . . . . . . . . . . . . . . . . . . . . . . . . . . . . . . . . . . . . 4
4. Unpacking and setting up . . . . . . . . . . . . . . . . . . . . . . . . . . . . . . . . . . . . . . . . . . . . . . . . 6
5. Operation . . . . . . . . . . . . . . . . . . . . . . . . . . . . . . . . . . . . . . . . . . . . . . . . . . . . . . . . . . . 7
6. Cleaning . . . . . . . . . . . . . . . . . . . . . . . . . . . . . . . . . . . . . . . . . . . . . . . . . . . . . . . . . . . . 8
7. Faults and remedies . . . . . . . . . . . . . . . . . . . . . . . . . . . . . . . . . . . . . . . . . . . . . . . . . . . . 9
8. Disposal . . . . . . . . . . . . . . . . . . . . . . . . . . . . . . . . . . . . . . . . . . . . . . . . . . . . . . . . . . . 10
9. Technical data . . . . . . . . . . . . . . . . . . . . . . . . . . . . . . . . . . . . . . . . . . . . . . . . . . . . . . . 10
10. Warranty . . . . . . . . . . . . . . . . . . . . . . . . . . . . . . . . . . . . . . . . . . . . . . . . . . . . . . . . . . 10
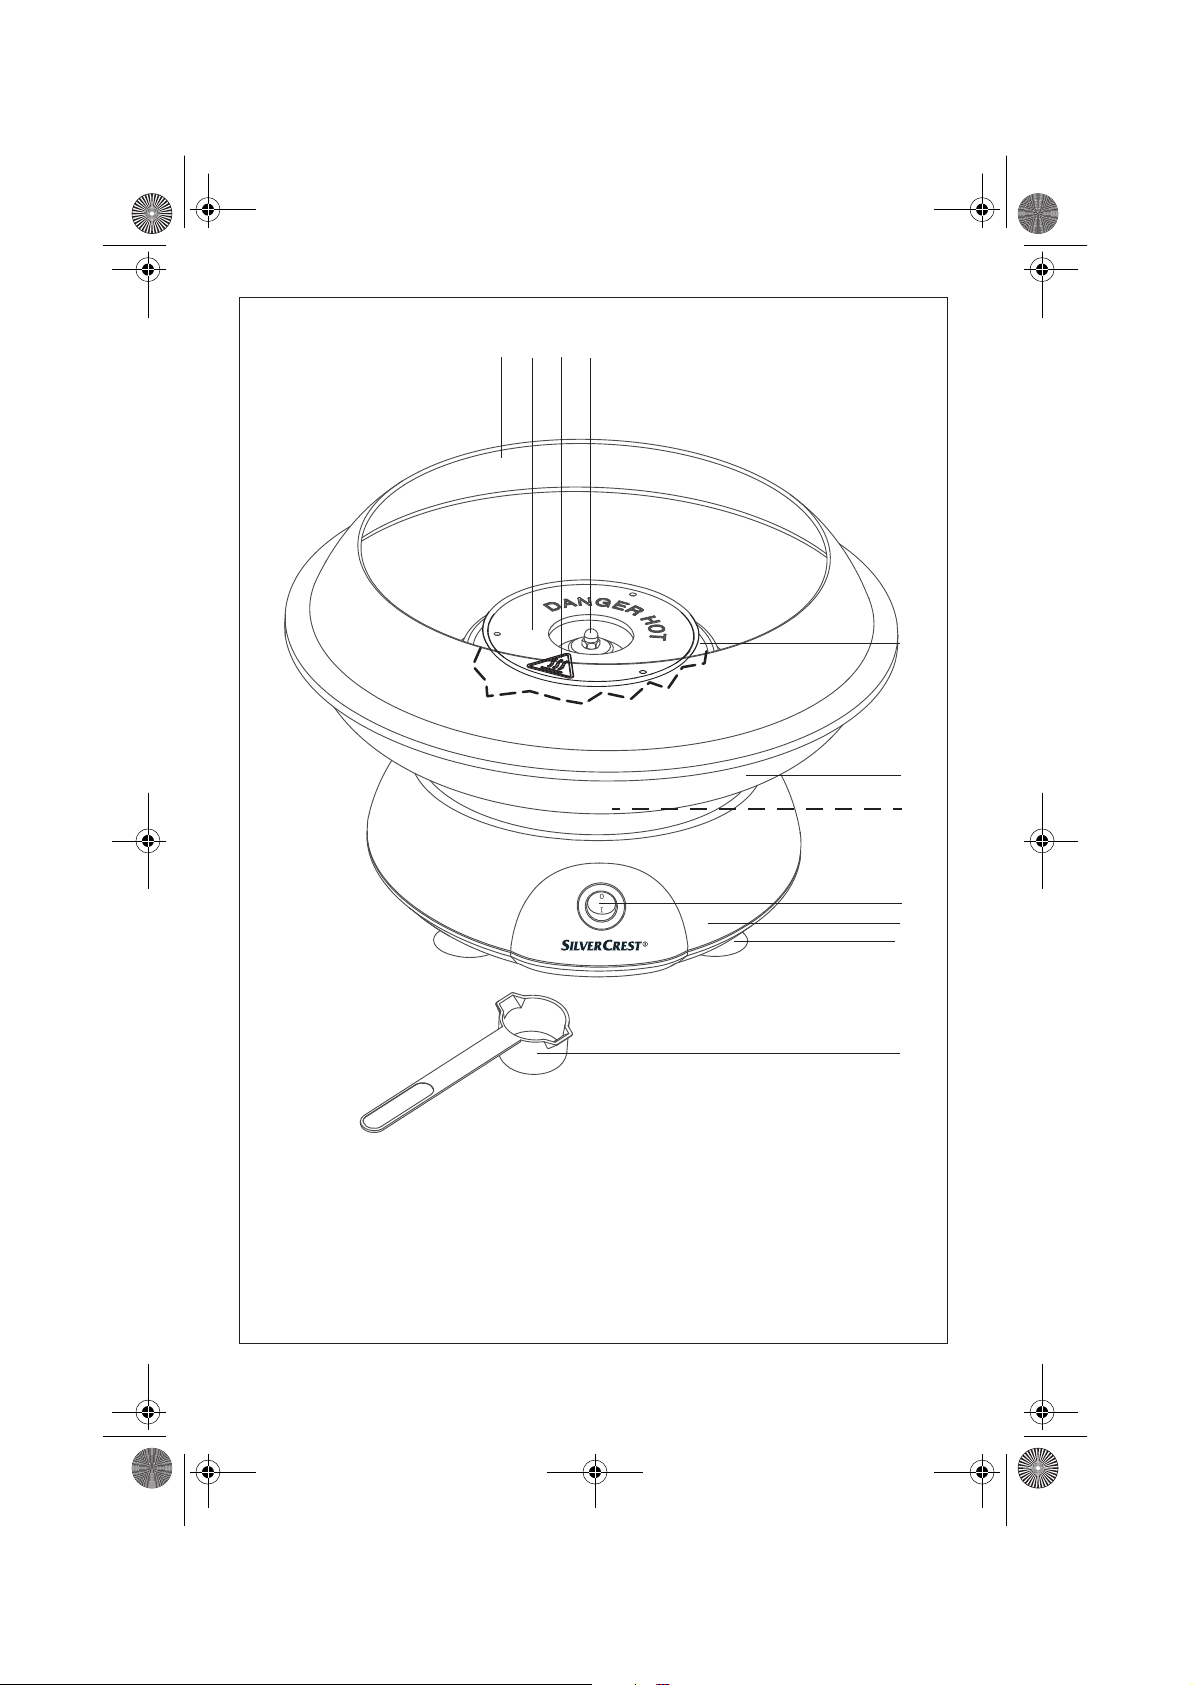
1. Part names
Splash guard
Carameliser
Warning symbol “Warning, hot
surfaces”
Drive shaft
Heating elements
2. Device description
2.1 Intended purpose
This SilverCrest SZW 400 A1 candyfloss
machine is for making candyfloss.
The candyfloss is made from fine sugar.
This appliance should only be used in dry
rooms. It must not be used in the open air or
in humid rooms.
This product is intended for use in private
households and is not suitable for
commercial purposes.
(see foldout)
Candyfloss bowl
Locks
On/Off switch
Bottom section
Feet
Measuring spoon
2.2 Scope of supply
• 1 Candyfloss machine, comprising:
– 1 Bottom section
– 1 Candyfloss bowl
– 1 Carameliser
– 1 Splash guard
– 1 Measuring spoon
– 10 Bamboo sticks
• 1 Set of user instructions
2.3 Symbols on the appliance
The adjacent symbol 3 warns
against touching hot surfaces.
SZW 400 A1
3
Page 6

RP66929 ZuckerWG LB6 Seite 4 Freitag, 10. Juni 2011 2:24 14
3. Safety information
3.1 Explanation of terms
The following keywords are used in these
user instructions:
Warning!
High risk: ignoring this warning
could result in a risk to life and
limb.
Caution!
Medium risk: ignoring this warning may
result in damage.
Note:
Low risk: points to be noted when handling
the appliance.
3.2 General information
• Please read these user instructions
carefully before use. They are a
constituent part of the appliance and
must be kept to hand at all times.
• Use the appliance only for the purpose
described (see “2.1 Intended purpose”
on page 3).
• Check that the required mains voltage
(see type plate on the appliance)
complies with your mains voltage, as an
incorrect mains voltage may damage the
appliance.
• This appliance is not intended for use by
persons (including children) with
reduced physical, sensory or mental
capabilities or lack of experience and/
or lack of knowledge, unless either
supervised by a person responsible for
their safety or given instructions on the
use of the appliance by such a person.
Children should be supervised to ensure
they do not play with the appliance.
• Please note that any claim under the
warranty or for liability will be invalid if
accessories are used that are not
recommended in these user instructions,
or if original spare parts are not used for
repairs. This also applies to repairs
undertaken by unqualified persons. The
contact data can be found in
“10. Warranty” on page 10.
• If the appliance should develop a fault
during the warranty period, it may only
be repaired by our Service Centre.
Otherwise all claims under warranty are
null and void.
3.3 Protection against electric shock
Warning! The following safety
information is intended to protect
you against electric shock.
• Only connect the appliance to a mains
socket with an earthing contact as this
provides protection against electric
shock.
• The appliance must not under any
circumstances be used if it is damaged.
Have the device repaired in such cases
by a qualified specialist. The contact
data can be found in “10. Warranty” on
page 10.
• If the mains cable for this appliance is
damaged, it must be replaced by the
manufacturer or a person with similar
qualifications in order to avoid a
hazard.
• Water or other liquids must never be
allowed to enter the bottom section 9 .
For this reason:
– never use it outdoors
– never immerse the bottom section 9 in
water
4
Page 7

RP66929 ZuckerWG LB6 Seite 5 Freitag, 10. Juni 2011 2:24 14
– never place containers filled with
liquid, such as drinking glasses, vases
etc. on the appliance
– never use in very humid environments
– never use in the immediate vicinity of
a kitchen sink, bath, shower or a
swimming pool, as water may splash
into the appliance.
If liquid should enter the appliance,
unplug the mains plug immediately and
have the appliance repaired by a
qualified technician. The contact data
can be found in “10. Warranty” on
page 10.
• Never try to insert your fingers or any
objects into the inside of the bottom
section 9 while it is connected to the
mains or when the appliance is still hot.
• Never touch the appliance, the mains
cable or the mains plug with wet hands.
• Always unplug it by pulling out the plug,
never pull on the cable itself.
• Ensure that the mains cable is not
kinked, twisted or crushed.
• Keep the mains cable away from hot
surfaces, such as the top of a stove.
• If you are not going to use the appliance
for a while, remove the plug from the
wall socket. Only then is the appliance
completely free of current.
• Avoid using extension cables. These may
only be used under very specific
conditions:
– the extension cable must be able to
handle the amount of current drawn
by the appliance,
– the extension cable must not be
"suspended". Keep children away
from it and ensure that it does not
present a trip hazard,
– under no circumstances use a
damaged extension cable,
– do not connect any other appliances
to the mains socket, since it could
cause an overload (do not use multiple
sockets of any kind).
• The device must not be operated with an
external timer or separate remote control
system such as a remote control socket.
3.4 Protection against injury
Warning! To avoid injury, please
observe the following information.
• Ensure that it is not possible for anyone
to trip over or to get caught up in or step
on the mains cable.
• The carameliser 2 becomes very hot and
rotates very quickly. You should
therefore never touch the carameliser 2
with parts of your body or with other
items while the machine is working or
cooling down.
• Switch off and unplug the appliance
when changing accessories and before
approaching parts that move when the
appliance is operating.
3.5 Protection against the danger of
fire
Warning! As the appliance works
at high temperatures, please
observe the following safety
information to prevent fire.
• Take great care that no sugar enters the
bottom section 9 . Sugar can be
flammable and damage the appliance.
Should this happen at some stage
nonetheless, proceed as described in
“7. Faults and remedies” on page 9.
• To avoid overheating, the appliance
must never be covered. Always check
that air can freely enter and escape.
SZW 400 A1
5
Page 8

RP66929 ZuckerWG LB6 Seite 6 Freitag, 10. Juni 2011 2:24 14
9
Heat might otherwise build up inside the
appliance.
• Never leave the appliance running when
it is unattended. Damage is almost
always indicated by the presence of a
strong odour. If you notice any such
odour, unplug the mains plug
immediately and have the appliance
inspected. The contact data can be found
in “10. Warranty” on page 10.
3.6 For the safety of your child
Warning! Children are often
unaware of danger and are
injured as a result. Please note
therefore:
• Only allow children to use this appliance
under the supervision of an adult.
• Ensure the appliance is always kept out
of the reach of children.
• Ensure that children cannot pull the
appliance down onto themselves with
the mains cable.
4. Unpacking and setting up
• Ensure that the packing foil does not
become a deadly trap for a child.
Packing foils are not toys.
3.7 Material damage
Caution! To avoid material damage, please
observe the following conditions.
• Place the appliance on a level, dry, nonslip surface only, so that the appliance
can neither topple over nor slide down.
• Sugar must only be added when the
carameliser 2 is stationary. If sugar is
added while the carameliser 2 is
rotating, it could be spun outwards and
could possibly enter the bottom section
.
• Should some sugar fall nonetheless into
the bottom section 9 , proceed as
described in “7. Faults and remedies”
on page 9.
Note: As the appliance and heating
elements 5 are supplied with a thin film of
grease, there might be a small amount of
smoke and odour the first time the appliance
is used. This is not harmful and will stop
after a short while. Please ensure meanwhile
that there is sufficient ventilation.
1. Remove the individual parts from the
packaging.
2. Check that all the individual parts are
complete (see “2.2 Scope of supply” on
page 3) and there are no signs of
damage.
3. Clean the appliance thoroughly before
using it for the first time (see
“6. Cleaning” on page 8).
6
4. Place the candyfloss bowl 6 on the
bottom section 9 .
5. Turn the candyfloss bowl 6 anticlockwise
so that the candyfloss bowl engages in
the locks 7 .
7
6. Position the carameliser 2 on the drive
shaft 4 .
Page 9

RP66929 ZuckerWG LB6 Seite 7 Freitag, 10. Juni 2011 2:24 14
Note: There is a cross pin located in the
drive shaft 4 . This cross pin must grip
into the lower indentation on the
carameliser 2 .
4
5. Operation
5.1 Making candyfloss
Warning! Only connect the
appliance to a mains socket with
an earthing contact as this
provides protection against electric
shock.
1. Insert the plug into a suitable mains
socket with an earthing contact (see
“9. Technical data” on page 10).
2. Switch on the candyfloss machine using
the On/Off switch 8 .
3. Allow the candyfloss machine to run for
about 2 minutes to pre-heat.
4. Switch the candyfloss machine off again
using the On/Off switch 8 .
5. Wait until the carameliser 2 is stationary.
6. Fill the measuring spoon 11 with sugar.
7. Pour the sugar into the
middle of the
carameliser 2 .
7. Position the splash guard 1 onto the
candyfloss bowl 6 .
8. Place the appliance on a level, dry, nonslip surface, so that the appliance can
neither topple over nor slide down.
Note: Do not overfill the carameliser 2
as otherwise the excess sugar will be
spun outwards.
8. Switch the candyfloss machine on again
using the On/Off switch 8 .
After a short time the first candyfloss
strands will form at the edge of the
candyfloss bowl 6 .
9. Guide a bamboo stick
(e.g. a kebab stick)
clockwise around the
carameliser 2 , turning it in
your fingers as you do so.
10. As soon as the first
sugar strands
adhere to the bamboo stick:
– lift the bamboo stick up and out of the
candyfloss bowl 6 ,
– hold it horizontally over the
appliance,
– continue turning the bamboo stick
continuously,
SZW 400 A1
7
Page 10

RP66929 ZuckerWG LB6 Seite 8 Freitag, 10. Juni 2011 2:24 14
– move the wooden stick slowly to and
fro to catch all the sugar strands.
When no more sugar strands form, the
sugar has been used up.
Note: Practice makes perfect! The results
will improve with practice. The more
evenly you turn the bamboo stick
between your fingers, the more even the
results will be.
11.To make more candyfloss, start again
from step 4.
Note: If you wish to colour your candy floss,
use special colouring powder available from
specialist shops or online.
6. Cleaning
5.2 Switching off the appliance
1. Switch the candyfloss machine off using
the On/Off switch 8 .
2. Wait until the carameliser 2 is stationary.
3. Wait for the appliance to cool down.
4. Take off the candyfloss bowl 6 and
remove the ring of sugar that forms on
the side of the candyfloss bowl 6 .
5. Clean the appliance carefully after use
(see “6. Cleaning” on page 8).
5.3 Thermal cut-out
The appliance has a thermal cut-out. If the
temperature rises too high and there is a risk
of damage, the appliance switches off
automatically.
In this case unplug the mains plug
immediately and have the appliance
inspected. The contact data can be found in
“10. Warranty” on page 10.
Warning! To avoid the danger of an
electric shock, injury or damage:
– Remove the plug from the mains
socket before starting to clean
the appliance.
– Allow the appliance to cool
down before cleaning.
– Never immerse the bottom
section 9 in water, and protect it
from splashes and drops of
water.
Caution! Never use abrasive, corrosive or
caustic cleaning materials. These could
damage the appliance.
8
6.1 Dismantling the appliance
1. Remove the plug from the mains socket.
2. Take off the splash guard 1.
3. Pull the carameliser 2 upwards and off.
4. Turn the candyfloss bowl 6 clockwise
and lift it up and off.
6.2 Cleaning the bottom section
1. Clean the bottom section 9 with a damp
cloth. You could also use a little washingup liquid.
2. Wipe off with clean water.
3. Do not use the machine again until it is
fully dry.
Page 11

RP66929 ZuckerWG LB6 Seite 9 Freitag, 10. Juni 2011 2:24 14
6.3 Cleaning the carameliser
Note: The carameliser 2 must be cleaned
carefully after each use. If the carameliser 2
is dirty it will not work properly.
1. Clean the carameliser 2 by hand in
warm water.
Caution! The carameliser 2 is not
dishwasher safe.
2. For stubborn encrustations leave it to
soak in warm water for about
20 30 minutes. You could add a few
drops of mild washing-up liquid.
7. Faults and remedies
Water has entered the bottom section 9:
1. Remove the plug from the mains socket
immediately.
2. Turn the bottom section 9 over and leave
it to drain.
3. Have the appliance repaired by a
qualified specialist. The service address
can be found in “10. Warranty” on
page 10.
Sugar has entered the bottom section 9:
1. Remove the plug from the mains socket
immediately.
2. Allow the appliance to cool down.
3. Remove the carameliser 2.
4. Turn the bottom section 9 over and let
the sugar trickle out. Shake the
appliance gently if required.
5. If necessary, remove any sugar that has
burned onto the heating elements 5. Do
this carefully.
Note: Water will accumulate in the
edges of the carameliser 2 during this
process. This must be removed before
the appliance can be used again.
3. Carefully shake out any water from the
carameliser 2.
4. Let the carameliser 2 dry thoroughly
before using the appliance again.
6.4 Cleaning accessories
Clean the splash guard 1, candyfloss bowl 6
and measuring spoon 11 by hand in the
sink.
The splash guard 1 and the candyfloss bowl
6 can also be cleaned in a dishwasher.
Caution! Never use abrasive, corrosive
or caustic cleaning materials or metal
objects to do this. These could damage
the heating elements 5.
The carameliser 2 is not turning:
Check that the carameliser 2 has been
inserted correctly (see “4. Unpacking and
setting up” on page 6).
No sugar strands are forming:
Clean the carameliser 2 thoroughly; it might
be jammed (see “6.3 Cleaning the
carameliser” on page 9).
The appliance has suddenly stopped
working:
Possibly the appliance has been in
operation for too long (see “2.1 Intended
purpose” on page 3) and the thermal cutout has triggered.
In this case, allow the appliance to cool
down completely, clean it (see “5.3 Thermal
cut-out” on page 8) and then use it again.
SZW 400 A1 9
Page 12

RP66929 ZuckerWG LB6 Seite 10 Freitag, 10. Juni 2011 2:24 14
8. Disposal
8.1 Appliance
The symbol with the crossedout rubbish bin on wheels
means that within the European
Union, the product must be
disposed of to a sorted rubbish
collection. This applies to the
product and all accessories which are
marked with this symbol. Marked products
must not be disposed of via the regular
domestic waste but must be handed in to a
9. Technical data
Power supply: 220 - 240 V~/50 Hz
Output: 400 watt
Protection class: I
10. Warranty
The warranty for your appliance is valid for
3 years from the date of purchase. The warranty does not cover damage resulting from
improper connection, the use of another
manufacturer’s parts, normal wear and tear,
the use of force, improper use, or attempts to
carry out repairs yourself. The appliance
has been manufactured in accordance with
strict quality guidelines and checked before
leaving the factory.
Nonetheless, should operational faults
occur, please contact the Service Centre
first.
Please do not send in any appliance before
contacting our Service Centre.
recycling centre for electrical or electronic
devices. Recycling helps to reduce the use of
raw materials and to relieve the
environment. It is therefore imperative that
you follow the disposal regulations
applicable in your country.
8.2 Packaging
If you wish to discard the packaging, please
observe the applicable environmental
regulations in your country.
To enable us to process your request quickly,
please have ready your proof of purchase
and the product number (for this appliance:
SZW 400 A1).
Contact data:
Free service hotline:
00800/4212 4212
(Monday to Friday between
8 a.m. and 4 p.m.
E-mail: hoyer-gb@teknihall.com
10
Page 13

RP66929 ZuckerWG LB6 Seite 11 Freitag, 10. Juni 2011 2:24 14
Page 14

,$1
+R\HU+DQGHO*PE+
.¾KQHK¸IH
6=:$B Ɇ,$1
53B=XFNHUZDWWHPDVFKLQHB&RYHUB/%LQGG
'+DPEXUJ
 Loading...