

Page 1
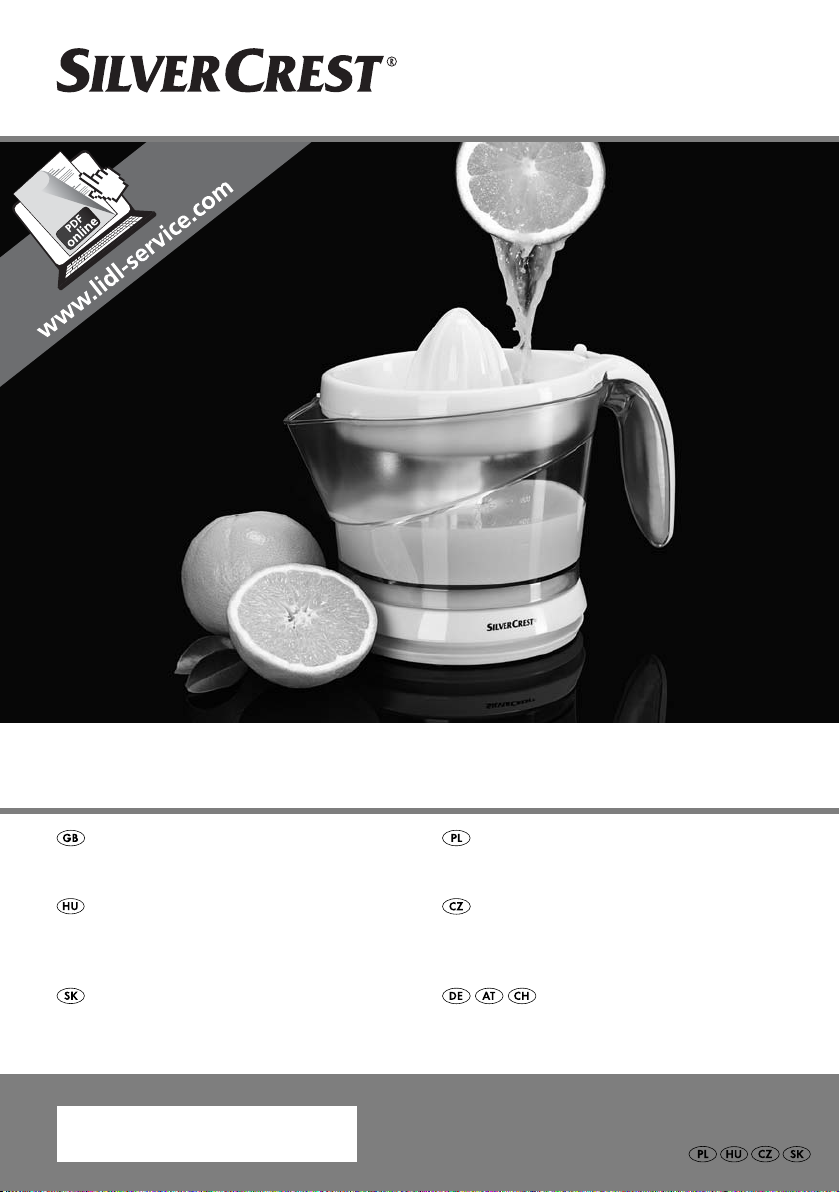
CITRUS PRESS JUICER SZP 25 A1
CITRUS PRESS JUICER
Operating instructions
CITROMFACSARÓ
Használati utasítás
LIS NA CITRUSOVÉ OVOCIE
Návod na obsluhu
IAN 102538
WYCISKARKA DO CYTRUSÓW
Instrukcja obsługi
ODŠŤAVŇOVAČ NA
CITRUSOVÉ PLODY
Návod k obsluze
ZITRUSPRESSE
Bedienungsanleitung
Page 2
Before reading, unfold the page containing the illustrations and familiarise yourself with all functions of
the device.
Przed przeczytaniem proszę rozłożyć stronę z ilustracjami, a następnie proszę zapoznać się z wszystkimi
funkcjami urządzenia.
Olvasás előtt kattintson az ábrát tartalmazó oldalra és végezetül ismerje meg a készülék mindegyik
funkcióját.
Před čtením si otevřete stranu s obrázky a potom se seznamte se všemi funkcemi přístroje.
Pred čítaním si odklopte stranu s obrázkami a potom sa oboznámte so všetkými funkciami prístroja.
Klappen Sie vor dem Lesen die Seite mit den Abbildungen aus und machen Sie sich anschließend mit allen
Funktionen des Gerätes vertraut.
GB Operating instructions Page 1
PL Instrukcja obsługi Strona 9
HU Használati utasítás Oldal 17
CZ Návod k obsluze Strana 25
SK Návod na obsluhu Strana 33
DE / AT / CH Bedienungsanleitung Seite 41
Page 3
Page 4

CONTENT PAGE
Introduction 2
Intended use 2
Technical Data 2
Items supplied 2
Appliance description 2
Important safety instructions 3
Set-up and assembly of the appliance 4
Juice extraction 5
Emptying 5
Disassembly 5
Cleaning and Care 6
Storage 6
Disposal 6
Warranty & Service 7
Importer 7
Read the operating instructions carefully before using the device for the first time and preserve this booklet
for later reference. Pass this manual on to whoever might acquire the device at a future date.
- 1 -
Page 5

CITRUS PRESS JUICER
Introduction
Congratulations on the purchase of your new
appliance.
You have selected a high-quality product. The operating instructions are a constituent of this product.
They contain important information about safety,
usage and disposal. Before using the product, familiarise yourself with all of the operating and safety
instructions. Use the product only as described and
for the specified usage areas. Keep these operating
instructions in a safe place. Please also pass these
operating instructions on to any future owner(s).
Technical Data
Mains voltage: 220 - 240 V ~/ 50 Hz
Rated output: 25 W
Protection class: II /
Items supplied
Citrus Press Juicer
Large squeezing cone
Small squeezing cone
Fruit pulp sieve (2 parts)
Operating instructions
Appliance description
Intended use
The appliance is intended for the extraction of juices
from citrus fruits such as oranges and lemons. Only
foodstuffs may be processed with the appliance. All
other usages or modifications are regarded as contrary to the operating instructions and contain a great risk
of accidents. The manufacturer accepts no liability
for damage(s) resulting from usage that is contrary
to these instructions. Not for commercial use.
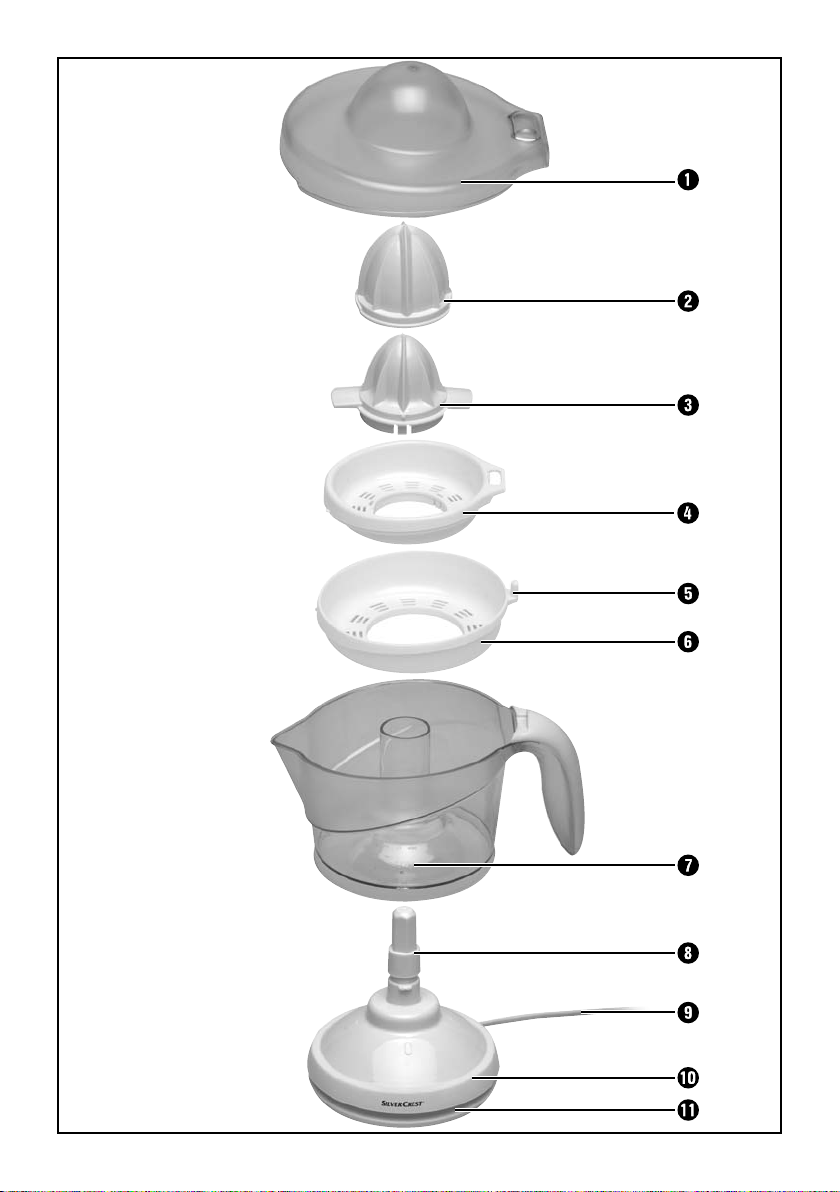
Lid
q
Large squeezing cone
w
Small squeezing cone
e
Upper fruit pulp sieve
r
Fruit pulp regulator
t
Lower fruit pulp sieve
y
Juice collector
u
Drive axle
i
Power cable with power plug
o
Appliance plinth
a
Power cable storage
s
- 2 -
Page 6

Important safety instructions
Danger – electric shock!
• The rating of the local power supply must tally completely with the details given
on the rating plate of the appliance.
• Arrange for defective power plugs and/or cables to be replaced at once by
qualified technicians or our Customer Service Department.
• Arrange for damaged or malfunctioning appliances to be inspected and/or
repaired by a qualified specialist or the Customer Service Department as soon
as possible.
• Do not expose the appliance to rain and never use it in a humid or wet environment. Ensure that the power cable never becomes moist or wet during
operation.
Warning - Risk of injury!
• Never use the appliance for purposes other than those described in these
instructions.
• Before replacing any accessories or additional parts that move during operation,
the appliance must be switched off and disconnected from the mains power.
• The appliance should always be disconnected from the mains when it is not
being supervised and prior to assembly, dismantling or cleaning.
• This appliance may be used by children aged 8 years or over if they are
supervised or have been told how to use the appliance safely and are aware
of the potential risks.
• User cleaning and maintenance may not be carried out by children unless they
are 8 years old or older and are supervised.
• The appliance and its connecting cable must be kept away from children younger
than 8 years old.
• This appliance may be used by people with reduced physical, sensory or
mental capabilities or lack of experience and/or knowledge if they are supervised and have been instructed in how to use the appliance safely and have
understood the potential risks.
• Children must not play with the appliance.
- 3 -
Page 7
• Children should be supervised to ensure that they do not play with the appliance.
• Provide for a safe and slip-free positioning of the appliance.
• Ensure that the power plug is easily accessible in the event of danger, and that
there is no danger of anyone tripping over the power cable.
Using the appliance safely:
• In the event of danger, immediately remove the power plug from the wall socket.
• Do not use the appliance outdoors.
Set-up and assembly of the
appliance
Caution:
Ensure that the power plug is not in the power
socket before assembling the appliance. Otherwise
there is a risk that the appliance could start
unintentionally.
1. Unwind the power cable
cable storage
recess on the appliance plinth
2. Place the appliance plinth
slipfree surface.
and secure it in the lateral
s
Note:
Rinse all removable components thoroughly before
the first usage of the appliance (see chapter
"Cleaning and care").
3. Place the juice collector
of the appliance plinth aand turn it clockwise
as far as it will go.
completely from the
o
.
a
on a level and
a
on the drive axle
u
i
4. Place both parts of the fruit pulp sieve r/
into each other so that the fruit pulp regulator
protrudes through the recess. Both parts must
audibly engage.
5. Place the assembled fruit pulp sieve
the juice collector
must lie on the grip and catch in the rabbet on
the grip.
6. Press the small squeezing cone
axle
so that it engages.
i
. The fruit pulp regulator
u
e
y
on
r/y
on the drive
Note:
If you want to press oranges or other larger fruits,
place the large squeezing cone
squeezing cone
small squeezing cone
the large squeezing cone
7. Insert the power plug into a wall power socket.
The appliance is now ready for use.
. Ensure that the lobes of the
e
engage in the recesses of
e
w
w
.
over the small
t
t
- 4 -
Page 8

Juice extraction
Emptying
Note:
When pressing out juice, do not exceed the 600 ml
volume marking on the scale of the juice collector
1. Adjust the fruit pulp regulator t, by sliding it, so
that the slits in the fruit pulp sieve
exactly above each other if you wish to have fruit juice with fruit pulp. Adjust the fruit pulp regulator
, by sliding it, so that the slits in the fruit
t
pulp sieve
if you do not wish to have fruit juice with fruit pulp.
2. Cut the fruits in half (orange, lemon etc.)
3. Press the halved fruit lightly onto the squeezing
cone
w/e
automatically as soon as the squeezing cone
is pressed down.
w/e
4. Apply pressure at various parts of the fruit rind
with your fingers. Thereby the juice will be evenly squeezed out of the fruit.
5. When no more juice flows from the fruit, stop
applying pressure to the squeezing cone
The appliance stops.
6. Press the squeezing cone
ly to loosen it, until it turns in the opposite
direction.
7. When no more juice flows from the fruit, stop
applying pressure to the squeezing cone
The appliance stops. Remove the fruit skin from
the squeezing cone
8. Continue similarly with further fruit-halves until
you have squeezed out the desired volume of
fruit juice. The current volume squeezed can be
read off from the scale on the side of the juice
collector
are not lying above each other
r/y
. The appliance switches itself on
w/e
.
u
w/e
.
r/y
down repeated-
u
lie
w/e
w/e
Caution:
Remove the power plug from the wall socket when
you empty the fruit pulp sieve
.
collector
ance could start unintentionally.
• Turn the juice collector uanti-clock-wise until the
. Otherwise there is a risk that the appli-
u
perceptible resistance desists. You can now lift it
from the drive axle
and pour the juice out.
i
r/y
or the juice
Disassembly
If you wish to disassemble the Citrus Press, e.g. for
the cleaning of it, proceed as follows:
1. Remove the power plug from the wall socket
2. Remove the squeezing cone
3. Remove the fruit pulp sieve
Press the hook on the underside of the upper fruit
pulp sieve
light pressure on the fruit pulp sieve
.
ponents allow themselves to be pressed apart.
4. Turn the juice catchment container
clockwise until the perceptible resistance
diminishes. You can now lift it from the drive
axle
i
.
inwards. At the same time exert
r
.
w/e
r/y
.
.
t
u
o
. The com-
anti-
.
- 5 -
Page 9
Cleaning and Care
Storage
Caution:
Always remove the power plug from the wall socket
before cleaning the appliance. There is a risk of
receiving an electric shock!
Caution:
To avoid receiving an electrical shock, NEVER
submerse the appliance plinth
fluids.
• Disassemble the Citrus Press as described in the
chapter "Disassembly".
• Clean the appliance plinth
moistened cloth.
• Clean all other removable parts in a warm milddetergent solution and dry them carefully.
• To clean the fruit pulp sieve
and clean it with a dishwashing brush under
running water.
in water or other
a
only with a slightly
a
, take it apart
r/y
Note:
Do not use aggressive detergents to clean the
appliance. These substances can attack the upper
surfaces.
The appliance and its components may not be
cleaned in a dishwasher or in boiling water.
If you do not intend to use the appliance for an
extended period, wrap the power cable
the power cable storage
cable through the lateral recess on the appliance
plinth
close the lid. Store the appliance at a clean and dry
location.
. Assemble the appliance completely and
a
, directing the end of the
s
o
around
Disposal
Do not dispose of the appliance in your
normal domestic waste. This product is
subject to the European guideline
2012/19/EU.
Dispose of the appliance through an approved disposal centre or at your community waste facility.
Observe the currently applicable regulations.
In case of doubt, please contact your waste disposal
centre.
Dispose of all packaging materials in an
environmentally responsible manner.
- 6 -
Page 10

Warranty & Service
Importer
The warranty for this appliance is for 3 years from
the date of purchase. The appliance has been
manufactured with care and meticulously examined
before delivery.
Please retain your receipt as proof of purchase. In
the event of a warranty claim, please make contact
by telephone with our Service Department. Only in
this way can a post-free despatch for your goods be
assured.
The warranty covers only claims for material and
maufacturing defects, but not for transport damage,
for wearing parts or for damage to fragile components, e.g. buttons or batteries. This product is for
private use only and is not intended for commercial
use. The warranty is void in the case of abusive and
improper handling, use of force and internal tampering not carried out by our authorized service branch.
Your statutory rights are not restricted in any way by
this warranty.
The warranty period will not be extended by repairs
made under warranty. This applies also to replaced
and repaired parts. Any damage and defects extant
on purchase must be reported immediately after unpacking the appliance, at the latest, two days after
the purchase date. Repairs made after the expiration
of the warranty period are subject to payment.
KOMPERNASS HANDELS GMBH
BURGSTRASSE 21
44867 BOCHUM
GERMANY
www.kompernass.com
Service Great Britain
Tel.: 0871 5000 720 (£ 0.10/Min.)
E-Mail: kompernass@lidl.co.uk
IAN 102538
Hotline availability:
Monday to Friday 08:00 - 20:00 (CET)
- 7 -
Page 11

- 8 -
Page 12

SPIS TREŚCI STRONA
Wstęp 10
Użytkowanie zgodne z przeznaczeniem 10
Dane techniczne 10
Zakres dostawy 10
Opis urządzania 10
Ważne wskazówki dotyczące bezpieczeństwa 11
Ustawienie i montaż urządzenia 12
Wyciskanie soku 13
Opróżnianie urządzenia 13
Demontaż 13
Czyszczenie i konserwacja 14
Przechowywanie 14
Utylizacja 14
Gwarancja i serwis 15
Importer 15
Przed pierwszym użyciem urządzenia należy dokładnie przeczytać niniejszą instrukcję obsługi i zachować ją na
przyszłość. W przypadku przekazania urządzenia osobom trzecim należy przekazać im także instrukcję.
- 9 -
Page 13

WYCISKARKA DO
CYTRUSÓW
Wstęp
Serdecznie gratulujemy zakupu nowego urządzenia.Wybrany produkt charakteryzuje się wysoką jakością. Instrukcja obsługi stanowi element składowy
produktu. Zawiera ona ważne informacje na temat
bezpieczeństwa, użytkowania i utylizacji. Przed rozpoczęciem użytkowania produktu należy zapoznać
się ze wszystkimi informacjami dotyczącymi obsługi
i bezpieczeństwa. Produkt należy użytkować wyłącznie zgodnie z zamieszczonym tu opisem oraz
w podanym zakresie zastosowań. Instrukcję obsługi
przechowuj zawsze w bezpiecznym miejscu. W
przypadku przekazania urządzenia innej osobie
należy dołączyć również instrukcję obsługi.
Użytkowanie zgodne z
przeznaczeniem
Urządzenie jest przeznaczone do wyciskania soku
z owoców cytrusowych, takich jak pomarańcze i
cytryny. Urządzenie wolno stosować tylko do przetwarzania produktów spożywczych. Jakiekolwiek
inne użycie lub zmiany urządzenia uważane są za
niezgodne z przeznaczeniem i kryją w sobie
poważne niebezpieczeństwo wypadku.
Producent nie bierze na siebie żadnej od-powiedzialności w przypadku powstania szkody, wynikającej z użytkowania urzą-dzenia w sposób całkowicie
niezgodny z przeznaczeniem. Urządzenie nie jest
przeznaczone do celów komercyjnych.
Dane techniczne
Napięcie zasilania: 220-240 V~/ 50 Hz
Moc znamionowa: 25 W
Klasa ochrony: II /
Zakres dostawy
Wyciskarka do cytrusów
Duży stożek do wyciskania soku
Mały stożek do wyciskania soku
Sitko do miąższu (2 części)
Instrukcja obsługi
Opis urządzania
Pokrywa
q
Duży stożek do wyciskania soku
w
Mały stożek do wyciskania soku
e
Górne sitko do miąższu
r
Regulator gęstości soku
t
Dolne sitko do miąższu
y
Dzbanek na sok
u
Oś napędowa
i
Kabel zasilający z wtyczką
o
Podstawa urządzenia
a
Schowek na kabel zasilający
s
- 10 -
Page 14

Ważne wskazówki dotyczące bezpieczeństwa
Niebezpieczeństwo - porażenie prądem elektrycznym!
• Napięcie źródła zasilania musi być zgodne z danymi podanymi na tabliczce
znamionowej urządzenia.
• Uszkodzoną wtyczkę lub uszkodzony kabel zasilający należy niezwłocznie
oddać do naprawy do autoryzowanego specjalisty lub serwisu.
• Urządzenia, które nie działają bez zastrzeżeń lub zostały uszkodzone, należy
niezwłocznie przekazać do punktu serwisowego w celu przeprowadzenia
kontroli i naprawy.
• Urządzenia nie wolno wystawiać na działanie deszczu ani używać go w
wilgotnym lub mokrym środowisku. Należy uważać, aby podczas używania
urządzenia kabel sieciowy był zawsze suchy.
Ostrzeżenie – niebezpieczeństwo odniesienia obrażeń!
• Nie używaj urządzenia do innych celów niż opisane w tej instrukcji.
• Przed wymianą osprzętu lub elementów dodatkowych, które podczas pracy
są w ruchu, wyłącz urządzenie i odłącz je od sieci elektrycznej.
• Przy braku nadzoru oraz przed montażem, złożeniem, rozłożeniem lub
czyszczeniem należy zawsze odłączać urządzenie od zasilania sieciowego.
• To urządzenie może być używane przez dzieci od 8. roku życia wyłącznie
pod nadzorem lub po przeszkoleniu w zakresie bezpiecznego używania urządzenia oraz wynikających z niego zagrożeń.
• Czyszczenia ani konserwacji przez użytkownika nie mogą wykonywać dzieci,
chyba że mają 8 lat lub więcej i są pod nadzorem.
• Urządzenie oraz jego przewód zasilający należy trzymać poza zasięgiem
dzieci w wieku poniżej 8 lat.
• To urządzenie może być używane przez osoby o zmniejszonych zdolnościach
fizycznych, sensorycznych lub umysłowych lub też osoby nieposiadające odpowiedniego doświadczenia i/lub wiedzy, wyłącznie pod nadzorem lub po
przeszkoleniu w zakresie bezpiecznego używania urządzenia oraz wynikających z niego zagrożeń.
• Dzieci nie mogą bawić się urządzeniem.
- 11 -
Page 15
• Poinformuj dzieci o zagrożeniach związanych z użytkowaniem urządzenia i
nie pozwól dzieciom bawić się urządzeniem.
• Urządzenie należy ustawić na stabilnej i nie śliskiej powierzchni.
• Należy zapewnić możliwość szybkiego odłączenia wtyczki z gniazdka sieciowego w razie niebezpieczeństwa oraz wyeliminować ryzyko potknięcia się o
kabel zasilający.
Aby zachować bezpieczeństwo:
• W wypadku zagrożenia należy natych-miast wyciągać wtyczkę z gniazdka
sieciowego.
• Urządzenia nie należy używać na wolnym powietrzu.
Ustawienie i montaż
urządzenia
Uwaga:
Przed montażem urządzenia należy sprawdzić, czy
wtyczka jest wyłączona z gniazdka. W przeciwnym
razie istnieje niebezpieczeństwo niezamierzonego
uruchomienia urządzenia.
1. Rozwiń całkowicie kabel zasilający
schowka na kabel zasilający
bocznym wycięciu w podstawie urządzenia
2. Postaw podstawę urządzenia
nie śliskiej powierzchni.
s
a
Wskazówka:
Przed pierwszym użyciem urządzenia należy dokładnie wymyć wszystkie zdejmowane części (patrz
rozdział „Czyszczenie i konserwacja“).
3. Włóż dzbanek na sok
w podstawie urządzenia ai obróć nim aż do
oporu w kierunku zgodnym z ruchem wskazówek
zegara.
na oś na-pędową
u
ze
o
i umocuj go w
a
na płaskiej i
i
4. Złóż ze sobą dwie części sitka do miąższu
, tak aby regulator gęstości soku twysta-
r/y
wał przez otwór. Przy połączeniu obydwu części sitka musi rozlec się odgłos blokowania.
5. Złożone sitko do miąższu
dzbanek na sok
musi znajdować się przy uchwycie i wejść do
rowka w uchwycie.
6. Załóż mały stożek do wyciskania soku
napędową
u
, tak aby się na niej zablokował.
i
r/y
. Regulator gęstości soku
Wskazówka:
Przy wyciskaniu pomarańczy lub innych dużych
.
owoców na mały stożek do wyciskania soku
leży nałożyć duży stożek do wyciskania soku
Należy zwrócić uwagę, aby skrzydełka małego
stożka do wyciskania soku
w dużym stożku do wyciskania soku
7. Włóż wtyczkę sieciową do gniazdka.
Urządzenie jest gotowe do pracy.
weszły do otworów
e
włóż na
e
.
w
na oś
e
w
t
na-
.
- 12 -
Page 16

Wyciskanie soku
Opróżnianie urządzenia
Wskazówka:
Przy wyciskaniu soku nie należy przekraczać
oznaczenia 600 ml na skali dzbanka na sok
1. Przy wyciskaniu soku z miąższem przesuń regulator gęstości soku
aby szczeliny w sitku do miąższu
dokładnie nad sobą. Przy wyciskaniu soku bez
miąższu przesuń regulator gęstości soku
i ustaw go w taki sposób, aby szczeliny w sitku
do miąższu
siebie.
2. Przekrój owoc (pomarańcze, cytryny itp.) na pół.
3. Dociśnij lekko połowę owocu do stożka do
wyciskania soku
do wyciskania soku
włącza się automatycznie.
4. Dociskaj palcami skórkę owocu do stożka w
różnych miejscach. Pozwoli to na równomierne
wyciskanie soku z owocu.
5. Jeśli sok nie wypływa już z owocu, należy przestać dociskać owoc do stożka do wyciskania
soku
6. Dociśnij stożek do wyciskania soku
do dołu i puść go, aż zacznie się on obracać w
przeciwnym kierunku.
7. Jeśli sok nie wypływa już z owocu, przestań
dociskać owoc do stożka do wyciskania soku
w/e
kę owocu ze stożka do wyciskania soku
8. Postępuj tak samo z kolejnymi owocami, aż do
uzyskania pożądanej ilości soku. Ilość wyciśniętego soku można odczytać na skali dzbanka na
sok
r/y
. Urządzenie zatrzymuje się.
w/e
. Urządzenie zatrzymuje się. Zdejmij skór-
.
u
i ustaw go w taki sposób,
t
r/y
były przesu-nięte wobec
. Po dociśnięciu stożka
w/e
do dołu urządzenie
w/e
w/e
u
leżały
t
lekko
w/e
.
Uwaga:
Przy opróżnianiu dzbanka na sok ulub sitka na
miąższ
ka. W przeciwnym razie istnieje niebezpieczeństwo
niezamierzonego uruchomienia urządzenia.
• Obróć dzbanek na sok
nym do ruchu wskazówek zegara aż do jego
poluzowania. Teraz można go zdjąć z osi
napędowej
należy odłączyć wtyczkę z gniazd-
r/y
w kierunku przeciw-
u
i nalać sok.
i
Demontaż
Przy rozkładaniu wyciskarki do owoców cytrusowych, np. w celu jej wyczyszczenia, należy
wykonać następujące czynności:
1. Wyciągnij wtyczkę sieciową
2. Zdejmij stożki do wyciskania soku
3. Zdejmij sitko do miąższu
wewnątrz haczyki umie-szczone w dolnej części
górnego sitka do miąższu
naciśnij lekko na regulator gęstości soku
ydwie części zostają w ten sposób rozłączone.
4. Obracaj pojemnikiem na sok
odwrotnym do ruchu wskazówek zegara aż
do napotkania wyraźnie wyczuwalnego oporu.
Możesz go teraz odłączyć do góry od osi
napędowej
.
i
.
z gnia-zdka.
o
. Wciśnij do
r/y
. Jednocześnie
r
w kierunku
u
w/e
.
t
. Ob-
- 13 -
Page 17

Czyszczenie i konserwacja
Przechowywanie
Uwaga:
Przed czyszczeniem urzą-dzenia należy wyciągnąć
wtyczkę sieciową z gniazdka. Istnieje zagrożenie
porażenia prądem elektrycznym!
Uwaga:
Aby uniknąć zagrożenia porażeniem prądem
elektrycznym, podstawy urządzenia
zanurzać do wody lub innych cieczy.
• Rozłóż wyciskarkę do owoców cytrusowych
zgodnie z opisem w rozdziale „Demontaż“.
• Wyczyść podstawę urządzenia
lekko zwilżonej szmatki.
• Wszystkie inne wyjmowane części wyczyść w
ciepłym roztworze wody z mydłem, a następnie
starannie je wysusz.
• Aby wyczyścić sitko do miąższu
je na części, a następnie wyczyść poszczególne
elementy za pomocą szczotki pod bieżącym
strumieniem wody.
nie wolno
a
za pomocą
a
r/y
, rozłóż
Wskazówka:
Do czyszczenia urzą-dzenia nie należy używać
żadnych agresywnych środków czyszczących. W
przeciwnym razie można uszkodzić powierzchnię.
Urządzenia oraz jego części składowych nie wolno
czyścić w zmywarce do naczyń ani w gorącej
wodzie.
Gdy urządzenie nie jest używane przez dłuższy
czas, kabel zasilający
schowku na kabel s, a jego koniec należy wyprowadzić na zewnątrz poprzez boczne wycięcie w
podstawie urządzenia
całkowicie złożyć i założyć pokrywę. Urządzenie
należy przechowywać w chłodnym i suchym
miejscu.
należy nawinąć
o
. Urządzenie należy
a
w
Utylizacja
Urządzenia nie należy wyrzucać wraz
z normalnymi odpadami domowymi.
Niniejszy produkt podlega działaniom,
przewidziamyn w przepisach dyrektywy europejskiej 2012/19/EU.
Urządzenie należy usuwać w akredytowanych zakładach utylizacji odpadów lub komunalnych zakładach utylizacji odpadów.
Należy przestrzegać aktualnie obowiązujących
przepisów. W razie pytań i wątpliwości odnośnie
zasad utylizacji należy skontaktować się z najbliższym zakładem utylizacji odpadów.
Materiał opakowaniowy należy przekazywać do utylizacji zgodnie z przepisami o
ochronie środowiska.
- 14 -
Page 18

Gwarancja i serwis
Importer
Urządzenie objęte jest 3-letnią gwarancją, licząc
od daty zakupu. Urządzeniezostało starannie wyprodukowane i poddane skrupulatnej kontroli przed
wysyłką.
Paragon należy zachować jako dowód dokonania
zakupu. W przypadku roszczeń gwarancyjnych należy skontaktować się telefonicznie z serwisem. Tylko
w ten sposób można zagwarantować bezpłatną
wysyłkę zakupionego produktu.
Gwarancja obejmuje wyłącznie wady materiałowe
i fabryczne, natomiast nie obejmuje szkód powstałych podczas transportu, części ulegających zużyciu ani uszkodzeń części łatwo łamliwych/podatnych na uszkodzenia mechaniczne, np.
wyłączników, akumulatorów. Produkt przeznaczony
jest wyłącznie do użytku domowego, a nie do zastosowań profesjonalnych.
Gwarancja traci ważność w przypadku niewłaściwego używania urządzenia, używania niezgodnego z przeznaczeniem, użycia siły lub ingerencji w
urządzenie dokonywanej poza naszymi autoryzowanymi punktami serwisowymi. Niniejsza gwarancja nie ogranicza ustawowych praw nabywcy urządzenia.
Okres gwarancji nie ulega wydłużeniu o czas trwania usługi gwarancyjnej. Dotyczy to również wymienionych i naprawionych części. Szkody i wady zauważone już w chwili zakupu należy zgłosić od razu
po rozpakowaniu, nie później niż po upływie
dwóch dni od daty zakupu. Po upływie okresu
gwarancyjnego wszystkie naprawy będą wykonywane płatnie.wane płatnie.
KOMPERNASS HANDELS GMBH
BURGSTRASSE 21
44867 BOCHUM
GERMANY
www.kompernass.com
Serwis Polska
Tel.: 22 397 4996
E-Mail: kompernass@lidl.pl
IAN 102538
Czas pracy infolinii:
od poniedziałku do piątku, w godzinach
08:00 - 20:00 czasu środkowoeuropejskiego
- 15 -
Page 19

- 16 -
Page 20

TARTALOMJEGYZÉK OLDALSZÁM
Bevezetés 18
Rendeltetésszerű használat 18
Műszaki adatok 18
Tartozékok 18
A készülék leírása 18
Fontos biztonsági utasítások 19
A készülék felállítása és összeszerelése 20
Lécsavarás 21
Kiürítés 21
Szétszerelés 21
Tiszítás és ápolás 22
Tárolás 22
Ártalmatlanítás 22
Garancia és szerviz 23
Gyártja 23
Az első használat előtt figyelmesen olvassa el a használati utasítást majd későbbi használatra tegye el.
A készülék harmadik személy részére történő továbbadásakor adja át a leírást is.
- 17 -
Page 21

CITROMFACSARÓ
Bevezetés
Gratulálunk új készüléke megvásárlásához!
Vásárlásával kiváló minőségű termék mellett döntött.
A használati utasítás a termék része. Fontos tudnivalókat tartalmaz a biztonságra, használatra és ártalmatlanításra vonatkozóan. A termék használata előtt
ismerkedjen meg valamennyi használati útmutatóval
és biztonsági figyelmeztetéssel. Csak a leírtak szerint
és a megadott célokra használja a készüléket. Őrizze meg jól ezt a használati útmutatót. A készülék
harmadik személynek történő továbbadása esetén
adja át a készülékhez tartozó valamennyi leírást is.
Műszaki adatok
Hálózati feszültség: 220 - 240 V ~/ 50 Hz
Névleges teljesítmény: 25 W
Védettségi osztály : II/
Tartozékok
Citromfacsaró
nagy facsarókúp
kis facsarókúp
gyümölcshús szűrő (kétrészes)
Használati útmutató
A készülék leírása
Rendeltetésszerű használat
A készülék olyan citrusfélék, mint narancs és citrom
levének kicsavarására készült. Csak élelmiszert szabad feldolgozni a készülékkel. Minden másfajta
használat vagy változtatás nem rendeltetésszerűnek
minősül és balesetveszélyes.
A nem rendeltetésszerű használatból eredő
károkért a gyártó nem vállal felelősséget.
Nem alkalmas kereskedelmi használatra.
fedél
q
nagy facsarókúp
w
kis facsavarókúp
e
felső gyümölcshússzűrő
r
gyümölcshús szabályozó
t
alsó gyümölcshússzűrő
y
gyömölcsléfelfogó edény
u
meghajtótengely
i
hálózati vezeték csatlakozóval
o
készülék talpazata
a
vezetékfelcsévélő
s
- 18 -
Page 22

Fontos biztonsági utasítások
Veszély - elektromos áramütés!
• Az áramforrás feszültségének meg kell egyeznie a készülék típustábláján szereplő adatokkal.
• A veszélyek elkerülése érdekében a sérült hálózati csatlakozót vagy vezetéket
azonnal cseréltesse ki enge-déllyel rendelkező szakemberrel vagy az ügyfélszolgálattal.
• A hibásan működő vagy sérült készüléket azonnal ellenőriztesse és javíttassa
meg a vevőszolgálattal.
• Ne tegye ki a készüléket esőnek és soha ne használja a készüléket nedves
vagy vizes környezetben. Ügyeljen arra, hogy a hálózati vezeték használat
közben ne legyen nedves vagy vizes.
Figyelmeztetés - sérülésveszély!
• Ne használja a készüléket az ebben az útmutatóban leírtaktól eltérő célra.
• A használat közben mozgó tartozékok vagy kiegészítők cseréje előtt a készüléket ki kell kapcsolni és le kell választani a hálózatról.
• A készüléket mindig válassza le a hálózatról, ha felügyelet nélkül hagyja,
valamint az összeszerelés, a szétszedés vagy tisztítás előtt.
• A készüléket 8 évesnél nagyobb gyermekek felügyelet mellett használhatják
abban az esetben, ha megtanították őket a készülék biztonságos használatára
és megértették az ebből eredő veszélyeket.
• A felhasználói tisztítást és a karbantartást nem végezhetik gyerekek, ez alól
csak a 8 évesnél idősebb és felügyelet alatt lévő gyerekek képeznek kivételt.
• Ügyeljen arra, hogy 8 évesnél fiatalabb gyermekek ne kerüljenek a készülék
és a csatlakozó-vezeték közelébe.
• A készüléket csökkent fizikai, érzékszervi vagy mentális képességű vagy tapasztalattal és/vagy tudással nem rendelkező személyek csak akkor használhatják, ha felügyelet alatt állnak, vagy megtanították őket a készülék biztonságos használatára és megértették az ebből eredő veszélyeket.
• Gyermekek nem játszhatnaki a készülékkel.
- 19 -
Page 23

• Világosítsa fel a gyermekeket a készülékről és annak veszélyeiről, hogy ne
játsszanak vele.
• Gondoskodjon arról, hogy a készülék biztonságosan és csúszásmentesen álljon.
• Gondoskodjon arról, hogy a hálózati csatlakozó veszély esetén gyorsan
elérhető legyen és hálózati vezetékben ne lehessen felbotlani.
Így cselekszik helyesen:
• Veszély esetén azonnal húzza ki a hálózati csatlakozót a konnektorból.
• Ne használja a készüléket a szabadban
.
A készülék felállítása és
összeszerelése
Figyelem:
Győződjön meg róla, hogy a hálózati csatlakozó ki
van húzva, mielőtt összeszerelné a készüléket.
Máskülönben fennáll annak a veszélye, hogy a
készülék véletlenül bekapcsol.
1. Teljesen tekerje le a vezetékfelcsévélésről
vezetéket
lévő oldalsó horonyba.
a
2. Helyezze
csúszásmentes felületre.
és rögzítse a készülék talpazatán
o
készülék talpazatát a sima és
a
Megjegyzés:
az első használat előtt alaposan öblítsen le minden
levehető részt (lásd a „Tisztítás és ápolás“ részt).
3. Illessze a gyömölcsléfelfogó edényt ua készülék talpazatának
fordítsa el ütközésig az óramutató járásával
megfelelő irányban.
meghajtótengelyére iés
a
s
a
4. Illessze össze a gyümölcshússzűrő
két részét, hogy a gyümölcs-hússzabályozó
kinyúljon a hornyon túl. Mindkét résznek
hallhatóan be kell pattannia a helyére.
5. Helyezze az összeillesztett gyümölcshússzűrőt
a gyümölcsléfelfogó edényre u.
r/y
A gyümölcshússzabályozónak
lennie és a nyélen lévő horonyba kell beleilleszkednie.
6. Úgy illessze a kis facsarókúpot
meghajtótengelyre
a helyére.
, hogy az bepattanjon
i
t
e
Megjegyzés:
Ha narancsnak, vagy más nagyobb gyümölcsnek
akarja kifacsarni a levét, helyezze a nagy facsarókúpot
facsarúkúp
vájatába illeszkedjen.
7. Csatlakoztassa a készüléket egy konnektorba. A
a kicsi efölé. Ügyeljen arra, hogy a kis
w
kiálló füle a nagy facsarókúp
e
készülék ezzel üzemkész.
mind-
r/y
t
a nyélnél kell
a
w
- 20 -
Page 24

Lécsavarás
Kiürítés
Megjegyzés:
ne facsarjon ki a gyü-mölcsléfelfogó edény
mérőskáláján lévő 600 ml-es jelölésnél több
gyü-mölcslevet.
1. A gyümölcshússzabályzót
sa be, hogy a gyümölcshús szűrőjében
lévő rések pontosan egymás felett legyenek, ha
rostos gyümölcslevet szeretne. A gyümölcshússzabályzót
gyümölcshús szűrőjében
legyenek egymás felett, ha gyümölcshús nélküli
gyü-mölcslevet szeretne.
2. Vágja félbe a gyümölcsöt (narancs, citrom, stb.).
3. Nyomja a megfelezett gyümölcsöt lazán a
facsarókúpra
bekapcsol, ha a facsarókúpot
nyomja.
4. Ujjaival a gyömölcs héját több helyen nyomja
meg. Ezáltal a lé egyenletesen préselődik ki a
gyümölcsből.
5. Ha már nem jön ki több lé a gyümölcs-ből,
engedje el a facsarókúpot
megáll.
6. Annyiszor nyomja lefele és engedje el a fa-csarókúpot
forog.
7. Ha már nem jön ki több lé a gyümölcs-ből, engedje el a facsarókúpot
gáll. Vegye le a gyümölcs héját a facsarókúpról
w/e
8. Ugyanígy járjon el a többi félbevágott gyümölccsel is, amíg nem facsart ki elég gyümölcslevet. A kifacsart menynyiséget a gyümölcsléfelfogó edény
eltolással úgy állítsa be, hogy a
t
. A készülék automatikusan
w/e
, amíg az ellenkező irányba nem
w/e
.
mérőskáláján olvashatja le.
u
eltolással úgy állít-
t
r/y
w/e
w/e
. A készülék me-
w/e
u
r/y
lévő rések ne
lefele
. A készülék
Figyelem:
húzza ki a hálózati vezetéket, ha ki akarja üríteni a
gyümölcshús szűrőt
gó edényt
lye, hogy a készülék véletlenül bekapcsol.
• Fordítsa el a gyümölcsléfelfogó edényt
óramutató járásával ellentétes irányba, majd
emelje le a meghajtótengelyről
levet.
. Máskülönben fennáll annak a veszé-
u
vagy a gyümölcsléfelfo-
r/y
és töltse ki a
i
u
az
Szétszerelés
Ha szét szeretné szerelni a citrusprést, pl. mert meg
akarja tisztítani, az alábbiak szerint járjon el:
1. Húzza ki a hálózati csatlakozót
2. Vegye le a facsarókúpot
3. Vegye le a gyümölcshússzűrőt
Nyomja be a felső gyümölcshússzűrő
lévő pöcköt. Egyidőben gyakoroljon enyhe
nyomást a gyümölcshús-szabályozóra
majd vegye szét a két részt.
4. Fordítsa el a gyümölcsléfelfogó tartályt
óramutató járásával ellentétes irányba, amíg az
érezhető ellenállás enged. Ekkor le lehet venni a
meghajtó tengelyről
i
w/e
.
.
o
.
r/y
.
alján
r
t
az
u
- 21 -
Page 25

Tiszítás és ápolás
Tárolás
Figyelem:
húzza ki a hálózati csatlakozót, mielőtt tisztítani
kezdené a készüléket. Ez esetben áramütés
veszélye állhat fenn!
Figyelem:
Az elektromos áramütés elkerülése érdekében ne
merítse vízbe vagy más folyadékba a készülék
talpazatát
• A citrusprést a „Szétszerelés“ című részben
leírtak alapján szerelje szét.
• Csak enyhén nedves kendővel tisztítsa a készülék talpazatát
• Valamennyi levehető részt meleg szappanos
vízben mosson el és alaposan öblítse le őket.
• A gyümölcshús-szűrő
szét a szűrőt, és folyó víz alatt tisztítsa meg
mosogatókefével.
a
.
.
a
tisztításához vegye
r/y
Megjegyzés:
ne használjon erős tisztítószert a készülék tisztítására. Máskülönben hozzáérhet a felülethez.
A készülék és annak részei nem tisztíthatók
mosogatógépben vagy forró vízben.
Ha a készüléket hosszabb ideig nem használja,
csavarja a hálózati vezetéket
lőre
és a vezeték végét bújtassa át a készülék
s
talpazatán
szerelje össze a készüléket és csukja be a fedelét.
A készüléket tiszta és száraz helyen tárolja.
lévő oldalsó vájatba. Teljesen
a
a vezetékfelcsévé-
o
Ártalmatlanítás
Semmi esetre se dobja a készüléket a
háztartási hulladékba. Jelen termékre
a 2012/19/EU számú európai utasítás
rendelkezési vonatkoznak.
A készüléket engedélyeztetett hulladékgyűjtő
helyen vagy a helyi hulladékeltávolító üzemnél
tudja kidobni.
Vegye figyelembe az érvényben lévő idevonatkozó
előírásokat. Ha kérdése merülne fel, vegye fel a
kapcsolatot a hulladékfeldolgozó vállalattal.
A csomagolóanyagot juttassa környezetvédő ártalmatlanítóhelyre.
- 22 -
Page 26

Garancia és szerviz
Gyártja
A készülékre 3 év garanciát adunk a vásárlás dátumától számítva. A készüléket gondosan gyártottuk,
és szállítás előtt lelkiismeretesen ellenőriztük.
Kérjük, a vásárlás igazolására őrizze meg a pénztári blokkot. Kérjük, garanciaigény esetén vegye fel
a kapcsolatot telefonon az Ön közelében lévő szervizzel. Csak ebben az esetben garantálhatjuk, hogy
ingyen tudja beküldeni az árut.
A garancia csak anyag- és gyártási hibára vonatkozik, nem pedig szállítási kárra, kopásra vagy törékeny
részek (pl. kapcsoló vagy elem) sérülésére. A termék
kizárólag magánhasználatra, nem üzleti használatra
készült.
A garancia érvényét veszti visszaélésszerű vagy
szakavatatlan kezelés, erőszak alkalmazása vagy
olyan beavatkozások esetén, amelyeket nem engedélyeztetett szervizelő üzleteink hajtottak végre. Az
ön törvényes jogait ez a garancia nem korlátozza.
A garanciaidő nem hosszabbodik a jótállással. Ez
a kicserélt vagy javított alkatrészekre is érvényes.
Az esetlegesen már a megvételkor meglévő károkat
és hiányosságokat azonnal kicsomagolás után, legkésőbb két nappal a vétel dátumától számítva jelezni kell. A garanciális idő lejárta után esedékes javítások térítéskötelesek.
KOMPERNASS HANDELS GMBH
BURGSTRASSE 21
44867 BOCHUM
GERMANY
www.kompernass.com
Szerviz Magyarország
Tel.: 0640 102785
E-Mail: kompernass@lidl.hu
IAN 102538
- 23 -
Page 27

- 24 -
Page 28

OBSAH STRANA
Úvod 26
Účel použití 26
Technické údaje 26
Rozsah dodávky 26
Popis přístroje 26
Důležitá bezpečnostní upozornění 27
Instalace a montáž spotřebiče 28
Odšťavňování 29
Vyprázdnění 29
Demontáž 29
Čištění a údržba 30
Úschova 30
Zneškodnění 30
Záruka & servis 31
Dovozce 31
Před prvním použitím si pozorně přečtěte návod k obsluze a uschovejte jej pro pozdější potřebu. Při předávání
zařízení třetím osobám předejte i tento návod.
- 25 -
Page 29

ODŠŤAVŇOVAČ K
NA CITRUSOVÉ PLODY
Úvod
Gratulujeme vám k zakoupení nového přístroje.
Rozhodli jste se pro vysoce kvalitní výrobek. Návod
k obsluze je součástí tohoto výrobku. Obsahuje
důležité informace o bezpečnosti, použití a likvidaci. Před použitím výrobku se prosím dobře seznamte
se všemi provozními a bezpečnostními pokyny.
Výrobek používejte pouze předepsaným způsobem
a pro uvedené oblasti použití. Tento návod k obsluze
dobře uschovejte. Při předávání výrobku třetím osobám předejte spolu s ním i tyto podklady.
Účel použití
Spotřebič je určen k odšťavňování citrusových plodů,
jako jsou pomeranče a citróny. Pomocí tohoto spotřebiče
mohou být zpracovávány jen potraviny. Jakékoliv jiné
používání nebo změny jsou považovány za takové,
které jsou v rozporu s účelem použití, a představují
nebezpečí zranění.
Pro škody, které vzniknou při použití mimo vymezený
účel, neposkytuje výrobce záruku.
Přístroj není určen pro průmyslové použití.
Technické údaje
Jmenovité napětí: 220 - 240 V ~/ 50 Hz
Jmenovitý výkon: 25 W
Třída ochrany: II/
Rozsah dodávky
Odšťavňovač k na citrusové plody
Velký lisovací kužel
Malý lisovací kužel
Sítko na dužninu (2 části)
Popis přístroje
kryt
q
velký lisovací kužel
w
malý lisovací kužel
e
horní sítko na dužninu
r
regulátor podílu dužniny ve šťávě
t
spodní sítko na dužninu
y
nádoba na zachycení šťávy
u
hnací náprava
i
síťový kabel se zástrčkou
o
podstavec spotřebiče
a
navíjení kabelu
s
- 26 -
Page 30

Důležitá bezpečnostní upozornění
Nebezpečí úrazu elektrickým proudem!
• Napětí elektrického zdroje musí souhlasit s údaji na typovém štítku přístroje.
• Poškozené zástrčky nebo síťový kabel nechte ihned vyměnit autorizovanými
odborníky nebo zákaznickým servisem - vyhnete se tím nebezpečí.
• Přístroje, které nefungují bez závad nebo byly poškozeny, nechte okamžitě
přezkoumat a opravit v zákaznickém servisu.
• Nevystavujte zařízení působení deště a rovněž jej nikdy nepoužívejte ve
vlhkém nebo mokrém prostředí. Dbejte na to, aby síťový kabel během provozu
nebyl nikdy vlhký nebo mokrý.
Výstraha - nebezpečí zranění!
• Nepoužívejte přístroj nikdy pro jiné účely, než je popsáno v tomto návodu.
• Před výměnou příslušenství nebo dodatečných dílů, které se během provozu
pohybují, musí být přístroj vypnutý a odpojený od elektrické sítě.
• Přístroj se při chybějícím dohledu a před montáží, demontáží nebo čištěním
musí vždy odpojit od sítě.
• Děti od 8 let mohou používat tento přístroj pouze tehdy, pokud jsou pod dohledem nebo pokud byly poučeny o bezpečném používání přístroje a pokud
porozuměly z toho vyplývajícímu nebezpečí.
• Děti nesmí provádět uživatelské čištění ani údržbu, ledaže jsou starší 8 let a
jsou pod dohledem.
• Děti mladší 8 let nesmí mít přístup k přístroji a jeho přípojnému vedení.
• Osoby s omezenými fyzickými, smyslovými nebo mentálními schopnostmi či
nedostatkem zkušeností a/nebo znalostí mohou používat tento přístroj pouze
tehdy, pokud jsou pod dohledem nebo pokud byly poučeny o bezpečném
používání přístroje a pokud porozuměly z toho vyplývajícímu nebezpečí.
• Děti si nesmí hrát s přístrojem.
- 27 -
Page 31

• Dohlížejte na děti, aby si nehrály s tímto přístrojem.
• Zajistěte bezpečné a stabilní umístění spotřebiče.
• Zajistěte, aby síťová zástrčka byla v případě nebezpečí rychle dosažitelná a
aby přes síťový kabel nikdo nemohl klopýtnout.
Bezpečnostní pokyny:
• V případě nebezpečí okamžitě vytáhněte síťovou zástrčku ze zásuvky.
• Přístroj nikdy nepoužívejte venku.
Instalace a montáž spotřebiče
4. Zastrčte oba díly sítka na dužninu r/ydo sebe
Pozor:
Před montáží spotřebiče se ujistěte, zda je zástrčka
vytažená ze zásuvky. Jinak existuje nebezpečí, že
dojde k nechtěnému spuštění spotřebiče.
1. Síťový kabel
a upevněte ho pomocí postranní drážky na podstavec spotřebiče
2. Podstavec spotřebiče
a neklouzavou podložku.
zcela odviňte z navíjení kabelu
o
.
a
postavce na rovnou
a
s
Poznámka:
Všechny odnímatelné díly před prvním použitím důkladně opláchněte (viz kapitola „Čištění a péče“).
3. Nasaďte nádobu na zachycení šťávy una hnací
nápravu
s ní ve směru hodinových ručiček až k zarážce.
podstavce spotřebiče aa otáčejte
i
tak, aby regulátor obsahu dužniny
z drážky. Obě části musejí slyšitelně zaklapnout.
5. Nasaďte složené sítko na dužninu
ádobu na zachycení šťávy
dužniny
do drážky na držadle.
6. Zastrčte malý lisovací kužel
i
musí ležet na držadle a musí zapadat
t
tak, aby zaklapl.
. Regulátor obsahu
u
e
Poznámka:
Pokud chcete lisovat pomeranče nebo jiné velké plody,
nasaďte velký lisovací kužel
kužel
. Dbejte na to, aby křídla malého lisovacího
e
kužele
kužele
7. Zastrčte zástrčku do zásuvky. Nyní je spotřebič
zapadla do drážek velkého lisovacího
e
.
w
připravený k provozu.
přes malý lisovací
w
vyčníval
t
r/y
na hnací nápravu
na
- 28 -
Page 32

Odšťavňování
Vyprázdnění
Poznámka:
Nikdy nelisujte více šťávy než do značky 600 ml
na stupnici nádoby na zachycení šťávy
1. Nastavte regulátor obsahu dužniny tposunováním
tak, aby výřezy v sítku na dužninu
přesně přes sebe, pokud chcete šťávu s dužninou.
Nastavte regulátor obsahu dužniny
tak, aby výřezy v sítku na dužninu
přesně přes sebe, pokud chcete šťávu bez dužniny.
2. Citrusový plod překrojte na polovinu (pomeranč,
citrón atd.).
3. Rozpůlený plod lehce přitlačte na lisovací kužel
. Spotřebič se automaticky zapne, jakmile
w/e
stlačíte lisovací kužel
4. Tlačte prsty na slupku na různých místech plodu.
Tím se šťáva z plodu vylisuje rovnoměrně.
5. Pokud již z plodu nevychází žádná šťáva, přestaňte
vykonávat tlak na lisovací kužel
se vypne.
6. Stlačujte lisovací kužel
dolů a opět ho uvolňujte, dokud se neotočí do
jiného směru.
7. Pokud již z plodu nevychází žádná šťáva, přestaňte
tlačit na lisovací kužel
Vyjměte slupku z lisovacího kuželu
8. S dalšími polovinami plodů postupujte stejně,
dokud nevylisujete požadované množství šťávy.
Vylisované množství můžete odečíst na stupnici
nádoby na zachycení šťávy
směrem dolů.
w/e
w/e
tak často směrem
w/e
. Spotřebič se vypne.
w/e
u
r/y
t
r/y
w/e
.
.
u
ležely
posunováním
neležely
. Spotřebič
.
Pozor:
Pokud vyprazdňujete sítko na dužninu r/y nebo
nádobu na zachycení šťávy
zásuvky. Jinak existuje nebezpečí, že dojde k nechtěnému spuštění spotřebiče.
• Otáčejte nádobou na zachycení šťávy
směru hodinových ručiček, dokud nepovolí
citelný odpor. Nyní můžete nádobu zvednou
z hnací nápravy
i
, vytáhněte zástrčku ze
u
a nalít šťávu.
u
proti
Demontáž
Pokud chcete lis na citrusové plody demontovat,
např. za účelem vyčištění, postupujte následovně:
1. Vytáhněte zástrčku
2. Sejměte lisovací kužel
3. Sejměte sítko na dužninu
na spodní straně horního sítka na dužninu
směrem dovnitř. Vykonávejte současně lehký
tlak na regulátor obsahu dužniny
od sebe oddělíte stlačením.
4. Otočte záchytnou nádobu na šťávu
směru hodinových ručiček, dokud nepovolí citelný odpor. Nyní ji můžete nadzvednout z hnací
nápravy
i
.
o
.
w/e
.
. Stiskněte háky
r/y
. Oba díly
t
u
r
proti
- 29 -
Page 33

Čištění a údržba
Úschova
Pozor:
Před čištěním spotřebiče vytáhněte zástrčku ze
zásuvky. Hrozí nebezpečí zásahu elektrickým
proudem!
Pozor:
Podstavec spotřebiče anikdy neponořujte do vody
nebo do jiné tekutiny, hrozí nebezpečí úrazu elektrickým proudem.
• Lis na citrusové plody demontujte podle popisu
uvedeného v kapitole „Demontáž“.
• Podstavec spotřebiče
ným hadříkem.
• Všechny ostatní odnímatelné díly očistěte teplou
mýdlovou vodou a pečlivě je opláchněte.
• Sítko na dužninu
berete a vyčistíte pomocí kartáčku a tekoucí
vody.
čistěte jen mírně navlhče-
a
vyčistíte tak, že ho roze-
r/y
Poznámka:
K čištění spotřebiče nepoužívejte žádné agresivní
čisticí prostředky. Mohlo by dojít k poškození povrchu.
Spotřebič ani jeho součásti se nesmějí umývat v myčce
na nádobí nebo ve vařící vodě.
Pokud spotřebič nebudete delší dobu používat, oviňte
síťový kabel
kabelu veďte postranní drážkou v podstavci spotřebiče
a
Spotřebič uložte na suchém a čistém místě.
kolem navíjení na kabel sa konec
o
. Spotřebič kompletně sestavte a uzavřete víko.
Zneškodnění
V žádném případě nevyhazujte přístroj
do normálního domovního odpadu.
Na tento výrobek se vztahuje evropská
směrnice 2012/19/EU.
Nechte přístroj zlikvidovat v autorizované provozovně
nebo v místním zařízení na likvidaci podobných výrobků.
Dodržujte aktuálně platné předpisy.
V případě pochybností se spojte s nejbližší provozovnou, která likviduje podobné výrobky.
Také všechny obalové materiály zlikvidujte
v souladu s ekologickými předpisy.
- 30 -
Page 34

Záruka & servis
Dovozce
Na tento přístroj platí 3 letá záruka od data zakoupení. Přístroj byl vyroben s nejvyšší pečlivostí a před
odesláním prošel výstupní kontrolou. Uschovejte si,
prosím, pokladní
lístek jako doklad o nákupu. V případě uplatňování
záruky kontaktujte telefonicky
Vaší servisní službu. Pouze tak může být zajištěno
bezplatné zaslání Vašeho zboží.
Záruka se vztahuje pouze na chyby materiálu nebo
výrobní závady, ale ne na škody,vzniklé při přepravě, ne na součásti, podléhající rychlému opotřebení
nebo na poškození křehkých dílů, jako jsou např.
spínače nebo akumulátory. Výrobek je určen pouze
pro privátní použití, ne průmyslové.
Při nesprávném a neodborném využívání, při použití
násilí a při zásazích, které nebyly provedeny našimi
autorizovanými servisními provozovnami, záruční
nároky zanikají.
Vaše práva vyplývající ze zákona touto zárukou
nejsou omezena.
Záruční doba se zárukou neprodlouží. Toto platí
také pro náhradní díly a opravené součásti. Případné škody a vady, existující už při koupi, se musí hlásit ihned po vybalení, nejpozději však
do dvou dnů od data nákupu. Po uplynutí záruční
doby se provedené opravy musí zaplatit.
KOMPERNASS HANDELS GMBH
BURGSTRASSE 21
44867 BOCHUM
GERMANY
www.kompernass.com
Servis Česko
Tel.: 800143873
E-Mail: kompernass@lidl.cz
IAN 102538
Dostupnost horké linky:
pondělí až pátek 8:00 hod. – 20:00 hod. (SEČ)
- 31 -
Page 35

- 32 -
Page 36

OBSAH STRANA
Úvod 34
Používanie v súlade s účelom použitia 34
Technické údaje 34
Obsah dodávky 34
Opis prístroja 34
Dôležité bezpečnostné pokyny 35
Umiestnenie a poskladanie prístroja 36
Odšťavovanie 37
Vyprázdnenie 37
Demontáž 37
Čistenie a údržba 38
Uskladnenie 38
Likvidácia 38
Záruka a servis 39
Dovozca 39
Pred prvým použitím si pozorne prečítajte návod na používanie a uschovajte si ho pre prípadné ďalšie použitie. Pri odovzdávaní prístroja tretej osobe odovzdajte prístroj spolu s návodom.
- 33 -
Page 37

LIS NA CITRUSOVÉ
OVOCIE
Úvod
Srdečne vám gratulujeme ku kúpe Vášho nového
elektrického spotrebiča.
Touto kúpou ste sa rozhodli pre vysokokvalitný výrobok. Návod na obsluhu je súčasťou tohto výrobku.
Obsahuje dôležité upozornenia týkajúce sa bezpečnosti, používania a zneškodnenia. Pred používaním výrobku sa oboznámte so všetkými pokynmi na
obsluhu a bezpečnostnými upozorneniami. Výrobok
používajte iba tak, ako je popísané a iba v uvedených oblastiach použitia. Tento návod na obsluhu
dobre uschovajte. Pri postúpení výrobku tretej osobe odovzdajte s ním aj všetky podklady.
Používanie v súlade s účelom
použitia
Prístroj je určený na odšťavovanie citrusových plodov,
ako sú pomaranče alebo citróny. Týmto prístrojom
možno spracovávať len potraviny. Akékoľvek iné
používanie alebo zmena sa považuje za použitie
mimo stanoveného účelu a je spojené s veľkým rizikom
úrazu.
Za škody vzniknuté používaním, ktoré je v rozpore
s deklarovaným účelom nepreberá výrobca žiadnu
záruku.
Nie je určený na komerčné používanie.
Technické údaje
Sieťové napätie: 220 - 240 ~ V / 50 Hz
Menovitý výkon: 25 W
Trieda ochrany : II/
Obsah dodávky
Lis na citrusové ovocie
veľký vytláčací kužeľ
malý vytláčací kužeľ
sitko na ovocnú dužinu (2 diely)
návod na používanie
Opis prístroja
kryt
q
veľký vytláčací kužeľ
w
malý vytláčací kužeľ
e
horné sitko na ovocnú dužinu
r
regulátor ovocnej dužiny
t
dolné sitko na ovocnú dužinu
y
záchytná nádoba na ovocnú šťavu
u
pohonná oska
i
sieťová šnúra so zástrčkou
o
podstavec prístroja
a
navíjanie kábla
s
- 34 -
Page 38

Dôležité bezpečnostné pokyny
Nebezpečenstvo zásahu elektrickým prúdom!
• Napätie elektrického zdroja musí korešpondovať s údajmi na typovom štítku
prístroja.
• Poškodenú sieťovú šnúru alebo zástrčku nechajte ihneď vymeniť oprávnenému
odborníkovi alebo v zákazníckom servise, aby ste sa vyhli ohrozeniu zdravia.
• Prístroje, ktoré nefungujú bezchybne alebo boli poškodené, dajte okamžite
skontrolovať a opraviť v oddelení zákazníckych služieb.
• Prístroj nevystavujte dažďu a nikdy ho nepoužívajte vo vlhkom alebo mokrom
prostredí. Dbajte na to, aby sieťový kábel počas prevádzky nikdy nezmokol
ani nezvlhol.
Výstraha - Nebezpečenstvo poranenia!
• Nepoužívajte elektrický spotrebič na iné účely, ako je popísané v tomto návode.
• Pred výmenou príslušenstva alebo prídavných dielov, ktoré sa počas
prevádzky budú pohybovať, musíte elektrický spotrebič vypnúť a odpojiť ho
od elektrickej siete.
• Pokiaľ nie je elektrický spotrebič pod dohľadom a pred zložením, rozoberaním
alebo čistením ho vždy odpojte od siete.
• Tento elektrický spotrebič môžu používať deti staršie ako 8 rokov, ak sú pod
dozorom alebo boli dostatočne poučené o bezpečnom používaní elektrického
spotrebiča a pochopili z toho vyplývajúce riziká.
• Čistenie a užívateľskú údržbu nesmú vykonávať deti, iba ak sú staršie ako 8
rokov a sú pod dozorom.
• Elektrický spotrebič a jeho prípojný kábel musíte uchovávať mimo dosahu detí
mladších ako 8 rokov.
• Tento elektrický spotrebič môžu používať osoby so zníženými fyzickými, senzorickými alebo mentálnymi schopnosťami alebo s nedostatočnými skúsenosťami
a/alebo znalosťami, ak sú pod dozorom alebo boli dostatočne poučené o
bezpečnom používaní elektrického spotrebiča a pochopili z toho vyplývajúce
riziká.
• Deti sa s elektrickým spotrebičom nesmú hrať.
- 35 -
Page 39

• Na deti treba dozerať, aby sa zabezpečilo, že sa nebudú hrať s prístrojom.
• Postarajte sa o bezpečné a protišmykové umiestnenie prístroja.
• Postarajte sa o to, aby bola v prípade nebezpečenstva sieťová zástrčka rýchlo a
ľahko dostupná, a aby sa nedalo zakopnúť o sieťovú šnúru.
Zaistenie bezpečného používanie:
• Vytiahnite pri nebezpečenstve ihneď zástrčku zo sieťovej zásuvky.
• Nepoužívajte prístroj vonku.
Umiestnenie a poskladanie
prístroja
Upozornenie:
Predtým než sa pustíte do skladania prístroja, sa
ubezpečte, že je sieťová zástrčka vytiahnutá.
V opačnom prípade hrozí nebezpečenstvo, že sa
prístroj nechcene zapne.
1. Celkom odviňte sieťovú šnúru
kábla
podstavci prístroja
2. Postavte podstavec prístroja
a nešmykľavý povrch.
a upevnite ju v bočnej vyhĺbenine na
s
.
a
Upozornenie:
Pred prvým použitím poriadne umyte všetky odnímateľné časti (pozri kapitola „Čistenie a údržba“).
3. Nasuňte záchytnú nádobu na šťavu z ovocia
na pohonnú osku ina podstavci prístroja
a otočte ju v smere hodinových ručičiek až na
doraz.
z navíjania
o
na rovný
a
a
4. Zasuňte oba diely sitka na ovocnú dužinu r/
do seba tak, aby regulátor ovocnej dužiny
trčal do vyhĺbeniny. Oba diely musia počuteľne
zaklapnúť.
5. Nasaďte poskladané sitko na ovocnú dužinu
na záchytnú nádobu na ovocnú šťavu u.
y
Regulátor ovocnej dužiny
a siahať do drážky na rukoväti.
6. Nasuňte malý výtlačný kužeľ
osku
tak, aby zaklapol.
i
musí ležať na rukoväti
t
e
Upozornenie:
Keď chcete vytláčať pomaranče alebo iné veľké
ovocie, nasaďte veľký vytláčací kužeľ
vytláčací kužeľ
malého vytláčacieho kužeľa
vo veľkom vytláčacom kuželi
7. Zasuňte sieťovú zástrčku do elektrickej zásuvky.
u
Prístroj je teraz pripravený na zapnutie.
. Dajte pozor na to, aby krídla
e
zapadli do vyhĺbenín
e
.
w
na pohonnú
na malý
w
t
r
y
/
- 36 -
Page 40

Odšťavovanie
Vyprázdnenie
Upozornenie:
Nikdy nevytláčajte viac šťavy než po značku 600 ml
na stupnici záchytnej nádoby na ovocnú šťavu
1. Nastavte regulátor ovocnej dužiny
tak, aby zárezy v sitku
sebou, ak chcete mať šťavu aj s dužinou. Nastavte
regulátor ovocnej dužiny
zárezy v sitku
ak chcete mať šťavu bez dužiny.
2. Rozrežte ovocie na polovice (pomaranče, citróny
a pod.).
3. Zľahka natlačte polovičky ovocia na vytláčací
kužeľ
čo je vytláčací kužeľ
4. Prstami vyviňte na rôznych miestach ovocia tlak
na kôru. Tým sa šťava z ovocia vytlačí rovnomerne.
5. Keď už z ovocia nejde žiadna šťava, prestaňte
vyvíjať tlak na vytláčací kužeľ
zastaví.
6. Dovtedy stláčajte vytláčací kužeľ
a znova ho púšťajte, kým sa točí v opačnom
smere.
7. Keď už z ovocia nejde žiadna šťava, prestaňte
vyvíjať tlak na vytláčací kužeľ
zastaví. Vyberte kôru z vytláčacieho kužeľa
8. S ďalšími polovicami ovocia postupujte rovnako
dovtedy, kým nevylisujete požadované množstvo
šťavy. Vylisované množstvo šťavy môžete odčítať
na stupnici nádoby na šťavu z ovocia
r/y
. Prístroj sa zapne automaticky, len
w/e
r/y
neležali presne nad sebou,
w/e
t
ležali presne nad
posúvaním tak, aby
t
stlačený nadol.
w/e
w/e
w/e
.
u
posúvaním
. Prístroj sa
nadol
. Prístroj sa
w/ e
.
u
Upozornenie:
Vždy vytiahnite sieťovú zástrčku, keď vyprázdňujete
sitko na ovocnú dužinu
dobu na ovocnú šťavu
zí nebezpečenstvo, že sa prístroj nechcene zapne.
• Otočte záchytnú nádobu na ovocnú šťavu uproti
smeru hodinových ručičiek, až povolí citeľný odpor.
Teraz ju môžete z pohonnej osky
a naliať šťavu do pohárov.
alebo záchytnú ná-
r/y
. V opačnom prípade hro-
u
i
Demontáž
Keď chcete lis na citrusové plody demontovať,
napr. ak ho idete čistiť, postupujte takto:
1. Vytiahnite sieťovú zástrčku
2. Vyberte výtlačný kužeľ
3. Vyberte sitko na ovocnú dužinu
háky na spodnej strane horného sitka na ovocnú
dužinu
nym tlakom na regulátor ovocnej dužiny
Obe diely sa dajú od seba odtlačiť.
4. Otáčajte záchytnú nádobku na šťavu
smeru otáčania hodinových ručičiek, kým nepovolí citeľný odpor. Teraz môžete nádobku zdvih-
.
núť z pohonnej osi
dovnútra. Zatlačte rovnomerným mier-
r
i
w/e
.
o
.
.
r/y
zdvihnúť
. Stlačte
.
t
proti
u
- 37 -
Page 41

Čistenie a údržba
Upozornenie:
Pred každým čistením prístroja vytiahnite sieťovú
zástrčku zo zásuvky. Hrozí nebezpečenstvo úrazu
elektrickým prúdom!
Upozornenie:
Nikdy neponárajte podstavec prístroja ado vody
alebo do iných tekutín, pretože hrozí úraz elektrickým
prúdom.
• Lis na citrusové plody demontujte podľa opisu
uvedeného v kapitole „Demontáž“.
• Podstavec prístroja
kusom látky.
• Všetky ostatné odnímateľné diely čistite v teplej
mydlovej vode a starostlivo ich opláchnite.
• Ak chcete vyčistiť sitko na ovocnú dužinu
rozoberte ho a vyčistite ho kefou pod tečúcou
vodou.
Upozornenie:
Na čistenie prístroja nepoužívajte žiadne agresívne
čistiace prostriedky. Mohli by ste tým poškodiť jeho
povrchové časti.
čistite len mierne navlhčeným
a
r/y
Uskladnenie
Keď nebudete prístroj dlhšiu dobu používať, naviňte
sieťovú šnúru
kábla veďte cez bočnú vyhĺbeninu na podstavci
prístroja
a
Prístroj uskladnite na čistom a suchom mieste.
okolo navíjania kábla sa koniec
o
. Kompletne zostavte prístroj a zatvorte kryt.
Likvidácia
Prístroj v žiadnom prípade nevyhadzujte
do normálneho domového odpadu. Na
tento výrobok sa vzťahuje európska
smernica 2012/19/EU.
Zlikvidujte ho v oprávnenej likvidačnej firme alebo
v miestnom zariadení na likvidáciu odpadu.
Dodržte pritom aktuálne platné predpisy.
V prípade pochybností sa obráťte na zariadenia
,
na odstraňovanie odpadu.
Všetok baliaci materiál zlikvidujte
ekologickým spôsobom.
Prístroj a jeho súčasti sa nesmú umývať v umývačke
riadu ani čistiť vo vriacej vode.
- 38 -
Page 42

Záruka a servis
Dovozca
Na tento prístroj máte 3 ročnú záruku od dátumu
nákupu. Prístroj bol starostlivo vyrobený a pred expedíciou dôkladne vyskúšaný. Uschovajte si, prosím, účtenku ako dôkaz o nákupe. V prípade uplatňovania záruky sa spojte s opravovňou telefonicky.
Len tak sa dá zabezpečiť bezplatné zaslanie tovaru.
Záruka platí len na chyby materiálu a výroby, nie
na poškodenia spôsobené prepravou, opotrebením
ani na poškodenia krehkých častí, ako sú spínače
alebo akumulátory.
Výrobok je určený výlučne na súkromné používanie
a nie na komerčné účely.
Záruka prestáva platiť pri zaobchádzaní nezodpovedajúcom účelu, pri neprimeranom zaobchádzaní,
pri používaní násilia a pri zásahoch, ktoré neurobil
nami autorizovaný servis. Práva vyplývajúce zo zákona nie sú touto zárukou obmedzené.
Záručná doba sa nepredlžuje o dobu trvania záručných opráv. To platí aj na vymenené alebo opravené diely. Prípadné poškodenia a nedostatky zistené
už pri nákupe musíte ohlásiť ihneď po vybalení, najneskoršie však do dvoch dní od dátumu zakúpenia.
V prípade opráv spadajúcich do obdobia po uplynutí záručnej doby ste povinní uhradiť vzniknuté
náklady.
KOMPERNASS HANDELS GMBH
BURGSTRASSE 21
44867 BOCHUM
GERMANY
www.kompernass.com
Servis Slovensko
Tel.: 0850 232001
E-Mail: kompernass@lidl.sk
IAN 102538
Dostupnosť hotline:
pondelok až piatok od 8:00 hod. - 20:00 hod.
(SEČ)
- 39 -
Page 43

- 40 -
Page 44

INHALTSVERZEICHNIS SEITE
Einleitung 42
Bestimmungsgemäßer Gebrauch 42
Technische Daten 42
Lieferumfang 42
Gerätebeschreibung 42
Wichtige Sicherheitshinweise 43
Gerät aufstellen und zusammenbauen 44
Entsaften 45
Entleeren 45
Demontieren 45
Reinigen und Pflegen 46
Aufbewahren 46
Entsorgen 46
Garantie und Service 47
Importeur 47
- 41 -
Page 45

ZITRUSPRESSE
Einleitung
Herzlichen Glückwunsch zum Kauf Ihres neuen
Gerätes.
Sie haben sich damit für ein hochwertiges Produkt
entschieden. Die Bedienungsanleitung ist Bestandteil dieses Produkts. Sie enthält wichtige Hinweise
für Sicherheit, Gebrauch und Entsorgung. Machen
Sie sich vor der Benutzung des Produkts mit allen
Bedien- und Sicherheitshinweisen vertraut. Benutzen
Sie das Produkt nur wie beschrieben und für die angegebenen Einsatzbereiche. Bewahren Sie diese
Bedienungsanleitung gut auf. Händigen Sie alle
Unterlagen bei Weitergabe des Produkts an Dritte
mit aus.
Bestimmungsgemäßer
Gebrauch
Das Gerät ist zum Entsaften von Zitrusfrüchten wie
Orangen und Zitronen konzipiert. Es dürfen nur
Lebensmittel mit dem Gerät verarbeitet werden.
Jede andere Verwendung oder Veränderung gilt
als nicht bestimmungsgemäß und birgt erhebliche
Unfallgefahren.
Für aus bestimmungswidriger Verwendung
entstandene Schäden übernimmt der Hersteller
keine Haftung.
Nicht für gewerblichen Einsatz bestimmt.
Technische Daten
Netzspannung: 220 - 240 V~/ 50 Hz
Nennleistung: 25 W
Schutzklasse: II
Lieferumfang
Zitruspresse
großer Auspresskegel
kleiner Auspresskegel
Fruchtfleischsieb (2 Teile)
Bedienungsanleitung
Gerätebeschreibung
Deckel
q
großer Auspresskegel
w
kleiner Auspresskegel
e
oberes Fruchtfleischsieb
r
Fruchtfleischregler
t
unteres Fruchtfleischsieb
y
Saftauffangbehälter
u
Antriebsachse
i
Netzkabel mit Netzstecker
o
Gerätesockel
a
Kabelaufwicklung
s
- 42 -
Page 46

Wichtige Sicherheitshinweise
Gefahr - elektrischen Schlag!
• Die Spannung der Stromquelle muss mit den Angaben auf dem Typenschild
des Gerätes übereinstimmen.
• Lassen Sie beschädigte Netzstecker oder Netzkabel sofort von autorisiertem
Fachpersonal oder dem Kundenservice austauschen, um Gefährdungen zu
vermeiden.
• Lassen Sie Geräte, die nicht einwandfrei funktionieren oder beschädigt wurden, sofort vom Kundendienst untersuchen und reparieren.
• Setzen Sie das Gerät nicht dem Regen aus und benutzen Sie es auch niemals
in feuchter oder nasser Umgebung. Achten Sie darauf, dass das Netzkabel
während des Betriebs niemals nass oder feucht wird.
Warnung - Verletzungsgefahr!
• Missbrauchen Sie das Gerät nicht für andere Zwecke, als in dieser Anleitung
beschrieben.
• Vor dem Auswechseln von Zubehör oder Zusatzteilen, die im Betrieb bewegt
erden, muss das Gerät ausgeschaltet und vom Netz getrennt werden.
• Das Gerät ist bei nicht vorhandener Aufsicht und vor dem Zusammenbau, dem
Auseinandernehmen oder Reinigen stets vom Netz zu trennen.
• Dieses Gerät kann von Kindern ab 8 Jahren benutzt werden, wenn sie beaufsichtigt werden oder bezüglich des sicheren Gebrauchs unterwiesen wurden
und die daraus resultierenden Gefahren verstanden haben.
• Reinigung und die Wartung durch den Benutzer dürfen nicht durch Kinder
vorgenommen werden, es sei denn, sie sind 8 Jahre oder älter und werden
beaufsichtigt.
• Das Gerät und seine Anschlussleitung sind von Kindern jünger als 8 Jahren
fernzuhalten.
• Dieses Gerät kann von Personen mit reduzierten physischen, sensorischen oder
mentalen Fähigkeiten oder Mangel an Erfahrung und/oder Wissen benutzt
werden, wenn sie beaufsichtigt oder bezüglich des sicheren Gebrauchs des
Gerätes unterwiesen wurden und die daraus resultierenden Gefahren verstanden haben.
• Kinder dürfen nicht mit dem Gerät spielen.
- 43 -
Page 47

• Kinder sollten beaufsichtigt werden, um sicherzustellen, dass sie nicht mit dem
Gerät spielen.
• Sorgen Sie für einen sicheren und rutschfesten Stand des Gerätes.
• Sorgen Sie dafür, dass der Netzstecker bei Gefahr schnell erreichbar ist und
das Netzkabel nicht zur Stolperfalle werden kann.
So verhalten Sie sich sicher:
• Ziehen Sie bei Gefahr sofort den Netzstecker aus der Steckdose.
• Verwenden Sie das Gerät nicht im Freien.
Gerät aufstellen und
zusammenbauen
Achtung:
Vergewissern Sie sich, dass der Netzstecker
gezogen ist, bevor Sie das Gerät zusammensetzen.
Ansonsten besteht die Gefahr, dass das Gerät
unbeabsichtigt startet.
1. Wickeln Sie das Netzkabel
der Kabelaufwicklung
der seitlichen Aussparung am Gerätesockel
2. Stellen Sie den Gerätesockel
und rutschfeste Unterlage.
s
Hinweis:
Spülen Sie alle abnehmbaren Teile vor dem ersten
Gebrauch gründlich (siehe Kapitel „Reinigen und
Pflegen“).
3. Stecken Sie den Saftauffangbehälter
Antriebsachse
hen Sie ihn bis zum Anschlag im Uhrzeigersinn.
des Gerätesockels aund dre-
i
vollständig von
o
ab und fixieren Sie es mit
a
auf eine ebene
a
auf die
u
4. Stecken Sie die beiden Teile des Fruchtfleischsiebes
regler
Teile müssen hörbar einrasten.
5. Setzen Sie das zusammengesetzte Fruchtfleischsieb
Der Fruchtfleischregler
und in die Nut am Griff fassen.
6. Stecken Sie den kleinen Auspresskegel
die Antriebsachse
.
Hinweis:
Wenn Sie Orangen oder andere große Früchte pressen wollen, setzen Sie den großen Auspresskegel
über den kleinen Auspresskegel e. Achten Sie darauf, dass die Flügel des kleinen Auspresskegels
die Aussparungen des großen Auspresskegels
fassen.
7. Stecken Sie den Netzstecker in eine
Netzsteckdose. Das Gerät ist nun betriebsbereit.
ineinander, so dass der Fruchtfleisch-
r/y
durch die Aussparung ragt. Die beiden
t
auf den Saftauffangbehälter u.
r/y
muss am Griff liegen
t
, dass dieser einrastet.
i
e
so auf
e
w
w
in
- 44 -
Page 48

Entsaften
Entleeren
Hinweis:
Pressen Sie nie mehr Saft aus, als bis zur
600 ml-Markierung an der Skala des
Saftauffangbehälters
1. Stellen Sie den Fruchtfleischregler tdurch
Schieben so ein, dass die Schlitze im Fruchtfleischsieb
wenn Sie Saft mit Fruchtfleisch wollen. Stellen
Sie den Fruchtfleischregler
ein, dass die Schlitze im Fruchtfleischsieb
nicht übereinander liegen, wenn Sie Saft ohne
Fruchtfleisch wollen.
2. Halbieren Sie die Frucht (Orange, Zitrone etc.).
3. Drücken Sie die halbierte Frucht leicht auf den
Auspresskegel
automatisch ein, sobald der Auspresskegel
herunter gedrückt wird.
4. Üben Sie mit den Fingern an verschiedenen Stellen
der Frucht Druck auf die Schale aus. Dadurch
wird der Saft gleichmäßig aus der Frucht gepresst.
5. Wenn kein Saft mehr aus der Frucht heraus
kommt, üben Sie keinen Druck mehr auf den
Auspresskegel
6. Drücken Sie den Auspresskegel
herunter und lösen Sie ihn wieder, bis er sich in
die andere Richtung dreht.
7. Wenn kein Saft mehr aus der Frucht heraus
kommt, üben Sie keinen Druck mehr auf den Auspresskegel
men Sie die Schale vom Auspresskegel
8. Verfahren Sie mit weiteren Fruchthälften genauso,
bis Sie die gewünschte Menge Saft ausgepresst
haben. Die ausgepresste Menge können Sie an
der Skala des Saftauffangbehälters
r/y
w/e
.
u
genau übereinander liegen,
durch Schieben so
t
. Das Gerät schaltet sich
w/e
aus. Das Gerät stoppt.
w/e
w/e
aus. Das Gerät stoppt. Neh-
u
r/y
w/e
so oft
w/e
ablesen.
.
Achtung:
Ziehen Sie den Netzstecker, wenn Sie das Fruchtfleischsieb
leeren. Ansonsten besteht die Gefahr, dass das
Gerät unbeabsichtigt startet.
• Drehen Sie den Saftauffangbehälter ugegen
den Uhrzeigersinn bis der spürbare Wiederstand
nachlässt. Sie können ihn nun von der Antriebsachse
oder den Saftauffangbehälter
r/y
heben und den Saft ausschenken.
i
u
Demontieren
Wenn Sie die Zitruspresse demontieren wollen, z.B.
um sie zu Reinigen, gehen Sie wie folgt vor:
1. Ziehen Sie den Netzstecker
2. Nehmen Sie die Auspresskegel
3. Nehmen Sie das Fruchtfleischsieb
Drücken Sie die Haken an der Unterseite des
oberen Fruchtfleischsiebes
Sie gleichzeitig leichten Druck auf den Fruchtfleischregler
auseinander drücken.
4. Drehen Sie den Saftauffangbehälter
den Uhrzeigersinn bis der spürbare Widerstand
nachlässt. Sie können ihn nun von der Antriebsachse
aus. Die beiden Teile lassen sich
t
heben.
i
.
o
ab.
w/e
r/y
nach innen. Üben
r
u
ab.
gegen
- 45 -
Page 49

Reinigen und Pflegen
Achtung:
Ziehen Sie den Netzstecker, bevor Sie das Gerät
reinigen. Es besteht die Gefahr eines elektrischen
Schlages!
Achtung:
Tauchen Sie den Gerätesockel aniemals in Wasser oder in eine andere Flüssigkeit, um elektrische
Stromschläge zu vermeiden.
• Demontieren Sie die Zitruspresse wie im Kapitel
„Demontieren“ beschrieben.
• Reinigen Sie den Gerätesockel
leicht angefeuchteten Tuch.
• Reinigen Sie alle anderen abnehmbaren Teile in
warmem Seifenwasser und spülen Sie sie sorgfältig ab.
• Um das Fruchtfleischsieb
men Sie es auseinander und reinigen Sie es mit
einer Spülbürste unter laufendem Wasser.
r/y
Hinweis:
Verwenden Sie keine aggressiven Reinigungsmittel,
um das Gerät zu säubern. Die Oberfläche kann
ansonsten angegriffen werden.
mit einem nur
a
zu reinigen, neh-
Aufbewahren
Wenn Sie das Gerät längere Zeit nicht benutzen,
wickeln Sie das Netzkabel
wicklung
durch die seitliche Aussparung am Gerätesockel
Setzen Sie das Gerät komplett zusammen und
schließen Sie den Deckel.
Bewahren Sie das Gerät an einem sauberen und
trockenen Ort auf.
und führen Sie das Ende des Kabels
s
um die Kabelauf-
o
a
Entsorgen
Werfen Sie das Gerät keinesfalls in den
normalen Hausmüll. Dieses Produkt
unterliegt der europäischen Richtlinie
2012/19/EU.
Entsorgen Sie das Gerät über einen zugelassenen
Entsorgungsbetrieb oder über Ihre kommunale
Entsorgungseinrichtung.
Beachten Sie die aktuell geltenden Vorschriften.
Setzen Sie sich im Zweifelsfall mit Ihrer Entsorgungseinrichtung in Verbindung.
Führen Sie alle Verpackungsmaterialien
einer umweltgerechten Entsorgung zu.
.
Das Gerät und dessen Bestandteile dürfen nicht in
der Spülmaschine oder in kochendem Wasser
gereinigt werden.
- 46 -
Page 50

Garantie und Service
Sie erhalten auf dieses Gerät 3 Jahre Garantie ab
Kaufdatum. Das Gerät wurde sorgfältig produziert
und vor Anlieferung gewissenhaft geprüft.
Bitte bewahren Sie den Kassenbon als Nachweis
für den Kauf auf. Bitte setzen Sie sich im Garantiefall mit Ihrer Servicestelle telefonisch in Verbindung.
Nur so kann eine kostenlose Einsendung Ihrer Ware
gewährleistet werden.
Die Garantieleistung gilt nur für Material- oder
Fabrikationsfehler, nicht aber für Transportschäden,
Verschleißteile oder für Beschädigungen an zerbrechlichen Teilen, z. B. Schalter oder Akkus. Das
Produkt ist lediglich für den privaten und nicht für
den gewerblichen Gebrauch bestimmt.
Bei missbräuchlicher und unsachgemäßer Behandlung, Gewaltanwendung und bei Eingriffen, die
nicht von unserer autorisierten Service-Niederlassung vorgenommen wurden, erlischt die Garantie.
Ihre gesetzlichen Rechte werden durch diese
Garantie nicht eingeschränkt.
Die Garantiezeit wird durch die Gewährleistung
nicht verlängert. Dies gilt auch für ersetzte und reparierte Teile. Eventuell schon beim Kauf vorhandene
Schäden und Mängel müssen sofort nach dem
Auspacken gemeldet werden, spätestens aber zwei
Tage nach Kaufdatum. Nach Ablauf der Garantiezeit anfallende Reparaturen sind kostenpflichtig.
Service Deutschland
Tel.: 0800 5435 111
(Kostenfrei aus dem dt. Festnetz/Mobilfunknetz)
E-Mail: kompernass@lidl.de
IAN 102538
Service Österreich
Tel.: 0820 201 222 (0,15 EUR/Min.)
E-Mail: kompernass@lidl.at
IAN 102538
Service Schweiz
Tel.: 0842 665566 (0,08 CHF/Min.,
Mobilfunk max. 0,40 CHF/Min.)
E-Mail: kompernass@lidl.ch
IAN 102538
Erreichbarkeit Hotline:
Montag bis Freitag von 8:00 Uhr - 20:00 Uhr (MEZ)
Importeur
KOMPERNASS HANDELS GMBH
BURGSTRASSE 21
44867 BOCHUM
GERMANY
www.kompernass.com
- 47 -
Page 51

KOMPERNASS HANDELS GMBH
BURGSTRASSE 21
44867 BOCHUM
DEUTSCHLAND / GERMANY
www.kompernass.com
Last Information Update · Stan informacji · Információk állása
Stav informací · Stav informácií · Stand der Informationen:
07 /2014 · Ident.-No.: SZP25A1-052014-1
IAN 102538
4
 Loading...